

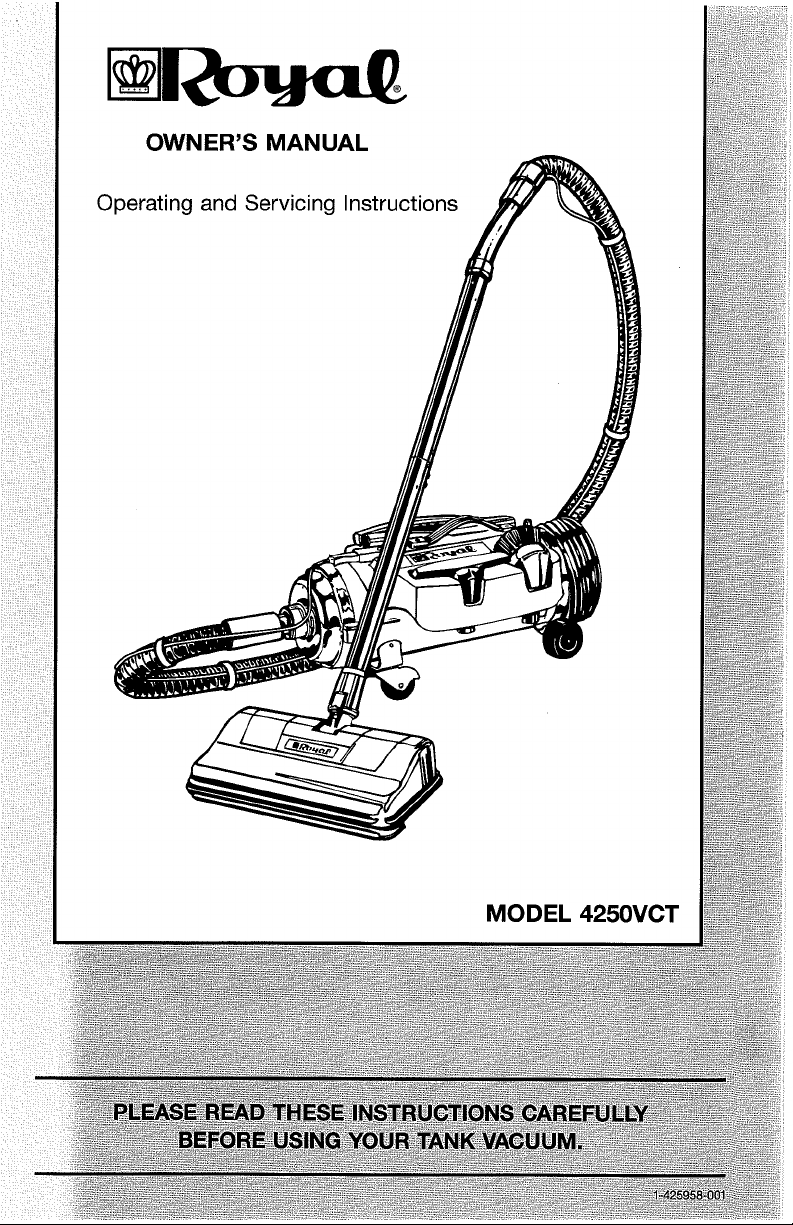
Page 1
Page 2
This information has been compiled by the Vacuum Cleaner Manufacturer's Association working with government and private sources, concerned with product safety.
These basic guidelines are for your protection and convenience.
THIS CLEANER IS INTENDED FOR HOUSEHOLD USE ONLY
IMPORTANT SAFETY INSTRUCTIONS
When you use an appliance, basic precautions should always be followed, including the
following:
READ ALL INSTRUCTIONS BEFORE YOU USE THE APPLIANCE
ALWAYS FOLLOW THESE SAFETY INSTRUCTIONS
WARNING: TO REDUCE THE RISK OF
FIRE, ELECTRIC SHOCK OR INJURY:
Look on your vacuum cleaner and follow all
label and marking instructions.
Electric shock could occur if used outdoors or
on wet surfaces.
Do not let children play with the vacuum cleaner. Watch closely when the vacuum cleaner is
used by or near children.
Do not use the vacuum cleaner to pick up flammable or combustible liquids or fumes, such as
gasoline, or use in areas where they may be
present.
Keep the vacuum cleaner on the floor. Only the
hand-held vacuum cleaners may be set on
furniture.
Unplug the vacuum cleaner if you leave the
room. Unplug it when it is not in use and before
you service it.
Keep end of hose, wands and other openings
away from your face and body. Keep your hands,
feet, hair and clothing away from moving parts.
Only use attachments and hoses recommended
by the manufacturer. Use the vacuum cleaner only
as stated in this manual.
Turn all controls to "OFF", before unplugging
the vacuum cleaner.
Do not use an extension cord with this vacuum
cleaner.
Do not touch the plug or the vacuum cleaner
with wet hands.
Do not use the power cord to pull or carry the
vacuum cleaner. Do not use the power cord as a
handle. Do not shut any door on the cord or pull
the cord around sharp edges or corners. Keep the
cord away from heated surfaces. Do not run the
vacuum cleaner over the cord.
Do not use vacuum cleaner with a damaged
cord or plug. Do not use vacuum cleaner if working improperly, dropped, damaged, left outdoors
or dropped in water. First, send to service center
for check and repair.
Do not use the vacuum cleaner without dustbag
or filters in place.
Store the vacuum cleaner indoors. Put the vacuum cleaner away after use to prevent tripping
accidents.
Do not pull on the cord to unplug the vacuum
cleaner. Grasp the plug instead.
Be most careful when vacuum cleaning on
stairs.
Do not put any object into the vacuum cleaner
vent or other openings. Do not turn the vacuum
cleaner on if something is blocking an opening.
Keep vents free of things that slow air flow, such
as
dust, lint and hair.
Do not pick up anything that is hot, smoking or
burning. Do not pick up cigarettes, hot ashes or
matches.
Always turn off the vacuum cleaner before connecting or removing either the hose or the motorized nozzle.
Using improper voltage may result in damage to
motor and possible injury to user. Proper voltage
is listed on the cleaner plate.
Approved by the Vacuum Cleaners Manufacturer's Association Executive Committee,
29,
April
1987.
Page 3
GROUNDING INSTRUCTIONS
(only for 3-wire models, those that include 2 blades and 1 grounding pin)
This appliance must be grounded. If it should malfunction or breakdown, grounding
provides a path of least resistance for electric current to reduce the risk of electric
shock. This appliance is equipped with a cord having an equipment-grounding conductor and grounding plug. The plug must be plugged into an appropriate outlet that is
properly installed and grounded in accordance with all local codes and ordinances.
DANGER
can result in a risk of electric shock. Check with a qualified electrician or service
person if you are in doubt as to whether the outlet is properly grounded. Do not modify
the plug provided with the appliance
installed by a qualified electrician.
This appliance is for use on a nominal 240-volt circuit. Make sure that the appliance is
connected to an outlet having the same configurations as the plug. No adapter should
be used with this appliance.
If the supply cord of this appliance is damaged, it must be replaced by the special cord
#I
-425436-000.
Part
-
Improper connection of the equipment-grounding conductor
-
if it will not fit the outlet, have a proper outlet
WARNING:
Electrical shock could occur if used outdoors or on wet surface.
TABLE
Features
Using your Tank Vacuum Cleaner
Attachments
Using the Power Nozzle
Paper Bag Removal and Replacement
MICRO FRESH Filtration System (Optional)
Using the Blower Feature
Warranty
..........................................................
...................................................
.........................................................
OF
CONTENTS
....................................
6-7
........................................
................................
........................
..........................................
10-11
12
13
4
5
8
9
Page 4
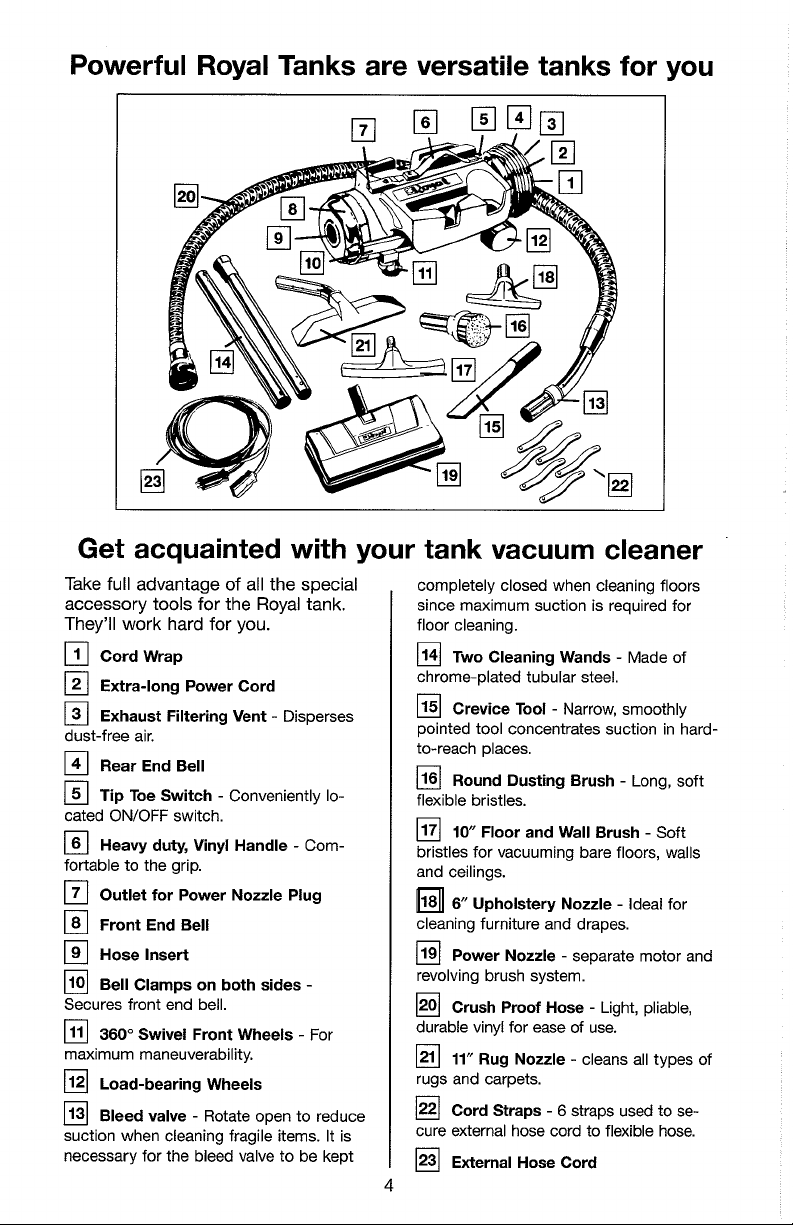
Powerful Royal Tanks are versatile tanks for you
Get acquainted with your tank vacuum cleaner
Take full advantage of all the special
accessory tools for the Royal tank.
They'll work hard for you.
Cord Wrap
-
12
Extra-long Power Cord
-
Exhaust Filtering Vent
dust-free air.
Rear End Bell
1
Tip Toe Switch - Conveniently lo-
cated
ON/OFF
16
Heavy duty, Vinyl Handle - Com-
fortable to the grip.
Outlet for Power Nozzle Plug
Front End Bell
191
Hose Insert
1101
Bell Clamps on both sides
Secures front end bell.
111]
360"
maximum maneuverability.
Load-bearing Wheels
Bleed valve
suction when cleaning fragile items. It is
necessary for the bleed valve to be kept
switch.
Swivel Front Wheels - For
-
Rotate open to reduce
Disperses
-
completely closed when cleaning floors
since maximum suction is required for
floor cleaning.
114(
Two Cleaning Wands - Made of
chrome-plated tubular steel.
Crevice Tool - Narrow, smoothly
pointed tool concentrates suction in hardto-reach places.
1161
Round Dusting Brush - Long, soft
flexible bristles.
1171
10
bristles for vacuuming bare floors, walls
and ceilings.
cleaning furniture and drapes.
1191
revolving brush system.
durable vinyl for ease of use.
rugs and carpets.
1221
cure external hose cord to flexible hose.
1231
Floor and Wall Brush - Soft
6
Upholstery Nozzle - Ideal for
Power Nozzle - separate motor and
Crush Proof Hose - Light, pliable,
11"
Rug Nozzle - cleans all types of
Cord Straps
External Hose Cord
-
6
straps used to se-
Page 5
USING YOUR ROYAL TANK VACUUM
IS AS EASY AS
ATTACH THE FLEXIBLE HOSE
Insert the slotted connector end of the hose into the front end bell.
Twist clockwise to lock securely.
SELECT THE ATTACHMENT
Determine what vacuuming you will be doing, then insert the desired
tool into the pistol grip or wand.
PLUG IN THE TANK AND TURN ON
Plug the power cord into your most convenient wall outlet.
The 40-foot total cleaning radius lets you clean without constantly
replugging.
1-2-3
...
Page 6

HOW TO
Your tank's assortment of cleaning tools lets you vacuum almost everything around your home.
USE
THE ATTACHMENTS
NOTE:
Disconnect cleaner from electrical outlet during assembly
ASSEMBLE THE CLEANING WANDS:
The wand with the vinyl seal is the lower section which attaches to the
Power nozzle and cleaning tools. The other metal wand attaches to the grip.
To join wands together, push in pin of lower wand and lock into hole of upper
wand.
VINYL SEAL
d!Y
FLOOR AND WALL BRUSH:
Cleans linoleum, tile, bare wood or concrete floors, papered or painted
walls and ceilings.
This 10-inch brush has long, soft bristles that dust and buff at the same
time. Inserted into the lower wand section, the brush will lock into place
and then swivel conveniently as you clean.
Page 7

ROUND DUSTING BRUSH:
Cleans bookcases, lampshades, screens, televisions, picture frames,
baseboards, and all metal, wood, or molded plastic furniture
around your home.
The long soft bristles won't mar your furniture but will delicately lift the
surface dust and whisk it away.
. . .
any place
UPHOLSTERY NOZZLE:
Cleans furniture, curtains, stairways, bedding, clothing, and car interiors.
Nozzle may be used with either both cleaning wands to reach drapery
valances, the back of the sofa, and other hard-to-clean places.
NOTE: To clean the brushes, just apply suction from the hose directly
to the bristles.
CREVICE TOOL:
Cleans all hard-to-reach places including deep furniture crevices, button
cushions, bookcases, baseboard corners, and automobile upholstery. It's
also easier to clean behind ranges and refrigerators.
To
attach,
Pull apart to remove.
To remove FLOOR TOOL ONLY,
apart.
push the end of the selected tool into the opening of the wand.
depress vinyl collar to release pin. Pull
Page 8

Transforms the tank into an upright-type vacuum. With its separate motor
and revolving brush system, the Power Nozzle actually lifts your carpet.
The revolving brush gently sweeps the carpet clean of dust and dirt
particles deep in carpeting.
To attach,
flat area of the tube seal should face towards the front of the power nozzle.
Plug the external hose cord into the outlet on the top of the tool caddy
(Refer to
external hose cord to the flexible hose.
To disconnect,
Position flat area of the tube seal to face toward the front of the pin. Push
in on flat area of the tube seal to release locking pin and pull.
When ordering a Power Nozzle, refer to the following:
press down on wand until pin snaps into place and locks. The
#7,
page
4)
and the power nozzle. Use the straps to secure the
unplug the external hose cord from the power nozzle.
Power Nozzle Grid
Tank
I
Model / Required Power Nozzle
/
Page 9

PAPER BAG REMOVAL
AND REPLACEMENT
NOTE:
Replace the paper bag when approximately one-half full.
Disconnect cleaner from electrical outlet for maintenance.
Set the tank on end with the exhaust vent (rear bell) on the floor.
Grasp the bell clamps in each hand. Holding your hands toward the
rear of the clamp, pull outward.
Grasp the. front end bell (the hose may still be connected), gently pull
outward. Take care not to spill any dirt. Pull off paper bag and discard.
The cloth bag in the tank does not always have to be removed for
cleaning. If cleaning is required, remove the bag and shake dirt into a
suitable container.
Replace with a new paper bag. Place the hole in the paper bag over
the metal fitting inside the front end bell.
Place the front end bell back onto the tank by sliding the paper bag
into the tank. The chrome end plate must slide over the edges of the
tank. Hold in place and fasten the bell clamps to both sides. Clamps
will "snap" into place when fully seated.
Continue normal operation of your vacuum cleaner.
Page 10

Fl
LTRATION SYSTEM
Royal's filtration system for over 99.9% "fresh" exhaust air. This system
assures you that fine powdery dust will not be blown back into the air you
breathe or onto your furniture and carpets again.
(optional)
*Examine the Five Layers of Filtration in Your Tank Vacuum
Circulating air lifts dust and dirt from your carpets and transports it
through the hose to a
(I)*.
The second layer of the paper bag contains electrostatically charged
fibers
(2)*.
The air passes through the double layered paper bag, depos-
iting dirt and lint. It then passes into a finely woven cotton twill cloth bag
(3)
with
160
square inches. The air finally passes through a double-sided
filter pad. The MICRO
charged fiber material
(5).
When used as a system, the air expelled at the rear exhaust is over
99.9% "fresh".
*Not included on all models.
175
square inch double layer disposable paper bag
FRESH
(4)
filter pad consists of an electrostatically
attached to a reticulated flexible urethane foam
Page 11

Replaceable
NOTE:
The filter pad is located between the filter bag and tank motor. Check your
filter pad periodically for dirt build-up. The filter pad should be changed at
least every six months or when three paper bags have been used.
TO
white side facing towards you. Put cloth bag back into place. Attach front
end bell and continue normal operation of your tank.
Unplug tank before changing filter.
INSTALL, remove front end bell and cloth bag. Drop filter into tank with
Fa-]
Filter Pads
Replaceable Paper Bags
MICRO FRESH disposable paper bags are lined with electrostatically
charged fibers that trap fine dust and pollen particles down to
in size.
To
remove and replace,
Enhance the performance of your tank vacuum with MICRO FRESH high
filtration paper bags and filter pads. See an Authorized Royal Dealer or a
participating retailer to purchase an assortment of MICRO FRESH products.
refer to page
9.
(optional)
0.1
microns
Page 12

HOW TO USE YOUR TANK FOR BLOWING
NOTE:
(1) Simply connect the hose to the rear end bell of the tank instead of the
front end bell. You'll be using the exhaust end instead of the suction end.
Be conscious of
always blow it toward a dampened sheet or towel which will trap the dust
and not send it flying into the air. Then, you simply toss the "dusty" sheet
or towel into your automatic washer for cleaning.
Don't be concerned if the paper filter bag is not empty when you use the
blower. The tank's MICRO FRESH Filtration System will entrap the dust
and not allow it to recirculate during this use. (MICRO FRESH filter pads
optional.)
When you finish using your Royal tank as a blower, unplug your tank and
reconnect the hose to the front end bell for vacuum cleaning.
Unplug tank before changing Hose Connection.
where
you'll be blowing the dust. Our suggestion is to
OPTIONAL ACCESSORIES
When you need replacement parts or are ready to expand your Tank
Cleaning System, consult an authorized Royal Dealer.
Cloth Bag
Package of 3 Paper Bags
Package of 10 Paper Bags
Package of 3 High Filtration
Paper Bags and 1 MICRO FRESH Filter Pad
MICRO FRESH Filter Pad
..........................................
............................
...........................
..........
............................
2-041 140-000
3-040447-001
3-041 147-001
3-467130-001
1-460030-001
NOTE:
Register your cleaner to validate warranty.
Page 13

WARRANTY
Royal Appliance Mfg. Co. warrants this Royal vacuum cleaner to be free
from defects in material and workmanship. The period of the warranty is a
LIFETIME on the housing and a limited number of years (stated on original
carton) on all other components (except two years on the hose assembly,
accessory tools, and on the power nozzle), depending on model purchased. The warranty commences upon the date of original purchase and
receipt of your warranty card.
If the vacuum cleaner should become defective within the warranty
period, complete service (parts and labor) will be provided free of charge:
1)
at the store where the machine was purchased, if the store is an
AUTHORIZED DEALER and WARRANTY STATION.
2)
by Royal Appliance Mfg. Co. if the store, where the machine was
purchased, is an AUTHORIZED DEALER.
In the event of a change in the purchaser's residence of
from residence at time of purchase from an AUTHORIZED DEALER, such
service will be provided by the nearest warranty station.
This warranty does not cover the following:
1)
Parts that normally require replacement such as belts, bags,
brushes. and bulbs.
2)
Failure, loss, or deterioration due to ordinary wear and tear or from
misuse or unauthorized repair.
3)
Machines used for other than normal personal, family, or household purposes.
4)
Costs of any transportation to and from any place of repair, all of
which costs are to be paid by the owner.
This warranty gives you specific legal rights and you may also have
other rights which may vary from state to state.
50
or more miles
Page 14

Model No.
PLEASE ENTER SERIAL NO.
I I
NO.
s
Page 15

Page 16

 Loading...