


Safety, Operation and Maintenance Instructions
For Electric Upholstery Staple Gun (NS12)
I-50AA
Product Specications:
• Operating at 110 volts, 60 Hz, 12.5A.
• Staple type: 22 gauge ne wire, 71 series staples.
• Staple crown width: 9.1 mm.
• Staple leg length range: 1/4" to 5/8".
• Use our fasteners. Stock #: NS32/E, NS33/E,
NS34/E, NS35/E .
Applications:
• Upholstery applications: covering cornice boards,
head boards, sofas, chairs, ottomans, upholstered
walls etc.
• Window treatment applications: covering dust boards,
mounting soft treatments to dust boards, etc.
Important:
This manual contains safety warnings, tool operation,
maintenance, cleaning procedures, parts list and
diagram. Keep the manual in a safe place for future
reference.
Limited Warranty
• The warranty covers material and workmanship
defects of the Electric Staple Gun ( NS12 ).
• The warranty period is 90 days from the date of
purchase.
• During the warranty period, replacements or
repairs (at Rowley Co.’s discretion) of the tool will
be made free of charge.
• The warranty does not cover damages by accident,
misuse or due to using staples not recommended
by Rowley Co. Unauthorized repair or modication
of the tool will void the warranty.
• After warranty period expires, customers can still
receive repair services from Rowley Co. The
customer will be charged the labor and parts cost.
• To receive the repairs or replacements under
warranty or to obtain repair services after warranty
period expires, the tool must be returned to Rowley
Co. at the customer’s expense.
• The user of the tool must read and understand the
safety warnings, tool operation procedures and
tool maintenance information contained in this
instruction manual. Rowley Co. is not liable for any
personal injuries or material damages associated
directly or indirectly with using this tool.
Safety Instructions:
Read and understand all safety, tool operation and
maintenance instructions BEFORE using the tool.
A) Work Area Safety
1. Keep work area clean and well lit. Cluttered
benches and dark areas invite accidents. Always
keep the work area free of obstructions, grease,
oil, trash and other debris.
2. Do not operate the Staple Gun near ammable
fumes or liquids. Sparks created by the Staple
Gun may ignite fumes or liquids.
3. Keep bystanders, especially children away while
operating the Staple Gun.
B) Electrical Safety
4. The Staple Gun must be plugged into an outlet
properly installed and grounded in accordance
with all codes and ordinances. This Staple Gun is
equipped with a polarized plug and will t in a
polarized outlet only one way. If plug does not
plug fully into the outlet, turn the plug around. Do
not use any adapter plugs. Check with a qualied
electrician if you are in doubt as whether an outlet
is properly installed.
5. Avoid body contact with grounded surfaces such
as pipes, radiators, ranges and refrigerators. There
is an increased risk of electric shock if your body is
grounded.
6. Do not expose the Staple Gun to rain or any damp
or wet conditions.
7. Do not abuse the Power Cord. Never use the
Power Cord to carry the Staple Gun or yank it to
unplug the tool. Keep the Power Cord away from
heat, oil, sharp edges, or moving parts. Replace
damaged Power Cords immediately. Damaged
Power Cords increase the risk of electric shock.
8. If an extension cord must be used, make sure the
extension cord exceeds the recommended
minimum wire gauge (See Table below).
Cord Length (ft.) 0-25 26-50 >50
Minimum Wire Gauge 14 1 0 Not
Rec ommended
9. Make sure your extension cord is properly wired
and in good condition. Always replace a damaged
extension cord.
10. Keep your extension cords from sharp objects,
excessive heat, and wet areas.
11. When operating the Staple Gun outdoors, use an
outdoor rated extension cord.
Updated August, 2007
© Rowley Co. 2007
1

C) Personal Safety
12. Avoid accidental firing. Unplug Staple Gun and
avoid placing fingers on the Trigger when carrying
the tool, loading or unloading staples.
13. Always wear safety glasses and ear plugs when
using the Staple Gun.
14. Maintain proper footing, balance and proper
control of the Staple Gun at all time.
15. Stay alert. Always use common sense and watch
what you are doing. Do not operate the tool when
you are tired.
D) Operation Safety
16. Stapling will be more successful if you have a firm,
stationary and non cushioned surface underneath
the workpiece.
17. Use clamps to secure and support the workpiece
to a stable platform. Holding the workpiece by
hand or against your body can be unstable and
may lead to loss of control.
18. Do not use the Staple Gun if Safety or Trigger
does not operate properly.
19. Always keep hands away from the workpiece,
Staple Gun Nose when firing staples. The Staple
Gun has enough power to force staples through
skin and causing serious injury.
20. Fire staples into an appropriate surface only. Do
not attempt to fire staples into surfaces too hard
to penetrate. Do not fire a staple on top of another
staple, or at too steep of an angle. Fasteners can
ricochet causing personal injury.
21. Do not fire staples too close to the edge of a
workpiece. Staples may split the workpiece and
fly free, causing personal injury.
22. Never point the Staple Gun at yourself or at
anyone else. Always assume that Staple Gun is
loaded with staples and powered. Never engage
in horseplay.
23. If the Staple Gun overheats, unplug it from the
power source and let it cool down.
24. Always keep tool clean, properly maintained. Do
not use a damaged tool. Tag damaged tools "Do
not use" until repaired.
25. Never leave the Staple Gun unattended when it is
plugged into an electrical outlet.
26. Disconnect the Staple Gun from power source,
empty out staples before clearing a staple jam,
servicing, cleaning, repairing or storing.
27. Store the Staple Gun at a safe place and keep it
out of reach of children.
28. When servicing a tool, use only authorized
replacement parts. Follow instructions in the
"Inspect, Maintain and Clean the Tool" section of
this manual. Using unauthorized parts or failure to
follow maintenance instructions may create a risk
of electric shock or injury.
Operation Instructions:
Warning: This Staple Gun is not suited for nailing or
stapling into concrete, masonry, bricks, or metal.
Warning: Do not fire if there is a staple jam. Unplug the
unit and follow the "Remove Jammed Staples"
section of this instruction manual.
Warning: This Staple Gun has a safety mechanism. With
the safety depressed against the stapling surface, the
staple gun will fire only once when the trigger is
pressed. Do not attempt to disable the safety. Test the
safety mechanism and make sure it is always in proper
working order.
Apply Pressure Here
When Fire Staples
Trigger
Safety
Nose
A) Test the Safety Mechanism
1. The Staple Gun should not fire if the Safety is not
depressed against the stapling surface.
2. Make sure the Staple Gun is unplugged from the
power supply. Empty staples out of the Magazine.
Check the Trigger and the Safety, make sure both
move freely, without sticking.
3. Plug the Staple Gun into the power outlet. Test the
staple gun by depressing the Safety against the
stapling surface without pressing the Trigger. The
Staple Gun must not fire. If it fires, stop
immediately and contact us for repair.
4. Remove the Staple Gun from the stapling surface.
The Safety should return to its original position.
Squeeze the Trigger. The Staple Gun must not fire.
If it fires, stop immediately and contact us for
repair.
5. Depress the Safety against the stapling surface
and squeeze the Trigger. The tool should fire only
once. If it does not fire or fires more than once,
contact us for repair.
Fastener View
Window
Magazine
Fig. 1
Power Cord
Magazine
Lever
2
B) Load Staples
Warning: Unplug the Staple Gun before loading staples.
1. We strongly suggest using following staples from
Rowley Co. See size chart below.
Approx.
Stock # Leg Length Leg Length
NS32/E 6mm 1/4"
NS33/E 10mm 3/8"
NS34/E 13mm 1/2"
NS35/E 16mm 5/8"
2. Make sure the Staple Gun is unplugged from the
power outlet.
3. Turn the Staple Gun upside down. Depress the
Magazine Lever as shown in Fig. 2, and Magazine
cover will slide open.
Fig. 2
Depress Lever to
open Magazine
4. Drop in a strip of staples with staple legs pointing
up as shown in Fig. 3.
Fig. 3
Drop in Staples with
legs up
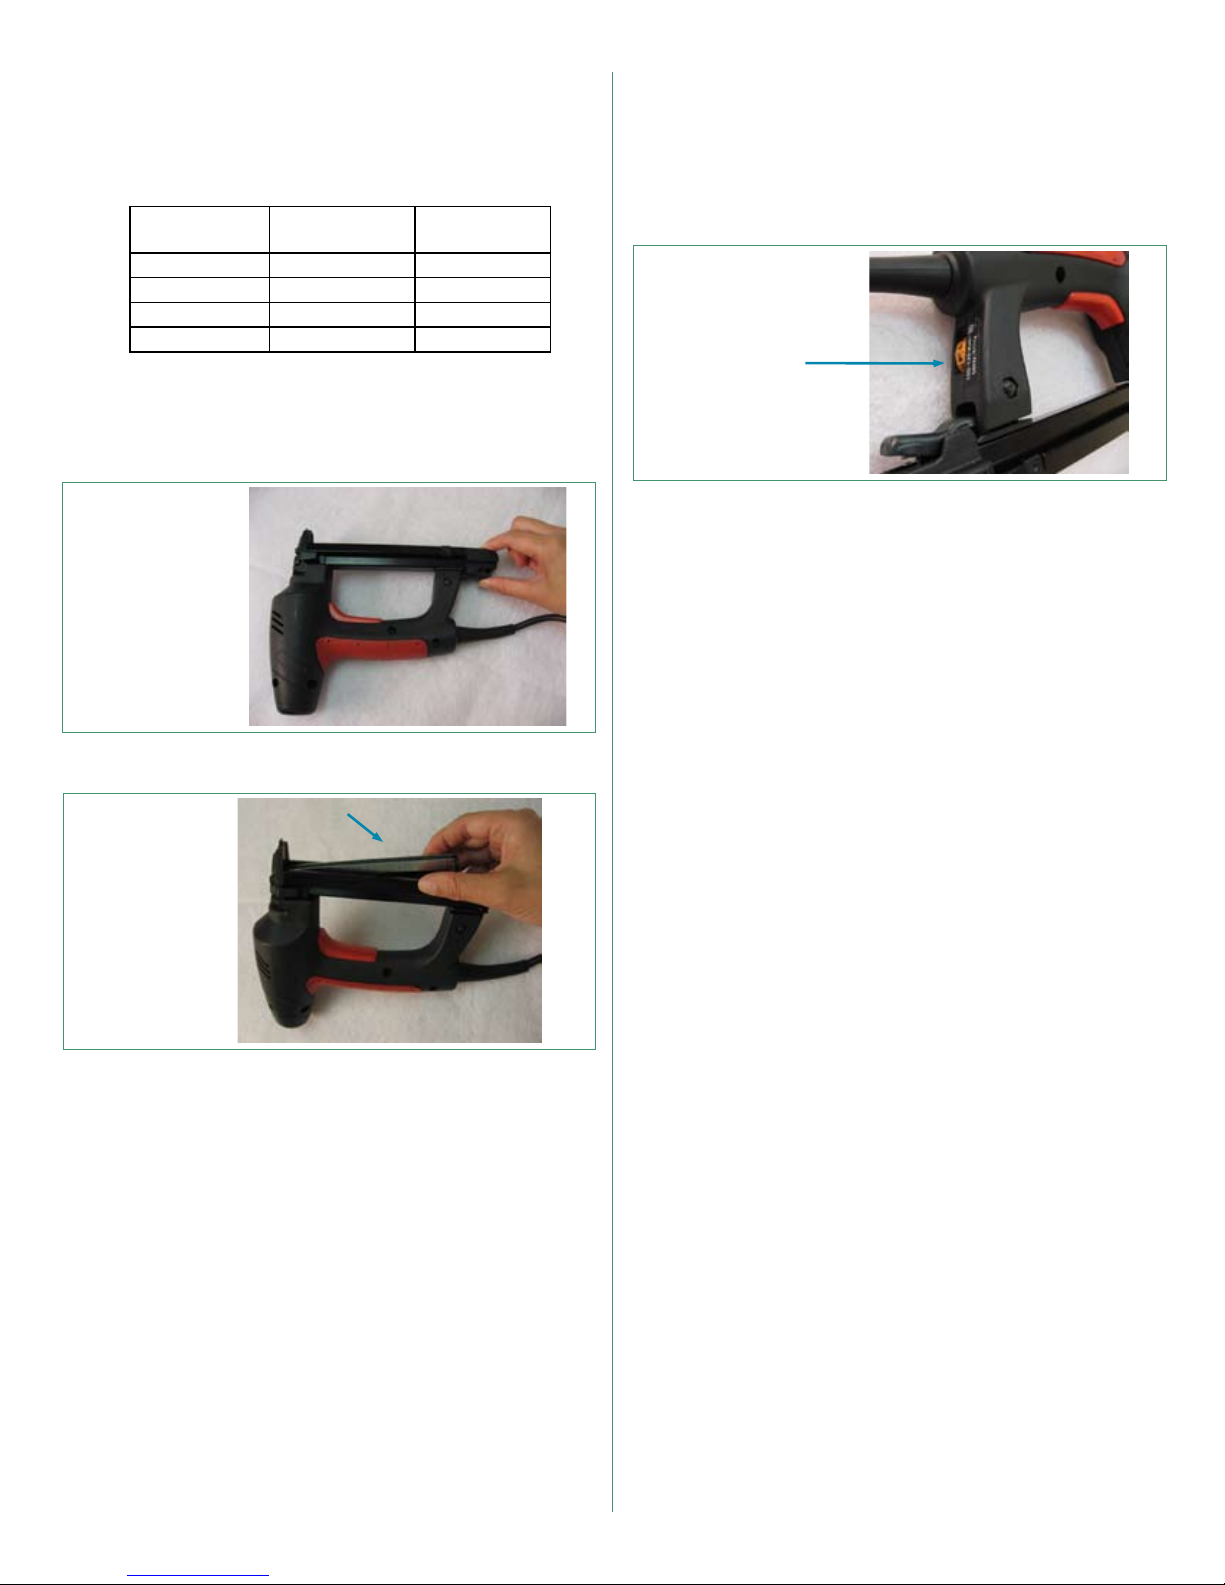
4. If you need to adjust stapling depth, turn the
Depth Adjuster as shown in Fig. 4. Turn to a
higher number for deeper penetration. Apply more
pressure on the Staple Gun head (See Fig. 1)
when even deeper staple penetration is desired or
when driving a staple into hard wood. Try depth
adjustment on a scrap piece first.
Fig. 4
Depth
Adjuster
5. Do not hold Staple Gun at an extreme angle when
firing staples.
6. Avoid firing Staple Gun when empty of staples.
7. If the Staple Gun overheats during stapling, stop
stapling and let it cool down before resuming
operation.
D) Remove Jammed Staples
1. Stop firing. Unplug the Staple Gun. Release the
Magazine Lever and remove the remaining clip of
staples. If a staple is jammed in the discharge
area, remove it with a pair of pliers.
2. If a staple is jammed in the front of the Magazine,
use a flat screwdriver and/or needle nose pliers to
remove the Staple. Be careful not to damage the
Staple Gun with the pliers or screwdriver.
5. Slide the Magazine forward until Magazine Lever
clicks into place. Do not force.
C) Operate Staple Gun:
Caution: Always wear safety glasses and ear plugs before
operating Staple Gun!
1. Plug the Stapler Gun Power Plug into a power
outlet.
2. Firmly grasp Staple Gun by handle, and with the
other hand applying pressure at the head of the
Staple Gun (See Fig. 1), so that the Nose is flat
against the stapling surface, and the Safety is
depressed.
3. Gently squeeze the Trigger to fire a staple. Test
stapling action by firing a few staples into a scrap
piece.
Note: Each time you fire the Staple Gun, the
Safety must be depressed firmly against the
stapling surface.
E) Inspect, Maintain and Clean the Tool
Warning: Make sure that the Staple Gun is unplugged
and staples are unloaded before performing any
inspection, maintenance, or cleaning procedures.
1. Before each use, inspect the general condition of
the Staple Gun. Check for loose screws,
misalignment or binding of moving parts, cracked
or broken parts, damaged electrical wiring, and
any other condition that may affect its safe
operation. If abnormal noise or vibration occurs,
have the problem corrected before use. Do not
use a damaged Staple Gun.
2. Wipe Staple Gun clean with a lint free cloth.
3. Keep the Nose and Safety free of dirt or debris at
all times. Debris jammed in the Safety can prevent
the Safety mechanism from working properly.
3

Parts List:
Part No. Description
1 Stop
2 Striking Pad
3 Blade
4 Coil Spring
5 Coil
6 Bumper
7 Power Cord
8 Wire Cover
9 Rod
10 Control Unit
11 Trigger Switch
12 Trigger Spring
13 Trigger
14 Body A
15 Body B.
16 Safety Switch
17 Hex Bolt
18 Nose Cover
19 Nose Plate
20 Spacer
21 Safety
22 Magazine
23 Feeder Shoe
24 Inner Magazine
25 Label
26 Brace
27 Magazine Back
28 Lever Spring
29 Lever
30 Feeder Spring
31 Support
32 Depth Adjuster
1
8
2
10
3
11
12
4
13
5
6
16
14
9
7
32
15
17
18
19
20
21
31
29
22
30
24
23
4
25
28
27
26
 Loading...