


Page 1
www.rowenta.com
ADD VU2060-VU5060 060137 18/12/06 10:34 Page 1
Page 2
1
3
2
4
5
6
B
C
E
D
ADD VU2060-VU5060 060137 18/12/06 10:34 Page 2
Page 3

NACHTRAG ZENITUDE PROTECT VENTILATOR MIT ANTI-MÜCKEN-SYSTEM VU2060 UND VU5060
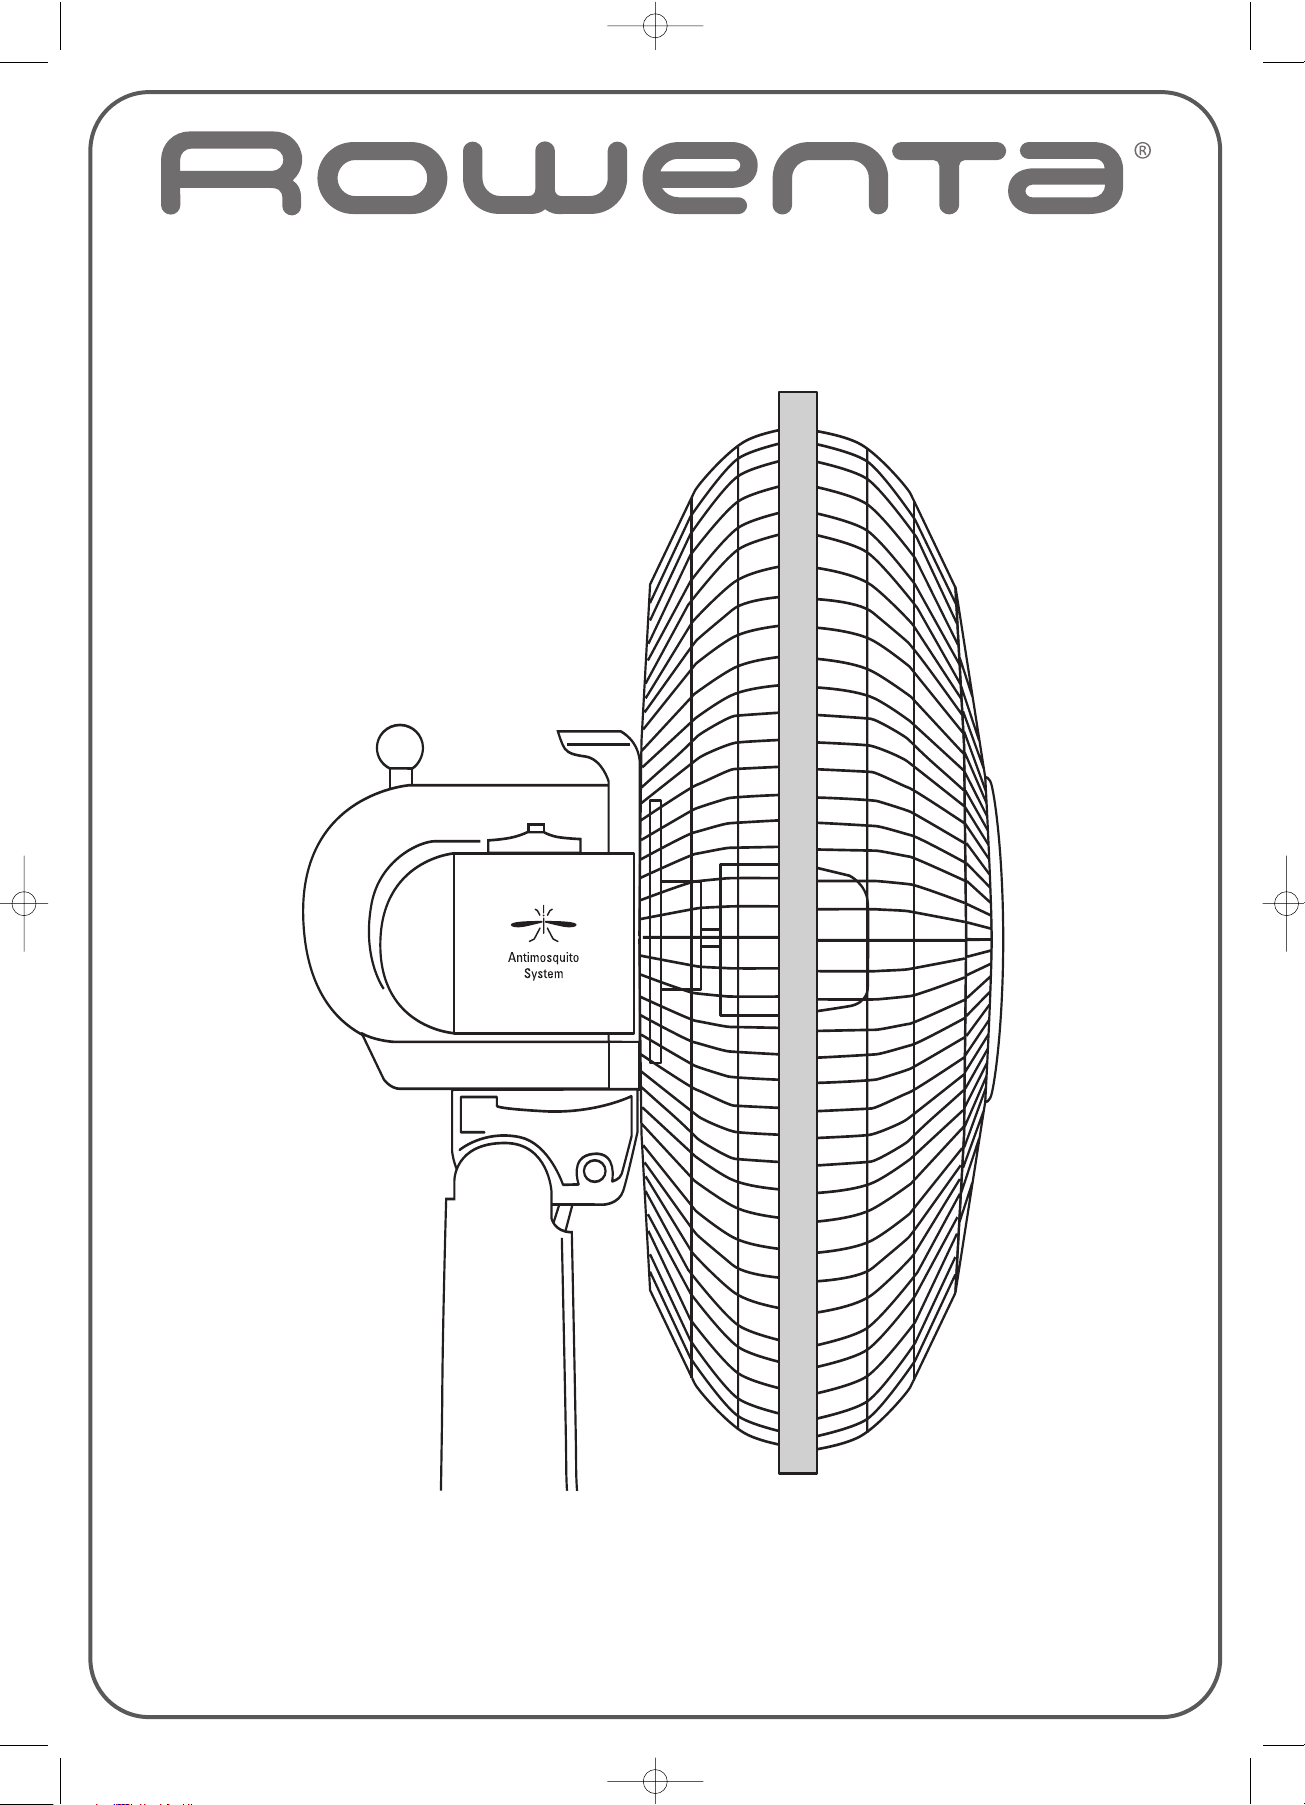
BESCHREIBUNG
B. Anti-Mücken-System
C. Schutzdeckel des Verdampfers
D. Elektrischer Verdampfer:
- Schutzdeckel
- Heizplatte aus Metall
E. Einstellknopf des Systems (3 Positionen):
Offen - STOP
Zu - STOP
In Betrieb
Dieser Ventilator ist mit einem Anti-Mücken-System ausgestattet
HINWEISE
Bitte lesen Sie diesen Nachtrag sowie die Hauptgebrauchsanweisung des Geräts unbedingt aufmerksam durch und beachten Sie die folgenden Hinweise:
- Benutzen Sie ausschließlich im Handel erhältliche Plättchen für elektrische Verdampfer.
- Halten Sie sich unbedingt an die Gebrauchsanweisung des Hersteller der Plättchen (manche Produkte dieser Hersteller sind umweltschädlich).
- Diese Ersatz-Plättchen werden nicht mitgeliefert.
- Nehmen Sie das Anti-Mücken-System nicht ohne Plättchen in Betrieb.
- Lassen Sie das Anti-Mücken-System vor Eingriffen jeglicher Art abkühlen.
SEHR WICHTIG
Das Gerät darf nur mit den empfohlenen Verdampfungs-Substanzen betrieben werden.
Der Einsatz anderer Substanzen kann das Risiko einer Vergiftung oder des Ausbruchs eines Feuers bergen.
FUNKTIONSWEISE DES ANTI-MÜCKEN-SYSTEMS
Lassen Sie das Anti-Mücken-System vor jeglichem Eingriff abkühlen und schalten Sie das Gerät aus.
1- Öffnen Sie den Schutzdeckel des Anti-Mücken-Systems (Abb. 1)
2- Schieben Sie das Plättchen unter das Schutzgitter des Verdampfers (unter Beachtung der Anweisungen des Herstellers der Plättchen) (Abb. 2)
3- Versichern Sie sich, dass das Plättchen richtig eingelegt ist (Abb. 3)
4- Schließen Sie den Schutzdeckel (Abb. 4)
5- Schalten Sie das Anti-Mücken-System in Position „IN BETRIEB” (Abb. 5)
BITTE BEACHTEN: Das Anti-Mücken-System funktioniert nur, wenn sich der Ventilator in Betrieb befindet (in allen Geschwindigkeitsstufen).
Gehen Sie beim Einlegen von neuen Plättchen vor wie oben beschrieben; bei Schritt 2 wird das verbrauchte Plättchen automatisch ausgeworfen (Abb. 6)
Werfen Sie das verbrauchte Plättchen weg.
AUFBEWAHRUNG
Wenn das Anti-Mücken-System nicht benutzt wird, muss die Patrone herausgenommen werden.
D
ADDENDUM ZENITUDE PROTECT FAN WITH ANTI-MOSQUITO SYSTEM VU2060 AND VU5060
DESCRIPTION
B. Anti-mosquito system
C. Diffuser protection cover
D. Electric diffuser
- Protection cage
- Metal hotplate
E. System control knob (3 positions)
Open - OFF
Closed - OFF
ON
This fan is equipped with an anti-mosquito system.
WARNINGS
It is essential to read this addendum and the main instructions for the appliance carefully and to observe the following recommendations:
- use only commercial solid refills, compatible with electric vaporisers,
- comply with the manufacturer’s instructions for the use of the refills (some products used by the refill manufacturers are damaging to the environment).
- The cartridge refills are not supplied with the appliance.
- do not operate the anti-mosquito system without a refill,
- allow the anti-mosquito system to cool before handling.
VERY IMPORTANT
Only substances recommended for diffusion with the appliance should be used.
The use of other substances can lead to a risk of toxicity or fire.
OPERATION OF THE ANTI-MOSQUITO SYSTEM
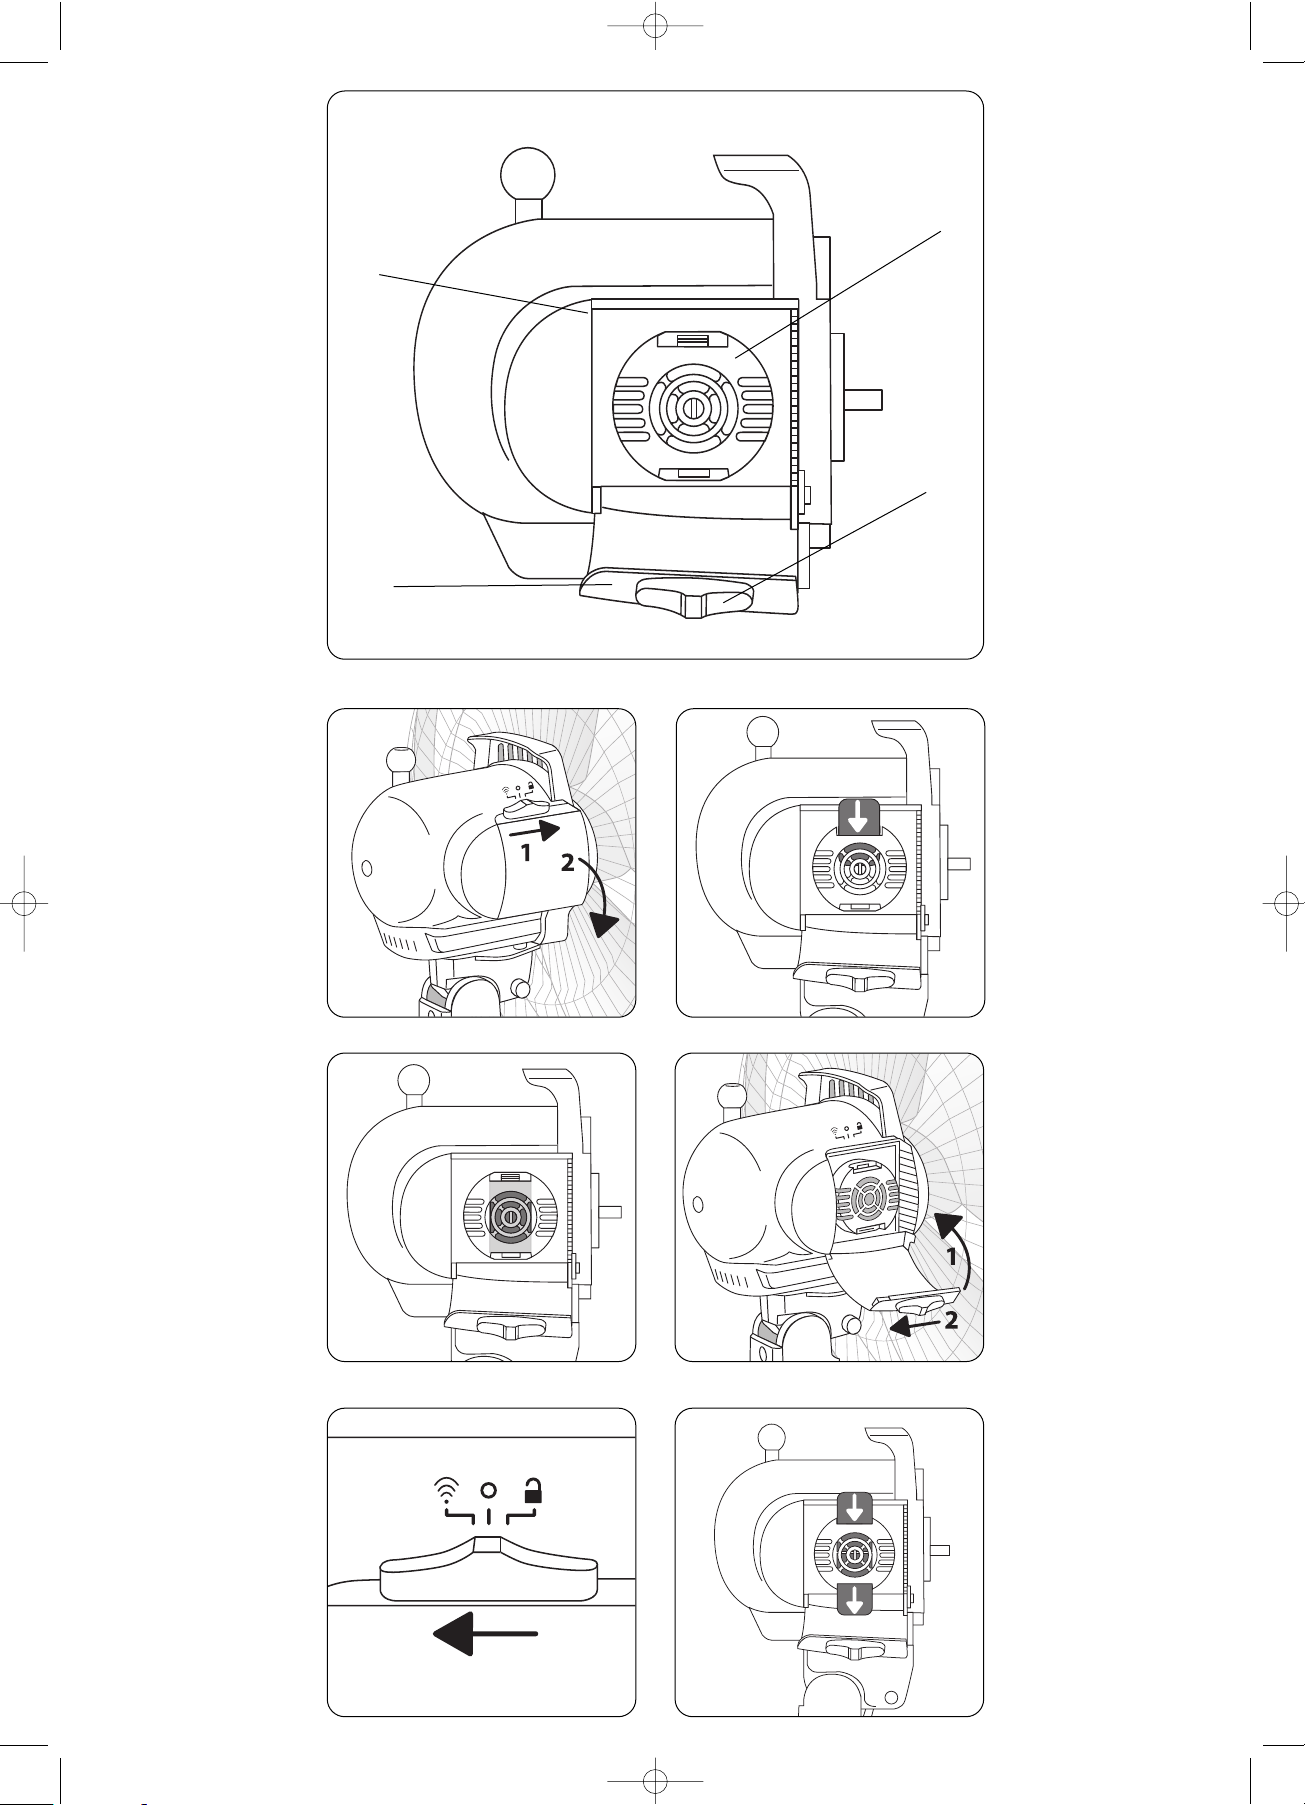
before handling the anti-mosquito system, it is recommended to allow it to cool and to turn off the appliance.
1. Open the protective cover of the anti-mosquito system (fig. 1)
2. Insert the refill under the protective grill of the diffuser, taking into account of the refill supplier’s recommendations (fig. 2)
3. Check that the refill is properly inserted (fig. 3)
4. Close the cover (fig. 4)
5. Set the anti-mosquito system control knob to the “ON” position (fig. 5)
NOTE: The anti-mosquito system only works when the fan is running, irrespective of the selected speed.
To change the refill, the steps are exactly as indicated above. In step 2, the new refill will automatically eject the used one (fig. 6).
Throw away the used refill.
STORAGE
When not using the anti-mosquito system, do not leave a refill in the system.
GB
ADD VU2060-VU5060 060137 18/12/06 10:34 Page 3
Page 4

ADDITIF VENTILATEUR ZENITUDE PROTECT AVEC SYSTEME ANTI-MOUSTIQUE VU2060 ET VU5060
DESSCRIPTIF
B. Système anti-moustique
C. Capot de protection du diffuseur
D. Diffuseur électrique:
- Grille de protection
- Plaque chauffante métallique
E. Bouton de commandes du système (3 positions):
Ouvert - Arrêt
Fermé - Arrêt
Marche
Ce ventilateur est équipé d’un système anti-moustique
AVERTISSEMENTS
il est essentiel de lire la notice principale de l'appareil et d'observer les recommandations suivantes:
- Utiliser uniquement des recharges plaquettes vendues dans le commerce et compatibles avec les diffuseurs électriques.
- Respecter impérativement les recommandations d’utilisation des recharges définies par le fabricant (Certains produits utilisés par les fabricants de
plaquettes sont nuisibles pour l’environnement).
- Ces recharges plaquettes ne sont pas fournies avec l’appareil.
- Ces recharges plaquettes ne sont pas fournies avec l’appareil.
- Ne pas faire fonctionner le système anti-moustique sans recharge.
- Laisser refroidir le système anti-moustique avant toute manipulation.
TRES IMPORTANT
L’appareil doit être utilisé uniquement avec les substances à diffuser recommandées.
L’utilisation d’autres substances peut entraîner un risque toxique ou des risques de feu.
FONCTIONNEMENT DU SYSTEME ANTI-MOUSTIQUE
Avant toute manipulation du système anti-moustique, il est recommandé de laisser refroidir le système et d’arrêter l’appareil.
1- Ouvrir le capot de protection du système anti-moustique (fig.1)
2- Insérer la recharge plaquette sous la grille de protection du diffuseur (en prenant en compte les préconisations des fournisseurs de recharges) (fig.2)
3- Vérifier que la recharge est bien en place (fig.3)
4- Fermer le capot (fig.4)
5- Mettre le système anti-moustique en position ‘’MARCHE’’ (fig.5)
NOTA : le système anti-moustique est fonctionnel uniquement lorsque le ventilateur est en fonctionnement (quelle que soit la vitesse sélectionnée).
Pour changer la recharge, les étapes sont identiques à celles indiquées ci-dessus ; à l'étape N°2, la nouvelle recharge éjectera automatiquement la recharge
usagée (fig.6)
Jeter la recharge usagée.
RANGEMENT
Lorsque vous n’utilisez pas le système anti-moustique, ne laissez pas de recharge dans le système.
F
AANVULLENDE INFORMATIE VENTILATOR ZENITUDE PROTECT MET ANTI-MUGGENSYSTEEM VU2060 EN VU5060
BESCHRIJVING
B. Anti-muggensysteem
C. Beschermkap verstuiver
D. Elektrische verstuiver:
- Beschermrooster
- Metalen verwarmingsplaat
E. Bedieningsknop van het systeem (3standen):
Open - Uit
Ditch - Uit
Aan
Deze ventilator is voorzien van een anti-muggensysteem
WAARSCHUWINGEN
Het is belangrijk deze aanvulling informatie en de handleiding van het apparaat aandachtig door te lezen en de instructies in acht te nemen:
- Gebruik uitsluitend de in de winkel verkrijgbare navullingen die voor elektrische verstuivers geschikt zijn.
- Neem altijd de door de fabrikant gegeven gebruiksinstructies voor de navullingen in acht (sommige door de fabrikanten van de navullingen gebruikte
producten zijn slecht voor het milieu).
- Deze navullingen worden niet bij het apparaat meegeleverd.
- Het anti-muggensysteem niet zonder navulling laten werken.
- Het anti-muggensysteem eerst laten afkoelen voordat u hier aan komt.
ZEER BELANGRIJK
Het apparaat dient uitsluitend met de aanbevolen te verspreiden stoffen gebruikt te worden.
Het gebruik van andere stoffen kan gevaar voor vergiftiging of brand veroorzaken.
WERKING VAN HET ANTI-MUGGENSYSTEEM
Voordat u aan het anti-muggensysteem komt, is het aan te raden het systeem af te laten koelen en het apparaat uit te schakelen.
1- Open de beschermkap van het anti-muggensysteem (fig.1)
2- Plaats de navulling onder het beschermrooster van de verstuiver (rekening houdend met de aanbevelingen van de fabrikant van de navullingen) (fig.2)
3- Controleer of de navulling goed op zijn plaats zit (fig.3)
4- Sluit de kap (fig.4)
5- Zet het anti-muggensysteem in de stand ‘’AAN’’ (fig.5)
NB: het anti-muggensysteem is uitsluitend functioneel wanneer de ventilator werkt (ongeacht de gekozen snelheid).
Voor het vervangen van de navulling zijn de handelingen gelijk als hierboven; bij stap nr. 2 zal de nieuwe navulling automatisch de lege navulling uitwerpen (fig.6)
Werp de lege navulling weg.
OPBERGEN
Wanneer u het anti-muggensysteem niet gebruikt, laat de navulling dan niet in het systeem zitten.
NL
ADD VU2060-VU5060 060137 18/12/06 10:34 Page 4
Page 5

COMPLEMENTO VENTILATORE ZENITUDE PROTECT CON SISTEMA ANTI-ZANZARE VU2060 E VU5060
DESCRIZIONE
B. Sistema anti-zanzare
C. Calotta di protezione del diffusore
D. Diffusore elettrico:
- Griglia di protezione
- Piastra riscaldante metallica
E. Pulsante di comando del sistema (3 posizioni):
Aperto - Off
Chiuso - Off
On
Questo ventilatore è dotato di un sistema anti-zanzare.
AVVERTENZE
È essenziale leggere attentamente questo complemento nonchè le istruzioni d’utilizzo dell’apparecchio e osservare le seguenti raccomandazioni:
- Utilizzare unicamente piastrine di ricarica vendute in commercio e compatibili con i diffusori elettrici.
- Rispettare tassativamente le raccomandazioni d’uso delle ricariche definite dal fabbricante (alcuni prodotti utilizzati dai fabbricanti di piastrine sono nocivi
per l’ambiente).
- Queste piastrine di ricarica non sono fornite con l’apparecchio.
- Non fare funzionare il sistema anti-zanzare senza ricarica.
- Lasciare raffreddare il sistema anti-zanzare prima di manipolarlo.
MOLTO IMPORTANTE
L’apparecchio deve essere utilizzato unicamente con le sostanze da diffondere raccomandate.
L’utilizzo di altre sostanze può comportare un rischio tossico o dei rischi di incendio.
FUNZIONAMENTO DEL SISTEMA ANTI-ZANZARE
Prima di manipolare il sistema anzi-zanzare, si raccomanda di lasciarlo raffreddare e di spegnere l’apparecchio.
1- Aprire la calotta di protezione del sistema anti-zanzare (fig.1)
2- Inserire la piastrina di ricarica sotto la griglia di protezione del diffusore (tenendo conto delle raccomandazioni dei fornitori di ricariche) (fig.2)
3- Verificare che la ricarica sia posizionata correttamente (fig.3)
4- Chiudere la calotta (fig.4)
5- Mettere il sistema anti-zanzare sulla posizione ‘ON’’ (fig.5)
NOTA: il sistema anti-zanzare è attivo unicamente quando il ventilatore è in funzione (qualunque sia la velocità selezionata).
Per cambiare la ricarica, le tappe sono identiche a quelle indicate qui sopra; alla tappa N°2, la nuova ricarica espellerà automaticamente la ricarica usata (fig.6)
Buttare la ricarica usata.
CONSERVAZIONE
Quando non utilizzate il sistema anti-zanzare, non lasciate nessuna ricarica nel sistema.
I
APÉNDICE VENTILADOR ZENITUDE PROTECT CON SISTEMA ANTI-MOSQUITOS VU2060 Y VU5060
DESCRIPCION
B. Sistema anti-mosquitos
C. Tapa de protección del difusor
D. Difusor eléctrico:
- Rejilla de protección
- Placa térmica metálica
E. Botón de mandos del sistema (3 posiciones):
Abierto - Parada
Cerrado - Parada
On
Este ventilador está provisto de un sistema anti-mosquitos.
ADVERTENCIAS
Es fundamental leer atentamente este apéndice así como el folleto principal del aparato y observar las recomendaciones siguientes:
- Utilizar solamente recargas de pastillas vendidas en el comercio y compatibles con los difusores eléctricos.
- Respetar obligatoriamente las recomendaciones de utilización de las recargas definidas por el fabricante (Algunos productos utilizados por los fabricantes
de pastillas son perjudiciales para el medio ambiente).
- Estas recargas de pastillas no están suministradas con el aparato
- No poner a funcionar el sistema anti-mosquitos sin recarga.
- Dejar enfriar el sistema anti-mosquitos antes de cualquier manipulación.
MUY IMPORTANTE
El aparato deberá utilizarse solamente con sustancias para difundir recomendadas
El uso de otras sustancias puede ocasionar un riesgo tóxico o riesgo de fuego
FUNCIONAMIENTO DELSISTEMA ANTI-MOSQUITOS
Antes de cualquier manipulación del sistema anti-mosquitos, se recomienda dejar enfriar el sistema y apagar el aparato.
1- Abrir la tapa de protección del sistema anti-mosquitos (fig.1)
2- Insertar la recarga de pastillas debajo de la rejilla de protección del difusor (teniendo en cuenta las recomendaciones de los proveedores de recargas) (fig.2)
3- Comprobar que la recarga está bien colocada (fig.3)
4- Cerrar la tapa (fig.4)
5- Poner el sistema anti-mosquitos en posición ‘’ON’’ (fig.5)
NOTA: el sistema anti-mosquitos sólo se activa cuando el ventilador está funcionando (sea cual sea la velocidad seleccionada).
Para cambiar la recarga, las etapas son idénticas a las indicadas anteriormente; en la etapa N°2, la nueva recarga expulsará automáticamente la recarga
usada (fig.6)
Tirar la recarga usada.
PARA GUARDAR
Cuando no utilice el sistema anti-mosquitos, no deje la recarga en el sistema.
E
ADD VU2060-VU5060 060137 18/12/06 10:34 Page 5
Page 6

SUPLEMENTO VENTOINHA ZENITUDE PROTECT COM SISTEMA ANTI-MOSQUITOS VU2060 E VU5060
DESCRIÇÃO
B. Sistema anti-mosquitos
C. Tampa de protecção do difusor
D. Difusor eléctrico:
- Grelha de protecção
- Placa de aquecimento em metal
E. Botão de controlo do sistema (3 posições):
Aberto - Desligar
Fechado - Desligar
Ligar
Esta ventoinha está equipada com um sistema anti-mosquitos
ADVERTÊNCIAS
É fundamental ler com atenção tanto esta adenda como o manual de instruções do aparelho, para além de respeitar as recomendações seguintes:
- Utilize apenas recargas em pastilhas à venda no mercado e compatíveis com os difusores eléctricos.
- É obrigatório respeitar as recomendações de utilização das recargas definidas pelo fabricante (determinados produtos utilizados pelos fabricantes de
recargas em pastilhas são nocivos para o meio ambiente).
- Estas recargas em placas pequenas não são fornecidas com o aparelho.
- Não coloque o sistema anti-mosquitos a funcionar sem recarga.
- Deixe o sistema anti-mosquitos arrefecer antes de qualquer manuseamento.
MUITO IMPORTANTE
O aparelho só pode ser utilizado com as substâncias de difusão recomendadas.
A utilização de outras substâncias pode causar um risco tóxico ou riscos de incêndio.
FUNCIONAMENTO DO SISTEMA ANTI-MOSQUITOS
Antes de qualquer manuseamento do sistema anti-mosquitos, é aconselhável deixar arrefecer o sistema e desligar o aparelho.
1 – Abra a tampa de protecção do sistema anti-mosquitos (fig.1)
2 – Insira a recarga em pastilha sob a grelha de protecção do difusor (respeitando as indicações dos fornecedores de recargas) (fig.2)
3 – Certifique-se de que a recarga foi colocada correctamente (fig.3)
4 - Feche a tampa (fig.4)
5 - Regule o sistema anti-mosquitos para a posição ‘’LIGAR’’ (fig.5)
NOTA : o sistema anti-mosquitos só funciona se a ventoinha estiver em funcionamento (independentemente da velocidade seleccionada).
Para substituir a recarga, as etapas a seguir são idênticas às indicadas acima. Na etapa N.º 2, a recarga nova ejecta automaticamente a recarga gasta (fig.6).
Deite fora a recarga gasta.
ARRUMAÇÃO
Sempre que não utilizar o sistema anti-mosquitos, não deixe qualquer recarga no sistema.
P
¶ƒ√™£∂Δ√ ∞¡∂ªπ™Δ∏ƒ∞™ ZENITUDE PROTECT ªÂ Û‡ÛÙËÌ· ηٿ ÙˆÓ ÎÔ˘ÓÔ˘ÈÒÓ VU2060 Î·È VU5060
°EINKH ¶EPI°PAıH
B. ™‡ЫЩЛМ· О·Щ¿ ЩˆУ ОФ˘УФ˘ИТУ
C. ∫·¿ОИ ЪФЫЩ·Ы›·˜ Ы˘ЫОВ˘‹˜ ‰И¿¯˘ЫЛ˜
D. ∏ПВОЩЪИО‹ Ы˘ЫОВ˘‹ ‰И¿¯˘ЫЛ˜:
- ™¯¿Ú· ÚÔÛÙ·Û›·˜
- ªÂÙ·ÏÏÈ΋ ıÂÚÌ·ÓÙÈ΋ Ͽη
√√ ··ÚÚÒÒÓÓ ··ÓÓÂÂÌÌÈÈÛÛÙÙ‹‹ÚÚ··˜˜ ‰‰ÈÈ··ıı¤¤ÙÙÂÂÈÈ ÛÛ‡‡ÛÛÙÙËËÌÌ·· Îη·ÙÙ¿¿ ÙÙˆˆÓÓ ÎÎÔÔ˘˘ÓÓÔÔ˘˘ÈÈÒÒÓÓ
¶ƒ√∂π¢√¶√π∏™∂π™
¶Ú¤ÂÈ ÔˆÛ‰‹ÔÙ ӷ ‰È·‚¿ÛÂÙ Ì ÚÔÛÔ¯‹ ÙÔ ·ÚfiÓ ÚÔÛ¿ÚÙËÌ·, ηıÒ˜ Î·È ÙÔ ‚·ÛÈÎfi ÂÁ¯ÂÈÚ›‰ÈÔ ¯Ú‹Û˘ Ù˘ Û˘Û΢‹˜ Î·È Ó· ·ÎÔÏÔ˘ı‹ÛÂÙ ÙȘ ·Ú·Î¿Ùˆ Ô‰ËÁ›Â˜:
- ГЪЛЫИМФФИВ›ЩВ ·ФОПВИЫЩИО¿ ·УЩ·ПП·ОЩИО¿ ВУЩФМФ·ФıЛЩИО¿ П·О›‰И· Ф˘ ˆПФ‡УЩ·И ЫЩФ ВМfiЪИФ О·И В›У·И Ы˘М‚·Щ¿ МВ ЩИ˜ ВУЩФМФ·ФıЛЩИО¤˜
ЛПВОЩЪИО¤˜ Ы˘ЫОВ˘¤˜.
- ∞ОФПФ˘ı‹ЫЩВ ФˆЫ‰‹ФЩВ ЩИ˜ Ф‰ЛБ›В˜ ЩЛ˜ О·Щ·ЫОВ˘¿ЫЩЪИ·˜ ВЩ·ИЪВ›·˜ ˆ˜ ЪФ˜ ЩЛ ¯Ъ‹ЫЛ ЩˆУ ·УЩ·ПП·ОЩИОТУ П·ОИ‰›ˆУ (√ЪИЫМ¤У· ЪФ˚fiУЩ· Ф˘
¯ЪЛЫИМФФИФ‡УЩ·И ·fi ЩИ˜ О·Щ·ЫОВ˘¿ЫЩЪИВ˜ ВЩ·ИЪВ›В˜ В›У·И ‚П·‚ВЪ¿ ЪФ˜ ЩФ ВЪИ‚¿ППФУ).
- Δ· ·ÓÙ·ÏÏ·ÎÙÈο ϷΛ‰È· ‰ÂÓ ‰È·Ù›ıÂÓÙ·È Ì ÙË Û˘Û΢‹.
- ªЛУ ı¤ЩВЩВ ЫВ ПВИЩФ˘ЪБ›· ЩФ Ы‡ЫЩЛМ· О·Щ¿ ЩˆУ ОФ˘УФ˘ИТУ ¯ˆЪ›˜ ·УЩ·ПП·ОЩИОfi.
- ∞К‹ЫЩВ У· ОЪ˘ТЫВИ ЩФ Ы‡ЫЩЛМ· О·Щ¿ ЩˆУ ОФ˘УФ˘ИТУ ЪИУ ·fi О¿ıВ ¯ВИЪИЫМfi.
¶√§À ™∏ª∞¡Δπ∫√
∏∏ ÛÛ˘˘ÛÛÎ΢˘‹‹ ÚÚ¤¤ÂÂÈÈ ÓÓ·· ¯¯ÚÚËËÛÛÈÈÌÌÔÔÔÔÈÈ››ÙÙ··ÈÈ ··ÔÔÎÎÏÏÂÂÈÈÛÛÙÙÈÈÎο¿ ÌÌ ÙÙÈȘ˜ ÚÚÔÔÙÙÂÂÈÈÓÓfifiÌÌÂÂÓÓ˜˜ ··ÚÚˆˆÌÌ··ÙÙÈÈÎΤ¤˜˜ ÔÔ˘˘ÛÛ››Â˜˜ ÚÚÔÔ˜˜ ‰‰ÈÈ¿¿¯¯˘˘ÛÛËË..
∏∏ ¯¯ÚÚ‹‹ÛÛËË ¿¿ÏÏÏψˆÓÓ ÔÔ˘˘ÛÛÈÈÒÒÓÓ ÌÌÔÔÚÚ›› ÓÓ·· ÂÂÓÓ¤¤¯¯ÂÂÈÈ ÙÙÔÔÍÍÈÈÎÎfifi ÎΛ›ÓÓ‰‰˘˘ÓÓÔÔ ‹‹ ÎΛ›ÓÓ‰‰˘˘ÓÓÔÔ ÚÚfifiÎÎÏÏËËÛÛˢ˜ ˘˘ÚÚÎη·ÁÁÈÈ¿¿˜˜..
§∂πΔ√Àƒ°π∞ Δ√À ™À™Δ∏ª∞Δ√™ ∫∞Δ∞ Δø¡ ∫√À¡√À¶πø¡
¶ЪИУ ·fi О¿ıВ ¯ВИЪИЫМfi ЩФ˘ Ы˘ЫЩ‹М·ЩФ˜ О·Щ¿ ЩˆУ ОФ˘УФ˘ИТУ, Ы·˜ Ы˘УИЫЩФ‡МВ У· ·К‹ЫВЩВ ЩФ Ы‡ЫЩЛМ· У· ОЪ˘ТЫВИ О·И У· ‰И·Оfi„ВЩВ ЩЛ ПВИЩФ˘ЪБ›· ЩЛ˜
Ы˘ЫОВ˘‹˜.
1- ∞ÓÔ›ÍÙ ÙÔ Î·¿ÎÈ ÚÔÛÙ·Û›·˜ ÙÔ˘ Û˘ÛÙ‹Ì·ÙÔ˜ ηٿ ÙˆÓ ÎÔ˘ÓÔ˘ÈÒÓ (ÂÈÎ.1)
2- ∂ÈÛ¿ÁÂÙ ÙÔ ·ÓÙ·ÏÏ·ÎÙÈÎfi ϷΛ‰ÈÔ Î¿Ùˆ ·fi ÙËÓ Û¯¿Ú· ÚÔÛÙ·Û›·˜ Ù˘ Û˘Û΢‹˜ ‰È¿¯˘Û˘ (Ï·Ì‚¿ÓÔÓÙ·˜ ˘fi„Ë ÙȘ Ô‰ËÁ›Â˜ ÙˆÓ ÚÔÌËı¢ÙÒÓ ÙˆÓ
·УЩ·ПП·ОЩИОТУ П·ОИ‰›ˆУ) (ВИО.2)
3- μВ‚·ИˆıВ›ЩВ fiЩИ ЩФ ·УЩ·ПП·ОЩИОfi ¤¯ВИ ЩФФıВЩЛıВ› ЫˆЫЩ¿ ЫЩЛ ı¤ЫЛ ЩФ˘ (ВИО.3)
4- ∫ПВ›ЫЩВ ЩФ О·¿ОИ (ВИО.4)
5- £¤ЩВЩВ ЩФ Ы‡ЫЩЛМ· О·Щ¿ ЩˆУ ОФ˘УФ˘ИТУ ЫЩЛ ı¤ЫЛ On (ВИО.5)
™™∏∏ªª∂∂ππøø™™∏∏:: ΔΔÔÔ ÛÛ‡‡ÛÛÙÙËËÌÌ·· Îη·ÙÙ¿¿ ÙÙˆˆÓÓ ÎÎÔÔ˘˘ÓÓÔÔ˘˘ÈÈÒÒÓÓ ÏÏÂÂÈÈÙÙÔÔ˘˘ÚÚÁÁ›› ÌÌfifiÓÓÔÔ fifiÙÙ··ÓÓ ‚‚ÚÚ››ÛÛÎÎÂÂÙÙ··ÈÈ ÛÛ ÏÏÂÂÈÈÙÙÔÔ˘˘ÚÚÁÁ››·· ÔÔ ··ÓÓÂÂÌÌÈÈÛÛÙÙ‹‹ÚÚ··˜˜ ((fifiÔÔÈÈ·· ÎÎÈÈ ··ÓÓ Â››ÓÓ··ÈÈ ËË ÂÂ