

Page 1
029724 (VA550/560) - 49-01
Page 2
1
2
Mod. VA-550
2
3
4
5
5
6
6
1
7
A
B
C
7
7
Mod. VA-560
Page 3

Deutsch
1. Vorderes Gitter
2. Ein-/Aus-Taste und Stufenwahlschalter
3. Einstellung Hin- und Herbewegung
4. Zeitschaltuhr (nur Mod. VA-560)
5. Schnur
6. Befestigungsschraube
7. Sockel
English
1. Front grid
2. On/off and speed selection buttons
3. Swivel control
4. Timer (mod. VA-560 only)
5. Power lead
6. Fastening screws
7. Base
Nederlands
1. Rooster voorzijde
2. Aan/uit-knoppen en snelheidschakelaar
3. Bediening draaibeweging
4. Tijdschakelaar (alleen model VA-560)
5. Snoer
6. Bevestigingsschroeven
7. Voetstuk
Italiano
1. Griglia anteriore e gitter
2. Tasti marcia/arresto e selettori di velocità
3. Comando oscillatore
4. Minuteria (solo mod. VA-560)
5. Cavo
6. Vite di fissaggio
7. Base
Español
1. Rejilla delantera
2. Teclas funcionamiento/parada y selectores de velocidades
3. Mando oscilador
4. Minutero (mod. VA-560 únicamente)
5. Cable
6. Tornillo de fijación
7. Base
Portuguès
1. Grelha da frente
2. Teclas de ligar/desligar e selectores de velocidade
3. Comando de oscilação
4. Temporizador (sómente para o modelo VA-560)
5. Fio de ligação à corrente
6. Parafusos de fixação
7. Base
Dansk
1. Forreste gitter
2. Start/stop knap og hastighedsvælgere
3. Svingnings-indstilling
4. Tidsindstilling ( kun model VA-560)
5. Ledning
6. Fastspændingsskrue
7. Sokkel
Norsk
1. Forsidegitter
2. Av/På-knapp og knapper for hastighetsvalg
3. Knapp for pendlingsbevegelser
4. Tidsinnstilling (kun på mod. VA-560)
5. Ledning
6. Festeskrue
7. Sokkel
Page 4

• Zwischen dem Gerät und anderen Gegenständen (Vorhänge, Wände, Sprühdosen ...) einen Abstand von 50 cm lassen.
• ES DARF NIEMALS WASSER IN DAS GERÄT EINDRINGEN.
• Das Gerät nicht mit feuchten Händen anfassen.
• Bitte stellen Sie vor der Betriebsnahme sicher :
- Der Zusammembau des Gerätes ergibt sich aus der entsprechenden Anleitung.
- Das Gerät ist auf einer beständigen und festen Oberfläche plaziert.
- Das Gerät ist in einer normalen Betriebsposition (Senkrecht auf seinen Füßen).
SEHR WICHTIG
• Überprüfen Sie vor der ersten Benutzung, ob die Netzspannung mit der auf
dem Gerät angegebenen Spannung übereinstimmt.
• Ihr Heizkörper muss an eine Steckdose mit Erdung angeschlossen werden.
Es handelt sich um ein Gerät der Klasse 1.
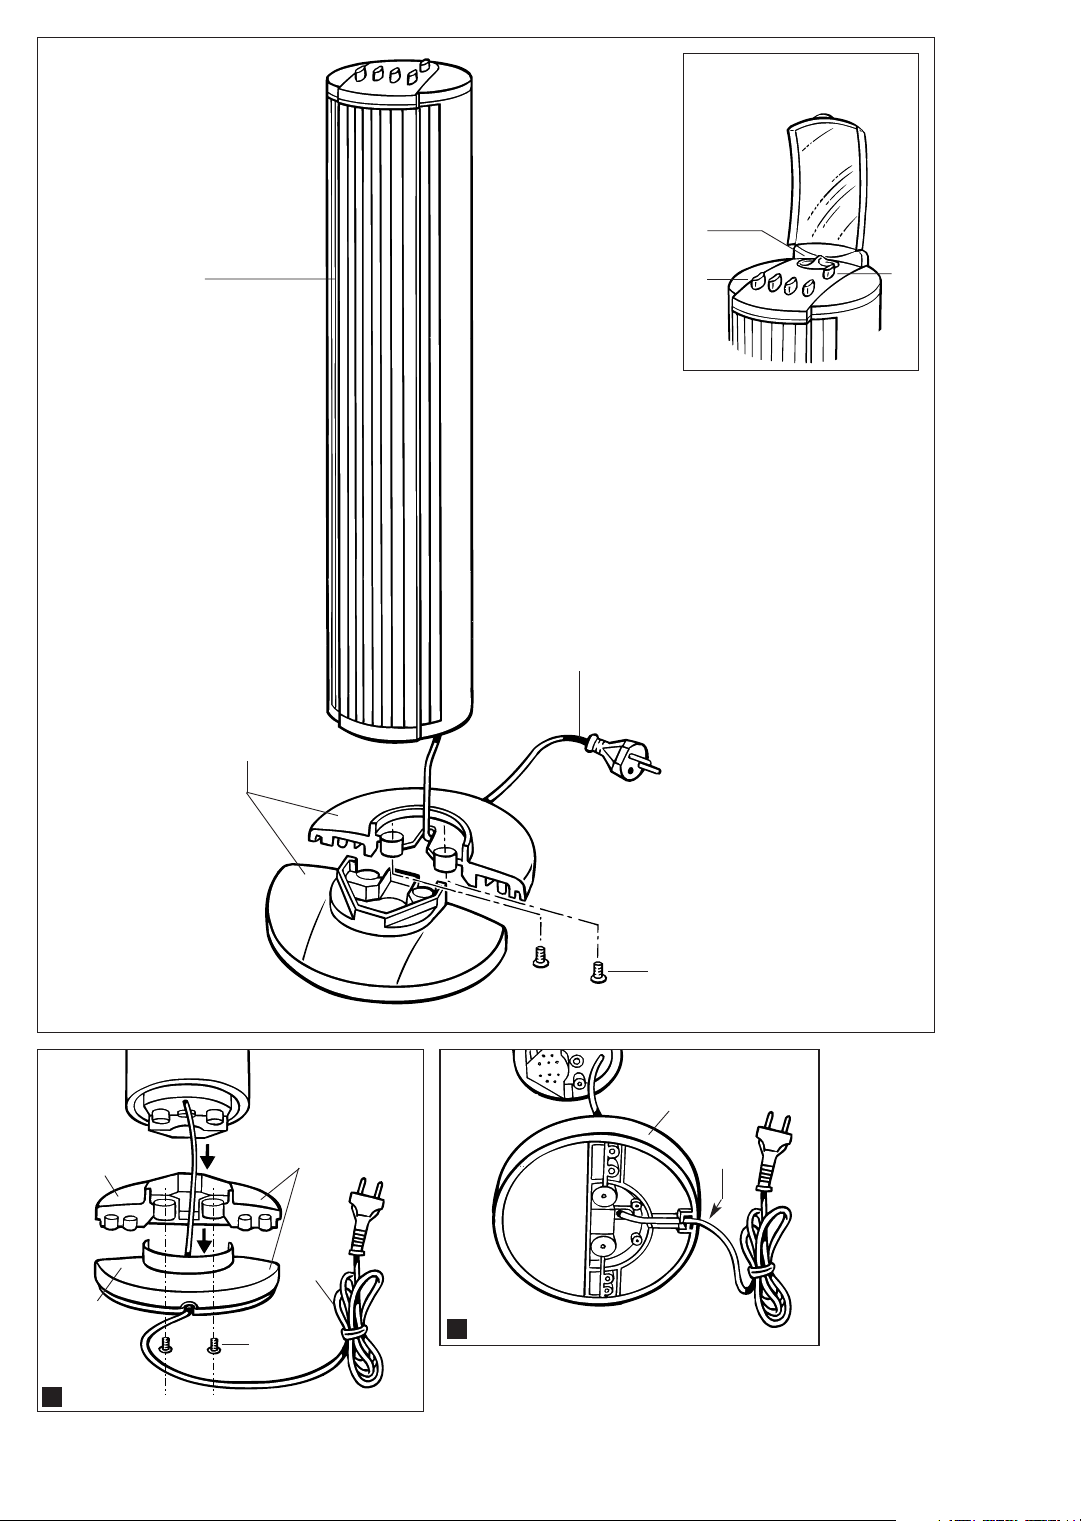
• Die Geräteschnur (5) in des Loch von Teil (A) das Sockels einführen.
• Teil (A) in Teil (B) des Sockels einfügen (Abb. 1).
• Das Gerät auf den Sockel (7) aufsetzen und mit den Befestigungsschrauben (6) des Sockels verschrauben (Abb. 2).
• Die Geräteschnur (5) in die Schnurklemm-platte (C) des Sockels (7) einführen (Abb. 2).
SPANNUNG
• Ihr Gerät wird in Einzelteile zerlegt geliefert. Aus Sicherheitsgründen ist
unbedingt darauf zu achten, das Gerät richtig zusammenzubauen.
MONTAGE
Bitte lesen Sie die vorliegende Anleitung unbedingt aufmerksam durch, und beachten Sie die folgenden Empfehlungen :
• Dieses Gerät entspricht den europäischen Richtlinien 73/23/CEE und 89/336/CEE.
• Überprüfen Sie vor jeder Benutzung das Gerät, den Stecker und das Kabel auf einwandfreien Zustand.
• Den Stecker weder am Gerät noch am Netzkabel aus der Wandsteckdose ziehen.
• Stecken Sie niemals Gegenstände (z.B.: Nadeln...) in das Gerät hinein.
• Während des Betriebs ist das Gerät außerhalb der Reichweite von Kleinkindern, Tieren und Personen mit bestimmten Behinderungen zu halten.
• Benutzen Sie das Gerät nicht in staubigen Räumen oder in Räumen mit Brandgefahr.
• Dieses Gerät ist ausschließlich Haushaltszwecken vorbehalten. Es darf nicht für industrielle Verwendungen benutzt werden.
• Bei Beschädigungen durch unsachgemäße Verwendung erlischt der Garantieanspruch.
• Ist das Stromkabel beschädigt, muß es aus Sicherheitsgründen vom Hersteller, in dessen Kundendienstwerkstaff oder von einer Person mit entsprechender
Qualifikation durch ein Neues ersetzt werden.
• Entsorgung nach Ablauf der Lebensdauer : Bringen Sie den Heizkörper zu einer Spezialsammelstelle oder einer Deponie.
HINWEISE
D
D
Deutsch
D
D
MONTAGE IHRES VENTILATORS
INBETRIEBSETZEN
D
D
• Ihr Ventilator ist mit einem automatischen Schwingungssystem ausgerüstet.
• Falls Sie einen Gerätebetrieb mit Hin- und Herbewegung wünschen, muß die Taste (3) gedrückt werden. Andernfalls bleibt Ihr Gerät unbeweglich.
HIN- UND HERBEWEGUNG
D
• Position “●” : Ihr Gerät funktioniert ununterbrochen. Stellen Sie die Zeitschaltuhr auf die gewünschte Funktionsdauer ein (maxi 2 Stunden);
das Gerät wird sich automatisch ausschalten, wenn diese Dauer abgelaufen ist.
ZEITSCHALTUHR (NUR MOD. VA-560)
• Nehmen Sie das Gerät niemals selbst auseinander. Ein falsch repariertes Gerät kann für den Benutzer eine große Gefahr darstellen.
• Wenn das Gerät nicht mehr funktionsfähig oder in irgendeiner Hinsicht beschädigt ist, kontaktieren Sie eine unserer Servicestellen.
BEI STÖRUNGEN
D
WARTUNG
D
Wenn Sie Ihr Gerät nicht benutzen, muß es in einem Raum vor Feuchtigkeit geschützt aufbewahrt werden.
Der Zustand der Geräteschnur ist regelmäßig zu prüfen.
AUFBEWAHREN
D
D
Durch Betätigen der Tasten : • Position O : Gerät ausgeschaltet.
• Position 1 : niedrige Lüftungsstufe.
• Position 2 : mittlere Lüftungsstufe.
• Position 3 : hohe Lüftungsstufe.
Achtung : Wenn der Knopf der Zeitschaltuhr (4) auf
der position steht, wird das Gerät nicht funktionieren,
auch wenn Sie auf die Knöpfe 1, 2 oder 3 drücken.
Vor allen Wartungsvorgängen muß Ihr Gerät ausgeschaltet werden. Das Gehäuse des Gerätes kann mit einem angefeuchteten Tuch gereinigt werden. Darauf
achten, daß kein Wasser in das Gerät eindringen kann.
Zur Reinigung der Schutzgitter des Ventilators einen Staubsauger verwenden.
Weder Alkohol noch Lösemittel verwenden.
Page 5

• Keep the appliance 50 cm away from any objects (curtains, walls, aerosols, etc.)
• NEVER ALLOW WATER TO PENETRATE THE APPLIANCE.
• Do not touch the appliance with wet hands.
• Before operating, please ensure that :
- The appliance is assembled according to the manufacturers instructions.
- The appliance is placed on a stable and firm surface
- The appliance is in a normal operating position (in an upright position on its feet).
VERY IMPORTANT
• Before using the appliance for the first time, ensure that your mains voltage
corresponds to the voltage indicated on the appliance.
• Your appliance must be used with a power plug with an earth connection.
It is a class 1 appliance.
• Insert the lead (5) into the hole in part (A) of the base (7).
• Slot part (A) into part (B) of the base (7) (fig. 1)
• Insert the unit onto the base (7) and screw into place using the base assembly screws (6) (fig. 2)
• Insert the load (5) into the lead-grip on the base (7) (fig. 2)
Press the buttons as follows : • Position O : stop the unit
• Position 1 : low-level ventilation
• Position 2 : medium ventilation
• Position 3 : high-level ventilation.
VOLTAGE
• Your appliance is supplied unassembled. For your safety, it is essential to
assemble it correctly.
ASSEMBLING
It is essential that you read these instructions carefully and comply with the following recommendations.
• This appliance complies with European directives 73/23/EEC and 89/336/EEC.
• Before using, always check the condition of the appliance, the power socket and the power lead.
• Do not pull on the power cable or the appliance, even to unplug it from the wall socket.
• Never insert objects into the appliance (e.g. needles...).
• When in use, this appliance must be kept out of the reach of young children, animals and certain handicapped people.
• Do not use your appliance in a dusty room or a room where there is a risk of fire.
• This appliance is intended for domestic use only. It must therefore not be used in industrial applications.
• The warranty will be void in the event of damage arising from improper use.
• If the power cable is damaged, it must be replaced by the manufacturer, its after-sales service or a person with similar qualifications to avoid any danger.
• Elimination of the product at the end of its life span : hand in your appliance to the existing selective collection / waste disposal centres.
WARNINGS
GB
GB
GB
GB
ASSEMBLING YOUR FAN
STARTING-UP
GB
GB
Your fan is equipped with an automatic oscillation fan. Press the button (3) if you want the fan to swivel. Otherwise, your fan will remain immobile.
“●” position : your fan runs continuously.
If you set the timer to the required operating time (2 hours timer), the unit will stop automatically once this time is up.
OSCILLATION
GB
TIMER (MOD. VA560 ONLY)
• Never dismantle your appliance yourself. A poorly repaired appliance may be dangerous for the user.
• If the appliance ceases to operate or is damaged in any way, contact one of our authorised service centres.
IN THE EVENT OF PROBLEMS
GB
When not in use, the unit must be stored in a damp-free area. Check the power lead regularly for wear or damage.
STORAGE
GB
It is important to unplug your fan before carrying out any maintenance work. You can clean the unit with a damp cloth. Never let water into the unit.
Use a vacuum cleaner to clean the front grid. Never use alcohol or solvents.
MAINTENANCE
GB
GB
English
Caution : if the timer (4) button is set to
, your fan will not start, even if you
press buttons 1, 2 or 3.
Page 6

SAFETY POINTS FOR REWIREABLE/MOULDED PLUG
The main lead of this appliance is fitted with a BS1363A plug.
If your socket outlet is not suitable for the plug, then the plug must be removed (cut off if it is a moulded plug), the flexible cord insulation should be
stripped back as appropriate and a suitable 3 pin plug fitted.
Warning : Dispose of a plug that has been cut from the power supply cord, as such a plug is hazardous if inserted in a live 13A socket outlet elsewhere
in the house.
Should the fuse need to be replaced an ASTA marked fuse, approved to BS1362, of the same rating must be used.
Always replace the fuse cover after fitting a fuse.
The plug must NOT be used if the cover is omitted or lost until a replacement is obtained - make certain that only the correct fuse cover is used
and fitted.
For plugs with a detachable fuse cover the replacement must be the same as the colour insert in the base of the plug, or as directed by the embossed
wording on the base of the plug.
If the detachable fuse cover is lost a replacement may be purchased from the Rowenta Service Centre (see enclosed Service Information leaflet).
Information for supply may also be obtained from the plug manufacturer.
SERVICE/SPARE PARTS.
Rowenta (UK)Limited has a network of Service Agents throughout the country; to telephone your nearest Rowenta Service Centre see enclosed Service
Information leaflet; these Service Agents carry out in-guarantee repairs (free of charge) and out-of-guarantee repairs (chargeable) on behalf of Rowenta.
Should service be required, or the appliance appear faulty, consult your local Rowenta Service Agent in the first instance. If a product develops a fault
during the guarantee period, it is the reponsibility of the consumer to supply to the Service Agent proof of the date of purchase of the appliance (eg.
completed guarantee card and/or receipt showing the date of purchase).
GUARANTEE (UK ONLY)
Details of the Rowenta guarantee are shown on the Guarantee Card enclosed with the appliance. This guarantee does not affect your statutory rights.
Should further information be required please see the enclosed Service Information leaflet.
WIRING INSTRUCTIONS (FOR U.K. ONLY).
Warning. This appliance must be earthed. Important
The wires in this mains lead are coloured in accordance with the following code-Green and Yellow :
Earth - Blue : Neutral - Brown : Live. As the colours of the wires of the mains lead of this appliance may
not correspond with the coloured markings identifying the terminals in your plug, proceed as follows :
The wire which is coloured green-and-yellow must be connected to the terminal in the plug which is marked
with the letter E or by the earth symbol or coloured green or green-and-yellow. The wire which is coloured
brown must be connected to the terminal which is marked with the letter L or coloured red. The wire which is
coloured blue must be connected to the terminal which is marked with the letter N or coloured black.If connecting to a BS 1363 A plug a 3 Amp fuse must be used.
GREEN & YELLOW
BLUE
BROWN
USE CABLE
GRIPPER
FIT CORRECT
FUSE
 Loading...