

Page 1

Mode d’emploi
TO 810
TO 800
Instructions for
use
Bedienungsanleitung
Gebruiksaanwijzing
Istruzioni per
l'uso
Instrucciones
de uso
Instruções de
utilização
Οδηγίες
χρήσης
Kullanma
kılavuzu
Page 2
p
l
u
s
C*
C
D
F
K
A
G
H
J
*
B
I
2
- secondo il modello - según modelo - consoante o modelo - ανάλογα µε το µοντέλο - modeline göre
* selon modèle - depending on model - je nach Modell - afhankelijk van het model
E
Page 3
1
plus
plus
2
3
4
5
(*)
6
7 8 9
** Pince à pain non fournie avec le produit - Bread tongs not provided with the toaster - Brotzange nicht mit dem Toaster geliefert - Broodtang niet met het product meegeleverd - Pinza per il pane non fornita con il prodotto - Pinza para extraer el pan no incluida en el aparato Pinça para pão não fornecida com o produto - Η λαβίδα για ψωµί δεν χορηγείται µαζί µε το προϊν - Ekmek maşas ürün ile birlikte verilmez
(*)
(**)
3
Page 4

p
l
u
s
10
p
l
u
s
11 12
13 14 15
- secondo il modello - según modelo - consoante o modelo - ανάλογα µε το µοντέλο - modeline göre
* selon modèle - depending on model - je nach Modell - afhankelijk van het model
4
Page 5

ENGLISH
plus
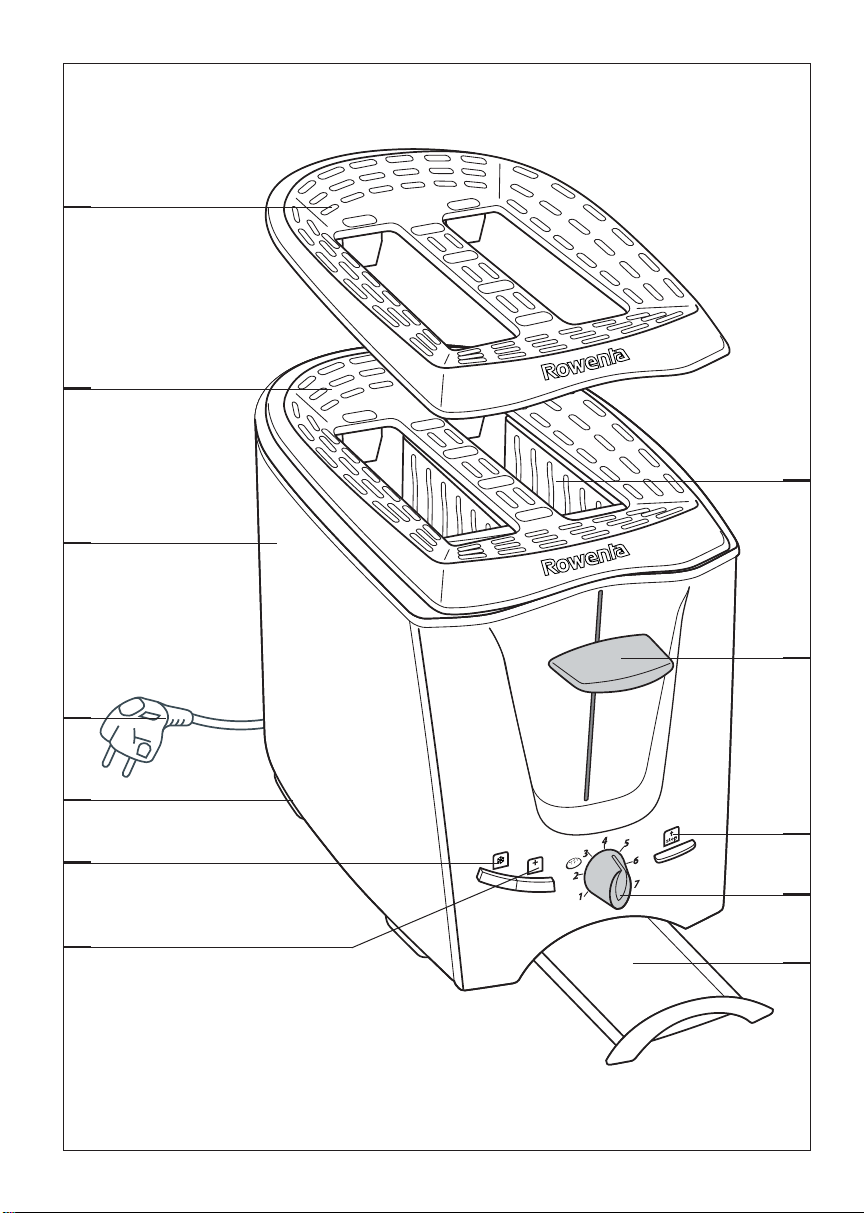
FEATURES OF THE TOASTER
A Control Lever with “HIGH-LIFT” position
B Browning control, 7 positions
C Integrated warming plate for warming croissants and
rolls (Removable C*)
D Cool touch body (or chrome finish*)
E Removable crumb tray
READ THE MANUAL AND CAREFULLY FOLLOW THE INSTRUCTIONS BEFORE USE.
(▲) This symbol indicates a reference to a paragraph which contains something “YOU SHOULD KNOW OR IS AN
IMPORTANT RECOMMENDATION“.
F Cord and plug
G Cord storage
H STOP/EJECT button
I TOUCH PLUS button
J DEFROST button*
K Bread toasting slots
BEFORE USING FOR THE FIRST TIME:
Unpack the appliance and remove any labels.
Clean the toaster and its metal warming plate with a
damp cloth. Dry it.
Unroll the electrical cord entirely and plug it in.
Set the browning control button to minimum without
inserting any bread.
Lower the control lever until it is locked down.
Operate the toaster empty once or twice to eliminate
“that new smell“, a slight amount of smoke may be noticed. This is normal because your toaster is new and this
will stop, after a couple of uses.
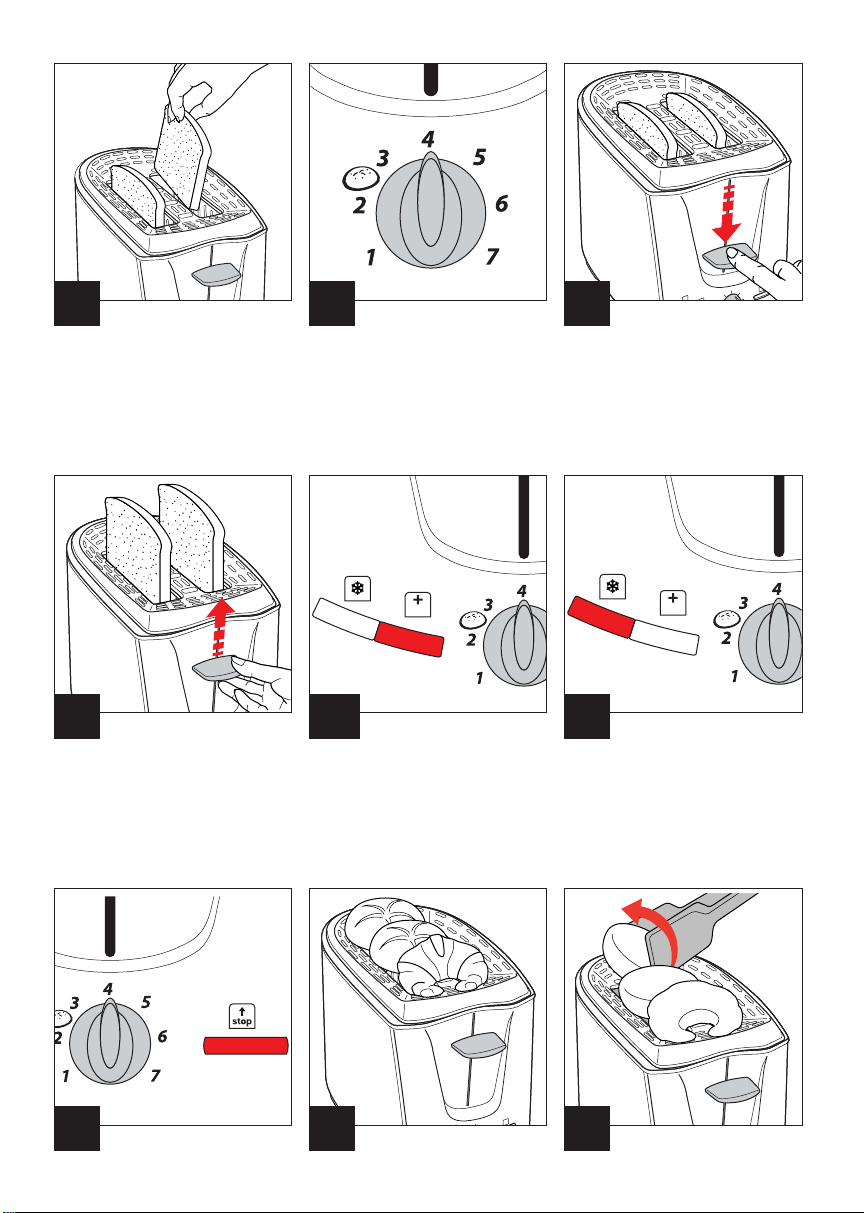
TOASTING BREAD AND “HIGH LIFT” FUNCTION
With the control lever in the high position, insert the
slice(s) of bread into the toasting slots. You can toast
slices of bread that are 8-32 mm thick - Fig.
1
Adjust the browning to the desired setting depending on
the type, freshness and the thickness of the bread - Fig.
2
1- Very slightly browned
2-3 Lightly browned
4 - 5 Well toasted
6-7 Very well toasted
To begin toasting press down the control lever until it
locks into the low position, the bread slices are automatically centred and the toasting begins - Fig.
3
The toaster automatically stops at the end of the toasting
time. The control lever lifts up automatically at threequarters of the lever carrriage and the slices of bread
pop up ready.
Set the browning control at a lower setting if you are not
using the whole capacity of the toaster, ie if you are only
toasting one slice of bread.
After trying out the toaster a few times you will quickly
get to know the correct setting for each type of bread.
TO TOAST SMALL SLICES OF BREAD EASILY -
4
Fig.
Use the “HIGH-LIFT” bread function by lifting the control
lever when the bread has finished toasting to easily
remove the toast. ▲
STOP/EJECT FUNCTION - Fig.
7
You can also cancel the toasting or the reheating cycles
or all other functions at any time by pressing on the
STOP/EJECT button, (positioned on the right hand
side of the appliance) the bread will pop up or the
reheating will stop. ▲
TOUCH PLUS BUTTON - Fig.
5
SPECIAL TOUCH-PLUS BUTTON for an extra bit of
browning.
When the first toasting cycle has finished and the lever
has popped up, if you require a browner degree of toasting, simply put the bread back in the toaster, press the
lever control down a second time and press the
“TOUCH PLUS” . This gives an extra 30 seconds
of warming and will brown the toast to the next browning
control on the dial to obtain your desired degree of
browning.
DEFROST FUNCTION* - Fig.
6
If toasting bread from frozen, place bread in the toasting
slots and adjust the browning control to the desired
position (depending on the type of bread).
Press the lever down and press the “DEFROST” button
. Once the toasting cycle has commenced, the
bread will then be toasted from frozen.
The bread will take a little longer to toast as the toaster
will automatically defrost the bread first before toasting
NEW TECHNOLOGY: INTEGRATED WARMING PLATE
SYSTEM USED FOR WARMING CROISSANTS, TEA
CAKES, PITTA BREADS, ROLLS, CRUMPETS, MUFFINS, BAGELS AND NAANS AND OTHER BREAD
PRODUCTS …
Use this toaster’s exclusive, integrated warming plate
feature to reheat croissants and rolls....
Do not warm sugared or fatty product(s) on the warming plate to avoid them melting in the toaster
Place the bakery product(s) directly on the integrated
warming plate designed for this purpose - ▲ Fig.
8
Up to 4 products can be warmed at one time (ie 4 croissants or tea cakes).
8
* depending on model
Page 6

Select the desired browning control setting. The browning
plus
control dial on the toaster shows a specific picture .
Lower the control lever once until it locks in the low position.
The toaster is now on, and heat is rising through the
warming plate to evenly heat breads rolls on top.
The toaster stops automatically and the control lever
springs up.
To reheat the other side, turn the bakery products over
using oven gloves or bread tongs if necessary as the
metal croissant warmer may still be hot ▲ -Fig.
(Bread tongs not provided with the toaster)
9
For appliance with a metallic finish:
Do not use any cleaning products designed for metals ;
use a soft cloth with a window or glass cleaner.
For removal of the Integrated warming plate*
Grip the metal warming plate by the middle and gently
pull until it becomes detached. Clean with washing up
liquid, then dry thoroughly - Fig.
1312
-
For replacing the warming plate on the top, insert the 4
small tongues in the .metal support in the corresponding
slots on the toaster and check that it is correctly in place
before each use ▲ -Fig.
14
For an optimum result, press the lever control down
a second time and then press on the “ PLUS “
button
and does not toast the bakery product being warmed
-Fig.
the heat rises through the warming plate
,
5
The bakery product(s) can be left on the warming plate
for a few minutes and they will remain warm.
To clean the crumb tray
Pull out the tray completely. Remove the crumbs - ▲
11
Fig.
Wipe it clean.
Do this regularly, after each use if possible (toasting or
re-heating).
If crumbs or crusts remain inside the heating elements,
remove the warming plate* and turn the toaster upside
MAINTENANCE, CLEANING AND PUTTING AWAY ▲
Always unplug the toaster and let it cool before any
cleaning or handling.
Wipe the outside of the toaster , the cord and the warming plate with a damp cloth or a slightly damp sponge
with a little washing up liquid. Dry thoroughly
10
- Fig.
down, so that these remaining crumbs fall out.
Replace the crumb tray and the metal warming plate
carefully.
Wind the cord around the cord storage area under the
toaster - Fig.
15
FOR YOUR INFORMATION (▲):
(▲) On electronic models, the control lever can only be locked in the lower position when the toaster is plugged in.
(▲) Any bread extending beyond the toaster slots will not be toasted.
(▲) Do not force the control lever as you may damage the mechanism.
(▲) When toasting currant buns or teacakes, remove any loose currants from the bread before placing them in the
toaster. Loose currants may fall into the appliance and damage the toaster.
(▲) Do not use any abrasive cleaning agents (no soda-based scouring products, no scouring pads...), no metallic
utensils, metal scouring pads etc.
(▲) Use just a soft cloth or a slightly damp sponge with a little washing up liquid.
(▲) The packaging box may be recycled, but it may be useful for returning the appliance to an authorised Service
Dealer if necessary.
WARNING: THIS APPLIANCE MUST BE EARTHED. FOR UK ONLY
Important: the wires in this lead are coloured in accordance with the following codes:
Green and Yellow: Earth
Blue: Neutral
Brown: Live
Connect the Green/Yellow wire to the terminal in the plug marked “E” (or by the
earth symbol) or coloured Green or coloured Green and Yellow. Connect the Brown
wire to the terminal in the plug marked “L” or coloured Red. Connect the Blue wire
to the terminal in the plug marked “N” or coloured Black. A 13 amp fuse should be
fitted when the appliance is connected to a BS 1363 plug. Seek professional advice
if you are unsure of the correct procedure for the above.
VOLTAGE
This appliance is designed to run on 230 - 240 volts only. Check that the mains supply corresponds to that shown on
the rating plate of the appliance. If the appliance is to be used in any country other than that of purchase, it should be
checked by an approved Service Dealer. Standards can vary from country to country.
* depending on model
9
Page 7

ABOUT YOUR FACTORY FITTED PLUG
FOR UK ONLY
(supplied with certain models only)
The cord is already fitted with a plug incorporating a 13 amp fuse. If the plug does not fit your socket outlet, see next
paragraph.
Should you need to replace the fuse in the plug supplied, a 13 amp approved BS 1362 fuse must be used.
The fuse cover is an important part of the plug. Please ensure that it is always refitted. If you lose this cover please do
not use the plug.
If the plug supplied does not fit your socket outlet, it should be removed from the mains lead and disposed of safely.
The flexible cord insulation should be stripped back as appropriate and a suitable alternative plug fitted. The replacement plug must be equipped with a 13 amp fuse.
Important: If the electrical cord of this appliance is damaged, it must only be replaced by an authorised Service Dealer. The safety of this appliance complies with the technical regulations and standards in force.
SAFETY INSTRUCTIONS:
To prevent any accidents:
• This toaster complies with the safety rules and conditions in effect, and with the following directives
•Electromagnetic Compatibility Directive 89/336/CEE modified by Directives 92/31/CEE and 93/68/CEE.
• Low Voltage Directive 73/23/CEE modified by Directive 93/68CEE.
•Given the many standards in effect, if this toaster is used in a country other than the country where it was purchased,
have it checked by an approved service centre*.
• Check that the electricity supply voltage corresponds to the voltage indicated on the appliance (ac current only).
• Check that the electricity installation is sufficient to supply the power required by this appliance.
•Always plug the toaster into an earthed socket.
• Do not let the cord hang and keep out of reach of children. Do not leave the cord in contact with the warm parts of
the appliance.
• Do not disconnect the appliance by pulling on the cord.
•Use extension cords which are in good condition, with an earthed connection, and with a minimum rating of 10A.
•In order to avoid electric shock, do not immerse the cord, the plug or the toaster in water or any other liquid.
• Do not use metal ustensils in the toasting mechanism, which could cause short circuits or electric shock
(spoon,knife...).
IMPORTANT SAFEGUARDS:
When using electrical appliances, basic safety precautions should always be followed including the following:
• Read all instructions and keep them safe.
• Do not let the toaster operate unattended, particularly when toasting for the first time or when changing set-
tings.
• Keep out of reach of children.
• Do not use the toaster without its warming plate
• The toaster must always be used in the upright position (not on its side or tilted forward or back).
• Never use the toaster for toasting bread and re-heating pastries/croissants at the same time.
• The toaster must always be upright when plugged in and unplugged.
• Do not use outdoors. This appliance is for household use only. Avoid humid environments
•Do not move the toaster when it is in operation.
•Use a stable work top, away from any contact with water and never under a kitchen unit or built into a kitchen unit.
•Keep this toaster away from sources of heat (gas, electric burner, heated oven).
• Do not store inflammable products near or under the place where the toaster is stored.
•Do not use this appliance as a source of heating or drying.
•Always unplug the toaster and let it cool before any cleaning.
•After every cleaning, check that the crumb tray is correctly placed back in the appliance.
• Do not try and toast very thick slices of bread which could block the toasting mechanism.
• If the bread jams in the slots after toasting and the elements do not swich off, disconnect the plug immediately
from the wall socket and wait for the appliance to cool down before attempting to remove the bread.
• Do not touch the warming plate as this will be hot. Use oven gloves or bread tongs if necessary .
•Do not cover this appliance while in use.
• Do not put paper tea towels cardboard or plastic in, on or under the toaster.
10
Page 8

•Never place utensils, plate, bowl, cup, bottle, paper, aluminium foil on the warming plate or in the appliance.
•Do not use the toaster for cooking, grilling or de-frosting frozen food other than bread products.
• Do not place sugared or fatty buns on the warming plate or in the toaster as these may tend to run or melt in the
toaster.
•Do not block or obstruct the air vents.
•Do not use this appliance if:
- The toaster or cord is faulty.
- It has fallen or shows visible damage or operating problems.
In any of these cases, the appliance must be sent to the nearest approved after sales service centre * in order to
avoid any risks of danger.
• Bread can burn. Therefore, do not use this appliance near any flammable materials such as curtains, under
shelving or wall cupboards, etc.
• If flames were to arise from parts of the toaster, never attempt to extinguish them with water. Unplug the appliance
and smother the flames with a damp cloth.
•Do not use accessories which have not been recommended by the manufacturer or accessories from any other
brand of toaster.
• This product has been designed for domestic use only. Any professional use, inappropriate use or failure to comply with the instructions, the manufacturer accepts no responsibility for and the guarantee will not apply.
•For your personal safety, do not dismantle the toaster yourself. Use the services of an approved service centre *.
•Keep these instructions for future reference.
*(see enclosed list)
HELPLINE:
For help and advice please call our customer relations team on:
0845 602 1454 - UK (calls charged at local rate)
(01) 412 3000 - Ireland
11
 Loading...