

Page 1

1/2Notice GP NEO GB/FR 2/04/03 19:31 Page c1
Page 2
A
B
D
E
F
H
K
I
J
G
C
1/2Notice GP NEO GB/FR 2/04/03 19:31 Page c2
Page 3
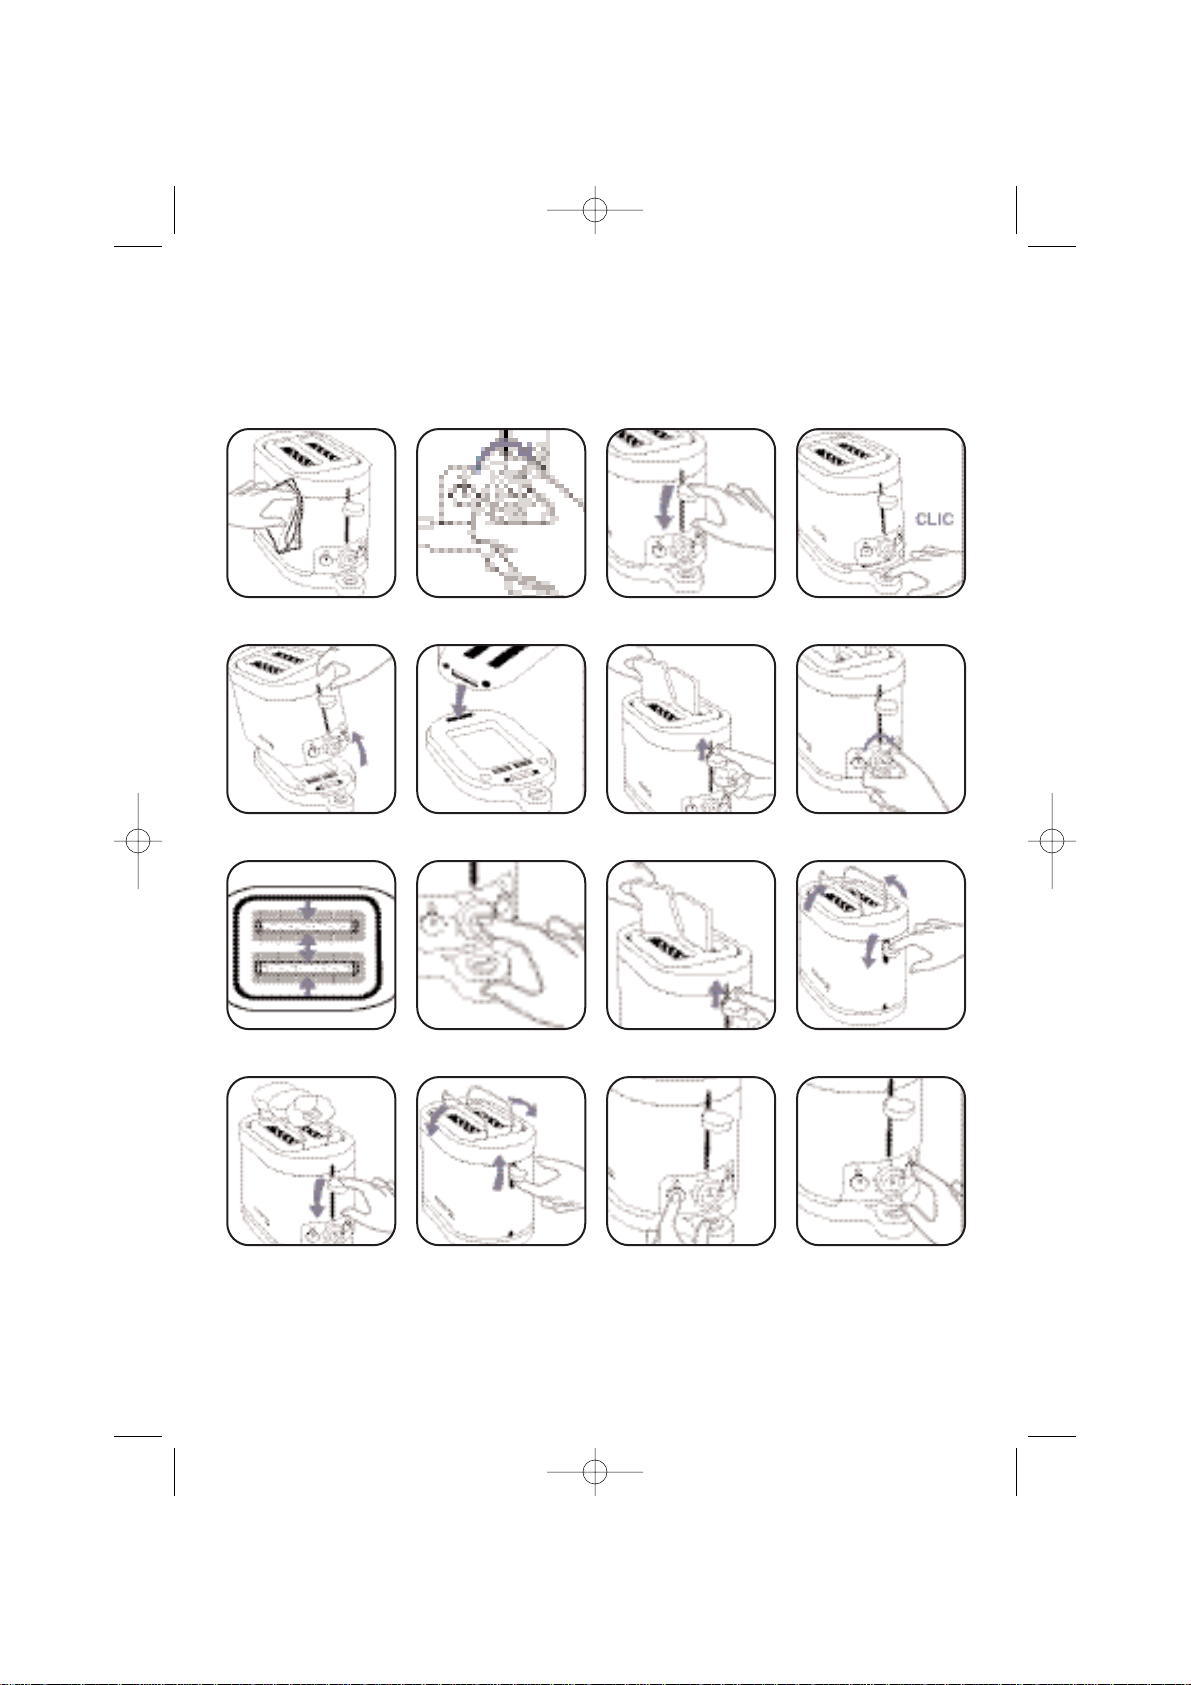
Fig 1
Fig 5
Fig 9
Fig 13
Fig 2
Fig 6
Fig 10
Fig 14
Fig 3
Fig 7
Fig 11
Fig 15
Fig 4
Fig 8
Fig 12
Fig 16
1/2Notice GP NEO GB/FR 2/04/03 19:31 Page c3
Page 4

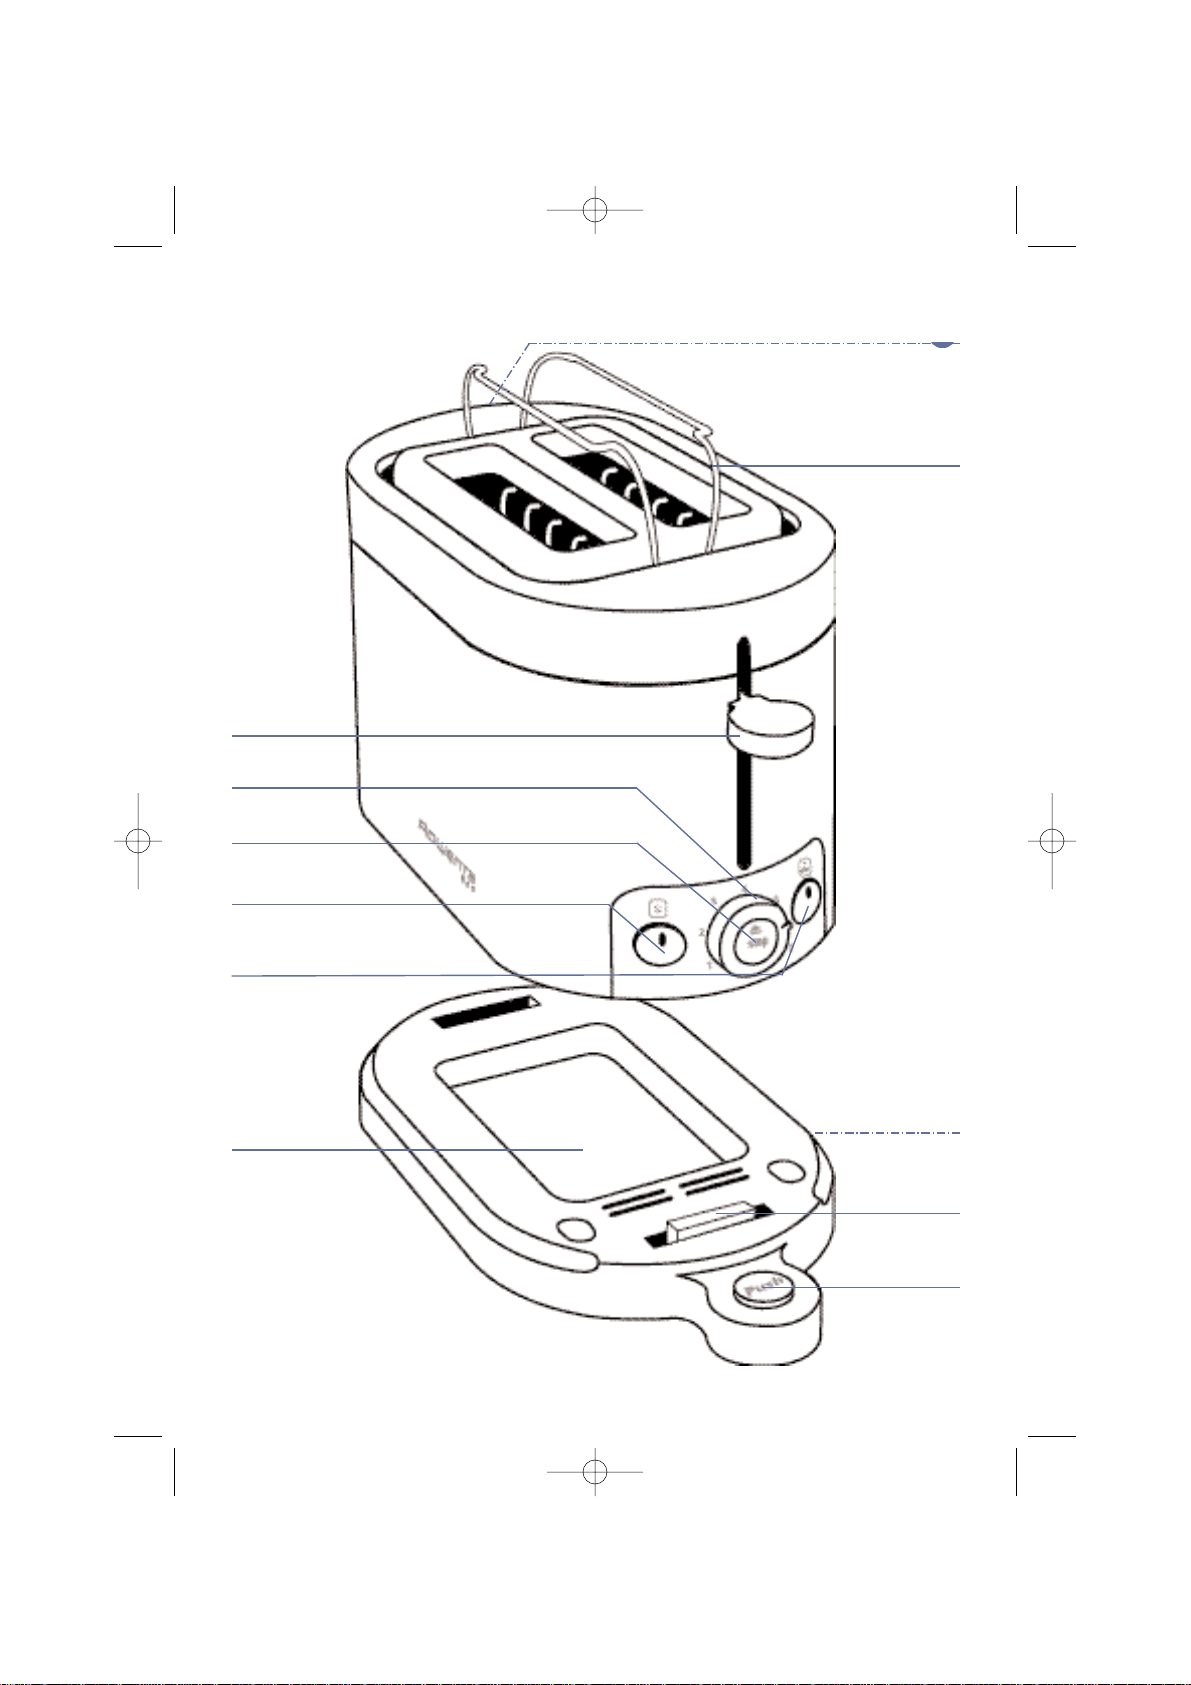
DESCRIPTION
A Bread control lever
B Browning control button (7 positions)
C Stop eject button
D Defrost button *
E Touch + button *
F Removable “crumb collection” base
G Crumb collection base unlock button
H Clasp for the crumb collection base
I Croissant/bun warming rack
J Warming rack lever (on back panel)
K Cord storage (underneath)
SAFETY INSTRUCTIONS
1 • To prevent any accidents:
This toaster complies with the safety rules
and conditions in effect, and with the
following directives
- Electromagnetic Compatibility Directive
89/336/CEE modified by Directives 92/31/CEE
and 93/68/CEE.
- Low Voltage Directive 73/23/CEE modified by
Directive 93/68CEE.
Check that the electricity supply voltage
corresponds to the voltage indicated on the
appliance (ac current only).
Given the many standards in effect, if this
toaster is used in a country other than the
country where it was purchased, have it
check ed by an approved service centre (see
enclosed after sales service information).
Check that the electricity installation is
sufficient to supply the power required by
this appliance. Always plug the toaster into
an earthed socket.
Do not let the cord hang over the edge of
work surface or come in contact with hot
surfaces.
Do not store the cord or the plug between the
slots in the appliance.
Do not disconnect the appliance by pulling on
the cord.
Use extension cords which are in good
condition, with an earthed connection, and
with a minimum rating of 10A.
In order to avoid electric shock, do not
immerse the cord, the plug or the toaster in
water or any other liquid.
Do not use metal utensils in the toasting
mechanism, which could cause short circuits
or electric shock (spoon, knife...).
Use a stable work surface, away from any
contact with water and never in a built-in
kitchen alcove.
Do not move or carry the appliance when
operating it.
2 • Important safeguards
When using electrical appliances, basic safety
precautions should always be followed:
Do:
Carefully read and follow all the instructions
of use.
The toaster must always be used in the
upright position, never on its side or tilted
forward or back.
Before each use make sure that the crumb
collection base is in its proper location.
Regularly remove crumbs from the crumb
collection base.
2
* depending on model
1/2Notice GP NEO GB/FR 2/04/03 19:31 Page 2
Page 5

The bread control lever must be in the "Up"
position before plugging in
or unplugging the appliance.
Unplug from the power socket when not in
use and before cleaning.
Allow to cool down before cleaning or storing
it.
If the bread jams in the slots after toasting
and the elements do not switch off,
disconnect the plug immediately and wait for
the appliance to cool before attempting to
remove the bread.
Unplug the appliance if it shows any working
abnormalities.
To disconnect remove the plug from the wall
socket (when the toasting cycle is finished).
Do not:
Do not leave the appliance within the reach of
children.
Do not let the toaster operate unattended,
particularly when toasting for the first time or
when changing settings.
Do not use the appliance for any other use
other than that for which it was designed.
Do not touch the metal parts or hot surfaces
of the appliance when it is working. Use
handles or knobs.
Oversized foods, metal foil packages, or
utensils (spoon, knife, etc.) must not be
inserted in a toaster as they may cause an
electric shock or fire.
Do not use accessory attachments that are
not recommended by the appliance
manufacturer as this may be dangerous.
To protect against electrical shock do not
immerse the cord, plugs, or appliance in
water or other liquids.
Do not place any sugar coated type of bread
in the toaster or anything that may melt or
drop into the toaster as this may cause
damage to the toaster or a risk of fire.
Do not try to toast very thick slices of bread
that could block the toasting mechanism.
Do not use this appliance if:
- it has a damaged cord.
- The appliance has been dropped and has a
visible damage or does not operate properly.
In every case, the appliance must be sent to
an approved after-sales service centre to
avoid any risk of danger. Refer to the
guarantee enclosed.
Do not let the cord hang over the edge of the
worktop or come into contact with hot
surfaces.
Do not use outdoors. Avoid humid
environments.
Do not place on or near a gas or electric
burner or near a heated oven.
Do not cover this appliance while in use.
Keep it away from flammable materials like
curtains, drapes or wood (shelving,
cupboards…).
Do not put paper towels, cardboard or plastic
in, on or under the toaster.
If flames were to arise from parts of the
toaster, never attempt to extinguish them
with water. Unplug the appliance and
smother the flames with a damp cloth.
Do not attempt to dislodge food once the
toasting cycle is engaged.
Do not use this appliance as a source of
heating or drying.
Do not use the toaster for cooking, grilling or
defrosting frozen food other than bread
products.
Do not use the toaster for toasting bread and
reheating pastries/croissants at the same
time.
This product has been designed for
domestic use only. Any commercial
use, inappropriate use or failure to
comply with the instructions, the
manufacturer accepts no
responsibility and the guarantee will
not apply.
3 • Save these instructions
3
GB
1/2Notice GP NEO GB/FR 2/04/03 19:31 Page 3
Page 6

4
GB
For U.K. only
Wiring instructions
This appliance must be earthed
Important: the wires in this lead are coloured in accordance with the following codes:
Green and Yellow: Earth
Blue: Neutral
Brown: Live
Connect the Green/Yellow wire to the terminal in the plug mark ed “E” (or by the earth symbol)
or coloured Green or coloured Green and Yellow.
Connect the Brown wire to the terminal in the plug marked “L” or coloured Red.
Connect the Blue wire to the terminal in the plug marked “N” or coloured Black.
A 13 amp fuse should be fitted when the appliance is connected to a BS 1363 plug.
Seek professional advice if you are unsure of the correct procedure for the above.
About your factory fitted plug
(supplied with certain models only)
The lead is already fitted with a plug incorporating a 13 amp fuse. If the plug does not fit your
socket outlet, see next paragraph.
Should you need to replace the fuse in the plug supplied, a 13 amp approved BS 1362 fuse
must be used. (refer to wiring instructions for use rating)
If the plug supplied does not fit your socket outlet, it should be removed from the mains lead
and disposed of safely. The flexible cord insulation should be stripped back as appropriate and
a suitable alternative plug fitted. The replacement plug must be equipped with a 13 amp fuse.
Important: If the electrical cord of this appliance is damaged, it must only be replaced by an
authorised Service Dealer. The safety of this appliance complies with the technical regulations
and standards in force.The fuse cover is an important part of the plug. Please ensure that it is
always refitted.
If you lose this cover please do not use the plug. You may contact TEFAL UK limited for a
replacement.
For expert help and advice please call our Customer Relations team first on:
0845 602 1454 – UK
(01) 4751947 – Ireland
or consult our web-site: www.rowenta.co.uk
1/2Notice GP NEO GB/FR 2/04/03 19:31 Page 4
Page 7

5
GB
1 • Before using for the first
time
Unpack the toaster and remove any labels.
Unwind the supply cord completely.
Wipe the outside of the toaster with a damp
sponge. Dry thoroughly – Fig 1.
Check that the toaster is correctly attached to
the removable base (if not, please refer to
the section entitled “Crumb collection base”).
Plug in the toaster.
Without inserting any bread select the
maximum browning level – Fig 2.
Press the bread control lever down – Fig 3 .
Operate the toaster 3 or 4 times while empty
to eliminate “that new smell”.
Open a window.
2 • Crumb collection base
The breadcrumbs are collected in the
toaster’s removable base, and this should be
emptied out regularly. Disconnect the toaster,
allow it to cool completely, and then separate
it from its base by pressing the button
provided for this purpose. – Fig 4.
Then tilt the appliance and unlock it from its
base - Fig 5.
Clean the base by hand or in the dishwasher,
dry it, and lock it back onto the toaster. To do
this, tilt the toaster, and insert the locating
tongue into the slot provided for it - Fig 6.
Then lower the front part of the toaster until it
locks - Fig 7.
3 • Inserting the bread
With the bread control lever in the raised
position, place a slice of bread in each slot
4 • Toasting
Select the browning control to the desired
toasting level depending on the type, the
freshness and the thickness of your bread.
- Fig 8.
1-2: very lightly toasted
3-4: moderately toasted bread,
5-6: well browned bread
7 : very well browned bread
For basic models only equipped with the
browning control button, use setting 7 to
toast frozen bread.
To begin toasting, press down on the bread
control lever until it locks into the low
position ; the bread slices are automatically
centred for an even toasting on both sides -
Fig 9.
When toasting raisin bread or tea-cakes,
remove any loose raisins from the bread
before placing them in the toaster. Loose
raisins may fall into the appliance and create
a fire hazard.
It is advisable to reduce the browning level if
you are toasting only one slice.
5•To stop toasting
When toasting is complete, the bread control
lever will unlock and the toasted slices of
bread will pop up.
The toasting cycle may be interrupted at any
time by pressing the « stop » button -
Fig 10.
6 • Hi-lift function
To remove small slices of bread after the
toasting cycle is complete, lift the control
lever - Fig 11.
7 • Rolls and croissants
warming function
The rolls and croissants warming function
allows you to warm up croissants and bread
USING THE TOASTER
WARNING For safety reasons, the
toaster will not function without this base.
WARNING Any bread protruding out
of the slots will not be toasted.
The toaster must be plugged in for the
control lever to stay down.
1/2Notice GP NEO GB/FR 2/04/03 19:31 Page 5
Page 8

6
10 • Cleaning
Clean your toaster regulary. Before any
maintenance, unplug the appliance and leave
the toaster to cool down completely.
Remove the crumb collection base by
pushing on the specific button and discard
the crumbs – Fig 4.
Wipe the outside of the toaster and the cord
with a damp cloth. Dry thoroughly – Fig. 1.
Do not use abrasive or scouring cleaning
products. Do not use bleach.
11 • Storage
Always let your toaster cool down completely
prior to storing, especially in a tightly
enclosed space; heat may damage any type
of material.
Do not wind the cord around the body of the
toaster. There is a cord storage area
underneath the appliance.
The packaging box may be recycled, but it
may also be useful for returning the
Toaster to an approved Service Dealer if
necessary (see enclosed leaflet).
If you have any problems or queries, please
call our Customer Relations Team first for
expert help and advice on:
0845 602 1454 – UK / (01) 4751947 - Ireland
rolls.
Press the lever located at the rear of the
appliance: the support wires then fall into
position -
Fig 12.
Place the bread rolls, croissants, etc. on to the
support wires. Select the desired browning
level (maxi. position 3) and press down the
bread control lever – Fig 13.
Once the cycle is finished, turn the rolls over
if necessary and re-lock the lever control in
the low position. Wait a few seconds before
removing the rolls and do not touch the
toaster, which might still be hot.
To lower the support wires, pull the lever
upwards. - Fig 14.
8 • Defrost function*
For toasting frozen bread, select the desired
toasting level , press the bread control lever
down and then the defrost button – Fig 15.
Extra time for toasting will automatically be
selected in order to defrost and then toast
your bread.
At the end of the cycle, the toaster will switch
off and the bread will pop up.
Leave the bread in the slots for
approximately 30 seconds before removing it.
9 • Touch +*
Once a toasting cycle is finished, if you
require a browner degree of toasting, press
the bread control lever down again and then
the « touch + » button (you don’ t need to
select a toasting level) - Fig 16.
The toaster will operate for a preset period of
time to brown the toast to the next browning
level on the dial to obtain your desired
degree of browning.
At the end of the cycle, the toaster will switch
off and the bread will pop up.
GB
WARNING Never insert a metal
object inside the toaster as this is
dangerous and may cause serious
damage.
WARNING Do not use the appliance
to toast and warm rolls/croissants at the
same time.
Never place bread rolls or croissants on
the slot openings of the toaster.
Do not use the appliance to cook or
defrost frozen food.
MAINTENANCE
* depending on model
1/2Notice GP NEO GB/FR 2/04/03 19:31 Page 6
Page 9

7
FR
DESCRIPTION
A. Levier de commande
B. Bouton de sélection de niveaux de grillage (7 positions)
C. Bouton stop eject
D. Bouton décongélation *
E. Touche + *
F. Base ramasse miettes amovible
G. Bouton de déverrouillage de la base ramasse miettes
H. Verrou de la base ramasse miettes
I. Accessoire réchauffe viennoiseries
J. Levier de mise en place du chauffe petits pains / croissants (derrière l’appareil)
K. Range-cordon (sous l’appareil)
CONSIGNES DE SECURITE
1 • Prévention des accidents
domestiques
La sécurité de cet appareil est conforme aux
règles techniques et aux normes en vigueur :
- Directive Compatibilité Electro magnétique
89/336/CEE modifiée 92/31/CEE et 93/68/CEE.
- Directive Basse tension 73/23/CEE modifiée
93/68/CEE.
Vérifiez que la tension du réseau correspond
bien à celle indiquée sur l’appareil (courant
alternatif seulement).
Compte-tenu de la diversité des normes en
vigueur, si l’appareil est utilisé dans un pays
différent de celui où il a été acheté, faites-le
vérifier par une station service agréée (voir
liste jointe).
Assurez-vous que l’installation électrique est
conforme aux normes en vigueur et
suffisante pour alimenter un appareil de cette
puissance. Branchez toujours l’appareil sur
une prise reliée à la terre.
Ne laissez pas le cordon pendre ou toucher
les parties chaudes de l’appareil. Ne rangez
pas le cordon ou la prise dans l’appareil entre
les grilles. Ne débranchez pas l’appareil en
tirant sur le cordon.
N’utilisez qu’une rallonge en bon état, avec
une prise de terre reliée à la terre, et avec un
fil conducteur de section au moins égale au
fil fourni avec le produit.
Afin d’éviter les chocs électriques, ne plongez
jamais le fil électrique, la prise de courant ou
l’appareil dans l’eau ou un autre liquide.
N’utilisez pas ou n’introduisez pas dans le
grille-pain d’ustensiles en métal qui
pourraient provoquer des courts-circuits
(cuillère, couteau…).
Utilisez un plan de travail stable à l’abri des
projections d’eau et en aucun cas dans une
niche de cuisine intégrée.
Ne portez ou ne déplacez pas l’appareil
pendant l’utilisation.
2 • Précautions importantes
Lors de l’utilisation d’appareils électriques, un
certain nombre de règles élémentaires
doivent être respectées, en particulier les
suivantes :
A FAIRE
Lisez entièrement le mode d’emploi et suivez
attentivement les instructions d’utilisation.
L’appareil doit être exclusi vement en position
debout, jamais couché, incliné ou à l’envers.
Avant chaque utilisation, vérifiez que le grillepain est bien positionné sur la base ramasse
miettes.
*selon modèle
1/2Notice GP NEO GB/FR 2/04/03 19:31 Page 7
Page 10

8
Enlevez régulièrement les miettes de la base
ramasse-miettes.
Le bouton de commande du chariot doit être
dans la position haute quand vous branchez
ou débranchez votre appareil. Débranchez
l’appareil quand il ne sert pas et avant de le
nettoyer. Attendre qu’il refroidisse pour le
nettoyer ou avant de le ranger.
En fin de cycle, si les tranches de pain
restaient coincées entre les grilles,
débranchez, et attendez que l’appareil
refroidisse avant de retirer le pain.
Débranchez l’appareil si une anomalie de
fonctionnement se produisait.
A NE PAS FAIRE
Ne laissez pas l’appareil à la portée des
enfants.
Ne laissez jamais l’appareil fonctionner sans
surveillance et particulièrement à chaque
premier grillage ou changement de réglage.
N’utilisez pas l’appareil pour tout autre usage
que celui pour lequel il a été conçu.
Ne touchez pas les parties métalliques ou
chaudes de l’appareil en cours d’utilisation,
utilisez les poignées et les boutons.
N’utilisez pas ou n’introduisez pas dans le
grille-pain d’ustensiles en métal qui
pourraient provoquer des courts-circuits
(cuillère, couteau…)
N’ajoutez pas au grille-pain des accessoires
qui ne sont pas recommandés par le fabricant
car cela peut-être dangereux.
Afin d’éviter les chocs électriques, ne plongez
pas dans l’eau le fil électrique, la prise de
courant ou tout l’appareil.
Ne grillez pas de pains susceptibles de fondre
(avec glaçage) ou de couler dans le toaster,
cela pourrait causer des dommages ou un
risque de feu.
N’introduisez pas dans l’appareil des trop
grosses tranches de pain susceptibles de
coincer le mécanisme du grille-pain.
N’utilisez pas l’appareil si :
- celui-ci a un cordon défectueux,
- l’appareil est tombé et présente des
détériorations visibles ou des anomalies de
fonctionnement.
Dans chacun de ces cas, l’appareil doit être
envoyé au centre de service après-vente
agréé le plus proche, afin d’éviter tout
danger. Consultez la garantie.
N’utilisez l’appareil que dans la maison.
Evitez les lieux humides.
Ne posez pas votre grille-pain sur toutes
surfaces chaudes, ni trop près d’un four
chaud.
Ne couvrez pas l’appareil pendant son
fonctionnement et ne le mettez pas en
contact ou à proximité de matériaux
inflammables comme des rideaux, des
tentures ou du bois (étagères, meubles…).
Ne placez jamais de papier, carton ou
plastique dans, sur ou sous l’appareil.
S’il arrivait que certaines parties du produit
s’enflamment, ne tentez jamais de les
éteindre avec de l’eau. Débranchez l’appareil
et étouffez les flammes avec un linge humide.
Ne tentez jamais d’ enlever le pain lorsque le
cycle de grillage est enclenché.
N’utilisez pas le grille-pain comme source de
chaleur ou de séchage.
N’utilisez pas le grille-pain pour cuire, griller,
réchauffer ou décongeler des plats surgelés.
Cet appareil a été conçu pour un
usage domestique uniquement,
toute utilisation professionnelle, non
appropriée ou non conforme au
mode d’emploi n’engage ni la
responsabilité, ni la garantie du
fabricant.
3• Gardez précieusement ces
consignes
1/2Notice GP NEO GB/FR 2/04/03 19:31 Page 8
Page 11

9
FR
1 •Avant la première utilisation
Déballez l’appareil et enlevez tous les
autocollants. Déroulez complètement le
cordon d’alimentation. Essuyez l’extérieur de
l’appareil et le cordon avec un linge humide.
Séchez – Fig 1.
Vérifiez que le grille-pain est bien fixé sur sa
base amovible (sinon reportez vous à la
partie intitulée “base ramasse miettes”).
Branchez la prise.
Sélectionnez le niveau de grillage maximum
à l’aide du bouton de sélection des niveaux
de grillage –
Fig 2.
Abaissez le levier de commande – Fig 3 .
Faites ainsi fonctionner l’appareil à vide trois
ou quatre fois pour éliminer “l’odeur
désagréable de neuf”. Aérez la pièce.
2 • Base ramasse miettes
Les miettes de pain sont collectées dans la
base amovible de l’appareil et doivent être
enlevées régulièrement. Débranchez le grillepain, laissez le refroidir complètement et
séparez le de sa base en appuyant sur le
bouton prévu à cet effet. – Fig 4.
Inclinez ensuite l’appareil et désengagez-le de
la base - Fig 5.
Nettoyez la base à la main ou au lavevaisselle, séchez la et replacez la sous le
grille-pain. Pour cela, inclinez l’appareil et
insérez sa languette dans l’emplacement
prévu à cet effet - Fig 6.
Abaissez la partie avant de l’appareil jusqu’au
verrouillage - Fig 7.
3 • Mise en place des tranches
de pain
Le levier de commande placé en position
haute, disposez les tranches de pain dans
chaque fente.
4 • Grillage du pain
Réglez le bouton de sélection des niveaux de
grillage sur la position désirée suivant la
nature, l’état de fraîcheur et l’épaisseur du
pain - Fig 8.
1-2 : très légèrement grillé
3-4 : légèrement grillé
5-6 : grillé
7 : bien grillé
(Pour les modèles de base munis uniquement
du sélecteur de grillage, la position 7 vous
permet également de griller du pain congelé).
Abaissez le levier de commande. Celui-ci se
verrouille en position basse et les grilles de
maintien centrent automatiquement les
tranches de pain entre les éléments
chauffants pour un grillage parfait des deux
côtés -
Fig 9.
Si vous grillez du pain aux raisins, enlevez les
raisins qui risquent de se détacher car ceux-ci
peuvent endommager l’appareil en
provoquant un court circuit.
Si vous grillez une seule tranche de pain,
vous pouvez diminuer le niveau de grillage.
5•Arrêt du grillage
En fin de grillage, la commande de
fonctionnement se déverrouille
automatiquement, le grille-pain cesse de
fonctionner et les tranches de pain
remontent. Vous pouvez interrompre à tout
moment le processus de grillage en appuyant
sur la touche “STOP”– Fig 10.
6 • Levier de remontée extrahaute
Pour saisir plus facilement les petites
UTILISATION
ATTENTION Par sécurité, le grille-
pain ne peut fonctionner sans cette base.
ATTENTION Si du pain dépasse des
grilles, il ne pourra être grillé.
Sur ce modèle électronique, le levier de
commande ne s’enclenche que lorsque
l’appareil est branché.
1/2Notice GP NEO GB/FR 2/04/03 19:31 Page 9
Page 12

10
10 • Nettoyage
Nettoyez régulièrement votre grille-pain.
Avant tout entretien, débranchez et laissez
refroidir l’appareil.
Enlevez la base à miette amovible en
pressant le bouton prévu à cet effet et videz
les miettes qu’elle contient – Fig 4.
Essuyez l’extérieur de l’appareil et le cordon
avec un linge humide. Séchez – Fig. 1.
N’utilisez pas de produits d’entretien trop
agressifs ou abrasifs, de produits décapants
ou d’eau de javel.
11 • Rangement
N’enroulez pas le cordon autour de l’appareil,
un range cordon se trouve sous l’appareil.
Attendez le refroidissement complet de
l’appareil avant de le ranger, surtout dans le
cas d’un endroit fermé, la chaleur pourrait
causer des dommages à tout matériau
inflammable.
L’emballage est recyclable, mais il peut-être
utile pour transporter ou retourner le grillepain à une station service après-vente agréée.
tranches de pain, remontez le levier de
commande au maximum une fois le cycle de
grillage terminé – Fig 11.
7 • Accessoire ‘réchauffe petits
pains/croissants’
Le réchauffe petits pains/croissants permet de
réchauffer et de dorer des croissants, des
petits pains, etc.
Appuyez sur le levier situé à l'arrière de
l'appareil : les fils-supports se mettent en
place - Fig 12.
Disposez les petits pains ou les croissants sur
l’accessoire. Sélectionnez un degré de
brunissage (maximum en position 3) et
abaissez le levier de commande – Fig 13.
Une fois le cycle terminé, retournez les
viennoiseries et ré-enclenchez un cycle si
nécessaire. Attendez quelques secondes
avant de saisir les viennoiseries et ne touchez
pas l’accessoire encore chaud.
Pour abaisser les fils-supports, tirez le levier
vers le haut -
Fig 14.
8 • Fonction décongélation*
Pour griller du pain congelé, appuyez sur le
bouton de décongélation – Fig 15.
Sélectionnez ensuite le niveau de grillage
souhaité en fonction du type de pain et
abaissez le levier de commande. A la fin du
cycle, le grille-pain s’arrête automatiquement
et les tranches de pain remontent. Avant de
retirer le pain des fentes, laissez la chaleur se
diffuser pendant encore environ 30 secondes.
9 • Touche +*
Pour ajuster le grillage de tranches de pain
venant d’être grillées, abaissez de nouveau le
levier de commande et appuyez sur la «
touche + » (il n’est pas utile de sélectionner
un niveau de grillage) - -Fig 16.
L’appareil va fonctionner pendant un temps
court, adapté simplement pour obtenir un
pain grillé à votre convenance. A la fin du
cycle, le grille-pain s’arrête automatiquement
et les tranches de pain remontent.
ATTENTION N’intervenez jamais à
l’intérieur de l’appareil avec un objet
métallique sous peine de détériorations
graves.
ATTENTION N’utilisez pas l’appareil
pour griller simultanément des tranches
de pain et réchauffer des viennoiseries.
Ne placez jamais les petits pains ou les
croissants directement sur les fentes du
grille-pain.
N’utilisez pas l’accessoire pour cuire ou
décongeler des plats surgelés.
ENTRETIEN
*selon modèle
1/2Notice GP NEO GB/FR 2/04/03 19:31 Page 10
 Loading...