

Page 1
Reference 026116
Rowenta Werke GmbH
63016 Offenbach am Main
Master
Instructions for Use
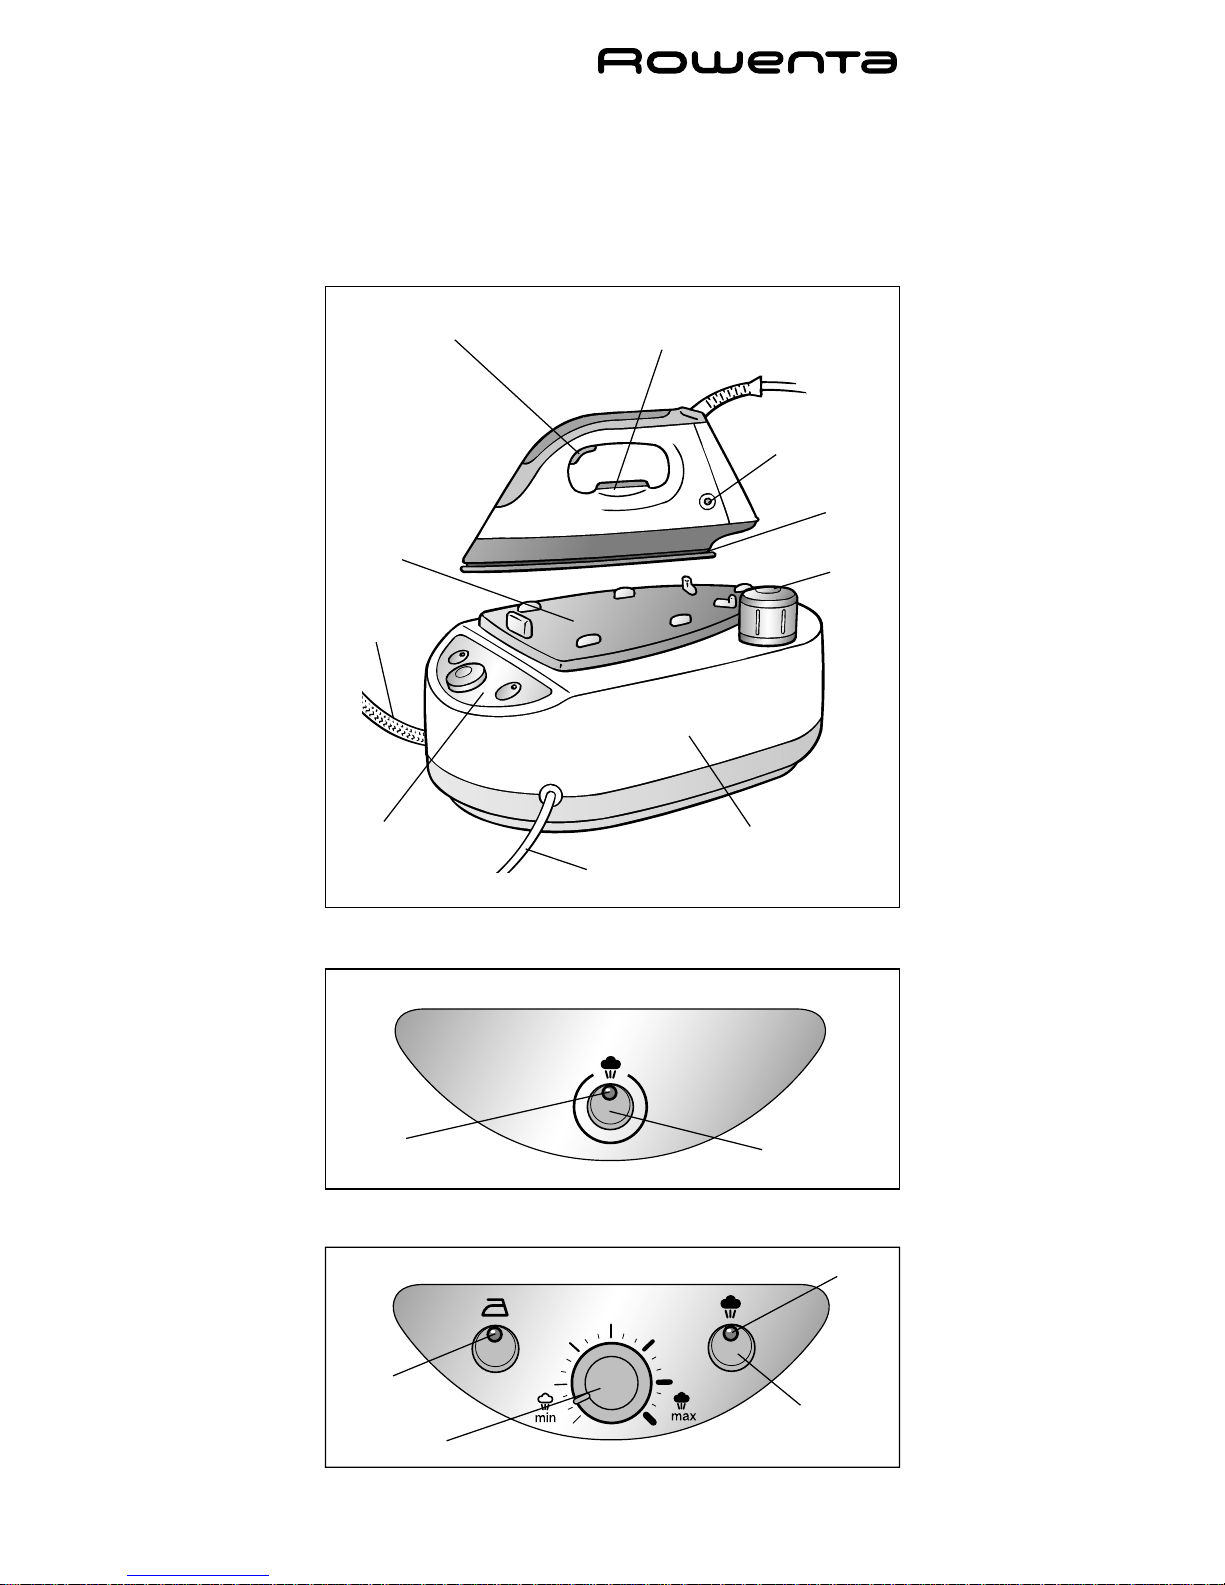
Steam button
Control
panel
Boiler unit / water tank
Power cord
DG 560
DG 580
Steam
indicator
On/Off switch (A)
Steam indicator
On/Off switch
boiler (A)
Steam output
control dial
On/Off
switch
iron (B)
Temperature control dial
Boiler
cap
Temperature
indicator light
Soleplate
Connection
cord
Iron rest
Page 2

IMPORTANT SAFETY
INSTRUCTIONS
When using your appliance, basic safety precautions should
always be followed, including the following:
Read all instructions before using the generator.
1. Use appliance only for its intended use.
2. To protect against a risk of electric shock, do not immerse
the appliance in water or other liquids.
3. The appliance should always be turned off before
plugging or unplugging from outlet. Never yank the cord
to disconnect from outlet, instead grasp plug and pull to
disconnect.
4. Always disconnect appliance from electrical outlet when
filling with water or emptying when not in use.
5. Do not allow cord to touch hot surfaces. Let iron cool
completely before putting away.
6. Do not operate appliance with a damaged cord or if
appliance has been dropped or damaged.
7. To avoid the risk of electric shock, do not disassemble
the appliance. Ship it to the nearest authorized Rowenta
approved service center for examination and repair.
Incorrect reassembly can cause a risk of electric shock
when the appliance is used.
8. Not intended for use by children. Close supervision is
necessary for any appliance being used near children.
Unsupervised use can result in fire or personal injury. Do
not leave appliance unattended while plugged in, on an
ironing board, or while it is still hot.
9. Burns can occur from touching hot metal parts, hot water
or steam. Use caution when you turn a steam generator
upside down. There may be hot water in the reservoir.
10. Never attempt to unscrew the boiler cap while the
appliance is in use. The strong steam pressure could result
in burns. Only unscrew when generator is cold or there is
no more pressure in the boiler.
11. Do not direct steam at people, animals or iron clothes
while they are being worn.
12. The use of accessory attachments is not recommended by
Rowenta and may result in fire, electric shock or personal
injury.
13. Always put the iron with the soleplate down on the iron
rest, never resting on its heel.
SPECIAL INSTRUCTIONS
1. This is a 1745 watt appliance. To avoid a circuit overload,
do not operate a high wattage appliance on the same
circuit.
2. This unit comes equipped with a 12.5 foot power cord
and 6 foot steam connection cord.
3. If an extension cord is absolutely necessary, a 15 ampere
cord should be used. Cords rated for less amperage may
overheat. Care should be taken to arrange the cord so that
it cannot be pulled or tripped over unintentionally.
4. Your Rowenta appliance is intended for household use
only.
SAVE THESE INSTRUCTIONS
Page 3

BEFORE USE
M
Please read all of the instructions for use and the Important
Safeguards carefully.
M
Remove all packaging from the generator.
M
It is normal for a small amount of smoke and a light odor to
be produced the first time it is used. This will quickly
disappear.
HELPFUL HINTS
M
Before using the generator for the first time or if you have
not used the steam function for a few minutes, press the
steam button several times in a row while holding the iron
away from your clothes. This will enable any cold water to
be removed from the steam connection cord.
M
When ironing start with fabrics that require a low
temperature setting (
●) and finish with those which need
the highest temperature (
● ● ●).
M
Mixed fiber fabrics should be ironed on the temperature for
the most delicate fabric. For example a shirt that is 60%
cotton and 40% polyester should be ironed at the (
●)
setting for synthetics.
M
If spray starch is used, spray it onto the reverse side of the
garment. Allow starch to penetrate before ironing.
M
For best results, use a mesh type ironing board to allow
excess steam to escape.
M
For delicate fabrics, we recommend carrying out a test on
an unobtrusive area of the garment such as an inner seam.
FILLING THE BOILER
The steam generator is designed to operate using tap water.
Please review Water Recommendations section for additional
water information.
1. While unplugged, place the
steam generator on a stable,
horizontal, heat resistant surface.
2. Unscrew the boiler cap.
3. Using a water pitcher, fill with
33oz. of water. Do not fill water
tank past the base of the boiler
cap thread. Do not overfill. Be
sure that water does not spill
over. If this occurs remove the
excess water.
4. Replace the boiler cap and screw
it on tightly.
To fill boiler while you are using the appliance see section
Filling Boiler While In Use.
TURNING ON AND OFF:
1. Plug the generator into a 120 volt
electric outlet.
1. DG560 model: Press the on/off
switch (A) on the control panel
and the steam indicator light will
turn on. Adjust the temperature
control dial on the iron to heat
the soleplate. The temperature
indicator light will light up on the
iron.
(A)
Page 4

DG580 model: Press both on/off switches (A) and (B) so that
the iron light and steam indicator light turn on.
2. When the steam indicator light
turns off (approximately 7
minutes), steam is ready.
3. During ironing the temperature
indicator light for the iron and the
steam indicator light will turn on
and off. This is normal as the
temperature is being regulated.
The unit is still on when these
lights go out.
4. To turn the unit off, press the
switch(es) in the opposite
direction so that the side without
the light is depressed. Unplug
and leave to cool completely
before emptying or putting away.
Set the temperature control dial
on the iron to the minimum
setting before unplugging.
STEAM IRONING
Warning: Never iron or steam clothes while they are
being worn.
DG 560
1. Set the iron’s temperature control dial according to the
type of fabric being ironed.Check the fabric’s label for
appropriate setting and steam recommendations.
2. Once the iron has heated to the proper temperature and
the boiler is ready, the temperature indicator light and
steam indicator light will go out. The iron is now ready for
use.
3. To obtain steam press the steam button beneath the iron
handle. When you release the button, steam will stop.
We recommend pressing and releasing the steam button
at regular intervals of 15 seconds.
With delicate fabrics (
● setting), press the steam
button under that handle intermittently rather than
continuously. This will avoid water droplets from
appearing with the steam.
(A)
(B)
Fabric Temperature
regulator
synthetics ●
e.g. viscose, (low temperature)
polyester
silk, ● ●
wool (medium temperature)
cotton, ● ● ●
linen (high temperature)
Page 5

DG580
The DG580 allows steam output to be adjusted.
● setting on the iron : the steam control dial should be
set to min.
● ● setting on the iron : the steam control should be set a
the mid level
● ● ● setting on the iron : the steam control dial can be set
to the max.
Note: It is normal for the connection cord to become warm
during use.
DRY IRONING
This appliance can be used for dry ironing if the steam button
is not pressed.
M
DG 560: Set the temperature control dial on the iron for
the type of material being ironed.
M
DG 580: Set the iron’s on/off switch to the on position.
Do not turn on the steam switch.
VERTICAL STEAM
M
To remove wrinkles in cotton or
linen, the soleplate can come in
contact with the fabric for
optimal results.
M
For synthetic fabrics, a distance of
4 inches is recommend to avoid
damage to the garment.
M
For delicate fabrics, we
recommend carrying out a test on
an unobtrusive part of the
garment (inner seam).
Caution:
Steam produced is very hot. To avoid burns and scalding
never iron or steam clothes while they are being worn.
1. Fill iron according to the Filling the Boiler section of
instructions.
2. DG 560 model: Press the on/off switch (A) on the control
panel and the steam indicator light will turn on. Set the
temperature control dial on the iron to the (
● ● ●) setting.
Type of fabric Iron thermostat Steam control
setting dial setting
Synthetic
Viscose
Polyester
● (low temperature)
Silk
Wool
● ●(medium temperature)
Cotton
Linen
● ● ● (high temperatures)
Page 6

The temperature indicator light will light up on the iron as
it is heating.
DG 580 model: Press both on/off switches (A) and (B) so
that the iron light and steam indicator light turn on.
3. When the steam indicator light turns off (approximately 7
minutes), steam is ready.
4. Hang the garment on a coat hanger and hold the fabric
slightly taut with one hand.
5. Holding the iron in a vertical position, press continuously
on the steam button while moving the iron from the top of
the garment to the bottom.
FILLING THE BOILER WHILE IN USE
Caution: NEVER UNSCREW THE BOILER CAP WHILE
IRON IS PRODUCING STEAM AND BOILER IS
UNDER PRESSURE.
1. Before opening the boiler, ensure that there is no steam
inside. To do this, press the steam button and keep it
pressed until there is absolutely no more steam.
2. Turn the unit to off (see section Turning On and Off) and
unplug from outlet.
3. Slowly unscrew the boiler cap. Using a water pitcher, fill
with 33 oz. of water. Do not fill water tank past the base of
the boiler cap thread. Be sure that water does not spill over.
If this occurs remove the excess water.
4. Replace the boiler cap and screw it on tightly.
5. Plug back in to electrical outlet.
AFTER IRONING
1. Turn the unit off. (Consult section Turning On and Off.)
2. Unplug the appliance.
3. Place the iron on the iron rest and allow to cool completely
which will take approximately 1 hour.
4. Once cold, empty water from the appliance before storing.
We recommend emptying the boiler when not in use.
CLEANING AND MAINTENANCE
Before cleaning ensure that the appliance is unplugged
and completely cooled down.
The iron can be cleaned with a damp cloth and wiped dry.
Never use household cleaners, descalers or solvents.
CLEANING THE SOLEPLATE
M
In normal use a draggy coating may build up on the
soleplate (starch, detergent buildup, burnt synthetic fibers).
This can be easily removed by using the Rowenta Soleplate
Cleaning Kit or a quality hot iron soleplate cleaner available
at most stores.
M
To prevent scratching of the soleplate, do not iron over
sharp objects (zippers, etc.).Do not place the iron on rough
surfaces, e.g. metal iron support, which may scratch the
soleplate. Place the iron on its rest on top of the base of
the unit.
M
Always put the iron with the soleplate down on the iron
rest, never place on its heel.
Page 7

RINSING OUT THE BOILER
Do not use descaling agents.
To ensure optimum steam performance, the boiler must be
rinsed out after every 10 uses. If your tap water is hard
increase the frequency.
1. Check that the generator is
unplugged and cold.
2. Fill the boiler 3/4 full with tap
water.
3. Shake the boiler for a few
moments and then empty it over
a sink.
4. Repeat the process
5. Wipe the generator base regularly
with a damp cloth and wipe dry.
6. Never hold the generator under
the tap.
Boiler Cap
To ensure a proper seal, please check the red rubber ring
in the safety cap for wear and tear regularly. If wear is
noted, replace ring. Replacement rings are available
through our main service centers.
WATER RECOMMENDATIONS
Tap water
Rowenta irons are designed to be used with REGULAR TAP
WATER (up to 12 grains of hardness). If your water is harder
than this, Rowenta recommends mixing half tap water with
half distilled water which reduces the hardness; or just use
inexpensive bottled spring water. Never use 100 % distilled
water as this can cause the iron to spit and leak.
Softened water
There are many types of household water softeners and the
water from many of them is perfectly acceptable for use in
steam generator. However, some types of softeners,
particularly those that use chemicals such as salt, can cause the
appliance to leak or spit during use. If you experience this type
of problem, we recommend that you try using inexpensive
bottled spring water or untreated tap water. Never use 100 %
pure distilled water.
Once you have changed water it will take several uses to
correct the problem. Rowenta recommends trying the steam
function for the first time on an old towel or cloth that can be
discarded to avoid damaging your clothes.
Iron and other impurities
If your water supply contains large amounts of iron or organic
matter, these minerals can collect inside the appliance and
eventually appear as brown stains. If you experience these
problems Rowenta recommends using inexpensive bottles
spring water.
Never use 100 % pure distilled water.
Page 8

Always remember:
Battery water and water containing additives (such as starch,
perfume or fabric conditioner) may not be used. Such
additives can affect the properties of the steam and, at high
temperatures, can form deposits in the steam chamber, which
will mark the laundry when they are emitted through the
steam vents. Descaling liquids/agents should not be used.
TROUBLESHOOTING
Issues Possible causes Solutions
Water runs Boiler is too full. Do not fill the boiler
through the with more than 33oz
holes in the water.
soleplate.
Thermostat isn't Send appliance to an
working. authorized service
center.
The iron was used Wait for the tempebefore it had reached rature/steam control
temperatures. lights to go out
before ironing.
Water has condensed Press the steam
in the steam tube as control button away
iron hasn't been used from your clothes
for some time. until iron produces
steam.
DG 580 DG 580
Steam output control Decrease steam outdial is set too high put while ironing at
for the temperature low temperature (
●).
set on the iron.
White streaks The boiler has a build- Rinse the boiler after
come through up of scale and needs every 10 uses (see
the holes in to be rinsed out Cleaning and Mainthe soleplate. regularly. tenance section).
Brown streaks Chemical descaling Never use descaling
come through agents or additives agents or additives.
the holes in have been used. Rinse boiler
the soleplate. thoroughly.
Tap water is high in Switch to bottled
organic matter such spring water or rinse
as rust or iron. boiler more often.
The soleplate Ironing at too high a Refer to the Steam
has build-up. temperature. Ironing section of the
instructions for
temperature
recommendations.
Spray starch Spray starch on the
build-up. reverse side of the
garment.
There is little The boiler is empty. Fill the boiler.
or no steam. The boiler is not Wait for the steam
ready. indicator light to go
out before using
steam.
Steam escapes Cap screwed on Unscrew cap when
from the incorrectly. unit is cold and put
boiler cap. back on.
The seal on the cap Check cap regularly
is worn. for signs of wear and
tear to red rubber
ring. Replace if wear
is noticed.
If troubleshooting does not assist, before consulting the
retailer regarding their return/exchange policy, please
telephone consumer service at 781-396-0600.
Page 9

Page 10

In the interest of improving products, Rowenta reserves the
right to change specifications without prior notice.
LIMITED WARRANTY
All Rowenta products are warranted for 1 year from date of
purchase against defects in material and workmanship.
During this period, any Rowenta product that, upon
inspection by Rowenta, is proved defective, will be repaired
or replaced, at Rowenta’s option, without charge to the
customer. If a replacement product is sent, it will carry the
remaining warranty of the original product. This warranty
does not apply to any defect arising from a buyer’s or user’s
misuse of the product, negligence, failure to follow
Rowenta’s instructions, use on current or voltage other than
stamped on the product or alteration or repair not
authorized by Rowenta. Repair or disassembly by anyone
other than a Rowenta authorized service center will void the
warranty. THE WARRANTIES SET FORTH HEREIN ARE
EXCLUSIVE AND NO OTHER WARRANTIES, EXPRESS OR
IMPLIED, INCLUDING BUT NOT LIMITED TO ANY
WARRANTY OF MERCHANTABILITY OR FITNESS FOR A
PARTICULAR PURPOSE OR USE, ARE MADE BY ROWENTA
OR ARE AUTHORIZED TO BE MADE WITH RESPECT TO THE
PRODUCT. If you believe your product is defective, bring
the product (or send it, postage prepaid) along with proof
of purchase to the nearest authorized Rowenta Service
Center (see below). If you send the product, please include
a letter explaining the nature of the claimed defect. In the
interest of improving products, Rowenta reserves the right
to change specifications without prior notice.
Rowenta Inc.
196 Boston Avenue
Medford, MA 02155
Tel.: (781)396-0600
www.rowentausa.com
OFFICE LOCATION ONLY.
To service product see service center information below.
If your appliance needs service, ship the product to your
nearest regional service center. Be sure to put your name on
the outside of shipping box (no P.O. boxes please). If in
warranty, Rowenta will repair or replace product at their
discretion. If the product is out of warranty, you will be
advised of the cost of repair before any work begins.
Our main service centers are listed below:
Turnpike Appliance Authorized Appliance
3495A Lawson Blvd. 1644 West Ogden Ave.
Oceanside, NY 11572 Downers Grove, IL 60515
516-483-5596
630-852-1550
Service center information is subject to change. Please visit
our website at
www.rowentausa.com or call our service center
information line at 781-306-4620. The information line
provides current service center information and listings in
California.
 Loading...