

Page 1
038826-07/06 - CF4012DO
CF4012DO 038826 12/06/06 9:54 Page 2
Page 2
1
5
67 8 9
10 11 13
12
14
234
CF4012DO 038826 12/06/06 9:54 Page 4
Page 3
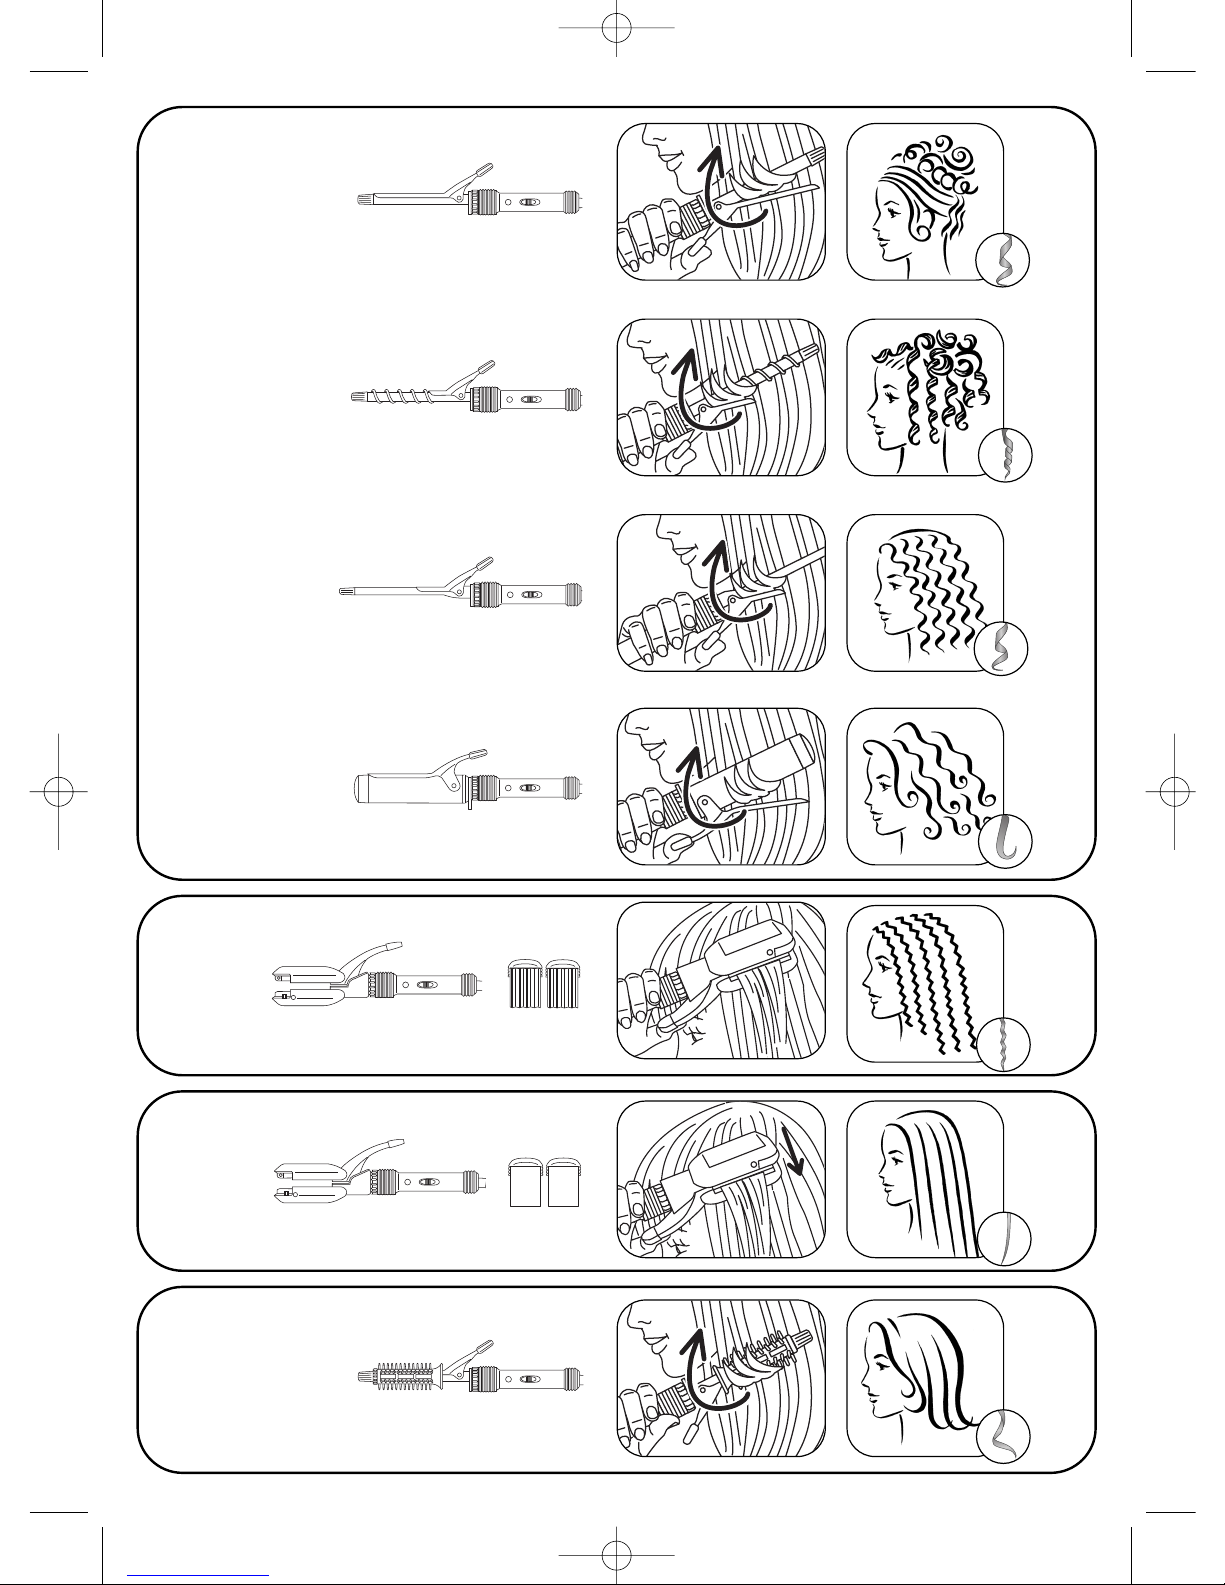
Fig. 13
Fig. 12
Fig. 7
Fig.
8
Fig. 10
Fig. 6
Fig.
9
CF4012DO 038826 12/06/06 9:54 Page 5
Page 4
GB
F
CZ
PL
BG
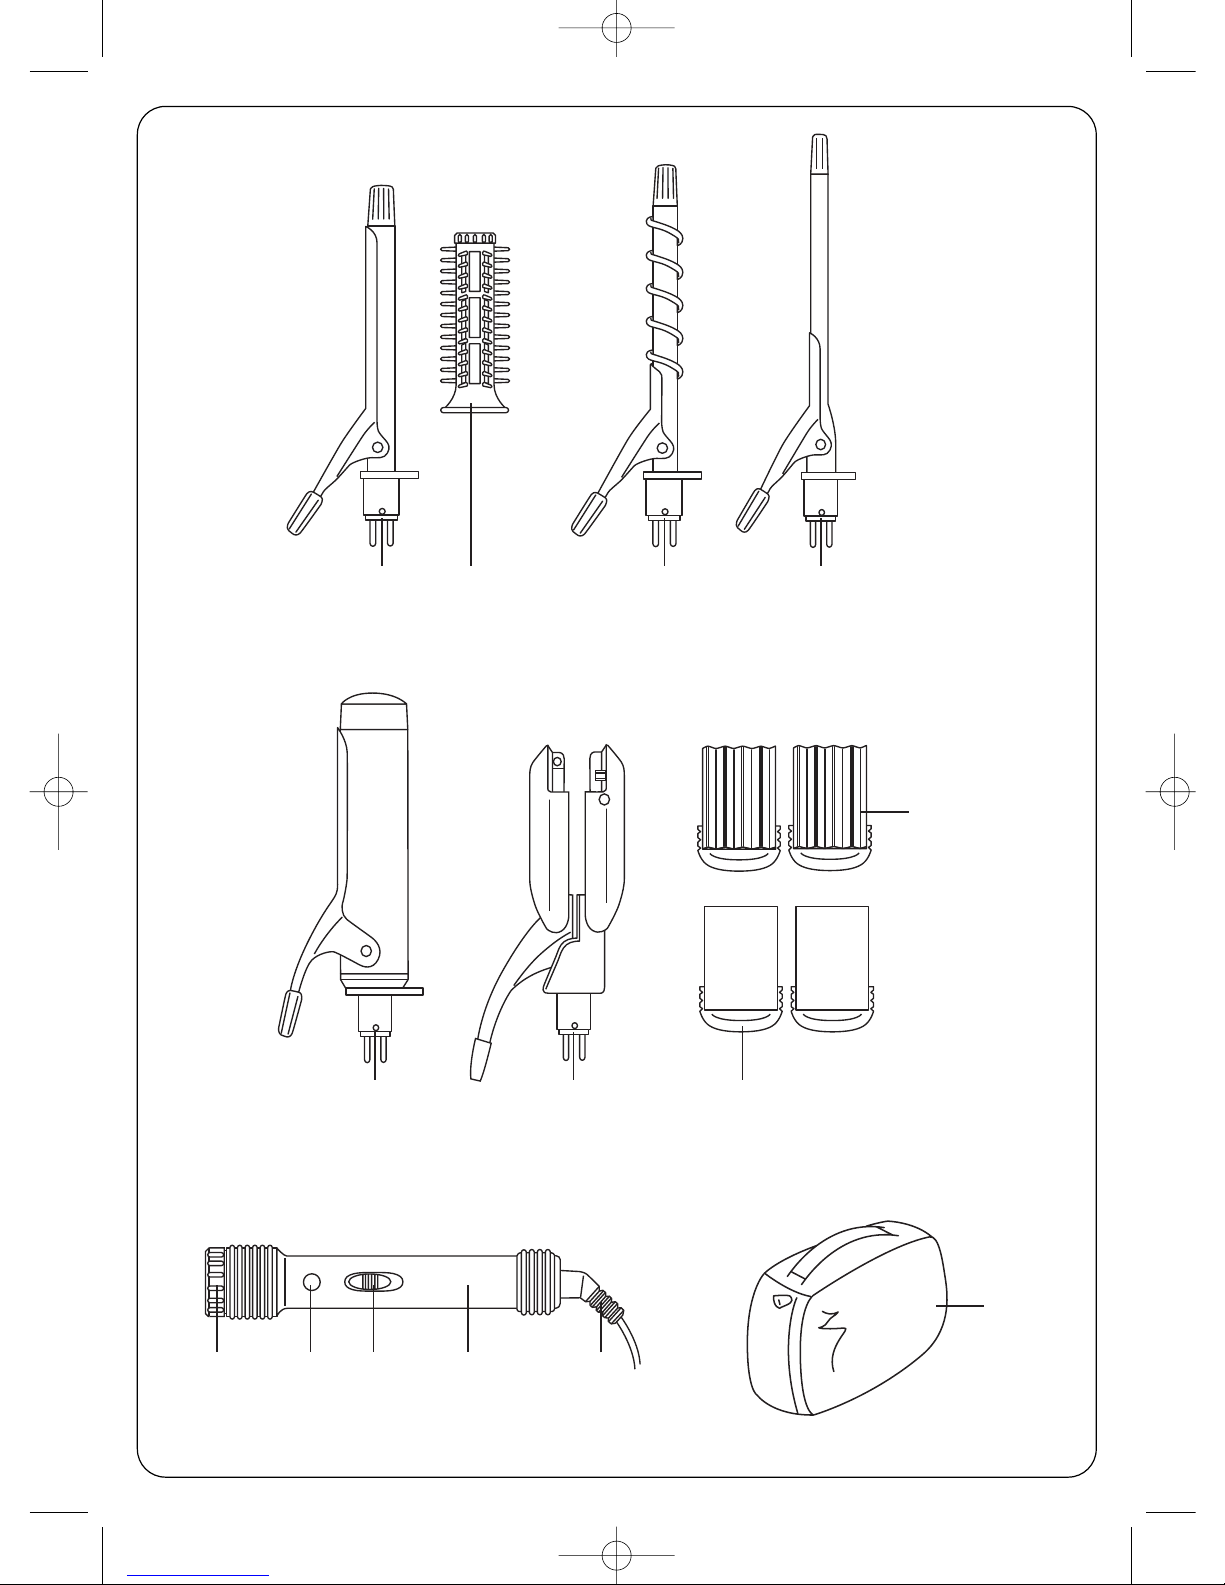
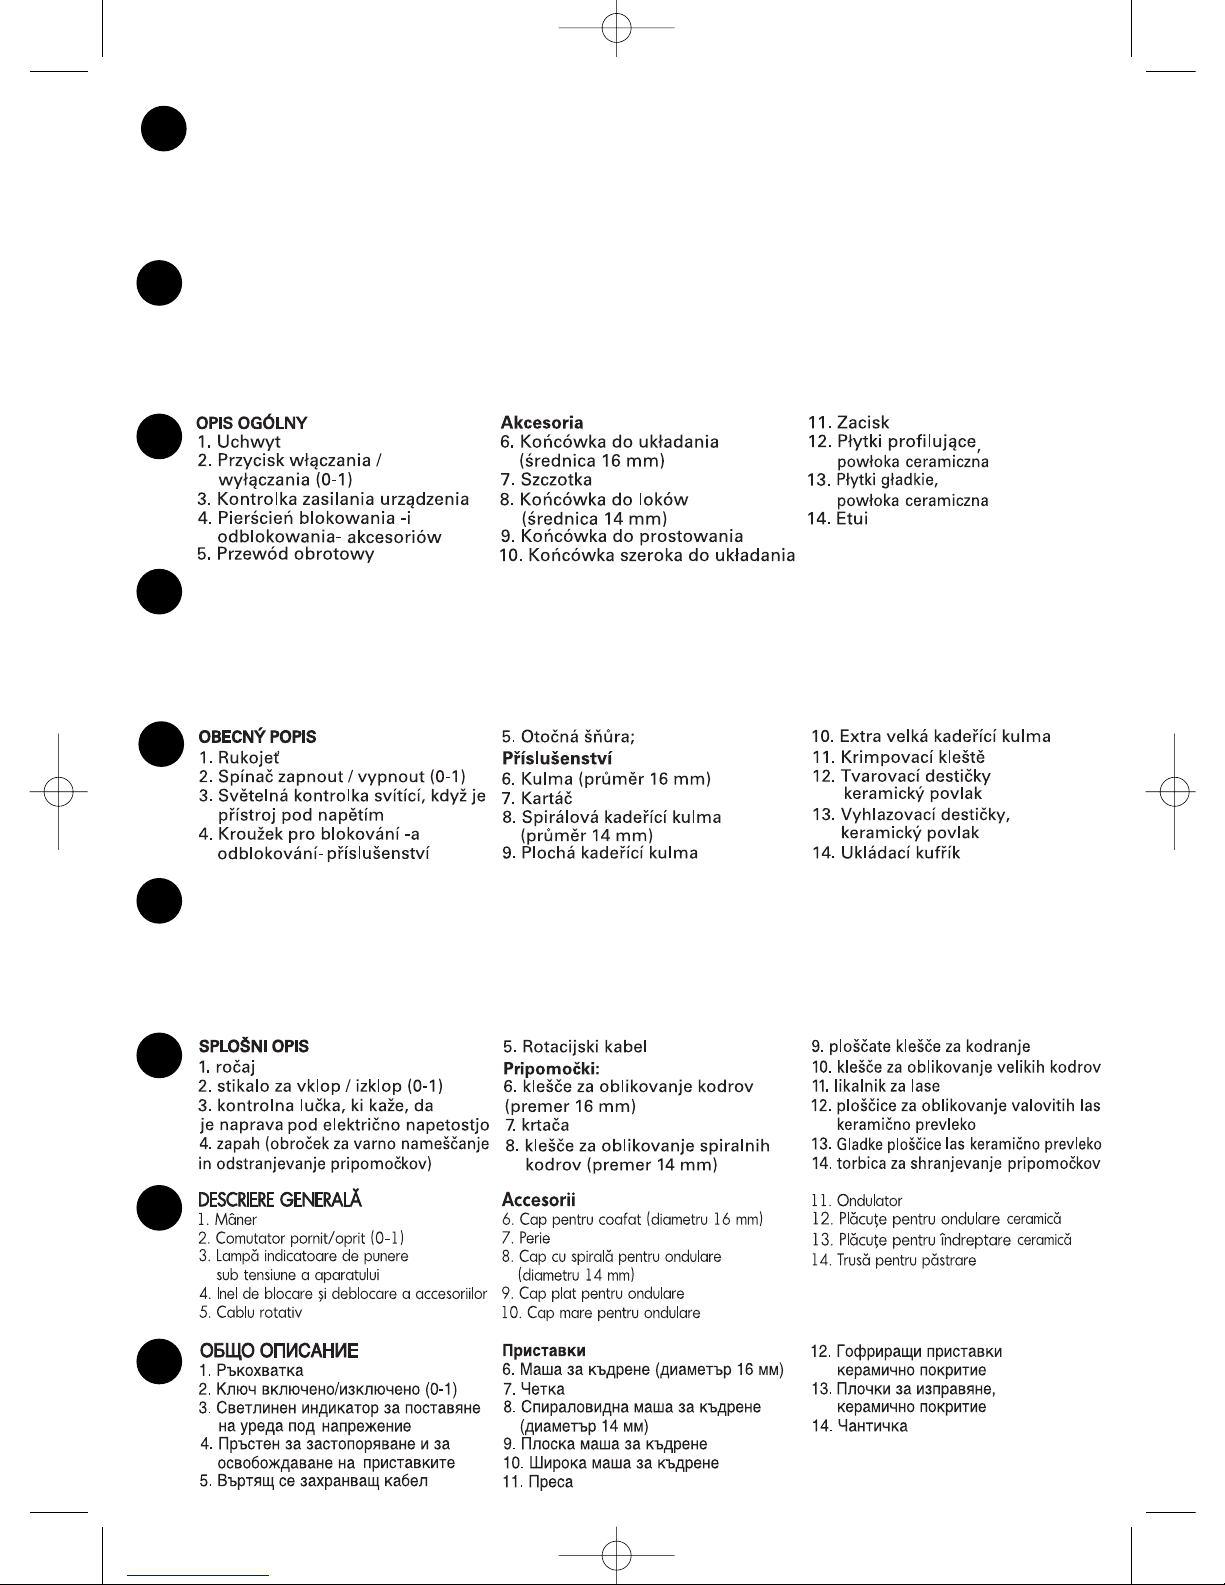
GENERAL DESCRIPTION
1. Handle
2. On/Off switch (1-0)
3. “Power on” light
4. Accessory locking –
and unlocking – ring
5. Swivel power lead
ACCESSORIES
6. Styling iron (16 mm diameter)
7. Brush
8. Spiral curling iron
(14 mm diameter)
9. Flat curling iron
10. Extra-wide curling iron
11. Crimper
12. Crimping plates
13. Ceramic straightening plates
14. Storage case
RO
DESCRIPTION GÉNÉRALE
1. Poignée
2. Interrupteur marche/arrêt (0-1)
3. Voyant lumineux de mise sous tension de l'appareil
4. Bague de verrouillage et
déverrouillage des accessoires
5. Cordon rotatif
ACCESSOIRES
6. Fer à coiffer (diamètre 16 mm)
7. Brosse
8. Fer à friser spirale (diamètre 14 mm)
9. Fer à friser plat
10. Fer à friser extra large
11. Crimper
12. Plaques gaufrantes
13. Plaques lissantes, revêtement
céramique
14. Trousse de rangement
H
SLO
SK
OBECN˘POPIS
1. RukoväÈ
2.Vypínaã zapnúÈ/vypnúÈ (0-1)
3. Svetelná kontrolka informujúca o zapojení
prístroja
4. KrúÏok na blokovanie a odblokovanie
príslu‰enstva
5. Otoãná ‰núra
PRÍSLU·ENSTVO
6.Vlasová Ïehliãka (priemer 16 mm)
7. Kefa
8. ·pirálovitá vlasová Ïehliãka
(priemer 14 mm)
9. Plochá vlasová Ïehliãka
10. Extra veºká vlasová Ïehliãka
11. Krimpovanie
12. Formovacie do‰tiãky
13.Vyhladzovacie do‰tiãky, keramick˘ povlak
14. ÚloÏn˘ kufrík
ÁLTALÁNOS LEÍRÁS
1. Fogantyú
2. Be-/kikapcsoló gomb (0-1)
3.A készülék bekapcsolását jelzŒ lámpa
4.A tartozékok rögzítésére és kioldására
szolgáló gyırı
5. Forgó kábel
TARTOZÉKOK
6. HajsütŒvas (16 mm-es átmérŒ)
7. Kefe
8. HajsütŒvas göndörített frizurához
(14 mm-es átmérŒ)
9. HajsütŒvas lapos frizurához
10. Extra méretı hajsütŒvas
11. Csíptetés
12. Kerámia burkolatú hajformázó lapok
13. Kerámia burkolatú simító lapok
14. Hordtáska
CF4012DO 038826 12/06/06 9:54 Page 6
Page 5

YU
HR
IR
AR
RUS
EST
LV
LT
UA
VISPÅR±GAIS APRAKSTS
1. Rokturis
2. Slïdzis: atslïgts/ieslïgts (0-1)
3. Sprieguma signalizÇcijas lampi¿a
4. Papildu piederumu blo˙ï‰anas un
atbr¥vo‰anas gredzens
5. Rotïjo‰s baro‰anas vads
PAPILDU PIEDERUMI
6. Matu cirto‰anas lok‰˙ïres
(diametrs 16 mm)
7. Suka ar zobi¿iem
8. lok‰˙ïres spirÇlveida cirtu veido‰anai
(diametrs 14 mm)
9. PlakanÇs lok‰˙ïres
10. Lok‰˙ïres lielu cirtu veido‰anai
11. Lok‰˙ïres matu taisno‰anai
12. PlÇksn¥tes matu gofrï‰anai
13. PlÇksn¥tes ar keramisku pÇrklÇjumu matu
gludinljanai
14. Uzglabljanas somi¿a
BENDRASIS APRA·YMAS
1. Rankena
2. Øjungimo/i‰jungimo jungiklis (0-1)
3.Aparato prijungimo prie tinklo indikatorius
4. Pried˜ verÏiamasis ir laisvinamasis Ïiedas
5. Sukamasis laidas
PRIEDAI
6. Kaitinamosios Ïnyplòs (skersmuo 16 mm)
7. ·epetys
8. Kaitinamosios spiralinòs Ïnyplòs
(skersmuo 14 mm)
9. Kaitinamosios Ïnyplòs plaukams banguoti
10.Ypaã plaãios kaitinamosios Ïnyplòs
11. Plauk˜ banguotuvas
12. Bangavimo plok‰telòs
13.Tiesinimo plok‰telòs, keramikiniu
pavir‰iumi
14. Krep‰ys
ÜLDINE KIRJELDUS
1. Käepide
2. Sisse/välja lülitamise nupp (0-1)
3. Aparaadi sisselülitamise signaallamp
4. Lisaseadmete kinnitamise ja
lahtivõtmise rõngas
5. Pöörlev juhe
LISASEADMED
6. Lokitangid (läbimõõt 16 mm)
7. Hari
8. Spiraallokitangid (läbimõõt 14 mm)
9. Lamedad lokitangid
10. Väga laiad lokitangid
11. Silumistangid
12. Vahvliloki plaadid
13. Triikimisplaadid, keraamiline kate
14. Seadmete kott
ЗАГАЛЬНИЙ ОПИС
1. Ручка
2. Вимикач ввiмкнення / вимкнення (0-1)
3. Свiтловий iндикатор включення
приладу пiд напругу
4. Кiльце блокування i розблокування
насадок
5. Поворотний електрошнур
ПРИЛАДДЯ
6. Щипцi для укладання волосся
(дiаметр 16 мм)
7. Щiтка
8. Щипцi для спiральних локонiв
(дiаметр 14 мм)
9. Плоскi щипцi для завивки
10. Щипцi для широких локонiв
11. Кримпер
12. Пластини для гофрування волосся
13. Пластини для розгладжування
волосся з керамiчним покриттям
14. Футляр для зберiгання приладу
CF4012DO 038826 12/06/06 9:54 Page 7
Page 6

Read the instruction leaflet and safety
instructions carefully before use.
1. SAFETY PRECAUTIONS
• For your safety, this appliance complies with the applicable standards and regulations (Low Voltage Directive,
Electromagnetic Compatibility, Environmental…).
• The appliance’s accessories become very hot during
use. Avoid contact with the skin. Make sure that the
supply cord never comes into contact with the hot parts
of the appliance.
• The appliance must be unplugged:
- before cleaning and maintenance procedures.
- if it is not working correctly
- as soon as you have finished using it
- if you leave the room, even momentarily.
• Check that the voltage of your electricity supply
matches the voltage of your appliance. Any error when
connecting the appliance can cause irreparable harm, not
covered by the guarantee.
• As an additional safety measure, we recommend the
installation of a residual current difference device in the
electrical circuit supplying the bathroom, acting at not
more than 30 mA. Ask your installer for advice.
• Caution: Never use the appliance with wet hands or
near baths, basins or other recipients containing water.
• When using the appliance in the bathroom, unplug it
after use as the presence of water nearby may pose a
danger even when the appliance is turned off.
• Close supervision is necessary when the appliance is
used on or in the presence of children or disabled people.
• If the power cord is damaged, it must be replaced by
the manufacturer, its after-sales service or a person
with similar qualifications, to avoid all danger.
• Stop using your appliance and contact an Authorised
Service Centre if:
- your appliance has fallen
- it does not work correctly.
• If your appliance is not working correctly, see
"Troubleshooting", or contact our Customer Helpdesk
or your dealer.
• Do not leave within the reach of children.
• Do not use if the cord is damaged.
• Do not immerse or put under running water, even for
cleaning purposes.
• Do not hold with damp hands.
• Do not hold the appliance by the casing, which is hot,
but by the handle.
• Do not unplug by pulling on the cord, rather pull out
by the plug.
• Do not use an electrical extension lead.
• Do not clean with abrasive or corrosive products.
• Do not use at temperatures below 0°C and above 35°C.
GUARANTEE
Your appliance is designed for use in the home only. It
should not be used for professional purposes. The guarantee becomes null and void in the case of improper
usage.
2. GETTING STARTED
Attaching and removing accessories:
1. Slot the required accessory into
the handle.
2. Turn the locking ring on the
handle to lock the accessory in
place.
All the accessories are attached in
the same way.
To remove an accessory, simply follow the above procedure in reverse order.
Plugging in your hair styler:
• When you have attached an
accessory to the handle, place the
appliance in a stable position on its
rest, on a flat surface.
• Plug it in and set the On/Off
switch to On (position 1).
The 'Power on' light will come
on and the accessory will begin
to heat up.
• Wait a few minutes to allow your
hair styler to reach its working
temperature
(2-4 min. for the "iron" accessories;
13 min. for the crimping plates).
When removing accessories, always
hold them by the plastic part – the
metal parts will be very hot.
3. OPERATION
Use this product on clean, untangled, DRY hair
(to avoid damaging your hair).
1 - STYLING IRONS
FIG. 6 - FOR TIGHT CURLS
FIG. 8 - FOR SPIRAL CURLS(RINGLETS)
FIG. 9 - FOR CRIMPED CURLS
FIG. 10 - FOR LOOSE CURLS
- Gather a small section of hair (approx. 2 to 3 cm
across).
- Press the lever to open the tong, then slip the tips of
the hair between the roller and the tong.
- Release the lever to close the tong. Check that all the
hair tips are correctly wound under the tong, in the
direction of the curl.
- Hold the insulated plastic end with the other hand.
- Turn the styler to wind the section of hair around the
accessory.
Wind the hair, working towards the scalp.
Take care not to burn yourself.
- Keep the iron in place for around 20 seconds
(longer for tighter curls).
GB
CF4012DO 038826 12/06/06 9:54 Page 9
Page 7

- Unwind the iron halfway, then open the tong and
allow the section of hair to slide free.
- Repeat the procedure with different sections of hair to
form more curls.
PROFESSIONAL TIPS
• To create extra volume: divide your curls using
your fingers.
• To obtain really tight curls: wind small sections
of hair at a time.
• For softer curls: wind on more hair.
• To prevent flyaway ends: check that the hair tips
are trapped under the tong and lying in the
direction of the curl.
• For a more natural, wavy look: lightly brush or
comb your hair once the curls have cooled.
2- STYLING BRUSH
FIG. 13 - FOR SOFT CURLS AND WAVES
- Fit the styling brush onto the curling iron while cold.
- Form a section of hair and wind it around the brush.
- Hold it in place for around 20 seconds, then gently
unwind it.
PROFESSIONAL TIPS
• Allow your hair to cool before styling.
3 - CRIMPER
FIG.7 - FOR CRIMPED HAIR
- Gather a section of hair approximately 5 cm across,
starting at the root of the hair.
- Press the lever to open the crimper attachment, and
place the hair between the crimping plates.
- Close the crimping plates for around 10 seconds.
- Release the hair and start again just below the wave
just formed.
PROFESSIONAL TIPS
• Always work from the roots towards the tips of
the hair.
• To enhance the effect, you can apply styling
mousse before crimping.
4- STRAIGHTENER
FIG. 12 - FOR STRAIGHTENED HAIR
- Your hair should be dry and tangle-free.
- Gather a section of hair approximately 5 cm across,
starting at the root of the hair.
- Press the lever to open the straightening attachment,
and place the hair between the straightening plates.
- Slide the appliance slowly down from the root to the
tip of the hair.
PROFESSIONAL TIPS
• To avoid kinks in long sections of hair, use a
fluid, continuous movement.
• To enhance the effect, you can apply styling
mousse before straightening.
4. CLEANING
• Unplug your styler and leave to cool on its stand.
• Clean accessories when fully cooled. To clean the
handle, wipe with a soft, damp cloth.
• Never allow water or any other liquid to enter the
handle.
5. ENVIRONMENT
PROTECTION FIRST !
Your appliance contains valuable
materials which can be recovered
or recycled.
Leave it at a local civic waste
collection point.
CF4012DO 038826 12/06/06 9:54 Page 10
Page 8

Lire attentivement le mode d'emploi ainsi que
les consignes de sécurité avant toute
utilisation.
1. CONSEILS DE SECURITE
• Pour votre sécurité, cet appareil est conforme aux
normes et réglementations applicables (Directives Basse
Tension, Compatibilité Electromagnétique,
Environnement...).
• Les accessoires de l'appareil deviennent très chauds
pendant l'utilisation. Evitez le contact avec la peau.
Assurez-vous que le cordon d'alimentation ne soit jamais
en contact avec les parties chaudes de l'appareil.
• L'appareil doit être débranché :
- avant le changement d'accessoire
- avant le nettoyage et l'entretien
- en cas d'anomalie de fonctionnement
- dès que vous avez terminé de l'utiliser
- si vous vous absentez, même quelques instants.
• Vérifiez que la tension de votre installation électrique
correspond à celle de votre appareil. Toute erreur de
branchement peut causer des dommages irréversibles
non couverts par la garantie.
• Pour assurer une protection supplémentaire, il est préconisé d'installer, dans le circuit électrique alimentant la salle
de bain, un dispositif à courant différentiel résiduel (DDR)
de courant différentiel de fonctionnement assigné n'excédant pas 30 mA. Demandez conseil à votre installateur.
• N'utilisez jamais votre appareil avec les mains mouillées
ou à proximité de l'eau contenue dans des baignoires,
lavabos ou autres récipients...
• Lorsque l'appareil est utilisé dans une salle de bain,
débranchez-le après usage car la proximité de l'eau peut
présenter un danger même lorsqu'il est arrêté.
• Une surveillance étroite est nécessaire lorsque l'appareil
est utilisé sur ou en la présence d'enfants ou de personnes invalides.
• Si le câble d'alimentation est endommagé, il doit être
remplacé par le fabricant, son service après-vente ou une
personne de qualification similaire, afin d'éviter un danger.
• N'utilisez pas votre appareil et contactez un Centre
Service Agréé si :
- votre appareil est tombé
- s'il ne fonctionne pas normalement.
• Pour tout défaut de fonctionnement, reportez-vous au
paragraphe "en cas de problème" ou contactez notre
service consommateur ou votre revendeur.
• Ne pas laisser à la portée des enfants
• Ne pas utiliser si le cordon est endommagé
• Ne pas immerger ni passer sous l’eau, même pour le
nettoyage
• Ne pas tenir avec les mains humides
• Ne pas tenir par le boîtier qui est chaud, mais par la poignée
• Ne pas débrancher en tirant sur le cordon, mais en tirant
par la prise
• Ne pas utiliser de prolongateur électrique
• Ne pas nettoyer avec des produits abrasifs ou corrosifs
• Ne pas utiliser par température inférieure à 0 °C et
supérieure à 35 °C
GARANTIE :
Votre appareil est destiné à un usage domestique
seulement.
Il ne peut être utilisé à des fins professionnelles.
La garantie devient nulle et invalide en cas d'utilisation
incorrecte.
2. MISE EN SERVICE
Mise en place et retrait des accessoires :
1. Placez les accessoires dans la
poignée.
2. Tournez l'anneau de verrouillage
situé sur la poignée, afin de bloquer
l'accessoire.
Procédez de la même façon pour
tous les accessoires.
Pour déconnecter les accessoires, suivez la procédure
inverse.
Branchement :
• Après avoir fixé l'accessoire sur la
poignée, posez l'appareil bien stable
sur son pied et sur une surface plane.
• Branchez l'appareil et placez
l'interrupteur sur 1.
Le voyant lumineux de mise sous
tension s'allume et l'accessoire
commence à chauffer.
• Attendez quelques minutes pour
que l'appareil atteigne la bonne
température (2 à 4 min pour les
accessoires "fer" ; 13 min pour les
plaques du crimper).
Quand vous retirez un accessoire,
touchez uniquement les parties en
plastique de l'accessoire, les zones
métalliques sont très chaudes.
3.UTILISATION
Les cheveux doivent être démêlés, propres et SECS
(pour éviter de les abîmer).
1 - FERS À COIFFER
FIG. 6. BOUCLES SERRÉES
FIG.8 - BOUCLES SPIRALES
FIG.9 - BOUCLES CRANTÉES
FIG. 10 - BOUCLES LARGES
- Formez une mèche de 2 à 3 cm de large.
- Ouvrez la pince en appuyant sur le levier et glissez la
pointe des cheveux entre le tube et la pince.
- Lâchez la pince pour refermer. Vérifiez que les pointes
sont correctement enroulées sous la pince, dans le sens
de la boucle.
- Tenez l'embout isolant de l'autre main.
- Tournez l'appareil pour enrouler la mèche autour de
l'accessoire. Enroulez la mèche en remontant vers le
cuir chevelu, en prenant garde de ne pas vous brûler.
F
CF4012DO 038826 12/06/06 9:54 Page 11
Page 9

- Maintenir le fer en place environ 20 secondes
(plus longtemps pour des boucles plus serrées).
- Déroulez le fer à moitié puis ouvrez la pince pour
laisser glisser la mèche.
- Répétez l'opération pour former de nouvelles boucles.
ASTUCES DU COIFFEUR
• Pour donner plus de volume : vous pouvez diviser les boucles avec les doigts.
• Pour obtenir des boucles très serrées : enroulez
peu de cheveux à la fois.
• Pour des boucles plus souples : enroulez
davantage de cheveux.
• Pour éviter les pointes rebelles : vérifiez que les
pointes sont bien enroulées sous la pince,
dans le sens de la boucle.
• Pour un résultat d'ondulations plus naturelles :
vous pouvez peigner ou brosser légèrement vos
cheveux après avoir laissé refroidir les boucles.
2- BROSSE À PICOTS
FIG. 13 - BOUCLES SOUPLES, VAGUES
- Faites glisser la brosse à picots sur le fer à boucler,
lorsqu'il est froid.
- Formez une mèche de cheveux et enroulez-la autour
de la brosse.
- Maintenir en place environ 20 secondes, puis déroulez
doucement.
ASTUCES DU COIFFEUR
• Laisser refroidir vos cheveux avant de les coiffer.
3 - CRIMPER
FIG.7 - CHEVEUX GAUFFRÉS
- Formez une mèche d'environ 5 cm de large,
en commençant par la racine des cheveux.
- Ouvrez la pince en appuyant sur le levier et placez la
mèche entre les plaques à gaufrer.
- Maintenez les plaques fermées environ 10 secondes.
- Relâchez puis reprendre à partir de la dernière vague
obtenue.
ASTUCES DU COIFFEUR
• Travaillez toujours des racines vers les pointes.
• Pour accentuer l'effet, vous pouvez appliquer
une mousse coiffante avant de gaufrer.
4- LISSEUR
FIG. 12 - CHEVEUX LISSÉS
- Vos cheveux doivent être démêlés et secs.
- Formez une mèche d'environ 5 cm de large,
en commençant par la racine des cheveux.
- Ouvrez la pince en appuyant sur le levier et placez la
mèche entre les plaques lissantes.
- Faites glisser l'appareil lentement de la racine à la
pointe des cheveux.
ASTUCES DU COIFFEUR
• Pour éviter des stries sur les longueurs, travaillez d'un mouvement souple et continu.
• Pour accentuer l'effet, vous pouvez appliquer
une mousse coiffante avant de lisser.
4. ENTRETIEN
• Débranchez l'appareil et laissez-le refroidir sur son
support.
• Nettoyez l' accessoire lorsqu'il est parfaitement froid.
Essuyez le manche à l'aide d'un chiffon doux humide.
• Ne jamais introduire d'eau ou tout autre liquide dans
le manche.
5. PARTICIPONS À LA PROTECTION
DE L’ENVIRONNEMENT !
Votre appareil contient de nombreux
matériaux valorisables ou recyclables.
Confiez celui-ci dans un point de collecte
ou à défaut dans un centre service agréé
pour que son traitement soit effectué.
CF4012DO 038826 12/06/06 9:54 Page 12
Page 10

PL
1.
3
Rys. 6 -
Rys. 10 -
Rys. 8 -
Rys. 9 -
CF4012DO 038826 12/06/06 9:54 Page 13
Page 11

Rys.13 -
Rys. 7 -
Rys. 12 -
CF4012DO 038826 12/06/06 9:54 Page 14
Page 12

H
Használat elŒtt olvassa el figyelmesen a használati
útmutatót és a biztonsági tanácsokat.
1. BIZTONSÁGI TANÁCSOK
• Az ön biztonsága érdekében, ez a készülék megfelel az idevágó
normáknak és szabályozásoknak (Az Alacsony feszültség, az
Elektromágneses kompatibilitás és a Környezet direktívák...).
• Használat közben a készülék tartozékai nagyon felmelegednek.
Kerülje el a bŒrhöz való érintését. Gondoskodjon arról, hogy a
tápkábel soha ne érjen a készülék forró részeihez.
• A készülék csatlakozó dugaszát az alábbi esetekben kell kihúzni:
- tartozékcsere elŒtt
- tisztítás és karbantartás elŒtt
- rendellenes mıködés esetén
- használat után
- ha akár néhány pillanatra is felügyelet nélkül hagyja.
• EllenŒrizze, hogy hálózati tápfeszültsége megegyezik-e a
készülékével.A csatlakoztatási hibák olyan visszafordíthatatlan
károsodásokat okozhatnak, amelyekre a garancia nem terjed ki.
• A többletvédelem érdekében, a fürdŒszobát tápláló elektromos
hálózatra egy olyan reziduális áramkör-megszakító eszközt
(DDR) kell szerelni, melynek differenciális mıködési
áramerŒssége nem haladja meg a 30 mA. Kérjen tanácsot a
szerelŒjétŒl.
• Soha ne használja nedves kézzel a készüléket, vagy fürdŒkád,
mosdókagyló vagy egyéb tartály közelében...
• Ha a készüléket fürdŒszobában használja, használat után húzza
ki a csatlakozó dugaszát, mivel a víz közelsége még akkor is
veszélyes, ha a készülék ki van kapcsolva.
• Ha a készüléket gyerekek vagy mozgássérült személyek
hajformázására vagy jelenlétében használják, szigorú felügyelet
alatt kell tartani.
• Ha a tápkábel megsérült, a veszélyek elkerülése végett, azt a
gyártó, annak vevŒszolgálata vagy egy hasonló szakképesítésı
személy kell kicserélje.
• Ne használja a készülékét és forduljon egy hivatalos
szervízközponthoz, ha:
- készüléke leesett
- rendellenesen mıködik.
• Bármilyen mıködési hiba esetén, lapozzon a „Probléma esetén”
címı fejezethez vagy lépjen kapcsolatba a vevŒszolgálatunkkal
vagy a viszonteladójával.
• Ne hagyja a gyerekek kezeügyében
• Ne használja, ha a tápkábel megsérült
• Még tisztításkor se merítse vízbe vagy ne tegye vízsugár alá
• Nedves kézzel ne fogja meg
• Ne a meleg burkolatától, hanem a fogantyújától fogja
• A csatlakozó dugasz kihúzását ne a tápkábel rángatásával, hanem
a dugasz megragadásával végezze
• Ne használjon hosszabbítót
• Ne tisztítsa karchatású vagy korrózióhatású termékekkel
• Ne használja 0°C-nál alacsonyabb és 35°C-nál magasabb
hŒmérsékleten
GARANCIA:
Az ön készüléke kizárólag háztartási használatra készült.
Professzionális célokra nem használható.
Helytelen használat esetén a garancia érvényét veszti.
2. ÜZEMBE HELYEZÉS
Üzembe helyezés és a tartozékok
eltávolítása:
1. Helyezze a fogantyúba a tartozékokat.
2.A tartozék rögzítéséhez, forgassa el a
fogantyún található reteszelŒ gyırıt.
Az összes többi tartozék rögzítéséhez
ugyanígy járjon el.
A tartozékok leválasztásához fordított sorrendben járjon el.
Csatlakoztatás:
• Miután a tartozékot felfogta a
fogantyúra, a készüléket helyezze egy
olyan sima felületre, amelyen stabilan
áll a tartólábán.
• Csatlakoztassa a készüléket és a
kapcsolót helyezze az 1-esre.A
bekapcsolásjelzŒ lámpa felgyullad,
és a tartozék melegedni kezd.
• Váron néhány percet, hogy a készülék
elérje az üzemhŒmérsékletét (2 - 4 perc
a „hajsütŒ” tartozékai esetén; 13 perc a
hajformázó lapok esetén).
Bármilyen tartozék eltávolításakor, annak
csak a mıanyag részeit fogja, mivel a
fémrészek nagyon melegek.
3. HASZNÁLAT
A haj ki kell legyen bontva, tiszta és SZÁRAZ kell legyen
(a hajtincsek összeroncsolásának elkerüléséért).
1 - HAJSÜTÃVASAK
6.ÁBRA CSAVART HAJFÜRTÖK
8.ÁBRA – GÖNDÖRÍTETT HAJFÜRTÖK
9.ÁBRA – FOGAZOTT HAJFÜRTÖK
10.ÁBRA – BÃ FÜRTÖK
- Alakítson ki egy 2 - 3 cm szélességı hajtincset.
- Az emelŒkar megnyomásával nyissa ki a csipeszt, és csúsztassa a
hajszálak végét a csŒ és a csipesz közé.
- A bezáródáshoz, engedje el a csipeszt. EllenŒrizze, hogy a
hajtincs végei megfelelŒen vannak-e felcsavarva a csipesz alá, és
hogy a hajfürt kialakításának irányában állnak-e.
- Fogja a másik kezével a szigetelt véget.
- A hajtincs tartozékra való felcsavarásához, forgassa el a
készüléket. Csavarja fel a hajtincset a fejbŒr felé haladva, vigyázva
arra, hogy nehogy megégesse magát.
- HozzávetŒleg 20 másodpercen át tartsa mozdulatlan a
hajsütŒvasat (a göndörebb hajfürtök esetén hosszabb ideig).
- A hajtincs feléig görgesse le a hajsütŒvasat, majd nyissa ki a
csipeszt a hajtincs szabad kicsúszása érdekében.
- Az újabb hajfürtök kialakítása érdekében, ismételje meg a
mıveletet.
CF4012DO 038826 12/06/06 9:54 Page 15
Page 13

FODRÁSZTRÜKKÖK
• A nagyobb térfogat érdekében: a hajfürtöket az ujjaival
is szétválaszthatja.
• Az erŒsen csavart hajfürtök érdekében: egyszerre csak
kevés hajat csavarjon fel.
• A hajlékonyabb fürtök számára: több hajat csavarjon fel.
• A rakoncátlan hajvégek elkerülése végett: ellenŒrizze,
hogy a hajvégek a hajfürt irányának megfelelŒen, jól fel
legyenek csavarva a csipesz alá.
• A természetesebb hajhullámok érdekében: a hajfürtök
lehılése után a haját könnyen fésülheti vagy kefélheti.
2- SZÁLKÁS KEFE
13.ÁBRA – HAJLÉKONY, HULLÁMOS FÜRTÖK
- Csúsztassa a még hideg hajsütŒvasra a szálkás kefét.
- Alakítson ki egy hajtincset és csavarja a kefe köré.
- Tartsa mozdulatlanul hozzávetŒleg 20 másodpercen át, majd
lassan csavarja ki.
FODRÁSZTRÜKKÖK
• MielŒtt frizurát készítene, hagyja lehılni a haját.
3 – CSÍPTETÉS
7.ÁBRA – FORMÁZOTT HAJ
- A fejbŒrtŒl kiindulva, alakítson ki egy hozzávetŒleg 5 cm
szélességı hajtincset.
- Az emelŒkar megnyomásával nyissa ki a csipeszt és helyezze a
hajtincset a hajformázó lapok közé.
- HozzávetŒleg 10 másodpercen át tartsa zárva a lapokat.
- Nyissa ki Œket, majd folytassa a legutoljára kialakított hullámtól.
FODRÁSZTRÜKKÖK
• Mindig a hajbŒrtŒl a hajszálak vége felé haladjon.
• A hatás kihangsúlyozásáért, a hajformázás elkezdése
elŒtt hajformázó habot is használhat.
4- HAJSIMÍTÓ
12.ÁBRA – SIMA HAJ
- Ha kibontott és száraz kell legyen.
- A fejbŒrtŒl kiindulva, alakítson ki egy hozzávetŒleg 5 cm szélességı hajtincset.
- Az emelŒkar megnyomásával nyissa ki a csipeszt és helyezze a
hajtincset a hajsimító lapok közé.
- Csúsztassa lassan a készüléket a fejbŒr irányából a hajszálak
vége felé.
FODRÁSZTRÜKKÖK
• A hosszúságban látható sávok elkerüléséért, hajlékony
és folyamatos mozgással dolgozzon.
• A hatás kihangsúlyozásáért, a hajsimítás elkezdése elŒtt
hajformázó habot is használhat.
4. KARBANTARTÁS
• Húzza ki a készülék hálózati csatlakozó dugaszát és hagyja
kihılni a tartóján.
• A használt tartozékot csak teljes lehılése után tisztítsa.
A fogantyút egy puha, megnedvesített ronggyal törölje le.
• Soha ne öntsön vizet vagy bármilyen más folyadékot a
fogantyúba.
5.VEGYÜNK RÉSZT A
KÖRNYEZETVÉDELEMBEN!
Az ön készülékében számos visszanyerhetŒ vagy
újrahasznosítható anyag van.A készülék feldolgozása
érdekében, adja át azt egy begyıjtŒközpontnak,
vagy ennek hiányában, egy elfogadott szervízközpontnak.
CF4012DO 038826 12/06/06 9:54 Page 16
 Loading...