

Page 1

RN-4142-EK-UG
RN-41-EK & RN-42-EK Evaluation Kit
User’s Guide
© 2012 Roving Networks. All rights reserved.
RN-4142-EK-UG Version 1.0 12/10/12
Page 2

Copyright © 2012 Roving Networks. All rights reserved. Roving Networks
is a registered trademark of Roving Networks. Apple Inc., iPhone, iPad,
iTunes, Made for iPhone are registered trademarks of Apple Computer.
Roving Networks reserves the right to make corrections, modifications,
and other changes to its products, documentation and services at any
time. Customers should obtain the latest relevant information before placing orders and should verify that such information is current and complete.
Roving Networks assumes no liability for applications assistance or customer’s product design. Customers are responsible for their products and
applications that use Roving Networks components. To minimize customer product risks, customers should provide adequate design and operating safeguards.
Roving Networks, Inc.
102 Cooper Court
Los Gatos, CA 95032
+1 (408) 395-5300
www.rovingnetworks.com
www.rovingnetworks.com Version 1.0 12/10/12 page 2
Roving Networks products are not authorized for use in safety-critical
applications (such as life support) where a failure of the Roving Networks
product would reasonably be expected to cause severe personal injury or
death, unless officers of the parties have executed an agreement specifically governing such use.
Page 3
RN-4142-EK-UG
1.0 OVERVIEW
This document describes the hardware and software setup for Roving Networks RN-41-EK and
RN-42-EK evaluation boards. The RN-41-EK and RN-42-EK evaluation boards are fiel d-ready,
Bluetooth SIG qualified prototyping platforms for the RN41 and RN42 modules, respectively. The
boards have the flexibility to connect directly to PCs via a standard USB interface (via the F TDI
chipset) or to embedded processors through the TTL UART interface. The status LEDs,
dipswitches, and signal headers enable rapid prototyping and integration into existing systems.
You configure and control the modules from a console with a simple ASCII command language.
Once the configuration is set up, the module can connect over Bluetooth. You use the evaluation
kit to configure the Bluetooth module using the command interface, create connections, and
transfer data. See “Resources & Related Documents” on page 16 for information on available
documentation.
The RN-41-EK and RN-42-EK evaluation boards support the serial port profile (SPP) and human
interface device (HID) profiles. The instructions in this document use the SPP profile. For more
information on these profiles and how to switch between them, refer to the Bluetooth Command
Reference & Advanced Information User’s Guide.
2.0 EVALUATION KIT DESCRIPTION
The evaluation kit includes the hardware required to conn ect the eva luatio n board to your computer. See Table 2-1. To evaluate the module on the evaluation board, you need a computer with
a USB port running the Microsoft Windows or Mac OS-X operating system.
Note: Before beginning your evaluation, you may need to install the FTDI driver for the
USB cable. You can download the driver (as well as other tools and utilities) from
the Roving Networks website at http://www.rovingnetworks.com/support.php.
TABLE 2-1: EVALUATION KIT CONTENTS
Hardware Description
Evaluation board Contains the Bluetooth module, status LEDs, and
dipswitches.
Mini-USB cable Links your computer to the evaluation board.
Figure 2-1 describes the evaluation board’s interfaces and connectors.Table 2-2 describes the
status LEDs. The green LED indicates the status of the Bluetooth connection and when the
device is in configuration mode. The RN41 and R N42 modules are pin compatiable; therefore,
the description applies to both the RN-41-EK and RN-42-EK boards. Refer to “RN-41-EK &
RN-42-EK Schematic” on page 17 for the board’s schematic.
www.rovingnetworks.com Version 1.0 12/10/12 page 3
Page 4
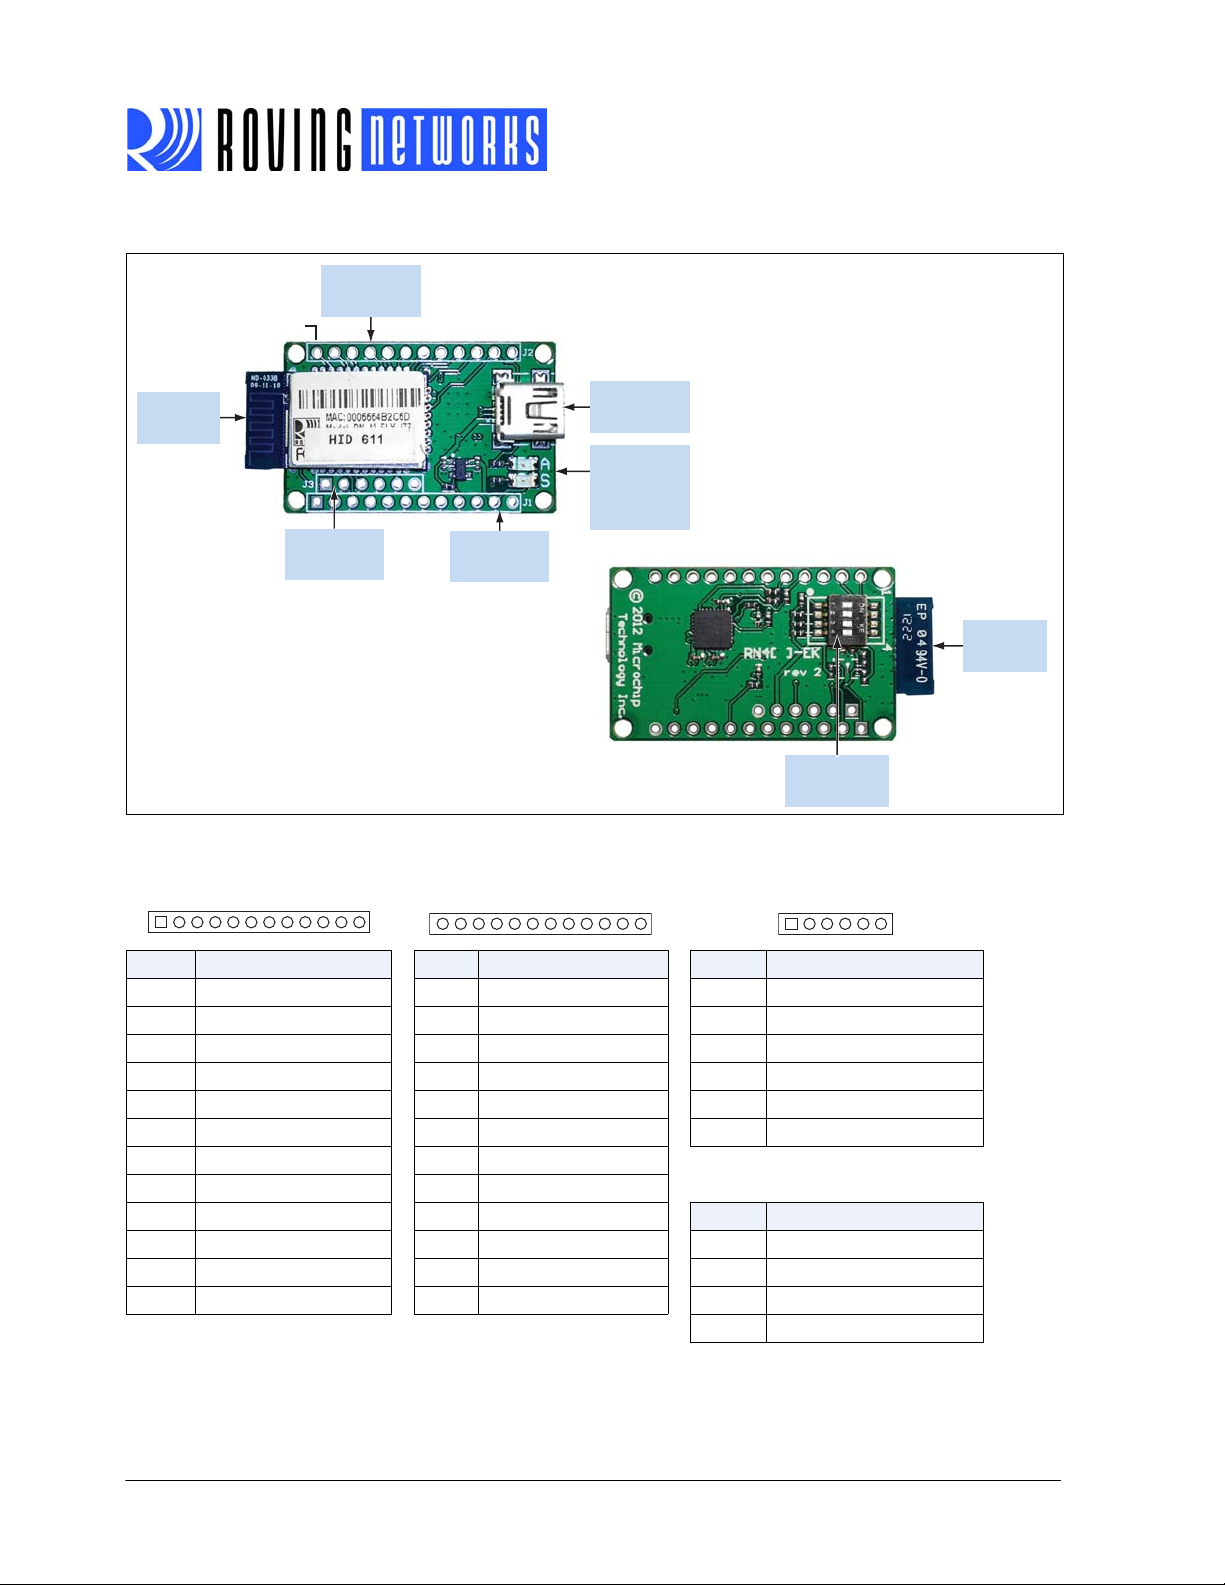
FIGURE 1-1: RN-41-EK & RN-42-EK EVALUATION BOARD, Note 1
87615432 1211109
615432
GPIO Signal
Header 2 (J2)
Pin 13
Top
RN-4142-EK-UG
PCB Trace
Antenna
Programming
Header (J3)
GPIO Signal
Header 1 (J1)
USB
Interface
LED
Indicators
(S = Green
A = Red)
Bottom
Configuration
Switches
Note 1: This figure shows the RN-42-EK board. The RN-41-EK board is similar.
GPIO Signal Header 1 (J1) GPIO Signal Header 2 (J2) Programing Header (J3)
20191813 17161514 24232221
Pin Description Pin Description Pin Description
1 GPIO6 13 GPIO4 1 SPI_MISO
2 GPIO7 14 GPIO3 2 SPI_MOSI
3 RESET_N 15 GPIO2 3 SPI_SCK
4 No Connect 16 CTS 4 SPI_SS
5 No Connect 17 RTS 5 3.3 V
6 No Connect 18 TXD 6 GND
7 No Connect 19 RXD
8 Sensor Input 1 (AIO1) 20 GPIO11 Configuration Switches
9 Shutdown (SHDN) 21 GPIO10
Switch Description
10 No Connect 22 GPIO9 1 Restore Factory Defaults
11 3.3 V 23 GPIO8 2 Automatic Discovery
12 GND 24 Sensor Input 0 (AIO0) 3 Automatic Master
4 Default Baud Rate
PCB Trace
Antenna
www.rovingnetworks.com Version 1.0 12/10/12 page 4
Page 5
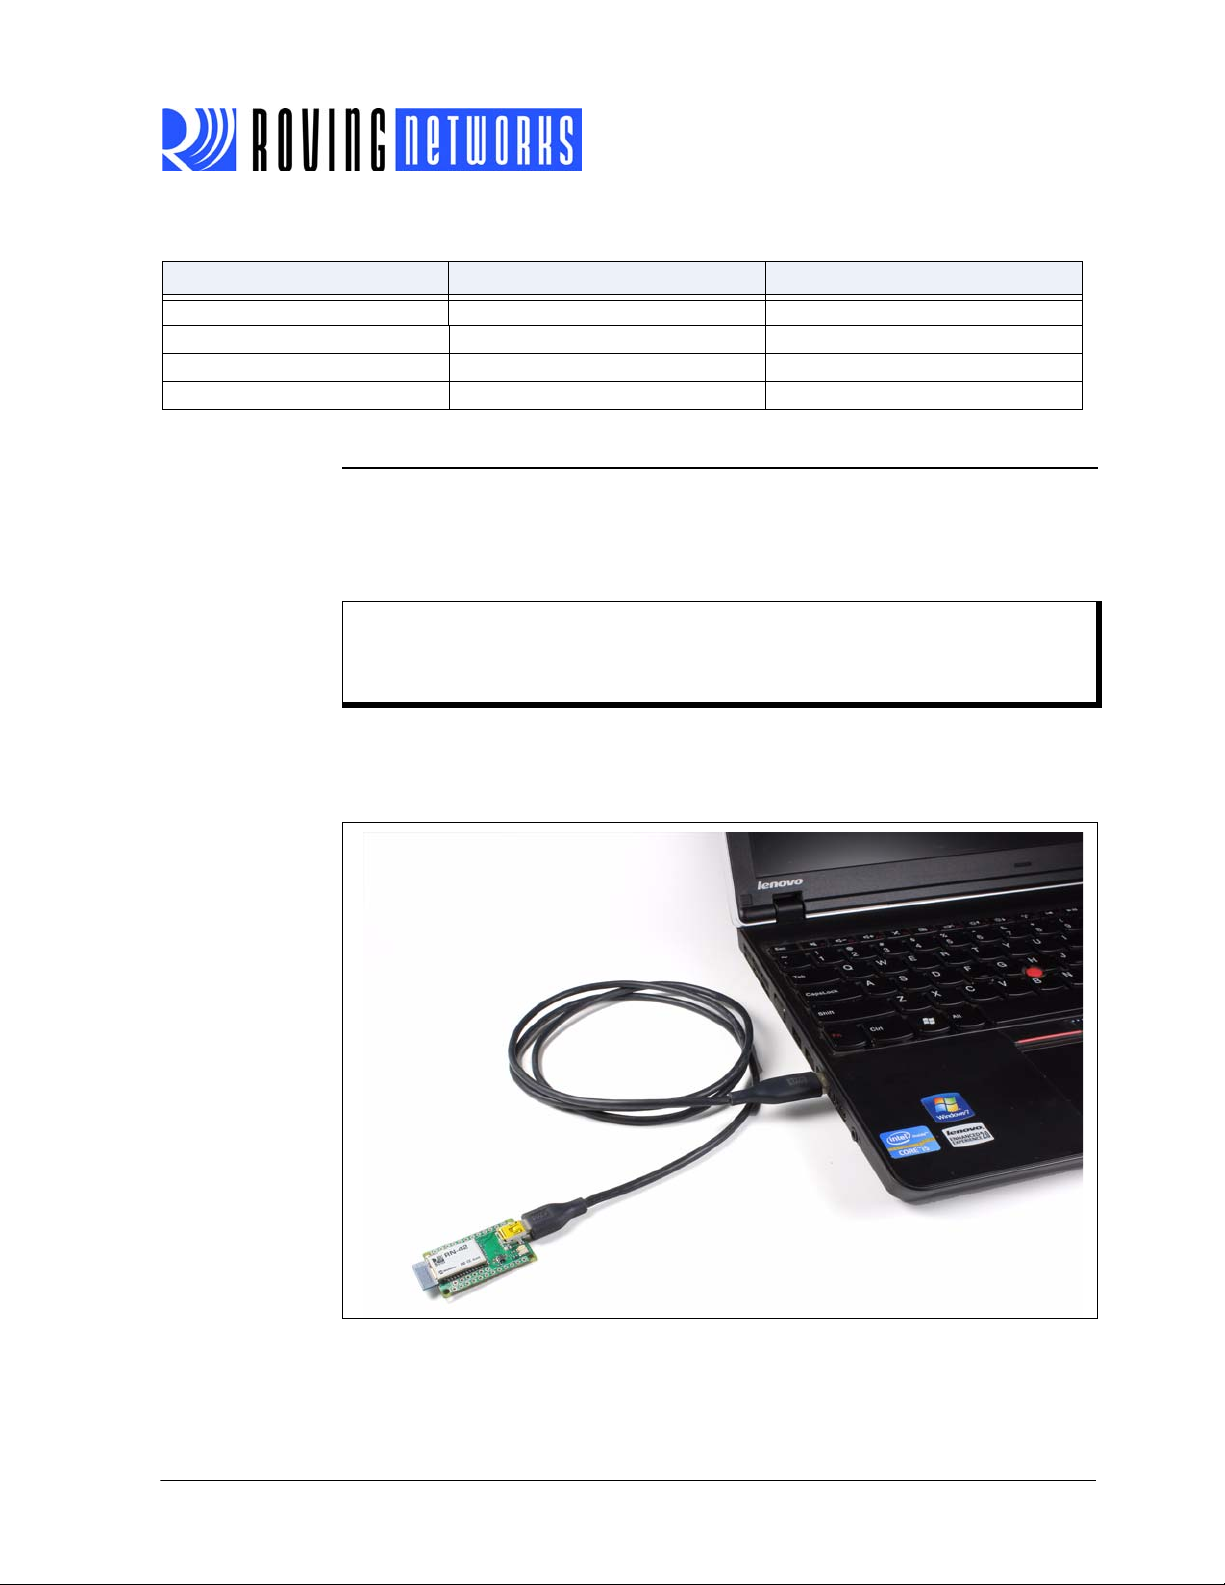
TABLE 2-2: STATUS LEDS
Mode Green LED (S) Red LED (A)
Fast blink, 10 times per second Command mode –
Blinks twice per second Boot up, remotely configurable –
Blinks once per second Discoverable/idle Data over the UART
Solid on
Connected –
3.0 HARDWARE SETUP
To set up the evaluation hardware, perform the following steps:
1. Connect the mini-USB cable to your computer’s USB port and to the evaluation board’s
mini-USB connector. This connection provides power to the board and provides a data
connection to the command console.
Note: Windows prompts you to install the FTDI drivers (that create a virtual COM port to
the module’s USB port) if they are not already installed. You can download the drivers from the Support page on the Roving Networks website at http://www.rovingnet-
works.com/support.php.
RN-4142-EK-UG
2. Note the COM port to which you have attached the cable.
Figure 3-1 shows the completed hardware setup for the evaluation boards.
FIGURE 1-2: COMPLETED HARDWARE SETUP
www.rovingnetworks.com Version 1.0 12/10/12 page 5
Page 6
RN-4142-EK-UG
UART
Bluetooth Interface
Bluetooth
Module
Command
Mode
$$$ $$$
A
B
User Data
Bluetooth
Host
A
B
4.0 USING THE EVALUATION KIT
You program Roving Networks Bluetooth devices over the Bluetooth link or through the serial
interface (USB port) using a simple ASCII command language, which is similar to the ind ustrystandard Hayes A T protocol. set commands configure the module and get commands echo the
current configuration. Configuration settings modified with the set command do not take effect
until the module has been rebooted, even though the get command may show otherwise.
This section assumes that you have a working knowledge of Bluetooth operation and communications. To configure the Roving Networks devices you need a Bluetooth-enabl ed PC (either
built-in or using a USB Bluetooth dongle). You can only configure one device at a time. Once
configured, device settings are saved (independent of power down) until they are explicitly
changed or the factory defaults are restored.
Note: For detailed information on the ASCII commands you use to configure the Bluetooth
module, refer to the Bluetooth Command Reference & Advanced Information User’s
Guide.
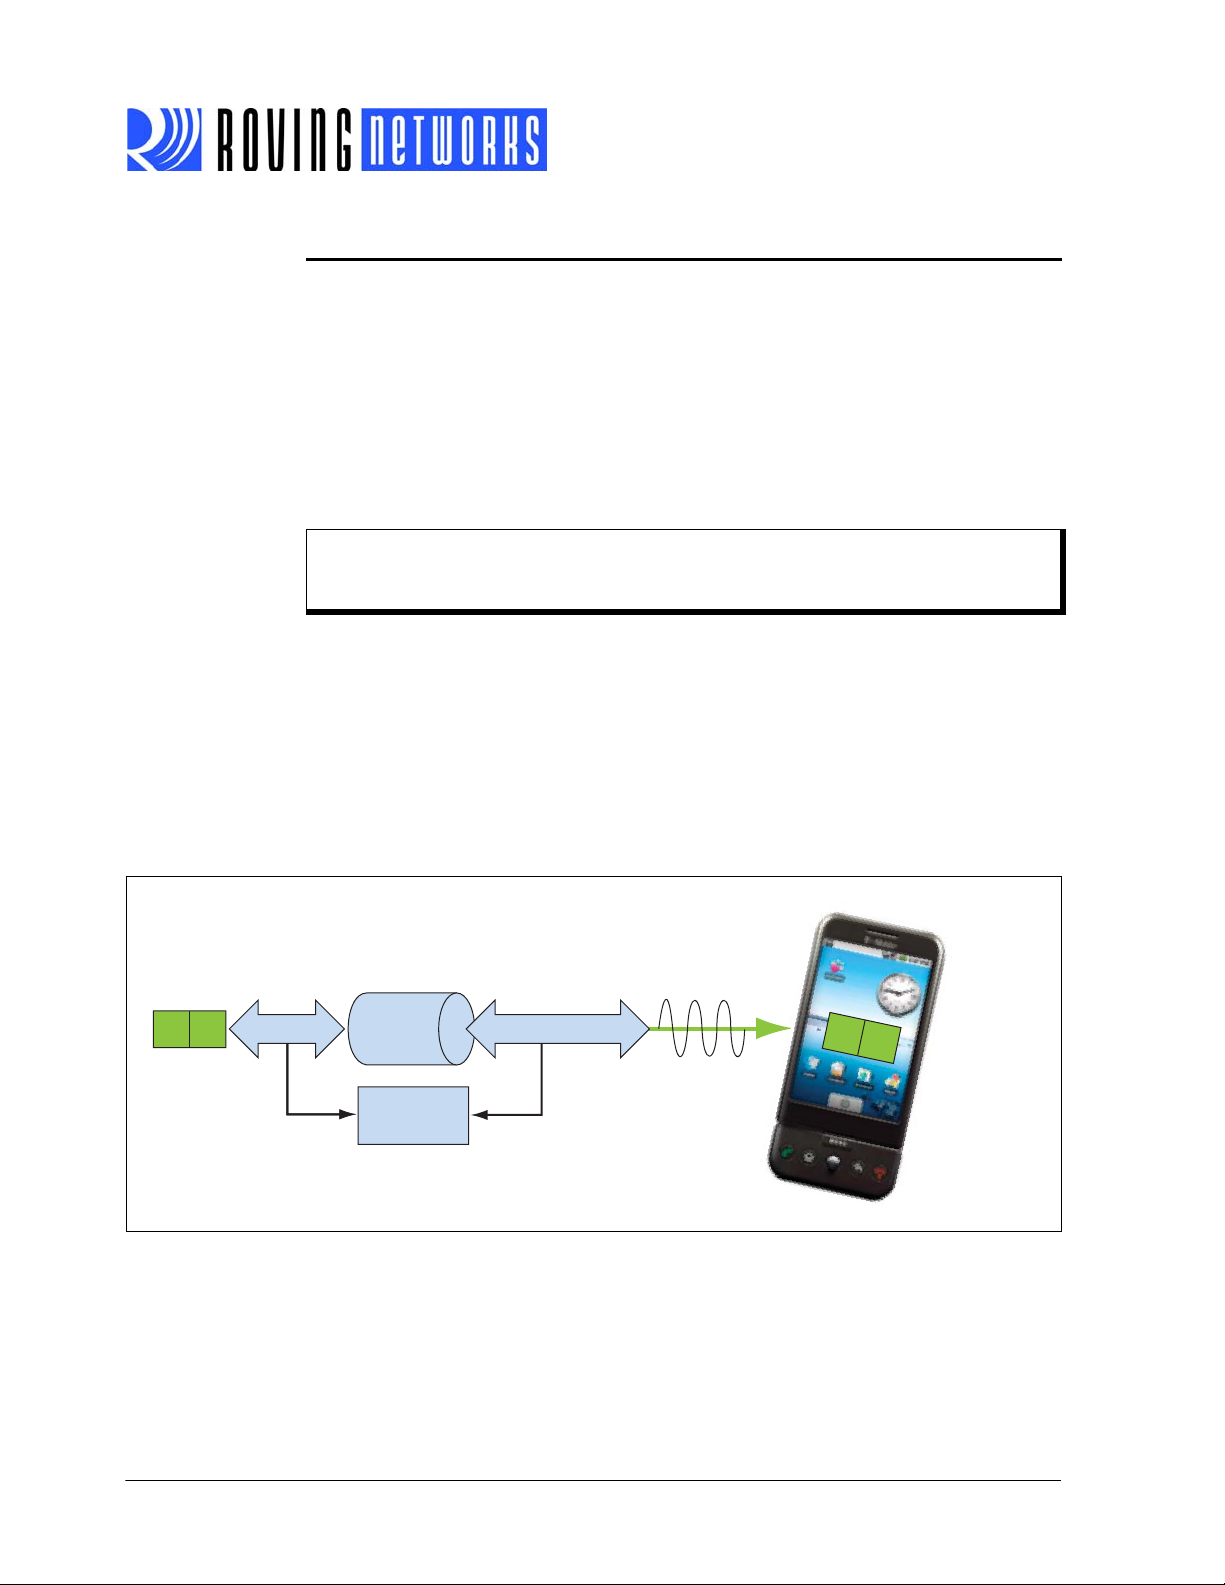
4.1 Command Mode vs. Data Mode
The Bluetooth device operates in two modes: data mode (default) and command mode. Upon
power up the device is in data mode. While in data mode, the module is essentially a data pipe.
When the module receives data from a remote Bluetooth device over a serial port profile (SPP)
connection, it strips the Bluetooth headers and trailers and passes the user data to the UART.
When data is written to the UART, the module constructs the Bluetooth packet and sends it out
over the Bluetooth SPP connection. Thus, the entire process of sending/receiving data to the
host is transparent to the end microprocessor. See Figure 1-1.
FIGURE 1-3: DATA & COMMAND MODES
www.rovingnetworks.com Version 1.0 12/10/12 page 6
Page 7

RN-4142-EK-UG
The default configuration for the Bluetooth device is:
• Bluetooth slave mode
• Keyboard default authentication mode (no pin code required)
• Serial port 115,200 Kbps baud rate, 8 bits, no parity, 1 stop bit
• Serial port flow control disabled
• Low power mode off
You configure the device by putting it into command mode and sending ASCII comman ds over
a serial port or the Bluetooth link. Once you change the configuration parameters, they persist
until you change them or perform a factory reset.
There are two ways to configure the Bluetooth module:
• Local configuration using your computer’s USB port
• Via Bluetooth
You need a terminal emulator to complete the setup.
Note: Suggested terminal emulator programs are TeraTerm (Windows OS) or CoolTerm
(Mac OS-X).
4.2 Configure the Module Locally Using the USB Port
Set up the RN-41-EK or RN-42-EK hardware as described in “Hardware Setup” on page 5. With
the Bluetooth device connected and powered on, run a terminal emulator and open the COM port
to which the cable is connected. You should configure the virtual COM port connected to the
RN-41-EK or RN-42-EK USB interface with the default settings (115,200 Kbps baud, no parity, 8
bits, 1 stop bit).
You can use command mode through the UART interface via the USB connector at any time
when the device does NOT have a Bluetooth connection, as wel l as under certain co nditio ns. If
the device is in configuration mode and a connection occurs, the device exits configuration mode
and data passes back and forth from the remote device.
Note: If the device is in Auto-Connect Master Mode, you cannot enter command mode
when connected over Bluetooth. See “Operating Modes” on page 9 for more information on the various operating modes.
4.3 Enter Command Mode
To enter command mode, launch a terminal emulator and specify the modu le’s default settings.
Table 4-1 shows the serial port settings.
TABLE 4-1: SERIAL PORT SETTINGS
Setting Value
Port COM port to which you attached the module
Baud rate 115200
Data rate 8 bits
Patiry None
Stop bits 1
Flow control None
Type $$$ into the terminal emulator to enter command mode.
The module returns the string CMD, which indicates that your connection and terminal setti ngs
are correct. While in command mode, the device accepts ASCII bytes as commands.
www.rovingnetworks.com Version 1.0 12/10/12 page 7
Page 8

RN-4142-EK-UG
When you power up the module, you must enter command mode within a 60 secon d configuration window; otherwise, the module goes into fast data mode in which all characters are ignored
including $$$. If the configuration timer expires while the device is in command mode, the device
does not go into fast data mode after exiting command mode. When you enter a valid command,
the module returns AOK. It returns ERR for an invalid command and ? for unrecognized commands. Type h <cr> to see a list of commands.
A quick check to confirm that you are in command mode is to type the X <cr> command after
entering command mode. This command shows the a summary of the module’s current settings,
such as the Bluetooth name, device class, and serial port setti ngs. See Figure 1-2.
To return to data mode, type --- <cr> or reset the device and re-connect.
FIGURE 1-4: VIEW CURRENT SETTINGS
www.rovingnetworks.com Version 1.0 12/10/12 page 8
Page 9

RN-4142-EK-UG
4.4 Operating Modes
The Bluetooth device has several operating modes, which you set using the SM comman d in
command mode.
Note: In all master modes, the device cannot be discovered or configured remotely over
Bluetooth.
• Slave Mode (SM,0)—Default mode, in which other Bluetooth devices can discover and
connect to the device. You can also make outbound connections in this mode.
• Master Mode (SM,1)—In this low-speed connection mode, the device makes connections
when a connect command (C) is received. This command can also contain the Bluetooth
address of the remote device. If a device is not specified, the module uses the stored
remote address. The connection can be broken if the special break character or string is
sent (use the SO command to set the break character). This mode is useful when you want
the device to initiate connections (not receive them). In this mode, the device is NOT discoverable or connectable.
• Trigger Mode (SM,2)—In this low-speed connection mode, the device makes connections
automatically when a character is received on the serial port (UART). The connection continues as long as characters are received on either end. The device has a configurable timeout (which you set using the ST command) that disconnects the module after the specified
number of seconds of inactivity (1 to 255) or a configurable break character is received.
• Auto-Connect Master Mode (SM,3)—In this mode, the device makes connections automat-
ically on power-up and re-connects when the connection is lost. This mode can be set by
command, or by setting the external dipswitch 3 during power up. If an address is not
stored, the device performs an inquiry process and the first device found that matches the
COD is stored. In this mode, high-speed data is passed without being interpreted; therefore, the connection cannot be broken via commands or software break characters. If a disconnect occurs, the device attempts to re-connect until successful.
• Auto-Connect DTR Mode (SM,4)—This mode must be set by command. It operates like
Auto-Connect Master Mode, except that you control connection and disconnection with
dipswitch 3. Turning the dipswitch on initiates the auto-connect process; turning the
dipswitch off causes a disconnect.
• Auto-Connect ANY Mode (SM,5)—This mode must be set by command. This mode oper-
ates like Auto-Connect DTR Mode, except that each time the dipswitch is set, an inquiry is
performed and the first device found is connected. The stored address is NOT used, and
the address found is never stored.
• Pairing Mode (SM,6)—In this mode, the device attempts to connect with the remote device
matching the store remote address. You set the remote address using the SR command.
www.rovingnetworks.com Version 1.0 12/10/12 page 9
Page 10

RN-4142-EK-UG
4.5 Configuration Switches
The evaluation boards have small configuration switches on th e bottom. You need a paper clip
or small screwdriver to flip them. Holding the board with the PCB antenna facing to the right, refer
to Figure 1-3 for the switch numbering and on/off positions.
FIGURE 1-5: CONFIGURATION SWITCHES
O On
1
2
3
4
Table 4-2 describes the functions controlled by the switches.
TABLE 4-2: CONFIGURATION SWITCH FUNCTIONS
Switch Function Default (Off) Description
1 Restore fac-
tory defaults
2 Automatic dis-
covery
3 Automatic
master
4 Default baud
rate
Do not restore factory defaults. Turn on the switch, power up the evaluation kit, and tog-
gle the switch ON-OFF-ON-OFF-ON to return the module to its factory settings. The green (labeled as S) LED
blinks quickly for a moment and then continues to blink
about once per second.
Automatic discovery is turned
off.
In slave mode, this switch sets a special class of device
that is used by the master to auto connect. If switch 3
also turned on, the module performs a search, stores,
and connects to a remote Roving Networks Bluetooth
device that has switch 2 turned on.
Automatic master is turned off. With this switch turned on, the module acts as Bluetooth
master and auto-connects to a stored remote address.
You must first set the Bluetooth address of the slave
device using the SR command or using instant cable
replacement settings.
With this switch turned off, the
default 115 K baud rate is over-
If this switch is turned on, the baud rate is 9600 and the
module ignores the software configuration.
ridden by software baud rate
configuration commands.
www.rovingnetworks.com Version 1.0 12/10/12 page 10
Page 11

RN-4142-EK-UG
4.6 Making a Bluetooth Connection
By default, the Bluetooth module acts as a slave and the PC is the master. You connect to the
Bluetooth module using your computer’s Bluetooth device manager, which varies depending on
the operating system. Regardless of the operating system, the process is the same: discovery,
pairing, and connecting.
4.6.1 DISCOVERY
When you turn on the RN-41-EK or RN-42-EK, the green LED (labeled as S) blinks once per second and the module is discoverable. Open yo ur PC’s Bluetooth devi ce manage r and choose to
add a new device. The Bluetooth device manager ’s icon is located in the bottom right corner of
your screen in the taskbar for Windows and in the upper right corner for Mac OS-X. The Bluetooth
device manager displays a list of discoverable Bluetooth device. The board displays as Fire-
Fly-XXXX, where XXXX are the last 2 bytes of the device’s Bluetooth address. See Figure 1-4.
FIGURE 1-6: DISCOVERY - ADD A BLUETOOTH DEVICE
4.6.2 PAIRING
To pair with the evaluation board, double-click the board’s name in the list. The firmware automatically stores up to 8 pairings from remote hosts in a first in, first out fashion. The evaluation
board’s default authentication mode is keyboard (no pin code required). However, most PCs
require authentication and display a pin code. If you are using a Bluetooth USB dongle
(e.g., RN-USB-T), your PC prompts you to choose how you want to pair . Figure 1-5 shows examples of pairing with and without a pin code.
Note: If your PC displays a pin code and asks you to confirm if it is correct, choose Yes.
www.rovingnetworks.com Version 1.0 12/10/12 page 11
Page 12

FIGURE 1-7: PAIRING - COMPARING PIN CODES & PAIRING OPTIONS
RN-4142-EK-UG
When the Bluetooth device manager completes pairing, it issues a message that the Bluetooth
device is installed on COMX where COMX is unique to your computer. In some cases, the Bluetooth device manager creates two COM ports; in this situation, only us e the COM port labeled
outgoing. Figure 1-6 shows example COM port settings.
FIGURE 1-8: PAIRING - BLUETOOTH COM PORT SETTINGS
www.rovingnetworks.com Version 1.0 12/10/12 page 12
Page 13

RN-4142-EK-UG
If the remote Bluetooth device does not require authentication , a connection can occur without
the pairing process. However the Bluetooth specification requires that if either device involved in
the pairing process requires authentication, the other device must participate to ensure a secure
link. Roving Networks modules default to an open mode, such that the module does NOT require
authentication. See “Security Modes” on page 15 for more information on using pass keys.
The module may use simple secure pairing (SSP) if it is attempting to pair with devices that support the Bluetooth specification version 2.1 + EDR. SSP does not require the user to remember
the pin code, but it asks to confirm the 6-digit number if the device has a display capability.
4.6.3 CONNECTING
In most cases, you connect from another device to the RN-41-EK or RN-42-EK as an outgoing
Bluetooth connection. You can also make an incoming connection in which the evaluation board
initiates the connection to the remote device.
4.6.3.1 Outgoing Connections
To establish an outgoing Bluetooth connection from a PC to the RN-41-EK or RN-42-EK board,
open the module’s outgoing COM port from your application or a terminal emulator. When you
establish a connection by opening the COM port, the evaluation board’s green LED (labeled as
S) goes on solid (not blinking) to indicate that the device is connected. The device remains connected until you close the COM port, remove power from the board, or terminate the connection
using the K,1 command. Refer to the Bluetooth Command Reference & Advanced Informati on
User’s Guide for more information on using commands.
Once connected, the device is in data mode allowing data to flow in both directions. The board’s
red LED (labeled as A) blinks once per second when data is transferred over the UART . For configuration and programming, the device must be in command mode. See “Enter Command
Mode” on page 7 for more information.
Note: Only one client can connect to a slave device at a time. As a master, the device can
make multiple connections, but only in a point-to-point, serialized fashion. The RN41
and RN42 modules do not currently support multi-point master mode.
4.6.3.2 Incoming Connections
For an incoming connection you use the port spec ified in your Bluetooth settings as incoming
(refer back to Figure 1-6). The PC or host listens for an incoming connection from the remote Bluetooth device, in this case the RN-41-EK or RN-42-EK. Perform the following ste ps to make in
incoming connection.
1. You need the MAC address of the PC’s Bluetooth radio to connect from the RN-41-EK or
RN-42-EK to the host PC. Open the PC’s Bluetooth advanced settings to find the MAC
address. See Figure 1-7.
www.rovingnetworks.com Version 1.0 12/10/12 page 13
Page 14

FIGURE 1-9: PC’S BLUETOOTH RADIO MAC ADDRESS
RN-4142-EK-UG
2. Pair your evaluation board with the PC as described in “Pairing” on page 11.
3. Open a terminal (called terminal A in this example) and connect it to the evaluation board’s
outgoing COM port. You can run this terminal on the host PC or another computer.
4. Open a second terminal (called terminal B in this example) on the host PC to listen for the
incoming Bluetooth connection using the incoming COM port number.
5. Type C,<MAC address> <cr> in terminal A to establish an SPP connection to the host PC.
See Figure 1-8 for an example connection.
6. Try the following commands:
• $$$ to enter command mode
• SO,% to enable status message to see connect/disconnect conditions
• R,1 to reboot
• $$$ to re-enter command mode
• + to enable local echo
• C,<MAC address> to attempt a connection with a remote device
Characters you type in terminal B are sent over Bluetooth to the host PC and appear in ter-
minal A. Any characters entered in terminal A are transmitted to terminal B.
7. To kill the connection, type the K,1 <cr> command in terminal B.
www.rovingnetworks.com Version 1.0 12/10/12 page 14
Page 15

FIGURE 1-10: TERMINALS A & B
RN-4142-EK-UG
4.7 Security Modes
The Bluetooth module supports authentication. If the local or remote Bluetooth device has
authentication enabled, a pin code is required the first time a connection is attempted. The pin
code is a series of numbers or characters from 1 to 16 characters in length . After you enter the
pin code, the Bluetooth devices compare them. If they match, a link key is generated and stored.
Usually, but not always, the remote device stores the link key. For subsequent connections, the
devices compare link keys. If they are correct, you do not need to re-enter the pin code.
If the remote device is a PC or PDA, the user generally is prompted to enter th is pin code. To
remove the stored link key on the remote device, you typically “unpair” or remove the device from
the Bluetooth manager. You can change the pin code to remove the link key on the Bluetooth
module, forcing a new pin code exchange to occur upon subsequent connection attempts.
Note: Only one master can connect to the Bluetooth module at a time.
www.rovingnetworks.com Version 1.0 12/10/12 page 15
Page 16

RN-4142-EK-UG
5.0 RESOURCES & RELATED DOCUMENTS
For more information, refer to the following sources:
• RN41/RN41N Class 1 Bluetooth Module Data Sheet
• RN42/RN42N Class 2 Bluetooth Module Data Sheet
• Bluetooth Command Reference & Advanced Information User’s Guide
6.0 DOCUMENT REVISION HISTORY
6.1 Version 1.0
Initial release.
7.0 ORDERING INFORMATION
Table 7-1 provides ordering information for the evaluation kits.
TABLE 7-1: EVALUATION KIT ORDERING INFORMATION
Part Number Description
RN-41-EK Evaluation kit for the RN41 (Class 1) Bluetooth module.
RN-42-EK Evaluation kit for the RN42 (Class 2) Bluetooth module.
Go to http://www.rovingnetworks.com for current pricing and a list of distributors carrying Roving
Networks products.
www.rovingnetworks.com Version 1.0 12/10/12 page 16
Page 17

TXD
RX D
GND
1
SPI _MOSI
2
PIO 6
3
PIO 7
4
RESET
5
SPI _SCK
6
PCM_CL K
7
PCM_SYNC
8
PCM_I N
9
PCM_OUT
10
VDD
11
GND
12
UART_RX
13
UART_TX
14
UART_RTS
15
UART_CTS
16
USB_D+
17
USB_D-
18
PIO 2
19
PIO 3
20
PIO 5
21
PIO 4
22
SPI _CS#
23
SPI _MI SO
24
GND
28
GND
29
AIO0
30
PIO831PIO932PIO1033PIO11
34
AIO135SHIEL D
0
M1 RN42 Module
SPI _MI SO
SPI _MOSI
SPI _SCK
SPI _SS
RT S
CT S
RESET _N
PIO 6
PIO 7
PIO 4
PIO 5
PIO 3
PIO 2
AIO1
AIO0
PIO11
PIO10
PIO9
PIO8
1
2
3
4
5
6
J3
SPI MASTER
SPI _MI SO
SPI _MOSI
SPI _SCK
SPI _SS
3.3V
3.3V
PCM_CL K
PCM_SYNC
PCM_OUT
PCM_I N
100k
R17
300k
R18
100k
R16
300k
R15
V
B1
V
B2
A
IO0
A
IO1
1
2
3
4
5
6
7
8
9
10
11
12
J1
HEADER 1
1
2
3
4
5
6
7
8
9
10
11
12
J2
HEADER 2
PIO 6
PIO 7
RESET _N
RX D
TX D
RT S
CT S
PIO 4
PIO 3
PIO 2
PIO11
PIO10
PIO 9
PIO 8
3.3V
VB1
VB2
SHDN
D_N
D_P
TXD
RXD
RTS
CTS
VBUS
RESET
18
3V 3OUT
16
USBDP
14
USBDM
15
GND
17
CBUS2
10
CBUS1
21
VCCIO
1
CBUS3
11
CBUS4
9
CBUS0
22
GND
20
RI
3
DCD
7
DSR
6
DTR
31
CTS
8
RTS
32
RXD
2
TXD
30
VCC
19
OSCI
27
OSCO
28
AGND
24
TEST
26
GND4THP
AD
33
FT232RQ
U3
100nF
C6
100nF
C5
100nF
C4
GND
5
D+
3
D-
2
VBUS
1
MTAB
6
USB Mini B
J4
3k3R12
3k3
R13
3k3
R11
3k3
R14
VBUS
3.3V VBUS
VI N
1
GND
2
SHDN
3
BYP
4
VOUT
5
U1 TC1185
1uF
C2
1uF
C1
SHDN
3k3
R1
1
2
3
4
S1
3k3R10
3k3
R9
3k3
R8
3k3
R7
3.3V
PIO 4
PIO 3
PIO 6
PIO 7
Red LEDD2
Activity
PIO 5
3.3V
PIO 8
Green LED
D1
Connection Status
470
R2
470
R3
APPENDIX A: RN-41-EK & RN-42-EK SCHEMATIC
Figure 1-9 shows the schematic for the RN-42-EK evaluation board. The RN41 and RN42 mod-
ules are pin compatible; th erefore, the schematic applies to both boards.
FIGURE 1-11: RN-41-EK & RN-42-EK SCHEMATIC
RN-4142-EK-UG
www.rovingnetworks.com Version 1.0 12/10/12 page 17
Page 18

NOTES:
RN-4142-EK-UG
www.rovingnetworks.com Version 1.0 12/10/12 page 18
 Loading...