

Page 1

! !
RN-131/171- PICTAIL-UM
RN-131-PICTAIL & RN-171-PICTAIL
Evaluation Boards
USER MANUAL
© 2012 Roving Networks. All rights reserved.
RN-131/171-PICTAIL-UM Version 1.1 9/20/2012
Page 2

!
www.rovingnetworks.com Version 1.1 9/20/2012 2
RN-131/171- PICTAIL- UM
OVERVIEW
The RN-131 and RN-171 WiFly radio modules are complete, standalone wireless LAN access devices. Each module
contains a TCIP/IP stack and related applications. After the module is configured, the radio can access the Wi-Fi network
automatically, and transmit and receive data over a UART.
General Description
The RN-131-PICTAIL and RN-171-PICTAIL evaluation boards work seamlessly with the Microchip Technology PIC18
Explorer Development Board. The evaluation boards plug into the PICtail™ modular connector on the PIC18 Explorer
Board, and add wireless functionality to PIC18-based microcontroller designs.
The evaluation boards are preloaded with firmware to simplify integration and minimize application development. In the
simplest configuration, the hardware only requires four connections (PWR, TX, RX, and GND) to create a wireless data
connection. The microcontroller can communicate with the boards via the UART and SPI interfaces, and can drive LEDs,
wake the boards, and reset them. The evaluation boards are updated and controlled with a simple ASCII command
language. Once the boards are set up, they can scan to find an access point, associate, authenticate, and connect over
any Wi-Fi network.
The PIC18 Explorer Board (DM183032) is a development platform equipped with a 28-pin PICtail connector and PIM that
can accommodate various versions of the 8-bit PIC16 and PIC18 microcontroller families. The PIC18 Explorer Board’s
8-bit microcontroller communicates with the RN-131-PICTAIL/RN-171-PICTAIL evaluation board via the PICtail connector.
This document describes how to use the RN-131-PICTAIL/RN-171-PICTAIL evaluation board connected to a PIC18
Explorer Board to associate with a Wi-Fi network and communicate with other devices within a LAN. Communication with
other LAN devices is performed using telnet.
RN-131-PICTAIL/RN-171-PICTAIL Module Features
• FCC/CE/IC certified 2.4-GHz IEEE 802.11b/g transceiver
• Plugs into the PICtail Plus connector on the PIC18 Explorer and Explorer 16 Development Boards
• Adds wireless capability to designs targeting the PIC18 Explorer and Explorer 16 boards
• Configurable transmit power: 0 to 10 dBm (RN-171-PICTAIL)
• PCB trace antenna (RN-171-PICTAIL) and on-board ceramic chip antenna (RN-131-PICTAIL)
• Ultra-low power
o 4-uA sleep, 38-mA Rx, 120-mA Tx at 0 dBm (RN-171-PICTAIL)
o 4 uA sleep, 40 mA Rx, 210 mA Tx (RN-131-PICTAIL)
• High throughput: 921 Kbps TX, 500 Kbps RX data rate with TCP/IP and WPA2 over UART, up to 2 Mbps over
SPI slave
• UART interface with hardware flow control
• SPI interface with slave interrupt
• Real-time clock for wakeup and time stamping
• 3 status LEDs (2 configurable)
• Powered by PIC18 Explorer and Explorer 16 boards
• Supports ad hoc and infrastructure networks
• Wi-Fi Alliance certified for WPA2-PSK
• Complete on-board TCP/IP networking stack
• Environmentally friendly: RoHS compliant
Page 3

!
www.rovingnetworks.com Version 1.1 9/20/2012 3
RN-131/171- PICTAIL- UM
Demo Applications
The example applications provided with this document include an MPLAB X project and 2 pre-compiled .hex files.
• The MPLAB X project files provide a sample 8-bit application framework that you can customize to configure and
control the RN-131/RN-171 from an 8-bit Microchip microcontroller.
• You use the pre-compiled sample application ConfigureInCmdMode.hex to configure the RN-131/RN-171
module.
• SampleTelnetApp.hex accepts specific telnet commands from a remote device and turns on/off the LEDs on
either the RN-131/RN-171 module or the PIC18 Explorer Development Board.
The following sections describe these applications in detail.
GETTING STARTED
This section describes how to setup up the PIC18 Explorer Board and to run the sample demo applications.
Hardware Requirements
To run the demo applications, you need the following hardware:
• RN-131-PICTAIL or RN-171-PICTAIL evaluation board
• PIC18 Explorer Development Board equipped with a PIC18F87J11 PIM (MA180020)
• Microchip programmer (e.g., ICD3 or Real Ice)
• 2 jumper wires to configure jumpers J4 and J13 on the PIC18 Explorer Board
NOTE: You cannot use the default jumper settings for J4 and J13. Instructions for configuring the jumpers are
provided in “Demo Setup” on page 4.
• 802.11b/g-compliant Wi-Fi access point
• Serial cable or USB-to-serial converter cable
Software Requirements
You need the following software tools/applications to run the demo applications:
• Terminal emulator application such as TeraTerm or CoolTerm—You will use the terminal emulator to send
configuration commands to the module over a UART interface. The emulator also displays information
transmitted from the module.
• MPLAB X version 1.2 or higher—You will use this application with the programmer to load the application into the
PIC, and to modify and customize the application.
• XC8 v1.10 compiler—You will use the compiler to build a customized application.
Sample Application Code
You can obtain the sample application code described in this user manual at www.microchip.com/wireless.
Page 4

!
www.rovingnetworks.com Version 1.1 9/20/2012 4
RN-131/171- PICTAIL- UM
Demo Applications
This section demonstrates how to use the demo applications to accomplish the following tasks:
• Configure the module to join a known, user-specified access point automatically.
• Communicate with the module via a telnet session to turn on/off LEDs using a command set that the application
running on the PIC recognizes.
Set Up Hardware
Perform the following steps to set up the hardware and prepare it for configuration:
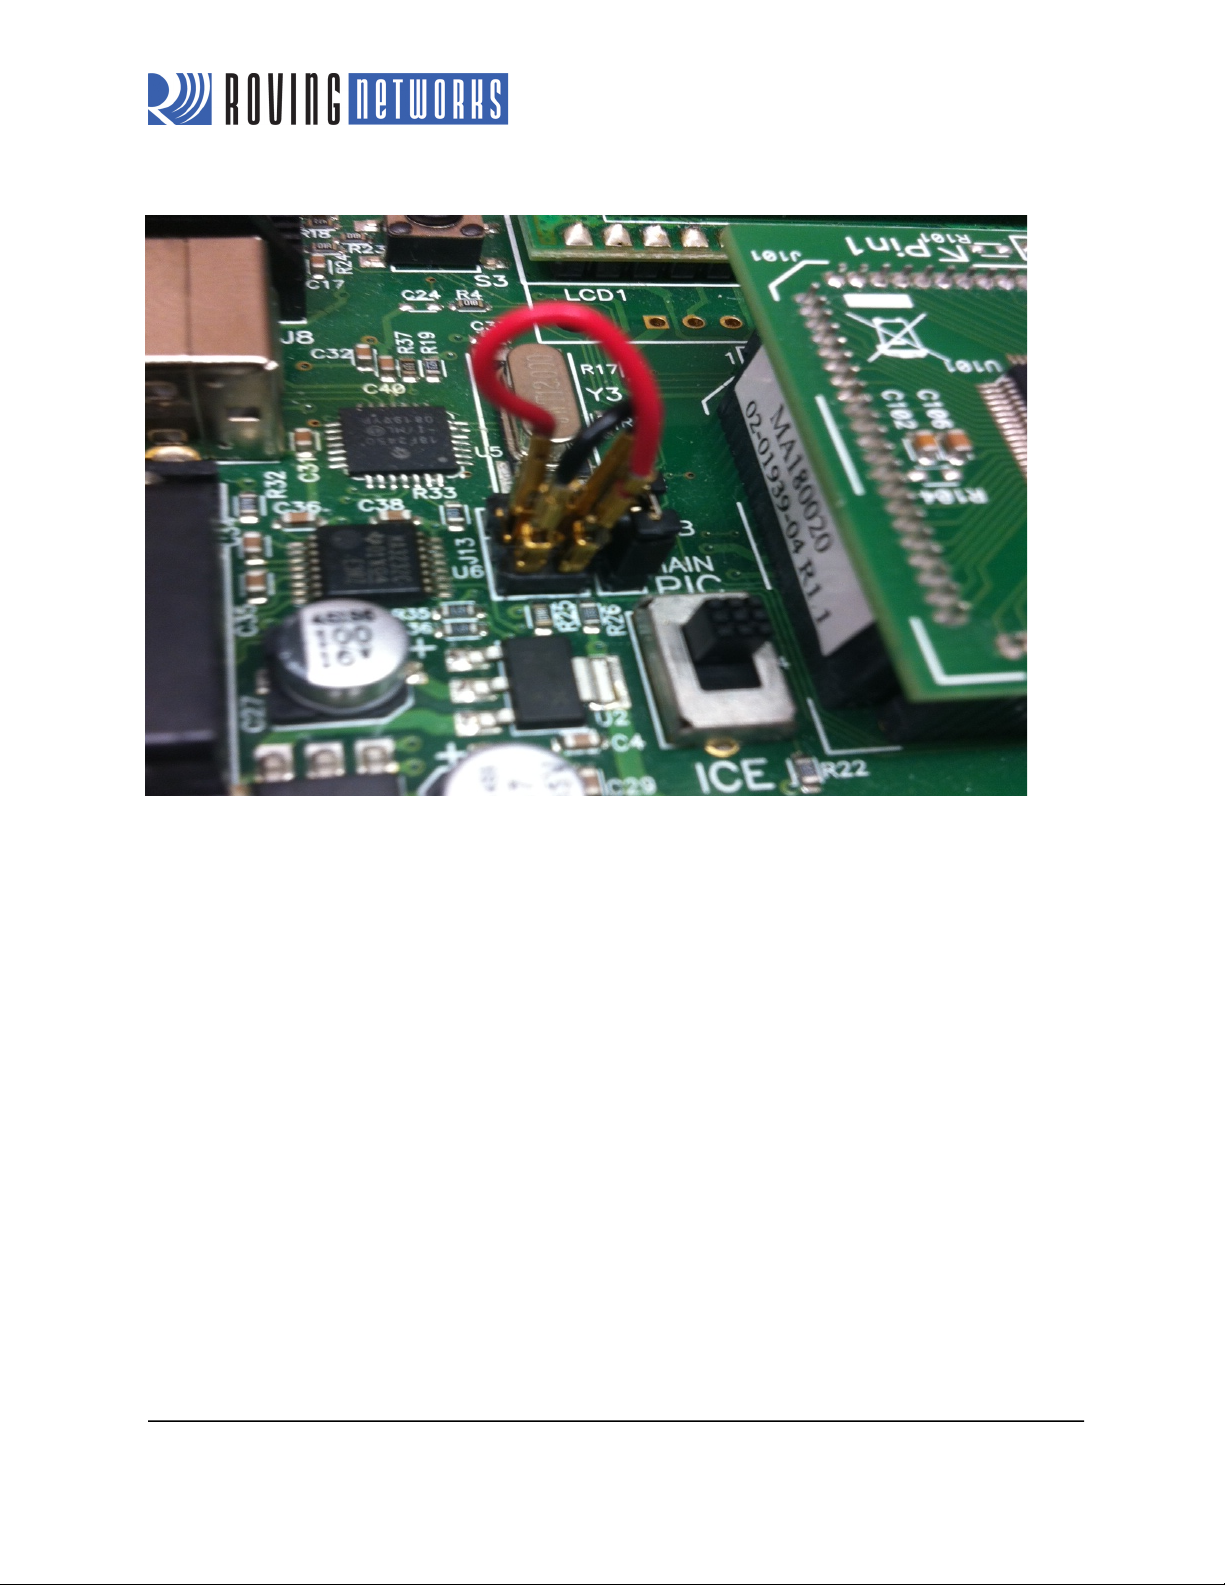
1. Plug the RN-131-PICTAIL/RN-171-PICTAIL evaluation board into the PIC18 Explorer Board’s PICtail connector.
See Figure 1.
Figure 1. Modules Connected to PIC18 Explorer Board
RN-171-PICTAIL Connected to the PIC18 Board
RN-131-PICTAIL Connected to the PIC18 Board
!
!
2. Configure the PIC18 Explorer Board’s J4 and J13 jumpers as shown in Figure 2. This configuration is for
command mode operation.
Page 5
!
www.rovingnetworks.com Version 1.1 9/20/2012 5
RN-131/171- PICTAIL- UM
Figure 2. Jumper Selection for Command Mode Operation
!
3. Connect a serial cable from the PIC18 Explorer Board’s DE9 connector to the PC. If you are using a laptop that
does not have a serial connector, use a USB-to-serial converter cable to connect the serial cable to the laptop’s
USB port.
4. Connect the programmer to the PIC18 Explorer Board and apply power.
Program the PIC18F87J11 & Configure the RN-131/RN-171
In this step you configure the RN-131/RN-171 modules so that they automatically search for, and join, a preferred access
point. First, you use the following steps to program the PIC18F87J11 with software that allows the RN-131/RN-171 to be
configured for its current operating environment. These steps are specific to the PIC18 Explorer Board because of the way
in which the UARTs are connected on the board.
1. Using the MPLAB X IDE and the programmer, load the ConfigureInCmdMode.hex file into the PIC18F87J11.
This application performs two important tasks:
• It configures the PIC18F8i7J11 I/O pins appropriately.
• It allows the UART signal to traverse from the Explorer 18 board’s DE9 connector to the
RN-131-PICTAIL/RN-171-PICTAIL, temporarily bypassing the PIC (this step is specific to the PIC18 Explorer
Board).
2. Open your terminal emulator to the COM port of the PIC18 Explorer Board/RN-131-PICTAIL/RN-171-PICTAIL.
The serial port settings are 9600 baud, 8-bits data, no parity, 1-stop bit, and no flow control.
Page 6

!
www.rovingnetworks.com Version 1.1 9/20/2012 6
RN-131/171- PICTAIL- UM
3. Type the following commands in the console of your terminal emulator:
$$$ This command places the RN-131/RN-171 module in command mode.
scan <cr> The device scans for networks and produces a list of available access points (see
Figure 3 for an example). The access point to which you wish to connect should be
listed. If it is not, repeat the scan command.
join # XX <cr> Associate with the access point, where XX is the access point’s number interest as
shown in the scan report.
leave <cr> This command asks the device to leave the network.
Figure 3. Access Point List
!
4. Store the parameters from step 3 into the RN-131/RN-171 module’s non-volatile memory so that they can be
used in the next application you run on the PIC18F87J11. Type the following commands in the console of your
terminal emulator:
set wlan ssid <string> <cr> Set the network’s SSID where <string> is the SSID (e.g., set wlan ssid
RovingNET).
set wlan pass <string> <cr> Set the passphrase to use when joining where <string> is the passphrase
(e.g., set wlan pass duckmauifries).
save <cr> Save the settings to persistent storage; reused when joining.
reboot <cr> Reboot the module so that the settings take effect.
Data Mode Operation
In the following steps you load an application into the PIC18F87J11 that allows the RN-131/RN-171 module to operate in
data mode and accept a telnet connection request. Additionally, the application lets you control the module’s LEDs by
sending specific PIC commands.
1. Configure the jumpers J4 and J13 as shown in Figure 4. This setting allows the PIC’s UART to communicate with
RN-131/RN-171 module’s UART via the PICtail connector, and also allows the module’s transmitted data to echo
back to the terminal emulator’s console. (This setting is specific to the PIC18 Explorer Board.)
Page 7

!
www.rovingnetworks.com Version 1.1 9/20/2012 7
RN-131/171- PICTAIL- UM
Figure 4. Data Mode Operation Jumper Selection
!
2. Use the MPLAB X IDE and the programmer to load the SampleTelnetApp.hex demo application into the
PIC18F87J11.
3. Press the MCLR reset button on the Explorer 18 board and observe the output transaction on the terminal
emulator console. A normal sequence is similar to that shown in Figure 5, i.e., the device is associated with the
designated access point, and the yellow LED on the RN-131-PICTAIL/RN-171-PICTAIL is illuminated.
Page 8

!
www.rovingnetworks.com Version 1.1 9/20/2012 8
RN-131/171- PICTAIL- UM
Figure 5. RN-131/RN-171 Association Start-Up Sequence
!
4. In the console, note the IP address that the access point assigns to the RN-131/RN-171 module. The IP is
unique to each wireless environment’s DHCP server. You will use this IP address to open a telnet session with the
device.
NOTE: The application source code includes a file called ConfigApp.h. Two parameters in this file establish which SSID
and passphrase is used if the default access point cannot be found:
#define NETWORK_SSID "xxxstringxxx"
#define NETWORK_PASS "yyystringyyy"
You can change these parameters to match your local network environment. Then, rebuild and re-load the
updated application. The application then uses these settings to search for the access point to join, in case the
default device parameters stored in the device cannot be found or if found, they do not allow association.
Page 9

!
www.rovingnetworks.com Version 1.1 9/20/2012 9
RN-131/171- PICTAIL- UM
The RN-131/RN-171 module is now associated to an access point and is operating in data mode. Use the following steps
to open a telnet session with the device and send it commands:
1. Associate your computer’s Wi-Fi connection with the same access point as the RN-131/RN-171 module.
2. On your computer, open a command line session and type the command:
telnet <address> 2000, where <address> is the IP address of the RN-131/RN-171 module.
For example: telnet 192.168.1.50 2000
2000 is the port number on which the RN-131/RN-171 module listens for telnet session commands.
3. The telnet console should display the echoed response *HELLO*.
4. Anything you type in the telnet console, followed by a <cr>, is echoed on the RN-131/RN-171 module’s console.
Type some random strings and observe the echoing.
5. The PIC18F87J11 connected to the RN-131/RN-171 module can recognize and act on the following commands:
MOD_TON_GRN Turn on module’s green LED.
MOD_TOFF_GRN Turn off module’s green LED.
EXP_TON_LED1 Turn on Explorer Board’s D8 LED.
EXP_TOFF_LED1 Turn off Explorer Board’s D8 LED.
EXP_TON_LED2 Turn on Explorer Board’s D7 LED.
EXP_TOFF_LED1 Turn off Explorer Board’s D7 LED.
Type one of these commands in the telnet console, either by itself or embedded in a longer string, followed by a
<cr>. Observe that you can turn on or off the appropriate LEDs on either the evaluation board or the PIC18
Explorer Board.
You have completed the application demonstration. The next section describes how the software is designed for PIC18
microcontroller.
Page 10

!
www.rovingnetworks.com Version 1.1 9/20/2012 10
RN-131/171- PICTAIL- UM
SAMPLE APPLICATION DESIGN
This chapter provides a high-level overview of how the sample demo application was designed, and shows some of the
APIs you can use to communicate with RN-171 module.
Demo Application Flow Diagram
Figure 6 shows the demo application flow diagram.
Figure 6. Flow Diagram
!
Initialize the PIC18 Explorer Board Hardware
During this processing stage, the void BoardIint(void) API function performs the following tasks:
• Chooses the external 10-MHz crystal as the clock source.
• Configures the ports/pins as digital and selects their direction to match the functional requirements of the PICtail
connector.
• Turns off the LEDs.
• Clears the interrupt flags.
• Disables the peripheral interrupts.
Power Up
Initialize Explorer 18
Hardware
Initialize PIC18 UART
Reset RN-171 Module
Check RN-171 Status
Associated?
yesno
Set Command Mode
Congure & Save
Reboot
Enable RCV INT
Process Commands
Page 11

!
www.rovingnetworks.com Version 1.1 9/20/2012 11
RN-131/171- PICTAIL- UM
Initialize the PIC’s UART
The void ConsoleInit(void) API function initializes the PIC’s UART1, which communicates with the RN-131/RN-171
module. It sets the UART’s baud rate to 9600 baud, 8 bits data, 1 stop bit, no parity, and no flow control. These settings
are the default for the RN-131/RN-171 module. To change the baud rate, modify the #define BAUD_RATE 9600 macro
in the console.h header file, and re-initialize the UART.
The ConsoleInit( ) function enables both transmit and receive UART capabilities, but their respective interrupts are
disabled until the application is prepared to receive them. Later, receive interrupts are enabled. Transmit interrupts remain
disabled.
Reset the RN-171 Module
The PICtail connector has an active-low reset pin (RB1) that is used to reset the RN-131/RN-171 module after the PIC18
Explorer Board and UART are properly initialized. The void rn_reset_wifi(void) API function is used for this reset operation.
It transitions the reset pin from high to low, holds the pin low for 10 ms, and then returns it high. This reset action triggers
the module to begin its joining procedure.
Check Module’s Status
Immediately after resetting the module, the PIC’s UART receiver interrupt is enabled. This process prepares the PIC to
receive the information that is transmitted from the RN-171’s UART as it goes through its start up procedure.
The PIC18 parses the RN-171 output and searches for the module’s IP address if it was successful in associating with an
access point. If a valid IP address is received, the assumption is made that the device is safely on a network and is in data
mode. In this case, the PIC18 waits to receive commands from the RN-131/RN-171 module in an endless loop. The PIC18
acts on each valid command as it receives it.
Command Mode
If the PIC18 application detects that the RN-171 module was not successful in its start-up attempt to associate with an
access point, the PIC’s application attempts to instruct the module to associate with a specific access point. The PIC18
application sends the following commands to the module in sequence:
$$$ Put the module into command mode.
set wlan ssid <string> Set the network’s SSID where <string> is the SSID.
set wlan pass <string> Set the passphrase to use when joining where <string> is the passphrase.
save Save the settings to persistent storage; reused when joining.
reboot Reboot the module so that the settings take effect.
When successful, the module reboots and associates with the specified access point. The following section describes the
APIs used to carry out these operations.
Page 12

!
www.rovingnetworks.com Version 1.1 9/20/2012 12
RN-131/171- PICTAIL- UM
Primary Module Communications API Functions
The API function that tells the device to go into command mode is:
err_t module_send_cmd(const char *response, const char *fmt, ...)
This function accepts 2 or more parameters (i.e., a variable length parameter list). The first parameter, response, is the
reply expected from the RN-171 module after it has processed the command. The command is carried in the fmt
parameter. For example, if the function is called as follows:
retValue = err_t module_send_cmd(“CMD”, “$$$”);
The command is $$$ and the expected return is CMD. For a more complex instantiation such as:
retValue = module_send_cmd(CMD_AOK, "set wlan ssid %s", NETWORK_SSID)
The variable parameter list is essential to properly resolve the %s into the value of the NETWORK_SSID macro.
The next API demonstrates how you can combine individual commands inside a single function to carry out a more
complex operation, such as joining a network. The following API function forces the device into command mode, saves the
SSID and passphrase, and reboots the module.
err_t module_network_connect(void);
Internally, it sends a total of 5 commands.:
module_send_cmd("CMD", "$$$")
module_send_cmd(CMD_AOK, "set w s %s", NETWORK_SSID)
module_send_cmd(CMD_AOK, "set w p %s", NETWORK_PASS)
module_send_cmd(NULL, "save")
module_send_cmd(NULL, "join")
This function represents a typical API that sends a sequence of commands to the module to carry out a complex task.
Most applications follow a similar pattern.
RESOURCES & RELATED DOCUMENTS
For more information, refer to the following sources, which are available on the Support page on the Roving Networks
website at http://www.rovingnetworks.com/support.php:
• RN-171 Data Sheet
• RN-131 Data Sheet
• Advanced User Manual
• WiFly Training Presentation
• Drivers, tools, and utilities
Page 13

!
www.rovingnetworks.com Version 1.1 9/20/2012 13
RN-131/171- PICTAIL- UM
BOARD SCHEMATICS
Figures 7 and 8 show the schematics for the RN-131-PICTAIL and RN-171-PICTAIL evaluation boards, respectively.
Figure 7. RN-131-PICTAIL Board Schematic
!
RB2/SS1/AN2
1
RF2/U1RX_E
2
RF6/SCK1
3
RF3/U1TX_E
4
RF7/SDI 1_E
5
RG2/SCL1
6
RF8/SDO1_E
7
RG3/SDA1
8
GND
9
GND
10
RB0/AN0
11
RB1/AN1
12
RB3/AN3
13
RB4/AN4
14
GND
15
GND
16
RE9/I NT2
17
RE8/I NT1
18
RD14/U1CTS_E19RD15/U1RTS_E
20
3.3V
21
3.3V
22
5V
23
5V
24
9V
25
9V
26
RG0
27
RF0
28
RG1
29
RF1
30
J2 PI CTAI L PLUS 30 Pin
RE2
1
RA5
2
RE3
3
RA4
4
RA7/OSC1
5
RA3
6
RA6/OSC2
7
RC5
8
RC7
9
RC4
10
RC6
11
RC3
12
RB7
13
RA0
14
RB6
15
RA1
16
RB5
17
RA2
18
RB4
19
RC0
20
RB3
21
RC1
22
RB2
23
RC2
24
RB1
25
V_VAR
26
RB0
27
GND
28
J1 PICTAI L 28 Pin
29 GPIO_4
29
30 SENSOR_1
30
31 SENSOR_2
31
32 SENSOR_3
32
33 SENSOR_POWER
33
34 SENSOR_0
34
36
G
ND
36
EPC_A 6
6
EPC_B 7
7
SUPERCAP_BAL ANCE 8
8
FORCE_AWAKE 9
9
UART_RTS(GPI O_13) 10
10
UART_CTS(GPI O_12) 11
11
UART_RX(GPI O_11) 12
12
UART_TX (GPI O_10) 13
13
SENSOR_6 1
1
SENSOR_4 2
2
SENSOR_5 3
3
SENSOR_7 4
4
RESET 5
5
SPI_MOSI 14
14
SPI_SCK 15
15
SPI_MISO 16
16
SREG _OUT 17
17
SREG_IN 18
18
GND 19
19
BATT 20
20
VDD 21
21
IS
P
_
TX
2
2
22
23 ISP_RX
23
24 GPIO_9
24
25 GPIO_8
25
26 GPIO_7
26
27 GPIO_6
27
28 GPIO_5
28
37 GN D
37
38 GND
38
39 GND
39
40 GN D4041 GN D
41
42 GND
42
43 GND
43
44 GND
44
M2
RN131 Module
VDD3V3
V
DD3V3
PIC_CTS PIC_RTS
PIC_RX
PIC_TX
SS
SCK
MI SO
MOSI
PIC_TX
PIC_RX
SCK
MI SO
MOSI
PIC_CTS
PIC_RTS
VDD3V3
PIC_CTS
PIC_RTS
UART_TX
SS
SCK
MI SO
MOSI
ISP_TX
ISP_RX
STATUS_L ED
WAKEUP
RESET
100k
R13
100k
R15
100k
R16
100k
R17
SIRQ
STATUS_L ED
SS
MI SO
MOSI
SIRQ
100k
R14
VDD3V3
WAKEUP
RESET
RESET
WAKEUP
PIC_ L EDR
PIC_ L EDR
SEN2
SEN3
SEN0
SIRQ
SIRQ
PIC_ L EDY
PIC_ L EDY
PIC_TX
i Power Net
i
Power Net
220R
R18
Green LED
D4
STAT US
_LE D
220R
R19
Red LED
D5
PIC_L EDR
220R
R20
PIC_L EDY
Yellow LED
D6
SEN0
100k
R22
220k
R21
PIC_TX
3k3
R12
1
2
3
4
S2
UART_TXPIC_RX
PIC_TX
ISP_TX
ISP_RX
SEN2
SEN3
SS
10uF
C3
10uF
C4
VDD3V3
Vin
1
GND
2
Vout
3
Tab
4
TC1262- 3.3VU2Vin
i Power Net
Vin
ISP_ T X
ISP_ R X
1 2
3 4
5 6
7 8
J3
ISP Connector
UART_TX
PIC_TX
RESETWAKEUP
VDD3V3
Page 14

!
www.rovingnetworks.com Version 1.1 9/20/2012 14
RN-131/171- PICTAIL- UM
Figure 8. RN-171-PICTAIL Board Schematic
!
!
29 SENSOR_0
29
30 SENSOR_1
30
31 SENSOR_2
31
32 SENSOR_3
32
33 SENSOR_POWER
33
34 VDD_3V3_RF
34
35 SENSOR_4
35
36 SENSOR_5
36
GPI O_7 6
6
GPI O_6 7
7
GPI O_5 8
8
GPI O_4 9
9
VDD_3V3 10
10
GPI O_3 11
11
GPI O_2 12
12
GPI O_1 13
13
GND 1
1
ISP_TX 2
2
ISP_RX 3
3
GPI O_9 4
4
GPI O_8 5
5
GND 14
14
FL ASH_CS 15
15
SPI _MI SO 16
16
SPI _SCK 17
17
SPI _MOSI 1 8
18
VDD_3V3_SW 19
19
GND 20
20
G
ND 21
21
GND 22
22
GND 23
23
ANTENNA 24
24
GND 25
25
G
ND 26
26
GND 27
27
28 GND
28
37 SENSOR_6
37
38 SENSOR_7
38
39 GND
39
40 RESET
40
41 FORCE_AWAKE
41
42 GPI O_14
42
43 GPI O_13 (UART_RTS)
43
44 GPI O_12 (UART_CTS)
44
45 GPI O_11 (UART_RX)
45
46 GPI O_10 (UART_TX)
46
47 GND
47
48 3
V
3_RE G_C TR L
48
49 V BA T T
49
M1
RN171 Module
A1
VDD3V3
VDD3V3
VDD3V3
PIC_CTS
PIC_RTS
UART_TX
3k3
R8
ISP_TX
ISP_RX
220R
R10
G
r
een L E D
D1
STATUS_LED
RESET
WAKEUP
1
2
3
4
S1
UART_TXPIC_RX
PIC_TX
ISP_TX
ISP_RX
STATUS_L ED
SS
SCK
MI SO
MOSI
SIRQ
220R
R9
Red LED
D2
P
IC
_
L
E
D
R
SEN2
SEN3
SEN2
SEN3
SEN0
SEN0
100k
R7
220k
R6
220R
R11
PIC_L EDY
Yellow LED
D3
PIC_TX
PIC_TX
iRF Net
100k
R1
100k
R3
100k
R5
100k
R4
STATUS_L ED
SS
MI SO
MOSI
SIRQ
100k
R2
VDD3V3
VDD3V3
Vin
1
GN
D
2
Vout
3
Tab
4
TC1262- 3.3VU1Vin
10uF
C1
10uF
C2
RB2/SS1/AN2
1
RF2/U1RX_E
2
RF6/SCK1
3
RF3/U1TX_E
4
RF7/SDI 1_E
5
RG2/SCL1
6
RF8/SDO1_E
7
RG3/SDA1
8
GND
9
GND
10
RB0/AN0
11
RB1/AN1
12
RB3/AN3
13
RB4/AN4
14
GND
15
GND
16
RE9/I NT2
17
RE8/I NT1
18
RD14/U1CTS_E19RD15/U1RTS_E
20
3.3V
21
3.3V
22
5V
23
5V
24
9V
25
9V
26
RG0
27
RF0
28
RG1
29
RF1
30
J2 PICTAI L PLUS 30 Pin
RE2
1
RA5
2
RE3
3
RA4
4
RA7/OSC1
5
RA3
6
RA6/OSC2
7
RC5
8
RC7
9
RC4
10
RC6
11
RC3
12
RB7
13
RA0
14
RB6
15
RA1
16
RB5
17
RA2
18
RB4
19
RC0
20
RB3
21
RC1
22
RB2
23
RC2
24
RB1
25
V_VAR
26
RB0
27
GND
28
J1 PICTAI L 28 Pin
VDD3V3VDD3V3
PIC_CTS PIC_RTS
PIC_RX
PIC_TX
SS
SCK
MI SO
MOSI
PIC_TX
PIC_RX
SCK
MI SO
MOSI
PIC_CTS
PIC_RTS
WAKEUP
RESET
RESET
WAKEUP
PIC_L ED R
PIC_L ED R
SIRQ
SIRQ
PIC_L ED Y
PIC_L ED Y
i
Power Net
SS
Vin
ISP_ TX
ISP_ R X
1 2
3 4
5 6
7 8
J3
ISP Connector
UART_TX
PIC_TX
RESETWAKEUP
VDD3V3
Page 15

!
www.rovingnetworks.com Version 1.1 9/20/2012 15
RN-131/171- PICTAIL- UM
NOTES
!
Page 16

!
www.rovingnetworks.com Version 1.1 9/20/2012 16
RN-131/171- PICTAIL- UM
Roving Networks, Inc.
102 Cooper Court
Los Gatos, CA 95032
+1 (408) 395-5300
www.rovingnetworks.com
Copyright © 2012 Roving Networks. All rights reserved. Roving Networks is a
registered trademark of Roving Networks. Apple Inc., iPhone, iPad, iTunes, Made
for iPhone are registered trademarks of Apple Computer.
Roving Networks reserves the right to make corrections, modifications, and other
changes to its products, documentation and services at any time. Customers
should obtain the latest relevant information before placing orders and should verify
that such information is current and complete.
Roving Networks assumes no liability for applications assistance or customer’s
product design. Customers are responsible for their products and applications
which use Roving Networks components. To minimize customer product risks,
customers should provide adequate design and operating safeguards.
Roving Networks products are not authorized for use in safety-critical applications
(such as life support) where a failure of the Roving Networks product would
reasonably be expected to cause severe personal injury or death, unless officers of
the parties have executed an agreement specifically governing such use.
 Loading...