


ROUTE 66 MINI & MAXI User Manual
Version 2.0
April 2008
Copyright © 1993-2008 ROUTE 66. All rights reserved. ROUTE 66 and the
ROUTE 66 logo are registered trademarks. Data copyright © NAVTEQ B.V.
IMPORTANT REMARK: No part of this publication may be multiplied, be
stored in a databank and electronically, mechanically, through
photocopying, on sound carriers or in any other way be copied, without
the explicit written approval of ROUTE 66. All other marks are the property
of their respective owners. The information contained in this document is
subject to change without prior notice.
2

Contents
Welcome ___________________________________________________________________ 9
WHAT SHOULD I DO FIRST? ___________________________________________________ 10
Preparing Your Device _______________________________________________________ 11
Launching the Application ____________________________________________________ 11
Detecting Your GPS Position___________________________________________________ 12
Common Buttons ___________________________________________________________ 13
The Keyboard ______________________________________________________________ 14
Using Filters in Lists _________________________________________________________ 15
Options in the Main Menu ____________________________________________________ 16
Options When the Cursor is Enabled ____________________________________________ 17
Options in a List _____________________________________________________________ 18
Options in the View Menu ____________________________________________________ 19
HOW CAN I START NAVIGATING? ______________________________________________ 21
Navigate Menu _____________________________________________________________ 22
Search a Location and Start Navigating _________________________________________ 22
Navigate to the Cursor Position ________________________________________________ 23
Select a Saved Trip and Start Navigating ________________________________________ 23
Stop Navigation_____________________________________________________________ 23
Travel Mode _______________________________________________________________ 23
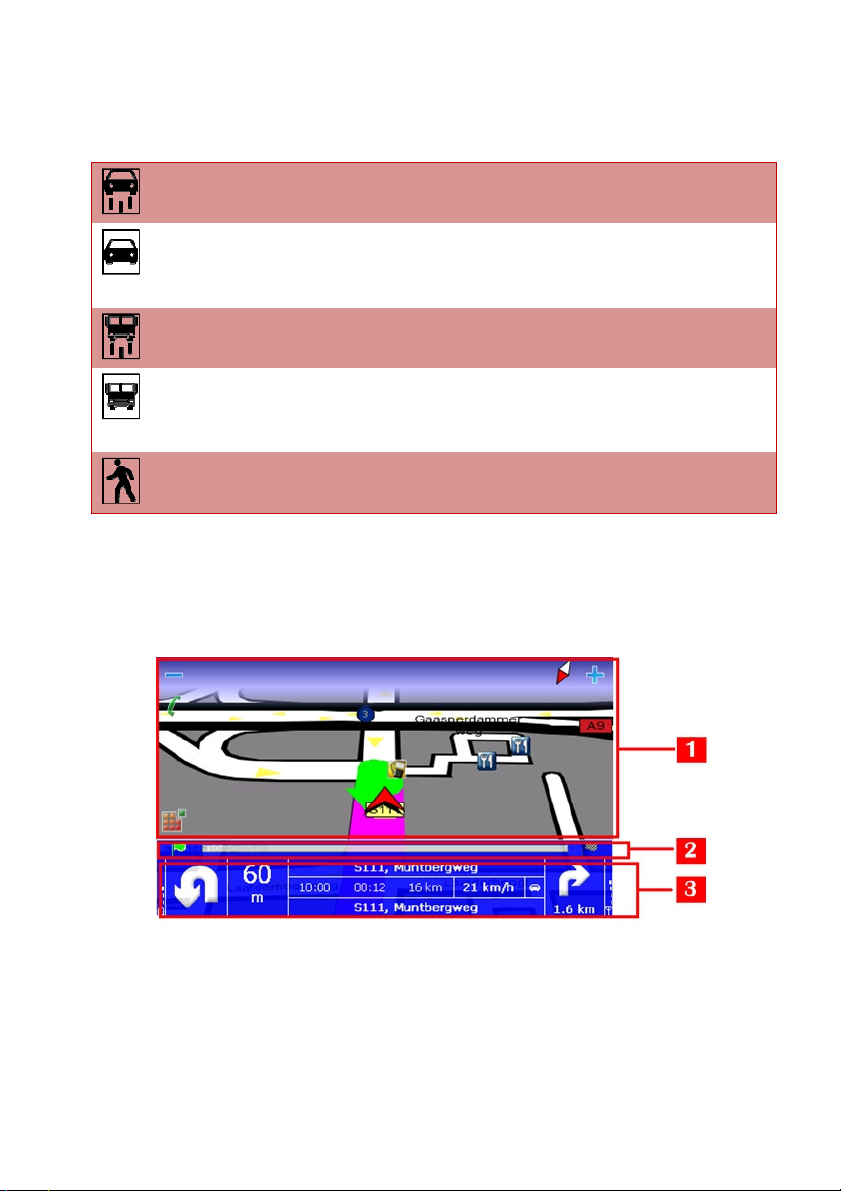
What’s on the Screen ________________________________________________________ 24
The Navigation Screen _______________________________________________________ 25
Navigation screen layout _____________________________________________________ 27
The Navigation Bar __________________________________________________________ 27
The Progress Bar ____________________________________________________________ 28
Route Description ___________________________________________________________ 29
Full Screen Driving Instructions ________________________________________________ 30
Enabling and Disabling Notifications____________________________________________ 31
Combining Navigation Options ________________________________________________ 31
Define Road Block ___________________________________________________________ 31
POI Alerts __________________________________________________________________ 33
ROUTE 66 MINI & MAXI User Manual
3

ROUTE 66 MINI & MAXI User Manual
Favourites Alerts ____________________________________________________________ 33
Safety Cameras Alerts________________________________________________________ 33
Speed Alarm _______________________________________________________________ 34
Exit Information ____________________________________________________________ 34
GPS Information ____________________________________________________________ 34
Statistics __________________________________________________________________ 36
Voice Instructions ___________________________________________________________ 36
Sound Intensity _____________________________________________________________ 37
HOW CAN I BROWSE THE MAP? _______________________________________________ 38
Map Browsing (No Navigation) ________________________________________________ 39
Zoom the Map ______________________________________________________________ 39
The Information Bar _________________________________________________________ 40
Show on Map ______________________________________________________________ 42
Map Display________________________________________________________________ 42
Sending Information _________________________________________________________ 42
Saving Information __________________________________________________________ 45
HOW CAN I FIND THE PLACE I NEED? ___________________________________________ 47
Search Menu _______________________________________________________________ 48
Searching Location __________________________________________________________ 48
Searching Points-of-Interest ___________________________________________________ 49
Searching the History Records _________________________________________________ 50
Searching Favourites ________________________________________________________ 51
Adding, Renaming, Deleting Favourites _________________________________________ 51
Your “Home” Address ________________________________________________________ 52
Your “Office” Address ________________________________________________________ 53
Searching the List of Favourites ________________________________________________ 54
Searching Contacts __________________________________________________________ 54
Searching Coordinates _______________________________________________________ 56
HOW CAN I PLAN MY TRIPS? __________________________________________________ 57
Plan a New Trip _____________________________________________________________ 58
What Can I Do with My Trips? _________________________________________________ 60
4

ROUTE 66 MINI & MAXI User Manual
Simulate Route _____________________________________________________________ 62
HOW CAN I USE MY PHONE? __________________________________________________ 63
Phone Capabilities __________________________________________________________ 64
Enabling and Disabling the Bluetooth Connection _________________________________ 65
Connecting Your Device to a Phone _____________________________________________ 65
Disconnecting Your Device from a Phone ________________________________________ 66
Importing Contacts from a Phonebook __________________________________________ 66
Making Phone Calls _________________________________________________________ 67
Receiving Phone Calls ________________________________________________________ 68
Checking the Phone Reports __________________________________________________ 69
HOW CAN I USE MY FM TRANSMITTER? _________________________________________ 70
What Is the FM Transmitter? __________________________________________________ 71
How to Use the FM Transmitter _______________________________________________ 71
HOW CAN I ADD OTHER FEATURES TO MY APPLICATION? __________________________ 73
Extras - Overview ___________________________________________________________ 74
Enter voucher code __________________________________________________________ 75
Accessing the Online Shop via the ROUTE 66 Sync Application _______________________ 75
Accessing the Online Shop via USB/LAN _________________________________________ 75
Buying and Downloading Content via ROUTE 66 SYNC _____________________________ 76
Status of Digital Content _____________________________________________________ 76
Options for Digital Content ___________________________________________________ 78
Synchronize License Keys _____________________________________________________ 78
Synchronize Content _________________________________________________________ 79
Delete Content _____________________________________________________________ 80
Maps – Overview ___________________________________________________________ 80
Traffic Information - Overview _________________________________________________ 82
Using the Traffic Messages ___________________________________________________ 83
Updating the Traffic Data ____________________________________________________ 83
Safety Cameras - Overview ___________________________________________________ 84
Using the Safety Cameras ____________________________________________________ 85
Updating the Safety Cameras Data _____________________________________________ 86
5

ROUTE 66 MINI & MAXI User Manual
Weather - Overview _________________________________________________________ 86
Using the Weather Service ____________________________________________________ 87
Adding Cities for Weather Forecasts ____________________________________________ 87
Updating the Weather Forecast _______________________________________________ 88
Weather Reports ____________________________________________________________ 89
Today _____________________________________________________________________ 89
Day list ____________________________________________________________________ 90
Current conditions___________________________________________________________ 90
Normal graph ______________________________________________________________ 90
Extended graph _____________________________________________________________ 91
Travel Guides - Overview _____________________________________________________ 91
Using the Travel Guides ______________________________________________________ 91
Voices - Overview ___________________________________________________________ 92
Changing the Language of the Voice Instructions _________________________________ 92
Colour Schemes - Overview ___________________________________________________ 93
Update - Overview __________________________________________________________ 94
HOW CAN I CHANGE THE “LOOK-AND-FEEL” OF MY APPLICATION? __________________ 95
Settings ___________________________________________________________________ 96
General settings ____________________________________________________________ 96
Interface Language __________________________________________________________ 96
UI Colour Scheme ___________________________________________________________ 97
Voice Language _____________________________________________________________ 97
Map Language _____________________________________________________________ 97
Volume ____________________________________________________________________ 98
Sound when Touching the Screen ______________________________________________ 98
Dynamic Volume ____________________________________________________________ 99
FM Transmitter ____________________________________________________________ 100
FM Frequency _____________________________________________________________ 100
Backlight _________________________________________________________________ 101
Units _____________________________________________________________________ 101
USB Connection Mode ______________________________________________________ 102
6

ROUTE 66 MINI & MAXI User Manual
Map Settings ______________________________________________________________ 102
Night Colours ______________________________________________________________ 102
Colour Scheme_____________________________________________________________ 103
2D Perspective _____________________________________________________________ 103
Viewing Angle _____________________________________________________________ 104
Show Scale ________________________________________________________________ 104
Rotate Map _______________________________________________________________ 104
Map _____________________________________________________________________ 105
Show Favourites ___________________________________________________________ 105
Show Points-of-Interest _____________________________________________________ 106
Navigation Settings_________________________________________________________ 106
Driving Type_______________________________________________________________ 106
Avoid Motorways __________________________________________________________ 107
Avoid Toll Roads ___________________________________________________________ 107
Avoid Ferries ______________________________________________________________ 108
Automatic Zooming ________________________________________________________ 108
Alarm Speed ______________________________________________________________ 109
Alarm Type _______________________________________________________________ 109
Navigation Bar Transparency ________________________________________________ 110
Speed ____________________________________________________________________ 110
Configure Alarm ___________________________________________________________ 111
Configure Alarm for Points-of-Interest _________________________________________ 111
Configure Alarm for Favourites _______________________________________________ 112
Configure Alarm for Safety Cameras ___________________________________________ 113
Extras Settings _____________________________________________________________ 114
Traffic Interval _____________________________________________________________ 115
Weather Interval ___________________________________________________________ 115
Safety Cameras Interval _____________________________________________________ 116
Usage in Roaming __________________________________________________________ 117
Source for traffic information ________________________________________________ 117
Activate TMC Pro __________________________________________________________ 118
7

ROUTE 66 MINI & MAXI User Manual
Legend ___________________________________________________________________ 119
Cities/Symbols (Legend) _____________________________________________________ 119
Roads/GPS (Legend) ________________________________________________________ 119
Areas (Legend) ____________________________________________________________ 120
Editing Colours in Legend ____________________________________________________ 120
Date & Time ______________________________________________________________ 121
Calibrate Screen ___________________________________________________________ 122
HOW CAN I USE MY DEVICE AS A PHOTO VIEWER? _______________________________ 123
Photo Viewer - Description ___________________________________________________ 124
Copying Your Photos on the Memory Card ______________________________________ 124
Browsing for Image Files ____________________________________________________ 125
Viewing Images ____________________________________________________________ 125
Viewing Image Details ______________________________________________________ 127
Sending Your Photos to Your Friends ___________________________________________ 127
Disclaimer ________________________________________________________________ 128
8

ROUTE 66 MINI & MAXI User Manual
Welcome
Hi! My name is MINI & MAXI!
I’m the youngest member of the ROUTE 66 product family.
I’m smart! I’m friendly!
I can help you do many things:
set your next journey in a few seconds, no matter the distance
find any location and start navigation at once
enjoy your ride and let me avoid certain roads or make sure you
don’t exceed speed limits
select those advanced features that fit your needs best
know beforehand useful information on the road you are about to
cover
plan your trips knowing everything about the weather worldwide
for the next two weeks
visit wonderful locations around the world, using the Lonely
Planet travel guides
trust the latest professional maps, voices or colours
call your beloved easily
feel the magic of loading amazing collections of images and forget
about boredom
Ready! Steady! Go!
From now on, I’m your driving companion! Let me do it for you. Trust my
experience and instincts!
I’M ON MY WAY
9

ROUTE 66 MINI & MAXI User Manual
W
HAATT SS
W
H
H
O
H
O
RSSTT??
FFIIR
ULL
U
D II
D
D
D
O
O
10
ROUTE 66 MINI & MAXI User Manual
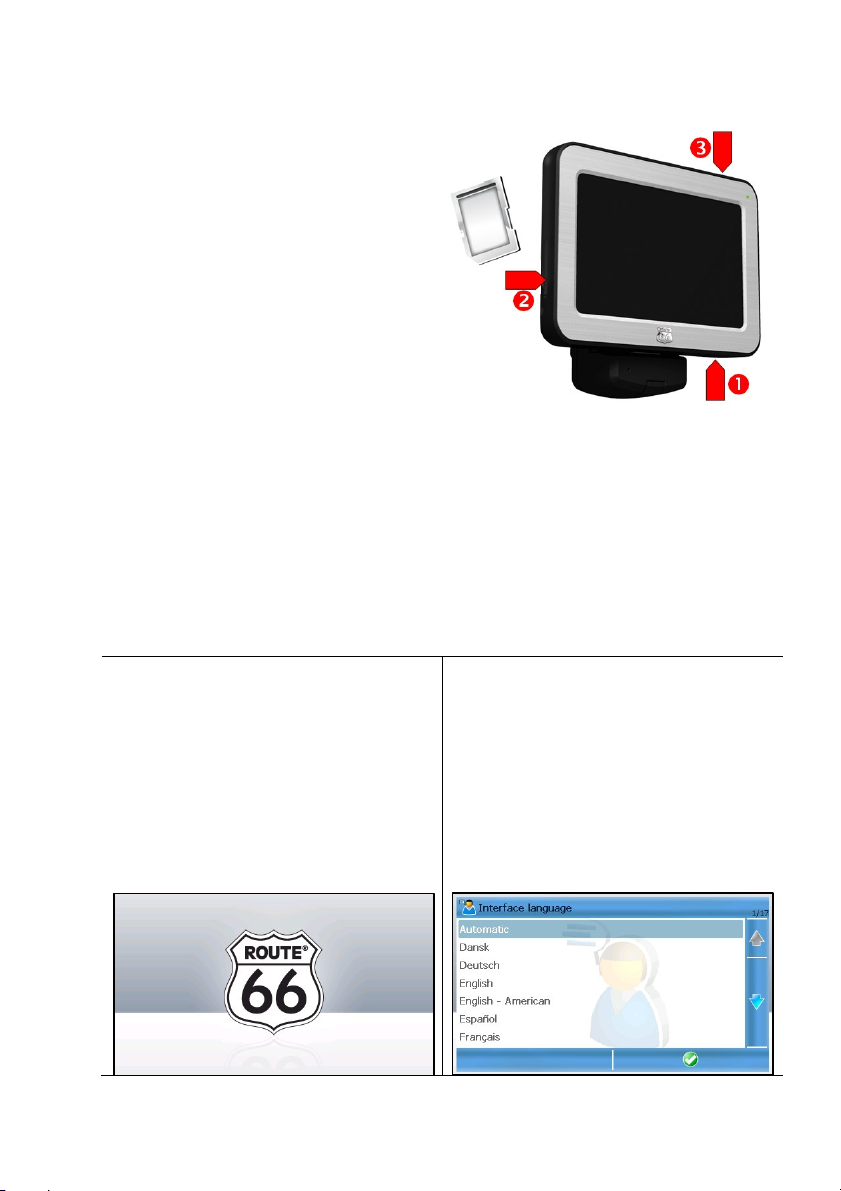
Preparing Your Device
To start using the application, you
have to carry out the following
steps:
1. Charge the battery of the
device.
2. Insert the memory card into
your device.
3. Switch on your device and wait
for a fixed GPS position.
Calibration
To ensure that the touchscreen of your device works properly, you must
first calibrate your screen. Calibrating means adjusting the precision and
reaction of the screen.
Refer to Main Menu>Settings>Calibrate screen for details.
Launching the Application
When you switch on your
device, the application starts
automatically.
When you start the
application for the first time, you
must select the interface language.
Scroll up or down to choose the
language you prefer. Go to the next
screen.
11

ROUTE 66 MINI & MAXI User Manual
Read and then accept the
terms and conditions of use.
An animation is displayed. The
application zooms in from the entire
globe to the street level. If you
want to interrupt this animation,
select the skip icon.
Decide if you want to see the
disclaimer the next time you launch
the application.
The application determines
your GPS position.
Detecting Your GPS Position
Depending on the strength of the GPS signal and the performance of the
GPS receiver, the time needed to get a GPS fix varies from a few seconds
to a few minutes.
Two scenarios are possible:
12
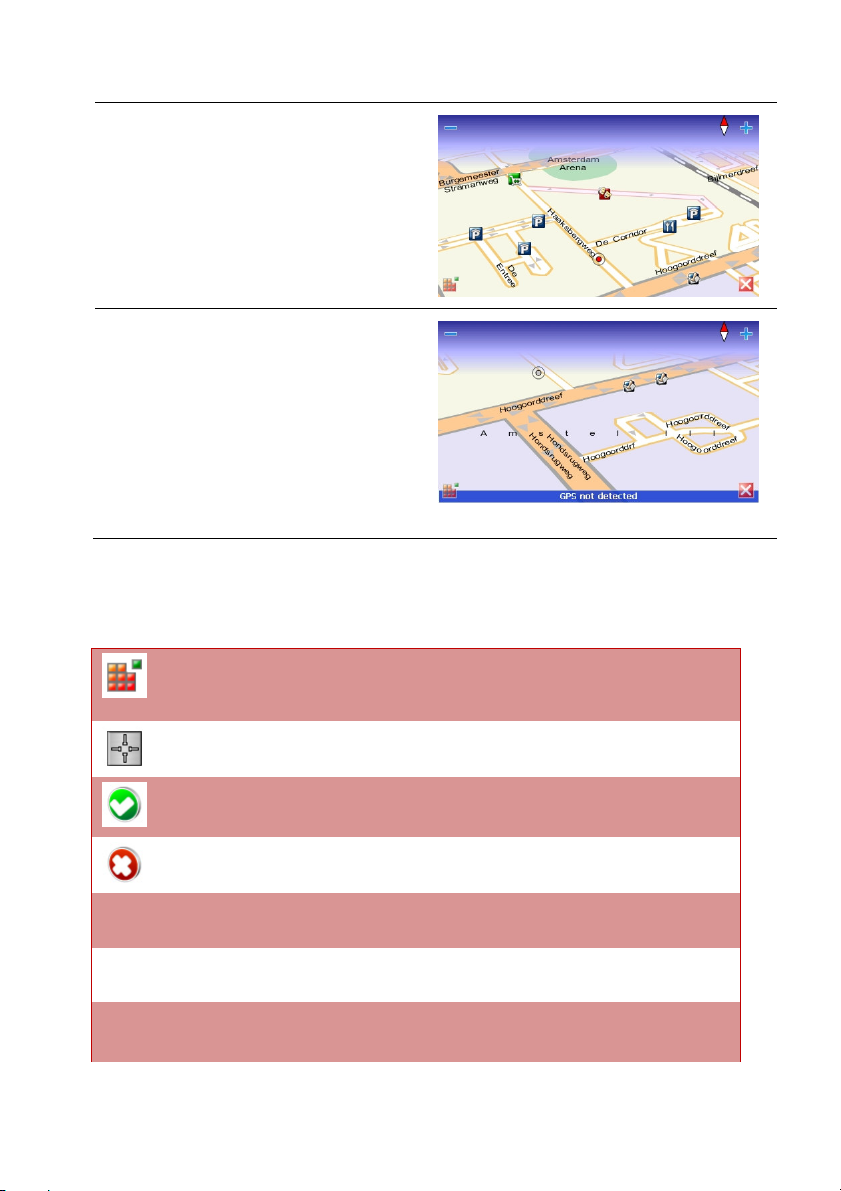
GPS position detected
A valid GPS position is established.
The application zooms from the
entire map to the street level.
Your current GPS position is
indicated by a red dot.
GPS not detected
The GPS position could not be
detected.
You can either retry to get a GPS
fix, or work without a GPS.
ROUTE 66 MINI & MAXI User Manual
The last known GPS position is
indicated on the map (gray dot).
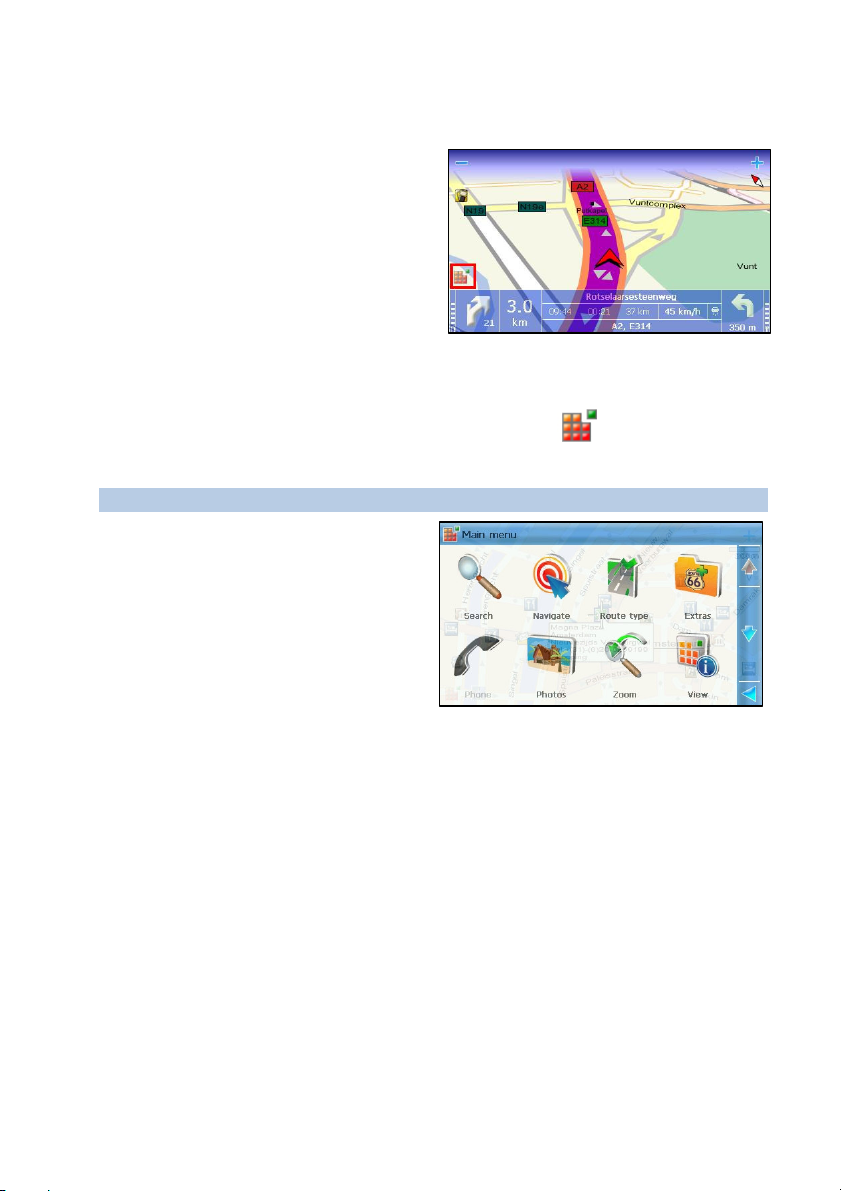
Common Buttons
The most frequently used buttons are:
Open the main modules (Search, Photos, etc.) or open the
main options of a module.
Open the contextual menu.
Confirm a choice, start an action, go to the next screen, save
changes.
Abort operation or discard changes.
Black tick. This list item is not selected.
Blue tick. This list item is selected.
Green tick (used only for the All categories item in a list).
Some (but not all) items in the list are selected.
13
ROUTE 66 MINI & MAXI User Manual
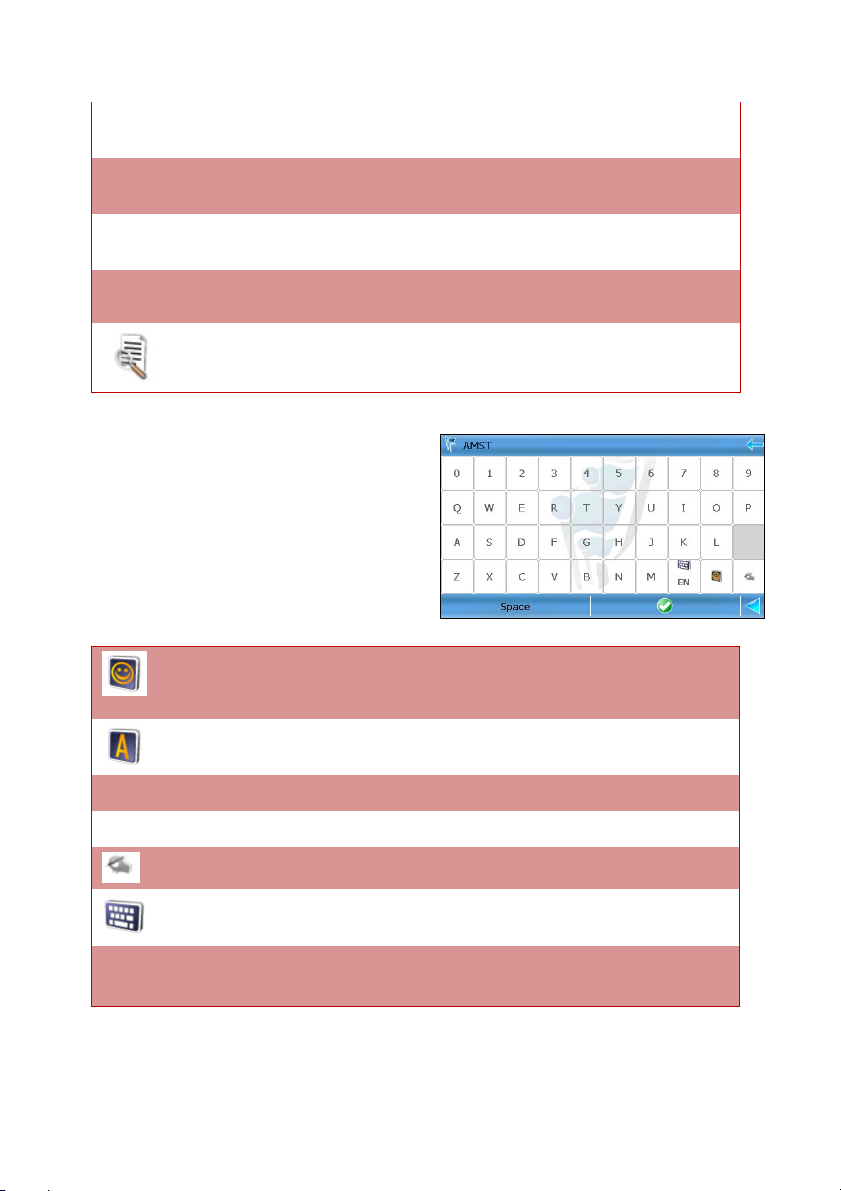
The Keyboard
The keyboard is displayed when
you intend to type alphanumeric
characters or symbols.
The keyboard contains all numbers
and letters.
Return to the previous screen.
Go to the next screen.
Scroll up to the beginning of the list.
Scroll down to the end of the list.
Filter results by entering keywords.
“Face” icon. Display a list of symbols.
“Letter” icon. Return to the alphanumeric list.
Backspace Delete characters.
Space Enter a blank space.
“EN” Switch to other writing systems (for example, Chinese, if
“Hand” icon. Switch to the handwriting mode.
“Keyboard” icon. Return to the regular writing mode.
available).
14
ROUTE 66 MINI & MAXI User Manual
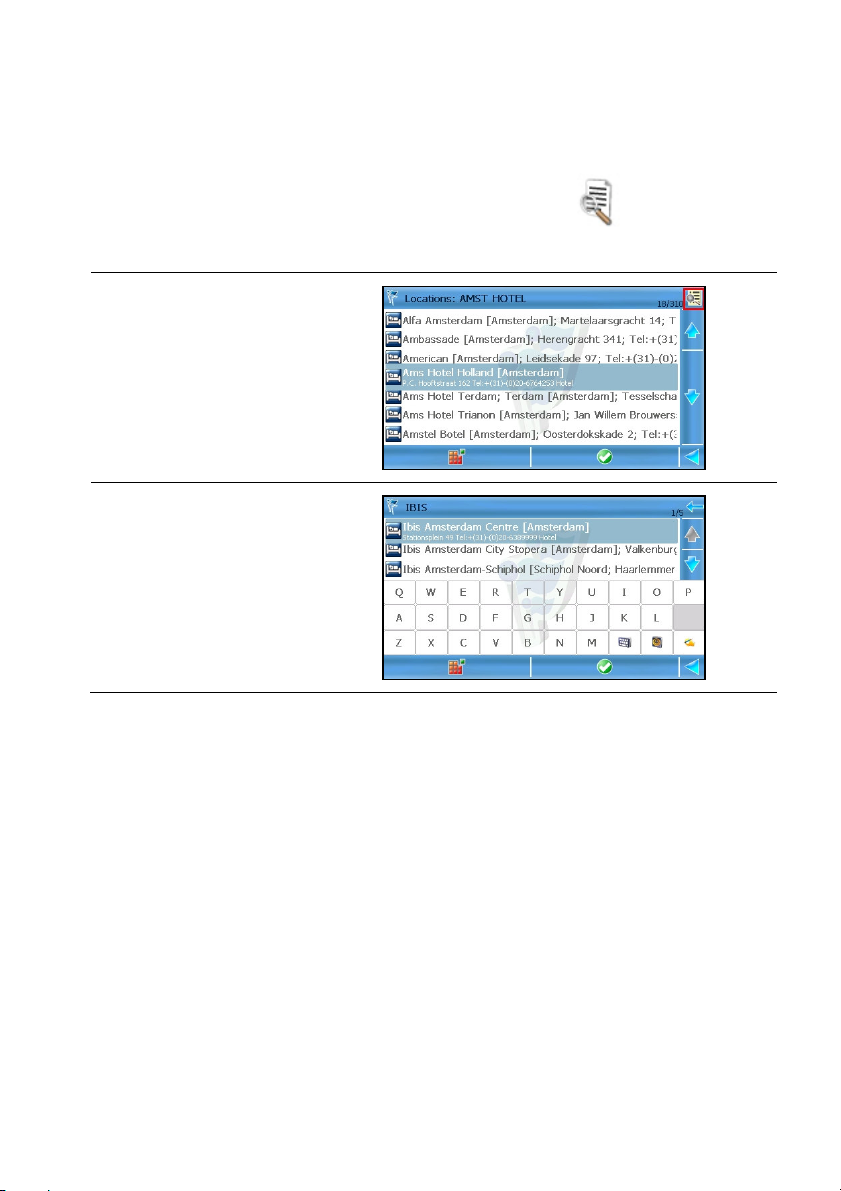
Using Filters in Lists
When there are too many results in a list you can filter the list by entering
an additional keyword. Click on the upper-right icon to activate the
filter.
List of results (filter is not
activated).
List of results (filter is
activated).
15
ROUTE 66 MINI & MAXI User Manual
Options in the Main Menu
The main menu contains:
the main modules of the
application: searching, route
planning, photo viewer, phone
calls, additional services,
customization, etc.
the most frequently used options
during navigation: zooming, activating advanced options for
navigation, etc.
To open the main menu, select the menu icon in the lower left
corner of the screen.
Main menu options (always):
Search – Select a database
and find the places you need.
Navigate – Select a database
and find the places you need.
Travel mode - Select the
travel mode for your current
navigation.
Extras – Buy and download additional content and services.
Photos – View your favourite images.
Phone – Connect your navigation device to a mobile phone.
Zoom – Increase and decrease the map details.
View menu – Access navigation-specific features.
Send – Send to other users a map image, the route description, your
GPS position or your cursor position.
Save – Save in the application a map image, your GPS position or
your cursor position.
Trips – Create and use your personal trips.
16
ROUTE 66 MINI & MAXI User Manual
Settings – Customize the behaviour of the application.
Help – Open the contextual help.
Main menu options (during navigation):
All options above plus:
Stop navigation - Interrupt the current trip.
Nearby - Search for points-of-interest around your current route and
start navigating towards one of them.
Define road block - Avoid a part of the planned route.
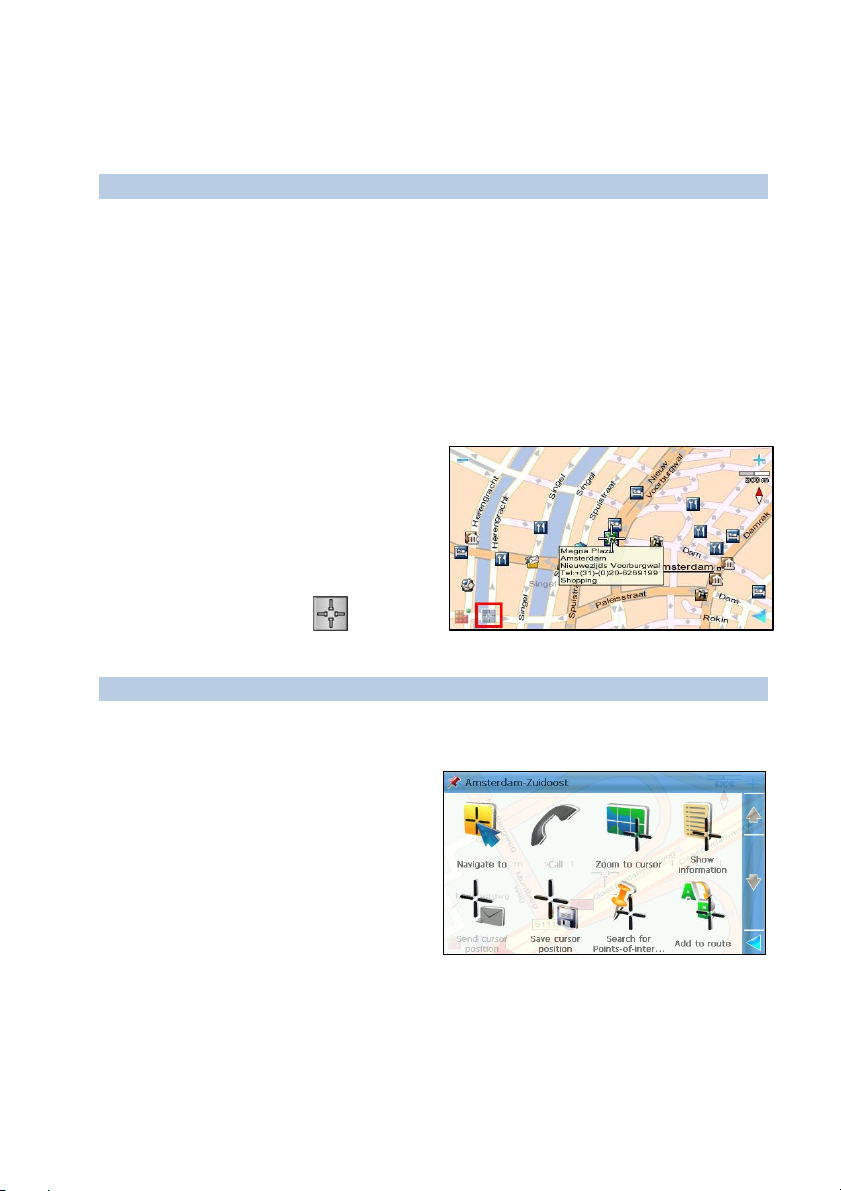
Options When the Cursor is Enabled
When you browse the map and
select the screen, or when you
choose Show on map, a cursor
is displayed above that location.
To open the contextual menu, select
the contextual icon in the
lower left corner of the screen.
Cursor options:
Navigate to - Start a (new) navigation. The cursor position is the
destination.
Call – Dial the phone number
of the selected item. If a phone
number is not available for that
location, this option is disabled.
Zoom to cursor - Zoom to
street level, with the cursor
placed in the centre of the
screen.
Show information - Display the text box (“the balloon information”)
for any point on the map, including streets, water areas and land
areas.
17

ROUTE 66 MINI & MAXI User Manual
Send cursor position - Send the cursor position to other users.
Refer to the sending methods for details.
Save cursor position - Save the cursor position as a contact / as a
favourite / as your home address / as your office address, or update
an existing contact.
Search for Points-of-interest around cursor – Select a category
and search points-of-interest around the cursor position.
Add to route - Add the cursor position to a (new) trip.
Options in a List
When you are in a list, select the Main menu and open the list of
options relevant for this context.
List options:
Navigate to - Start a (new)
navigation. The list item is the
destination.
Show on map – Display on the
map the selected item.
Add to route - Add the list item
to a (new) trip.
Call – Call the list item. If a phone number is not available for that
location, this option is disabled.
Search Points-of-interest around - Select a category and search
points-of-interest around the list item.
Mark/Unmark – Select or deselect an item / several items / all items
from the list. For example, you
can select and then delete an
entry.
Save - Save the selected item
as a contact / as a favourite / as
your home address / as your
office address, or update an
18
ROUTE 66 MINI & MAXI User Manual
existing contact.
Send - Use a Bluetooth connection and a phone to send information
to other users.
Map display - “Fly” on the map, from one item in the list to another.
Other options, like Delete, Rename, etc. are available in certain
contexts. For example, you can delete a history record but you cannot
delete a search result. You can rename a trip or a favourite but you cannot
rename a history record.
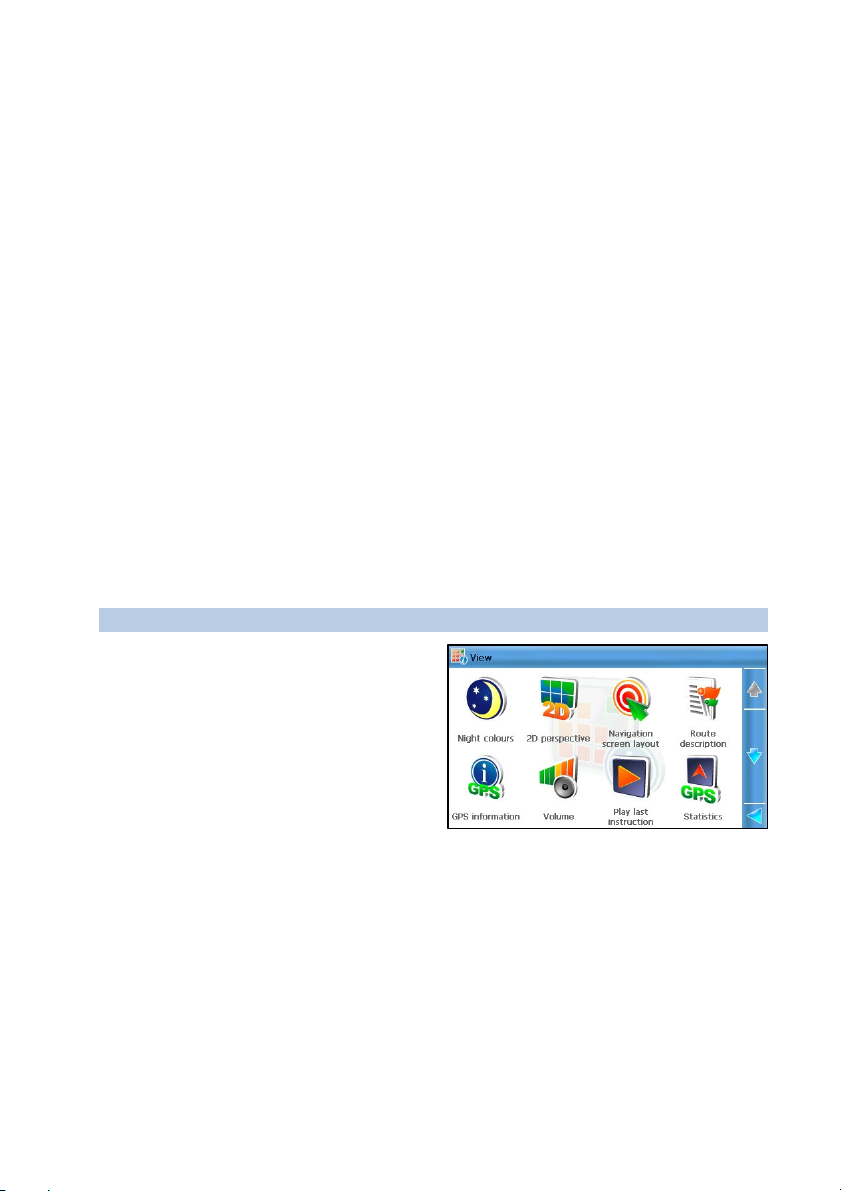
Options in the View Menu
From the View menu you can easily access those options you frequently
need during navigation or map browsing.
To open the View menu:
select Main menu > View.
select the navigation bar.
select the information bar.
View options (always):
Night colours / Day colours -
Choose the brighter colours
when you drive during the day.
Choose the dimmed colours
when you drive during the night
or in tunnels, forests, cloudy
weather conditions.
2D perspective / 3D
perspective - View the map from above, as you look at a printed
map (2D). Have a panoramic view, as you are actually seeing the road
ahead of you (3D).
Navigation screen layout - Modify the look and behaviour of the
screen.
GPS information - Check the status of the GPS receiver, whether
you are navigating or not.
19

ROUTE 66 MINI & MAXI User Manual
Volume - Set the sound intensity for the voice instructions. From here
you can also switch off the sound.
Statistics - Get statistical information about your current trip and all
previous trips: speed, distance, time, etc.
FM transmitter on / FM transmitter off - When the FM
transmitter is started, your navigation device sends (“broadcasts”) the
driving instructions to your audio system.
About - View the technical details of your device: software version,
engine version, device ID (IMEI number), operating system version,
etc.
View options (during navigation):
All options above plus:
Route description - Find out all the significant details of your current
trip: total length of route, estimated duration, travel mode, etc.
Play last instruction - If you missed or didn’t understand the last
driving instruction, select this button to repeat it.
20

ROUTE 66 MINI & MAXI User Manual
H
O
H
W CCAA
O
W
N II SSTTAA
N
RTT
R
NAAVVII
N
GAATTII
G
N
N
G??
G
21
ROUTE 66 MINI & MAXI User Manual
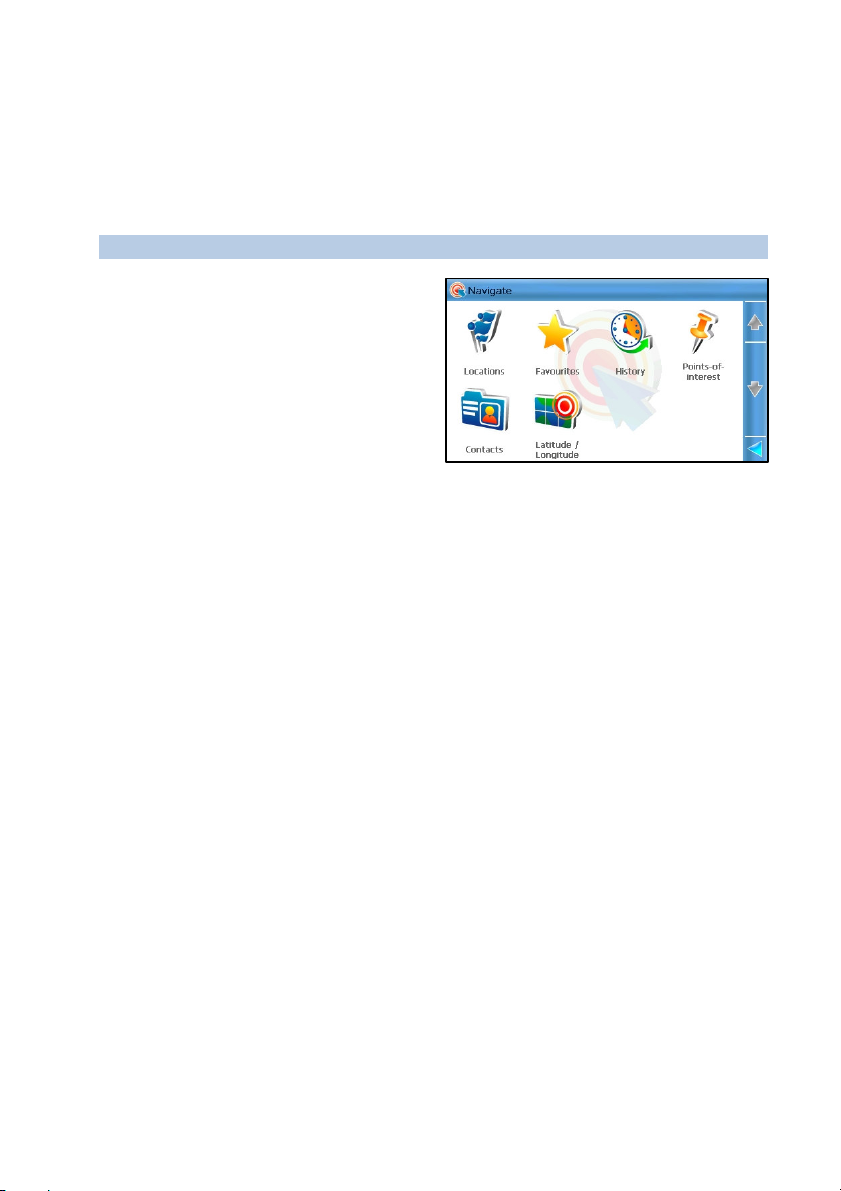
Navigate Menu
Use this section to start navigating to a place. After you choose a location,
you can start navigating towards it, save it, send it to somebody else, or
add it to a trip.
Navigate options:
Locations - Search for a
location by typing a city name, a
street name, or a house
number.
Favourites – Search in the list
of your favourite places.
History – Search in the list of
history records (locations you visited or used recently).
Points-of-interest – Select a category and search points-of-interest
located along the current trip, around the departure or the destination
of the current journey, around the cursor position, or around the GPS
position.
Contacts – Search in the list of personal contacts.
Latitude / Longitude – Search for a location by entering its
geographical coordinates (latitude and longitude).
For a more detailed description of these features, refer to the Searching
section.
Search a Location and Start Navigating
1. Select Main menu > Search.
2. Select the relevant database: Locations, Favourites, History,
Points-of-interest, Contacts, Latitude / Longitude.
3. Start the search query.
4. Select an item from the list of results.
5. Select Main menu > Navigate.
6. Optionally, select the travel mode in the Travel mode screen.
22

ROUTE 66 MINI & MAXI User Manual
7. The route is calculated and the navigation starts automatically.
Navigate to the Cursor Position
1. Point on the map to activate the cursor.
2. Browse the map and place the cursor over the desired location.
3. Select Main menu > Navigate. Or in the contextual menu select
Navigate to.
4. Optionally, select the travel mode in the Travel mode screen.
5. The route is calculated and the navigation starts automatically.
Select a Saved Trip and Start Navigating
1. Select Main menu > Trips.
2. In the list of defined routes, select a trip.
3. Open the trip.
4. Select Main menu > Start navigation or Navigate to.
5. Optionally, select the travel mode in the Travel mode screen.
6. The route is calculated and the navigation starts automatically.
Stop Navigation
If you want to manually interrupt the current trip, just select Main menu
> Stop navigation.
The current navigation is automatically interrupted when you select a
different destination and choose Navigate to.
Travel Mode
The application can calculate the best possible route to your destination.
Indicate if you drive a car or walk; if you use a personal car or a truck; or
if you prefer to travel along the fastest route or the shortest route. Taking
into account these personal preferences and the information available on
the current map, the route is calculated.
Select Main menu > Travel mode.
23
ROUTE 66 MINI & MAXI User Manual
During navigation, type the travel mode icon. In the Travel mode
screen, select the relevant option.
Fastest (car) Drive by using a personal car, along the
fastest route (higher speed limits).
Shortest (car) Drive by using a personal car, along the
shortest route (the shortest distance
from departure to destination).
Fastest (lorry) Drive by using a truck, along the fastest
route (higher speed limits).
Shortest (lorry) Drive by using a truck, along the
shortest route (the shortest distance
from departure to destination).
Pedestrian Walk to your destination (pedestrian-
only tracks).
You can change the travel mode anytime during the navigation!
What’s on the Screen
During navigation, the screen of the device is divided into:
1. The navigation screen – it contains the Main menu / Zoom icons, the
map scale and the compass, the current road, the calculated route
and the current change of direction. Also, you can check the map
elements (points-of-interest, road names and codes, buildings and
areas) and the dynamic warnings (POI alarm, Favourites alarm, speed
alarm, safety cameras alarm, etc.)
24
ROUTE 66 MINI & MAXI User Manual
2. The progress bar – this is a graphical overall representation of your
navigation.
3. The navigation bar – it contains all necessary driving instructions: type
of turn, distance to current turn, estimated time of arrival to
destination, remaining travel time and distance, navigation mode (by
car, pedestrian, etc.), and so on.
The progress bar and the navigation bar can be turned on or off when
needed. Check the Navigation screen layout chapter.
The Navigation Screen
The amount of information displayed on the navigation screen varies,
depending on the driving conditions and your personal preferences.
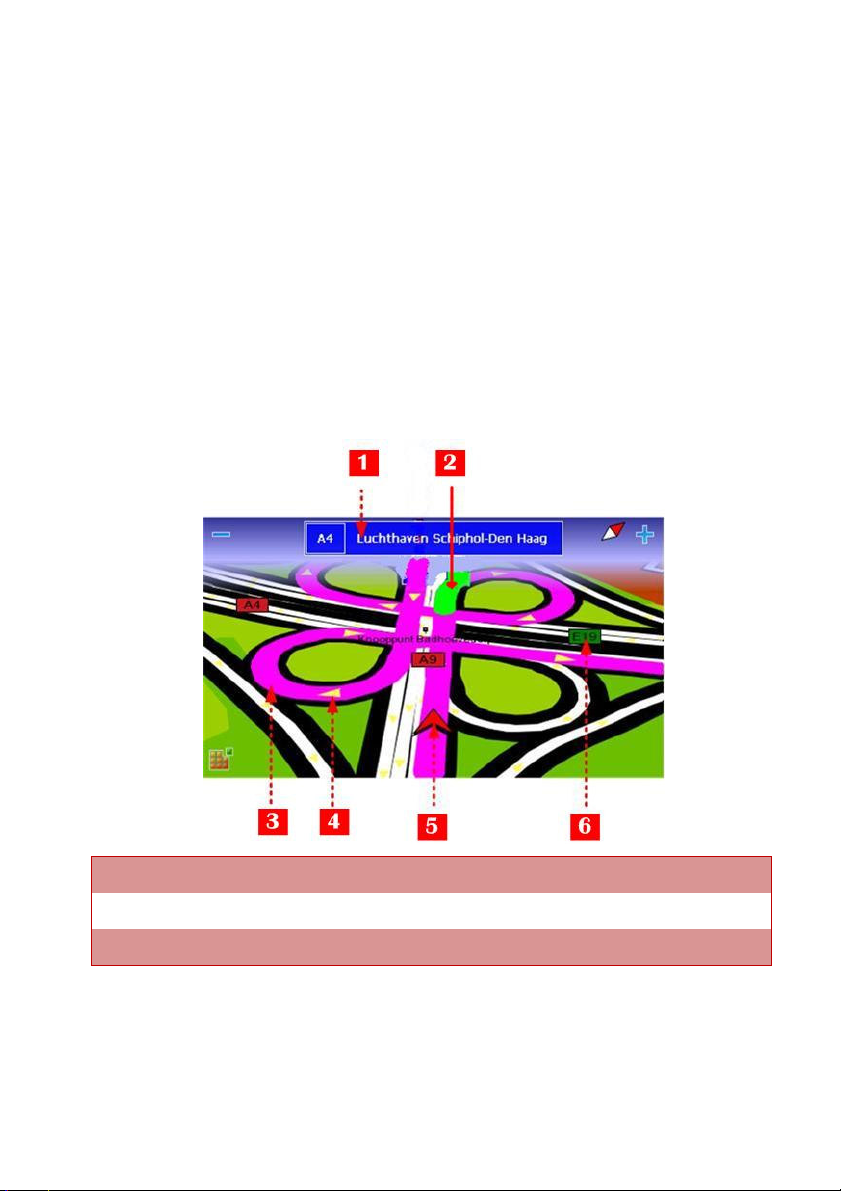
1 Exit information 4 Direction of traffic
2 Current change of direction 5 GPS arrow (“You are here!”)
3 Calculated route 6 Road code
25
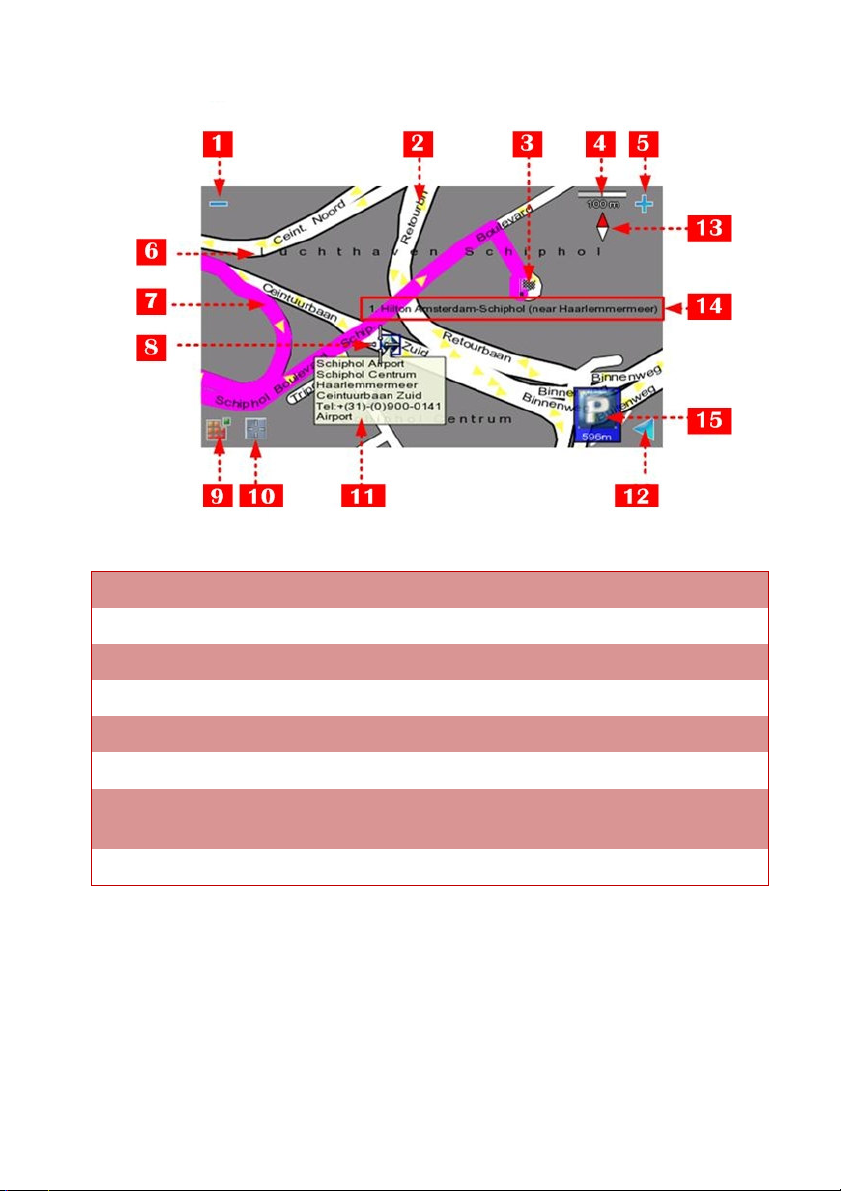
1 Zoom out 9 Main menu
ROUTE 66 MINI & MAXI User Manual
2 Street name 10 Contextual menu
3 Destination 11 Text box (information balloon)
4 Map scale 12 Return to the navigation screen
5 Zoom in 13 Compass
6 Area name 14 Details of destination
7 Calculated route 15 POI alarm and remaining distance
to this POI
8 Cursor position
Check the following sections for details.
26

ROUTE 66 MINI & MAXI User Manual
Navigation screen layout
You can easily adapt the application’s behaviour to your needs, by defining
the following options:
Progress bar on / Progress bar off - get an overall perspective of
the current trip: the distance completed, the current position relative
to the entire route, the remaining distance to destination.
Turn arrow view on / Turn arrow view off - the graphical symbol
of the current change of direction is displayed over the entire
navigation screen.
Navigation bar on / Navigation bar off - display all driving
information in a control panel (On); or choose a simple navigation
screen (Off).
Navigation bar position - place the navigation bar vertically or
horizontally.
Turn notify on / Turn notify off- always follow the driving
instructions, even if the navigation screen is not displayed; the current
turn will be always shown over any active screen.
The Navigation Bar
The navigation bar is your “control panel” during navigation. It contains
alphanumeric and graphical indicators which are continuously updated in
order to reflect the status of the trip.
27

ROUTE 66 MINI & MAXI User Manual
1 Battery level 8 Current speed
2 Current change of direction. 9 Travel mode
3 Remaining distance to the
current change of direction
4 Estimated time of arrival to
destination
5 Remaining travel time to
10 Remaining distance to the
next change of direction
11 Name and code of next
road
12 Next change of direction
destination
6 Name and code of current
13 Strength of GPS signal
road
7 Remaining travel distance to
destination
The colour of the navigation bar can be modified. Select Main menu >
Settings > Legend > Areas.
Additional options:
Tap the navigation bar to display the View.
Select the current street area or the next street area to place the
navigation bar horizontally or vertically. The same operation can be
done with the Navigation screen layout > Navigation bar
position option.
The Progress Bar
During navigation, you can have an overall perspective of the current trip:
the distance already completed,
the current position relative to the entire route,
the remaining distance to destination.
To display the progress bar,
select Main menu > View > Navigation
screen layout > Progress bar on.
28

ROUTE 66 MINI & MAXI User Manual
To hide the progress bar, select Main menu > View > Navigation
screen layout > Progress bar off.
1 Departure 4 Remaining trip
2 Trip you already completed 5 Destination
Current position relative to the
3
entire route (“You are here!”)
Tap the progress bar if you want to display the Route description
screen.
For a more detailed description of the current navigation,
display both the progress bar and the navigation bar!
Route Description
An alternative to the navigation bar
is the route description. To display
it during navigation, in the View
menu select Route description.
29
ROUTE 66 MINI & MAXI User Manual
You can also select the progress bar.
The route description contains the following information:
total length of route
estimated duration of trip (in hours and minutes)
travel mode
driving instructions
traffic messages
current position (green flag)
destination (chequered flag)
Pick an item from the list and then show that turn on the map.
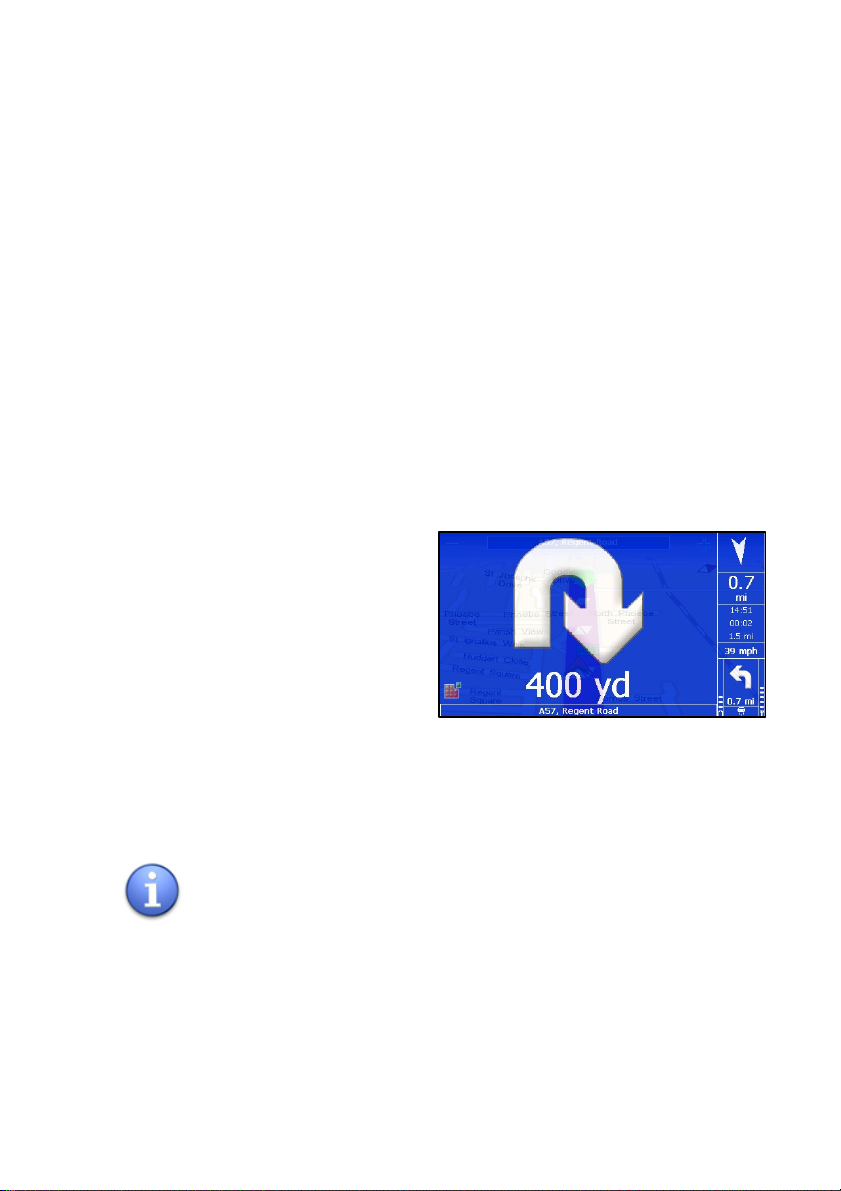
Full Screen Driving Instructions
An alternative to the navigation bar
is the full screen driving
instructions. The graphical symbol
of the current change of direction is
displayed over the entire navigation
screen. The symbol is displayed
and hidden dynamically, reflecting
the traffic conditions.
To display the full screen driving instructions, select Main menu > View
> Navigation screen layout > Turn arrow view on.
To hide the full screen driving instructions, select Main menu > View >
Navigation screen layout > Turn arrow view off.
For a more detailed description of the current navigation,
display both the full screen driving instructions and the
navigation bar!
30
 Loading...