

Page 1

Mini Contact Toaster
Model VCT-2
Mfg. Numbers:
9210904
www.ajantunes.com
P/N 1011271 Rev. A 06/14
Page 2

CONTENTS
General ...................................................... 2
Warranty
Information ............................................... 2
Service/Technical
Assistance ..................................................2
Important Safety
Information ............................................... 3
Warnings ...................................................3
Specications ............................................ 4
Installation ................................................ 5
Installing the Release Sheet ...........................6
Bun Thickness Compression
Knob Settings ......................................................6
Operating
Instructions ............................................... 7
Toasting Product ................................................7
Adjusting Toast Quality .................................... 8
Shutting down the Toaster .............................8
Reset to Default Settings .................................8
Hi Limit Reset Button ........................................8
Errors .......................................................................8
Maintenance .............................................9
Daily Maintenance .............................................9
Troubleshooting .....................................10
Replacement Parts..................................11
Wiring Diagram .......................................16
Notes ........................................................17
Limited Warranty ....................................20
IMPORTANT
A.J. Antunes & Co. reserves the right to
change specications and product de-
sign without notice. Such revisions do not
entitle the buyer to corresponding changes,
improvements, additions or replacements
for previously purchased equipment.
IMPORTANT
Keep these instructions for future refer-
ence. If the unit changes ownership, be sure
this manual accompanies the equipment.
GENERAL
This manual provides the safety, installation, and operating procedures for
your toaster. Please read all of the information contained in this manual prior
to installing and operating the toaster.
Your toaster is manufactured from
the nest materials available and is
assembled to Roundup’s strict quality
standards. This toaster was tested at the
factory to ensure dependable troublefree operation.
WARRANTY
INFORMATION
Please read the full text of the Limited
Warranty in this manual.
If the unit arrives damaged, contact the
carrier immediately and le a damage claim with them. Save all packing
materials when ling a claim. Freight
damage claims are the responsibility
of the purchaser and are not covered
under warranty.
The warranty does not extend to:
y Damages caused in shipment or
damage as result of improper use.
y Installation of electrical service.
y Normal maintenance as
outlined in this manual.
y Malfunction resulting from
improper maintenance.
y Damage caused by abuse
or careless handling.
y Damage from moisture into
electrical components.
Damage from tampering with, removal
of, or changing any preset control or
safety device.
SERVICE/TECHNICAL
ASSISTANCE
If you experience any problems with
the installation or operation of your
system, contact A.J. Antunes & Co.
at 1-630-784-1000, or toll free in the
United States at 1-800-253-2991.
Fill in the information in the next
column and have it handy when calling
for assistance. The serial number is on
the specication plate located on the
system.
Purchased From
Date of Purchase
Model Number
Serial Number
Mfg. Number
Use only genuine Roundup replacement parts in this unit. Use of replacement parts other than those supplied
by the manufacturer will void the warranty. Your Authorized Service Agency
has been factory trained and has a complete supply of parts for this unit.
Visit www. ajantunes.com or contact the factory at 1-630-784-1000 to
locate your nearest Authorized Service
Agency. Refer to the service agency
directory packaged with your manual
and ll in the information below.
Authorized Service Agency
Name
Phone Number
Address
2
P/N 1011271 Rev. A 06/14
Page 3

IMPORTANT SAFETY
INFORMATION
Use the following guidelines for safe
operation of the unit.
y Read all instructions be-
fore using equipment.
y For your safety, the equip-
ment is furnished with a properly grounded cord connector. Do not attempt to defeat
the grounded connector.
y Install or locate the equip-
ment only for its intended use
as described in this manual.
Do not use corrosive chemicals in this equipment.
y Do not operate this equipment if
it has a damaged cord or plug, if
it is not working properly, or if it
has been damaged or dropped.
y This equipment should be
serviced by qualied personnel only. Contact your nearest
Authorized Service Agency
for adjustment or repair.
y Do not block or cover any
openings on the unit.
y Do not immerse cord
or plug in water.
y Keep cord away from
heated surfaces.
y Do not allow cord to hang over
edge of table or counter.
y Turn the power o, unplug the
power cord, and allow unit to cool
down before performing any service or maintenance on the unit.
y The equipment should be
grounded according to local
electrical codes to prevent the
possibility of electrical shock. It
requires a grounded receptacle
with separate electrical lines,
protected by fuses or circuit
breaker of the proper rating.
y All electrical connections must
be in accordance with local electrical codes and any
other applicable codes.
y Do not clean this appli-
ance with a water jet.
WARNINGS
Be advised of the following warnings
when operating and performing maintenance on this unit.
y If the supply cord is damaged, it
must be replaced by the manufacturer or its service agent or
a similarly qualied person
in order to avoid a hazard.
y Do not modify the power sup-
ply cord plug. if it does not t
the outlet, have a proper outlet
installed by a qualied electrician.
y Do not use an extension
cord with this appliance.
y Electrical ground is re-
quired on this appliance.
y Check with a qualied electrician
if you are unsure if the appliance is properly grounded.
y If a chemical cleaner is used, be
sure it is safe to use on cast aluminum. Observe all precautions
and warnings on product label.
y Inspection, testing, and re-
pair of electrical equipment
should only be performed by
qualied service personnel.
y This equipment is to be installed
to comply with the basic plumbing code of the Building Ocials
and Code Administrators, Inc.
(BOCA) and the Food Service
Sanitation Manual of the Food
and Drug Administration (FDA).
y Do not use abrasive materials.
The use of these may cause damage to the stainless steel nish.
y Chlorides or phosphates in clean-
ing agents (e.g. bleach, sanitizers,
degreasers or detergents) could
cause permanent damage to
stainless steel equipment. The
damage is usually in the form of
discoloration, dulling of metal
surface nish, pits, voids, holes, or
cracks. This damage is permanent
and not covered by warranty.
y The following tips are recom-
mended for maintenance of
your stainless steel equipment:
y Always use soft, damp cloth
for cleaning, rinse with clear
water and wipe dry. When
required, always rub in direction of metal polish lines.
y Routine cleaning should be
done daily with soap, ammonia detergent, and water.
y Stains and spots should be
sponged using a vinegar solution.
y Finger marks and smears
should be rubbed o using soap and water.
y Hard water spots should be
removed using a vinegar solution.
P/N 1011271 Rev. A 06/14
3
Page 4
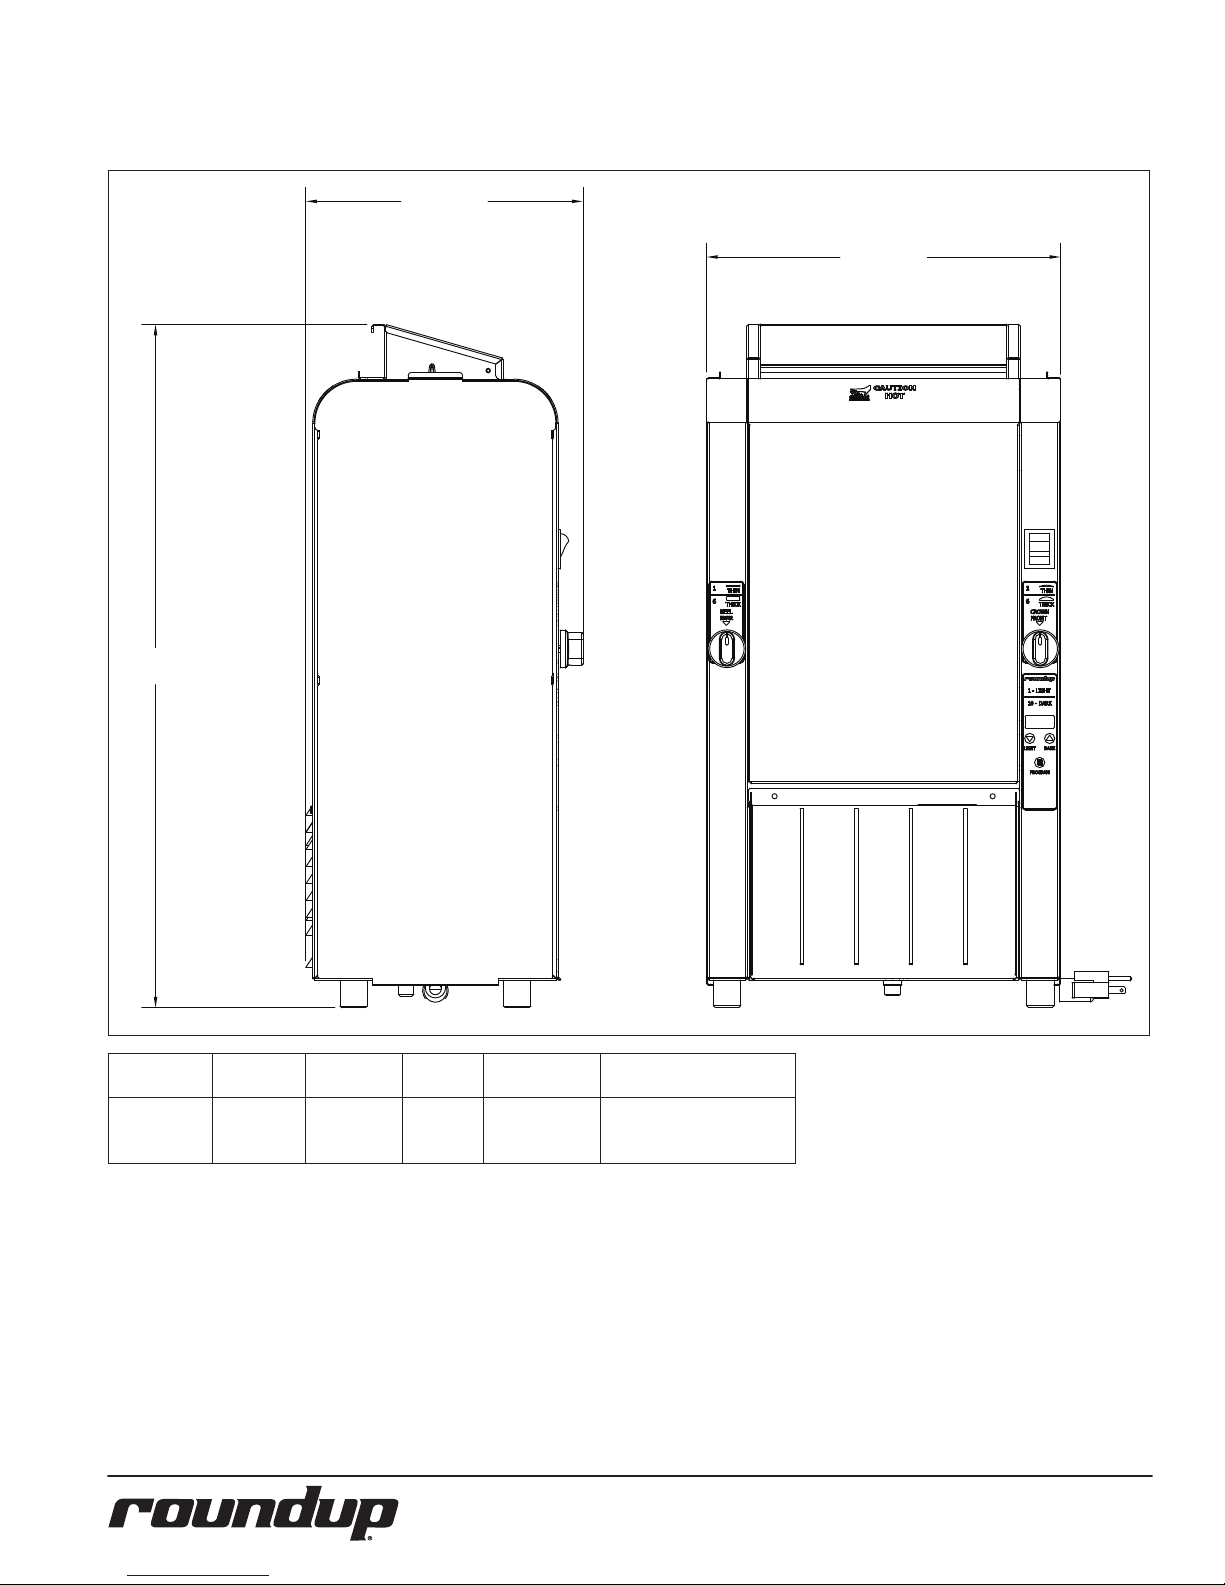
25”
(635 mm)
10.17”
(258.3 mm)
12.97”
(329.5 mm)
SPECIFICATIONS
Model &
Mfg. No.
9210904
VCT-2
Volts Watts Amps Hertz
120 1800 15 50/60
Plug
Description
5-15P 15 Amps., 120 V.,
Non-Locking
(assembly only)
4
P/N 1011271 Rev. A 06/14
Page 5

INSTALLATION
NOTE: When placing the toaster
into service, make sure to
provide at least 3 inches of
space on all sides of the unit.
1. Remove unit and all packing materials from shipping
carton. The toaster is shipped
with the items listed below:
• Owner’s Manual
• Authorized Service Agency
Directory
NOTE: If any parts are missing or dam-
aged, contact Antunes Technical
Service IMMEDIATELY at 1-877392-7854 or 1-630-784-1000.
2. Remove all packing materials and protective coverings from the unit.
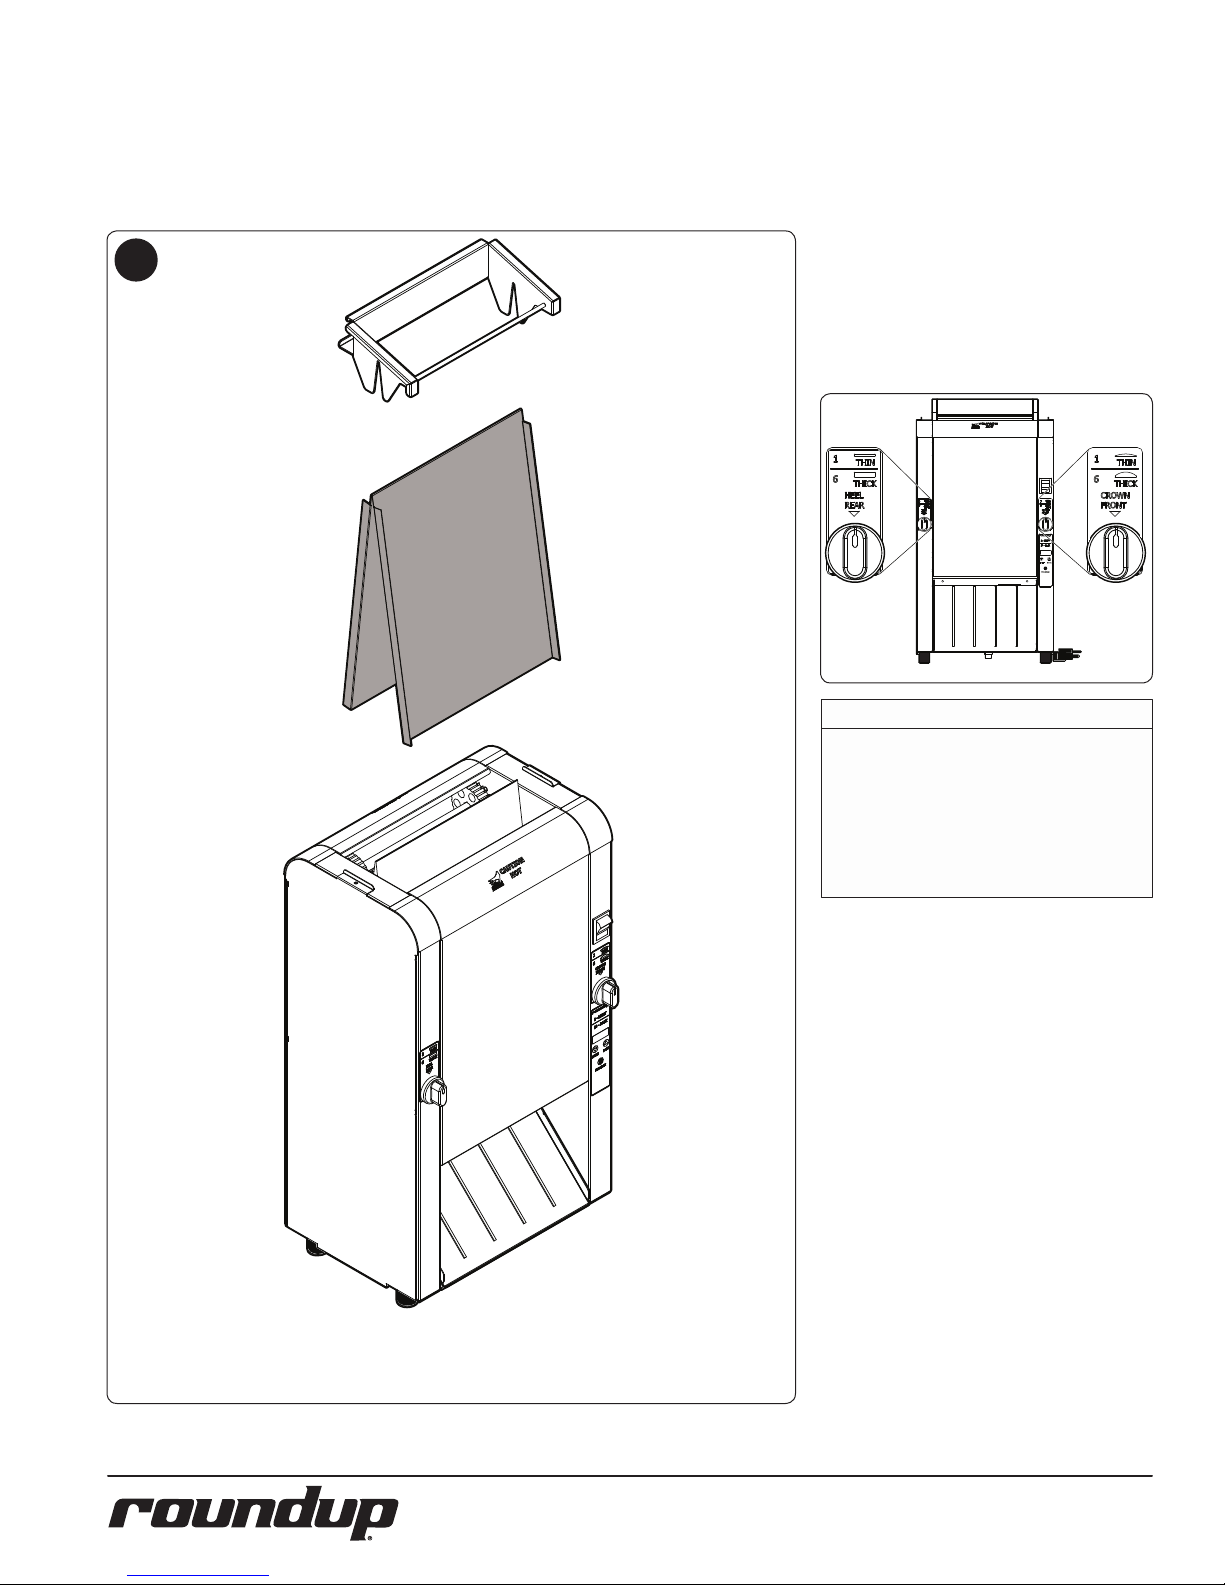
3. Refer to Figure 1. Remove the
Bun Feeder and Bun Chute. Wash
these items at the 3 compartment sink and set aside to air dry.
4. Refer to Figure 2. Remove
the Release Sheet.
NOTE: Do not wash the Release
Sheet or Release Sheet Retainers in the sink. These
must be washed by hand.
5. Wipe all surfaces of the unit
with a hot damp cloth.
6. Wipe both sides of the Release
Sheet with a hot damp cloth.
NOTE: Do NOT use a dripping wet
cloth. Wring out before use.
7. Re-install the Bun Feeder and
Bun Chute onto the unit.
8. Refer to the section titled
Installing the Release Sheet
on the next page. Install
the Release Sheet according to those instructions.
When placing the unit into service, pay
attention to the following guidelines.
y Make sure to provide at
least 3 inches of space on
all aides of the unit.
y Make sure the power switch
is o and the unit is at room
temperature before plugging in the power cord.
y Do not block or cover any
openings on the unit.
y Do not immerse the power
cord or plug in water.
y Keep the power cord away
from heated surfaces.
y Do not allow the power
cord to hang over edge
of table or counter.
Figure 1 Figure 2
Bun Feeder
Release Sheet
NOTE: The main Control Panel is
Bun Chute
located on the front of the unit.
P/N 1011271 Rev. A 06/14
5
Page 6
INSTALLING THE RELEASE SHEET
The Release Sheet allows buns to pass through the
toaster without sticking. The toaster should never be
operated without a clean Release Sheet installed.
BUN THICKNESS COMPRESSION
KNOB SETTINGS
The toaster uses two Bun Thickness
Compression Knobs for proper toasting
of buns (heels and crowns).
1
For best results, set both Bun Thickness
Compression Knobs to 4.
The compression settings range from
1 to 6. Setting 1 is the thinnest setting
and Setting 6 is the widest setting.
WARNING
Do NOT operate the toaster without the
release sheet installed. Do not use any
abrasive cleansers or tools such as scrub-
bers or scrapers on the Platen. Damage to
the Platen from operation without a Release
Sheet or damage caused from abrasive
cleansers or tools voids the warranty.
Remove the Bun Feeder. Install the Release Sheet evenly over the platen.
Reinstall the Bun Feeder.
6
P/N 1011271 Rev. A 06/14
Page 7

OPERATING
CROWNS
(Cut sides
facing IN)
HEELS
(Cut sides
facing IN)
INSTRUCTIONS
NOTE: If the toasting quality needs
adjustment, refer to Adjusting
Toasting Quality in the Operation section of this manual.
1
Power
Switch.
2
8888
The unit displays the software version,
the current platen setpoint tempera-
ture and starts to warm up .
3
TOASTING PRODUCT
Facing the front of the unit, insert product as described:
y Insert Crowns into the front lane
with the cut side facing in.
y Insert Heels into the rear lane
with the cut side facing in.
Refer to the image below.
Turn the Power switch to the on position. The unit makes a clicking sound.
This is normal.
4 D
After the system check, the unit begins
to warm up and Lo-P appears
on the display.
4
USE
The unit displays the USE
message when it reaches proper
operating temperature.
Buns Exit
Toaster Here
P/N 1011271 Rev. A 06/14
7
Page 8

ADJUSTING TOAST QUALITY
The unit can be adjusted to provide a
lighter or more darkly toasted product.
The lightest setting is 1 and the darkest
setting is 10.
Follow these steps to adjust toasting
quality.
1
D 4
1
USE
When the toaster reaches the newly
set Light/Dark temperature, the USE
message stops ashing and remains
on. The toaster is ready for use.
NOTE: The Light/Dark value is
maintained when the
unit is powered o.
HI LIMIT RESET BUTTON
A hi-limit control turns o power to
the unit if it overheats. To reset this HiLimit control, allow sucient time (1015 minutes) for the unit to cool down,
then remove the Hi-Limit control cap
and press the reset button located
on the bottom of the unit. If the unit
requires continuous resetting, call for
service.
To view the current Light/Dark setting,
briey press Light or Dark button. The
current Light/Dark setting
appears in the display.
2
USE
To change the Light/Dark setting,
press and hold the Light or Dark but-
ton until the unit beeps.
SHUTTING DOWN THE TOASTER
To turn the toaster o, turn the Power
switch to the o position.
RESET TO DEFAULT SETTINGS
Follow these steps to reset the toaster
to the factory settings
Follow these steps to reset to default
settings:
1. Turn the toaster o.
2. Pres and hold both the
Light and Dark buttons
and turn the toaster on.
3. Continue holding the Light and
Dark buttons until “fr” (factory
reset) appears in the display. The
toaster beeps when resetting is
done and starts up normally.
HILIMIT RESET
BUTTON
ERRORS
The toaster displays any kind of error
message, contact the factory immediately at 1-630-784-1000
Press the Light or Dark button set the
Light/Dark value as desired. Release
the Button. The USE message ashes
in the display as the unit adjusts the
platen temperature accordingly.
8
P/N 1011271 Rev. A 06/14
Page 9

MAINTENANCE
WARNING
The unit will remain hot while it is cooling
down. Personal injury and burns may result
from touching the unit before it is nished
cooling down. Wear Heat Resistant Gloves.
DAILY MAINTENANCE
The daily maintenance steps involve:
y Cleaning the Acces-
sories and Toaster
y Cleaning the Release Sheet
Cleaning the Accessories and Toaster
1. Turn the toaster o and allow
it to cool before proceeding.
2. Refer to Figure 3. Remove the
Bun Feeder, Release Sheet,
and Bun Chute and set aside.
NOTE: Do not wash the Release
Sheet in the sink. It must
be washed by hand.
3. Wash the Bun Feeder and
Bun Chute in soap and water. Rinse with clean water and allow to air dry.
4. Wipe all surfaces of the unit
with a hot damp cloth.
NOTE: Do not use a dripping wet
cloth. Wring out before use.
Figure 3
Cleaning the Release Sheet
1. Inspect the Release Sheet.
Replace the Release Sheet if
it is worn, creased, or torn.
2. Spray an approved cleanser
on a clean, dry towel.
3. Wipe the Release Sheet
rmly from top to bottom.
4. Repeat this procedure
with a clean, dry towel
dampened with water.
5. Next, wipe the release sheet
with a clean towel dampened with an approved
sanitizer. Allow to air dry.
6. Repeat Steps 1 through
6 on the inside portion
of the Release Sheet.
7. Refer to the section titled
Installing the Release Sheet.
Install the Release Sheet according to those instructions.
Cleaning the Belt Wraps
1. Open the front and rear Con-
veyor Covers (Figure 4)
2. Inspect the front and rear Belt
Wraps. Replace the Belt Wraps
if there are any signs of tearing, folding, or other damage.
3. Turn on the unit.
NOTE: This step requires that the
toaster be turned on with the
Conveyor Covers open. Use
caution during these steps.
4. Spray a clean, sanitized towel
with an approved cleanser and
wipe the front and rear Belt
Wraps for one full rotation.
5. Repeat Step 3 with an approved sanitizer.
NOTE: Repeat these steps as needed
until the Belt Wraps are clean.
Figure 4
P/N 1011271 Rev. A 06/14
9
Page 10

TROUBLESHOOTING
Problem Possible Cause Corrective Action
Power cord not plugged in Plug power cord into the proper electrical outlet
Hi-Limit has tripped
No Control Display
Conveyor does not turn on
Conveyor(s) hesitate
Buns not toasting adequately
Crowns and/or Heels must be
forced into the toaster. Buns
sticking and burning.
Toaster making unusal sounds
Buns/muns/bagels getting
caught in bun chute area
Circuit breakers turned o or tripped. Damaged electrical outlet, plug, or cord. Power switch damaged
Faulty or mis aligned communication cable Replace or align communication cable
Faulty Transformer Replace transformer.
Conveyor Belt/Chain has stretched. Chain skipping on
sprockets.
Loose sprocket Verify setscrew is tight on at part of shaft.
Motor Drive Chain came o sprocket(s) Reinstall drive chain
Inernal part /object interfering within conveyor system Check for interference & clear up as necessary.
Dive chains need lubrication. Lubricate chain
Loose or misaligned sprocket Align and tighten set screw on sprocket
Motor drive chain loose or stretched Replace or tighten up slack on drive chain.
Drive motor(s) have failed Contact your Maintenance person or Authorized Service agancy for service
Compression settings are incorrect. Use the recommended settings.
Release sheet is worn or needs cleaning (replace every
3-5 weeks)
Silicone belts are worn or need cleaning (replace every
2-4 months).
Silicone belts are not tacky.
Silicone belts not being cleaned properly. Clean silicone belts as described in the Maintenance section of this manual.
Silicone belts are not tacky.
Silicone belts are dirty, worn, or damaged (replace every
2-4 months)
Release sheet is not being cleaned properly.
Release sheet is not being reversed as required.
Conveyor Belt/Chains are skipping on sprockets.
Drive motor stalls intermittently. Contact your Maintenance person or Authorized Service agancy for service
Compression settings are incorrect. Use the recommended settings (4).
Buns are not inserted into the toaster properly.
Compression settings are too tight. Set bun thickness compression knobs to the correct setting.
Conveyor belt chains have stretched or adjusted incorrectly.
Motor Drive chain needs lubrication. Lubricate chain
Conveyor shaft bearing is binding. Contact your Maintenance person or Authorized Service agency for service
Bun chute installed incorrectly Reinstall Bun chute with lip end facing down towards exit
Allow unit to cool and reset the Hi-Limit Control. If it trips again, contact your
Maintenance person or Authorized Service Agency.
Reset circuit breakers. If they trip again, check the power cord,plug, and outlet for
damage. Contact your Maintenance person, Authorized Service Agency.
Measure and adjust the conveyor belt chains as described in the Maintenance
section of this manual.
Inspect release sheet for cleanliness, worn spots, wrinkles , or tears. Clean or
replace release sheet as described in the Maintenance section of this manual.
Replace or clean Silicone belts as desribed in thw Maintenance section of this
manual.
Replace or clean Silicone belts as desribed in thw Maintenance section of this
manual.
Replace or clean Silicone belts as desribed in thw Maintenance section of this
manual.
Replace or clean Silicone belts as desribed in thw Maintenance section of this
manual.
Clean both sides of release sheet as described in the Maintenance section of this
manual.
Reverse the release sheet or replace release sheet as described in the Maintenance section of this manual.
Adjust the conveyor belt chains as described in the Maintenance section of t his
manual.
Muns & Bagels should be inserted in the top feeder (#1) with cut side up.
Crowns should be inserted in the middle feeder(#2) with the cut side down. Heels
should be inserted in the lowere feeder only(#3) with the cut side up.
Adjust the conveyor belt chains as described in the Maintenance section of t his
manual.
10
P/N 1011271 Rev. A 06/14
Page 11

REPLACEMENT PARTS
Item Part No. Description Qty. Item Part No. Description Qty.
1 0012472 Inner Spring Tensioner Assy. 4
2 0012982 Conveyor Belt Assembly 37/2 2
3 0012988 Tensioner Assembly 4
4 0012989 Bun Feeder Assembly 1
5 0012990 Conveyor Cover Assembly 2
6 0021900 Idle Bearing Retainer Weldment 1
7 0021959 Cam Weldment 2
8 0021960 Base Weldment 1
9 0021962 Control Panel Weldment 2
10 0021964 End Housing Weldment 1
11 0021965 Control Housing Weldment 1
12 0100287 Platen, Grill 120V/1800W 1
13 0400147 Bushing, Shorty 7/8” 1
14 0400265 Bushing, Shorty 3/8” 4
15 0400437 Strain Relief, Rt Angle 1
16 0500464 Bearing Retainer 1
17 0503495 Bracket, Retainer Right 2
18 0503496 Bracket, Tensioner-Right 2
19 0503497 Bracket, Tensioner-Left 2
20 0503507 Bracket, Retainer Left 2
21 0506754 Panel, Electrical 1
22 0506755 Retainer, Bearing 6
23 0506756 Plate, Motor 1
24 0506763 Bracket, Trx-Conn 1
25 0506764 Chute, Bun 1
26 0700463 Power Cord,14/3 5-15P 1
27 0800455 Rod, Knob (Heel) 1
28 0800457 Rod, Knob (Crown) 1
29 0800458 Rod, Support 4
30 0800460 Shaft, Drive 2
31 0800461 Shaft, Idler 2
32 1000900 Label - Warning 1
33 1001181 Label, Crown 2
34 1001527 Label, Roundup Service 1
35 1001550 Label, Control 1
36 1001551 Label, Install 1
37 1001552 Label, Cam (Heel) 1
38 1001553 Label, Cam (Crown) 1
39 1001556 Label, Wiring Diagram 1
40 1031188 Spec Label 1
41 2100230 Bumper, Recess W/Washer 4
42 2100348 Knob, 1/4” Shaft, Push-On 2
43 2110127 Ring, Retaining 8
44 2120107 Spacer, Aluminum 2
45 2150158 Bearing, 1/2”Id X 1 1/8”Od 2
46 2150173 Sprocket, 25B12 5/16” Bore 1
47 2150179 Sprocket, 25B14 1/2” Bore 3
48 2150186 Bearing High Temp 1/2” Bore 6
49 2150190 Sprocket, 25B28 1/2”Bore Stepped Tooth 8
50 2150258 Bearing, Idler 1
51 2150260 Spacer, Bearing 6
52 2150368 Miter Gear, 20° Pressure Angle 4
53 2150370 Chain, Drive 1
54 2180145 Cover, Bumper 4
55 3000124 Ring, Penaining 3/8” 1
56 304P105* Nut, Hex ‘Keps’ #4-40 1
57 306P121* Screw, Mach #6-32 X 3/4” 1
58 306P123* Screw, Mach #6-32 X 7/8” Slrndhd 1
59 306P130* Nut, Hex Keps #6-32 (Small Pattern) 1
60 306P156* Screw, Mach. #6-32 X 1/2” 1
61 308P115* Screw, Mach. #8-32 X 3/8” 1
62 308P143* Nut, Hex ‘Keps’ #8-32 1
63 308P144* Screw, #8-32 X 1/4” (#6 Head) 1
64 308P157* Screw, Tap 8-32 X 3/8”Lg 1
65 308P203* Screw, Tap 8-32 X 3/8” W/
Int. Tooth Washer 1
66 310P103* Screw, Mach. #10-32 X 1/4” 1
67 310P136* Screw, Mach. #10-32 X 1/4” 1
68 310P146* Nut, Hex ‘Keps’ #10-32 1
69 310P213* Screw, Phpnhd #10-16 X 3/4” Thrd Form 1
70 325P163* Set Screw, 1/4-28 X 5/16” 1
71 325P203* Washer, Spring Steel Single-Wave 1
72 338P116* Screw, Shoulder 3/8-16 X 3/8 W/
1/2 Shoulder 1
73 4000173 Gearmotor, 9 Rpm, 115V 1
74 4000210 Fan, Axial 115V 1
75 4010199 Transformer, 120 Vac/12Vac 1
76 4010245 Switch, Rocker 1
77 4030332 Thermostat, Hi-Limit 1
78 4050214 Thermocouple Type “K” (Open End) 1
79 4051010 Relay, Random Phase, Solid State-50A 1
80 4060195 Terminal Block 2
81 4060355 Terminal Block, 3-Pole 1
82 4070202 Assy-Pcb, Cfa Contact Toaster 1
83 4070213 Varistor Board 1
84 7000985 Black Wavy Silicone Belt 1
85 0021961 Conveyor Cover Weldment 2
86 0011311 Roller Tensioner Assy. 2
87 0502199 Spacer 4
88 308P145 Nut, Hex Acorn #08-32 Low Crown 1
89 7000989 Platen Sheet (Pkg. of 2) 1
*Available in Packages of 10
P/N 1011271 Rev. A 06/14
11
Page 12

4
89
64
64
14
52
71
52
37
42
76
38
42
25 82
28
35
43
80
56
15
26
12
78
13
79
81
83
80
59
59
60
72
51
48
22
68
57
9
P/N 1011271 Rev. A 06/14
Page 13

64
51
48
22
68
72
52
52
71
43
45
16
68
47
47
47
46
53
9
68
55
50
65
72
45
6
27
42
73
23
66
P/N 1011271 Rev. A 06/14
13
Page 14

SEE EXPLOSION BELOW
ON THIS PAGE
5
5
5
5
2
84
2
12
63
20
61
63
17
70
49
70
70
70
49
31
49
31
44
49
44
49
7
49
30
70
70
18
61
7
19
61
18
61
61
61
19
20
63
63
17
3
5 55
1
5
14
P/N 1011271 Rev. A 06/14
Page 15

65
69
21
74
75
64
24
77
41
67
54
P/N 1011271 Rev. A 06/14
15
Page 16

WIRING DIAGRAM
BRD
MOV
WHT/BLU
POWER
CORD
BLK/BRN
GRN-YEL
TERMINAL
BLOCK #1
*GRN
POWER
SWITCH
*WHT
WIRING DIAGRAM
* 14 GA. AWM 105° C
∆ 14 GA. TFE 200Ā C
# 18 GA. AWM 105° C
22 GA. XLP 125Ā C
GND
*WHT
#WHT
8
7
#WHT
15
5
17
TERMINAL
BLOCK #3
*BLK
#BLK
TERMINAL
BLOCK #2
11
16
14
4
6
*WHT
#WHT
J1
1
2
J2
TERMINAL
#WHT
#WHT
#YEL
1
2
J3
MAIN
DISPLAY
BOARD
M
F
TRANSFORMER
#YEL
J5
1
2
3
4
MOTOR
#BLK
FAN
#BLK
#BLK
#BLK
RED
BLK
*BLK
+
3
S.S.
RELAY
2
1
-
4
HI-LIMIT
∆ WHT
TC
1800W PLATEN
16
∆ BLK
P/N 1011271 Rev. A 06/14
Page 17

NOTES
P/N 1011271 Rev. A 06/14
17
Page 18

18
P/N 1011271 Rev. A 06/14
Page 19

P/N 1011271 Rev. A 06/14
19
Page 20

LIMITED WARRANTY
Equipment manufactured by Roundup Food Equipment Division of A.J. Antunes & Co. has been constructed of the nest materials available and manufactured to high quality standards. These units are warranted to be free from electrical and mechanical defects for a period of one (1) year from date of purchase under normal use and service, and when installed in accordance
with manufacturer’s recommendations. To insure continued operation of the units, follow the maintenance procedures outlined in the Owner’s Manual. During the rst 12 months, electro-mechanical parts, non-overtime labor, and travel expenses up
to 2 hours (100 miles/160 km), round trip from the nearest Authorized Service Center are covered.
1. This warranty does not cover cost of installation, defects caused by improper storage or handling prior to placing of the
Equipment. This warranty does not cover overtime charges or work done by unauthorized service agencies or personnel. This warranty does not cover normal maintenance, calibration, or regular adjustments as specied in operating
and maintenance instructions of this manual, and/or labor involved in moving adjacent objects to gain access to the
equipment. This warranty does not cover consumable/wear items such as Release Sheets, Conveyor Belt Chain Assemblies, Belt Wraps, and Dampers. This warranty does not cover damage to the Platen due to operating the toaster
without a Release Sheet or cleaning with abrasive cleansers or tools, misuse or dropping of unit. This warranty does
not cover problems or failures resulting from improper/incorrect voltage supply. This warranty does not cover Travel
Time & Mileage in excess of 2 hours (100 miles/160 km) round trip from the nearest authorized service agency.
2. Roundup reserves the right to make changes in design or add any improvements on any product. The right is always reserved to modify equipment because of factors beyond our control and government regulations. Changes to update equipment do not constitute a warranty charge.
3. If shipment is damaged in transit, the purchaser should make a claim directly upon the carrier. Careful inspection should be made of the shipment as soon as it arrives and visible damage should be noted upon the carrier’s receipt. Damage should be reported to the carrier. This damage is not covered under this warranty.
4. Warranty charges do not include freight or foreign, excise, municipal or other sales or
use taxes. All such freight and taxes are the responsibility of the purchaser.
5. This warranty is exclusive and is in lieu of all other warranties, expressed or implied, including any implied warranty or merchantability or tness for a particular purpose, each of which is hereby expressly
disclaimed. the remedies described above are exclusive and in no event shall roundup be liable for special consequential or incidental damages for the breach or delay in performance of this warranty.
 Loading...