

Page 1
9235900
09-12 Dodge 4WD 1500 2.5” Leveling Kit
Thank you for choosing Rough Country for all your suspension needs.
Rough Country recommends a certified technician install this system. In addition to these instructions, professional
knowledge of disassemble/reassembly procedures as well as post installation checks must be known. Attempts to install
this system without this knowledge and expertise may jeopardize the integrity and/or operating safety of the vehicle.
Please read instructions before beginning installation. Check the kit hardware against the kit contents list on the back
page. Be sure you have all needed parts and know where they go. Also please review tools needed list and make sure
you have the tools needed to install the kit.
As a general rule, the taller a vehicle is, the easier it will roll. Seat belts and shoulder harnesses should be worn at all
times. Avoid situations where a side rollover may occur.
Generally, braking performance and capability are decreased when larger/heavier tires and wheels are used. Take this
into consideration while driving. Do not add, alter, or fabricate any factory or after-market parts to increase vehicle height
over the intended height of the Rough Country product purchased. Mixing component brands is not recommended.
Rough Country makes no claims regarding lifting devices and excludes any and all implied claims. We will not be responsible for any product that is altered.
We will be happy to answer any questions concerning the design, function, and use of our products.
This suspension system was developed using a 33X12.50/17, tire with factory wheels.
Any vehicle equipped with any Rough Country product should have a “Warning to Driver” decal installed on the inside of
the windshield or on the vehicle’s dash. The decal should act as a constant reminder for whoever is operating the vehicle of its unique handling characteristics.
INSTALLING DEALER - it is your responsibility to install the warning decal and forward these installation instructions on
to the vehicle owner for review. These instructions should be kept in the vehicle for its service life.
DOES NOT FIT TRX PACKAGE VEHICLES!!
PRODUCT USE INFORMATION
NOTICE TO DEALER AND VEHICLE OWNER
Tools Needed:
8mm Wrench
15mm Socket / Wrench
14mm Socket / Wrench
18mm Socket / Wrench
21mm Socket / Wrench
22mm Socket / Wrench
24mm Socket / Wrench
9/16” Socket
Torque Specs:
Size Grade 5 Grade 8
5/16” 15 ft/lbs 20 ft/lbs
3/8” 30 ft/lbs 35 ft/lbs
7/16” 45 ft/lbs 60 ft/lbs
9/16” 95 ft/lbs 130 ft/lbs
Class 8.8 Class 10.9
10MM 32ft/lbs 45ft/lbs
18MM 170ft/lbs 240ft/lbs
Page 2
INSTALLATION INSTRUCTIONS
1. Jack up the front of the vehicle and support the vehicle with jack stands, so that the front wheels are off the ground.
2. Using 22mm socket remove the front tires/wheels.
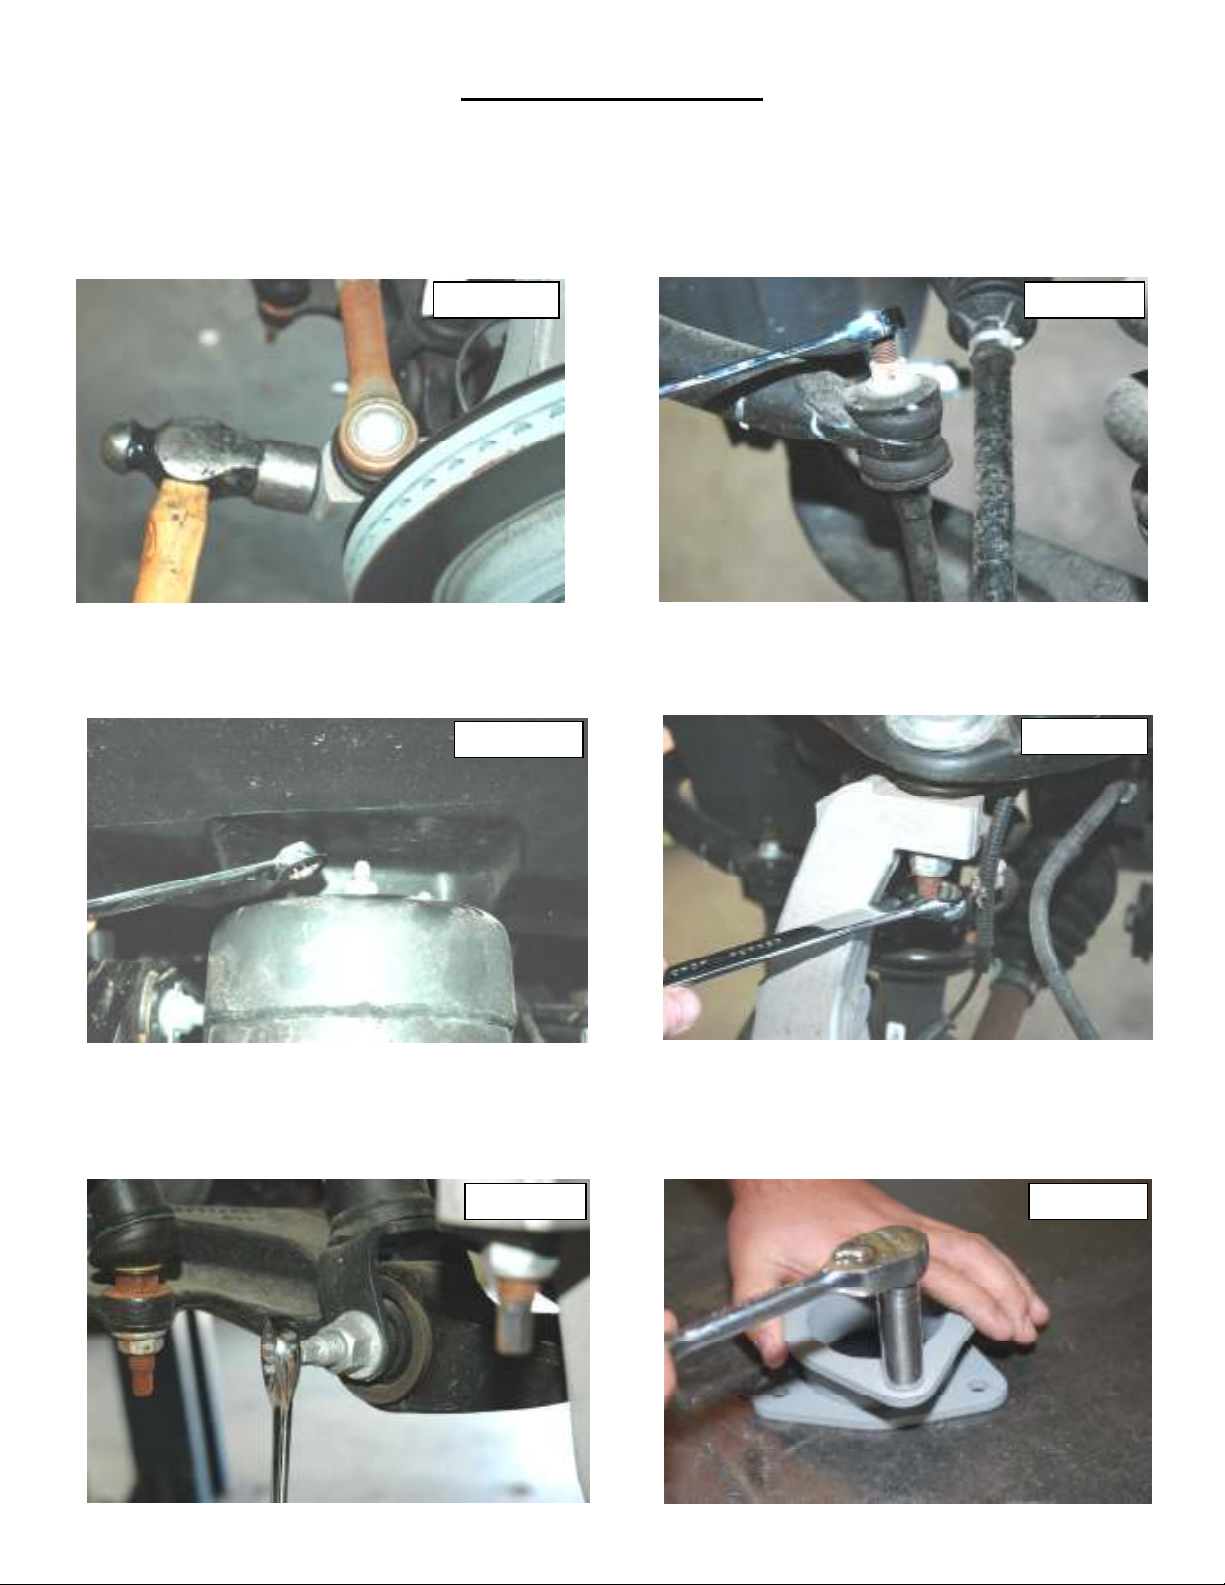
3. Using 21mm socket remove the nut from the steering linkage. Using a hammer hit on the side of the knuckle as
shown, and remove the linkage from the knuckle. Push linkage forward to make room for installation. Retain factory
hardware See PHOTO 1.
4. Using a 15mm wrench, remove the sway bar nut, and bushings allowing the sway bar to drop. Retain factory hardware. See PHOTO 2.
PHOTO 1 PHOTO 2
5. Using a 15mm socket, remove the strut nuts on the upper strut tower. See PHOTO 3
6. Place jack stand under the knuckle for support. Using 21 mm socket remove upper ball joint nut. Using a hammer hit
the knuckle to allow the ball joint to separate from the upper control arm See PHOTO 4. Do not allow the knuckle to
pull out far enough that it pulls the shaft out of the differential.
PHOTO 3
PHOTO 4
7. Using a 24mm socket and 21mm wrench, remove the strut bolt from the lower control arm and remove the strut assembly from the vehicle. Retain the factory lower bolt for reassembly. Note the direction of the bolt for reassembly.
See PHOTO 5.
8. Locate the supplied 3/8” stud extensions. Using a 9/16” socket snug self clinching stud in the new spacer as shown
in Photo 6. The stud should clinch with about 35-45 ft/lbs of torque. Do not over torque the nut.
PHOTO 5 PHOTO 6
Page 3
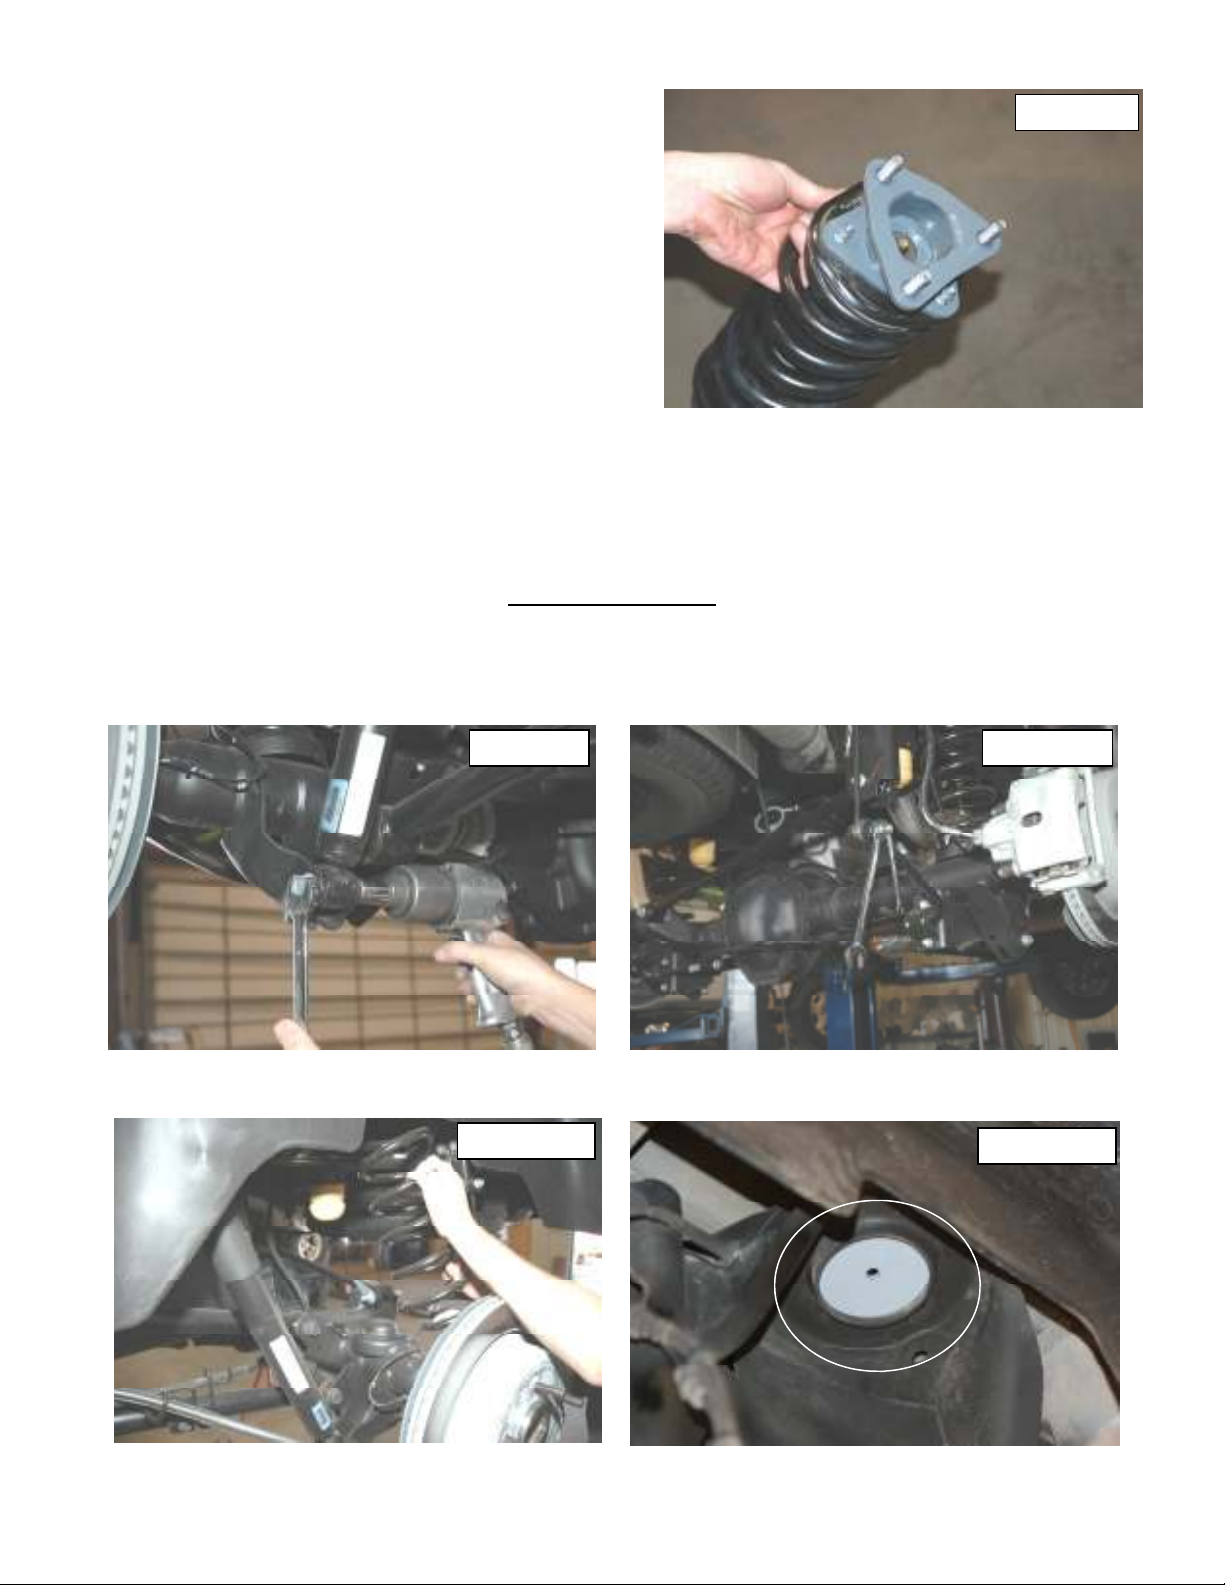
9. Place the strut extension on the strut and tighten using the
factory hardware. See PHOTO 7.
10. Install the strut assembly into the strut tower and start using
the supplied 3/8” nuts.
11. Install the lower strut bolt in the original position that it was
removed. Torque to factory specs.
12. Using a floor jack, raise the lower control arm and connect
the upper ball joint on the upper control arm to the spindle.
Torque to manufacturer specs.
13. Using a 21mm socket reinstall the steering linkage nut .
14. Repeat steps 3-13 on opposite side of vehicle
15. Using 15 mm wrench reinstall sway bar bushings and nut
using factory hardware. Torque to factory specs.
16. Install the wheels / tires.
17. Jack up the vehicle and remove the jack stands. Lower the
vehicle to the floor and torque all bolts to factory specifications.
REAR INSTALLATION
1. Jack up the rear of the vehicle and place jack stands underneath the frame rail.
2. Support the rear axle with a floor jack.
3. Remove the tires and wheels.
4. Remove the stock shocks from the lower shock mount using a 21mm wrench. See Photo 8.
5. Remove the sway bar link from the sway bar using a 18mm and 8mm wrench. See Photo 9.
PHOTO 7
PHOTO 8 PHOTO 9
6. Lower the axle with the floor jack and remove the coils springs. See Photo 10.
7. Install the flat upper spacer retainer as shown in Photo 11 on the upper coil seat.
PHOTO 10
PHOTO 11
Page 4
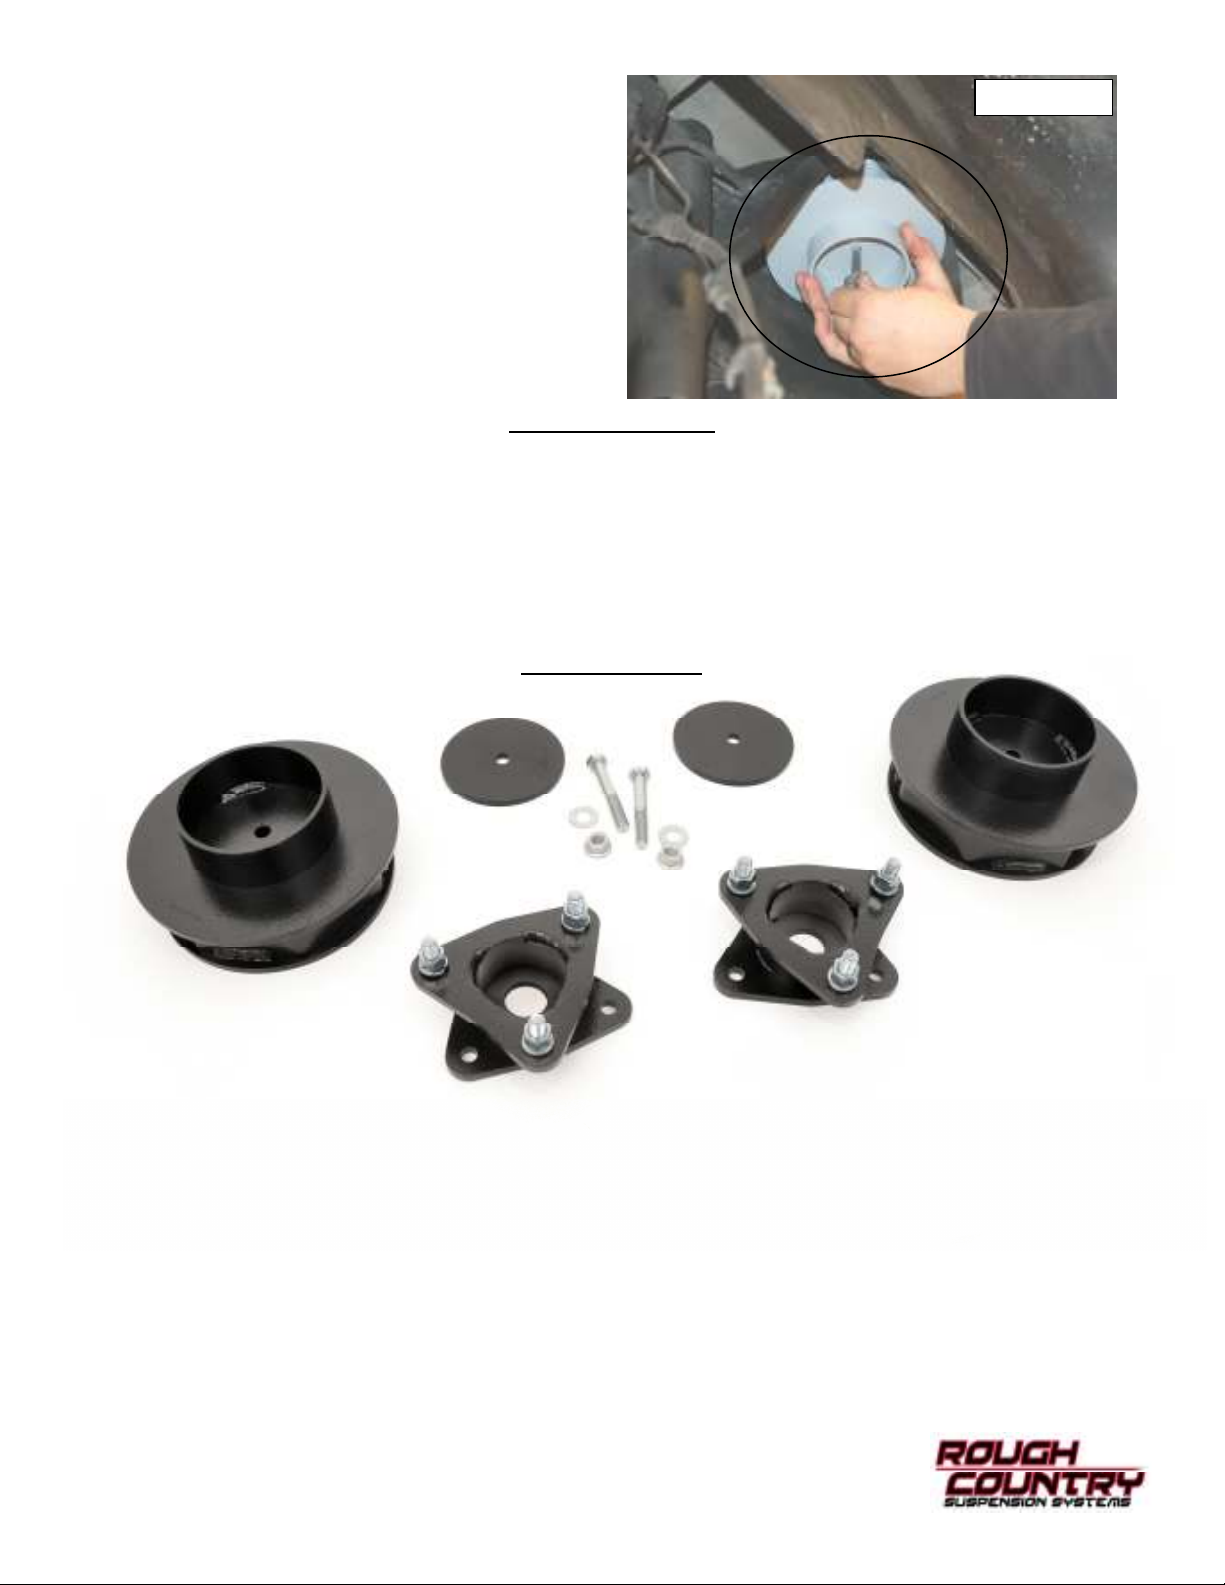
8. Install the spring spacer and secure with the supplied
3/8” x 2 1/2” bolt through the upper flat retainer to hold
the spacer in place. Tighten using a 14mm Socket &
wrench. See Photo 13.
9. Reinstall the coil spring.
10. Lift the axle with the floor jack and reinstall the stock
shocks with the stock hardware using a 21mm wrench.
11. Reinstall the sway bar link on the sway bar using a
18mm and 8mm wrench.
12. Reinstall the tires /wheels and remove the jack stands.
13. Lower the vehicle to the ground.
PHOTO 13
POST INSTALLATION
1. Check all fasteners for proper torque. Check to ensure there is adequate clearance between all rotating, mobile,
fixed and heated members. Check steering for interference and proper working order. Test brake system.
2. Perform steering sweep. The distance between the tire sidewall and the brake hose must be checked closely. Cycle
the steering from full turn to full turn to check for clearance.
3. Re torque all fasteners after 500 miles. Visually inspect components and re torque fasteners during routine vehicle
service.
4. Readjust headlights to proper settings and take truck in for a front-end alignment to a qualified alignment
professional.
KIT COMPONENTS
Rear Spacer Retainers
Rear Spacers
Front Strut Spacers
2-Front Strut Extensions
1-3/8 Bag that includes:
6-3/8” Studs
6-3/8” Nuts
6-3/8” Lock Washers
2-Rear Coil Spacers
1-359Bag2 Includes:
2-3/8” x 2 1/2” Bolts
2-3/8” Nylock Nuts
4-3/8” Flat Washers
Thank you for purchasing a Rough Country Leveling System.
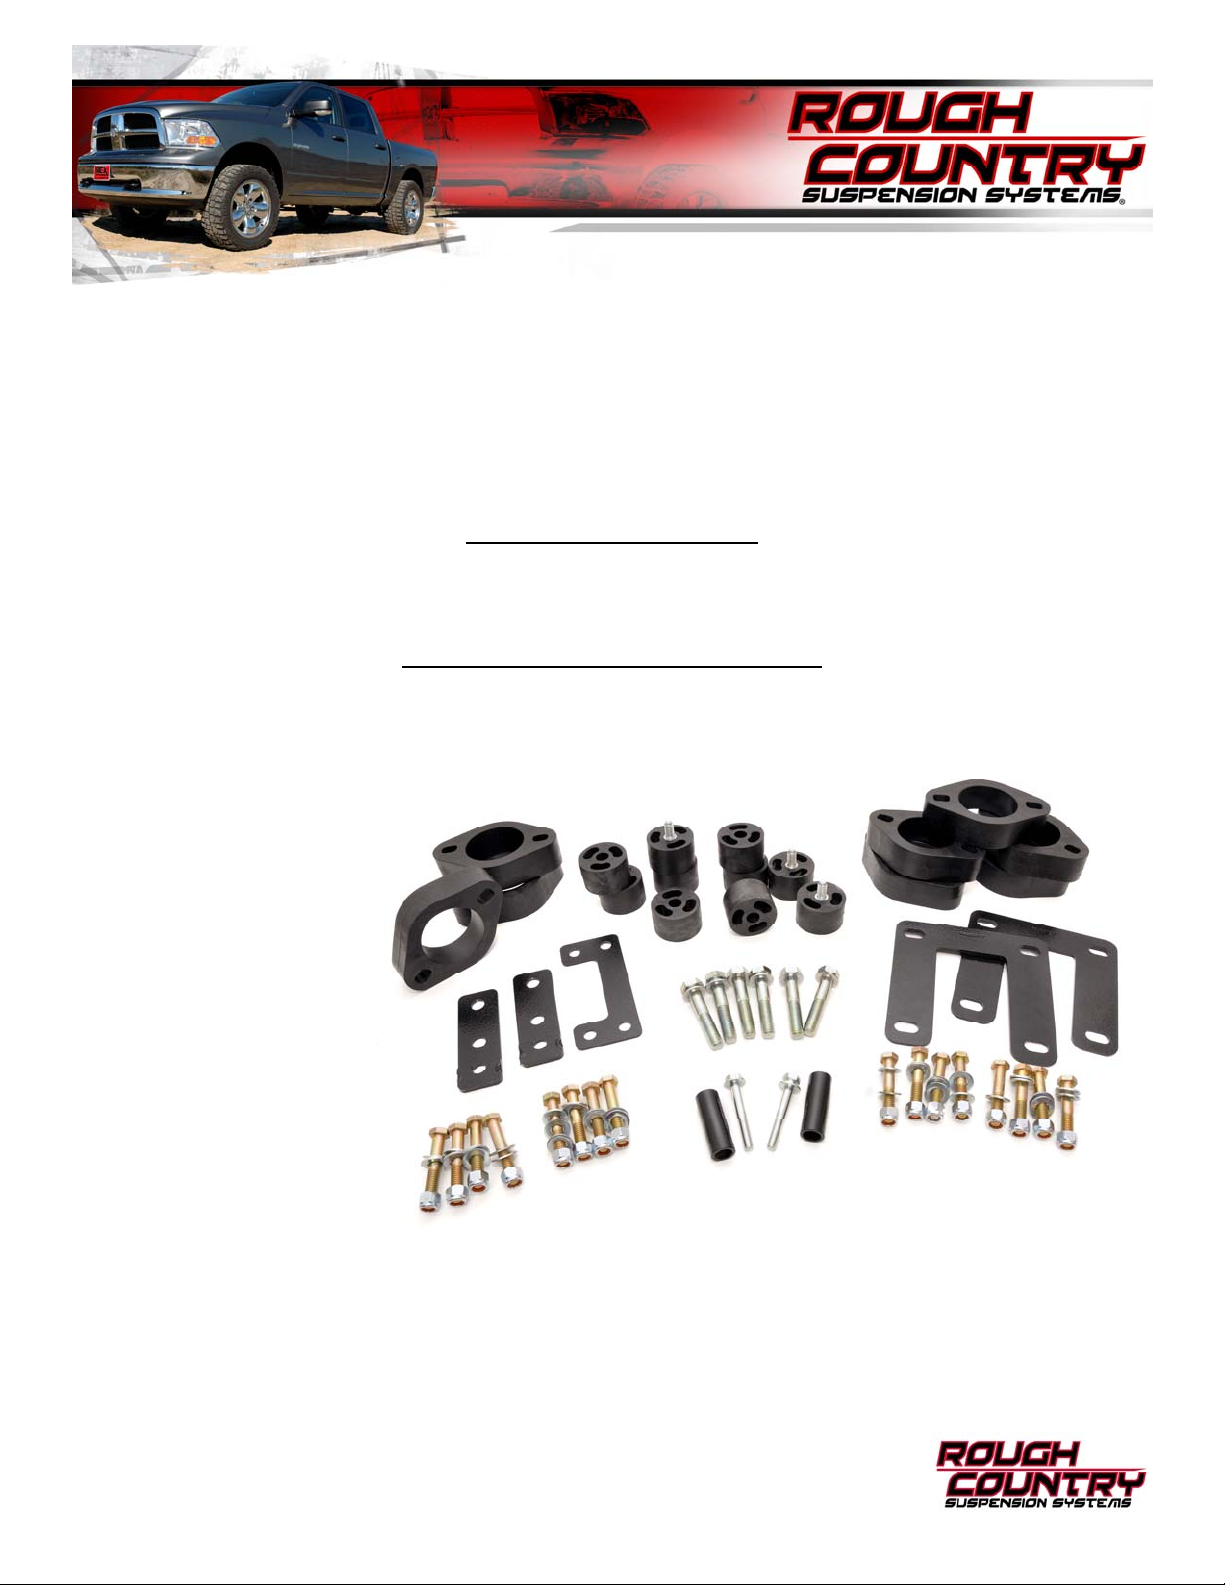
KIT CONTENTS:
Page 5
92RC80000
09-12 Dodge 4WD 1500 1 1/4” Body Lift
Thank you for choosing Rough Country for all your suspension needs.
Rough Country recommends a certified technician install this kit. Attempts to install this kit without this knowledge and
expertise may jeopardize the integrity and/or operating safety of the vehicle. Please read instructions before beginning
installation. Check the kit hardware against the kit contents list page. Be sure you have all needed parts and know
where they go. Review tools needed list and make sure you have the tools needed to install the kit.
This kit is packaged to accommodate Dodge 09-10 Standard Bed, Crew Cab models. Please be advised that in
the event that this kit is installed on a standard cab or any other combination cab and bed, all body pucks may
not be used, This kit does fit all models and in these instructions a 4DR SWB vehicle installation is shown.
PRODUCT USE INFORMATION
We will not be responsible for any product that is altered. We will be happy to answer any questions concerning the design, function, and use of our products by calling 800-222-7023.
This body lift was developed using a 33x12.5x20 tire with factory wheels.
NOTICE TO DEALER AND VEHICLE OWNER
Any vehicle equipped with any Rough Country product should have a “Warning to Driver” decal installed on the inside of
the windshield or on the vehicle’s dash. The decal should act as a constant reminder of the vehicles unique handling
characteristics. These instructions should be kept in the vehicle for its service life.
Kit Contents:
2-Fr Bumper Relocation Brackets
2-Rr Bumper Relocation Brackets
1-Rr Bumper Center Reloc Brkt
8-Cab Spacers
6-Bed Spacers
4-Bed Spacers w/ stud
1-Poly Bag Containing:
16-3/8” x 2 1/4’ Bolts
32-3/8” Flat Washers
16-3/8” Lock nuts
2-Rr Spare Tire Winch Sleeves
2-8mm x 60mm Bolts
2-8mm Flat Washers
6-12mm x 65mm Bolts
6-12mm Flat Washers
Tools Needed:
Jack
Jack Stands
Wood Blocks (2x4)
Pliers
Hammer
Phillips Screwdriver
Drill Motor
1/4” Drill Bit
1/2” Drill Bit
Reciprocating Saw
8mm Socket
10mm Socket / Wrench
14mm Socket / Wrench
13mm Socket / Wrench
15mm Socket / Wrench
16mm Socket / Wrench
18mm Socket / Wrench
19mm Socket / Wrench
Hand Grinder
Clamp
Page 6
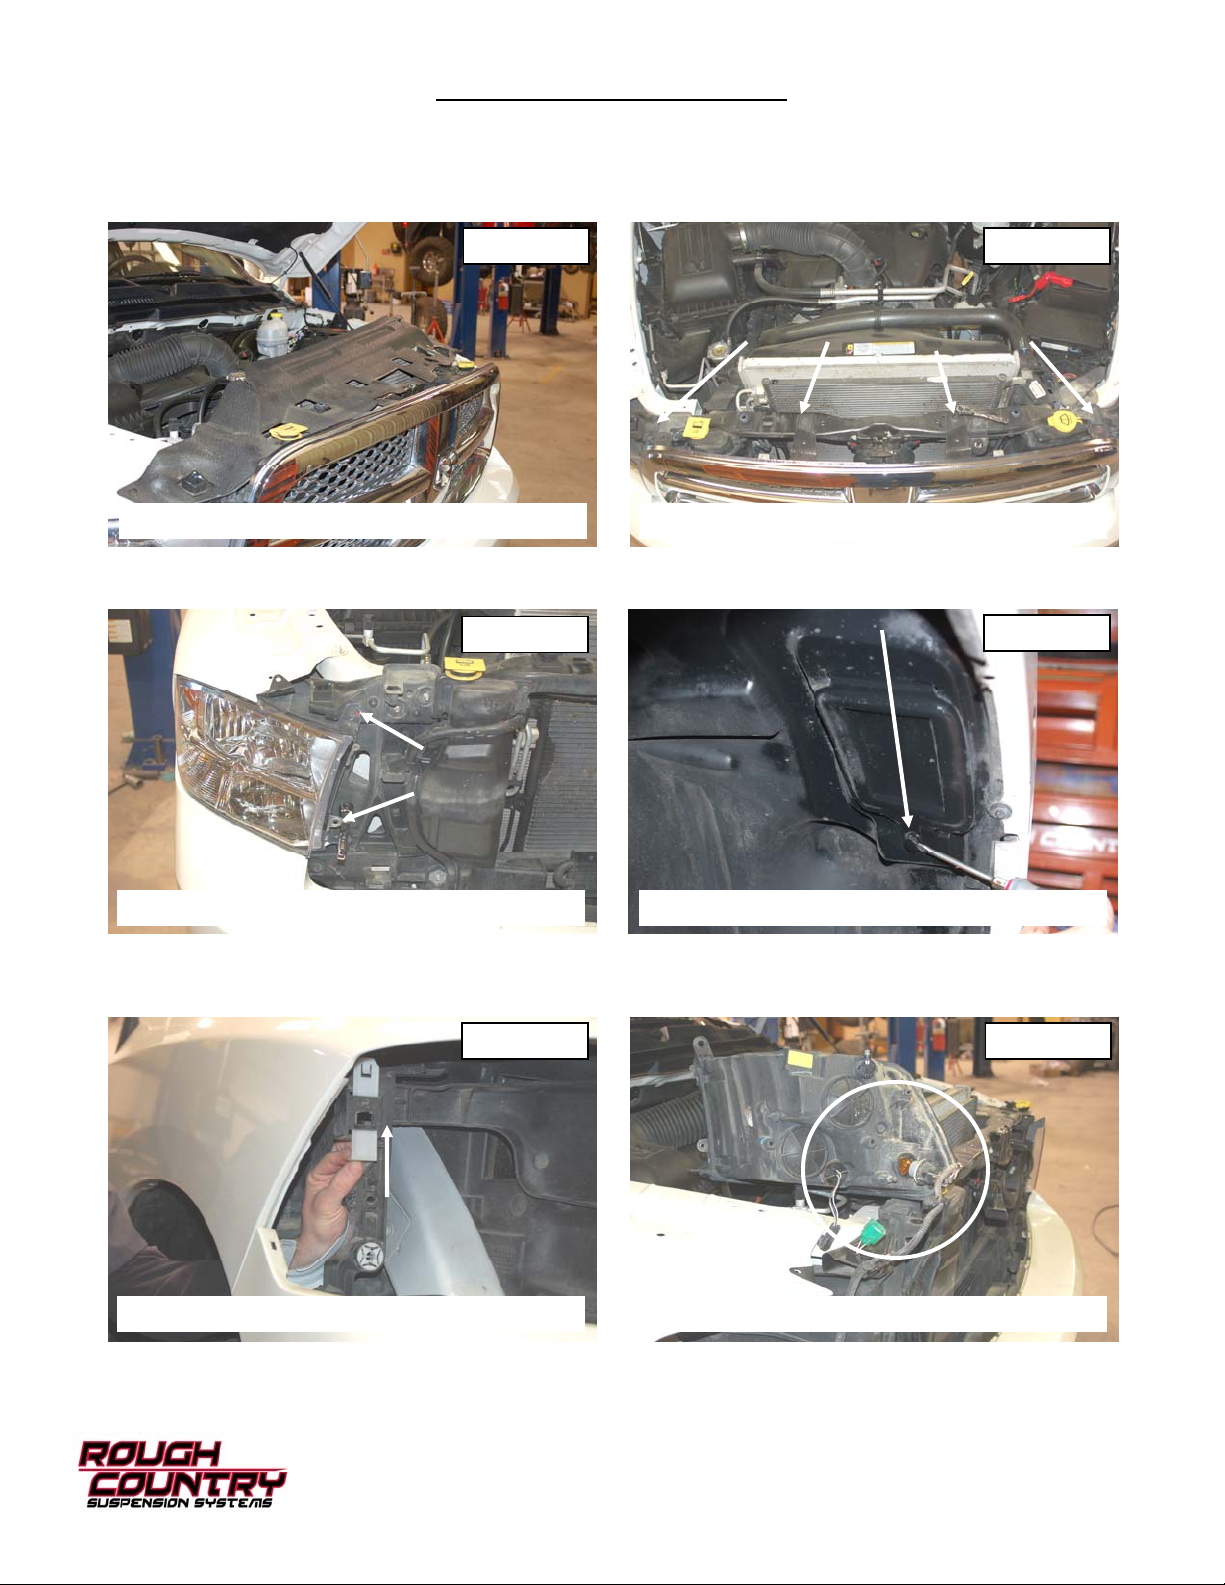
CAB INSTALLATION INSTRUCTIONS
1. Raise hood disconnect positive and negative battery cable from the battery using 10mm wrench. This is done because of airbags. Check owners manual and remove airbag fuses to prevent accidental air bag deployment.
2. Remove clips holding radiator bezel by pulling up on bezel at each clip using pliers if needed. See Photo 1.
3. Remove four bolts holding grill on using 10mm pull on lower part of grill to remove from truck. See Photo 2.
PHOTO 1 PHOTO 2
REMOVE RADIATOR BEZEL CLIPS REMOVE THE GRILL BOLTS
4. Remove two bolts from headlights using 10mm. See Photo 3. Remove clip from inner fender well to gain access to
rear of headlamp. See Photo 4.
PHOTO 3
REMOVE HEADLIGHT BOLTS REMOVE CLIP FROM FENDER WHEEL
5. Push up on clip as seen in Photo 5 to release the headlight.
6. Unplug all wires and remover the headlamp from the truck. See Photo 6. Repeat for other sid e.
PHOTO 5 PHOTO 6
PHOTO 4
HEADLIGHT RELEASE SHOWN REMOVE WIRES FROM HEADLIGHT
Page 7
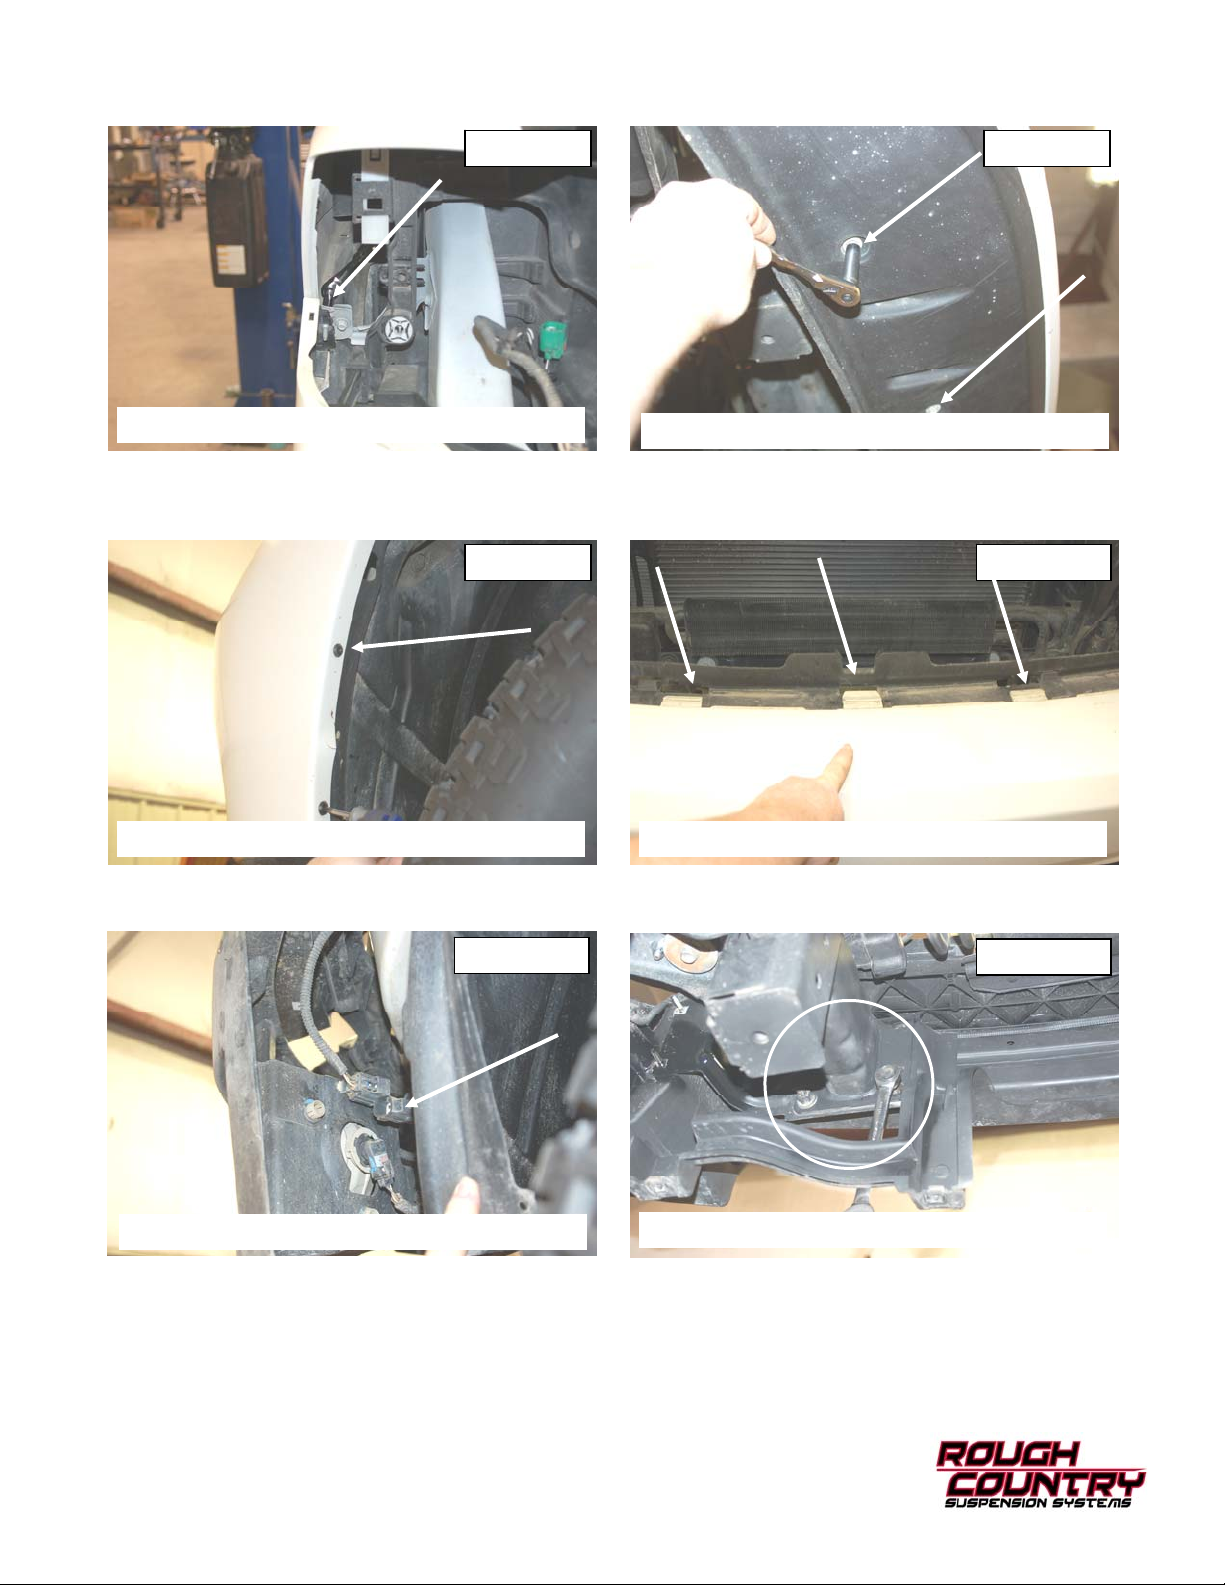
7. Remove painted bumper cover using 10mm and 8mm socket. There are 8 bolts 1 behind ea ch headlamp and four
on bottom of bumper and 2 bolts ( 8mm )on inner fender well. See Photo 7 & 8.
PHOTO 7 PHOTO 8
REMOVE THE BUMPER COVER
8. Remove clips that attach bumper to inner fender well (4 of these). See Photo 9. On topside of bumper there 9 tabs
that must be unclipped. See Photo 10.(Models with chrome bumper will not have 4 bolts on the bottom or clips on
fender wells). Remove the bumper cover from the vehicle.
PHOTO 9 PHOTO 10
REMOVE THE INNER FENDER UNCLIP TABS ON BUMPER
9. On driver side unplug and pull connector off of bumper above fog lamp. Then remove 6 nuts from bumper usin g
18mm wrench. (3 on each side). See Photo 11 & 12.
PHOTO 11
REMOVE BUMPER BOLTS
PHOTO 12
UNPLUG FOG LAMP CONNECTORS
REMOVE BUMPER BOLTS
Page 8
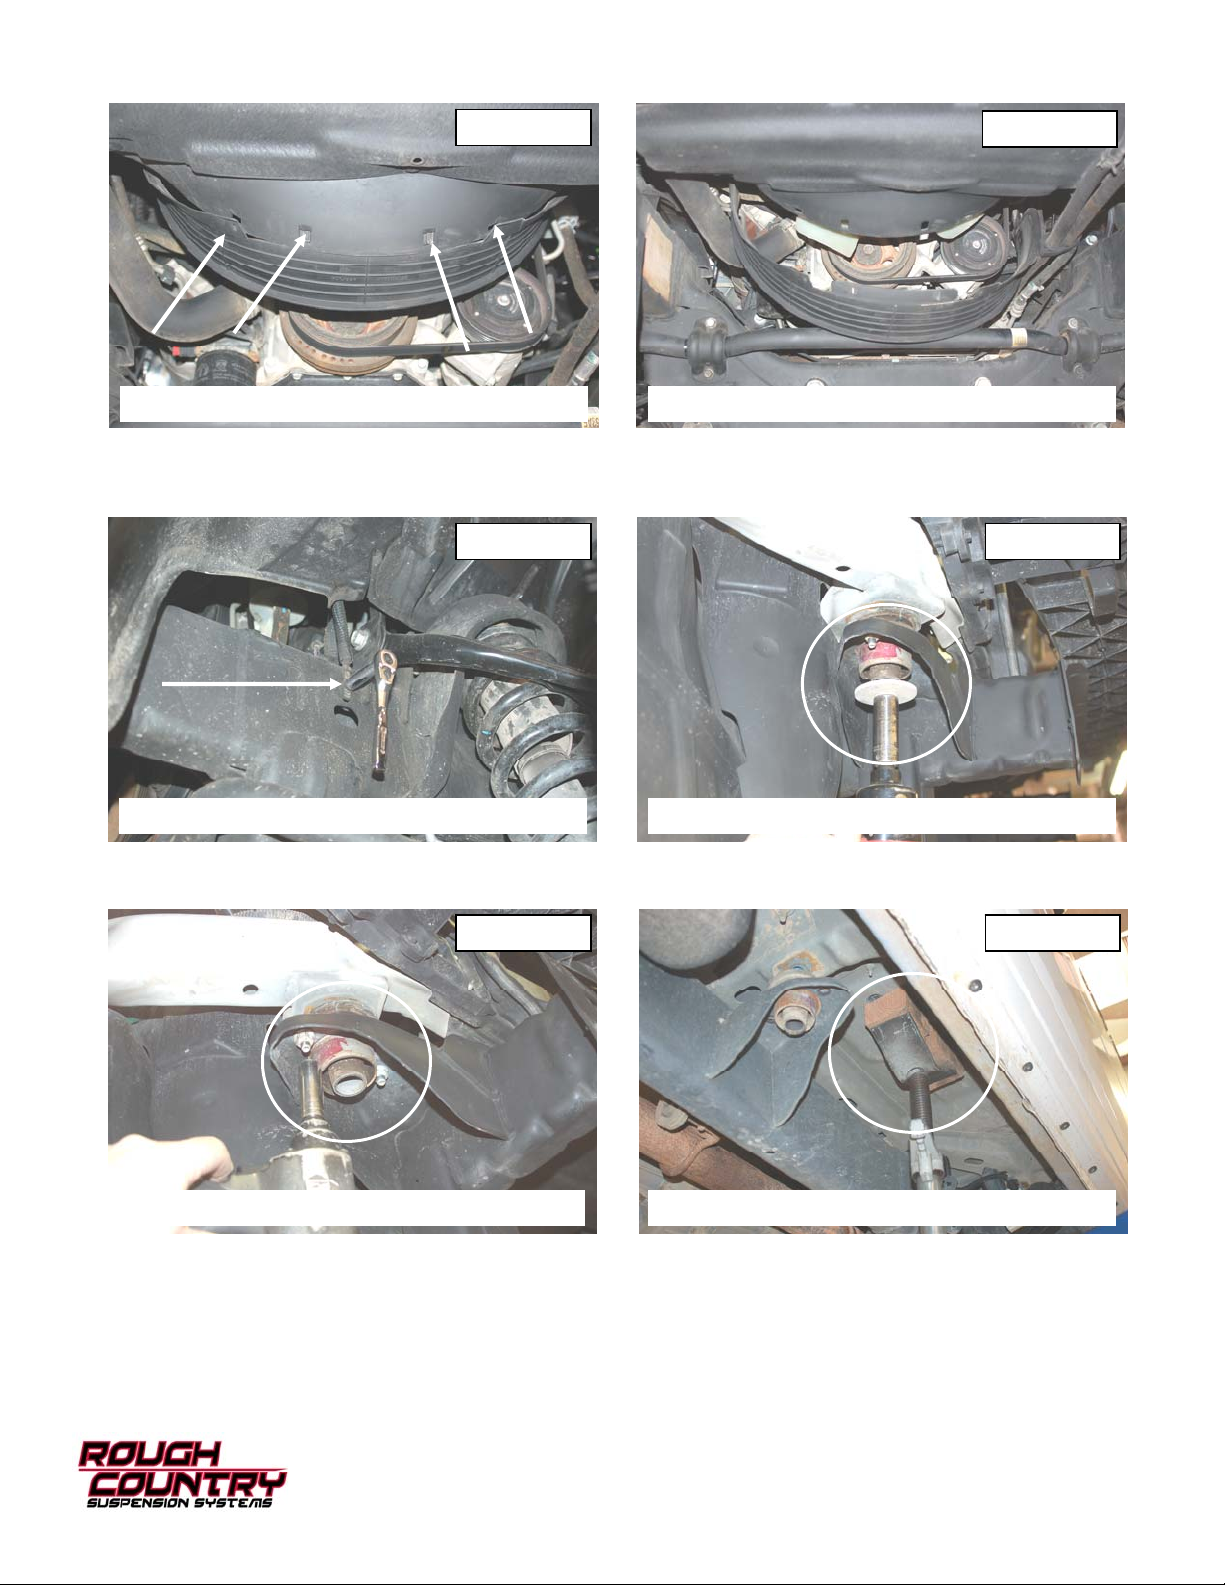
10. Undo the clips on lower fan shroud pull down and remove. See Photo 13 & 14.
PHOTO 13
UNCLIP FAN SHROUD REMOVE THE LOWER FAN SHROUD
11. Using a 10mm remove ground wire from frame on driver side. See Photo 15.
12. Loosen all cab body mounts. On one side of the cab only, remove the bolts using a 18mm socket. See Photo 16.
Retain the factory hardware.
PHOTO 15 PHOTO 16
PHOTO 14
REMOVE THE GROUND WIRE REMOVE CAB BOLTS (ONE SIDE ONLY)
13. Using a 16mm remove nuts from body mounts. See Photo 17.
14. Using jack stand lift body slowly from the frame. See Photo 18.
REMOVE NUTS FROM CAB BODY MOUNTS SLOWLY LIFT BODY
PHOTO 17 PHOTO 18
Page 9
15. Remove body mounts from one side of the vehicle.
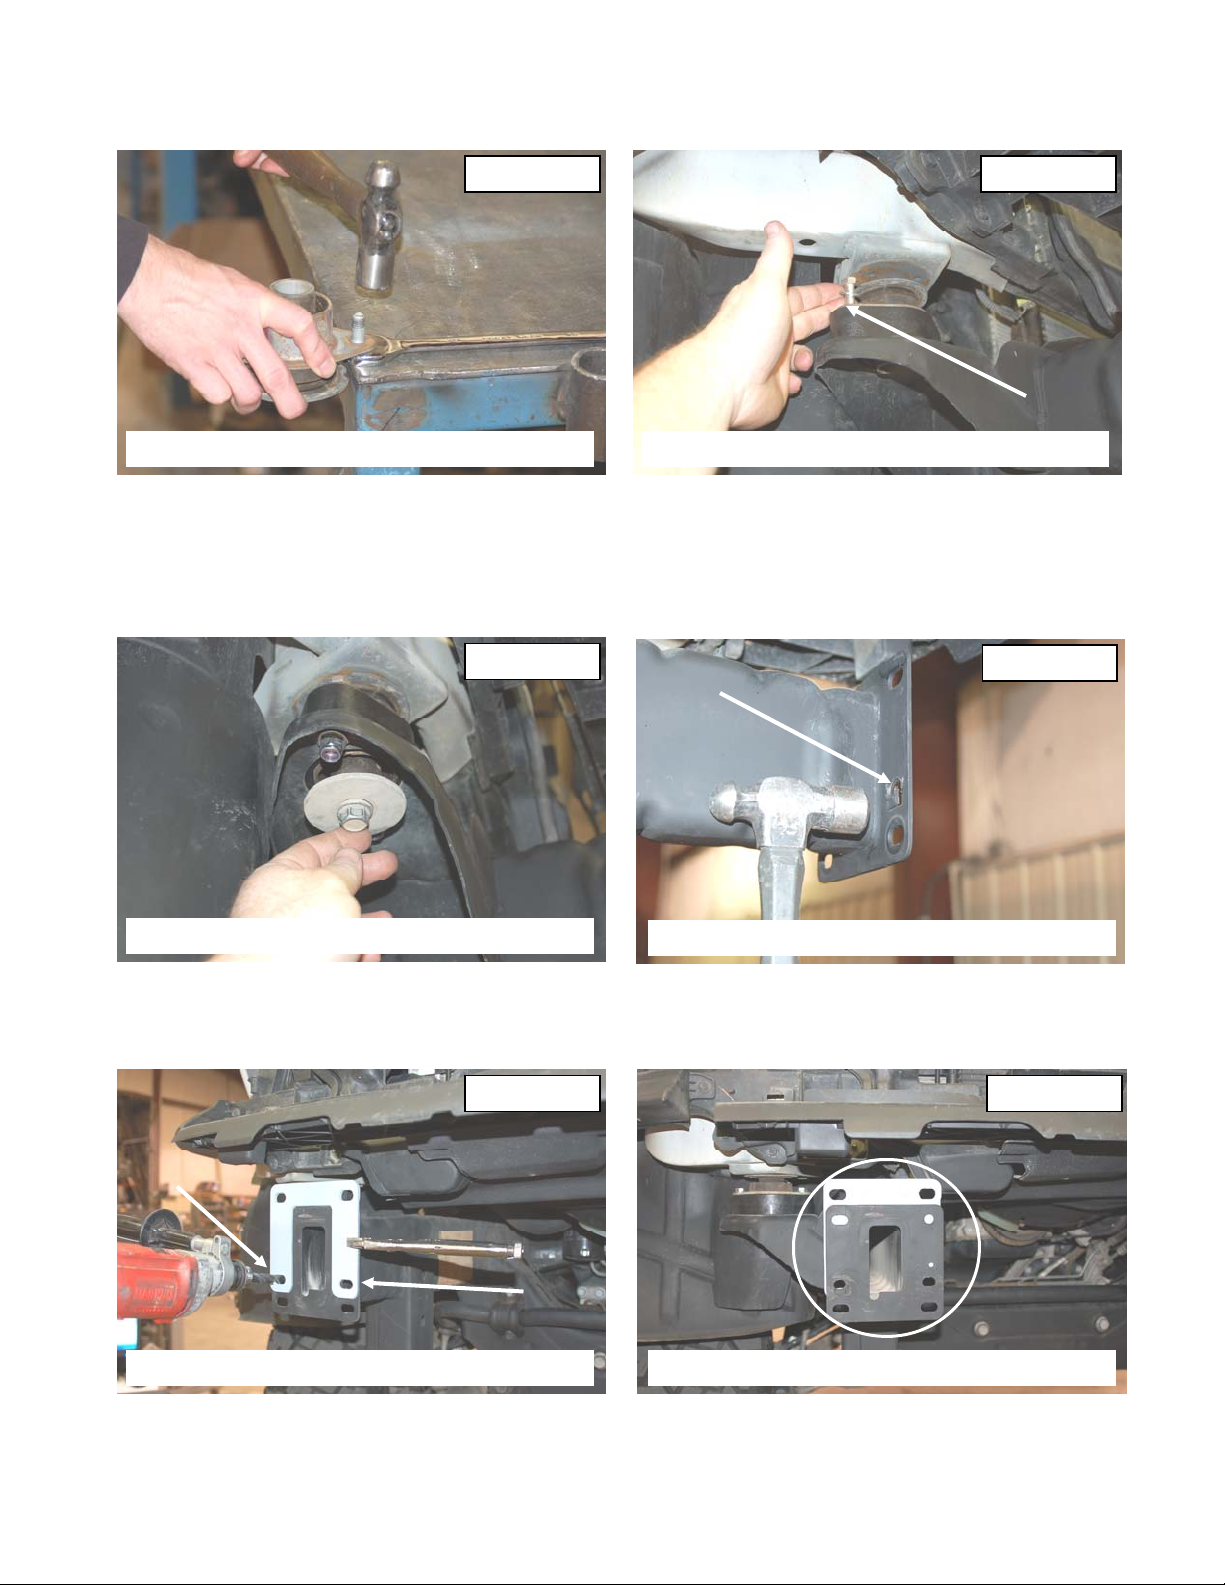
16. Remove studs from them using a hammer and a wrench. See Photo 19. Retain two for reuse on rear.
17. Install new body spacers using supplied 3/8” x 2 1/4” bolts, washers and nuts. 2 per mount. See Photo 20.
PHOTO 19 PHOTO 20
REMOVE THE STOCK STUDS INSTALL SPACERS WITH 3/8” 2 1/4” BOLTS
18. Reinstall body bolts as shown in Photo 21 and lower body back down on frame.
19. Proceed to opposite side and install body spacers. Do not tighten until both sides are finished.
20. Using 14mm wrench and socket tighten new 3/8” bolts then tighten stock body bolts using 18mm socket.
21. After all body bolts a tight reinstall ground wire on driver side using 10mm wrench.
22. On the factory bumper frame mount flatten the metal tab with hammer until its flush with outside. This is done because you will be drilling into it. See Photo 22.
PHOTO 21
REINSTALL STOCK CAB MOUNT BOLTS
FLATTEN TABS WITH HAMMER
PHOTO 22
23. Using new bumper mount as a guide, clamp in place and drill new 1/2” holes. See Photo 23. If needed use smaller
drill bit to make a pilot hole first. Test fit bumper to make sure holes line up.
24. After holes are drilled, install new bumper mount behind frame mount and install bumper into new holes. Install factory nuts using 18mm wrench. See Photo 24.
PHOTO 23 PHOTO 24
CLAMP BRACKET IN PLACE AND DRILL INSTALL BRACKET BEHIND MOUNT
25. Reattach fog light harness on driver side.
26. Install painted bumper cover using 8 and 10mm wrenches with factory hardware, making sure bumper fits properly .
27. Install all clips then install headlamps. Pull down on clip inside fender well to lock headlamp in place. Install factory
bolts.
28. Reinstall grill and then radiator bezel.
Page 10
BED INSTALLATION INSTRUCTIONS
1. Using a screwdriver remove license plate.
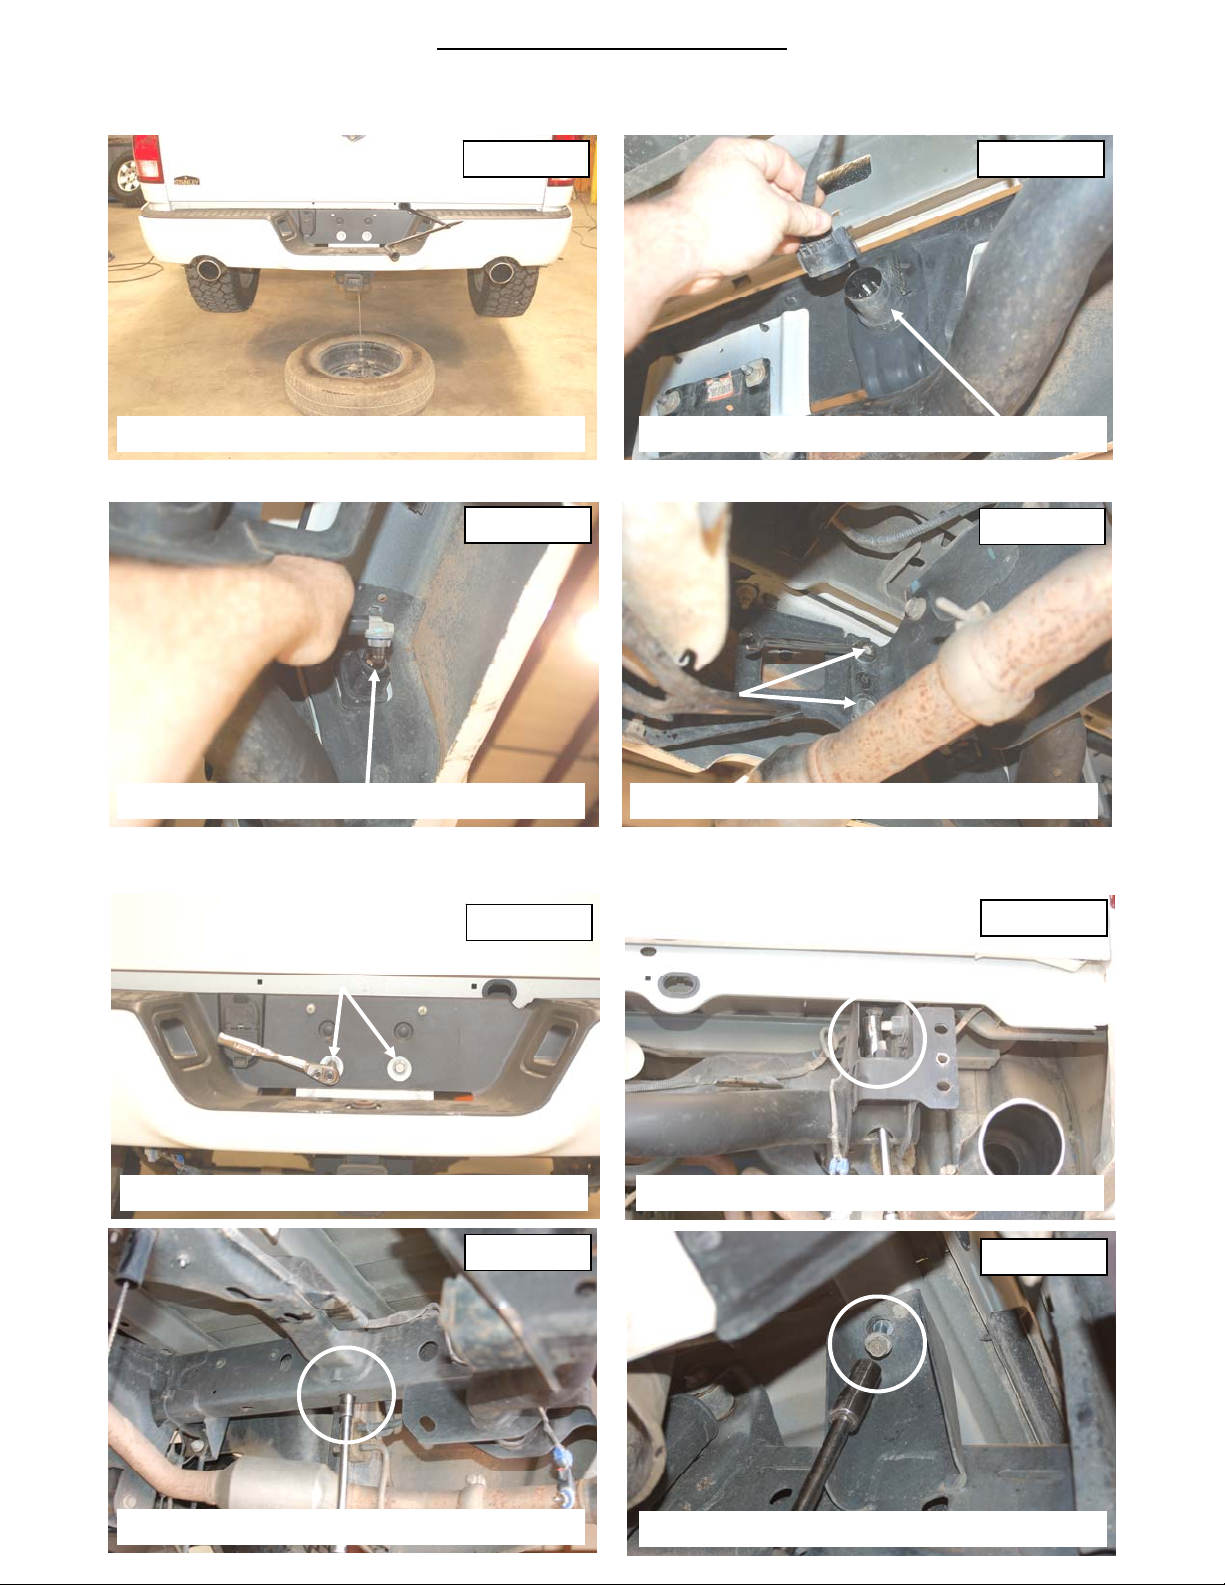
2. Find the spare tire tools under passenger side seat and remove spare tire from truck. See Photo 1.
3. Unplug trailer and lighting harness from bumper. See Photo 2 & 3.
PHOTO 1 PHOTO 2
LOWER SPARE TIRE FROM MOUNT UNPLUG TOWING CONNECTOR
4. Using 13mm and 15mm wrench remove bolts from bumper on both sides. See Photo 4. Retain stock hardware.
PHOTO 3
PHOTO 4
REMOVE PLATE ILLUMINATION HARNESS REMOVE BUMPER BOLTS
5. Remove the center bolts from bumper using 15mm socket and remove. See Photo 5. Retain stock hardware.
6. Remove the 6 bolts from truck bed using 18mm socket. See Photo 6, 7 & 8.
PHOTO 5
PHOTO 6
REMOVE CENTER BUMPER BOLTS REMOVE REAR BED BOLTS
PHOTO 7
REMOVE CENTER BED BOLTS
REMOVE FRONT BED BOLTS
PHOTO 8
Page 11
7. With jack stands or another method raise bed off of frame just enough to get body spacers in. Be sure to monitor
gas fill lines and take care not to over extend.
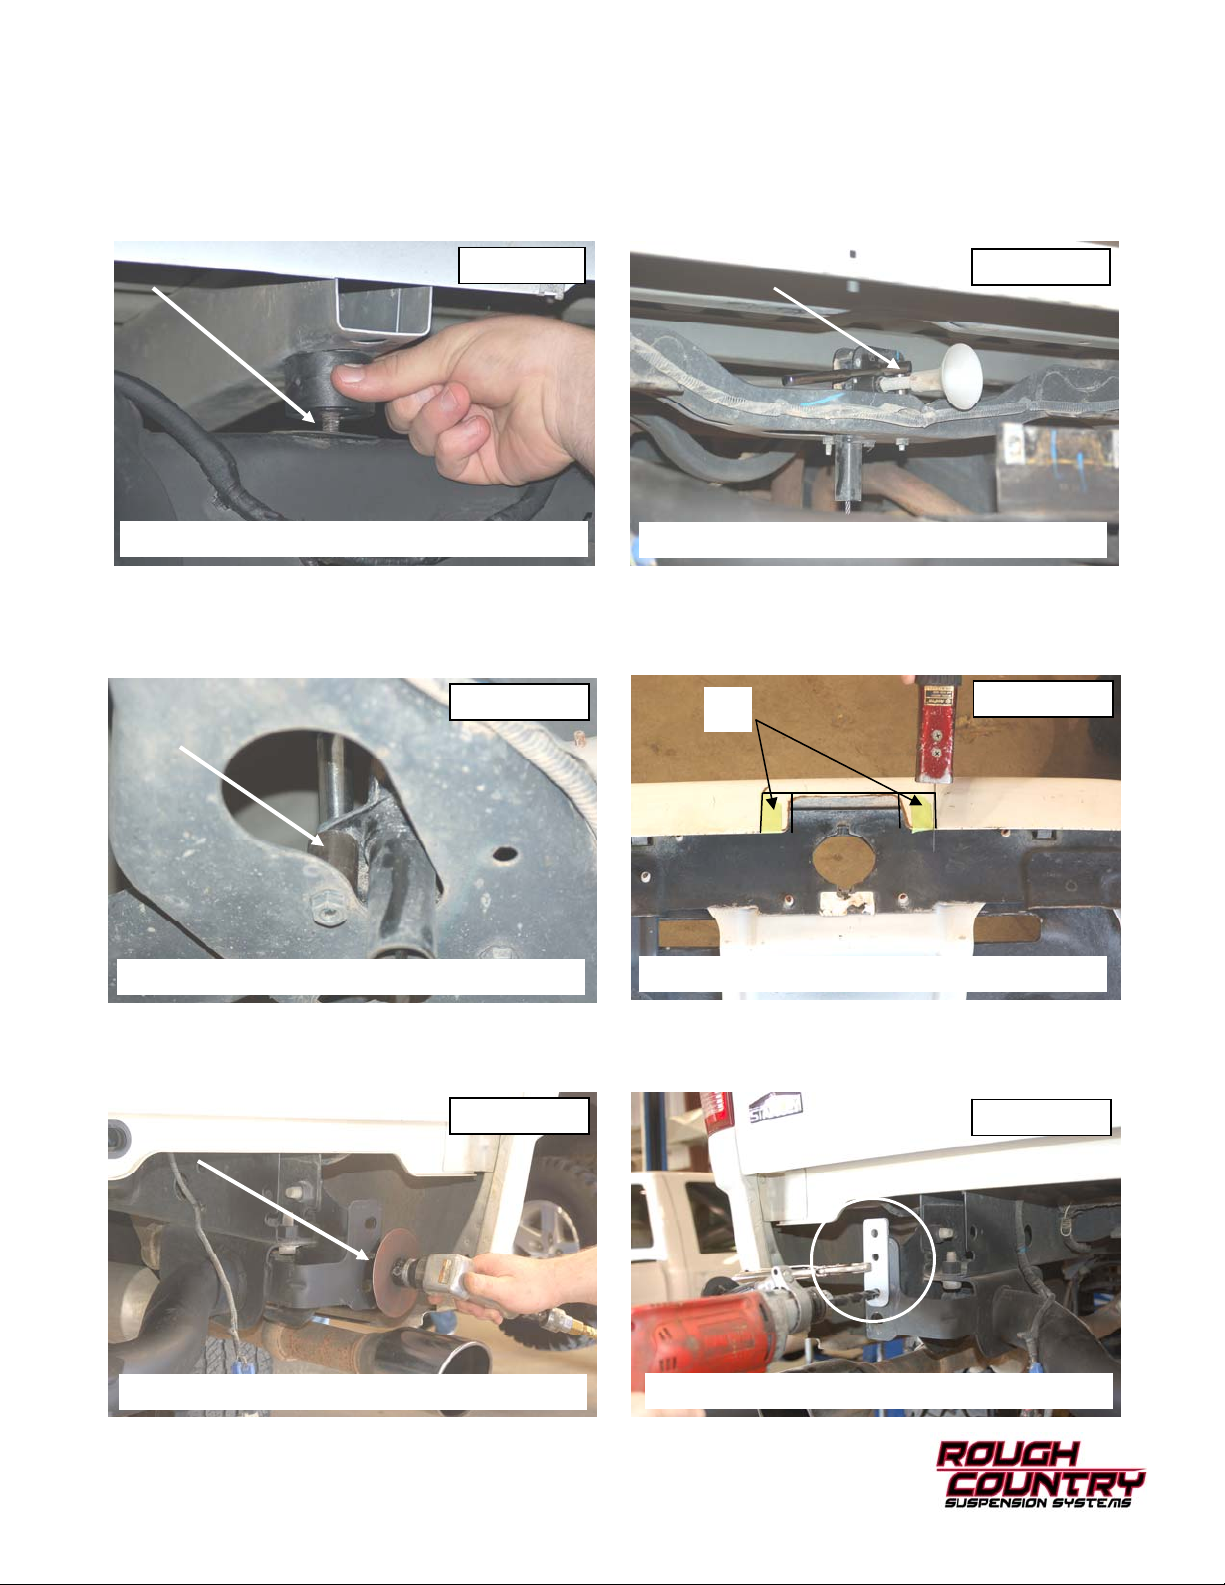
8. Install body spacers where factory bolts were removed. For 4 non bolt locations, install the supplied spacers with
the pressed in pin to hold them in place. See Photo 9.
9. Lower bed back on to frame. Install supplied 12mm x 65mm bolts& flat washers in factory mount locations.
10. Using a 19mm tighten all bolts bed bolts.
11. Using a 13mm socket remove spare tire winch. See Photo 10.
PHOTO 9
INSTALL BED SPACERS
12. Install the 2 supplied sleeves and 12mm x 65mm bolts & washers between the spare tire win ch and the frame. See
Photo 11. Tighten bolts using 13mm socket.
13. On the bottom of rear bumper measure 1 inch on each side of center gap and mark it. Using body saw cut pieces
off ,only cut 1 inch from side. See Photo 12.
PHOTO 11
REMOVE SPARE WINCH BOLTS
1”
PHOTO 10
PHOTO 12
INSTALL SPACER SLEEVES
14. On rear bumper mounts, grind the stock pins flat on both front and back sides of the mount. See Photo 13.
15. Clamp the new bumper bracket in place and using the new rear bumper bracket as a guide, mark hole and drill using 1/2 drill bit. See Photo 14.
PHOTO 13
GRIND STUDS FLAT
TRIM STOCK BUMPER
PHOTO 14
DRILL REAR MOUNT
Page 12
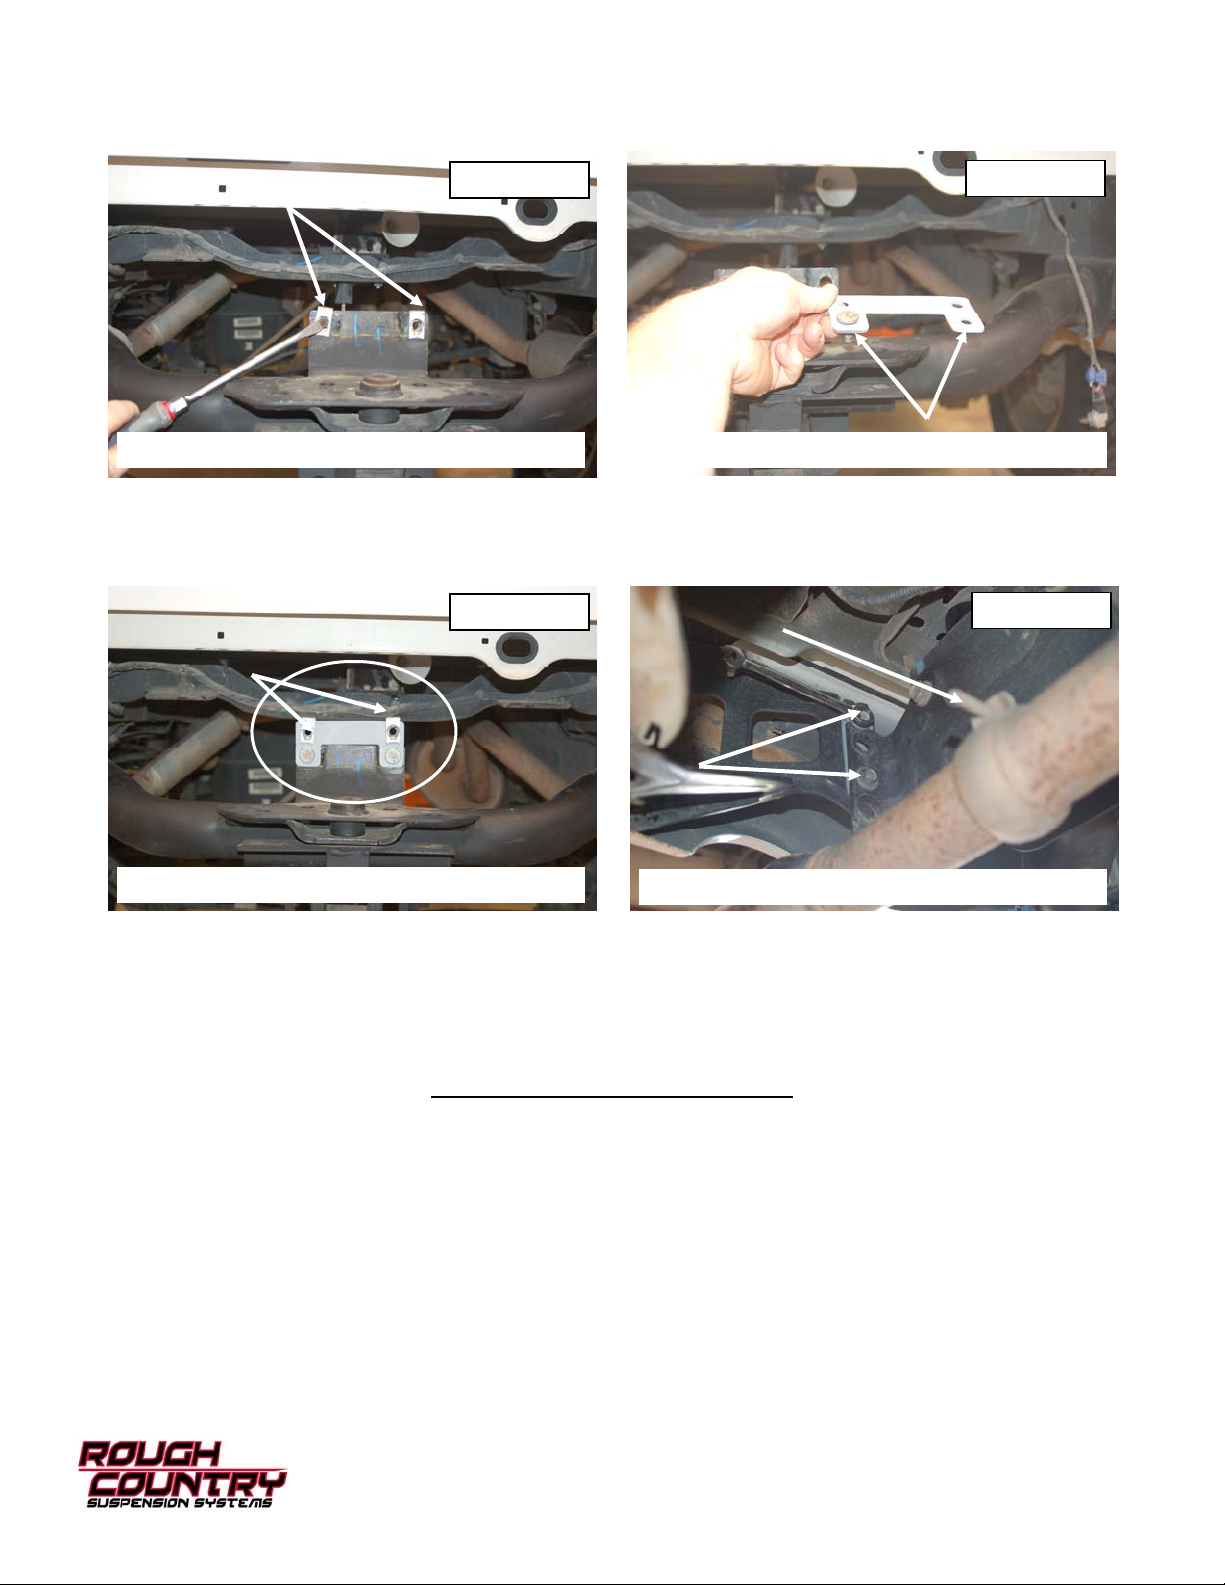
16. Remove the 2 clip from center of hitch using a screwdriver. See Photo 15.
17. Install 2 studs from front body mounts that where removed into new center bumper bracket with hammer or a socket
and a hammer. See Photo 16.
PHOTO 15
PHOTO 16
REMOVE CLIPS INSTALL STUDS IN BRACKET
18. Install center bumper bracket as shown using 16mm to tighten. Reinstall clips. See Photo 17.
19. Install bumper back onto truck using stock center bolt first but do not tighten. Make sure cut out goes around hitch.
20. Install new side bumper brackets using stock bolts.13mm and 15mm wrenches. See Photo 18.
21. Make sure bumper is centered on truck. Tighten all bumper bolts.
PHOTO 17
PHOTO 18
REINSTALL CLIPS
REINSTALL BUMPER BOLTS
22. Plug in trailer and lighting wiring harness. Install license plate and spare tire.
23. If factory equipped, loosen exhaust tips as shown using 13mm and move to the desired location and retighten. Do
not get tips too close to bumper. See Photo 18
24. Reconnect battery using 10mm.
POST INSTALLATION INSTRUCTIONS
1. Check all fasteners for proper torque. Check to ensure for adequate clearance betwee n all rotating, mobile, fixed,
and heated members. Test and inspect brake system.
2. On some vehicles the front lower skirting will need to be trimmed if using certain wheel /tire com binations and with
heavy offset wheels. Trim only as needed.
3. Activate four wheel drive system and check front hubs for engagement.
6. Perform head light check and adjustment to proper settings.
7. All kit components must be retightened at 500 miles and then every three thousand miles after installation. Periodically check all hardware for tightness.
8. Install “Warning to Driver” decal on sun visor.
 Loading...