

Page 1

OSCILLATINGTOWERVENTILATOR7711CH
U7711CH
GEBRAUCHSANWEISUNG
MODE D’EMPLOI
ISTRUZIONI PER L’USO
INSTRUCTION FOR USE
Gebrauchsanweisung ○ Mode d’emploi ○ Istruzioni per l’uso ○ Instruction for use
Page 2

Gerätebeschreibung
Description de
l’appareil
Descrizione
dell’apparecchio
Description of the
appliance
1 Bedienpanel
1 Panneau de
commande
1 Pannello di
comando
1 Control panel
2 3 Propeller
2 3 Hélice
2 3 ventole
2 3 Blades
3 Säule
3 Colonne
3 Colonna
3 Column
4 Basis Fuss
4 Socle
4 Zoccolo
4 Foot base
5 Mutter
5 Ecrou
5 Dado
5 Nut
6 Fernbedienung
6 Télécommande
6 Telecomando
6 Remote control
7 Duft-Pad
7 Coussin odorant
7 Dischetto
profumato
7 Fragrance pad
D / F / I / E
Gebrauchsanweisung ○ Mode d’emploi ○ Istruzioni per l’uso ○ Instruction for use
Page 3
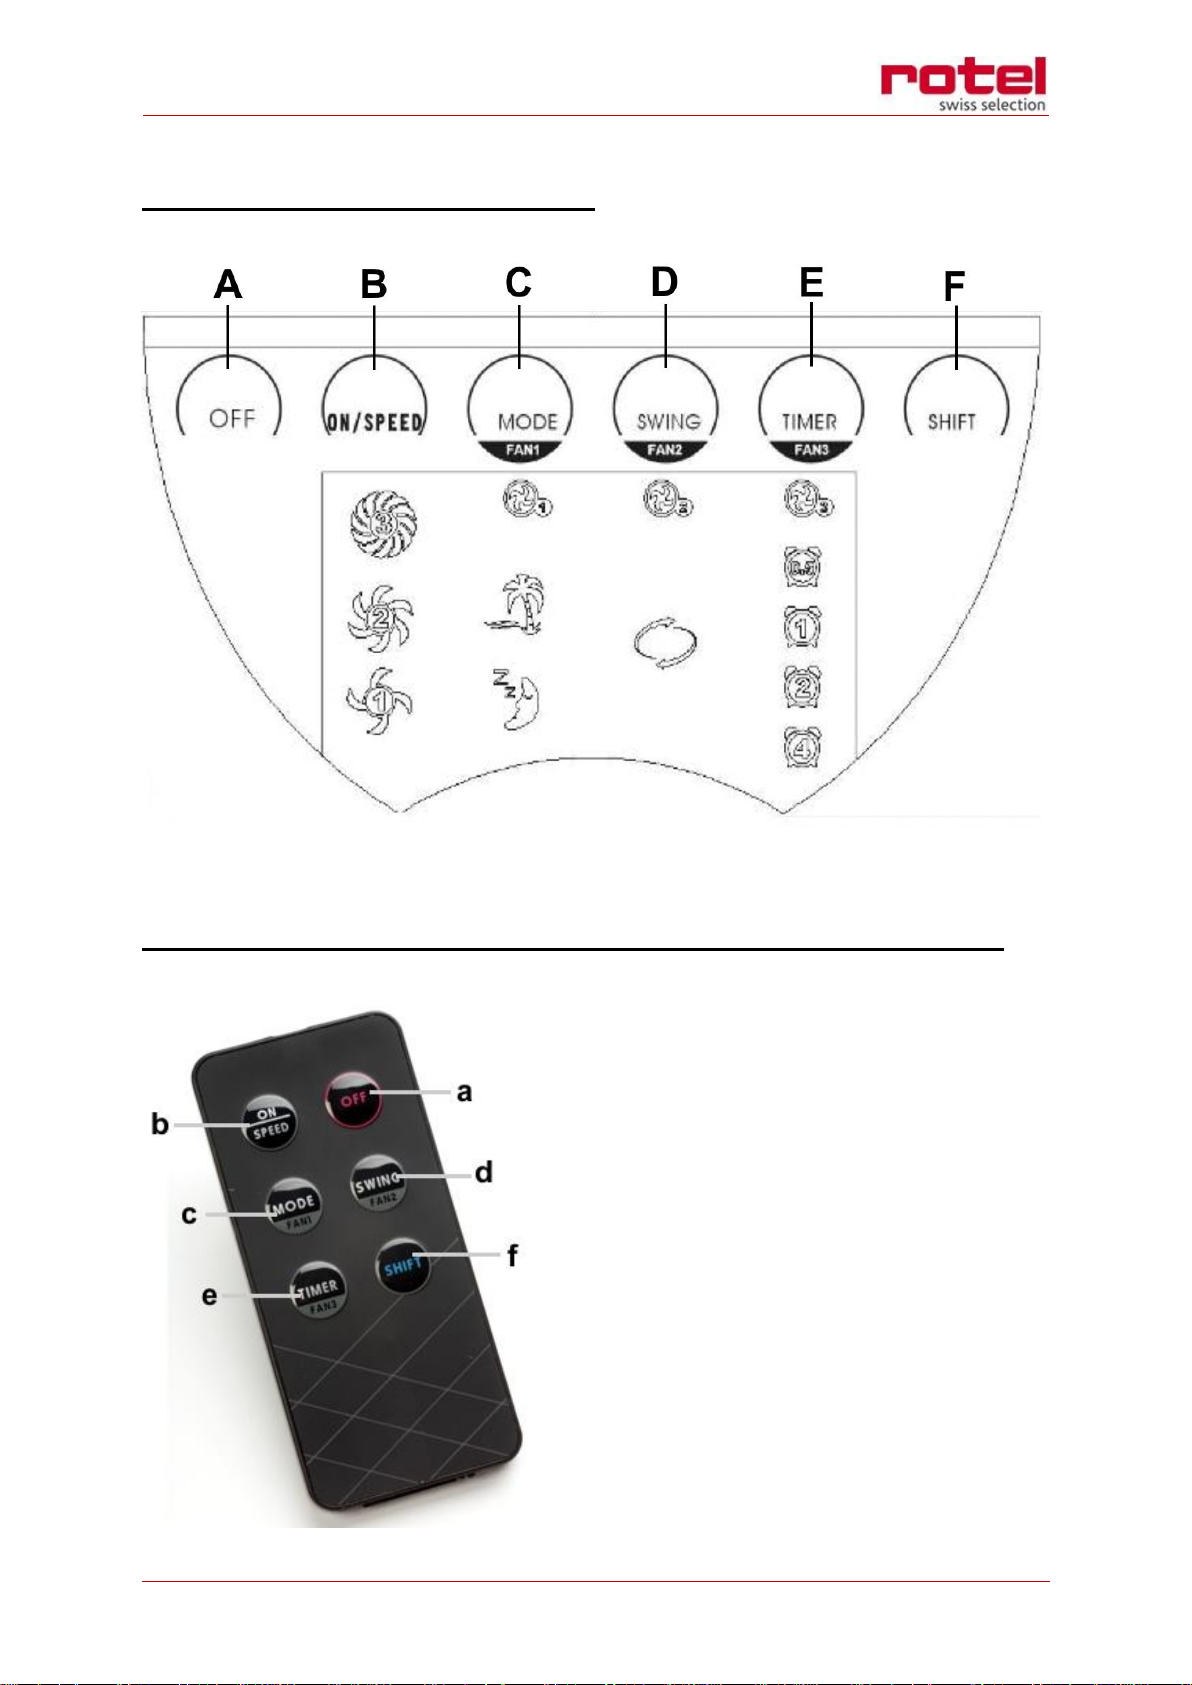
Panel / Panneau / Pannello / Panel
Fernbedienung / Télécommande / Telecomando / Remote control
Gebrauchsanweisung ○ Mode d’emploi ○ Istruzioni per l’uso ○ Instruction for use
Page 4

Deutsch
SICHERHEITSHINWEISE
o Lesen Sie erst alle Hinweise, bevor Sie das Gerät in
Betrieb nehmen.
o Dieses Gerät kann von Kindern ab einem Alter von
acht (8) Jahren und von Personen mit
eingeschränkten physischen, sensorischen oder
geistigen Fähigkeiten oder einem Mangel an
Erfahrung und/oder Wissen verwendet werden,
wenn sie beaufsichtigt werden oder bezüglich des
sicheren Gebrauchs des Geräts unterwiesen
wurden und die daraus resultierenden Gefahren
verstanden haben. Kinder dürfen nicht mit dem
Gerät spielen. Reinigung und Benutzerwartung
dürfen nicht durch Kinder ohne Beaufsichtigung
durchgeführt werden.
o Stecken Sie den Ventilator nicht ein, bevor dieser
nicht vollständig zusammen gebaut ist
o Benützen Sie das Gerät nicht, falls die
Rotationsblätter beschädigt oder gebrochen sind.
Gebrauchsanweisung ○ Mode d’emploi ○ Istruzioni per l’uso ○ Instruction for use
Page 5

o Achten Sie darauf, dass die Netzspannung mit der
auf dem Typenschild des Gerätes angegebenen
Spannung übereinstimmt.
o Stecken Sie niemals den Finger, einen Stift oder
andere Gegenstände durch das Gitter des
Ventilators (auch nicht, wenn das Gerät
ausgeschaltet ist).
o Um einer Beschädigung des Ventilators
vorzubeugen sprühen Sie keine Flüssigkeiten auf
das Gerät.
o Stecken Sie das Gerät aus bevor Sie es umstellen
oder reinigen.
o Drehen Sie nicht an den Rotationsblättern wenn
das Gerät ausgeschaltet ist.
o Stellen Sie das Gerät nur auf einen ebenen
Untergrund. Der Ventilator könnte sonst
umkippen.
o Benützen Sie das Gerät nicht wenn die Luft sehr
feucht ist, wenn Feuergefahr besteht oder wenn
chemische Produkte in der Nähe sind.
o Um eine Gefahr von Feuer oder elektrischem
Schlag zu minimalisieren drehen Sie an keinen
Schrauben, ausser denen in dieser Anleitung
beschriebenen.
Gebrauchsanweisung ○ Mode d’emploi ○ Istruzioni per l’uso ○ Instruction for use
Page 6

o Lassen Sie den Luftstrom nicht für längere Zeit auf
dieselben Personen gerichtet.
o Dieses Gerät entspricht den einschlägigen
Sicherheitsbestimmungen für Elektrogeräte.
Reparaturen an Elektrogeräten sind nur von
Fachkräften durchzuführen.
o Durch unsachgemässe Reparaturen können
erhebliche Gefahren für den Benutzer entstehen.
o Für Schäden, die durch falschen Gebrauch oder
nicht in dieser Anleitung vorgesehenen
Verwendung verursacht werden, können wir
keine Verantwortung übernehmen.
Gebrauchsanweisung ○ Mode d’emploi ○ Istruzioni per l’uso ○ Instruction for use
Page 7

MONTAGE
o Stellen Sie den unteren Teil der Säule (3) in die lose mitgelieferte Basis (4) und
befestigen Sie die Mutter (5) so wie in der Abbildung gezeigt. Achten Sie darauf,
dass die Mutter fest angezogen ist damit der Ventilator stabil stehten kann.
BEDIENUNG PANEL
o Das Panel ist mit einem „Touch-screen“ versehen welcher das Bedienen der
Funktionen durch einen sanften Druck auf die Zeichen vereinfacht.
GEBLÄSE
o Das Gerät verfügt über drei Ventilatoren welche individuell ein- und ausgeschaltet
werden können.
o Schalten Sie das Gebläse durch drücken der „ON/SPEED“ (B) Taste auf dem Panel
ein.
o Es werden alle drei Ventilatoren auf der schwächsten Stufe 1 eingeschaltet und die
Symbole für die einzelnen Ventilatoren sowie das Symbol für die Stufe 1 leuchten
auf
o Durch drücken der Taste „SHIFT“ (F) fangen die Symbole der Ventilatoren an zu
blinken.
o Solange die Symbole blinken können die einzelnen Ventilatoren durch drücken der
entsprechenden Tasten ein- und ausgeschalten werden:
Ventilator 1 (oben) = Taste C
Ventilator 2 (mitte) = Taste D
Ventilator 3 (unten) = Taste E
Geschwindigkeit
o Durch weiteres drücken der „ON/SPEED“ (B) Taste können drei Stufen gewählt
werden:
Stufe 1 = Schwach / Stufe 2 = Mittel / Stufe 3 = Stark
Die Stufe die gewählt wurde wird mit einem speziellen Symbol unter der
„ON/SPEED“ Taste im unteren Teil des Panels angezeigt.
Das Gebläse kann jederzeit ausgeschaltet werden indem Sie die Taste „OFF“ (A)
drücken.
o Die jeweils zuletzt gewählten Einstellungen der Anzahl Ventilatoren und der
Geschwindigkeit werden gespeichert und automatisch wieder eingeschaltet wenn
das Gerät mit der „ON/SPEED“ Taste aktiviert wird.
o Sobald der Netzstecker gezogen wird geht die Programmierungen verloren.
Gebrauchsanweisung ○ Mode d’emploi ○ Istruzioni per l’uso ○ Instruction for use
Page 8

TIMER
o Mit dem Timer kann der Ventilator so programmiert werden, dass er nach der
eingestellten Zeit automatisch abschaltet.
Schalten Sie zuerst das Gebläse durch drücken der „ON/SPEED“ (B) Taste ein.
Die gewünschte Anzahl Ventilatoren sowie die Geschwindigkeit können vor
oder nach der Programmierung des Timers gemäss Wunsch eingestellt werden.
Drücken Sie nun die „TIMER“ (E) Taste bis die gewünschte Laufzeit eingestellt
ist. Es kann in einem Abstand von jeweils einer halben Stunde die Zeit von
0.5std bis 7.5std programmiert werden.
Beim einschalten des Timers leuchtet das Symbol „0.5“ unter der „TIMER“
Taste. Dies bedeutet, dass das Gerät nach einer halben Stunde ausschaltet.
Jede weitere Betätigung der Timer Taste erhöht die Laufzeit um eine halbe
Stunde.
Sie können kontrollieren wie viel Laufzeit Sie eingestellt haben indem Sie die
Stundenangaben der aufleuchtenden Symbole zusammen zählen. Z.Bsp: Es
leuchten die Symbole „2“ und „1“ = Es sind 3std Laufzeit programmiert.
Die Programmierung kann gelöscht werden indem Sie das Gerät mit der „OFF“
(A) Taste ausschalten und danach wieder einschalten.
OSZILLATION
o Die Schwenkbewegung des Ventilators können Sie mit der Taste „SWING“ (D) ein
und ausschalten.
o Das Symbol unter der Taste „SWING“ leuchtet wenn die Schwenkbewegung
eingeschaltet ist.
SPEZIAL MODUS
Betriebsart „Nature Mode“:
o Je nach Einstellung des Gebläses auf Stufe 1, 2 oder 3 schaltet das Gerät in
verschiedenen Intervallen zwischen den Stufen hin und her. Z.Bsp. wenn das
Gebläse auf Stufe 1 gestellt ist, schaltet der „Nature“ Modus von 5 sec. schwachem
Gebläse auf 5 sec. ohne Gebläse.
o Wählen Sie mit der „ON/SPEED“ Taste (B) die gewünschte Gebläse-Stufe und mit
Hilfe der „SHIFT“ Taste (F) die gewünschte Anzahl Ventilatoren.
o Drücken Sie die Taste „MODE“ (C) bis das Symbol mit der Palme auf leuchtet.
Gebrauchsanweisung ○ Mode d’emploi ○ Istruzioni per l’uso ○ Instruction for use
Page 9
Betriebsart „Sleeping Mode“ (basiert auf dem „Nature Mode“):
o Die „Sleeping Mode“ Einstellung schaltet nach einer halben Stunde auf die nächst
tiefere „Nature Mode“ Einstellung. Wenn z.Bsp. das Gebläse auf Stufe 2 geschaltet
ist und der „Sleeping“ Modus aktiviert ist, läuft der „Nature“ Intervall-Modus von
Stufe 2 für eine halbe Stunde und schaltet dann um auf den Stufe 1 Modus.
o Wählen Sie mit der „ON/SPEED“ Taste (B) die gewünschte Gebläse-Stufe und mit
Hilfe der „SHIFT“ Taste (F) die gewünschte Anzahl Ventilatoren.
o Drücken Sie die Taste „MODE“ (C) bis das Symbol mit dem Mond leuchtet.
o Beide Betriebsarten können gelöscht werden in dem Sie die „MODE“ Taste solange
drücken bis keine der Beiden Symbole mehr leuchtet oder in dem Sie die „OFF“ (A)
Taste drücken.
o Die Programmierung des Timers ist bei beiden Betriebsarten möglich.
FERNBEDIENUNG
o Mit der Fernbedienung können Sie das Gerät genau gleich bedienen wie direkt über
das Panel. Die Bezeichnungen sind die Selben wie oben beschrieben.
o Um die Fernbedienung in Betrieb zu nehmen müssen Sie zuerst die Batterie
einlegen.
DUFT PAD (7)
o Beträufeln Sie den Watte Pad der sich in der kleinen Box in der Mitte des Gerätes
befindet mit einem wohlriechenden Oel oder Duftstoff und der Duft wird mit dem
Luftstrom im ganzen Raum verteilt.
PFLEGE
o Versichern Sie sich, dass das Gerät ausgeschaltet und ausgesteckt ist bevor Sie mit
der Reinigung beginnen.
o Benutzen Sie zur Reinigung nur ein feuchtes, weiches Tuch und eventuell etwas
milde Seife.
o Verwenden Sie keine Reinigungsartikel die Scheuermittel enthalten. Diese können
sonst der Oberfläche Schaden zu fügen.
ENTSORGUNG
o Für eine sachgerechte Entsorgung ist das Gerät dem Fachhändler, der Servicestelle
oder der Firma Rotel AG zurückzugeben.
Gebrauchsanweisung ○ Mode d’emploi ○ Istruzioni per l’uso ○ Instruction for use
Page 10

Français
CONSIGNES DE SÉCURITÉ
o Lire toutes les instructions avant usage.
o Cet appareil peut être utilisé par des enfants de
moins de huit (8) ans et par des personnes aux
capacités physiques, sensorielles ou intellectuelles
limitées ou manquant d’expérience ou de
connaissance si elles sont sous surveillance ou ont
été instruites sur l’utilisation sûre de l’appareil et
si elles ont compris les risques pouvant en
résulter. Les enfants ne doivent pas jouer avec
l’appareil. Le nettoyage ou la maintenance
utilisateur ne doivent pas être réalisés par des
enfants sans surveillance.
o Ne branchez pas le ventilateur avant de l'avoir
complètement monté.
o N'utilisez pas l'appareil si des pales sont
endommagées ou cassées.
o Veillez à ce que la tension du réseau concorde
avec celle indiquée sur la plaque signalétique de
l'appareil.
Gebrauchsanweisung ○ Mode d’emploi ○ Istruzioni per l’uso ○ Instruction for use
Page 11

o N'introduisez jamais un doigt, un crayon ou
d'autres objets dans la grille du ventilateur (même
quand l'appareil est à l'arrêt).
o Pour prévenir tout endommagement du
ventilateur, ne giclez pas de liquides sur l'appareil.
o Retirez la fiche de la prise électrique avant de
retourner ou de nettoyer l'appareil.
o Ne tournez pas les pales quand l'appareil est
arrêté.
o Placez l'appareil uniquement sur une surface
plane. Dans le cas contraire, l'appareil est
susceptible de se renverser.
o N'utilisez pas l'appareil si l'air est très humide, s'il
y a un risque de feu ou si des produits chimiques
se trouvent à proximité.
o Pour minimaliser le risque de feu ou de choc
électrique, ne tournez aucune vis à l'exception de
celles décrites dans ce mode d'emploi.
o Ne laissez par le flux d'air orienté sur la même
personne durant un temps prolongé.
o Cet appareil est conforme aux prescriptions en
vigueur en matière de sécurité des appareils
électriques. Les réparations sur les appareils
électriques ne doivent être effectuées que par des
professionnels.
Gebrauchsanweisung ○ Mode d’emploi ○ Istruzioni per l’uso ○ Instruction for use
Page 12

o Des réparations inadéquates peuvent être source
de dangers importants pour l'utilisateur.
o Nous déclinons toute responsabilité pour les
dommages résultant d'un emploi inapproprié ou
d'une utilisation qui n'a pas été prévue dans ce
mode d'emploi.
Gebrauchsanweisung ○ Mode d’emploi ○ Istruzioni per l’uso ○ Instruction for use
Page 13

MONTAGE
o Insérez la partie inférieure de la colonne (3) dans le socle (4) fourni séparément
avec l’appareil puis visser l’écrou (5) comme indiqué dans l’illustration. Veillez à ce
que l’écrou soit bien serré pour assurer la stabilité du ventilateur.
PANNEAU DE COMMANDE
o Le panneau est équipé d’un écran tactile, lequel simplifie la commande des
fonctions qui se fait en pressant légèrement sur les symboles.
VENTILATEUR
o L’appareil dispose de trois ventilateurs qui peuvent être enclenchés séparément ou
simultanément.
o Enclenchez le ventilateur en pressant la touche «ON/SPEED» (B) située sur le
panneau.
o Les trois ventilateurs sont enclenchés au niveau 1 (le plus faible) et les symboles des
différents ventilateurs ainsi que celui du niveau 1 s’allument.
o Presser la touche «SHIFT» (F) fait clignoter les symboles des ventilateurs.
o Aussi longtemps que les symboles clignotent, les différents ventilateurs peuvent
être enclenchés et déclenchés en pressant sur les touches correspondantes:
Ventilateur 1 (en haut) = touche C
Ventilateur 2 (au milieu) = touche D
Ventilateur 3 (en bas) = touche E
Vitesse
o Des pressions supplémentaires sur la touche «ON/SPEED» permettent de
sélectionner trois niveaux:
o Niveau 1 = faible / niveau 2 = moyen / niveau 3 = fort
o Le niveau sélectionné s’affiche en présentant un symbole spécial sous la touche
«ON/SPEED» dans la partie inférieure du panneau.
o Le ventilateur peut être arrêté à tout moment en pressant la touche «OFF» (A).
o Les réglages effectués en dernier pour le nombre de ventilateurs et la vitesse sont
mémorisés et automatiquement réactivés en pressant la touche «ON/SPEED».
o Dès que la fiche de secteur est retirée, les programmations sont perdues.
Gebrauchsanweisung ○ Mode d’emploi ○ Istruzioni per l’uso ○ Instruction for use
Page 14

MINUTERIE
o La minuterie permet de programmer le ventilateur de manière à ce qu’il s’arrête
automatiquement lorsque le temps réglé est écoulé.
Enclenchez d’abord le ventilateur en pressant la touche «ON/SPEED» (B). Le
nombre désiré de ventilateurs ainsi que la vitesse peuvent être réglés à souhait
avant ou après la programmation de la minuterie.
Pressez maintenant la touche «TIMER» (E) jusqu’à ce que le temps de
fonctionnement désiré soit réglé. Il est possible de programmer en segments
d’une demi-heure de 0.5h à 7.5h.
A l’enclenchement de la minuterie, le symbole «0.5» sous la touche «TIMER»
s’allume, ceci signifie que l’appareil s’arrêtera au bout d’une demi-heure.
Tout actionnement supplémentaire de la touche de minuterie augmente la
durée de temporisation d’une demi-heure.
Vous pouvez contrôler la durée de temporisation réglée en additionnant les
heures indiquées par les symboles allumées. Par ex.: le symbole est allumé sur
«2h» et sur «1h» = 3 heures de temporisation sont programmées.
Vous pouvez supprimer la programmation en pressant la touche «OFF» (A)
pour arrêter l’appareil et en la repressant pour l’enclencher de nouveau.
OSCILLATION
o Vous pouvez enclencher et déclencher le mouvement oscillant du ventilateur au
moyen de la touche «SWING».
o Le symbole situé sous la touche «SWING» s’allume quand le mouvement oscillant
est enclenché.
MODE SPÉCIAL
Le mode de service «Nature Mode»
o Selon que le ventilateur est réglé sur les niveaux 1, 2 ou 3, l’appareil commute à
différents intervalles entre les niveaux. Par ex., si le ventilateur est réglé sur «LOW»,
le mode NAT commute au bout de 5 s de la ventilation faible au mode sans
ventilation durant 5 s.
o Sélectionnez le niveau de ventilation désiré en pressant la touche «ON/SPEED» (B)
et le nombre désiré de ventilateurs à l’aide de la touche «SHIFT» (F).
o Pressez la touche «MODUS» (C) jusqu'à ce que le symbole du palmier s’allume.
Gebrauchsanweisung ○ Mode d’emploi ○ Istruzioni per l’uso ○ Instruction for use
Page 15

Le mode de service «Sleeping Mode» (est basé sur le mode «Nature»):
o Le réglage «Sleeping Mode» commute sur le prochain mode «Nature» inférieur au
bout d’une demi-heure. Si, par ex., le ventilateur est commuté sur le niveau 2 et
que le mode «Sleeping» est activé, le mode intervalle «nature» de niveau 2
fonctionne durant une demi-heure et passe ensuite en niveau 1.
o Sélectionnez le niveau de ventilation désiré en pressant la touche «ON/SPEED» (B)
et le nombre désiré de ventilateurs à l’aide de la touche «SHIFT» (F).
o Pressez la touche «MODE» (C) jusqu'à ce que le symbole de la lune s’allume.
o Les deux modes de service peuvent être supprimés en pressant la touche «MODE»
jusqu’à ce que les deux symboles soient éteints ou en pressant la touche «OFF» (A).
o La programmation de la minuterie est possible dans les deux modes de service.
TÉLÉCOMMANDE
o La télécommande vous permet de manipuler l’appareil directement, à l’instar du
panneau. Les marquages sont les mêmes que ceux susmentionnés.
o Avant d’utiliser la télécommande, vous devez d’abord y insérer deux batteries.
Celles-ci ne sont pas comprises dans le volume de livraison.
COUSSIN ODORANT (7)
o Humidifiez le coussin de ouate qui se trouve dans la petite boîte située au centre de
l’appareil en y versant quelques gouttes d’essence odoriférante ou de parfum pour
que l’odeur se répande dans toute la pièce avec le flux d’air.
ENTRETIEN
o Assurez-vous que l'appareil est arrêté et la fiche retirée de la prise électrique avant
de commencer à nettoyer.
o Pour le nettoyage, utilisez uniquement un chiffon humide et moelleux et
éventuellement un peu de savon doux.
o Ne pas utiliser des articles de nettoyage contenant un produit abrasif. Ceux-ci
pourraient endommager la surface.
ELIMINATION
o A la fin de la phase d’utilisation, la machine doit être remise au détaillant ou à un
point de service après-ventre, ou renvoyées directement à Rotel AG, qui se chargera
de l’éliminination ou du recyclage.
Gebrauchsanweisung ○ Mode d’emploi ○ Istruzioni per l’uso ○ Instruction for use
Page 16

Italiano
AVVERTENZE DI SICUREZZA
o Prima dell'uso leggere tutte le istruzioni.
o Questo apparecchio può essere usato da bambini
di età superiore a otto (8) anni e da persone con
ridotte capacità fisiche, sensoriali o mentali, o con
insufficiente esperienza e conoscenza, a
condizione che siano sotto sorveglianza o che
abbiano ricevuto istruzioni sull'uso sicuro
dell'apparecchio e siano consapevoli dei rischi
connessi. I bambini non devono giocare con
l'apparecchio, ne devono svolgere operazioni di
pulizia e manutenzione senza sorveglianza.
o Non innestate la spina nella presa di corrente
prima di avere completamente montato il
ventilatore.
o Non usate l'apparecchio se le pale del ventilatore
risultassero rotte o danneggiate.
o Controllate che la tensione della rete
d'alimentazione della corrente elettrica
corrisponda alla tensione indicata sulla targhetta
dell'apparecchio.
Gebrauchsanweisung ○ Mode d’emploi ○ Istruzioni per l’uso ○ Instruction for use
Page 17

o Non introducete mai un dito, un'asticciola od altri
oggetti attraverso al carter a rete del ventilatore,
anche quando esso non funziona.
o Per evitare danni all'apparecchio, non spruzzate
liquidi sulle sue superfici.
o Disinnestate l'apparecchio dalla presa di corrente
prima di rimuoverlo o pulirlo.
o Non fate girare le pale del ventilatore quando
questo non è in funzione.
o Appoggiate l'apparecchio solo su un piano
orizzontale. Diversamente l'apparecchio potrebbe
ribaltarsi.
o Non usate l'apparecchio in presenza di forte
umidità, di fuoco o di prodotti chimici.
o Per ridurre al minimo il pericolo d'incendio o di
scariche elettriche, non toccate le viti non
menzionate in queste istruzioni d'uso.
o Evitate di orientare in continuazione la corrente
d'aria sulla stessa persona.
o Il ventilatore ottempera alle norme di sicurezza
vigenti per apparecchi elettrici. Le riparazioni da
effettuare su apparecchi elettrici vanno eseguite
unicamente da personale specializzato.
o Un'esecuzione impropria delle riparazioni può
causare seri pericoli all'utente.
Gebrauchsanweisung ○ Mode d’emploi ○ Istruzioni per l’uso ○ Instruction for use
Page 18

o Non possiamo assumerci responsabilità per danni
causati da uso errato o da un'applicazione
dell'apparecchio non contemplata dal presente
manuale d'istruzioni.
Gebrauchsanweisung ○ Mode d’emploi ○ Istruzioni per l’uso ○ Instruction for use
Page 19

MONTAGGIO
o Collocate la parte inferiore della colonna (3) nello zoccolo fornito separato (4) e
fissate il dado (5) come indicato in figura. Prestate attenzione a serrare il dado con
forza in modo che il ventilatore possa poggiare stabilmente.
PANNELLO DI COMANDO
o Il pannello è provvisto di un „Touch-screen“ che rende semplice il comando delle
varie funzioni premendo delicatamente sui rispettivi simboli.
VENTOLA
o L’apparecchio dispone di tre ventilatori che possono essere attivati separatamente
o insieme.
o Attivate la ventola premendo il tasto „ON/SPEED“ (B) del pannello.
o Tutti e tre i ventilatori vengono inseriti al livello più basso 1 mentre si illuminano i
simboli dei singoli ventilatori, oltre al simbolo del livello 1
o Premendo il tasto „SHIFT“ (F) i simboli dei ventilatori iniziano a lampeggiare.
o Finché i simboli lampeggiano, è possibile inserire e disinserire i singoli ventilatori
premendo i rispettivi tasti:
Ventilatore 1 (in alto) = tasto C
Ventilatore 2 (centro) = tasto D
Ventilatore 3 (in basso) = tasto E
Velocità
o Premendo ancora il tasto „ON/SPEED“ (B) si può scegliere tra tre livelli:
o livello 1 = debole / livello 2 = medio / livello 3 = forte
o Il livello scelto viene visualizzato con un simbolo speciale sotto il tasto „ON/SPEED“,
nella parte inferiore del pannello.
o La ventola può essere disinserita in qualsiasi momento premendo il tasto .„OFF“ (A).
o Le regolazioni del numero di ventilatori e della velocità scelti per ultimi vengono
ogni volta salvati e si inseriscono di nuovo automaticamente quando l’apparecchio
viene attivato ancora con il tasto „ON/SPEED“.
o Appena si estrae la spina di rete, la programmazione viene cancellata.
TIMER
o Il ventilatore può essere programmato con il timer in modo che si arresti
automaticamente allo scadere del tempo programmato.
Gebrauchsanweisung ○ Mode d’emploi ○ Istruzioni per l’uso ○ Instruction for use
Page 20

Inserite dapprima la ventola premendo il tasto „ON/SPEED“ (B). Il numero
desiderato di ventilatori e la velocità possono essere regolati a piacere prima o
dopo la programmazione del timer.
Premete ora il tasto „TIMER“ (E) fino a impostare il tempo di funzionamento
desiderato. è possibile programmare un tempo da 0.5 ore a 7.5 ore, con
intervalli di mezz’ora.
Quando si inserisce il timer, si accende il simbolo „0.5“ sotto il tasto „TIMER“,
ciò significa che l’apparecchio si disattiva dopo mezz’ora.
Ogni ulteriore azionamento del tasto Timer aumenta il tempo di funzionamento
di mezz’ora.
Potete controllare quale tempo avete impostato sommando i simboli accesi. Ad
esempio: se sono accesi i simboli „2H“ e „1H“ vuol dire che sono programmate
3 ore di funzionamento.
La programmazione può essere cancellata spegnendo l’apparecchio con il tasto
„OFF“ (A) e accendendolo poi di nuovo.
OSCILLAZIONE
o Con il tasto „SWING“ (D) potete attivare e disattivare il movimento oscillante del
ventilatore.
o Quando viene attivato il movimento oscillante, si accende il simbolo sotto il tasto
“SWING”.
MODALITÀ SPECIALI
Il modo di funzionamento „Nature Mode“:
o A seconda dell’impostazione della ventola sui livelli 1, 2 o 3, l’apparecchio passa,
con diversi intervalli, da un livello all’altro. Ad esempio, se l’apparecchio è
posizionato su livello 1, il modo “Nature” commuta da ventola debole di 5 sec. a 5
sec. senza ventola.
o Con il tasto „ON/SPEED“ (B) scegliete il livello desiderato della ventola e, con il tasto
„SHIFT“ (F),il numero desiderato di ventilatori.
o Premete il tasto „MODUS“ (C) finché non si accenda il simbolo con la palma.
Il modo di funzionamento „Sleeping Mode“ (si basa sul modo „Nature Mode“):
o l’impostazione „Sleeping Mode“ commuta, dopo mezz’ora, sul successivo modo
„Nature“ più basso. Se, ad esempio, la ventola è commutata sul livello 2 ed è
attivato il modo “Sleeping”, il modo a intervalli „Nature“ funziona per una mezz’ora
e poi commuta sul livello 1.
Gebrauchsanweisung ○ Mode d’emploi ○ Istruzioni per l’uso ○ Instruction for use
Page 21

o Con il tasto „ON/SPEED“ (B) scegliete il livello desiderato per la ventola e, con il
tasto „SHIFT“ (F),il numero desiderato di ventilatori.
o Tenete premuto il tasto „MODE“ (C) finché non si accende il simbolo con la luna.
o Entrambi i tipi di funzionamento possono essere cancellati premendo il tasto
„MODE“ finché nessuno dei due simboli sia più acceso o premendo sul tasto „OFF“
(A).
o La programmazione del timer è possibile per entrambi i tipi di funzionamento.
TELECOMANDO
o Con il telecomando potete comandare l’apparecchio esattamente come dal
pannello. Le diciture sono identiche a quelle descritte sopra.
o Per mettere in funzione il telecomando, dovete prima inserire due batterie. Le
batterie non fanno parte della fornitura.
PAD PROFUMATO (7)
o Versate alcune gocce di olio profumato o sostanza fragrante sul dischetto di ovatta
che si trova nel piccolo box al centro dell’apparecchio, e il profumo si distribuisce
con il flusso d’aria in tutto l’ambiente.
CURA DELL'APPARECCHIO
o Prima di pulire il ventilatore, assicuratevi che esso sia spento e che il cavo elettrico
non sia allacciato alla presa di corrente.
o Per la pulizia, usate unicamente un panno morbido, inumidito ed eventualmente un
detersivo debole.
o Non usate articoli di pulizia contenenti polveri abrasive. Essi potrebbero infatti
danneggiare le superfici.
SMALTIMENTO
o Per lo smaltimento corretto, la macchina deve essere restituita al rivenditore
specializzato, al servizio di assistenza o alla ditta Rotel AG.
Gebrauchsanweisung ○ Mode d’emploi ○ Istruzioni per l’uso ○ Instruction for use
Page 22

English
SAFETY INSTRUCTIONS
o Read all instructions before using.
o This appliance can be used by children aged from
8 years and above and persons with reduced
physical, sensory or mental capabilities or lack of
experience and knowledge if they have been
given supervision or instruction concerning use of
the appliance in a safe way and understand the
hazards involved. Children shall not play with the
appliance. Cleaning and user maintenance shall
not be made by children without supervision.
o Do not plug the fan in before it is fully assembled.
o Do not use the appliance if the rotating blades are
damaged or broken.
o Make sure that the mains voltage is the same as
the voltage specified on the appliance's rating
label.
o Never stick your finger, pen or other implements
through the fan's guard (even if the appliance is
turned off).
Gebrauchsanweisung ○ Mode d’emploi ○ Istruzioni per l’uso ○ Instruction for use
Page 23

o In order to guard against any damages to the fan,
do not spray any liquids on the appliance.
o Unplug the appliance before moving it or cleaning
it.
o Do not turn the fan blades when the appliance is
turned off.
o Only place the appliance on an even surface.
Otherwise the ventilator may tip over.
o Do not use the appliance if the air is very humid, if
there is risk of a fire or if there are chemical
products in the vicinity.
o To minimise the risk of a fire or electric shock, do
not turn any screws other than those described in
this manual.
o Do not leave the flow of air pointed at the same
person for a long period of time.
o This appliance complies with the relevant safety
regulations for electrical appliances. Repairs on
electrical appliances must only be carried out by
qualified specialists.
o Incorrect repairs could lead to significant risks for
the user.
o We cannot assume any liability for damages
caused by incorrect use or any use not provided
for in this manual.
Gebrauchsanweisung ○ Mode d’emploi ○ Istruzioni per l’uso ○ Instruction for use
Page 24

ASSEMBLY
o Place the lower part of the column (3) in the separately delivered base (4) and
tighten the nut as shown in the diagram. Make sure that the nut is tightened
properly so that the fan is stable.
CONTROL PANEL
o The panel is fitted with a "Touch screen" which makes it really easy to operate the
appliance by simply tapping on the symbols.
FAN
o The appliance has three fans which can be turned on and off individually.
o Turn the fan on by pressing the "ON/SPEED" (B) button on the panel.
o All three fans are switched on at the lowest level 1 and the symbols for the
individual fans as well as the symbol for level 1 light up.
o By pressing the "SHIFT" (F) button, the symbols for the fans start to flash.
o Whilst the symbols are flashing, you can turn the individual fans on and off by
pressing the corresponding buttons:
Fan 1 (top) = button C
Fan 2 (middle) = button D
Fan 3 (bottom) = button E
Speed
o By pressing the "ON/SPEED" (B) button again you can select one of the three
settings:
o Level 1 = Low / Level 2 = Medium / Level 3 = High
o The level that has been selected is displayed with a special symbol under the
"ON/SPEED" button in the lower part of the panel.
o The fan can be turned off at any time by pressing the "OFF" (A) button.
o The last selected setting for the number of fans and the speed is stored and comes
on automatically when the appliance is turned back on again with the "ON/SPEED"
button.
o As soon as the plug is pulled out, this programming is deleted.
TIMER
o Using the Timer you can programme the fan so that it turns off automatically after a
set period of time.
Gebrauchsanweisung ○ Mode d’emploi ○ Istruzioni per l’uso ○ Instruction for use
Page 25

First turn the fan on by pressing the "ON/SPEED" (B) button. You can set the
number of fans and speed you want before or after programming the Timer.
Now press the "TIMER" (E) button until you reach the running time you want.
You can set this at half an hour intervals from 0.5 hours to 7.5 hours.
When the Timer turns on, the symbol "0.5" under the Timer button lights up.
This means that the device will turn off after half an hour.
Each time you press the Timer button you extend this time by half an hour.
You can check how long you have set it for by adding up the hours indicated on
the illuminated symbols. For example, the symbols "2" and "1" light up = The
appliance is programmed to run for 3 hours.
You can delete the programming by switching the appliance off with the "OFF"
(A) button and then switching it back on again.
OSCILLATION
o You can switch the oscillating movement of the fan on and off with the "SWING" (D)
button.
o The symbol under the "SWING" button lights up when the oscillating feature is
switched on.
SPECIAL MODE
Operating mode "Nature Mode":
o Depending on the setting of the fan at level 1, 2 or 3, the appliance alternates
between the different levels at varying intervals. For example, when the fan is set at
level 1, the "Nature" mode alternates from 5 seconds of low fanning to 5 seconds
without fanning.
o Using the "ON/SPEED" button (B) select the fanning level you want and use the
"SHIFT" button (F) to select the number of fans.
o Press the "MODE" button (C) until the symbol with the palm tree lights up.
Operating mode "Sleeping Mode" (based on the "Nature Mode"):
o After half an hour, the "Sleeping Mode" setting switches to the next lowest "Nature
Mode" setting. If, for example, the fan is switched to level 2 and the "Sleeping
mode" is activated, the "Nature" interval mode of level 2 will run for half an hour
and then switch to level 1 mode.
o Using the "ON/SPEED" button (B) select the fanning level you want and use the
"SHIFT" button (F) to select the number of fans.
o Press the "MODE" button (C) until the symbol with the moon lights up.
Gebrauchsanweisung ○ Mode d’emploi ○ Istruzioni per l’uso ○ Instruction for use
Page 26

o Both operating modes can be deleted by pressing the "MODE" button until neither
of the symbols are illuminated any more or by pressing the "OFF" button (A).
o You can still programme the Timer in either mode.
REMOTE CONTROL
o You can operate the appliance using the remote control in just the same way as you
would using the control panel on the appliance. The markings are the same as
described above.
o To get the remote control to work, you must first insert the batteries.
FRAGRANCE PAD (7)
o Drizzle a little oil or fragrance on the cotton pad that is in the small box in the
middle of the appliance, then the flow of air from the fan will distribute the scent all
around the room.
CARE
o Make sure that the appliance is turned off and unplugged before you start any
cleaning work.
o To clean the fan, simply use a damp, soft cloth and maybe a little mild soap.
o Do not use any cleaning agents that contain abrasives. Otherwise these could
damage the surface.
DISPOSAL
o For proper disposal, the unit is to return to the dealer, the service agent or the
company Rotel AG.
Gebrauchsanweisung ○ Mode d’emploi ○ Istruzioni per l’uso ○ Instruction for use
Page 27

D / F / I / E
2 JAHRE GARANTIE
2 ANNÉE DE GARANTIE
2 ANNI DI GARANZIA
2 YEARS WARRANTY
o Garantieverpflichtung
Wir verpflichten uns, dieses Gerät kostenlos wieder instand zu setzen, falls es bei sachgemässer Behandlung innerhalb der
Garantiezeit versagen sollte. Wir beseitigen alle Mängel, die auf Material- oder Fabrikationsfehlern beruhen. Die
Garantieleistung erfolgt durch Instandsetzung oder Austausch mangelhafter Teile nach unserer Wahl. Eine Garantieleistung
entfällt für Schäden an Verschleissteilen, für Schäden und Mängel, die durch unsachgemässe Behandlung oder Wartung
auftreten (insbesondere Verkalkung und gewerblicher Einsatz). Sie wird nur gewährt, wenn entweder die Garantiekarte mit
Kaufdatum, Händlerstempel und Unterschrift versehen oder die Kaufquittung mit dem Gerät an die zutreffende Servicestation
eingesandt wird (siehe Adresse unten). Rücksendungen sollen in der Originalverpackung erfolgen. Transportkosten gehen zu
Lasten des Käufers. Bitte vergessen Sie nicht, der Sendung Ihre Adresse und, falls der Fehler nicht offensichtlich ist, eine
Erklärung beizufügen.
o Obligation de garantie
Nous nous engageons à réparer gratuitement cet appareil s'il devait tomber en panne durant la période de garantie, pour
autant que celui-ci ait été utilisé de manière appropriée. Nous éliminons toutes les défectuosités du à des vices de matière ou
de fabrication. La prestation de garantie se fait en effectuant une réparation ou en échangeant les pièces, selon notre choix.
La garantie n'est pas accordée pour les dommages survenant sur les pièces d'usure, pour les dommages et vices dus à une
manipulation ou un entretien inapproprié (en particulier l'entartrage et l'utilisation à des fins professionnelles). Elle n'est
accordée que si la date d'achat, le cachet du revendeur et la signature figurent sur carte de garantie ou si la quittance d'achat
a été retournée avec l'appareil au point de service compétent (voir adresse ci-dessous). Les renvois doivent se faire dans
l'emballage d'origine. Les frais de transport sont à la charge de l'ache-teur. Veuillez ne pas oublier d'indiquer votre adresse et,
si le défaut n'est pas évident, de joindre une explication à votre envoi.
o Impegno di garanzia
Ci impegniamo a riparare gratis questo apparecchio, qualora – malgrado un uso corretto - si fosse gua-stato durante il periodo
di garanzia. Eliminiamo tutti i difetti causati da difetti del materiale o di fabbrica. La prestazione di garanzia avviene con il
ripristino o la sostituzione di pezzi difettosi a nostra discrezione. Una prestazione di garanzia decade nel caso di danni a pezzi
soggetti a usura, di danni e difetti dovuti a trattamento o a manutenzione non corretti (in particolare calcificazione e utilizzo
industriale). Viene concessa solo se la cartolina di garanzia munita della data d’acquisto, del timbro del rivenditore e della
firma o la ricevuta d’acquisto e l’apparecchio vengono inviati al rispettivo servizio di assistenza (vedi indirizzo in basso).
L’invio deve avvenire nell’imballaggio originale. Le spese di trasporto sono a carico dell’acquirente. Non dimenticatevi p.f. di
allegare all’invio il vostro indirizzo e, qualora il difetto non fosse chiaro, anche una spiegazione.
o Warranty commitment
We commit ourselves to repairing this device for free provided it has been handled properly and a failure has occured within
the period of warranty. We repair all defects caused by material or manufacturing faults. The warranty will be performed by
repair or replacement of defective parts at our discretion. A warranty does not cover damage due to parts worn-off and
damage and defects that occur due to improper usage, treatment or maintenance (particularly calcification and commercial
use). A warranty will only be granted if the warranty card showing the date of purchase, dealer's stamp and signature or the
purchase receipt together with the device is sent to the relevant service station (see address below). Returns are to be made
in the original package. Transport costs will be borne by the purchaser. Please do not forget to state your address and, should
the error not be obvious, include an explanation together with your parcel.
Servicestation:
Service après-vente: Rotel AG
Servizio Assistenza: Parkstrasse 43 Telefon 062 787 77 00
Service station: 5012 Schönenwerd E-mail: office@rotel.ch
Gebrauchsanweisung ○ Mode d’emploi ○ Istruzioni per l’uso ○ Instruction for use
 Loading...