

Page 1

BLADELESSTABLEFAN755CH1
U755CH1
GEBRAUCHSANWEISUNG
MODE D’EMPLOI
ISTRUZIONI PER L’USO
INSTRUCTION FOR USE
Gebrauchsanweisung ○ Mode d’emploi ○ Istruzioni per l’uso ○ Instruction for use
Page 2

Gerätebeschreibung
Description de
l’appareil
Descrizione
dell’apparecchio
Description of the
appliance
1. Ring
1. Anneau
1. Anello
1. Loop
2. Gehäuse
2. Corps
2. Corpo
2. Body
3. Bedienfeld
3. Zone de commande
3. Pannello di controllo
3. Control Panel
4. Netzschalter
4. Interrupteur principal
4. Interruttore generale
4. Power Switch
5. ON/OFF
5. ON/OFF
5. ON/OFF
5. ON/OFF
6. Luftströmungsregler
6. Commande de flux
d'air
6. Controllo del flusso
d'aria
6. Airflow Control
7. Drehbewegung
7. Oscillation
7. Oscillazione
7. Oscillation
SCHEMATISCHE DARSTELLUNG / BEDIENFELD
Vue d’ensemble
Diagramma della struttura
Structure diagram
D / F / I / E
Gebrauchsanweisung ○ Mode d’emploi ○ Istruzioni per l’uso ○ Instruction for use
Page 3

Deutsch
SICHERHEITSHINWEISE
o Lesen Sie erst alle Hinweise, bevor Sie das Gerät in
Betrieb nehmen.
o Dieses Gerät kann von Kindern ab einem Alter von
acht (8) Jahren und von Personen mit
eingeschränkten physischen, sensorischen oder
geistigen Fähigkeiten oder einem Mangel an
Erfahrung und/oder Wissen verwendet werden,
wenn sie beaufsichtigt werden oder bezüglich des
sicheren Gebrauchs des Geräts unterwiesen
wurden und die daraus resultierenden Gefahren
verstanden haben. Kinder dürfen nicht mit dem
Gerät spielen. Reinigung und Benutzerwartung
dürfen nicht durch Kinder ohne Beaufsichtigung
durchgeführt werden.
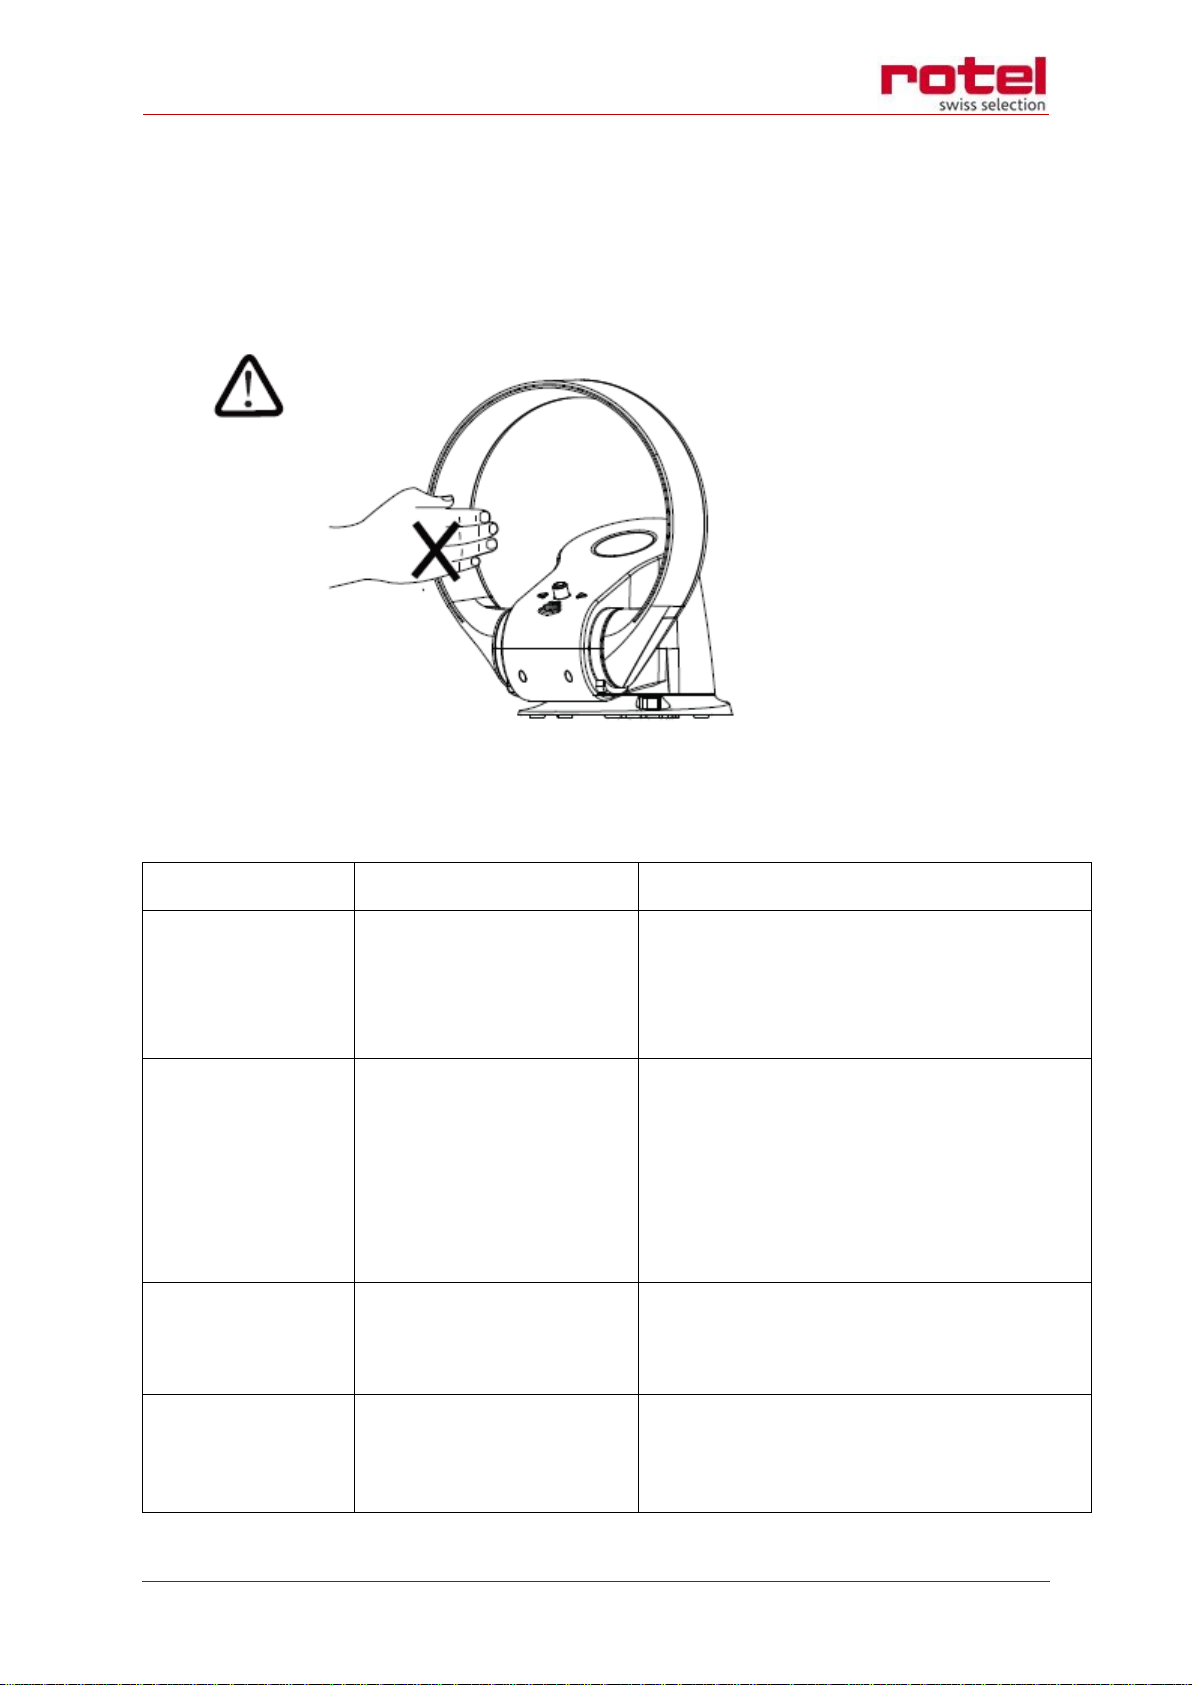
o Der Lüfter erwärmt sich während des Betriebs stark
und kühlt sich nach dem Ausschalten nur langsam
ab. Achten Sie darauf, keine heissen Flächen zu
berühren, um Verbrennungen zu vermeiden.
Bewegen Sie den Heizlüfter nur am Sockel und nicht
am Luftring.
Gebrauchsanweisung ○ Mode d’emploi ○ Istruzioni per l’uso ○ Instruction for use
Page 4

o Achten Sie bei der Aufstellung des Lüfters darauf,
dass brennbare Materialien wie Möbel, Kissen,
Bettwäsche, Papier, Kleidung und Vorhänge
mindestens 90 cm (3 Fuss) von der Vorderseite des
Lüfters entfernt sind und halten Sie diese
Materialien von den Seiten und der Rückseite fern,
wenn der Lüfter angeschlossen ist.
o Kinder, Senioren und Menschen mit Behinderungen
oder mangelnder Erfahrung dürfen das Gerät nur
unter Aufsicht und Anleitung einer
verantwortlichen Person benutzen. Kinder sind zu
beaufsichtigen, um sicherzustellen, dass sie nicht
mit dem Gerät spielen.
o Bitte verwenden Sie eine separate Steckdose, deren
Leistungs- und Spannungswerte den
Spezifikationen des keramischen Heizlüfters
entsprechen. Nicht mehr als ein Elektrogerät
gleichzeitig an der gleichen Steckdose benutzen.
o Bewegen Sie den keramischen Heizlüfter erst,
nachdem Sie ihn von der Stromversorgung getrennt
haben.
o Stecker nicht am Kabel aus der Steckdose ziehen.
Ziehen Sie stattdessen am Stecker selbst.
o Benutzen Sie das Gerät nicht, wenn Kabel oder
Stecker beschädigt sind. Bitte wenden Sie sich an
Gebrauchsanweisung ○ Mode d’emploi ○ Istruzioni per l’uso ○ Instruction for use
Page 5

einen Servicetechniker, um ein beschädigtes Kabel
zu reparieren oder auszutauschen.
o Dehnen Sie das Netzkabel nicht und setzen Sie es
keinen Spannungen aus. Halten Sie das Netzkabel
von Wärmequellen fern.
o Verlegen Sie das Kabel nicht unter Teppichen und
decken Sie es nicht mit Vorlegern, Läufern oder
ähnlichen Abdeckungen zu. Vermeiden Sie
Durchgangsbereiche, um Stolperrisiken zu
verringern.
o Schalten Sie alle Regler aus, bevor Sie das Gerät von
der Stromversorgung trennen. Trennen Sie das
Gerät von der Stromversorgung, wenn Sie es
längere Zeit nicht benutzen. Wickeln Sie das Kabel
sicher auf, um Stolperrisiken zu vermeiden.
o Keine Gegenstände in das Lüftungsgitter stecken.
Die Öffnung ist frei zu halten. Achten Sie darauf,
dass sich weder Staub, Flusen noch Haare in der
Öffnung verfangen und den Luftstrom behindern,
da dies zu elektrischen Schlägen, Brand oder zur
Beschädigung des Lüfters führen kann.
o Der Lüfter wird im Inneren sehr heiss. Nicht in
Bereichen verwenden, wo Benzin, Farben oder
brennbare Flüssigkeiten gelagert werden. Der
Lüfter darf nicht in der Nähe von Wärmequellen
Gebrauchsanweisung ○ Mode d’emploi ○ Istruzioni per l’uso ○ Instruction for use
Page 6

und nicht-korrosiven Gasen verwendet werden Das
Gerät ist auf einer ebenen Unterlage aufzustellen.
Das Gerät benötigt 150mm freien Platz, um eine
ausreichende Lüftung zu gewährleisten.
o Der Lüfter darf nicht im Freien oder auf feuchten
Unterlagen verwendet werden. Nicht in
Badezimmern, Waschräumen und ähnlichen
Räumlichkeiten benutzen. Stellen Sie den Lüfter
niemals so auf, dass er in eine Badewanne oder
andere Wasserbehälter fallen kann. Nicht in der
Nähe von Bädern, Duschen oder Schwimmbecken
lagern, bzw. an Orten, an denen das Gerät nass
werden kann.
o Lüfter, Netzkabel oder Stecker nicht in Wasser oder
andere Flüssigkeiten tauchen. Der Einsatz von
Verlängerungskabeln wird nur nach Prüfung durch
einen qualifizierten Techniker empfohlen.
o Nicht zusammen mit oder in direkter Nähe von
Lufterfrischern oder ähnlichen Produkten
benutzen.
o Keine Reinigungs- oder Schmiermittel benutzen.
Vor Reinigung, Transport oder
Instandhaltungsarbeiten Netzstecker ziehen.
Gebrauchsanweisung ○ Mode d’emploi ○ Istruzioni per l’uso ○ Instruction for use
Page 7

o Nicht auf weichen Unterlagen wie einem Bett
benutzen, wo es zur Blockierung der Öffnungen
kommen kann.
o Um Überhitzung und Brandrisiko zu vermeiden, darf
der Lüfter nicht abgedeckt werden.
o Der Lüfter ist so aufzustellen, dass der Luftstrom
nicht auf Wände oder Zimmerecken trifft.
Gebrauchsanweisung ○ Mode d’emploi ○ Istruzioni per l’uso ○ Instruction for use
Page 8
WICHTIGE SICHERHEITSVORKEHRUNGEN
o Zu Ihrer Sicherheit ist der Lüfter mit einer Abschaltautomatik ausgestattet, die
auslöst, sobald das Gerät kippt oder zu heiss wird. Ziehen Sie nach dem Auslösen der
Automatik den Netzstecker und lassen Sie das Gerät abkühlen.
o Prüfen Sie, ob die Lüftungsöffnungen blockiert sind, machen Sie sie gegebenenfalls
frei und stellen Sie das Gerät auf eine stabile, ebene Unterlage.
SPEZIFIKATIONEN
o Neues und innovatives Design.
o Das äusserst elegante Gerät ist mit einer Kontrollleuchte und Sicherheitsfunktionen
ausgestattet.
o Der keramische Heizlüfter lässt sich um 90° drehen und der Ring kann auf 120°
eingestellt werden.
BEDIENFELD
o Schalten Sie das Gerät am Netzschalter ein
o drücken Sie “ON/OFF” am Bedienfeld: das Gerät setzt sich in Betrieb und gibt kühle
Luft ab,
o drücken Sie “ON/OFF” erneut: die Kontrollleuchte wechselt auf rot und das Gerät gibt
warme Luft ab,
o drücken Sie “ON/OFF” drei Mal: das Gerät schaltet sich ab
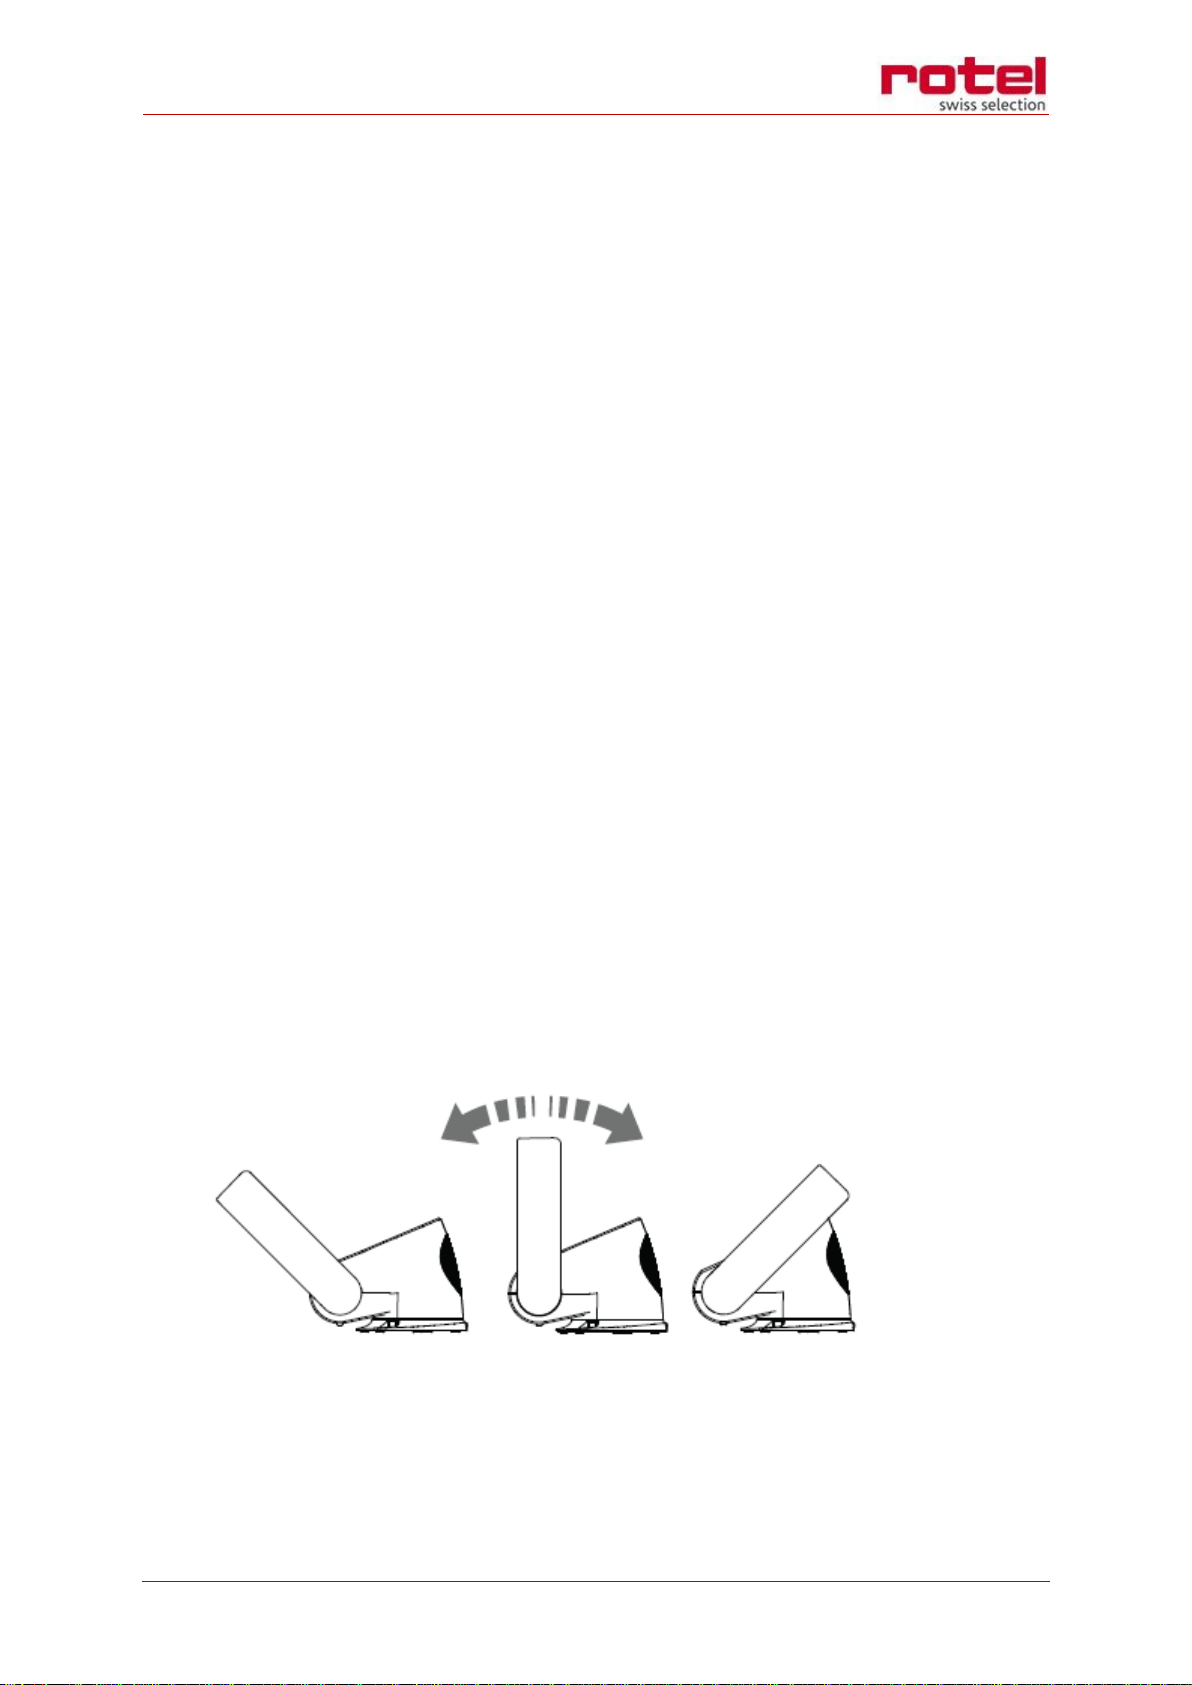
KIPPFUNKTION
o Kippen Sie den Sockel nach vorne oder nach hinten, um den gewünschten
Luftströmungswinkel einzustellen.
Gebrauchsanweisung ○ Mode d’emploi ○ Istruzioni per l’uso ○ Instruction for use
Page 9
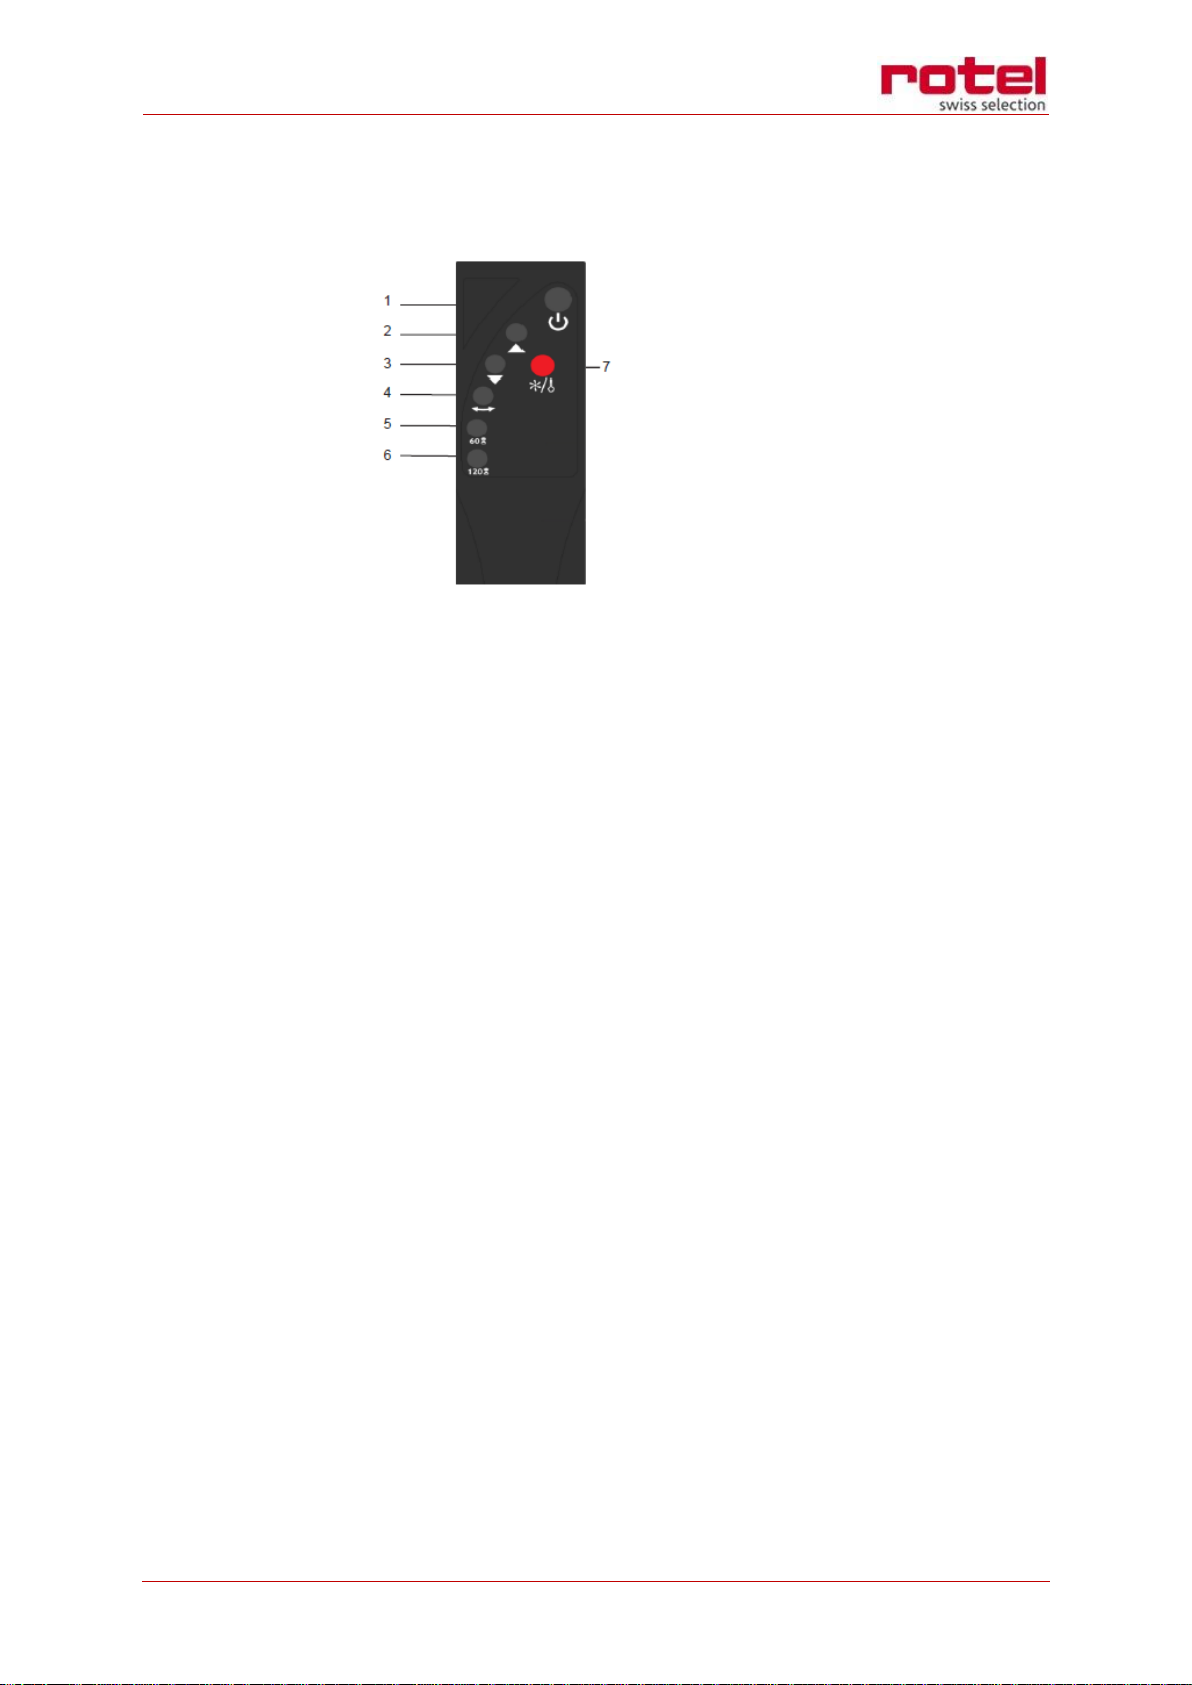
FERNSTEUERUNG
1. zum Ein- und Ausschalten
2. zum Erhöhen des Luftdurchsatzes
3. zum Verringern des Luftdurchsatzes
4. zum Kippen des Ventilators
5. 60-Minuten Zeitschaltuhr. Der Ventilator schaltet sich nach 60 Minuten ab. Durch
erneutes Drücken schalten Sie die Zeitschaltuhr aus.
6. 120-Minuten Zeitschaltuhr. Der Ventilator schaltet sich nach 120 Minuten ab. Durch
erneutes Drücken schalten Sie die Zeitschaltuhr aus.
7. Nach Drücken der “HOT/COOL”-Taste gibt der Ventilator warme Luft ab. Nach
erneutem Drücken der “HOT/COOL”-Taste wechselt der Ventilator von der Betriebsart
"Heizen" in die Betriebsart "Kühlen".
***Der Signalton beim Drücken der Taste zeigt an, dass die Fernbedienung funktioniert.
Gebrauchsanweisung ○ Mode d’emploi ○ Istruzioni per l’uso ○ Instruction for use
Page 10

A. Der Ventilator dreht sich
um 20 Grad nach links
B. Der Ventilator ist auf die
Fernbedienung
ausgerichtet
C. Der Ventilator dreht sich
um 20 Grad nach rechts
SIGNALEMPFANGSBEREICH DER FERNBEDIENUNG
o Die optimale Wirkung wird erzielt, wenn die Fernbedienung zwischen den Bereichen
A und C verwendet wird.
o Wir empfehlen, die Fernbedienung auf den Empfänger an der Vorderseite des
Ventilators auszurichten.
Gebrauchsanweisung ○ Mode d’emploi ○ Istruzioni per l’uso ○ Instruction for use
Page 11

REINIGUNG
o Bitte trennen Sie das Gerät vor der Reinigung von der Stromversorgung.
1. Ring reinigen
o Wischen Sie den Ring mit einem feuchten oder trockenen Lappen ab. Keine
Reinigungs- oder Poliermittel zur Reinigung des Ventilators verwenden.
2. Entfernen von Verstopfungen
o Achten Sie darauf, dass das Gerät von der Stromversorgung getrennt ist und sich
abgekühlt hat.
o Suchen Sie an den Lufteingangsöffnungen und in der kleinen Öffnung im Luftring nach
Verstopfungen.
o Verwenden Sie eine weiche Bürste, um Staub und Schmutz zu entfernen.
Gebrauchsanweisung ○ Mode d’emploi ○ Istruzioni per l’uso ○ Instruction for use
Page 12
Problem
Mögliche Ursache
Empfohlene Lösung
Die
Betriebsanzeige
leuchtet, aber der
Ventilator
funktioniert nicht
Die Netzspannung ist zu
gering
Halten Sie das Gerät an und starten Sie es
neu, sobald die Netzspannung wieder
normal ist.
Die
Betriebsanzeige
leuchtet nicht
Kein Strom
1. Prüfen Sie, ob die Steckdose funktioniert
2. Rufen Sie einen Elektriker
3. Prüfen Sie, ob der Ventilator auf einer
ebenen Unterlage steht und ob sich der
Kippschutzschalter an der Unterseite des
Gehäuse in der richtigen Position befindet
4. Prüfen Sie, ob das Gerät eingeschaltet ist
Der Luftstrom ist
nicht stark genug
Lufteingangs- oder ausgangskanäle sind
verstopft
Entfernen Sie die Verstopfungen
Das Gerät ist
angeschlossen,
heizt aber nicht
Die Umgebungstemperatur hat die
eingestellte Temperatur
erreicht (über 32°C)
Warten Sie, bis sich das Gerät abgekühlt hat
oder bis die Zimmertemperatur gefallen ist
3. Achtung: das Gerät erwärmt sich während des Betriebs sehr stark
o Der Lüfter erwärmt sich während des Betriebs stark und kühlt sich nach dem
Ausschalten nur langsam ab.
o Achten Sie darauf, keine heissen Flächen zu berühren, um Verbrennungen zu
vermeiden. Der Ventilator ist ausser Reichweite von Kindern aufzustellen.
STÖRUNGSBEHEBUNG
Gebrauchsanweisung ○ Mode d’emploi ○ Istruzioni per l’uso ○ Instruction for use
Page 13
ENTSORGUNG
o Für eine sachgerechte Entsorgung ist das Gerät dem Fachhändler, der Servicestelle
oder der Firma Rotel AG zurückzugeben.
Gebrauchsanweisung ○ Mode d’emploi ○ Istruzioni per l’uso ○ Instruction for use
Page 14

Français
CONSIGNES DE SÉCURITÉ
o Lire toutes les instructions avant usage.
o Cet appareil peut être utilisé par des enfants de
moins de huit (8) ans et par des personnes aux
capacités physiques, sensorielles ou intellectuelles
limitées ou manquant d’expérience ou de
connaissance si elles sont sous surveillance ou ont
été instruites sur l’utilisation sûre de l’appareil et si
elles ont compris les risques pouvant en résulter.
Les enfants ne doivent pas jouer avec l’appareil. Le
nettoyage ou la maintenance utilisateur ne doivent
pas être réalisés par des enfants sans surveillance.
o Ce radiateur est chaud quand il est utilisé et
pendant une courte période après l'arrêt. Évitez de
toucher les surfaces chaudes à peau nue afin
d'éviter des brûlures. Pour déplacer le radiateur,
prenez-le par la base et non par l'amplificateur d'air
annulaire.
Gebrauchsanweisung ○ Mode d’emploi ○ Istruzioni per l’uso ○ Instruction for use
Page 15

o Les matières combustibles, comme les meubles,
coussins, literies, papiers, vêtements et rideaux
doivent être à une distance d'au moins 0.9m de la
face avant du radiateur et éloignées derrière et de
côté lorsque le chauffage est enclenché.
o Les enfants, les personnes âgées et les personnes
handicapées ou manquant d'expérience doivent
être sous la surveillance et direction d'une personne
responsable. Les enfants doivent être surveillés afin
de s'assurer qu'ils ne jouent pas avec le ventilateur.
o Veuillez utiliser une prise de courant conforme à la
spécification de tension/courant du radiateur
soufflant sans pales. Ne pas utiliser simultanément
plus d'un appareil électrique sur une même prise de
courant.
o Ne pas déplacer le radiateur soufflant sans pales
sans l'avoir préalablement débranché de la prise de
courant.
o Ne pas débrancher en tirant sur le cordon. Tenez la
fiche et non le cordon pour débrancher.
o Ne pas utiliser le radiateur soufflant sans pales si le
cordon ou la fiche est endommagée. Veuillez
contacter le service après-vente pour remplacer ou
réparer le cordon s'il est endommagé.
Gebrauchsanweisung ○ Mode d’emploi ○ Istruzioni per l’uso ○ Instruction for use
Page 16

o Ne pas étirer ou solliciter le cordon. Gardez le
cordon éloigné des sources de chaleur.
o Ne pas faire passer le cordon sous des tapis; ne pas
couvrir le cordon avec des carpettes, moquettes ou
revêtements similaires. Lors de l'installation, passez
le cordon à distance des passages fréquentés afin
d'éviter de trébucher sur le cordon.
o Éteindre complètement l'appareil avant de le
débrancher. Retirez la fiche de la prise de courant si
l'appareil n'est pas utilisé pendant un certain temps.
Enroulez soigneusement le cordon afin d'éviter de
trébucher sur ce dernier.
o Ne jamais introduire d'objets dans la grille
d'aspiration. Ne pas obstruer l'ouverture. Garder
libre de poussières, fibres, cheveux et autres qui
pourraient réduire le flux d'air, car cela pourrait
provoquer une électrocution, un incendie ou
endommager le radiateur.
o Le radiateur a des composants chauds à l'intérieur.
Ne pas utiliser dans des endroits où de l'essence,
peinture ou liquides inflammables sont présents.
L'appareil doit être éloigné de toute source de
chaleur et de tout environnement de gaz non
corrosif. L'appareil doit être posé sur une surface de
Gebrauchsanweisung ○ Mode d’emploi ○ Istruzioni per l’uso ○ Instruction for use
Page 17

niveau. Assurez un espace de 150mm autour de
l'appareil pour une bonne ventilation.
o Ne pas utiliser l'appareil à l'extérieur ou sur des
surfaces mouillées. Ne pas utiliser l'appareil dans les
salles de bains, buanderies ou locaux similaires. Ne
jamais poser le radiateur en un endroit d'où il
pourrait tomber dans une baignoire ou autres
récipients d'eau. Ne jamais utiliser ni ranger dans un
endroit où il pourrait être mouillé ou à proximité
immédiate d'une baignoire, douche ou piscine.
o Ne jamais plonger l'appareil, le cordon ou la fiche
dans de l'eau ou autres liquides. L'emploi d'une
rallonge n'est pas recommandé, sauf après
vérification par une personne qualifiée.
o Ne jamais utiliser en combinaison avec ou à
proximité immédiate d'un parfumeur d'ambiance
ou produit similaire.
o Ne pas utiliser de produits détergents ou lubrifiants
sur cet appareil. Retirez la fiche avant de le
nettoyer, déplacer ou d'effectuer un entretien.
o Ne pas utiliser sur des surfaces douces, comme p.ex.
un lit, où les ouvertures pourraient s'obstruer.
o Ne pas couvrir le radiateur, afin d'éviter qu'il ne
surchauffe ou provoque un incendie.
Gebrauchsanweisung ○ Mode d’emploi ○ Istruzioni per l’uso ○ Instruction for use
Page 18

o Le radiateur doit être positionné de manière à ce
que le flux d'air ne soit pas dirigé contre un mur ou
un coin de la pièce.
Gebrauchsanweisung ○ Mode d’emploi ○ Istruzioni per l’uso ○ Instruction for use
Page 19

IMPORTANTES FONCTIONS DE SÉCURITÉ
o Pour votre sécurité, ce radiateur est pourvu de disjoncteurs automatiques qui
déclenchent lorsque le radiateur se renverse ou surchauffe. Si les disjoncteurs
déclenchent, débranchez le radiateur et laissez-le refroidir.
o Avant d'enclencher le radiateur, vérifiez s'il y une quelconque obstruction et assurez-
vous qu'il soit posé sur une surface de niveau et solide.
PARTICULARITÉS
o Un design nouveau et novateur. Avec lampe témoin, des fonctions de sécurité et très
moderne.
o Le radiateur soufflant sans pales peut osciller de 90° et l'anneau peut être réglé à
120°.
ZONE DE COMMANDE
o Pressez l'interrupteur principal sur la base
o Pressez "ON/OFF" sur la zone de commande: le radiateur soufflant sans pales se met
en marche et souffle de l'air froid,
o Pressez de nouveau "ON/OFF": la lampe devient rouge et l'air soufflé est chaud,
o Pressez trois fois "ON/OFF": le radiateur soufflant sans pales s'arrête
FONCTION OSCILLATION
o Ajustez la base vers l'avant ou l'arrière pour l'angle de flux d'air souhaité
Gebrauchsanweisung ○ Mode d’emploi ○ Istruzioni per l’uso ○ Instruction for use
Page 20

TÉLÉCOMMANDE
1. ON et OFF
2. augmenter le flux d'air
3. diminuer le flux d'air
4. le ventilateur oscille
5. minuterie 60 minutes Le ventilateur s'arrête après 60 minutes. Presser de nouveau
pour annuler la minuterie.
6. 120”, minuterie 120 minutes Le ventilateur s'arrête après 120 minutes. Presser de
nouveau pour annuler la minuterie.
7. presser “HOT/COOL” pour souffler de l'air chaud. Presser de nouveau ”HOT/COOL”
pour arrêter le mode chauffage et changer pour mode froid.
***les bips signifient que la télécommande fonctionne en l'utilisant.
Gebrauchsanweisung ○ Mode d’emploi ○ Istruzioni per l’uso ○ Instruction for use
Page 21

D. Le ventilateur tourne de
20 degrés vers la gauche
E. Le ventilateur est tourné
vers la télécommande
F. Le ventilateur tourne de
20 degrés vers la droite
GAMME DES SIGNAUX REÇUS PAR LA TÉLÉCOMMANDE
o Un effet optimal est obtenu en utilisant la télécommande entre la plage A à C.
o Nous recommandons de diriger la télécommande vers le récepteur à l'avant du
ventilateur.
Gebrauchsanweisung ○ Mode d’emploi ○ Istruzioni per l’uso ○ Instruction for use
Page 22

NETTOYAGE
o Veuillez débrancher le radiateur soufflant sans pales avant de le nettoyer.
1. Nettoyer l’anneau
o Nettoyer l'anneau avec un chiffon sec ou humide. Ne pas utiliser de détergent ou
produit de polissage pour nettoyer l'appareil.
2. Dégager les obstructions
o Assurez-vous que l'appareil est débranché et laissez-le refroidir.
o Regardez pour des obstructions dans les trous d'entrée d'air et dans la mince
ouverture dans l'anneau amplificateur de flux d'air.
o Utilisez une brosse douce pour retirer les débris.
Gebrauchsanweisung ○ Mode d’emploi ○ Istruzioni per l’uso ○ Instruction for use
Page 23

Problème
Cause possible
Solution proposée
Le voyant
d'alimentation est
allumé mais le
ventilateur ne
fonctionne pas
La tension est trop basse
Arrêtez le ventilateur et ne le redémarrez
que lorsque la tension est normale
Le voyant
d'alimentation ne
s'allume pas
Pas d'électricité
1. Vérifiez la prise de courant
2. Consultez un électricien
3. Vérifiez si la ventilateur est sur une
surface de niveau et si l'interrupteur de
renversement sous la base est dans la
bonne position
4. Vérifiez si l'interrupteur principal est sur
ON
Le flux d'air est
faible
L'entrée ou la sortie est
obstruée
Nettoyez l'obstruction
L'alimentation est
branchée, mais
pas de chauffage
La température a atteint
la température de
consigne (la température
de la pièce dépasse 32°C)
Attendez que le radiateur souffleur sans
pales refroidisse ou que la température de
la pièce diminue
3. Attention: l'appareil est chaud quand il est utilisé
o Ce radiateur est chaud quand il est utilisé et pendant une courte période après l'arrêt.
o Évitez de toucher les surfaces chaudes à peau nue. Si des enfants sont présents,
placez le radiateur hors de leur portée.
DÉPANNAGE
Gebrauchsanweisung ○ Mode d’emploi ○ Istruzioni per l’uso ○ Instruction for use
Page 24

ELIMINATION
o A la fin de la phase d’utilisation, la machine doit être remise au détaillant ou à un
point de service après-ventre, ou renvoyées directement à Rotel AG, qui se chargera
de l’éliminination ou du recyclage.
Gebrauchsanweisung ○ Mode d’emploi ○ Istruzioni per l’uso ○ Instruction for use
Page 25

Italiano
AVVERTENZE DI SICUREZZA
o Prima dell'uso leggere tutte le istruzioni.
o Questo apparecchio può essere usato da bambini
di età superiore a otto (8) anni e da persone con
ridotte capacità fisiche, sensoriali o mentali, o con
insufficiente esperienza e conoscenza, a
condizione che siano sotto sorveglianza o che
abbiano ricevuto istruzioni sull'uso sicuro
dell'apparecchio e siano consapevoli dei rischi
connessi. I bambini non devono giocare con
l'apparecchio, ne devono svolgere operazioni di
pulizia e manutenzione senza sorveglianza.
o Questo termoventilatore si surriscalda durante
l'uso e per un breve periodo dopo l'uso. Per evitare
scottature, non fare entrare in contatto la pelle con
le superfici calde. Quando si muove il
termoventilatore, sostenerlo dalla base, non
dall'amplificatore del circolo d'aria.
o Mantenere i materiali infiammabili quali mobili,
cuscini, biancheria da letto, fogli, vestiti e tende ad
almeno 0,9 m (3 piedi) dalla parte frontale del
Gebrauchsanweisung ○ Mode d’emploi ○ Istruzioni per l’uso ○ Instruction for use
Page 26

termoventilatore e mantenerli lontani dai lati e
dalla parte posteriore dell'apparecchio quando
questo è collegato alla presa di corrente.
o I bambini, gli anziani e le persone affette da
disabilità o prive di esperienza devono essere
sorvegliati da un responsabile durante l'uso del
prodotto. Tenere sotto controllo i bambini per
assicurarsi che non giochino con il ventilatore.
o Si prega di utilizzare una presa separata in
conformità con la corrente/la tensione del
termoventilatore senza pale. Non utilizzare più di
un'apparecchiatura elettrica simultaneamente sulla
stessa presa.
o Non muovere il termoventilatore senza pale prima
di scollegarlo dalla presa elettrica.
o Non togliere mai la spina tirando dal cavo: quando
la si estrae, afferrare la spina, non il cavo.
o Non mettere in funzione il termoventilatore senza
pale quando il cavo o la spina sono danneggiati. In
caso di cavo danneggiato, farlo riparare o sostituire
da un tecnico di assistenza.
o Non allungare il cavo né sottoporlo a trazione.
Mantenere il cavo lontano dalle fonti di calore.
o Non far passare il cavo sotto tappeti; non coprire il
cavo con tappetini, rivestimenti per scale o altre
Gebrauchsanweisung ○ Mode d’emploi ○ Istruzioni per l’uso ○ Instruction for use
Page 27

coperture simili. Durante l'installazione, far passare
il cavo mantenendolo lontano da aree di passaggio
per evitare di inciamparvi.
o Spegnere l'interruttore generale prima di estrarre la
spina dalla presa. Estrarre la spina dalla presa
quando non si utilizza l'apparecchiatura per un
lungo periodo. Per evitare il rischio di inciampare,
avvolgere il cavo in modo sicuro.
o Non posizionare alcun oggetto nella griglia
d'entrata. Non bloccare l'apertura: mantenerla
libera da polvere, pelucchi, capelli e qualsiasi
oggetto che possa ridurre il flusso d'aria, in quanto
ciò potrebbe provocare scosse elettriche o incendi
o danneggiare il termoventilatore.
o Un termoventilatore contiene parti bollenti al suo
interno. Non utilizzarlo in aree dove sono presenti
benzina, vernice o liquidi infiammabili. Il ventilatore
deve sempre trovarsi a debita distanza da qualsiasi
fonte di calore e ambienti con gas non corrosivi.
Posizionare il termoventilatore in orizzontale su di
una superficie piana. Lasciare uno spazio di 150 mm
attorno al ventilatore per garantire una buona
ventilazione.
o Non usare il ventilatore in ambienti esterni o su
superfici umide. Non usare il ventilatore in bagni,
Gebrauchsanweisung ○ Mode d’emploi ○ Istruzioni per l’uso ○ Instruction for use
Page 28

lavanderie e ambienti interni similari. Mai
posizionare il termoventilatore in modo che possa
cadere in una vasca da bagno o altri recipienti
d'acqua. Non usare o conservare il termoventilatore
in luoghi umidi o nelle immediate vicinanze di un
bagno, di una doccia o di una piscina.
o Non immergere il ventilatore, il cavo di
alimentazione o la spina in acqua o altro liquido. Si
sconsiglia l'utilizzo di prolunghe, a meno che queste
vengano ispezionate da una persona qualificata.
o Non usare in combinazione con o nelle immediate
vicinanze di deodoranti per ambienti o prodotti
simili.
o Non usare alcun detergente o lubrificante su questo
ventilatore. Estrarre la spina prima di procedere alla
pulizia, al trasporto e alla manutenzione.
o Non usare su superfici morbide quali letti, dove le
aperture possono ostruirsi.
o Per evitare il surriscaldamento e il rischio di
incendio, non coprire il termoventilatore.
o Posizionare il termoventilatore in modo tale da
dirigere il flusso d'aria in direzione opposta a pareti
o angoli dei locali.
Gebrauchsanweisung ○ Mode d’emploi ○ Istruzioni per l’uso ○ Instruction for use
Page 29

ISTRUZIONI IMPORTANTI PER LA SICUREZZA
o Per la vostra sicurezza, questo ventilatore è dotato di interruttori di circuito
automatici che scattano in caso di ribaltamento o surriscaldamento. Se scattano
questi interruttori, estrarre la spina dalla presa di corrente e lasciare raffreddare il
termoventilatore.
o Prima di rimetterlo in funzione, verificare eventuali ostruzioni rimuovendole
all'occorrenza e accertarsi che il termoventilatore si trovi su una superficie piana
SPECIFICHE TECNICHE
o Un design originale e innovativo. È dotato di una spia, è all'ultima moda e ha anche
funzioni di sicurezza.
o Il termoventilatore senza pale può ruotare di 90° e l'anello è regolabile di 120°
PANNELLO DI CONTROLLO
o Accendere l'interruttore generale posto sul telaio
o premere “ON/OFF” sul pannello di controllo: il termoventilatore senza pale si mette in
funzione soffiando aria fredda,
o premere nuovamente “ON/OFF”: la luce diventa rossa e inizia a uscire aria calda,
o premere “ON/OFF” per tre volte: il termoventilatore senza pale smetterà di funzionare
FUNZIONE DI INCLINAZIONE
o Regolare la base in avanti o indietro a seconda dell'angolo di flusso d'aria desiderato
Gebrauchsanweisung ○ Mode d’emploi ○ Istruzioni per l’uso ○ Instruction for use
Page 30

TELECOMANDO
1. accensione/spegnimento
2. aumenta il flusso d'aria
3. riduce il flusso d'aria
4. il ventilatore oscilla
5. timer di 60 minuti. Il ventilatore si fermerà dopo 60 min. Premere nuovamente per
annullare il timer.
6. timer di 120 minuti. Il ventilatore si fermerà dopo 120 min. Premere nuovamente per
annullare il timer.
7. Premere “HOT/COOL”: inizia a uscire aria calda. Premere ”HOT/COOL” nuovamente
per cancellare la modalità di riscaldamento e passare alla modalità di
raffreddamento.
***Il segnale acustico indica che il telecomando risponde alla pressione dei pulsanti.
Gebrauchsanweisung ○ Mode d’emploi ○ Istruzioni per l’uso ○ Instruction for use
Page 31

A. il ventilatore oscilla di 20
gradi verso sinistra
B. il ventilatore è rivolto
verso il telecomando
C. il ventilatore oscilla di 20
gradi verso destra
PORTATA DEL SEGNALE DI RICEZIONE DEL TELECOMANDO
o Per raggiungere un'efficacia ottimale, usare il telecomando tra gli intervalli A e C.
o Consigliamo di puntare il telecomando verso il ricevitore posto sulla parte frontale del
ventilatore.
Gebrauchsanweisung ○ Mode d’emploi ○ Istruzioni per l’uso ○ Instruction for use
Page 32

PULIZIA
o Scollegare il termoventilatore senza pale dalla presa prima di procedere alla pulizia.
1. Pulizia dell'anello
o Pulire l'anello passandovi un panno umido o asciutto. Non usare detergenti o lucidi per
pulire il ventilatore.
2. Rimozione delle ostruzioni
o Accertarsi che il termoventilatore sia scollegato dalla rete elettrica e che si sia
raffreddato.
o Cercare eventuali ostruzioni nei fori di entrata dell'aria e nella piccola apertura
nell'amplificatore dell'aria.
o Usare una spazzola delicata per rimuovere i residui.
Gebrauchsanweisung ○ Mode d’emploi ○ Istruzioni per l’uso ○ Instruction for use
Page 33

Problema
Possibile causa
Soluzioni proposte
La spia di
accensione è
accesa, ma il
ventilatore non
funziona
La tensione è insufficiente
Fermare il ventilatore e non riavviarlo
finché la tensione è normale.
La spia di
accensione non si
accende
Non c'è corrente
1. Controllare se la presa funziona
2. Rivolgersi a un elettricista
3. Controllare che il ventilatore poggi su una
superficie piana e che l'interruttore
antiribaltamento sotto il telaio si trovi nella
posizione corretta
4. Controllare che l'interruttore generale sia
acceso
Flusso d'aria
debole
L'entrata o l'uscita è
ostruita
Rimuovere le ostruzioni
C'è corrente, ma
non riscalda
La temperatura ha
raggiunto la temperatura
presente nel locale (temp.
ambiente superiore a 32°)
Attendere finché il termoventilatore senza
pale si raffredda o finché la temperatura del
locale si abbassa
3. Attenzione: si surriscalda quando è in uso
o Questo termoventilatore si surriscalda durante l'uso e per un breve periodo dopo l'uso.
o Evitare di fare entrare in contatto la pelle con le superfici calde. Se sono presenti
bambini, posizionare eventualmente il termoventilatore fuori dalla loro portata.
GUIDA PER LA RISOLUZIONE DI PROBLEMI
Gebrauchsanweisung ○ Mode d’emploi ○ Istruzioni per l’uso ○ Instruction for use
Page 34

SMALTIMENTO
o Per lo smaltimento corretto, la macchina deve essere restituita al rivenditore
specializzato, al servizio di assistenza o alla ditta Rotel AG.
Gebrauchsanweisung ○ Mode d’emploi ○ Istruzioni per l’uso ○ Instruction for use
Page 35

English
SAFETY INSTRUCTIONS
o Read all instructions before using.
o This appliance can be used by children aged from 8
years and above and persons with reduced
physical, sensory or mental capabilities or lack of
experience and knowledge if they have been given
supervision or instruction concerning use of the
appliance in a safe way and understand the hazards
involved. Children shall not play with the
appliance. Cleaning and user maintenance shall not
be made by children without supervision.
o This heater is hot when in use and for a short period
after use. To avoid burns, do not let bare skin touch
hot surfaces. When moving the heater hold it by the
base, not the air loop amplifier.
o Keep combustible materials, such as furniture,
pillows, bedding, papers, clothes and curtains, at
least 0.9m (3 feet) from the front of the heater and
keep them away from the sides and rear when the
heater is plugged in.
Gebrauchsanweisung ○ Mode d’emploi ○ Istruzioni per l’uso ○ Instruction for use
Page 36

o Children, the elderly and people with disabilities or
lacking experience should be under care and
guidance of a responsible person when using this
product. Children should be under supervision to
ensure that they will not play with the fan as a toy.
o Please use a separate outlet in accordance with the
bladeless fan heater current/voltage. Don’t use
more than one electrical appliance at the same time
on the same outlet.
o Don’t move the bladeless fan heater until you
unplug it from the outlet.
o Don’t unplug by pulling on cord. You should unplug
and grasp the plug, not the cord.
o Don’t operate the bladeless fan heater with a
damaged cord or plug. Please ask a service agent to
replace or repair the cord if the cord is damaged.
o Don’t stretch the cord or place the cord under
strain. Keep the cord away from heat sources.
o Don’t run the cord under carpeting; don’t cover the
cord with throw rugs, runners or similar coverings.
When installing, run the cord away from frequented
areas to avoid tripping over the cord.
o Turn off all controls before unplugging. Remove the
plug from the socket when not in use for long
Gebrauchsanweisung ○ Mode d’emploi ○ Istruzioni per l’uso ○ Instruction for use
Page 37

periods of time. To avoid a tripping hazard, safely
coil the cord.
o Don’t put any objects into the inlet grille. Don’t
block the opening. Keep free of dust, lint, hair and
anything that may reduce the airflow as this may
cause an electric shock or fire or damage the heater.
o A heater has hot parts inside. Do not use it in areas
where petrol, paint, or flammable liquids are
present. The fan should be away from any heat
source and non-corrosive gas surroundings. It
should be placed on a level surface. Allow for
150mm space around the fan to ensure good
ventilation.
o Don’t use the fan outdoors or on wet surfaces. Do
not use in bathrooms, laundry areas and similar
indoor locations. Never position the heater where it
may fall into a bath or other water containers. Do
not use or store where it may get wet or in the
immediate vicinity of a bath, shower or swimming
pool.
o Don’t immerse the fan, power cord or plug into the
water or other liquids. Use of extension cords isn’t
recommended except after testing by a qualified
person.
Gebrauchsanweisung ○ Mode d’emploi ○ Istruzioni per l’uso ○ Instruction for use
Page 38

o Don’t use in conjunction with or directly next to an
air freshener or similar products.
o Don’t use any cleaning agent or lubricants on this
fan. Unplug before cleaning, carrying and
performing any maintenance.
o Do not use on soft surfaces, such as a bed, where
openings may become blocked.
o In order to avoid overheating and fire hazard, do not
cover the heater.
o The heater should be positioned so the airflow is
directed away from any walls or room corners.
Gebrauchsanweisung ○ Mode d’emploi ○ Istruzioni per l’uso ○ Instruction for use
Page 39

IMPORTANT SAFETY FEATURES
o For your safety this heater is fitted with automatic cut-out switches that operate if
the heater tips over or overheats. If the switches are triggered, unplug the heater and
allow it to cool.
o Before restarting the heater, check and clear and blockages and ensure the heater is
on a solid level surface.
SPECIFICATIONS
o A new and innovative design. It comes with an indicator light, is very fashionable and
has safety features.
o The bladeless fan heater can rotate 90º and the loop can be adjust to 120°
CONTROL PANEL
o Turn on the power switch on the chassis
o press “ON/OFF”on the control panel: the bladeless fan heater starts to work and blows
cool air,
o press “ON/OFF” again: the light will change to red and the air will blow hot,
o press “ON/OFF” three times: the bladeless fan heater will stop working
TILT FUNCTION
o Adjust base forward or backward for required airflow angle
Gebrauchsanweisung ○ Mode d’emploi ○ Istruzioni per l’uso ○ Instruction for use
Page 40

REMOTE CONTROL
1. Power on and off
2. Increase Airflow
3. Decrease Airflow
4. The fan will tilt
5. 60-minute timer. The fan will stop working after 60 min. Press again to cancel timer.
6. 120”, 120 minute timer. The fan will stop working after 120 min. Press again to cancel
timer.
7. Press “HOT/COOL” starts to blow hot air. Press ”HOT/COOL” again to cancel the heating
mode and change to cool mode.
***Beep means the remote control is working when you press it..
Gebrauchsanweisung ○ Mode d’emploi ○ Istruzioni per l’uso ○ Instruction for use
Page 41

A. The fan oscillates 20
degrees to the left
B. The fan is aimed at the
remote control
C. The fan oscillates 20
degrees to the right
THE RECEIVING SIGNAL RANGE OF THE REMOTE CONTROL
o Optimal effect can be reached if using the remote control between the range of A to
C.
o We suggest that the remote control be aimed at the receiver at the front of the
fan.ventilatore.
Gebrauchsanweisung ○ Mode d’emploi ○ Istruzioni per l’uso ○ Instruction for use
Page 42

CLEANING
o Please unplug the bladeless fan heater from the outlet before cleaning.
1. Cleaning loop
o To clean, wipe with a dry or damp cloth. Do not use detergents or polishes to clean the
fan.
2. Cleaning blockages
o Ensure the heater is unplugged and has been allowed to cool.
o Look for blockages in the air inlet holes and in the small aperture inside the air loop
amplifier.
o Use a soft brush to remove debris.
Gebrauchsanweisung ○ Mode d’emploi ○ Istruzioni per l’uso ○ Instruction for use
Page 43

Problem
Possible cause
Suggested solution
Power indicator
light on, but fan
does not work
The voltage is too low
Stop the fan and don’t restart until the
voltage is normal
Power indicator
does not light
No electricity
1. Check if the outlet working
2. Consult an electrician
3. Check if the fan is on a level surface, antitilt switch underneath the chassis is on right
position or not
4. Check if the power switch is on or not
Airflow is slow
Inlet or outlet is blocked
Clean the blockages
Power connection,
but no heating
The temperature has
reached the preset
temperature (room temp
is over 32°)
Wait for the bladeless fan heater to cool
down or until the room temperature drops
3. Caution: hot when in use
o This heater is hot when in use and for a short period after use.
o Do not let bare skin touch hot surfaces. If children are present,
o consider positioning the heater out of their reach.
TROUBLESHOOTING GUIDE
Gebrauchsanweisung ○ Mode d’emploi ○ Istruzioni per l’uso ○ Instruction for use
Page 44

DISPOSAL
o For proper disposal, the unit is to return to the dealer, the service agent or the
company Rotel AG.
Gebrauchsanweisung ○ Mode d’emploi ○ Istruzioni per l’uso ○ Instruction for use
Page 45

D / F / I / E
2 JAHRE GARANTIE
2 ANNÉE DE GARANTIE
2 ANNI DI GARANZIA
2 YEARS WARRANTY
o Garantieverpflichtung
Wir verpflichten uns, dieses Gerät kostenlos wieder instand zu setzen, falls es bei sachgemässer Behandlung innerhalb der
Garantiezeit versagen sollte. Wir beseitigen alle Mängel, die auf Material- oder Fabrikationsfehlern beruhen. Die
Garantieleistung erfolgt durch Instandsetzung oder Austausch mangelhafter Teile nach unserer Wahl. Eine Garantieleistung
entfällt für Schäden an Verschleissteilen, für Schäden und Mängel, die durch unsachgemässe Behandlung oder Wartung
auftreten (insbesondere Verkalkung und gewerblicher Einsatz). Sie wird nur gewährt, wenn entweder die Garantiekarte mit
Kaufdatum, Händlerstempel und Unterschrift versehen oder die Kaufquittung mit dem Gerät an die zutreffende Servicestation
eingesandt wird (siehe Adresse unten). Rücksendungen sollen in der Originalverpackung erfolgen. Transportkosten gehen zu
Lasten des Käufers. Bitte vergessen Sie nicht, der Sendung Ihre Adresse und, falls der Fehler nicht offensichtlich ist, eine
Erklärung beizufügen.
o Obligation de garantie
Nous nous engageons à réparer gratuitement cet appareil s'il devait tomber en panne durant la période de garantie, pour autant
que celui-ci ait été utilisé de manière appropriée. Nous éliminons toutes les défectuosités du à des vices de matière ou de
fabrication. La prestation de garantie se fait en effectuant une réparation ou en échangeant les pièces, selon notre choix. La
garantie n'est pas accordée pour les dommages survenant sur les pièces d'usure, pour les dommages et vices dus à une
manipulation ou un entretien inapproprié (en particulier l'entartrage et l'utilisation à des fins professionnelles). Elle n'est
accordée que si la date d'achat, le cachet du revendeur et la signature figurent sur carte de garantie ou si la quittance d'achat a
été retournée avec l'appareil au point de service compétent (voir adresse ci-dessous). Les renvois doivent se faire dans
l'emballage d'origine. Les frais de transport sont à la charge de l'ache-teur. Veuillez ne pas oublier d'indiquer votre adresse et,
si le défaut n'est pas évident, de joindre une explication à votre envoi.
o Impegno di garanzia
Ci impegniamo a riparare gratis questo apparecchio, qualora – malgrado un uso corretto - si fosse gua-stato durante il periodo
di garanzia. Eliminiamo tutti i difetti causati da difetti del materiale o di fabbrica. La prestazione di garanzia avviene con il
ripristino o la sostituzione di pezzi difettosi a nostra discrezione. Una prestazione di garanzia decade nel caso di danni a pezzi
soggetti a usura, di danni e difetti dovuti a trattamento o a manutenzione non corretti (in particolare calcificazione e utilizzo
industriale). Viene concessa solo se la cartolina di garanzia munita della data d’acquisto, del timbro del rivenditore e della firma
o la ricevuta d’acquisto e l’apparecchio vengono inviati al rispettivo servizio di assistenza (vedi indirizzo in basso). L’invio deve
avvenire nell’imballaggio originale. Le spese di trasporto sono a carico dell’acquirente. Non dimenticatevi p.f. di allegare all’invio
il vostro indirizzo e, qualora il difetto non fosse chiaro, anche una spiegazione.
o Warranty commitment
We commit ourselves to repairing this device for free provided it has been handled properly and a failure has occured within
the period of warranty. We repair all defects caused by material or manufacturing faults. The warranty will be performed by
repair or replacement of defective parts at our discretion. A warranty does not cover damage due to parts worn-off and damage
and defects that occur due to improper usage, treatment or maintenance (particularly calcification and commercial use). A
warranty will only be granted if the warranty card showing the date of purchase, dealer's stamp and signature or the purchase
receipt together with the device is sent to the relevant service station (see address below). Returns are to be made in the
original package. Transport costs will be borne by the purchaser. Please do not forget to state your address and, should the
error not be obvious, include an explanation together with your parcel.
Servicestation:
Service après-vente: Rotel AG
Servizio Assistenza: Parkstrasse 43 Telefon 062 787 77 00
Service station: 5012 Schönenwerd E-mail: office@rotel.ch
Gebrauchsanweisung ○ Mode d’emploi ○ Istruzioni per l’uso ○ Instruction for use
 Loading...