

Rotel Surround Sound Receiver RSX-1055 Owner's Manual

Owner’s Manual
RSX-1055
Surround Sound Receiver
2CH
DOLBY
PLII/3ST
DTS
NEO 6 DSP
MULTI
INPUT
DYNAMIC
RANGE RECZONE
CD TUNER TAPE
SURROUND SOUND RECEIVER RSX-1055
POWER
VIDEO1 VIDEO2 VIDEO3 VIDEO5VIDEO4
6 7 8 9 0 DIRECT MEMORYMONO
12345
TUNING
VOLUME
BAND

Notice
The COMPUTER I/O connection should be handled by authorized person
only.
FCC Information
This equipment has been tested and found to comply with the limits for a
Class B digital device, pursuant to Part 15 of the FCC Rules. These limits
are designed to provide reasonable protection against harmful interference
in a residential installation. This equipment generates, uses and can radiate radio frequency energy and, if not installed and used in accordance
with the instruction, may cause harmful interference to radio communications.
However, there is no guarantee that interference will not occur in a particular installation. If this equipment does cause harmful interference to radio
or television reception, which can be determined by turning the equipment
off and on, the user is encouraged to try to correct the interference by one
or more of the following measures:
• Reorient or relocate the receiving antenna.(TV, radio, etc.)
• Increase the separation between the equipment and receiver
• Connect the equipment to an outlet on circuit different from that to which
the receiver is connected.
• Consult the dealer or an experienced radio/TV technician for additional
help.
Caution
This device complies with part 15 of the FCC Rules operation is subject to
the following to conditions: (1) This device may not cause harmful interference, and (2) this device must accept any interference received, including
interference that may cause undesired operation.

Important Safety Instructions
WARNING: There are no user serviceable parts inside. Refer
all servicing to qualified service personnel.
WARNING: To reduce the risk of fire or electric shock, do not
expose the unit to moisture or water. Do not allow foreign
objects to get into the enclosure. If the unit is exposed to moisture,
or a foreign object gets into the enclosure, immediately disconnect the power cord from the wall. Take the unit to a qualified
service person for inspection and necessary repairs.
Read all the instructions before connecting or operating the component.
Keep this manual so you can refer to these safety instructions.
Heed all warnings and safety information in these instructions and on the
product itself. Follow all operating instructions.
Clean the enclosure only with a dry cloth or a vacuum cleaner.
You must allow 10 cm or 4 inches of unobstructed clearance around the
unit. Do not place the unit on a bed, sofa, rug, or similar surface that could
block the ventilation openings. If the unit is placed in a bookcase or cabinet, there must be ventilation of the cabinet to allow proper cooling.
Keep the component away from radiators, heat registers, stoves, or any
other appliance that produces heat.
The unit must be connected to a power supply only of the type and voltage
specified on the rear panel. (USA: 115 V/60Hz, EC: 230V/50Hz)
Connect the component to the power outlet only with the supplied power
supply cable or an exact equivalent. Do not modify the supplied cable. Do
not defeat grounding and/or polarization provisions. The cable should be
connected to a 2-pin polarized wall outlet, matching the wide blade of the
plug to the wide slot of the receptacle. Do not use extension cords.
Do not route the power cord where it will be crushed, pinched, bent, exposed to heat, or damaged in any way. Pay particular attention to the power
cord at the plug and where it exits the back of the unit.
The power cord should be unplugged from the wall outlet if the unit is to be
left unused for a long period of time.
Immediately stop using the component and have it inspected and/or serviced by a qualified service agency if:
• The power supply cord or plug has been damaged.
• Objects have fallen or liquid has been spilled into the unit.
• The unit has been exposed to rain.
• The unit shows signs of improper operation
• The unit has been dropped or damaged in any way
NOTE TO CATV SYSTEM INSTALLER: Call the CATV system or antenna
installer’s attention to Article 820-40 of the NEC. This provides guidelines
for proper grounding and, in particular, specifies that the cable ground
shall be connected to the grounding system of the building, as close to the
point of cable entry as practical. See installation diagram.
NOTE: This equipment has been tested and found to comply with the limits for a Class B digital device, pursuant to Part 15 of the FCC Rules. These
limits are designed to provide reasonable protection against interference
in a residential installation. This equipment generates and can radiate radio frequency energy and, if not installed and used in accordance with
the instructions, may cause interference to radio or TV communications.
There is no guarantee that interference will not occur in a particular installation. If this equipment does cause interference to radio or television reception, which can be determined by turning the equipment off and on,
try to correct the interference by one or more of the following measures:
• Reorient or relocate the receiving antenna.
• Increase the separation between the unit and the television tuner.
• Connect the unit to an AC power outlet on a different electrical circuit.
• Consult your authorized Rotel retailer for assistance.

4
RSX-1055 Surround Sound Receiver
1: Controls and Connections
SPEAKERS
FRONT/CB
R/2
SURROUND
L
R
CENTER
L/1
SURROUND SOUND RECEIVER
MODEL NO. RSX-1055
POWER CONSUMPTION: 450 WATTS
21321435IN OUT
MONITOR
OUT
COMPOSITE IN COMPOSITE OUT
VIDEO OUT
23451231
VIDEO INTAPECD
INPUT
L
R
PREOUT
DIGITAL INPUT
DIGITAL
OUPUT
21
COAXIAL
COAXIAL OPTICAL
3
21
OPTICAL
L
R
REARCB1FRONT CTR1SUB1
CB2 CTR2SUB2
COMPUTER
I/O
23451
S-VIDEO IN S-VIDEO OUT
213
12V TRIG
OUT
1
2
ZONE REM EXT REM
IR
OUT
1
2
L
R
ZONE
OUT
CB1
REAR LFRONT L
CENTER
REAR R SUBFRONT R
MULTI INPUT
Y
C
R
C
B
21
IN
MONITOR
OUT
COMPONENT VIDEO
SOFTWARE
UPGRADABLE
OFF
ON
S.C.
IR
ANTENNA
2CH
DOLBY
PLII/3ST
DTS
NEO 6 DSP
MULTI
INPUT
DYNAMIC
RANGE RECZONE
CD TUNER TAPE
SURROUND SOUND RECEIVER RSX-1055
POWER
VIDEO1 VIDEO2 VIDEO3 VIDEO5VIDEO4
6 7 8 9 0 DIRECT MEMORYMONO
12345
TUNING
VOLUME
BAND
63 4 51 2
7 8 9 10 11 15141312 17
16
1918
20 2322
32
33
2921 28 3130272625
3936 403837 4341
34 35
42
24

5
2: RR-969 Remote
TIME/ALMMACRO LEARNEDIT/ CLONE
LANG
PAGE 1/2
CLEAR RESETPRELOAD
SHIFT ZONE
SELECT
DYNMC
FILTER
EXT IN BACK SCAN SUR +
CD
TUN
PH
TAPE1 TAPE2
V1 V2 V3 V4 V5
S
R
CM
-
+
UP
DWN
ENT
POWER
AUD TV SAT VCR DVD
CD TUN AV 1 AV 2 AV 3
DISPLAY
123
456
789
+10
0
X
BAND MUTE
TV/VCR
SWAPPIP POS ANT MODE
INPUT1 INPUT2 INPUT3
RECORD
DVD
SETUP AUDIO ANGLE
SUBTITLE
TITLE
ZOOM CLEAR MODE
CONDITION DISPLAY
CH VOL
PLAY
TRACK
STOPPAUSE
GUIDE
INPUT
MENU
PREV CH
OSD
SEARCH +
SEARCH –
TUNER
FM
MONO
DIRECT
FM
NARROW
SHIFT
PTY TA
TP
FILTER
EXT IN ZONE
PRESET
SUR +
DISPLAY
CD
TUN
PH
TAPE1 TAPE2
V1 V2 V3 V4 V5
TV/VCR
SWAPPIP POS ANT MODE
INPUT1 INPUT2 INPUT3
TV/VCR RECORD
TUNER
FM
MONO
DIRECT
FM
NARROW
SHIFT
PTY TA
TP
FILTER
EXT IN ZONE
PRESET
SUR +
DISPLAY
CD
TUN
PH
TAPE1 TAPE2
V1 V2 V3 V4 V5
TV/VCR
SWAPPIP POS ANT MODE
INPUT1 INPUT2 INPUT3
TV/VCR RECORD
CD
TUN
PH
TAPE1 TAPE2
V1 V2 V3 V4 V5
CD
DISC1 DISC2 DISC3 DISC4 DISC5
PROGRAM RANDOM
REPEAT DISC DISC+
SHIFT
PTY TA
TP
FILTER
EXT IN ZONE
PRESET
SUR +
DISPLAY
DVD
SETUP AUDIO ANGLE
SUBTITLE
TITLE
ZOOM CLEAR MODE
CONDITION
A
F
Z
B
S
D
Q
P
T
N
L
H
I
G
C
E
W
X
U
V
O
M
J
Y
R
K
6
RSX-1055 Surround Sound Receiver
INPUT
SPEAKERS
FRONT/CB
R/2
SURROUND
L
R
CENTER
L/1
SURROUND SOUND RECEIVER
MODEL NO. RSX-1055
POWER CONSUMPTION: 450 WATTS
21321435IN OUT
MONITOR
OUT
COMPOSITE IN COMPOSITE OUT
VIDEO OUT
23451231
VIDEO INTAPECD
INPUT
L
R
PREOUT
DIGITAL INPUT
DIGITAL
OUPUT
21
COAXIAL
COAXIAL OPTICAL
3
21
OPTICAL
L
R
REARCB1FRONT CTR1SUB1
CB2 CTR2SUB2
L
R
REARCBFRONT CTR
COMPUTER
I/O
23451
S-VIDEO IN S-VIDEO OUT
213
12V TRIG
OUT
1
2
ZONE REM EXT REM
IR
OUT
1
2
L
R
ZONE
OUT
CB1
REAR LFRONT L
CENTER
REAR R SUBFRONT R
MULTI INPUT
Y
C
R
C
B
21
IN
MONITOR
OUT
COMPONENT VIDEO
SOFTWARE
UPGRADABLE
OFF
ON
S.C.
IR
ANTENNA
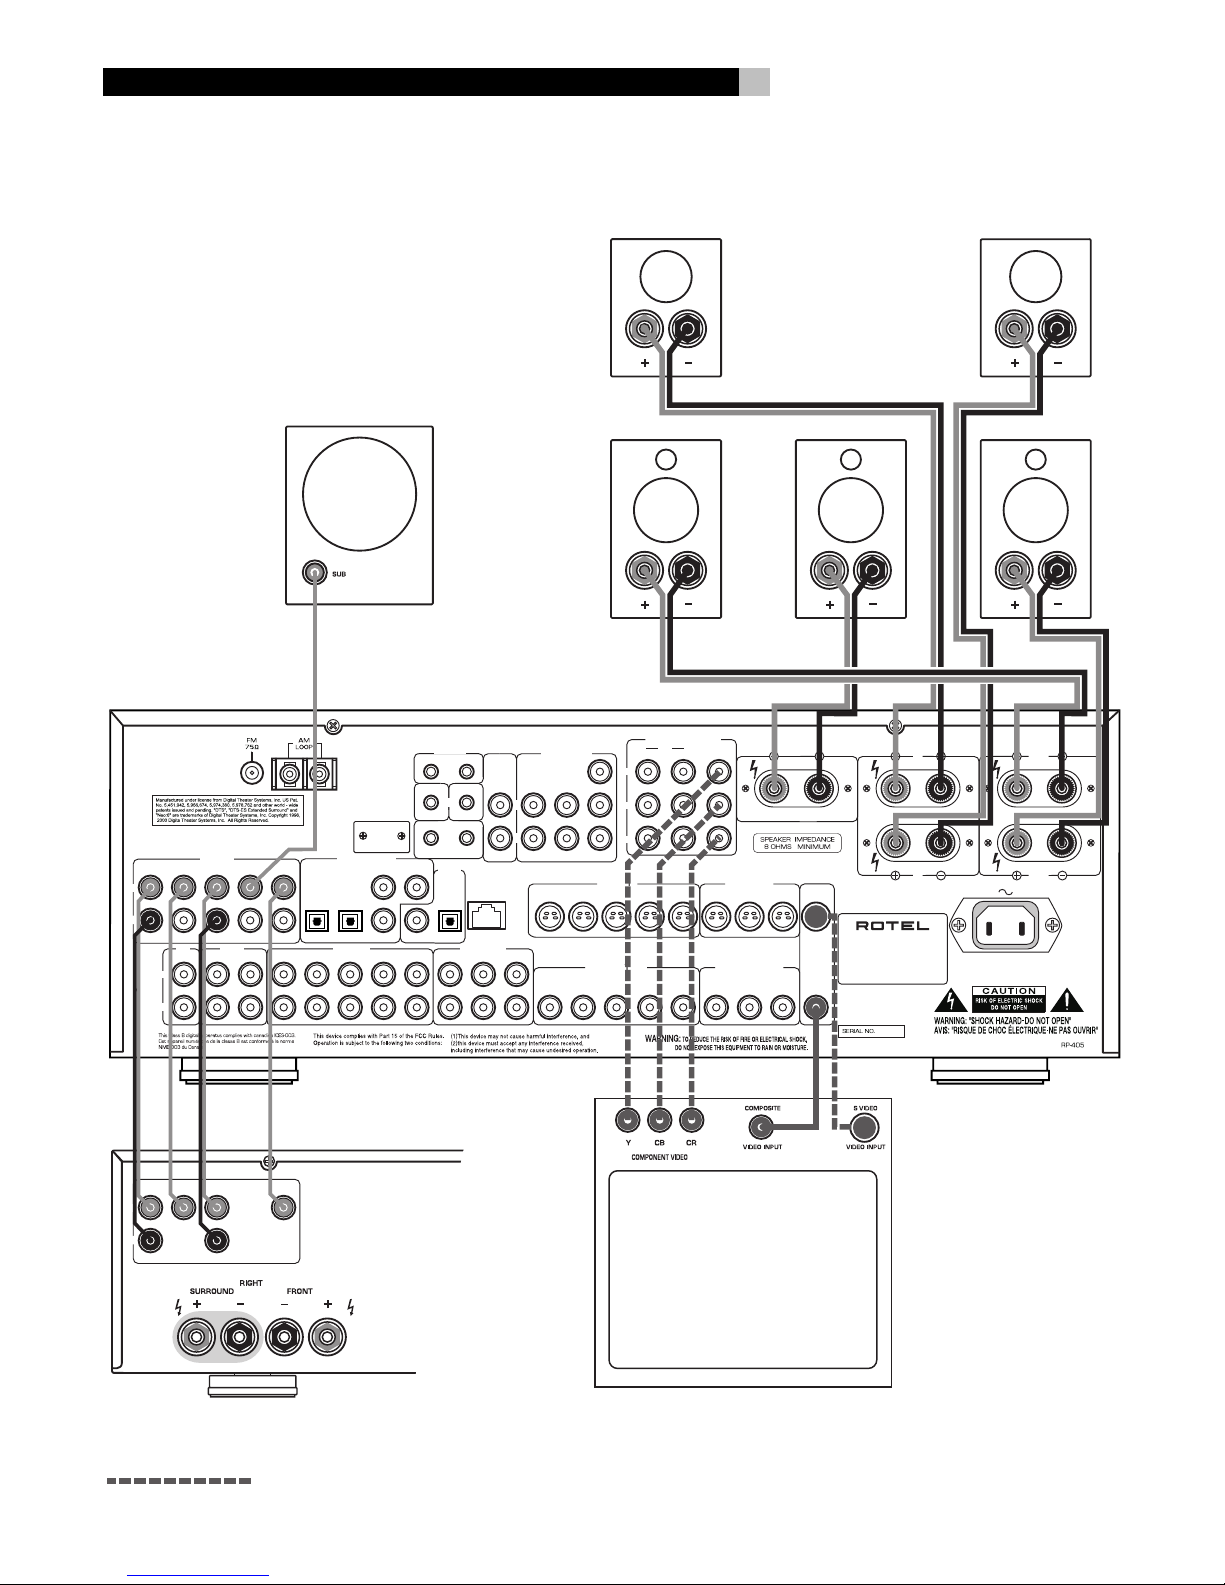
Alternate Video Connections
SUBWOOFER
TV
RIGHT FRONTLEFT FRONT
LEFT REAR RIGHT REAR
CENTER
3: Outputs

7
SPEAKERS
FRONT/CB
R/2
SURROUND
L
R
CENTER
L/1
SURROUND SOUND RECEIVER
MODEL NO. RSX-1055
POWER CONSUMPTION: 450 WATTS
21321435IN OUT
MONITOR
OUT
COMPOSITE IN COMPOSITE OUT
VIDEO OUT
23451231
VIDEO INTAPECD
INPUT
L
R
PREOUT
DIGITAL INPUT
DIGITAL
OUPUT
21
COAXIAL
COAXIAL OPTICAL
3
21
OPTICAL
L
R
REARCB1FRONT CTR1SUB1
CB2 CTR2SUB2
COMPUTER
I/O
23451
S-VIDEO IN S-VIDEO OUT
213
12V TRIG
OUT
1
2
ZONE REM EXT REM
IR
OUT
1
2
L
R
ZONE
OUT
CB1
REAR LFRONT L
CENTER
REAR R SUBFRONT R
MULTI INPUT
Y
C
R
C
B
21
IN
MONITOR
OUT
COMPONENT VIDEO
SOFTWARE
UPGRADABLE
OFF
ON
S.C.
IR
ANTENNA
L
R
L
R
REC
IN
LINE
OUT
L
R
REC
IN
LINE
OUT
REC
IN
LINE
OUT
AUDIO
S-VIDEO
COMPOSITE
VIDEO
ANALOG
OUTPUT
L
R
AUDIO
OUTPUT
DIGITAL
OUTPUT
S-VIDEO
COMPOSITE
VIDEO
OUTPUTS
COMPONENT VIDEO
Y
C
R
C
B
4: Source Connections
Alternate Video Connections
VCR
DVD
ROTEL RSX-1055
CD
TAPE

8
RSX-1055 Surround Sound Receiver
SPEAKERS
FRONT/CB
R/2
SURROUND
L
R
CENTER
L/1
SURROUND SOUND RECEIVER
MODEL NO. RSX-1055
POWER CONSUMPTION: 450 WATTS
21321435IN OUT
MONITOR
OUT
COMPOSITE IN COMPOSITE OUT
VIDEO OUT
23451231
VIDEO INTAPECD
INPUT
L
R
PREOUT
DIGITAL INPUT
DIGITAL
OUPUT
21
COAXIAL
COAXIAL OPTICAL
3
21
OPTICAL
L
R
REARCB1FRONT CTR1SUB1
CB2 CTR2SUB2
COMPUTER
I/O
23451
S-VIDEO IN S-VIDEO OUT
213
12V TRIG
OUT
1
2
ZONE REM EXT REM
IR
OUT
1
2
L
R
ZONE
OUT
CB1
REAR LFRONT L
CENTER
REAR R SUBFRONT R
MULTI INPUT
Y
C
R
C
B
21
IN
MONITOR
OUT
COMPONENT VIDEO
SOFTWARE
UPGRADABLE
OFF
ON
S.C.
IR
ANTENNA
5: Zone 2 Connections
ROTEL RSX-1055
CD
AMPLIFIER
ZONE 2 IR
LEFTRIGHT

9
6: Antenna
SPEAKERS
FRONT/CB
R/2
SURROUND
L
R
CENTER
L/1
SURROUND SOUND RECEIVER
MODEL NO. RSX-1055
POWER CONSUMPTION: 450 WATTS
21321435IN OUT
MONITOR
OUT
COMPOSITE IN COMPOSITE OUT
VIDEO OUT
23451231
VIDEO INTAPECD
INPUT
L
R
PREOUT
DIGITAL INPUT
DIGITAL
OUPUT
21
COAXIAL
COAXIAL OPTICAL
3
21
OPTICAL
L
R
REARCB1FRONT CTR1SUB1
CB2 CTR2SUB2
COMPUTER
I/O
23451
S-VIDEO IN S-VIDEO OUT
213
12V TRIG
OUT
1
2
ZONE REM EXT REM
IR
OUT
1
2
L
R
ZONE
OUT
CB1
REAR LFRONT L
CENTER
REAR R SUBFRONT R
MULTI INPUT
Y
C
R
C
B
21
IN
MONITOR
OUT
COMPONENT VIDEO
SOFTWARE
UPGRADABLE
OFF
ON
S.C.
IR
ANTENNA
10
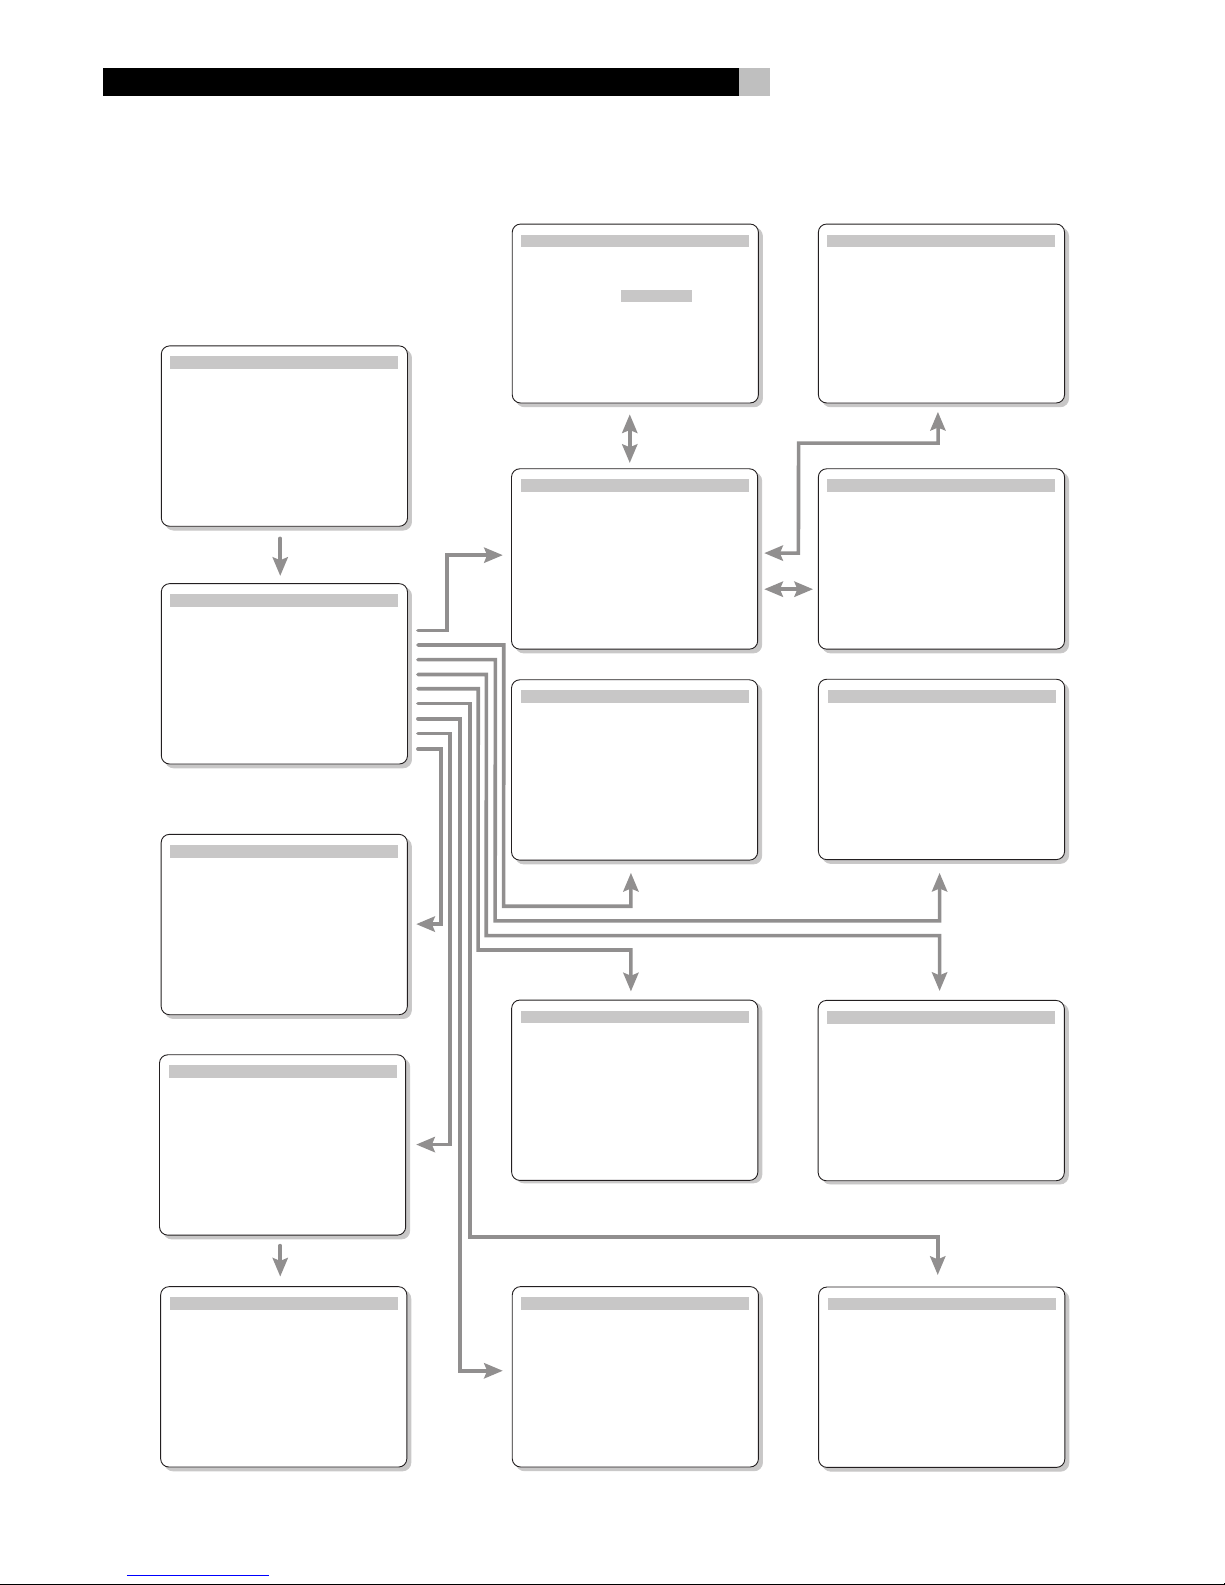
7: On-Screen Display Menus
TEST TONE
LEFT: 0dB
CENTER: 0dB
RIGHT: 0dB
R SURROUND: 0dB
CENTER BACK: 0dB
L SURROUND: 0dB
SUBWOOFER: 0dB
ENT KEY=MAIN MENU UP KEY=up
+/– KEY=change DWN KEY=down
SUB SETUP
CROSSOVER: 100HZ
DOLBY: 0dB
DTS: 0dB
STEREO: 0dB
MUSIC: 0dB
MULTI INPUT: 0dB
ENT KEY=MAIN MENU UP KEY=up
+/– KEY=change DWN KEY=down
SYSTEM STATUS
LISTEN: VIDEO 1
RECORD: Tuner
MODE: Dolby Digital 2CH
INPUT: Coaxial 1
VOLUME: 45
ZONE: Off
ENT KEY=MAIN MENU
OSD KEY=EXIT
MAIN MENU
INPUT SPEAKER
DELAY TEST TONE
SUB LEVEL ZONE 2
OTHER DEFAULT SETUP
TONE
ENT KEY=ENTER
UP KEY=up DWN KEY=down
INPUT SETUP
LISTEN: Video 2
INPUT LABEL: _ _ _ _ _
INPUT: Coaxial 1
SURR MODE: Dolby 3 Stereo
ENT KEY=MAIN MENU UP KEY=up
+/– KEY=change DWN KEY=down
SPEAKER SETUP
FRONT: Large
CENTER: Large
SURROUND: Large
CENTER BACK: Large
SUBWOOFER: Yes
CB SPKR SEL: 1 SPEAKER
ENT KEY=MAIN MENU UP KEY=up
+/– KEY=change DWN KEY=down
TONE SETUP
BASS: +10
TREBLE: 0
ENT KEY=MAIN MENU UP KEY=up
+/– KEY=change DWN KEY=down
DELAY SETUP
Dolby D Dolby
/DTS Pro LogicII
CENTER: 1ms
R SURROUND: 15ms 25ms
L SURROUND: 15ms 25ms
CNTR-BACK: 15ms 25ms
ENT KEY=MAIN MENU UP KEY=up
+/– KEY=change DWN KEY=down
INPUT SETUP
LISTEN: Video 2
INPUT LABEL: _ _ _ _ _
INPUT: Coaxial 2
SURR MODE: Dolby 3 Stereo
ENT KEY=ENTER
+/– KEY=char
DOLBY PRO LOGIC II
MODE: Music
OPTIONAL PARAMETERS
PANORAMA: Off
DIMENSION: 3
CENTER WIDTH: 0
ENT KEY=input setup UP KEY=up
+/– KEY=change DWN KEY=down
DTS Neo:6
MODE: CINEMA
ENT KEY=input setup
+/– KEY=change
OTHER OPTIONS
RECORD: CD
DYNAMIC: Max
MULTI INPUT: Off
CINEMA EQ: Off
POWER: Direct
OSD: On
LANGUAGE: ENGLISH
ENT KEY=MAIN MENU UP KEY=up
+/– KEY=change DWN KEY=down
DEFAULT SETUP
TUNER SETTING: N. AMERICA
REDIRECT: FRONT
FACTORY DEFAULT: No
USER DEFAULT: No
USER DEFAULT SET: No
ENT KEY=MAIN MENU UP KEY=up
+/– KEY=change DWN KEY=down
DEFAULT SETUP
TUNER SETTING: N. AMERICA
REDIRECT: FRONT
FACTORY DEFAULT: Yes
USER DEFAULT: No
USER DEFAULT SET: No
ENT KEY=Exec. UP KEY=up
+/– KEY=change DWN KEY=down
ZONE2 SETUP
SOURCE: CD
VOLUME SETUP: Variable
VOLUME: 20
ENT KEY=MAIN MENU UP KEY=up
+/– KEY=change DWN KEY=down
RSX-1055 Surround Sound Receiver

11
English
Contents
Boxed numbers refer to RSX-1055 illustration.
Boxed letters refer to RR-969 illustration.
About Rotel .........................................12
Getting Started .................................... 12
Key Features ................................................... 12
Unpacking ....................................................... 13
Placement ....................................................... 13
RR-969 Remote Control .......................13
Using the RR-969 ...................................... 13
Programming the RR-969
PRELOAD Button ....................................... 13
Basic Controls ...................................... 13
POWER Button .................................... 13
Remote Sensor .......................................... 13
Front-panel Display ................................... 13
Volume Control .................................. 14
MUTE Button ............................................. 14
Tone Adjustments ............................... 14
FILTER Button ............................................ 14
MENU Button ............................................ 14
ENTER Button ............................................ 14
Input Controls ......................................14
Input Source Buttons .......................... 14
REC Button
ZONE Button ............................................. 15
MULTI Input
EXT IN ...................................................... 15
Overview of Surround Formats .............15
Dolby Surround
Dolby Pro Logic ............................................... 15
Dolby Digital ................................................... 15
DTS 5.1 ........................................................... 16
6.1 and 7.1 Surround ...................................... 16
Other Formats ................................................. 16
DSP (Digital Signal Processing) ........................ 16
Surround Controls ...............................17
Automatic Surround Modes .............................. 17
Manually Selecting
Surround Modes .............................................. 17
2CH Button ............................................... 17
DOLBY PLII/3ST Button ............................. 17
DTS Neo:6 Button ..................................... 18
DSP Button ............................................... 18
Setting Surround Modes from the Remote
SUR+ Button ............................................. 18
Speaker Level Adjustment
Selection Buttons
UP/DOWN Buttons .................................... 18
DYNAMIC RANGE Button
DWN Button .............................................. 19
Tuner Controls ......................................19
BAND Button ...................................... 19
TUNING Buttons ................................. 19
MEMORY Button ........................................ 19
NUMERIC Buttons: Station Presets ....... 19
DIRECT Button .................................... 20
MONO Button ........................................... 20
PRESET Button .......................................... 20
RDS and RBDS Broadcast Reception ...... 20
DISPLAY Button ......................................... 20
PTY Button ................................................ 21
TP Button .................................................. 21
TA Button .................................................. 21
Connections: Overview .........................21
Video Connections ............................................ 21
Audio Source Connections ..................... 22
CD Inputs .................................................. 22
TAPE Inputs and Outputs ........................... 22
Video Source Inputs.............................. 22
VIDEO 1–5 Audio Inputs ........................... 22
VIDEO 1–5 Composite Video Inputs ........... 22
VIDEO 1–5 S-Video Inputs ......................... 22
VIDEO 1–2 Component Video Inputs ......... 22
MULTI Inputs ............................................. 23
Video Source Outputs ...........................23
VIDEO 1–3 Audio Outputs ......................... 23
VIDEO 1–3 Composite Video Outputs ......... 23
VIDEO 1–3 S-Video Outputs ...................... 23
Digital Source Connections ....................23
Digital Inputs ............................................ 23
Digital Outputs .......................................... 23
Output Signal Connections ....................24
TV Monitor Output .............................. 24
Speaker Outputs ....................................... 24
Preamp Outputs ........................................ 24
Antenna Connections ............................ 24
AM Antenna .............................................. 25
FM Antenna .............................................. 25
Power and Miscellaneous Connections ...25
AC Input ................................................... 25
12V TRIGGER Connections ......................... 25
EXTERNAL REM IN ..................................... 25
Computer I/O ........................................... 25
Zone 2 Connection and Operation ..........25
Zone 2 Power On/Off Operation ...................... 26
Controlling Zone 2 from the Main Room
ZONE Button ............................................. 26
Controlling Zone 2 from the Remote Location... 26
Zone 2 Audio Outputs ............................... 26
ZONE REM IN Jack .................................... 27
IR OUT Jacks ............................................. 27
On-Screen Display and
System Configuration ........................... 27
Navigation Buttons ............... 27
SYSTEM STATUS Menu ...................................... 28
MAIN Menu ..................................................... 28
INPUT Menu .................................................... 28
DTS Neo:6 Sub-Menu
DOLBY PRO LOGIC II Sub-Menu ........................ 29
SPEAKER SETUP Menu ...................................... 29
TEST TONE Menu .............................................. 31
DELAY SETUP Menu.......................................... 31
SUBWOOFER SETUP Menu ................................ 32
TONE SETUP Menu ........................................... 32
OTHER OPTIONS Menu ..................................... 33
DEFAULT SETUP Menu ...................................... 33
ZONE 2 SETUP Menu ........................................ 34
Specifications .......................................35
Audio .............................................................. 35
Video ............................................................... 35
FM Tuner ......................................................... 35
AM Tuner......................................................... 35
General ........................................................... 35
 Loading...