

Page 1

Owner’s manual
Manuel d’utilisation
Bedienungsanleitung
Manuale di istruzioni
Manual de instrucciones
Gebruiksaanwijzing
RT-1080
AM/FM Stereo Tuner
Tuner Stéréophonique AM/FM
AM/FM-Stereo-Tuner
Sintonizzatore Stereo AM/FM
Sintonizador Estereofónico de AM/FM
Middengolf/FM Stereo Afstemeenheid
POWER
PTY
TA TP
ANT
AFDISPLAY
ATT
ANT
FM IF
A/B
NARROWFMMONO
AM/FM STEREO TUNER RT-1080
UP
DOWN
12345
67890
AUTO
PRESET
TUNE
TUNING
SCAN
/PRESET
BANDMEMORY
Page 2
Owner’s manual 8
Manuel d’utilisation 14
Bedienungsanleitung 23
Manuale di istruzioni 30
Manual de instrucciones 38
Gebruiksaanwijzing 47
Page 3

English
WARNING: There are no user serviceable parts inside. Refer
all servicing to qualified service personnel.
WARNING: To reduce the risk of fire or electric shock, do not
expose the unit to moisture or water. Do not allow foreign
objects to get into the enclosure. If the unit is exposed to moisture,
or a foreign object gets into the enclosure, immediately disconnect the power cord from the wall. Take the unit to a qualified
service person for inspection and necessary repairs.
Read all the instructions before connecting or operating the component.
Keep this manual so you can refer to these safety instructions.
Heed all warnings and safety information in these instructions and on the
product itself. Follow all operating instructions.
Clean the enclosure only with a dry cloth or a vacuum cleaner.
You must allow 10 cm or 4 inches of unobstructed clearance around the
unit. Do not place the unit on a bed, sofa, rug, or similar surface that could
block the ventilation slots. If the component is placed in a bookcase or cabinet,
there must be ventilation of the cabinet to allow proper cooling.
Keep the component away from radiators, heat registers, stoves, or any
other appliance that produces heat.
The unit must be connected to a power supply only of the type and voltage
specified on the rear panel of the unit.
Connect the component to the power outlet only with the supplied power
supply cable or an exact equivalent. Do not modify the supplied cable in
any way. Do not attempt to defeat grounding and/or polarization provisions. Do not use extension cords.
Do not route the power cord where it will be crushed, pinched, bent at severe angles, exposed to heat, or damaged in any way.
The power cord should be unplugged from the wall outlet if the unit is to be
left unused for a long period of time.
Immediately stop using the component and have it inspected and/or serviced by a qualified service agency if:
• The power supply cord or plug has been damaged.
• Objects have fallen or liquid has been spilled into the unit.
• The unit has been exposed to rain.
• The unit shows signs of improper operation
• The unit has been dropped or damaged in any way
Place the unit on a fixed, level surface strong enough to support its weight.
Do not place it on a moveable cart that could tip over.
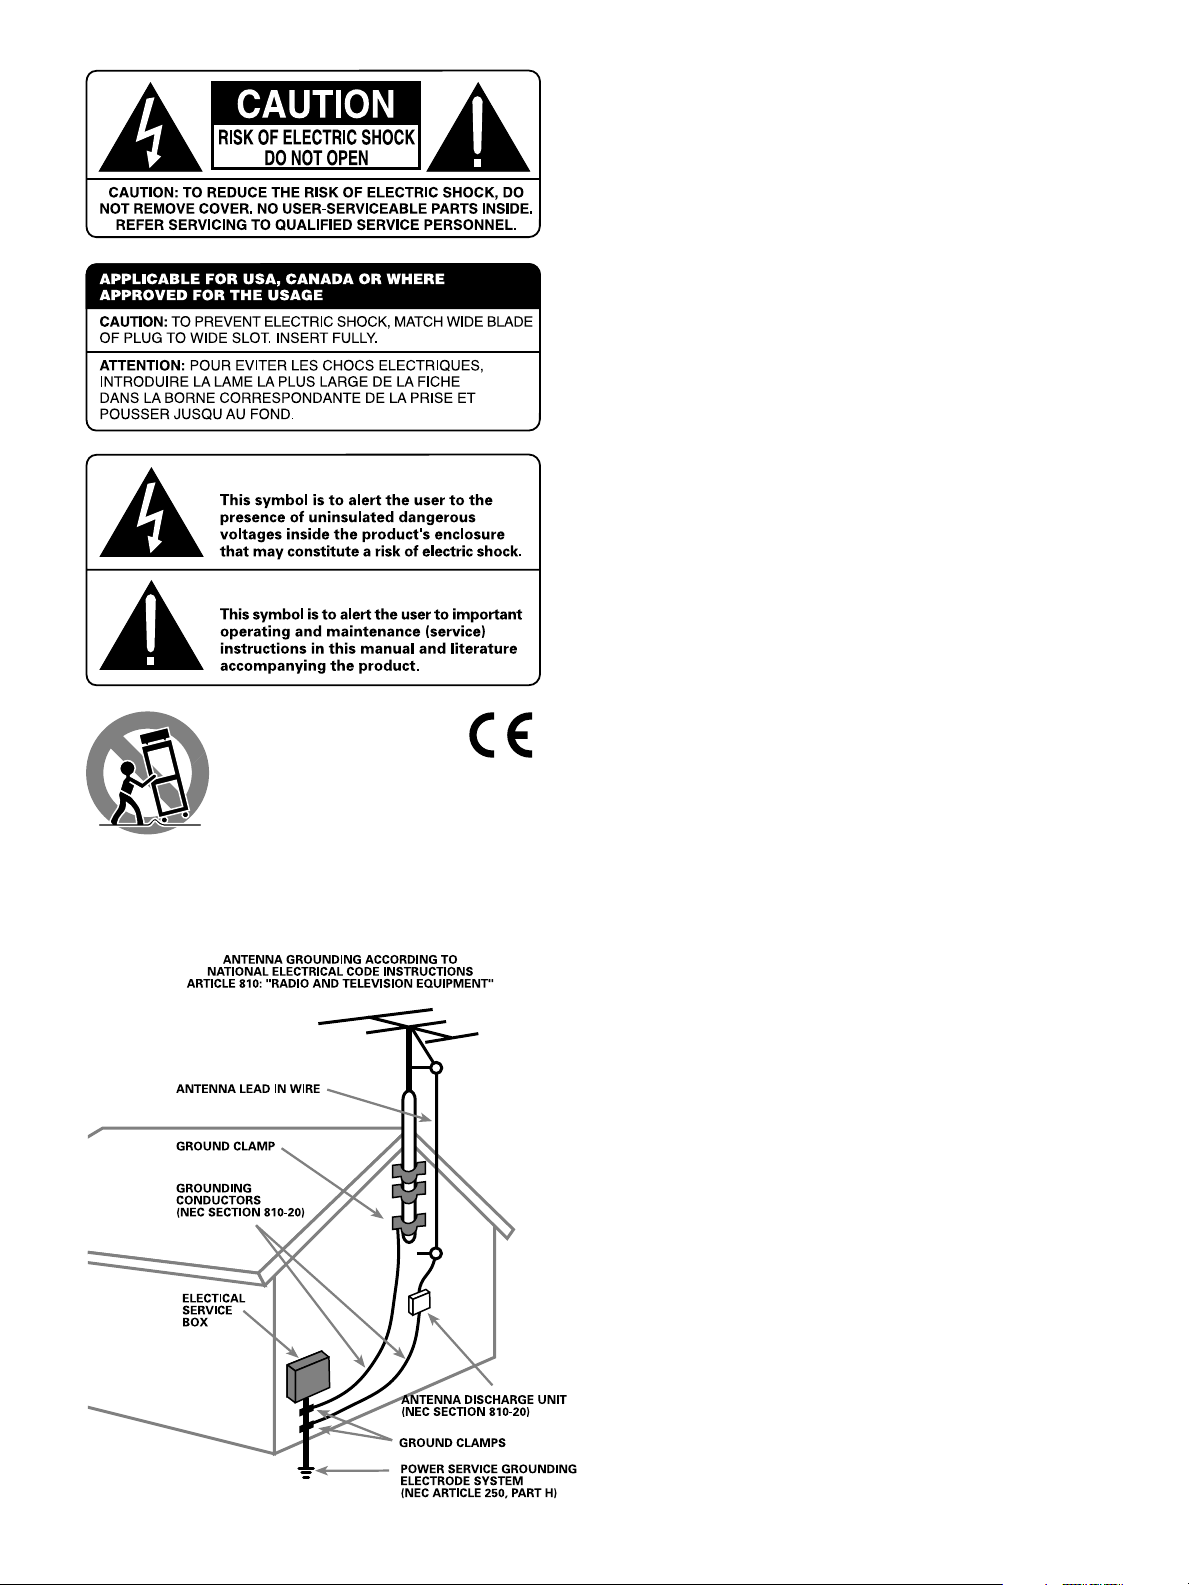
NOTE TO CATV SYSTEM INSTALLER: Call the CATV system or antenna
installer’s attention to Article 820-40 of the NEC. This provides guidelines
for proper grounding and, in particular, specifies that the cable ground shall
be connected to the grounding system of the building, as close to the pint
of cable entry as practical. See installation diagram.
NOTE: This equipment has been tested and found to comply with the limits
for a Class B digital device, pursuant to Part 15 of the FCC Rules. These
limits are designed to provide reasonable protection against interference
in a residential installation. This equipment generates and can radiate radio frequency energy and, if not installed and used in accordance with the
instructions, may cause interference to radio or TV communications. There
is no guarantee that interference will not occur in a particular installation.
If this equipment does cause interference to radio or television reception,
which can determined by turning the equipment off and on, try to correct
the interference by one or more of the following measures:
• Reorient or relocate the receiving antenna.
• Increase the separation between the unit and the television tuner.
• Connect the unit to an AC power outlet on a different electrical circuit.
• Consult your authorized Rotel retailer for assistance.
Français
Explication des symboles graphiques
L’éclair dans un triangle équilatéral indique la présence interne de tensions
électriques élevées susceptibles de présenter des risques graves d’électrocution.
ATTENTION : POUR RÉDUIRE LE RISQUE D’ÉLECTROCUTION, NE PAS
RETIRER LE CAPOT. IL N’Y A À L’INTÉRIEUR AUCUNE PIÈCE SUSCEPTIBLE
D’ÊTRE MODIFIÉE PAR L’UTILISATEUR. EN CAS DE PROBLÈME, ADRESSEZVOUS À UN RÉPARATEUR AGRÉÉ.
Le point d’exclamation dans un triangle équilatéral indique à l’utilisateur
la présence de conseils et d’informations importantes dans le manuel
d’utilisation accompagnant l’appareil. Leur lecture est impérative.
ATTENTION: Il n’y a à l’intérieur aucune pièce susceptible d’être modifiée
par l’utilisateur. Adressez-vous impérativement à une personne qualifiée.
ATTENTION: Prenez garde à ce qu’aucun objet ou liquide ne tombe à
l’intérieur de l’appareil par ses orifices de ventilation ; Si l’appareil est exposé
à l’humidité ou si un objet tombe à l’intérieur, couper immédiatement
l’alimentation secteur de tous les appareils. Débrancher l’appareil des autres
maillons, et adressez-vous immédiatement et uniquement à une personne
qualifiée et agréée.
Lisez les instructions: Tous les conseils de sécurité et d’installation doivent
être lus avant de faire fonctionner l’appareil. Conservez soigneusement ce
livret - Vous devez pouvoir le consulter à nouveau pour de futures références.
Respectez tous les conseils: Tous les conseils de sécurité doivent être
soigneusement respectés. Suivez les instructions - Respectez les procédures
d’installation et de fonctionnement indiquées dans ce manuel.
Entretien: L’appareil doit être nettoyé uniquement selon les recommandations
de son constructeur.
Ventilation: L’appareil doit être placé de telle manière que sa propre
ventilation puisse fonctionner. Par exemple, il ne doit pas être posé sur un
fauteuil, un canapé, une couverture ou toute autre surface susceptible de
boucher ses ouïes d’aération ; ou placé dans un meuble empêchant la bonne
circulation d’air autour des orifices d’aération.
Chaleur: Cet appareil doit être placé loin de toute source de chaleur, tels
que radiateurs, chaudières, bouches de chaleur ou d’autres appareils (y
compris amplificateurs de puissance) produisant de la chaleur.
Cet appareil doit être branché sur une prise d’alimentation secteur, d’une
tension et d’un type conformes à ceux qui sont indiqués sur la face arrière
de l’appareil.
Brancher l’appareil uniquement grâce au cordon secteur fourni, ou à un
modèle équivalent. Ne pas tenter de modifier ou changer la prise. Notamment,
ne pas tenter de supprimer la prise de terre si celle-ci est présente. Ne pas
utiliser de cordon rallonge.
Prendre garde à ce que ce cordon d’alimentation ne soit pas pincé, écrasé
ou détérioré sur tout son trajet, à ce qu’il ne soit pas mis en contact avec
une source de chaleur. Vérifier soigneusement la bonne qualité des contacts,
à l’arrière de l’appareil comme dans la prise murale.
Si l’appareil ne doit pas être utilisé pendant une longue période, la prise
secteur sera débranchée.
Service après vente: L’appareil doit être immédiatement éteint, débranché
puis éventuellement retourné au service après-vente agréé dans les cas suivants:
• Le cordon secteur ou la prise ont été endommagés.
• Un objet est tombé, ou du liquide a coulé à l’intérieur de l’appareil.
• L’appareil a été exposé à la pluie.
• L’appareil ne fonctionne pas normalement, ou ses performances sont
anormalement limitées.
• L’appareil est tombé, ou le coffret est endommagé.
Placer l’appareil sur une surface plane, solide et rigide. Ne jamais placer
l’appareil sur une surface ou un support mobile pouvant basculer.
Page 4

Deutsch
Bitte lesen Sie sich die Bedienungsanleitung vor Gebrauch des Gerätes genau
durch. Sie enthält wichtige Sicherheitsvorschriften, die unbedingt zu beachten
sind! Bewahren Sie die Bedienungsanleitung so auf, daß sie jederzeit
zugänglich ist.
Außer den in der Bedienungsanleitung beschriebenen
Handgriffen sollten vom Bediener keine Arbeiten am Gerät
vorgenommen werden. Das Gerät ist ausschließlich von einem
qualifizierten Fachmann zu öffnen und zu reparieren.
Dieses Gerät darf nur in trockenen Räumen betrieben werden.
Um die Gefahr von Feuer oder eines elektrischen Schlags
auszuschließen, dürfen keine Flüssigkeiten oder Fremdkörper
in das Gerät gelangen. Sollte dieser Fall trotzdem einmal
eintreten, trennen Sie das Gerät sofort vom Netz ab. Lassen
Sie es von einem Fachmann prüfen und die notwendigen
Reparaturarbeiten durchführen.
Befolgen Sie alle Warn- und Sicherheitshinweise in der Bedienungsanleitung
und auf dem Gerät.
Dieses Gerät sollte, wie andere Elektrogeräte auch, nicht unbeaufsichtigt
betrieben werden.
Ist das Gerät z.B. während des Transports über längere Zeit Kälte ausgesetzt
worden, so warten Sie mit der Inbetriebnahme, bis es sich auf Raumtemperatur
erwärmt hat und das Kondenswasser verdunstet ist.
Bitte stellen Sie sicher, daß um das Gerät ein Freiraum von 10 cm gewährleistet
ist, so daß die Luft ungehindert zirkulieren kann. Stellen Sie das Gerät weder
auf ein Bett, Sofa, Teppich oder ähnliche Oberflächen, um die
Ventilationsöffnungen nicht zu verdecken. Das Gerät sollte nur dann in einem
Regal oder in einem Schrank untergebracht werden, wenn eine ausreichende
Luftzirkulation gewährleistet ist.
Stellen Sie das Gerät nicht in die Nähe von Wärmequellen (Heizkörper,
Wärmespeicher, Öfen oder sonstige wärmeerzeugende Geräte).
Bevor Sie das Gerät in Betrieb nehmen, prüfen Sie, ob die
Betriebsspannung mit der örtlichen Netzspannung
übereinstimmt. Die Betriebsspannung ist an der Rückseite des
Gerätes angegeben.
Schließen Sie das Gerät nur mit dem dazugehörigen zweipoligen Netzkabel
an die Wandsteckdose an. Modifizieren Sie das Netzkabel auf keinen Fall.
Versuchen Sie nicht, die Erdungs- und/oder Polarisationsvorschriften zu
umgehen. Das Netzkabel sollte an eine zweipolige Wandsteckdose
angeschlossen werden. Verwenden Sie keine Verlängerungskabel.
Netzkabel sind so zu verlegen, daß sie nicht beschädigt werden können
(z.B. durch Trittbelastung, Möbelstücke oder Erwärmung). Besondere Vorsicht
ist dabei an den Steckern, Verteilern und den Anschlußstellen des Gerätes
geboten.
Sollten Sie das Gerät für eine längere Zeit nicht in Betrieb nehmen, ziehen
Sie den Netzstecker aus der Steckdose.
Schalten Sie das Gerät sofort aus und ziehen Sie geschultes Fachpersonal
zu Rate, wenn:
• das Netzkabel oder der Stecker beschädigt sind,
• Gegenstände bzw. Flüssigkeit in das Gerät gelangt sind,
• das Gerät Regen ausgesetzt war,
• das Gerät nicht ordnungsgemäß funktioniert bzw. eine deutliche
Leistungsminderung aufweist,
• das Gerät hingefallen ist bzw. beschädigt wurde.
Ziehen Sie den Netzstecker aus der Steckdose, bevor Sie mit der Reinigung
des Gerätes beginnen. Reinigen Sie die Oberflächen des Gerätes nur mit
einem weichen, trockenen Tuch. Verwenden Sie keine scharfen Reinigungsoder Lösungsmittel. Vor der erneuten Inbetriebnahme des Gerätes ist
sicherzustellen, daß an den Anschlußstellen keine Kurzschlüsse bestehen
und alle Anschlüsse ordnungsgemäß sind.
Stellen Sie das Gerät waagerecht auf eine feste, ebene Unterlage. Es sollte
weder auf beweglichen Unterlagen noch Wagen oder fahrbaren Untergestellen
transportiert werden.
Italiano
ATTENZIONE: rischio di scossa elettrica, non aprire.
AVVERTENZA: per ridurre il rischio di scossa, non togliete il
coperchio del cabinet. Non contiene parti utili per l'utente.
Per l'assistenza fate riferimento a personale qualificato.
SPIEGAZIONE DEI SIMBOLI GRAFICI:
Il fulmine inserito in un triangolo vi avverte della presenza
di materiale non isolato a "voltaggio elevato" all'interno del
prodotto che può essere abbastanza potente da costituire
pericolo di folgorazione.
Il punto esclamativo entro un triangolo equilatero vi avverte
della presenza di istruzioni importanti per l'utilizzo e la
manutenzione nel manuale che accompagna
l'apparecchiatura.
ATTENZIONE: Non vi sono parti interne riparabili
dall’utilizzatore. Per l’assistenza fate riferimento a personale
qualificato.
ATTENZIONE: Per ridurre il rischio di incendio o di folgorazione,
non esporre all’umidità o all’acqua. Evitare che oggetti estranei
cadano all’interno del cabinet. Se l’apparecchio è stato esposto
all’umidità o un oggetto estraneo è caduto all’interno del cabinet, staccare il cordone di alimentazione dalla presa di rete.
Portare l’apparecchio ad un centro di assistenza qualificato
per i necessari controlli e riparazioni.
Leggere attentamente tutte le istruzioni prima di collegare l’apparecchio
alla rete di alimentazione. Conservate questo manuale per ogni riferimento
futuro alle istruzioni di sicurezza.
Seguire attentamente tutte le avvertenze e le operazioni per il funzionamento.
Pulire l’unità solamente con un panno asciutto o con un piccolo aspirapolvere.
Lasciate uno spazio libero di 10cm intorno all’unità. L’apparecchiatura
non dovrebbe essere posta su un letto, divano, tappeto, o posti che possano
bloccare le aperture di ventilazione. Se l’apparecchio è posizionato in
una libreria o in un cabinet, fate in modo che ci sia abbastanza spazio
attorno all’unità per consentire un’adeguata ventilazione e raffreddamento.
L’unità dovrebbe essere posta lontano da fonti di calore come caloriferi,
termostati, stufe, o altri apparecchi che producano calore
L’apparecchiatura dovrebbe essere collegata solamente a una sorgente
elettrica del tipo descritto nelle istruzioni o indicato sul pannello posteriore
dell’apparecchiatura.
Collegate l’unità alla presa di alimentazione solo con il cavo a due poli
polarizzato che viene fornito o con un equivalente. Non cercate di eliminare
la massa o di manomettere le polarizzazioni. Il cavo dovrebbe essere
collegato ad un’uscita a muro polarizzata a due poli collegando la lamella
piatta della spina nella fessura più ampia. Non usate prolunghe
Non far passare il cavo di alimentazione dove potrebbe essere schiacciato,
pizzicato, piegato ad angoli acuti, esposto al calore o danneggiato in
alcun modo. Fate particolare attenzione al cavo di alimentazione all’altezza
della spina e nel punto in cui esce dalla parte posteriore dell’apparecchio.
Il cordone di alimentazione dovrebbe essere scollegato quando
l’apparecchiatura è inutilizzata per un periodo piuttosto lungo.
L’apparecchiatura dovrebbe essere subito disattivata e data a personale
qualificato quando:
• Il cavo di alimentazione o la spina sono stati danneggiati
• Oggetti sono caduti, o del liquido è stato versato nell’apparecchio
• L’apparecchiatura è stata esposta alla pioggia
• L’apparecchiatura non sembra funzionare in modo normale
• L’apparecchiatura è caduta, o è stata in qualche modo danneggiata
Posizionate l’unità su una superficie piana abbastanza resistente da
sopportare il suo peso. Non posizionatela su un carrello che potrebbe
ribaltarsi.
Page 5

Español
RIESGO DE ELECTROCUCION: NO ABRIR. Este símbolo es para alertar
al usuario sobre la presencia de tensiones peligrosas no aisladas en el interior del aparato susceptibles de constituir un riesgo de electrocución.
PRECAUCION: PARA REDUCIR EL RIESGO DE RECIBIR UNA DESCARGA
ELECTRICA, NO QUITAR LA CUBIERTA SUPERIOR. NO HAY COMPONENTES
MANIPULABLES POR EL USUARIO EN EL INTERIOR DEL APARATO. CUALQUIER
OPERACION DE MANTENIMIENTO DEBE SER LLEVADA A CABO POR PERSONAL CUALIFICADO. Este símbolo es para alertar al usuario sobre la
presencia de instrucciones importantes relacionadas con el funcionamiento
y el mantenimiento (servicio) tanto en este manual como en la literatura que
acompaña al producto.
ADVERTENCIA: No hay componentes manipulables por el usuario
en el interior del aparato. Cualquier operación de mantenimiento
debe ser llevada a cabo por personal cualificado.
ADVERTENCIA: Para reducir el riesgo de que se produzca un
incendio o una descarga eléctrica, no exponga el RT-1080 al agua
o la humedad. No permita que ningún objeto extraño penetre
en el interior del aparato. Si el aparato está expuesto a la humedad
o algún objeto extraño penetra en su interior, desconecte
inmediatamente el cable de alimentación de la red eléctrica. En
caso de que fuera necesario, envíe el aparato a un especialista
cualificado para su inspección y posterior reparación.
Lea todas las instrucciones del presente manual antes de conectar o hacer
funcionar el RT-1080. Conserve este manual cerca de usted para el caso de
que necesite revisar las instrucciones de seguridad que se indican a continuación.
Tenga siempre en mente las advertencias y la información relativa a seguridad
que figuran tanto en estas instrucciones como en el propio aparato. Siga al
pie de letra todas las instrucciones relacionadas con el funcionamiento del mismo.
Limpie el exterior del RT-1080 únicamente con una gamuza seca o un aspirador.
Mantenga siempre despejadas las ranuras destinadas a la ventilación del
aparato. Por ejemplo, no coloque nunca el RT-1080 sobre una cama, un
sofá, una alfombra o una superficie similar que pueda de bloquear las ranuras
de ventilación. Si el RT-1080 está ubicado en la estantería de una librería o
un mueble, debe haber suficiente espacio a su alrededor y ventilación en el
mueble para permitir una refrigeración adecuada.
Mantenga el RT-1080 alejado de radiadores, estufas, cocinas o de cualquier
otra instalación que produzca calor.
El RT-1080 debe ser conectado únicamente a una fuente de alimentación
del tipo y tensión especificados en su panel posterior.
Conecte el RT-1080 a una toma de corriente eléctrica únicamente a través
del cable de alimentación de dos clavijas polarizado suministrado de serie
o un equivalente exacto del mismo. No modifique de ningún modo dicho
cable. No intente desactivar los terminales destinados a la conexión a tierra
o polarización. El cable debería ser conectado a una toma de corriente eléctrica
de dos terminales que se adapten perfectamente a las clavijas del cable de
alimentación del RT-1080. No utilice ningún tipo de cable de extensión.
No coloque el cable de alimentación en lugares en que pueda ser aplastado,
perforado, doblado en ángulos críticos, expuesto al calor o dañado de algún
modo. Preste particular atención al punto de unión entre el cable y la toma de
corriente y también a la ubicación de esta última en el panel posterior del aparato.
El cable de alimentación debería desconectarse de la red eléctrica cuando
el aparato no vaya a ser utilizado durante un largo período de tiempo (por
ejemplo durante las vacaciones de verano).
Desconecte inmediatamente el RT-1080 y envíelo a un servicio técnico cualificado
para su inspección/reparación si:
• El cable de alimentación o alguna clavija del mismo ha sido dañado.
• Han caído objetos o se ha derramado líquido en el interior del aparato.
• El aparato ha sido expuesto a la lluvia.
• El aparato muestra signos de funcionamiento inadecuado.
• El aparato ha sido golpeado o dañado de algún modo.
Coloque el RT-1080 sobre una superficie fija y equilibrada que sea
suficientemente resistente para soportar su peso. No coloque nunca el RT-1080
en una carretilla móvil de la que pueda volcar.
Nederlands
WAARSCHUWING: Om het risico op elektrische schokken of brand te
vermijden: zorg dat het apparaat niet nat wordt. Verwijder de kast niet: er
bevinden zich in het apparaat geen bedieningsorganen. Indien nodig
waarschuw een bevoegd technicus!
EEN LAATSTE WAARSCHUWING:
Om het risico op elektrische schokken te voorkomen: laat het apparaat
gesloten. Iedere reparatie dient door een gekwalificeerde technicus verricht
te worden.
Lees de gehele gebruiksaanwijzing. Voordat u met het apparaat gaat werken
is het van groot belang dat u weet hoe u ermee om moet gaan en dat zo
veilig mogelijk. Bewaar deze gebruiksaanwijzing op een plek, die u zich
na verloop van tijd nog weet te herinneren.
De waarschuwingen op het apparaat en in de gebruiksaanwijzing zijn
belangrijk, sla ze niet in de wind.
Als het apparaat vuil wordt, stof het dan af met een zachte droge doek, of
maak gebruik van een stofzuiger. Gebruik nooit een oplosmiddel van welke
soort dan ook.
Het apparaat moet dusdanig gebruikt worden, dat een behoorlijke koeling
niet in het gedrang komt. Voorbeeldjes: Gebruik het apparaat niet op bed,
sofa, plaid of andere onregelmatige oppervlakken, waardoor de
ventilatiegaten geblokkeerd zouden kunnen worden. Ook het inbouwen
in een te kleine ruimte kan een voldoende koeling in de weg staan.
Het apparaat moet verre gehouden worden van warmtebronnen zoals:
radiatoren en kachels, maar ook versterkers.
Het apparaat mag alleen aangesloten worden op het voltage zoals
aangegeven op de achterkant, in dit geval 220 - 240 Volts 50 Hz.
Het apparaat dient alleen aangesloten te worden met de bijgeleverde netkabel,
of een soortgelijke.
Maatregelen dienen genomen te worden, die de aarding en polarisatie
van het apparaat niet te niet doen. Gebruik vooral geen verlengsnoeren.
De lichtnetkabel dient zo neergelegd te worden, dat er niet op getrapt kan
worden of afgeklemd kan worden door scherpe voorwerpen. Vooral de
aansluitpunten zijn belangrijk: de aansluiting in de wandcontactdoos en
daar waar de kabel het apparaat binnengaat of op het apparaat wordt
aangesloten.
Wanneer het apparaat voor langere tijd niet in gebruik is, dient de lichtnetkabel
uit het lichtnet verwijderd te zijn.
Het apparaat zal in service gegeven moeten worden wanneer één van de
volgende situaties zich voordoet:
• Wanneer het netsnoer en/of steker beschadigd zijn.
• Wanneer er toch voorwerpen/vloeistof in het apparaat terecht zijn
gekomen.
• Als het apparaat in de regen heeft gestaan.
• Als het apparaat niet normaal functioneert of een duidelijk afwijkend
gedrag vertoont..
• Wanneer het apparaat gevallen is en/of de kast beschadigd is.
Plaats het apparaat op een vaste, vlakke en stevige ondergrond. Plaats
hem niet op een verrijdbare wagen die gemakkelijk om kan vallen.
Page 6
RT-1080
6
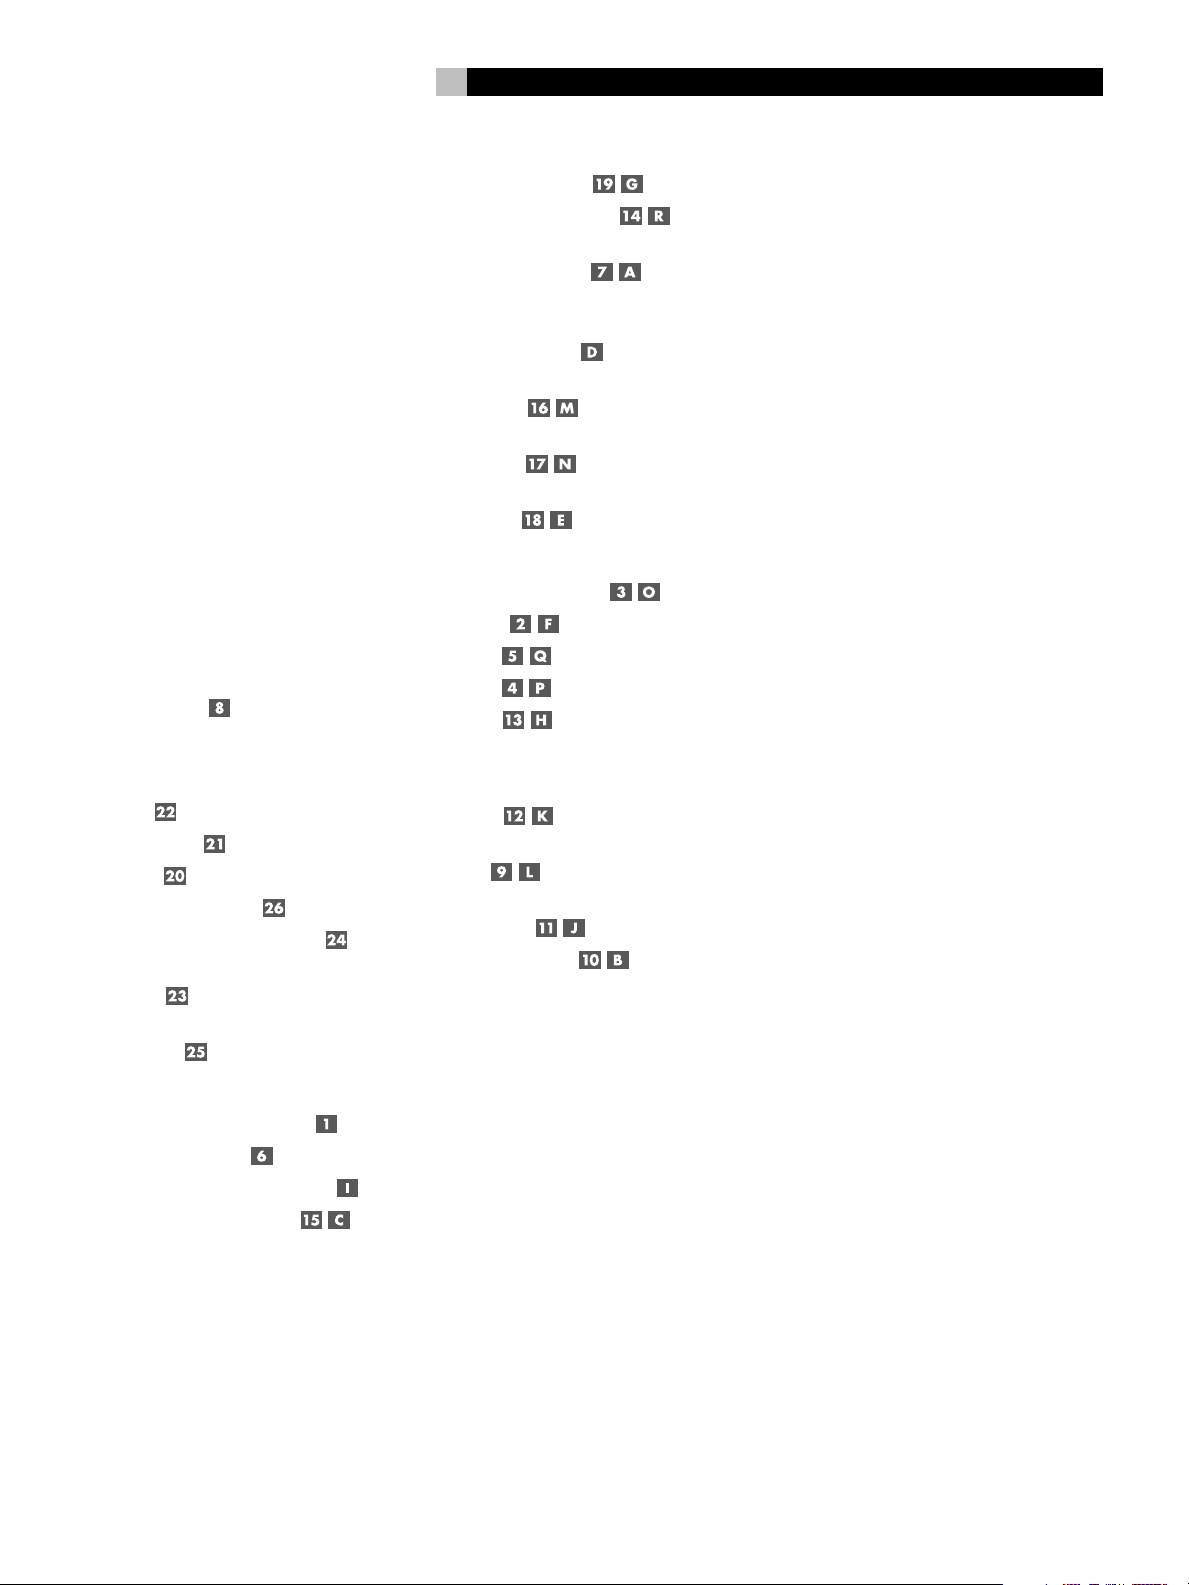
1: Controls and Connections / Commandes et Branchements / Bedienelemente und Anschlüsse
Controlli e collegamenti / Controles y Conexiones / De bedieningsorganen en aansluitingen
5 6 721
4
3
English
POWER
ANT
ATT
ANT
A/B
TAPTY TP
FM IF
NARROWFMMONO
AFDISPLAY
AM/FM STEREO TUNER RT-1080
DOWN UP
12345
67890
AUTO
TUNING
8 19
COMPUTER I/O
ANTENNA
FM
AB
AM G
AM/FM STEREO TUNER
MODEL NO. RT-1080
POWER CONSUMPTION: 10 W
RT-1080
OUTPUTS
LEFT
RIGHT
12V TRIGGER
IN OUT
EXT REM.
IN
24222120
2: Hook-up Illustration / Schéma de branchement type / Anschlußdiagramm
Schema di collegamento / Ejemplo de Conexionado / Het aansluitingsschema
TUNE
/PRESET
17 1815 1612 14139 10 11
PRESET
BANDMEMORY
SCAN
WARNING:
AVIS:
RISQUE DE CHOC ELECTRIQUE–NE PAS OUVRIR
SHOCK HAZARD – DO NOT OPEN
2623 25
ANTENNA
FM
AB
AM G
AM/FM STEREO TUNER
MODEL NO. RT-1080
POWER CONSUMPTION: 10 W
RT-1080
OUTPUTS
LEFT
RIGHT
12V TRIGGER
IN OUT
EXT REM.
IN
COMPUTER I/O
WARNING:
SHOCK HAZARD – DO NOT OPEN
AVIS:
RISQUE DE CHOC ELECTRIQUE–NE PAS OUVRIR
Page 7
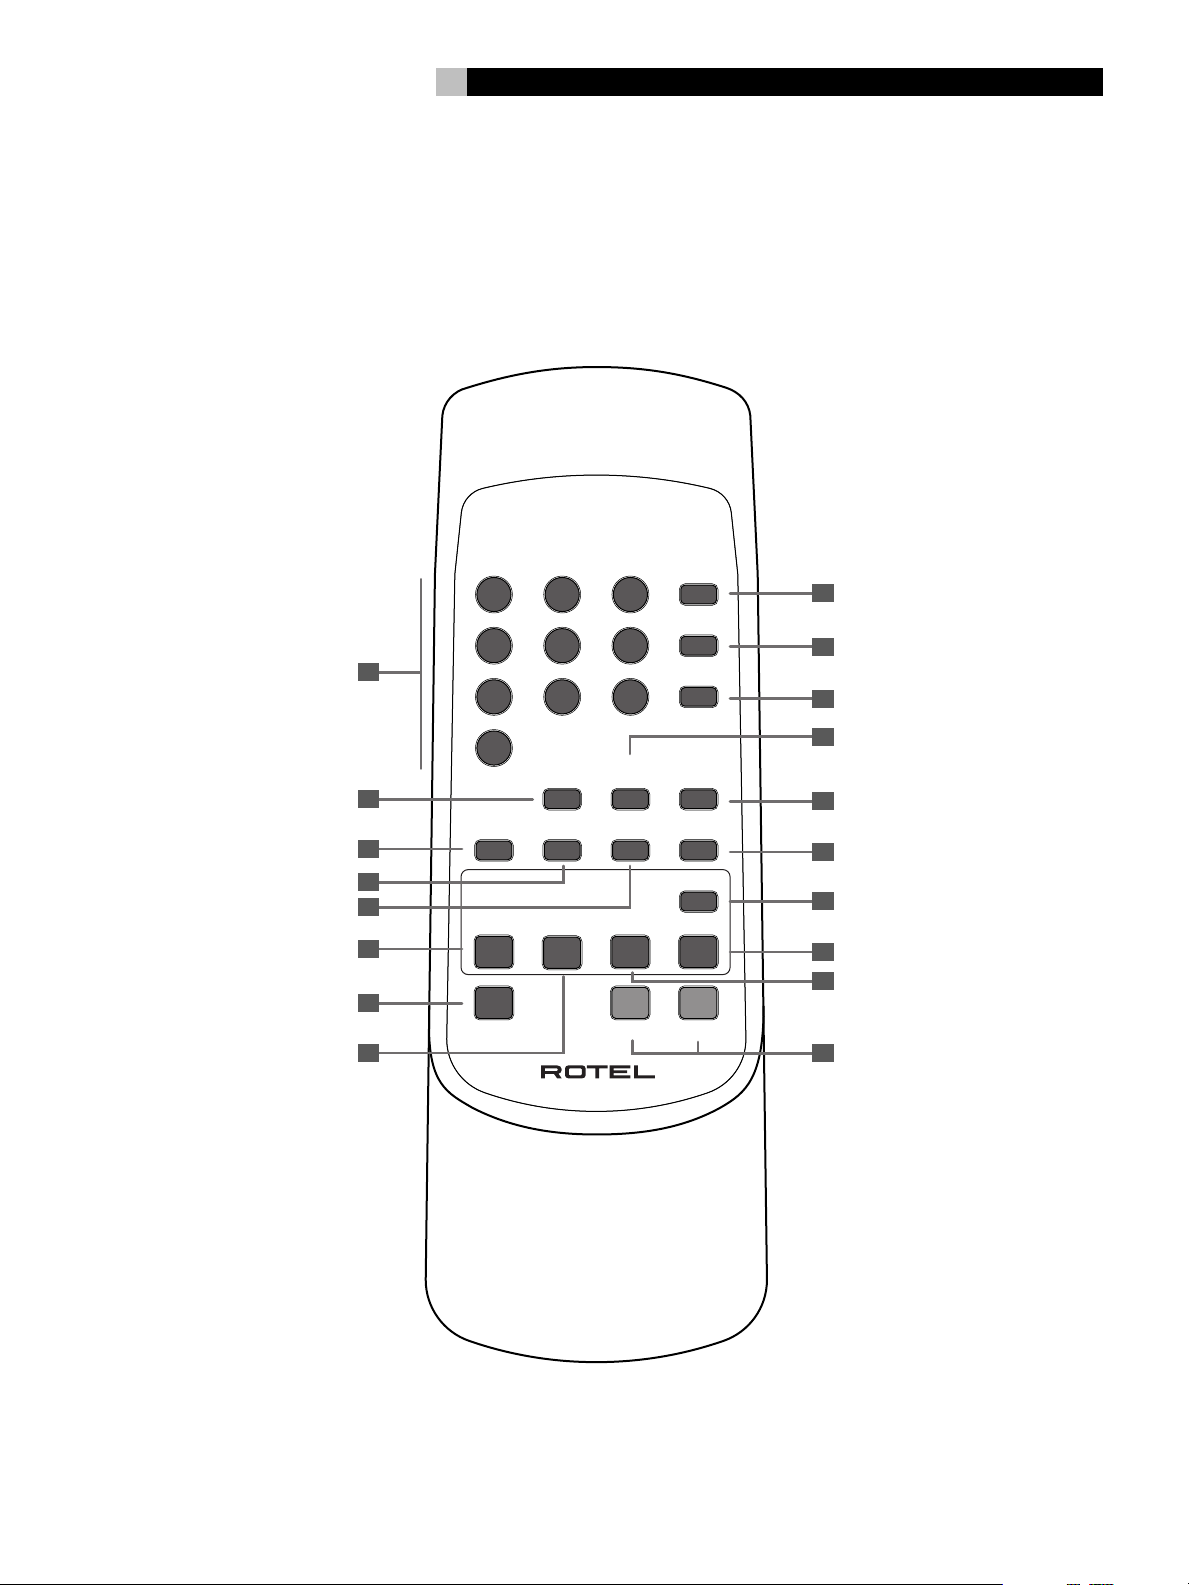
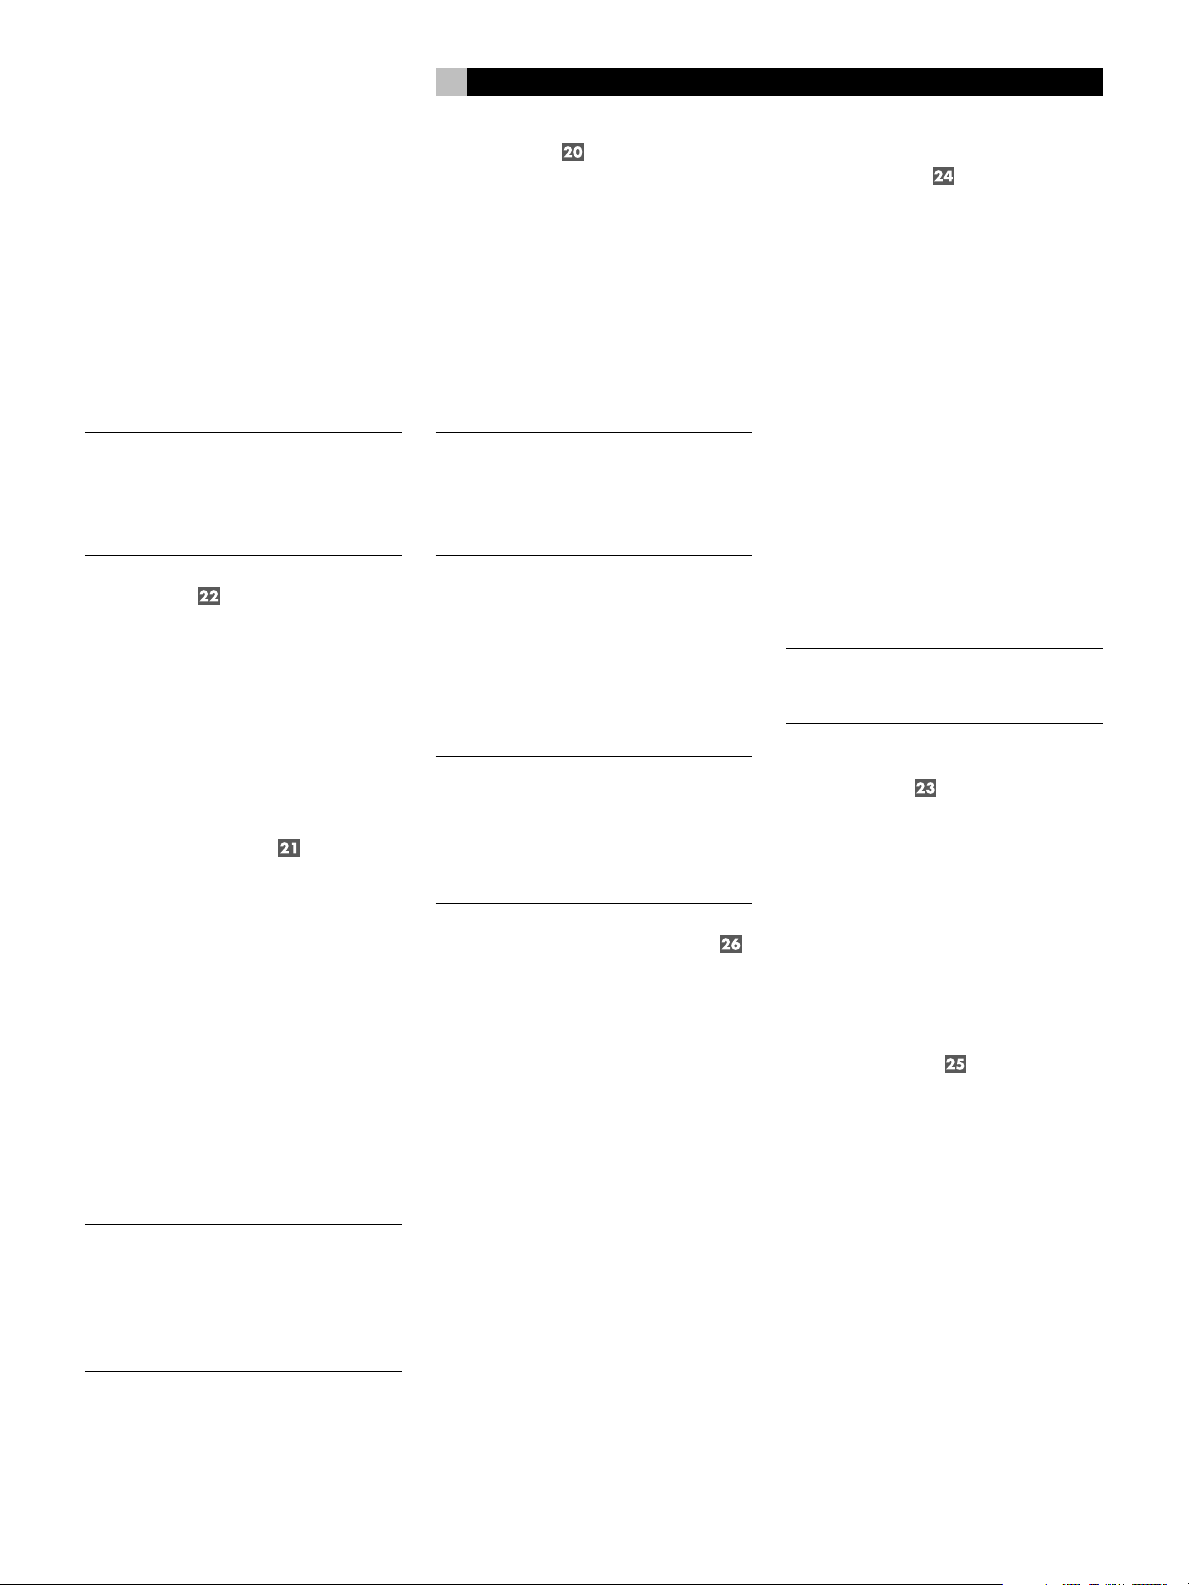
3: RR-T92 Remote Control
Télécommande RR-T92
Fernbedienung RR-T92
Controllo a distanza RR-T92
Mando a Distancia RR-T92
De RR-T92 Afstandsbediening
7
123
DIMMER
I
456
FM IF
NARROW
J
A
7
89
FM
MONO
K
0
ANT
AB
ANT
ATT
AUTO
TUNING
B
MEMORY
FREQUENCY
DIRECT
PRESET
SCAN
TUNE
/PRESET
C
D
DISPLAY
E
AFPTY TATP
F
L
M
N
O
P
Q
G
BAND
H
RR-T92
<
TUN/PRESET
>
R
Page 8
RT-1080 AM/FM Stereo Tuner
8
Contents
Boxed numbers refer to RT-1080 illustration.
Boxed letters refer to RR-T92 illustration.
1: Controls and Connections 6
2: Hook-up Illustration 6
3: RR-T92 Remote Control
About Rotel ...........................................8
Getting Started ...................................... 8
Key Features 9
Unpacking 9
Placement 9
Cables 9
Remote Control ......................................9
Remote Sensor 9
Remote Control Batteries 9
Rear Panel Connections .......................... 9
RCA Outputs 9
AM Loop Antenna 9
FM Antenna 10
AC Input 10
12V TRIGGER Connections 10
EXT REM. IN Jack 10
COMPUTER I/O Interface 10
Basic Operating Controls....................... 10
Power Button 10
Front Panel Display 10
DIMMER Button 10
MEMORY Button 10
Setting Country Mode 11
Basic Tuning Controls ............................11
BAND Button 11
TUNING Controls 11
NUMERIC Buttons: Station Presets 11
FREQUENCY DIRECT Button:
Direct Access Tuning 12
AUTO TUNING Button 12
TUNE/PRESET Button 12
PRESET SCAN Button 12
RDS and RBDS Reception ......................12
DISPLAY Button 12
PTY Button 13
TP Button 13
TA Button 13
AF Button 13
Additional Tuning Features ....................13
FM MONO Button 13
ANT ATT Button 13
FM IF NARROW Button 13
ANT A/B Button 13
Specifications .......................................14
FM Tuner 14
AM Tuner 14
General 14
About Rotel
A family whose passionate interest in music
led them to manufacture high fidelity components of uncompromising quality founded Rotel
over 40 years ago. Through the years that
passion has remained undiminished and the
family goal of providing exceptional value for
audiophiles and music lovers regardless of their
budget, is shared by all Rotel employees.
The engineers work as a close team, listening to, and fine tuning each new product until
it reaches their exacting musical standards.
They are free to choose components from
around the world in order to make that product the best they can. You are likely to find capacitors from the United Kingdom and Germany, semi conductors from Japan or the United
States, while toroidal power transformers are
manufactured in Rotel’s own factory.
Rotel’s reputation for excellence has been
earned through hundreds of good reviews and
awards from the most respected reviewers in
the industry, who listen to music every day.
Their comments keep the company true to its
goal – the pursuit of equipment that is musical, reliable and affordable.
All of us at Rotel, thank you for buying this
product and hope it will bring you many hours
of enjoyment.
Getting Started
Thank you for purchasing the Rotel RT-1080
AM/FM Stereo Tuner. When used in a highquality music audio system, it will provide years
of musical enjoyment.
The RT-1080 is a full featured, high performance
component. All aspects of the design have been
optimized to retain the full dynamic range and
subtle nuances of your music. Rotel’s Balanced
Design Concept combines advanced circuit
board layout, comprehensive parts evaluation,
and extensive listening tests for superior sound
and long term reliability.
The printed circuits are designed with Symmetrical Circuit Traces so that the precise timing of the music is faithfully preserved. Metal
film resistors and polystyrene or polypropylene
capacitors are used in important signal paths.
All aspects of this design have been examined
to ensure the most faithful music reproduction.
Page 9
9
English
The main functions of the RT-1080 are easy
to install and use. If you have experience with
other stereo systems, you shouldn’t find anything perplexing. Simply plug in the associated components and enjoy.
Key Features
• Full-function wireless remote control
• User-friendly Fluorescent Display
• AM and FM tuning capabilities
• 30 Station Presets for memorizing your
favorite stations
• Manual frequency and preset tuning, auto-
search tuning, preset scanning, and frequency direct tuning.
• RDS (Radio Data System) capability for
Europe and RBDS (Radio Broadcast Data
Service) capability for the USA.
• Dual selectable FM antenna inputs
• Stereo/mono switching, selectable local/
distance antenna attenuation, selectable
narrow/wide IF band.
• 12 volt trigger connections for remote turn
on/off by Rotel preamplifiers and surround
processors.
• Computer I/O connection for operation of
the unit from a home automation controller or a computer running special software
Unpacking
Carefully remove the RT-1080, the remote
control, and accessories from the shipping
carton. Save the shipping carton and all enclosed packing material for future use. Shipping or moving the unit in anything other than
the original packing material may result in severe damage.
Keep the original sales receipt. It is your best
record of the date of purchase, in the event
warranty service is ever required.
Placement
Like all audio components that handle low-level
signals, the RT-1080 can be affected by its
environment. Avoid placing the RT-1080 on
top of other components.
The RT-1080 generates some heat as part of
its normal operation. There should be 10 cm
(4 inches) of clearance around the chassis,
and reasonable airflow through the installation location, to prevent overheating.
Place the unit on a solid shelf. We recommend
installing the RT-1080 in furniture designed to
house audio components. Such furniture is designed to reduce or suppress vibration which
can adversely affect sound quality. Ask your
authorized Rotel dealer about component furniture and proper installation.
The RT-1080 is supplied with an RR-T92 remote control and must be placed where the
infrared signal from the remote can reach the
front panel Remote Sensor.
Cables
Keep power cords, digital cables, and audio
cables away from each other. This will minimize the chance of the audio signal cables
picking up noise or interference from the power
cords or digital cables. Using high quality,
shielded cables will also help to prevent noise
or interference. If you have any questions see
your authorized Rotel dealer for advice about
the best cable to use with your system.
Remote Control
The RT-1080 includes an RR-T92 remote control that operates many of the features of the
RT-1080.
Remote Sensor
The remote sensor receives infrared signals
from the remote control. Do not cover or block
the sensor. It must be unobstructed or the remote control will not work properly.
The operation of the remote sensor can also
be affected if exposed to bright sunlight or
certain types of lighting (such as halogen lights)
that emit infrared light. In addition remote control functions may not work reliably if the batteries in the RR-AT92 are weak.
NOTE
: To use the remote, aim it at the remote
sensor on the front panel of the RT-1080.
Remote Control Batteries
Two UM-4/AAA size batteries (supplied) must
be installed before the remote control can be
used. To install the batteries, remove the cover
on the back of the RR-AT92. Install the batteries as shown in the illustration in the battery
well. Test the control for proper operation, then
replace the cover. When the batteries become
weak the remote control won’t operate the
RT-1080 consistently. Installing fresh batteries
should eliminate the problem.
NOTE
: Remove the batteries from the remote
if it will not be used for a long period of time.
Do not leave run down batteries in the remote control; they can leak corrosive chemicals which will damage the unit.
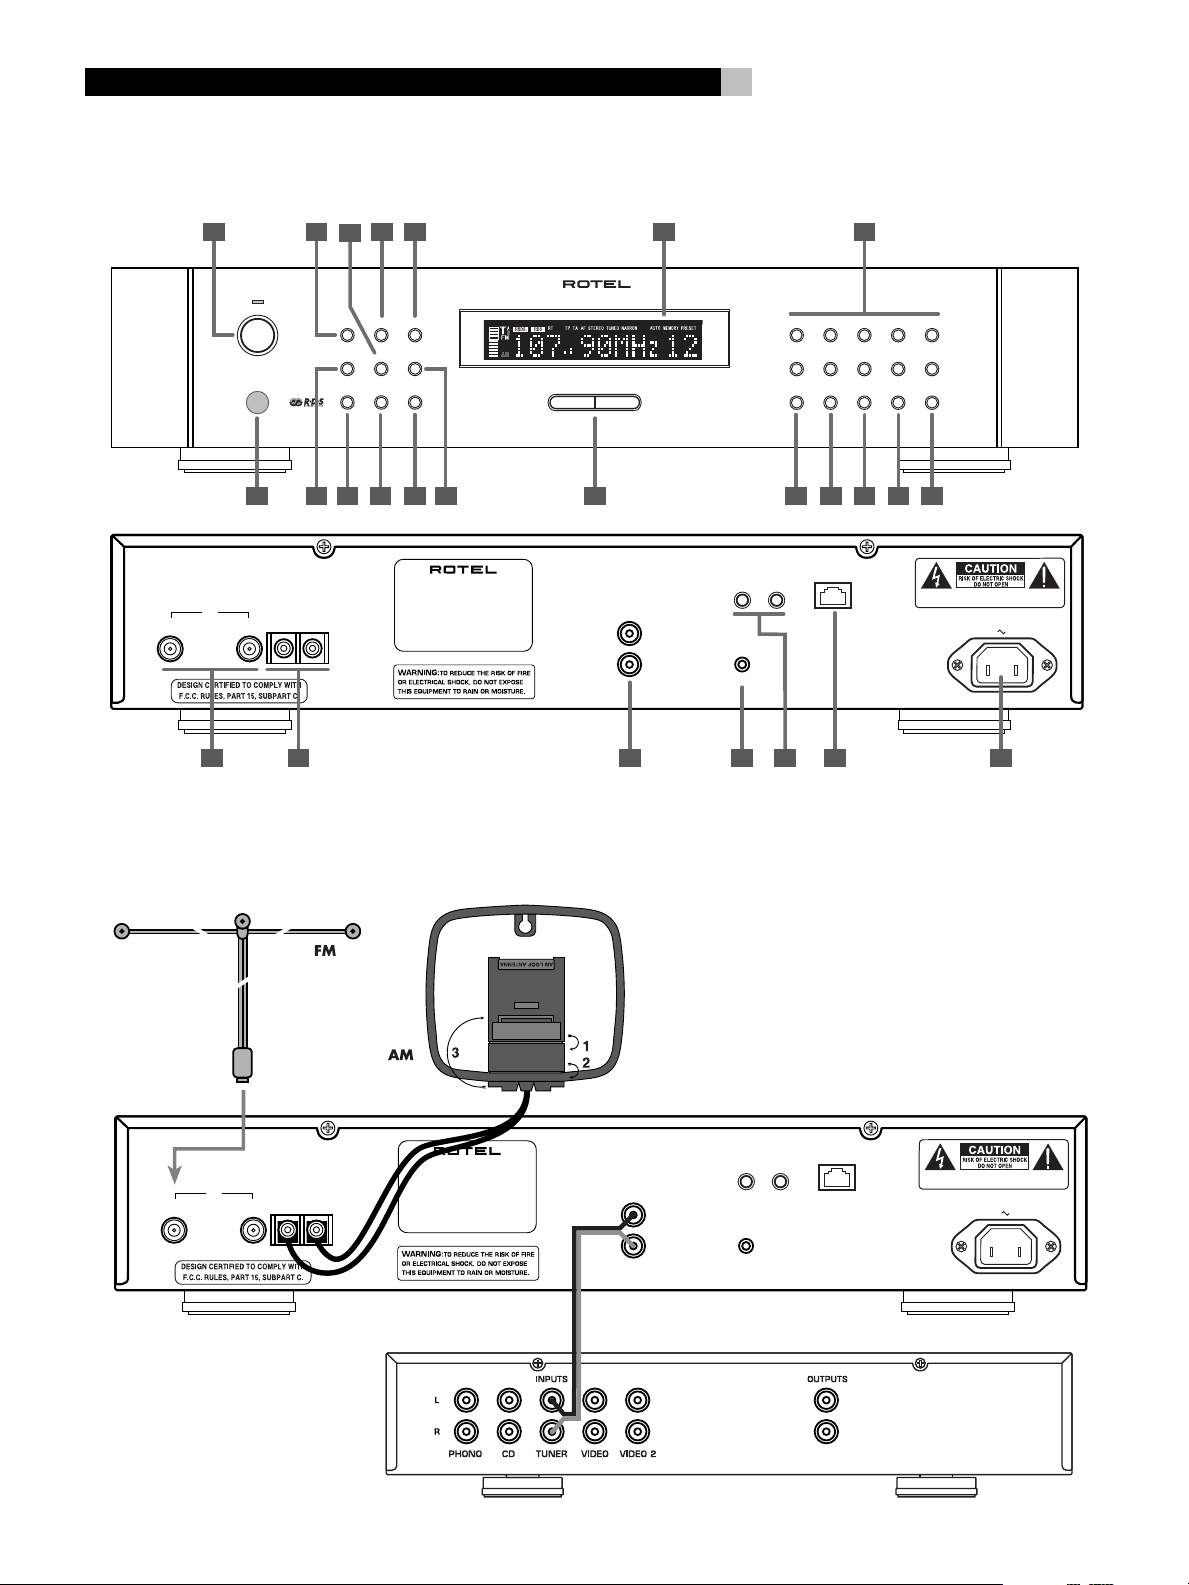
Rear Panel Connections
The RT-1080 provides rear panel connections
for audio line level output, two FM antennas,
an AM antenna, computer interface, a remote
IR connection, 12V trigger connections for remote turn-on and AC power input.
NOTE
: Do not plug any system component into
an AC source until system hookup is complete and you are sure that all connections
have been properly made.
RCA Outputs
A pair of line level RCA audio outputs sends
a fixed-level stereo signal from the RT-1080
to your preamplifier, surround processor, or
integrated amplifier. Use a standard RCA au-
left
dio cable to connect the
left
channel tuner input on your system con-
right
troller and the
nel tuner input on your system controller.
output jack to the
AM Loop Antenna
The RT-1080 includes a loop antenna to receive AM radio signals. Remove this antenna
from the box and locate it near the RT-1080.
Connect the 300 ohm twin-conductor wire from
the loop antenna to the pair of screw terminals labeled AM LOOP, attaching one wire
to each terminal. It does not matter which wire
attaches to which terminal, but make sure that
the connections are solid and that the two wires
do not touch.
output jack to the
right
chan-
Page 10
RT-1080 AM/FM Stereo Tuner
10
You may need to rotate or otherwise reorient
the antenna to find the best position.
NOTE
: To use an outdoor antenna, connect its
300 ohm twin-conductor wire instead of the
loop antenna, only after a professional contractor has installed the antenna system in
accordance with local electrical codes.
FM Antenna
The RT-1080 has two FM antenna connections,
labeled A and B. This permits you to switch
between two different FM antenna systems
using a front panel or remote control switch.
This feature could be useful to switch between
an indoor antenna and an outdoor antenna
system or between a standard FM antenna and
a cable or satellite TV decoder that provides
an FM antenna signal.
NOTE
: The following instructions assume the
use of a standard FM wire antenna supplied
with the unit. To hook up a cable or satellite
TV FM antenna system, see the instructions
supplied with that unit.
The RT-1080 is supplied with a T-shaped indoor FM antenna. Connect the attached coax
F-type plug to one of the FM antenna connectors on the RT-1080. For best reception, unfold the T-shaped antenna. Eyelets at both ends
of the T allow tacking the antenna to a wall,
if desired. Experiment with positioning for best
reception.
NOTE
: To use an outdoor antenna, connect its
75 ohm coax lead wire to the FM connector
instead of the indoor wire antenna, only after a professional contractor has installed the
antenna system in accordance with local electrical codes. In the USA, you will need to use
the supplied F-type converter to connect the
75 ohm coax cable to the antenna input.
AC Input
Your RT-1080 is configured at the factory for
the proper AC line voltage in the country where
you purchased it (115 volts/60Hz in the USA
and 230 volts/50Hz in Europe). The AC line
configuration is noted on a decal on the back
of your unit. Make sure that your unit is configured properly for your AC voltage.
Plug the supplied cord into the AC input receptacle on the back of the unit. Once all other
rear panel connections are completed, plug
the power cord into an AC wall outlet or
switched AC outlet on another component.
12V TRIGGER Connections
The RT-1080 can be activated by a 12 volt
trigger signal from a Rotel preamplifier.
These two connections provide an input to
receive the 12 volt trigger signal from the
preamp and an output to pass through the trigger signal to another component such as a
Rotel power amplifier.
The trigger input accepts any control signal
(AC or DC) ranging from 3 volts to 30 volts.
When a cable is connected to the input and
a trigger signal is present, the tuner is activated.
When the trigger signal is interrupted, the tuner
goes into standby mode. The front panel indicator light remains lit, but the display goes
dark and the unit will not operate.
NOTE
: When using the 12V Trigger feature,
leave the POWER button in the ON position.
EXT REM. IN Jack
This 3.5mm jack receives command codes from
industry-standard infrared receivers (Xantech,
etc.) via hard-wired connections. This feature
could prove useful when the unit is installed
in a cabinet and the front panel sensor is
blocked. Consult your authorized Rotel dealer
for information on external repeaters and the
wiring of a jack to fit the receptacle.
COMPUTER I/O Interface
The unit can be operated from a home automation controller or a computer running audio system control software from third-party
developers. This control is accomplished by
sending the operating codes normally sent by
the RR-T92 remote over a hard-wired network
connection from the computer.
The COMPUTER I/O input provides the necessary connection on the back panel. It accepts standard RJ-45 8-pin modular plugs, such
as those commonly used in 10-BaseT UTP
Ethernet cabling.
For information on the connections, software,
and operating codes for computer control,
contact your authorized Rotel dealer.
Basic Operating Controls
The following explanations will help you get
familiar with the features and controls. When
a function is available on both the front panel
and the remote, a number (see front panel
illustration) and a letter (see remote control
illustration) are shown in the instructions. For
example, to change from the AM to FM band,
you can either press the front panel button
or use the button on the remote. When only
one identifier appears, that control is available only on the front panel or the remote, but
not both.
Power Button
The POWER button is located on the front panel
of the RT-1080 and is not duplicated on the
remote control.
Push the button in to turn the unit on. The LED
above the switch and the display will light up.
Push the button again (returning it to the out
position), to turn the unit off.
NOTE
: If you are using a switched outlet on
another component to power the RT-1080 or
if you are using the 12 volt trigger feature,
leave the POWER switch in the ON position.
Front Panel Display
The fluorescent display in the center of the
RT-1080 provides status information used in
operating the AM/FM receiver (such as station frequency display, band, preset memory,
RDS information, etc.).
DIMMER Button
Available only on the remote control, this button
selects three display brightness settings: NORMAL, DIM, or OFF. When the display is OFF,
pressing any button or control will return it to
the NORMAL mode. Press the button to cycle
through the three settings.
NOTE
: When the tuner is turned off and back
on, the display reverts to its normal setting.
MEMORY Button
The MEMORY button is used to confirm and
memorize various settings in the setup and
operation of the RT-1080, including tuner station
presets. Its use is described in detail in the
relevant sections that follow.
Page 11
11
English
Setting Country Mode
The RT-1080 has two modes (one for the USA
and one for Europe) that configure the unit for
differences in local markets, including FM tuning
intervals, AM tuning intervals, and differences
in the European RDS and United States RBDS
standards. Your unit has been factory configured to the correct mode for the country in which
it was purchased.
To switch to the USA mode, press and
hold the POWER, MEMORY, and 9 buttons
for 5 seconds. The word LOADING will appear in the display and the unit will power up
in the USA configuration.
To switch to the European mode, press
and hold the POWER, MEMORY, and 0 buttons for more than 5 seconds. The word LOADING will appear in the display and the unit
will power up in the European configuration.
Basic Tuning Controls
The RT-1080 features a digital synthesized AM/
FM tuner with RDS or RBDS capability and 30
station presets. The unit offers a wide range
of tuning options. Here is an overview of the
tuning options (more detailed information is
provided in subsequent sections of this manual):
• Manual frequency tuning tunes up or
down to the next station frequency. Set the
TUNE/PRESET mode to TUNE. Turn off
AUTO TUNING. Use the DOWN/UP controls to tune up or down.
• Direct frequency tuning lets you en-
ter the desired station frequency digits. Press
the FREQUENCY DIRECT button on the
remote and enter the digits using the
NUMERIC buttons.
• Automatic frequency search tuning
lets you search up or down to find the next
receivable broadcast signal. Set the TUNE/
PRESET mode to TUNE. Turn on AUTO
TUNING. Use the DOWN/UP controls to
search up or down.
• Memory station preset tuning lets
you directly enter the number of a memorized station preset number. Enter the number of the memorized preset using the NUMERIC buttons.
• Preset scan tuning scans through the
memorized station presets. Press the PRESET SCAN button to begin scanning.
• RDS (Europe) or RBDS (USA) tuning
provides special tuning and search features
based on data codes encoded with the
broadcast signal. See the RDS section of
this manual for detailed information.
BAND Button
The BAND button selects whether the tuner
receives AM or FM broadcast signals. Press
the button to toggle between AM and FM. An
indicator will light at the left portion of the
display to confirm your choice. The currently
tuned station frequency will be shown.
TUNING Controls
A pair of buttons, labeled DOWN/UP on the
front panel and < TUN/PRESET > on the remote, serve as the main tuning controls for the
RT-1080. In the following instructions, we refer to these as DOWN/UP buttons. You can
use either the front panel or remote buttons;
their function is identical.
These controls provides different tuning functions, depending on the mode of operation:
In the FREQUENCY TUNING mode with
AUTO TUNING off, press a DOWN/UP
button to manually jump to the next frequency,
regardless of whether or not a station is broadcasting on that frequency.
SET button and AUTO TUNING button sections
for details on changing the tuning modes.
In the FREQUENCY TUNING mode with
AUTO TUNING on, press a DOWN/UP
button to start auto tuning. The tuner begins
automatically scanning up or down through
the frequencies until the next receivable signal is detected. If this is not the desired station, repeat the automatic tuning procedure
to find the next station. Weak stations will be
skipped during auto tuning. If no receivable
signal is detected, the tuner will revert to the
last previously tuned station.
PRESET button and AUTO TUNING button
sections for details on changing the tuning
modes.
See the TUNE/PRE-
See the TUNE/
In the PRESET TUNING mode, press a
DOWN/UP button to advance to the next
memorized station preset.
SET button section for details on changing the
tuning modes.
In the RDS PTY search mode, press a
DOWN/UP button to select the desired program type from the scrolling list in the display.
See the RDS PTY button in the section on RDS
tuning for details.
NOTE
: Several indicators in the display assist
tuning. A large display shows the tuned frequency. A signal strength indicator shows the
strength of the incoming signal. A TUNED indicator lights when a sufficiently strong signal is received. A ST indicator lights when a
stereo FM signal is received. Indicators show
the currently selected tuning mode.
See the TUNE/PRE-
NUMERIC Buttons:
Station Presets
The RT-1080 can store up to 30 station presets for recall using the NUMERIC keypad.
These station presets can be used for any
combination of AM stations and FM stations.
The RT-1080 is delivered from the factory with
a set of generic station presets that may or may
not match available stations in your area. To
memorize a new station preset:
1. Tune to the desired station, AM or FM.
2. Press the MEMORY button. A MEMORY
indicator will flash in the display.
3. While the MEMORY indicator is flashing,
press the number of the preset where you
wish to store the station frequency. For example, to memorize preset 3, press the 3
button. To memorize preset 15, press the
1 button followed by the 5 button.
4. A previously stored frequency is erased from
memory when a new frequency is memorized for the same preset.
To tune to a previously memorized
station preset, press the preset number using the NUMERIC buttons. For
example, to tune to preset 3, press the 3 button. To tune to preset 30, press the 3 button
and then press the 0 button within 5 seconds.
NOTE
: The NUMERIC buttons can also be used
for FREQUENCY DIRECT tuning.
Page 12
RT-1080 AM/FM Stereo Tuner
12
FREQUENCY DIRECT Button:
Direct Access Tuning
If you know the frequency of the desired station, you may tune it directly using the FREQUENCY DIRECT button (remote only) and
the NUMERIC buttons.
1. Press the FREQUENCY DIRECT button to
change the NUMERIC buttons from station
preset to direct access mode. The display
will change to a series of bars, representing the digits of a station frequency, with
the first bar blinking.
2. Enter the first digit of the station frequency
using the NUMERIC buttons. The digit will
appear in the frequency display and the
next bar will flash. Enter the remaining digits
of the frequency. When all of the digits have
been entered, the tuner will automatically
tune to the displayed station frequency.
NOTE
: On the USA version only, pressing 1
in the FM mode will enter 10 as the digit in
the frequency display. On the European
version, press 1 and then 0 to enter 10. For
US FM stations, press only one digit following the decimal point as shown in the first
example following. For European FM stations, press two digits after the decimal
point as shown in the second example.
EXAMPLES:
(USA FM) 87.50MHz Press 8>7>5
(Europe FM) 87.50MHz Press 8>7>5>0
(all AM) 1610kHz Press 1>6>1>0
If no frequency is entered within 5 seconds,
the tuner will cancel FREQUENCY DIRECT
tuning mode and revert to the last previously tuned station.
AUTO TUNING Button
The AUTO TUNING button toggles between
the frequency search tuning feature and manual
frequency tuning. When using the DOWN/
UP buttons in AUTO TUNING mode, the tuner
will begin automatically scanning up or down
through the frequencies until the next receivable signal is detected. If this is not the desired station, use the DOWN/UP buttons again
to find the next station. Weak stations will be
skipped during auto tuning. If no receivable
signal is detected, the tuner will revert to the
previously tuned station.
To toggle between FREQUENCY TUNING
mode and AUTO TUNING mode, press the
AUTO TUNING button. An AUTO indicator
will appear in the display.
NOTE
: AUTO TUNING mode is disengaged
when the TUNE/PRESET button is set to PRESET tuning mode. See the following section.
TUNE/PRESET Button
The TUNE/PRESET button toggles between
FREQUENCY TUNING mode (the DOWN/
UP buttons advance to the next station frequency) and PRESET TUNING mode (the
DOWN/UP buttons advance to the next station preset). To toggle between the two modes,
press the TUNE/PRESET button. A PRESET indicator in the display will light when the PRESET mode is active.
NOTE
: AUTO TUNING mode is disengaged
when the TUNE/PRESET button is set to PRESET tuning mode.
PRESET SCAN Button
This button activates a preset scanning feature.
When you press the button, the tuner will automatically scan through all memorized station presets, playing each for five seconds before moving to the next. To stop the station scanning when the desired station preset is reached,
press the button again.
NOTE
: If a PRESET station is currently tuned
when the PRESET SCAN button is pressed,
scanning will start with the next higher preset
number and continue through all presets, stopping on the initial preset. If a PRESET station
is not currently tuned when the button is
pressed, scanning will start from PRESET 1
and continue to PRESET 30.
RDS and RBDS Reception
The Rotel RT-1080 is equipped with RDS (Radio Data Systems) capabilities for Europe and
RBDS (Radio Broadcast Data Service) capabilities for the United States. These broadcast
systems provide additional functionality to FM
radio reception by transmitting encoded information along with the radio signal. This signal is decoded by an RDS or RBDS receiver
and can provide a range of informational
features including:
1. a display of the station’s identifying name
(e.g. BBC1)
2. a display of the station’s program content
(e.g. ROCK or NEWS)
3. traffic information broadcasts
4. a scrolling text display for announcements
or information
In addition, RDS provides several advanced
search features including:
1. Search for a station with the desired program content (PTY)
2. Search for traffic information (TP)
3. Search for stations broadcasting special
traffic announcements (TA).
RDS broadcasting has been widely available
in many European markets for years. There
are a large number of RDS stations and most
users will be familiar with the features and
operation. In the USA, implementation of the
RBDS system is more recent. Fewer stations
are broadcasting RBDS signals and the features may be less familiar to many users. Ask
your authorized Rotel dealer for information
on RDS or RBDS broadcasting in your area.
NOTE
: The RDS and RBDS features are en-
tirely dependent on the broadcaster sending
properly encoded signals. Thus, they will only
be available where RDS or RBDS is currently
implemented and where stations are broadcasting these data signals. If there are no RDS
or RBDS stations, the RT-1080 will function
as a standard radio receiver.
NOTE
: RDS and RBDS services are only avail-
able on FM broadcasts. The features described are only operational in FM mode.
DISPLAY Button
There are five display options when the tuned
station is broadcasting RDS data and the RDS
indicator in the display is lit. Press the DISPLAY
button to step through the five available options:
1. Standard FREQUENCY display.
2. PROGRAM SERVICE name. This is typically
the station’s call letters, such as BBC1. If
the current station is not broadcasting an
RDS signal, the display will show a blinking PS indication.
Page 13
13
English
3. PROGRAM TYPE. This is a description of
the station’s content from a list of program
types (for example:
INFO, SPORT, EDUCATION, DRAMA, CULTURE, SCIENCE,
VARIED, POP, ROCK, EASY LISTENING, LIGHT CLASSI-
CAL, SERIOUS CLASSICAL, OTHER MUSIC, WEATHER,
FINANCE, CHILDREN, SOCIAL AFFAIRS, RELIGION, PHONE
IN, TRAVEL, LEISURE, JAZZ, COUNTRY, NATIONAL MUSIC,
OLDIES, FOLK, and DOCUMENTARY). If the station
is not broadcasting an RDS signal, the display will show a blinking PT indication.
4. CLOCK TIME. A time and date display
broadcast by the station. If the station is
not broadcasting an RDS signal, the display will show a blinking CT indication.
5. RADIO TEXT. Scrolling text messages broadcast by the station. If the station is not broadcasting an RDS signal, the display will show
a blinking RT indication.
NEWS, CURRENT AFFAIRS,
PTY Button
The PTY search function scans for RDS stations
broadcasting a particular type of program.
TA Button
Searches for an RDS station broadcasting
special traffic announcements:
1. Press the TA button. The tuner will attempt
to find an RDS station broadcasting traffic announcements.
2. If no station is located, the tuner will return to the last previously tuned station.
3. Cancel the TA function by pressing any
button (except DIMMER or FM MONO).
AF Button
In some cases, an RDS station is part of a
network of stations broadcasting the same
programming (for example, BBC1 programming in the UK may be available at several
different frequencies). Stations broadcasting
this programming may transmit an RDS data
signal providing the tuner with a list of alternate frequencies where this programming is
available. If this data list is transmitted, an AF
indicator will appear in the display.
dicator will light in the display. In mono mode,
a mono signal will be heard even if the station is broadcasting a stereo signal.
NOTE
: Switching to mono mode can be a use-
ful way to improve the reception of weak or
distant FM signals. Less signal strength is required for clean mono reception than for stereo reception.
ANT ATT Button
Sometimes known as a LOCAL/DISTANCE
switch, the ANT ATT button reduces the signal level at the FM antenna input. For the best
reception of stations located some distance
away, this button should be in the default or
OFF position. However, if you are located in
an urban area very close to the radio transmitter, the incoming signal may be high enough
to overload the FM inputs. Press this button to
reduce the incoming signal. When activated,
a LOC indicator appears in the display. Press
the button again to toggle back to normal operation. This switch only effects FM reception.
1. Press the PTY button. The current RDS program content type appears in the display.
2. If desired, change to a different PROGRAM
TYPE using the DOWN/UP buttons to scroll
through the list.
3. Press the PTY button a second time within
5 seconds. The tuner will attempt to find
an RDS station broadcasting the selected
type of program. If the button is not pressed
within 5 seconds after selecting a program
type, the PTY function will be cancelled.
4. If no station is located for the desired content type, the tuner will return to the last
previously tuned station.
5. Cancel the PTY function by pressing any
button (except DIMMER or FM MONO).
TP Button
Searches for an RDS station broadcasting traffic
information programming:
1. Press the TP button. The tuner will attempt
to find an RDS station broadcasting the
traffic programming.
2. If no station is located, the tuner will return
to the last previously tuned station.
3. Cancel the TP function by pressing any
button (except DIMMER or FM MONO).
The AF button is used to scan the alternate
frequencies to find a stronger signal. The button
is only functional when the AF indicator is lit.
1. Press the AF button. The tuner will scan each
of the alternate frequencies for the same
programming in the stored list and tune to
the strongest signal.
2. If no station is located, the tuner will return to the last previously tuned station.
3. If the signal strength of the new station is
weaker, the tuner will revert to the previously tuned station.
4. Cancel the AF function by pressing any
button (except DIMMER or FM MONO).
Additional Tuning Features
The following buttons provide features which
may be used to improve FM reception and/
or provide additional functionality:
FM MONO Button
The FM MONO button changes the FM mode
from stereo reception to mono reception. In
stereo mode, a stereo signal will be heard if
the station is broadcasting a stereo signal and
there is sufficient signal strength. A stereo in-
FM IF NARROW Button
FM reception works by receiving and decoding a carrier signal centered at the tuned frequency. To accommodate broadcast stations
that may be misadjusted off this carrier frequency, the receiver accepts signals slightly
to either side of the tuned frequency. This
generally provides satisfactory performance.
If you are located in an urban area with a large
number of stations at closely spaced frequencies, you may occasionally notice interference
from adjacent stations. To provide better performance under these conditions, the RT-1080
allows you to reduce the range of frequencies
to either side of the precise tuned frequency,
thus reducing inter-station interference. Press
the FM IF NARROW button to use this feature.
A NARROW indication will appear in the
display. Press the button again to toggle back
to normal operation.
ANT A/B Button
As described in the REAR PANEL CONNECTIONS section of this manual, the RT-1080 provides two FM antenna connections, labeled
A and B. This button toggles between the two
antenna inputs. An A or B indicator will appear in the display, indicating which FM antenna input is active.
Page 14

RT-1080 AM/FM Stereo Tuner
Specifications
FM Tuner
Usable Sensitivity:
12.2 dBf
50dB Quieting Sensitivity:
20.2 dBf (mono)
45.3 dBf (stereo)
Signal to Noise Ratio (at 65 dBf):
75 dBf (mono)
72 dBf (stereo)
Harmonic Distortion (at 65 dBf):
0.2% (mono)
0.3% (stereo)
Frequency Response:
10 Hz-15 kHz, ± 3 dB
Capture Ratio:
2.0 dB
Alternate Channel Selectivity:
47 dB (± 400 kHz)
Spurious Response Ratio:
90 dB
Image Rejection Ratio:
80 dB
IF Rejection Ratio:
80 dB
AM Suppression Ratio:
55 dB
Stereo Separation (100Hz/1 kHz/10 kHz):
40 dB/45 dB/35 dB
Output level:
1.2V
Antenna Input:
75 ohms unbalanced
14
AM Tuner
Usable Sensitivity:
300 µV/m
Selectivity:
25 dB
Harmonic Distortion:
0.5%
Image Rejection Ratio:
45 dB
Signal to Noise Ratio:
48 dB
Output level:
165 mV
Antenna Input:
Loop Antenna
General
Power Consumption:
10 watts
Power Requirements (AC):
115 volts, 60 Hz (USA version)
230 volts, 50 Hz (European version)
Weight:
4.7 Kg/10.4 lb.
Dimensions (W x H x D):
430 x 92 x 340 mm
16
15/16" x 35/8" x 137/16"
All specifications are accurate at the time of
printing.
Rotel reserves the right to make improvements
without notice.
Rotel and the Rotel HiFi logo are registered
trademarks of The Rotel Co, Ltd., Tokyo, Japan.
Page 15
15
Français
Sommaire
Les numéros encadrés renvoient à l’illustration du
RT-1080. Les chiffres encadrés renvoient à
l’illustration de la télécommande RR-T92.
1: Commandes et Branchements 6
2: Schéma de branchement type 6
3: Télécommande RR-T92 7
Sommaire............................................. 15
Au sujet de Rotel.................................. 15
Démarrage ...........................................15
Caractéristiques principales 16
Déballage 16
Installation 16
Câbles 16
Télécommande ......................................16
Capteur infrarouge 16
Piles de la télécommande 16
Branchements en face arrière ................17
Prises RCA 17
Antenne cadre AM 17
Antenne FM 17
Prise d’alimentation secteur 17
Prises de commutation 12 V TRIGGER 17
Prise d’entrée télécommande
EXT REM. IN 17
Prise d’interface ordinateur
COMPUTER I/O 17
Commandes de base ............................. 18
Bouton de mise sous tension POWER 18
Afficheur de la face avant 18
Touche d’atténuation afficheur DIMMER 18
Touche de mémorisation MEMORY 18
Réglage mode régional 18
Commandes de fonctionnement du tuner 18
Touche de gamme BAND 19
Commande d’accord TUNING 19
Clavier numérique:
Présélection des stations 19
Touche de recherche par fréquence
FREQUENCY DIRECT:
Accord par accès direct 19
Touche d’accord automatique
AUTO TUNING 20
Touche d’accord/présélection
TUNE/PRESET 20
Touche de balayage des stations
PRESET SCAN 20
Réception de type RDS ......................... 20
Touche d’afficheur DISPLAY 20
Touche PTY 21
Touche TP 21
Touche TA 21
Touche AF 21
Caractéristiques complémentaires.......... 21
Touche de réception mono
FM MONO 21
Touche d’atténuation antenne
ANT ATT 21
Touche bande étroite
FM IF NARROW 21
Touche d’antenne A/B 22
Spécifications .......................................22
Tuner FM 22
Tuner AM 22
Divers 22
Au sujet de Rotel
C’est une famille de passionnés de musique
qui a fondé Rotel, il y a maintenant quarante
ans. Pendant toutes ces années, leur passion
ne s’est jamais émoussée et tous les membres
de la famille se sont toujours battus pour
fabriquer des appareils présentant un
exceptionnel rapport musicalité prix, suivis en
cela par tous les employés.
Les ingénieurs travaillent toujours en équipe
réduite, écoutant et peaufinant soigneusement
chaque appareil pour qu’il corresponde
parfaitement à leurs standards musicaux. Ils
sont libres de choisir n’importe quels
composants dans le monde entier, uniquement
en fonction de leur qualité. C’est ainsi que vous
trouvez dans les appareils Rotel des
condensateurs britanniques ou allemands, des
transistors japonais ou américains, tandis que
tous les transformateurs toriques sont
directement fabriqués dans une usine Rotel.
L’excellente réputation musicale des appareils
Rotel a été saluée par la plupart des magazines
spécialisés; ils ont reçu d’innombrables
récompenses, et sont choisis par de nombreux
journalistes critiques du monde entier, parmi
les plus célèbres, ceux qui écoutent de la musique
quotidiennement. Leurs commentaires restent
immuables: Rotel propose toujours des maillons
à la fois musicaux, fiables et abordables.
Mais plus que tout, Rotel vous remercie pour
l’achat de cet appareil, et souhaite qu’il vous
apporte de nombreuses heures de plaisir
musical.
Démarrage
Nous vous remercions pour l’achat de ce tuner
stéréo AM/FM Rotel RT-1080. Le tuner RT-1080
vous garantit des années et des années de
plaisir musical si vous l’associez à d’autres
éléments haute fidélité de très haute qualité.
Le RT-1080 est un tuner doté de toutes les
fonctions souhaitables pour garantir des
performances de réception radio très élevées.
Sa conception interne garantit le respect intégral
de la dynamique et des plus infimes subtilités
de vos musiques préférées. Le principe
«Balanced Design Concept» (conception
totalement symétrique) de Rotel sous-entend un
dessin des circuits optimisé, un choix très précis
Page 16

RT-1080 Tuner Stéréophonique AM/FM
16
de tous les composants électroniques et de très
nombreux tests d’écoute, pour obtenir une
musicalité exceptionnelle et une fiabilité totale.
Les circuits imprimés intègrent le principe
«Symmetrical Circuit Traces», c’est-à-dire des
pistes imprimées de trajet et de longueur
rigoureusement identiques pour les deux
canaux. Des résistances à couche métallique
et des condensateurs au polypropylène ou au
polystyrène sont utilisés à tous les endroits
stratégiques pour la qualité du signal audio.
Rien n’a été laissé au hasard pour garantir
la musicalité la meilleure possible.
Les fonctions principales du RT-1080 sont faciles
à comprendre et à utiliser. Si vous avez déjà
l’expérience d’une chaîne haute fidélité, rien
ne vous semblera incompréhensible. Il vous
suffit de relier le tuner aux autres maillons, et
d’apprécier la musique!
Caractéristiques principales
• Télécommande complète de toutes les
fonctions.
• Afficheur fluorescent très complet
• Réception des gammes AM et FM
• 30 stations présélectionnées
• Recherche manuelle ou par présélections,
recherche automatique, balayage des
stations présélectionnées, et recherche pas
entrée directe de la fréquence.
• Fonctions RDS (Radio data system) pour
l’Europe
Déballage
Sortez soigneusement l’appareil de son
emballage. N’oubliez pas la télécommande et
les autres accessoires. Installez les piles fournies
dans la télécommande. Conserver l’emballage
est la meilleure solution pour protéger le RT-1080
lors de tout transport ultérieur.
Conservez également la facture; elle constitue
votre meilleure preuve d’achat et de date
d’achat, au cas fort peu probable où vous
devriez faire jouer la garantie.
Installation
Posez le RT-1080 sur une surface rigide, plate,
et sèche, loin de tout rayon direct du soleil, de
la chaleur excessive, d’une humidité trop élevée,
ou de fortes vibrations. Evitez de le poser
directement sur un autre maillon de la chaîne.
Le RT-1080 peut générer de la chaleur durant
son fonctionnement normal. S’il est installé dans
un coffret ou un meuble, vérifiez qu’il dispose
d’une ventilation correcte. Laissez un espace
d’au moins 10 cm tout autour de lui. Nous vous
recommandons d’utiliser un meuble Hi-Fi
spécifique, capable d’éliminer les vibrations
susceptibles de détériorer la qualité sonore.
Consultez votre revendeur agréé Rotel pour
le choix d’un tel meuble.
Le RT-1080 est livré avec la télécommande
RR-T92. N’oubliez pas qu’il doit être installé
de telle manière que son capteur infrarouge
reçoive aisément le signal envoyé par cette
télécommande.
Télécommande
Le RT-1080 est livré d’origine avec sa
télécommande RR-T92, capable d’en piloter
à distance la majeure partie des fonctions.
Capteur infrarouge
Ce capteur infrarouge reçoit les codes de
commande de la télécommande. Ne pas cacher
ce capteur. S’il est obstrué, la télécommande
ne fonctionnera pas correctement.
Ce bon fonctionnement peut également être
altéré par les rayons directs du soleil ou certains
types d’éclairage (lampes halogène, par
exemple) qui émettent de la lumière infrarouge.
En cas de problème, vérifiez également que
les piles de la télécommande soient
suffisamment chargées.
NOTE
: dirigez l’avant de la télécommande vers
la façade du RT-1080 pour l’utiliser.
Piles de la télécommande
Deux piles de type UM-4/AAA (fournies)
doivent être installées dans la télécommande
avant son bon fonctionnement. Pour les installer,
retirer le couvercle au dos de la télécommande.
Installez les piles en respectant leur polarité
gravée dans leur logement. Testez le bon
fonctionnement avant de remettre le couvercle
en place. Lorsque les piles commencent à être
déchargées, la télécommande ne fonctionne
plus que de manière erratique. Installez
immédiatement des piles neuves.
• Double entrée antennes FM
• Commutation stéréo/mono, atténuation
d’antenne local/distance, filtre IF bande
étroite/large.
• Prises de commutation 12 volts trigger pour
la mise sous tension automatique d’autres
maillons de la chaîne (préamplificateur,
processeur Surround, etc.)
• Prise ordinateur entrée/sortie pour
fonctionnement de l’appareil à partir d’un
logiciel de domotique ou d’un contrôleur
spécial
Câbles
Séparez les câbles secteur, audio numérique
et audio analogique les uns des autres. Cela
permet de minimiser les effets parasites émis
par chacune de ces catégories de liaisons.
N’utilisez que des câbles blindés de très haute
qualité. N’hésitez pas à consulter votre
revendeur agréé Rotel pour le choix des
meilleurs câbles possible.
NOTE
: Retirez les piles de leur logement si vous
ne devez pas utiliser la télécommande
pendant une longue période. Ne laissez pas
des piles déchargées dans la télécommande;
elles peuvent présenter des fuites de liquide
corrosif capable de détruire définitivement les
circuits de la télécommande.
Page 17
17
Français
Branchements en face
arrière
Le RT-1080 dispose en face à arrière des prises
suivantes: sortie niveau Ligne, deux prises
antennes FM, une prise antenne AM, une prise
d’interface pour ordinateur type DB-9, une prise
pour récepteur de télécommande IR, une prise
de commutation 12 V «trigger» et une prise
d’alimentation secteur.
NOTE
: ne reliez aucun maillon du système dans
les prises secteur tant que tous les
branchements ne sont pas terminés. Assurezvous que tous les branchements de maillon à
maillon ont bien été effectués.
Prises RCA
Une paire de prises type RCA envoie un signal
stéréo de niveau fixe depuis le RT-1080 vers
votre préamplificateur, ou votre amplificateur
intégré. Les sorties respectivement repérées LEFT
(gauche) et RIGHT (droite) doivent être
branchées dans les entrées correspondantes
repérées TUNER sur le préamplificateur ou
l’amplificateur intégré.
Antenne cadre AM
Le RT-1080 est livré avec une antenne cadre
permettant de recevoir les signaux AM (stations
émises en modulation d’amplitude). Placez cette
antenne près du RT-1080.
Branchez le câble deux conducteurs 300 ohms
dans les deux bornes à vis repérées AM LOOP
(boucle AM), un câble à chaque borne. Le
sens de branchement des deux conducteurs
n’a pas d’importance; vérifiez simplement que
le serrage est correct et que les deux câbles
ne se touchent pas.
Vous devez orienter l’antenne afin d’obtenir
la réception la plus correcte possible.
NOTE
: on peut brancher une antenne AM
extérieure en utilisant les deux bornes
repérées «AM» à la place de l’antenne cadre.
Seul un installateur agréé peut installer une
antenne AM extérieure, répondant aux
normes électriques en vigueur.
Antenne FM
Le RT-1080 est équipé de deux prises pour
antennes FM, repérées «A» et «B». Cela vous
permet de commuter entre deux antennes FM
différentes, à partir d’une touche en face avant
ou sur la télécommande. Cette caractéristique
s’avère très utile pour passer d’une antenne
intérieure à une antenne extérieure, par
exemple, ou encore pour utiliser à la fois une
antenne FM standard et un décodeur satellite
fournissant lui aussi un signal FM.
NOTE
: Les instructions suivantes concernent
l’utilisation du tuner avec son antenne FM
intérieure fournie. Pour utiliser une antenne FM
de réception par câble ou satellite, voir les
instructions fournies avec l’appareil en question.
Le RT-1080 est livré avec une antenne FM
intérieure en forme de «T». Branchez sa prise
F sur une des prises du tuner. Les deux œillets
aux extrémités de l’antenne sont prévus pour
la fixer le long d’un mur. Effectuez divers essais
d’orientation correcte avant de la fixer
définitivement.
NOTE
: Pour utiliser une antenne extérieure,
branchez-la sur la prise 75 ohms, via un câble
adéquat. Seul un installateur agréé sera en
mesure de vous fournir un équipement
d’excellente qualité dans ce domaine:
consultez votre revendeur Rotel à ce sujet.
Prise d’alimentation secteur
Votre RT-1080 est réglé en usine pour s’adapter
aux caractéristiques de votre alimentation
secteur, c’est-à-dire 230 volts 50 Hz, en Europe.
Ce réglage figure sur une étiquette, en face
arrière de l’appareil. Vérifiez qu’il est conforme
à votre installation avant de brancher l’appareil
sur le secteur.
Utilisez le câble secteur fourni. Branchez-le
d’abord dans la prise à l’arrière du RT-1080,
puis dans la prise murale. N’effectuez ce
branchement que lorsque toutes les connexions
entre maillons ont bien été effectuées.
Prises de commutation
12 V TRIGGER
Le RT-1080 peut être mis sous tension grâce
à un signal 12 volts envoyé par un préamplificateur Rotel.
Il y a deux prises 12 V TRIGGER. La première
permet de recevoir la tension 12 volts
d’activation du tuner. La seconde renvoie la
tension de 12 volts vers un second appareil,
par exemple un amplificateur de puissance.
La commutation peut se faire en pratique avec
une tension comprise entre 3 et 30 volts, en
courant continu ou alternatif. Lorsqu’un câble
est branché sur cette entrée et qu’une tension
apparaît à ses bornes, le tuner s’allume. Si
cette tension disparaît, le tuner se met en mode
de veille Standby. L’indicateur de la face avant
reste allumé, mais l’afficheur du tuner s’éteint
et l’appareil ne fonctionne pas.
NOTE
: Si vous utilisez cette fonction 12 V
TRIGGER, laissez la touche POWER enfoncée
(position ON).
Prise d’entrée télécommande
EXT REM. IN
Cette prise jack 3,5 mm reçoit les codes de
commande infrarouge normalisés (Xantech, etc.)
via une liaison par câble. Cette caractéristique
est utile si l’appareil, encastré dans un meuble,
n’a pas son récepteur infrarouge visible de
l’extérieur. Consultez votre revendeur agréé Rotel
pour connaître les accessoires optionnels
nécessaires à l’utilisation de cette prise.
Prise d’interface ordinateur
COMPUTER I/O
Cette prise d’interface, de type RS-232, permet
de commander l’appareil à partir d’une unité
spéciale ou d’un ordinateur équipé d’un logiciel
approprié. En fait, cela revient à envoyer les
codes de la télécommande par l’intermédiaire
d’une liaison câblée, via un contrôleur
domotique spécialisé ou un logiciel de
domotique géré par ordinateur PC.
La prise de la face arrière repérée COMPUTER
I/O fournit les branchements nécessaires à cette
fonction. Elle reconnaît le standard par prise
modulaire 8 broches (type téléphone) RJ-45,
tel celui utilisé dans les liaisons Ethernet 10-Base T.
Page 18

RT-1080 Tuner Stéréophonique AM/FM
18
Pour de plus amples informations sur ces
branchements, les logiciels de gestion et les
codes de commande via un ordinateur,
contactez votre revendeur agréé Rotel.
Commandes de base
Les paragraphes suivants vont vous permettre
de vous familiariser avec les fonctions et
commandes principales de votre nouveau tuner.
Les nombres cerclés renvoient aux illustrations,
au début de ce manuel d’utilisation.
La plupart des fonctions sont accessibles, soit
sur la face avant de l’appareil, soit sur la
télécommande livrée avec. Lorsqu’apparaissent
respectivement un chiffre et une lettre cerclés,
ils renvoient respectivement à la face avant
et à la télécommande. Par exemple, pour
passer de la bande AM à la bande FM, vous
pouvez soir presser la touche
avant, soit presser la touche
télécommande. Si seul un numéro ou une lettre
apparaît, c’est que la fonction correspondante
n’est accessible que via la façade, ou au
contraire la télécommande.
Bouton de mise sous tension
POWER
La touche POWER ne se trouve que sur la face
avant du tuner.
Pressez la touche pour mettre le tuner sous
tension. La lumière correspondante s’allume.
Une seconde pression sur cette même touche
coupe l’alimentation.
NOTE
: Si vous utilisez la prise de renvoi d’un
autre maillon pour alimenter le RT-1080, ou
si vous utilisez la commutation 12 V TRIGGER,
laissez toujours la touche POWER sur ON.
Afficheur de la face avant
Ce grand afficheur fluorescent au centre de
la façade du RT-1080 donne toutes les
informations souhaitables sur la réception d’une
station de radio (fréquence, gamme, numéro
de présélection, information RDS, etc.)
de la face
de la
Touche d’atténuation afficheur
DIMMER
Disponible uniquement à partir de la
télécommande, cette fonction permet de réduire
la luminosité de l’afficheur de la face avant.
Chaque pression sur cette touche fait passer
d’une luminosité normale (NORMAL) à une
luminosité réduite (DIM) puis à l’extinction de
l’affichage (OFF), et ainsi de suite.
NOTE
: Après chaque extinction puis
réallumage du tuner, la luminosité redevient
en position normale.
Touche de mémorisation
MEMORY
La touche repérée MEMORY est utilisée pour
confirmer la mémorisation de différents
réglages et fonctions du RT-1080, et notamment
la présélection des stations. Son fonctionnement
est expliqué plus loin en détail.
Réglage mode régional
Le RT-1080 possède deux modes de
fonctionnement par défaut: un pour les ÉtatsUnis, l’autre pour l’Europe. Cela concerne les
gammes de fréquences AM et FM, les pas de
recherche en fréquence, les différences entre
les fonctions RDS en Europe et RBDS aux ÉtatsUnis. Le tuner que vous possédez a
normalement été configuré en usine pour la
région qui vous concerne.
Pour passer en mode «USA», appuyez
et maintenez la pression simultanément sur les
touches POWER, MEMORY et le chiffre «9»
pendant au moins 5 secondes. Le mot
LOADING apparaît dans l’afficheur, et
l’appareil démarre en mode «USA».
Pour passer en mode «Europe»,
appuyez et maintenez la pression
simultanément sur les touches POWER,
MEMORY et le chiffre «0» pendant au moins
5 secondes. Le mot LOADING apparaît dans
l’afficheur, et l’appareil démarre en mode
«Europe».
Commandes de
fonctionnement du tuner
Le RT-1080 intègre un tuner à synthèse
numérique, doté des fonctions RDS et RBDS,
avec présélection possible de 30 stations
différentes. Cet appareil offre également une
grande latitude quant à la recherche des stations.
Voici un aperçu général de ces fonctions,
expliquées dans les paragraphes qui suivent:
• Accord en fréquence manuel. Il
permet de «monter» et «descendre» les
fréquences pour rechercher les stations
disponibles. (Mode TUNE/PRESET sur
TUNE, AUTO TUNING hors service et
recherche par les touches TUNING).
• Accord direct par fréquence
d’émission. Ce type d’accord consiste
à entrer directement dans le tuner les chiffres
correspondants à la fréquence d’accord
de la station voulue. (Touche FREQUENCY
DIRECT sur la télécommande, puis entrée
de la fréquence via le clavier numérique).
• Recherche automatique d’accord.
Les fréquences sont balayées
automatiquement, et la recherche s’arrête
à chaque fois qu’elle rencontre un signal
suffisamment fort à l’antenne. (Mode TUNE/
PRESET sur TUNE, AUTO TUNING en
service, puis touches TUNING).
• Sélection directe d’une station après
mémorisation de celle-ci dans la
banque des stations présélectionnées. Les touches du clavier numérique
permettent d’entrer directement le numéro
de présélection de la station voulue.
• Balayage de toutes les stations mises
en mémoire. La touche PRESET SCAN
permet d’écouter brièvement toutes les stations préalablement mises en mémoire.
• Recherche via les fonctions RDS
(Europe) et RBDS (USA). Ces fonctions
fournissent un grand nombre d’indications
sur les stations effectivement reçues. Voir
plus loin la section RDS.
Page 19

19
Français
Touche de gamme BAND
La touche BAND permet de sélectionner la
gamme d’ondes reçue: AM (Petites Ondes)
ou FM (Modulation de Fréquence). Un
indicateur correspondant s’allume dans
l’afficheur, à gauche; la dernière station
sélectionnée dans chaque gamme d’ondes est
automatiquement choisie.
Commande d’accord
TUNING
Une paire de touches, repérées UP («vers le haut»)
et DOWN («vers le bas») sur la face avant, et
«TUN»/ «PRESET» sur la télécommande
représentent le moyen principal de recherche
des stations et d’accord sur celles-ci du RT-1080.
Vous pouvez utiliser au choix ces deux groupes
de touches: leur fonction est identique.
Ces commandes jouent un rôle différent suivant
le mode de recherche de station préalablement
choisi:
En mode de recherche manuel (AUTO
TUNING OFF), une pression sur les touches
permet de modifier la fréquence, et de s’arrêter
sur n’importe quelle valeur même si celle-ci
ne correspond pas effectivement à une émission
Voir les paragraphes consacrés aux
radio.
touches TUNE/PRESET et AUTO TUNING pour
le choix du mode de recherche.
En mode de recherche automatique
(AUTO TUNING ON), une pression sur une
touche TUNING démarre automatiquement la
recherche. La gamme de fréquence est
balayée, et l’examen des fréquences s’arrête
dès qu’une station émise est captée. Les stations
émettant un signal trop faible sont
volontairement ignorées durant cette recherche
automatique. Si aucune nouvelle station n’est
détectée, le tuner revient sur la station
précédemment choisie.
consacrés aux touches TUNE/PRESET et AUTO
TUNING pour le choix du mode de recherche.
Dans le mode présélection PRESET
TUNING, chaque pression sur une touche
sélectionne la station mémorisée précédente
ou suivante, dans l’ordre des présélections
(numéros choisis).
En mode de recherche RDS PTY, une
pression sur une des deux touches entraîne
la sélection d’un type de programmes, suivant
une liste déroulante dans l’afficheur.
paragraphe concernant la fonction RDS PTY.
Voir les paragraphes
Voir le
NOTE
: Plusieurs indicateurs, sur l’afficheur, vous
assistent en permanence pendant les
opérations de recherche d’une station. La
fréquence est toujours affichée de manière
claire et précise. Un indicateur «TUNED»
confirme la bonne réception d’une station.
L’indicateur «ST» s’allume si la station reçue
émet en stéréophonie. Enfin, des indicateurs
renseignent en permanence sur le mode de
recherche et d’accord sélectionné.
Clavier numérique:
Présélection des stations
Le RT-1080 peut mettre en mémoire jusqu’à
trente stations différentes, que l’on rappelle
ensuite via le clavier numérique, en tapant
simplement leur numéro de mise en mémoire.
Ces mémorisations concernent indifféremment
des stations émises en AM ou en FM.
Normalement, le RT-1080 est livré en sortie
d’usine avec un certain nombre de stations
déjà mémorisées, mais celles-ci ne
correspondent évidemment pas forcément à
vos goûts (ou à vos fréquences en fonction de
la situation géographique). Pour mémoriser
une station, procéder comme suit:
1. Choisissez la gamme d’ondes désirée, AM
ou FM, et trouvez la station voulue.
2. Appuyez sur la touche MEMORY de la face
avant: une indication «MEMORY» se met
à clignoter dans l’afficheur.
3. Pendant que cet indicateur MEMORY
clignote, appuyez sur le numéro de
présélection que vous désirez attribuer à
la station en question. Par exemple, pour
mémoriser la station dans la banque de
mémoire n° 3, appuyez sur la touche «3».
Pour la mémoriser sous le numéro 15,
appuyez successivement sur les touches «1»
puis «5».
4. Une station préalablement mise en mémoire
sous ce même numéro sera alors
automatiquement effacée, laissant place
à la nouvelle.
Pour choisir une station préalablement
mise en mémoire sous un numéro de
mémorisation, appuyez simplement sur les
touches correspondantes du clavier numérique:
«3» pour la station n° 3, «1» et «5» pour la
station n° 15. Pour la station mise en mémoire
sous le numéro 30, appuyez sur la touche «3»
puis la touche «0».
NOTE
: Le clavier numérique est également
utilisé pour entrer la fréquence exacte
d’émission d’une station, lors de l’accord par
entrée directe de la fréquence.
Touche de recherche par
fréquence FREQUENCY DIRECT:
Accord par accès direct
Si vous connaissez la fréquence exacte de
réception d’une station, vous pouvez entrer
directement cette valeur (uniquement à partir
de la télécommande), en utilisant
successivement la touche repérée
«FREQUENCY DIRECT» puis les touches du
clavier numérique.
1. Appuyez sur la touche FREQUENCY
DIRECT afin de faire passer les touches
chiffrées du clavier numérique du mode de
sélection des stations préréglées au mode
d’accord par entrée directe de la fréquence
de réception. L’affichage de la fréquence,
en face avant se transforme en une suite
de tirets, le premier clignotant.
2. Entrez le premier chiffre correspondant à
la fréquence de réception. Il apparaît sur
l’afficheur, tandis que le second tiret clignote.
Entrez ainsi tous les chiffres composant la
valeur de la fréquence de réception. Lorsque
tous les chiffres ont été entrés, la station
est automatiquement reçue par le tuner.
NOTE
: sur la version européenne du RT-1080,
on presse successivement les touches «1» et
«0» pour entrer la valeur 10, alors que dans
la version américaine, une pression sur «1»
suffit. De même, la version européenne
nécessite d’entrer deux chiffres après la
virgule, là où la version américaine ne
nécessite qu’un seul chiffre.
EXEMPLES:
(USA FM) 87,50 MHz:
Appuyez sur 8 > 7 > 5
(Europe FM) 87,50 MHz:
Appuyez sur 8 > 7 > 5 > 0
(Tous, AM) 1 610 kHz:
Appuyez sur 1 > 6 > 1 > 0
Si aucune fréquence n’est entrée dans les cinq
secondes suivant la dernière pression d’une
touche, le tuner annule automatiquement le
principe d’entrée directe de la fréquence.
Page 20

RT-1080 Tuner Stéréophonique AM/FM
20
Touche d’accord automatique
AUTO TUNING
La touche AUTO TUNING permet de choisir
entre le mode de recherche directe par affichage
de la fréquence et le mode de recherche manuel.
En mode AUTO TUNING, chaque impulsion
sur le bouton rotatif de la face avant ou une
des touches de la télécommande fait
automatiquement défiler la fréquence de
réception des stations. Dès que le tuner rencontre
une station, il s’arrête sur celle-ci. Une nouvelle
impulsion sur le bouton ou pression sur une des
touches relance la recherche. Les stations d’un
niveau de réception trop faible sont
automatiquement ignorées. Si aucune station
n’est détectée, le tuner revient automatiquement
à la fréquence de départ du balayage.
Pour passer du mode de recherche par
fréquence FREQUENCY TUNING MODE au
mode de recherche automatique AUTO
TUNING, appuyez sur la touche AUTO
TUNING. L’indication «AUTO» apparaît dans
l’afficheur.
NOTE
: Le mode AUTO TUNING est désengagé
lorsque la touche TUNE/PRESET est placé en
mode de recherche PRESET. Voir les
paragraphes suivants.
Touche d’accord/présélection
TUNE/PRESET
La touche TUNE/PRESET permet de passer du
mode de recherche par fréquence FREQUENCY
TUNING (recherche et avance jusqu’à la station
captée suivante) au mode de recherche PRESET
TUNING (passage d’une station préalablement
présélectionnée à la station présélectionnée
suivante). Pour passer d’un mode à l’autre,
simplement presser la touche TUNE/PRESET.
Lorsque le mode PRESET est choisi, l’indication
«PRESET» apparaît dans l’afficheur.
NOTE
: Le mode AUTO TUNING est auto-
matiquement désengagé lorsque la touche
TUNE/PRESET est utilisée en position PRESET.
Touche de balayage des
stations PRESET SCAN
Ces touches activent la fonction de balayage
automatique de chacune des stations
présélectionnées. Lorsque vous pressez cette
touche, le tuner commence automatiquement
à vous faire écouter, successivement et pendant
cinq secondes, chacune des stations
précédemment mémorisées. Pour arrêter ce
balayage sur la station en cours d’audition,
appuyez simplement une seconde fois sur la
touche.
NOTE
: Si une station présélectionnée est en
écoute au moment où l’on utilise la fonction
PRESET SCAN, la première station suivante
écoutée sera celle dont le numéro de mise en
mémoire est immédiatement supérieur à la
station que l’on écoutait. Si on n’écoutait pas
une station présélectionnée, le balayage
commence sur la station n° 1 et se termine
avec la station n° 30.
Réception de type RDS
Le Rotel RT-1080 est équipé des fonctions RDS,
ou Radio Data System (fonctions RBDS pour
les États-Unis). Le principe du RDS consiste à
transmettre en plus du message sonore normal
des informations codées qui ajoutent des
fonctions et possibilités au tuner. Les principales
fonctions ajoutées sont les suivantes:
1. Affichage en clair du nom de la station reçue
(par exemple, «Classique»)
2. Affichage du type de programme écouté
(News pour infos, Rock, etc.)
3. Commutation automatique sur les
informations routières
4. Texte défilant donnant diverses indications
(morceau de musique émis, etc.)
De plus, le RDS permet d’accéder à d’autres
fonctions pratiques:
1. Recherche de stations ne concernant qu’un
type de programme (mode PTY, très peu
répandu en France).
2. Recherche automatique des informations
routières (mode TP)
Les fonctions RDS sont désormais utilisées par
la majorité des stations FM émettant en Europe.
Pour information, le mode RBDS américain,
semblable dans son principe, est plus récent
et moins répandu.
NOTE
: Les fonctions RDS sont dépendantes de
chaque station écoutée. Si celles-ci ne
semblent pas accessibles, n’incriminez pas
votre tuner! Il fonctionnera alors comme un
tuner traditionnel.
NOTE: Les fonctions RDS ne sont accessibles
que sur la bande FM. Les fonctions décrites
ci-dessous ne fonctionnent donc que sur cette
bande de fréquences.
Touche d’afficheur
DISPLAY
Il y a cinq options d’affichage réservées au
mode de réception d’une station RDS. L’accès
à ces modes d’affichage se fait de manière
séquentielle, en pressant une ou plusieurs fois
la touche repérée DISPLAY. Ces options sont
les suivantes:
1. Affichage standard de la fréquence
2. Affichage du nom de la station PS (en entier
ou en abrégé, selon le choix de la station
radio elle-même).
3. Affichage du type de programme PTY (très
peu répandu en France, cette fonction
permet de classer les stations suivant le type
de programme émis.) Par exemple, les
catégories sont Musique Classique, Jazz,
Rock, Pop, Informations, Sport, Culture,
Météo, Religion, Voyage, etc.) Si la station
n’émet pas le signal RDS correspondant,
l’indication PT clignote dans l’afficheur.
4. Heure (Clock Time). La date et l’heure sont
affichées. Si la station n’émet pas le signal
RDS correspondant, l’indication CT clignote
dans l’afficheur.
5. Radio Text. Des messages écrits sont diffusés
sur l’afficheur du tuner (fonction peu usitée
en France). Si la station n’émet pas le signal
RDS correspondant, l’indication RT clignote
dans l’afficheur.
3. Recherche automatique des stations
diffusant régulièrement les informations
routières (mode TA)
Page 21

21
Français
Touche PTY
La fonction de recherche PTY permet de ne
sélectionner que les stations diffusant un certain
type de message. (Fonction pratiquement pas
utilisée en France):
1. Appuyez sur la touche PTY. Le contenu
correspondant au type de programme
apparaît sur l’afficheur.
2. Pour choisir un autre type de programme,
utilisez les commandes TUNING.
3. Appuyez une seconde fois sur la touche
PTY dans les cinq secondes, et le tuner ne
recherchera que les stations diffusant le type
de programme sélectionné. Si vous
n’appuyez pas dans les cinq secondes, la
fonction PTY est annulée.
4. Si aucune station ne correspond au type
de programme sélectionné, le tuner revient
sur la station précédemment sélectionnée.
5. Annulez la fonction PTY en pressant
n’importe quelle touche (sauf les touches
DIMMER et FM MONO, qui n’ont pas
d’effet d’annulation).
Touche TP
Cette touche permet de rechercher les stations
de radio émettant des informations routières
régulières:
1. Pressez la touche TP. Le tuner cherche une
station émettant des informations routières.
2. Si aucune station n’est trouvée, le tuner
revient sur la station précédemment écoutée.
3. Annulez la fonction TP en pressant n’importe
quelle touche (sauf les touches DIMMER
et FM MONO, qui n’ont pas d’effet
d’annulation).
Touche TA
Cette touche permet de rechercher les stations
de radio émettant des informations routières
spéciales:
1. Pressez la touche TA. Le tuner cherche une
station émettant des informations routières.
2. Si aucune station n’est trouvée, le tuner
revient sur la station précédemment écoutée.
3. Annulez la fonction TA en pressant n’importe
quelle touche (sauf les touches DIMMER
et FM MONO, qui n’ont pas d’effet
d’annulation).
Touche AF
Dans certains cas, une station RDS est une
station émettant sur plusieurs fréquences
différentes afin de couvrir, avec le même
programme, une zone géographique étendue.
(C’est le cas par exemple des stations de Radio
France, et de RTL, Europe 1, etc.). Ces stations
envoient alors au tuner, en permanence, une
liste de fréquences «alternatives» permettant
de capter le même programme. Si c’est le cas,
l’indication «AF» apparaît dans l’afficheur.
La touche AF est utilisée pour essayer ces
diverses stations afin de trouver le signal émis
le plus fort. Cette fonction est activée en
permanence si l’indicateur AF est allumé.
1. Pressez la touche AF. Le tuner recherche alors
toutes les fréquences «alternatives» stockées
dans une liste, et s’accorde sur le signal à
l’antenne correspondant le plus fort.
2. Si aucune station n’est trouvée, le tuner
revient sur la station précédemment écoutée.
3. Si le signal trouvé devient trop faible, le
tuner retourne à la fréquence précédente.
4. Annulez la fonction AF en pressant
n’importe quelle touche (sauf les touches
DIMMER et FM MONO, qui n’ont pas
d’effet d’annulation).
Caractéristiques
complémentaires
Les fonctions suivantes permettent d’améliorer
encore la réception en FM, et/ou ajoutent
d’autres possibilités pratiques au RT-1080.
Touche de réception mono
FM MONO
Cette touche permet de forcer la réception d’une
station stéréophonique en monophonie. C’est
souvent une solution nécessaire lorsque la force
du signal présente à l’antenne est trop faible.
En stéréo, un indicateur correspondant s’allume
dans l’afficheur.
NOTE
: On utilisera systématiquement la touche
Mono lorsque la réception FM est entachée
de souffle ou de perturbations parasites
diverses. En effet, un signal moins fort suffit
généralement pour une bonne reproduction
mono alors qu’il faut un signal fort pour une
bonne réception en stéréo.
Touche d’atténuation antenne
ANT ATT
Souvent repérée «LOCAL/DISTANCE»
(réception locale/stations éloignées), cette
touche réduit volontairement le niveau du signal
à l’antenne. En utilisation normale (stations
relativement éloignées); cette touche doit être
laissée en position OFF (atténuation hors
service). Cependant, si vous êtes
géographiquement situé tout près de l’émetteur,
vous pouvez rencontrer des problèmes de
saturation. Dans ce cas, pressez la touche
repérée ANT ATT pour bénéficier de
l’atténuateur intégré. Dans ce cas, l’indication
LOC s’allume sur l’afficheur. Une seconde
pression sur la touche met hors service
l’atténuateur. Cet atténuateur ne fonctionne que
sur la gamme FM.
Touche bande étroite
FM IF NARROW
La réception FM fonctionne en utilisant une
porteuse (ou signal porteur) centré sur la
fréquence d’accord. Pour s’accommoder des
signaux qui présentent un léger glissement par
rapport à cette porteuse, le tuner accepte des
fréquences légèrement décalées, «à droite et
à gauche», de la fréquence centrale. Cela
donne les meilleurs résultats dans la plupart
des situations géographiques.
Page 22

RT-1080 Tuner Stéréophonique AM/FM
22
Mais si vous vous trouvez dans une zone
urbaine, desservie par de très nombreuses
stations dont les fréquences d’accord se situent
très près les unes des autres, vous pouvez
entendre parfois des interférences provenant
d’une station adjacente. Dans ce cas, le
RT-1080 vous permet de réduire la gamme
de fréquences analysée de part et d’autre de
la fréquence centrale, afin de réduire les
interférences inter-stations. Ce dispositif
s’appelle FM IF NARROW (IF pour «Fréquence
Intermédiaire», Narrow pour «étroit»). Il suffit
pour le mettre en service de presser la touche
correspondante FM IF NARROW. L’indication
NARROW apparaît dans l’afficheur. Appuyez
de nouveau sur la touche pour mettre hors
service cette fonction.
Touche d’antenne A/B
Comme décrit dans le paragraphe
BRANCHEMENTS EN FACE ARRIÈRE, le
RT-1080 propose deux entrées d’antenne FM,
repérées A et B. Ce sélecteur permet de
sélectionner une des deux entrées, au choix.
Un indicateur «A» ou «B» apparaît alors dans
l’afficheur, indiquant quelle entrée est réellement
en service.
Spécifications
Tuner FM
Sensibilité utile:
12,2 dBf
Sensibilité pour S/B = 50 dB:
20,2 dBf (mono)
45,3 dBf (stéréo)
Rapport signal/bruit (à 65 dBf):
75 dBf (mono)
72 dBf (stéréo)
Distorsion harmonique (à 65 dBf):
0,2 % (mono)
0,3 % (stéréo)
Réponse en fréquence:
10 Hz-15 kHz, ± 3 dB
Rapport de capture:
2 dB
Sélectivité:
47 dB (±400 kHz)
Réjection fantôme:
90 dB
Réjection image:
80 dB
Réjection Fréquence Intermédiaire:
80 dB
Réjection AM:
55 dB
Séparation des canaux
(100 Hz/1 kHz/10 kHz):
40/45/35 dB
Niveau de sortie:
1,2 volt
Entrée antenne:
75 ohms asymétrique
Tuner AM
Sensibilité utile:
300 µV/m
Sélectivité:
25 dB
Distorsion harmonique:
0,5 %
Réjection image:
45 dB
Rapport signal/bruit:
48 dB
Niveau de sortie:
165 mV
Entrée antenne:
Antenne cadre
Divers
Consommation électrique:
10 watts
Alimentation secteur:
115 volts, 60 Hz (USA)
230 volts, 50 Hz (Europe)
Poids:
4,7 kg
Dimensions (L x H x P):
430 x 92 x 340 mm
Toutes ces spécifications sont garanties exactes au
moment de l’impression
Rotel se réserve le droit d’effectuer toutes les
améliorations souhaitables sans préavis.
Rotel et le logo Rotel HiFi sont des marques
déposées de The Rotel Co, Ltd, Tokyo, Japon.
Page 23

23
Deutsch
Inhaltsverzeichnis
Die grau markierten Zahlen beziehen sich auf die
Abbildungen des RT-1080. Die grau markierten
Buchstaben beziehen sich auf die Abbildung der
RR-T92.
1: Bedienelemente und Anschlüsse 6
2: Anschlußdiagramm 6
3: Fernbedienung RR-T92 7
Die Firma Rotel ....................................23
Zu dieser Anleitung .............................. 23
Die wesentlichen Merkmale 24
Auspacken 24
Aufstellung des Gerätes 24
Kabel 24
Fernbedienung ......................................24
Sensor an der Gerätefront 24
Einsetzen der Batterien in die Fernbedienung 24
Anschlüsse an der Rückseite ................. 24
Cinch-Ausgänge 24
MW-Rahmenantenne 25
FM-Antennenanschluß 25
Netzeingang 25
12 V TRIGGER-Anschlüsse 25
EXT REM. IN-Buchse 25
Computerschnittstelle 25
Grundbedienelemente ...........................25
Netzschalter 25
Frontdisplay 26
DIMMER-Taste 26
MEMORY-Taste 26
Einstellen des Ländermodus 26
Grund-Tuning-Funktionen ......................26
BAND-Taste 26
Bedienelemente zur Frequenzabstimmung
(TUNING CONTROLS) 26
ZIFFERNTASTEN: Senderspeicher 27
FREQUENCY DIRECT-Taste :
Direkte Frequenzeinstellung
über die Zehnertastatur 27
AUTO TUNING-Taste 27
TUNE/PRESET-Taste 27
PRESET SCAN-Taste 27
RDS- und RBDS-Empfang ......................28
DISPLAY-Taste 28
PTY-Taste 28
TP-Taste 28
TA-Taste 28
AF-Taste 28
Zusätzliche Tuning-Tasten .....................29
FM MONO-Taste 29
ANT ATT-Taste 29
FM IF NARROW-Taste 29
ANT A/B-Taste 29
Technische Daten .................................. 29
FM-Tuner 29
AM-Tuner 29
Sonstige Daten 29
Die Firma Rotel
Die Firma Rotel wurde vor 40 Jahren von einer
Familie gegründet, deren Interesse an Musik
so groß war, daß sie beschloß, qualitativ
hochwertigste HiFi-Produkte herzustellen und
Musikliebhabern ungeachtet ihres Geldbeutels
einen außergewöhnlichen Wert zukommen zu
lassen. Ein Ziel, das von allen Rotel-Angestellten
verfolgt wird.
Die Ingenieure arbeiten als Team eng zusammen.
Sie hören sich jedes neue Produkt an und
stimmen es klanglich ab, bis es den gewünschten
Musikstandards entspricht. Die eingesetzten
Bauteile stammen aus verschiedenen Ländern
und wurden ausgewählt, um das jeweilige
Produkt zu optimieren. So finden Sie in RotelGeräten Kondensatoren aus Großbritannien und
Deutschland, Halbleiter aus Japan oder den USA
und direkt bei Rotel gefertigte Ringkerntransformatoren.
Rotels guter Ruf wird durch hunderte von
Testerfolgen von den angesehensten Testern der
Branche, die jeden Tag Musik hören,
untermauert. Die Ergebnisse beweisen, daß das
Unternehmen sein Ziel konsequent verfolgt hat,
mit Equipment hoher Musikalität und
Zuverlässigkeit bei gleichzeitig günstigen Preisen.
Wir wünschen Ihnen viel Hörvergnügen.
Zu dieser Anleitung
Vielen Dank, daß Sie sich für den Rotel-AM/
FM-Stereo-Tuner RT-1080 entschieden haben.
Rotels Balanced-Design-Konzept entsprechend
verfügt dieser Tuner über ein ausgeklügeltes
Platinenlayout und hochwertige Bauteile.
Klanglich überzeugt er ebenso wie in puncto
Zuverlässigkeit.
Der RT-1080 ist mit einer Vielzahl von
Ausstattungsmerkmalen ausgestattet. Alle
Designaspekte sind darauf ausgelegt, den
kompletten Dynamikbereich und feinste
Nuancen der Musik wiederzugeben.
Die Signalwege sind streng symmetrisch
gehalten, um Laufzeitunterschiede in den
Kanälen zu verhindern. In die Platine sind
Metallfilmwiderstände und Polystyrol- bzw.
Polypropylenkondensatoren integriert. Alle
Aspekte dieser Konstruktion dienen nur dem
Ziel der originalgetreuen Wiedergabe von
Musik.
Page 24

RT-1080 AM/FM-Stereo-Tuner
24
Der RT-1080 ist einfach zu installieren und zu
bedienen. Sollten Sie bereits Erfahrung mit der
Installation anderer Stereosysteme haben,
dürften keinerlei Probleme auftreten. Schließen
Sie einfach die dazugehörigen Komponenten
an und genießen Sie die Musik.
Die wesentlichen Merkmale
• Bedienerfreundliche Fernbedienung
• Großzügiges Display
• Tuning-Funktionen für UKW- und MWSender
• 30 Senderspeicher
• Manuelle Einstellmöglichkeit der Frequenz
und Senderspeichersuche, automatische
Frequenzabstimmung, Senderspeichersuchlauf, direkte Frequenzeinstellung
• RDS(Radio Data System) für Europa und
RBDS(Radio Broadcast Data Service) für
die USA
• Zwei schaltbare FM-Antennenanschlüsse
• FM Mono-Taste, ANT ATT-Taste zur
Abschwächung des Signalpegels am FMAntenneneingang, FM IF NARROW-Funktion
• 12V TRIGGER-Anschlüsse zur Fernein- und
-abschaltung durch Vorverstärker und
Surround-Prozessoren von Rotel
• Computer I/O-Anschluß
Auspacken
Nehmen Sie das Gerät vorsichtig aus der
Verpackung. Neben dem Tuner enthält der
Versandkarton eine Fernbedienung und weiteres
Zubehör. Setzen Sie die beiliegenden Batterien
in die Fernbedienung ein. Bewahren Sie den
Versandkarton und das übrige
Verpackungsmaterial des RT-1080 für einen
eventuellen späteren Einsatz auf. Der Versand
oder Transport des Tuners in einer anderen als
der Originalverpackung kann zu erheblichen
Beschädigungen des Gerätes führen.
Schicken Sie die Ihrem Tuner beiliegende
Garantieanforderungskarte ausgefüllt an den
Rotel-Distributor in Ihrem Land. Bewahren Sie
bitte die Original-Kaufquittung auf. Sie belegt
am besten das Kaufdatum, das für Sie wichtig
wird, sobald Sie eine Garantieleistung in
Anspruch nehmen.
Aufstellung des Gerätes
Wie bei vielen anderen Audio-Komponenten
auch, kann die Signalqualität des RT-1080
durch seine Umgebung beeinträchtigt werden.
Stellen Sie ihn nicht auf andere Geräte.
Der RT-1080 erwärmt sich während des
normalen Betriebes. Um das Gehäuse muß ein
Freiraum von 10 cm und am Aufstellungsort eine
ausreichende Luftzirkulation gewährleistet sein,
um einer Überhitzung des Tuners vorzubeugen.
Stellen Sie das Gerät auf ein stabiles Regal.
Wir empfehlen, ihn in entsprechendem HiFiMobiliar unterzubringen. HiFi-Mobiliar ist so
ausgelegt, daß klangbeeinträchtigende
Erschütterungen gedämpft bzw. unterdrückt
werden. Lassen Sie sich von Ihrem autorisierten
Rotel-Fachhändler in bezug auf HiFi-Mobiliar
und die optimale Aufstellung von AudioKomponenten beraten.
Dem RT-1080 liegt die Fernbedienung RR-T92
bei. Daher muß der RT-1080 dort aufgestellt
werden, wo das Infrarotsignal der
Fernbedienung ungehindert den Sensor an der
Gerätefront erreichen kann.
Kabel
Achten Sie bitte darauf, daß Netz-, Digitalund die normalen Audio-Signalkabel separat
verlaufen. Dies minimiert die Wahrscheinlichkeit, daß Netz- bzw. Digitalkabel die Signale
der Analogkabel stören. Wir empfehlen,
hochwertige abgeschirmte Kabel zu
verwenden. Wenden Sie sich bei etwaigen
Fragen zu den optimalen Kabeln für Ihr System
an Ihren autorisierten Rotel-Fachhändler.
Fernbedienung
Zum Lieferumfang des RT-1080 gehört die Fernbedienung RR-T92. Über diese Fernbedienung
können viele der Funktionen des RT-1080
gesteuert werden.
Sensor an der Gerätefront
Dieser Sensor empfängt die Infrarotsignale der
Fernbedienung. Verdecken Sie ihn nicht, da
ansonsten kein ordnungsgemäßer Betrieb der
Fernbedienung gewährleistet ist. Ist der Sensor
hellem Licht, insbesondere Sonnenlicht, oder
bestimmten Beleuchtungsarten (z.B.
Halogenlicht) ausgesetzt oder sind die Batterien
verbraucht, können Fehlfunktionen auftreten.
HINWEIS
: Möchten Sie den RT-1080 über die
Fernbedienung steuern, so richten Sie diese
direkt auf den Sensor an der Gerätefront des
Tuners.
Einsetzen der Batterien in die
Fernbedienung
Vor Inbetriebnahme der Fernbedienung müssen
die beiden beiliegenden Batterien (Typ UM4/AAA) eingesetzt werden. Entfernen Sie den
Batteriefachdeckel an der Rückseite der
Fernbedienung. Legen Sie die Batterien
entsprechend den Markierungen auf dem
Batteriefachboden ein. Prüfen Sie, ob die
Fernbedienung ordnungsgemäß funktioniert.
Wenn ja, schließen Sie den Deckel.
HINWEIS
: Wird die Fernbedienung über
längere Zeit nicht benutzt, sollten die Batterien
herausgenommen werden. Lassen Sie keine
verbrauchten Batterien in der Fernbedienung,
da diese durch auslaufende Batterien
beschädigt werden kann.
Anschlüsse an der
Rückseite
Der RT-1080 verfügt über die folgenden
Anschlußmöglichkeiten: Hochpegelausgänge,
zwei FM-Antennenanschlüsse, einen AMAntennenanschluß, eine Computerschnittstelle,
einen EXT REM. IN-Anschluß, 12V TRIGGERAnschlüsse sowie den Netzeingang.
HINWEIS
komponenten erst an das Netz an, wenn die
Geräte miteinander verbunden sind und alle
Verbindungen zwischen den Geräten
ordnungsgemäß hergestellt wurden.
Cinch-Ausgänge
Über die beiden Hochpegel-Cinch-Audioausgänge sendet der RT-1080 Stereo-Signale
konstanter Stärke zu Ihrem Vorverstärker, SystemController oder Vollverstärker. Verwenden Sie
ein Standard-Cinch-Audiokabel, um die mit „LEFT
OUTPUT“ gekennzeichnete Buchse mit dem
linken Tuner-Eingangsanschluß an Ihrem SystemController zu verbinden. Verbinden Sie die mit
„RIGHT OUTPUT“ gekennzeichnete Buchse über
ein zweites Standard-Cinch-Kabel mit dem
rechten Tuner-Eingangsanschluß an Ihrem
System-Controller.
: Schließen Sie die System-
Page 25

25
Deutsch
MW-Rahmenantenne
Zum Empfang der MW-Audiosignale liegt dem
RT-1080 eine Rahmenantenne bei. Nehmen
Sie die Rahmenantenne aus dem Versandkarton
und plazieren Sie sie neben dem RT-1080.
Schließen Sie das zweiadrige 300-Ohm-Kabel
der Rahmenantenne mit den Kabelschuhen an
die mit „AM“ und „G“ gekennzeichneten
Anschlußklemmen an. Dabei spielt es keine
Rolle, welches Kabel mit welcher
Anschlußklemme verbunden wird. Achten Sie
aber auf eine stabile Verbindung und darauf,
daß die beiden Kabel sich nicht berühren.
Verändern Sie die Ausrichtung der Antenne
solange, bis Sie einen optimalen Empfang
haben.
HINWEIS
: Schließen Sie eine MW-Außen-
antenne erst dann an, wenn das Antennensystem von einem Fachmann den örtlichen
Vorschriften entsprechend installiert worden ist.
FM-Antennenanschluß
Der RT-1080 verfügt über zwei, mit A und B
gekennzeichnete FM-Antennenanschlüsse,
zwischen denen über die ANT A/B-Taste an
der Gerätefront oder der Fernbedienung
gewählt werden kann. Diese Funktion
ermöglicht Ihnen, zwischen einer Zimmer- und
einer Außenantenne oder zwischen einer
Standard-UKW-Antenne und einem Kabel- oder
TV-Satelliten-Decoder, der ein UKWAntennensignal zur Verfügung stellen kann,
hin und her zu schalten.
HINWEIS
ausgegangen, daß die dem Tuner
beiliegende T-förmige Standard-UKWZimmerantenne verwendet wird. Hinweise
zum Anschluß eines Kabel- oder SatellitenTV-UKW-Antennensystems entnehmen Sie
bitte der dem System beiliegenden Anleitung.
Der RT-1080 wird mit einer T-förmigen UKWZimmerantenne geliefert. Nehmen Sie die
Antenne aus der Verpackung und schließen
Sie den Koax-F-Stecker an einen der FMAnschlüsse an der Rückseite des RT-1080 an.
An jeder Seite der T-förmigen Antenne befindet
sich jeweils eine Befestigungsöse. Damit kann
die Antenne an einer Wand befestigt werden.
Experimentieren Sie mit der Position der
Antenne, bis der Empfang optimal ist.
: Im folgenden wird davon
HINWEIS
: Verwenden Sie eine Außenantenne,
so schließen Sie das 75-Ohm-Koaxialkabel
anstelle der Zimmerantenne an den FMAnschluß an. Vorher ist das Antennensystem
von einem Fachmann entsprechend der
örtlichen Bestimmungen zu installieren. In den
USA ist der beillegende Adapter (F-Typ)
erforderlich, um das 75-Ohm-Koaxialkabel an
den Antenneneingang anzuschließen.
Netzeingang
Ihr RT-1080 wird von Rotel so eingestellt, daß
er der in Ihrem Land üblichen Spannungsversorgung (Europa: 230 Volt/50 Hz, USA:
115 Volt/ 60 Hz) entspricht. Die Einstellung
ist an der Geräterückseite angegeben.
Verbinden Sie das beiliegende Netzkabel mit
der Geräterückseite. Sind alle Verbindungen
ordnungsgemäß hergestellt, schließen Sie das
Netzkabel an eine Wandsteckdose oder die
Gerätesteckdose einer anderen Systemkomponente an.
12 V TRIGGER-Anschlüsse
Der RT-1080 kann über das 12-Volt-Triggersignal
eines Rotel-Vorverstärkers aktiviert werden.
Die mit IN gekennzeichnete Buchse empfängt
das 12-Volt-Triggersignal des Vorverstärkers und
über die mit OUT gekennzeichnete Buchse kann
das Triggersignal zu einer anderen Komponente
(z.B. zu einer Rotel-Endstufe) geleitet werden.
Der Triggereingang akzeptiert Gleich- oder
Wechselspannungssignale von 3 bis 30 Volt.
Ist ein Kabel an den Eingang angeschlossen
und liegt ein Triggersignal an, wird der Tuner
aktiviert. Wird das Triggersignal unterbrochen,
schaltet der Tuner in den Standby-Modus. Die
Betriebsanzeige leuchtet weiter, jedoch schalten
sich Display und Gerät ab.
HINWEIS
: Möchten Sie das 12V-Trigger-Feature
nutzen, so ist die POWER-Taste in die EINPosition zu setzen.
EXT REM. IN-Buchse
Diese 3,5-mm-Anschlußbuchse kann über ein
Kabel mit 3,5-mm-Klinkensteckern mit einem
Video-Link-Infrarotempfänger von Xantech
(können Sie optional bei Systeminstallateuren
erwerben) verbunden werden. Dieses Feature
ist sehr hilfreich, wenn das Gerät in einen
Schrank eingebaut und der Infrarotsensor
verdeckt ist. Lassen Sie sich diesbezüglich von
Ihrem autorisierten Fachhändler beraten.
Computerschnittstelle
Der RT-1080 kann über einen HomeAutomation-Controller oder einen Computer
mit spezieller Audio-Software bedient werden.
Dabei werden die Betriebscodes, die der Tuner
normalerweise von der Fernbedienung RR-T92
erhält, vom Computer gesendet.
Anschluß bietet der COMPUTER I/O-Eingang
an der Geräterückseite. Die Verbindung zu
diesem Eingang kann über einen RJ-45-8-PinStecker hergestellt werden. Diese Stecker
werden normalerweise bei der 10-BaseT UTPEthernet-Verkabelung genutzt.
Weitere Informationen zu diesem
Ausstattungsmerkmal des RT-1080 erhalten Sie
bei Ihrem autorisierten Rotel-Fachhändler.
Grundbedienelemente
Die folgenden Erläuterungen helfen Ihnen, sich
mit den Ausstattungsmerkmalen und
Bedienelementen vertraut zu machen. Die
Referenznummern beziehen sich auf
die Abbildungen am Anfang dieser
Bedienungsanleitung.
Die meisten Funktionen können über die
Bedienelemente an der Gerätefront (vergleiche
Ziffern in der Abbildung der Gerätefront) und
die beiliegende Fernbedienung (vergleiche
Buchstaben in der Abbildung der Fernbedienung) gesteuert werden. Möchten Sie
beispielsweise von MW auf UKW umschalten,
können Sie entweder die BAND-Taste
der Gerätefront drücken oder die BAND-Taste
auf der Fernbedienung. Ist eine Referenznummer angegeben, so kann diese Funktion
nur über die Bedienelemente an der Gerätefront
oder nur über die Fernbedienung aktiviert
werden.
Netzschalter
Der RT-1080 kann nur über den Netzschalter
(POWER-Taste) an der Gerätefront und nicht
über die Fernbedienung ein- und ausgeschaltet
werden.
Drücken Sie den Netzschalter, um das Gerät
einzuschalten. Die LED über dem Netzschalter
und das Display beginnen zu leuchten. Drücken
Sie den Netzschalter noch einmal, so schalten
Sie das Gerät ab.
an
Page 26

RT-1080 AM/FM-Stereo-Tuner
26
HINWEIS
: Wenn Sie den RT-1080 an die
Gerätesteckdose einer anderen Systemkomponente anschließen oder die 12V
TRIGGER-Funktion nutzen, muß der
NETZSCHALTER vorher gedrückt (also in
die EIN-Position) gebracht werden.
Frontdisplay
Das große FL-Display ist mittig in den RT-1080
integriert und stellt Statusinformationen über
den AM/FM-Receiver zur Verfügung (z.B.
Anzeige der Sendefrequenz, des Bandbereichs, des Senderspeichers, von RDSInformationen usw.).
DIMMER-Taste
Diese Taste finden Sie nur auf der
Fernbedienung. Sie haben die folgenden
Einstellmöglichkeiten: NORMAL, DIM oder OFF.
Ist OFF aktiviert, so wird im Display nach
Drücken einer beliebigen Taste die normale
Helligkeitsstufe eingestellt. Durch Drücken der
DIMMER-Taste rufen Sie nacheinander die zur
Verfügung stehenden Einstellungen auf.
HINWEIS
: Wird der Tuner ausgeschaltet und
dann wieder eingeschaltet, leuchtet das
Display in der normalen Helligkeitsstufe.
MEMORY-Taste
Mit der MEMORY-Taste können verschiedene
Einstellungen im Setup und beim Betrieb des
RT-1080 bestätigt und gespeichert werden (z.B.
die Senderspeicher). Weitere Details folgen
in den entsprechenden Abschnitten.
Einstellen des Ländermodus
Der RT-1080 verfügt über zwei Modi (einen
für die USA und einen für Europa), die das
Gerät entsprechend den Anforderungen des
jeweiligen Landes konfigurieren (einschließlich
FM-Tuning-Intervalle, AM-Tuning-Intervalle und
Unterscheidung zwischen dem amerikanischen
RBDS- und dem europäischen RDS-Standard).
Ihr Gerät wird im Werk passend für das Land
eingestellt, in das es geliefert wird.
Um in den US-Standardmodus zu
schalten, drücken Sie 5 Sekunden lang die
POWER-, die MEMORY- und die Zifferntaste
9. Im Display erscheint das Wort LOADING,
und das Gerät wechselt in den US-Modus.
Um in den Europa-Modus zu schalten,
drücken Sie länger als 5 Sekunden die
POWER-, die MEMORY- und die Zifferntaste
0. Im Display erscheint das Wort LOADING,
und das Gerät wechselt in den Europa-Modus.
Grund-Tuning-Funktionen
Der RT-1080 ist ein AM/FM-Digitaltuner mit
RDS- und RBDS-Funktion sowie 30 Senderspeichern. Das Gerät bietet eine Reihe von
Tuning-Funktionen. Im folgenden erhalten Sie
eine kurze Übersicht (weitere Einzelheiten
entnehmen Sie bitte den entsprechenden
Abschnitten in dieser Anleitung):
• Manuelles Einstellen der Frequenz.
Setzen Sie dazu die TUNE/PRESET-Taste
auf TUNE. Deaktivieren Sie die AUTOTUNING-Funktion. Schalten Sie mit
DOWN/UP auf niedrigere bzw. höhere
Frequenzen um.
• Bei der direkten Frequenzeinstellung
geben Sie die Frequenz des gewünschten
Senders direkt über die Zifferntasten ein.
Drücken Sie zunächst die FREQUENCY
DIRECT-Taste auf der Fernbedienung und
anschließend die entsprechenden
ZIFFERNTASTEN.
• Bei der automatischen Frequenz-
abstimmung können Sie niedrigere und
höhere Frequenzen anwählen und so das
nächste Sendesignal finden. Setzen Sie die
TUNE/PRESET-Taste auf TUNE. Aktivieren
Sie den AUTO-TUNING-Modus. Mit
DOWN/UP können Sie Sender mit
niedrigeren bzw. höheren Frequenzen
einstellen.
• Bei der Senderspeichersuche können Sie
die Nummer eines gespeicherten Senders
direkt über die Zifferntasten eingeben.
• Beim Senderspeichersuchlauf werden
die gespeicherten Sender der Reihe nach
abgerufen. Drücken Sie die PRESET SCANTaste, um mit dem Suchlauf zu beginnen.
• Die RDS (Europa)- bzw. RBDS (USA)-
Funktion bietet eine Reihe von besonderen
Tuning- und Suchmöglichkeiten. Diese
basieren auf Datencodes, die mit dem
Sendesignal codiert sind. Detaillierte
Informationen hierzu entnehmen Sie bitte
dem Kapitel RDS- und RBDS-Empfang in
dieser Anleitung.
BAND-Taste
Mit der BAND-Taste können Sie zwischen UKWund MW-Sendern hin und her schalten. Zur
Bestätigung Ihrer Wahl leuchtet eine entsprechende Anzeige links im DISPLAY. Ferner
wird die Frequenz des eingestellten Senders
angezeigt.
Bedienelemente zur
Frequenzabstimmung
(TUNING CONTROLS)
Die Tasten DOWN/UP an der Gerätefront und
<TUN/PRESET> auf der Fernbedienung dienen
beim RT-1080 als wesentliche Bedienelemente
zur Frequenzabstimmung. Im folgenden nennen
wir der Einfachheit halber nur die DOWN/UPTasten. Sie können aber sowohl die Tasten an
der Gerätefront als auch die Tasten auf der
Fernbedienung nutzen; ihre Funktion ist identisch.
Diese Tasten bieten abhängig vom Betriebsmodus mehrere verschiedene Tuning-Funktionen:
Im Frequenzabstimmmodus mit
deaktivierter AUTO-TUNING-Funktion
drücken Sie eine DOWN/UP-Taste, um manuell
zur nächsten Frequenz zu springen. Dies ist
unabhängig davon, ob auf dieser Frequenz
gesendet wird oder nicht. [Weitere
Informationen zur Änderung der Tuning-Modi
entnehmen Sie bitte unten den Abschnitten
TUNE/PRESET-Taste und AUTO-TUNING-Taste.]
Im Frequenzabstimmmodus mit
aktivierter AUTO-TUNING-Funktion
drücken Sie eine DOWN/UP-Taste, um den
AUTO-TUNING-Modus zu aktivieren. Der Tuner
beginnt nun automatisch, die einzelnen
Frequenzen zu durchlaufen, bis das nächste
Empfangssignal erkannt wird. Ist der gefundene
Sender nicht der gewünschte, wiederholen Sie
den Auto-Tuning-Vorgang, um den nächsten
Sender zu finden. Schwache Sender werden
im Auto-Tuning-Modus übersprungen. Empfängt
der Tuner kein Signal, so kehrt er zum zuletzt
eingestellten Sender zurück. [Weitere
Informationen zur Änderung der Tuning-Modi
entnehmen Sie bitte den Abschnitten TUNE/
PRESET-Taste und AUTO-TUNING-Taste.]
Im PRESET-TUNING-Modus drücken Sie
eine DOWN/UP-Taste, um den nächsten
Senderspeicher aufzurufen. [Weitere
Informationen zur Änderung der TuningModi entnehmen Sie bitte dem Abschnitt
TUNE/PRESET-Taste.]
Page 27

27
Deutsch
Im RDS-PTY-Suchmodus drücken Sie eine
DOWN/UP-Taste, um die gewünschte
Programmkategorie aus einer im Display
erscheinenden Liste auszuwählen. [Weitere
Informationen entnehmen Sie bitte dem
Abschnitt zur PTY-Taste].
HINWEIS
: Beim Tunen erweist sich das
großzügige Display an der Gerätefront
besonders bedienerfreundlich. Es zeigt die
eingestellte Frequenz an, und eine Signalstärkeanzeige gibt Auskunft über die
Empfangsbedingungen. Das Wort TUNED
erscheint, wenn ein Signal ausreichender
Stärke empfangen wird. Ist das eingehende
Signal ein Stereo-FM-Signal, leuchten die
Buchstaben ST. Zusätzlich wird der gewählte
Tuning-Modus angezeigt.
ZIFFERNTASTEN:
Senderspeicher
Der RT-1080 kann bis zu 30 UKW-/MWSender in beliebiger Reihenfolge speichern.
Diese Sender können jederzeit über die
ZIFFERNTASTEN abgerufen werden.
Im Werk werden eine Reihe von Sendern
gespeichert, wobei diese nicht überall
empfangen werden können. Möchten Sie einen
neuen Sender speichern, gehen Sie
folgendermaßen vor:
1. Stellen Sie den gewünschten Bandbereich
ein: UKW oder MW.
2. Drücken Sie die MEMORY-Taste. Eine
MEMORY-Anzeige erscheint im Frontdisplay.
FREQUENCY DIRECT-Taste :
Direkte Frequenzeinstellung
über die Zehnertastatur
Kennen Sie die genaue Frequenz des
gewünschten Senders, können Sie diese direkt
mit der FREQUENCY DIRECT-Taste (nur auf der
Fernbedienung) und den ZIFFERNTASTEN
direkt einstellen.
1. Drücken Sie die FREQUENCY DIRECT-Taste,
um den Ziffernblock vom Senderspeicherauf den Direktzugriffsmodus zu schalten.
Im Frontdisplay erscheinen eine Reihe von
Platzhaltern, die für die Senderfrequenz
stehen. Der erste Platzhalter blinkt.
2. Geben Sie über den ZIFFERNBLOCK die
erste Ziffer der Senderfrequenz ein. Die
Ziffer erscheint im Frequenzdisplay und der
zweite Platzhalter leuchtet auf. Geben Sie
die restlichen Ziffern für die Frequenz ein.
Sind alle Ziffern eingegeben, stimmt der
Tuner automatisch auf die angezeigte
Senderfrequenz ab.
HINWEIS
: Bei der amerikanischen Version geben
Sie im FM-Modus durch Drücken der 1 eine 10
ein. Bei der europäischen Version müssen Sie
zur Eingabe einer 10 die 1 und anschließend
die 0 drücken. Für die amerikanischen FMSender geben Sie nach dem Punkt nur eine
Ziffer ein (siehe das erste der folgenden
Beispiele). Für die europäischen FM-Sender
geben Sie hinter dem Punkt zwei Ziffern ein
(siehe das zweite der folgenden Beispiele).
BEISPIELE
:
automatisch nach dem nächsten
Empfangssignal zu suchen. Ist der gefundene
Sender nicht der gewünschte, nutzen Sie erneut
die DOWN/UP-Tasten, um den nächsten
Sender zu suchen. Schwache Sender werden
beim Auto Tuning übersprungen. Empfängt der
Tuner kein Signal, kehrt er zum vorher
eingestellten Sender zurück.
Drücken Sie die AUTO TUNING-Taste, um
zwischen dem FREQUENCY TUNING-Modus
und dem AUTO TUNING-Modus hin und her
zu schalten. Im Display erscheint bei aktivierter
Auto Tuning-Funktion eine AUTO-Anzeige.
HINWEIS
: Der AUTO TUNING-Modus wird
deaktiviert, wenn die TUNE/PRESET-Taste in
den PRESET Tuning-Modus gesetzt wird. Siehe
folgenden Abschnitt.
TUNE/PRESET-Taste
Mit der TUNE/PRESET-Taste können Sie
zwischen dem FREQUENCY-TUNING-Modus
(nach Drücken der DOWN/UP-Tasten sucht
sich der RT-1080 die nächste Sendefrequenz)
und dem PRESET TUNING-Modus (nach
Drücken der DOWN/UP-Tasten sucht sich der
RT-1080 den nächsten gespeicherten Sender).
Drücken Sie die TUNE/PRESET-Taste, um
zwischen den beiden Modi hin und her zu
schalten. Eine PRESET-Anzeige leuchtet bei
aktiviertem PRESET-Modus im Frontdisplay.
HINWEIS
: Der AUTO TUNING-Modus wird
deaktiviert, wenn die TUNE/PRESET-Taste in
den PRESET Tuning-Modus gesetzt wird.
3. Drücken Sie nun, während die MEMORYAnzeige aufleuchtet, die Nummer, unter der
Sie die Senderfrequenz speichern möchten.
Um beispielsweise einen Sender unter der
Nummer 3 zu speichern, drücken Sie die
Zifferntaste 3. Um einen Sender unter der
Nummer 15 zu speichern, drücken Sie erst
die Taste 1 und anschließend die Taste 5.
4. Ein Sender wird aus dem Speicher gelöscht,
sobald unter derselben Nummer eine neue
Frequenz gespeichert wird.
Möchten Sie einen gespeicherten
Sender abrufen, so drücken Sie die
entsprechende(n) ZIFFERNTASTE(N). Um
z.B. Senderspeicher 3 abzurufen, drücken Sie
die Taste 3. Um Senderspeicher 30 aufzurufen,
drücken Sie die Taste 3 und anschließend
innerhalb von 5 Sekunden die Taste 0.
(USA FM) 87.50MHz
Drücke: 8>7>5
(Europa FM) 87.50MHz
Drücke: 8>7>5>0
(alle AM) 1610kHz
Drücke: 1>6>1>0
Erfolgt innerhalb von fünf Sekunden keine
Frequenzeingabe, wird die FREQUENCY DIRECT
Tuning-Funktion deaktiviert. Der Tuner schaltet
auf den zuletzt eingestellten Sender zurück.
AUTO TUNING-Taste
Mit der AUTO TUNING-Taste können Sie
zwischen der Frequenzsuchfunktion und der
manuellen Frequenzabstimmung wählen.
Nutzen Sie die DOWN/UP-Tasten im AUTO
TUNING-Modus, beginnt der Tuner
PRESET SCAN-Taste
Durch Drücken dieser Taste wird der Senderspeichersuchlauf aktiviert. Alle gespeicherten
Sender werden der Reihe nach abgerufen.
Jeder Sender wird fünf Sekunden gespielt,
bevor der RT-1080 zum nächsten schaltet. Spielt
der RT-1080 den gewünschten Sender, drücken
Sie noch einmal die PRESET SCAN-Taste, um
den Senderspeichersuchlauf zu beenden.
HINWEIS
: Ist bereits ein gespeicherter Sender
eingestellt, so beginnt der Senderspeichersuchlauf nach Drücken der PRESET
SCAN-Taste mit der nächst höheren Speichernummer. Es werden alle Senderspeicher
abgerufen, bis der Tuner am Ausgangssender
angekommen ist. Drücken Sie die PRESET
SCAN-Taste und ist vorher kein gespeicherter
Sender eingestellt worden, so beginnt der
Page 28

RT-1080 AM/FM-Stereo-Tuner
28
Senderspeichersuchlauf mit SENDERSPEICHER 1 und ruft bis SENDERSPEICHER
30 alle gespeicherten Sender ab.
RDS- und RBDS-Empfang
Der Rotel RT-1080 ist mit RDS(Radio Data
System)-Funktion für Europa und RBDS(Radio
Broadcast Data Service)-Funktion für Amerika
ausgestattet. Bei diesen Übertragungssystemen
werden beim UKW-Empfang zusammen mit
dem Radiosignal codierte Signale übertragen.
Diese Signale werden von einem RDS- bzw.
RBDS-Empfänger decodiert und damit eine Reihe
zusätzlicher Informationen zur Verfügung gestellt:
1. Anzeige des Sendernamens des
empfangenen Senders (z.B. BBC1)
2. Anzeige des Programminhalts des
jeweiligen Senders (z.B. ROCK oder
NEWS)
3. Verkehrsfunk
4. eine Fließtextanzeige für Ankündigungen
oder Informationen
Zusätzlich haben Sie mit der RDS-Funktion die
Möglichkeit,
1. nach einem Sender zu suchen, der den
gewünschten Programminhalt ausstrahlt
(PTY)
2. einen Sender mit Verkehrsfunk zu suchen
(TP)
3. sich den stärksten Sender mit speziellen
Verkehrsinformationen zu suchen (TA).
HINWEIS:
Eine Nutzung der RDS-Funktion ist
nur dann möglich, wenn der Sender
entsprechend codierte Signale aussendet.
Somit funktioniert dies nur in Ländern, in
denen RDS implementiert ist und die Sender
RDS-Signale übertragen. Sind keine RDSSender vorhanden, arbeitet der RT-1080 als
Standard-Radio-Receiver.
HINWEIS:
RDS- und RBDS-Informationen stehen
nur bei UKW-Sendern zur Verfügung. Die im
folgenden beschriebenen Features können nur
im FM-Modus genutzt werden.
DISPLAY-Taste
Überträgt ein eingestellter Sender RDSInformationen und leuchtet die RDS-Anzeige
im Frontdisplay, so gibt es fünf DisplayOptionen. Diese können Sie nacheinander
durch Drücken der DISPLAY-Taste abrufen:
1. Standard-FREQUENZ-Anzeige.
2. PROGRAMMDIENST-Bezeichnung.
Dies ist normalerweise der Sendername
wie z.B. BBC1. Sendet der eingestellte
Sender keine RDS-Signale, blinkt im Display
die Buchstabenkombination PS.
3. PROGRAMMKATEGORIE. Die folgende
Aufzählung ist eine standardisierte Liste von
Programmkategorien (NEWS, CURRENT
AFFAIRS, INFO, SPORT, EDUCATION,
DRAMA, CULTURE, SCIENCE, VARIED,
POP, ROCK, EASY LISTENING, LIGHT
CLASSICAL, SERIOUS CLASSICAL, OTHER
MUSIC, WEATHER, FINANCE, CHILDREN,
SOCIAL AFFAIRS, RELIGION, PHONE IN,
TRAVEL, LEISURE, JAZZ, COUNTRY,
NATIONAL MUSIC, OLDIES, FOLK und
DOCUMENTARY). Sendet der gewählte
Sender keine RDS-Signale, so blinkt im
Display die Buchstabenkombination PT.
4. CLOCK TIME. Eine vom Sender
übertragene Zeit- und Datumsanzeige.
Überträgt der eingestellte Sender kein RDSSignal, blinkt im Display die
Buchstabenkombination CT.
5. RADIO TEXT. Vom Sender ausgestrahlte
zusätzliche Fließtextinformationen.
Überträgt der ausgewählte Sender kein
RDS-Signal, blinkt im Display die
Buchstabenkombination RT.
PTY-Taste
Die PTY-Suchfunktion ermöglicht die Suche nach
RDS-Sendern, die eine vorgegebene Programmkategorie ausstrahlen.
1. Drücken Sie die PTY-Taste. Die Programmkategorie des eingestellten Senders erscheint
im Display.
2. Wenn Sie dies möchten, so können Sie mit
den DOWN/UP-Tasten die Liste durchsuchen
und auf eine andere PROGRAMMKATEGORIE umschalten.
3. Drücken Sie die PTY-Taste innerhalb von 5
Sekunden ein zweites Mal. Der Tuner sucht
nun nach einem RDS-Sender, der die
gewählte Programmkategorie überträgt.
Wird die PTY-Taste innerhalb der nächsten
fünf Sekunden nach Auswahl der
Programmkategorie nicht gedrückt, wird
die Suchfunktion deaktiviert.
4. Findet der Tuner keinen Sender, der die
gewünschte Programmkategorie ausstrahlt,
kehrt der Tuner zum zuletzt eingestellten
Sender zurück.
5. Deaktivieren Sie die PTY-Funktion durch
Drücken einer beliebigen anderen Taste (mit
Ausnahme der DIMMER- und der FM
MONO-Taste).
TP-Taste
Sie suchen einen RDS-Sender, der Verkehrsfunk
überträgt:
1. Drücken Sie die TP-Taste. Der Tuner sucht
nun einen RDS-Sender, der Verkehrsinformationen sendet.
2. Findet er keinen Sender, kehrt der Tuner
zum zuletzt eingestellten Sender zurück.
3. Deaktivieren Sie die TP-Funktion, indem Sie
eine beliebige andere Taste (mit Ausnahme
der DIMMER- und der FM MONO-Taste)
drücken.
TA-Taste
So suchen Sie nach einem starken RDS-Sender,
der spezielle Verkehrsinformationen überträgt:
1. Drücken Sie die TA-Taste. Der Tuner wird
versuchen, einen RDS-Sender zu finden,
der die gewünschten Verkehrsinformationen
überträgt.
2. Findet er keinen Sender, kehrt der Tuner
zum zuletzt eingestellten Sender zurück.
3. Deaktivieren Sie die TA-Funktion, indem Sie
eine beliebige andere Taste (mit Ausnahme
der DIMMER- und der FM MONO-Taste)
drücken.
AF-Taste
In einigen Fällen gehört der RDS-Sender zu einem
Netz von Sendern, die alle das gleiche Programm
übertragen (in Großbritannien wird
beispielsweise BBC1 auf mehreren verschiedenen Frequenzen übertragen). Sender,
die dieses Programm ausstrahlen, können dem
Tuner ein RDS-Datensignal mit einer Liste
alternativer Frequenzen senden. Wird diese Liste
übertragen, erscheint im DISPLAY die AF-Anzeige.
Page 29

29
Deutsch
Ist der Empfang eines Senders schlecht, wird nach
dem Drücken der AF-Taste nach einem stärkeren
Sender gesucht, der das gleiche Programm
ausstrahlt. Die AF-Taste funktioniert allerdings nur,
wenn die AF-Anzeige im DISPLAY leuchtet.
1. Drücken Sie die AF-Taste. Die Suche beginnt
und es wird geprüft, ob ein stärkerer Sender
das gleiche Programm ausstrahlt.
2. Wird kein Sender gefunden, kehrt der Tuner
zum zuletzt eingestellten Sender zurück.
3. Ist der neue Sender schwächer als der zuvor
eingestellte Sender, so kehrt der Tuner zu
letzterem zurück.
4. Drücken Sie eine beliebige Taste (mit Ausnahme der DIMMER- und der FM MONOTaste), um die AF-Funktion zu beenden.
Zusätzliche Tuning-Tasten
Die im folgenden aufgeführten Ausstattungsmerkmale werden zur Verbesserung des FMEmpfangs genutzt. Über die ANT A/B-Taste
bietet der RT-1080 eine zusätzliche Funktion.
FM MONO-Taste
Mit der MONO-Taste schalten Sie im FM-Modus
von Stereoempfang auf Monoempfang um. Im
Stereo-Modus hören Sie ein Stereosignal, wenn
der übertragende Sender ein Stereosignal sendet
und die Signalstärke groß genug ist. Im
Frontdisplay leuchtet die Stereoanzeige. Im
Mono-Modus hören Sie ein Monosignal, auch
wenn der Sender ein Stereosignal sendet.
HINWEIS
: Das Umschalten in den Mono-Modus
kann ein sinnvoller Weg sein, um den
Empfang schwacher oder weit entfernter FMSignale zu verbessern. Für einen sauberen
Monoempfang ist eine geringere Signalstärke
erforderlich als für den Stereoempfang.
ANT ATT-Taste
Diese Taste ist besser unter der Bezeichnung
LOCAL/DISTANCE-Taste bekannt. Durch
Aktivieren dieser Funktion wird der Signalpegel
am FM-Antenneneingang gesenkt. Bei Sendern,
deren Abstand zum Tuner ausreichend ist, sollte
diese Taste in der Standard- bzw. OFF-Position
bleiben. Wohnen Sie jedoch in der Nähe des
Radiosenders, kann das eingehende Signal
so stark sein, daß es zu einer Überlastung der
FM-Eingänge kommt. Drücken Sie die ANT ATTTaste, um das eingehende Signal
abzuschwächen. Ist diese Funktion aktiviert,
erscheint im DISPLAY die Anzeige LOC. Durch
erneutes Drücken dieser Taste schalten Sie in
den normalen Betriebszustand zurück. Diese
Taste beeinflußt nur den FM-Empfang.
FM IF NARROW-Taste
Beim FM-Empfang wird ein Trägersignal
empfangen und decodiert, das auf die
abgestimmte Frequenz eingepegelt ist. Der
Receiver akzeptiert jedoch auch Signale, die
etwas von dieser Trägerfrequenz abweichen.
Dies führt in den meisten Gebieten zu einer
zufriedenstellenden Empfangsqualität.
Wohnen Sie aber in einer Stadt, wo die
Frequenzen mehrerer Sender sehr dicht
beieinander liegen, so kann es zu Interferenzen
kommen. Um unter diesen Bedingungen für
einen besseren Empfang zu sorgen, bietet der
RT-1080 die Möglichkeit, den von der präzise
abgestimmten Frequenz abweichenden und
vom Tuner akzeptierten Frequenzbereich zu
reduzieren und somit Interferenzen zwischen
den Sendern zu verringern. Drücken Sie die
FM IF NARROW-Taste, um dieses Feature zu
nutzen. Im DISPLAY erscheint die Anzeige
NARROW. Drücken Sie diese Taste erneut, um
in den normalen Betriebszustand zurückzuschalten.
ANT A/B-Taste
Wie im Abschnitt „ANSCHLÜSSE AN DER
RÜCKSEITE“ dieser Anleitung beschrieben,
verfügt der RT-1080 an der Rückseite über zwei,
mit A und B gekennzeichnete FM-Antennenanschlüsse. Über die ANT A/B-Taste können Sie
zwischen A und B hin und her schalten. Im
DISPLAY leuchtet der Buchstabe A oder der
Buchstabe B und zeigt damit an, welcher FMAntenneneingang gerade aktiviert ist.
Technische Daten
FM-Tuner
Empfindlichkeit
12,2 dBf
50-dB-Empfindlichkeitsschwelle
20,2 dBf (Mono)
45,3 dBf (Stereo)
Geräuschspannungsabstand (bei 65 dBf)
75 dBf (Mono)
72 dBf (Stereo)
Klirrfaktor (bei 65 dBf)
0,2 % (Mono)
0,3 % (Stereo)
Frequenzgang
10 – 15.000 Hz, ± 3 dB
Gleichwellenselektion
2,0 dB
Nachbarkanalunterdrückung
47 dB (± 400 kHz)
Nebenwellenunterdrückung
90 dB
Spiegelfrequenzdämpfung
80 dB
ZF-Unterdrückung
80 dB
AM-Unterdrückung
55 dB
Stereokanaltrennung
(100 Hz/1 kHz/10 kHz)
40 dB/45 dB/35 dB
Ausgangsspannung
1,2 V
Antenneneingang
75 Ohm (unsymmetrisch)
AM-Tuner
Empfindlichkeit
300 µV/m
Selektivität
25 dB
Klirrfaktor
0,5 %
Spiegelfrequenzdämpfung
45 dB
Geräuschspannungsabstand
48 dB
Ausgangsspannung
165 mV
Antenneneingang
Anschluß für eine Rahmenantenne
Sonstige Daten
Leistungsaufnahme
10 Watt
Spannungsversorgung
115 V, 60 Hz (USA)
230 V, 50 Hz (Europa)
Gewicht
4,7 kg
Abmessungen (B x H x T)
430 x 92 x 340 mm
Die hierin gemachten Angaben entsprechen dem
Stand bei Drucklegung. Änderungen in Technik
und Ausstattung vorbehalten.
Rotel und das Rotel HiFi-Logo sind eingetragene
Warenzeichen von The Rotel Co, Ltd., Tokio, Japan.
Page 30

RT-1080 Sintonizzatore Stereo AM/FM
30
Indice
I numeri nel riquadro si riferiscono all’illustrazione
dell’RT-1080. Le lettere nel riquadro si riferiscono
all’illustrazione dell’RR-T92.
1: Controlli e collegamenti 6
2: Schema di collegamento 6
3: Controllo a distanza RR-T92 7
Alcune Parole Sulla Rotel ......................30
Per Cominciare .....................................30
Caratteristiche essenziali 31
Sballaggio 31
Posizionamento 31
Cavi 31
Comando a Distanza .............................31
Sensore a distanza 31
Pile del comando a distanza 31
Collegamenti sul Pannello Posteriore .....32
Uscite RCA 32
Antenna am ad anello 32
Antenna FM 32
Ingresso in corrente alternata 32
Attivazione Trigger 12V 32
Presa EXT REM. IN 32
Interfaccia COMPUTER I/O 32
Controlli Operativi di Base ....................33
Pulsante di alimentazione 33
Display pannello anteriore 33
Pulsante DIMMER 33
Pulsante MEMORY 33
Modalità’ di regolazione a seconda
del paese di utilizzo 33
Controlli Base di Sintonia ......................33
Pulsante BAND 33
Controlli di sintonizzazione
(TUNING) 33
Tastiera numerica:
Preselezione delle stazioni 34
Pulsante di FREQUENCY DIRECT:
sintonizzazione di accesso diretto 34
Pulsante di AUTO TUNING 35
Pulsante TUNE/PRESET 35
Pulsante PRESET SCAN 35
Ricezione di Trasmissioni RDS e RBDS ... 35
Pulsante DISPLAY 35
Pulsante PTY 36
Pulsante TP 36
Pulsante TA 36
Pulsante AF 36
Altre Caratteristiche
di Sintonizzazione ................................36
Pulsante FM MONO 36
Pulsante ANT ATT 36
Pulsante NARROW IF FM 36
Pulsante ANT A/B 37
Caratteristiche .....................................37
Sintonizzatore FM 37
Sintonizzatore AM 37
Generali 37
Alcune Parole Sulla Rotel
Una famiglia, la cui passione per la musica ha
spinto a realizzare componenti hi-fi di qualità,
fondò la Rotel più di 40 anni fa. Attraverso gli
anni la passione è rimasta intatta e l’obbiettivo
di offrire prodotti eccezionali agli audiofili e
amanti della musica ad un costo non elevato
è condiviso da tutti alla Rotel.
Gli ingegneri lavorano come una squadra
affiatata, ascoltando e mettendo a punto ogni
nuovo prodotto finché non raggiunge
perfettamente i loro standard musicali. Sono
liberi scegliere i componenti in qualsiasi parte
del mondo al fine di realizzare il prodotto nel
miglior modo possibile. Così potrete trovare
condensatori provenienti dall’Inghilterra e
Germania, semiconduttori dal Giappone o dagli
Stati Uniti, mentre i trasformatori sono prodotti
proprio dalla Rotel.
La fama di eccellenza della Rotel è stata
guadagnata grazie a centinaia di ottime
riconoscimenti conferiti dai più autorevoli esperti
del settore, che ascoltano la musica giorno. I
loro commenti confermano l’obiettivo della
società – La ricerca di un che sia musicale,
affidabile e conveniente.
Vi ringraziamo per aver scelto questo prodotto
augurandovi molte ore di piacevole
intrattenimento musicale.
Per Cominciare
Grazie per aver acquistato il sintonizzatore
stereo AM/FM Rotel RT-1080. Quando
utilizzato in un impianto audio di alta qualità,
vi garantirà anni di piacevole intrattenimento
musicale.
L’RT-1080 è un componente completo di alta
qualità. Tutti gli aspetti del design sono stati
ottimizzati per garantire una gamma dinamica
completa e le più sottili sfumature musicali. Il
concetto Balanced Design della Rotel abbina
un design circuitale avanzato, un’accurata
selezione dei componenti e numerosi test di
ascolto per una grande affidabilità nel tempo
e un suono superiore.
I circuiti stampati sono progettati con tracce
circuitali simmetriche in modo da garantire la
precisione temporale del messaggio musicale.
Le resistenze metalliche e i condensatori in
polistirene o polipropilene sono usati in percorsi
Page 31

31
Italiano
di segnali importanti. Tutti gli aspetti di questo
design sono stati esaminati per garantire la
riproduzione musicale più fedele.
Le funzioni principali dell’RT-1080 sono facili
da da utilizzare. Se avete esperienza di altri
impianti stereo, non dovreste avere alcun
problema. Collegate semplicemente i
componenti abbinati e gustatevi la musica.
Caratteristiche essenziali
• Comando a distanza senza fil con funzioni
complete
• Display fluorescente di facile lettura
• Gamme di sintonia AM e FM
• Sintonizzatore con 30 stazioni preselezionabili per memorizzare le vostre
stazioni preferite
• Frequenza manuale e sintonizzazione
preselezionata, sintonizzazione con ricerca
automatica, scansione delle stazioni
preselezionate e sintonizzazione diretta
della frequenza
• Funzionalità RDS (Radio Data System) per
l’Europa e RBDS (Radio Broadcast Data
Service) per USA
• Doppi ingressi selezionabili per l’antenna
FM.
• Interruttore mono/stereo, attenuazione
d’antenna selezionabile per stazioni locali
o distanti, banda IF selezionabile stretta
o ampia
• Collegamenti a scatto da 12V per
attivazione e disattivazione a distanza di
preamplificatori e processori surround Rotel
• Collegamento al computer I/O per il
funzionamento dell’apparecchio da un
controller di automazione domestica o un
computer che utilizza un software speciale
Sballaggio
Togliete accuratamente l’RT-1080, il comando
a distanza e gli accessori dal loro imballaggio.
Conservate l’imballaggio e la scatola per un
uso futuro. La spedizione e il trasloco
dell’apparecchio in qualsiasi altra cosa
potrebbe causare serio danno.
Tenete la ricevuta di vendita originale. Costituisce
il promemoria migliore della data di acquisto
nel caso fosse necessaria un’assistenza in
garanzia.
Posizionamento
Come tutti i componenti audio che utilizzano
segnali a basso livello, l’RT-1080 può essere
influenzato dal suo ambiente. Evitate di
appoggiarlo al di sopra di altri componenti.
L’RT-1080 produce calore durante il suo
funzionamento. Ci dovrebbero essere 10 cm
di spazio intorno al telaio e una ventilazione
sufficiente in tutto l’ambiente dell’installazione
per impedire il surriscaldamento.
Collocate l’apparecchio su uno scaffale solido.
Vi raccomandiamo di installarlo in mobili adibiti
a contenere componenti audio. Tali mobili sono
progettati in modo da ridurre o eliminare le
vibrazioni che possono influenzare in modo
negativo la qualità del suono. Chiedete
informazioni al vostro rivenditore autorizzato
Rotel sul mobilio e la corretta installazione.
L’RT-1080 viene fornito con un comando a
distanza RR-T92 e deve essere collocato in un
luogo in cui il segnale a raggi infrarossi dal
comando a distanza possa raggiungere il
pannello anteriore del sensore a distanza.
Cavi
Tenete separati gli uni dagli altri i cordoni di
alimentazione, i cavi digitali e i cavi audio .
Questo ridurrà la possibilità che i cavi di
segnale audio raccolgano disturbi o
interferenze dai cavi di alimentazione o cavi
digitali. Anche l’uso di cavi schermati di alta
qualità contribuirà a prevenire il disturbo e
l’interferenza. Se avete delle domande
contattate il vostro rivenditore autorizzato Rotel
per avere un consiglio sui cavi migliori per il
vostro impianto.
Comando a Distanza
L’RT-1080 comprende un comando a distanza
RR-T92 che controlla molte delle caratteristiche
dell’RT-1080.
Sensore a distanza
Il sensore a distanza riceve segnali a raggi
infrarossi dal comando a distanza. Non coprite
o ostruite il sensore. In caso contrario il comando
a distanza non funzionerà correttamente.
Il funzionamento del sensore a distanza può
anche disturbato se viene esposto alla luce
diretta del sole o a certi tipi di illuminazione
(come le lampade alogene) che emettono luce
a raggi infrarossi. Inoltre, le funzioni del
comando a distanza potrebbero non
funzionare in modo adeguato nel caso le pile
dell’RR-T92 fossero scariche.
NOTA
: Per utilizzare il comando a distanza,
rivolgetelo verso il sensore a distanza sul
pannello anteriore dell’RT-1080.
Pile del comando a distanza
Due pile del tipo AAA/UM-4 (in dotazione)
devono essere installate prima che il comando
a distanza possa essere utilizzato. Per installare
le pile, togliete il coperchio sul retro dell’RR-T92.
Installate le pile come mostrato nell’illustrazione
nell’alloggiamento per le pile. Verificate il
comando per il funzionamento, poi rimettete
il coperchio. Quando le pile si esauriscono,
il comando a distanza non controllerà l’RT-1080
in modo costante. L’installazione di pile nuove
dovrebbe eliminare il problema.
NOTA
: Togliete le pile dal comando a distanza
se non venisse utilizzato per un lungo periodo
di tempo. Non lasciate pile scariche nel
comando a distanza ; potrebbero lasciar
uscire liquido chimico corrosivo che
danneggerebbe l’apparecchio.
Page 32

RT-1080 Sintonizzatore Stereo AM/FM
32
Collegamenti sul Pannello
Posteriore
L’RT-1080 pannello posteriore è provvisto di
connessioni sul pannello posteriore per uscite
audio di livello linea, due ingressi per antenna
FM, uno per antenna AM, un’interfaccia per
computer, una connessione per sensore ad
infrarossi, connessioni a scatto da 12V per
attivare il comando a distanza e l’ingresso in
corrente alternata.
NOTA
: Non collegate alla rete di alimentazione
alcun componente di sistema fino a che non
avete completato il collegamento dell’impianto
e siete sicuri che tutte le connessioni tra i
componenti siano correttamente eseguite.
Uscite RCA
Una coppia di uscite audio RCA invia un
segnale stereo a livello fisso dall’RT-1080 al
vostro preamplificatore, processore surround,
o amplificatore integrato. Utilizzate un cavo
standard audio RCA per collegare
all’ingresso tuner del canale sinistro
sinistra
del vostro controller di sistema e
all’ingresso tuner del canale destro del vostro
controller di sistema.
Antenna am ad anello
L’RT-1080 è dotato di un’antenna ad anello
per ricevere segnali radio AM. Rimuovete
questa antenna dalla scatola e posizionatela
vicino all’RT-1080.
Collegate il filo a due conduttori da 300 ohm
dall’antenna alla coppia di terminali a vite
contrassegnati AM LOOP, attaccando un filo
su ogni terminale. Non è importante quale filo
colleghiate a quale terminale, ma assicuratevi
che i collegamenti siano ben saldi e che i due
fili non si tocchino.
Potreste avere la necessità di ruotare o
diversamente riorientare l’antenna per trovare
la migliorericezione.
NOTA
: Per utilizzare un’antenna esterna
collegate il suo filo a due conduttori da 300
ohm ai terminali G e AM al posto dell’antenna
ad anello, solo dopo che un installatore
professionista abbia installato il sistema di
antenna in osservanza alle normative
elettriche locali.
l’uscita
l’uscita destra
Antenna FM
L’RT-1080 è dotato di due connessioni
d’antenna, indicate con A e B. Questo permette
di selezionare due diversi tipi d’antenna,
utilizzando un interruttore di controllo sul
pannello anteriore o sul comando a distanza.
Questa caratteristica potrebbe essere utile per
commutare un’antenna interna ed un’antenna
esterna o un’antenna standard FM e un
decoder TV via cavo o satellitare che fornisce
un segnale d’antenna FM.
NOTA:
Le istruzioni che seguono sono relative
all’utilizzo di un’antenna standard FM a filo
fornita con l’apparecchio. Per collegare un
sistema d’antenna FM satellitare o via cavo,
leggete le istruzioni fornite con quell’unità.
L’RT-1080 è dotato di un’antenna interna FM
a forma di “T”. Collegate il suo connettore
coassiale tipo F ad una delle connessioni
d’antenna FM poste sull’RT-1080. Per una
migliore ricezione, srotolate l’antenna a “T” .
Ci sono degli occhielli a entrambe le estremità
della “T” che consentono di fissare l’antenna
a un muro se lo desiderate. Provate diversi
posizionamenti per ottenere la migliore ricezione.
NOTA
: Per utilizzare un’antenna esterna
collegate il suo connettore coassiale da 75
ohm al connettore FM al posto dell’antenna
interna a filo, solo dopo che un installatore
professionista abbia installato il sistema di
antenna in osservanza alle normative
elettriche locali. Negli Stati Uniti dovete
utilizzare il connettore di tipo F fornito per
collegare il cavo da 75 coassiale ohm
all’ingresso dell’antenna.
Ingresso in corrente alternata
Il vostro RT-1080 è già predisposto in fabbrica
per il corretto voltaggio in corrente alternata per
il paese in cui lo avete acquistato (USA: 115
volt AC/60 Hz o Europa: 230 volt AC/50 Hz).
La configurazione del voltaggio è indicata su
una targhetta adesiva sulla parte posteriore del
vostro apparecchio. Assicuratevi che il vostro
apparecchio sia configurato correttamente per
il vostro voltaggio in corrente alternata.
Inserite il cavo fornito nella presa AC INPUT
sulla parte posteriore dell’unità. Una volta che
tutti gli altri collegamenti sul pannello posteriore
sono completati inserite la spina del cavo di
alimentazione nella presa a muro in corrente
alternata o nella presa in corrente ausiliaria
di un altro componente di sistema.
Attivazione Trigger 12V
L’RT-1080 può essere attivato da un segnale
trigger da 12V proveniente da un preamplificatore Rotel.
Questi due collegamenti forniscono un ingresso
per ricevere un segnale a scatto da 12V
preamplificatore e un’uscita per passare un
segnale trigger a un altro componente come
amplificatore di potenza Rotel.
L’ingresso a scatto accetta qualsiasi segnale
di comando (AC o DC) che va da 3 a 30 volt.
Quando un cavo è collegato all’ingresso e il
segnale a scatto è presente, il sintonizzatore
è attivo. Quando il segnale a scatto viene
interrotto, il sintonizzatore entra il modalità
STANDBY. La spia sul pannello anteriore rimane
accesa, ma il display si oscura e l’apparecchio
non funzionerà.
NOTA
: Quando utilizzate la caratteristica a
scatto 12V, lasciate il pulsante di
alimentazione in posizione ON.
Presa EXT REM. IN
Questo mini-jack da 3.5mm riceve codici di
comando da trasmettitori a raggi infrarossi di
tipo standard (Xantech, ecc.) attraverso
collegamenti via cavo. Questa caratteristica
potrebbe dimostrarsi utile quando l’unità fosse
installata in un mobile apposito e il sensore
sul pannello anteriore fosse ostruito. Consultate
il vostro rivenditore autorizzato Rotel per avere
informazioni su questi ripetitori esterni e sul
cablaggio corretto del jack da inserire nella
presa del mini-jack.
Interfaccia COMPUTER I/O
L’apparecchio può essere attivato da una
centralina di comando home automation o da
un PC con un particolare software che controlla
l’impianto audio. Questo controllo viene
realizzato inviando i codici di funzionamento
in modo normale dal comando a distanza
RR-T92 attraverso un collegamento a cavo
rigido proveniente da questo computer.
L’ingresso Computer I/O fornisce il collegamento
necessario sul pannello posteriore. Accetta spine
standard RJ-45 a 8 pin modulari, come quelle
utilizzate comunemente nel cablaggio 10-BaseT
UTP Ethernet.
Per informazioni sui collegamenti, sul software
e sui codici di funzionamento per il controllo del
computer, consultate il vostro rivenditore Rotel.
Page 33

33
Italiano
Controlli Operativi di Base
Le spiegazioni seguenti vi aiuteranno a
familiarizzare con le caratteristiche e i comandi.
Quando una funzione è disponibile sia sul
pannello anteriore sia sul comando a distanza,
un numero (vedi l’illustrazione del pannello
anteriore) e una lettera (vedi l’illustrazione del
comando a distanza) vengono mostrate nelle
istruzioni. Per esempio, per cambiare dalla
banda AM a quella FM, potete sia premere
il pulsante sul pannello anteriore
utilizzare il pulsante sul comando a distanza
. Quando appare solamente un termine di
identificazione, quel comando è disponibile
solamente sul pannello anteriore o sul comando
a distanza, ma non su entrambi.
Pulsante di alimentazione
Il pulsante POWER (di alimentazione) è
posizionato sul pannello anteriore dell’RT-1080
e non viene duplicato sul comando a distanza.
Premete il pulsante all’interno per attivare l’unità.
La spia sopra l’interruttore e il display del
pannello anteriore si illumineranno. Premete
nuovamente il pulsante (tornando nella
posizione OUT), per disattivare l’unità.
NOTA
: Se state utilizzando un’uscita attiva su
un altro componente per alimentare
l’RT-1080, o se state utilizzando l’interruttore
a scatto da 12V, dovreste lasciare l’interruttore
POWER in posizione ON.
Display pannello anteriore
Il display fluorescente posto al centro
dell’RT-1080 fornisce una serie di informazioni
utilizzate nella ricezione AM/FM (come il
display della frequenza della stazione, banda,
memoria di prestazione, informazione RDS,
ecc.).
Pulsante DIMMER
Disponibile solo su comando a distanza, questo
pulsante seleziona tre regolazioni di luminosità
del display: NORMAL, DIM, OFF. Quando il
display è spento, premendo qualsiasi pulsante
o comando si ritornerà in modalità NORMAL.
Premete il pulsante per scorrere attraverso le
tre regolazioni.
NOTA
: Quando il sintonizzatore è spento e
poi riacceso, il display ritorna alla sua
regolazione di luminosità normale.
sia
Pulsante MEMORY
Il pulsante memory è utilizzato per confermare
e memorizzare diverse regolazioni nella messa
a punto e il funzionamento dell’RT-1080, incluse
le preselezioni delle stazioni del sintonizzatore.
Il suo utilizzo è descritto in dettaglio nelle
importanti sezioni che seguono.
Modalità’ di regolazione a
seconda del paese di utilizzo
L’RT-1080 ha due modalità (una per gli Stati
Uniti e una per l’Europa) che configurano l’unità
per le differenze che esistono nei mercati locali
tra cui gli intervalli di sintonia FM, gli intervalli
di sintonia AM e le differenze negli standard
RDS europei e quelli RDBS degli Stati Uniti. Il
vostro apparecchio è stato configurato in
fabbrica nella corretta modalità del paese in
cui è stato acquistato.
Per selezionare la modalità USA, tenete
premuto i pulsanti POWER, MEMORY e 9 per
cinque secondi. La parola LOADING apparirà
sul display e l’unità si predisporrà nella
configurazione USA.
Per selezionare la modalità europea,
tenete premuti i pulsanti POWER, MEMORY
e 0 per cinque secondi. La parola LOADING
apparirà sul display e l’unità si predisporrà
nella configurazione europea.
Controlli Base di Sintonia
L’RT-1080 è dotato di un sintonizzatore AM
/FM a sintesi di frequenza digitale con funzione
RDS o RBDS e preselezione di 30 stazioni.
L’unità offre un’ampia gamma di tipi di sintonia.
Ecco una panoramica dei tipi di sintonia
(informazioni più dettagliate sono descritte nelle
successive sezioni di questo manuale):
• La sintonia di frequenza manuale
vi consente di spostarvi, avanti o indietro,
alla frequenza della stazione successiva.
Selezionate la modalità Tune/preset su
TUNE. Disattivate AUTOTUNING.
Utilizzate i controlli TUNING per spostarvi
nella sintonia.
• La sintonia di frequenza diretta vi
consente di accedere alle cifre della
frequenza della stazione desiderata.
Premete il pulsante FREQUENCY DIRECT
sul comando a distanza e componete le
cifre utilizzando i pulsanti numerici.
• La sintonia con ricerca automatica
di frequenza vi permette di spostarvi nella
ricerca in avanti o indietro per trovare il
successivo segnale di trasmissione.
Selezionate la modalità TUNE/PRESET su
TUNE. Attivate l’AUTOTUNING. Utilizzate
i controlli TUNING per spostarvi in avanti
o indietro nella ricerca.
• La sintonia delle stazioni
preselezionate in memoria vi consente
di accedere direttamente al numero di una
stazione preselezionata in memoria.
Digitate il numero della preselezione
memorizzata utilizzando i pulsanti numerici.
• La sintonia a scansione delle stazioni
preselezionate vi consente di esplorare
attraverso le stazioni preselezionate in
memoria. Premete il pulsante PRESET SCAN
per iniziare la scansione.
• La sintonia RDS (Europa) o RBDS
(USA) offre una serie di particolari
caratteristiche di sintonia e ricerca basata
su messaggi codificati con i segnali di
trasmissione. Leggete la sezione RDS di
questo manuale per informazioni più
dettagliate.
Pulsante BAND
Il pulsante di banda BAND seleziona le gamme
di frequenza AM o FM. Premete il pulsante per
passare avanti e indietro fra AM e FM. Una
spia corrispondente si illuminerà sulla parte
sinistra del display del pannello anteriore per
confermare la vostra scelta. La frequenza della
stazione sintonizzata in quel momento apparirà.
Controlli di sintonizzazione
(TUNING)
Una coppia di pulsanti, etichettati DOWN/
UP sul pannello anteriore e < TUN/PRESET>
sul comando a distanza, fungono da comandi
di sintonizzazione principali per l’RT-1080.
Nelle istruzioni che seguono chiameremo questi
pulsanti tasti DOWN/UP. Potete utilizzare sia
il pannello anteriore sia il comando a distanza;
la loro funzione è identica.
Questi controlli forniscono diverse funzioni di
sintonia in relazione alla modalità di
funzionamento:
Nella modalità di FREQUENCY TUNING,
con l’AUTOTUNING disattivato premete
un pulsante DOWN/UP per saltare manual-
Page 34

RT-1080 Sintonizzatore Stereo AM/FM
34
mente alla successiva frequenza di stazione,
senza considerare o meno se una stazione stia
trasmettendo su quella frequenza.
sezioni relative al pulsante TUNE/PRESET e
pulsante AUTOTUNING per ulteriori dettagli
sul cambiamento delle modalità di sintonia.)
Nella modalità FREQUENCY TUNING con
l’AUTOTUNING attivato premete un
pulsante DOWN/UP per fare partire
l’AUTOTUNING. Il sintonizzatore incomincia
automaticamente la scansione della frequenza,
avanti e indietro, fin quando viene individuato
il successivo segnale. Se questa non è la stazione
desiderata, ripetete la procedura di sintonia
automatica per trovare la stazione successiva.
Le stazioni con segnale debole verranno saltate
durante la sintonia automatica. Se non viene
individuato alcun segnale che possa essere
ricevuto, il sintonizzatore ritornerà all’ultima
stazione precedentemente sintonizzata.
le sezioni relative al pulsante TUNE/PRESET e
pulsante AUTOTUNING per ulteriori dettagli
sul cambiamento delle modalità di sintonia.)
Nella modalità di SINTONIZZAZIONE
PRESELEZIONATA (PRESET TUNING),
premete UN PULSANTE DOWN/UP per
saltare alla seguente stazione preselezionata
in memoria. .
pulsante TUNE/PRESET per ulteriori dettagli
sul cambiamento delle modalità di sintonia.)
In modalità di ricerca RDS PTY, premete
un pulsante down/up per selezionare il tipo
di programma desiderato dallo scrolling list
sul display . Vedere la sezione sulla
sintonizzazione RDS per maggiori dettagli.
(Vedere la sezione del pulsante RDS PTY per
maggiori informazioni).
NOTA
: Varie spie sul display del pannello
(Leggete la sezione relativa al
(Leggete le
(Leggete
anteriore aiutano nella sintonizzazione. Un
ampio display mostra la frequenza
sintonizzata e aumenta o diminuisce durante
la sintonizzazione. Una spia della intensità
del segnale indica la forza del segnale in
ingresso. Una spia di sintonizzazione
(TUNED) si illumina quando un segnale
abbastanza forte viene ricevuto. Una spia ST
si illumina quando viene ricevuto un segnale
FM stereo. Inoltre, gli indicatori mostrano la
modalità di sintonia attualmente selezionata.
Tastiera numerica:
Preselezione delle stazioni
L’RT-1080 può memorizzare fino a 30
preselezioni per richiamare le stazioni in
qualsiasi momento utilizzando la tastiera
numerica. Queste preselezioni di stazioni
possono essere utilizzate per qualsiasi
combinazioni stazioni AM e FM.
L’RT-1080 viene consegnato dalla fabbrica con
una serie generica di preselezioni che possono
o meno abbinarsi alle stazioni disponibili nella
vostra zona. Per memorizzare una nuova
preselezione di stazione:
1. Sintonizzate la stazione desiderata, o AM
o FM.
2. Premete il pulsante MEMORY sul pannello
anteriore. Una spia MEMORY si illuminerà
per cinque secondi sul display del pannello
anteriore.
3. Mentre la spia MEMORY sta
lampeggiando, premete il numero di
preselezione dove desiderate memorizzare
la frequenza della stazione Per esempio,
per memorizzare una stazione come
preselezione 3, premete il pulsante 3. Per
memorizzare il preset 15, premete il
pulsante 1 seguito dal pulsante 5.
4. Una frequenza precedentemente
memorizzata viene cancellata dalla
memoria quando una nuova frequenza
viene memorizzata con lo stesso numero
di preselezione.
Per sintonizzarsi su una stazione
precedentemente memorizzata, premete il numero preselezionato sulla
tastiera numerica. Per esempio, per
memorizzare una stazione come preselezione
3, premete il pulsante 3. Per sintonizzare il preset
30, premete il pulsante 3 seguito dal pulsante
0 entro 5 secondi.
NOTA
: I tasti NUMERICI possono anche essere
utilizzati per la sintonizzazione diretta della
frequenza (FREQUENCY DIRECT).
Pulsante di FREQUENCY DIRECT:
sintonizzazione di accesso
diretto
Se conoscete la frequenza della stazione
desiderata, potete sintonizzarvi direttamente
utilizzando il pulsante FREQUENCY DIRECT
(solo sul comando a distanza) e la tastiera
NUMERICA.
1. Premete il pulsante FREQUENCY DIRECT
per cambiare la tastiera NUMERICA dalla
modalità di preselezione della stazione alla
modalità Accesso Diretto (Direct Access).
Il display del pannello anteriore si trasformerà
in una serie di barre, rappresentanti i numeri
di frequenza di una stazione, con la prima
barra che lampeggia.
2. Introducete la prima cifra della frequenza
della stazione utilizzando la tastiera
numerica. La cifra apparirà sul display di
frequenza e la seconda barra lampeggerà.
Introducete le rimanenti cifre della frequenza.
Quando tutte le cifre sono state inserite, il
sintonizzatore si sintonizzerà automaticamente sulla frequenza di quella stazione.
NOTA
: Solo nella versione americana
premendo 1 nella modalità FM si introdurrà
10 come i numeri sul display delle frequenze.
Nella versione europea è necessario premere
1 e poi 0 per inoltrare il numero 10. Per le
stazioni americane FM, premete solo un
numero susseguente a un punto decimale
come nel primo esempio. Per le stazioni FM
europee, premete due cifre dopo il punto
decimale come nel secondo esempio.
ESEMPI
:
(USA FM) 87.50MHz
premete: 8>7>5
(Europa FM) 87.50 MHz
premete: 8>7>5>0
(tutte AM) 1610kHz
premete: 1>6>1>0
Se non viene introdotta entro 5 secondi, il
sintonizzatore annullerà la modalità di
sintonizzazione FREQUENCY DIRECT e
ritornerà all’ultima stazione precedentemente
sintonizzata.
Page 35

35
Italiano
Pulsante di AUTO TUNING
Il pulsante AUTO TUNING alterna tra la
caratteristica di sintonia automatica per la ricerca
della frequenza e la sintonia di frequenza
manuale. Quando utilizzate i comandi Down/
up nella modalità AUTO TUNING, il
sintonizzatore comincerà automaticamente a
passare attraverso le frequenze fino a che non
viene ricevuto il successivo segnale di
trasmissione. Se non si tratta della stazione
desiderata, usate nuovamente i pulsanti
DOWN/UP per cercare la stazione successiva
. Le stazioni deboli verranno saltate durante
questa sintonizzazione automatica. Se non viene
recepito alcun segnale, il sintonizzatore ritornerà
alla stazione precedentemente sintonizzata.
Per passare dalla modalità FREQUENCY
TUNING e quella AUTO TUNING, premete
il pulsante AUTO TUNING. Una spia AUTO
apparirà sul display.
NOTA
: Quando il pulsante TUNE/PRESET
viene posto in modalità di sintonia PRESET,
la modalità AUTO TUNING viene disattivata.
Vedere la sezione successiva.
Pulsante TUNE/PRESET
Il pulsante TUNE/PRESET alterna fra la modalità
FREQUENCY TUNING (i comandi DOWN/
UP avanzano alla frequenza della stazione
successiva) e la modalità PRESET TUNING (i
comandi DOWN/UP avanzano alla successiva
preselezione di stazione memorizzata). Per
passare attraverso le due modalità premete il
pulsante TUNE/PRESET. Una spia PRESET sul
display del pannello anteriore si illuminerà
quando la modalità PRESET è attiva.
NOTA
: La modalità AUTO/TUNING è
disinserita quando il pulsante TUNE/PRESET
è posto in modalità di sintonizzazione PRESET.
Pulsante PRESET SCAN
Questo pulsante attiva una caratteristica di
scansione predefinita PRESET SCANNING.
Quando premete il pulsante il sintonizzatore
passerà automaticamente attraverso tutte le
stazioni preselezionate in memoria,
riproducendone ognuna per cinque secondi
prima di passare alla seguente. Per arrestare
la scelta sulla stazione preselezionata
desiderata, premete nuovamente il pulsante.
NOTA
: Se una stazione preselezionata è
sintonizzata nel momento in cui si preme il
pulsante PRESET SCAN, la scansione inizierà
con il numero successivo di preselezione e
continuerà attraverso tutte le successive stazioni
preselezionate. Se una stazione preselezionata
non è sintonizzata al momento in cui viene
premuto il pulsante, la scansione inizierà da
PRESET 1 e continuerà fino a PRESET 30.
Ricezione di Trasmissioni
RDS e RBDS
L’RT-1080 è dotato di ricezione RDS (Radio
Data Systems) per l’Europa e di RBDS (Radio
Broadcast Data Service) per gli Stati Uniti.
Questi sistemi di trasmissione forniscono ulteriori
funzionalità alla ricezione FM trasmettendo
un’informazione codificata insieme al segnale
radio. Questo segnale viene decodificato da
un sintoamplificatore dotato di RDS o RBDS
e può offrire una gamma di informazioni che
comprendono:
1. Un display con il nome di identificazione
della stazione (es.: BBC1)
2. Un display del contenuto del programma
della stazione (es./ ROCK o NOTIZIE)
3. Trasmissioni di informazione sul traffico
4. Annunci o informazioni che scorrono su
un display
Inoltre, RDS offre parecchie caratteristiche di
ricerca avanzata che comprendono:
1. La capacità di ricercare una stazione con
il contenuto del programma desiderato (PTY)
2. La capacità di ricercare l’informazione sul
traffico (TP)
3. La capacità di ricercare automaticamente
stazioni che trasmettono particolari
informazioni sul traffico (TA).
La trasmissione RDS è stata ampiamente
disponibile in molti paesi europei per anni. C’è
un vasto numero di stazioni RDS e molti utenti
avranno già familiarizzato con le sue
caratteristiche e l’uso. Negli Stati Uniti, l’uso
del sistema RBDS è più recente. Meno stazioni
stanno trasmettendo segnali RBDS e le sue
caratteristiche possono essere meno familiari
a molti utenti. Consultate il vostro rivenditore
autorizzato Rotel per maggiori informazioni sulle
trasmissioni RDS e RBDS sul vostro mercato.
NOTA
: Le caratteristiche RDS e RBDS
dipendono totalmente dalla trasmittente che
invia i segnali codificati correttamente.
Pertanto, saranno disponibili solamente sui
mercati dove l’RDS o RBDS vengono
implementati abitualmente e dove le stazioni
trasmettono questi segnali. Se non ci sono
stazioni RD o RBDS, l’RT-1080 funzionerà
come un normale sintoamplificatore radio.
NOTA
: I servizi RDS e RBDS sono disponibili
solo su trasmissioni FM. Le caratteristiche e i
pulsanti descritti sotto sono operativi
solamente in modalità FM.
Pulsante DISPLAY
Ci sono cinque modalità di display quando
la stazione sintonizzata sta trasmettendo
informazione RDS e la spia RDS sul display
del pannello anteriore è illuminata. Premete
il pulsante del display per passare in sequenza
le cinque modalità disponibili del display:
1. Display di FREQUENZA standard
2. Nome del SERVIZIO DEL PROGRAMMA.
Queste sono di base le lettere del nome
della stazione (come BBC1). Se la stazione
non sta trasmettendo un segnale RDS, il
display evidenzierà “NO NAME DATA”.
3. TIPO DI PROGRAMMA. Questa è la
descrizione del contenuto della stazione da
un elenco di tipi di programma. (NEWS
(notizie), CURRENT AFFAIRS (attualità),
INFORMATION (informazioni), SPORT,
EDUCATION (educazione), DRAMA (teatro),
CULTURE (cultura), SCIENCE (scienza),
VARIED (varie), POP MUSIC, ROCK MUSIC,
EASY LISTENING MUSIC (musica di facile
ascolto), LIGHT CLASSICAL (classica
leggera), SERIOUS CLASSICAL (classica
seria), OTHER MUSIC (altra musica),
WEATHER (previsioni del tempo), FINANCE
(finanza), CHILDREN’S PROGRAMS
(programmi per bambini), SOCIAL AFFAIRS
(affari sociali), RELIGION (religione), PHONE
IN (chiamate di radioascoltatori), TRAVEL
(viaggi), LEISURE (tempo libero), JAZZ
MUSIC, COUNTRY MUSIC, NATIONAL
MUSIC, OLDIES MUSIC, FOLK MUSIC e
DOCUMENTARY (documentari).) Se la
stazione in corso non sta trasmettendo un
segnale RDS, il display mostrerà una spia
PT intermittente.
Page 36

RT-1080 Sintonizzatore Stereo AM/FM
36
4. OROLOGIO ( TIME). Display dell’orario
e della data trasmesso dalla stazione. Se
la stazione non sta trasmettendo un segnale
RDS, il display mostrerà una spia CT
intermittente.
5. TESTO RADIO (RADIO TEXT). Altri messaggi
di testo trasmessi dalla stazione. Se la
stazione non sta trasmettendo un segnale
RDS, il display mostrerà una spia RT
intermittente.
Pulsante PTY
La funzione di ricerca PTY vi permette di
vagliare le trasmissioni disponibili per le stazioni
RDS che trasmettono un particolare tipo di
contenuto di programma.
1. Premete il pulsante PTY. Il tipo di contenuto
del programma RDS apparirà sul display.
2. Se desiderate, passate a un diverso tipo
di programma utilizzando i pulsanti
DOWN/UP per scorrere l’elenco.
3. Premete il pulsante PTY una seconda volta
entro 5 secondi. Il sintonizzatore cercherà
di trovare una stazione RDS che trasmetta
il tipo di programma selezionato. Se il
pulsante non viene premuto entro 5 secondi
dopo la selezione di un tipo di programma,
la funzione PTY verrà annullata.
4. Se non viene trovata alcuna stazione per
il tipo di contenuto desiderato, il
sintonizzatore ritornerà all’ultima stazione
precedentemente selezionata.
5. Annullate la funzione PTY premendo
qualsiasi altro pulsante (eccetto DIMMER
o FM MONO).
Pulsante TP
Ricerca una stazione RDS che trasmetta
programmi di informazione sul traffico:
1. Premete il pulsante TP. Il sintonizzatore
cercherà di trovare una stazione RDS che
trasmetta programmi sul traffico.
2. Se non viene trovata alcuna stazione, il
sintonizzatore ritornerà alla stazione
precedentemente sintonizzata.
3. Annullate la funzione TP premendo qualsiasi
altro pulsante (eccetto DIMMER o FM
MONO).
Pulsante TA
Ricerca una stazione RDS che trasmetta
programmi di informazione sul traffico:
1. Premete il pulsante TA. Il sintonizzatore
cercherà di trovare una stazione RDS che
trasmetta programmi sul traffico.
2. Se non viene trovata alcuna stazione, il
sintonizzatore ritornerà alla stazione
precedentemente sintonizzata.
3. Annullate la funzione TA premendo qualsiasi
altro pulsante (eccetto DIMMER o FM
MONO).
Pulsante AF
In alcuni casi, una stazione RDS è parte di
una rete di stazioni che trasmettono la stessa
programmazione (per esempio, BBC1
programmata nel Regno Unito è disponibile
su parecchie stazioni diverse). Stazioni che
trasmettono questa programmazione possono
trasmettere un segnale di dati RDS fornendo
al sintonizzatore una serie di frequenze
alternate in cui questo programma è
disponibile. Se questo elenco di dati è
trasmesso, una spia AF apparirà sul display.
Il pulsante AF viene utilizzato per dare una
scansione alle frequenze alternate per trovare
un segnale più forte. Il pulsante è in funzione
quando la spia AF è accesa.
1. Premete il pulsante AF. Il sintonizzatore
esplorerà ognuna delle frequenze alternate
per la stessa programmazione nell’elenco
memorizzato e si sintonizzerà sul segnale
più forte.
2. Se non viene localizzata alcuna stazione,
il sintonizzatore ritornerà all’ultima stazione
precedentemente sintonizzata.
3. Se la forza del segnale della nuova stazione
è più debole, il sintonizzatore ritornerà alla
stazione precedentemente sintonizzata.
4. Annullate la funzione AF premendo
qualsiasi pulsante (eccetto DIMMER o FM
MONO).
Altre Caratteristiche di
Sintonizzazione
I seguenti pulsanti offrono caratteristiche che
possono essere utilizzate per migliorare la
ricezione FM e/o aggiungere ulteriore
funzionalità:
Pulsante FM MONO
Il pulsante MONO FM cambia la modalità
FM dalla ricezione mono alla ricezione stereo.
In modalità stereo si udirà un segnale stereo
se la stazione sta trasmettendo un segnale
stereo e c’è un’intensità di segnale sufficiente.
Una spia stereo si illuminerà sul display del
pannello anteriore. In modalità mono, si sentirà
un segnale mono anche se la stazione sta
trasmettendo un segnale stereo.
NOTA
: Il passaggio in modalità mono può
rappresentare un modo utile di migliorare la
ricezione di segnali FM deboli e distanti. Per
una ricezione mono limpida è necessaria una
forza di segnale minore della ricezione stereo.
Pulsante ANT ATT
Comunemente conosciuto come interruttore
LOCAL/DISTANCE, il pulsante ANT/ATT riduce
il livello di segnale all’ingresso dell’antenna
FM. Per una migliore ricezione di stazioni
distanti, questo pulsante dovrebbe essere in
posizione OFF. Tuttavia, se vi trovate in un’area
urbana molto vicina al trasmettitore radio, il
segnale in ingresso potrebbe essere
abbastanza forte da saturare gli ingressi FM.
Premete questo pulsante per ridurre il segnale
in ingresso. Quando attivato, una spia LOC
apparirà sul DISPLAY. Premete nuovamente il
pulsante per ritornare al normale
funzionamento. Questo interruttore influenza
solamente la ricezione FM.
Pulsante NARROW IF FM
La ricezione FM funziona ricevendo e
decodificando un segnale portante centrato
sulla frequenza sintonizzata. Per sintonizzare
le stazioni che possono essere non
perfettamente centrate su questa portante, il
sintonizzatore accetta segnali che sono laterali
alla frequenza di sintonia. Questo offre una
resa soddisfacente nella maggior parte delle
aree di ricezione.
Page 37

37
Italiano
Se vi trovate in una zona urbana con un ampio
numero di stazioni con frequenze ravvicinate,
potreste notare interferenza dalle stazioni
vicine. Per fornire una resa migliore in queste
condizioni, l’RT-1080 vi permette di ridurre
la gamma delle frequenze ai due estremi della
frequenza accuratamente sintonizzata,
riducendo così l’interferenza fra stazioni. Per
fare uso di questa caratteristica premete il
pulsante FM IF NARROW. Una indicazione
NARROW apparirà sul DISPLAY. Premete
nuovamente il pulsante per ritornare al
funzionamento normale.
Pulsante ANT A/B
Come descritto nella sezione
pannello posteriore
NECTIONS) di questo manuale, l’RT-1080
fornisce due collegamenti per l’antenna FM,
contrassegnati da A e B. Questo pulsante passa
fra i due ingressi di antenna. Una spia A o B
apparirà sul DISPLAY, indicando quale ingresso
dell’antenna FM è attiva al momento.
Collegamenti del
(REAR PANEL CON-
Caratteristiche
Sintonizzatore FM
Sensibilità utilizzabile
12.2 dBf
Sensibilità di silenziamento (50 dB)
20.2 dBf (mono)
45.3 dBf (stereo)
Rapporto S/N (a 65 dBf)
75 dBf (mono)
72 dBf (stereo)
Distorsione armonica (a 65 dBf)
0.2% (mono)
0.3% (stereo)
Risposta in frequenza
10 Hz – 15 kHz, ± 3 dB
Rapporto di cattura
2.0 dB
Selettività di canale alternato
47 dB (± 400 kHz)
Rapporto di risposta spuria
90 dB
Rapporto di reiezione di immagine
80 dB
Rapporto di reiezione IF
80 dB
Rapporto di soppressione AM
55 dB
Separazione stereo
(100Hz/1kHz/10kHz)
40 dB /45 dB / 35 dB
Livello di uscita
1.2 V
Ingresso di antenna
75 ohm non bilanciato
Sintonizzatore AM
Sensibilità utilizzabile
300 µV/m
Selettività
25 dB
Distorsione armonica
0.5%
Reiezione di immagine
45 dB
Rapporto S/N
48 dB
Livello di uscita
165 mV
Ingresso di antenna
Antenna ad anello
Generali
Assorbimento
10 watt
Alimentazione
USA: 115 volt, 60 Hz
CE: 230 volt, 50 Hz
Peso
4.7 kg
Dimensioni (L x A x P)
430 x 92 x 340 mm
Tutte le caratteristiche sono accurate al momento
della stampa.
Rotel si riserva il diritto di apportare
miglioramenti senza alcun preavviso
Rotel e il logo Rotel HiFi sono marchi registrati di
The Rotel Co. Ltd. Tokyo, Giappone.
Page 38

RT-1080 Sintonizador Estereofónico de AM/FM
38
Contenido
Los números encerrados en cajas hacen referencia
a la ilustración del RT-1080. Las letras encerradas
en cajas hacen referencia a la ilustración del
RR-T92.
1: Controles y Conexiones 6
2: Ejemplo de Conexionado 6
3: Mando a Distancia RR-T92 7
Acerca de Rotel ....................................38
Para Empezar .......................................38
Prestaciones Clave 39
Desembalaje 39
Colocación 39
Cables 39
Mando a Distancia ................................39
Sensor de Control Remoto 39
Pilas del Mando a Distancia 39
Conexiones del Panel Posterior .............40
Salidas RCA 40
Antena de Bucle Cerrado
para AM 40
Antena de FM 40
Entrada de Corriente Eléctrica 40
Conexiones para SEÑAL DE DISPARO
de 12 V 40
Toma REMOTE EXT IN 41
Interfaz COMPUTER I/O 41
Controles de Funcionamiento Básicos .....41
Botón de Puesta en Marcha (Power) 41
Visualizador de Funciones
del Panel Frontal 41
Botón DIMMER 41
Botón MEMORY 41
Ajuste de la Sintonía en Función del País 41
Controles de Sintonización Básicos ........ 42
Botón BAND 42
Controles TUNING 42
Teclado NUMERICO:
Emisoras Presintonizadas 43
Botón FREQUENCY DIRECT:
Sintonización por Acceso Directo
a la Frecuencia de la Emisora 43
Botón de SINTONIZACION AUTOMATICA
(“AUTO TUNING”) 43
Botón TUNE/PRESET 43
Botón de EXPLORACION DE EMISORAS
PRESINTONIZADAS (“PRESET SCAN”) 44
Recepción de Emisoras con RDS y RBDS. 44
Botón DISPLAY 44
Botón PTY 45
Botón TP 45
Botón TA 45
Botón AF 45
Funciones de Sintonización Adicionales ..45
Botón FM MONO 45
Botón ANT ATT 45
Botón FM IF NARROW 46
Botón ANT A/B 46
Características Técnicas ........................ 46
Sintonizador de FM 46
Sintonizador de AM 46
General 46
Acerca de Rotel
Rotel fue fundada hace 40 años por una familia
cuyo entusiasta interés por la música la condujo
a diseñar y construir componentes de Alta
Fidelidad sin ningún tipo de compromiso. Esta
pasión ha permanecido inalterada durante todo
este tiempo, hasta el punto de que el objetivo
de los fundadores de la compañía –
proporcionar productos de la máxima calidad
a melómanos y audiófilos independientemente
de cuales sean sus posibilidades económicases compartido por todos sus empleados.
Los ingenieros de Rotel trabajan como un
equipo compacto, escuchando y llevando a
cabo el ajuste fino de cada nuevo producto
hasta que satisface de manera exacta los
estándares de calidad musical para los que
fue diseñado. Para lograrlo, disponen de la
máxima libertad para escoger los mejores
componentes allí donde se encuentren. Le
sorprenderá agradablemente encontrar
exquisitos condensadores procedentes del
Reino Unido y Alemania o semiconductores
de Japón o Estados Unidos, mientras que los
transformadores toroidales de potencia son
construidos en la propia factoría de Rotel.
Rotel se ha ganado a pulso, a través de cientos
de artículos, bancos de pruebas y galardones
avalados por los críticos especializados más
respetados del mundo, una sólida reputación
por la excelencia de sus productos. Los
comentarios de estos profesionales que
escuchan música cada día hacen posible que
la compañía se reafirme en la validez de sus
objetivos: la puesta a punto de componentes
y equipos musicales, fiables y asequibles.
Le agradecemos que haya adquirido este
producto y esperamos que le permita disfrutar
de su música predilecta durante largos años.
Para Empezar
Gracias por haber adquirido el Sintonizador
Estereofónico de AM/FM Rotel RT-1080.
Instalado en un sistema de reproducción
musical de alta calidad, le proporcionará años
y años de disfrute musical.
El RT-1080 es un componente de altas
prestaciones muy completo. Todos los aspectos
de su diseño han sido optimizados para
preservar la gama dinámica y las sutilezas
de su música favorita. El Concepto de Diseño
Page 39

39
Español
Equilibrado exclusivo de Rotel combina placas
de circuito impreso de diseño muy avanzado,
una extensa evaluación de los componentes
utilizados y numerosas pruebas de escucha
para garantizar un sonido superior y una
mayor fiabilidad a largo plazo.
Las placas de circuito impreso han sido
diseñadas con Pistas Circuitales Simétricas con
el fin de preservar fielmente las complejas
relaciones temporales de la música. En los
puntos más importantes del recorrido de la
señal se han utilizado resistencias de película
metálica y condensadores de poliestireno o
polipropileno. Todos los aspectos de este diseño
han sido cuidadosamente examinados para
garantizar una reproducción de la música lo
más fiel posible.
Las principales funciones del RT-1080 son fáciles
de instalar y utilizar. Si usted ya tiene experiencia
con otros sistemas estereofónicos, no debería
sorprenderse por nada. Basta con que conecte
el RT-1080 al resto de componentes de su equipo
y disfrute con la escucha de sus composiciones
musicales predilectas.
• Conexiones para señal de disparo de 12
V continuos para el arranque/apagado a
distancia desde preamplificadores y
procesadores de sonido envolvente de Rotel.
• Toma de entrada/salida de ordenador para
el control del aparato desde un sistema de
domótica o un ordenador equipado con
software especial.
Desembalaje
Saque cuidadosamente el RT-1080, el mando
a distancia y los correspondientes accesorios
de su embalaje. Guarde la caja del embalaje
para cualquier uso futuro de la misma. El
embalaje o transporte del aparato en
condiciones distintas de las originales puede
provocar serios daños en el mismo.
Guarde el recibo de compra puesto que en
caso de que el RT-1080 necesite algún servicio
de mantenimiento durante el período de
garantía constituye el principal reflejo de la
fecha de compra.
Colocación
Cables
Asegúrese de que los cables de alimentación,
digitales y de modulación de su equipo estén
alejados entre sí ya que de este modo se
minimizarán las posibilidades de que la señal
de audio se vea afectada por ruido o interferencias procedentes de los cables digitales
o de alimentación. El uso exclusivo de cables
apantallados de alta calidad también contribuirá
a prevenir la entrada de ruido o interferencias
susceptibles de degradar la calidad sonora de
su equipo. Si tiene alguna pregunta que realizar
al respecto, le recomendamos que visite a su
distribuidor autorizado de productos Rotel para
que le aconseje los cables más adecuados para
su sistema.
Mando a Distancia
El RT-1080 se suministra de serie con un mando
a distancia RR-T92 que gobierna la mayoría
de funciones del aparato.
Sensor de Control Remoto
Prestaciones Clave
• Mando a distancia multifunción.
• Visualizador de Funciones Fluorescente
claro y conciso.
• Capacidad de sintonización de emisoras
de radio en AM y FM.
• 30 preselecciones para memorizar sus
emisoras favoritas.
• Sintonización manual y automática de
emisoras, sintonización con búsqueda
automática de emisoras, barrido de
emisoras preseleccionadas y sintonización
directa por frecuencia.
• Funciones RDS (Radio Data System) para
Europa y RBDS (Radio Broadcast Data
Service) para Estados Unidos.
• Doble entrada de antena para FM
seleccionable.
• Conmutación mono/estéreo, atenuación
de la señal de antena local/distante
seleccionable y banda estrecha/amplia
seleccionable para la frecuencia intermedia
(IF).
Al igual que todos los componentes de audio
que manejan señales de bajo nivel, el RT-1080
puede verse afectado por su entorno. Evite
colocar el aparato encima de otros.
El RT-1080 genera algo de calor durante su
funcionamiento normal. Con el fin de prevenir
cualquier sobrecalentamiento del aparato,
debería haber unos 10 mm de espacio libre
alrededor del chasis del mismo, así como una
circulación de aire razonable
Coloque el RT-1080 sobre una superficie
sólida. Le recomendamos que instale el
RT-1080 en un mueble diseñado específicamente para albergar componentes de audio.
Un mueble de dicha clase está concebido para
reducir o suprimir vibraciones susceptibles de
afectar negativamente a la calidad sonora.
Consulte a su distribuidor autorizado de
productos Rotel para que le informe sobre los
diferentes modelos para componentes de audio
y la correcta instalación de los mismos.
El RT-1080 se suministra de serie con un mando
a distancia RR-T92 y debe ubicarse en lugares
en los que la señal de rayos infrarrojos
procedente de este último alcance sin
problemas el Sensor de Infrarrojos del panel
frontal.
El sensor de control remoto capta los rayos
infrarrojos procedentes del mando a distancia.
No lo cubra ni bloquee nunca ya que en caso
contrario no funcionará correctamente.
El funcionamiento del sensor de control remoto
también puede verse afectado si es expuesto
a la luz solar directa o ciertos tipos de
iluminación artificial, como por ejemplo las
lámparas halógenas (que emiten una cierta
cantidad de luz infrarroja). Asimismo, es
posible que las funciones de control a distancia
no actúen de manera fiable si las pilas del
RR-T92 están a punto a de agotarse.
NOTA
: Para utilizar el mando a distancia,
oriéntelo hacia el sensor de control remoto
del panel frontal del RT-1080.
Pilas del Mando a Distancia
Antes de utilizar el mando a distancia deben
colocarse en el mismo dos pilas del tipo UM4/AAA (suministradas con el RT-1080). Para
instalar las pilas, quite en primer lugar la
cubierta que figura en la parte posterior del
RR-T92. Coloque las pilas respetando las
indicaciones de polaridad que se ilustran en
el propio compartimento portabaterías.
Verifique que el mando a distancia funcione
correctamente y a continuación vuelva a
Page 40

RT-1080 Sintonizador Estereofónico de AM/FM
40
colocar en su lugar la tapa del compartimento
portabaterías. Cuando las pilas empiecen a
agotarse, el mando a distancia dejará de
funcionar correctamente. Bastará con que
cambie las pilas (todas) por otras nuevas para
eliminar el problema.
NOTA
: Quite las pilas del mando a distancia
si no piensa utilizarlo durante un largo
período de tiempo. No deje pilas agotadas
en el interior del mando a distancia ya que
podrían derramar productos químicos
corrosivos susceptibles de dañarlo.
Conexiones del Panel
Posterior
El panel posterior del RT-1080 incorpora
conexiones para una salida de audio de nivel
de línea, dos antenas de FM, una antena de
AM, un interfaz de ordenador, un sensor de
rayos infrarrojos remoto, señales de disparo
de 12 V para el arranque a distancia y una
entrada de corriente alterna.
NOTA
: No conecte ningún componente de su
equipo a una toma de corriente eléctrica
hasta que la configuración del mismo haya
sido completada y esté seguro de que todas
las conexiones entre componentes han sido
realizadas adecuadamente.
Salidas RCA
Un par de salidas de audio en formato RCA
envían una señal estereofónica de nivel fijo
desde el RT-1080 a su preamplificador,
procesador de sonido envolvente o
amplificador integrado. Utilice un cable de
audio RCA estándar para conectar la toma
left
de salida
canal
controlador de sistema y la toma de salida
right
derecho para sintonizador de su controlador
de sistema.
a la entrada correspondiente al
izquierdo
a la entrada correspondiente al canal
para sintonizador de su
Antena de Bucle Cerrado
para AM
El RT-1080 incluye una antena de bucle cerrado
para recibir señales de radio en AM. Saque
esta antena del embalaje del aparato y sitúela
cerca de este último.
Conecte el cable de dos conductores gemelos
de 300 ohmios desde la antena de bucle
cerrado al par de terminales de tipo tornillo
designados por AM LOOP, fijando un cable
a cada terminal. No importa el terminal al
que se fije cada cable aunque sí el hecho de
que las conexiones sean sólidas y los cables
no se toquen entre sí.
Es posible que necesite girar o reorientar la
antena para encontrar la mejor posición.
NOTA
: Para utilizar una antena exterior,
conecte su cable de dos conductores gemelos
de 300 ohmios en lugar de la antena de
bucle cerrado una vez que un instalador
especializado haya montado el sistema de
antena en concordancia con las normas de
seguridad eléctrica locales.
Antena de FM
El RT-1080 tiene dos conexiones de antena
para FM designadas por A y B. Esto le permite
a usted conmutar entre dos sistemas de antena
de FM diferentes utilizando un conmutador
situado en el panel frontal o el mando a
distancia. Esta función podría resultar útil para
conmutar entre una antena exterior y una
interior o incluso entre una antena de FM
estándar y un decodificador de televisión por
cable o por satélite que suministre una señal
de antena en FM.
NOTA
: Las instrucciones que siguen
presuponen el uso de la antena de FM de
tipo cable suministrada con el aparato. Para
conectar un sistema de antena de FM
correspondiente a televisión por cable o por
satélite, lea las instrucciones suministradas
con el correspondiente aparato.
El RT-1080 se suministra de serie con una
antena interior de FM en forma de “T”. Conecte
la clavija coaxial en forma de “F” a uno de
los dos conectores para antena de FM del
RT-1080. Para conseguir una mejor recepción,
despliegue la antena en forma de “T”. En caso
de que así lo desee, los dos pequeños agujeros
que hay en los extremos de la “T” le permitirán
fijar la antena a una pared. Experimente con
diferentes posiciones hasta conseguir la mejor
recepción.
NOTA
: Para utilizar una antena exterior, conecte
su cable de 75 ohmios al conector de 75
ohmios en lugar de la antena interior una vez
que un instalador especializado haya montado
el sistema de antena en concordancia con las
normas de seguridad eléctrica locales. En
Estados Unidos, usted necesitará utilizar el
convertidor en forma de “F” suministrado con
el RT-1080 para conectar el cable coaxial de
75 ohmios a la entrada de antena.
Entrada de Corriente Eléctrica
Su RT-1080 está configurado en fábrica para
que funcione con la tensión de red
correspondiente al país en que usted lo haya
comprado (115 voltios de corriente alterna
a 60 Hz en Estados Unidos y 230 voltios de
corriente alterna a 50 Hz en Europa). Dicha
configuración está indicada en el panel
posterior del aparato. Asegúrese de que su
RT-1080 esté adecuadamente configurado
para que se ajuste a los requisitos de su red
eléctrica local.
Conecte el cable de alimentación suministrado
de serie en el receptáculo AC INPUT situado
en el panel posterior del RT-1080. Una vez
que el resto de conexiones del panel posterior
hayan sido completadas, inserte el cable de
alimentación en una toma de corriente alterna
de una de las paredes de su casa o en una
toma conmutada del panel posterior de otro
componente de su equipo.
Conexiones para SEÑAL DE
DISPARO de 12 V
El RT-1080 puede ser activado por una señal
de disparo de 12 voltios continuos procedente
de un preamplificador Rotel.
Estas dos conexiones proporcionan una
entrada para recibir la señal de disparo de
12 voltios procedente del preamplificador y
una salida para enviar la señal de disparo a
otro componente, como por ejemplo una etapa
de potencia Rotel.
La entrada para señal de disparo acepta
cualquier señal de control (tanto si es continua
como alterna) de valor comprendido entre 3
y 30 voltios. Cuando se conecta un cable a
la entrada y hay una señal de disparo presente,
el sintonizador de activa. Cuando la señal de
Page 41

41
Español
disparo es interrumpida, el sintonizador se sitúa
en su posición de espera (“standby”). El
indicador luminoso del panel frontal permanece
activado pero el visualizador de funciones se
oscurece y el aparato no funcionará.
NOTA
: Cuando utilice la función de Disparo
con señal de 12 V, deje el botón POWER en
la posición ON.
Toma REMOTE EXT IN
Esta minitoma de 3’5 mm recibe códigos de
control por cable procedentes de sistemas de
gestión por infrarrojos estandarizados por la
industria (Xantech, etc.). Esta prestación podría
resultar muy útil cuando el aparato estuviese
instalado en el interior de un mueble y por
tanto el sensor de rayos infrarrojos del panel
frontal estuviera bloqueado. Consulte a su
distribuidor autorizado de productos Rotel para
que le informe acerca de estos repetidores
externos de rayos infrarrojos y sobre el
cableado adecuado para montar un conector
que se adapte a la mencionada minitoma.
Interfaz COMPUTER I/O
El RT-1080 puede ser manejado desde un
controlador de domótica independiente o un
ordenador personal que funcione con software
especial. Este control se lleva a cabo enviando
desde un ordenador y por cable los códigos
de funcionamiento habitualmente enviados por
el RR-T92.
La entrada COMPUTER I/O proporciona la
conexión necesaria para la anterior en el panel
posterior del RT-1080. Acepta clavijas
modulares RJ-45 de 8 patillas, como por
ejemplo las habitualmente utilizadas en los
cables 10-BaseT para interconexionado de
redes Ethernet.
Contacte con su distribuidor autorizado de
productos Rotel para obtener más información
acerca de las conexiones, el software y los
códigos de funcionamiento para control por
ordenador.
Controles de
Funcionamiento Básicos
Las explicaciones que siguen le ayudarán a
familiarizarse con las funciones y controles del
RT-1080. Cuando una función está disponible
tanto en el panel frontal como en el mando a
distancia, se muestra un número (ver ilustración
del panel frontal) y una letra (ver ilustración
del mando a distancia) en las instrucciones.
Por ejemplo, para cambiar de la banda de
AM a la de FM, usted puede tanto pulsar el
botón
del mando a distancia. Cuando solamente
aparezca un identificador, significa que el
correspondiente control está disponible
únicamente en el panel frontal o el mando a
distancia pero no en ambos.
Botón de Puesta en Marcha
(Power)
El botón POWER está ubicado en el panel
frontal del RT-1080 y no está duplicado en el
mando a distancia.
Púlselo (situándolo en la posición IN) para
poner en marcha el aparato. Tanto el indicador
luminoso situado encima del conmutador como
el visualizador de funciones del panel frontal
se activarán. Pulse de nuevo el botón
(devolviéndolo a su posición OUT) para
desactivar el aparato.
NOTA
conmutada de otro componente para poner
en marcha el RT-1080 o si está empleando
el circuito de disparo de señal de 12 voltios,
debería dejar el conmutador POWER en la
posición ON.
Visualizador de Funciones del
Panel Frontal
El visualizador de funciones fluorescente
situado en la parte central del RT-1080
suministra información de estado
correspondiente al funcionamiento del receptor
de AM/FM (como por ejemplo visualización
de la frecuencia de la emisora, banda de
frecuencias, memoria preseleccionada,
información RDS, etc.).
del panel frontal como el botón
: Si está utilizando una toma de corriente
Botón DIMMER
Disponible únicamente en el mando a
distancia, este botón selecciona tres niveles
de brillo para el visualizador de funciones:
NORMAL, DIM o OFF. Cuando el visualizador
de funciones esté desactivado (posición OFF),
la pulsación de cualquier botón o control hará
que el aparato regrese al modo NORMAL.
Pulse el botón para conmutar cíclicamente entre
los tres ajustes disponibles.
NOTA
: Cuando el sintonizador es desactivado
y a continuación se vuelve a activar, el
visualizador de funciones regresa a su modo
normal.
Botón MEMORY
El botón MEMORY es utilizado para confirmar
y memorizar varios ajustes durante la puesta
a punto inicial y el funcionamiento del RT-1080,
incluyendo la preselección de emisoras. Su
uso se describe con detalle en las secciones
que siguen.
Ajuste de la Sintonía en
Función del País
El RT-1080 tiene dos modos de funcionamiento
por defecto, uno para Estados Unidos y uno
para Europa, que lo configuran para que se
adapte a las diferencias existentes en mercados
locales, como por ejemplo los intervalos de
sintonía en FM y AM y las diferencias entre
los estándares RDS (europeo) y RBDS
(estadounidense). Su aparato ha sido
configurado en fábrica para que se adapte
al modo por defecto correcto correspondiente
al país en el que haya sido adquirido.
Para conmutar al modo por defecto
para Estados Unidos, pulse y mantenga
pulsados los botones POWER, MEMORY y 9
durante 5 segundos. La palabra LOADING
aparecerá en el visualizador de funciones y
el aparato se pondrá en marcha según la
configuración estadounidense.
Para conmutar al modo por defecto
para Europa, pulse y mantenga pulsados
los botones POWER, MEMORY y 0 durante
5 segundos. La palabra LOADING aparecerá
en el visualizador de funciones y el aparato
se pondrá en marcha según la configuración
europea.
Page 42

RT-1080 Sintonizador Estereofónico de AM/FM
42
Controles de Sintonización
Básicos
El RT-1080 incluye un sintonizador de AM/
FM por sintetización digital con capacidad
RDS o RDBS y memorización de hasta 30
emisoras. El aparato ofrece un amplio rango
de opciones de sintonización, que se repasan
a continuación (se proporciona información
detallada sobre las mismas en las siguientes
secciones del presente manual):
• La sintonización manual de la
frecuencia le permite a usted aumentar
o disminuir el valor de la frecuencia hasta
que encuentre una emisora. Sitúe el modo
TUNE/PRESET en TUNE. Desactive la
sintonización automática (AUTO TUNING).
Utilice los controles TUNING para
incrementar/decrementar la frecuencia de
la emisora.
• La sintonización directa de la
frecuencia le permite introducir los dígitos
correspondientes a la frecuencia de la
emisora deseada. Pulse el botón
FREQUENCY DIRECT del mando a
distancia e introduzca los dígitos utilizando
el teclado NUMERICO.
• La sintonización por búsqueda
automática de la frecuencia de la
emisora le permite a usted buscar hacia
arriba o hacia abajo en el dominio de la
frecuencia para encontrar la siguiente
emisora válida. Sitúe el modo TUNE/
PRESET en TUNE. Active la sintonización
automática (AUTO TUNING). Utilice los
controles TUNING para incrementar/
decrementar la frecuencia de la emisora.
• La sintonización de emisoras
almacenadas en memoria le permite
introducir directamente el número de una
emisora presintonizada almacenada en
memoria. Introduzca el número de la
emisora presintonizada utilizando el teclado
NUMERICO.
• La sintonización mediante barrido
de las emisoras presintonizadas le
permite a usted explorar en sentido
ascendente/descendente las emisoras
preseleccionadas. Pulse el botón PRESET
SCAN para iniciar la exploración.
• El RDS (Europa) o RBDS (Estados
Unidos) proporciona un amplio abanico
de funciones de sintonización y búsqueda
basado en códigos de datos codificados
en la señal de FM. Diríjase a la sección
“RDS” de este manual para obtener
información detallada al respecto.
Botón BAND
El botón BAND selecciona la posición del
sintonizador en el modo de AM o FM. Púlselo
para conmutar alternativamente entre uno y
otro. Un indicador luminoso específico situado
en la parte izquierda del visualizador de
funciones del panel frontal se activará para
confirmar su elección, mostrándose a
continuación la frecuencia de la emisora
seleccionada por usted.
Controles TUNING
Un par de botones, denominados DOWN/
UP en el panel frontal y <TUN/PRESET> en
el mando a distancia, se encargan de llevar
a cabo las funciones de sintonización
principales del RT-1080. En las instrucciones
que siguen, nos referiremos a los botones de
sintonía como DOWN/UP; usted puede utilizar
tanto los del panel frontal como los del mando
a distancia ya que su función es idéntica.
Estos controles permiten acceder a diferentes
funciones de sintonía dependiendo del modo
de funcionamiento seleccionado:
En el modo de SINTONIZACION DE
FRECUENCIA (“FREQUENCY TUNING”)
con la función de SINTONIZACION
AUTOMATICA (“AUTO TUNING”)
desactivada, pulse un botón DOWN/UP
para saltar de forma manual a la frecuencia
de la emisora siguiente independientemente
de que en la misma se esté retransmitiendo o
no un programa.
las que se trata los botones TUNE/PRESET y
AUTO TUNING para obtener más detalles
sobre el cambio de los modos de sintonización.
En el modo de SINTONIZACION DE
FRECUENCIA (“FREQUENCY TUNING”)
con la función de SINTONIZACION
AUTOMATICA (“AUTO TUNING”)
activada, pulse un botón DOWN/UP para
iniciar la sintonización automática. El
sintonizador iniciará automáticamente la
exploración de frecuencias en sentido
ascendente o descendente hasta que detecte
Diríjase a las secciones en
la siguiente emisora disponible. En caso de
que dicha emisora no sea la emisora buscada,
repita el procedimiento de sintonización
automática hasta encontrarla. Durante la
sintonización automática, las emisoras débiles
serán ignoradas. En caso de que no se detecte
ninguna señal útil, el sintonizador regresará
a la última emisora sintonizada.
secciones en las que se trata los botones TUNE/
PRESET y AUTO TUNING para obtener más
detalles sobre el cambio de los modos de
sintonización.
En el modo SINTONIZACION DE
EMISORAS PRESELECCIONADAS
(“PRESET TUNING”), pulse un botón
DOWN/UP para saltar a la siguiente emisora
preseleccionada.
las que se trata el botón TUNE/PRESET para
obtener más detalles sobre el cambio de los
modos de sintonización.
En el modo de búsqueda PTY del RDS,
pulse un botón DOWN/UP para seleccionar
el tipo de programa deseado de la lista que
se desplaza a través del visualizador de
funciones.
sección de sintonización RDS y a la subsección
que hace referencia al botón PTY.
NOTA
: Varias indicaciones que aparecen en
el panel frontal le asisten durante el proceso
de sintonización. Una visualización de gran
tamaño muestra la frecuencia sintonizada.
Un indicador de intensidad de señal muestra
la “fuerza” de la señal entrante (es decir la
que es captada por la antena). Un indicador
luminoso TUNED se activa cuando una señal
lo suficientemente intensa es recibida. Un
indicador luminoso ST se activa cuando se
recibe una señal estereofónica de FM
(frecuencia modulada). Se dispone además
de otros indicadores que muestran el modo
de sintonización seleccionado en cada
momento.
Diríjase a las secciones en
Para más detalles, diríjase a la
Diríjase a las
Page 43

43
Español
Teclado NUMERICO:
Emisoras Presintonizadas
El RT-1080 puede almacenar hasta 30
emisoras para recuperarlas en cualquier
momento con ayuda del teclado NUMERICO.
Estas preselecciones pueden ser utilizadas para
memorizar cualquier combinación de emisoras
de AM y FM.
El RT-1080 es suministrado de fábrica con un
conjunto de emisoras genéricas presintonizadas que pueden o no coincidir con emisoras
disponibles en su área de residencia. Para
memorizar una nueva emisora presintonizada:
1. Sintonice la emisora deseada, sea de AM
o de FM.
2. Pulse el botón MEMORY del panel frontal.
Un indicador luminoso MEMORY
parpadeará en el visualizador de funciones
del panel frontal.
3. Mientras el indicador MEMORY esté
parpadeando, pulse el número de la
preselección en la que usted desea
almacenar la frecuencia de la emisora
sintonizada. Por ejemplo, para memorizar
la emisora como preselección 3, pulse el
botón 3. Para memorizar la preselección
15, pulse el botón 1 seguido del 5.
4. Cuando se memoriza una nueva frecuencia
en una determinada preselección, la
emisora previamente almacenada en la
misma es automáticamente borrada.
Para sintonizar una emisora previamente memorizada, basta con que
pulse el correspondiente número de
preselección utilizando los botones del
teclado NUMERICO. Por ejemplo, para
sintonizar la preselección 3 pulse el botón 3.
Para sintonizar la preselección 30, pulse el botón
3 y a continuación pulse el botón 0 antes de
que transcurran 5 segundos.
NOTA
: Los botones del teclado NUMERICO
también pueden ser utilizados para la
sintonización por INTRODUCCION DIRECTA
DE LA FRECUENCIA DE LA EMISORA
(“FREQUENCY TUNING”).
Botón FREQUENCY DIRECT:
Sintonización por Acceso Directo
a la Frecuencia de la Emisora
Si usted ya conoce la frecuencia de la emisora
deseada, puede sintonizarla directamente
utilizando el botón FREQUENCY DIRECT
(disponible sólo en el mando a distancia) y
los botones del teclado NUMERICO.
1. Pulse el botón FREQUENCY DIRECT para
cambiar los botones del teclado
NUMERICO desde el modo de
preselección de emisoras al de acceso
directo. La visualización de frecuencia
presente en el visualizador de funciones
del panel frontal se convertirá en una serie
de barras, con la primera de ellas
parpadeando, que representan los dígitos
de la frecuencia de una emisora.
2. Introduzca el primer dígito correspondiente
a la frecuencia de la emisora utilizando
el teclado NUMERICO. El dígito aparecerá
en la visualización de frecuencia y la
segunda barra parpadeará. Introduzca los
restantes dígitos de la frecuencia. Cuando
todos los números hayan sido introducidos,
el sintonizador sintonizará automáticamente
la emisora correspondiente a la frecuencia
visualizada.
NOTA
: En la versión destinada al mercado
estadounidense, la pulsación de 1 en el modo
FM hará que se introduzca un 10 en la
visualización de frecuencia. En la versión
europea, es necesario pulsar un 1 y un 0
para introducir un 10. Para las emisoras de
FM estadounidenses, pulse solamente un
dígito después del punto decimal tal y como
se muestra en el primer ejemplo que sigue.
Para las emisoras de FM europeas, pulse dos
dígitos después del punto decimal tal y como
se muestra en el segundo ejemplo.
EJEMPLOS
(FM EE.UU.) 87’50 MHz:
Pulse: 8 > 7 > 5
(FM Europa) 87’50 MHz:
Pulse: 8 > 7 > 5 > 0
(AM EE.UU./Europa) 1610 kHz:
Pulse: 1 > 6 > 1 > 0
En caso de que no se introduzca ninguna
frecuencia en un intervalo de 5 segundos, el
sintonizador cancelará el modo de
:
sintonización por ACCESO DIRECTO A LA
FRECUENCIA DE LA EMISORA y regresará
a la última emisora sintonizada.
Botón de SINTONIZACION
AUTOMATICA
(“AUTO TUNING”)
El botón AUTO TUNING conmuta entre la
función de sintonización por búsqueda de
frecuencia y la sintonización manual de
frecuencia. Cuando se utilicen los botones
DOWN/UP del panel frontal o el mando a
distancia en el modo AUTO TUNING, el
sintonizador empezará automáticamente a
explorar frecuencias en sentido ascendente
o descendente hasta que detecte la siguiente
emisora útil. Si dicha emisora no es la deseada,
utilice de nuevo los botones DOWN/UP para
buscar la siguiente emisora. Las emisoras
débiles serán ignoradas durante el proceso
de sintonización automática. En caso de que
no se detecte ninguna señal con la intensidad
suficiente, el sintonizador regresará a la última
emisora sintonizada.
Para conmutar entre los modos FREQUENCY
TUNING y AUTO TUNING, pulse el botón
AUTO TUNING. Aparecerá una indicación
AUTO en el visualizador de funciones para
confirmarlo.
NOTA
: El modo AUTO TUNING es desactivado
cuando el botón TUNE/PRESET es situado en
el modo de sintonización PRESET. Diríjase a
la siguiente sección para más detalles.
Botón TUNE/PRESET
El botón TUNE/PRESET conmuta entre los
modos FREQUENCY TUNING (los botones
DOWN/UP avanzan hacia la frecuencia
correspondiente a la siguiente emisora) y
PRESET TUNING (los botones TUNING
avanzan hacia la siguiente emisora
presintonizada). Para conmutar entre los dos
modos, pulse el botón TUNE/PRESET. Cuando
el modo PRESET esté activado, aparecerá una
indicación luminosa en el visualizador de
funciones del panel frontal para confirmarlo.
NOTA
: El modo AUTO TUNING es desactivado
cuando el botón TUNE/PRESET es situado en
el modo de sintonización PRESET.
Page 44

RT-1080 Sintonizador Estereofónico de AM/FM
44
Botón de EXPLORACION DE
EMISORAS PRESINTONIZADAS
(“PRESET SCAN”)
Este botón activa una función de barrido de
emisoras presintonizadas. Cuando usted pulse
dicho botón, el sintonizador realizará
automáticamente un barrido de todas las
emisoras memorizadas, reproduciendo cada
una de ellas durante cinco segundos antes de
pasar a la siguiente. Para detener la
exploración de emisoras en la emisora
preseleccionada que desee escuchar, pulse
de nuevo el mencionado botón.
NOTA
: Si una emisora PRESINTONIZADA está
seleccionada en el momento de pulsar el
botón PRESET SCAN, la exploración
comenzará con el número de presintonía
inmediatamente superior y continuará a lo
largo de todas las emisoras presintonizadas,
deteniéndose en la presintonía inicial. Si no
se ha sintonizado ninguna emisora
presintonizada cuando el mencionado botón
es pulsado, la exploración comenzará en la
PRESINTONIA 1 (“PRESET 1”) y finalizará
en la PRESINTONIA 30 (“PRESET 30”).
Recepción de Emisoras con
RDS y RBDS
El Rotel RT-1080 está equipado con la función
RDS (“Radio Data System”/”Sistema de Datos
Radiofónicos”) para Europa y la función RDBS
(“Radio Broadcast Data Service”/”Servicio de
Datos Radiofónicos”) para Estados Unidos.
Estos sistemas de radiodifusión proporcionan
una funcionalidad adicional a la recepción
de radio en FM mediante la transmisión de
información codificada junto con la señal de
radio. Esta señal es decodificada por un
receptor equipado con los correspondientes
circuitos RDS o RDBS y puede proporcionar
una extensa gama de prestaciones entre las
que se incluyen las siguientes:
1. Una visualización del nombre de
identificación de la emisora (por ejemplo
BBC1).
2. Una visualización del contenido de la
programación de la emisora (por ejemplo
ROCK o NOTICIAS).
3. Emisiones en las que se informa acerca
del estado del tráfico.
4. Una visualización de texto relacionado con
información o anuncios que se desplaza
a través de la pantalla.
Además, el RDS proporciona varias opciones
de búsqueda avanzadas entre las que se
encuentran las siguientes:
1. La capacidad para buscar una emisora
que contenga una programación
determinada (PTY).
2. La capacidad de buscar información
relacionada con el estado del tráfico (TP).
3. La capacidad de buscar automáticamente
emisoras que estén difundiendo anuncios
especiales relacionados con el estado del
tráfico (TA).
La radiodifusión con RDS está ya ampliamente
disponible en muchos mercados europeos
desde hace bastantes años. Hay un gran
número de emisoras que operan con dicho
sistema, por lo que la inmensa mayoría de
usuarios se familiarizará rápidamente con sus
funciones. En Estados Unidos, la
implementación del sistema RBDS es más
reciente. En la actualidad, sólo unas pocas
emisoras difunden señales RBDS, por lo que
es posible que las funciones asociadas al mismo
sean menos familiares para muchos usuarios.
Consulte a su distribuidor autorizado de
productos Rotel para obtener más información
sobre el estado de la radiodifusión de señales
de radio con RDS o RBDS en su mercado.
NOTA
: Las funciones del RDS y el RBDS
dependen por completo de la emisora que
envía las señales adecuadamente
codificadas. En consecuencia, solamente
estarán disponibles en países en los que el
RDS o el RBDS esté ya implementado y en
los que las emisoras de radio difundan estas
señales de datos. Si no hay emisoras RDS o
RBDS, el RT-1080 funcionará como un
receptor de radio convencional.
NOTA
: Los servicios RDS y RBDS solamente
están disponibles en la banda de FM. Por
tanto, las funciones y botones que se
describen a continuación sólo son operativos
en el modo FM.
Botón DISPLAY
Se dispone de cinco opciones de visualización
cuando la emisora seleccionada en ese
momento esté difundiendo información RDS
y el indicador luminoso RDS del visualizador
de funciones del panel frontal esté activado.
Pulse el botón DISPLAY para saltar
secuencialmente a través de las cinco opciones
de visualización disponibles:
1. Visualización de FRECUENCIA estándar.
2. Nombre del SERVICIO DE PROGRAMA.
Por lo general suele corresponder a las letras
con que se designa a una determinada
emisora (por ejemplo BBC1). Si la emisora
seleccionada en ese momento no está
difundiendo una señal RDS, el visualizador
de funciones mostrará una indicación PS
parpadeante.
3. TIPO DE PROGRAMA. Es una
descripción del contenido de la emisora a
partir de una lista estandarizada de tipos
de programa (por ejemplo: NOTICIAS,
TEMAS DE ACTUALIDAD, INFORMACION,
DEPORTES, EDUCACION, DRAMA,
CULTURA, CIENCIA, MUSICA VARIADA,
MUSICA POP, MUSICA ROCK, MUSICA
AMBIENTAL, MUSICA CLASICA LIGERA,
MUSICA CLASICA SERIA, OTROS TIPOS
DE MUSICA, TIEMPO, FINANZAS,
PROGRAMAS PARA NIÑOS, ASUNTOS
SOCIALES, RELIGION, CONVERSACIONES TELEFONICAS, VIAJES,
OCIO, MUSICA JAZZ, MUSICA COUNTRY,
MUSICA NACIONAL, MUSICA RETRO,
MUSICA FOLK y DOCUMENTALES). En
caso de que la emisora seleccionada no
esté difundiendo una señal RDS, el
visualizador de funciones mostrará una
indicación PT parpadeante.
4. TIEMPO. Se trata de una visualización
de tiempo y fecha difundida por la emisora.
Si la emisora seleccionada no está
difundiendo una señal RDS, el visualizador
de funciones mostrará una indicación CT
parpadeante.
5. RADIOTEXTO. Son mensajes de texto
adicionales difundidos por la emisora que
se desplazan a través de la pantalla de
visualización. Si la emisora seleccionada
no está difundiendo una señal RDS, el
visualizador de funciones mostrará una
indicación RT parpadeante.
Page 45

45
Español
Botón PTY
La función de búsqueda PTY le permite a usted
explorar las emisiones disponibles para buscar
emisoras RDS que emitan un tipo de programa
con un contenido particular.
1. Pulse el botón PTY. El tipo de contenido del
programa RDS seleccionado aparecerá en
el visualizador de funciones.
2. Si lo desea, cambie a un TIPO DE
PROGRAMA diferente utilizando los
botones DOWN/UP para desplazarse a
través de la lista.
3. Pulse una segunda vez, dentro de un
intervalo de 5 segundos, el botón PTY. El
sintonizador intentará encontrar una
emisora RDS que esté difundiendo el tipo
de programa seleccionado. Si el botón no
es pulsado dentro de un intervalo de 5
segundos inmediatamente después de
seleccionar un tipo de programa, la función
PTY será cancelada.
4. Si no se localiza ninguna emisora para el
tipo de contenido deseado, el sintonizador
regresará a la última emisora sintonizada.
5. Cancele la función PTY pulsando cualquier
otro botón (excepto DIMMER o FM
MONO).
Botón TP
Busca una emisora RDS que esté difundiendo
información sobre el estado del tráfico:
1. Pulse el botón TP. El sintonizador intentará
encontrar una emisora RDS que esté
difundiendo información sobre el estado
del tráfico.
2. Si no se localiza ninguna emisora, el
sintonizador regresará a la última emisora
sintonizada.
3. Cancele la función TP pulsando cualquier
otro botón (excepto DIMMER o FM MONO).
Botón TA
Busca una emisora RDS que esté difundiendo
anuncios especiales relacionados con el estado
del tráfico:
1. Pulse el botón TA. El sintonizador intentará
encontrar una emisora RDS que esté
difundiendo anuncios especiales
relacionados con el estado del tráfico.
2. Si no se localiza ninguna emisora, el
sintonizador regresará a la última emisora
sintonizada.
3. Cancele la función TA pulsando cualquier
otro botón (excepto DIMMER o FM MONO).
Botón AF
En algunos casos, una emisora RDS es parte
de una red de emisoras que difunden la misma
programación (por ejemplo, la programación
de la BBC1 para el Reino Unido puede estar
disponible en varias frecuencias diferentes). Las
emisoras que difunden esta programación
pueden transmitir una señal de datos RDS que
suministre al sintonizador una lista de frecuencias
alternativas en las que dicha programación esté
disponible. En el caso de que esta lista de datos
sea transmitida, aparecerá un indicador AF en
el visualizador de funciones.
El botón AF es utilizado para explorar las
frecuencias alternativas con el fin de encontrar
una señal más intensa. Dicho botón sólo es
operativo cuando el indicador luminoso AF
está activado.
1. Pulse el botón AF. El sintonizador explorará
cada una de las frecuencias alternativas
correspondientes al mismo programa
presentes en la lista memorizada y
sintonizará la que posea la señal más
intensa.
2. En caso de que no se localice ninguna
emisora, el sintonizador regresará a la
última emisora sintonizada.
3. En caso de que la intensidad de la señal
correspondiente a la nueva emisora sea
más débil, el sintonizador regresará a la
emisora previamente sintonizada.
Funciones de Sintonización
Adicionales
Los siguientes botones permiten acceder a
funciones que pueden utilizarse para mejorar
la recepción en FM y/o proporcionar
funcionalidad adicional:
Botón FM MONO
El botón FM MONO cambia la recepción de
señales en FM de estéreo a mono. En el modo
estereofónico, una señal estereofónica será
oída si la emisora está difundiendo una señal
estereofónica y si la misma posee la suficiente
intensidad. Para confirmarlo, se activará el
indicador luminoso “stereo” en el visualizador
de funciones del panel frontal. En el modo
monofónico, se oirá una señal monofónica
incluso si la emisora está difundiendo una señal
estereofónica.
NOTA
: La conmutación de estéreo a mono
puede ser una forma útil de mejorar la
recepción de señales de FM débiles o distantes
puesto que para obtener una recepción limpia
en mono se necesita menos intensidad de señal
que para hacer lo propio en estéreo.
Botón ANT ATT
Conocido a veces como selector LOCAL/
DISTANCE, el botón ANT ATT reduce el nivel
de la señal presente en la entrada de la antena
de FM. Para lograr la mejor recepción posible
de emisoras ubicadas a cierta distancia, este
botón debería estar en su posición por defecto
(OFF). Sin embargo, si usted se encuentra en
una zona urbana muy cercana al transmisor
de radio, es posible que la señal entrante sea
lo suficiente intensa para sobrecargar las
entradas de FM. Pulse este botón para reducir
el nivel de la señal entrante. Una vez que el
mismo haya sido activado, aparecerá una
indicación luminosa LOC en el visualizador
de funciones. Pulse el botón de nuevo para
regresar al funcionamiento normal. Este
conmutador sólo afecta a la recepción en FM.
4. Cancele la función AF pulsando cualquier
botón (excepto DIMMER o FM MONO).
Page 46

RT-1080 Sintonizador Estereofónico de AM/FM
46
Botón FM IF NARROW
La recepción en FM se basa en la recepción
y decodificación de una señal portadora
centrada en la frecuencia sintonizada. Para
acomodar emisoras cuya señal portadora
tenga la frecuencia ligeramente desajustada,
el receptor acepta señales cuya frecuencia se
sitúe muy cerca, en cualquiera de sus lados,
de la sintonizada. De este modo se consiguen
unos resultados satisfactorios en la mayoría
de condiciones de recepción.
Si usted se encuentra en una zona urbana en
la que haya un gran número de emisoras cuyas
frecuencias estén muy cercanas entre sí, es
posible que ocasionalmente note interferencias
debidas a las emisoras adyacentes. Para
proporcionar unas prestaciones superiores bajo
estas condiciones, el RT-1080 le permite reducir
la gama de frecuencias situada en cada uno
de los lados de la frecuencia sintonizada,
disminuyendo de este modo la interferencia
entre emisoras. Pulse el botón FM IF NARROW
para utilizar esta función. Para confirmarlo,
aparecerá una indicación luminosa NARROW
en el visualizador de funciones. Pulse de nuevo
el citado botón para volver al modo de
funcionamiento normal.
Botón ANT A/B
Tal y como se describe en la sección de este
manual correspondiente a las CONEXIONES
DEL PANEL POSTERIOR, el RT-1080 incluye
dos conexiones para antena de FM designadas
por A y B. Este botón permite conmutar entre
las dos entradas de antena. Aparecerá una
indicación luminosa A o B en el visualizador
de funciones para confirmar cual de las dos
antenas de FM está siendo utilizada.
Características Técnicas
Sintonizador de FM
Sensibilidad Util:
12’2 dBf
Sensibilidad para una Relación Señal/
Ruido de 50 dB:
20’2 dBf (mono)
45’3 dBf (estéreo)
Relación Señal/Ruido (a 65 dBf):
75 dB (mono)
72 dB (estéreo)
Distorsión Armónica (a 65 dBf):
0’2% (mono)
0’3% (estéreo)
Respuesta en Frecuencia:
10-15.000 Hz, ± 3 dB
Relación de Captura:
2.0 dB
Selectividad de Canal Alterno:
47 dB (± 400 kHz)
Nivel de Rechazo de las Señales Espúreas:
90 dB
Nivel de Rechazo de la Frecuencia Imagen:
80 dB
Nivel de Rechazo de la Frecuencia
Intermedia (IF):
80 dB
Nivel de Supresión de las Señales de AM:
55 dB
Separación Estéreo
(100 Hz/1 kHz/10 kHz):
40 dB/45 dB/35 dB
Nivel de Salida:
1’2 V
Entrada de Antena:
75 ohmios no balanceada
Sintonizador de AM
Sensibilidad Util:
300 uV/m
Selectividad:
25 dB
Distorsión Armónica:
0’5%
Nivel de Rechazo de la Frecuencia Imagen:
45 dB
Relación Señal/Ruido:
48 dB
Nivel de Salida:
165 mV
Entrada de Antena:
Antena de Bucle Cerrado
General
Consumo:
10 vatios
Alimentación:
115 voltios/60 Hz (EE.UU.)
230 voltios/50 Hz (Europa)
Peso:
4’7 kg
Dimensiones (An x Al x Pr):
430x92x340 mm
Todas las especificaciones son correctas en el
momento de la impresión del presente manual.
Rotel se reserva el derecho a realizar mejoras sin
aviso previo.
Rotel y el logotipo Rotel HiFi son marcas
registradas de The Rotel Co., Ltd., Tokio, Japón.
Page 47

47
Nederlands
Inhoud
(de in vierkanten geplaatste cijfers verwijzen naar
de figuren van de tuner en de in vierkanten
geplaatste letters naar die van de
afstandsbediening)
1: De bedieningsorganen en aansluitingen 6
2: Het aansluitingsschema 6
3: De RR-T92 Afstandsbediening 7
Wij van Rotel .......................................47
Aan de slag met de RT-1080 ................ 47
De belangrijkste eigenschappen 48
Het uitpakken 48
Een plek voor de RT-1080 48
De bekabeling 48
De afstandsbediening ...........................48
Het afstandsbedieningsoog 48
Het inbrengen van de batterijen 48
Alles over de achterkant .......................48
De cinch uitgangen 48
De meegeleverde midden-golfantenne 48
De FM-antenne aansluiting 49
De lichtnetaansluiting 49
De 12v. TRIGGER uitgang 49
De externe afstandsbedieningsaansluiting 49
De computer interface-aansluiting 49
De belangrijkste afstemtoetsen .............50
De bandkeuzetoets “BAND” 50
De afstemorganen 50
Het numerieke toetsenbord:
De voorkeurzendertoetsen 51
De frequentiekeuzetoets:
Directe frequentie inbreng 51
De automatische afstemtoets 51
De afstem/voorkeur keuzetoets 51
De voorkeur aftasttoets 51
RDS ontvangst .....................................52
De infoschermtoets 52
De PTY toets 52
De TP toets 52
De TA toets 52
De AF toets 53
Afstem extra’s..................................... 53
De monotoets 53
De antenneverzwakker toets 53
De smalle band toets 53
De antenne A/B keuzetoets 53
Technische gegevens .............................54
FM deel 54
Middengolf deel 54
Algemeen 54
Wij van Rotel
Het is alweer meer dan 40 jaar geleden dat
een familie met een gepassioneerde
betrokkenheid bij muziek besloot om zelf
geluidsapparatuur van onberispelijke kwaliteit
te gaan vervaardigen onder de naam Rotel.
Door de loop der jaren heen is die passie
gebleven en het familiedoel om audiofielen
en muziekliefhebbers voor aantrekkelijke
prijzen topkwaliteit te bieden wordt door iedere
Rotel-medewerker gesteund.
De technici werken als een hecht team al
tweakend en luisterend totdat ieder nieuw
produkt dat muzikale niveau heeft bereikt dat
hun bij de aanvang voor ogen stond. Zij
worden volkomen vrijgelaten in hun keuze van
componenten, waar ze ook van de wereld
vandaan moeten komen. In Rotel apparatuur
kunt u condensatoren vinden uit Duitsland en
Engeland of half geleiders uit Amerika en
Japan, terwijl de ringkerntransformatoren in
eigen huis worden vervaardigd.
Onze goede reputatie werd gevestigd door
honderden waarderende testrapporten en vele
onderscheidingen die wij hebben mogen
ontvangen van mensen die uit professie dag
in dag uit naar muziek luisteren. Hun kritiek houdt
ons bij de les: het vervaardigen van muzikale,
betrouwbare en betaalbare apparatuur.
Door de aanschaf van dit produkt danken wij
u voor het vertrouwen in ons gesteld en wensen
wij u er veel en langdurig plezier mee.
De belangrijkste bedieningsorganen ...... 49
De aan/uitschakelaar 49
Het infoscherm 50
De “DIMMER” toets 50
De geheugentoets “MEMORY” 50
Het instellen van de landencode 50
Aan de slag met de
RT-1080
Wij danken u voor de aanschaf van onze
RT-1080 middengolf/FM tuner. Voor het
bereiken van onze bekende geluidskwaliteit
ontwikkelde Rotel zijn “Balanced Design
Concept”: een combinatie van geavanceerde
circuit opbouw, een continue zoektocht naar
de beste onderdelen en vooral veel luisteren.
Wij zijn er dan ook van overtuigd dat de
RT-1080 u vele jaren veel luisterplezier zal
brengen.
Page 48

RT-1080 Middengolf/FM Stereo Afstemeenheid
48
De RT-1080 is een topkwaliteit tuner met vele
mogelijkheden. Hij is zo ontworpen dat hij de
volledige dynamiek en de meest subtiele
nuances van uw favoriete muziek met het
grootste gemak kan weergeven.
De beide circuits op de printboards zijn
volkomen symmetrisch opgebouwd. Deze
symmetrie zorgt ervoor dat de integriteit van
het signaal gewaarborgd blijft. Bij ongelijke
signaalwegen krijgt u nl. een licht tijdsverschil
tussen het linker en rechter kanaal, met alle
vervelende gevolgen van dien. In de
signaalweg op de PCB’s gebruiken wij
uitsluitend metaalfilm-weerstanden en
polystyreen- of polypropyleen condensatoren,
want alle aspecten van dit ontwerp zijn maar
met één doel voor ogen gemaakt: de
natuurgetrouwe reproduktie van muziek.
De belangrijkste
eigenschappen
• Draadloze afstandsbediening voor alle
functies
• Eenvoudig te begrijpen infoscherm
• Middengolf en FM ontvangst-mogelijkheden
• 30 voorkeurzenders
• Afstemmen met de hand en via
voorkeurzenders, het aftasten van de voorkeurzenders en afstemmen direct op de frequentie
• RDS (Radio Data System) ontvangstmogelijkheden
• Dubbele antenne-ingang
• Mono/stereo schakelaar/inschakelbare
antenneverzwakker voor stations van zeer
dichtbij, breed/smalband instelmogelijkheid
• 12V triggerschakeling om aan/
uitgeschakeld te kunnen worden via een
Rotel voorversterker of processor
• Computer interface-aansluiting voor het
functioneren van de tuner via pc of
automatiseringssysteem
Het uitpakken
Haal het apparaat voorzichtig uit de
verpakking. Vergeet de afstandsbediening en
andere accessoires niet. Bewaar als het even
kan de verpakking. Altijd handig bij een
eventuele verhuizing of wanneer het apparaat
opgestuurd moet worden voor reparatie, want
er is geen betere bescherming tijdens transport
dan zijn eigen doos.
Een plek voor de RT-1080
De plaats voor RT-1080 moet vlak zijn, vrij
van vocht, trillingen en hoge temperaturen. Stel
hem niet bloot aan directe zonnestralen, sluit
‘m niet op in een niet geventileerde ruimte en
zet er ook niets bovenop.
De RT-1080 wordt wat warm, wij raden u dan
ook aan hem in een speciaal audiomeubel
te gebruiken. Daarin kan hij op zijn eigen plank
nooit
staan. Zet hem
of ander component. Zodoende voorkomt u
oververhitting, brom en interactie met andere
componenten van de hi-fi keten. Hou de
bekabeling aan de ruime kant, het
vereenvoudigt het installeren en eventuele
veranderingen later.
op een eindversterker
De bekabeling
Hou de lichtnet, digitale en analoge
signaalkabels uit elkaar. Dit vermindert de kans
dat het lichtnet of de digitale informatie invloed
kan uitoefenen op het analoge signaal. Ook
het gebruik van hoge kwaliteits verbindingskabels voorkomt signaalvervuiling van buitenaf.
Als het goed is weet uw onvolprezen Rotel
leverancier hier alles van.
De afstandsbediening
Zoals boven al gemeld hebben wij bij de
RT-1080 de afstandsbediening RR-T92 gedaan
en deze bedient bijna alle functies van deze
tuner.
Het afstandsbedieningsoog
Het oog op de voorkant van de tuner ontvangt
de commandosignalen van de afstandsbediening. Zorg ervoor dat niets de signalen
in de weg staat anders kan de afstandsbediening niet op de juiste wijze zijn werk
verrichten.
Direct zonlicht en/of beïnvloeding van
halogeenverlichting dient ook vermeden te
worden. Alhoewel de afstandsbediening
weinig energie gebruikt is regelmatige controle
van de batterijen een must voor het goed
functioneren van de afstandsbediening.
EXTRA INFORMATIE
juist te gebruiken, moet u hem richten op de
voorkant van de tuner.
: Om de afstandsbediening
Het inbrengen van de
batterijen
De meegeleverde AAA batterijen (minipenlights) moeten geïnstalleerd worden voordat
u de afstandsbediening kan gebruiken.
Daarvoor opent u het klepje achterop de
afstandsbediening. U brengt nu de batterijen
aan op de manier zoals op de afstandsbediening staat aangegeven. Test nu de RR-T92
op juiste werking en sluit het batterijcompartiment. Wanneer de batterijen uitgeput
raken zal de afstandsbediening de RT-1080
niet meer altijd correct instrueren. Verse
batterijen is dan ons advies.
EXTRA INFORMATIE
voor een langere periode niet gebruikt,
adviseren wij u de batterijen te verwijderen.
Laat ook geen oude batterijen in de
afstandsbediening vanwege het gevaar van
lekken.
: Als u de afstandsbediening
Alles over de achterkant
Achterop de RT-1080 vindt u de uitgangen voor
de versterker, aansluitingen voor twee FM
antennes en een middengolfantenne, een pc
interface aansluiting, een aansluiting voor een
extra afstandsbedieningsoog, 12V triggeraansluiitngen voor het aan/uitzetten op afstand
en de aansluiting voor de lichtnetkabel.
EXTRA INFORMATIE
apparaat pas op het lichtnet aan te sluiten
nadat u zich ervan vergewist heeft dat alle
noodzakelijke verbindingen gemaakt en
correct zijn.
De cinch uitgangen
Op de achterkant van de RT-1080 vindt u o.a.
de audio uitgangen (“OUTPUTS”). Deze cinch
pluggen moeten verbonden worden met de
ingangen van uw (voor)-versterker. Let u er
vooral op dat u links (“LEFT”) en rechts
(“RIGHT”) juist aansluit.
De meegeleverde middengolfantenne
Bij de RT-1080 hebben we een z.g. ringantenne
verpakt voor de ontvangst van de lokale
middengolfzenders. Haal de antenne uit de
doos en leg hem in de buurt van de RT-1080.
: Wij raden u aan een
Page 49

49
Nederlands
Verbindt de dubbele draad van de antenne
onder de schroefjes van de “AM LOOP”
aansluiting. Onder ieder schroefje een draadje.
Het geeft niet hoe u ze aansluit als u het maar
goed doet en er geen sluiting is.
Door het verdraaien van de antenne kunt u
de ontvangst beïnvloeden. Experimenteer naar
hartelust!
EXTRA INFORMATIE
gebruikt voor de middengolfontvangst,
monteer dan de dubbele draad aan dezelfde
antenne-ingangen als de ringantenne. Laat
een dergelijke antenne wel door een vakman
plaatsen.
: Als u een buitenantenne
De FM-antenne aansluiting
De RT-1080 heeft aansluitingen voor twee FMantennes “A” en “B”. Daardoor bent u in staat
de tuner b.v. zowel op de kabel als op een
buitenantenne aan te sluiten. Of aan de kabel
en de meegeleverde binnenhuis-antenne of een
FM signaal leverende satelliet tuner. Middels
de schakelaar “ANT A/B” op de tuner of op
de afstandsbediening kunt u van de ene
antenne- op de andere antenne-ingang
overschakelen.
EXTRA INFORMATIE:
antenne kan alleen gebruikt worden wanneer
u op steenworp afstand woont van alle
zenders, die u wenst te ontvangen. Wij
adviseren u dan ook deze in Nederland niet
te gebruiken.
Wilt u het toch proberen: rol de antenne uit
en steek de coaxplug in de antenne ingang
“A” of “B”. Manipuleer een beetje met de
antenne en wanneer u de beste richting heeft
gevonden kunt u hem aan een muur o.i.d.
vastzetten.
EXTRA INFORMATIE
kabel – Wanneer u zich niet in de bevoorrechte
positie bevindt dat u aan de bovenstaande
noodantenne genoeg heeft, dan moet u een
echte antenne op het dak (laten) plaatsen. Ook
om deze antenne aan te sluiten steekt u de
75? plug in de antenne ingang achterop de
RT-1080. Wilt u echter een maximum aan
stations dan staat de meeste van u signaal uit
de muur ter beschikking: de kabel. Ook deze
sluit u op dezelfde manier aan.
De bijgeleverde nood-
: De buitenantenne en de
De lichtnetaansluiting
De RT-1080 is vanuit de fabriek ingesteld om
op 220-230 Volt wisselspanning te
functioneren. Probeer hem niet zonder meer
op een ander voltage te laten werken en
behandel het lichtnetsnoer met zorg. Bent u
niet zeker van het voltage: deze staat op het
typeplaatje op de achterkant van de tuner.
Steek het meegeleverde netsnoer in de “AC
INPUT” op de achterkant van de RT-1080. Als
u alle andere verbindingen ook gemaakt heeft
kunt u de lichtnetsteker in het stopcontact steken
of in de geschakelde spanningsuitgang van
uw (voor)versterker.
De 12v. TRIGGER uitgang
De RT-1080 kan ook aan/uitgezet worden
middels een “triggersignaal” van een Rotel
voorversterker.
Van de twee aansluitingen is er één een ingang
die het signaal ontvangt van de voorversterker
en een uitgang die het signaal weer doorgeeft
aan een ander apparaat dat middels het
triggersignaal aan en uitgezet kan worden.
Het signaal kan van elke soort zijn (wissel- of
gelijkspanning) tussen de 3 en 30 volts.
Wanneer aan de triggeringang een kabel
wordt aangesloten waar een dergelijk signaal
opstaat, dan wordt de tuner geactiveerd. Wordt
dit signaal echter onderbroken, dan gaat de
tuner weer uit (standby). Het indicatortje blijft
branden, maar het schermpje en het apparaat
doen het niet meer.
EXTRA INFORMATIE
wilt gebruiken, moet u ervoor zorgen dat de
tuner altijd aanstaat middels de schakelaar
“POWER”.
: Als u de 12V triggerfunctie
De externe
afstandsbedieningsaansluiting
Op deze 3,5 mm miniplug ingang kunt u een
infraroodontvanger (Xantech o.i.d.) aansluiten,
om het mogelijk te maken de RT-1080 toch
op afstand te kunnen bedienen ondanks dat
hij niet binnen bereik is van uw
afstandsbediening. Informeer bij uw Rotel
adviseur over de mogelijkheden en de manier
waarop u zo’n ontvanger moet aansluiten.
De computer interfaceaansluiting
Met deze aansluiting kunt u de RT-1080
bedienen via een opzich staand huis
automatiseringssysteem of met een thuiscomputer uitgerust met speciale “software”.
De RT-1080 wordt dan aangestuurd met
dezelfde data die normaal van de RT-92
afkomen. Raadpleeg uw leverancier
betreffende de mogelijkheden.
De “COMPUTER I/O” aansluiting op de
achterkant zorgt voor de nodige verbinding met
de externe apparatuur. De 8-pins RJ-45 plug
wordt ervoor gebruikt. Een standaard verbinding
voor 10-baseT UTP Ethernet bekabeling.
EXTRA INFORMATIE
betreffende bediening via een “PC” inwinnen
op onze website:
WWW.ROTEL.COM/DOWNLOADS
: U kunt ook informatie
/
De belangrijkste
bedieningsorganen
We raden u aan alvorens met het aansluiten te
gaan beginnen de voor- en achterkant van de
RT-1080 even rustig te bestuderen. De nummers
en letters bij de onderwerpen refereren aan de
tekeningen elders in de gebruiksaanwijzing en
helpen u vertrouwd te maken met de
aansluitingen, mogelijkheden en bedieningsorganen van de tuner. De nummers horen bij
het apparaat en de letters bij de afstandsbediening. De meeste functies vindt u zowel op
het apparaat als op de afstandsbediening. Er
zijn echter een paar functies die zich slechts op
een van beide bevinden.
De aan/uitschakelaar
De aan/uitschakelaar vindt u links op de
voorkant van de tuner onder de aanduiding
“POWER” en heeft geen dubbelganger op de
afstandsbediening.
Wanneer u de RT-1080 aan wilt zetten drukt
u deze schakelaar in. Het lampje boven deze
schakelaar gaat nu aan ten teken dat de tuner
aan staat.
EXTRA INFORMATIE
spanningsuitgang van een ander component
of de triggerfunctie gebruikt om de RT-1080
van energie te voorzien, laat dan de aan/
uitschakelaar van de tuner ingedrukt.
: Wanneer u een geschakelde
Page 50

RT-1080 Middengolf/FM Stereo Afstemeenheid
50
Het infoscherm
Het scherm op de voorkant van de RT-1080
toont u de informatie die u nodig heeft t.b.v.
de bediening van het apparaat.
De “DIMMER” toets
Deze functie vindt u alleen maar op de
afstandsbediening. Met de “DIMMER” toets
kunt u tijdelijk het helderheidsniveau van het
infoscherm wat lager instellen. De standen zijn:
“NORMAL”, “DIM” of “OFF”. Druk een paar
maal op de toets om het verschil te zien.
Wanneer het infoscherm uitstaat zal dat weer
aangaan bij de eerste de beste toets die u gaat
gebruiken.
EXTRA INFORMATIE
zal hij altijd op de heldere instelling
terugkomen.
: Wanneer u de tuner aanzet
De geheugentoets
“MEMORY”
Met deze toets kunt u diverse instellingen in
het geheugen van de RT-1080 plaatsen, zoals
b.v. de voorkeurzenders op de FM. Verderop
in de gebruiksaanwijzing staat exact hoe te
handelen in welke omstandigheid.
Het instellen van de
landencode
De RT-1080 kent twee ingebakken codes: één
voor de Verenigde Staten en één voor Europa.
Met deze configuraties kunt u de RT-1080
aanpassen aan de radiosituatie ter plekke,
zoals de frequentieintervallen op middengolf
en FM en de verschillen in RDS ontvangst. Als
het goed is hoeft u er niets aan te doen uw
RT-1080 is voor Europa ingesteld.
Het instellen voor de Verenigde Staten.
Druk gedurende 5 seconden tegelijkertijd op
de toetsen “POWER”, “MEMORY” en de “9”
van het numerieke toetsenbord. Op het scherm
verschijnt nu het woordje LOADING. De
RT-1080 is nu “USA ready”.
Het instellen voor Europa. Druk
gedurende 5 seconden en tegelijkertijd op de
toetsen “POWER”, “MEMORY” en de “0” van
het numerieke toetsenbord. Op het scherm
verschijnt nu het woordje LOADING. De
RT-1080 kunt u nu op correcte wijze in Europa
gebruiken.
De belangrijkste
afstemtoetsen
De RT-1080 is een middengolf/FM tuner met
RDS data ontvangstmogelijkheden en de
mogelijkheid om 30 zenders in het geheugen
vast te leggen. Ook kunt u met de RT-1080
op verschillende manieren afstemmen.
Hieronder vindt u een overzicht van die
mogelijkheden. (Meer details vindt u in de
hoofdstukken over het betreffende onderwerp.)
• Met de handmatige afstemmethode
“DOWN/UP” toetsen of de “TUNE” toets
op de afstandsbediening de band op en
af gaan. Zet eerst de “TUNE/PRESET” toets
op TUNE en schakel de “AUTO TUNING”
functie uit. U kunt nu handmatig afstemmen.
• Door de frequentie in te toetsen, kunt
u direct op een gewenste zender
afstemmen. Druk eerst op de “FREQUENCY
DIRECT” toets op de afstandsbediening en
breng de afstemfrequentie in van de
betreffende zender middels de numerieke
toetsen.
• Met de frequentie zoekfunctie kunt
u de band op en af gaan op zoek naar
goed te ontvangen zenders. Zet eerst de
“TUNE/PRESET” toets op TUNE en schakel
de “AUTO TUNING” functie aan. U kunt
nu automatisch afstemmen.
• U kunt ook direct afstemmen op uw
voorkeurzenders. Zet eerst de “TUNE/
PRESET” toets op TUNE. Toets nu de
gewenste voorkeurzender in middels de
numerieke toetsen.
• Met de voorkeurzender zoek-
functie kunt u uw voorraad
voorkeurzenders “afzappen”. Druk op de
“PRESET SCAN” toets om het zappen te
starten.
• RDS biedt u een scala aan alternatieve
afstem- en zoekmogelijkheden, die
gebaseerd is op een datastroom die wordt
meegezonden bij bepaalde zenders. Zie
het RDS hoofdstuk voor gedetailleerde
informatie.
De bandkeuzetoets
“BAND”
Met de bandkeuzetoets kiest u of u de tuner
wilt afstemmen op de middengolf- of op de
FM-band. Links op het infoscherm kunt u zien
voor welke band u heeft gekozen, met daarbij
de frequentie van de zender waarop u heeft
afgestemd.
De afstemorganen
De toetsen “DOWN/UP” op de voorkant en
de “TUNE/PRESET” toetsen op de
afstandsbediening zijn de belangrijkste
organen waarmee u kunt afstemmen. Vanaf
nu reppen wij alleen nog maar over de
“DOWN/UP” toetsen daar beide op dezelfde
wijze bediend worden.
U kunt met deze toetsen op verschillende
manieren afstemmen afhankelijk van de wijze
waarop de tuner staat ingesteld:
Tijdens frequentie-afstemming met de
AUTO TUNING functie uit. Druk op één
van de “DOWN/UP” toetsen om handmatig
frequentiestap voor frequentiestap door de
afstemband heen te gaan ongeacht of er een
zender is of niet. Zie ook het betreffende
hoofdstuk elders.
Tijdens frequentie-afstemming met de
AUTO TUNING functie aan. Druk op één
van de “DOWN/UP” toetsen om het
automatisch afstemmen te starten. De tuner gaat
nu de band op of af zoekend naar de eerst
goed ontvangbare zender. Mocht dit niet een
gewenste zender zijn druk dan nogmaals op
dezelfde toets om de procedure te herhalen.
Tijdens het automatisch afstemmen worden
zwakke zenders overgeslagen. Mocht de tuner
geen goed te ontvangen zender meer
tegenkomen, dan gaat hij automatisch weer
terug naar de laatst afgestemde zender. (Zie
ook de hoofdstukken afstem/voorkeur
keuzetoets en voorkeur aftasttoets voor
gedetailleerde informatie over dit onderwerp.)
Tijdens voorkeurzender afstemming:
druk u op één van de afstemtoetsen om op
de volgende resp. vorige voorkeurzender af
te stemmen. (Zie ook het hoofdstuk afstem/
voorkeur keuzetoets voor gedetailleerde
informatie over dit onderwerp.)
Page 51

51
Nederlands
Tijdens RDS PTY afstemming: drukt u op
één van de afstemtoetsen om het gewenste
programmasoort van de getoonde lijst te
kunnen kiezen. (Zie ook de hoofdstukken RDS
en RDS PTY toets voor gedetailleerde informatie
over dit onderwerp.)
EXTRA INFORMATIE
: Op het infoscherm bevinden
zich een paar aanduidingen die u bij het
afstemmen kunnen helpen. Heel groot wordt
getoond de afstemfrequentie welke meegaat
gedurende het afstemmen. Een signaalsterkte
indicator toont de veldsterkte waarmee de
zender binnenkomt. Het woordje “TUNED”
verschijnt in het scherm wanneer correct op een
zender is afgestemd en tevens verschijnt “ST”
wanneer het een stereozender betreft alsmede
informatie over de wijze van afstemming.
Het numerieke toetsenbord: De
voorkeurzendertoetsen
Het geheugen van de RT-1080 kan 30
voorkeurstations bevatten zowel op de
middengolf als op de FM. U kunt deze
oproepen d.m.v. de toetsen van het numerieke
toetsenbord.
Vanuit de fabriek hebben we wat willekeurige
frequenties in het geheugen gezet. Om een
bepaalde zender in het geheugen te zetten,
doet u de volgende handelingen:
1. Stem af op de gewenste zender. Hetzij op
de middengolf of de FM-band.
2. Druk op de toets “MEMORY”. De indicator
MEMORY gaat knipperen.
3. Druk, terwijl MEMORY knippert, op het
gewenste nummer waaronder u de
betreffende zender wilt verstoppen.
Voorbeeld: Om de gevonden zender onder
drie te zetten drukt u tijdens het knipperen
op 3 en als u hem onder 15 wilt laten schuil
gaan, drukt u eerst op 1 en vervolgens op
5.
4. Wanneer een bepaald voorkeurnummer al
was bezet door een andere zender zal deze
worden overschreven (pech: zender weg).
Om af te stemmen op een voorkeurstation hoeft u alleen maar de
betreffende toets in te drukken van één
van de numerieke toetsenborden.
Bijvoorbeeld: Voor voorkeurzender drie drukt
u op 3 en voor voorkeurzender vijftien drukt u
eerst op 1 en daarna binnen vijf seconden
op 5.
EXTRA INFORMATIE
: Het numerieke toetsenbord
kan ook gebruikt worden voor het direct
intoetsen van een zenderfrequentie (zie
hieronder).
De frequentiekeuzetoets:
Directe frequentie inbreng
Als u de frequentie van een bepaalde zender
weet, kunt u die direct intoetsen met de
“FREQUENCY DIRECT” toets.
1. Druk op de “FREQUENCY DIRECT” toets
om de functie van het numerieke
nummerbord te veranderen van voorkeurnaar direct frequentiekeuzegebruik. De
zender-frequentie verandert nu in 4
liggende streepjes, die de vier cijfers van
de frequentie-aanduiding voorstellen. Het
eerste streepje knippert nu.
2. Breng het eerste cijfer van de frequentie
in met een van de genummerde toetsen.
Het cijfer verschijnt nu op het infoscherm
en het tweede streepje begint te knipperen.
Breng nu de resterende cijfers van de
afstemfrequentie in. Wanneer alle cijfers
zijn ingebracht wordt automatisch de
afgestemde zender ten gehore gebracht.
VOORBEELDEN
(USA FM) 87.50MHz Druk 8>7>5
(EU FM) 87.50MHz Druk 8>7>5>0
(AM) 1610kHz Druk 1>6>1>0
Als u niet binnen vijf seconden een frequentie
inbrengt, stopt de DIRECTE FREQUENTIE
inbrengwijze en gaat de tuner terug naar de
laatst afgestemde zender.
:
De automatische afstemtoets
Met de toets “AUTO TUNING” kunt u heen en
weer schakelen tussen automatisch afstemmen
op frequentie en handmatig afstemmen op
frequentie. Wanneer u afstemt met de “DOWN/
UP” toetsen tijdens AUTO TUNING stemt de
RT-1080 automatisch af op de eerstvolgende
goed te ontvangen zender. Is dit niet de gewenste
zender, herhaal dan de procedure. Zwakke
zenders worden met deze zoekmethode
overgeslagen. Wordt er geen goed ontvangbare
zender ontdekt dan gaat de tuner terug naar
de laatst afgestemde zender.
Om over te schakelen van frequentie
afstemming naar automatische afstemming
gebruikt u de “AUTO TUNING” toets. Tijdens
het automatisch afstemmen verschijnt “AUTO”
in het infoscherm.
EXTRA INFORMATIE
: Wanneer u middels de
“TUNE/PRESET” toets de PRESET functie
activeert wordt de AUTO/TUNING functie
opgeheven. Zie volgende onderwerp.
De afstem/voorkeur keuzetoets
Met de toets “TUNE/PRESET” kunt u heen en
weer schakelen tussen frequentie-afstemming
(met het activeren van de afstemtoetsen gaat
u iedere keer een afstemfrequentie hoger of
lager) en voorkeur-afstemming (met het
activeren van de afstemtoetsen gaat u iedere
keer een voorkeurzender hoger of lager).
Om over te schakelen van frequentie-afstemming
naar voorkeur-afstemming gebruikt u de “TUNE/
PRESET” toets. Tijdens het voorkeur afstemmen
verschijnt “PRESET” in het infoscherm.
EXTRA INFORMATIE
: Wanneer u middels de
“TUNE/PRESET” toets de PRESET functie
activeert wordt de AUTO/TUNING functie
opgeheven.
De voorkeur aftasttoets
Met de “PRESET SCAN” toets kunt u alle
voorkeurzenders de revue laten passeren.
Wanneer u deze toets indrukt laat de RT-1080
alle voorkeurzenders gedurende vijf seconden
op volgorde horen. Wilt u deze activiteit staken,
druk dan nogmaals op deze toets.
EXTRA INFORMATIE
weergeven van een voorkeurzender de PRESET
SCAN functie activeert, gaat de RT-1080 naar
de eerstvolgende voorkeurzender op rij om
vervolgens de hele rij af te werken en pas
weer te stoppen op het station waar de
rondgang begon. Is de tuner afgestemd op
een zender niet uit de rij van voorkeurstations
dan start de PRESET SCAN functie met
voorkeurzender 1 om vervolgens de hele rij
op volgorde af te werken.
: Wanneer u tijdens het
Page 52

RT-1080 Middengolf/FM Stereo Afstemeenheid
52
RDS ontvangst
We hebben de Rotel RT-1080 uitgerust met
RDS (Radio Data System) ontvangstmogelijkheden. Met RDS krijgt u toegevoegde
informatie die als een gecodeerde datastroom
wordt meegezonden bij het gewone signaal
van een zender. Deze datastroom wordt
gedecodeerd door een decoder in de RT-1080
en kan u voorzien van de volgende informatie:
• de naam van de zender waarop u heeft
afgestemd (b.v. Radio 1 of SKY)
• het soort programma dat de betreffende
zender uitzendt (b.v. ROCK of NEWS enz.)
• verkeersinformatie
• roltekst voor aankondigingen of algemene
informatie
Daarbij biedt RDS verschillende zoekroutines
zoals:
• de mogelijkheid naar een zender te zoeken
met een bepaald soort programmainhoud
(PTY).
• de mogelijkheid van het zoeken naar een
zender die verkeersinformatie uitzendt (TP).
• de mogelijkheid om automatisch af te
stemmen op verkeersinformatie (TA).
EXTRA INFORMATIE
afhankelijk van het feit of een zender wel
RDS data uitzendt. Dus kunt u RDS informatie
alleen maar daar ontvangen waar de zenders
voorzien zijn van RDS apparatuur. Ontvangt
u geen RDS informatie dan gedraagt de
RT-1080 zich als een normale tuner.
EXTRA INFORMATIE
maar uitgezonden via FM zenders.
Bovenstaande ontvangst-procedure is dan ook
slechts van toepassing in de FM-band.
: De RDS functie is geheel
: RDS informatie wordt alleen
De infoschermtoets
Er zijn vijf verschillende infoschermmogelijkheden wanneer een zender RDS data
uitzendt en de desbetreffende RDS indicator
oplicht. Druk herhaaldelijk op de RDS
infoschermtoets “DISPLAY” of om achtereenvolgens de onderstaande opties te kunnen
aanschouwen:
1. De zendfrequentie waarop de
afgestemde zender uitzendt.
2. De (roep)naam van de zender
waarop afgestemd is. (b.v. Radio 1). Zendt
de betreffende zender geen RDS data uit
dan knippert in het venster “PS”.
3. Het type programma. Hier wordt
gekozen uit een standaard lijst van
programmatypes en die helaas in het Engels
is opgesteld. (NEWS, CURRENT AFFAIRS,
INFORMATION, SPORT, EDUCATION,
DRAMA, CULTURE, SCIENCE, VARIED,
POP MUSIC, ROCK MUSIC, EASY
LISTENING MUSIC, LIGHT CLASSICAL,
SERIOUS CLASSICAL, OTHER MUSIC,
WEATHER, FINANCE, CHILDREN’S
PROGRAMS, SOCIAL AFFAIRS,
RELEGION, PHONE IN, TRAVEL, LEISURE,
JAZZ MUSIC, COUNTRY MUSIC,
NATIONAL MUSIC, OLDIES MUSIC, FOLK
MUSIC and DOCUMENTARY). Zendt de
betreffende zender geen RDS data uit dan
knippert in het venster “PS”.
4. Een tijdmelding (CLOCK TIME) zoals die
wordt uitgezonden door de betreffende
zender (dus lokale tijd). Zendt de
betreffende zender geen RDS data uit dan
knippert in het venster “CT”.
5. Een toegevoegde tekst (RADIO TEXT).
Informatie of boodschappen waarvan de
zendgemachtigde het belangrijk vindt dat
u ze consumeert. Zendt de betreffende
zender geen RDS data uit dan knippert in
het venster “RT”.
De PTY toets
3. Druk nu binnen vijf seconden een tweede
maal op de PTY toets of. De tuner gaat nu
een andere zender zoeken met het
gewenste programmatype. Als u te lang
wacht met het voor de tweede keer
indrukken van de PTY toets dan vervalt de
PTY functie.
4. Indien er geen zender wordt gevonden met
het gewenste programmatype dan wordt
automatisch weer teruggekeerd naar de
laatst afgestemde zender.
5. Wilt u de PTY functie beëindigen dan drukt
op een willekeurige toets (behalve
“DIMMER” en “FM-MONO”).
De TP toets
Met de TP toets kunt u alle (RDS) zenders met
verkeersinformatie afzoeken.
1. Druk op de TP toets. De tuner gaat nu op
zoek naar een zender met verkeersinformatie.
2. Indien er geen zender wordt gevonden met
verkeersinformatie dan wordt automatisch
weer teruggekeerd naar de laatst
afgestemde zender.
3. Wilt u de TP functie beëindigen dan drukt
op een willekeurige toets (behalve
“DIMMER” en “FM-MONO”).
De TA toets
Met de TA toets kunt u alle (RDS) zenders met
gesproken verkeersinformatie afzoeken.
1. Druk op de TA toets. De tuner gaat nu op
zoek naar een zender met gesproken
verkeersinformatie.
2. Indien er geen zender wordt gevonden met
gesproken verkeersinformatie dan wordt
automatisch weer teruggekeerd naar de
laatst afgestemde zender.
3. Wilt u de TA functie beëindigen dan drukt
op een willekeurige toets (behalve
“DIMMER” en “FM-MONO”).
Met de PTY toets kunt u alle (RDS) zenders op
programmatype afzoeken.
1. Druk op de PTY toets. Het huidige
programmatype verschijnt in het infoscherm.
2. Verander indien gewenst van programmatype middels de afstemtoetsen. U kunt de
veranderingen zien in het infoscherm.
Page 53

53
Nederlands
De AF toets
Er zijn landen waar een RDS zender deel
uitmaakt van een zendernetwerk, zoals hier
in Nederland, waar Radio 1, 2, 3 en 4 door
verschillende zenders op verschillende
frequenties door het gehele land worden
uitgezonden. Deze zenders kunnen een RDS
signaal meezenden met een lijst van frequenties
waar hetzelfde programma elders wordt
uitgezonden. Mocht dit het geval zijn met een
zender waarop uw RT-1080 is afgestemd, dan
staat AF in het infoscherm te lezen.
De “AF” toets wordt gebruikt om te
onderzoeken of de zender waarop u bent
afgestemd wel de best te ontvangen zender
is met hetzelfde programma. De AF toets werkt
alleen maar wanneer de AF indicator in het
infoscherm brandt.
1. Druk op de “AF” toets. De tuner gaat nu
alle frequenties af die de lijst met AF
informatie opgeeft en zal dan afstemmen
op de best te ontvangen zender.
2. Is er geen betere zender dan zal de RT-1080
zichzelf weer afstemmen op oorspronkelijke
zender.
3. Wordt het signaal van de nieuwe zender
zwakker dan zal de oude zender weer
worden opgezocht.
4. Wilt u de AF functie beëindigen dan drukt
u op een willekeurige toets (behalve
“DIMMER” en “FM-MONO”).
EXTRA INFORMATIE
uitgezonden is pas de moeite waard als de
signaalsterkte voldoende is. Af en toe is dat
niet het geval. Druk dan de “FM MONO” toets
in. De stereoinformatie is nu wel verdwenen
maar ruis en andere vervelende storing
vanwege te geringe signaalsterkte ook.
: Een programma in stereo
De antenneverzwakker toets
Met de “ANT ATT” toets kunt u het
antennesignaal van een bepaalde zender
verzwakken. Voor zenders die met een normaal
of zwak signaal binnenkomen moet deze
verzwakker natuurlijk uitgeschakeld (OFF) zijn.
Er zijn echter wel eens zenders, vooral als ze
dichtbij staan, die met een overdosis aan signaal
uw tuner tot wanhoop brengen, met vervorming
als resultaat. Gebruik dan deze toets om die
bepaalde zender weer in het gareel te brengen.
Wanneer de verzwakker in functie is staat er
LOC in het infoscherm te lezen. Deze functie
werkt alleen op de FM band.
De smalle band toets
FM ontvangst is een kwestie van ontvangen en
decoderen van een draaggolfsignaal op een
vastgelegde frequentie. Er zijn echter zenders
waarbij dat “vastgelegde” een beetje met een
korreltje zout genomen moet worden: ze wijken
iets af van die frequentie. Nu is onze RT-1080
letterlijk zeer ruim denkend en accepteert zulke
zenders feilloos en dat werkt normaal gesproken
dan ook zonder problemen.
De antenne A/B keuzetoets
Zoals reeds beschreven in het hoofdstuk “Alles
over de achterkant” bezit de RT-1080 twee
antenne-ingangen genaamd “A” en “B”. Met
de toets “ANT A/B” kunt u tussen deze twee
ingangen heen en weer schakelen. In het
infoscherm staat aangegeven welke van de
twee antenne-ingangen u in gebruik heeft.
Afstem extra’s
De nu volgende toetsen kunnen het leven van
een radioluisteraar aanzienlijk veraangenamen:
De monotoets
Met de “FM MONO” toets kunt u een
programma dat in stereo wordt uitgezonden
in mono ontvangen. In STEREO zal de RT-1080
een in stereo uitgezonden programma in stereo
weergeven mits de signaalsterkte voldoende
is. De STEREO indicator in het infoscherm licht
dan op. Staat de tuner in MONO dan is de
weergave ook in mono ongeacht de
uitzendwijze van de zender.
Bent u echter in de omstandigheid dat u woont
in een gebied waar veel zenders binnenkomen
en er een paar bij zijn die op elkaars lip zitten,
dus bijna op dezelfde frequentie werken, dan
kan het gebeuren dat ze elkaar dwars gaan
zitten. In het jargon heet dat “interfereren”: u
hoort de ene zender een beetje door de andere
heen. Om deze omstandigheid het hoofd te
kunnen bieden kunt u de z.g. bandbreedte
van de RT-1080 versmallen middels de “FM
IF NARROW” toets. Door het inschakelen van
deze functie maakt u de afstand van de
betreffende zenders schijnbaar wat groter,
waardoor ze weinig of geen last meer van
elkaar hebben. Als u de “FM IF NARROW”
toets indrukt, verschijnt er NARROW in het
infoscherm. U heft de functie weer op door
nogmaals op deze toets te drukken.
Page 54

Technische gegevens
FM deel
Bruikbare gevoeligheid:
12,2 dBf
Gevoeligheid bij 50 dB signaal/ruisverh.:
20,2 dBf (mono)
45,3 dBf (stereo)
Signaal/ruisverhouding (bij 65 dBf):
75 dBf (mono)
72 dBf (stereo)
Harmonische vervorming (bij 65 dBf):
0,2% (mono)
0,3% (stereo)
Frequentiebereik:
10 Hz – 15 kHz. ± 3 dB
Vangverhouding:
2 dB
Naastliggend kanaal selectiviteit:
47 dB (± 400 kHz)
Valse frequentie onderdrukking:
90 dB
Spiegelfrequentie onderdrukking:
80 dB
IF signaal onderdrukking:
80 dB
AM signaal onderdrukking:
55 dB
Kanaalscheiding
(bij 100 Hz/1 kHz/10 kHz):
40 dB/45 dB/35 dB
Uitgangsniveau:
1,2V
Antenne-impedantie:
75Ω ongebalanceerd
Middengolf deel
Bruikbare gevoeligheid:
300 µV/m
Selectiviteit:
25 dB
Harmonische vervorming:
0,5%
Spiegelfrequentie onderdrukking:
45 dB
Signaal/ruisverhouding:
48 dB
Uitgangsniveau:
165 mV
Antenne-impedantie:
Gesloten ring-antenne
Algemeen
Opgenomen vermogen:
10 Watts
Lichtnetspanning/frequentie:
230 Volts/50 Hz. (EU versie)
115 Volts/60 Hz. (USA versie)
Afmetingen (b x h x d):
430 x 92 x 340 mm
Netto gewicht:
4.7 kg
Gegevens en ontwerp zijn voorbehouden.
Rotel en het Rotel hi-fi logo zijn geregistreerde
handelsmerken van “The Rotel Co. Ltd”, Tokyo,
Japan.
Page 55

Page 56

The Rotel Co. Ltd.
10-10 Shinsen-Cho
Shibuya-Ku
Tokyo 150-0045
Japan
Phone: +81 3-5458-5325
Fax: +81 3-5458-5310
Rotel of America
54 Concord Street
North Reading, MA 01864-2699
USA
Phone: +1 978-664-3820
Fax: +1 978-664-4109
Rotel Europe
Meadow Road
Worthing, West Sussex BN11 2RX
England
Phone: +44 (0)1903 524 813
Fax: +44 (0)1903 524 831
Rotel Deutschland
Kleine Heide 12
D-33790 Halle/Westf.
Germany
Phone: +49 05201-87170
Fax: +49 05201-73370
www.rotel.com
082 OM-RT-1080 022301
English • Français • Deutsch • Italiano • Español • Nederlands
 Loading...