

Page 1

WATCH INSTRUCTIONS
Rotary Instructions RT140:Rotary Instructions RT140 09/03/2009
Page 2

Page Instructions for
1 - 3 Sofia
4 - 10 Rotary Revelation
TM
11 - 19 CAL No. AW00
20 - 22 S6L71
23 - 28 OS70
29 - 30 Movement ref 2521
31 - 37 ETA G15.211
Rotary Instructions RT140:Rotary Instructions RT140 09/03/2009
Page 3
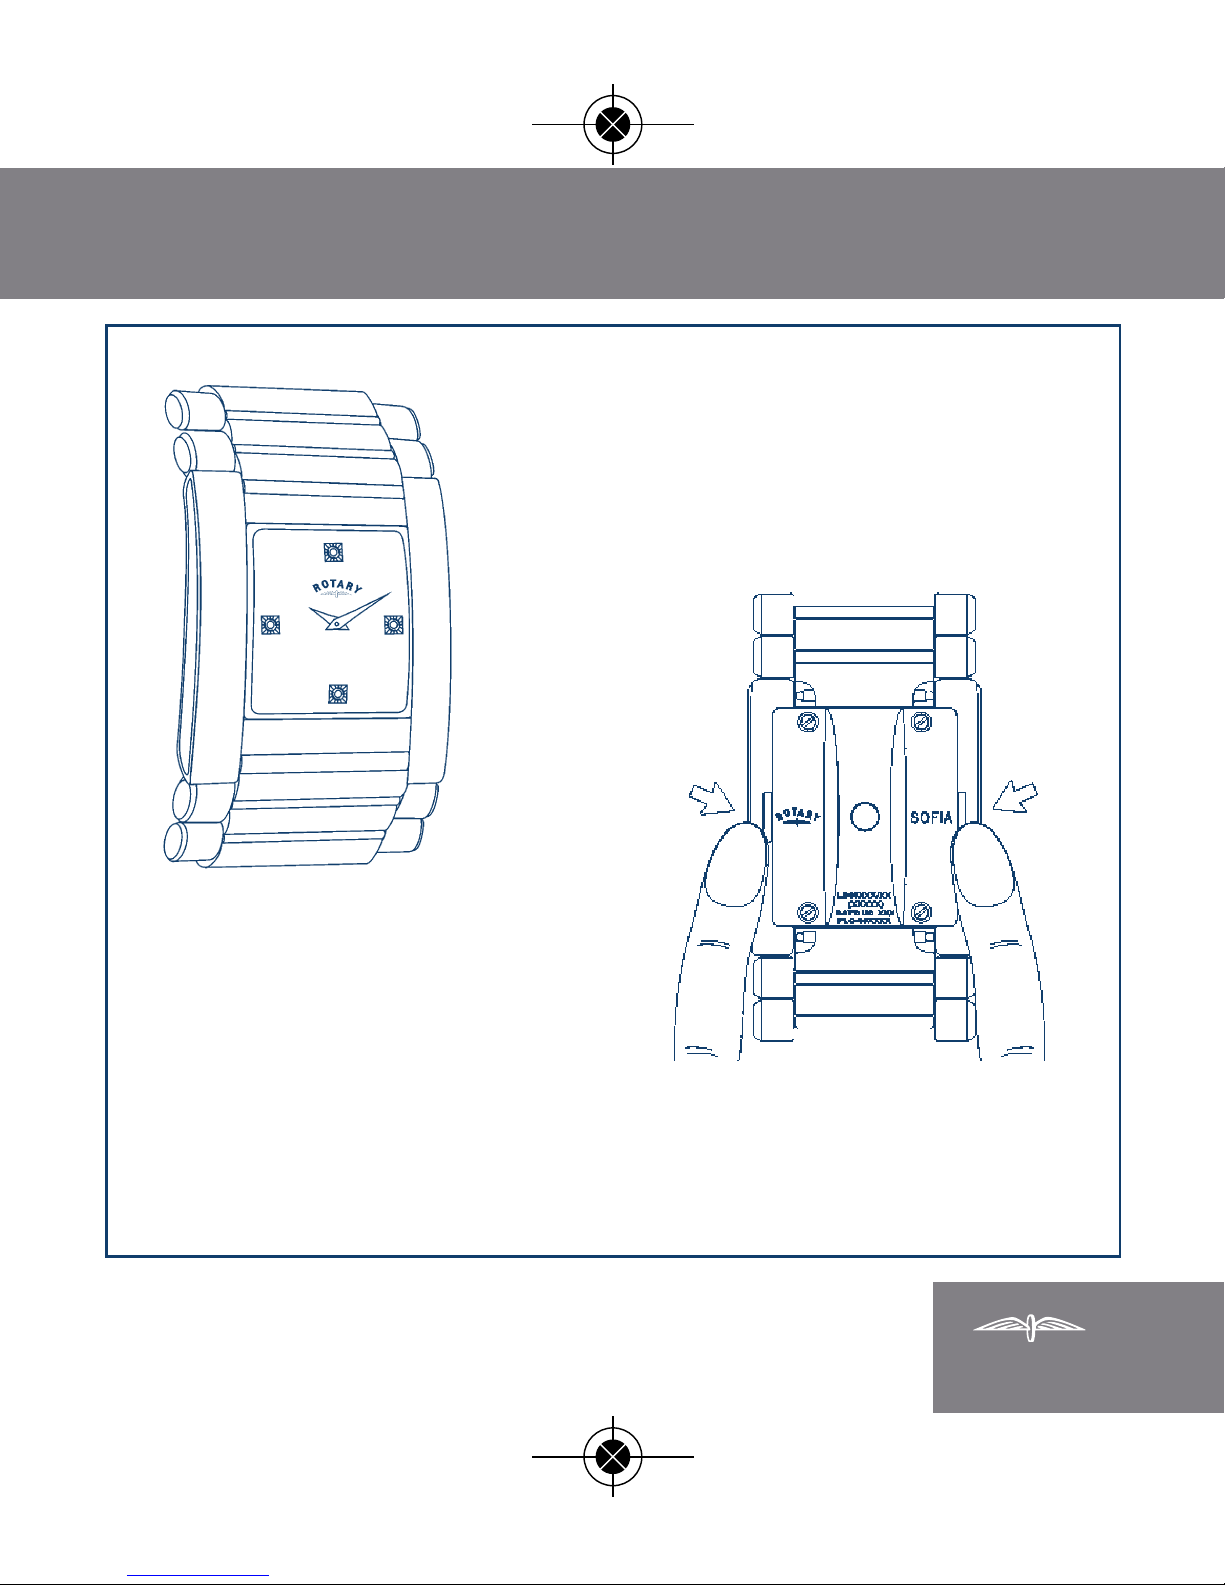
SOFIA WATCH INSTRUCTIONS
1
1
2
Press the back to release
the stones
Rotary Instructions RT140:Rotary Instructions RT140 09/03/2009
Page 4
2
4
3
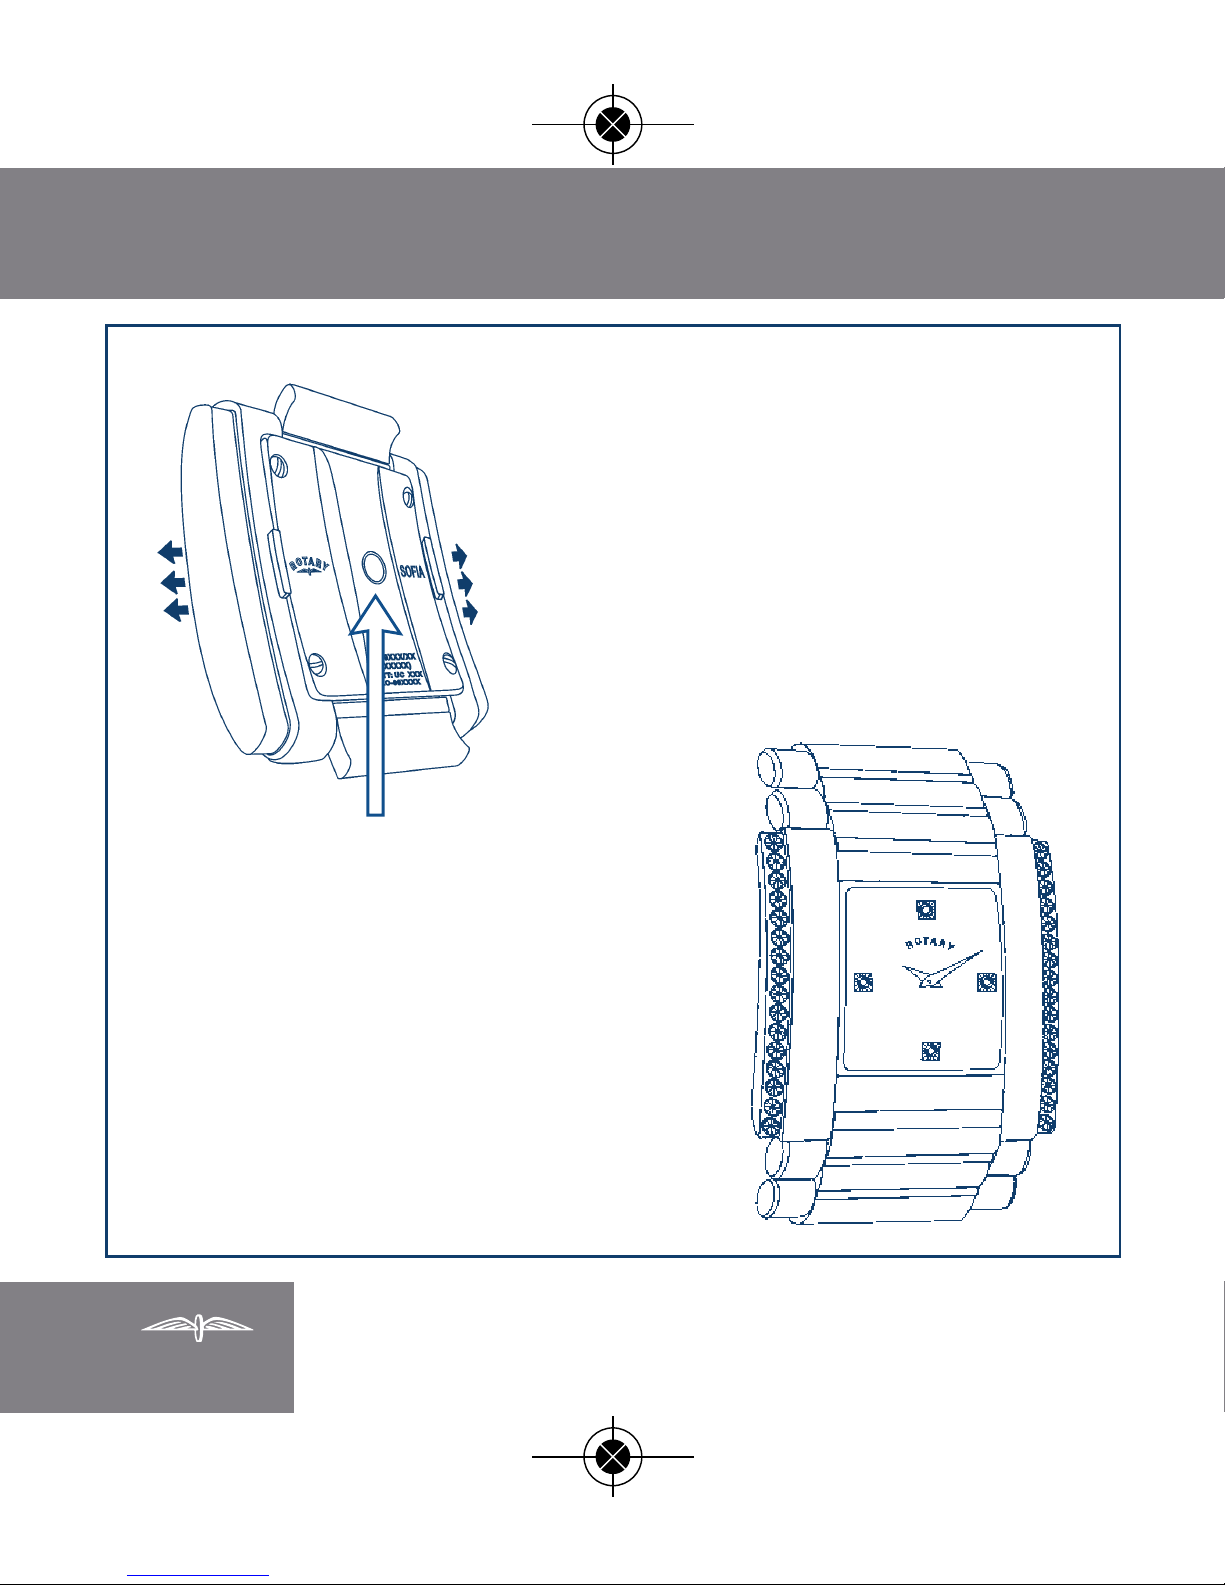
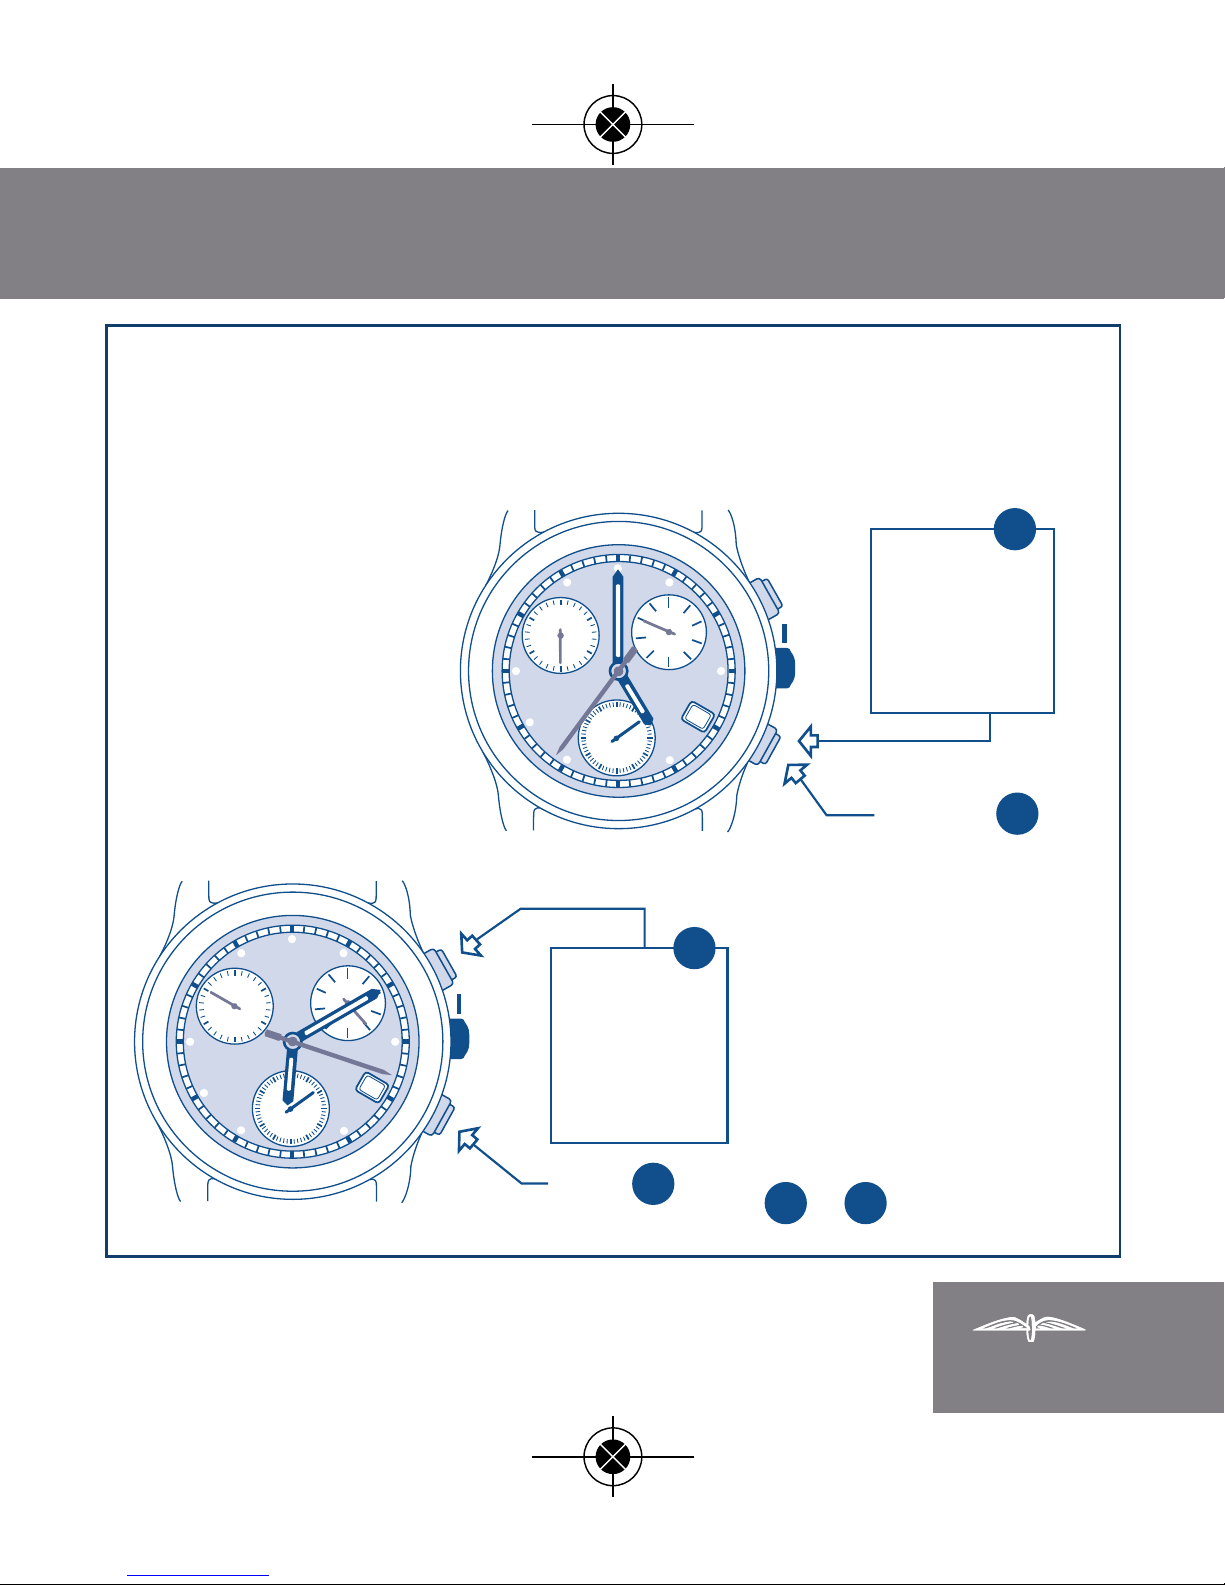
To change the time, push
here with a pointed
object until correct time
is shown.
Rotary Instructions RT140:Rotary Instructions RT140 09/03/2009
Page 5
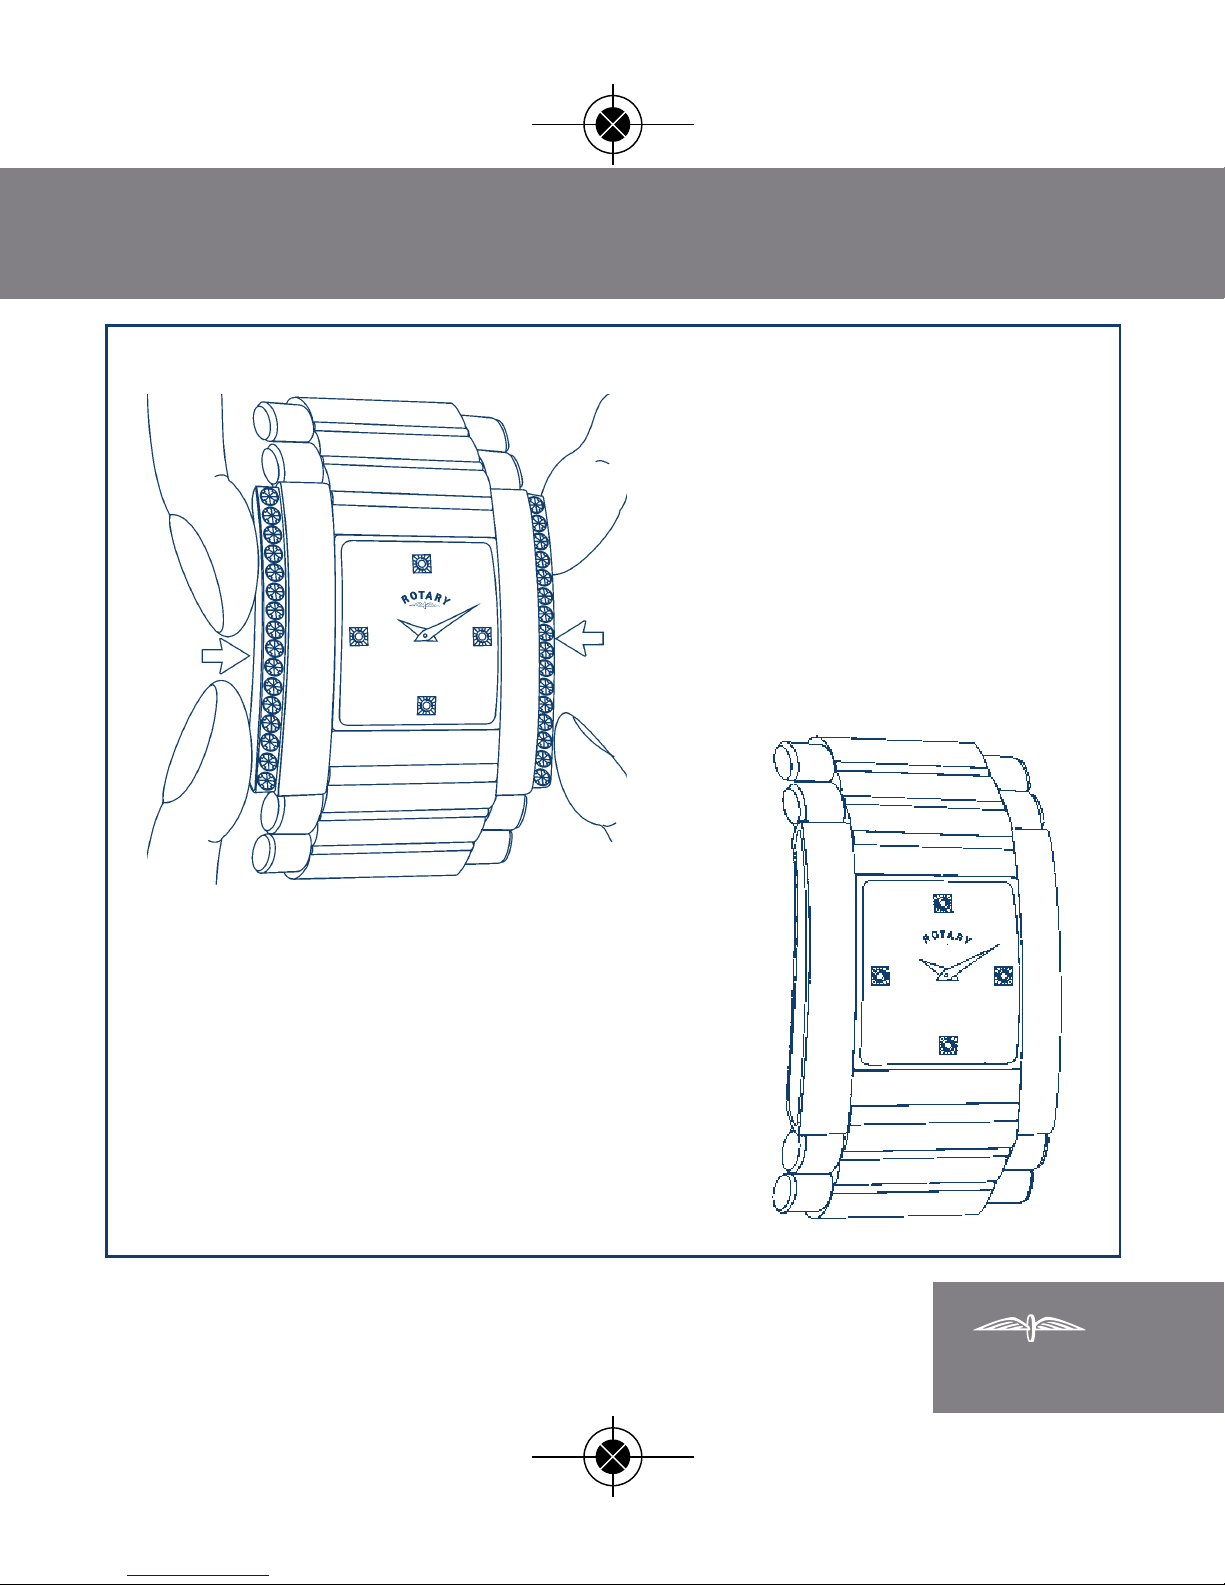
SOFIA WATCH INSTRUCTIONS
3
5
6
Squeeze the bars and the
stones disappear
Rotary Instructions RT140:Rotary Instructions RT140 09/03/2009
Page 6
TM
4
Rotary Instructions RT140:Rotary Instructions RT140 09/03/2009
Page 7
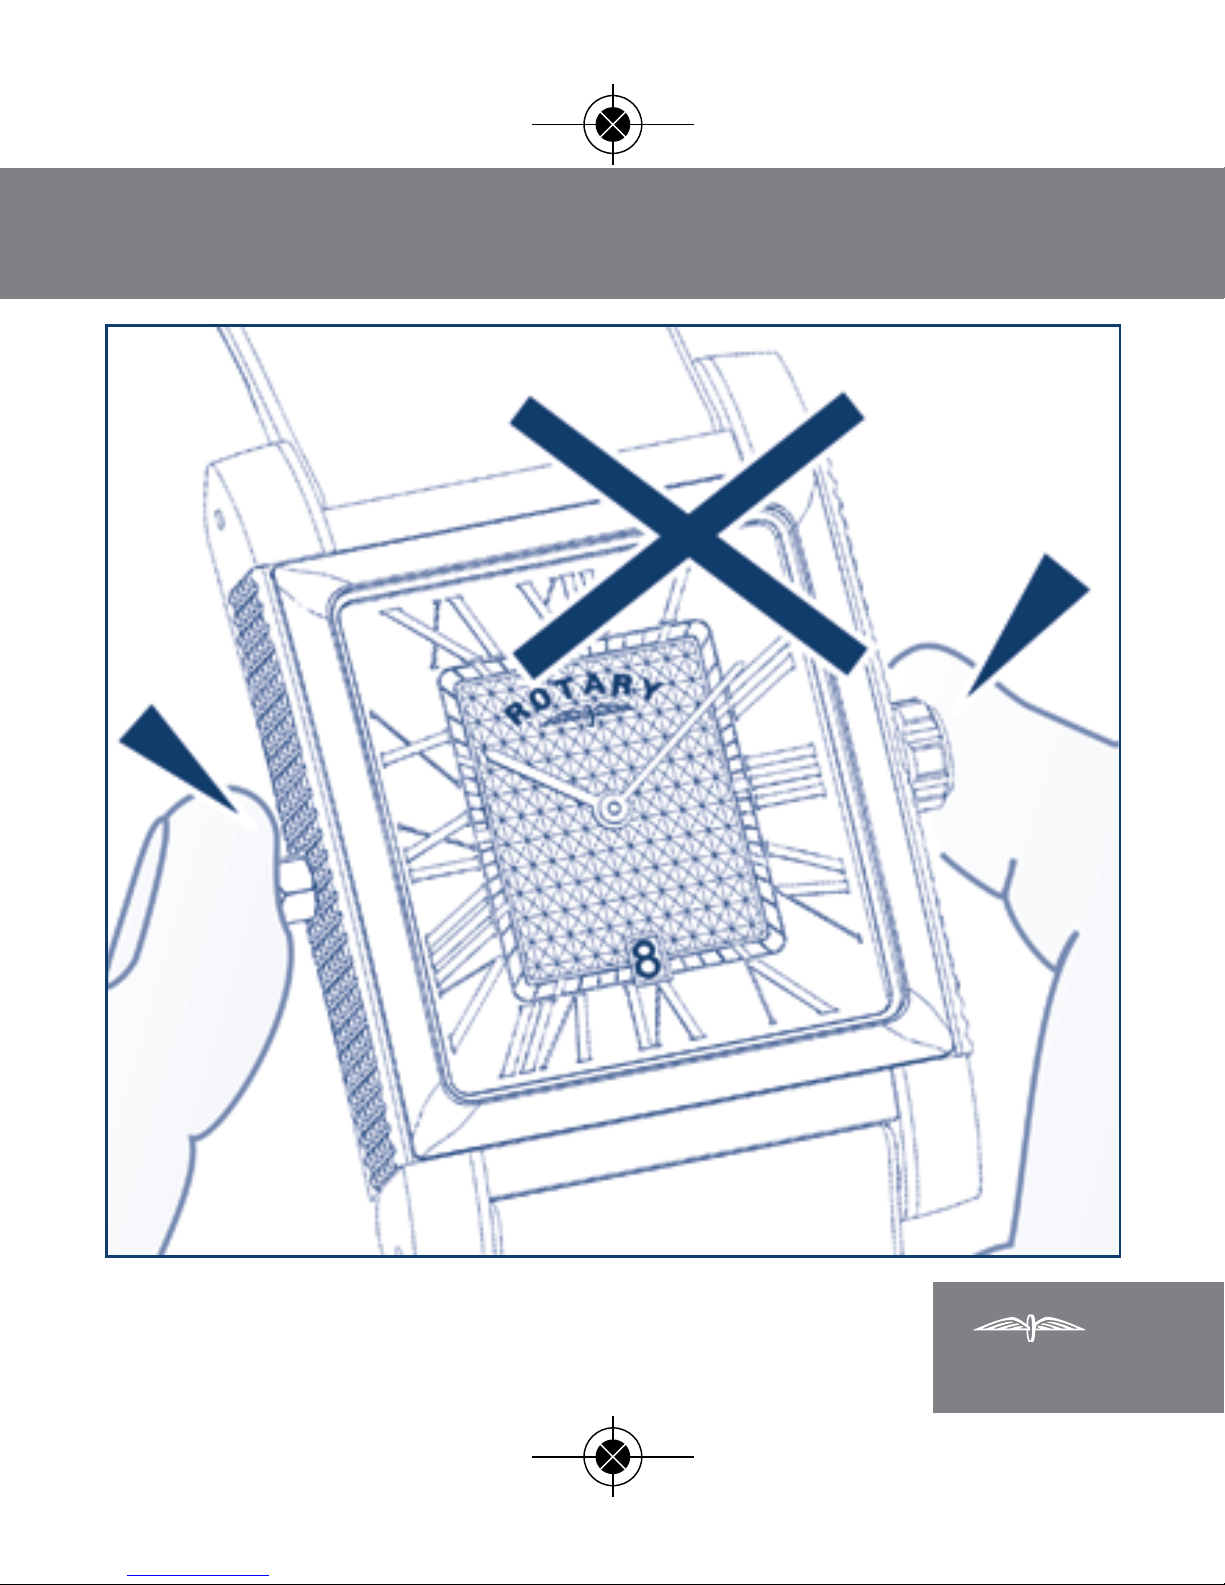
ROTARY REVELATION
TM
5
Rotary Instructions RT140:Rotary Instructions RT140 09/03/2009
Page 8
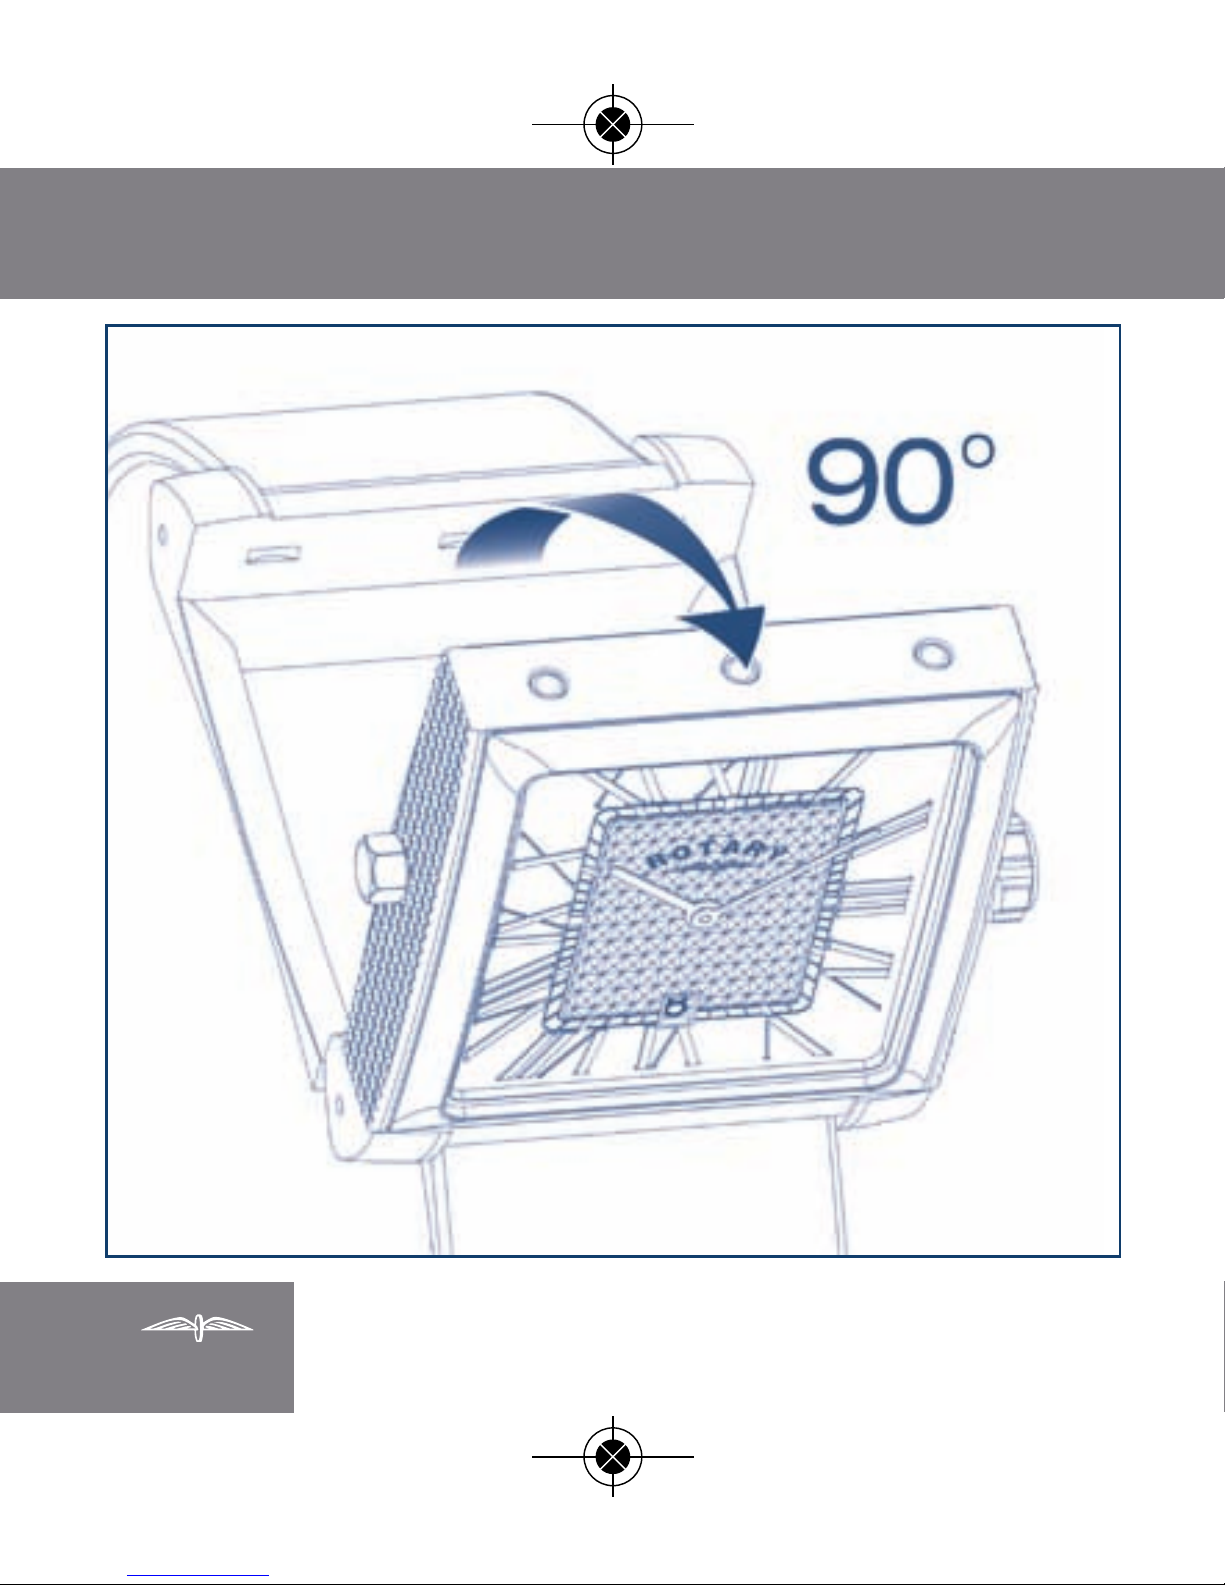
TM
6
Rotary Instructions RT140:Rotary Instructions RT140 09/03/2009
Page 9
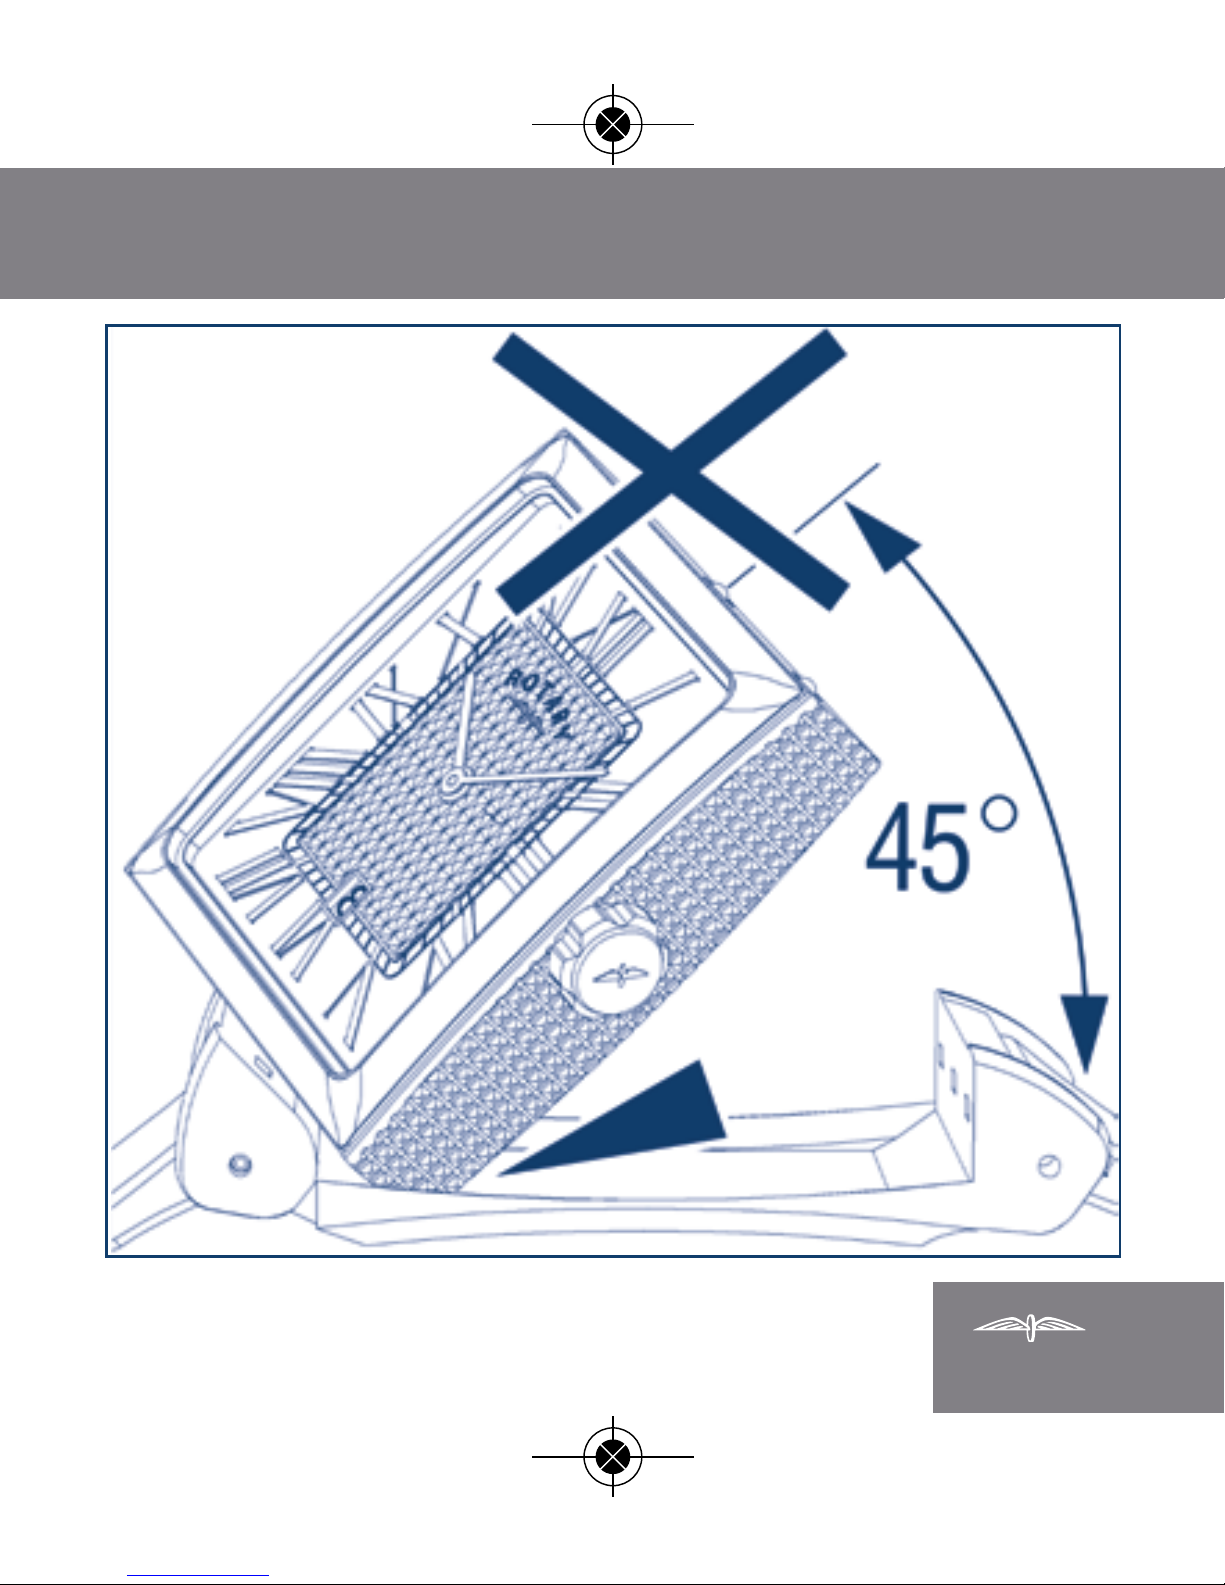
ROTARY REVELATION
TM
7
Rotary Instructions RT140:Rotary Instructions RT140 09/03/2009
Page 10
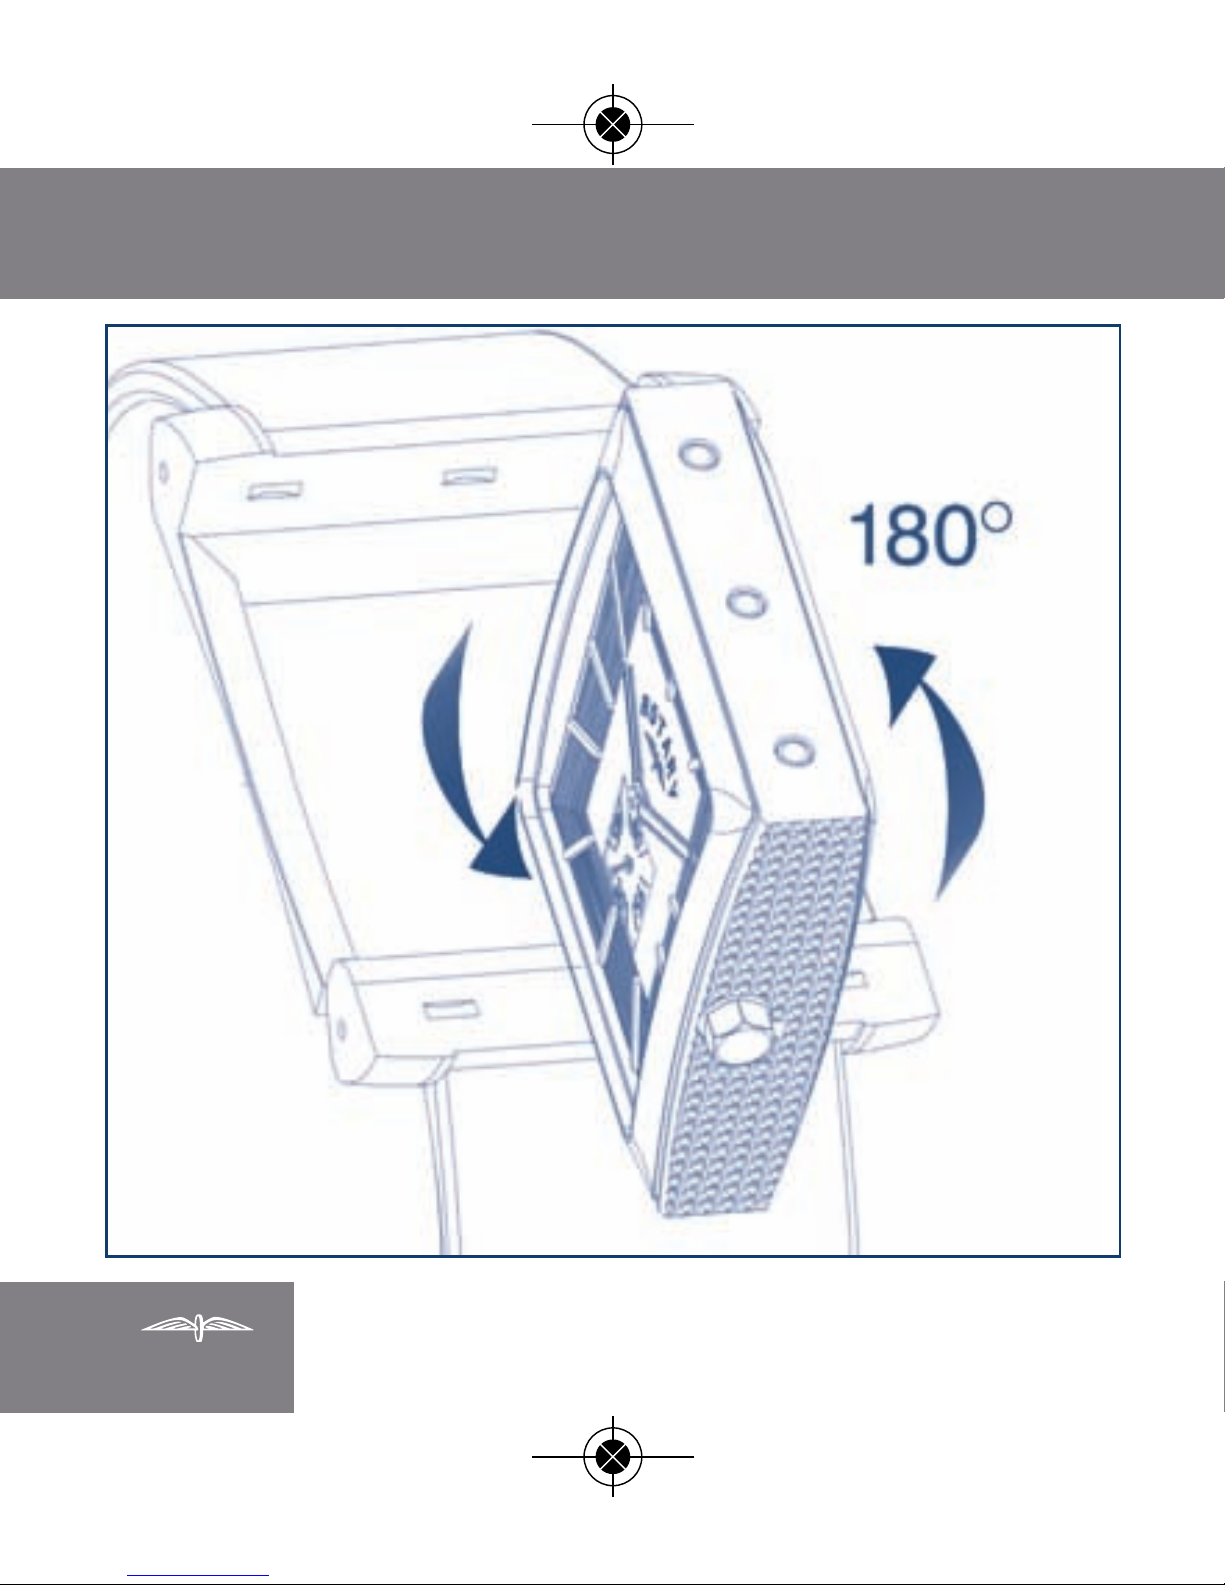
TM
8
Rotary Instructions RT140:Rotary Instructions RT140 09/03/2009
Page 11
ROTARY REVELATION
TM
9
Rotary Instructions RT140:Rotary Instructions RT140 09/03/2009
Page 12
TM
10
Rotary Instructions RT140:Rotary Instructions RT140 09/03/2009
Page 13
CAL. No. AW00
11
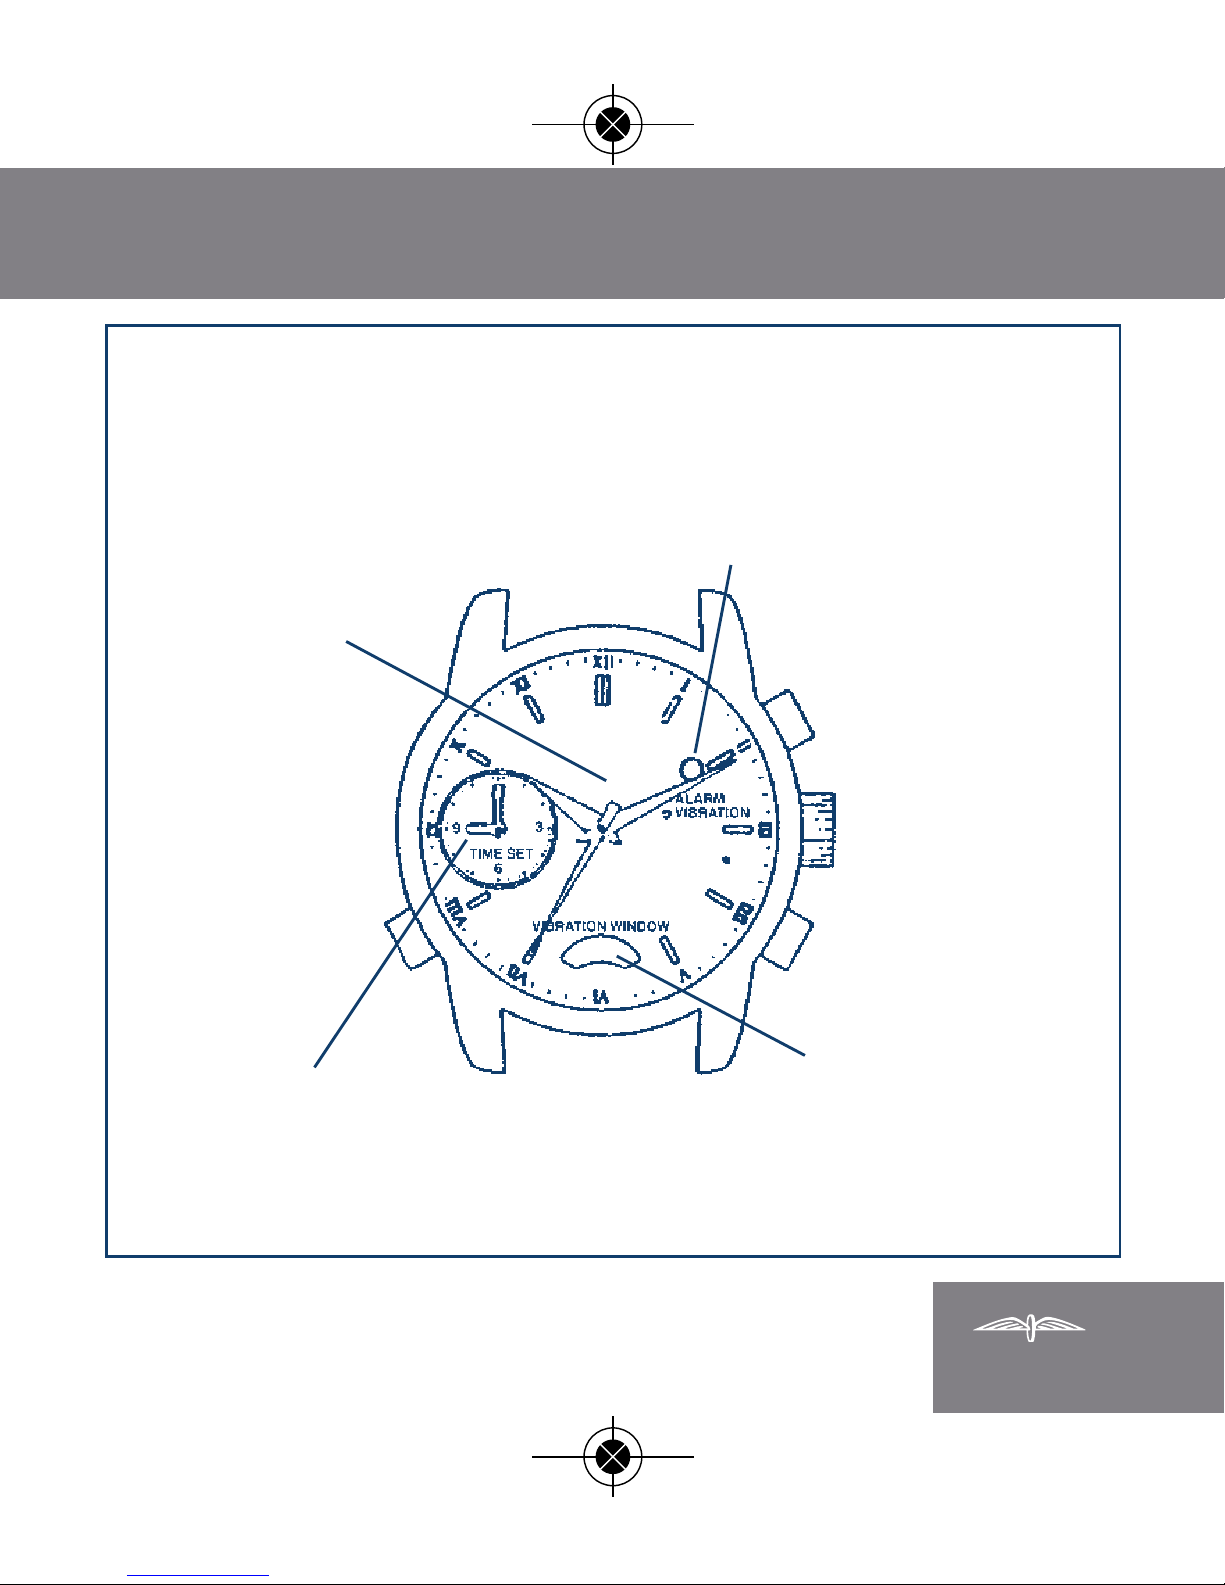
1. Explanation of Displays and Buttons
Primary Time
Vibration motor
rotary disk
Auxiliary time
(current time/alarm set time)
Button A
Button C
Button B
Crown
Alarm identification mark
(Blue: Vibration /
White: Sound)
Rotary Instructions RT140:Rotary Instructions RT140 09/03/2009
Page 14

12
(When Using the Vibration Alarm)
• Vibrations may not be felt easily if the watch is worn too loosely. Wear the watch so
that the watch body is constantly in contact with your arm.
• It may also be difficult to feel the vibrations during strenuous exercise or when
performing work that involves swinging or shaking your arm.
• If you take off your watch and simply carry it in your pocket and so forth, it may not
be possible to detect that the vibration alarm has gone off when the set alarm time is
reached. In such cases, switch from vibration to the sound alarm.
(When Using the Sound Alarm)
• If you wear your watch tightly on your wrist, it may be difficult to hear the alarm
sound. Wear the watch somewhat loosely to hear the alarm sound better.
• When it is difficult to hear the alarm sound due to high levels of surrounding noise and
so forth, switch to the vibration alarm.
• Switch to the vibration alarm when desiring to be informed of the time by the alarm
in a manner that does not inconvenience those around you.
Refer to the alarm identification mark on the display to determine whether the watch
is set to the sound alarm or vibration alarm.
2. Precautions when Wearing Your Watch
Rotary Instructions RT140:Rotary Instructions RT140 09/03/2009
Page 15
CAL. No. AW00
13
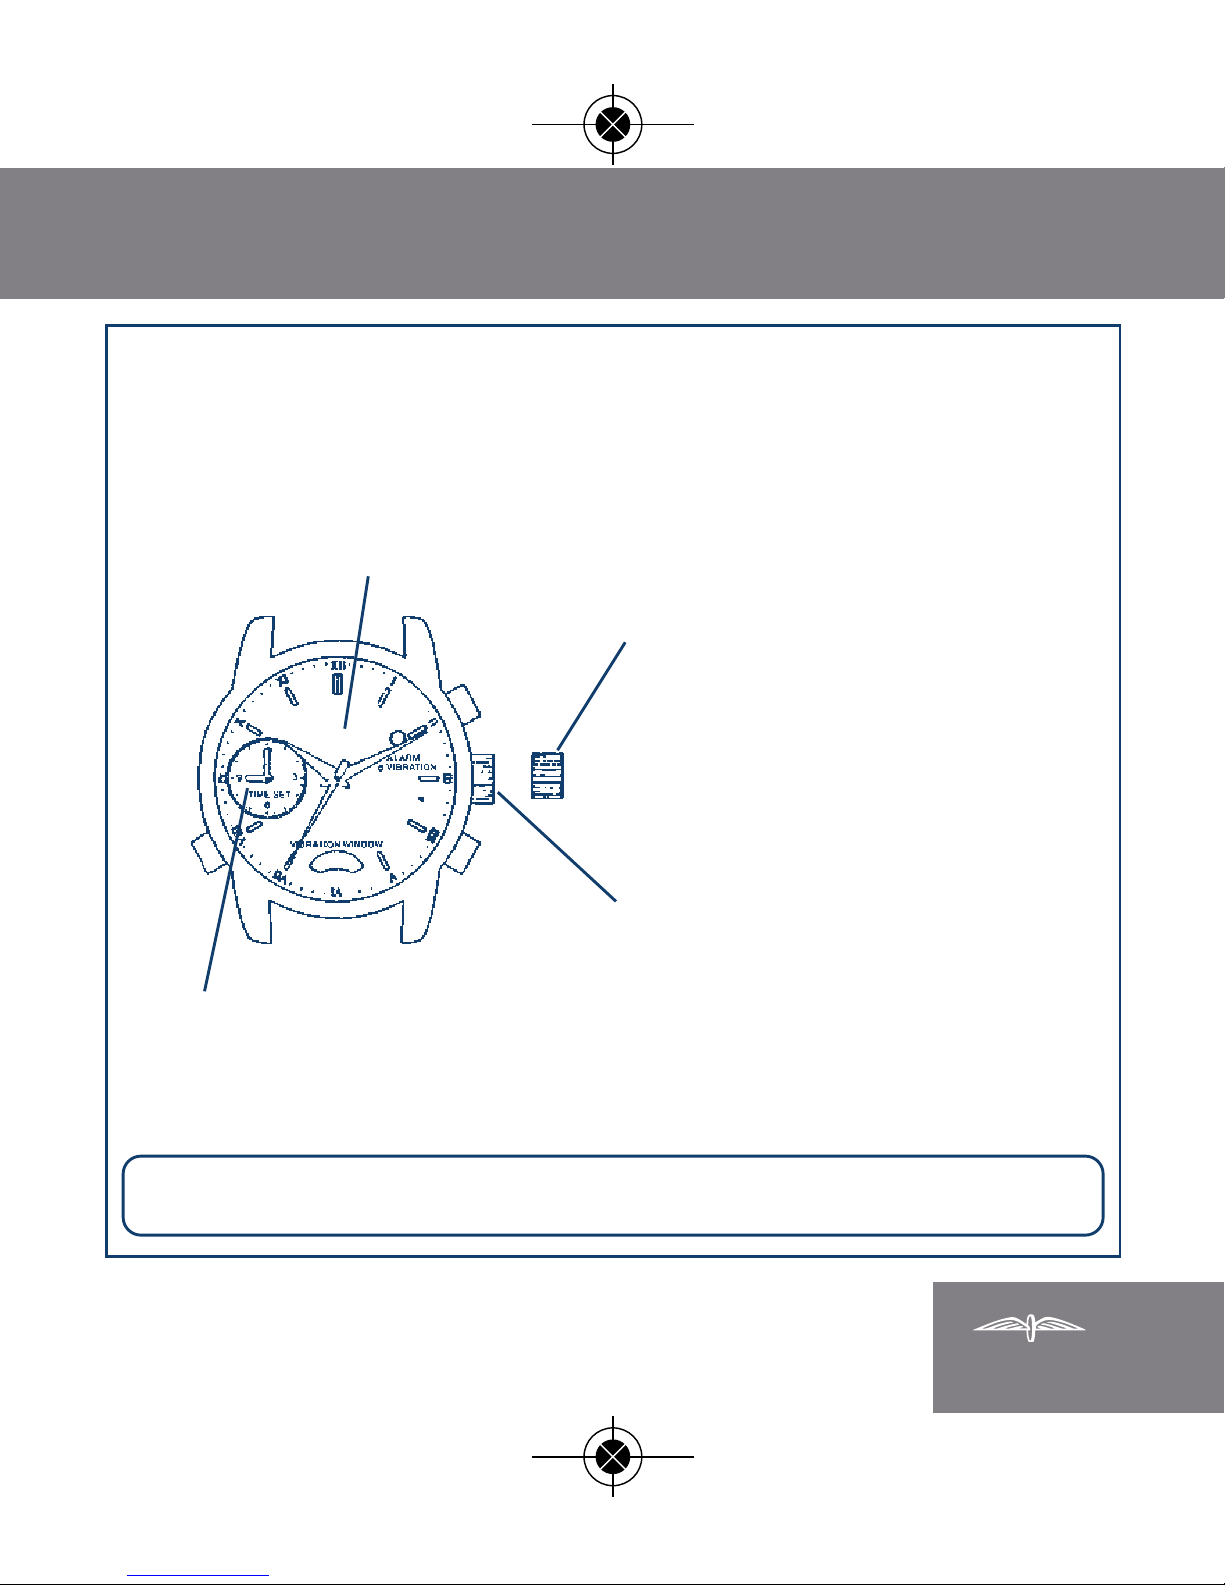
3. Setting the Time
(1) Pull the crown out to the time
correction position when the second
hand reaches the 0 second position.
(2) Turn the crown to set the primary
time.
(3) Press button C to set the auxiliary time
to the primary time.
• The auxiliary time will be corrected by
1 minute each time button C is
pressed. Pressing button C
continuously will cause the minutes to
advance rapidly.
(4) Return the crown to the normal
position in accordance with a time
signal.
• Primary time: Hands move at 1
second intervals.
• Auxiliary time: Hands move at 1
minute intervals.
The alarm is turned off when the
time is set.
When setting the time, the alarm will not sound at the correct time if the
auxiliary time is not properly set according to the primary time.
Primary time
Button B
Crown
Auxiliary time
Button A
Button
C
Time correction
position
Normal
position
✩
Rotary Instructions RT140:Rotary Instructions RT140 09/03/2009
Page 16
14
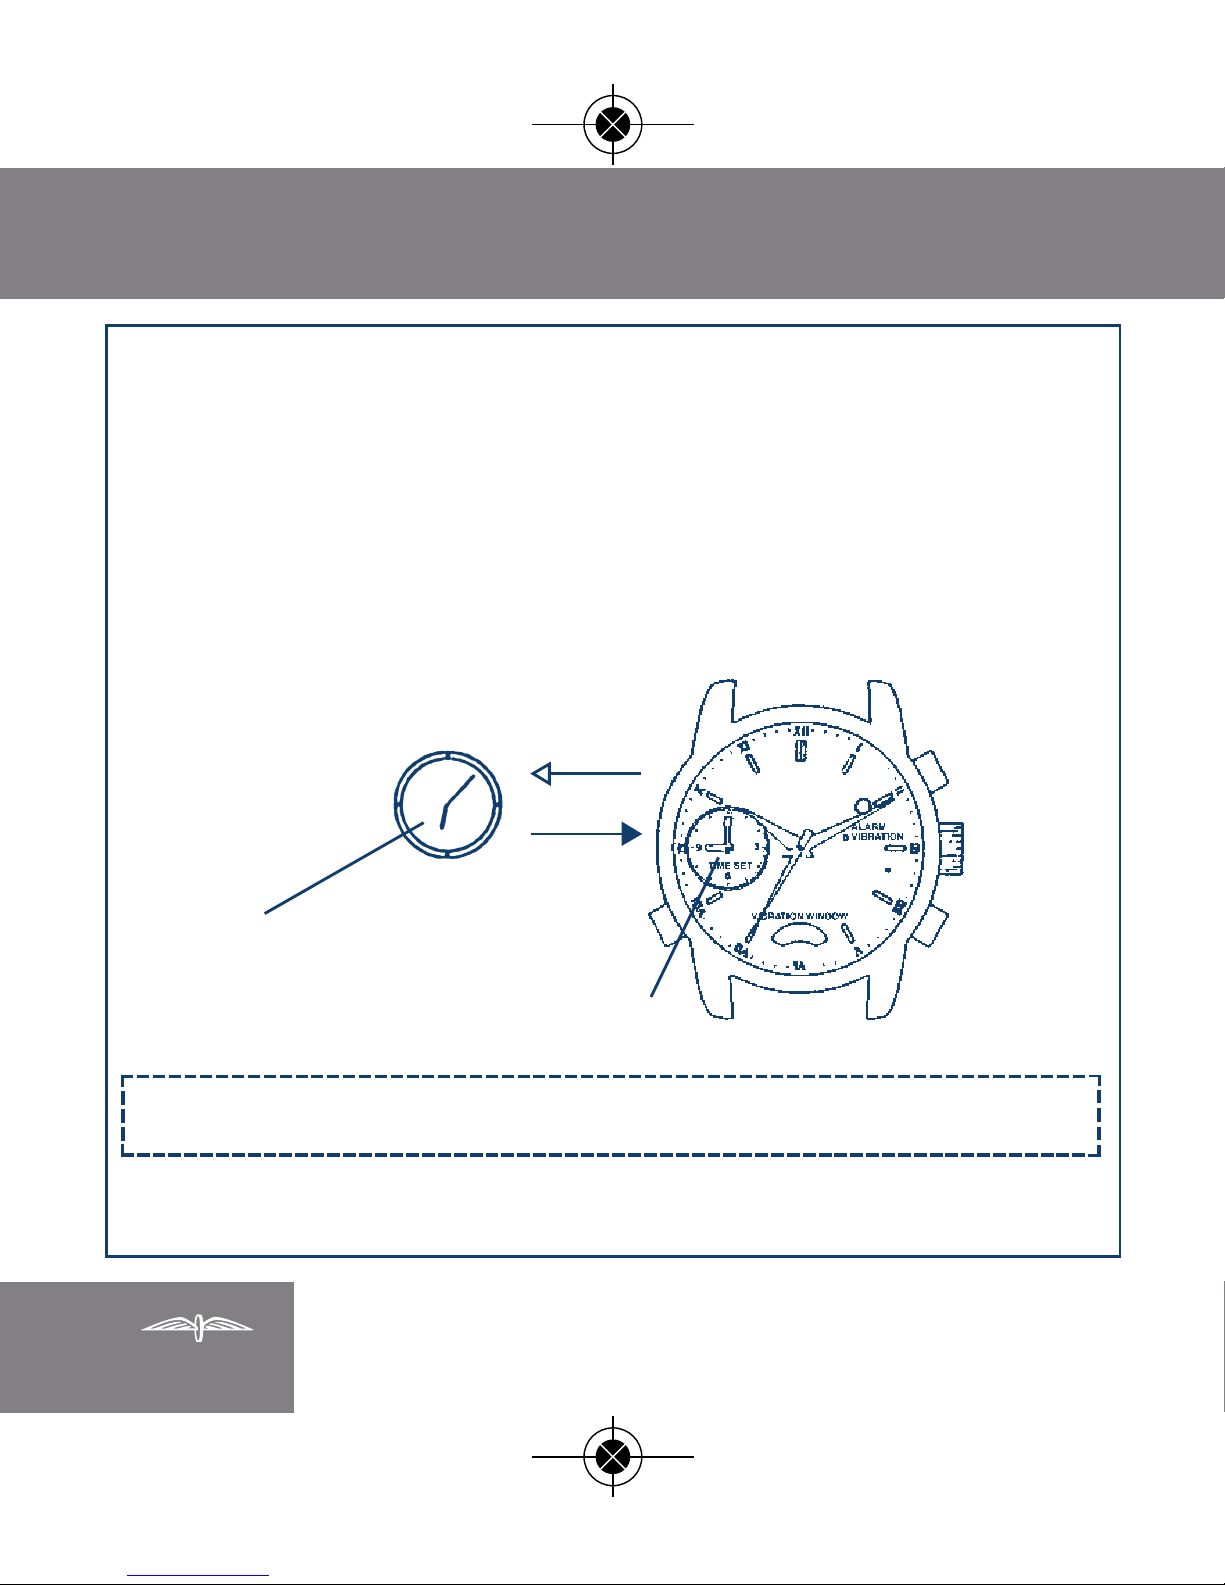
The alarm function of this watch uses a 12-hour clock. The alarm is turned off
automatically once it has sounded or vibrated. The auxiliary time (alarm set time) is then
switched over to the current time display and runs concurrently with the primary time.
4. Use of the Alarm
When primary time is different from auxiliary time : Alarm is on.
When primary time is the same as auxiliary time : Alarm is off.
Button B
Button A
On
Alarm set time
display
Off
Button A
Button C
Current time display
Rotary Instructions RT140:Rotary Instructions RT140 09/03/2009
Page 17

CAL. No. AW00
15
(Setting the Alarm Time)
(1) Press button C to set the alarm with the auxiliary time. (When pressing button C for
the first time, pressing it continuously for at least 0.5 seconds will cause the auxiliary
time to advance in 1 minute increments. After that, the auxiliary time will advance by
1 minute each time button C is pressed. Pressing button C continuously causes the
auxiliary time to advance rapidly.)
• The following occur when the alarm set time (auxiliary time) is reached:
When using the sound alarm: The alarm sounds for 15 seconds.
When using the vibration alarm: The watch vibrates 10 times.
After sounding or vibrating, the alarm is switched off automatically, and auxiliary time
switches over to primary time.
Since the alarm set time is stored in the memory of the watch, when the alarm is
turned again by pressing button A, the auxiliary time will switch over to the set time
stored in memory.
(Switching Between Sound Alarm and Vibration Alarm)
(1) The alarm notification method switches between the sound alarm and vibration alarm
each time button B is pressed.
• Blue identification mark: Vibration alarm
• White identification mark: Sound alarm
Rotary Instructions RT140:Rotary Instructions RT140 09/03/2009
Page 18

16
(Stopping the Alarm from Sounding or Vibrating)
• When the time reaches the alarm set time, the alarm will either sound for 15 seconds
or vibrate 10 times.
• The alarm can be stopped by pressing any button.
(Turning the Alarm On and Off)
• Pressing button A (for about 2 seconds) turns the alarm function on and off.
When the alarm function is turned on, the auxiliary time will switch to the alarm set
time.
The following occur when the alarm function is turned on:
When using the sound alarm: The alarm sounds three times.
When using the vibration alarm: The watch will vibrate three times.
When the alarm function is turned off, the auxiliary time will switch over to the
primary time, and run concurrently with primary time.
Rotary Instructions RT140:Rotary Instructions RT140 09/03/2009
Page 19
CAL. No. AW00
17
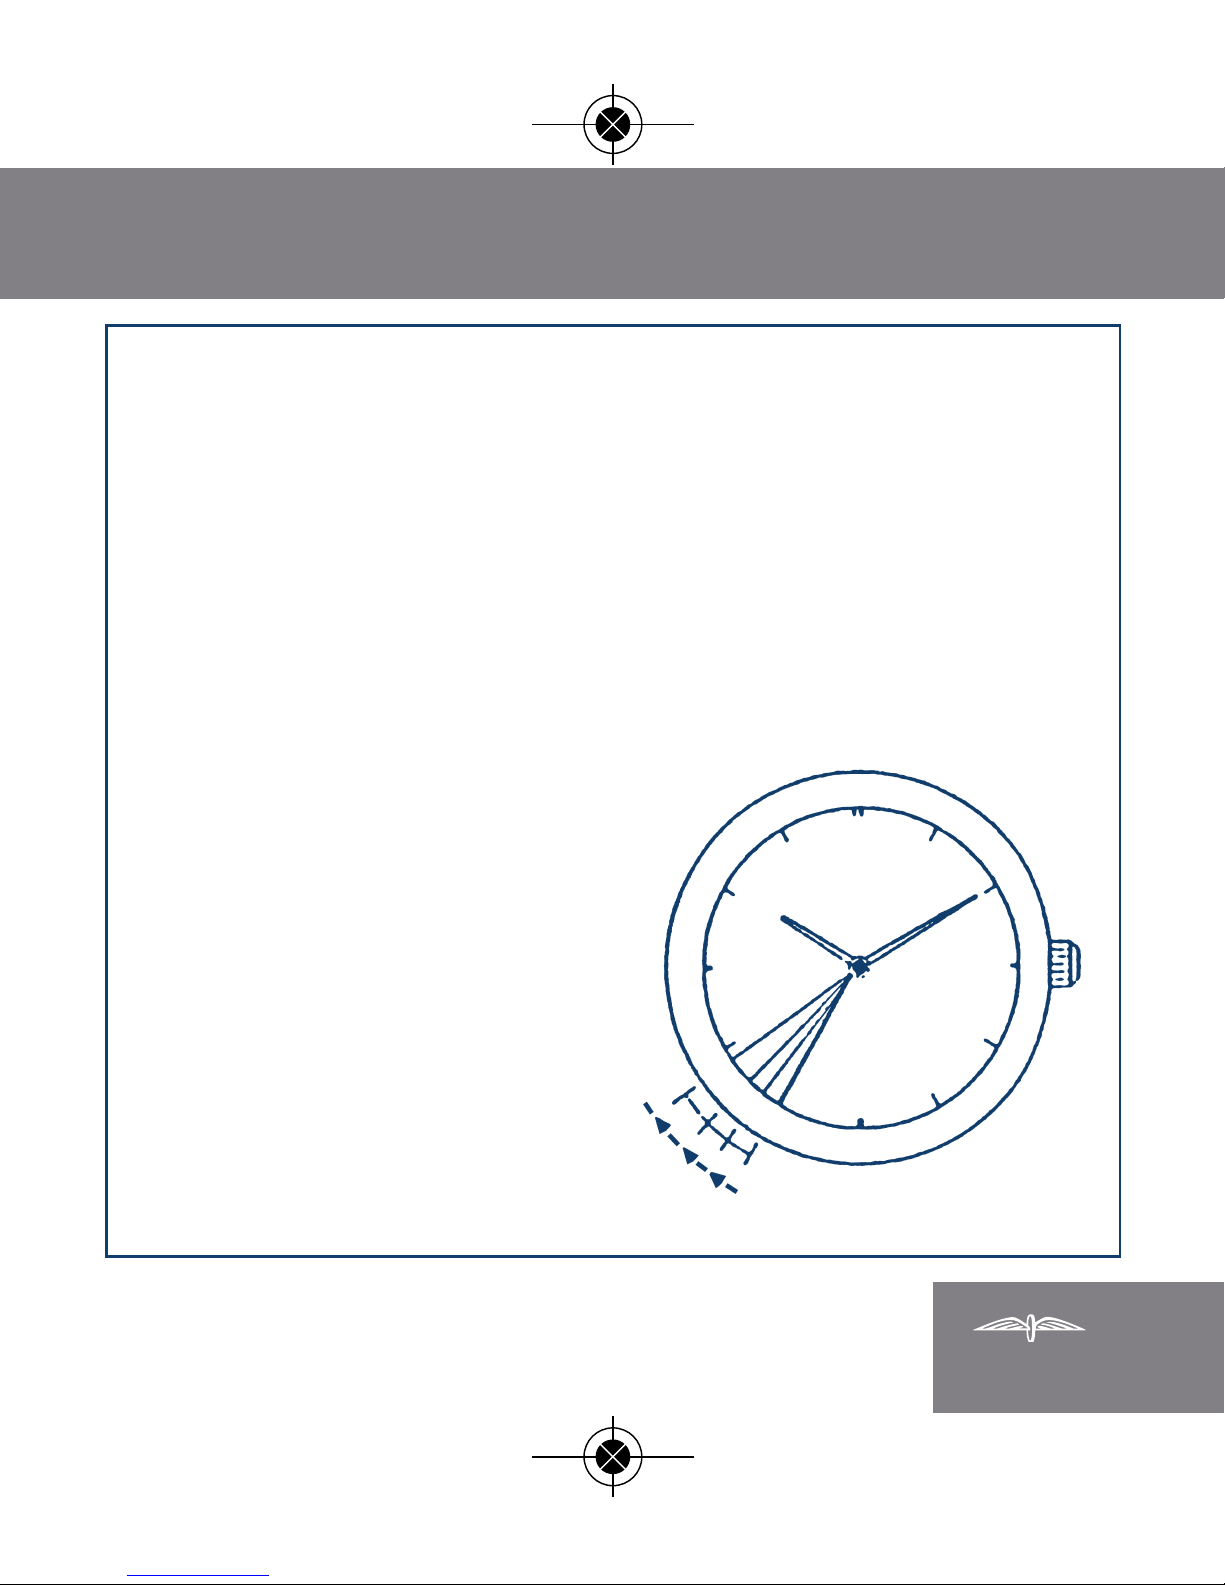
When the watch is not worn or carried in a pocket or other clothing so that the
watch falls to a temperature lower than that when normally worn, the vibration
motor low temperature power saving feature is activated. This feature
automatically turns off the vibration alarm function. When this vibration motor
low temperature power saving feature has been activated, the second hand
switches to irregular 2-second interval movement. When this happens, warm
up the watch body by putting the watch on your arm in the manner it is worn
normally. The watch will then switch
from irregular 2-second interval
movement and return to normal
operation. The sound alarm operates
normally.
5. Troubleshooting
Irregular 2-second interval movement
Rotary Instructions RT140:Rotary Instructions RT140 09/03/2009
Page 20
18
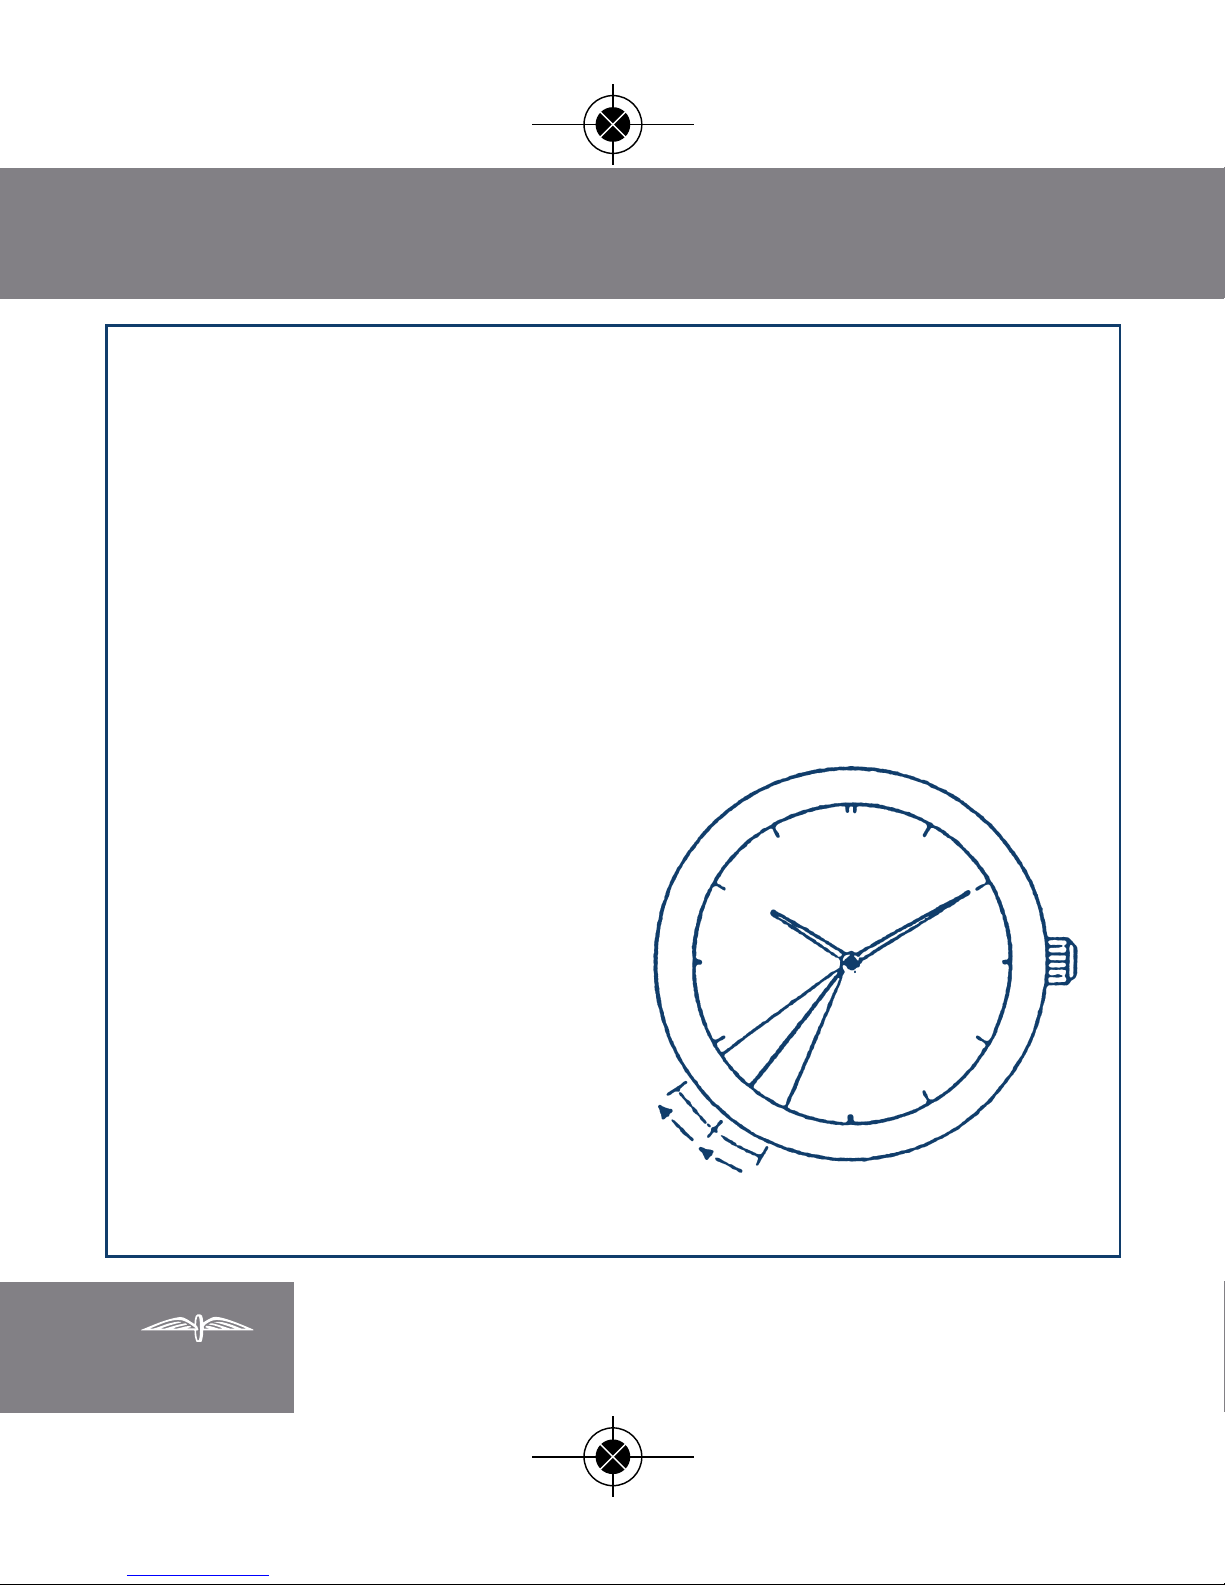
As the battery approaches the end of its service life, the second hand will
switch to 2-second interval movement, in which the second advances two
seconds at a time, informing the wearer that the battery is nearly worn out.
When this happens, have the battery replaced promptly.
When the low battery warning feature is acti vated, the sound alarm function
and vibration alarm function will no longer operate.
6. Low Battery Warning Feature
2-second interval movement
Rotary Instructions RT140:Rotary Instructions RT140 09/03/2009
Page 21

CAL. No. AW00
19
1. Type: Analog quartz watch
2. Accuracy: Within ±20 seconds per month on average (when
worn at +5°C to +35°C/41°F to 95°F)
3. Operating Temperature Range: -10°C to +60°C (14°F to 140°F)
4. Additional Functions:
• 12-hour clock alarm
• Alarm set time storage feature
• Vibration motor low temperature power saving feature
• Low battery warning feature
5. Battery: SR927W
6. Battery Life: Approx. 3 years (assuming that the sound alarm or
vibration alarm is used once a day)
Specifications are subject to change without notice
7. Specifications
Rotary Instructions RT140:Rotary Instructions RT140 09/03/2009
Page 22

S6L71
20
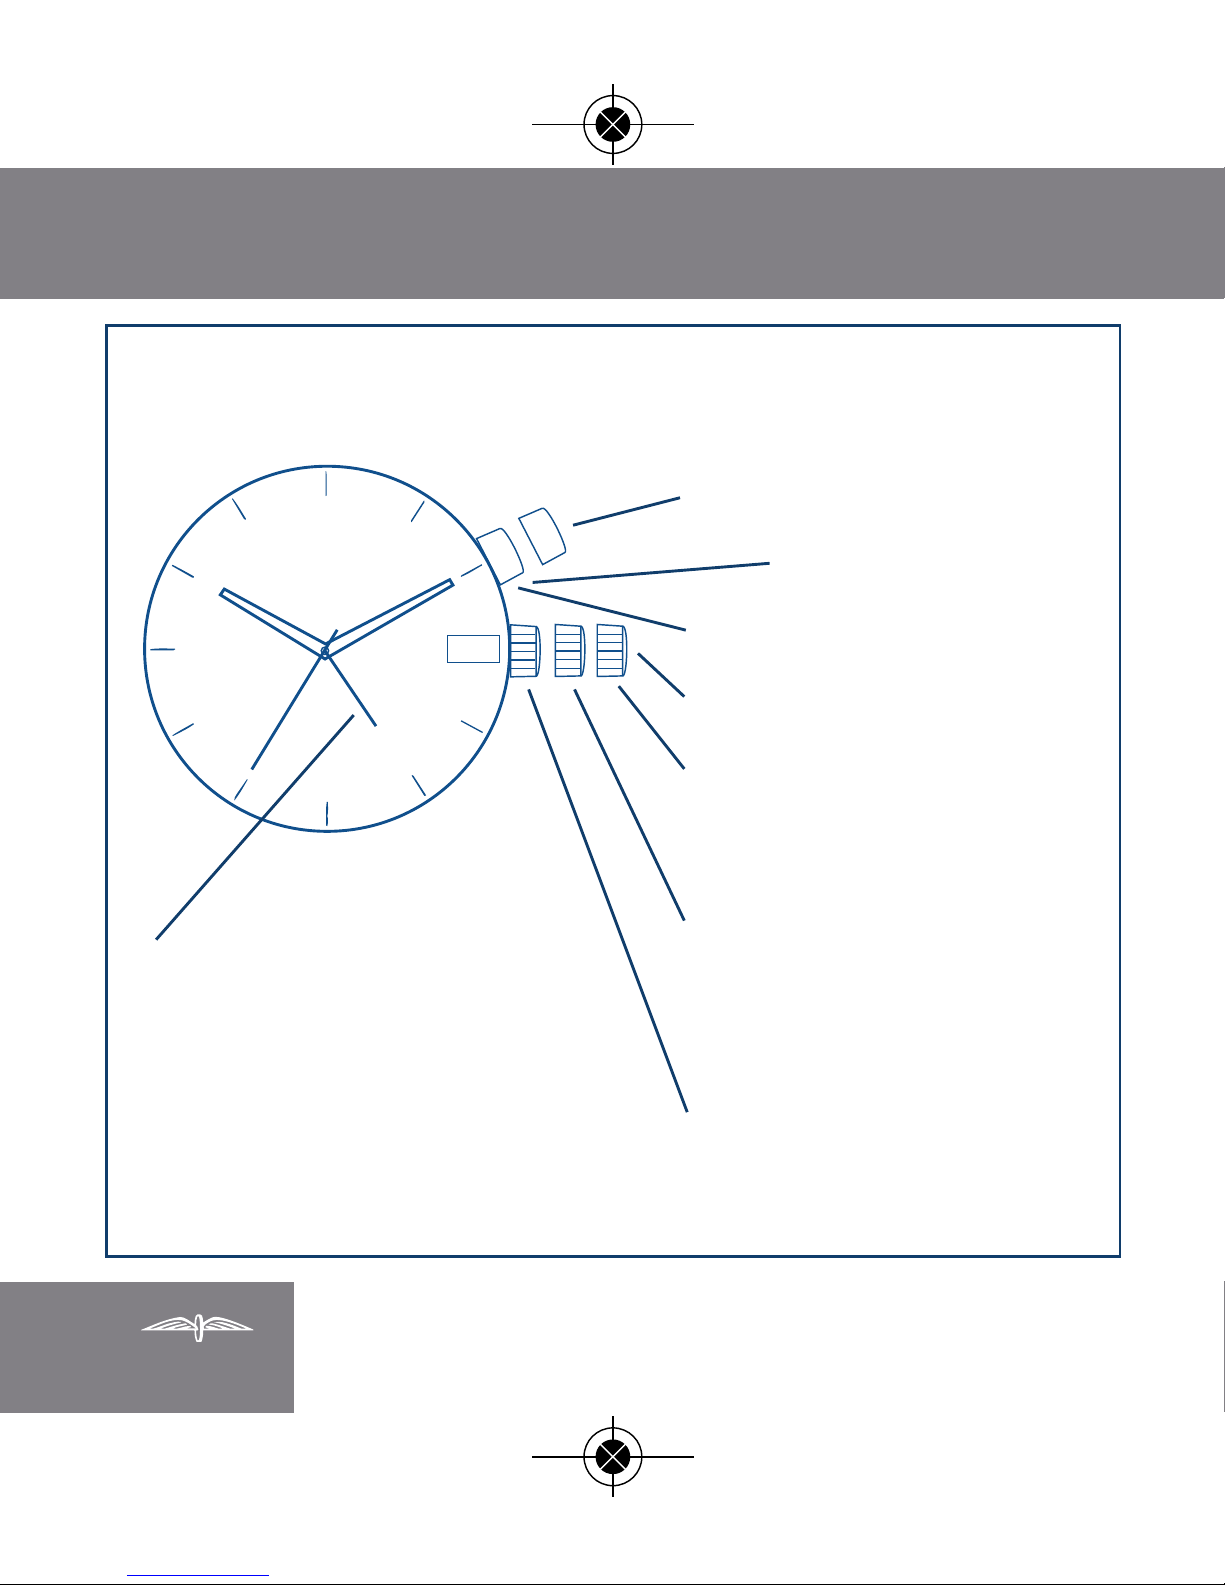
A Normal Position
B Alarm Time Setting Position
Pull out the crown by one click, then rotating the crown
clockwise sets Alarm time indicator and Date is set
quickly by rotating the crown counterclockwise.
C Pull out the crown by two clicks and advance hour /
minute hands.
D Alarm Sound ON Position
Pull out the button. The alarm function is ready and the
alarm sound can be heard at the time set.
E Alarm Sound OFF Position
Push the button fully. The alarm sound stops.
Rotary Instructions RT140:Rotary Instructions RT140 09/03/2009
Page 23

S6L71
21
Remarks
1) Retailers – when in your warehouse ensure the alarm
button is pushed in completely.
2) If you reset the position of the Alarm time indicator
within three minutes after the alarm has sounded, the
alarm may not be heard. In this case, push the alarm
button once and pull it out again.
Rotary Instructions RT140:Rotary Instructions RT140 09/03/2009
Page 24
22
D: Alarm sound ON
Alarm button
E: Alarm sound OFF
Crown for time correction
C: Time correction
Second hand stopping
Power saving switch
B: Alarm time setting
Alarm time indicator (clockwise)
Quick date setting
(counterclockwise)
A: Normal position
Rotary Instructions RT140:Rotary Instructions RT140 09/03/2009
Page 25
OS 70
23
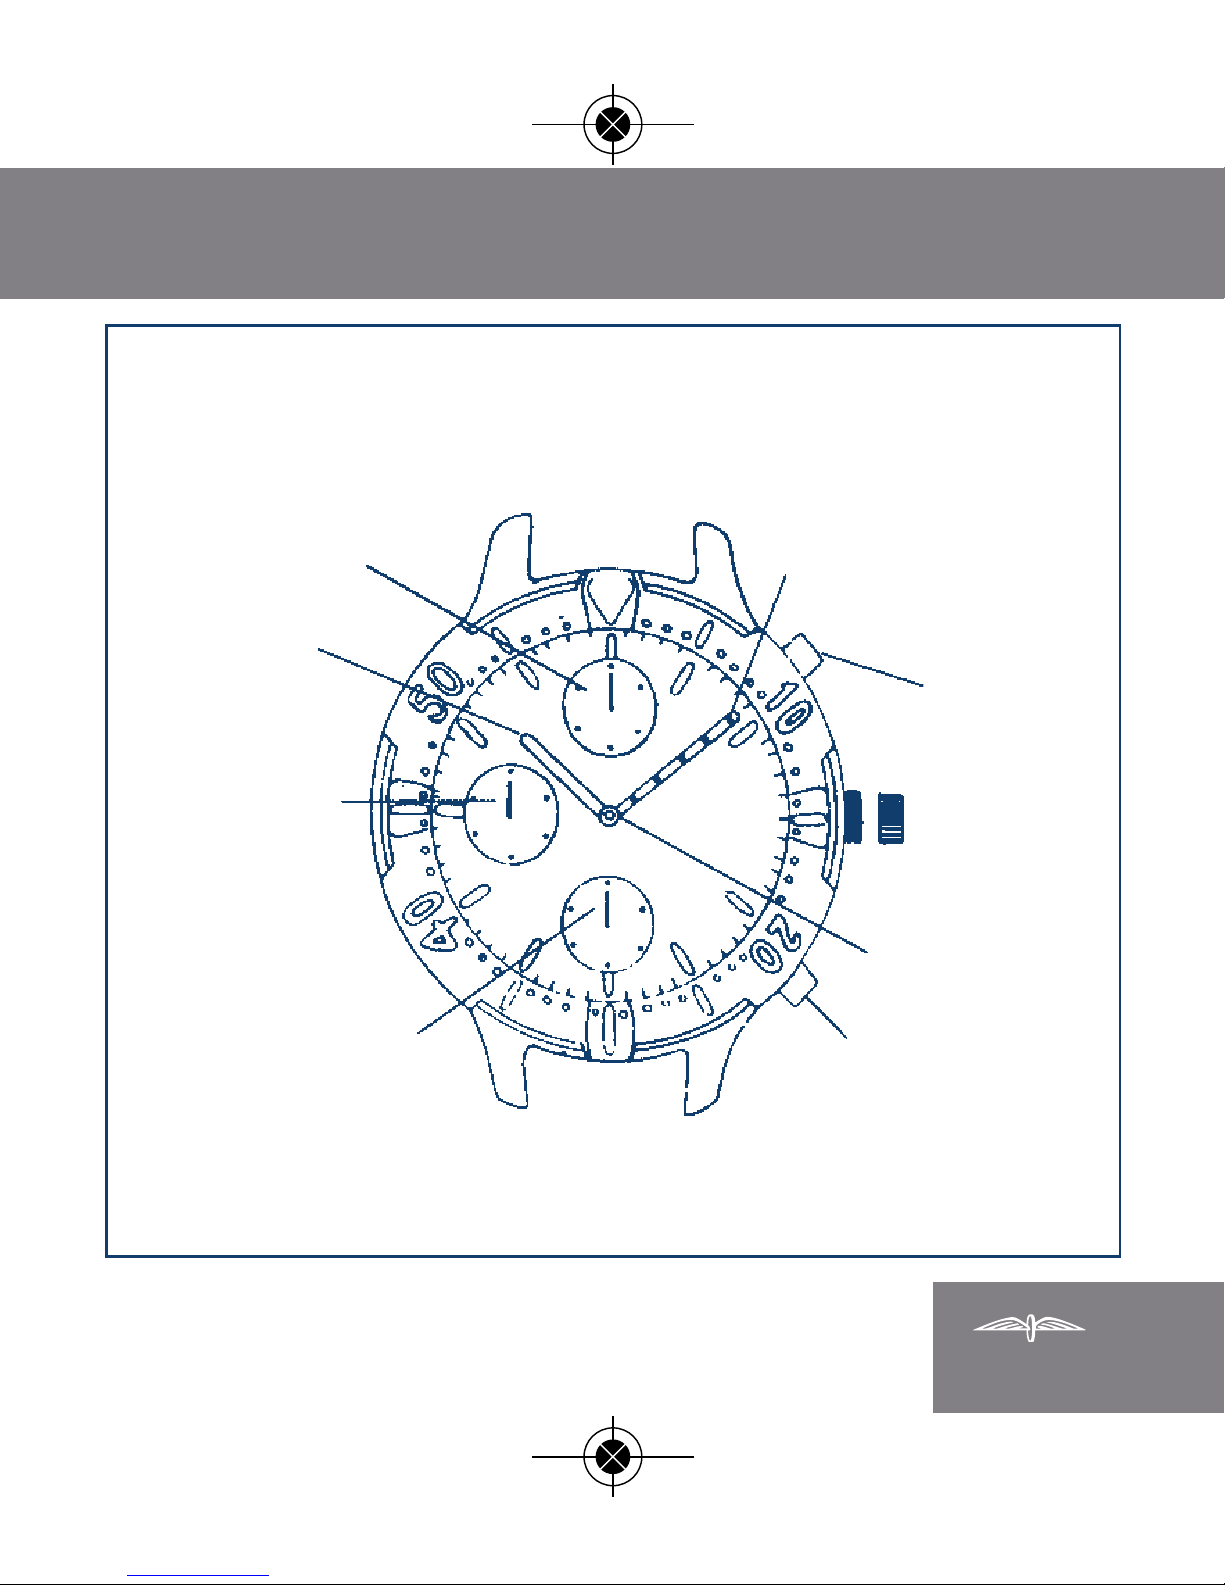
OS70
Chrono minute
Minute Hand
(B)
(A)
Screw Down
Crown
Hour Hand
1/20 Second Hand
and Second Hand
Chrono Second
Chrono Hour
Rotary Instructions RT140:Rotary Instructions RT140 09/03/2009
Page 26

24
THIS WATCH IS FITTED WITH A
WATER RESISTANT SCREW-IN
CROWN. TO CHANGE THE TIME
UNSCREW THE CROWN
ANTI-CLOCKWISE AND ONCE
FULLY UNSCREWED, PULL OUT
Rotary Instructions RT140:Rotary Instructions RT140 09/03/2009
Page 27

OS 70
25
SPECIFICATION
■
2 Hands
■
3 Mini Dials
■
Unidirectional Bezel
■
Water Resistant 100
metres
■
Sapphire Glass
■
Screw Down Crown
■
Chronograph
12 Hour Counter
Minute Counter
Second Hand
1/20 Second Counter
■
Battery life: 2 years
(60 minute chronograph
operation per day)
■
Battery fitted:
395 or equivalent
■
Accuracy:
+/-20 seconds a month
under normal
circumstances
Rotary Instructions RT140:Rotary Instructions RT140 09/03/2009
Page 28

26
CHRONOGRAPH “ZERO” RESET
A) Unscrew crown
B) Pull out crown to position (1)
C) Pressing Button (A)* will set chrono second hand
to 12 o’clock (zero) position.
D) Pressing Button (B)* will set 1/20 second hand to
12 o’clock (zero) position.
E) Return crown to (0) position and screw down
crown.
*Pressing Buttons (A) or (B) for longer than 2 seconds will advance
hand continuously.
NB Do not return crown to (0) position until chrono or 1/20 hands
have returned to ‘zero’ position.
Rotary Instructions RT140:Rotary Instructions RT140 09/03/2009
Page 29

OS 70
27
TO SET TIME
A) Unscrew crown
B) Pull out crown to position (1)
C) Set hands to correct time
D) Return crown to (0) position and screw down
crown. The 1/20 second hand will act as a second
hand when crown is returned to (0) Position. After
using the chronograph the 1/20 hand will return to
‘zero’ position and will return to normal seconds
once (B) is pressed.
Rotary Instructions RT140:Rotary Instructions RT140 09/03/2009
Page 30

28
OPERATION OF CHRONOGRAPH
A) Ensure crown is at position (0)
B) Press Button (B) to return 1/20 hand to ‘zero’
position
C) Press Button (A) to start and stop chronograph
D) Pressing Button (B) will return hands to ‘zero’
position (if hands do not return to ‘zero’ position
see CHRONOGRAPH “ZERO” RESET). After 30
seconds, the 1/20 hand stops - the watch will
continue to monitor elapsed time. Exact time
elapsed will be indicated when the chronograph is
stopped.
Rotary Instructions RT140:Rotary Instructions RT140 09/03/2009
Page 31

Movement ref 2521
29
Date and Time setting instruction
Your automatic watch will never need a battery as the
movement means that it supports both an automatic and
mechanical function.
For manual winding turn the crown clockwise at its
original position until it feels tight. Alternatively the rotor
will wind the mainspring every time you move and can
run for 40 hours.
Movement ref 2521
Rotary Instructions RT140:Rotary Instructions RT140 09/03/2009
Page 32
Movement ref 2521
30
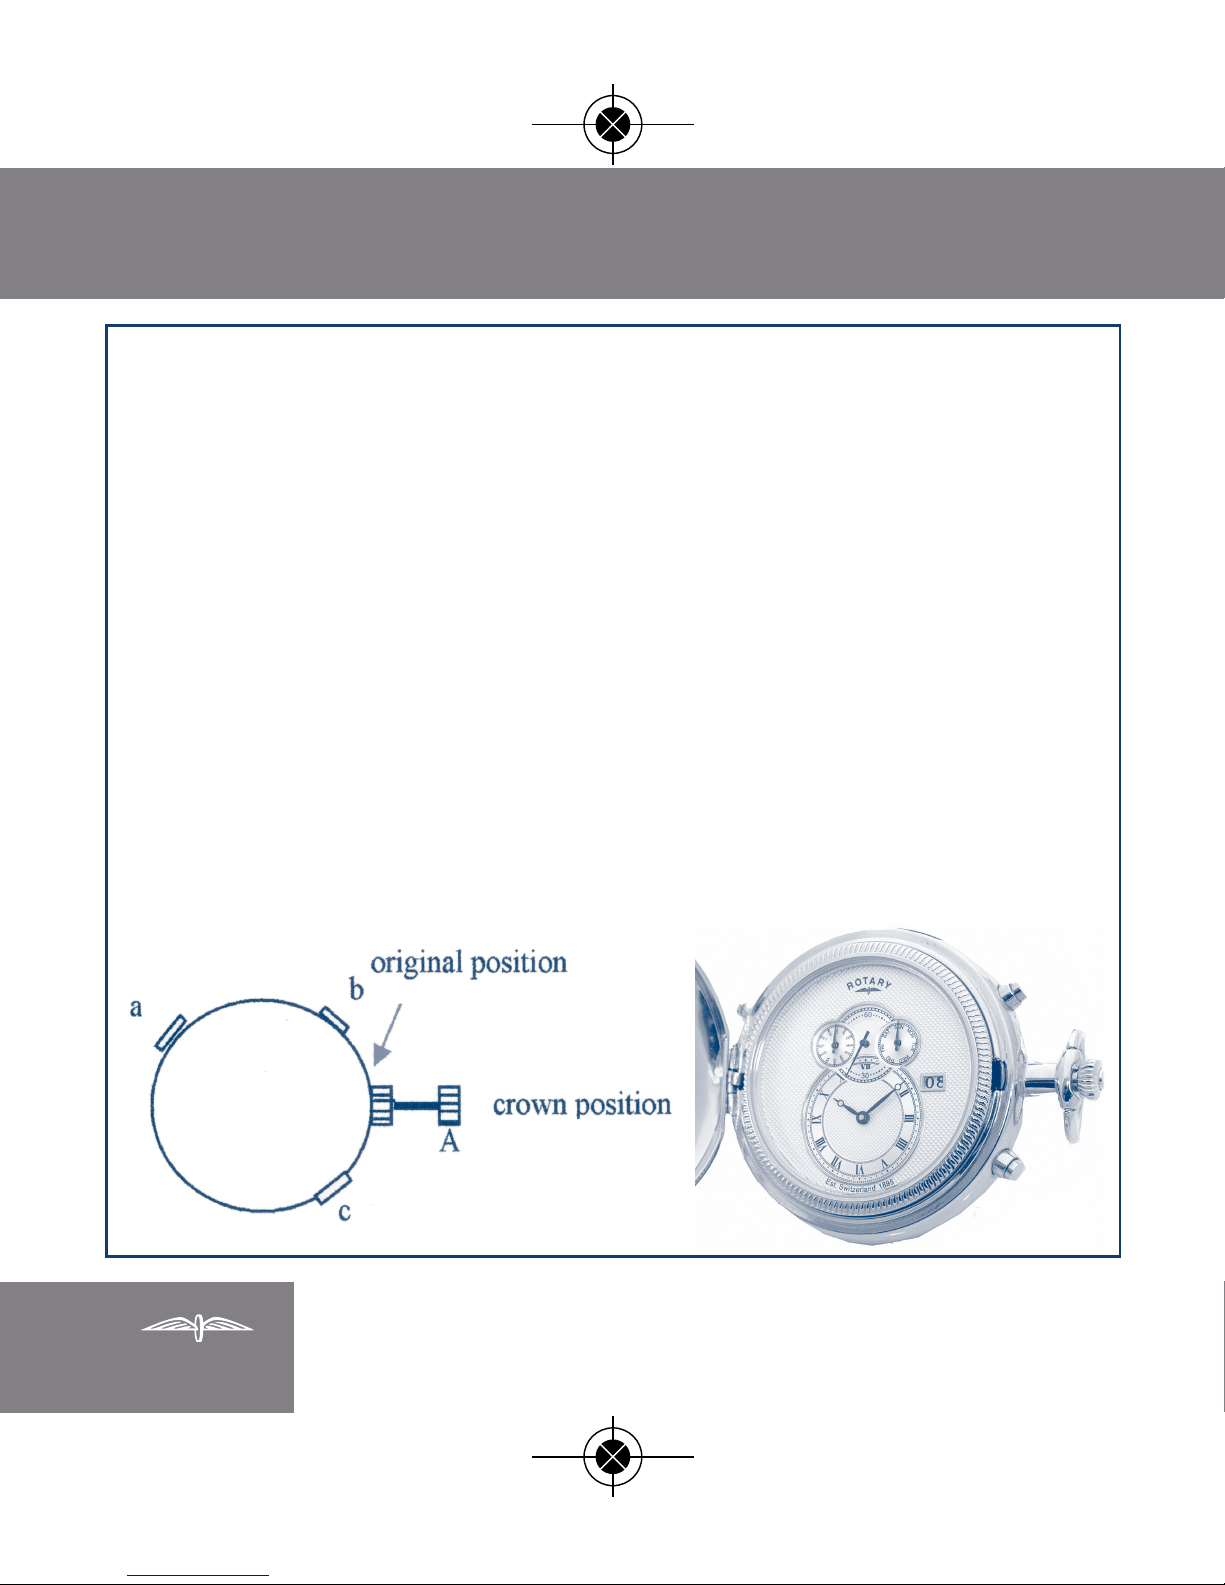
1) You can set the date, day and month easily by pushing
pusher “a”, “b” and “c”
Pusher “a” - setting the month, which is displayed in the left
upper dial
Pusher “b” - setting the day, which is displayed in the right
upper dial
Pusher “c” - setting the date, which is displayed in the square
window
2) To set the time pull the crown to position (A) and turn it to
either direction, this is displayed in the bottom dial. Then
press the crown back into its original position.
Rotary Instructions RT140:Rotary Instructions RT140 09/03/2009
Page 33
31
ETA G15.211
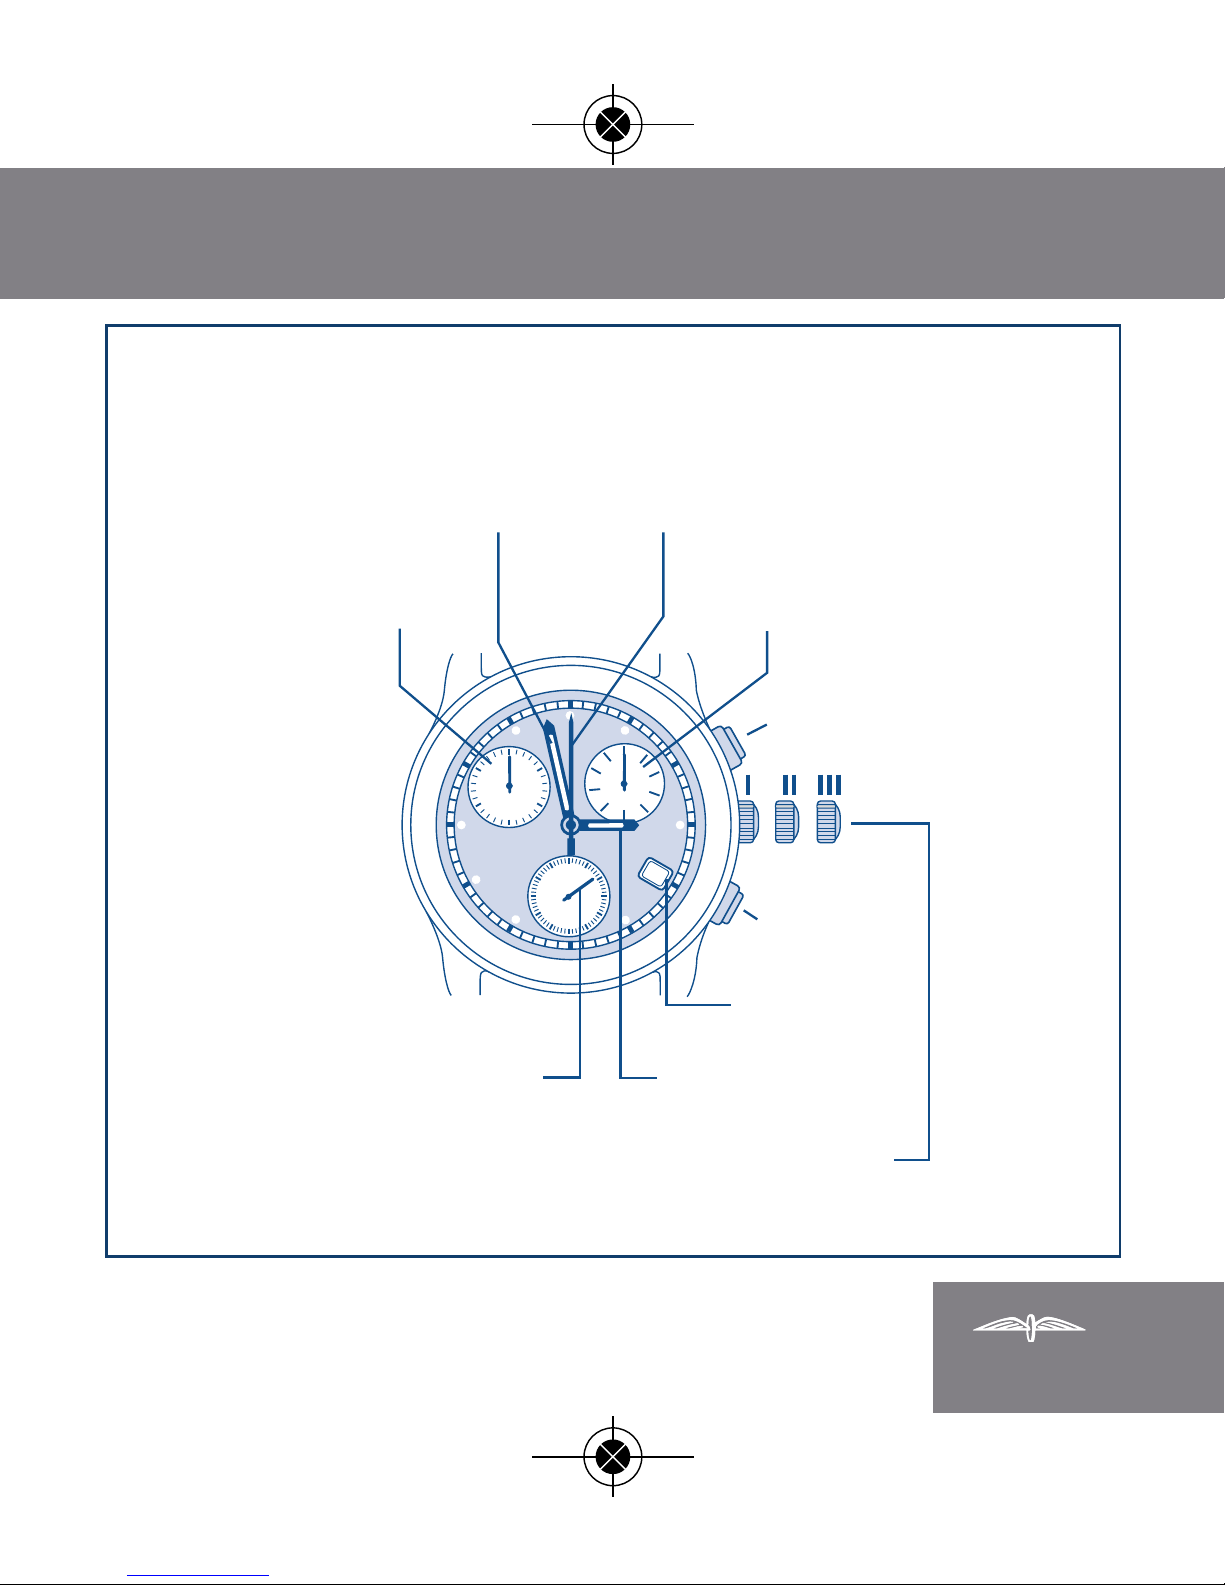
Display - Watch hands
20
10
30
30
45 15
60
20
Setting crown
(position I, II, III)
Pushbutton B
Date
indicator
Hour
hand
Second
hand
30 minutes
timer
Minute
hand
60 seconds
timer
1/10 second
timer
Pushbutton A
Rotary Instructions RT140:Rotary Instructions RT140 09/03/2009
Page 34
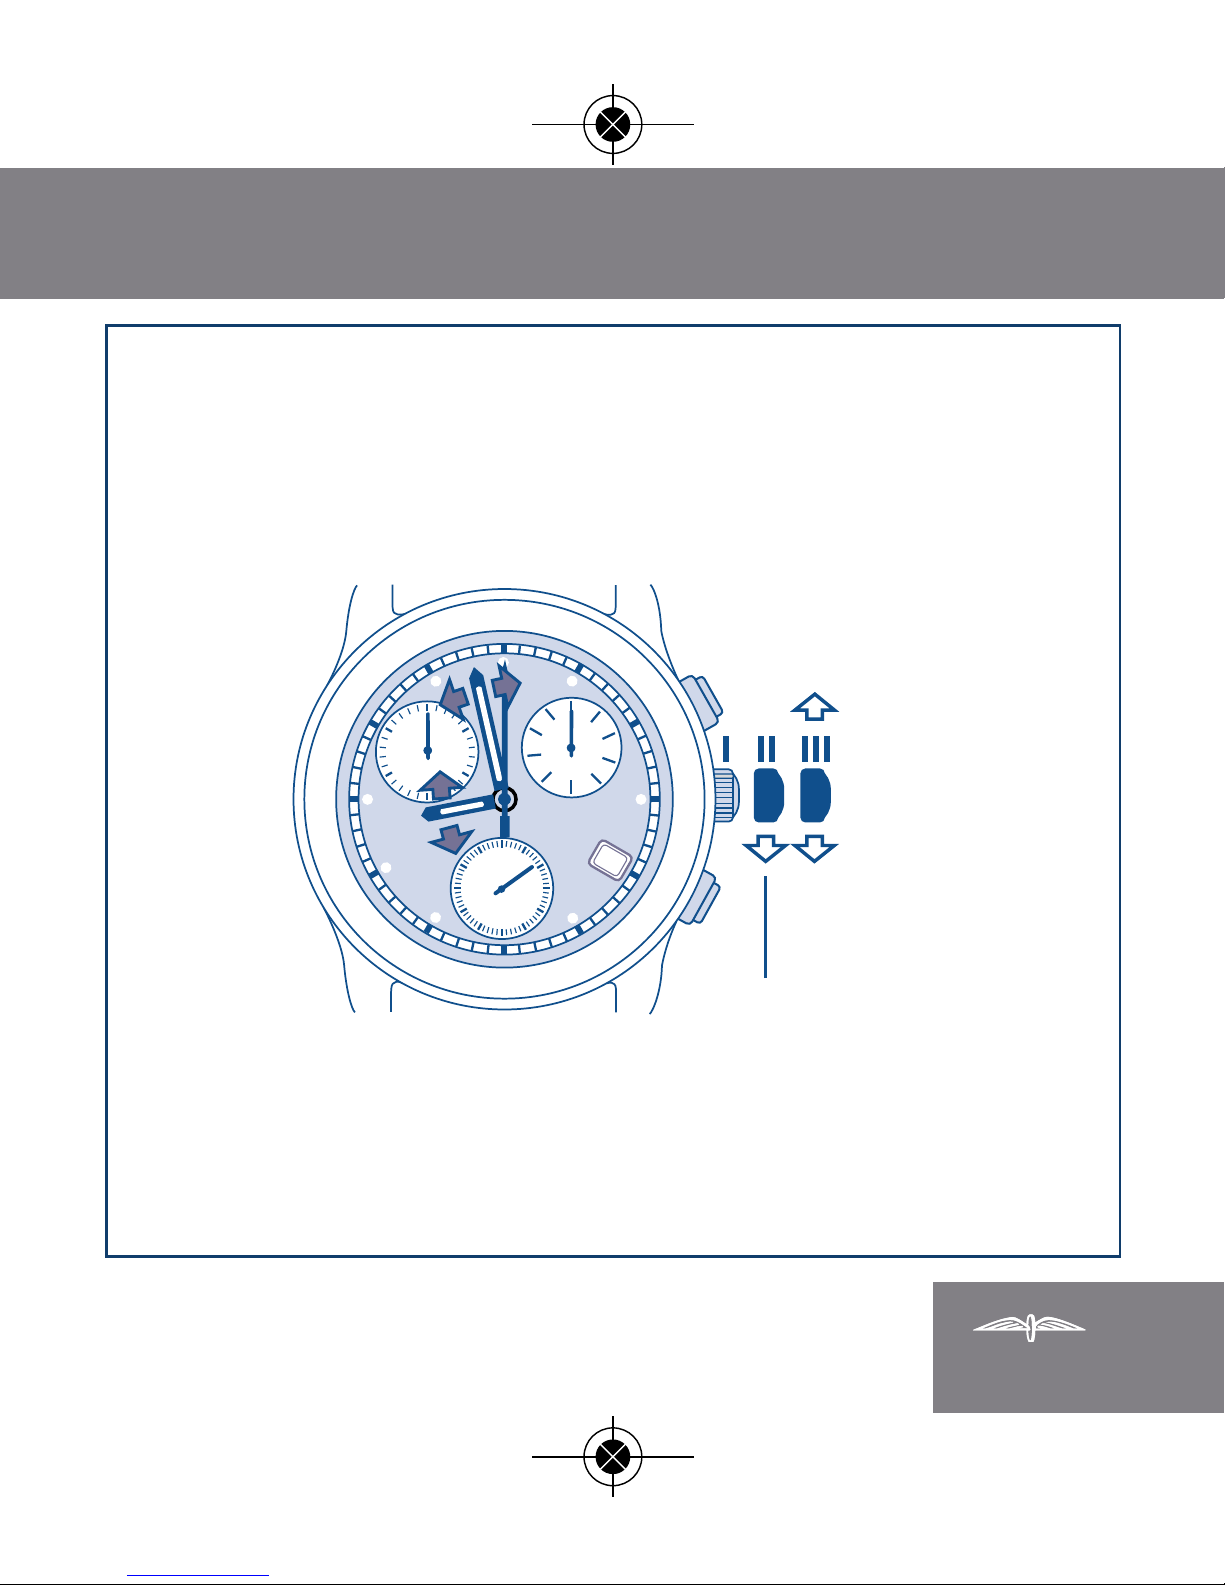
32
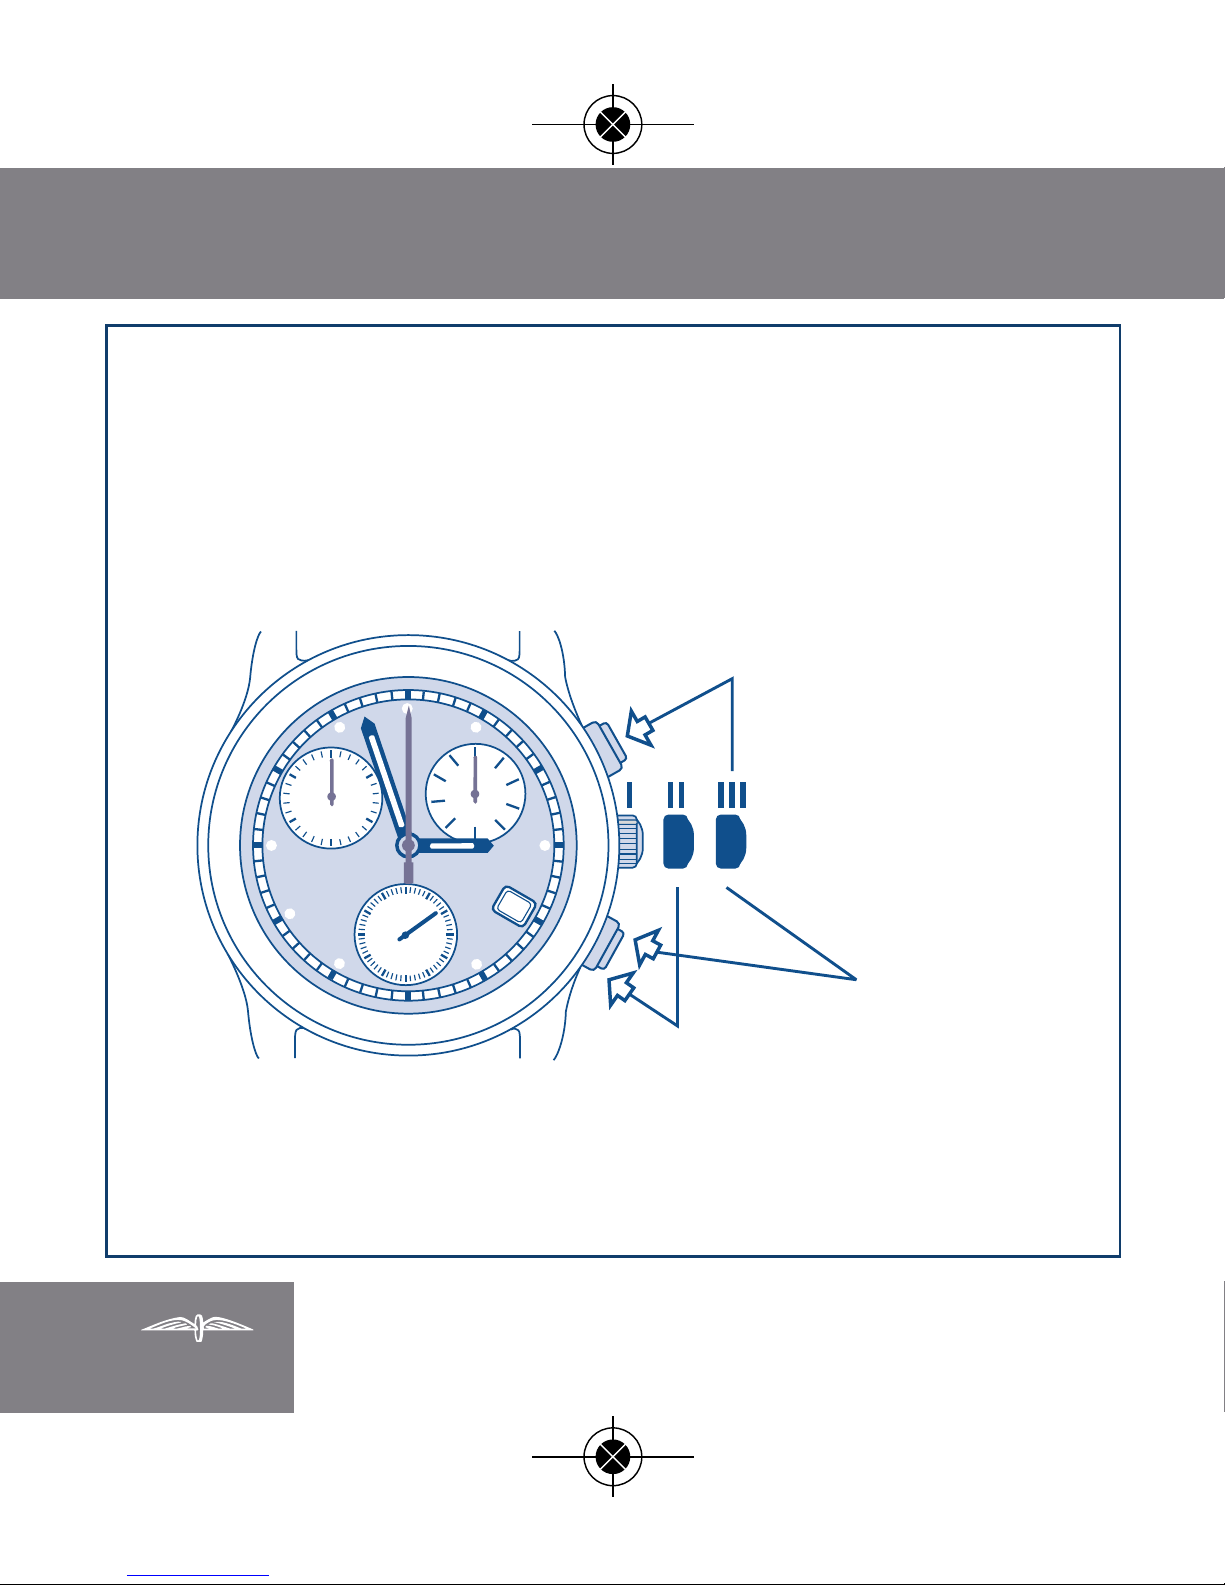
Setting the timers to zero
Setting crown in position II or III
20
10
30
30
45 15
60
20
Setting crown
Set the
hand of the
60 seconds
timer to zero
Set the hand
of the 1/10
second
timer to zero
Set the
hand of the
30 minutes
timer to zero
Rotary Instructions RT140:Rotary Instructions RT140 09/03/2009
Page 35
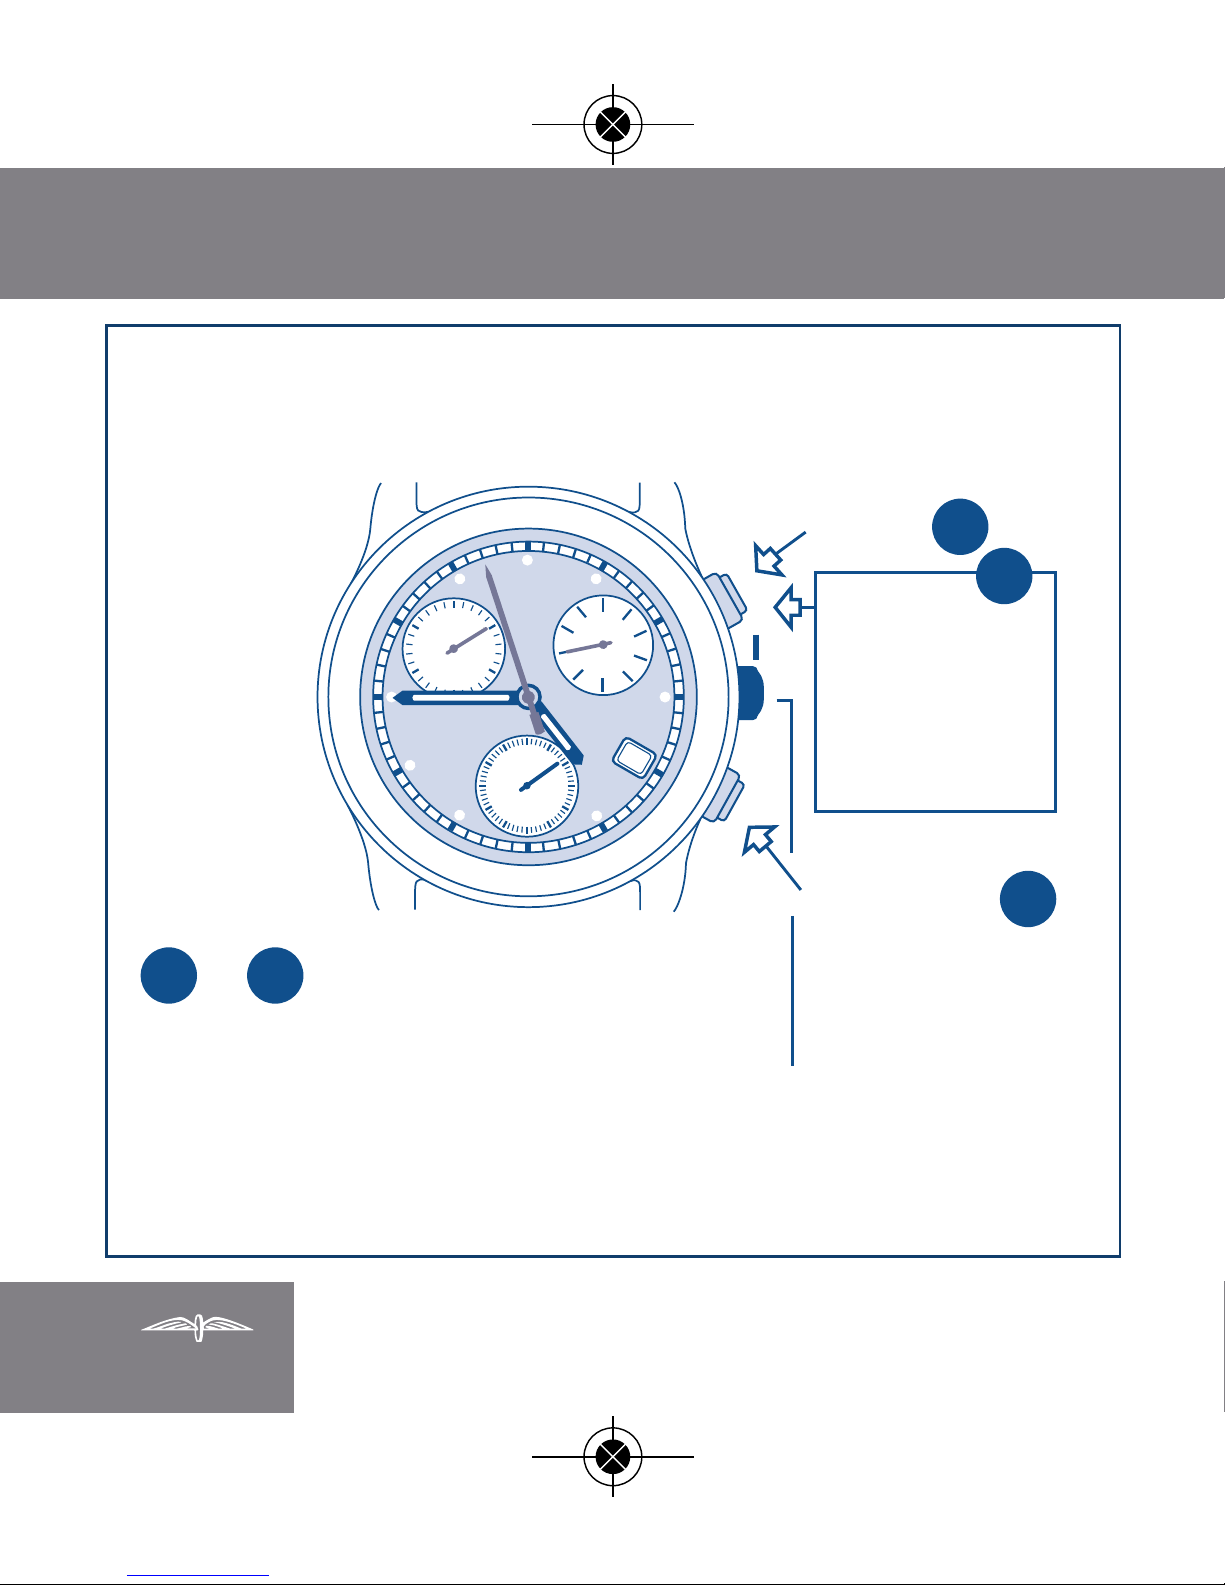
33
ETA G15.211
Correction mode
Setting the time
Correction of date
20
10
30
30
45 15
60
20
Correction
of hour and
minute hand
and date at
every passing
at midnight
B
A
Rapid
correction
of date
Note
Setting crown in position III : STOP-SECOND
Rotary Instructions RT140:Rotary Instructions RT140 09/03/2009
Page 36
34
20
10
30
30
45 15
60
20
B
A
STOP
Read time
- 5 minutes
- 57 seconds
- 7/10 sec
2
3
Reset to zero
START
Setting crown
in position I
1
WARNING
Before starting the time, put back the chronograph hands to their
original position.
If necessary, see paragraph SETTING THE TIMERS TO ZERO.
Timing mode
Simple timing function
31
to order of functions
Rotary Instructions RT140:Rotary Instructions RT140 09/03/2009
Page 37
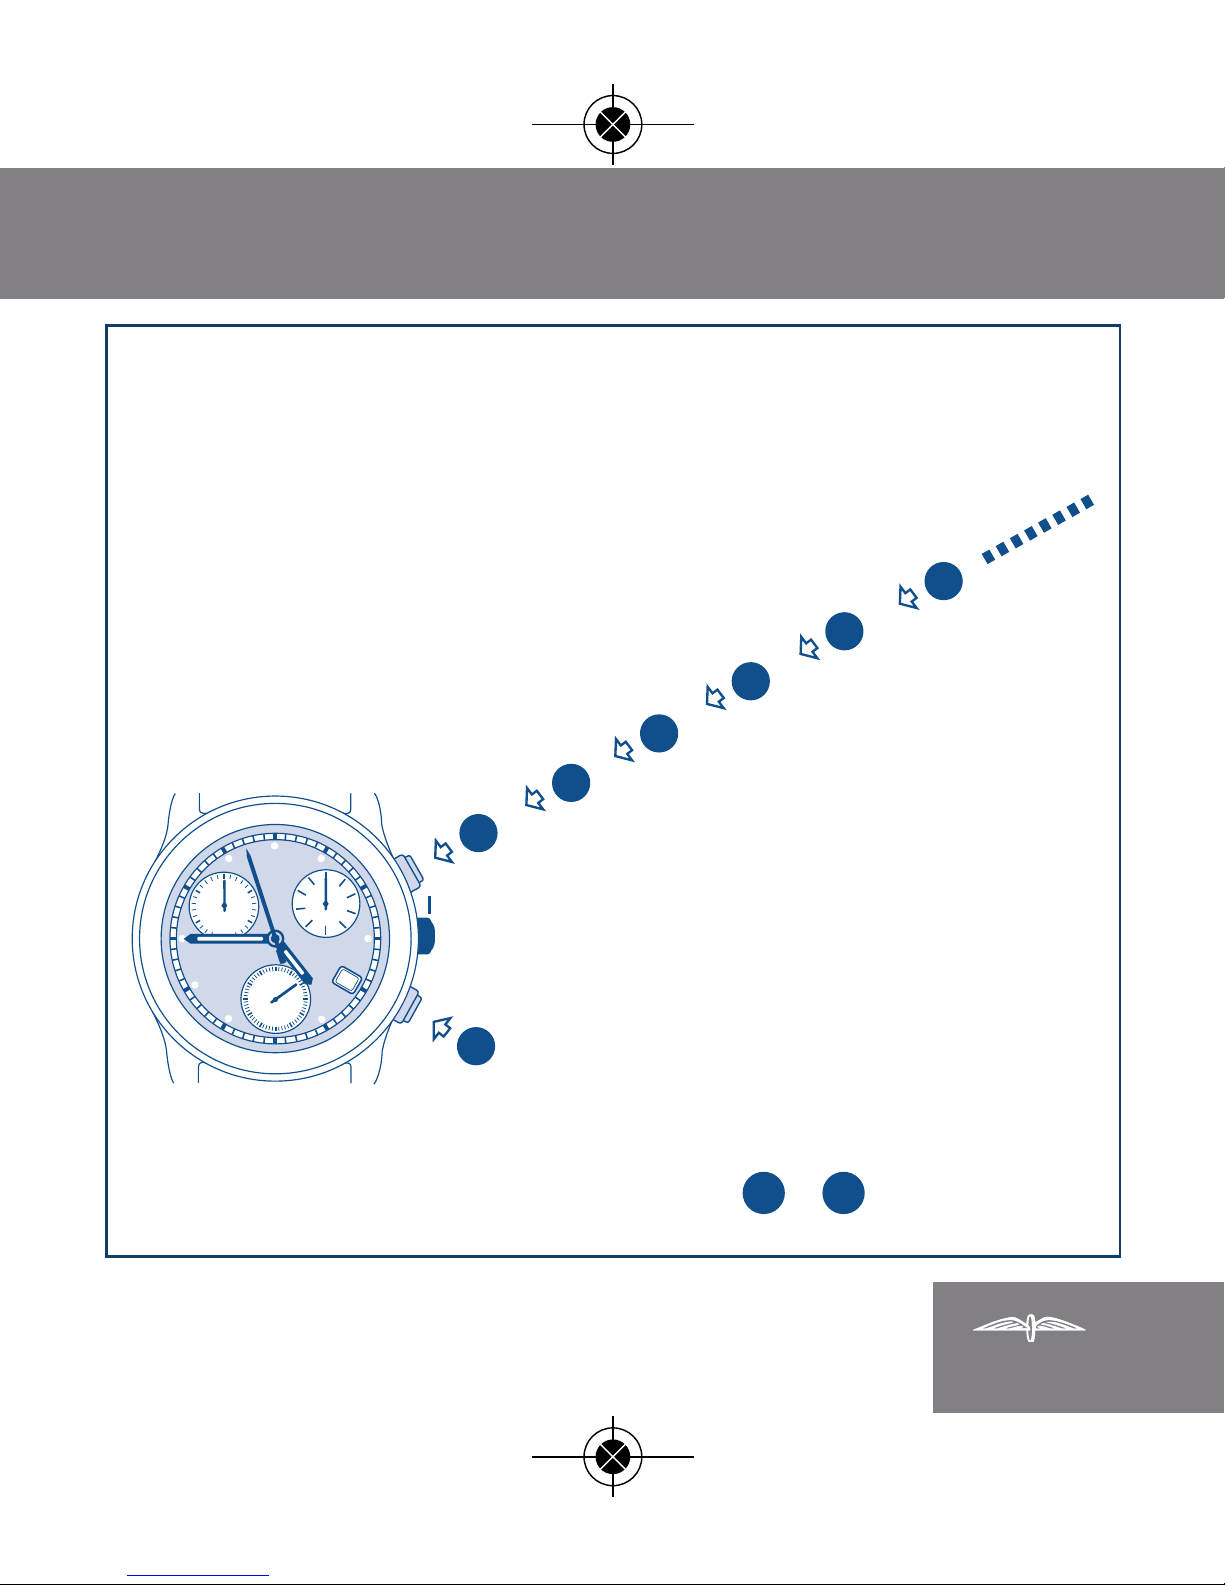
35
ETA G15.211
Timing mode
ADD function
20
10
30
30
45 15
60
20
Reset to zero
B
Setting crown in position I
A
START
STOP Read
STOP Read
STOP Read
RESTART
RESTART
6
5
4
3
2
1
X
X1
to order of functions
Rotary Instructions RT140:Rotary Instructions RT140 09/03/2009
Page 38
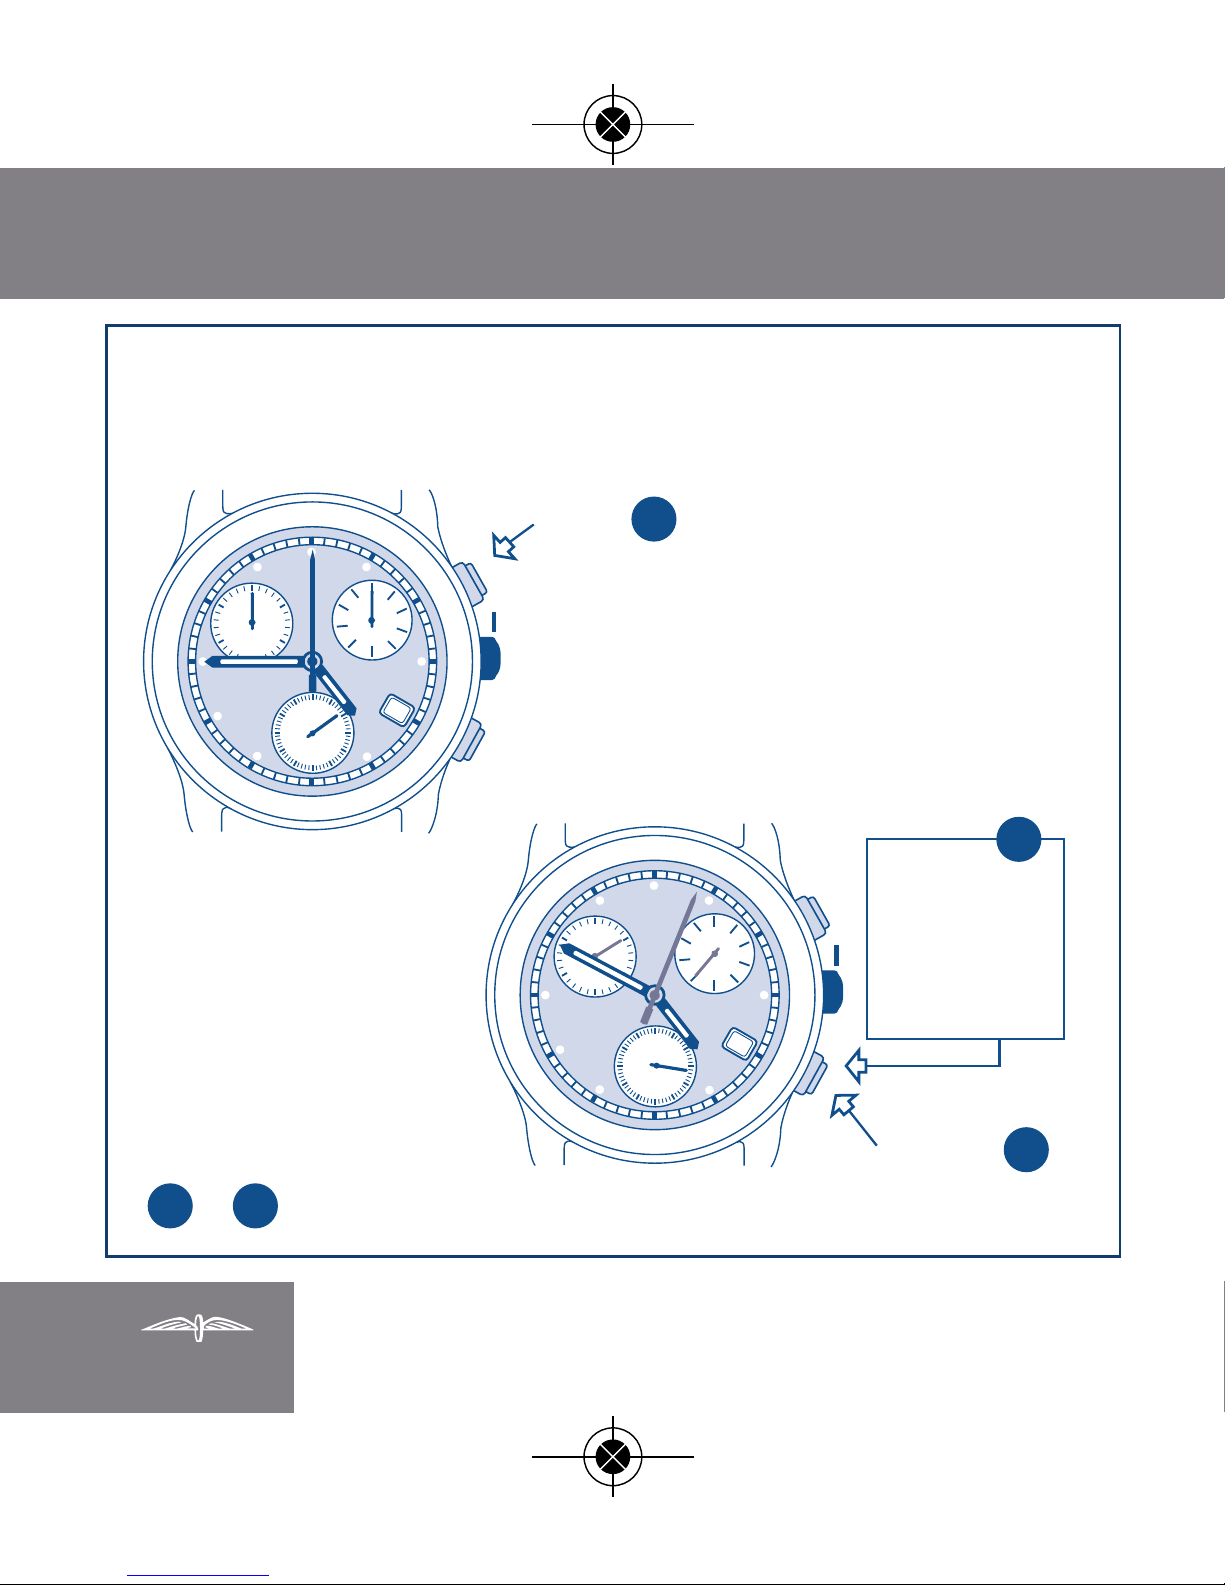
36
Timing mode
SPLIT-TIME or INTERMEDIATE TIMES function
20
10
30
30
45 15
60
20
B
Setting crown
in position I
A
START
1
20
10
30
30
45 15
60
20
B
A
SPLIT 1
Read time 1
- 5 minutes
- 04 seconds
- 6/10 sec
2
3
RESTART
(catching-up)
31
to order of functions
Rotary Instructions RT140:Rotary Instructions RT140 09/03/2009
Page 39
37
ETA G15.211
20
10
30
30
45 15
60
20
B
A
SPLIT 2
Read time 2
- 15 minutes
- 36 seconds
- 8/10 sec
4
5
RESTART
(catching-up)
20
10
30
30
45 15
60
20
B
A
STOP
Read
LAST TIME
- 25 minutes
- 18 seconds
- 4/10 sec
7
Reset
to zero
6
74
to order of functions
Timing mode
SPLIT-TIME or INTERMEDIATE TIMES function (cont. and end)
Rotary Instructions RT140:Rotary Instructions RT140 09/03/2009
Page 40

For more information, to request a brochure
or view our range, please visit
www.rotarywatches.com
RT: 140
Rotary Instructions RT140:Rotary Instructions RT140 09/03/2009
 Loading...