

Rossmax MR 800 Instruction Manual
Automatic Upper Arm Blood Pressure Monitor
Superior Accuracy
Hypertension
Risk Indicator
Irregular Heartbeat
Detector
2 Users Up to 120
Memories with
Date/Time Stamp
EN Instruction Manual. ...........2-10
UA Instruction Manual. ...........11-17
RU Instruction Manual. ...........18-25
RO Instruction Manual. ...........26-33
LT Instruction Manual. ...........34-41
LV Instruction Manual. ...........42-49
EE Instruction Manual. ...........52-57
Model: MR 800 i PC
Introduction
Blood pressure measurements determined with this unit are equivalent to those obtained by a
trained observer using cu/stethoscope auscultation method, within the limits prescribed by the
American National Standard Manual, Electronic or Automated Sphygmomanometers. This unit
is to be used by adult consumers in a home environment. Do not use this device on infants or
neonates.
This unit is protected against manufacturing defects by an established International Warranty
Program. For warranty information, you can contact the manufacturer, Rossmax International Ltd.
or your local distributors.
Attention: Consult the accompanying documents.
Please read this manual carefully before use, for specic information on your own blood pressure,
contact your physician. Please be sure to keep this manual.
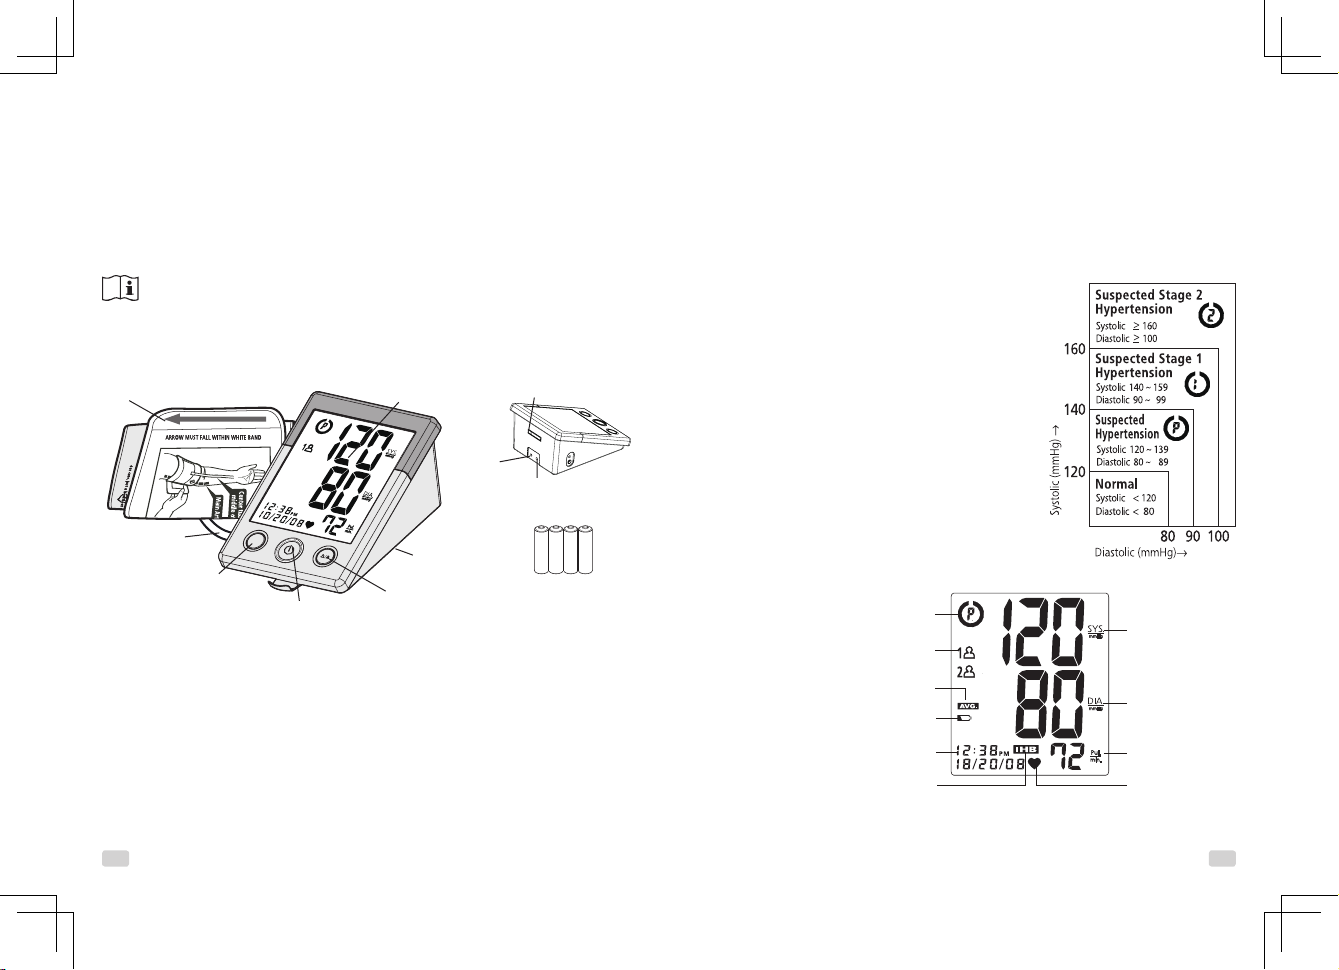
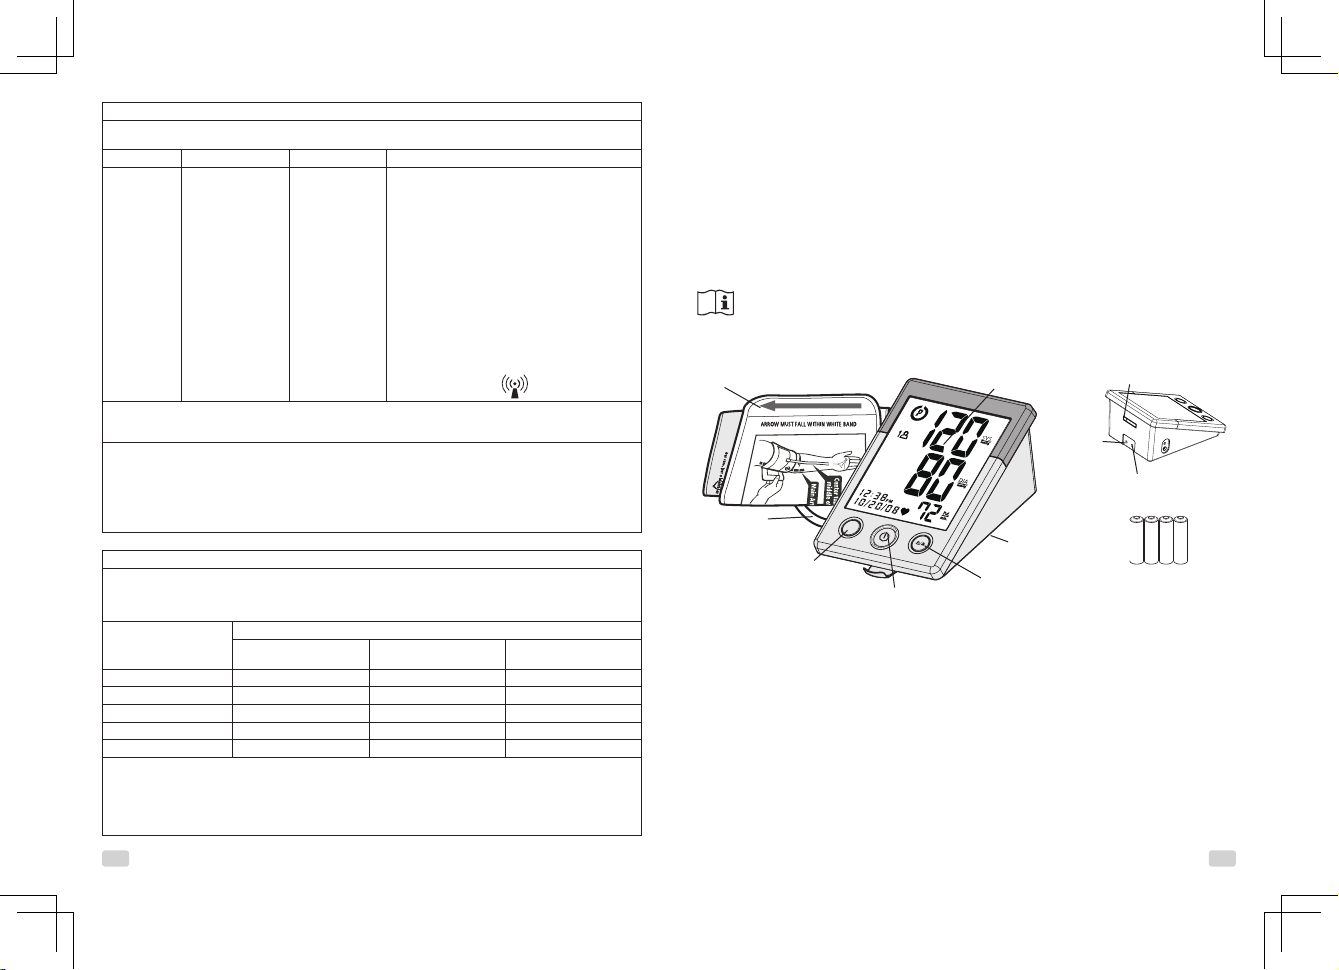
Name/Function of Each Part
Arm Cu
LCD Display
Date/Time Set key
does not require re-calibration for 2 years under normal usage with approximately 3 times a
day, until, at which time your monitor displays CA . The unit should also be re-calibrated if the
monitor sustains damange due to blunt force (such as dropping) or exposure to uids and / or
extreme hot or cold temperature / humidity changes. When CA appears, simply return to your
nearest dealer for re-calibration service.
Blood Pressure Standard
The National High Blood Pressure Education Program Coordinating Committee has developed
a blood pressure standard, according to which areas of low- and high-risk blood pressure are
identified. This standard, however, is a general guideline as individual's blood pressure varies
among different people and different age groups...etc.
(Ref. The Seventh Report of the Joint National Committee on
Prevention, Detection, Evaluation, and Treatment of High Blood
Pressure-Complete Report JNC-7, 2004)
This blood pressure classification are based on historical data,
and may not be directly applicable to any particular patient.
It is important that you consult with your physician regularly.
Your physician will tell you your normal blood pressure range
as well as the point at which you will be considered at risk.
Data Link
Socket
AC Adapter Jack
The National High Blood Pressure Education Program
Coordinating Committee has developed a blood pressure
standard, classifying blood pressure ranges into 4 stages. This
unit is equipped with innovative blood pressure risk indicator,
which visually indicates the assumed risk level (prehyperten-
Air Tube and
Connector
Memory key
M
ON/OFF/START key
Battery Cover
(Located on
back of unit)
User-Switching key
4“AA”(R06) size,
1.5V batteries.
Preliminary Remarks
This Blood Pressure Monitor complies with the European regulations and bears the CE mark
"CE 0366". The quality of the device has been veried and conforms to the provisions of the EC
council directive 93/42/EEC dated 14 June 1993 concerning medical devices:
EN 1060-1: 1995/A1: 2002 Non-invasive sphygmomanometers - Part 1 - General requirements
EN 1060-3: 1997/A2: 2009 Non-invasive sphygmomanometers
- Part 3 - Supplementary requirements for electro-mechanical blood pressure measuring systems
EN 1060-4: 2004 Non-invasive sphygmomanometers
- Part 4: Test Procedures to determine the overall system accuracy of automated non-invasive
sion / stage 1 hypertension / stage 2 hypertension) of the
result after each measurement. (Please note below.)
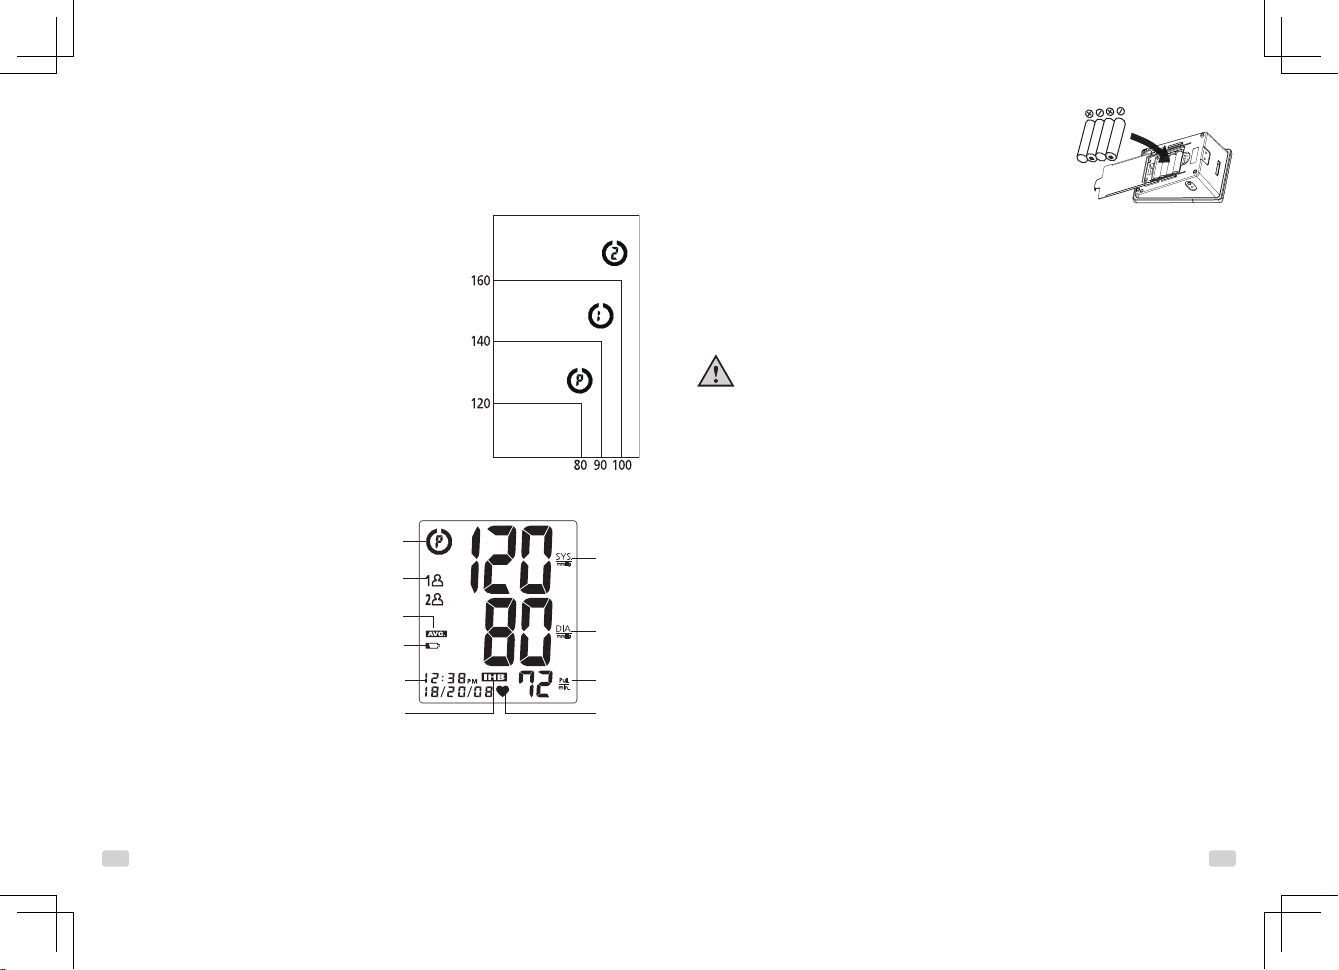
Display Explanations
1. Hypertension Risk Indicator
2. Memory Zones
3. Memory Average
4. Weak Battery Mark
5. Date/Time Indicator
6. Irregular Heartbeat (IHB) Detector
7. Systolic Pressure
8. Diastolic Pressure
9. Pulse Rate
10. Pulse Mark
1
2
3
4
5
6
7
8
9
10
sphygmomanometers.
This blood pressure monitor was designed for long service time. To ensure continued accuracy,
it's recommended that all digital blood pressure monitors require re-calibration. This monitor
EN - 2 3 - EN
Irregular Heartbeat (IHB) Detector
This unit is equipped with an Irregular Heartbeat (IHB) Detector which allows those who have
an irregular heartbeat to obtain accurate measurements alerting the user of the presence of an
irregular heart beat during the measurement.
Note: It is strongly recommended that you consult your physician if the IHB icon (IHB) appears
often.
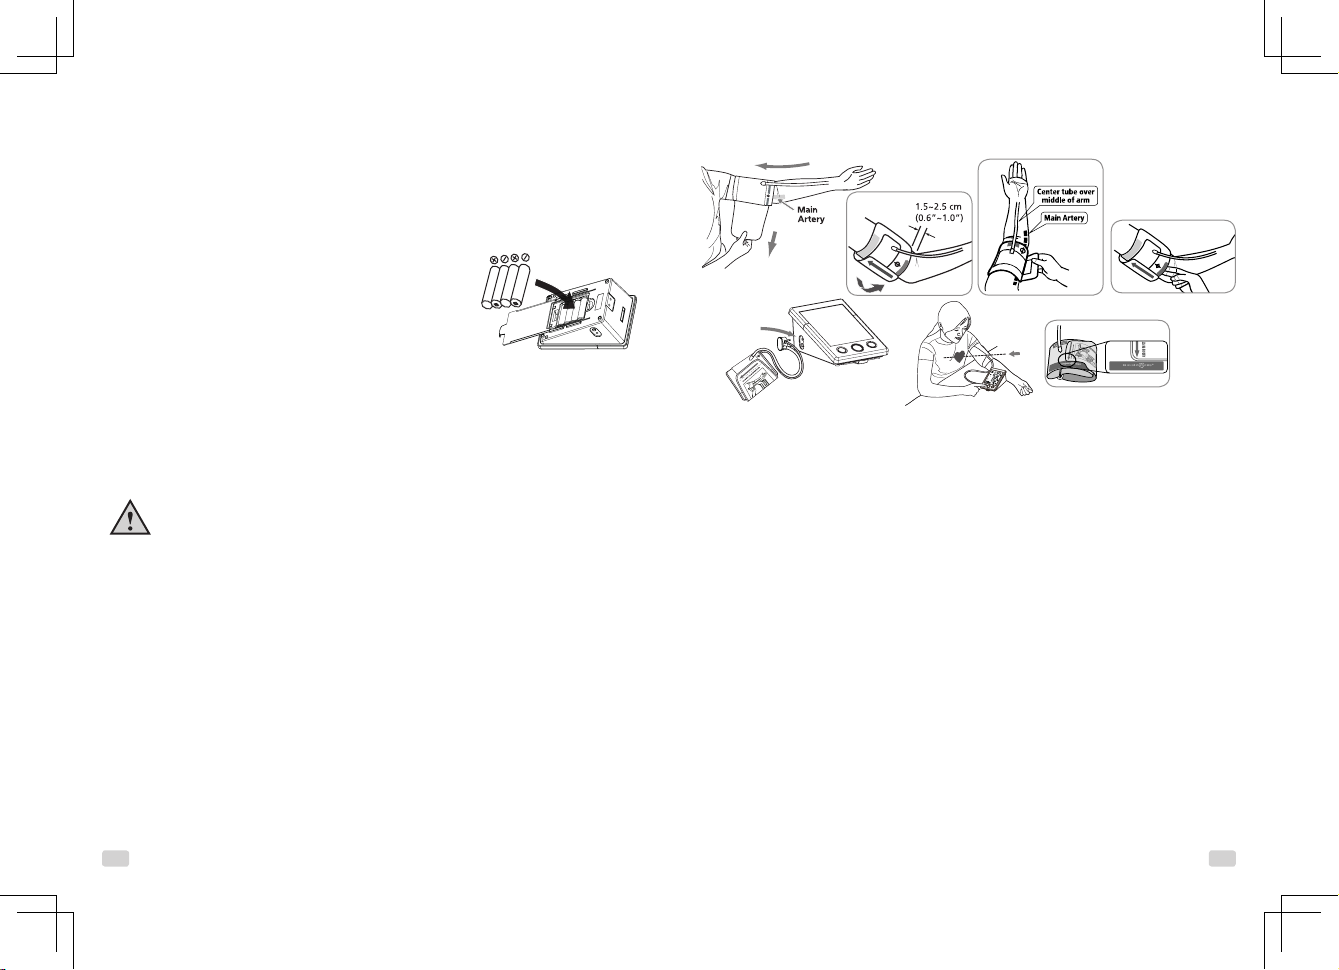
Installing Batteries
1. Press down and lift the battery cover in the direction of the arrow
to open the battery compartment.
2. Install or replace 4 “AA” sized batteries in the battery compart-
ment according to the indications inside the compartment.
3. Replace the battery cover by clicking in the bottom hooks rst,
then push in the top end of the battery cover.
4. As the supplied batteries are for test only, they may be discharged earlier than batteries you
buy in stores. Replace the batteries in pairs. Remove batteries when unit is not in use for extended periods of time.
You need to replace the batteries when:
1. low battery icon appears on display.
2. the ON/OFF/START key is pressed and nothing appears on display.
Caution: 1. Batteries are hazardous waste. Do not dispose them together with the household
garbage.
2. There are no user serviceable parts inside. Batteries or damage from old batteries are
not covered by warranty.
3. Use exclusively brand batteries. Always replace with new batteries together. Use
batteries of the same brand and same type.
Using the AC Adapter
1. Connect the AC adapter with the AC adapter jack in the back of the unit.
2. Plug the AC adapter into the socket. Please use the compatible AC adapters. (AC adapters with
required voltage and current indicated near the AC adapter jack.)
Caution:
1. Please unload the batteries when operating with the AC mode for a longer period of time.
2. AC adapters are optional. Please contact the distributor for the compatible AC adapters.
3. Use only the authorized AC Adaptor with this blood pressure monitor. Information for the au-
thorized AC adaptor, please refer to APPENDIX 1.
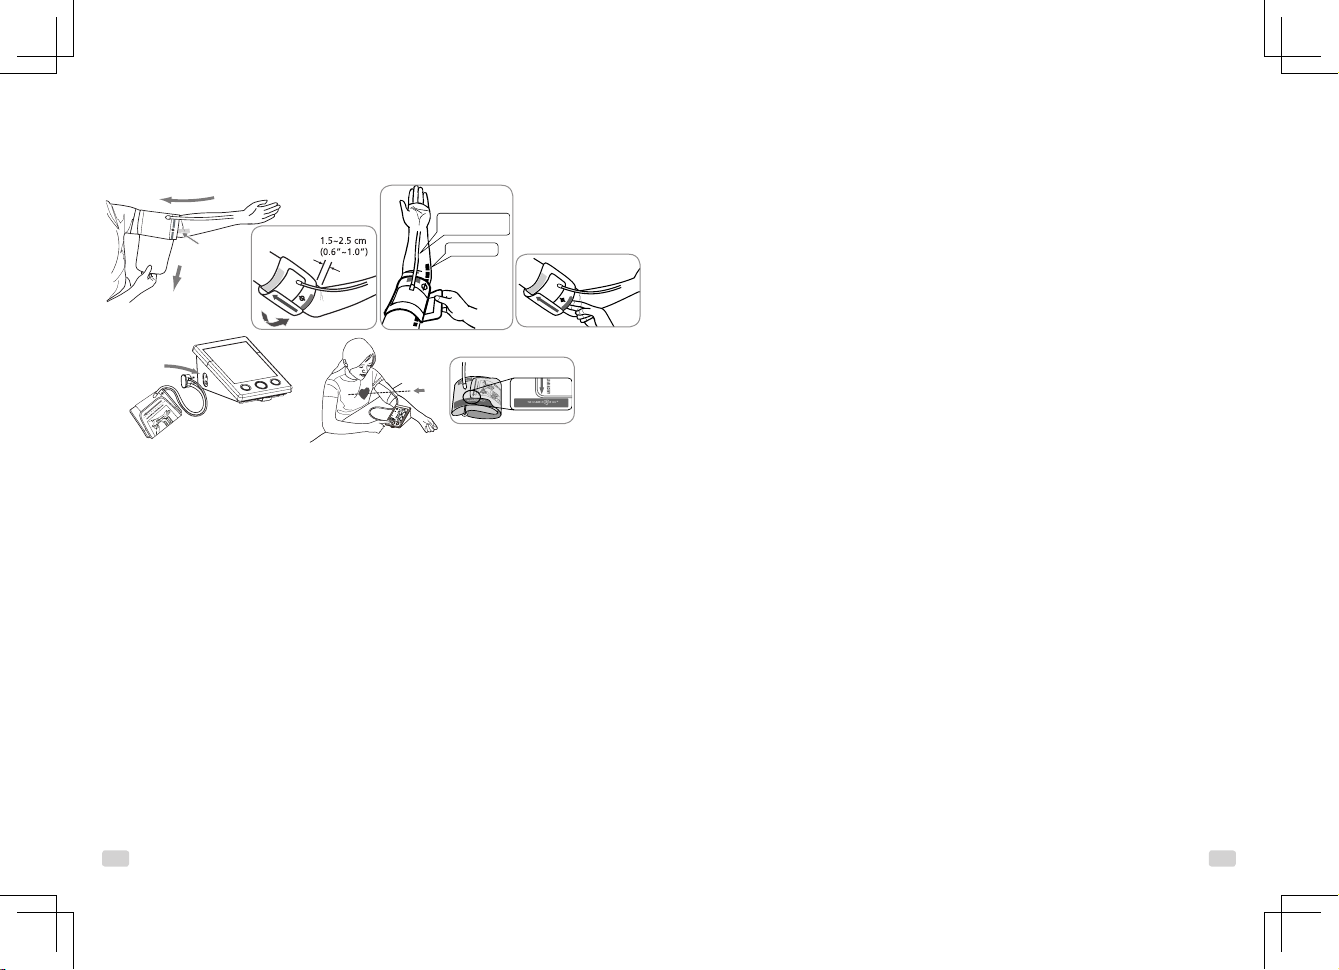
Applying the Cu
1. Unwrap the arm cu, leaving the end of the cu through the D-ring of the cu.
2. Put your left arm through the cu loop. The color strip indication should be positioned closer
to you with the tube pointing in the direction of your arm (Fig.1). Turn your left palm upward
and place the edge of the arm cu at approximately 1.5 to 2.5 cm above the inner side of the
elbow joint. Tighten the cu by pulling the end of the cu.
Fig.2
Fig.1
Fig.6
Fig.5
3. Center the tube over the middle of the arm. Press the hook and loop material together securely.
Allow room for 2 ngers to t between the cu and your arm. Position the artery mark (Ø) over
the main artery (on the inside of your arm) (Fig. 3,4).
Note: Locate the main artery by pressing with 2 ngers approximately 2 cm above the bend of
your elbow on the inside of your left arm. Identify where the pulse can be felt the strongest.
This is your main artery.
4. Plug in the cu connecting tube into the unit (Fig. 5).
5. Lay your arm on a table (palm upward) so the cu is at the same height as your heart. Make sure
the tube is not kinked (Fig. 6).
6. This cu is suitable for your use if the arrow falls within the solid color line as shown on the
right (Fig. 7). If the arrow falls outside the solid color line, you will need a cu with other circumferences. Contact your local dealer for additional size cus.
Measurement Procedures
Important Notes:
Here are a few helpful tips to help you obtain more accurate readings:
• Blood pressure changes with every heartbeat and is in constant uctuation throughout the day.
• Blood pressure recording can be aected by the position of the user, his or her physiological
condition and other factors. For greatest accuracy, wait one hour after exercising, bathing, eating,
drinking beverages with alcohol or caeine, or smoking to measure blood pressure.
• Before measurement, it’s suggested that you sit quietly for 15 minutes as measurement taken
during a relaxed state will have greater accuracy. You should not be physically tired or exhausted
while taking a measurement.
• Do not take measurements if you are under stress or tension.
Fig.3
Fig.7
Fig.4
EN - 4 5 - EN

• During measurement, do not talk or move your arm or hand muscles.
• Take your blood pressure at normal body temperature. If you are feeling cold or hot, wait a while
before taking a measurement.
• If the monitor is stored at very low temperature (near freezing), have it placed at a warm location for at least one hour before using it.
• Wait about 5 minutes before taking the next measurement.
1. Press the User-Switching Key to select memory zone 1 or memory zone 2.
After a memory zone is selected, press the ON/OFF/START Key to reset the monitor so it can start
measurement in the chosen memory zone.
2. Press the ON/OFF/START Key. All digits will light up, checking the display functions. The check-
ing procedure will be completed in 2 seconds.
3. After all symbols appear, the display will show a blinking “0”. The monitor is “Ready to Measure”
and will automatically inate the cu slowly to start measurement.
4. When the measurement is completed, the cu will exhaust the pressure inside. Systolic pres-
sure, diastolic pressure and pulse will be shown simultaneously on the LCD screen . The meas-
urement is then automatically stored into the pre-designated memory zone.
This monitor will re-inate automatically to approximately 220 mmHg if the system detects that
your body needs more pressure to measure your blood pressure.
Note: 1. This monitor automatically switches o approximately 1 minute after last key operation.
2. To interrupt the measurement, simply press the ON/OFF/START or Memory key; the cu
will deate immediately.
3. During the measurement, do not talk or move your arm or hand muscles.
Recalling Values from Memory
1. The monitor has two memory zones (1 and 2). Each zone can store up to 60 measurements.
2. To read memory values from a selected memory zone, use the User-Switching key to select a
memory zone (1 or 2) from which you want to recall values. Then, press the Memory key, and the
values will be shown on the LCD display.
3. The monitor will display an average of the previous measurements rst. Every new press of the
Memory key calls for one set of prior values stored. Latest memory will be recalled rst. The
calculated average will be applied to a maximum of the last 3 memories.
Note: The memory bank can store up to 60 readings per memory zone. When the number of
readings exceeds 60, the oldest data will be replaced with the new record.
Clearing Values from Memory
1. Press the User-Switching Key to select memory zone 1 or memory zone 2.
2. Continue to press and hold the Memory key for approximately 5 seconds, then the data in the
pre-designated memory zone can be erased automatically.
Time Adjustment
1. To adjust the date/ time in the monitor, press the Time-set key. The display will show a blinking
number showing the month.
2. Change the month by pressing the “+” key. Each press will increase the number by one in a
cycling manner. Press the Time-set key again to conrm the entry, and the screen will show a
blinking number representing the date.
3. Change the date, the hour, and the minute as described in Step 2 above, using the “+” key to
change and the Time-set key to conrm the entries.
4. “0” will reappear as the Blood Pressure Monitor is ready for measurement again.
Data Transfer to PC Ready (Optional)
Accessories for data transfer to PC including:
1. BP MANAGER software CD-ROM
2. connecting cable (USB)
3. instruction manual
are packaged and sold separately from the blood pressure monitor.
Troubleshooting
If any abnormality should arise during use, please check the following points.
EE / Measurement Error: Make sure the L-plug is securely connected to the air socket and
measure again. Wrap the cu correctly and keep arm steady during measurement. If the error
keeps occurring, return the device to your local distributor or service center.
E1 / Air Circuit Abnormality: Make sure the L-Plug is securely connected to the air socket on
the side of the unit and measure again. Another possible cause can be due to the short circuit
of the microphone embedded in the cu. If the errors still occur, return the device to your local
distributor or service center for help.
E2 / Pressure Exceeding 300 mmHg: Switch the unit o and measure again. If the error keeps
occurring, return the device to your local distributor or service center.
E3 / Data Error: Remove the batteries, wait for 60 seconds, and reload. If the error keeps occurring, return the device to your local distributor or service center.
Er / Exceeding Measurement Range: Measure again. If the error keeps occurring, return the
device to your local distributor or service center.
No display when the ON/OFF/START key is pressed: Re-insert the batteries in the correct
positions.
Note: If the unit still does not work, return it to your dealer. Under no circumstance should you
disassemble and repair the unit by yourself.
Cautionary Notes
1. The unit contains high-precision assemblies. Therefore, avoid extreme temperatures, humidity,
and direct sunlight. Avoid dropping or strongly shocking the main unit, and protect it from
dust.
2. Clean the blood pressure monitor body and the cu carefully with a slightly damp, soft cloth.
Do not press. Do not wash the cu or use chemical cleaner on it. Never use thinner, alcohol or
petrol (gasoline) as cleaner.
EN - 6 7 - EN
3. Leaky batteries can damage the unit. Remove the batteries when the unit is not used for a
long time.
4. The unit should not be operated by children so to avoid hazardous situations.
5. If the unit is stored near freezing, allow it to acclimate at room temperature before use.
6. This unit is not eld serviceable. You should not use any tool to open the device nor should you
attempt to adjust anything inside the device. If you have any problems, please contact the store
or the doctor from whom you purchased this unit or please contact Rossmax International Ltd.
7. For users diagnosed with common arrhythmia (atrial or ventricular premature beats or atrial
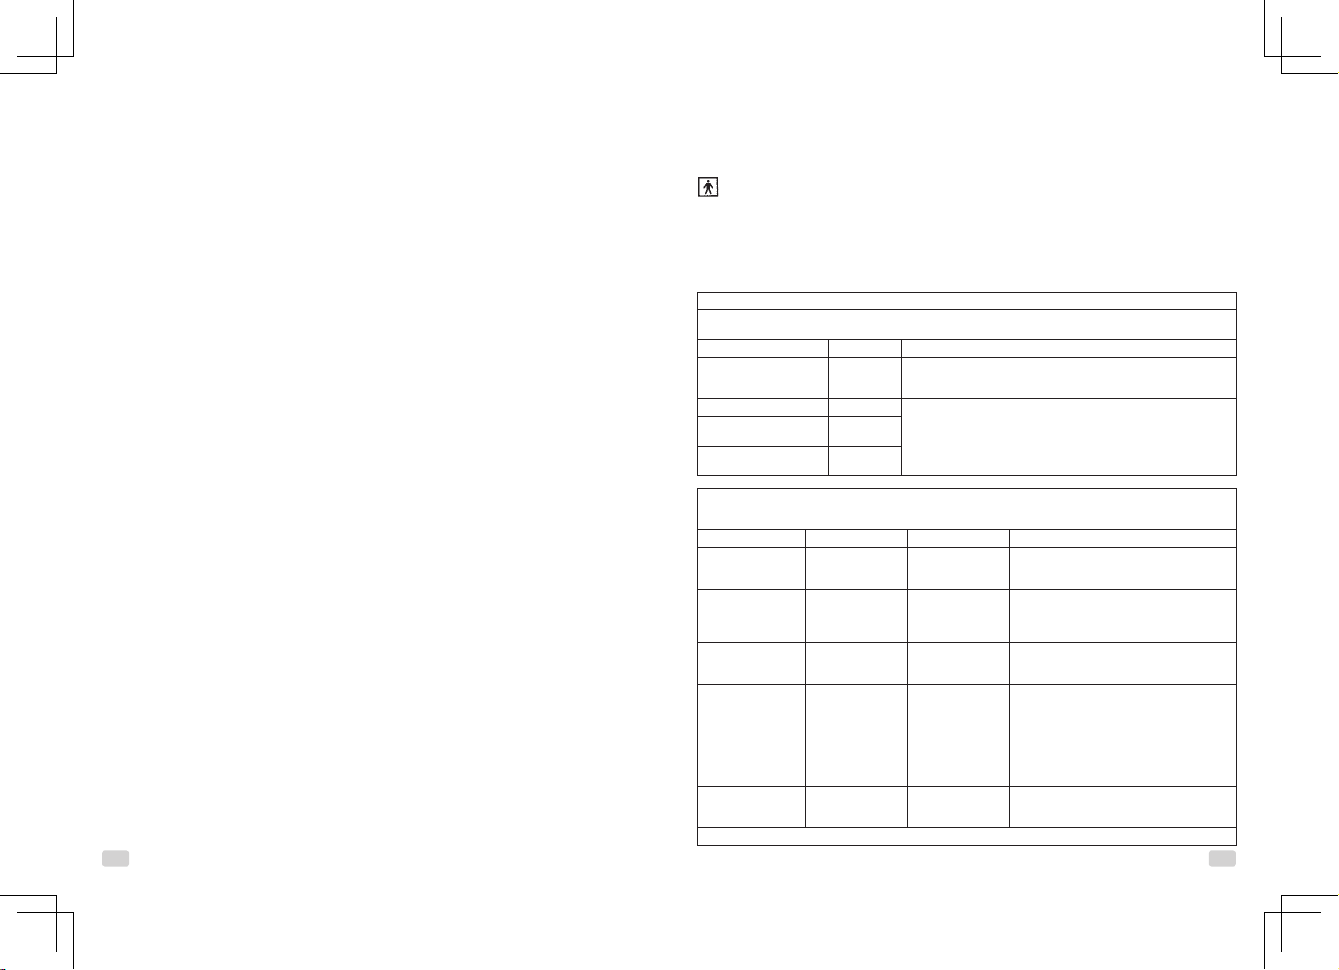
Dimensions : 155 (L) X 110 (W ) X 75 (H) mm
Weight : 430g (G.W.) (w/o Batteries)
Arm circumference : 24~36 cm (9.4”~14.2”)
Limited users : Adult users
: Type BF : Device and cu are designed to provide special protection
against electrical shocks.
*Specications are subject to change without notice.
brillation), diabetes, poor circulation of blood, kidney problems, or for users suered from
stroke, or for unconscious users, the device may have diculty in determining the proper blood
pressure.
8. To stop operation at any time, press the ON/OFF/START key, and the air in the cu will be rapidly exhausted.
9. Once the ination reaches 300 mmHg, the unit will start deating rapidly for safety reasons.
10. Please note that this is a home healthcare product only and it is not intended to serve as a
substitute for the advice of a physician or medical professional.
11. Do not use this device for diagnosis or treatment of any health problem or disease. Measure-
ment results are for reference only. Consult a healthcare professional for interpretation of
pressure measurements. Contact your physician if you have or suspect any medical problem.
Do not change your medications without the advice of your physician or healthcare professional.
12. Electromagnetic interference: The device contains sensitive electronic components. Avoid
strong electrical or electromagnetic fields in the direct vicinity of the device (e.g. mobile
telephones, microwave ovens). These may lead to temporary impairment of measurement
accuracy.
13. Dispose of device, batteries, components and accessories according to local regulations.
14. This monitor may not meet its performance specication if stored or used outside tempera-
ture and humidity ranges specied in Specications.
Specications
Measurement Method : Oscillometric
Measurement Range : Pressure: 40~250mmHg; Pulse: 40~199 beats/ minute
Pressure Sensor : Semi conductor
Accuracy : Pressure: ±3mmHg; Pulse: ±5% of reading
Ination : Pump Driven
Deation : Automatic Pressure Release Valve
Memory capacity : 60 memories for each zone x 2 zones
Auto-shut-o : 1 minute after last key operation
Operation Environment : 10°C~40°C (50°F~104°F); 40%~85% RH
Storage Environment : -10°C~60°C (14°F~140°F); 10%~90% RH
DC Power Source : DC 6V four R06 (AA) Batteries
AC Power Source : DC 12V, ≥ 600mA (Plug size: outer(-) is Ø3.8, inner(+) is Ø1.3)
EMC guidance and manufacturer’s declaration
The MR800iPC is intended for use in the electromagnetic environment specied below.
The customer or the user of the MR800iPC should assure that it is used in such an environment.
Emission test Compliance Electromagnetic environment-guidance
RF emissions CISPR 11 Group 1 The MR800iPC uses RF energy only for its internal function. Therefore, its
RF emissions CISPR 11 Class B The MR800iPC is suitable for use in all establishments, including doHarmonic emissions
IEC 61000-3-2
Voltage uctuations/icker
emissions IEC 61000-3-3
The customer or the user of the MR800iPC should assure that it is used in such an environment.
Immunity test IEC 60601 test level Compliance level Electromagnetic environment-guidance
Electrostatic
discharge(ESD) IEC
61000-4-2
Electrical fast
transient/burst IEC
61000-4-4
Surge IEC 61000-4-5 ± 1kV line(s) to
Voltage Dips, short
interruptions and
voltage variations on
power supply input
lines IEC 61000-4-11
Power frequency
(50/60 Hz) mag-netic
eld IEC 61000-4-8
Guidance and manufacturer’s declaration-electromagnetic emissions
RF emissions are very low and are not likely to cause any interference in
nearby electronic equipment.
Class A
Compliance
Guidance and manufacturer’s declaration-electromagnetic immunity
The MR800iPC is intended for use in the electromagnetic environment specied below.
± 6 kV contact
± 8 kV air
± 2kV for power sup-
ply lines
± 1kV for input / output lines
line(s)
± 2kV line(s) to earth
<5% UT(>95% dip in
UT) for 0,5 cycle
40% UT(60% dip in
UT) for 5 cycles
70% UT(30% dip in
UT) for 25 cycles
<5% UT(>95% dip in
UT) for 5 s
3 A/m 3 A/m Power frequency magnetic elds should be at
NOTE: UT is the a.c. mains voltage prior to application of the test level.
mestic establishments and those directly connected to the public lowvoltage power supply network that supplies buildings used for domestic
purposes.
± 6 kV contact
± 8 kV air
± 2kV for power sup-
ply lines
Not applicable
± 1kV differential
mode
Not applicable
<5% UT(>95% dip in
UT) for 0,5 cycle
40% UT(60% dip in
UT) for 5 cycles
70% UT(30% dip in
UT) for 25 cycles
<5% UT(>95% dip in
UT) for 5 s
Floors should be wood, concrete or ceramic tile.
If oors are covered with synthetic material, the
relative humidity should be at least 30%
Mains power quality should be that of a typical
commercial or hospital environment.
Mains power quality should be that of a typical
commercial or hospital environment.
Mains power quality should be that of a typical
commercial or hospital environment. If the user
of the MR800iPC requires continued operation
during power mains interruptions, it is recommended that the MR800iPC be powered from an
uninterruptible power supply or a battery.
levels characteristics of a typical location in a
typical commercial or hospital environment
EN - 8 9 - EN
The MR800iPC is intended for use in the electromagnetic environment specied below.
The customer or the user of the MR800iPC should assure that is used in such and environment.
Immunity test IEC 60601 test level Compliance level Electromagnetic environment-guidance
Conducted RF
IEC 61000-4-6
Radiated RF
IEC 61000-4-3
NOTE 1: At 80 MHz and 800 MHz, the higher frequency range applies.
NOTE 2: These guidelines may not apply in all situations. Electromagnetic propagation is affected by absorption and reec-
a: Field strengths from xed transmitters, such as base stations for radio (cellular/cordless) telephones and land mobile ra-
dios, amateur radio, AM and FM radio broadcast and TV broadcast cannot be predicted theoretically with accuracy. To assess the electromagnetic environment due to xed RF transmitters, an electromagnetic site survey should be considered.
If the measured eld strength in the location in which the MR800iPC is used exceeds the applicable RF compliance level
above, the MR800iPC should be observed to verify normal operation. If abnormal performance is observed, additional
measures may be necessary, such as re-orienting or relocating the MR800iPC.
b: Over the frequency range 150 kHz to 80 MHz, eld strengths should be less than 3 V/m.
Recommended separation distance between portable and mobile RF communications equipment and the MR800iPC
The MR800iPC is intended for use in an electromagnetic environment in which radiated RF disturbances are controlled. The
customer or the user of the MR800iPC can help prevent electromagnetic interference by maintaining a minimum distance
between portable and mobile RF communications equipment (transmitters) and the MR800iPC as recommended below, according to the maximum output power of the communications equipment.
Rated maximum output
power of transmitter
For transmitters rated at a maximum output power not listed above, the recommended separation distance d in metres (m)
can be estimated using the equation applicable to the frequency of the transmitter, where p is the maximum output power
rating of the transmitter in watts (W) according to the transmitter manufacturer.
NOTE 1: At 80 MHz and 800 MHz, the separation distance for the higher frequency range applies.
NOTE 2: These guidelines may not apply in all situations. Electromagnetic propagation is affected by absorption and reec-
Guidance and manufacturer’s declaration-electromagnetic immunity
Portable and mobile RF communications equipment
should be used no closer to any part of the MR800iPC
including cables, than the recommended separation
distance calculated from the equation applicable to the
frequency of the transmitter.
Recommended separation distance:
3 Vrms
150 KHz to 80 MHz
3 V/m
80MHz to 2,5 GHz
tion from structures, objects and people.
W
0,01 0,12 0,12 0,23
0,1 0,38 0,38 0,73
1 1,2 1,2 2,3
10 3,8 3,8 7,3
100 12 12 23
tion from structures, objects and people.
3 Vrms
3 V/m
Separation distance according to frequency of transmitter; m
150 kHz to 80 MHz
d = 1,2 √P
d = 1,2 √P
d = 1,2 √P 80MHz to 800 MHz
d = 2,3 √P 800MHz to 2,5 GHz
Where P is the maximum output power rating of the transmitter in watts (W) according to the transmitter manufac-
turer and d is the recommended separation distance in
metres (m).
Field strengths from xed RF transmitters, as determined
by an electromagnetic site survey, a should be less than
the compliance level in each frequency range.
Interference may occur in the vicinity of equipment marked
with the following symbol:
80 MHz to 800 MHz
d = 1,2 √P
800 MHz to 2,5 GHz
b
d = 2,3 √P
Вступ
Показники артеріального тиску, в результаті проведення вимірювання даним приладом,
відповідають показникам, отриманим за допомогою аускультативного методу з
використанням манжети/стетоскопа, в межах норм, прийнятих Американським
Національним Стандартним Керівництвом для електронних або автоматичних
сфігмоманометрів. Призначений для використання в домашніх умовах. Не застосовувати для
дітей і новонароджених.
Міжнародна програма забезпечення гарантії якості захищає даний прилад від промислових
дефектів. Для отримання детальнішої інформації про гарантійні умови звертайтеся до
виробника Rossmax International Ltd або офіційного дистриб'ютора компанії у вашій країні.
Увага: Уважно ознайомтеся з даною інструкцією перед початком використання
приладу. Зберігайте інструкцію впродовж всього періоду експлуатації.
Комплектація і опис приладу
Манжета на плече
Повітряна
трубка з
конектором
Кнопка Виклику
Пам'яті
M
Кнопка увімкнення /
вимкнення
РК-дисплей
Батарейний
відсік
Кнопка Перемикання
Користувача
Кнопка установки
дати/часу
Гніздо
передачі
данихSocket
Гніздо підключення
мережевого адаптера
4 елементу
живлення типу
АА по 1.5 В
Стандарти якості
Даний вимірювач артеріального тиску відповідає вимогам Європейських стандартів
якості, що підтверджується директивою ЄС 0366. Продукт сертифікований на відповідність
європейському ЄС 93/42/EEC (Директива про медичні вироби), Додаток I, Обов'язкові
вимоги з використанням узгоджених стандартів.
EN 1060-1: 1995/A1: 2002 Неінвазивні сфігмоманометри. Частина 1. Основні вимоги
EN 1060-3: 1997/A2: 2009 Неінвазивні сфігмоманометри. Частина 3. Додаткові вимоги для
електромеханічних вимірювальних систем артеріального тиску.
EN 1060-4: 2004. Неінвазивні сфігмоманометри. Частина 4. Процедури тестування
для визначення загальної системи точності свідчень автоматичних неінвазивних
сфігмоманометрів.
Прилад призначений для тривалого використання. Рекомендуємо провести обов'язкову
перевірку всіх цифрових вимірювачів артеріального тиску. При звичайному використанні,
EN - 10 11 - UA
не більш 3-х разів на день протягом 2-х років, перевірку приладу не проводять до тих
пір, поки на дисплеї не з'явиться напис CA. Слід також провести перевірку апарату, якщо
пристрій був пошкоджений через удар або падіння, в нього потрапила вода або прилад
було піддано дії высокої/низької температури або зміні вологості. Будь ласка, зверніться до
найближчого офіційного ділера або в сервісний центр при появі на дисплеї напису CA.
Стандарт артеріального тиску
Всесвітньою Організацією Охорони здоров'я розроблений
стандарт визначення артеріального тиску, згідно якого
розрізняють зони підвищеного і зниженого тиску. Проте
цей стандарт грунтується на середньостатистичних даних,
тоді як у різних людей рівень нормального тиску може
відрізнятися. Величина артеріального тиску варіюється
залежно від віку, маси тіла і інших параметрів. Усесвітньою
Організацією Охорони здоров'я розроблений стандарт
визначення артеріального тиску, згідно якого розрізняють
4 рівні артеріального тиску. Даний прилад обладнаний
сучасним індикатором з візуальним відображенням
передбачуваного рівня риски артеріального тиску
(передгіпертонія, гіпертонія 1-ої стадії, гіпертонія 2-ої
стадії) по результату кожного вимірювання. (Інформація
надана нижче) Важливо регулярно консультуватися з
вашим лікарем, який визначить нормальні і критичні
показники артеріального тиску саме для вас.
Умовні позначення на дисплеї
1. Класифікатор тиску за нормами ВОЗ
2. Зони пам'яті
3. Середнє значення
4. Індикатор рівня зарядки батареї
5. Індикатор дати/часу
6. Індикатор аритмії
7. Тиск систоли
8. Тиск діастоли
9. Частота пульсу
10. Індикатор пульсу
Індикатор нерегулярного серцебиття (аритмії)
Даний прилад має індикатор нерегулярного серцебиття (аритмії), який інформує
користувачів про наявність нерегулярного серцебиття, відміченого на момент проведення
вимірювання артеріального тиску і пульсу.
Примітка. Наполегливо рекомендуємо звернутися до лікаря при частій появі на дисплеї
індикатора аритмії (IHB)
1
2
3
4
5
6
Гіпертонія 2 стадії
Систола <160
Діастола <100
Гіпертонія 1 стадії
Систола 140~159
Діастола 90~99
Передгіпертонія
Систола 120~139
Діастола 80~89
Норма
Систола <120
Діастола <80
Систола тиск ->
Діастола тиск ->
7
8
9
10
Установка елементів живлення
1. Натисніть і зніміть кришку батарейного відсіку в напрямі,
вказаному стрілкою.
2. Встановіть або замініть 4 елементи живлення типу “ АА”
відповідно до вказівок усередині батарейного відсіку.
3. Закрийте кришку батарейного відсіку: вставте кронштейни на
кришці в пази на корпусі і замкніть її.
4. Елементи живлення, які входять в комплектацію приладу, є тестовими. Вони можуть
розрядитися раніше, ніж елементи живлення, придбані в магазині. Заміну елементів
живлення необхідно проводити одночасно. Завжди виймайте елементи живлення, якщо
не плануєте користуватися приладом протягом тривалого часу.
Необхідно замінити елементи живлення, якщо:
1. На дисплеї з'явилося зображення елементу живлення.
2. При натисненні кнопки ON/OFF/START прилад не включається.
Увага: 1 Елементи живлення є небезпечними відходами. Не утилізуйте їх разом з побутовим
сміттям.
2. Гарантійні зобов'язання даного приладу не розповсюджуються на елементи
живлення або пошкодження від старих елементів живлення.
3. Використовуйте тільки нові елементи живлення. Проводіть заміну всіх елементів
живлення одночасно. Використовуйте елементи живлення однієї марки і типу.
Використання мережевого адаптера
1. Підключіть мережевий адаптер до роз'єму, розташованого на задній стороні приладу.
2. Включіть мережевий адаптер в мережу. Слід використовувати сумісні мережеві адаптери.
(Напруга і змінний струм вказані на етикетці біля гнізда мережевого адаптера)
Увага:
1. Виймайте елементи живлення при використанні мережевого адаптера впродовж
тривалого часу.
2. Наявність мережевого адаптера є опційною. Зверніться до офіційного дистриб'ютора для
придбання сумісних адаптерів.
3. Використовуйте офіційно дозволені мережеві адаптери при роботі з даним вимірювачем
артеріального тиску. Для отримання докладнішої інформації див. Додаток 1
Накладення манжети
1. Поверніть манжету так, щоб її кінець залишався протягнутим в металеве кільце.
2. Накладіть манжету на ліву руку. Повітряна трубка повинна знаходитися з боку долоні (мал.
1) Розверніть ліву руку догори і розташуйте нижній край манжети на відстані приблизно
1,5-2,5 см вище за ліктьову западину. Зафіксуйте манжету, затягнувши її край.
3. Розташуйте повітряну трубку по центру руки. Зафіксуйте манжету. Залиште невелику
відстань між манжетою і рукою. Розмістіть позначення уздовж плечової артерії (вона
трохи зміщена від центру руки до її внутрішнього краю).(Мал. 3,4)
Примітка:
Знайдіть головну артерію. Для цього притисніть два пальці на відстані приблизно 2-х см над
згином ліктя на внутрішній стороні лівої руки. Ваша головна артерія знаходиться там, де
сильніше прослуховується пульс.
4. З'єднайте манжету і прилад за допомогою конектора. (Мал. 5)
5. Покладіть руку на стіл долонею вгору так, щоб манжета знаходилася на одному рівні з
UA - 12 13 - UA
серцем. Перевірте, щоб повітряна трубка не була перекручена. ( Мал. 6)
6. Манжета придатна для використання, якщо стрілка знаходиться в межах широкої
кольорової смужки, як показано на мал. 7 справа. Якщо стрілка знаходиться за межами
даної смужки, вам потрібна манжета іншого розміру. Зверніться до місцевого офіційного
дистриб'ютора для заміни на манжету потрібного розміру
Розташуйте повітряну
трубку по центру руки.
Головна
артерія
Рис 1
Головна артерія
Рис 4
Рис 3
Рис 2
Рис 6
Рис 7
Рис 3
Процедура вимірювання
Корисні поради
Для отримання точних свідчень дотримуйтеся наступних рекомендацій:
• Артеріальний тиск змінюється при кожному ударі серця і коливається впродовж всього
дня.
• На свідчення артеріального тиску впливає поза користувача, фізіологічний стан, а також
інші чинники. Для більшої точності результатів вимірювання артеріального тиску зачекайте
1 годину після фізичних вправ, купання, паління, прийняття їжі, вживання напоїв, що містять
алкоголь або кофеїн.
• Рекомендуємо посидіти спокійно протягом 15 хвилин до проведення вимірювання.
Вимірювання, які проводяться в розслабленому стані, дають точніший результат. Не слід
проводити вимірювання після фізичних навантажень або при сильній втомі.
• Не вимірюйте артеріальний тиск, якщо ви збуджені або знаходитеся в стані стресу.
• Під час вимірювання не розмовляйте, не рухайте м'язами руки і інших частин тіла.
• Під час вимірювання артеріального тиску температура тіла має бути нормальною. Якщо ви
відчуваєте озноб або жар, відкладіть вимірювання на деякий час.
• Розташуйте прилад в теплому місці на 1 годину, якщо він зберігався при низькій
температурі нижче +5°С
• Перерва між вимірюваннями має бути не менше 5 хвилин.
1. Натисніть кнопку Перемикання Користувача для вибору зони пам'яті 1 або 2
Після того, як вибрана зона пам'яті, натисніть кнопку ON/OFF/STOP для повернення приладу
в початковий стан. Результати вимірювань будуть збережені у вибраній зоні пам'яті.
2. Натисніть кнопку ON/OFF/STOP. На екрані відобразяться всі символи. Процедура
перевірки функцій дисплея триває 2 секунди.
3. На дисплеї з'явиться “0”. Прилад готовий для початку вимірювань і автоматично почне
накачувати повітря в манжету.
4. Після завершення процесу вимірювання, прилад почне випускати повітря з манжети.
На РК-дисплеї одночасно відобразяться показники тиску систоли, діастоли і пульсу.
Результати вимірювання будуть автоматично збережені у вибраній зоні пам'яті.
Прилад автоматично почне накачувати повітря до 220 мм. рт. ст., якщо система визначить,
що для вимірювання вашого артеріального тиску потрібний додатковий тиск.
Примітка: 1. Прилад автоматично відключається приблизно через 1 хвилину після
2. Для зупинки процесу вимірювання натисніть кнопку ON/OFF/STOP або кнопку
3. Під час процедури вимірювання не розмовляйте, не рухайте м'язами руки і
останньої операції.
Виклику Пам'яті. Прилад відразу почне випускати повітря з манжети.
інших частин тіла.
Поглядання пам'яті
1. Прилад має дві зони пам'яті, 1 і 2. У кожній зоні зберігається до 60 показників.
2. Використовуйте кнопку Перемикання Користувача для вибору зони пам'яті 1 або 2,
щоб проглянути показники з вибраної зони. Далі натисніть кнопку Виклику Пам'яті, дані
відобразяться на РК-дисплеї приладу.
3. Спочатку прилад відобразить середнє значення останніх результатів вимірювань.
Кожне подальше натиснення кнопки Виклику Пам'яті відтворить попереднє значення
вимірювань, збережених в пам'яті. Останні результати з'являться першими. Середнє
значення розраховується після 3-го останнім вимірюванням.
Видалення запису з пам'яті
1. Натисніть кнопку Перемикання Користувача для вибору зони пам'яті 1 або 2.
Продовжуйте натискати і утримувати кнопку Виклику Пам'яті протягом 5 секунд, після
чого всі вибрані дані будуть видалені автоматично.
Установка часу
1. Натисніть кнопку для установки дати і часу. На дисплеї почнуть блимати цифри, які
позначають годину
2. Натисніть кнопку для зміни свідчень. Кожне натиснення змінює значення на 1 годині
Натисніть кнопку підтвердження введення даних. На екрані почнуть блимати цифри, що
відображають хвилини.
3. Аналогічним чином змініть хвилини і дату (см пункт 2), використовуючи кнопку зміни і
кнопку підтвердження введення.
4. На дисплеї з'явиться “0 “, як тільки прилад буде готовий для проведення вимірювань.
Перенесення даних на ПК (опційний)
Аксесуари для перенесення даних на ПК (додатково, в комплект з приладом не входять):
1 CD-ROM з програмою BP MANAGER
2 USB кабель
3 Інструкція з використання
Усунення несправностей
Якщо при роботі з приладом виникають несправності, зверніться до таблиці
EE / Помилка вимірювання: Переконайтеся, що конектор щільно вставлений в гніздо,
UA - 14 15 - UA

повторіть процедуру вимірювання. Правильно накладіть манжету і не рухайте рукою під час
вимірювання. Якщо помилка продовжує відображатися на екрані, зверніться до місцевого
офіційного дистриб'ютора або в сервісний центр.
E1 / Помилка циркуляції повітря: Переконайтеся, що конектор щільно вставлений
в гніздо, і повторіть процедуру вимірювання знову. Інша можлива причина виникнення
помилки - коротке замикання датчика, вбудованого в манжету. Якщо помилка продовжує
відображатися на екрані, зверніться до місцевого офіційного дистриб'ютора або в сервісний
центр.
E2 / Тиск перевищує 300 мм. рт. ст: Відключіть прилад, потім повторіть вимірювання.
Якщо помилка продовжує повторюватися, зверніться до місцевого офіційного
дистриб'ютора або в сервісний центр.
E3 / Помилка даних: Витягніть батареї, зачекайте 60 секунд і знов завантажте елементи
живлення. Якщо помилка продовжує відображатися на екрані, зверніться до місцевого
офіційного дистриб'ютора або в сервісний центр.
Er / Перевищення діапазону вимірювання: Повторіть вимірювання. Якщо помилка
продовжує відображатися на екрані, зверніться до місцевого офіційного дистриб'ютора або
в сервісний центр.
При включенні приладу на дисплеї не відображаються символи: Переустановіть
елементи живлення відповідно до полярності
Примітка
Якщо прилад не функціонує, зверніться до офіційного ділера. Не розбирайте або не
ремонтуйте прилад самостійно.
Зберігання і відхід
1. Прилад містить високоточні механізми. Не піддавайте прилад дії перепадів температури,
прямих сонячних променів і підвищеної вологості. Не кидайте і не піддавайте ударам
прилад, оберігайте від попадання пилу.
2. Обережно протирайте корпус і манжету злегка вологою м'якою тканиною. Не тисніть на
корпус. Не періть манжету і не використовуйте хімічні речовини для чищення. Ніколи не
використовуйте розчинник, спирт або бензин як очищувач.
3. Несправні елементи живлення можуть пошкодити прилад. Дістаньте елементи живлення з
батарейного відсіку, якщо прилад не використовується протягом тривалого часу.
4. Щоб уникнути небезпечних ситуацій не давайте прилад дітям.
5. Якщо прилад зберігався при низьких температурах, занесіть його в тепле приміщення до
початку використання.
6. Не намагайтеся самостійно розбирати або лагодити прилад. Якщо у вас виникають
проблеми з його використанням, зверніться за місцем покупки або в Rossmax International
Ltd.
7. Іноді можуть виникнути проблеми з визначенням точних свідчень артеріального тиску
для користувачів з діагнозом звичайна аритмія (передсердна екстрасистола, шлуночкова
екстрасистола або миготлива аритмія), діабет, погана циркуляція крові, хвороби нирок, а
також у користувачів, які перенесли удар або знаходяться в несвідомому стані.
8. Для зупинки вимірювання у будь-який момент натисніть кнопку ON/OFF/START. Повітря з
манжети почне швидко випускатися.
9. Як тільки тиск при накачуванні досягне 300 мм рт. ст., прилад почне автоматично
випускати повітря.
10. Прилад призначений для домашнього використання і не може замінити консультацію
лікаря або медичних працівників.
11. Не використовуйте прилад для діагностування або лікування хвороб. Результати
вимірювань носять інформаційний характер. Зверніться за роз'ясненням до медичного
персоналу. Отримайте консультацію у вашого лікаря, якщо є симптоми хвороби. Не
змінюйте схему лікування без рекомендації лікаря.
12. Електромагнітне випромінювання. Прилад містить надчутливі електронні компоненти.
Не розташовуйте прилад поблизу сильних електричних або електромагнітних полів
(мобільні телефони, мікрохвильові печі), оскільки це може привести до спотворення
результатів вимірювань.
13. Проводіть утилізацію приладу, елементів живлення, компонентів і аксесуарів відповідно
до правил і норм вашої країни.
14. Даний прилад може не відповідати технічним характеристикам, якщо зберігався або
використовувався за межами температурного режиму і вологості, вказаного в технічному
описі.
Технічні характеристики
Метод вимірювання Осцилометричний метод за Коротковим
Діапазон вимірювань Тиск 30-260 мм. рт. ст.; Пульс 40-199 ударів за хвилину
Датчик тиску напівпровідниковий
Погрішність вимірювання Тиск ±3 мм. рт. ст, пульс±5 %
Нагнітання повітря автоматично
Випускання повітря автоматично
Місткість пам'яті 2 зони пам'яті по 60 значень
Автоматичне відключення через 1 хвилину після останнього натиснення кнопки
Умови експлуатації Температура +10°С~+40°С; Відносна вологість 40-85%
Умови зберігання Температура +10°С~+60°С; Відносна вологість 10-90%
Джерело живлення постійний струм 6В,
Адаптер постійний струм 12В, 600мА
Розміри 160X 120 X 81 мм
Вага 552 г ( без батарей)
Розмір манжети 24~36 см
Користувачі дорослі
Тип BF. прилад і манжета сконструйовані так, щоб уникнути
*Виробник залишає за собою право змінювати технічні характеристики без попередження
чотири елементи живлення типу R06(AA)
поразки електричним струмом
UA - 16 17 - UA
 Loading...