

Rossmax CalPro Instruction Manual

Mobile Calibration System
for Blood Pressure Monitor
Model: CalPro
Instruction Manual

2 3
Table of Contents:
Introduction ...................................................................................... 3
Preliminary Remarks ........................................................................... 3
Cautionary Notes ............................................................................... 3
Name/Function of Each Part ............................................................ 4,5
LCD Display Explanations ................................................................... 6
Using the AC Adapter ........................................................................ 7
Connect Methods ........................................................................... 7,8
Operation Procedures
1. Data link status operation ........................................................... 9
2. Readout Mode .......................................................................... 10
3. Auto Calibration Mode ............................................................. 18
4. Measurement Count Display Mode ........................................... 20
5. Measurement Count Clearance Mode ....................................... 21
6. Calibration Reminder Setting Mode .......................................... 22
7. Pressure Gauge Mode .......................................................... 23-25
Change "mmHg" to "kPa" ............................................................. 26
Error Messages ................................................................................ 27
Specications ................................................................................... 28
Safety Certications ......................................................................... 29
USA FCC Class B ............................................................................. 29
Maintenance of ROSSMAX Calibrator .............................................. 29
Introduction
The calibration system developed by Rossmax Reasearch and Development is equipped with the following features :
● Automatic device pressure checking
● Automatic device pressure calibration
● Measurement count check and reset
● Digital manometer
Which helps our partners to offer on-site and prompt calibration service
to end users as well as signicantly enhance customer satisfaction!
Preliminary Remarks
The quality of the device has been veried and conforms to the provisions of the Electromagnetic Compatibility EMC Directive 2014/30/EU;
Low Voltage Directive (LVD) 2014/35/EU and EN/IEC 61010-1 :2010 Safety requirements for electrical equipment for measurement, control, and
laboratory use - Part 1: General requirements.
Cautionary Notes
1. The unit contains high-precision assemblies. Therefore, avoid extreme
temperatures, humidity, and direct sunlight. Avoid dropping or strongly shocking the main unit, and protect it from dust.
2. The unit should not be operated by children so to avoid hazardous
situations.
3. If the unit is stored near freezing, allow it to acclimate at room temperature before use.
4. This unit is not eld serviceable. You should not use any tool to open
the device nor should you attempt to adjust anything inside the device. If you have any problems, please contact the store or the doctor
from whom you purchased this unit or please contact Rossmax International Ltd.
5. Dispose of device, batteries, components and accessories according to
local regulations.
6. Data link can only be connected with Rossmax blood pressure monitor
and calibrator. It cannot be used for any other purpose.
7. Clean the device carefully with a slightly damp, soft cloth.
4 5
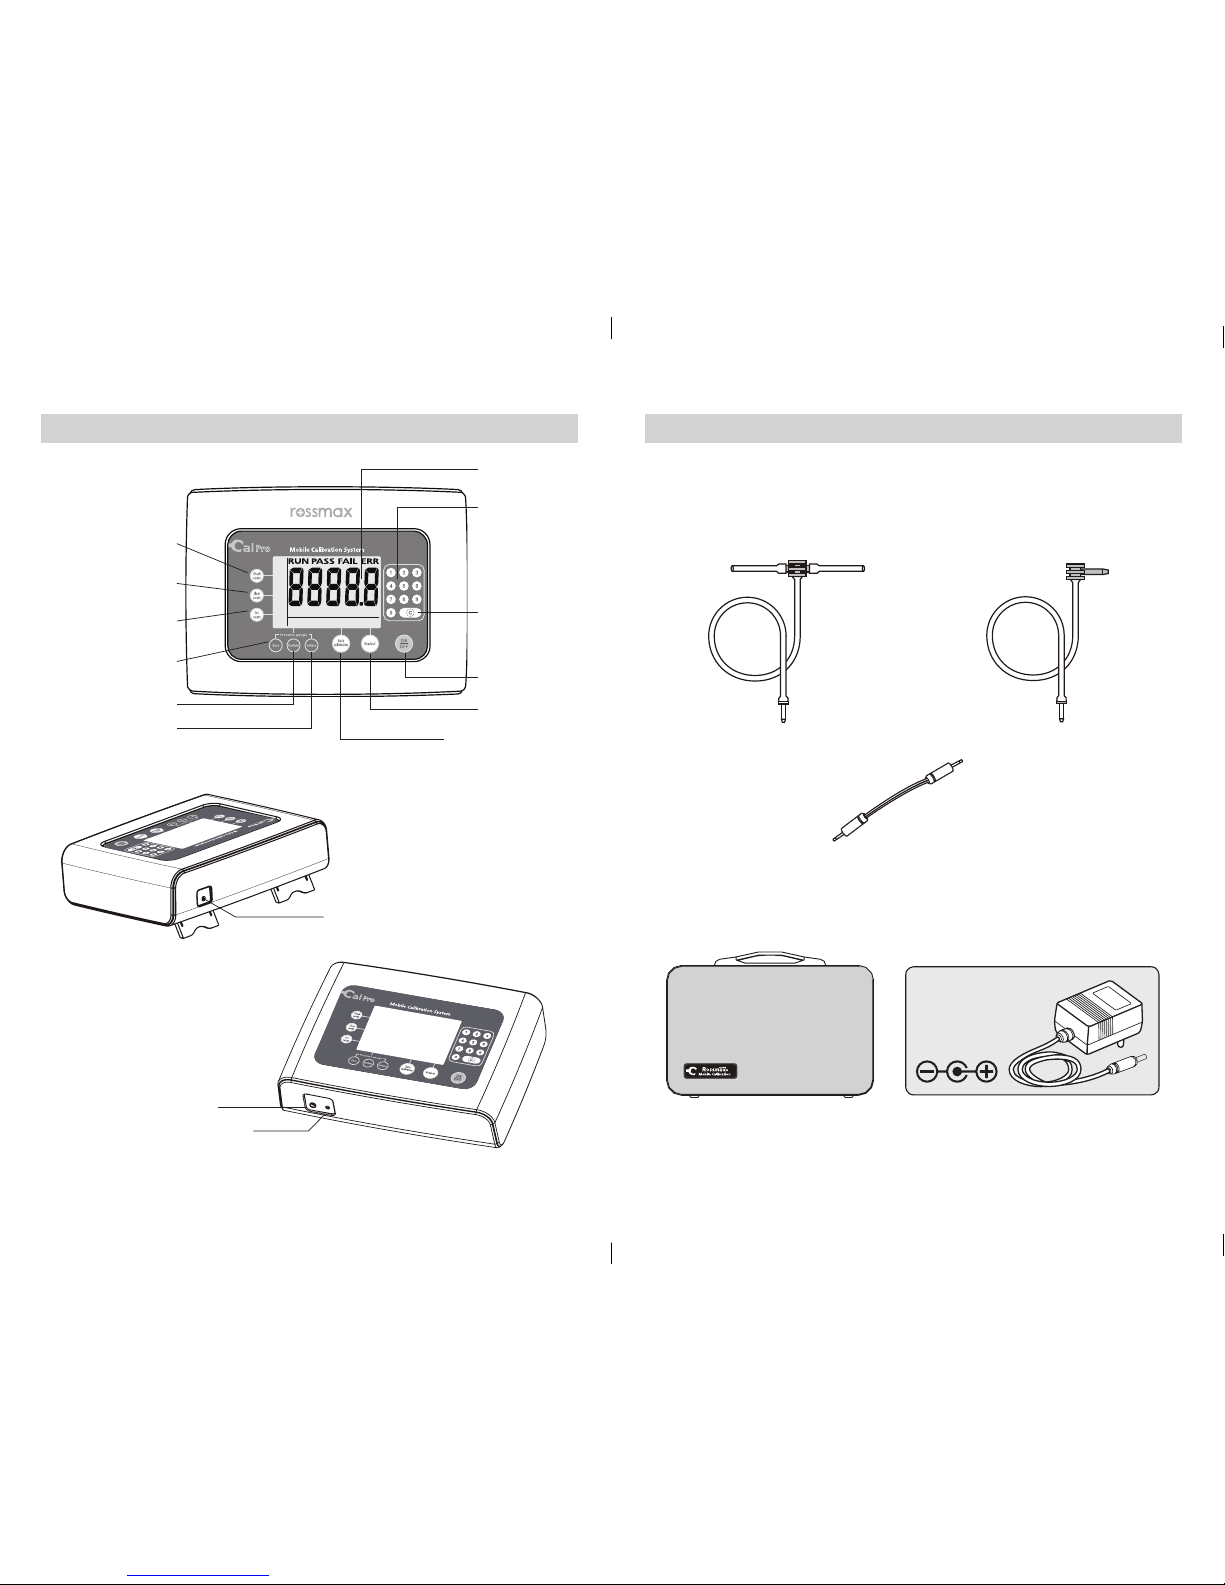
Name/Function of Each Part
kPa mmHg
ReadoutAuto calibrationPressure gauge
Check
count
Clear
count
Set
count
LCD Display
Number
Entry key
Clear key
ON/OFF key
Readout key
Auto Calibration
key
Zero key
Deate key
Inate key
Check Count key
Clear Count key
Set Count key
Air tube socket
Data Link Port
AC Adapter Jack
Data Link Cable
Air Tube and Connector
for Wrist Monitors
Air Tube and Connector
for Upper Arm Monitors
Carrying Bag
AC Adapter
Output: 600mA
(Ø3.8/Ø1.3)
Name/Function of Each Part
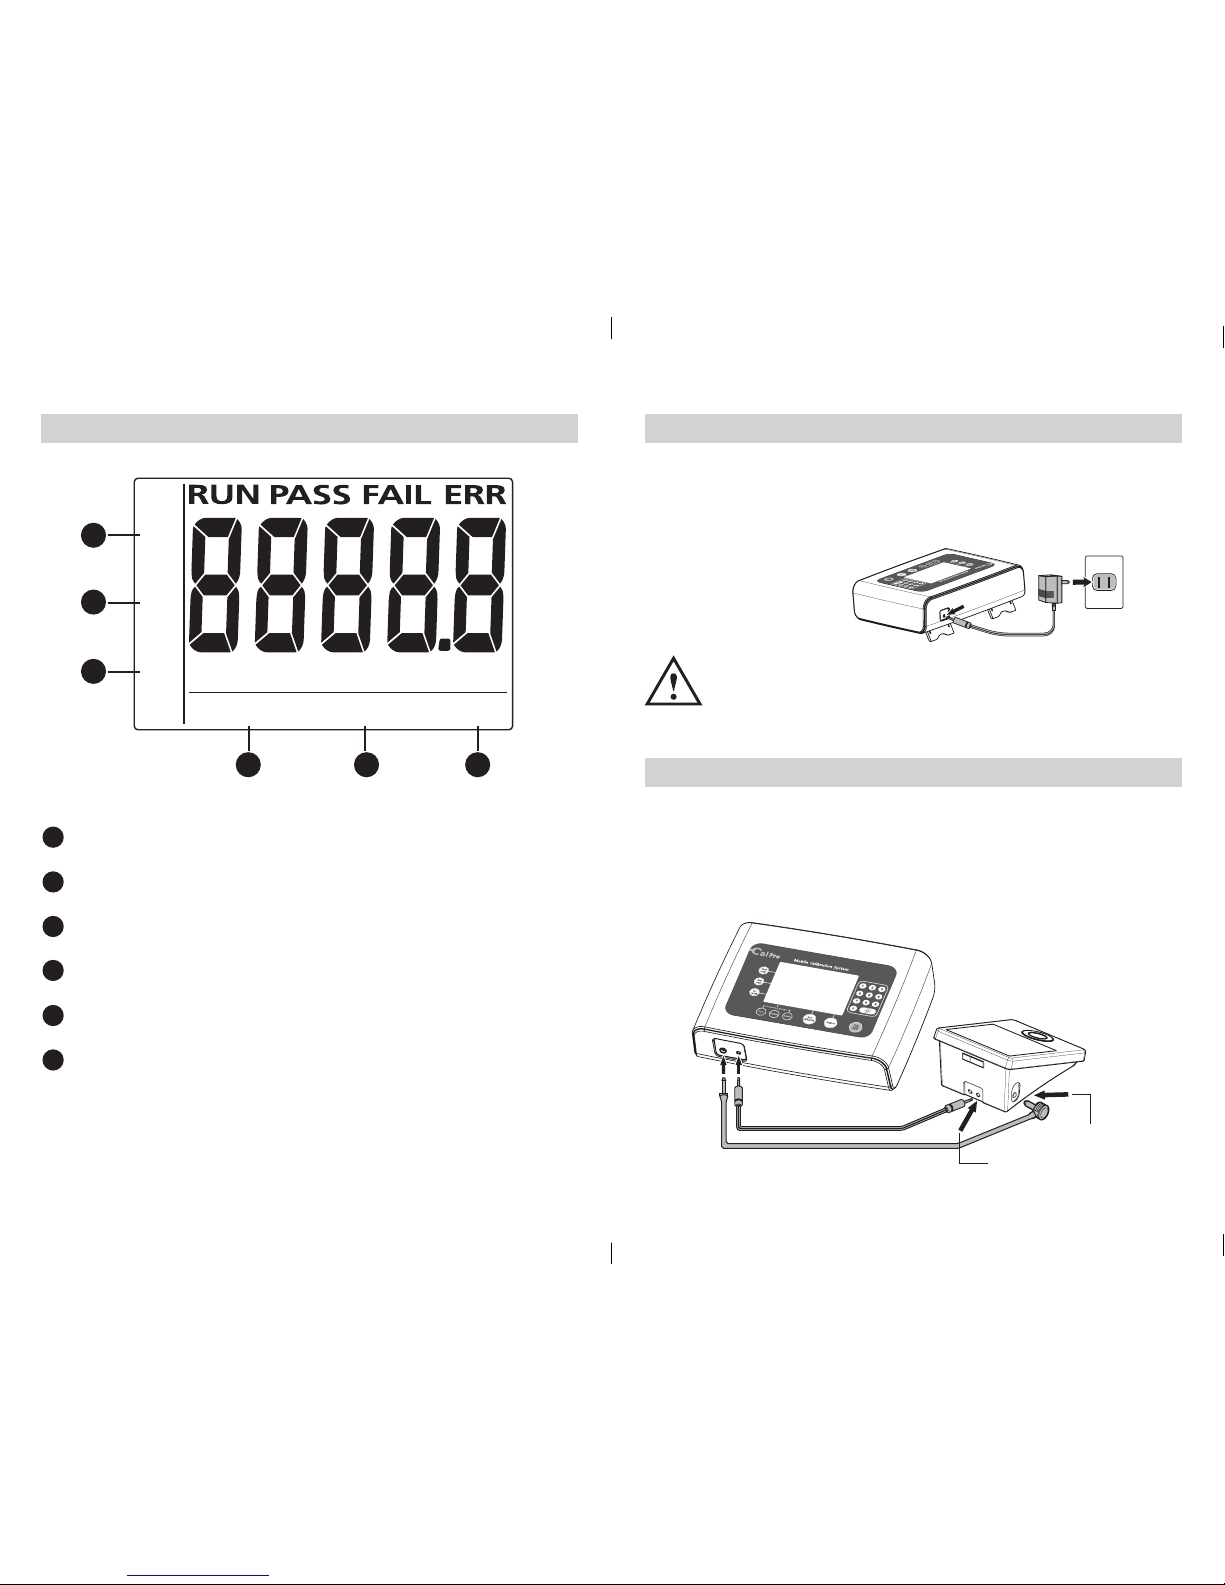
6 7
1
2
3
5
6
4
kPa mmHg
ReadoutAuto calibrationPressure gauge
Check
count
Clear
count
Set
count
LCD Display Explanations Using the AC Adapter
1. Connect the AC adapter with the AC adapter jack in the back of the
calibrator.
2. Plug the AC adapter into the socket. Use the compatible AC adapters.
(AC adapters with required voltage and current indicated near the AC
adapter jack.)
• Do not plug or unplug the AC adapter into the electrical
outlet with wet hands.
• Unplug the AC adapter from the electrical outlet after using
the device.
Connection Methods
Upper Arm Blood Pressure Monitor:
1. Connect the tube between the calibrator and the monitor to the air
tube socket.
2. Then connect the data link cable between the calibrator and the monitor to the data link port.
Data Link Cable
Air Tube
Date Link Port
Air Tube Socket
1
Readout Mode: Automatic device pressure checking
1
2
Auto Calibration Mode: Automatic device pressure calibration
1
2
3
Pressure Gauge Mode: Digital Manometer feature
1
2
3
4
Measurement Count Display Mode: Check number of uses
1
2
3
5
4
Measurement Count Clearance Mode: Zero setting of uses
1
2
3
5
6
4
Calibration Reminder Setting Mode: Re-set number of use cali-
bration reminder
8 9
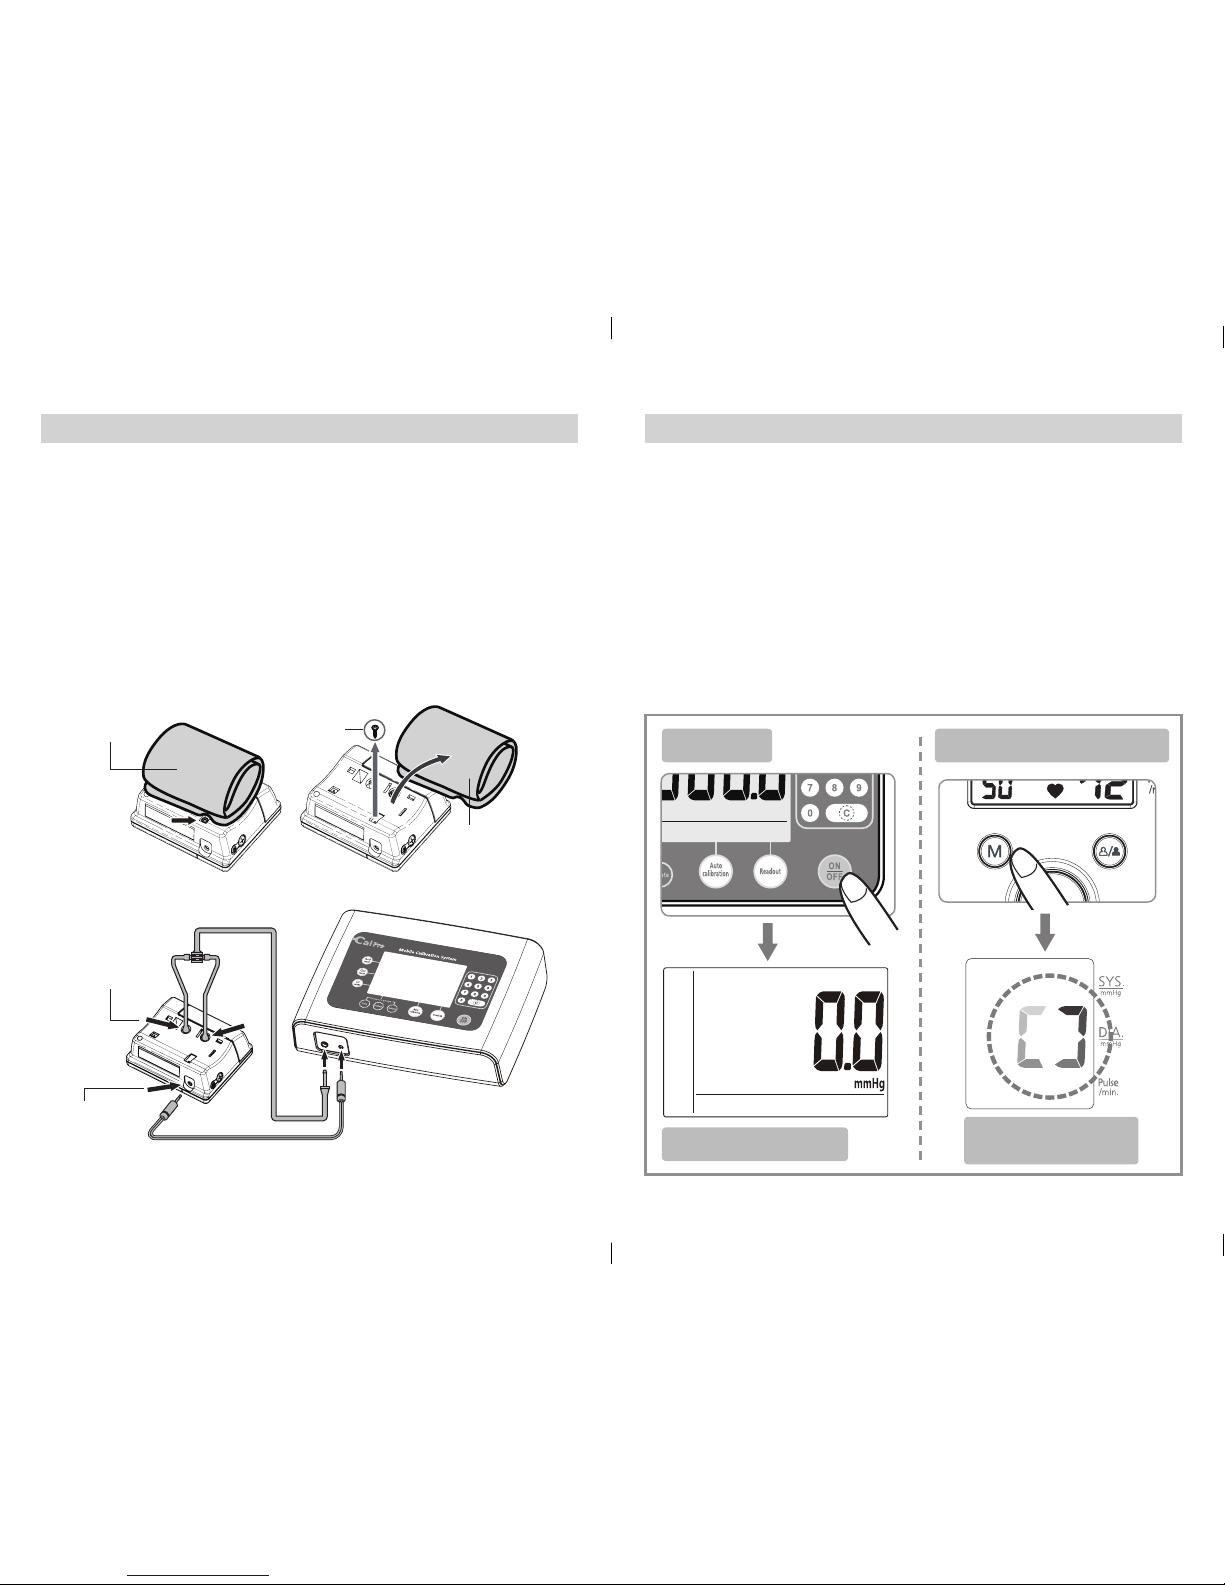
Cuff Screw
Connection Methods
Wrist Blood Pressure Monitor:
1. Loosen the screw that secures the cuff to the monitor.
2. Remove the cuff from the monitor.
a. Push cuff to the screw direction.
b. Slightly pull cuff to remove the cuff from the monitor.
3. Connect the tube between the calibrator and the monitor to the air
outlet.
4. Connect the data link cable between the calibrator and the monitors
data link port.
kPa mmHg
ReadoutAuto calibrationPressure gauge
Operation Procedures
1. Data link status operation
Before operation, make sure the air tube and the data link cable are
securely connected to the calibrator and the blood pressure monitor.
Press the ON/OFF key of the calibrator, then press the M key of the
blood pressure monitor.
Note: If there is no M key on the blood pressure monitor, please press
the ON/OFF key instead.
A loop will appear on the LCD display of the Blood Pressure Monitor,
indicating the data link status.
Data Link Cable
Air Tube
Date Link Port
Air Tube Socket
Calibrator
Blood Pressure Monitor
Calibrator Screen
Blood Pressure
Monitor Screen
Wrist Cuff
Wrist Cuff
10 11
check point on
Calibrator
check point from Blood
Pressure Monitor
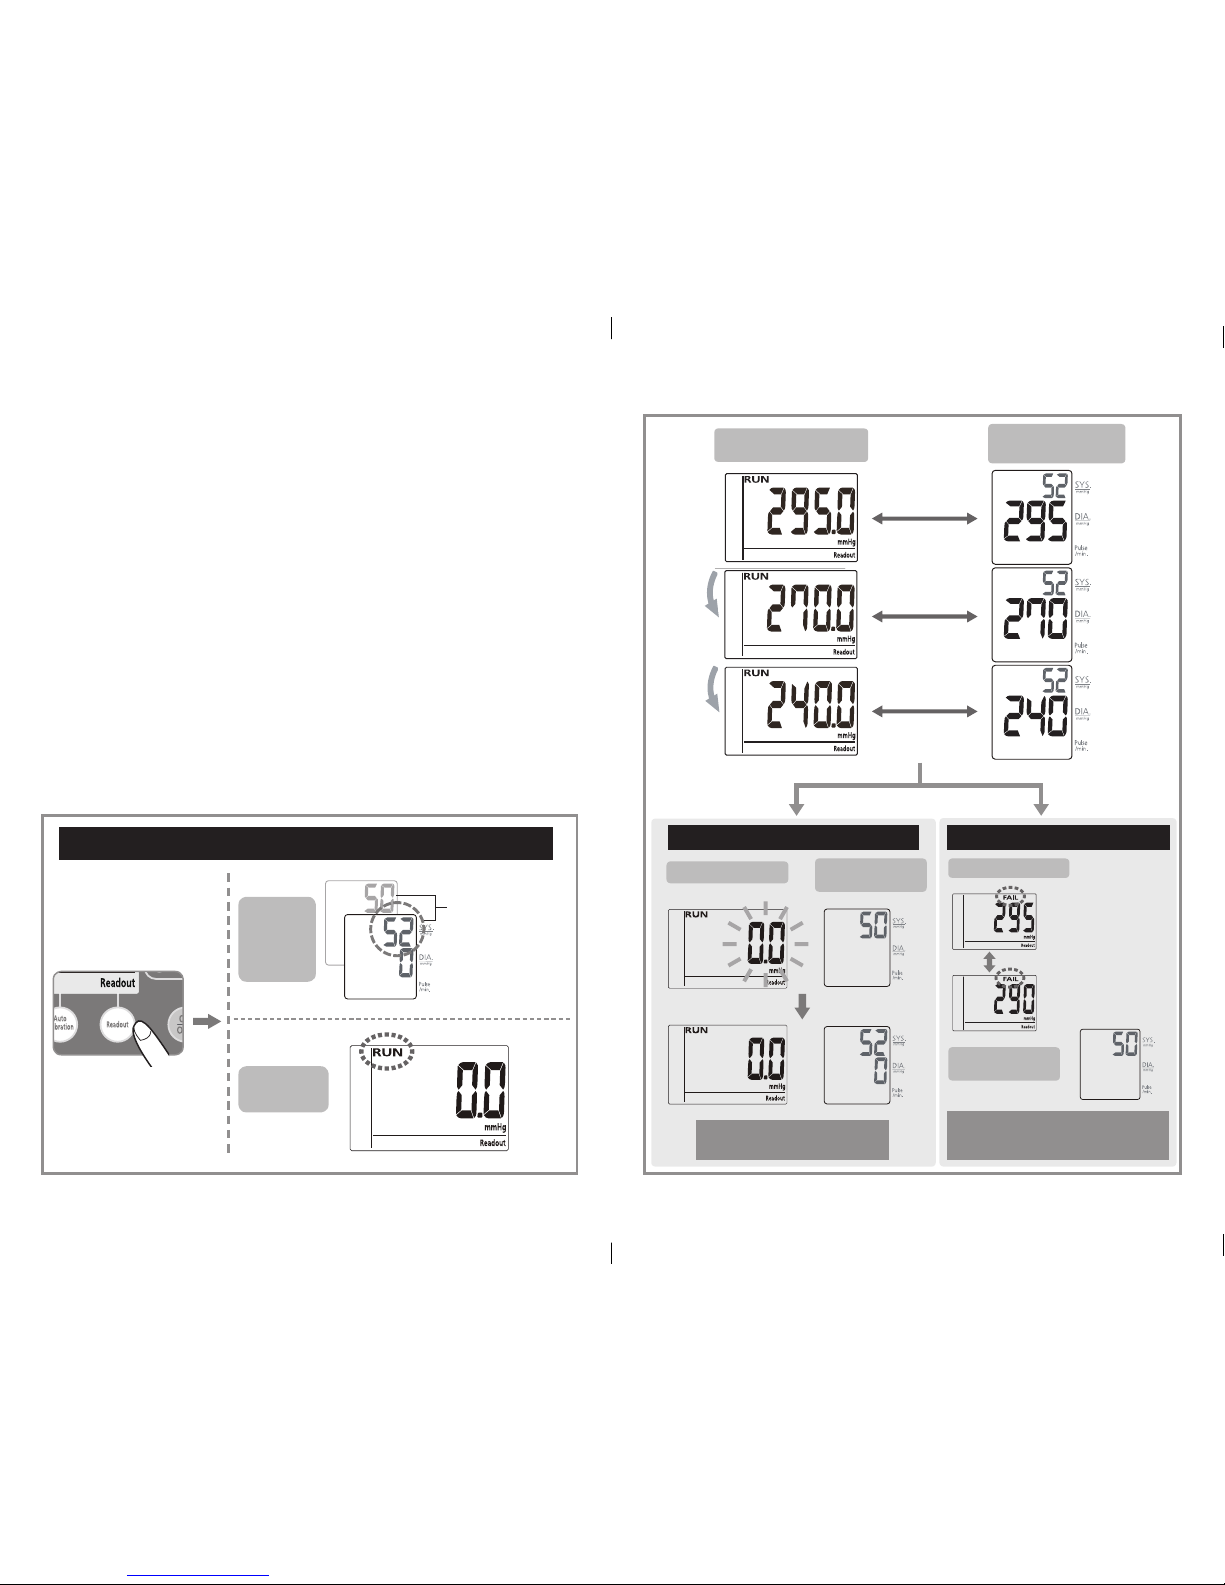
2. Readout Mode
This feature checks monitor pressure, if you would like to ignore
pressure checking , skip to "Auto Calibration Mode"(page 18) directly.
Press “Readout” to start. “RUN” will appear on LCD and pressure is
checked at 0/295/270/240 mmHg points. If the pressure difference
at 0/295/270/240 mmHg is within ± 3mmHg, the calibrator will rapid
exhaust to 0 mmHg, then go on checking 2nd points. If "FAIL" appears
, the faulty pressure points will be shown (both the default pressure
check point and the actual pressure measured will appear alternatively.).
If "FAIL" appears, press the "Auto calibration" key for re-calibration.
After this process is complete, press the "Readout" key to verify
calibration was successful.
Calibrator
Screen
Blood
Pressure
Monitor
Screen
If deviation under ±3mmHg If deviation over ±3mmHg
Check First Pressure Points (295/270/240 mmHg)
Automatic Check 2nd
Pressure Points
Link Code
(Reference Only)
Calibrator Screen
Blood Pressure
Monitor Screen
Calibrator Screen
Blood Pressure
Monitor Screen
Press Auto Calibration Mode
(follow instructions on Page 18)
Calibrator Screen
Blood Pressure
Monitor Screen
 Loading...