

Page 1

LDP-8242
Multi-Definition Loudness Processor
User Manual
Page 2

LDP-8242 User Manual
• Ross Part Number: 8242DR-004-03
• Release Date: June 25, 2012.
The information in this manual is subject to change without notice or obligation.
Copyright
© 2012 Ross Video Limited. All rights reserved.
Contents of this publication may not be reproduced in any form without the written permission of
Ross Video Limited. Reproduction or reverse engineering of copyrighted software is prohibited.
Patents
This product is protected by the following US Patents: 4,205,346; 5,115,314; 5,280,346;
5,561,404; 7,304,886; 7,508,455; 7,602,446; 7,834,886; 7,914,332. This product is protected by
the following Canadian Patents: 2039277; 1237518; 1127289. Other patents pending.
Notice
The material in this manual is furnished for informational use only. It is subject to change without
notice and should not be construed as commitment by Ross Video Limited. Ross Video Limited
assumes no responsibility or liability for errors or inaccuracies that may appear in this manual.
Trademarks
• is a registered trademark of Ross Video Limited.
• Ross, ROSS, ROSS®, and MLE are registered trademarks of Ross Video Limited.
• openGear® is a registered trademark of Ross Video Limited.
• DashBoard Control System™ is a trademark of Ross Video Limited.
• Linear Acoustic® is a registered trademark of Linear Acoustic, Inc. 2.0-to-5.1 audio
upmixer licensed feature uses the AutoMAX-II™ upmix algorithm provided under
license from Linear Acoustic Inc. Loudness processor licensed feature uses
AEROMAX™ algorithms provided under license from Linear Acoustic Inc. Linear
Acoustic, the “LA” symbol, UPMAX, AutoMAX, AutoMAX-II, and AEROMAX are
trademarks of Linear Acoustic Inc. All rights reserved.
• All other product names and any registered and unregistered trademarks mentioned in
this manual are used for identification purposes only and remain the exclusive property of
their respective owners.
Page 3
Important Regulatory and Safety Notices to Service Personnel
Before using this product and nay associated equipment, refer to the “Important Safety
Instructions” listed below to avoid personnel injury and to prevent product damage.
Product may require specific equipment, and/or installation procedures to be carried out to satisfy
certain regulatory compliance requirements. Notices have been included in this publication to call
attention to these specific requirements.
Symbol Meanings
This symbol on the equipment refers you to important operating and maintenance (servicing)
instructions within the Product Manual Documentation. Failure to heed this information may
present a major risk of damage to persons or equipment.
Warning — The symbol with the word “Warning” within the equipment manual indicates a
potentially hazardous situation, which, if not avoided, could result in death or serious injury.
Caution — The symbol with the word “Caution” within the equipment manual indicates a
potentially hazardous situation, which, if not avoided, may result in minor or moderate injury. It
may also be used to alert against unsafe practices.
Notice — The symbol with the word “Notice” within the equipment manual indicates a
potentially hazardous situation, which, if not avoided, may result in major or minor equipment
damage or a situation which could place the equipment in a non-compliant operating state.
ESD Susceptibility — This symbol is used to alert the user that an electrical or electronic
device or assembly is susceptible to damage from an ESD event.
Important Safety Instructions
Caution — This product is intended to be a component product of the DFR-8300 series
frame. Refer to the DFR-8300 Series Frame User Manual for important safety instructions
regarding the proper installation and safe operation of the frame as well as its component
products.
Warning — Certain parts of this equipment namely the power supply area still present a
safety hazard, with the power switch in the OFF position. To avoid electrical shock, disconnect
all A/C power cords from the chassis’ rear appliance connectors before servicing this area.
Warning — Service barriers within this product are intended to protect the operator and
service personnel from hazardous voltages. For continued safety, replace all barriers after any
servicing.
This product contains safety critical parts, which if incorrectly replaced may present a risk of
fire or electrical shock. Components contained with the product’s power supplies and power
supply area, are not intended to be customer serviced and should be returned to the factory for
repair. To reduce the risk of fire, replacement fuses must be the same time and rating. Only use
attachments/accessories specified by the manufacturer.
Page 4

EMC Notices
United States of America
FCC Part 15
This equipment has been tested and found to comply with the limits for a class A Digital device,
pursuant to part 15 of the FCC Rules. These limits are designed to provide reasonable protection
against harmful interference when the equipment is operated in a commercial environment. This
equipment generates, uses, and can radiate radio frequency energy and, if not installed and used
in accordance with the instruction manual, may cause harmful interference to radio
communications. Operation of this equipment in a residential area is likely to cause harmful
interference in which case the user will be required to correct the interference at their own
expense.
Notice — Changes or modifications to this equipment not expressly approved by Ross Video
Limited could void the user’s authority to operate this equipment.
CANADA
This Class “A” digital apparatus complies with Canadian ICES-003.
Cet appareil numérique de la classe “A” est conforme a la norme NMB-003 du Canada.
EUROPE
This equipment is in compliance with the essential requirements and other relevant provisions of
CE Directive 93/68/EEC.
INTERNATIONAL
This equipment has been tested to CISPR 22:1997 along with amendments A1:2000 and
A2:2002, and found to comply with the limits for a Class A Digital device.
Notice — This is a Class A product. In domestic environments, this product may cause radio
interference, in which case the user may have to take adequate measures.
Maintenance/User Serviceable Parts
Routine maintenance to this openGear product is not required. This product contains no user
serviceable parts. If the module does not appear to be working properly, please contact Technical
Support using the numbers listed under the “Contact Us” section on the last page of this manual.
All openGear products are covered by a generous 5-year warranty and will be repaired without
charge for materials or labor within this period. See the “Warranty and Repair Policy” section in
this manual for details.
Page 5

Environmental Information
The equipment that you purchased required the extraction and use of natural
resources for its production. It may contain hazardous substances that could
impact health and the environment.
To avoid the potential release of those substances into the environment and to diminish the need
for the extraction of natural resources, Ross Video encourages you to use the appropriate
take-back systems. These systems will reuse or recycle most of the materials from your
end-of-life equipment in an environmentally friendly and health conscious manner.
The crossed out wheelie bin symbol invites you to use these systems.
If you need more information on the collection, reuse, and recycling systems, please contact your
local or regional waste administration.
You can also contact Ross Video for more information on the environmental performance of our
products.
Page 6

Company Address
Ross Video Limited Ross Video Incorporated
8 John Street P.O. Box 880
Iroquois, Ontario, K0E 1K0 Ogdensburg, New York
Canada USA 13669-0880
General Business Office: (+1) 613 • 652 • 4886
Fax: (+1) 613 • 652 • 4425
Technical Support: (+1) 613 • 652 • 4886
After Hours Emergency: (+1) 613 • 349 • 0006
E-mail (Technical Support): techsupport@rossvideo.com
E-mail (General Information): solutions@rossvideo.com
Website: http://www.rossvideo.com
Page 7

Contents
Introduction 1
Overview.............................................................................................................................. 1-2
Manual Overview ................................................................................................................ 1-5
Functional Block Diagram................................................................................................... 1-6
Video Subsystem Overview................................................................................................. 1-7
Audio Subsection Overview ................................................................................................ 1-9
Control and Data Input/Output Interfaces ......................................................................... 1-15
User Control Interface ....................................................................................................... 1-16
Documentation Terms and Conventions............................................................................ 1-17
Features.................................................................................................................. 1-2
Video/Audio Signal Types .................................................................................... 1-3
Video and Audio Options...................................................................................... 1-3
Control and Data Inputs/Outputs........................................................................... 1-3
Supported Audio and Video Formats .................................................................... 1-4
Card Software Versions and this Manual.............................................................. 1-5
Video Processor..................................................................................................... 1-7
Frame Sync Function............................................................................................. 1-7
Timecode Processor............................................................................................... 1-7
Closed Captioning Processor................................................................................. 1-8
Audio Processing Overview.................................................................................. 1-9
Audio Input Routing/Mixing Function................................................................ 1-10
Audio Output Routing Function .......................................................................... 1-12
Upmixer Licensed Feature (UMA-8242) ............................................................ 1-12
Loudness Processor ............................................................................................. 1-13
Tone Generators .................................................................................................. 1-14
Rear Modules....................................................................................................... 1-15
GPI Interface ....................................................................................................... 1-15
Serial (COMM) Ports .......................................................................................... 1-15
DashBoard™ User Interface ............................................................................... 1-16
Warnings, Cautions, and Notes ........................................................................... 1-17
Installation 2
Before You Begin ................................................................................................................2-2
Installing a Rear Module...................................................................................................... 2-3
Installing a Card................................................................................................................... 2-4
Cabling for the LDP-8242 ................................................................................................... 2-5
Setting up Network Remote Control ................................................................................... 2-8
Operating Instructions 3
Control and Display Descriptions........................................................................................ 3-2
LDP-8242 User Manual (Iss. 03) Contents • i
Static Discharge..................................................................................................... 2-2
Unpacking.............................................................................................................. 2-2
Installing a Rear Module ....................................................................................... 2-3
Installing the LDP-8242 ........................................................................................ 2-4
Cabling Overview.................................................................................................. 2-5
Page 8

Function Submenu/Parameter Submenu Overview............................................... 3-2
Card-edge Controls, Indicators, and Display .......................................................................3-3
Card-edge Controls................................................................................................ 3-3
DashBoard™ User Interface ................................................................................................3-5
Accessing the Card via DashBoard™..................................................................................3-6
Accessing the Card via DashBoard ....................................................................... 3-6
Checking Card Information..................................................................................................3-8
Ancillary Data Line Number Locations and Ranges ........................................................... 3-9
Function Submenu List and Descriptions .......................................................................... 3-10
Troubleshooting .................................................................................................................3-51
Error and Failure Indicator Overview.................................................................. 3-51
Basic Troubleshooting Checks ............................................................................3-55
Processing Error Troubleshooting .......................................................................3-55
In Case of Problems.............................................................................................3-56
Specifications 4
Technical Specifications ...................................................................................................... 4-2
Service Information 5
Troubleshooting Checklist ...................................................................................................5-2
Warranty and Repair Policy .................................................................................................5-3
ii • Contents LDP-8242 User Manual (Iss. 03)
Page 9

Introduction
In This Chapter
This chapter contains the following sections:
• Overview
• Manual Overview
• Functional Block Diagram
• Video Subsystem Overview
• Audio Subsection Overview
• Control and Data Input/Output Interfaces
• User Control Interface
• Documentation Terms and Conventions
A Word of Thanks
Congratulations on choosing an openGear LDP-8242 Multi-Definition Loudness Processor. Your
LDP-8242 is part of a full line of Digital Products within the openGear Terminal Equipment
family of products, backed by Ross Video’s experience in engineering and design expertise since
1974.
You will be pleased at how easily your new LDP-8242 fits into your overall working
environment. Equally pleasing is the product quality, reliability and functionality. Thank you for
joining the group of worldwide satisfied Ross Video customers!
Should you have a question pertaining to the installation or operation of your LDP-8242, please
contact us at the numbers listed on the back cover of this manual. Our technical support staff is
always available for consultation, training, or service.
LDP-8242 User Manual (Iss. 03) Introduction • 1–1
Page 10

Overview
Features
The LDP-8242 is ideal for correcting irritating loudness differences between programs and
commercials. Featuring 24-bit audio processing that supports 16 channels of embedded audio
from an HD/SD-SDI signal.
With Linear Acoustic AEROMAX™ technology, the card applies loudness control on up to six
channels of audio from any of the 16 channels of embedded audio. Linear Acoustic
AEROMAX™ algorithms use a sophisticated multi-band approach to loudness processing. These
algorithms can apply multifaceted loudness correction specifically targeted to various frequency
ranges and other characteristics within the program material, resulting in audio free from abrupt
loudness or image shifts while preserving more of the original content than previously possible.
Because the card processes audio loudness locally and in sync with the video, loudness is
processed without the accumulated latency delay found in other loudness processors.
An optional discrete AES option provides 16 channels of discrete audio support, with 8 AES pair
BNCs, which can be configured as inputs or outputs. The AES-8242 option provides discrete
audio loudness processing as well as 16 channel embedding / de-embedding.
Optional Linear Acoustic UPMAX upmixing technology allows legacy stereo program audio to
be converted to 5.1 channel audio, with the UMA-8242 option.
The LDP-8242 includes the following features:
• Loudness Processing with Linear Acoustic AEROMAX™ algorithm
• Actively and automatically corrects irritating loudness level changes
• Automatic video delay to match audio processing delay
• Loudness control for stereo or 5.1 audio
• Sophisticated multi-band processing
• Audio channel mapping, phase inversion and level control
• 16 channels of sample rate conversion
• Passes all audio channels
• 16 channel embedding and de-embedding
• Handles all popular formats of SD (270Mbps) and HD (1.485Gbps) signals
• Reports status and configuration remotely via the DashBoard Control System™
• 5-year transferable warranty
1–2 • Introduction LDP-8242 User Manual (Iss. 03)
Page 11
Video/Audio Signal Types
Tab le 1 .1 lists the video/audio inputs and outputs provided by the LDP-8242. Note that some
signal types are supported through the use of options.
Table 1.1 Video/Audio Signal Types
Signal ID Description
SDI IN A HD-SD-SDI BNC video input Standard
Eight AES 3-id BNC pairs; each pair
AES Audio IN/OUT
(1-16)
SDI OUT A HD-SD-SDI BNC video output Standard
Note: The input/output complement listed above and shown in Figure 1.1 and Figure 1.3 represent the
maximum capability of the LDP-8242.
user GUI-selectable as either input or
output. Independent SRC for each
input, with auto/manual SRC bypass
for non-PCM data.
Option/Rear Module
Package Required
AES-8242 licensed option
Video and Audio Options
In addition to the I/O options described in Ta bl e 1. 1 , the LDP-8242 offers the video and audio
options described in Tab le 1 .2 .
Table 1.2 Video/Audio Options
Option Description
Added second Linear
Acoustic™ Loudness
Processing function
In addition to base loudness processor,
a second Linear Acoustic™
AEROMAX™ 5.1-channel or stereo
audio output loudness processing can
be added.
Option/Rear Module
Package Required
Standard
Linear Acoustic™ AUTOMAX™
Linear Acoustic™
Upmixing software
converts legacy stereo program audio
(from any source received by the card)
to 5.1-channel audio).
Control and Data Inputs/Outputs
Tab le 1 .3 lists the control and data input/output interfaces (available via the rear module
connections) provided by the LDP-8242.
Table 1.3 Control and Data Input/Output Interfaces
Signal ID Description
Two ground-closure sensing GPI inputs (each sharing common
GPI 1, 2
COMM 1, 2
ground connection at chassis potential). GPI activation invokes a
user-specified card control preset. Refer to the section “Control
and Data Input/Output Interfaces” on page 1-15 for information.
Two serial Rx/Tx ports, each individually configurable as RS-485
or RS-232. Refer to the section “Control and Data Input/Output
Interfaces” on page 1-15 for information.
UMA-8242 licensed option
LDP-8242 User Manual (Iss. 03) Introduction • 1–3
Page 12

Supported Audio and Video Formats
Tab le 1 .4 provides details regarding the audio and video formats supported by the LDP-8242.
Table 1.4 Supported Audio and Video Formats
Item Description/Specification
Raster Structure: Frame Rate:
a
1080i
Input / Output
Video
720p 50; 59.94
a
486i
a
575i
25; 29.97
29.97
25
Embedded
Audio
The LDP-8242 supports all four groups (16 channels) of embedded audio
at full 24-bit resolution in both SD (with extended data packets) and HD.
The AES-8242 licensed option enables the LDP-8242 to accept 16
Discrete AES
Audio
channels (8 pairs) of discrete AES audio on 75W BNC connections
(maximum total of inputs and outputs). Sample rate conversion can be
employed to accommodate sample rate differences in the AES stream and
the input video stream.
a. All rates displayed as frame rates; interlaced (“i”) field rates are two times the rate
value shown.
1–4 • Introduction LDP-8242 User Manual (Iss. 03)
Page 13

Manual Overview
This manual provides installation and operating instructions for the LDP-8242.
This manual consists of the following chapters:
• Introduction — Provides information about this manual and what is covered. Also
provides general information regarding the LDP-8242.
• Installation — Provides instructions for installing the LDP-8242 in a frame, and
optionally installing a rear module.
• Operating Instructions — Provides overviews of operating controls and instructions for
using the LDP-8242.
• Specifications — Provides the technical specifications for the LDP-8242.
• Service Information — Provides troubleshooting solutions and warranty information.
Card Software Versions and this Manual
When applicable, Ross Video provides for continual openGear product enhancements through
software updates. As such, functions described in this manual may pertain specifically to cards
loaded with a particular software build. If you received your LDP-8242 card and this manual at
the same time, this manual reflects all facets of your card.
The software version of your card can be checked by viewing the Info submenu on the card-edge
display, or by checking the Card Info menu in DashBoard™. Refer to the section “Checking
Card Information” on page 3-8 for more information. This section provides guidance when
your card software does not match this manual.
Card software is an earlier version
Card is not loaded with the latest software. Not all functions and/or specified performance
described in this manual may be available.
You can update your card by:
1. Contacting Ross Technical Support.
2. Downloading the latest firmware and/or software for your card onto your computer.
3. Uploading the new firmware and/or software to your card through DashBoard™.
Card software is a newer version
A new manual is expediently released whenever a card’s software is updated and specifications
and/or functionality have changed as compared to an earlier version (a new manual is not
necessarily released if specifications and/or functionality have not changed). A manual earlier
than a card’s software version may not completely or accurately describe all functions available
for your card.
If your card shows features not described in this manual, you can check for the latest manual (if
applicable) and download it by going to our website.
LDP-8242 User Manual (Iss. 03) Introduction • 1–5
Page 14
Functional Block Diagram
The base model LDP-8242 provides Linear Acoustic™ loudness processing with frame sync,
video processing, embedded audio support, and timecode support. (Figure 1.1) The various
options are described in detail in the section “Video and Audio Options” on page 1-3, and as
applicable throughout this manual.
This section provides a functional block diagram that outlines the workflow of the LDP-8242.
Note that signal connections shown depicts full input/output capability. Practical input/output
signal availability is determined by the licensed features installed.
Figure 1.1 Simplified Block Diagram — LDP-8242
1–6 • Introduction LDP-8242 User Manual (Iss. 03)
Page 15

Video Subsystem Overview
Descriptions below include some functions and features that are available only as options.
The LDP-8242 features a frame sync that can select from either of two card frame reference
sources, or free-run input video sync. In the event of input video loss of signal, the output can be
set to disable video, go to black, go to an internal test signal generator pattern, or freeze to the last
intact frame (last frame having valid SAV and EAV codes).
Video Processor
The LDP-8242 provides full color processing control (luma gain and lift, chroma saturation, and
color phase) of the output video. The color correction function can be user-selected to be applied
to input video or output video as shown in Figure 1.3.
Frame Sync Function
This function provides for frame sync control using either one of two external FRAME REF IN
(1,2) reference signals distributed with the DFR-8321 series frame, or the input video as a frame
sync reference.
This function also allows horizontal and/or vertical offset to be added between the output video
and the frame sync reference.
An internal test signal generator provides a selection of 10 standard patterns such as color bars,
sweep patterns, and other technical patterns. The generator output can be invoked upon loss of
program video input, or applied to the program video output via user controls.
Timecode Processor
This function uses extracted timecode data from the input video (waveform or ATC), reference
VITC waveform, or internal (free run) and in turn re-inserts selected timecode data into the
program video signal.(Figure 1.2) The function can monitor video input and reference input for
supported timecode formats, and then select and prioritize among SDI VITC waveform, SDI
ATC_VITC, and SDI ATC_LTC timecode sources. If the preferred format is detected, the
preferred format is used by the card; if the preferred format is not detected, the card uses other
formats (where available) as desired.
The function also provides conversion between various timecode formats and provides
independent insertion and line number controls for each SDI timecode output format.
LDP-8242 User Manual (Iss. 03) Introduction • 1–7
Page 16
Figure 1.2 Timecode Processor
Closed Captioning Processor
This function provides support for closed captioning setup. When enabled, the function allows
passage of timecode data. The function also allows the selection of the ancillary data line number
where the ancillary closed caption data is outputted when the output is HD.
1–8 • Introduction LDP-8242 User Manual (Iss. 03)
Page 17

Audio Subsection Overview
Descriptions below include some functions and features that are available only as options.
Audio Processing Overview
The LDP-8242 audio processing subsection is built around a card internal 16-channel bus. This
16-channel bus receives inputs from an input routing crosspoint that routes de-embedded and
discrete AES signals over the 16-channel bus. Correspondingly, at the output end of the
16-channel bus is an output routing crosspoint that in turn distributes the 16-channel bus signals
to embedded and discrete AES audio outputs. An Audio DSP function (which interfaces with the
output routing block) provides eight tone generators and advanced functions such as loudness
processing and upmixing. The routing and Audio DSP functions are described in detail later in
this section.
As such, the audio subsection provides a full crosspoint between all supported audio inputs and
output formats.
The audio subsection allows choices from the following audio inputs:
• 16 channels of de-embedded audio from the SDI program video path
• Up to 16 channels (8 pairs) of discrete AES input
• Up to 10 channels of decoded Dolby® E or AC-3 audio
• Digital silence (mute) setting
The audio subsection allows routing to the following audio outputs:
• 16 channels of embedded audio on the SDI output
• Up to 16 channels of discrete AES output on eight AES pairs
Note — Practical AES channel count handled by the card is 8 pairs, of which each
pair can be user GUI-selectable as an input or output.
All embedded and AES channels have status displays that show the following for each channel
pair:
• PCM signal presence
• Dolby® E® signal presence
• Dolby® Digital® signal presence
• Missing (no signal detected)
Embedded, and AES input channel pairs also have displays showing slow-ballistics true peak
levels for each pair. Embedded and AES channels at digital silence signal level show Mute.
Output audio rates are always 48 kHz locked to output video, but discrete AES inputs can pass
through the sample rate converters to align these inputs with the output timing. Output AES is
always precisely synchronized with the output video.
LDP-8242 User Manual (Iss. 03) Introduction • 1–9
Page 18
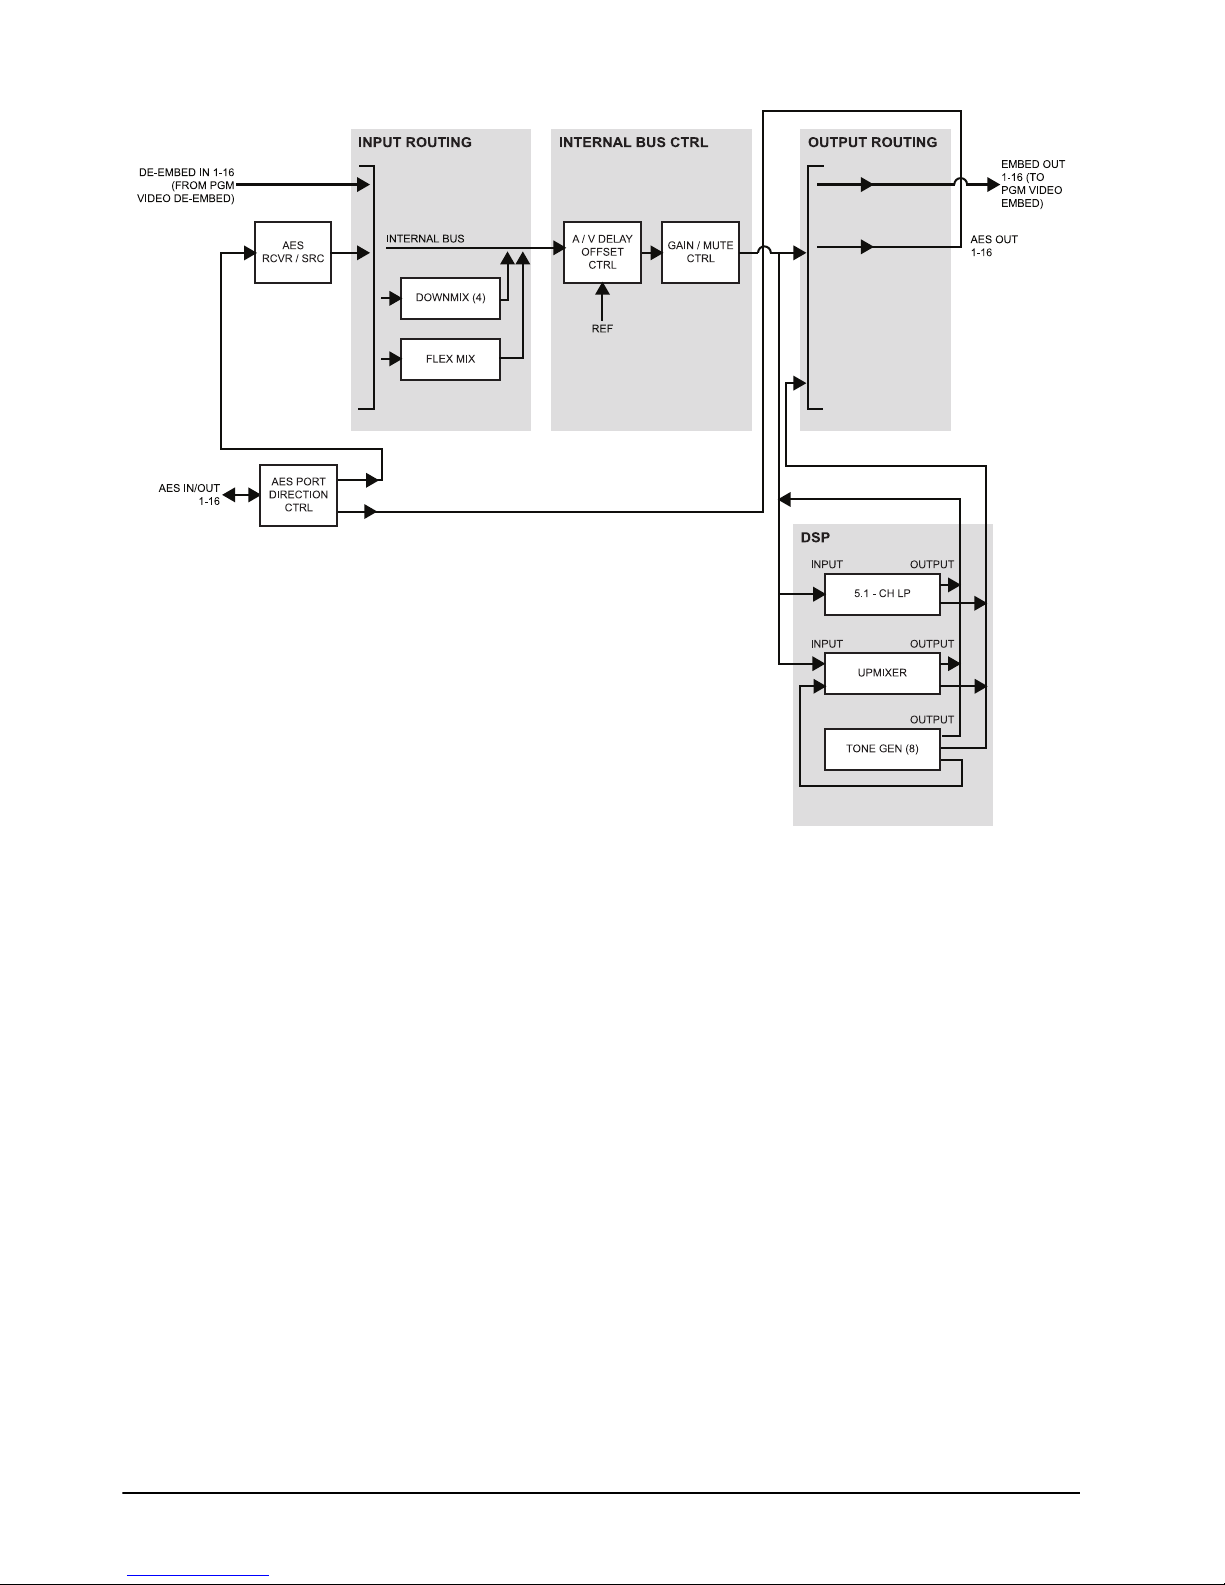
Figure 1.3 Audio Block Diagram
Audio Input Routing/Mixing Function
The input routing function provides gain and mute controls for each input signal. (Figure 1.3)
Following these controls, selected inputs can directly exit the input routing function and be
applied to the internal bus, or first be applied to one of four downmixers or flex mixers.
Downmixers
Four independent downmixers (Downmix-A thru Downmix-D) provides for the selection of any
five embedded, AES discrete, Dolby® decoded, or analog audio sources serving as Left (
Right (
R), Center (C), Left Surround (Ls), and Right Surround (Rs) individual signals to be
multiplexed into a stereo pair. The resulting stereo pairs
can in turn be routed and processed just like any of the other audio sources described earlier. See
Figure 1.4 for an example.
L),
Downmix-A(L/R) thru Downmix-D(L/R)
1–10 • Introduction LDP-8242 User Manual (Iss. 03)
Page 19
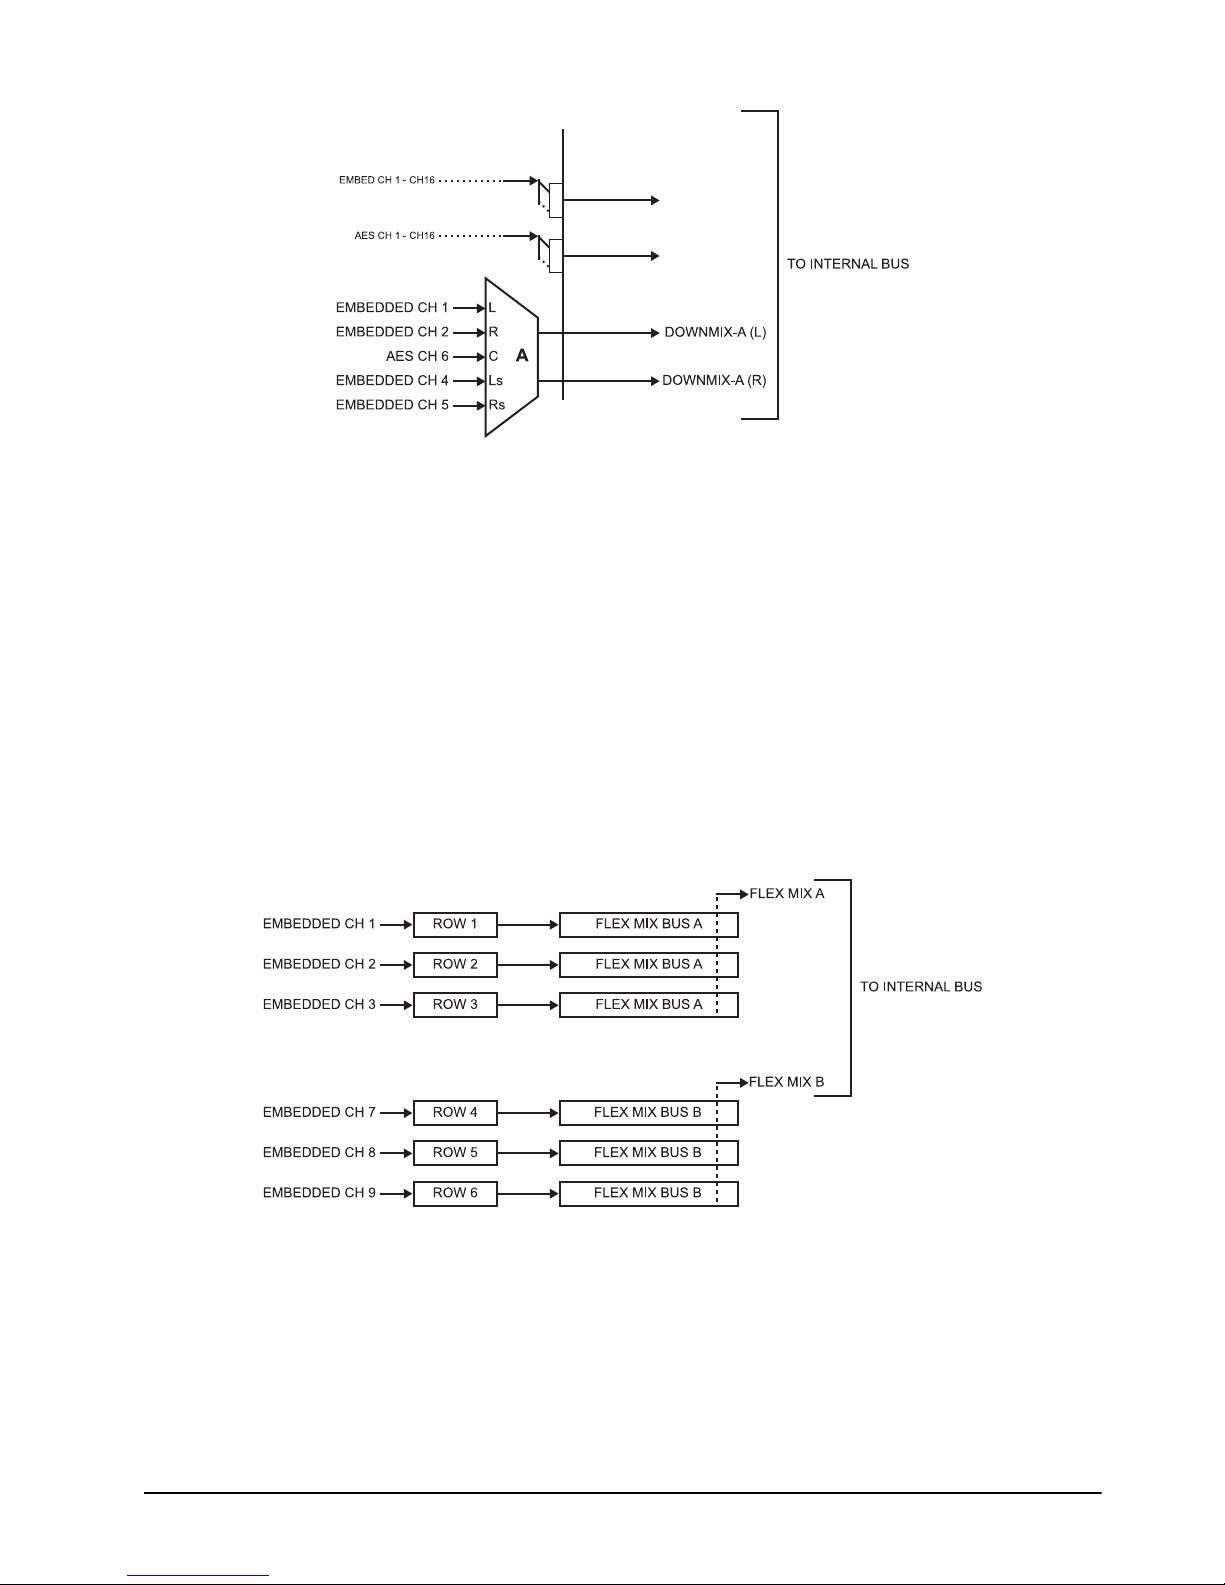
Figure 1.4 Downmixing Functional Block Diagram with Example Sources
Flex Mixer
The Flex Mixer is a flexible-structure mixer in which any of 16 summing nodes (Flex Mix Bus A
thru
Flex Mix Bus P) can be applied to any of the 16 inputs, thereby allowing several
customizable mixing schemes. Any individual input row can be assigned to any of the Flex Mix
buses.
Using this scheme, full cross-point mixing of PCM signals can be achieved within the limit of
available Flex Mix buses, and eventually applied to any of the internal bus channels. Figure 1.5
shows an example of two independent 3-to-1 mono mixers availed by setting inputs (rows) 1 thru
3 to use virtual flex mix bus
bus
Flex Mix Bus B. The Flex Mix Bus A and Flex Mix Bus B virtual outputs can then be routed
over any of the internal bus channels. In this example, because rows 1 thru 3 are all applied in
common to mixer node
these inputs. The mono mix on the
rows 4 thru 6.
Flex Mix Bus A, and by setting inputs 4 thru 6 to use virtual flex mix
Flex Mix Bus A, the Flex Mix Bus A output is the mono-mixed sum of
Flex Mix Bus B node similarly produces a mono mix of input
Figure 1.5 Flex Mixer with Dual Mono Mixer Example
Internal Bus
The internal bus receives its audio inputs from the input routing function and accommodates a
maximum of 16 concurrent channels. This conduit serves as a centralized point for managing
audio delay offset from video and master gain controls for outputs from the input routing
function.
LDP-8242 User Manual (Iss. 03) Introduction • 1–11
Page 20

A bulk (master) video/audio delay function allows adding or reducing audio delay from the video
delay. The LDP-8242 re-establishes video/audio sync following framesync changes by applying
an offset in small, progressive amounts to provide a seamless, glitch-free retiming.
In addition to the master sync/delay controls, each bus channel has its own independent delay and
gain control.
As shown in Figure 1.3, the internal bus receives inputs directly from card external sources as
listed below.
•Emb Ch 1-16
•AES Ch 1-16
• Silence
Audio Output Routing Function
The output routing function provides routing to card outputs. This function can also direct
internal bus signals to further mixing capabilities or advanced Audio DSP functions. This
function also provides gain and mute controls for each signal.
Audio DSP functions include 5.1-channel and stereo loudness processing, and upmixing.
The Audio DSP block provides the function complement (selected via user controls) listed below.
Because this block is entirely software-based, it can provide the Audio DSP combinations listed
below (depending on ordered options).
• 5.1-Ch Loudness Processor
• 5.1-Ch Loudness Processor + Upmixer
Upmixer Licensed Feature (UMA-8242)
The 2.0-to-5.1 Upmixer function receives a normal PCM stereo pair from any internal bus
channel pair. The stereo pair is upmixed to provide 5.1 channels (Left (
Low Frequency Effects (
upmixer is active, it overwrites the six selected 5.1 output channels with the new 5.1 upmix
signals (including replacing the original source stereo
The 2.0-to-5.1 upmixer can be set to upmix in any of three modes: Always upmix, Bypass upmix,
or Auto enable/bypass upmixing. The Auto upmixing mode looks at the signal levels on the
selected channels and compares them to a selectable level threshold. It then determines whether
or not to generate 5.1 upmixing from the stereo pair as follows:
• If the upmixer detects signal level below a selected threshold on all three of the selected
channels designated as
not carrying 5.1. In this case, the upmixer produces new 5.1 content generated by the
upmixer.
• If the upmixer detects signal level above a selected threshold on any of the three selected
channels designated as
already carrying viable 5.1 content. In this case, the upmixer is bypassed and the channels
fed to the upmixer pass unaffected to the upmixer outputs.
LFE), Left Surround (Ls), and Right Surround (Rs)). Whenever the
C, Ls, and Rs, this indicates to the upmixer that these channels are
C, Ls, and Rs, this indicates to the upmixer that the channel(s) are
L), Right (R), Center (C),
L and R inputs with new L and R signals).
The examples in Figure 1.6 and Figure 1.7 show the automatic enable/disable upmixing function
applied to example selected channels
processing is contingent upon the signal levels of the channels selected to carry the new 5.1
upmix relative to the selected threshold (in this example, -60 dBFS).
1–12 • Introduction LDP-8242 User Manual (Iss. 03)
Bus Ch 1 thru Bus Ch 6. As shown and described, the
Page 21

Figure 1.6 Upmixing Auto Enable with Example Sources
Figure 1.7 Upmixing Auto Enable Bypass with Example Sources
Loudness Processor
The loudness processor function receives up to six selected channels from the internal bus and
performs loudness processing on the selected channels. A loudness processing profile best suited
for the program material can be selected from several loudness processing presets. See Figure 1.8
for an example.
Discussion and example here describes 5.1-channel loudness processor. Stereo and dual-stereo
processors operate similar to described here.
The example in Figure 1.8 shows routing of embedded output channels Emb Out Ch 1 thru Ch 6
fed through the loudness processor. A master output gain control is provided which allows fine
adjustment of the overall output level.
LDP-8242 User Manual (Iss. 03) Introduction • 1–13
Page 22

Figure 1.8 5.1-Channel Loudness Processor with Example Sources
Tone Generators
The LDP-8242 contains eight built-in tone generators (Tone Generator 1 thru Tone Generator 8).
Each of the eight tone generators can be routed to the upmixer or directly to card audio outputs.
(default output is 1.0 kHz at -20 dBFS).
1–14 • Introduction LDP-8242 User Manual (Iss. 03)
Page 23

Control and Data Input/Output Interfaces
This section briefly summarizes the communication types available for the LDP-8242.
Rear Modules
The LDP-8242 physically interfaces to system video and audio connections using the R2-8242
Rear Module.
All inputs and outputs shown in the video and audio block diagrams (Figure 1.1 and Figure 1.3
respectively) enter and exit the card via the card-edge backplane connector. The Rear Module
breaks out the LDP-8242 card-edge connections to industry standard connections that interface
with other components and systems in the signal chain.
The rear module cabling is outlined in the section “Installing a Rear Module” on page 2-3.
GPI Interface
Two independent ground-closure sensing GPI inputs (GPI 1 and GPI 2; each sharing common
ground connection as chassis potential) are available. Associated with each GPI user control is a
selection of one of 64 user-defined card presets in which GPI activation invokes a card control
preset. Because the GPI closure invokes a user-defined preset, the resulting setup is highly
flexible and totally user-defined. Invoking a user preset to effect a change involves card setup
communication limited only to the items being changed; the card remains on-line during the
setup, and the called preset is rapidly applied.
GPI triggering can be user selected to consider the activity on discrete GPI ports, or combinations
of logic states considering both GPI inputs. This flexibility allows multistage, progressive actions
to be invoked if desired. Indication is provided showing whenever a GPI input has been invoked.
Serial (COMM) Ports
The LDP-8242 is equipped with two, 3-wire serial ports (COMM 1 - Serial Port A, COMM 2 -
Serial Port B) which are used for Dolby® metadata Rx and Tx. Each port can independently be
GUI-configured as RS-232 or RS-485.
LDP-8242 User Manual (Iss. 03) Introduction • 1–15
Page 24

User Control Interface
Figure 1.9 shows the user control interface options for the LDP-8242.
Figure 1.9 User Control Interface
DashBoard™ User Interface
Using DashBoard™, the LDP-8242 and other cards installed in the DFR-8321 series frame can
be controlled from a computer and monitor.
DashBoard™ allows users to view all frames on a network with control and monitoring for all
populated slots inside a frame. This simplifies the setup and use of numerous modules in a large
installation and offers the ability to centralize monitoring. Cards define their controllable
parameters to DashBoard™, so the control interface is always up to date.
The DashBoard™ software can be downloaded from the Ross Video website. The DashBoard™
user interface is described in the section “Function Submenu List and Descriptions” on
page 3-10.
If network remote control is to be used for the frame and the frame has not yet been set up for
remote control, refer to the DFR-8300 Series User Manual and the MFC-8300 Series User
Manual for setup details.
1–16 • Introduction LDP-8242 User Manual (Iss. 03)
Page 25

Documentation Terms and Conventions
Ch01
In this manual, display messages and connectors are shown using the exact name shown on the
LDP-8242 itself. Examples are provided below.
• Card-edge display messages are shown like this:
• Connector names are shown like this: AES I/O 8
In this manual, the terms below are applicable as follows:
• All references to the DFR-8321 series frame also includes all versions of the 20-slot
frames and any available options unless otherwise noted.
•“Board” and “Card” refer to openGear terminal devices within openGear frames,
including all components and switches.
•“System” and “Video System” refers to the mix of interconnected production and
terminal equipment in your environment.
• The “Operating Tip” and “Note” boxes are used throughout this manual to provide
additional user information.
Warnings, Cautions, and Notes
Certain items in this manual are highlighted by special messages. The definitions are provided
below.
Warnings
Warning messages indicate a possible hazard which, if not avoided, could result in personal injury
or death.
Cautions
Caution messages indicate a problem or incorrect practice which, if not avoided, could result in
improper operation or damage to the product.
Notes
Notes provide supplemental information to the accompanying text. Notes typically precede the
text to which they apply.
LDP-8242 User Manual (Iss. 03) Introduction • 1–17
Page 26

1–18 • Introduction LDP-8242 User Manual (Iss. 03)
Page 27

Installation
In This Chapter
This chapter provides instructions for installing the LDP-8242, installing the card into the frame,
and cabling details.
This chapter contains the following information:
• Before You Begin
• Installing a Rear Module
• Installing a Card
• Cabling for the LDP-8242
• Setting up Network Remote Control
LDP-8242 User Manual (Iss. 03) Installation • 2–1
Page 28

Before You Begin
Before proceeding with the instructions in this chapter, ensure that your DFR-8321 series frame is
properly installed according to the instructions in the DFR-8300 Series User Manual.
Static Discharge
Throughout this chapter, please heed the following cautionary note:
ESD Susceptibility — Static discharge can cause serious damage to sensitive
semiconductor devices. Avoid handling circuit boards in high static environments such as
carpeted areas and when synthetic fiber clothing is worn. Always exercise proper grounding
precautions when working on circuit boards and related equipment.
This card contains semiconductor devices which are susceptible to serious damage from
Electrostatic Discharge (ESD). ESD damage may not be immediately apparent and can affect
the long-term reliability of the device.
Unpacking
Unpack each card you received from the shipping container and ensure that all items are included.
If any items are missing or damaged, contact your sales representative or Ross Video directly.
2–2 • Installation LDP-8242 User Manual (Iss. 03)
Page 29

Installing a Rear Module
Screw Hole
Module Seating Slot
This procedure is applicable only if the R2-8242 rear module is not currently installed in the slot
where the LDP-8242 is to be installed. Cabling details are described in the section “Cabling for
the LDP-8242” on page 2-5.
Installing a Rear Module
Use the following procedure to install a rear module in a DFR-8321 series frame:
1. Locate the card frame slots on the rear of the DFR-8321 series frame.
2. Remove the Blank Plate from the slot you have chosen for the LDP-8242 installation. If
there is no Blank Plate installed, proceed to the next step.
3. Install the bottom of the rear module in the Module Seating Slot at the base of the
frame’s back plane. (Figure 2.1)
Figure 2.1 Rear Module Installation (LDP-8242 not shown)
4. Align the top hole of the rear module with the screw on the top-edge of the frame back
plane.
5. Using a Phillips screwdriver and the supplied screw, fasten the rear module to the back
plane of the frame. Do not over tighten.
6. Ensure proper frame cooling and ventilation by having all rear frame slots covered with
rear modules or Blank Plates.
This completes the procedure for installing a rear module in a DFR-8321 series frame.
LDP-8242 User Manual (Iss. 03) Installation • 2–3
Page 30

Installing a Card
This section outlines how to install a LDP-8242 card when the Rear Module is already installed in
a DFR-8321 series frame. If you are installing the LDP-8242 card in a slot with no rear module, a
rear module is required before cabling can be connected. Refer to the section “Installing a Rear
Module” on page 2-3 for rear module installation procedure.
Caution — If required, make certain the rear module(s) is installed before installing
the LDP-8242 card into the frame slot. Damage to card and/or rear module can occur
if module installation is attempted with card already installed in the slot.
Installing the LDP-8242
Use the following procedure to install the LDP-8242 card into a frame slot:
1. Check the packaging in which the card was shipped for any extra items such as a rear
module label. In some cases, this label is shipped with the card and should be installed
on the rear I/O connector bank corresponding to the slot location of the card.
2. Determine the slot in which the card is to be installed.
Notice — Heat and power distribution requirements within a frame may dictate
specific slot placement of cards. Cards with many heat-producing components should
be arranged to avoid areas of excess heat build-up.
3. Open the frame front access panel.
4. While holding the card by the card-edges, align the card such that the plastic ejector tab
is on the bottom.
5. Align the card with the top and bottom guides of the slot in which the card is being
installed.
6. Gradually slide the card into the slot. When resistance is noticed, gently continue
pushing the card until its rear printed circuit edge terminals engage fully into the rear
module mating connector.
Caution — If the card resists fully engaging in rear module mating connector, check
for alignment and proper insertion in slot tracks. Damage to card and/or rear module
may occur if improper card insertion is attempted.
7. Verify that the card is fully engaged in rear module mating connector.
8. Close the frame front access panel.
9. Connect the input and output cables as outlined in the section “Cabling for the
LDP-8242” on page 2-5.
10. Repeat steps 1 through 9 for other cards.
Operating Tip — To remove a card, press down on the ejector tab to unseat the
card from the rear I/O module mating connector. Evenly draw the card from its slot.
This completes the procedure for installing a card in a DFR-8321 series frame. Note that some
Rear Modules and labels have several ventilation holes. To allow maximum ventilation, it is
recommended to place the label fully over connectors such that label is flush with rear module
and holes are not obscured.
2–4 • Installation LDP-8242 User Manual (Iss. 03)
Page 31

Cabling for the LDP-8242
Figure 2.2 shows and describes the R2-8242 Rear Module specifically for use with the
LDP-8242. Note that the LDP-8242 BNC inputs are internally 75-ohm terminated. It is not
necessary to terminate unused BNC inputs or outputs.
Cabling Overview
This section provides a general overview of the connections available on the R2-8242 Rear
Module.
Figure 2.2 Cable Connections for the R2-8242 Rear Module
R2-8242 Full Rear Module
Each rear module occupies four slots and provides the following connections:
• One HD/SD-SDI video input BNC (
• Eight AES I/O BNC (AES-3id) input/outputs (
each connection is software-configurable)
• Two opto-isolated GPI inputs (terminals
• Two serial ports (
• One HD/SD-SDI video output BNC (
COMM1 and COMM2), software-configurable as RS-485 or RS-232
SDI IN A)
AES I/O 1 thru AES I/O 8; I/O function of
GPI 1-G and GPI 2-G)
SDI OUT A)
External Reference Signals
External frame sync reference signals are received by the LDP-8242 over a reference bus on the
DFR-8321 series frame, and not on any card rear module connectors. The frame has BNC
connectors labeled
such as a house distribution.
REF 1 and REF 2 which receive the reference signal from an external source
LDP-8242 User Manual (Iss. 03) Installation • 2–5
Page 32

COMM Port Connections
A (-)
B (+) G
Tx
Rx G
RS-485
RS-232
Removable Phoenix Contact™
plug view oriented with top
(screw terminals) up
Rear module
PCB connector
21C
Connect external interfaces to either the COMM 1 (Serial A) and/or COMM 2 (Serial B)
connectors as shown in Figure 2.3.
Note — RS-485 communication will not work if any of the connections are reversed
from that shown here.
It is preferable to wire connections to Phoenix Contact™ plugs oriented as shown here rather than
assessing polarity on rear module connectors. Note that the orientation of rear module connectors
is not necessarily consistent within a rear module, or between different rear modules. If wiring is
first connected to the Phoenix Contact™ plug oriented as shown here, the electrical orientation
will be correct regardless of rear module connector orientation.
Figure 2.3 COMM Connections for RS-485 and RS-232 Protocols
2–6 • Installation LDP-8242 User Manual (Iss. 03)
Page 33

GPI Port Connections
IN 2
G
IN 1
G
GPI 2
GPI 1
Removable Phoenix plug
view oriented with top
(screw terminals) up
Rear module
PCB connector
1 2 G
Each GPI input (GPI 1, GPI 2) consists of an opto-isolator in which a forward-biased LED
activates upon an applied resistance ≤ 10 kΩ. (or when pulled low from an external logic source
at an applied voltage ≤ 2.0 VDC). (Figure 2.4)
It is preferable to wire connections to Phoenix Contact™ plugs oriented as shown here rather than
assessing connections on rear module connectors. Note that the orientation of rear module
connectors is not necessarily consistent within a rear module, or between different rear modules.
If wiring is first connected to the Phoenix plug oriented as shown here, the electrical orientation
will be correct regardless of rear module connector orientation.
Figure 2.4 GPI Connections
LDP-8242 User Manual (Iss. 03) Installation • 2–7
Page 34

Setting up Network Remote Control
If network remote control is to be used for the frame and the frame has not yet been set up for
remote control, refer to the MFC-8300 Series User Manual for information.
If installing a card in a frame already equipped for, and connected to DashBoard™, no network
setup is required for the card. The card will be discovered by DashBoard™ and be ready for use.
2–8 • Installation LDP-8242 User Manual (Iss. 03)
Page 35

Operating Instructions
In This Chapter
This section describes the user interface controls, indicators, and displays (both card-edge and
remote controls) for using the LDP-8242. The functions can be accessed and controlled using any
of the user interfaces described in this chapter.
The following topics are discussed:
• Control and Display Descriptions
• Card-edge Controls, Indicators, and Display
• DashBoard™ User Interface
• Accessing the Card via DashBoard™
• Checking Card Information
• Ancillary Data Line Number Locations and Ranges
• Function Submenu List and Descriptions
• Troubleshooting
LDP-8242 User Manual (Iss. 03) Operating Instructions • 3–1
Page 36

Control and Display Descriptions
This section describes the user interface controls, indicators, and displays (both on-card and
remote controls) for using the LDP-8242 card. The LDP-8242 functions can be accessed and
controlled using any of the user interfaces described here.
The format in which the LDP-8242 functional controls, indicators, and displays appear and are
used varies depending on the user interface being used. Regardless of the user interface being
used, access to the LDP-8242 functions (and the controls, indicators, and displays related to a
particular function) follows a general arrangement of Function Submenus under which related
controls can be accessed (as described in the section “Function Submenu/Parameter Submenu
Overview” below).
After familiarizing yourself with the arrangement described in Function Submenu/Parameter
Submenu Overview, proceed to the subsection for the particular user interface being used.
Descriptions and general instructions for using each user interface are individually described in
the following subsections:
•“Card-edge Controls, Indicators, and Display” on page 3-3
•“DashBoard™ User Interface” on page 3-5
When a setting is changed, settings displayed on DashBoard™ are the settings as effected by the
LDP-8242 card itself and reported back to the remote control; the value displayed at any time is
the actual value as set on the card.
Function Submenu/Parameter Submenu Overview
The functions and related parameters available on the LDP-8242 card are organized into function
submenus, which consist of parameter groups as shown below.
Figure 3.1 shows how the LDP-8242 card and its submenus are organized, and also provides an
overview of how navigation is performed between cards, function submenus, and parameters.
Figure 3.1 Function Submenu/Parameter Submenu Overview
3–2 • Operating Instructions LDP-8242 User Manual (Iss. 03)
Page 37

Card-edge Controls, Indicators, and Display
Tab l e 3.1 shows and describes the LDP-8242 card-edge controls, indicators, and display.
Figure 3.2 Controls, Indicators, and Display
Card-edge Controls
This section provides a general overview of the components used for navigating the menu system
on the card-edge.
4-Character Display
Displays 4-digit abbreviated code showing menu and submenu selections. When in a menu
displaying a parameter setting, the display shows parametric scalar value (and +/- sign where
applicable).
Menu Select Toggle Switch
This switch is not implemented.
Enter Submenu Pushbutton
This pushbutton is not implemented.
Exit Submenu Pushbutton
This pushbutton is not implemented.
LDP-8242 User Manual (Iss. 03) Operating Instructions • 3–3
Page 38

Status and Selection LEDs on the Card-edge
The front-edge of the LDP-8242 has LED indicators for communication activity. Basic LED
displays and descriptions are provided in Ta bl e 3. 1.
Table 3.1 LEDs on the LDP-8242
LED Color Display and Description
RMT
Blue
When flashing, this LED indicates when the card is receiving
control messages from DashBoard™.
REF
LOCK
ERR
INPUT
FORMAT
MENU
DEPTH
Blue
Blue
Blue
When lit, this LED indicates when the card is receiving valid
frame sync when set up for reference frame sync.
When lit, this LED indicates when the LDP-8242 is unable to
lock to frame sync, or unable to lock to input standard.
This LED is not implemented.
Three blue LEDs indicate the input signal format being received
and locked onto by the card as follows:
• HD (1080p 29.97/25, 720p)
• SD (625i, 525i)
Continuous cycling of the LEDs indicates the card has not locked
onto a particular format (as in the case of no signal input)
These LEDs are not implemented.
3–4 • Operating Instructions LDP-8242 User Manual (Iss. 03)
Page 39

DashBoard™ User Interface
Select top-level menu item
Video Proc
Set Video Proc
enable to On
Set Luma Gain to 120 using direct
numeric entry or slider control
Set Color Gain to 90
Main Tab
Sub Tabs
Some LDP-8242 tabs have sub-tabs
at the bottom of the pane which allow
access to additional functions without
the clutter of all controls appearing in a
single pane.
In this example, Color Correction
controls in addition to the Video Proc
controls shown here can be accessed
by clicking the Color Correction
sub-tab.
The LDP-8242 function submenus are organized in DashBoard™ using tabs (for example,
“Video Proc”).(Figure 3.3) When a tab is selected, each parametric control or selection list item
associated with the function is displayed. Scalar (numeric) parametric values can then be adjusted
as desired using the GUI slider controls. Items in a list can then be selected using GUI drop-down
lists.
Figure 3.3 DashBoard™ Setup of Example Video Proc Function
LDP-8242 User Manual (Iss. 03) Operating Instructions • 3–5
Page 40

Accessing the Card via DashBoard™
Access the LDP-8242 card using DashBoard™ as described below.
Accessing the Card via DashBoard
1. On the computer connected to the frame LAN, open DashBoard™.
2. As shown below, in the left side Basic View Tree, locate the frame containing the
LDP-8242 card to be accessed (in this example, Frame 1A).
Basic Tree View — Selecting the Frame
3. As shown below, expand the tree to access the cards within the frame. Select the card to
be accessed (in this example, Slot 7: LDP-8242).
.
Basic Tree View — Selecting the LDP-8242
As shown on Figure 3.4, when the card is accessed in DashBoard™ its function
submenu screen showing tabs for each function is displayed. (The particular submenu
screen displayed is the previously displayed screen from the last time the card was
accessed by DashBoard™).
3–6 • Operating Instructions LDP-8242 User Manual (Iss. 03)
Page 41

Card Access/Navigation
Tree Pane
Card Info Pane Card Function Submenu and Controls Pane
Figure 3.4 LDP-8242 Tabs in DashBoard
LDP-8242 User Manual (Iss. 03) Operating Instructions • 3–7
Page 42

Checking Card Information
The Tree View shows the cards seen by DashBoard™.
In this example, Frame 1A is hosting a LDP-8242 card in
slot 7.
Status Displays
Clicking the Status sub-tab shows the status the signal
being received by the LDP-8242, and other card
conditions. Green Settings icon shows that any changes
made on DashBoard™ are sucessfully saved on the
card’s memory.
Clicking the Product sub-tab shows product information
such as card model, options installed, and firmware
versions. Use this information when communicating to
Ross Video regarding the card.
The operating status and software version the LDP-8242 card can be checked using
DashBoard™. Figure 3.5 shows and describes the LDP-8242 card information screen using
DashBoard™.
Proper operating status in DashBoard™ is denoted by green icons for the status indicators shown
in Figure 3.5. Yellow or red icons respectively indicate an alert or failure condition. Refer to the
section “Troubleshooting” on page 3-51 for corrective action.
3–8 • Operating Instructions LDP-8242 User Manual (Iss. 03)
Figure 3.5 Card Info Utility
Page 43

Ancillary Data Line Number Locations and Ranges
Format Line No. Limiting Format Line No. Limiting Format Line No. Limiting
525i 12-19 720p 9-25 1080p 9-41
625i 9-22 1080i 9-20
Tab le 3 .2 lists typical default output video VANC line number locations for various ancillary data
items that may be passed or handled by the card.
Table 3.2 Typical Ancillary Data Line Number Locations/Ranges
Item
SD HD
AFD 12 (Note 2) 9 (Note 2)
ATC_VITC 13 (Note 2) 9/8 (Note 2)
ATC_LTC — 10 (Note 2)
Dolby® Metadata 13 (Note 2) 13 (Note 2)
SDI VITC Waveform 14/16 (Note 2) —
Closed Captioning 21 (locked) 10 (Note 2)
Notes:
1. The card does not check for conflicts on a given line number. Make certain the selected line is available and carrying no
other data.
2. While range indicated by drop-down list on GUI may allow a particular range of choices, the actual range is
automatically clamped (limited) to certain ranges to prevent inadvertent conflict with active picture area depending on
video format. Limiting ranges for various output formats are as follows:
Default Line No. / Range
Because line number allocation is not standardized for all ancillary items, consideration should be
given to all items when performing set-ups. Figure 3.6 and Figure 3.7 show an example of
conflicted and resolved VANC allocation within an HD-SDI stream.
Figure 3.6 Example VANC Line Number Allocation — Conflict
LDP-8242 User Manual (Iss. 03) Operating Instructions • 3–9
Figure 3.7 Example VANC Line Number Allocation — Resolved
Page 44

Function Submenu List and Descriptions
Some functions use sub-tabs to help maintain clarity and
organization. In these instances, this section shows the
ordinate tab along with its sub-tabs. Highlighted sub-tabs
indicate that controls described are found by selecting
this sub-tab (in this example, the Input Routing sub-tab).
This section individually lists and describes each LDP-8242 function submenu (“tab”) and its
related list selections, controls, and parameters. Where helpful, examples showing usage of a
function are also provided. DashBoard™ to access each function and its corresponding submenus
and parameters.
All numeric (scalar) parameters displayed on DashBoard™ can be changed using the slider
controls, arrows, or by numeric keypad entry in the corresponding numeric field. (When using
numeric keypad entry, add a return after the entry to commit the entry.)
Unless specified otherwise, controls described here affect the card program video path (for
example, the Video Proc tab controls have no effect on the card key or fill video paths).
On DashBoard™ itself and in this section, the function submenu items are organized using tabs
as shown in Figure 3.8.
Figure 3.8 DashBoard — Example of Tabs and Sub-tabs
The table below provides a quick-reference to the page numbers where each function submenu
item can be found.
Function Submenu Item Page Function Submenu Item Page
Video Input Control 3-11 Audio Bus Input Routing/Controls 3-28
Video Proc/Color Correction 3-11 Output Audio Routing/Controls 3-35
Timecode 3-12 Loudness Processing 3-41
Closed Captioning 3-16 Upmixing 3-43
Framesync 3-17 Metadata Routing and Embedding 3-46
AFD/WSS/VI ARC Controls 3-22 GPI Controls 3-47
Video Output Crosspoint Control 3-22 Presets 3-49
Input Audio Status 3-27
3–10 • Operating Instructions LDP-8242 User Manual (Iss. 03)
Page 45

Selects the card program video input.
Input Video Preference Selects the input video source to be applied to the card’s program video
Video Proc Video Proc (On/Off) provides master on/off control of all Video Proc
Reset to Unity Reset to Unity provides unity reset control of all Video Proc functions.
Luma Gain Adjusts gain percentage applied to Luma (Y channel).
input.
Note: Choices shown here are examples only.
Provides the following Video Proc and Color Correction parametric
controls
functions.
• When set to Off, Video Proc is bypassed.
• When set to On, currently displayed parameter settings take effect.
When Confirm is clicked, a Confirm? pop-up appears, requesting
confirmation.
• Click Ye s to proceed with the unity reset.
• Click No to reject unity reset.
(0% to 200% range in 0.1% steps; unity = 100%)
Luma Lift Adjusts lift applied to Luma (Y-channel).
(-100% to 100% range in 0.1% steps; null = 0.0%)
Color Gain Adjusts gain percentage (saturation) applied to Chroma (C-channel).
(0% to 200% range in 0.1% steps; unity = 100%)
Color Phase Adjusts gain percentage (saturation) applied to Chroma (C-channel).
(0% to 200% range in 0.1% steps; unity = 100%)
Gang Luma/Color Gain When set to On, changing either the Luma Gain or Color Gain controls
increases or decreases both the Luma and Color gain levels by equal
amounts.
LDP-8242 User Manual (Iss. 03) Operating Instructions • 3–11
Page 46

Provides timecode data extraction from various sources, and provides
Noting that the incoming video contains VITC
waveform timecode data (as shown in the status
display), set the Source Priority drop-down lists to
include VITC Waveform timecode data (SDI VITC) as
a choice. This extracts VITC Waveform timecode
data from the incoming video.
In this example, it is desired to provide SD ATC_VITC
timecode data in the output video. As such, set
SD ATC VITC Insertion to Enabled.
In the example here, the line numbers are set to the
default SMPTE 12M-2-2008 recommended value.
Shown below is an example in which received SDI video with SDI VITC waveform timecode is to be converted to SDI
ATC_VITC timecode data. Each Timecode control is fully described on the pages that follow.
formatting and re-insertion controls for inserting the timecode into the
output video.
Timecode
3–12 • Operating Instructions LDP-8242 User Manual (Iss. 03)
Page 47

(continued)
•
•
In this example, Input VITC 1st priority selection selects SDI VITC
(received on SDI input) over reference VITC (received on frame
reference) regardless of video input material source to be processed by
the card.
The selected timecode source is embedded on the SDI video output (in
this example, 720p) using the selected line number. In this example, if
the SDI VITC on the SDI input becomes unavailable, the card then uses
the reference VITC data received on the frame reference.
Timecode Source Status Displays Displays the current status and contents of the four supported external
Incoming ATC Packet Removal Control Enables or disables removal of existing input video ATC timecode packets
Source Priority Selects the priority assigned to each of the four supported external
timecode formats shown to the left.
• If a format is receiving timecode data, the current content (timecode
running count and line number) is displayed.
• If a format is not receiving timecode data, Not Present is displayed.
from the output. This allows removal of undesired existing timecodes from
the output, resulting in a “clean slate” where only desired timecodes are
then re-inserted into the output. (For example, if both SDI ATC_VITC and
ATC_LTC are present on the input video, and only ATC_LTC is desired,
using the Removal control will remove both timecodes from the output.
The ATC_LTC timecode by itself can then be re-inserted on the output
using the other controls discussed here.)
formats, and internal Free Run in the event the preferred source is
unavailable.
Source Priority 1 thru Source Priority 4 select the preferred format to be
used in descending order (i.e., Source Priority 2 selects the second-most
preferred format, and so on. See example below.)
Output Status Display Displays the current content and source being used for the timecode data
LDP-8242 User Manual (Iss. 03) Operating Instructions • 3–13
as follows:
Output status OK (in this example, SDI VITC timecode received and
outputted).
Timecode Insertion button set to Disabled; output insertion disabled.
Note: If timecode is not available from Source Priority selections
performed, timecode on output reverts to Free Run (internal count) mode.
Because the 1’s digit of the display Frames counter goes from 0 to 29, the
fractional digit (along with the 1’s digit) indicates frame count as follows:
0.0 Frame 0
0.1 Frame 1
1.0 Frame 2
1.1 Frame 3
......
29.1 Frame 59
Page 48

(continued)
Offset Controls Allows the current timecode count to be advanced or delayed on the
Note: Although the output line drop-down on the controls described below will allow a particular range of choices, the actual range
is automatically clamped (limited) to certain ranges to prevent inadvertent conflict with active picture area depending on video
format. See Ancillary Data Line Number Locations and Ranges (p. 3-9) for more information.
The card does not check for conflicts on a given line number. Make certain the selected line is available and carrying no other data.
SD VITC Waveform Insertion Controls For SD output, enables or disables SD VITC waveform timecode insertion
SD ATC Insertion Control For SD output, enables or disables SD ATC_VITC timecode insertion into
output video.
• Offset Advance or Delay selects offset advance or delay.
• Offset Field delays or advances or delays timecode by one field.
• Offset Frame delays or advances or delays timecode by up to 5
frames.
Note: Default settings are null, with both controls set at zero as shown.
into the output video, and selects the VITC1 and VITC2 line numbers (6
thru 22) where the VITC waveform is inserted.
Note: If only one output line is to be used, set both controls for the
same line number.
SD VITC Waveform Insertion control only affects VITC waveforms
inserted (or copied to a new line number) by this function. An
existing VITC waveform on an unscaled SD SDI stream is not
affected by this control and is passed on an SDI output.
the output video, and selects the line number for ATC_VITC.
HD ATC_LTC Insertion Control For HD output, enables or disables ATC_LTC timecode insertion into the
HD ATC_VITC Insertion Control For HD output, enables or disables ATC_VITC timecode insertion into the
output video, and selects the line number for ATC_LTC timecode data.
output video, and selects the line number for ATC_VITC1 and
ATC _VIT C2.
Note: If only one output line is to be used, set both controls for the same
line number.
3–14 • Operating Instructions LDP-8242 User Manual (Iss. 03)
Page 49

(continued)
ATC_VITC Legacy Support Control When enabled, accommodates equipment requiring ATC_VITC packet in
Free Run Timecode Controls Allows an initial (starting) count to be applied to output video timecode
both fields as a “field 1” packet (non-toggling).
Note: Non-toggling VITC1 and VITC2 packets do not conform to
SMPTE 12M-2-2008 preferences. As such, ATC_VITC Legacy
Support should be enabled only if required by downstream
equipment.
when Free Run insertion is enabled.
Note: Initialization can only be applied when card is outputting Free
Run timecode (as shown by Output Status displaying “Free Run”).
If failover to Free Run occurs due to loss of external timecode(s),
the Free Run count assumes its initial count from the last valid
externally supplied count.
LDP-8242 User Manual (Iss. 03) Operating Instructions • 3–15
Page 50

Provides support for closed captioning setup.
HD packet-based display
SD waveform-based display
Message Description
Unsupported
Frame Rate
Film rate closed-captioning (either as
pass-through or up/down conversion) is not
supported by the card.
Data Not Present
Packet is marked from closed captioning
source external to the card that no data is
present.
Service Inactive
Packet is marked from closed captioning
source external to the card indicating packet
does not contain active caption service.
No Data ID
Packet from closed captioning source external
to the card is not properly identified with
0x9669 as the first word of the header
(unidentified packet).
Closed Captioning
Closed Captioning Input Status Displays incoming Closed Captioning status as follows:
• If closed captioning is present, a message similar to the example
shown left is displayed. Also displayed is the VANC line number of
the incoming closed captioning packet (or SD waveform-based
VANC line number).
• If no closed captioning is present in the video signal, Not Present
or Disabled is displayed.
Note: Packet closed captioning status Captioning Rejected Due
To message can appear due to the items described below. The
closed captioning function assesses cdp_identifier, cdp_frame_rate,
ccdata_present, and caption_service_active items contained in the
packet header to make the determinations listed below. Refer to
CEA-708-B for more information.
The closed captioning function does not support PAL closed
captioning standards.
Closed Captioning Output Insertion Control Turns on or off the Closed Captioning on the output video.
Closed Captioning HD Output Line Selects the VANC line number (9 thru 41) for the closed caption data
3–16 • Operating Instructions LDP-8242 User Manual (Iss. 03)
Note: When set to On, closed captioning is set to standard default
line number. See the section “Ancillary Data Line Number Locations
and Ranges” on page 3-9. SD output is locked to line 21.
The card does not check for conflicts on a given line number. Make
certain selected line is available and carrying no other data.
when the output is HD.
Note: Although the output line drop-down will allow any choice
within the 9 thru 41 range, the actual range is automatically
clamped (limited to) certain ranges to prevent inadvertent conflict
with active picture area depending on video format. See Ancillary
Data Line Number Locations and Ranges (p. 3-9) for more
information.
The card does not check for conflicts on a given line number. Make
certain the selected line is available and carrying no other data
unless existing metadata is to be intentionally overwritten.
Page 51

Framesync
Provides video frame sync/delay control and output control/loss of
program video failover selection controls.
Framesync Enable Selects Frame Sync functions from the choices shown to the left and
Initial Startup Format Select Selects a synthesized frame sync format/rate to be invoked (from the
described below.
• Free Run: Output video is locked to the card’s internal clock.
Output video is not locked to external reference.
• Lock to Reference: Output video is locked to external reference
received on the frame reference bus. Default uses Ext Ref 1 frame
bus, with failover to Ext Ref 2 in the event valid reference signal is
not present on Ext Ref 1. (External reference signals Reference 1
and Reference 2 are distributed to the card and other cards via an
8320 frame bus.)
Note: If valid reference is not received, the
portion of DashBoard™, indicating invalid frame sync reference
error.
• Lock to Input: Uses the program video input video signal as the
reference standard.
Note: If Lock to Input is used for framesync, any timing instability on
the input video will result in corresponding instability on the output
video.
choices shown to the left) in the time preceding stable lock to external
reference.
Set this control to that of the intended external reference to help ensure
smoother frame sync locking.
indication appears in the Card Info status
Program Video Output Mode Select Provides a convenient location to select between card program video
Loss of Input Signal Selection In the event of program input video Loss of Signal (LOS), determines
output and other technical outputs from the choices shown to the left and
described below.
• Input Video – card outputs input program video (or loss of signal
choices described below).
• Flat Field (Black) – card outputs black flat field.
• Freeze – card outputs last frame having valid SAV and EAV codes.
• Test Pattern – card outputs standard technical test pattern (pattern
is selected using the Pattern drop-down described below).
action to be taken as follows:
• Disable Outputs: Disable program video SDI outputs.
• Flat Field (Black) – go to black flat field on program video output.
• Freeze – go to last frame having valid SAV and EAV codes on
program video output.
• Test Pattern – go to standard technical test pattern on program
video output (pattern is selected using the Pattern drop-down
described below).
LDP-8242 User Manual (Iss. 03) Operating Instructions • 3–17
Page 52

(continued)
Pattern Select Provides a choice of standard technical patterns (shown to the left) when
Output Video Reference Offset Controls With framesync enabled, provides the following controls for offsetting the
Test Pattern is invoked.
output video from the reference:
• Vertical (Lines) – sets vertical delay (in number of lines of output
video) between the output video and the frame sync reference.
(Positive values provide delay; negative values provide advance)
(Range is -1124 thru 1124 lines; null = 0 lines.)
• Horizontal (ms) – sets horizontal delay (in ms of output video)
between the output video and the frame sync reference. (Positive
values provide delay; negative values provide advance)
(Range is -64 thru 64 msec; null = 0.000 msec.)
Note: Offset advance is accomplished by hold-off of the
reference-directed release of the frame, thereby effectively advancing the
program video relative to the reference.
Minimum Latency Frames Control
Minimum Latency Frames Control
When Framesync is enabled, specifies the smallest amount of latency
allowed by the frame sync (latency measurement in output video frames).
The frame sync will not output a frame unless the specified number of
frames are captured in the buffer. The operational latency of the frame
sync is always between the specified minimum latency and
minimum latency plus one frame (not one field).
(Maximum range is 0 to 16.)
Note: Due to card memory limits, the maximum available Minimum
Latency Frames is related to the output video format selected.
For example, with a 525i59.94 output, the practical maximum limit is 13.
When using this control, be sure to check the Framesync Status display
as follows:
• Latency frames selection within limits.
• Latency frames selection exceeds limits.
3–18 • Operating Instructions LDP-8242 User Manual (Iss. 03)
Page 53

(continued)
Video Delay Display Displays the current input-to-output video delay (in msec units) as well as
Framesync Status Display Displays the current framesync status as follows:
in terms of Frames/fractional frame (in number of lines).
• Framesync status OK.
•
• Framesync Enable set to Off.
• Improper or missing framesync reference.
•
• Framesync derived using card local clock.
•
• Latency frames selection exceeds limits.
Note: See Minimum Latency Frames Control in Framesync (p. 3-17) for
more information about this message.
Note: Audio timing offset from video is performed using the delay controls on the Audio Bus Input Routing/Controls tab. Refer to
Audio Bus Input Routing/Controls (p. 3-28) for these controls.
LDP-8242 User Manual (Iss. 03) Operating Instructions • 3–19
Page 54

Allows assignment of AFD, WSS, and/or VI codes to the SDI output video,
NTSC-Coded
(4:3) 1080i
Video Signal
with 1010 AFD Code
1010 AFD Code
Received and
applied to Scaler
Without AFD
NTSC-Coded
(4:3) 1080i
Video Signal
NTSC-Coded
image on 16:9
display shows
letterbox cropping
Uncorrected
up-conversion
results in "postage
stamp" effect with
both letterbox and
sidebars visible on
16:9 display
1080i Video Signal
with 16:9
uncorrected signal
Up-Conversion
to 16:9
With AFD
NTSC-Coded
image on 16:9
display shows
letterbox cropping
AFD corrected
up-conversion
results in intended
image area
properly visible on
16:9 display
1080i Video Signal
with 16:9
corrected signal
Up-Conversion
to 16:9
and allows custom ARC settings to be applied for each. Also allows
translation between WSS, VI, and AFD active ARC formats.
3–20 • Operating Instructions LDP-8242 User Manual (Iss. 03)
Page 55

continued
Note: ARC control/converter function only manipulates output SDI ARC codes
and has no local effect on card output aspect ratio.
Noting that the incoming video contains WSS coding, Trigger on WSS is
set to ETSI, with other choices set to Off. The settings here allow ARC to
trigger only on an ETSI-coded WSS received code.
In this example, it is desired to use the H/V re-aspecting inherent in the
received video ARC, perform the re-aspecting with no modification, and
output an AFD code representing the re-aspecting performed.
As such, Force Input Mapping is set to Follow Trigger, thereby
bypassing the Output ARC Cross-Matrix Map table and directly perform
the re-aspecting defined by the received code (in this example, Letterbox
16x9). Also in this example, the scaler is directed to apply the output AFD
re-aspecting by setting Scaler Follow AFD to Enabled.
In this example, since only AFD is to be outputted, AFD Output is set to
Enabled, with WSS and VI choices set to Disabled.
AFD Status shows AFD code now being outputted.
The insertion line number (using its default value here), can be set using
the AFD Output Line controls (for the progressive format in this example,
the Field 1 control serves as the line number control).
Shown below is an example in which received 625i50 SDI video is being up converted to 720p50. The settings shown in the
example below provide for directing the scaler to re-aspect the 4:3 input video to full, centred 16:9 re-aspecting, and mark the
output video with the AFD code representing the new re-aspected H/V format.
LDP-8242 User Manual (Iss. 03) Operating Instructions • 3–21
Page 56

AFD/WSS/VI sub-tab provides prioritized and gated input monitoring for
AFD, WSS, and/or VI formats. Also provides translation between input
and output AFD, WSS, and VI ARC formats.
Note:
• Active ARC control is unavailable. The ARC control/convert function only manipulates output SDI ARC codes and has no
local effect on card output aspect ratio.
• Line number control available only for AFD format. WSS and VI use fixed line numbers per applicable standards.
• Some AFD codes are not supported in WSS and VI formats. Refer to AFD/WSS/VI Transition Matrix section for more
information.
Input Format Status Displays
Input Mapping When received ARC code is received, applies H/V coding as follows:
Input Triggering Controls Individual ARC format input controls allow accepting or rejecting received
Displays the current status and contents of the three supported ARC
formats are shown to the left.
• If a format is received, the current formatting code and description is
displayed (as shown in the example).
• If a format is not receiving data, Not Present is displayed.
• Follow Trigger — Uses the ARC coding inherent in the received
triggering ARC.
• 4x3 ARC Codes — For received triggering formats coded as 4x3,
applies the H/V coding selected in this drop-down.
• 16x9 ARC Codes — For received triggering formats coded as
16x9, applies the H/V coding selected in this drop-down.
Note: Settings performed here can be applied directly to the output video,
or the settings applied here can be custom modified if desired for any of
the eleven 4x3 codes and any of the eleven 16x9 codes available here
using the AFD Map sub-tab. Refer to section “AFD/WSS/VI Transtion
Matrix” on page 3-25 for more information.
ARC formats as follows:
Trigger on AFD:
• Off rejects AFD-coded triggering.
• On allows trigger on AFD.
Trigger on WSS:
• Off rejects WSS-coded triggering.
• AFD allows triggering on AFD-coded WSS.
• ETSI allows triggering on ETSI-coded WSS.
Trigger on VI:
• Off rejects VI-coded triggering.
• AFD allows triggering on AFD-coded WSS.
• SMPTE allows triggering on SMPTE-coded WSS.
Note: If multiple formats are present on the input video, AFD pre-empts
other formats, followed by WSS or VI (as set by the WSS/VI Priority
control).
3–22 • Operating Instructions LDP-8242 User Manual (Iss. 03)
Page 57

(continued)
Output Enable Controls Individual ARC format input controls allow accepting or rejecting received
Output Status Displays Displays the current output status, coding, and H/V ratio for AFD, WSS,
ARC formats as follows:
AFD Output:
• Disable turns off AFD format on output.
• Enable inserts AFD packet on output, and allows changing line
number.
• Follow Input Line inserts AFD packet on same line as received AFD
line number (where applicable).
WSS Output:
• Disable turns off WSS format on output.
• AFD Enabled inserts AFD-coded WSS on output.
• ETSI Enabled inserts ETSI-coded WSS on output.
VI Output:
• Disable turns off WSS format on output.
• AFD Enabled inserts AFD-coded VI on output.
• SMPTE Enabled inserts SMPTE-coded VI on output.
and VI formats.
• If a format is active and enabled (as set with the Output Enable
controls), the code and H/V description is displayed.
• If a format is not outputting data, Disabled is displayed.
Note:
• The code displayed shows the outputted code. If the code is
modified by user settings performed in the AFD Map sub-tab, these
changes are shown here. Refer to AFD Map sub-tab for more
information.
• As shown in the example, settings that result in invalid mapping
across format translations will display Disabled. In these cases, no
output is inserted for the format.
AFD Output Line Control Allows selecting the line location of the AFD data within the video signal
Ancillary Data space.
Note:
• The card does not check for conflicts on a given line number. Make
certain the selected line is available and carrying no other data.
• For progressive formats, the Field 1 control serves as the line
number control.
LDP-8242 User Manual (Iss. 03) Operating Instructions • 3–23
Page 58

The table below lists valid translations between WSS, VI, and SMPTE 2016 AFD codes for both 4x3 and 16x9-coded frames.
Input Output
AFD
WSS
ETSI 625
WSS
ETSI 525
VI Description AFD
WSS
ETSI 625
WSS
ETSI 525
VI Description
4:3 Coded
0010 4
4x3 Letterbox
16x9 top
0010 4 0
1 (NTSC)
2 (PAL)
4x3 Letterbox
16x9 top
0011 2
4x3 Letterbox
14x9 Top
0011 2 0
1 (NTSC)
2 (PAL)
4x3 Letterbox
14x9 Top
0100 5 2
4x3 Letterbox
16x9 Center
0100 5 2
1 (NTSC)
2 (PAL)
4x3 Letterbox
16x9 Center
0101,
0110,
0111
Undefined
1000 0 0
0
1 (NTSC)
2 (PAL)
4x3 Coded
Frame
1000 0 0
1 (NTSC)
2 (PAL)
4x3 Coded
Frame
1001 4x3 Center 1001 0 0
1 (NTSC)
2 (PAL)
4x3 Center
1010 3 4x3 16x9 Center 1010 3 2
1 (NTSC)
2 (PAL)
4x3 16x9 Center
1011 1 4x3 14x9 Center 1011 1 0
1 (NTSC)
2 (PAL)
4x3 14x9 Center
1100 3, 4, 7 Reserved 1100
0
1 (NTSC)
2 (PAL)
Reserved
1101 6 4x3 Protect 14x9 1101 6 0
1 (NTSC)
2 (PAL)
4x3 Protect 14x9
1110
4x3 Letterbox
16x9; Protect
14x9 Center
1110
2
1 (NTSC)
2 (PAL)
4x3 Letterbox
16x9; Protect
14x9 Center
1111
4x3 Letterbox
16x9; Protect 4x3
Center
1111
2
1 (NTSC)
2 (PAL)
4x3 Letterbox
16x9; Protect 4x3
Center
16:9 Coded
0010
16x9 Letterbox
16x9 Top
0010 1
5 (NTSC)
6 (PAL)
16x9 Letterbox
16x9 Top
0011
16x9 Letterbox
14x9 Top
0011
1
5 (NTSC)
6 (PAL)
16x9 Letterbox
14x9 Top
0100
16x9 Letterbox
16x9 Center
0100
1
5 (NTSC)
6 (PAL)
16x9 Letterbox
16x9 Center
0101,
0110,
0111
Undefined
1000 7 1
0
5 (NTSC)
6 (PAL)
16x9 Coded
Frame
1000 7 11
5 (NTSC)
6 (PAL)
16x9 Coded
Frame
1001 16x9 4x3 Center 1001
1
5 (NTSC)
6 (PAL)
16x9 4x3 Center
1010
16x9 Center
Protect 16x9
1010 7 1
5 (NTSC)
6 (PAL)
16x9 Center
Protect 16x9
1100 Reserved 1100
1
5 (NTSC)
6 (PAL)
Reserved
1101
16x9 4x3 Protect
14x9
1101
1
5 (NTSC)
6 (PAL)
16x9 4x3 Protect
14x9
1110
16x9 Protect
14x9
1110
1
5 (NTSC)
6 (PAL)
16x9 Protect
14x9
1111 16x9 Protect 4x3 1110
1
5 (NTSC)
6 (PAL)
16x9 Protect 4x3
AFD/WSS/VI Translation Matrix
3–24 • Operating Instructions LDP-8242 User Manual (Iss. 03)
Note: Shaded cells indicate invalid translation which cannot be used.
Page 59

Input Audio Status
Scaling and Pan/Tilt factors effect the
re-aspecting and position offset here
that result in a 4x3 0010 Letterbox
16x9 Top image when these defaults
are applied.
The AFD coding representing the
applied re-aspecting is applied to the
output video.
AFD Map sub-tab allows bi-directional re-aspecting from 4x3 frames to
companion 16x9 frames, and allows customizing aspect ratio settings for
the AFD codes (and the corresponding WSS and VI Translation
equivalents) supported by the card.
Separate control groups for 4x3 and 16x9 coded input frames allow custom ARC (as well as pan/tilt) for various coded frames.
By default, each row is set for its companion re-aspected output, along with output AFD code for the companion output (i.e., 4x3
frames get re-aspected to a companion 16x9 re-aspecting and AFD code, and similarly 16x9 frames get re-aspected to a
companion 4x3 re-aspecting and AFD code).
In this example, default settings provide the scaling and tilt factors to convert a 16x9-coded 0010 frame to its companion
4x3 0010 Letterbox 16x9 Top frame.
Your card can only mark the output signal with an AFD code, and does not perform any re-aspecting.
LDP-8242 User Manual (Iss. 03) Operating Instructions • 3–25
Page 60

Input Audio Status
Provides an output video crosspoint between up to four SDI output ports
and the card program video and auxiliary streams.
Output Video Crosspoint For each SDI output port supported by the card, provides a crosspoint for
routing program processed video, reclocked, or other video handled by
the card.
In this example, reclock of SDI IN A is fed to SDI OUT A port, and
buffered program video is fed to SDI OUT B thru SDI OUT D.
3–26 • Operating Instructions LDP-8242 User Manual (Iss. 03)
Page 61

Displays signal status for embedded and discrete audio received by the
card.
Input Audio Status
Individual signal status and peak level displays for embedded audio channel pairs 1-2 thru 15-16 and AES pairs 1 thru 8, and
analog audio input pairs 1-2 thru 7-8 as follows:
• Unlocked: Indicates AES pair or embedded channel does not contain recognized audio PCM data.
• PCM: Indicates AES pair or embedded channel contains recognized AES audio PCM data.
• Dolby E: Indicates AES pair or embedded channel contains Dolby® E encoded data.
• Dolby Digital: Indicates AES pair or embedded channel contains Dolby® Digital encoded data.
Note: Dolby status displays shown to the left only occur for valid Dolby® signals meeting SMPTE 337M standard.
If a Dolby pair is passed through the card without decoding, the signal is passed with all related gain controls set to unity.
Note: After familiarizing yourself with the controls described in the audio routing/control sections that follow, refer to the section
“Troubleshooting” on page 3-51 for a comprehensive example using these controls for multi-source audio routing.
LDP-8242 User Manual (Iss. 03) Operating Instructions • 3–27
Page 62

Audio Bus Input Routing/Controls
All audio inputs are transferred through the card
via the 16-channel Internal Bus (Bus Ch 1 thru
Bus Ch 16).
The example above shows various Source
selections that direct Emb Ch 1 thru Ch 6 and
AES Ch 1 and Ch 2 onto the card internal bus
(unused bus channels can be set to Silence or
Mute).
Each bus channel provides Gain, Mute, and
Audio/Video Delay Offset controls. A Bulk
Audio/Video Delay control provides master
control of all 16 internal bus channels.
The source-to-destination correlation shown
here is only an example; any of the sources
described on the following pages can route to
any of the internal bus channels.
•
•
•
•
•
•
•
•
•
•
Provides routing, gain, and individual/master audio-video delay controls
for embedded, AES, analog, and downmix/flex mix input audio. These
controls route selected audio sources onto the card 16-channel internal
bus (which is used for all audio processing).
3–28 • Operating Instructions LDP-8242 User Manual (Iss. 03)
Page 63

(continued)
•
•
•
•
Note: Default factory preset routing routes embedded Ch 1 thru Ch 16 to bus channels Bus Ch 1 thru Bus Ch 16.
Bus Ch 2 thru Bus Ch 16 have controls identical to the controls described here for Bus Ch 1. Therefore, only the Bus Ch 1
controls are shown here.
For each bus channel, its source should be considered and appropriately set. Unused bus channels should be set to the Silence
selection.
Bus Channel Source Using the Source drop-down list, selects the audio input source to be
Embedded Ch 1 thru Ch 16 as Source Embed Ch 1 thru Embed Ch 16 range in Source drop-down list routes an
AES Ch 1 thru AES Ch 16 as Source AES Ch 1 thru AES Ch 16 range in Source drop-down list routes an AES
directed to the corresponding bus channel from the choices described
below.
embedded channel (Ch 1 thru Ch 16) to be the source for the selected
destination bus channel.
(In this example, Embed Ch 1 (embedded Ch 1) is the source for
destination Bus Ch 1)
channel (Ch 1 thru Ch 16) to be the source for the selected destination
bus channel.
(In this example, AES Ch 1 is the source for destination Bus Ch 1)
Note: AES inputs are only available on card equipped with the AES-8242
licensed option (AES audio I/O).
AES port connectors (channel pairs) on the card rear module are set as
either Input or Output using the AES Port Direction control on the Output
Audio Routing/Controls DashBoard tab. Make certain an AES channel
pair is not being used an output before assigning it as a source here.
(Refer to Output Audio Routing/Controls (p. 3-35) for more information.)
Downmix A (L/R) thru Downmix D (L/R) as
Source
Flex Mix Sum Node A thru P as Source Flex Mix A thru Flex Mix P range in Source drop-down list routes 1 of 16
LDP-8242 User Manual (Iss. 03) Operating Instructions • 3–29
Downmix A L thru Downmix D R range in Source drop-down list routes a
downmixer output channel to be the source for the selected destination
bus channel.
(In this example, Downmix A L (L output channel of downmixer A) is the
source for destination Bus Ch 1)
Note: See Input Downmixers sub-tab description in this section for more
information.
flex mix summing nodes (Flex Mix A thru Flex Mix P) to be the source for
the selected destination bus channel.
(In this example, Flex Mix A (sum node of flex mixer A) is the source for
destination Bus Ch 1)
Note: See Input Flex Mix sub-tab description in this section for more
information.
Page 64

(continued)
•
•
Gain / Mute Control Provides relative gain (in dB) control and a channel Mute checkbox.
(-80 to +20 dB range in 0.1 dB steps; unity = 0.0 dB)
Channel Audio/Video Delay
Control/Display
Bulk (Master) Audio/Video Delay
Control/Display
Offset control adds or reduces (offsets) channel audio delay from the
matching video delay (audio delay offset setting adds or removes delay in
addition to any delay included by other actions). This control is useful for
correcting lip sync problems when video and audio paths in the chain
experience differing overall delays.
(-800.0 to +800.0 msec range in 0.1 msec steps; null = 0.0 msec)
Delay Status shows current delay from video for the corresponding audio
channel.
Note: Maximum advance/delay offset is dependent on video format. Refer
to the section “Technical Specifications” on page 4-2 for details.
Offset control adds or reduces (offsets) bulk (entire bus) audio delay from
the matching video delay (audio delay offset setting adds or removes
delay in addition to any delay included by other actions). This control is
useful for correcting lip sync problems when video and audio paths in the
chain experience differing overall delays.
(-800.0 to +800.0 msec range in 0.1 msec steps; null = 0.0 msec)
Delay Status shows current delay from video for the audio bus.
Note: Maximum advance/delay offset is dependent on video format. Refer
to “Technical Specifications” on page 4-2 for details.
3–30 • Operating Instructions LDP-8242 User Manual (Iss. 03)
Page 65

Input Downmixers – Provides four independent downmixers that each
•
•
The example here shows selection from various sources and the resulting stereo pair Downmix A(L) and Downmix A(R). The
two signals comprising the pair can be routed and processed the same as any other audio input source.
Note: The stereo pair consists of basic L/R PCM signals with no additional encoded information.
multiplex any five embedded, AES, analog, or Dolby decoder output audio
channel sources (as L, R, C, Ls, Rs inputs) into a stereo pair (Downmix
A(L) / Downmix A(R) thru Downmix D(L) / Downmix D(R))
Note: Downmixers B thru D have controls identical to the controls described here for Downmixer A. Therefore, only the
Downmixer A controls are shown here.
For each downmixer input channel, its source should be considered and appropriately set. Unused bus channels should be set to
the Silence selection.
Downmixer A thru D Input Channel
Selection
Separate L, R, C, Ls, Rs drop-downs for each of the four independent
downmixers (A thru D) that directs any combination of card audio inputs
(listed below) to each downmixer input channel.
• Embed Ch 1 thru Embed Ch 16
• AES Ch 1 thru AES Ch 16
• Silence
LDP-8242 User Manual (Iss. 03) Operating Instructions • 3–31
Page 66

(continued)
Center Mix Ratio Control Adjusts the attenuation ratio of center-channel content from 5-channel
Surround Mix Ratio Control Adjusts the attenuation ratio of surround-channel content from 5-channel
source that is re-applied as Lt and Rt content to the DM-L and DM-R
stereo mix.
• Minimum attenuation setting (-0.0 dB) applies no ratiometric
reduction. Center channel content is restored as in-phase
center-channel content with no attenuation, making center-channel
content more predominate in the overall mix.
• Maximum attenuation setting (-80.0 dB) applies a -80 dB ratiometric
reduction of center-channel content. Center-channel content is
restored as in-phase center-channel content at a -80 dB ratio
relative to overall level, making center-channel content less
predominate in the overall mix.
(20.0dB to -80.0 dB range in 0.1 dB steps; default = 0 dB)
Note: Default setting is recommended to maintain center-channel
predominance in downmix representative to that of the original source
5-channel mix.
source that is re-applied as Lo and Ro content to the DM-L and DM-R
stereo mix.
• Minimum attenuation setting (-0.0 dB) applies no ratiometric
reduction. Surround-channel content is restored with no
attenuation, making Lo and Ro content more predominate in the
overall mix.
• Maximum attenuation setting (-80.0 dB) applies a -80 dB ratiometric
reduction of surround-channel content. Surround-channel content is
restored at a -80 dB ratio relative to overall level, making
surround-channel content less predominate in the overall mix.
(20.0 dB to -80.0 dB range in 0.1 dB steps; default = 0 dB)
Note: Default setting is recommended to maintain surround-channel
predominance in downmix representative to that of the original source
5-channel mix.
3–32 • Operating Instructions LDP-8242 User Manual (Iss. 03)
Page 67

Input Flex Mix – Provides a 16-channel mixer in which each of the inputs
In this example four, 4-input mono mixers are provided by selecting
Flex Mixer Bus A for the Flex Mix 1 thru Flex Mix 4 inputs, and Flex Mixer Bus B
for the next four inputs, and so on as shown.
can be mixed onto up to 16 independent output summing nodes. Each
input channel has independent gain and mute controls.
LDP-8242 User Manual (Iss. 03) Operating Instructions • 3–33
Page 68

(continued)
Note: Flex Mix input channels Flex Mix 2 thru Flex Mix 16 have controls identical to that described here for Flex Mix 1. Therefore,
only the Flex Mix 1 controls are shown here.
For each Flex Mix input channel, its source should be considered and appropriately set. Unused input channels should be set to
the Silence selection.
Flex Mix Input Channel Source Using the Source drop-down list, selects the audio input source to be
Gain / Mute Control Provides relative gain (in dB) control and a channel Mute checkbox.
Flex Mix Summing Node (Bus) Selector Each Flex Mix input channel can be fed as desired to any of 16 summing
directed to the corresponding bus channel from the choices listed below.
• Silence
• Embed Ch 1 thru Embed Ch 16
• AES Ch 1 thru AES Ch 16
(-80 to +20 dB range in 0.1 dB steps; unity = 0.0 dB)
node buses (Flex Mix A thru Flex Mix P). The flex mix buses can be
routed and processed the same as any other audio input source.
Note: See the examples on the previous page for providing various types
of mixers by applying a common Flex Mix Bus to various input channels.
3–34 • Operating Instructions LDP-8242 User Manual (Iss. 03)
Page 69

Output Audio Routing/Controls
The card internal bus, Audio DSP outputs, and
the Dolby encoder output pair are available as
sources for the card embedded audio outputs.
The example here shows various Source
routing selections (using the Emb Audio Out
sub-tab) that direct upmix outputs L thru Rs to
Embedded outputs Ch 1 thru Ch 6, the
pre-upmix Bus Ch1 and Ch 2 sources to
Embedded outputs Ch 7 and Ch 8, (unused
embedded channels can be set to Silence or
Mute).
Each bus channel provides Gain, Mute, and a
peak level display.
The source-to-destination correlation shown
here is only an example; any of the digital audio
output destinations described on the following
pages can receive inputs from any of the
internal bus, or DSP sources.
Provides controls to route card audio from card processing paths to
16-channel embedded audio destinations external of the card. Use the
Embed Audio Out sub-tab to access embedded output routing.
LDP-8242 User Manual (Iss. 03) Operating Instructions • 3–35
Page 70

(continued)
•
•
•
•
•
•
•
•
Note: Default factory preset routing routes bus channels Bus Ch 1 thru Bus Ch 16 to embedded outputs Emb Ch 1 thru Emb Ch
16. Emb Ch1 thru Emb Ch 16 controls are identical to those shown here for Emb Ch 1.
Embedded Output Channel Source Select With the Emb Audio Out sub-tab selected, using the Source drop-down
Bus Ch 1 thru Ch 16 as Source for
Embedded Channel Output
Upmixer Channels as Source for
Embedded Channel Output
Loudness-Processed Channels as Source
for Embedded Channel Output
list selects the card audio source to be directed to the corresponding
embedded output channel from the choices described below.
Bus Ch 1 thru Bus Ch 16 range in Source drop-down list routes a card
internal bus channel (Bus Ch 1 thru Bus Ch 16) to be the source for the
selected embedded output channel.
(In this example, Bus Ch 1 is the source for destination Embedded output
Ch 1).
Upmix L thru Upmix Rs range in Source drop-down list routes an upmixed
channel to be the source for the selected embedded output channel.
(In this example, Upmix L is the source for destination Embedded output
Ch 1).
Note: This menu option is only available with the UM-8242 licensed
feature.
LP51 L thru LP51 Rs (5.1-channel loudness processor processed
channels L thru Rs) range in Source drop-down list routes a
loudness-processed channel to be the source for the selected embedded
output channel.
(In this example, loudness-processed channel LP51 L is the source for
destination Embedded output Ch 1)
Note: Where stereo loudness processor is available, drop-down
selections for these channels are LP2 L and LP2 R.
Tone as Source for Embedded Channel
Output
3–36 • Operating Instructions LDP-8242 User Manual (Iss. 03)
Ton e 1 thru To ne 8 range in Source drop-down list routes one of eight
tones to be the source for the selected embedded output channel.
(In this example, Tone 1 is the source for destination Embedded output
Ch 1)
Page 71

(continued)
Silence as Source for Embedded Channel
Output
Gain / Mute Control Provides relative gain (in dB) control and peak level display for
Silence as Source for AES Channel Output Silence selection in Source drop-down list mutes the selected AES output
Silence selection in Source drop-down list mutes the selected embedded
output channel. Use this setting for any unused embedded output
channels.
(In this example, Silence is the source for destination Embedded output
Ch 1)
corresponding embedded output channel.
Also provides a channel Mute checkbox.
(-80 to +20 dB range in 0.1 dB steps; unity = 0.0 dB)
channel. Use this setting for any unused AES output channels.
(In this example, Silence is the source for destination Embedded output
Ch 1)
Note: If an AES pair is being used as an input, the channels do not have
be muted here.
Gain / Mute Control Provides relative gain (in dB) control and peak level display for
corresponding AES output channel.
Also provides a channel Mute checkbox.
(-80 to +20 dB range in 0.1 dB steps; unity = 0.0 dB)
LDP-8242 User Manual (Iss. 03) Operating Instructions • 3–37
Page 72

Channel Mapping sub-tab provides channel selection for 5.1 and/or
•
•
stereo channels to be loudness processed. Also provides controls for
selecting loudness processing profile preset.
Audio Loudness Dual Metering
Note:5.1-channel loudness processor is described below. Stereo loudness processor has identical controls with omission of
controls other than L and R.
Loudness Meter 1 / Meter 2 Source
Channel Selection
Processing Profile Preset Selection Enables or bypasses loudness processing, and allows selection of preset
Separate drop-down lists for each loudness processor input channel that
directs any combination of card audio processing channels (listed below)
to each of the loudness processor inputs as shown below.
Note: Set any unused channel inputs to Silence.
loudness profile best suited for the program material and/or model of
processing desired as follows:
• TV 5B General – This is the general, recommended preset for all
types of content. It provides moderate dynamic range compression
and is calibrated to produce audio having an average dialog
loudness of -27LKFS with no additional output level trim. Use of this
preset as an initial setting is recommended.
• TV 5B Light – Similar to TV 5B General, this preset varies in that
multi-band compression is reduced closer to 2:1, thereby providing
a more gentle action.
Note: This preset sacrifices agility in loudness control in favor of a
more gentle compression profile; this preset may not be suitable for
some material.
• TV 5B Heavy – Similar to TV 5B General, this preset varies in that
multi-band compression is increased for greater level
density/adherence to target at the expense of dynamic range.
• TV 5B Loud – Similar to TV 5B Heavy, but with a louder, more
punchy perception.
• ITU Loud Limit – Utilizes a specially tuned input AGC plus
multi-band and a final limiter to gradually adjust the average
program loudness to an internally set AGC value, with the
multi-band and final limiters acting until the AGC gains control of the
level. This preset is most appropriate for ingest or live program
material.
Note: This preset bypasses the multi-band AGC. As such, it has
less ability to manage spectral balance.
• Protection Limit – Bypasses all processing except for final output
limiter, which is set only to prevent overload.
Note: Unless the audio received has already been loudness
processed, this setting is typically not recommended.
• Custom – See next page.
Master Output Gain Control Allows fine adjustment of the overall output gain.(-20.0 dB to 11 dB range
Note: For convenience, Measurement 1 and Measurement 2 audio loudness metering displays are duplicated on this
sub-tab. Refer to Card Loudness Metering (p. 3-47) for full descriptions of these displays and their controls.
3–38 • Operating Instructions LDP-8242 User Manual (Iss. 03)
in 0.1 dB steps; default = 0.0 dB)
Note: This control is primarily useful in matching the output level to an
alternate LKFS target level if required. Also, it is useful (where desired) in
matching various Processing Profile presets to have similar output levels.
Page 73

Provides custom detailed parametric controls for modifying any of the
factory Presets profiles to suit user preferences.
Audio Loudness Dual Metering
Note:
• Modification of default presets settings using the Custom Preset page can have a profound effect on program material
technical and aesthetic aspects. Setup should only be performed by authorized personnel, and should be fully assessed
before being used for on-air programming.
• Custom settings may result in loudness processing that is no longer compliant with ITU BS.1770 – ATSC A/85.
The Custom Preset page exposes parametric controls correlating to functional blocks as shown below. Refer to A thru H on the
next page for these controls.
L , R, C,
LF E, L s , R s
PC M I nputs
(F rom A udi o
Ro uti ng/Ga in
Co ntr ol)
G
F
E
D
C
B
A
C ros so ver
C ros so ver
C ros so ver
C ros so ver
Input
Pa rame tric
E Q 1 – 3
Inpu t A GC
B5 BP
B5 AGC
B4 BP
B4 A GC
HP
B3 BP
B3 AGC
HP
B2 BP
HP
B1 BP
B2 AGC
B1 AGC
B5 L im iter
B4 L im iter
B3 L im iter
B2 L im iter
B1 L im iter
L , R, C,
Ou tput Li mi ter /
Σ
H
Mast er Ga in
C ontro l
L FE , L s , R s
PCM O utp uts
LDP-8242 User Manual (Iss. 03) Operating Instructions • 3–39
Page 74

(continued)
A
B
C
D
E
F
G
H
Audio Loudness Dual Metering
Shown below are the Custom Preset sub-tab parametric controls corresponding to A thru H on the previous page. Non-standard
controls and unique functions are described below.
• Parametric EQ 1 thru 3: Provides 3 bands to provide notch filters. Default set to 0 dB (no effect). Each filter has a ±12 dB
gain control, and selectable center frequencies from 20 Hz – 22.05 kHz.
• Inf:>1Thr check boxes: When enabled, automatically increases AGC ratio to Infinity:1 once a signal exceeds the AGC
threshold, allowing for expansion below the threshold and limiting above the threshold. Useful for bass frequency control.
• Soft Clip controls: For low-frequency bands 1 and 2, sets the point above in which band 1 (low bass) and band 2 (mid bass)
are very quickly limited, acting more like a clipper without the artifacts. This helps maintain a “tight” bass sound.
Applying and Saving Custom Presets
Note: Presets are engaged on the Channel Mapping sub-tab page. The Presets drop-down on this page only populate the
fields here with the defaults used for a particular preset profile.
1. In Presets drop-down on the Channel Mapping sub-tab page, select Custom.
2. On this sub-tab page, select the default preset to “build from” (i.e., preset closest to desired custom) and press Load
Tem pla te. The fields here are now populated with the detailed default settings for the selected default preset profile.
3. Perform parametric changes as desired. Listen to material and assess changes performed. Note: Any changes made on
this page are saved using card global presets and not locally on this page.
4. Save the custom settings in accordance with Presets tab instructions in Chapter 3. Operating Instructions of the card’s
product manual.
3–40 • Operating Instructions LDP-8242 User Manual (Iss. 03)
Page 75

Provides an ITU-R BS.1770-1 / ATSC A/85 Audio Loudness
•
•
In this example, 5.1-channel
selections in Meter 1 and
Meter 2 are respectively used
for loudness pre-processed
channels from a card
Upmixing function, and
loudness post-processed
channels from a card
5.1-channel loudness
processor. The respective
Measurement displays show a pre-processed short-term loudness of -11.3 LUFS, and a post-processed short-term loudness of
-23.0 LUFS, with both measurements being within reasonable ranges and as expected.
measurement of two independent 5.1-channel groups (L, R, C, LFE, Ls,
and Rs). If desired, the independent meters can be set to provide pre and
post-processing assessments of the same program material.
Audio Loudness Dual Metering
Note: This function provides only loudness metering as described here; this function does not provide active loudness correction.
Selected channels are only monitored by this function, with no affect on the channels.
Loudness Meter 1 / Meter 2 Source
Channel Selection
For Meter 1 and Meter 2, separate drop-down lists for each loudness
meter source (input) channel as listed below.
• Bus Ch1 thru Bus Ch 16
• Upmix L, R, C, LFE, Ls, Rs output channel
• Loudness Processor L, R, C, LFE, Ls, Rs output channel
• Tone 1 thru Tone 8
• Silence
Note: Source input channels include drop-downs for L, R, C, LFE,
Ls, Rs, Aux 1, and Aux 2 channels. LFE, Aux 1, and Aux 2 channels
are not included in loudness measurements.
On cards equipped with multiple upmixers and/or loudness
processors, drop-down choices are identified by function, processor
designator, and channel (e.g., “LP51 A Ls” denotes 5.1-channel
loudness processor A, left surround (Ls) channel output).
Set any unused channel inputs to Silence.
Measured Loudness Display Dual displays for Meter 1 and Meter 2 that show respective current
LDP-8242 User Manual (Iss. 03) Operating Instructions • 3–41
aggregate ITU-R BS.1770-1 loudness for the selected monitored
channels.
Note: -inf LUFS display indicates loudness meter is not receiving any
input (for example, as in the case of wrong (muted) channels being routed
to meter instead of intended channels).
Page 76

(continued)
In this example, the last 3 measurement periods are averaged in each reported LUFS value. This cycle is continually
repeated. The Measurement Window parameter sets the sampling time accumulated before each averaging
recalculation.
Short Term Window / Reset Control Ganged Short Term Window control for Meter 1 and Meter 2 sets the
duration (in seconds) that sampling time accumulates before each
averaging recalculation (see below)
(0.1 to 60.0 seconds range in 0.1-second steps; default = 1.8 sec)
Reset button clears the accumulated moving average data, and restarts
measurement.
3–42 • Operating Instructions LDP-8242 User Manual (Iss. 03)
Page 77

Provides upmixing of any normal PCM stereo pair into 5.1 surround
•
•
•
Selects the audio input source to be
directed to the corresponding upmixer input
from the choices listed below.
• Bus Ch 1 thru Bus Ch 16
• LP L thru LP Rs (multiple if equipped with
multiple loudness processing)
•Ton e 1 thru Tone 8
• Silence
Bus Ch 1 –
Ch 16
>
Bus Ch 1
Bus Ch 2
Bus Ch 3
Bus Ch 4
Bus Ch 5
Bus Ch 6
L
R
(C)
(LFE)
(Ls)
(Rs)
Upmix L
Upmix R
Upmix C
LFE
Upmix Ls
Upmix Rs
Upmix outputs
(available as
sources for
audio output
routing)
sound. Requires the UMA-8242 option.
Note: For any six channels selected for this function, the Left and Right channel selections always serve as the stereo input pair.
• Up Mixer Mode Control
• Upmixer Input Channel Selection
Enables or bypasses upmixer as follows:
• Auto: Automatic enable/bypass of 5.1 upmix function as follows:
If detected signal level on all three of the selected channels
designated as Center, Left Surround, and Right Surround are
below the level threshold set using the 5.1 Detection Threshold
control (described below), upmixer produces new 5.1 content
generated by the upmixer.
If detected signal level on any of the three of the selected channels
designated as Center, Left Surround, and Right Surround is
above the level threshold set using the 5.1 Detection Threshold
control, upmixing is bypassed and the channels fed to the upmixer
pass unaffected to the upmixer outputs.
• Always Upmix: Manual enable turns on upmixer and overwrites
content on all six selected channels with new 5.1 content generated
by the upmixer regardless of original signal level or content.
• Bypass: Manual disable bypasses the upmixer. When bypassed,
the six input audio channels pass unaffected to the upmixer output.
Separate drop-down lists for Left, Right, Center, LFE, Left Surround,
and Right Surround allow a stereo pair to be upmixed to 5.1-channel.
The example here shows selection of bus channels 1 and 2 as the
received stereo source (Bus Ch1 and Ch 2 for Left and Right drop-down
list selections in the Upmixer Selection tool).
Using the setup shown in the example, when upmix is active (either forced
upmix or auto-enabled) the Upmix L thru Upmix Rs channels comprise a
5.1-channel upmix of the input stereo pair. If any content is present on the
monitored C, LFE, Ls, or Rs input channels whose is above a
user-defined level threshold (Bus Ch 3 thru Ch 6 in this example), all six
inputs channels pass through the upmixer, with upmixing bypassed.
Upmixer output channels Upmix L thru Upmix Rs are available as
sources for the card audio output routing.
LDP-8242 User Manual (Iss. 03) Operating Instructions • 3–43
Page 78

(continued)
• Up Mixer Status Display
• Auto Crossfade Speed Controls
Shows activity status of upmixer processing as follows:
• Auto Mode - Currently Upmixing: With upmixer enable set to
Auto, indicates selected channels designated as Center, LFE, Left
Surround, and Right Surround are clear for use (as described
above); upmixer is currently up-mixing received stereo pair and
overwriting the six selected channels with new 5.1 upmix.
• Auto Mode - Currently Bypassed: With upmixer enable set to
Auto, indicates selected channels designated as Center, LFE, Left
Surround, and Right Surround have content (such as existing
original 5.1 or other content); upmixer is bypassed (disabled) and
allows normal passage of six selected channels.
• Upmixing: Indicates upmixer is manually enabled (set to Always
Upmix) and is currently up-mixing received stereo pair and
overwriting the six selected channels with new 5.1 upmix.
• Bypassed: Indicates upmixer is manually disabled (set to Bypass)
and is currently passing all selected channels unaffected.
•
Individual controls select the relative crossfade transition speed between
Upmix to Bypass (going to inactive; from 5.1 to 2.0) and Bypass to Upmix
(going to active; from 2.0 to 5.1) when upmixer enable is set to Auto and
the active threshold (as set by the 5.1 Detection Threshold control) is
crossed in either direction.
To suit program material and production aesthetic preferences, several
choices are available as shown to the left. Slower settings allow for a
more gradual transition between modes, however with a longer interval
before levels stabilize. Faster settings conversely allow for a smaller
interval before levels stabilize, however with greater perceived
abruptness.
3–44 • Operating Instructions LDP-8242 User Manual (Iss. 03)
Page 79

(continued)
-20dBFS
-60dBFS
CLsRs
A
CLsRs
B
Above Threshold
(Bypass)
Below Threshold
(Overwrite)
• 5.1 Detection Threshold Control
Adjusts the threshold at which selected channels designated as C, LFE,
Ls, and Rs are considered to have viable content, or at which signal levels
can be considered insignificant when upmixer enable is set to Auto.
Setting affects automatic enable/bypass of 5.1 upmix function as follows:
• If detected signal level on all three of the selected channels
designated as Center, Left Surround, and Right Surround are
below the level threshold set using the 5.1 Detection Threshold
control, upmixer allows overwrite of all six selected channels with
the new 5.1 signal complement.
• If detected signal level on any of the three of the selected channels
designated as Center, Left Surround, and Right Surround is above
the level threshold set using the 5.1 Detection Threshold control,
upmixer is bypassed, thereby releasing the selected six channels
and allowing the original channels to pass unaffected.
(Range is -150 dB to 0 dB in 0.1dB steps;
0 dB equivalent to +24 dBu=> 0 dBFS
Typicallythe 5.1 Detection Threshold control should be set to provide a
usable threshold that maintains a threshold at which valid levels large
enough over the threshold disable the auto upmix (A) while nuisance
levels considerably below the threshold (B) are rejected, allowing the
upmixer to stay locked in the enabled mode and overwrite these signals
with the new signals.
Optimum setting is dependent on program material general overall levels.
A -60dB setting is recommended for material closely adhering to the
SMPTE -20dBFS Alignment level for normal material such as dialog.
LDP-8242 User Manual (Iss. 03) Operating Instructions • 3–45
• Center Width Control
• Surround Depth Control
Adjusts center channel content (in terms of percentage) applied to L and
R channels.
• Minimum setting keeps all L+R (mono) content confined to center
(C) channel, with any center channel content removed from L and R
channels.
• Higher settings progressively blend respective L and R mono
content back into L and R channels, with 100% setting resulting in
center channel level going to zero and L/R channels becoming
normal L/R channels containing some mono content.
(0% to 100% range in 0.1% steps; default = 0%)
Adjusts surround channel content (in terms of percentage) applied to Ls
and Rs channels.
• Maximum setting results in greatest surround channel levels.
• Lower settings progressively diminish surround channel levels, with
0% setting resulting in no Ls or Rs level, with Ls and Rs content
progressively folded back into L and R, respectively.
(0% to 100% range in 0.1% steps; default = 100%)
Page 80

Provides input and output support of Dolby metadata routing between the
Port 1
as output
Dolby®
Decoder
Dolby® Decoder
Input Video (VBI metadata)
(Input)
Dolby decoder/encoder and serial/video interfaces.
Metadata Routing and Embedding
Note: After familiarizing yourself with the controls described here, see the following page for an example showing interrelated use
of these controls.
Serial Port Selectors For serial ports 1 and 2, selects the source for metadata to be exported
(outputed) from the card over a port as shown from the choices listed to
the left and shown below. (None selection frees the port to be used as an
input.)
Note: If settings here and described below attempt to set a given port as
both an output and an input, Serial Ports Conflicts status display
indicates conflict (e.g., “Port A configured as both input and output”.))
VBI SMPTE 2020 Embedding Source
Selector
For VBI embedding at the card SDI output, selects the source of metadata
to be exported (outputed) from the card from the choices listed to the left
and shown below.)
Serial Port 1
Serial Port 2
Dolby®
Decoder
Dolby® Decoder
Input Video (VBI metadata)
None
Output SMPTE
2020 VBI
metadata
embedding
SDI Input VBI Metadata Status Display Indicates if Dolby metadata is present on input SDI VBI, as well as VBI
Metadata Embedding
3–46 • Operating Instructions LDP-8242 User Manual (Iss. 03)
line number. (If no metadata present, displays “Not Present”.)
Embedded Metadata Output enables SMPTE 2020-1 metadata
embedding in the SDI video output, as selected using controls described
above.
Embedded Output Line allows selection of SMPTE 2020-1 metadata line
location within the VANC space for re-inserted Dolby® metadata.
(Range is 9 thru 41)
Note: Although the output line drop-down will allow any choice
within the 9 thru 41 range, the actual range is automatically
clamped (limited to) certain ranges to prevent inadvertent conflict
with active picture area depending on video format. See Ancillary
Data Line Number Locations and Ranges (p. 3-9) for more
information.
The card does not check for conflicts on a given line number. Make
certain the selected line is available and carrying no other data
unless existing metadata is to be intentionally overwritten.
Typically, when encoding is active it is recommended that whatever
metadata source the encoder is using (e.g., input video SMPTE
2020, decoder, or serial) be also applied to metadata output
embedding, and also that the line number be set to overwrite
obsolete input VBI metadata. This avoids any ambiguity of having
different metadata packets on multiple lines.
Page 81

Provides two independent GPI controls for GPI 1 and GPI 2 that invoke a
•
•
user-defined card presets upon receiving a contact closure/logic level on
the corresponding GPI input.
GPI Controls
Note: After familiarizing yourself with the GPI controls described here, refer to the section “Troubleshooting” on page 3-51 for a
comprehensive example using these controls for multi-source audio routing.
GPI Status Displays Status displays for GPI 1 and GPI 2 indicate Open (and “unlit” indicator)
GPI Preset Number Go-To Select Individual drop-downs (one for each of the four GPI states monitored by
GPI Trigger Coding Selects GPI triggering as follows:
for GPI not present on GPI input. Display indicates Closed (and “lit”
indicator) when GPI is present.
Note: GPI trigger threshold/type is set using GPI Coding drop-down
described below. Refer to Specifications in Introduction, Chapter 1 for GPI
electrical specifications and limitations.
the card) allow invoking a card preset when the corresponding GPI state
is true.
• No Preset setting inhibits going to a preset if the state
corresponding to the drop-down becomes true. This setting is
typically used to inhibit GPI for an unused GPI.
• 1 thru 64 setting allows any of 64 user-defined presets to be
invoked when the state corresponding to the drop-down becomes
true.
Note: No Preset setting should be considered and used for any
logic state that is not specifically to be used for a valid GPI state.
GPI go-to number settings are independent of saved presets and
cannot be defined under a preset.
• Disabled: GPI conditions on both GPI ports are ignored; no preset
is invoked as a result of GPI status. Use this setting as a master
disable of GPI functions.
• Edge and Binary: See the description and examples below.
Note: Make certain GPI Trigger Coding is set to Disabled if GPI is not to
be used. Selecting Binary triggering without controlled GPI inputs
will result in inadvertently invoking a preset.
LDP-8242 User Manual (Iss. 03) Operating Instructions • 3–47
Page 82

Edge GPI coding triggers on transitional state changes occurring
on individual GPI inputs for the four states on the GUI (shown to
the right).
In this example, when GPI 2 “closes” (edge trigger going
from HI to LO), Preset 7 is invoked. Preset 7 would be
defined to invoke the settings desired for this GPI action.
When GPI 2 “opens” (edge trigger going from LO to HI),
Preset 8 is invoked. Preset 8 could be defined to invoke
normal settings to revert to the pre-GPI condition. The state
shown in bold is the currently active state.
Binary GPI coding triggers on conditions that consider state combinations on both GPI 1 and GPI 2 for the four state combinations
on the GUI (shown to the right). This mode is useful where both GPIs must be considered before invoking an action.
In this example, both GPIs are to be considered:
- “AES local insertion” on GPI 1 preempts network embedded audio by invoking Preset 2.
- “EAS insertion” on GPI 2 preempts both network embedded audio and AES local insertion by invoking Preset 3.
Setting both of these
drop-downs to Preset 3
sets rule for if GPI 2 is
closed (LO), Preset 3
(“EAS insertion” in this
example) is invoked
regardless of
open/close on GPI 1.
Refer to the section
“Troubleshooting” on
page 3-51” (p. 3-51) for a
example showing the audio
routing presets described here.
If GPI 1 is closed (LO), and
GPI 2 is open, Preset 2
(“AES local insertion” in this
example) is invoked.
In this setup, when both
GPI 1 and GPI 2 are open
(HI), Preset 1 (“norm”, or go
back to network embedded)
is invoked. The state shown
in bold is the currently active
state.
(continued)
3–48 • Operating Instructions LDP-8242 User Manual (Iss. 03)
Page 83

Allows up to 64 card user settings configuration presets to be saved in a
The Preset Name field allows entry of
names that are useful in describing the
purpose or action of a particular preset,
as shown in the examples here.
(Up to 62 ASCII characters can be
entered.)
• Pressing Save stores all current card control settings for the
selected preset (in this example, pressing Save for Preset 1
(“norm”) saves all current card control settings to Preset 1 norm.
• Pressing Load recalls a preset.
• Pressing Delete clears a preset. (After a delete, pressing Load
replaces the deleted preset with factory default settings.)
•
•
Download (save) card presets to a
network computer by clicking
Download Presets
– Save at the
bottom of the
Presets page.
Browse to a desired
save location (in
this example, My
Documents\My
Presets).
The file can then be
renamed if desired
(RCVR21 Presets
in this example)
before committing
the save.
Upload (open) card presets from a network
computer by clicking Upload
at the bottom of
DashBoard.
Browse to the location
where the file was saved
on the computer or
drive (in this
example, My
Documents\My
Presets).
Select the desired
file and click Open
to load the file to the
card.
Note: Preset transfer between card download and file
upload is on a group basis (i.e., individual presets cannot
be downloaded or uploaded separately.
After uploading a presets file, engagement of a desired
preset is only assured by pressing the Press To Load
button for a desired preset.
Presets allow convenient recall of custom user settings performed on the card. Presets are especially useful in defining card
settings to invoke particular actions upon receiving a GPI trigger (see GPI Controls (p. 3-47) for more information).
When a preset is invoked, only the setting changes called by the preset are re-loaded, avoiding unnecessary delay or signal
disruption that would otherwise result from a global control preset change.
Preset and then recalled (loaded) as desired. All current settings
(including list selections and scalar (numeric) control settings such as
Gain, etc.) are saved when a Preset Save is invoked.
Presets
LDP-8242 User Manual (Iss. 03) Operating Instructions • 3–49
Page 84

(continued)
•
•
Event-based loading is particularly useful in providing automated card setup when transitioning from normal processing to
processing supporting an alternate format (as shown in the example here when transitioning from network HD to local/legacy
SD)
As described in this manual, card control settings are set up
for expected input formats and saved to presets on the
Presets sub-tab (in this example, normal HD settings and an
alternate SD setting where analog audio is embedded).
With the event-based loading set as shown here, the presets
saved above are invoked upon receiving an HD or SD input
Save/Delete Protect Button Locks and unlocks editing of presets to prevent accidental overwrite as
Event Preset Load Select Separate drop-downs for SD, and HD input signal acquisition states allow
follows:
• Unprotected: Allows preset Save and Delete buttons to save or
delete current card settings to the selected preset. Use this setting
when writing or editing a preset.
• Protected: Toggle to this setting to lock down all presets from being
inadvertently re-saved or deleted. Use this setting when all
presets are as intended.
Note: When toggling between button modes, make sure to wait for the
card Settings status indicator to turn green before moving on.
Event-based loading allows a defined preset to be automatically engaged
upon various received signal statuses.
going to a selected preset upon input acquisition state.
Note: No Preset setting should be considered and used for any
input state that is not specifically to be used for a valid GPI state.
Go-to number settings are independent of saved presets and
cannot be defined under a preset.
3–50 • Operating Instructions LDP-8242 User Manual (Iss. 03)
Page 85

Troubleshooting
This section provides general troubleshooting information and specific symptom/corrective
action for the LDP-8242 card and its remote control interface. The LDP-8242 card requires no
periodic maintenance in its normal operation; if any error indication (as described in this section)
occurs, use this section to correct the condition.
Error and Failure Indicator Overview
The LDP-8242 card itself and its remote control systems all (to varying degrees) provide error
and failure indications. Depending on how the LDP-8242 card is being used (i.e, standalone or
network controlled through DashBoard™), check all available indications in the event of an error
or failure condition.
The various LDP-8242 card and remote control error and failure indicators are individually
described below.
The descriptions below provide general information for the various status and error indicators.
For specific failures, also use the appropriate subsection listed below.
•“Basic Troubleshooting Checks” on page 3-55
•“Processing Error Troubleshooting” on page 3-55
Card-edge Status/Error Indicators and Display
Figure 3.9 shows and describes the LDP-8242 card-edge status indicators and display. These
indicators and the display show status and error conditions relating to the card itself and remote
(network) communications (where applicable). Because these indicators are part of the card itself
and require no external interface, the indicators are particularly useful in the event of
communications problems with external devices such as network remote control devices.
Figure 3.9 Card-edge Status Indicators and Display
LDP-8242 User Manual (Iss. 03) Operating Instructions • 3–51
Page 86

Table 3.3 Status/Error Indicators and Display
Item Function
Displays 4-digit abbreviated code showing menu and submenu selections. When in a menu
Display
displaying a parameter setting, the display shows parametric scalar value (and +/- sign where
applicable).
Card-edge
Manual
Controls
Input Format
Indicators
Menu Depth
Indicators
RMT LED
REF LED
LOCK LED
ERR LED
These controls are not implemented.
Three blue LEDs indicate the input signal format being received and locked onto by the LDP-8242:
• HD (1080p2997/25, 720p)
• SD (625i, 525i)
Continuous cycling of the LEDs indicates the LDP-8242 has not locked onto a particular format (as
in the case of no signal input).
This function is currently reserved.
When flashing, this LED indicates that the LDP-8242 is receiving control message from remote
network control (DashBoard™)
When lit, this LED indicates that the LDP-8242 is receiving valid framesync when set up for
framesync reference.
When lit, this LED indicates that the LDP-8242 unable to lock to framesync, or unable to lock to
input standard.
This LED is not implemented.
3–52 • Operating Instructions LDP-8242 User Manual (Iss. 03)
Page 87

DashBoard™ Status/Error Indicators and Displays
Tab l e 3.4 shows and describes the DashBoard™ status indicators and displays. These indicator
icons and displays show status and error conditions relating to the LDP-8242 card itself and
remote (network) communications.
Table 3.4 DashBoard™ Status Indicators Icons and Displays
Indicator Icon or Display Error Description
Red indicator icon in Card Access/Navigation Tree pane shows card with Error
condition (in this example, the Card Access/Navigation Tree pane shows a general
error issued by the LDP-8242 card in slot 7).
Specific errors are displayed in the Card Info pane (in this example “No connection to
device” indicating LDP-8242 card is not connecting to frame/LAN).
If the LDP-8242 card is not connecting to the frame or LAN, all controls are grayed-out
(as shown in the example here).
Gray indicator icon in Card Access/Navigation Tree pane shows card(s) are not being
seen by DashBoard™ due to lack of connection to frame LAN (in this example, both a
LDP-8242 card in slot 7 and the MFC-8320-N Network Controller Card for its frame in
slot 0 are not being seen).
Yellow indicator icon in Card Access/Navigation Tree pane shows card with Alert
condition (in this example, the Card Access/Navigation Tree pane shows a general
alert issued by the MFC-8320-N Network Controller Card).
Clicking the card slot position in the Card Access/Navigation Tree (in this example
Network Controller Card “Slot 0: MFC-8320-N”) opens the Card Info pane for the
selected card. In this example, a “Fan Door Open” specific error is displayed.
Yellow indicator icon in LDP-8242 Card Info pane shows error alert, along with cause
for alert (in this example, the LDP-8242 is receiving no video input, or a video input that
is invalid for the card and/or its current settings).
LDP-8242 User Manual (Iss. 03) Operating Instructions • 3–53
Page 88

Access the Card Info pane for a specific card by clicking the card slot position in the Card
By clicking on “Slot 0: MFC-8320-N”
in this example, Card Info is
displayed for frame Network
Controller Card
Status for selected card is
shown here (in this
example, connection OK
and “Fan Door Open”
alert)
Card general information
is displayed in lower
portion of Card Info pane
By clicking on “Slot 3:
LDP-8242” in this example,
Card Info is shown for
LDP-8242 card in slot 3
Status for selected
card is shown here
(in this example, all
indications are OK)
Where applicable,
additional status is
displayed (as shown in
this example)
Access/Navigation Tree pane (as shown in the example in Figure 3.10).
Figure 3.10 Selecting Specific Cards for Card Info Status Display
3–54 • Operating Instructions LDP-8242 User Manual (Iss. 03)
Page 89

Basic Troubleshooting Checks
Failures of a general nature (affecting many cards and/or functions simultaneously), or gross
inoperability errors are best addressed first by performing basic checks before proceeding further.
Tab le 3 .5 provides basic system checks that typically locate the source of most general problems.
If required and applicable, perform further troubleshooting in accordance with the other
troubleshooting tables in this section.
Item Checks
Verify for power presence
Check Cable connection
secureness and connecting
points
Table 3.5 Basic Troubleshooting Checks
On both the frame Network Controller Card and the LDP-8242, in all cases when
power is being properly supplied there is always at least one indicator illuminated.
Any card showing no illuminated indicators should be cause for concern.
Make certain all cable connections are fully secure (including coaxial cable attachment
to cable ferrules on BNC connectors). Also, make certain all connecting points are as
intended. Make certain the selected connecting points correlate to the intended card
inputs and/or outputs. Cabling mistakes are especially easy to make when working
with large I/O modules.
Card seating within slots
Check status indicators and
displays
Troubleshoot by substitution
Processing Error Troubleshooting
Tab le 3 .6 provides LDP-8242 processing troubleshooting information. If the LDP-8242 card
exhibits any of the symptoms listed in Ta bl e 3. 6, follow the troubleshooting instructions
provided.
In the majority of cases, most errors are caused by simple errors where the LDP-8242 is not
appropriately set for the type of signal being received by the card.
The error indications shown below are typical for the corresponding error conditions listed. Other
error indications not specified here may also be displayed on DashBoard™ and/or the LDP-8242
card-edge status indicators.
Where errors are displayed on both the LDP-8242 card and network remote controls, the
respective indicators and displays are individually described in this section.
Make certain all cards are properly seated within its frame slot. (It is best to assure
proper seating by ejecting the card and reseating it again.)
On both DashBoard™ and the LDP-8242 card-edge indicators, red indications signify
an error condition. If a status indicator signifies an error, proceed to the following
tables in this section for further action.
All cards within the frame can be hot-swapped, replacing a suspect card or module
with a known-good item.
LDP-8242 User Manual (Iss. 03) Operating Instructions • 3–55
Page 90

Table 3.6 Troubleshooting Processing Errors by Symptom
Symptom Error/Condition Corrective Action
• DashBoard™ shows Video
yellow icon and Input Invalid
message in LDP-8242 Card Info
pane.
• Card-edge Input Format LEDs
show continuous cycling.
• DashBoard™ shows none in
Reference message in
LDP-8242 Card Info pane.
No video input present
Frame sync reference not
properly selected or not being
received
Make certain intended video source is
connected to appropriate LDP-8242 card video
input. Make certain BNC cable connections
between frame Rear I/O Module for the card
and signal source are OK.
• If external frame sync reference is not
intended to be used, make certain the
Framesync Mode selection list is set to Free
Run or Input Video as desired.
• If external frame sync reference is intended to
be used, make certain selected external frame
sync reference is active on frame sync frame
bus. (External reference signals Reference 1
and Reference 2 are distributed to the
LDP-8242 and other cards via a the frame
bus.).
Refer to Framesync function submenu tab on
page 3-17 for more information.
Video/audio synchronization or
delay noted.
Ancillary data (closed captioning,
timecode, Dolby® metadata,
AFD) not transferred through
LDP-8242.
AES audio not processed or
passed through card.
Card will not retain user settings,
or setting changes or presets
spontaneously invoked.
Source synchronization
condition
VANC line number conflict
between two or more ancillary
data items
AES Port Direction Select not
set to match intended use for
AES rear module port.
GPI Controls tab GPI Coding
set to Binary with no controlled
GPI source connected to GPI
inputs
Use the Audio/Video Delay Offset controls to
compensate for video/audio delay.
Refer to Audio Bus Input Routing/Controls
function submenu tab on page 3-28 for more
information.
Make certain each ancillary data item to be
passed is assigned a unique line number (see
Ancillary Data Line Number Locations and
Ranges on page 3-9).
Each AES channel pair has port direction
selectors that set the AES as input or output.
Make certain port is set as input or output, as
intended, in accordance with Output Audio
Routing/Controls (p. 3-35).
If GPI is not to be used, make certain GPI
Coding control on GPI Controls tab is set to
Disabled. (If control is left on Binary with no
inputs, the pull-up HI logic state on the open
inputs will be interpreted as two “HI’s” on the
inputs, resulting in an invoked preset.
In Case of Problems
Should any problem arise with this product that was not solved by the information in this section,
please contact Ross Technical Support.
3–56 • Operating Instructions LDP-8242 User Manual (Iss. 03)
Page 91

Specifications
In This Chapter
This chapter provides the technical specification information for the LDP-8242. Note that
technical specifications are subject to change without notice.
The following topics are discussed:
• Technical Specifications
LDP-8242 User Manual (Iss. 03) Specifications • 4–1
Page 92

Technical Specifications
This section provides technical specifications for the LDP-8242. Input/output types and number
of input/outputs in some cases are a function of option(s) installed. Input/outputs requiring
options are specified below. Refer to Tab le 1. 2 for detailed information on available input/output
complements and corresponding options/rear module requirements
Table 4.1 LDP-8242 Technical Specifications
Category Parameter Specification
1080i 59.94, 1080i 50, 1080p 29.97, 1080p 25
720p 59.94, 720p 50, 720p 29.97, 720p 25
Standards
Accommodated
HD
SD 486i 59.94, 576i 50
Number of Inputs 4 BNC input connectors (maximum)
Number of Outputs 4 BNC output connectors (maximum)
SDI Inputs and
Outputs
AES Inputs and
Outputs
(LDP-8242-A)
Data Rates Supported
Impedance 75W terminating
Return Loss -10dB
Cable Equalization
Jitter, Alignment (HD / SD) 0.2UI / 0.2UI
Jitter, Timing (HD / SD) 1.0UI / 0.2UI
Connector Type BNC
Number of inputs/outputs
(maximum total between inputs
and outputs)
SMPTE Standards
Accommodated
Impedance 75W
Return Loss > 15dB @ up to 6.144MHz
Input Level 0.2 to 2.0Vp-p
Output Level 1.0Vp-p
SMPTE 292 HD-SDI: 1.485Gbps or 1.485/1.001Gbps
SMPTE 259M-C SD-SDI: 270Mbps
HD: 591ft (180m) Belden 1694A
SD: 1050ft (320m) Belden 1694A
8 pairs (16-channel) on BNC connectors per AES3-id
SMPTE 276M
Input SRC Range 32kHz to 96kHz
Connector Type BNC
Frame Sync Min. Latency 2 lines
Configurable Video Delay
Audio/Video
Delay
4–2 • Specifications LDP-8242 User Manual (Iss. 03)
(HD / SD)
Configurable Audio Delay
1.0 / 5.0 seconds (max.)
• 16-channel; independent delay per channel; 1 sample
step size
• Up to 5 sec delay for each channel
Page 93

Table 4.1 LDP-8242 Technical Specifications
Category Parameter Specification
Two non-terminating (looping) Frame Reference inputs
with selectable failover
SMPTE 170M/318M (“black burst”)
SMPTE 274M/296M (“tri-color”)
Frame
Reference Input
Number of Inputs
Standards Supported
Return Loss > 35dB up to 5.75MHz
Number of Ports 2
Rx Functions Closed captioning input, Dolby® metadata input
Serial Ports
GPI Ports
Other
Tx Functions
Closed captioning output, Dolby® metadata output,
card status logging
Each port is 3-wire independently configurable for
Connector Type
RS-232 or RS-485 protocol using Phoenix Contact™
connectors with removable screw terminal blocks
Number of Ports 2
Mapping
User-configurable by invoking acknowledge and release
settings per selected card presets
GPI acknowledge upon falling-edge input triggered by
R<
Response
GPI release upon rising-edge input triggered by
R>
“G” (GND) terminal at chassis-ground potential;
suitable for use with 3.3V LVCMOS logic
Maximum Recommended Logic
Control Voltage Range
0 to 5 VDC
Each port is opto-isolated with self-sourcing current on
Connector Type
3-wire (IN 1, IN 2, GND) Phoenix Contact™ connector
with removable screw terminal blocks
8 built-in tone generators, each configurable for 18
Internal Tone Generators
discrete sine wave frequencies ranging from 50Hz to
16kHz
Generator source signal level is equivalent to -20dBu
10kΩ (or Vin < 2.0V)
10kΩ (or Vin >2.0V)
Frame Communications 10/100Mbps Ethernet with Auto-MDIX
Operating temperature: 32°F – 104°F (0°C – 40°C)
Environment
Relative humidity (operating or
storage)
Power
LDP-8242 User Manual (Iss. 03) Specifications • 4–3
Max. Power Consumption < 20W
< 95%, non-condensing
Page 94

4–4 • Specifications LDP-8242 User Manual (Iss. 03)
Page 95

Service Information
In This Chapter
This chapter contains the following sections:
• Troubleshooting Checklist
• Warranty and Repair Policy
LDP-8242 User Manual (Iss. 03) Service Information • 5–1
Page 96

Troubleshooting Checklist
Routine maintenance to this openGear product is not required. In the event of problems with your
LDP-8242, the following basic troubleshooting checklist may help identify the source of the
problem. If the frame still does not appear to be working properly after checking all possible
causes, please contact your openGear products distributor, or the Technical Support department at
the numbers listed under the “Contact Us” section.
1. Visual Review — Performing a quick visual check may reveal many problems, such as
connectors not properly seated or loose cables. Check the card, the frame, and any
associated peripheral equipment for signs of trouble.
2. Power Check — Check the power indicator LED on the distribution frame front panel
for the presence of power. If the power LED is not illuminated, verify that the power
cable is connected to a power source and that power is available at the power main.
Confirm that the power supplies are fully seated in their slots. If the power LED is still
not illuminated, replace the power supply with one that is verified to work.
3. Re-seat the Card in the Frame — Eject the card and re-insert it into the frame.
4. Check Control Settings — Refer to the Installation and User Controls sections of this
manual to verify all user-adjustable component settings
5. Input Signal Status — Verify that source equipment is operating correctly and that a
valid signal is being supplied.
6. Output Signal Path — Verify that destination equipment is operating correctly and
receiving a valid signal.
7. Unit Exchange — Exchanging a suspect unit with a unit that is known to be working
correctly is an efficient method for localizing problems to individual units.
5–2 • Service Information LDP-8242 User Manual (Iss. 03)
Page 97

Warranty and Repair Policy
The LDP-8242 is warranted to be free of any defect with respect to performance, quality,
reliability, and workmanship for a period of FIVE (5) years from the date of shipment from our
factory. In the event that your LDP-8242 proves to be defective in any way during this warranty
period, Ross Video Limited reserves the right to repair or replace this piece of equipment with a
unit of equal or superior performance characteristics.
Should you find that this LDP-8242 has failed after your warranty period has expired, we will
repair your defective product should suitable replacement components be available. You, the
owner, will bear any labor and/or part costs incurred in the repair or refurbishment of said
equipment beyond the FIVE (5) year warranty period.
In no event shall Ross Video Limited be liable for direct, indirect, special, incidental, or
consequential damages (including loss of profits) incurred by the use of this product. Implied
warranties are expressly limited to the duration of this warranty.
This LDP-8242 User Manual provides all pertinent information for the safe installation and
operation of your openGear Product. Ross Video policy dictates that all repairs to the LDP-8242
are to be conducted only by an authorized Ross Video Limited factory representative. Therefore,
any unauthorized attempt to repair this product, by anyone other than an authorized Ross Video
Limited factory representative, will automatically void the warranty. Please contact Ross Video
Technical Support for more information.
In Case of Problems
Should any problem arise with your LDP-8242, please contact the Ross Video Technical Support
Department. (Contact information is supplied at the end of this publication.)
A Return Material Authorization number (RMA) will be issued to you, as well as specific
shipping instructions, should you wish our factory to repair your LDP-8242. If required, a
temporary replacement frame will be made available at a nominal charge. Any shipping costs
incurred will be the responsibility of you, the customer. All products shipped to you from Ross
Video Limited will be shipped collect.
The Ross Video Technical Support Department will continue to provide advice on any product
manufactured by Ross Video Limited, beyond the warranty period without charge, for the life of
the equipment.
LDP-8242 User Manual (Iss. 03) Service Information • 5–3
Page 98

Notes:
Page 99

Notes:
Page 100

Contact Us
Contact our friendly and professional support representatives for the following:
• Name and address of your local dealer
• Product information and pricing
• Technical support
• Upcoming trade show information
T e c h n i c a l
Support
General
Information
After Hours Emergency: +1 613 • 349 • 0006
Telephone: +1 613 • 652 • 4886
Email: techsupport@rossvideo.com
Telephone: +1 613 • 652 • 4886
Fax: +1 613 • 652 • 4425
Email: solutions@rossvideo.com
Website: http://www.rossvideo.com
Visit Us
Visit our website for:
• Company information and news
• Related products and full product lines
• Online catalog
• Testimonials
 Loading...