

Page 1

Carbonite Black Solo
Operation Manual
v1.2
Page 2

Thank You For Choosing
Ross
You've made a great choice. We expect you will be very
happy with your purchase of Ross Technology.
Our mission is to:
Provide a Superior Customer Experience
1.
• offer the best product quality and support
Make Cool Practical Technology
2.
• develop great products that customers love
Ross has become well known for the Ross Video Code
of Ethics. It guides our interactions and empowers our
employees. I hope you enjoy reading it below.
If anything at all with your Ross experience does not live
up to your expectations be sure to reach out to us at
solutions@rossvideo.com.
know in your heart is right. (You may rent
helicopters if necessary.)
David Ross
CEO, Ross Video
dross@rossvideo.com
Ross Video Code of Ethics
Any company is the sum total of the people that make
things happen. At Ross, our employees are a special
group. Our employees truly care about doing a great job
and delivering a high quality customer experience every
day. This code of ethics hangs on the wall of all Ross
Video locations to guide our behavior:
We will always act in our customers' best interest.
1.
We will do our best to understand our customers'
2.
requirements.
We will not ship crap.
3.
We will be great to work with.
4.
We will do something extra for our customers, as
5.
an apology, when something big goes wrong and
it's our fault.
We will keep our promises.
6.
We will treat the competition with respect.
7.
We will cooperate with and help other friendly
8.
companies.
We will go above and beyond in times of crisis. If
9.
there's no one to authorize the required action in
times of company or customer crisis - do what you
2 • Thank You For Choosing Ross — Carbonite Black Solo Operation Manual (v1.2)
Page 3

Document Information
• Ross Part Number: 4840DR-110-01.2
• Release Date: January, 2017. Printed in Canada
The information contained in this document is subject to
change without notice or obligation.
Copyright
©
2016 Ross Video Limited, Ross®, CrossOver®,
MiniME™, and any related marks are trademarks or
registered trademarks of Ross Video Limited. All other
trademarks are the property of their respective companies.
PATENTS ISSUED and PENDING. All rights reserved.
No part of this publication may be reproduced, stored in
a retrieval system, or transmitted in any form or by any
means, mechanical, photocopying, recording or
otherwise, without the prior written permission of Ross
Video. While every precaution has been taken in the
preparation of this document, Ross Video assumes no
responsibility for errors or omissions. Neither is any
liability assumed for damages resulting from the use of
the information contained herein.
Microsoft®, Windows®, and Windows XP®are either
registered trademarks or trademarks of Microsoft
Corporation in the United States and/or other countries.
Macintosh®, and OS X®are trademarks of Apple Inc.,
registered in the U.S. and other countries.
Google Chrome™, Google®, and the Google logo are
registered trademarks of Google Inc.
Patents
Patent numbers US 7,034,886; US 7,508,455; US
7,602,446; US 7,802,802 B2; US 7,834,886; US
7,914,332; US 8,307,284; US 8,407,374 B2; US
8,499,019 B2; US 8,519,949 B2; US 8,743,292 B2; US
D752,530 S; GB 2,419,119 B; GB 2,447,380 B; and other
patents pending.
Important Regulatory and Safety
Notices to Service Personnel
Before using this product and any associated equipment,
refer to the “Important Safety Instructions” listed in
the front of your Setup Manual to avoid personnel injury
and to prevent product damage.
Symbol Meanings
Protective Earth: This symbol identifies a Protective
Earth (PE) terminal, which is provided for connection
of the supply system's protective earth (green or
green/yellow) conductor.
Important: This symbol on the equipment refers you
to important operating and maintenance (servicing)
instructions within the Product Manual Documentation.
Failure to heed this information may present a major
risk of damage or injury to persons or equipment.
Warning: The symbol with the word “Warning” within
the equipment manual indicates a potentially
hazardous situation which, if not avoided, could result
in death or serious injury.
Caution: The symbol with the word “Caution” within
the equipment manual indicates a potentially
hazardous situation which, if not avoided, may result
in minor or moderate injury. It may also be used to
alert against unsafe practices.
Warning Hazardous Voltages: This symbol is
intended to alert the user to the presence of
uninsulated “dangerous voltage” within the product
enclosure that may be of sufficient magnitude to
constitute a risk of shock to persons.
ESD Susceptibility: This symbol is used to alert the
user that an electrical or electronic device or assembly
is susceptible to damage from an ESD event.
Important Safety Instructions
1.
2.
3.
4.
5.
6.
7.
8.
9.
10.
11.
Warning: Read these instructions.
Keep these instructions.
Heed all warnings.
Follow all instructions.
Do not use this apparatus near water.
Clean only with a dry cloth.
Do not block any ventilation openings. Install in
accordance with manufacturer's instructions.
Do not install near heat sources such as radiators,
heat registers, stoves, or other apparatus (including
ampliers) that produce heat.
Do not defeat the safety purpose of the polarized or
grounding-type plug. A polarized plug has two
blades with one wider than the other. A grounding
type plug has two blades and a third grounding
prong. The third prong is provided for your safety.
If the provided plug does not t into your outlet,
consult an electrician for replacement of the obsolete
outlet.
Protect the power cord from being walked on or
pinched, particularly at plugs, convenience
receptacles, and the point where they exit from the
apparatus.
Only use attachments/accessories specied by the
manufacturer.
Carbonite Black Solo Operation Manual (v1.2) — Document Information • 3
Page 4

Unplug this apparatus during lightning storms or
12.
when unused for long periods of time.
Refer all servicing to qualied service personnel.
13.
Servicing is required when the apparatus has been
damaged in any way, such as when the power-supply
cord or plug is damaged, liquid has been spilled or
objects have fallen into the apparatus, the apparatus
has been exposed to rain or moisture, does not
operate normally, or has been dropped.
Do not expose this apparatus to dripping or
14.
splashing, and ensure that no objects lled with
liquids, such as vases, are placed on the apparatus.
To completely disconnect this apparatus from the
15.
AC Mains, disconnect the power supply cord plug
from the AC receptacle.
The mains plug of the power supply cord shall
16.
remain readily operable.
17.
18.
Warning: Indoor Use: To reduce the risk of fire
or electric shock, do not expose this apparatus
to rain or moisture.
The safe operation of this product requires that a
protective earth connection be provided. A
grounding conductor in the equipment's supply cord
provides this protective earth. To reduce the risk of
electrical shock to the operator and service
personnel, this ground conductor must be connected
to an earthed ground.
19.
20.
21.
Warning: This apparatus, when equipped with
multiple power supplies, can generate high
leakage currents. To reduce the risk of electric
shock, ensure that each individual supply cord
is connected to its own separate branch circuit
with an earth connection.
Caution: These service instructions are for use
by qualified service personnel only. To reduce
the risk of electric shock, do not perform any
servicing other than that contained in the
operating instructions unless you are qualified
to do so.
Service barriers within this product are intended to
protect the operator and service personnel from
hazardous voltages. For continued safety, replace
all barriers after servicing.
Certain parts of this equipment still present a safety
22.
hazard with the power switch in the OFF position.
To avoid electrical shock, disconnect all A/C power
cords from the chassis' rear appliance connectors
before servicing.
This product contains safety critical parts, which, if
23.
incorrectly replaced, may present a risk of re or
electrical shock. Components contained within the
product's power supplies and power supply area are
not intended to be customer-serviced and should be
returned to the factory for repair.
To reduce the risk of re, replacement fuses must
24.
be the same type and rating.
Use only power cords specied for this product and
25.
certied for the country of use.
The safe operation of this equipment requires that
26.
the user heed and adhere to all installation and
servicing instruction contained within the
equipment's Setup Manuals.
27.
28.
Warning: This product includes an “Ethernet
Port” which allows this product to be connected
to a local area network (LAN). Only connect to
networks that remain inside the building. Do not
connect to networks that go outside the building.
Caution: This apparatus contains a Lithium
battery, which if replaced incorrectly, or with an
incorrect type, may cause an explosion. Replace
only with a CR2032 coin type lithium battery.
Dispose of used batteries according to the
manufacturer's instruction by qualified service
personnel.
EMC Notices
United States of America — FCC Part 15
This equipment has been tested and found to comply
with the limits for a class A Digital device, pursuant to
part 15 of the FCC Rules. These limits are designed to
provide reasonable protection against harmful
interference when the equipment is operated in a
commercial environment. This equipment generates,
uses, and can radiate radio frequency energy and, if not
installed and used in accordance with the instruction
manual, may cause harmful interference to radio
communications. Operation of this equipment in a
residential area is likely to cause harmful interference in
which case the user will be required to correct the
interference at his own expense.
Important: Changes or modifications to this
equipment not expressly approved by Ross Video
Limited could void the user's authority to operate this
equipment.
Canada
This Class “A” digital apparatus complies with Canadian
ICES-003.
Cet appareil numérique de la classe « A » est conforme
a la norme NMB-003 du Canada.
4 • Document Information — Carbonite Black Solo Operation Manual (v1.2)
Page 5

Europe
This equipment is in compliance with the essential
requirements and other relevant provisions of CE
Directive 93/68/EEC.
International
This equipment has been tested to CISPR 22:1997 along
with amendments A1:2000 and A2:2002, and found to
comply with the limits for a Class A Digital device.
Important: This is a Class A product. In domestic
environments, this product may cause radio
interference, in which case the user may have to take
adequate measures.
General Handling Guidelines
• Careful handling, using proper ESD precautions, must
be observed.
• Power down the system before PCB removal.
A Word About Static Discharge
Throughout the many procedures in this manual, please
observe all static discharge precautions.
Caution: Avoid handling the switcher circuit boards
in high static environments such as carpeted areas,
and when synthetic fiber clothing is worn. Touch the
frame to dissipate static charge before removing
boards from the frame, and exercise proper grounding
precautions when working on circuit boards. Exercise
proper grounding precautions when working on circuit
boards.
This warranty is void if products are subjected to misuse,
neglect, accident, improper installation or application,
or unauthorized modication.
In no event shall Ross Video Limited be liable for direct,
indirect, special, incidental, or consequential damages
(including loss of prot). Implied warranties, including
that of merchantability and tness for a particular
purpose, are expressly limited to the duration of this
warranty.
This warranty is TRANSFERABLE to subsequent
owners, subject to Ross Video's notication of change
of ownership.
Environmental Information
The equipment that you purchased required the
extraction and use of natural resources for its
production. It may contain hazardous substances that
could impact health and the environment.
To avoid the potential release of those substances into
the environment and to diminish the need for the
extraction of natural resources, Ross Video encourages
you to use the appropriate take-back systems. These
systems will reuse or recycle most of the materials from
your end-of-life equipment in an environmentally friendly
and health conscious manner.
The crossed-out wheeled bin symbol invites you to use
these systems.
Warranty and Repair Policy
Ross Video Limited (Ross) warrants its switchers and
related options, to be free from defects under normal use
and service for a period of ONE YEAR from the date of
shipment. Fader handle assemblies are warranted for the
life of the product. If an item becomes defective within
the warranty period Ross will repair or replace the
defective item, as determined solely by Ross.
Warranty repairs will be conducted at Ross, with all
shipping FOB Ross dock. If repairs are conducted at the
customer site, reasonable out-of-pocket charges will
apply. At the discretion of Ross, and on a temporary loan
basis, plug in circuit boards or other replacement parts
may be supplied free of charge while defective items
undergo repair. Return packing, shipping, and special
handling costs are the responsibility of the customer.
Software upgrades for switchers may occur from time to
time, and are determined by Ross Video. The upgrades
are posted on the Ross Video website, and are free of
charge for the life of the switcher.
If you need more information on the collection, reuse,
and recycling systems, please contact your local or
regional waste administration.
You can also contact Ross Video for more information
on the environmental performances of our products.
Company Address
Ross Video Limited — 8 John Street Iroquois, Ontario,
Canada, K0E 1K0
Ross Video Incorporated — P.O. Box 880, Ogdensburg,
New York, USA, 13669-0880
(+1)613-652-4886General Business
Ofce:
(+1)613-652-4425Fax:
(+1)613-652-4886Technical
Support:
Carbonite Black Solo Operation Manual (v1.2) — Document Information • 5
Page 6

(+1)613-349-0006After Hours
Emergency:
E-Mail (Support):
E-Mail (General):
Website
techsupport@rossvideo.com
solutions@rossvideo.com
www.rossvideo.com
Technical Support
At Ross Video, we take pride in the quality of our
products, but if a problem does occur, help is as close as
the nearest telephone.
Our 24-Hour Hot Line service ensures you have access
to technical expertise around the clock. After-sales
service and technical support are provided directly by
Ross Video personnel. During business hours (eastern
standard time), technical support personnel are available
by telephone. Outside of normal business hours and on
weekends, a direct emergency technical support phone
line is available. If the technical support personnel who
is on call does not answer this line immediately, a voice
message can be left and the call will be returned shortly.
Our Technical support staff are available to react to any
problem and to do whatever is necessary to ensure
customer satisfaction.
Supporting Documentation
Ross Video provides a wide variety of helpful
documentation for the setup and support of your
equipment. Most of this documentation can be found
either on the Product Resources disk that came with your
equipment, on the Ross Video website
(www.rossvideo.com), or on the Ross Video Community
site (discussions.rossvideo.com/)
• Carbonite Online Help for DashBoard — visit
help.rossvideo.com/carbonite
• Operation Manual (4840DR-110) — operational
instructions for Carbonite Black Solo
• Setup Manual (4840DR-110) — setup and
conguration instructions for Carbonite Black Solo
• Carbonite Black Solo QuickStart Poster
(4840DR-200) — setup information and
specications for the Carbonite Black Solo
• Upgrade Notes (4840DR-500) — upgrade
instructions, new features, and known issues for a
given software version
• Software Licenses (4802DR-502) — third-party
software licences
• Carbonite Multilingual Safety Information
(4802DR-503) — translated product safety
information
• Contro Panel Mounting (4840DR-300) — desk and
rack mounting instructions
• SideBox Installation (4802DR-304) — installation
and mounting instruction for SideBox module
• Auxiliary Control Panel Installation (4802DR-305)
— installation and mounting instruction for remote
aux panel (CPS-AUX-053B)
• GVG100 Supported Command (4802DR-401) —
connection and GVG100 commands supported by
the switcher
• RossTalk Commands (4802DR-403) — supported
commands using RossTalk protocol
• Device Setup Sheets (4802DR-6xx) — setup
information for controlling external devices from the
switcher
• Robotic Camera Control (4802DR-131) —
overview of the operational interface when controlling
a robotic camera from the switcher
• Audio Mixer Control (4802DR-132) — overview
of the operational interface when controlling an audio
mixer from the switcher
• Video Server Control (4802DR-133) — overview
of the operational interface when controlling a video
server from the switcher
• — product description and marketing codes for
switchers and options
• CarboNET Installation (4805DR-100) —
installation instructions for the Carbonite PMC
translator.
6 • Document Information — Carbonite Black Solo Operation Manual (v1.2)
Page 7

Contents
Features...............................................................9
Clean Feed Output..................................................................9
Custom Controls......................................................................9
Device Control.........................................................................9
DVE (Fly Key)..........................................................................9
Effects Dissolve.......................................................................9
General Purpose Interface (GPI).............................................9
LiveEDL...................................................................................9
Matte/Wash Generator............................................................9
ME Effect System....................................................................9
Media-Store...........................................................................10
MediaManager......................................................................10
MediaWipe............................................................................10
MemoryAI Recall Mode.........................................................10
Memory System....................................................................10
MiniME™................................................................................10
MultiScreen...........................................................................10
MultiViewer............................................................................10
Pattern and Matte/Wash Generators.....................................11
Tally Outputs..........................................................................11
UltraChrome..........................................................................11
Control Panel Overview...................................12
Control Panel Top..................................................................12
Control Panel Rear................................................................12
Menu System....................................................14
Menu Navigation...................................................................14
Auto-Follow Menus................................................................14
ViewControl.......................................................19
ViewControl Overview...........................................................19
Custom Control Buttons.........................................19
Bus Selection Buttons............................................19
Keyer Transition Buttons........................................19
Transition Buttons..................................................19
Custom Control Button Setup................................................20
To Set up the Custom Control Buttons..................20
Transitions........................................................21
Performing Transitions..........................................................21
Understanding the Transition Menu.......................21
To Perform a Transition..........................................21
To Override the Pre-Delay Setting.........................22
To Abort a Transition During the
Pre-Delay........................................................22
Cut Transitions......................................................................22
Dissolve Transitions..............................................................22
To Set Up a Dissolve..............................................22
WhiteFlash............................................................................23
To Set Up a WhiteFlash.........................................23
Wipe Transitions....................................................................23
To Set Up a Wipe...................................................23
To Apply a Border to a Pattern...............................24
DVE Transitions.....................................................................24
To Set Up a DVE Transition...................................24
MediaWipe Transitions..........................................................24
To Set Up a MediaWipe.........................................25
Transition Limits....................................................................25
To Set Up a Transition Limit...................................25
GPI Output Triggers..............................................................25
To Manually Trigger a GPI Output.........................26
To Override a GPI Output......................................26
Switcher Basics................................................15
Audio and Video Processing.................................................15
Video Processing and Flow...................................15
Audio Processing and Flow...................................15
Video Sources.......................................................................15
To Select a Source on a Bus..................................15
Video Layering......................................................................16
Re-Entry.................................................................16
FlexiClean Clean Feed..........................................16
Video Preview........................................................................16
MultiViewer............................................................16
ME Copy................................................................................17
To Copy an ME Using DashBoard.........................17
DashBoard........................................................18
Status....................................................................................18
Configuration.........................................................................18
Live Assist.............................................................................18
PaneLINK...............................................................18
Custom Controls....................................................................18
MediaManager......................................................................18
Patterns, Washes, and Mattes.........................27
Patterns.................................................................................27
To Set Up a Pattern................................................27
Washes..................................................................................27
To Set Up a Wash..................................................27
Mattes....................................................................................27
To Set Up a Matte Color.........................................27
Keying................................................................29
Understanding the Keying Menu...........................................29
Self Keys...............................................................................29
To Set up a Self Key..............................................29
Auto Select Keys...................................................................30
To Set Up an Auto Select Key................................30
UltraChrome Chroma Key.....................................................31
Chroma Key Modes...............................................31
Chroma Key Basic Mode.......................................31
Chroma Key Advanced Mode................................32
DVE Keys..............................................................................34
To Set Up a DVE Key.............................................34
To Apply a DVE to a Key (Fly Key)........................35
To Apply a Border to a DVE Key............................35
Carbonite Black Solo Operation Manual (v1.2) — Contents • 7
Page 8

Masks....................................................................................36
To Pattern Mask a Key...........................................36
To Box Mask a Key................................................36
Split Keys..............................................................................37
To Set Up a Split Key.............................................37
Memory Functions............................................38
Memory Access Mode...........................................................38
To Set the Memory Access Mode..........................38
Storing Memories..................................................................38
To Store a Memory.................................................38
Recalling Memories...............................................................38
To Recall a Memory...............................................38
Memory Recall Mode............................................................39
To Set Up the Recall Mode Memory
Attribute..........................................................39
To Set the Effects Duration....................................39
Memory Attributes.................................................................39
To Set the Program Bus Source
Attribute..........................................................39
To Set the Preset Bus Source Attribute.................39
To Set the Transition Type Attribute.......................40
To Set the Next Transition Attribute.......................40
To Set the Run Auto Trans Attribute......................40
To Set the Shared Pattern Generator
Attribute..........................................................40
To Set the Key Bus Sources Attribute....................40
To Set the Key On-Air Attribute..............................40
To Set the Key Type Attribute................................41
To Set the Key Mask Attribute................................41
To Set the Media-Store Attribute............................41
To Set the Aux Bus Attribute..................................41
To Set the Camera Shot Attribute..........................41
To Set the Roll GPO Attribute................................41
To Set the Roll VTR Attribute.................................41
Clear Memories.....................................................................41
To Clear the Memory Registers.............................42
Custom Controls..............................................49
Custom Control Setup (Carbonite Black Solo Only)..............49
To Set Custom Control Options.............................49
Recording Custom Controls (Carbonite Black Solo
Only)...............................................................................49
To Record a Custom Control..................................49
Special Functions..................................................................49
To Insert a Special Event into a Custom
Control............................................................50
Running a Custom Control....................................................50
To Run a Custom Control.......................................50
Editing a Custom Control......................................................51
To Edit a Custom Control.......................................51
To Edit a CC From DashBoard..............................51
Custom Control Events..........................................51
Naming Custom Controls......................................................75
To Name a Custom Control....................................75
Deleting Custom Controls.....................................................75
To Delete a Custom Control...................................75
Copying and Pasting Custom Controls.................................75
To Copy and Paste a Custom Control...................75
Switcher Soft Reset..........................................76
Soft Reset..............................................................................76
To Reset the Switcher Software.............................76
Custom Reset Settings..........................................................76
To Save a Custom Reset Setting...........................76
To Load a Custom Reset Setting...........................76
Factory Default Settings........................................................76
To Factory Reset the Switcher...............................76
Resetting Individual Components..........................................77
Glossary............................................................78
Switcher Sets....................................................43
To Store a Set........................................................................43
To Load a Set........................................................................43
Media-Store.......................................................44
Working With Media-Store Animations..................................44
Working With Media-Store Audio..........................................44
Loading Stills or Animations..................................................44
Media-Store File Specifications.............................44
To Load a Still or Animation...................................45
Media-Store Capture.............................................................45
To Capture a Still....................................................45
Media-Store Attributes...........................................................46
Understanding the Attributes Menu.......................46
To Set Media-Store File Attributes.........................46
To Lock a Media Number Place and
Bank................................................................47
MediaManager......................................................................47
Using MediaManager ............................................47
The MediaManager Window..................................47
8 • Contents — Carbonite Black Solo Operation Manual (v1.2)
Page 9

Features
KEY 1 KEY 2
PGM/
PST
KEY 3 PGM
CLEAN
FEED
KEY 4
Source
Effect
Destination
Effect
Thank you for buying a Ross Video Carbonite Black
Series Multi-Denition Live Production Switcher. The
Carbonite Black series builds on the Ross Video
reputation for designing switchers that t the needs of
any production environment.
destination memory, creating a smooth, two key frame
effect.
Clean Feed Output
Clean feed is typically used for bilingual and live-to-tape
productions. It provides a second Program output that is
derived from a different location than the standard
program output. A frequent application is the recording
of shows for later airing without call-in phone numbers
inserted.
The clean feed output can come from before or between
the keyers.
Custom Controls
This feature brings the power of macros to the switcher
operator. Button presses, menu selections, event
commands, or even the switcher state can be recorded to
a custom control with pauses or holds between the events.
A simple button press can play these events back again.
Step through complex show openings as easily as
pressing Custom Control buttons 1, 2, then 3.
Device Control
The switcher can control a number of external devices,
such as video servers and robotic cameras. For a complete
list of supported devices, and information on how to set
up and control these devices, visit the Ross Video website
(rossvideo.com/production-switchers/carbonite/interface-list).
DVE (Fly Key)
The advanced 2D DVE comes standard with each
switcher, and can be used for performing over the
shoulder, or picture in picture shots. This allows all key
types to be zoomed, cropped, and repositioned
horizontally and vertically to create the look you want,
or you can use one of the useful pre-built 2D effects to
perform 2D background transitions.
Effects Dissolve
The Effects Dissolve feature allows you to interpolate
from one memory to another using a memory recall. The
switcher will interpolate from the starting memory to the
Only elements such as clip level and pattern position can
be interpolated in the effects dissolve. Other elements,
such as crosspoint selection, pattern, and next transition
data are recalled rst, and then the switcher will slew to
the recalled memory.
An effects dissolve can be performed on as many
elements and MEs as required, based on the memory that
is being recalled.
General Purpose Interface (GPI)
The switcher is equipped with 24 GPI I/Os that can be
assigned as either an input or output independently.
The GPI inputs allow the switcher to interface with
peripheral equipment such as editors. Each GPI input
can be used to perform simple editing and switcher
functions such as fade to black or an auto transition.
LiveEDL
Edit Decision Lists (EDL) are les used by non-linear
editing (NLE) suites to aid in post-production. Your
switcher can capture EDL data in a le that you load into
your NLE suite.
For information on using the LiveEDL feature, visit the
Ross Video Website (rossvideo.com).
Matte/Wash Generator
A matte generator and complex wash generator per ME,
capable of multi-color washes comes standard. Any one
of the color generators can be assigned to MATTE, or
wipe pattern edges. An additional simple color generator
is available for an Aux Bus.
ME Effect System
The ME (Multi-level Effect) systems are standard. The
number of MEs depends on the chosen switcher model.
Each ME provides 4 keyers supporting pattern mask,
box mask, self-key, linear key, and an UltraChrome
advanced chroma key for each ME and is available to
each keyer.
Carbonite Black Solo Operation Manual (v1.2) — Features • 9
Page 10
Media-Store
Key
MiniME 1 MiniME 2
Edge
Area
MiniME
™
Up to 4 independent channels of still/animations are
available switcher-wide, allowing for thousands of full
screen stills and logos that can be cached and used on
the switcher.
Media-Store provides 8 GB of cache. The number of
images cached increases considerably when smaller,
non-full screen images like logos are loaded from USB.
MediaManager
The MediaManager allows you to easily manage stills
and animations on the switcher in a graphics interface.
MediaWipe
A MediaWipe allows you to use an animation from the
Media-Store to play over a background or key transition.
When the transition starts, the switcher plays the selected
animation over top of the background and keys that are
being transitioned. A cut, dissolve, wipe, or DVE wipe
is then performed layered under the animation to bring
up the next shot when the animation ends.
MemoryAI Recall Mode
We take the guessing out of memory recalls by ensuring
that a memory recall will not affect what is currently
on-air. MemoryAI uses the content of the memory to
congure the Next Transition area and Preview bus for
the background and keyers so that the next transition
takes the same sources on-air that were on-air in the
memory.
For example, store a memory that has a key on-air with
CAM1 and CAM2 selected on the background. When
this memory is recalled normally, it pops the same key
on-air with CAM1 and CAM2 on the background. When
the memory is recalled with MemoryAI turned on, CAM1
is selected on the preset bus, and CAM2 is selected on a
key that is not on-air. The transition area is then set up
for a background transition to bring CAM2 onto the
background, take any on-air keys off, and take a key
on-air with CAM1.
The MiniME™is an additional ME that is provided with
the switcher to perform basic dissolves and cuts. Each
MiniME™has 2 keyers, background, and preset buses.
Unlike a full ME, the MiniME™only supports dissolves
and cuts, restricts key 1 to DVE keys only, and has no
preview output. Key 2 on a MiniME™is the same as an
ME keyer. The MiniME™shares all the same sources as
the ME.
MultiScreen
The switcher comes standard with 1 integrated
MultiScreen generator. The MultiScreen can break a
scene into up to 2 outputs that can be sent to independent
projectors or displays to make a unied picture.
Each screen in the MultiScreen output uses a MiniME
to create the background and key of the output.
Note: No edge blending is available.
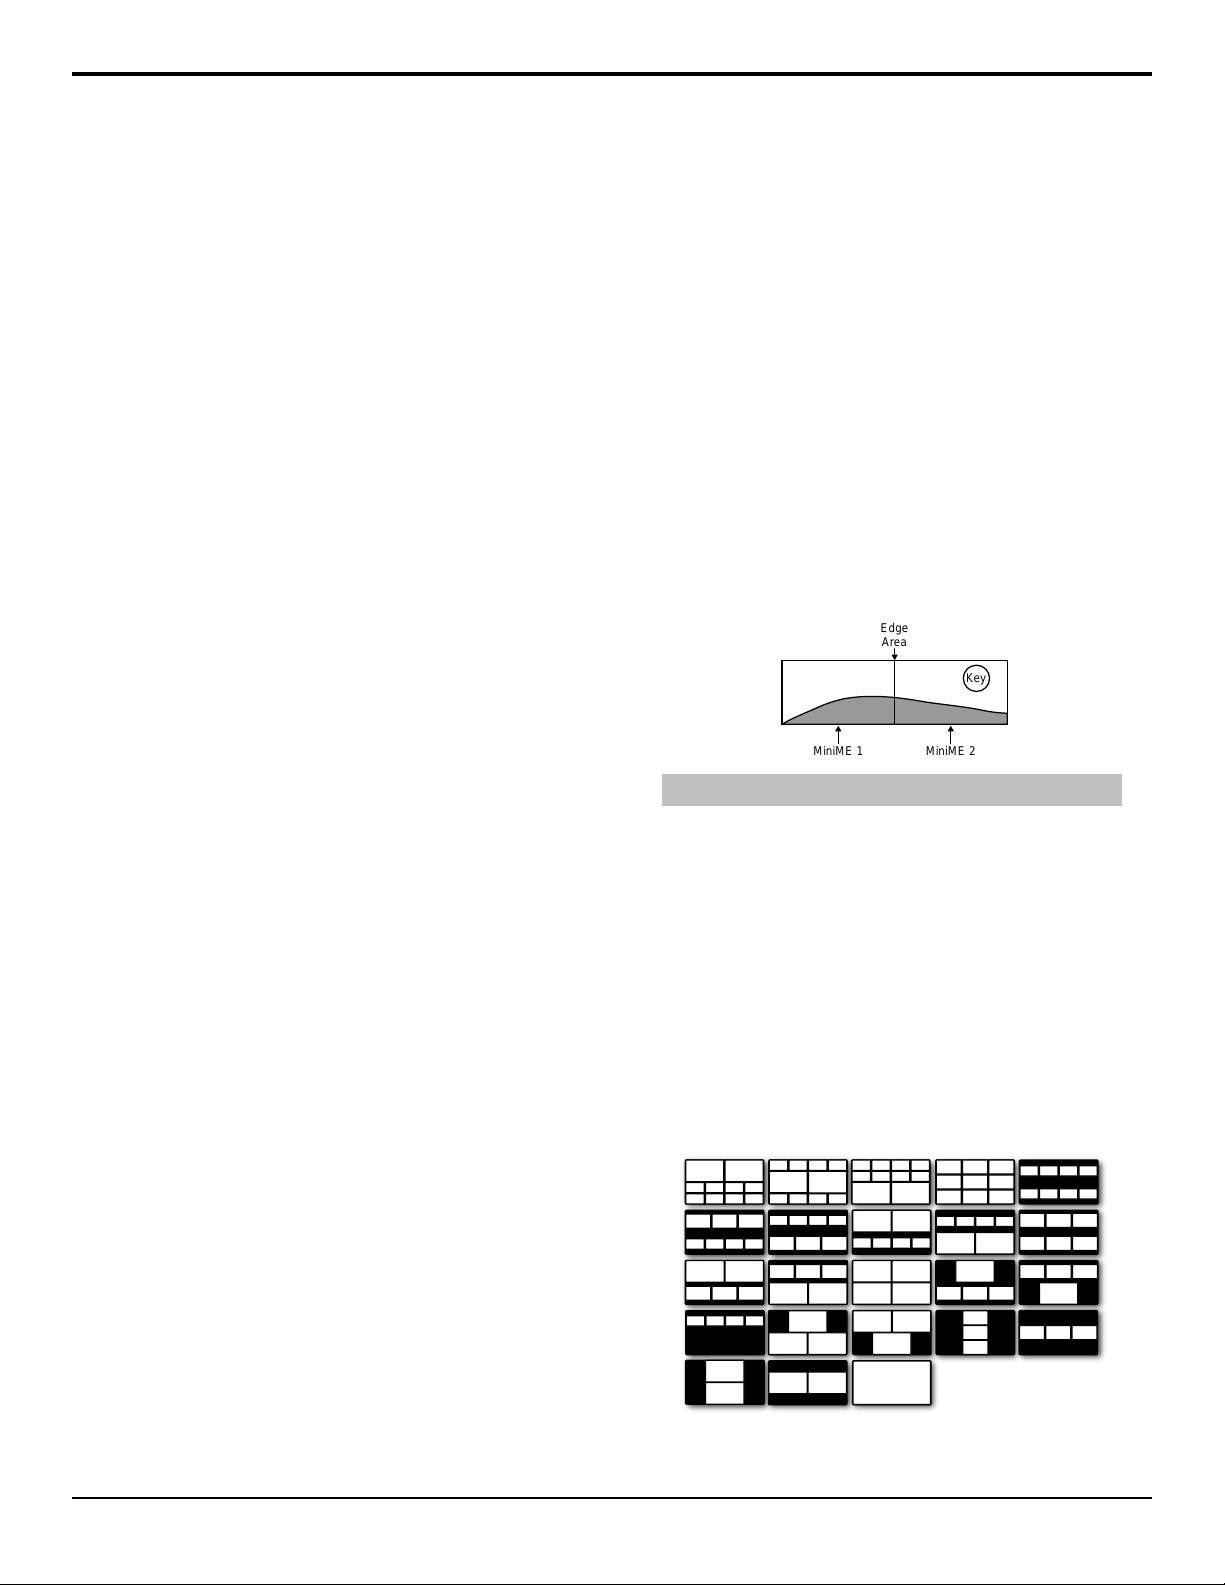
MultiViewer
The MultiViewer allows you to view up to 10 video
sources, in 23 layouts, from a single output BNC. Any
video source on the switcher, including ME Program,
Preview, and Media-Store channels, can be routed to any
box on the MultiViewer. All boxes on the MultiViewer
output include mnemonic source names and red and green
tallies.
The Carbonite Black Solo comes standard with 1
broadcast-quality integrated MultiViewer generator. Only
one MultiViewer output is supported at a time from the
switcher on output BNC 5, or HDMI OUT1.
™
Memory System
Storage for 100 complete switcher snapshots per ME,
MiniME™, and MultiScreen comes standard with all
switchers. All of these memories can be stored to a USB
media drive, providing custom tailored memories for
every operator and every show.
10 • Features — Carbonite Black Solo Operation Manual (v1.2)
Figure 1: HD Layouts
Page 11

Figure 2: MultiViewer Grid
Pattern and Matte/Wash Generators
A single pattern generator dedicated to wipes comes
standard, and is equipped with 10 classic wipes. Most
wipes can be rotated, bordered, multiplied, aspectized,
and repositioned.
Tally Outputs
The switcher has 16 assignable tally relays. Each tally
can be assigned to any number of combinations of input
and output or bus.
UltraChrome
The UltraChrome chroma keyers uses advanced video
processing technology to provide exceptional blue spill
reduction and clean edges, even with difcult source
material. Glass, smoke, translucent materials, and natural
shadows are handled superbly.
There is 1 oating Chroma Key.
Carbonite Black Solo Operation Manual (v1.2) — Features • 11
Page 12

Control Panel Overview
ON
OFF
POWER
PS1 PS2
SERIAL
TALLY
GPIO
OUT1 OUT2 OUT3 OUT4 OUT5
REFIN
IN1 IN2 IN3 IN4 IN5 IN6
UPGD SD
HDMIIN2
HDMIIN1
HDMIOUT1
HDMIIN3
AES
12 34
1
2
345
6 8 10
7 9 11
12 14
13
This chapter provides a basic introduction to the control
panel, including an overview of the different areas on
the control panel, using the menu system, as well as an
introduction to the various ports, and video buses.
If you have the Carbonite Black 109 there is no integrated
panel. The DashBoard control system provides an
interface to the menu system that allows you to control
the switcher without the use of a panel.
Control Panel Top
The Carbonite Black Solo and CB9 control panel are
made up of a number of distinct areas that control
different aspects of the switcher.
Figure 3: Carbonite Black Solo Panel Top
Pattern/Menu Selection Buttons — These buttons
1.
are used to select a pattern for a wipe transition, or
to access switcher menus.
USB — The USB port on the control panel is used
2.
for upgrades and media les. It is not implemented
for the CB9.
Memory Store/Recall Buttons — These buttons
3.
are used to store or recall memories.
Main Display and Selection Knobs — The three
4.
selection knobs are used to adjust and select various
menu items or values. The knobs are rotated to
choose a value, and pressed to make a selection. The
main display shows the menu system of the switcher.
Menu Navigation Buttons — These buttons are
5.
used to access switcher menus, move back and forth
between menus.
Positioner — The positioner is used to control some
6.
wipe, border, and wash parameters, as well as some
external devices. Along with the 2D positioner is a
knob used for additional input.
Key Type Buttons — These buttons are used to
7.
choose the type of key you want to use. Use these
buttons with the key select buttons to select the
keyer, and the type of key you want to use.
Keyer Select Buttons — By default these user select
8.
buttons are used to select which keyer the panel is
assigned to. Each button can be assigned to a
different selection.
User Select Buttons — These user select buttons
9.
are used to choose which keyer, aux bus, MiniME™,
ME, or custom control bank the panel is assigned
to.
Video Source Buses — These buses are broken into
10.
the Preset, Program, and Key/Aux/Custom Control
buses. The Preset bus is the bottom row of source
buttons and selects the video source that will be
taken on-air with the next background transition.
The Program bus is the middle row of source buttons
and selects the video source that is currently on-air
on the background. The Key/Aux/Custom Control
bus is the top row of source buttons and selects the
video source that is chosen on the selected keyer or
aux bus, or the custom control that is chosen on the
selected custom control bank.
Transition Area — These buttons are used to select
11.
which video source buses will be included in the
next transition and what type of transition will be
performed. The Cut and Auto Trans buttons are used
to perform transitions.
On-Air Lights — These lights glow red to show
12.
which keyers are currently on-air.
Keyer Transitions Buttons — These buttons are
13.
used to perform auto transitions on keys directly,
without having to include them as part of the next
transition.
Manual Transition Fader Bar — The fader is used
14.
to manually control the rate of a transition. What is
being transitioned, and the type of transition, are
controlled from the Transition Area.
Control Panel Rear
The Carbonite Black Solo control panel has a number of
ports and connectors that are used for power, signal
input/output, and external communications.
Note: The Carbonite Black 109 has the same ports as the
Carbonite Black Solo.
Figure 4: Carbonite Black Solo Panel Rear
12 • Control Panel Overview — Carbonite Black Solo Operation Manual (v1.2)
Page 13

1
2
PS1
PS2
SD
12 3 4
11 62
Figure 5: CB9 Panel Rear
Power Switch — turns the switcher on or off.
1.
Power Ports — connect the primary and secondary
2.
power supplies to the switcher.
Serial Port — supports the RS-422 transmission
3.
standard for external device control.
Tally Port — provides 16 assignable tally pins.
4.
GPI Port — provides 24 GPI pins that can be used
5.
as inputs or outputs.
Ethernet Port — supports standard ethernet for
6.
device control and connecting to DashBoard.
Ethernet port 2 is not available on the CB9 at this
time.
Upgrade Switch — used to force an upgrade of the
7.
switcher.
microSD™Card Slot — used for forced upgrades
8.
from a backup software version on the microSD
card.
AES Port — provides audio output for the
9.
Media-Store and MediaWipe channels.
HDMI™Ports — provide 3 HDMI inputs and 1
10.
HDMI output.
DIP Switches — used to set the switcher to the
11.
default IP address.
Output BNCs — provide 5 congurable SDI
12.
outputs.
Input BNCs — provide 6 congurable SDI inputs.
13.
Reference In — supports house sync using
14.
selectable tri-level sync or analog black burst.
™
Carbonite Black Solo Operation Manual (v1.2) — Control Panel Overview • 13
Page 14

Menu System
The menu system is accessed either by pressing MENU
and the Menu Selection button for the menu you want
to access, or through an auto-follow for selected
functions.
Menu Navigation
The menu system allows you to access all of the setup
and conguration information for the switcher. In some
cases, a menu can be accessed either by pressing the
MENU button and navigating to the menu, or by
double-pressing a button on the control panel.
1.
Press MENU. The Pattern/Menu Selection buttons
light up.
Press the Pattern/Menu button for the menu you want
2.
to navigate to. The rst page of the menu is shown
on the display.
3.
Press NEXT to navigate to the next page of the
current menu. If the NEXT button is not lit, there
are no other pages to the current menu.
Tip: If you want to return to the first page of a menu, press and
hold NEXT and press HOME. You can also navigate up one
level in a menu tree by pressing and holding NEXT and pressing
UP.
Auto-Follow Menus
The switcher navigates to auto-follow menus
automatically when you select certain functions on the
switcher. For example, when you select a key the key
adjustment menu is shown on the display.
Auto-Follow functionality also applies to video source
buttons that have external devices assigned to them. If
you select a source button that an external device is
assigned to, the peripheral control menu for that specic
device is shown.
14 • Menu System — Carbonite Black Solo Operation Manual (v1.2)
Page 15
Switcher Basics
Video
Processing
& DVE
Crosspoint
FSFC
Video
Inputs
ANC
Insert
Video
Outputs
No
Apply
FSFC?
Yes
No
ANC
set to
Strip?
Audio is stripped
from video signal
Audio cannot be
re-embedded in
video signal
Audio is
re-embedded in
video signal
Switcher
Before using your switcher, it is important to become
familiar with how audio and video is handled by the
switcher. Some important concepts includes video
sources, video layering and re-entry, and preview.
Audio and Video Processing
Video and audio signals are processed and passed through
the switcher in different ways, depending on how the
switcher is being used or is set up. A better understanding
of how the switcher is processing these signals help you
to achieve the production you want.
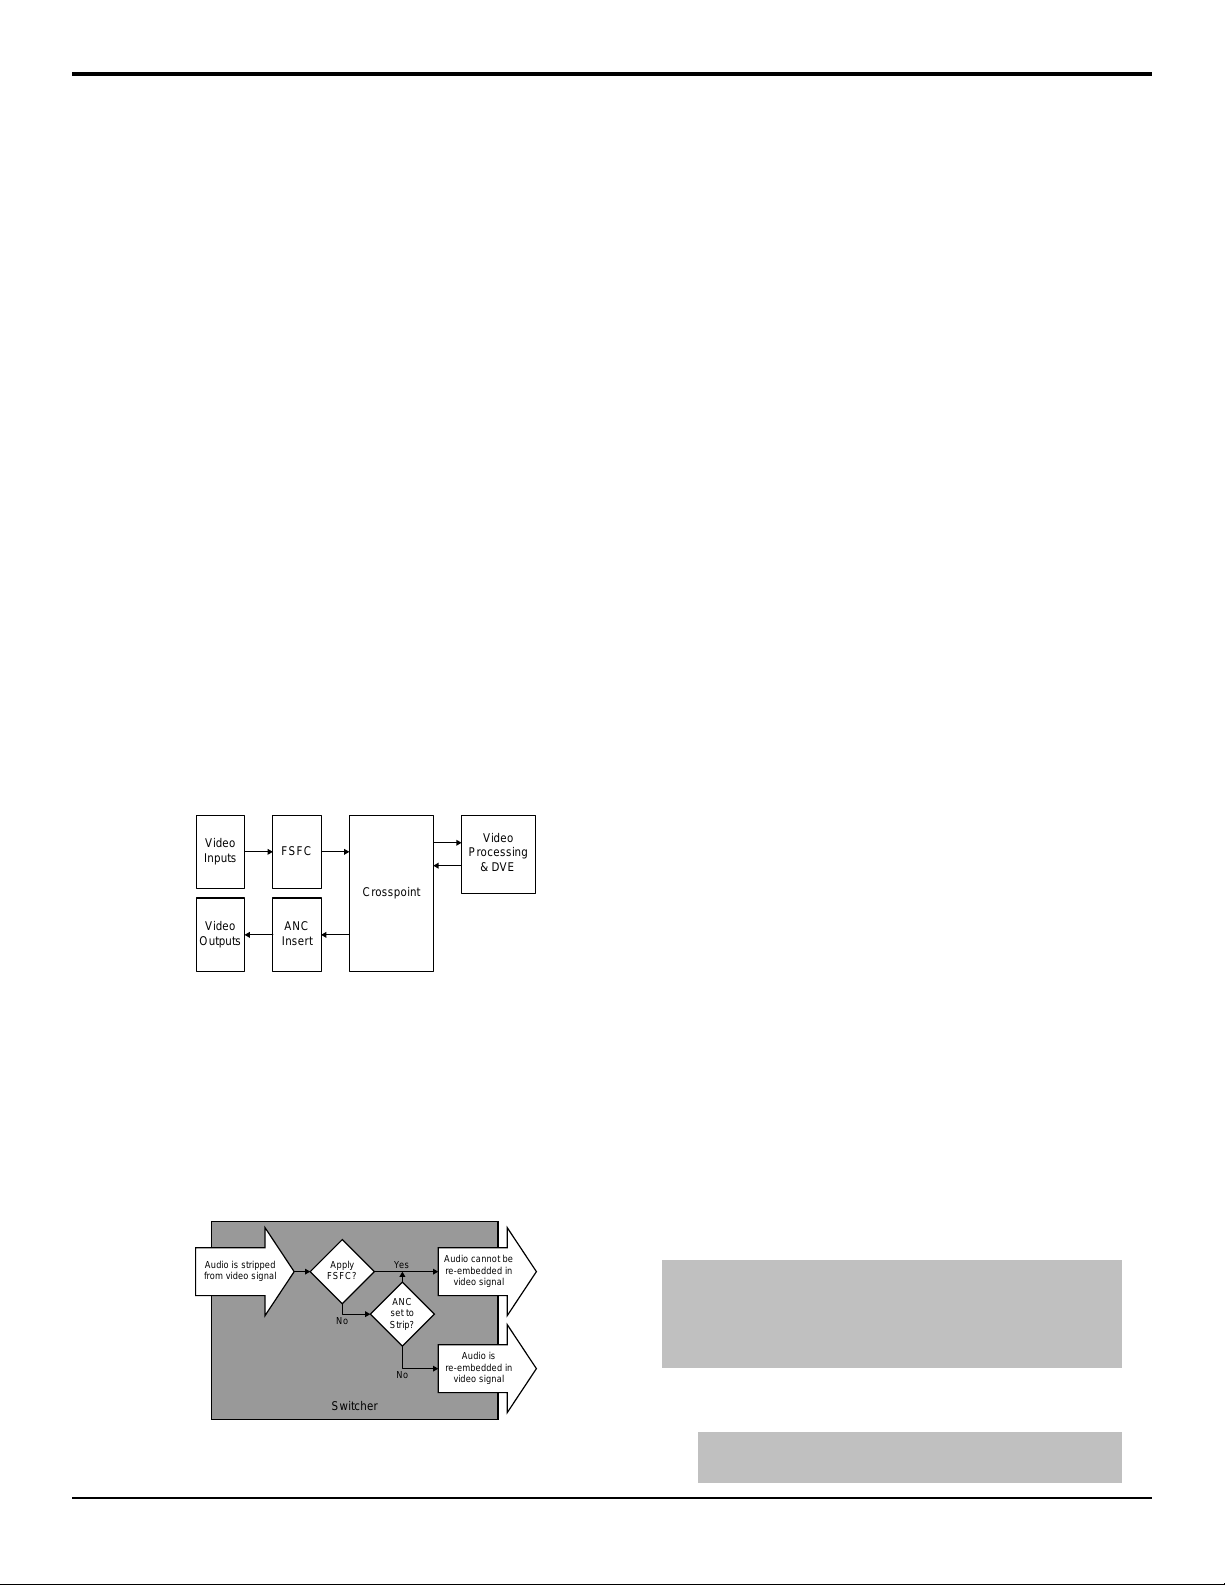
Video Processing and Flow
Video is processed in a number of blocks in the switcher.
After video comes into the switcher, the frame
synchronizers / format converters are applied (depending
on the frame you have). At this point any required color
correction is also applied. After input the video signal is
routed through the crosspoint. The crosspoint can route
any input to any output for straight switching, or to the
video processor and DVE and back for video
manipulation. Just before the video signal is sent to the
output, the processing of the ancillary data is performed.
Figure 6: Video Flow Through the Switcher
Audio Processing and Flow
Unlike video, the switcher does not handle audio signals
independently. An audio signal is embedded into the
ancillary data of a video signal before is comes into the
switcher. As the signal comes into the switcher and is
manipulated, you must ensure not to perform an operation
that will force the ancillary data to be stripped.
The following restrictions apply to ancillary data being
included in the output:
• All ME program buses pass ancillary data.
• MultiViewer outputs do not include any ancillary
data.
• MiniME™and MultiScreen outputs do not include
any ancillary data unless an ME with ancillary data
is re-entered onto the background bus.
• ME Preview does not include ancillary data unless
the background is not selected as part of the next
transition.
• A MiniME™or MultiScreen can include ancillary
data if an ME is re-entered onto the background.
• Any format conversion on the input video signal.
• Setting ancillary data to be stripped.
When you are performing a transition, or keying, the
embedded audio is carried in the ancillary data of the
background video signal. The ancillary data from the
background source is replaced with the ancillary data
from the preset source, and the ancillary data for keyed
sources is stripped.
Video Sources
The switcher has access to two basic types of video
sources, external and internal. All video sources can be
assigned to video source buttons. By pressing a video
source button on a bus, the video source assigned to that
button is selected on that bus.
• External — External video sources come from
cameras, video servers, character generators, or other
external devices into the switcher.
• Internal — Internal video sources come from
internally generated video, such as Media-Store
channels, matte color, and black.
To Select a Source on a Bus
To select a video source on a bus, you must identify
the ME, MiniME™, or Aux and bus you want to assign
a video source to, and then press the source button you
want to select on that bus.
The user buttons on the control panel allow you to switch
between any ME, MiniME™, Aux Bus, or MultiScreen.
Figure 7: Audio Flow Through the Switcher
Tip: Source selection can also be made from the Buses tab on
the Live Assist node in DashBoard. Key bus source selections
can also be made using the Key Source button on the Keyers
tab on the Live Assist node in DashBoard.
Select the ME, MiniME™, Aux, MultiScreen, or
1.
keyer that you want to select a source on.
Tip: The user select buttons can be assigned to select any
bus on the switcher. If you change what the button is
Carbonite Black Solo Operation Manual (v1.2) — Switcher Basics • 15
Page 16

assigned to you should make sure to change the text on
ME Background
Keyer1
Keyer2
Keyer3
Keyer4
1 2 3
MiniME ME MiniME
MiniME ME
MiniME MiniME
KEY 1 KEY 2
PGM/
PST
KEY 3 PGM
CLEAN
FEED
KEY 4
the button cap.
•
Key — press one of the KEY X buttons to select
that keyer.
•
ME — press ME.
•
MiniME™— press and hold MiniME/MS and
press the button on the key bus that corresponds
to the MiniME™you want to select. Source
button 1 selects MiniME™1 and button 2 selects
MiniME™2.
Tip: You can also press and hold ME and press the
button on the key bus that corresponds to the MiniME
you want to select. Source button 3 selects MiniME
1 and button 4 selects MiniME™2.
•
Aux — press and hold Aux and press the button
on the key bus that corresponds to the Aux you
want to select.
•
MultiScreen — press and hold MiniME/MS
and press the button on the key bus that
corresponds to the MultiScreen you want to
select. Source button 6 selects the MultiScreen.
Tip: If you want to select the MultiScreen bus directly, you
must re-assign one of the user buttons to MultiScreen.
Select the bus you want to select a source on.
2.
Tip: You can select a MiniME™on an ME or different MiniME
to re-enter it. Up to two MiniME™re-entries, including an ME is
allowed.
™
Re-Entry
Re-entry is the term used to describe the process of
selecting a MiniME™on an ME.
Keep the following in mind when working with
re-entries:
• You cannot re-enter an ME, or the Clean Feed of an
™
™
ME, into itself.
Re-Entry Timing
To maintain proper video timing through the switcher,
each MiniME™exists in a specic timing window relative
to the ME. These windows restrict what can be re-entered
into what.
Figure 9: MiniME™Timing Windows
3.
Video Layering
How video is layered in the output of the switcher
depends on what keyers are on-air and how MiniME
outputs are re-entered.
Note: The user select buttons can be assigned to specific
keyers or aux buses or they can be configured so that you
can press and hold a single button and use the key bus to
select the keyer or aux bus.
• Program Bus — use the PROGRAM bus.
• Preset Bus — use the PRESET bus.
•
Key Bus — press KEY X to assign the
KEY/AUX/CUSTOM CONTROL bus to that
keyer.
• Aux Bus — use the KEY/AUX/CUSTOM
CONTROL bus.
Select the source you want to use on the bus. Use
the Shift button to access additional sources.
™
Figure 8: Video Layering
FlexiClean Clean Feed
FlexiClean provides a second program output that is
derived from a different location than the standard
program output. A frequent application is the recording
of shows for later airing without call-in phone numbers
inserted.
The clean feed output can come from before or between
the keyers.
Figure 10: Clean Feed Modes
Video Preview
Video preview allows you to use an additional monitor
to preview what the next shot is going to be. The preview
for an ME shows what is selected for the next transition
on that ME. This includes the keys and background video
sources that will be on-air after the next transition.
MultiViewer
The MultiViewer allows you to view up to 10 video
sources, in 23 layouts, from a single output BNC. Any
video source on the switcher, including ME Program,
Preview, and Media-Store channels, can be routed to any
16 • Switcher Basics — Carbonite Black Solo Operation Manual (v1.2)
Page 17

box on the MultiViewer. All boxes on the MultiViewer
output include mnemonic source names and red and green
tallies.
ME Copy
You can copy the entire contents of an ME or MiniME
to another ME or MiniME™. The entire contents of the
destination is replaced with the contents of the source.
When you copy an ME, the switcher tries to assign
resources to the destination ME to match the source ME.
If these resources are not available, the switcher may
need to steal resources. If you are performing the copy
from the control panel you will be asked to conrm the
stealing of any required resources. From DashBoard you
will not be asked and the required resources will be
stolen.
Note: You cannot perform an ME copy from the control panel.
To Copy an ME Using DashBoard
1.
Click Navigation Menu > Live Assist > ME
Copy.
2.
Click a Source button to select the source you want
to copy.
3.
Click a Destination button to select the destination
that you want to copy to.
4.
Click Copy.
™
Carbonite Black Solo Operation Manual (v1.2) — Switcher Basics • 17
Page 18

DashBoard
The DashBoard control system allows remote access to
multiple pieces of Ross Video equipment, including
openGear®cards, Carbonite production switchers,
BlackStorm video servers, and ACID UltraChromeHR
cameras.
Download and install the latest version of DashBoard
from http://www.opengear.tv/. Review the documentation
that comes with DashBoard for information on installing
and launching DashBoard.
Tip: For detailed instructions on using DashBoard with
Carbonite, navigate to the online help at
help.rossvideo.com/carbonite.
Configuration
The Conguration node provides a graphical interface
to switcher settings such as Reference, Inputs, Outputs,
and MultiViewer. You can switch between the different
by selecting the tabs at the bottom of the DashBoard
window.
Live Assist
The Live Assist node provides a graphical interface to
functions such as keying, transition, and memory settings
of the switcher. You can switch between the different
settings by selecting the tabs at the bottom of the
DashBoard window.
Status
The Status node provides a read only overview of the
state of a number of important switcher components and
equipment.
The following items are available on the Status node:
• Software Version — the current version of the
software running on the switcher
• Serial Number — the serial number of the frame
• Engine Type — the model of frame
• Video Mode — the video format that the switcher is
operating in
• Video Reference Source — the source of video
reference to the switcher
• External Reference — the video format of the
external reference, if connected
• Reference — status of whether the switcher has
locked to the reference format
• Field Dominance — the switching eld
• Ancillary Mode — how ancillary data is handled
(strip or pass)
• Temperature — status of the ambient temperature
in the frame
• CPU Temperature (C) — the temperature of the
frame CPU in degrees Celsius
• FPGA Temperature (C) — the temperature of the
frame FPGA in degrees Celsius
• Fan #1 — status of fan 1 in the frame (left fan)
• Fan #2 — status of fan 2 in the frame (right fan)
• Timecode — the current timecode being received by
the switcher
• Allocated DVEs — where DVE channels are
allocated in the switcher.
PaneLINK
Live Assist can be set to either mirror actions on the
switcher control panel, or only show actions on the
currently selected ME and Keyer on the current tab. For
example, with PaneLINK turned on, pressing KEY 1
SEL, WIPE, and then SELF KEY causes Live Assist
to show the Keyers tab, the Trans tab, and then the
Keyers tab again. With PaneLINK turned off, Live
Assist does not switch between tabs.
The PaneLINK button is located at the bottom right
corner of the Live Assist window.
Custom Controls
The Custom Control node provides a graphics interface
for recording, editing, and running custom controls.
MediaManager
The MediaManager node allows you to connect to the
MediaManager web interface from within DashBoard.
Tip: You can either launch the MediaManager directly using the
switcher IP address, or you can access it using the
MediaManager node in DashBoard. If you are logging into
MediaManager from DashBoard, you must have Microsoft
Internet Explorer®10, or higher, installed.
®
18 • DashBoard — Carbonite Black Solo Operation Manual (v1.2)
Page 19
ViewControl
The ViewControl interface through DashBoard allows
you to coordinate control of the Carbonite switcher,
XPression Live Graphics System, and the BlackStorm
Playout Server all through a touchscreen interface.
Through ViewControl you can select sources, perform
transitions, and run custom controls.
Keep the following in mind when working with
ViewControl
• ViewControl requires DashBoard 5.1, or later.
• Only the sources assigned to the MultiViewer boxes
are available for direct selection. Custom controls
can be used to select other sources.
• A running custom control, or a custom control that
is paused or held, are not shown on the ViewControl
interface.
• The control panel does not follow key and bus
selections made on ViewControl.
ViewControl Overview
The ViewControl interface provides quick access to a
number of custom control buttons as well as the transition
functionality of the switcher.
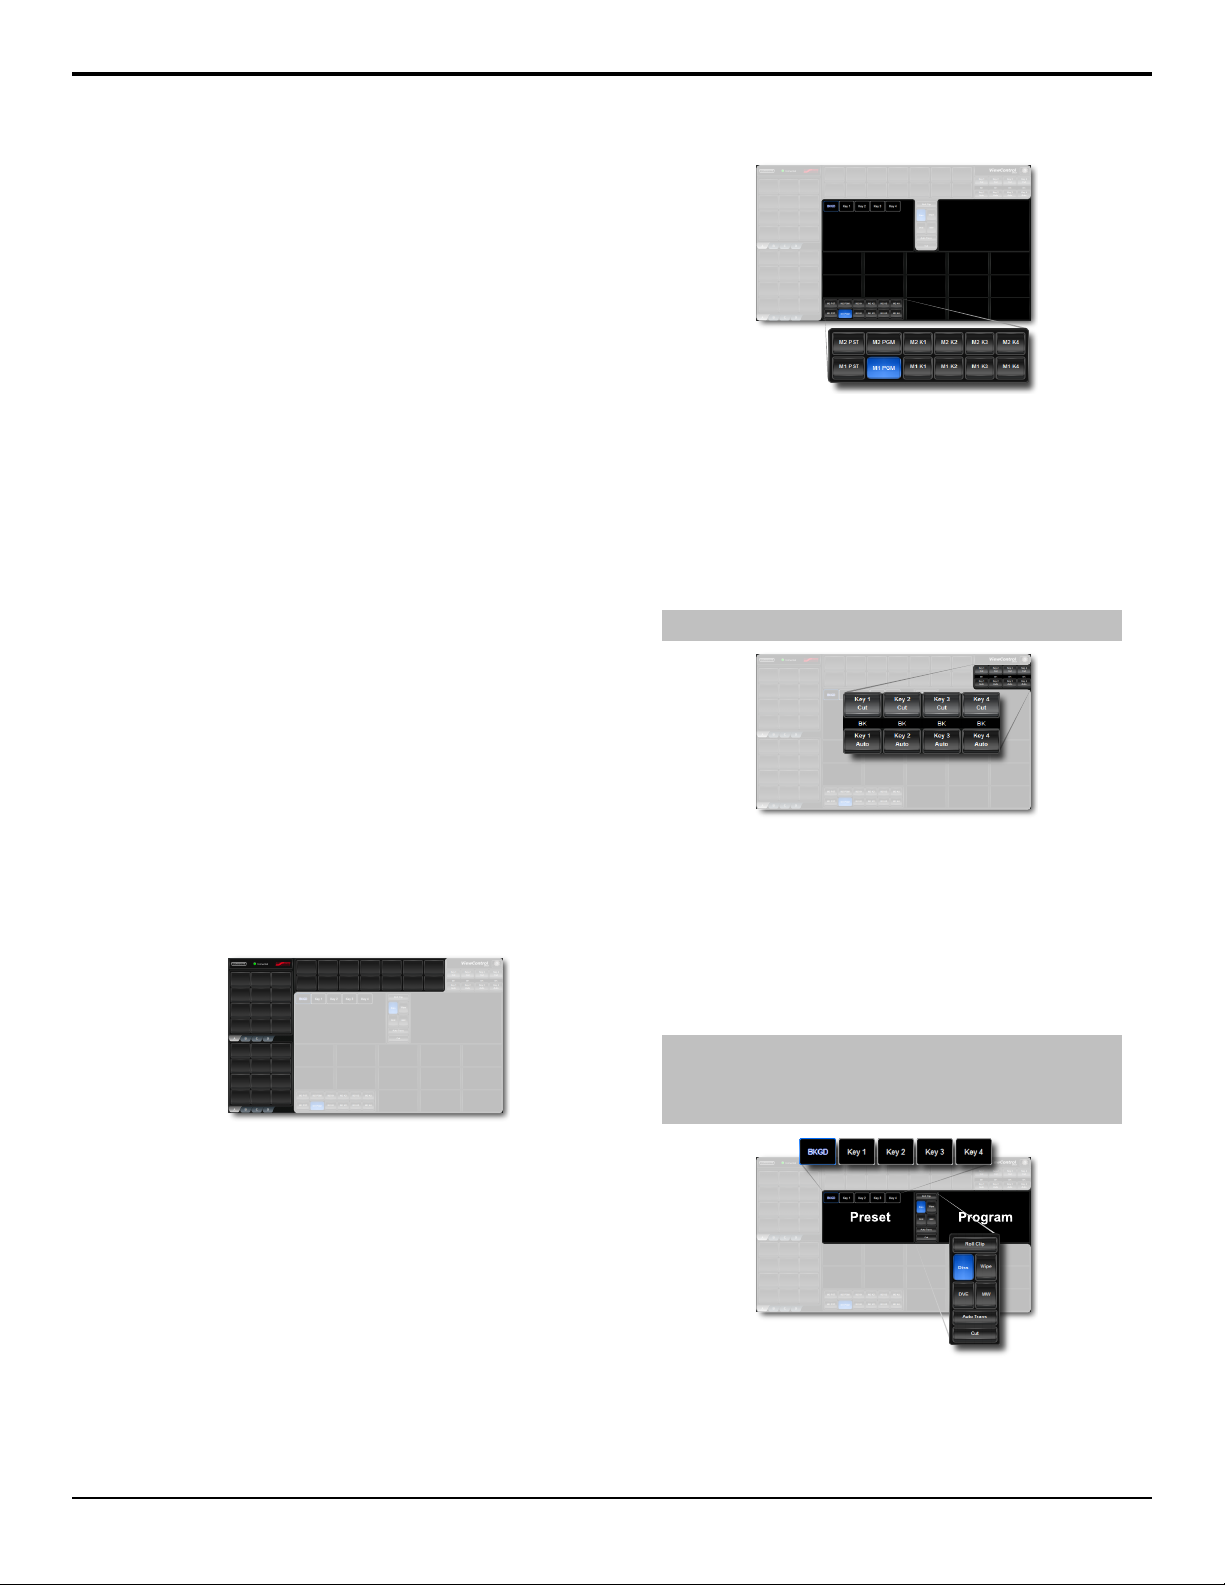
Figure 12: Bus Selection Buttons
Keyer Transition Buttons
The Keyer Transition buttons allow you to perform a cut
or dissolve of the keys on the Program bus, without
having to include them as part of the next transition.
These buttons act the same as the Keyer Transition
Buttons on the control panel.
Tip: The Cut buttons turn red when a key is on-air.
Custom Control Buttons
The custom control buttons can be assigned to any
custom control on the switcher and given unique names
and icons. The button groups on the left (shown below)
are organized into groups, or tabs.
Figure 11: Custom Control Buttons
Bus Selection Buttons
The bus selection buttons allow you to select the different
buses on different ME outputs of the switcher.
To select a source on a bus, press the bus selection button,
and press the MultiViewer box for the source you want
to select. For example, to select camera 1 on ME 2 Key
3, press M2 K3 and then press the box for the camera 1
source.
Figure 13: Keyer Transition Buttons
Transition Buttons
The transition buttons allow you to select what is
included in the next transition, what type of transition is
to be performed, and perform the transition. These
buttons function similarly to the buttons in the Transition
Area on the control panel.
Tip: The Transition Buttons on ViewControl only control the
transition area of ME 2. To control ME 1 you can create a custom
control to perform the effect you want and assign it to one of the
custom control buttons.
Figure 14: Transition Buttons
Carbonite Black Solo Operation Manual (v1.2) — ViewControl • 19
Page 20

Custom Control Button Setup
When you assign a custom control to a button, you can
give that button a unique name and assign an icon to it.
The images for the icons must be on a USB drive in the
frame when you assign them. Once assigned the icons
are stored in the frame and the USB can be removed.
Each of the tabs can be named.
The conguration of the tabs and custom control
assignment to buttons are stored with the switcher
personality settings.
To Set up the Custom Control Buttons
If you want to assign icons to the custom control buttons,
you must have the images you want to use for the icons
stored on a USB drive installed in the frame. After the
images have been assigned you can remove the USB
drive.
1.
Click the icon in the upper right corner of the
window.
Figure 15: ViewControl Edit Button
Press the custom control button that you want to set
2.
up.
3.
Enter a name for the button in the Button Name
eld.
Tip: You can change the name of a tab by selecting a
button on the tab and then entering a new name in the
Group Name field.
4.
Click the Bank button and select the number of the
bank you want to select a custom control from.
5.
Click the CC X button and select the number of the
custom control you want to assign to the button.
Navigate the les on the USB drive and click the
6.
image you want to assign as the icon for the button.
Tip: Press Default Icon to switch back to the default icon.
Set up additional custom control buttons as required.
7.
8.
Press Done when you are done setting up custom
control buttons.
20 • ViewControl — Carbonite Black Solo Operation Manual (v1.2)
Page 21

Transitions
options that are available depend on the type of transition
that is selected.
Transitions are used to change the background video and
take keys on and off-air. A transition can include any
combinations of background and keyers for an ME. The
background and each keyer can be transitioned
independently and at the same time using the dedicated
KEY TRANS buttons.
Performing Transitions
What you can include in the transition, and the type of
transition you can perform, depend on the number of
media resources you have, and if you are performing a
background and keyer transition at the same time.
Keep the following in mind when performing
transitions:
• If any of the sources going on-air have an assigned
GPI output, the GPI output is triggered and the
switcher then waits the congured pre-delay interval
before performing the transition. If you perform a
transition with the fader handle, the GPI output is
triggered but the pre-delay interval is ignored.
• If any of the sources going on-air are assigned to a
video server, you can have the video server play when
the source is taken on-air by using the RlClip knob
to select On.
• If any of the sources going on-air are assigned to a
video server, the switcher waits for the congured
pre-delay interval before performing the transition.
If you perform a transition with the fader handle, the
pre-delay interval is ignored.
• If the fader is moved during an auto transition, control
of the transition is passed to the fader. You must
complete the transition with the fader. This allows
you to override any auto transition in progress with
the fader.
• A key only transition can be performed by pressing
the KEY TRANS button for the key you want to
transition.
• You can pause an auto transition by pressing the
AUTO TRANS button during the transition. Press
the button again to continue the transition.
• On a MiniME™, Background and key 2 only support
Dissolve and Cut transitions.
• There is no preview output for a MiniME™.
Understanding the Transition Menu
When you select a transition type button, the menu
system displays a number of options that allow you to
adjust how a transition is performed or appears. The
Table 1: Transition Menu Items
DescriptionMenu Item
Time
RlClip
DisTyp
Dirctn
Key X
Border
Soft
Attrib
selects the amount of time (Transition Rate), in frames,
that an auto transition takes
selects whether GPI outputs assigned to input sources
are triggered before a transition
selects whether the dissolve is a standard dissolve or a
WhiteFlash transition.
selects the direction that the wipe is performed (forward
or reverse), as well as turns the Flip-Flop feature on or
off
selects the amount of time, in frames, that an auto
transition dissolve for the keyer takes
selects the pattern for the wipe transitionPattrn
selects the horizontal position for the wipe patternX Pos
selects the vertical position for the wipe patternY Pos
selects the aspect ratio for the wipe patternAspect
turns the border feature on and selects the size of the
border on the wipe pattern
selects the amount of softness that is applied to the wipe
border
selects the color for the wipe border from a pre-set listLoad
adjusts the hue of the wipe border colorBHue
adjusts the saturation of the wipe border colorBSat
adjusts the luminance of the wipe border colorBLum
selects the rotation for the wipe patternRot
multiplies the wipe pattern horizontally (1-32)HMult
multiplies the wipe pattern vertically (1-32)VMult
selects an animation for a media transitionBrowse
used with the Value knob to adjust parameters for the
MediaWipe (Media-Store Attributes on page 46)
selects how the Attrib adjustments are savedFunc
turns the Transition Limit feature on or offLimit
selects the pattern for the DVE transitionEffect
To Perform a Transition
All transitions, with the exception of cuts on the
background or key bus, have the same basic setup. To
perform a transition, you must select what sources you
want to transition on what buses, and how you want the
transition to appear.
Select the ME, MiniME™, or MultiScreen that you
1.
want to perform a transition on.
Select the video sources you want to take on-air on
2.
each bus.
Carbonite Black Solo Operation Manual (v1.2) — Transitions • 21
Page 22

For a background transition you must select the
Cut
source you want to transition to on the preset bus.
3.
In the Transition Area, select the elements (BKGD,
KEY 1, KEY 2, KEY 3, KEY 4) you want to
include in the next transition. To select multiple keys
and background, press and hold the rst element,
and select the additional elements.
4.
Use the Time knob to set the length of the
background transition.
5.
Select the type of transition (DISS (Dissolve or
WhiteFlash), WIPE, DVE, MEDIA) you want to
perform.
6.
Use the RlClip knob to select whether you want any
video server clips assigned to a source being taken
on-air to play with the transition (On), or not (Off).
Perform the transition.
7.
Tip: You can preview the transition on the preview output
by pressing and holding the transition type button and
perform the Auto Trans or Fader transition. You cannot
preview the independent key-only transitions or a MiniME
transition.
•
Auto Transition — press AUTO TRANS. The
transition is performed at the set transition rate
•
Cut — press CUT
• Fader — move the fader from one limit to the
other. The rate at which you push the fader
determines the rate of the transition.
If a pre-delay has been set, the switcher will apply
the pre-delay interval before performing the
transition.
To Override the Pre-Delay Setting
• Press any source button on any bus other than the
source button on the background bus that is
going-on air.
•
Press the BKGD or Key X button in the next
transition area.
•
Press the CUT or AUTO TRANS button.
• If a key is included in the transition, press one of
the dedicated key transition button.
• Recall a memory. The pre-delay countdown and
transition are aborted and the memory register is
recalled.
Cut Transitions
A Cut is an instantaneous transition between video
sources. Unlike all the other transition types, there are
no intermediate steps between the video source that is
on-air, and the video source you are transitioning to.
™
Figure 16: Example Cut Transition
A cut is performed either by selecting difference sources
on a background or key bus, or by pressing a CUT button.
Dissolve Transitions
A Dissolve is a gradual fade between video sources. For
a Background transition, the video signal on the
Background bus and the video signal on the Preset bus
are mixed together until the Preset bus video signal
completely replaces the Background bus video signal.
During the pre-delay time, you can override the pre-delay
count and cut the sources on-air immediately.
• While the switcher is waiting for the pre-delay
countdown to complete, perform one of the following
• Press the source button on the background bus
that is going-on air. The pre-delay countdown and
the transition are aborted and the source is cut to
air on the background bus.
• Initiate a transition with the fader handle. The
pre-delay countdown is aborted and the transition
proceeds as you move the fader handle.
To Abort a Transition During the Pre-Delay
During the pre-delay time, you can abort the transition
completely.
• While the switcher is waiting for the pre-delay
countdown to complete, perform one of the following
22 • Transitions — Carbonite Black Solo Operation Manual (v1.2)
Figure 17: Example Dissolve Transition
To Set Up a Dissolve
A dissolve transition requires that you set a background
and key transition rate for the auto transition. A fader
transition does not use the transition rate.
1.
Press DISS.
Tip: You can use the same procedure for a MiniME™or
MultiScreen.
2.
Use the Time knob to set the length of the
background transition.
3.
Use the DisTyp knob to select Diss.
4.
Press NEXT.
5.
Use the Key X knobs to select the length of the key
transitions.
Page 23

WhiteFlash
Wipe Transitions
Perform a two-step transition where a dissolve to and
from white, or other selected color, is performed in the
middle of the transition. The video signal on the
Background bus is transitioned to a color background of
the selected WhiteFlash color. The color background is
then transitioned to the preset bus. WhiteFlash consumes
a pattern generator for the transition.
Each ME has a separate WhiteFlash generator.
To Set Up a WhiteFlash
A WhiteFlash transition is performed just like a normal
dissolve except that you must set the color for the ash
and the rates for the onset, hold, and fade. transition is
performed just like a normal dissolve except that you
must set the color for the ash and the rates for the onset,
hold, and fade.
1.
Press DISS.
Tip: You can use the same procedure for a MiniME™or
MultiScreen.
2.
Use the Time knob to set the length of the
background transition.
3.
Use the DisTyp knob to select Flash.
4.
Press NEXT.
5.
Use the Key X knobs to select the length of the key
transitions.
6.
Press NEXT > NEXT > NEXT.
7.
Use the Onset, and Offset knobs to select the
percentage of the transition that each phase of the
WhiteFlash takes.
•
Onset — duration of the dissolve to the
WhiteFlash color.
•
Offset — duration of the dissolve to the preset
video source.
•
Hold — duration of the dissolve that the
WhiteFlash color is held. This value is the
residual of entire duration minus the onset and
offset.
8.
Press NEXT.
Select a default or custom color for the WhiteFlash.
9.
•
Default — use the Load knob to select a preset
color for the WhiteFlash.
•
Custom — press NEXT and use the Hue, Sat,
and Lum knobs to select your own color.
A Wipe is a gradual transition where one video signal is
replaced with another according to a wipe pattern. In the
example below, a line wipe is being used.
Figure 18: Wipe Transition
For Key transitions, the key is wiped on or off-air with
the transition and the background remains untouched.
The duration of a wipe transition depends on either the
transition rate for the ME, or the rate at which the fader
is moved.
To Set Up a Wipe
A wipe transition requires that you select a wipe pattern,
set the direction and number/size of wipe pattern, as well
as set a background and key transition rate for the auto
transition. A fader transition does not use the transition
rate.
1.
Press WIPE.
2.
Use the Time knob to set the length of the
background transition.
3.
Use the Dirctn knob to select the direction that the
wipe travels.
4.
Press the Dirctn knob to select whether the wipe
runs forward during the rst transition and then
reverse during the second (FF), or if it always goes
in the same direction.
5.
Press NEXT.
6.
Use the Pattrn knob to select the wipe pattern you
want to use. You can also select the pattern by
pressing the pattern button directly.
7.
Use the X Pos and Y Pos knobs to position the
wipe pattern. You can also use the positioner.
8.
Press NEXT.
9.
Use the Aspect knob to adjust the aspect ratio of
the wipe pattern.
Not all patterns can be adjusted.
10.
Use the Border and Soft knobs to apply a border
to the wipe pattern.
Refer to the section To Apply a Border to a Pattern
on page 24 for information on borders.
11.
Press NEXT. If a border is applied to the wipe, you
must press NEXT multiple times to get to the next
step.
12.
Use the Rot knob to rotate the pattern.
Carbonite Black Solo Operation Manual (v1.2) — Transitions • 23
Page 24

Not all patterns can be rotated.
13.
Use the HMult knob to multiply the pattern
horizontally.
14.
Use the VMult knob to multiply the pattern
vertically.
To Apply a Border to a Pattern
1.
Press WIPE > NEXT > NEXT.
2.
Use the Border knob to adjust the size of the border
around the pattern.
3.
Use the Soft knob to adjust the softness of the
pattern border.
4.
Press NEXT.
Select a default or custom color for the border.
5.
•
Default — use the Load knob to select a preset
color for the border.
•
Custom — press NEXT and use the BHue,
BSat, and BLum knobs to select your own
color.
DVE Transitions
A DVE transition is a gradual transition where one video
signal is replaced with another according to a 2D DVE
pattern.
Keep the following in mind when performing DVE
transitions:
• You must include the background when performing
a DVE transition on a Chroma Key, Self Key, or
Auto-Select Key. If you do not include the
background, a dissolve transition is performed.
• Performing a DVE transition on a DVE Key without
including the background scales the transition effect
to the size of the DVE Key. This transition does not
consume an additional DVE resource.
• Performing a DVE transition on a DVE Key with the
background included does not scale the transition
effect. This transition consumes the second DVE
resource.
To Set Up a DVE Transition
A DVE transition requires that you select the DVE
pattern and duration for the transition.
1.
Press DVE.
3.
Use the Dirctn knob to select the direction that the
wipe travels.
4.
Press the Dirctn knob to select whether the wipe
runs forward during the rst transition and then
reverse during the second (FF), or if it always goes
in the same direction.
5.
Press NEXT.
6.
Use the Effect knob to select the DVE pattern you
want to use. You can also select most of the patterns
by pressing, or double-pressing, the pattern button
directly.
•
PushL — Push Left (0)
•
PushR — Push Right (double-press 0)
•
PushU — Push Up (1)
•
PushD — Push Down (double-press 1)
•
SqzHor — Squeeze Horizontally (2)
•
SqzVert — Squeeze Vertically (3)
•
SqzCtr — Squeeze to the Center (7)
•
PushUL — Push to Upper-Left (4)
•
PushUR — Push to Upper-Right (double-press
2)
•
PushDL — Push to Lower-Left (double-press
3)
•
PushDR — Push to Lower-Right (double-press
4)
•
SqzUR — Squeeze to Upper-Right (5)
•
SqzUL — Squeeze to Upper-Left (6)
•
SqzDR — Squeeze to Lower-Right
(double-press 6)
•
SqzDL — Squeeze to Lower-Right
(double-press 5)
•
CirclL — Circle Left (8)
•
CirclR — Circle Right (double-press 8)
•
FlyTru — Fly Through (double-press 7)
•
Strtch — Stretch Horizontally to Black (9)
•
Tumble — Tumble Down (double-press 9)
•
1000lb — Falls and then Bounces
•
SqzU — Squeeze Up
•
SqzD — Squeeze Down
•
SqzL — Squeeze Left
•
SqzR — Squeeze Right
MediaWipe Transitions
Tip: You can use the same procedure for a MiniME™or
MultiScreen.
2.
Use the Time knob to set the length of the
background transition.
24 • Transitions — Carbonite Black Solo Operation Manual (v1.2)
A MediaWipe allows you to use an animation to cover
a transition. When the transition starts, the switcher plays
the selected animation over top of the background and
keys that are being transitioned. A MediaWipe can be
used to cover a cut, dissolve, wipe, or DVE transition.
Page 25

For a cut MediaWipe, the transition is performed when
the cut point is reached. It is important to use a full-screen
image in the animation at the cut point so that the cut is
not visible on-air.
Keep the following in mind when performing
MediaWipe:
• Although you can select a still image for a media
transition, it is not recommended.
• Only Auto Transition should be used for Media
transitions. Using the fader to perform the transition
manually could result in jumps in the animation.
• The duration of the transition (Time) is set by the
length of the animation and the play speed of the
animation.
• The audio associated with a MediaWipe is only
available on the AES outputs.
• You cannot perform a MediaWipe transition on a
MiniME™or MultiScreen.
• If the Media-Store channel being used for a
MediaWipe is set as a MSFS, the transition is
switched to a standard dissolve.
To Set Up a MediaWipe
A MediaWipe requires that you select the animation you
want to use and then set up how you want to transition
performed under the animation. This information is stored
with the media item when you press save.
1.
Press MEDIA.
2.
Use the Dirctn knob to select the direction that the
wipe travels.
3.
Press the Dirctn knob to select whether the wipe
runs forward during the rst transition and then
reverse during the second (FF), or if it always goes
in the same direction.
4.
Press the Browse knob and use the knob to navigate
to the le you want to load. Press the knob to make
a selection.
5.
Double-press the MEDIA button.
In the pattern selection area, select the type of
6.
transition you want to use under the MediaWipe.
•
Cut — Use the Cut knob to select the cut point
for the transition.
•
Dissolve — Use the Start knob to select the
point where the dissolve starts and the Rate knob
to select the duration of the transition.
•
Wipe — Use the Start knob to select the point
where the dissolve starts and the Rate knob to
select the duration of the transition. Press NEXT
and set up the remaining wipe parameters as
normal. Wipe border is not supported.
•
DVE — Use the Start knob to select the point
where the dissolve starts and the Rate knob to
select the duration of the transition. Press NEXT
and set up the remaining DVE wipe parameters
as normal.
Tip: If you select a negative start point for the transition,
the transition will start first and then the animation will play
after the start point duration has passed.
7.
Press Save to save the new setting to the selected
media item.
Transition Limits
The Transition Limit allows you to set the point in a
transition where an auto transition stops. When active,
the point in the transition where the auto transition will
stop is indicated by a ashing segment on the transition
progress bar next to the fader handle. The auto transition
proceeds to this point and stops. The second auto
transition starts from the transition limit point and goes
back to where the rst transition started.
Tip: If you turn Limit off when the transition has stopped at the
transition limit point, the next transition starts from the transition
limit point and goes forward to complete the transition, instead
of going back to the start.
To Set Up a Transition Limit
A transition limit is set using the fader of the ME that
you want to set up the transition limit on. The transition
limit is specic to the ME it is set on.
Set up the transition you want to perform.
1.
2.
Press NEXT until Limit is shown on the menu.
Tip: You can use the same procedure for a MiniME™or
MultiScreen.
Move the fader to the position in the transition where
3.
you want to set the transition limit point.
4.
Toggle the Limit knob (On) to set the transition
limit point.
The transition limit is set and active for the ME you set
it on. You can turn transition limit on and off by toggling
the Limit knob while the fader is at either the top or
bottom limit. If the fader is not on a limit when you
toggle the transition limit on, a new transition limit will
be set. Double-press the Limit knob to reset the transition
limit point.
GPI Output Triggers
Each video source can have a GPI output assigned to it.
This GPI can be used to trigger an external device, such
as a video server, to play the cued clip when the video
Carbonite Black Solo Operation Manual (v1.2) — Transitions • 25
Page 26

sources from the video server are taken on-air. This
trigger can be set up to occur automatically any time the
video source is transitioned on-air, or it can be triggered
manually.
An automatic GPI output trigger can be overridden if
required.
Note: The Next Button Secondary Function must be set to GPO
to be able to trigger a GPI output manually using the NEXT
button.
Keep the following in mind when working with GPI
output triggers:
•
The RlClip knob must be set to On to trigger a GPI
output with a transition.
• Edge triggered GPI outputs remain triggered for the
congured duration.
• Level triggered GPI outputs toggle between high and
low each time they are triggered.
To Manually Trigger a GPI Output
The GPI must already be set up as a output and the Next
button functionality must be set to GPO before you can
manually trigger it.
1.
Press and hold the NEXT button.
While holding the Next button, the pattern buttons
light for each GPI output that is currently triggered.
Press the pattern button for the GPI output you want
2.
to trigger. The numbers on the pattern buttons
correspond to the GPI.
To Override a GPI Output
The RlClip personality option must be set to User for
you to override GPI output triggering.
Prepare the transition as required, but do not perform
1.
the transition.
Press the transition type button again to bring up the
2.
transition menus.
3.
Use the RlClip knob to select whether the GPI
output is triggered (On), or is not triggered (Off).
26 • Transitions — Carbonite Black Solo Operation Manual (v1.2)
Page 27

Patterns, Washes, and Mattes
Patterns, Washes, and Mattes are internally generated
graphical elements that can be used for key or
background ll, key shapes, and transition effects.
Patterns
Pattern generators are used for wipes, masks, and washes.
Each pattern generator can create a single pattern output
that can be adjusted to create a specic look.
Patterns can be applied to the following:
•
Wipes — Press WIPE.
• Masks — Select the key you want apply the mask to
and use the Mask knob to select Pattern.
•
Washes — Select the matte generator (BG) on a
background or key bus and use the Wash knob to
select On.
To Set Up a Pattern
When a pattern generator is assigned to a wipe, mask, or
wash, the pattern setting are displayed. Selecting the
WIPE button, KEY SEL button, or the matte generator
(BG) returns to this menu. When a pattern generator is
assigned the pattern settings are part of the setup menu.
1.
Use the Pattrn knob to select the wipe pattern you
want to use. You can also select the pattern by
pressing the pattern button directly.
2.
Use the X Pos knob to position the wipe pattern
horizontally. You can also use the positioner.
3.
Use the Y Pos knob to position the wipe pattern
vertically. You can also use the positioner.
4.
Press NEXT.
5.
Use the Aspect knob to adjust the aspect ratio of
the patten. Not all patterns can be adjusted.
6.
Use the Border knob to apply a border to the wipe.
7.
Press NEXT. If a border is applied to the wipe or
mask, you must press NEXT multiple times to get
to the next step.
8.
Use the Rot knob to adjust the aspect ratio of the
patten. Not all patterns can be rotated.
9.
Use the HMult knob to multiply the pattern
horizontally.
10.
Use the VMult knob to multiply the pattern
vertically.
Washes
Washes are applied to matte generators selected on the
background or key buses and allow you to apply a
two-color effect based on a selected pattern.
To Set Up a Wash
A wash applies colors to a pattern selected for a matte.
The rst color is preset to the matte color, but both are
selectable. Selecting the source button again returns to
this menu. Refer to the sections on mattes and patterns
for information on setting them up. You can load a preset
color instead of creating the rst custom color.
1.
Use the Hue 1 knob to adjust the hue of the rst
custom color.
2.
Use the Sat 1 knob to adjust the saturation of the
rst custom color.
3.
Use the Lum 1 knob to adjust the luminance of the
rst custom color.
4.
Press NEXT.
5.
Use the Wash knob to select On.
6.
Press NEXT.
7.
Use the Size knob to select the size of the wash
pattern.
8.
Press NEXT > NEXT > NEXT > NEXT.
9.
Use the Hue 2 knob to adjust the hue of the second
custom color.
10.
Use the Sat 2 knob to adjust the saturation of the
second custom color.
11.
Use the Lum 2 knob to adjust the luminance of the
second custom color.
Mattes
Mattes are solid color signals that can be applied to
backgrounds and keys, and borders. Color selection is
done either by picking a preset color, or by adjusted hue,
saturation, and luminance to create a custom color.
Mattes can be applied to the following:
•
Background — Select the matte generator (BG) on
a background or key bus. The full region of the
background or key is lled with the selected color.
•
Border — Assign a border to a WIPE transition or
a key. The wipe border is lled with the selected
color.
To Set Up a Matte Color
When a matte generator is assigned to a background or
key, the matte setting are displayed. Selecting the source
button again returns to this menu. When a matte generator
Carbonite Black Solo Operation Manual (v1.2) — Patterns, Washes, and Mattes • 27
Page 28

is assigned to a key border or wipe border, the matte
settings is part of the setup menu, and become active
when Border is set to greater than 0.
1.
Press NEXT.
2.
Use the Load knob to select the preset color you
want to use.
3.
Press the Load knob to load the selected color.
If you want to use the preset color, ignore the rest
of this procedure.
4.
Press NEXT.
5.
Use the Hue knob to adjust the hue of your custom
color.
6.
Use the Sat knob to adjust the saturation of your
custom color.
7.
Use the Lum knob to adjust the luminance of your
custom color.
28 • Patterns, Washes, and Mattes — Carbonite Black Solo Operation Manual (v1.2)
Page 29

Background
Key1
Key2
Key3
Key4
Keying
Keying is the term used to describe when you insert (or
electronically cut) portions of one scene into another, or
place titles over background images. Keys are made up
of two basic components, an alpha, that cuts the hole in
the background video, and a ll, that lls the hole with
different video.
Keys are layered onto the background video signal from
the lowest numbered key to the highest.
Note: DashBoard Live Assist will not notify you of error
messages or if a confirmation is required. For example, if there
are no available resources for the DVE Key, or Chroma Key,
you are trying to create, the switcher will not create the key and
no notification will be shown.
Figure 19: Key Priority
If you are using a MiniME™, key 1 only supports a DVE
key type, and key 2 only supports the Self Key, Auto
Select, and Chroma Key types. Key priority on a
MiniME™is the same as on an ME.
Understanding the Keying Menu
When you select a key type button (SELF KEY, AUTO
SELECT, CHR KEY, or DVE), the menu system
displays a number of options that allow you to adjust
how a the key appears. The options that are available
depend on the type of key that is selected.
The switcher supports Self, Auto Select, Chroma, and
DVE keys in each ME.
Table 2: Keying Menu Items
DescriptionMenu Item
removes lower-saturated colors from the video imageClip
adjusts the transition between video image, and the parts
of the video image that are removed
adjusts the overall transparency of the key videoTransp
sets the clip, gain, and transparency values for self keys
back to the default
reverses the polarity of the key alpha so that the holes in
the background are cut by dark areas of the key alpha
instead of bright areas
overrides the shaped setting for the keyMode
selects the type of mask that is applied to the key (Masks
on page 36)
Gain
Linear
Invert
Mask
DescriptionMenu Item
M-Frce
M-Inv
Border
Soft
turns the force mask feature on or off (To Pattern Mask
a Key on page 36)
turns the invert mask feature on or off (To Pattern Mask
a Key on page 36)
adjusts the size of the mask or DVE keySize
selects the pattern for the pattern maskPattrn
selects the horizontal position of the mask or DVE keyX Pos
selects the vertical position of the mask or DVE keyY Pos
selects the aspect ratio for the mask pattern or DVE keyAspect
turns the border feature on and selects the size of the
border on the mask pattern or DVE key
selects the amount of softness that is applied to the mask
or DVE key border
selects the color for the border from a pre-set listLoad
adjusts the hue of the border colorBHue
adjusts the saturation of the border colorBSat
adjusts the luminance of the border colorBLum
selects the rotation for the mask patternRot
multiplies the mask pattern horizontally (1-32)HMult
multiplies the mask pattern vertically (1-32)VMult
press to toggle between HCrop, Left/R, and L/RghtHCrop
• HCrop — adjusts the horizontal cropping of the DVE
key
• Left/R — adjusts the cropping of the left side of the
DVE key
• L/Rght — adjusts the cropping of the right side of
the DVE key
adjusts the vertical cropping of the DVE keyVCrop
• Top/B — adjusts the cropping of the top of the DVE
key
• T/Bttm — adjusts the cropping of the bottom of the
DVE key
press to toggle between Left/R and L/RghtLeft/R
• Left/R — adjusts the cropping of the left side of the
box mask
• L/Rght — adjusts the cropping of the right side of
the box mask
press to toggle between Top/B and T/BttmTop/B
• Top/B — adjusts the cropping of the top of the box
mask
• T/Bttm — adjusts the cropping of the bottom of the
box mask
Self Keys
A Self Key is a key in which the luminance, or
brightness, values of the key source are used as the alpha
for the key.
To Set up a Self Key
A self key is set up by selecting the keyer and video
source you want to use, and adjusting the key parameters.
Carbonite Black Solo Operation Manual (v1.2) — Keying • 29
Page 30

Tip: You can return the clip and gain values to the default
settings by pressing the Make Linear knob.
Select the keyer that you want to set up a Self Key
1.
on. .
Tip: You can use the same procedure for a MiniME™or
MultiScreen.
Select the video signal, on the key bus, that you want
2.
to use for the key.
3.
Press SELF KEY.
4.
Use the Clip knob to remove lower-saturated colors
from the video image.
5.
Use the Gain knob to adjust the transition between
the video image and the parts of the video image
that are removed.
6.
Use the Transp knob to adjust the transparency of
the key from opaque (0%) to fully transparent
(100%).
7.
Press NEXT.
8.
Use the Invert knob to reverse the polarity of the
key alpha (On) so that the holes in the background
are cut by dark areas of the key alpha instead of
bright areas.
9.
Use the Mode knob to override the shaped setting
for the key.
•
Normal — use the shaped/unshaped setting from
the key setup.
•
Addtve — set to an additive keyer for a shaped
source.
•
Full — set the alpha to fully opaque (white). The
Clip, Gain, Make Linear, and Key Invert
functions are disabled in this mode.
Note: The mode is reset to Normal when a different source
is selected on the key bus, the alpha is changed, or a
memory is recalled.
10.
Press NEXT.
11.
Use the Mask knob to apply a mask to the key.
Auto Select Keys
An Auto Select key is a key in which two video signals
are required to make the key. The alpha is used to cut
the hole in the video and the ll is used to ll the hole.
These signals often originate from external devices such
as character generators, external still stores, or other
graphics systems.
To Set Up an Auto Select Key
An auto select key is set up by selecting the keyer and
video source you want to use, and adjusting the key
parameters. The pairing of the video and alpha video
signals is done when conguring video inputs. Refer to
the Setup Manual that came with your switcher for
information on setting up Auto Keys.
Tip: You can return the clip and gain values to the default
settings by pressing the Make Linear knob.
Select the keyer that you want to set up an Auto
1.
Select on.
Tip: You can use the same procedure for a MiniME™or
MultiScreen.
Select the video signal, on the key bus, that you want
2.
to use for the key.
3.
Press AUTO SELECT.
4.
Use the Clip knob to remove lower-saturated colors
from the video image.
5.
Use the Gain knob to adjust the transition between
the video image and the parts of the video image
that are removed.
6.
Use the Transp knob to adjust the transparency of
the key from opaque (0%) to fully transparent
(100%).
7.
Press NEXT.
8.
Use the Invert knob to reverse the polarity of the
key alpha (On) so that the holes in the background
are cut by dark areas of the key alpha instead of
bright areas.
9.
Use the Mode knob to override the shaped setting
for the key.
•
Normal — use the shaped/unshaped setting from
the key setup.
•
Addtve — set to an additive keyer for a shaped
source.
•
Full — set the alpha to fully opaque (white). The
Clip, Gain, Make Linear, and Key Invert
functions are disabled in this mode.
Note: The mode is reset to Normal when a different source
is selected on the key bus, the alpha is changed, or a
memory is recalled.
10.
Press NEXT.
11.
Use the Mask knob to apply a mask to the key.
The Auto Select key uses the pre-assigned Auto Key
association to select the proper video and alpha. If you
want to temporarily select a different video source for
the alpha, press and hold the AUTO SELECT button
and select the video source you want to use as the new
ll.
30 • Keying — Carbonite Black Solo Operation Manual (v1.2)
Page 31

UltraChrome Chroma Key
An UltraChrome Chroma Key is a key in which the hole
is cut based on a color value, or hue, rather than a
luminance value or alpha signal. The color is removed
and replaced with background video from another source.
The default color is blue.
Chroma Key adjustments are persistent and are not
affected by a soft reset or switcher reboot. However,
initializing the Chroma Key or performing a factory reset
returns all adjustments to default values.
Chroma Key Modes
The UltraChrome Chroma Key operates in one of two
modes, Basic or Advanced, depending on the complexity
of the Chroma Key you are setting up.
• Basic Mode — In basic mode, UltraChrome provides
a simple background/foreground chroma key with
adjustment for background spill and edge softness.
• Advanced Mode — In advanced mode, UltraChrome
provides advanced background shadow and
translucency control, as well as control over
background/foreground transition areas.
Although it is possible to switch back and forth between
advanced and basic mode, the additional image correction
of the advanced mode is only applied in the advanced
mode. For example, if you use the basic mode to set up
the Chroma Key and then switch to the advanced mode,
the entire image may change as the image correctors
provided by the advanced mode are applied at their
default settings.
Chroma Key Basic Mode
The following chroma key parameters can be adjusted
in Basic Mode:
• Background Gain — Allows you to modify the
range of colors that are considered background and
are masked out of the Chroma Key.
• Edge Softness — Allows you to adjust the amount
of edge softening applied to the foreground. This
helps blend the foreground into the new background.
• Foreground Clip/Hue/Reject — Allows you to
modify the range of colors that are considered
foreground and are not masked.
• Spill Range — Allows you to remove background
color casts that may spill into the foreground image
(green color cast on the foreground from a
green-screen for example).
To Set Up a Chroma Key in Basic Mode
The UltraChrome chroma key tries to automatically
adjust for the scene you are trying to chroma key. For
the best results, initialize the key rst, and then identify
the areas where you need to adjust the key.
Select the keyer that you want to set up an Chroma
1.
Key on.
Note: You can use the same procedure for a MiniME™.
Select the video signal, on the key bus, that you want
2.
to use for the key.
3.
Press CHR KEY.
4.
Use the Mode knob to select Basic.
5.
Use the Color knob to select the color you want to
key out.
6.
Press the Init knob to initialize the chroma key.
Every time the key is initialized, the switcher resets
all the Chroma Key parameters to their default
settings.
7.
Press NEXT.
8.
Use the Type knob to select Additv and the Value
knob to turn additive keying on or off.
•
Off — Reduces the level of detail in the edges
of the chroma key as well as the overall noise in
the key image that can be the result of certain
lighting conditions or high detail camera settings.
This is the default setting.
•
On — Include the maximum detail in the edges
of the chroma key.
9.
Use the Type knob to select Bkgd and use the
Value knob to adjust the background gain.
• Increasing the gain value causes the background
to appear more opaque. This results in less of the
background color being removed.
• Decreasing the gain value causes the background
to appear more transparent. This results in more
of the background color being removed.
10.
Use the Type knob to select Edge and use the
Value knob to add or remove edge softening of the
foreground image and alpha channel.
• Increasing the softness value increases the
amount of softness applied to the foreground
edges and alpha channel.
• Decreasing the softness value decreases the
amount of softness applied to the foreground
edges and alpha channel.
11.
Use the Type knob to select Foregd.
12.
Use the Cntrl knob to select Clip and use the Value
knob to adjust the foreground clipping.
• Increasing the clip value removes lower-saturated
colors from the foreground image.
Carbonite Black Solo Operation Manual (v1.2) — Keying • 31
Page 32

• Decreasing the clip value includes
lower-saturated colors in the foreground image.
13.
Use the Cntrl knob to select Hue and use the Value
knob to select the central (base) color for the
foreground.
• Increasing the hue value moves
counter-clockwise around the color wheel to
select a base color.
• Decreasing the hue value moves clockwise
around the color wheel to select a base color.
14.
Use the Cntrl knob to select Reject and use the
Value knob to include or reject hues adjacent to the
base color
• Increasing the Reject value decreases the amount
of adjacent hues that are included in the
foreground.
• Decreasing the Reject value increases the amount
of adjacent hues that are included in the
foreground.
15.
Use the Type knob to select Spill and use the
Value knob to remove any color cast onto the
foreground.
• Increasing the range value causes more of the
foreground colors to be corrected for background
color spill.
• Decreasing the range value causes fewer of the
foreground colors to be corrected for background
color spill.
16.
Press NEXT.
17.
Use the Mask knob to apply a mask to the key.
Chroma Key Advanced Mode
An UltraChrome chroma key, in advanced mode, breaks
the image into ve elements which determine, or partially
determine, which part of the image is keyed out, or
removed.
• Background — Background elements are those
pixels in the source video that are the same color as
the one you chose to key out. Note that the Shadow
and translucent areas (see below) are completely
contained within the Background area.
• Shadow — Shadow elements are those pixels in the
source video with colors that are within the
Background range, but with lower luminance values,
depending on the shadow range. You modify the
Shadow range to cover darker areas of the background
(e.g. where the foreground is casting a shadow on the
background screen).
• Translucency — Translucent elements are those
pixels in the source video that are in the Background
range, but with higher luminance values than the
Shadow range. You can control the upper-end of the
Translucency range by setting a wider hue-range to
constrain the area. You can also control the
transparency of the Translucent area.
• Transition — Transition elements are those pixels
in the source video with colors that are not within
any of the previous three ranges and are also not
considered part of the Foreground area. These are
typically the pixels near the edge of the foreground,
where it blends into the background.
• Foreground — Foreground elements are those pixels
that are not within the Background, Shadow,
Translucency, or Transition ranges. This is the area
with colors that will not be keyed out and will remain
solid.
• Spill Suppress — Spill Suppression elements are
those pixels in the Foreground that have a noticeable
tint of the Background color. This typically occurs
around the edge of the foreground subject as glow
from the background blue-screen or green-screen
“spills” onto them.
• Edge Softness — Edge Softness lets you apply
varying degrees of softening to the Foreground edges
to help it blend in with the underlying background
image that it is being keyed over.
• Luminance — Luminance allows you to control the
overall brightness of Shadow, Translucency, and
Transition areas as well as partial reections to more
closely match the Foreground brightness.
To Set Up a Chroma Key in Advanced Mode
The UltraChrome chroma key tries to automatically
adjust for the scene you are trying to chroma key. For
the best results, initialize the key rst, and then identify
the areas where you need to adjust the key.
Select the keyer that you want to set up an Chroma
1.
Key on.
Note: You can use the same procedure for a MiniME™.
Select the video signal, on the key bus, that you want
2.
to use for the key.
3.
Press CHR KEY.
4.
Use the Mode knob to select Adv.
5.
Use the Color knob to select the color you want to
key out.
6.
Press the Init knob to initialize the chroma key.
Every time the key is initialized, the switcher resets
all the Chroma Key parameters to their default
settings.
7.
Press NEXT.
32 • Keying — Carbonite Black Solo Operation Manual (v1.2)
Page 33

8.
Use the Type knob to select Additv and the Value
knob to turn additive keying on or off.
•
Off — Reduces the level of detail in the edges
of the chroma key as well as the overall noise in
the key image that can be the result of certain
lighting conditions or high detail camera settings.
This is the default setting.
•
On — Include the maximum detail in the edges
of the chroma key.
9.
Use the Type knob to select Bkgd.
10.
Use the Cntrl knob to select NegHue and use the
Value knob to adjust the range of hues that are
included in the Background, expanding
counter-clockwise around the color wheel.
11.
Use the Cntrl knob to select PosHue and use the
Value knob to adjust the range of hues that are
included in the Background, expanding clockwise
around the color wheel.
12.
Use the Cntrl knob to select Sat and use the Value
knob to adjust the saturation range of the background
color.
• Increasing the saturation range value includes a
wider range of saturation values to be included
in the background.
• Decreasing the saturation range value includes
a narrower range of saturation values to be
included in the background.
13.
Use the Type knob to select Edge and use the
Value knob to add or remove edge softening of the
foreground image and alpha channel.
• Increasing the softness value increases the
amount of softness applied to the foreground
edges and alpha channel.
• Decreasing the softness value decreases the
amount of softness applied to the foreground
edges and alpha channel.
14.
Use the Type knob to select Foregd.
15.
Use the Cntrl knob to select Clip and use the Value
knob to adjust the foreground clipping.
• Increasing the clip value removes lower-saturated
colors from the Foreground image.
• Decreasing the clip value includes
lower-saturated colors in the Foreground image.
16.
Use the Cntrl knob to select Hue and use the Value
knob to select the central (base) color for the
foreground.
• Increasing the hue value moves
counter-clockwise around the color wheel to
select a base color.
• Decreasing the hue value moves clockwise
around the color wheel to select a base color.
17.
Use the Cntrl knob to select Reject and use the
Value knob to include or reject hues adjacent to the
base color.
• Increasing the reject value decreases the amount
of adjacent hues that are included in the
foreground.
• Decreasing the reject value increases the amount
of adjacent hues that are included in the
foreground.
18.
Use the Type knob to select Lum.
19.
Use the Cntrl knob to select BkLuma and use the
Value knob to change the overall brightness of
Shadow, Translucent, and Transition areas.
• Increasing the background luminance value
increases the brightness of Background,
Translucent, and Transition areas.
• Decreasing the background luminance value
decreases the brightness of Background,
Translucent, and Transition areas.
20.
Use the Cntrl knob to select Refl and use the Value
knob to change the brightness of semi-transparent
reections (like reections from glasses).
• Increasing the reections value increases the
brightness of semi-transparent reections.
• Decreasing the reections value decreases the
brightness of semi-transparent reections.
21.
Use the Type knob to select Shadow.
22.
Use the Cntrl knob to select Gain and use the
Value knob to adjust the shadow appearance.
• Increasing the gain value creates darker shadows.
• Decreasing the gain value creates lighter
shadows.
23.
Use the Cntrl knob to select Range and use the
Value knob to adjust the range of the shadow colors.
• Increasing the range value widens the shadow
area by including lower-luminance background
colors. The increased range comes as a result of
colors moving from the translucent area to the
shadow area.
• Decreasing the range value narrows the shadow
area by excluding high-luminance colors. These
excluded colors move back into the translucent
area.
24.
Use the Type knob to select Spill.
25.
Use the Cntrl knob to select Clip and use the Value
knob to adjust spill suppress clipping.
Carbonite Black Solo Operation Manual (v1.2) — Keying • 33
Page 34

• Increasing the clip value removes
higher-saturated colors from spill suppress
correction.
• Decreasing the clip value includes
higher-saturated colors in spill suppress
correction. If your foreground image contains
bright-colored areas that are suffering from
background spill, decrease the clip value to have
it corrected.
26.
Use the Cntrl knob to select Hue and use the Value
knob to select the central, or base, color for spill
suppress correction. If the color spill does not appear
to be the same color as the background, use this
control to adjust which hue is considered to be
"spilled" into the foreground.
• Increasing the hue value moves
counter-clockwise around the color wheel while
selecting a base color.
• Decreasing the hue value moves clockwise
around the color wheel while selecting a base
color.
27.
Use the Cntrl knob to select Reject and use the
Value knob to include or reject adjacent hues to the
base.
• Increasing the reject value increases the amount
of adjacent hues that are included in spill
correction.
• Decreasing the reject value decreases the amount
of adjacent hues that are included in spill
correction.
28.
Use the Type knob to select Trans.
29.
Use the Cntrl knob to select Gain and use the
Value knob to adjust the appearance of the
Transition colors.
• Increasing the gain value makes the transition
area pixels more opaque.
• Decreasing the gain value makes the transition
area pixels more transparent.
30.
Use the Type knob to select Trnslc.
31.
Use the Cntrl knob to select Gain and use the
Value knob to adjust the appearance of the
translucent colors.
• Increasing the gain value causes the translucent
colors to appear more opaque.
• Decreasing the gain value causes the translucent
colors to appear more transparent.
32.
Use the Cntrl knob to select Range and use the
Value knob to adjust the range of the translucent
colors.
• Increasing the range value widens the translucent
area by including more hues from the
background range (the lower-end of the range is
dened by the shadow range you just set).
• Decreasing the range value narrows the
translucent area by excluding hues.
33.
Press NEXT.
34.
Use the Mask knob to apply a mask to the key.
DVE Keys
The DVE key allows you to apply digital video effects,
such as scale, crop, aspect ratio, position, and border to
video image or another key type. When the DVE is
applied to another key type, it is said to be ying (Fly
Key).
Tip: You can see where DVE channels are allocated from the
Status page in DashBoard.
Keep the following in mind when working with a Fly
Key:
• The Fly Key feature consumes a single DVE channel
for self keys and chroma keys, but two DVE channels
for an auto select key.
• The Fly Key feature is not available when the
switcher is in Standard mode.
• The Fly Key feature cannot be applied to a DVE key.
• The Key Invert feature is not available for a Fly Key.
• The self key Fly Key can be used with all MultiScreen
layouts. The auto select key Fly Key can only be used
with the Dual Vert or Dual Horiz MultiScreen layouts.
• A chroma key should be initialized and adjusted
before the DVE (Fly Key) is applied to it.
To Set Up a DVE Key
The DVE resources for this key may not be available.
Depending on how your switcher is congured, you may
be asked to steal the resources from another element, or
be prevented from using the resources.
Select the keyer that you want to set up a DVE key
1.
on.
Tip: You can use the same procedure for a MiniME™or
MultiScreen.
Select the video signal, on the key bus, that you want
2.
to use for the key.
3.
Press DVE.
4.
Use the X Pos, Y Pos, and Size knobs to position
and size the key. You can also use the positioner.
5.
Press NEXT.
34 • Keying — Carbonite Black Solo Operation Manual (v1.2)
Page 35

6.
Use the Aspect knob to adjust the aspect ratio of
the key.
7.
Use the Border knob to apply a border to the key.
Refer to the section To Apply a Border to a DVE
Key on page 35 for information on borders.
5.
Use the Aspect knob to adjust the aspect ratio of
the key.
6.
Use the Border knob to apply a border to the key.
Refer to the section To Apply a Border to a DVE
Key on page 35 for information on borders.
8.
Press NEXT.
Crop the key horizontally as follows:
9.
a)
Use the HCrop knob to crop the key
horizontally on both the left and right sides at
the same time.
b)
Press HCrop and use the Left/R knob to crop
the key horizontally on the left side only.
c)
Press Left/R and use the L/Rgt knob to crop
the key horizontally on the right side only.
Crop the key vertically as follows:
10.
a)
Use the VCrop knob to crop the key vertically
on both the top and bottom sides at the same
time.
b)
Press VCrop and use the Top/B knob to crop
the key vertically on the top side only.
c)
Press Top/B and use the T/Bttm knob to crop
the key vertically on the bottom side only.
11.
Press NEXT.
12.
Use the Freeze knob to freeze the key. You can
freeze the video and appearance of a key. When a
key is frozen, the DVE attribute menus are disabled
and you can not move the key or adjust DVE
attributes.
13.
Use the Mask knob to apply a mask to the key.
To Apply a DVE to a Key (Fly Key)
7.
Press NEXT. If a border is applied to the pattern,
you must press NEXT multiple times to get to the
next step.
Crop the key horizontally as follows:
8.
a)
Use the HCrop knob to crop the key
horizontally on both the left and right sides at
the same time.
b)
Press HCrop and use the Left/R knob to crop
the key horizontally on the left side only.
c)
Press Left/R and use the L/Rgt knob to crop
the key horizontally on the right side only.
Crop the key vertically as follows:
9.
a)
Use the VCrop knob to crop the key vertically
on both the top and bottom sides at the same
time.
b)
Press VCrop and use the Top/B knob to crop
the key vertically on the top side only.
c)
Press Top/B and use the T/Bttm knob to crop
the key vertically on the bottom side only.
10.
Use the Mask knob to apply a mask to the key.
To Apply a Border to a DVE Key
Select the keyer that you want to set up a DVE key
1.
border on.
Tip: You can use the same procedure for a MiniME™or
MultiScreen.
The DVE resources for this key may not be available.
Depending on how your switcher is congured, you may
be asked to steal the resources from another element, or
be prevented from using the resources.
You should set up your key as you want it before
applying the Fly Key.
1.
Press and hold SELF KEY, AUTO SELECT, or
CHR KEY for the key you want to apply the DVE
to and press DVE.
Tip: Hold the SELF KEY, AUTO SELECT, or CHR KEY
button again and press DVE to turn off the Fly Key.
2.
Press the KEY X SEL button for the key you are
setting up.
3.
Use the X Pos, Y Pos, and Size knobs to position
and size the key. You can also use the positioner.
4.
Press NEXT.
Select the video signal, on the key bus, that you want
2.
to use for the key.
3.
Press DVE.
4.
Use the Border knob to turn on the border and
adjust the size of the border around the key.
5.
Use the Soft knob to adjust the softness of the
border.
6.
Press NEXT.
Select a default or custom color for the border.
7.
•
Default — use the Load knob to select a preset
color for the border.
•
Custom — press NEXT and use the BHue,
BSat, and BLum knobs to select your own
color.
Carbonite Black Solo Operation Manual (v1.2) — Keying • 35
Page 36

Masks
A Mask is a technique in which a pattern is combined
with the key source to block out unwanted portions of
the key source.
Two types of masks are available, Box masks and Pattern
masks. All key types can be masked.
• Box Mask — uses a simple box shape to mask out a
portion of the key
• Pattern Mask — uses a pattern from the pattern
generator to mask out a portion of the key
To Pattern Mask a Key
Pattern masks can be adjusted for size, location, rotation,
and multiplication.
Select the keyer that you want to set up a mask for.
1.
2.
Press NEXT. Depending on the key type and features
set up for the key, you must press NEXT multiple
times to get to the next step.
3.
Use the Mask knob to select Pattrn.
4.
Press Edit Params.
5.
Use the M-Frce knob to force the area inside the
mask region to the foreground (On).
Force mask is not available for all key types.
6.
Use the M-Inv knob to invert the masked area with
the unmasked area (On).
The portion of the key that was masked out is now
visible, and the portion that was visible is masked.
7.
Press NEXT.
8.
Use the Size knob to adjust the size of the mask
region. You can also twist the positioner.
9.
Press NEXT.
10.
Use the Pattrn knob to select the mask pattern you
want to use. You can also select the pattern by
pressing the pattern button directly.
11.
Use the X Pos and Y Pos knobs to position the
mask. You can also use the positioner.
12.
Press NEXT.
13.
Use the Aspect knob to adjust the aspect ratio of
the mask.
Not all patterns can be adjusted.
14.
Use the Border and Soft knobs to apply a border
to the mask.
Refer to the section To Apply a Border to a Pattern
on page 24 for information on borders.
15.
Press NEXT. If a border is applied to the pattern,
you must press NEXT multiple times to get to the
next step.
16.
Use the Rot knob to rotate the pattern.
Not all patterns can be rotated.
17.
Use the HMult knob to multiply the pattern
horizontally.
18.
Use the VMult knob to multiply the pattern
vertically.
To Box Mask a Key
Box masks can be adjusted for size, location, rotation,
and multiplication.
Select the keyer that you want to set up a mask for.
1.
2.
Press NEXT. Depending on the key type and features
set up for the key, you must press NEXT multiple
times to get to the next step.
3.
Use the Mask knob to select Box.
4.
Use the M-Frce knob to force the area inside the
mask region to the foreground (On).
Force mask is not available for all key types.
5.
Use the M-Inv knob to invert the masked area with
the unmasked area (On).
The portion of the key that was masked out is now
visible, and the portion that was visible is masked.
6.
Press NEXT.
7.
Use the X Pos and Y Pos knobs to position the
mask. You can also use the positioner.
8.
Use the Size knob to adjust the size of the mask
region. You can also twist the positioner.
9.
Press NEXT.
Adjust the position of the left and right sides of the
10.
box mask as follows:
a)
Use the Left/R knob to adjust the position of
the left side of the box mask.
b)
Press the Left/R knob.
c)
Use the L/Right knob to adjust the position of
the right side of the box mask.
Adjust the position of the top and bottom sides of
11.
the box mask as follows:
a)
Use the Top/B knob to adjust the position of
the top side of the box mask.
b)
Press the Top/B knob.
c)
Use the T/Bttm knob to adjust the position of
the bottom side of the box mask.
36 • Keying — Carbonite Black Solo Operation Manual (v1.2)
Page 37

Split Keys
A Split key allows you to assign a different alpha source
for a key than the ll/alpha associations that are set up
during conguration, or to use a separate alpha source
for a Self key.
A split key can be applied to an AUTO SELECT, or
SELF KEY.
To Set Up a Split Key
A split key works on an Auto Select or Self Key that
has been set up and you want to apply a different alpha
to.
Set up your key with the video source you want to
1.
use.
2.
Press and hold the Auto Select or Self Key,
depending on the key type you are splitting.
Press the source button on the key bus for the alpha
3.
source you want to use.
Tip: If the new alpha source is not assigned to a source
button, press any other button on the key bus and use the
Alpha knob to select a different alpha source.
Carbonite Black Solo Operation Manual (v1.2) — Keying • 37
Page 38

Memory Functions
A memory register is a snapshot of the current state of
the switcher that can include one or multiple ME,
MiniME™, or MultiScreen outputs. Up to 100 memory
registers per ME, MiniME™, or MultiScreen can be stored
and recalled on the switcher. Each of these memory
registers can store as little as the information of one ME,
or as much as the current state of the entire switcher,
including all ME, MiniME™, MultiScreen outputs, Aux
Buses, and DVE settings.
Memory Access Mode
Switcher memories can be accessed either through Direct
Access or Bank mode.
• Direct Access — enter the bank and memory number
to store or recall a memory
• Bank — enter the memory number to store or recall
a memory (the bank is locked)
To Set the Memory Access Mode
The memory access mode applies to both memory storing
and recalling.
1.
Press STORE.
2.
Use the Mode knob to select the memory access
mode you want to use.
Storing Memories
When you store a memory, you are storing the complete
state of that panel row. This includes the current state of
all the areas on the ME, including keyer settings,
transition rates, wipe and pattern selections, and source
selections. In addition to the current state of the panel,
the current settings for the various keyers, such as chroma
key settings, and clip and gain settings, are also stored.
To Store a Memory
To store a memory, you must select which ME,
MiniME™, or MultiScreen to store the memory for, and
then use the mnemonic buttons to select the bank and
register to store the memory in.
1.
Press and hold STORE and select the source buttons
on the key bus to select the ME, MultiScreen, or
MiniME™that you want to store the memory for.
•
1 — ME
•
3 — MiniME™1
•
4 — MiniME™2
•
6 — MultiScreen 1
Use the pattern buttons to select the bank and
2.
register. For example, press 4 and then 9 to select
bank 4, register 9.
The memory has been stored to the selected memory
register and the RECALL button is selected.
Recalling Memories
When you recall a memory, the existing conguration
of that ME is replaced with the settings stored in the
memory.
Keep the following in mind when recalling memories:
• How a memory is recalled depends on the how the
Memory Attributes are set.
• Recalling a memory that includes a new Media-Store
image to be loaded from a USB drive may result in
the currently loaded image to be displayed for a few
frames while the new image is loaded.
• Recalling a memory that includes a source assigned
to a camera also recalls the shot stored in the memory
for that camera if the CamRcl memory attribute is
set to Recall. There is no delay in the memory recall
so camera movement may be visible while the shot
is recalled.
• You can exit without recalling a memory register by
pressing any button other than a Wipe Pattern,
dedicated key transition, CUT, AUTO TRANS, or
source button.
• You can override the video source stored in a memory
by pressing and holding a source button and recalling
the memory (Bus Hold). The held source button
overrides the source that is recalled with the memory
for that bus. The memory is not affected by a Bus
Hold and will recall properly without the Bus Hold.
• Enabling Memory AI mode changes the way key
elements are recalled. If a key is currently on-air, the
element for that key is recalled in the next available
off-air key. If there is no available off-air keys, the
element is not recalled. All resource sharing is set to
FLOAT mode so that key elements may be recalled
to other keys than originally stored.
To Recall a Memory
To recall a memory, you must select which ME,
MiniME™, or MultiScreen to recall the memory for, and
then use the mnemonic buttons to select the bank and
register to recall the memory from.
1.
Press and hold RECALL and select the source
buttons on the key bus to select the ME or
MultiScreen that you want to recall the memory for.
•
1 — ME
•
3 — MiniME™1
38 • Memory Functions — Carbonite Black Solo Operation Manual (v1.2)
Page 39

•
4 — MiniME™2
•
6 — MultiScreen 1
Use the pattern buttons to select the bank and register
2.
you want to recall the memory from.
Memory Recall Mode
3.
Use the Value knob to select duration you want to
use to transition from the current on-air scene to the
one stored in the memory.
•
Memory — the duration stored in the memory
is used
•
1-999fr — sets a specic duration in frames
The Memory Recall mode sets how a memory is recalled.
This includes whether a memory is recalled on-air, or
only on the program bus, or if effects such as Effects
Dissolve or DVE Dissolve are used.
To Set Up the Recall Mode Memory Attribute
1.
Press RECALL > NEXT.
2.
Use the Attrib knob to select Recall Mode.
3.
Use the Value knob to select the memory recall
mode you want to use.
•
Memory — the memory recall mode (PGM,
MemAI, or EffDis) stored with the memory is
used
•
PGM — all elements are recalled as stored
(default)
•
MemAI — current on-air elements are
unchanged and the transition area is congured
to take the on-air elements of the memory on-air
with the next transition
•
EffDis — on-air elements listed below are
transitioned to the elements stored in the memory
• Matte colors (background, wash or borders)
• Keyer settings like clip, gain, transparency
• Mask position and size
• Chroma key settings, except the background
color
• Pattern settings like size, position, aspect,
border, softness, rotation
• DVE settings like size, position, aspect,
border, softness, cropping
• Media-Store x/y position
• Transition Progress
To Set the Effects Duration
Effects duration applies to Effects Dissolves, and sets
the length of time that the switcher will use to transition
from the on-air scene to the scene stored in the memory.
1.
Press RECALL > NEXT.
Tip: If you want to store the effects dissolve rate in the
memory, press STORE > NEXT.
2.
Use the Attrib knob to select EffDur.
Memory Attributes
Memory Attributes allow you to specify what elements
are recalled with a memory, as well as adding effects to
memory recalls. These elements include the
background/preset buses, keyer bus, Aux bus, and
Media-Store selections, as well as keyer on-air status,
and transition selections.
In addition to setting which sources to recall with the
memory, effects such as performing an auto transition
after the memory recall or running a custom control after
the memory recall, can also be included.
Memory attributes can be set both when the memory is
stored, and when it is recalled. This allows you to store
a set of attributes with a memory and then recall it as
stored, or override the attributes stored in the memory
and apply different ones when the memory is recalled.
A memory attribute does not need to be stored in the
memory to be recalled.
Tip: It is recommended that if you are new to working with
memories, use the memory store attributes to set how you want
a memory to be recalled and set the recall attributes to be
Memory.
To Set the Program Bus Source Attribute
1.
Press MENU > NEXT.
2.
Use the Attrib knob to select PGMBus.
3.
Use the ME knob to select the ME, MiniME™, or
MultiScreen output that you want to set the attribute
for.
4.
Use the Value knob to select how the sources
selected on the program bus are recalled.
•
Memory — settings come from the memory
being recalled
•
NoRcl — sources are not recalled on the
program bus
•
Recall — sources are recalled on the program
bus (default)
To Set the Preset Bus Source Attribute
1.
Press MENU > NEXT.
2.
Use the Attrib knob to select PSTBus.
Carbonite Black Solo Operation Manual (v1.2) — Memory Functions • 39
Page 40

3.
Use the ME knob to select the ME, MiniME™, or
MultiScreen output that you want to set the attribute
for.
4.
Use the Value knob to select how the sources
selected on the preset bus are recalled.
•
Memory — settings come from the memory
being recalled
•
NoRcl — sources are not recalled on the preset
bus
•
Recall — sources are recalled on the preset bus
(default)
To Set the Transition Type Attribute
1.
Press MENU > NEXT.
2.
Use the Attrib knob to select Trans.
3.
Use the ME knob to select the ME, MiniME™, or
MultiScreen output that you want to set the attribute
for.
4.
Use the Value knob to select how the next transition
type and parameters are recalled.
•
Memory — settings come from the memory
being recalled
•
NoRcl — transition selections are not recalled
•
Recall — transition selections are recalled
(default)
To Set the Next Transition Attribute
1.
Press MENU > NEXT.
2.
Use the Attrib knob to select NextTr.
3.
Use the ME knob to select the ME, MiniME™, or
MultiScreen output that you want to set the attribute
for.
4.
Use the Value knob to select how the next transition
area is recalled.
•
Memory — settings come from the memory
being recalled
•
NoRcl — next transition area settings are not
recalled
•
Recall — next transition are settings are recalled
(default)
To Set the Run Auto Trans Attribute
1.
Press MENU > NEXT.
2.
Use the Attrib knob to select RnAuto.
3.
Use the ME knob to select the ME, MiniME™, or
MultiScreen output that you want to set the attribute
for.
4.
Use the Value knob to select whether a transition
is performed after the memory is recalled.
•
Memory — settings come from the memory
being recalled
•
NoRun — a transition is not performed after
the memory is recalled (default)
•
Run — a transition is performed after the
memory is recalled
To Set the Shared Pattern Generator Attribute
1.
Press MENU > NEXT.
2.
Use the Attrib knob to select SrdPat.
3.
Use the ME knob to select the ME output that you
want to set the attribute for.
4.
Use the Value knob to select whether the settings
for the shared Key Mask/Wash pattern generator is
recalled.
•
Memory — settings come from the memory
being recalled
•
NoRcl — shared pattern generator settings are
not recalled
•
Recall — shared pattern generator settings are
recalled (default)
To Set the Key Bus Sources Attribute
1.
Press MENU > NEXT.
2.
Use the Attrib knob to select KeyBus.
3.
Use the Key knob to select the keyer you want to
set the attribute for.
4.
Use the Value knob to select whether sources
selected on the selected key bus are recalled.
•
Memory — settings come from the memory
being recalled
•
NoRcl — sources are not recalled on the key
bus
•
Recall — sources are recalled on the key bus
(default)
To Set the Key On-Air Attribute
1.
Press MENU > NEXT.
2.
Use the Attrib knob to select KActiv.
3.
Use the Key knob to select the keyer you want to
set the attribute for.
4.
Use the Value knob to select whether sources
selected on the selected key bus are recalled.
•
Memory — settings come from the memory
being recalled
40 • Memory Functions — Carbonite Black Solo Operation Manual (v1.2)
Page 41

•
NoRcl — sources are not recalled on the key
bus
•
Recall — sources are recalled on the key bus
(default)
To Set the Key Type Attribute
1.
Press MENU > NEXT.
2.
Use the Attrib knob to select KType.
3.
Use the Key knob to select the keyer you want to
set the attribute for.
4.
Use the Value knob to select whether the key type
is recalled for the selected key.
•
Memory — settings come from the memory
being recalled
•
NoRcl — key type is not recalled
•
Recall — key type is recalled (default)
To Set the Key Mask Attribute
1.
Press MENU > NEXT.
2.
Use the Attrib knob to select KMask.
3.
Use the Key knob to select the keyer you want to
set the attribute for.
4.
Use the Value knob to select whether mask settings
for the selected key are recalled.
•
Memory — settings come from the memory
being recalled
•
NoRcl — key mask settings are not recalled
•
Recall — key mask settings are recalled
(default)
To Set the Media-Store Attribute
1.
Press MENU > NEXT.
2.
Use the Attrib knob to select Media.
3.
Use the Media knob to select the Media-Store
channel you want to set the attribute for.
4.
Use the Value knob to select whether Media-Store
image and settings for the selected channel are
recalled.
•
Memory — settings come from the memory
being recalled
•
NoRcl — Media-Store image and settings are
not recalled (default)
•
Recall — Media-Store image and settings are
recalled
To Set the Aux Bus Attribute
1.
Press MENU > NEXT.
2.
Use the Attrib knob to select Aux.
3.
Use the Aux knob to select the aux bus you want to
set the attribute for.
4.
Use the Value knob to select how the sources
selected on the aux bus are recalled.
•
Memory — settings come from the memory
being recalled
•
NoRcl — sources are not recalled on the aux
bus (default)
•
Recall — sources are recalled on the aux bus
To Set the Camera Shot Attribute
1.
Press MENU > NEXT.
2.
Use the Attrib knob to select CamRcl.
3.
Use the Value knob to select whether camera shots
are recalled.
•
Memory — settings come from the memory
being recalled
•
NoRcl — camera shots are not recalled
•
Recall — camera shots are recalled (default)
To Set the Roll GPO Attribute
1.
Press MENU > NEXT.
2.
Use the Attrib knob to select RllGPO.
3.
Use the Value knob to select whether GPI outputs
attached to sources are triggered when recalled.
•
Memory — settings come from the memory
being recalled
•
NoRoll — GPI outputs are not triggered
•
Roll — GPI outputs are trigged (default)
To Set the Roll VTR Attribute
1.
Press MENU > NEXT.
2.
Use the Attrib knob to select RllVTR.
3.
Use the Value knob to select whether a play
command is triggered when a source that is assigned
to a video server is recalled.
•
Memory — settings come from the memory
being recalled
•
NoRoll — play command is not triggered
•
Roll — play command is triggered (default)
Clear Memories
You can clear all the memory registers on the switcher
so that they are all empty. This deletes all the contents
of the memories.
Carbonite Black Solo Operation Manual (v1.2) — Memory Functions • 41
Page 42

You cannot clear individual memory registers.
To Clear the Memory Registers
1.
Press MENU > RESET > NEXT > NEXT.
2.
Press the Clear Mems knob to clear the memory
registers.
42 • Memory Functions — Carbonite Black Solo Operation Manual (v1.2)
Page 43

Switcher Sets
5.
Press Confrm.
The switcher stores conguration and operation data in
a number of registers that contain the individual entries
for items such as memories or personality settings. These
registers can be stored as a single archive le, or as a
register set that contains all the individual register of that
type; all memories for example. These les are stored
into Sets on USB drive. Different Sets can be created for
different shows or applications, allowing you to quickly
locate and recall the switcher congurations.
The switcher stores information in the following registers:
• Memory — contains all the memories for ME,
MiniME™, and MultiScreen.
• Custom Control — contains all the custom control
banks and macros.
• Personality — contains all the user interface settings,
such as transition rates, that are stored under the
PERS menu. Some personality settings are specic
to the control panel and can be stored independently
if you are working with a MultiPanel system.
• Installation — contains all the external device setup,
and software settings for the switcher.
To Store a Set
Switcher Sets can only be stored to a USB drive. The
USB drive must be present before you try to store the
Set. A total of 10 Sets of switcher setup information can
be stored onto the same USB drive.
Insert a USB drive into the USB Port on the
1.
switcher. You must wait 5 seconds for the switcher
to recognise the USB drive.
2.
Press MENU > SAVE.
3.
Use the All knob to select the set (0-9) you want to
store the switcher registers to.
Press the knob to select the registers you want to
4.
store to the selected set. If an (*) is shown on the
menu, that register already exist in the set and will
be overwritten.
•
All — store all registers to the set.
•
Mems — store only the memory registers to the
set.
•
Cust — store only the custom control registers
to the set.
•
Inst — store only the installation registers to the
set.
•
PersX — store only the personality registers to
the set. Use the Pers knob to select whether to
include the personality setting for all panels
(PersA) or only the current panel (PersM/1/2).
To Load a Set
Switcher Sets can only be loaded from a USB drive. The
USB drive must be present before you try to load the
settings.
Insert your USB drive into the USB Port on the
1.
switcher. You must wait 5 seconds for the switcher
to recognise the USB drive.
2.
Press MENU > LOAD.
3.
Use the All knob to select the set (0-9) you want to
load the switcher registers from.
Press the selected set. Only registers with an (*)
4.
shown on the menu exist in the set.
•
All — recall all registers from the set.
•
Mems — recall only the memory registers from
the set.
•
Cust — recall only the custom control registers
from the set.
•
Inst — recall only the installation registers from
the set.
•
Pers — recall only the personality registers from
the set. Use the Pers knob to select whether to
include the personality setting for all panels
(PersA) or only a specic panel (PersM/1/2).
5.
Press Confrm.
Carbonite Black Solo Operation Manual (v1.2) — Switcher Sets • 43
Page 44

Media-Store
Media-Store allows you to load stills, animations, or
audio les from the USB drive and make them available
across all MEs. Two channels of Media-Store with alpha,
or four channels without alpha, are provided.
Keep the following in mind when working with the
Media-Store:
• A still, animation, or audio can be loaded either by
browsing the le system, or by entering the still
number using the pattern buttons.
• You can clear a Media-Store channel by loading
media number 000.
• If you are loading an Auto Key into a Media-Store
channel, you must have another Media-Store channel
associated with the current one to load the alpha into.
• An FTP connection using RossLinq can be created
from an external device directly to a Media-Store
channel on the switcher.
Working With Media-Store Animations
Media-Store animations are used for things animated
backgrounds, branding "bugs", or media transitions. You
can set up an animation to loop, play automatically when
take on-air, play in reverse, or even play at different
speeds.
You can play an animation manually by selecting the
source button for the Media-Store channel with the
animation you want to play, and pressing Run. The knob
changed to Stop as the animation is playing.
Keep the following in mind when working with
Media-Store animations:
• When you load an animation to an off-air Media-Store
channel, or the animation goes off-air with a
transition, the preview shows the cut point (CutFr)
for that animation, and not the rst frame of the video.
• You can manually cycle through frames by turning
the Run knob while the animation is stopped.
•
Double-pressing the Run knob stops playback and
re-cues the animation to the rst frame.
• You can shuttle forwards and backwards through the
animation by turning the positioner clockwise or
anti-clockwise when the animation is stopped. Shuttle
speed is increased and decreased by turning the
positioner more or less in each direction.
• You can run or stop an animation by pressing the
button on the top of the positioner.
Working With Media-Store Audio
Audio can be added to the playout of a Media-Store
channel either by loading the le directly, or by naming
the audio le the same as the animation or still you want
it to play out with. When you load the still or animation,
the switcher will automatically load the audio le of the
same name.
Keep the following in mind when working with
Media-Store audio:
• Media-Store audio is only available on the AES
output assigned to the Media-Store or MediaWipe
channel.
• Audio les must be 20-bit or 24-bit wav les at a
48kHz sample rate.
• Audio les must be in the same folder and have the
same name as the still or animation they are to be
associated with.
• An audio le does not need to be of the same length
as the animation it is associated with.
• A still with audio or audio only have the Auto Play
and Looping attributes. These apply to the audio
playout.
• The looping time of an animation with audio is the
length of the animation.
• A Media-Store channel can be loaded with Audio
only.
Loading Stills or Animations
Stills or animations can be loaded into Media-Store
channels either from USB or the internal cache using the
media number, or by browsing to the le.
Note: The internal cache is used for sample images only and
cannot be used to store user stills or animations.
Media numbers are 4-digit numbers that are assigned to
stills or animations and allow you to load stills or
animations directly using the pattern buttons. Each media
number is made up of three sections, the Place (0-1), the
Bank (00-99), and the Item Number (0-9). The Place is
either 0 for internal stills, or 1 for external.
Media-Store File Specifications
Media-Store images and animations can be TGA, PNG,
or JPG le formats. For animations, the les must be
numbered to indicate the order they go in, and the name
and the number must be separated with an underscore.
For audio, 20-bit or 24-bit wav les of the same name
as the still or animation are used to associate audio with
a still or animation.
• Anim_001.tga
• Anim_002.tga
44 • Media-Store — Carbonite Black Solo Operation Manual (v1.2)
Page 45

• Anim_003.tga
• ...
• Anim_100.tga
Together, these les are treated as a single animation
named Anim that is 100 frames long.
Note: An animation must start with _001 as the end of the
name of the first frame.
Files names cannot contain symbols such as ! @ # & *
( ) / , ? ' " and cannot start with an underscore (_).
To Load a Still or Animation
Stills or animations can be loaded from the USB drive,
or from the internal cache. Only the default images that
came with your switcher are available on the internal
cache.
If you are loading a le from USB, insert your USB
1.
drive into the USB Port on the switcher. You must
wait 5 seconds for the switcher to recognise the USB
drive.
If the les on your USB are new, it takes about 2
seconds per le for the switcher to generate the
thumbnail for the MediaManager. Once all the
thumbnails are generated, they are displayed in the
MediaManager window.
Press the source button for the Media-Store channel
2.
that you want to load a still into. If the le has an
alpha, the paired channel will load the alpha as well.
3.
Press the Browse knob.
Use the left knob to navigate to the le you want to
4.
load. Press the knob to make a selection.
•
<..> — up one
•
USB(1) — the USB drive
•
Internal(0) — the internal cache
•
<folder> — a sub-folder of the name "folder"
•
image — a still of the name "image"
•
image.tga .wav — a still with an associated
audio le (not in the database)
•
image [V][A] — a still with an associated audio
le (in the database)
•
animation [V10] — a 10 frame animation of
the name "animation" (in the database)
•
animation.tga[10] .wav — a 10 frame
animation with an associated audio le (not in
the database)
•
animation [V10][A] — a 10 frame animation
with an associated audio le (in the database)
Tip: If you want to associate an audio file with the still or
animation but the .wav does not appear in the name, ensure
that the audio file is named the same as the still or
animation and in the same folder.
A still or animation can be loaded using the Media
Number for the still and the pattern buttons.
To Load Stills Using Media Numbers
How you load a still using the media number depends
on whether the Place or Media are locked. If the Place
is locked, you only have to enter the 3-digit Media
number. If the Place and Media are locked, you only have
to enter the last digit of the Media number.
Note: Loading 000 clears the current Media-Store channel.
Insert your USB drive into the USB Port on the
1.
switcher. You must wait 5 seconds for the switcher
to recognise the USB drive. If you are loading a le
from the internal cache, you do not need the USB
drive.
Press the source button for the Media-Store channel
2.
that you want to load a still into. If the le has an
alpha, the paired channel will load the alpha as well.
Using the pattern buttons, enter the media number
3.
for the still you want to load.
For example, press 1051 to select the USB(1) drive,
Media 051.
4.
Press Select.
Media-Store Capture
Still images can be captured from any input BNC, as well
as the program, preview, and clean feed from any ME.
To Capture a Still
Insert your USB drive into the USB Port on the
1.
switcher. You must wait 5 seconds for the switcher
to recognise the USB drive.
Press the source button for the Media-Store channel
2.
that you want to capture a still into.
3.
Press the Capt knob.
4.
Press the P/B or E/E knob to select the mode you
want the Media-Store in.
•
E/E — electronic-to-electronic, or record, mode
allows you to record a still
•
P/B — playback mode allows you to review
your still
5.
Use the P/B or E/E knob to select the video source
that you want to perform the capture of.
6.
Press NEXT.
7.
Use the Alpha knob to select whether you want to
capture the alpha signal (Yes) or not (No). You
Carbonite Black Solo Operation Manual (v1.2) — Media-Store • 45
Page 46

must have an input BNC selected as the capture
source to capture the alpha.
8.
Press NEXT.
9.
Use the Capt knob to select a number for the still
you want to capture.
10.
Press the Capt knob to perform the capture. The
new media item is stored and the media number is
increased by one.
Media-Store Attributes
Attributes are applied to the image or animation directly,
regardless of the channels that the image or animation
are loaded in. If you adjust the attributes of the still in
one channel, these settings are applied to that image or
animation in all other channels that the same image or
animation is loaded into.
Understanding the Attributes Menu
When you select a still or animation, the menu system
displays a number of attributes that allow you to adjust
how a the image or animation appears. The options that
are available depend on the type of Media-Store image
or animation that is selected.
Table 3: Attributes Menu Items
DescriptionMenu Item
selects the horizontal position of the image or animationX Pos
selects the vertical position of the image or animationY Pos
Shaped
AutoPly
MediaX
CutFr
GPO
GPOFr
Mute
To Set Media-Store File Attributes
The attributes that you can set depend on whether the
le you are setting them for is a still or animation.
selects shaped or unshaped for the alpha of the image
or animation
selects whether the animation loops automatically or notLooping
selects whether the animation plays in reverse or notReverse
selects whether the animation starts playing automatically
when taken on-air or not
selects the speed that an animation plays at (0.1-10)Speed
selects the media number that you want to use to recall
the still or animation
selects the point, in frames, from the start of the animation
that the background transition occurs
selects the GPI output that you want to trigger by a media
transition
selects the time, in frames, from the start of the media
transition that the GPI output is triggered
selects whether the associated audio is turned on or off
during playback
Insert your USB drive into the USB Port on the
1.
switcher. You must wait 5 seconds for the switcher
to recognise the USB drive. If you are loading a le
from the internal cache, you do not need the USB
drive.
Press the source button for the Media-Store channel
2.
that you want to load a still into. If the le has an
alpha, the paired channel will load the alpha as well.
3.
Press NEXT.
4.
Use the Attrib knob to select the attribute you want
to set, and the Value knob to select the value you
want to assign to the attribute.
•
X Pos — selects the horizontal position of the
image or animation
•
Y Pos — selects the vertical position of the
image or animation
•
Shaped — selects shaped or unshaped for the
alpha of the image or animation
•
Looping — selects whether the animation loops
automatically or not
•
Reverse — selects whether the animation plays
in reverse or not
•
AutoPly — selects whether the animation starts
playing automatically when taken on-air or not
•
Speed — selects the speed that an animation
plays at (0.1-10)
•
MediaX — selects the media number that you
want to use to recall the still or animation
•
CutFr — selects the point, in frames, from the
start of the animation that the background
transition occurs
•
GPO — selects the GPI output that you want to
trigger by a media transition
•
GPOFr — selects the time, in frames, from the
start of the media transition that the GPI output
is triggered
•
Mute — selects whether the associated audio is
turned on or off during playback
5.
Use the Func knob to select how you want to save
the attributes.
•
Save — saves the adjustments for the selected
Attrib value only
•
SavAll — saves the adjustments for all Attrib
values
•
Revert — undoes the adjustments for the
selected Attrib value only
•
RevAll — undoes the adjustments for all Attrib
values
6.
Press the Func knob to make the selection.
46 • Media-Store — Carbonite Black Solo Operation Manual (v1.2)
Page 47

To Lock a Media Number Place and Bank
Locking the Media Number Place and Bank means that
you do not have to enter them when loading a still. Lock
setting are specic to the channel they are set on.
Press the source button for the Media-Store channel
1.
that you want to set the Place and Bank lock settings
for.
2.
Press the Browse knob.
3.
Press NEXT.
4.
Use the Place knob to select USB or Internal.
5.
Press the Place knob to toggle the lock on or off.
Locked is shown with [] around the name.
6.
Use the Media knob to select the bank you want to
lock to.
7.
Press the Media knob to toggle the lock on or off.
Locked is shown with [] around the name.
MediaManager
The MediaManager provides a graphical interface to the
operation of the Media-Store from. The layout of the
MediaManager window is stored in Perspectives. The
last loaded Perspective is used when the browser is
refreshed or opened.
From the Menu Bar at the top of the window you can
manage Perspectives.
Tip: You can either launch the MediaManager directly using the
switcher IP address, or you can access it using the
MediaManager node in DashBoard. If you are logging into
MediaManager from DashBoard, you must have Microsoft
Internet Explorer®10, or higher, installed.
Using MediaManager
To use the MediaManager, you must have a computer
connected to the same subnet as the switcher, the IP
address of your switcher, and the Google Chrome
browser installed on your computer. In the web browser,
navigate to the IP address of the switcher, the
MediaManager is displayed.
When you are communicating with the switcher, a
moving status indicator is shown in the lower right corner
of the browser window. If you lose communications with
the switcher, refresh the browser window to reconnect.
Refreshing the browser will reset your Perspectives.
Keep the following in mind when logging in and using
the MediaManager:
• Ross Video recommends using Google Chrome
v14.0 running on Microsoft®Windows®7 or
Macintosh®OS X®Lion to connect to the
MediaManager.
• Your browser must have Oracle®JavaScript®and
cookies enabled.
• Ross Video recommends that you do not connect
more than 5 MediaManager clients to a single
switcher at the same time.
The MediaManager Window
The MediaManager window provides a graphical
interface to the Media-Store. From this window, you can
load stills or animations from the internal cache or USB
into a Media-Store channel or edit the on-air properties.
Media-Store channels have a red background when on-air
and green when going on-air with the next transition.
Figure 20: MediaManager Window
Tip: The film-strip symbol ( ) on a thumbnail indicates that
the media item is an animation, the key symbol ( ) indicates
that the still or animation has an alpha, and the speaker symbol
®
™
™
( ) indicates that the media item has audio associated with it.
Stills and animations can be loaded into a channel by
either selecting the channel and double-clicking on the
le, or by dragging a le and dropping it onto the
channel. When a channel or le is selected, the properties
for the animation or still can be viewed in the ITEM
DETAILS area.
Note: If the files on your USB are new, it takes about 2 seconds
per file for the switcher to generate the thumbnail for the
MediaManager. Once all the thumbnails are generated, they are
displayed in the MediaManager window.
Animation Controls
The MediaManager interface allows you to manually
control the play-out of an animation.
Figure 21: Media-Store Channel — Animation Controls
Carbonite Black Solo Operation Manual (v1.2) — Media-Store • 47
Page 48

Table 4: Animation Controls
DescriptionNameIcon
Play
Looping
Play the animation loaded in
the Media-Store channel.
Turns Looping of the
animation on or off.
Delete
DescriptionNameIcon
Delete the selected item from
the playlist. This does not
delete the item, or clear the
Media-Store channel.
Clears the current playlist.New Playlist
Reverse
Eject
Toggle the direction that the
animation is played in.
Loads the animation again.Recue
Eject the current still or
animation from the Media-Store
channel. This is the same as
loading media number 000 on
the panel.
Playlists
Playlists allow you to create a rundown of stills or
animations that you want to load into a Media-Store
channel. Using the left and right arrows, you can advance
to the next or previous still or animation in the playlist.
Note: Items on the playlist are not pre-cached. As you advance
to the next item in the list, the switcher must load that still or
animation. Depending on what you are loading, and if the item
has been loaded before, this could take a few seconds.
Load or Save
Playlist
Expand or
Collapse
Allows you to load, save, or
delete a playlist on the
switcher. If you delete a playlist
that was loaded into a
Media-Store channel, it does
not clear that channel.
Expand or Collapse the playlist
area for the Media-Store
channel.
Figure 22: Playlist
Table 5: Playlist Controls
DescriptionNameIcon
Previous
Next
Up and Down
Up and Down
Advance to the previous item
in the playlist. The item in the
playlist that is being shown on
the Media-Store channel
indicated with a check-mark.
The playlist does not loop back
to the top when it reaches the
last item.
Advance to the next item in the
playlist.
Move the currently selected
item up in the playlist.
Move the currently selected
item down in the playlist.
48 • Media-Store — Carbonite Black Solo Operation Manual (v1.2)
Page 49

Custom Controls
Once programmed, a custom control (CC) can be played
back by pressing a button. The custom control can be as
simple as triggering an output GPI pulse, or as complex
as recalling a specic memory register on an ME,
performing a switcher transition, and selecting a group
of keys.
You can record, edit, and run custom controls from the
Custom Control node in DashBoard.
Custom Control Setup (Carbonite Black Solo Only)
The custom control interface on your switcher can be
customized to automatically add delays between each
custom control event as you are recording a custom.
2.
Use the Bank knob to select the bank that the
custom control you want to record will be stored on.
3.
Use the CC knob to select the custom control that
you want to record to, or select the custom control
on the bus directly. If the custom control already has
a macro recorded, an * is shown next to the number.
4.
Press START/STOP to start recording.
Insert the events you want to record. These can
5.
include source selections, key types, transitions, and
menu selection, for example. Special functions can
also be inserted.
Each custom control can have a maximum of 998
events, plus the End event.
6.
Press START/STOP to nish recording.
Tip: Press CANCEL if you do not want to store your
changes to the custom control.
To Set Custom Control Options
1.
Press CC > NEXT > NEXT.
2.
Use the CCPaus knob to set whether pauses are
added automatically after each event.
•
Manual — pauses are not added automatically
•
Record — each command is automatically
separated from the previous command by a pause
equal to the real-time delay between the user
entering commands
Recording Custom Controls (Carbonite Black Solo Only)
When you create a custom control, you record a series
of button presses on the panel, as well as special
functions, that are played back when you run the custom
control.
Almost any action or setting can be stored in a custom
control, with the following exceptions:
• Diagnostic Functions
• Conrmation Dialogs
• Panel-Specic Functions
To Record a Custom Control
A basic custom control records a series of button presses
on the control panel.
Tip: If the CCPaus feature is set to Record, pauses will
automatically be added between button pressed. If it is set to
Manual you will have go back and edit the custom control to add
the pauses.
1.
Press MENU > BANK CC > START/STOP.
Special Functions
Special functions allow you to include events not
associated with a button press into a custom control. A
special function can be inserted into any existing custom
control, or used when creating a new custom control.
Table 6: Special Functions
DefinitionFunction
Hold
Pause
Loop
GPO
CutKey
TrnKey
Allows you to place a command in a
custom control that will stop the custom
control at the hold event. You must press
the custom control button again, or use a
GPI trigger, to continue the custom
control.
Allows you to place a command in a
custom control that will stop a custom
control at the pause event. The length of
the pause is set when the pause is
inserted.
Allows you to have a custom control run
continuously until stopped, or a
Cancel/Cancel All custom control
command is executed from another
custom control.
Allows you to trigger a pre-selected GPI
output using a custom control. The
specific GPI output is set when the GPO
command is inserted.
Allows you create a custom control that
will cut keys on or off. The specific key
and whether the key is cut on or off is set
when the key cut command is inserted.
Allows you to create a custom control that
will transition keys on or off. The specific
key and whether the key is transitioned
Carbonite Black Solo Operation Manual (v1.2) — Custom Controls • 49
Page 50

DefinitionFunction
on or off is set when the key transition
command is inserted.
IncKey
Resume
Cancel
CancelAll
State
Allows you to create a custom control that
will include a key with the next transition
to take the key on-air, or off-air. The
specific key and whether it should go
on-air, or off-air is set when the include
key command is inserted.
Allows you to resume a particular custom
control that is at a hold. The specific
custom control is set when the resume is
inserted. If the target custom control is not
at a hold event, the resume command will
not start the target custom control.
Allows you to stop a particular custom
control. The specific custom control is set
when the cancel is inserted.
Allows you to stop all running custom
controls.
Allows you to embed the entire state of
the switcher into a custom control. A state
in a custom control behaves just like a
memory.
To Insert a Special Event into a Custom Control
A special function can be inserted into any existing
custom control, or used when creating a new custom
control.
Start recording or editing your custom control where
1.
you want to insert the special event.
2.
Press INSERT.
3.
Use the INSERT knob to select the event you want
to insert.
You can also press and hold the INSERT button and
press the source button on the custom control bus
for the event you want to insert. The event names
are shown on the mnemonics.
•
Hold — press the Insert knob to insert a hold
event
•
Pause — use the Secs and Frames knobs to
enter the length of the pause event
•
Loop — press the Loop knob to loop the
custom control back to the beginning
•
GPO — use the Pin knob to select the GPI
output
•
CutKey — use the Key knob to select the key,
and the State knob to select whether you want
the key cut on or off
•
TrnKey — use the Key knob to select the key,
and the State knob to select whether you want
the key transitioned on or off
•
IncKey — use the Key knob to select the key,
and the State knob to select whether the key
should be transitioned on-air or off-air with the
next transition
•
Resume — use the Bank knob to select the
custom control bank, and the CC knob to select
which custom control to resume
•
Cancel — use the Bank knob to select the
custom control bank, and the CC knob to select
which custom control to cancel
•
CancelAll — press the CancelAll knob to
insert a cancel all custom controls command
•
State — press the Insert knob to insert the state
4.
Press the Insert knob to insert the event.
5.
Press START/STOP.
Running a Custom Control
Once a custom control has been programmed, you can
run that custom control by pressing the button that the
custom control was recorded to.
Keep the following in mind when running custom
controls:
• A custom control will continue to run until it reaches
a hold event, is stopped by another custom control,
you edit a custom control, or the custom control
reaches the end.
• When a custom control is running, the button on the
custom control bus is red.
• When a custom control is held (at a Hold event), the
button on the custom control bus ashes white.
• You can run multiple custom controls at the same
time. The number of running custom controls is
shown on the display when in custom control mode.
• You can stop a running custom control by pressing
the red custom control button on the custom control
bank.
• You can stop all running custom controls by selecting
a custom control with no events recorded to it.
• A maximum of 128 custom controls can be run at the
same time.
To Run a Custom Control
Once a custom control has been recorded, you can run
that custom control at any time.
1.
Press MENU.
2.
Press and hold the CC BANK button and select the
bank you want to use by pressing the source button
on the key bus. As you hold the CC BANK button
the source button for the currently selected bank is
lit.
50 • Custom Controls — Carbonite Black Solo Operation Manual (v1.2)
Page 51

Tip: Any of the user select buttons can be assigned as a
cc bank select button.
Select the custom control you want to run by
3.
pressing the source button on the custom control
bus.
The custom control starts to play immediately.
Editing a Custom Control
Insert an event into a custom control as follows:
7.
Use the left knob to select the event you want
a)
to insert an event before. You can also use the
PREV and NEXT buttons.
b)
Press INSERT.
Insert the events you want.
c)
d)
Press START/STOP to nish recording.
After you have recorded a custom control, you can go
back and edit that custom control to add or remove
events.
Tip: Custom controls can also be edited from the Custom
Control node in DashBoard.
To Edit a Custom Control
When editing a custom control, you can delete and insert
events at any point in the custom control, or append
events to the end.
Tip: When editing a custom control, press RUN EVENT to run
the currently selected event. This can help you diagnose
problems in a custom control.
1.
Press MENU > BANK 1 > EDIT.
2.
Use the Bank knob to select the bank that the
custom control you want to record will be stored on,
or select the bank button directly.
3.
Use the CC knob to select the custom control that
you want to edit, or select the custom control on the
bus directly. The custom control will have an * next
to the number.
4.
Use the Func knob to select where and how you
want to edit the custom control.
•
Edit — select the position in the custom control
to edit events
•
Append — add events to the end of the custom
control
5.
Press the Func knob to start editing.
Tip: You can also start editing a custom control by pressing
and holding EDIT and selecting the bank and custom that
you want to edit to.
The display changes to show the name and duration
of the custom control, and the currently selected
event in the custom control.
Delete an event in a custom control as follows:
6.
Use the left knob to select the event you want
a)
to delete. You can also use the PREV and
NEXT buttons.
b)
Press DELETE.
To Edit a CC From DashBoard
When editing a custom control, you can delete and insert
events at any point in the custom control, or append
events to the end.
Tip: When editing a custom control, press Run Event to run
the currently selected event. This can help you diagnose
problems in a custom control.
1.
Click Navigation Menu > Custom Control >
Editor (Beta).
2.
Click Bank X to select the bank that the custom
control you want to edit is on.
Click the custom control that you want to edit.
3.
Click the event that you want to edit or insert an
4.
event before.
Refer to Custom Control Events on page 51 for
information on available events.
Edit the custom control or event.
5.
•
Append (Record) — start inserting events to
the end of the custom control
•
Append — insert the current event at the end
of the custom control
•
Copy — copy the entire custom control
•
Delete — delete the entire custom control
•
Delete Event — delete the currently selected
event
•
Edit Event — edit the parameters of the
currently selected event
•
Insert (Record) — start insert events after the
currently selected event
•
Insert — insert the current event after the
currently selected event
•
Record — start recording a new custom control
over the existing one
•
Run Event — run the currently selected event
Custom Control Events
The Custom Control editor in DashBoard allows you to
add or edit events in custom controls.
Carbonite Black Solo Operation Manual (v1.2) — Custom Controls • 51
Page 52

Ancillary Data
Mode
Audio Mixer Pan
Audio Mixer
Volume
Auto Trans
Bus Source Select
Switcher
Installation >
Ancillary Mode
Devices >
Audio Mixer
Devices >
Audio Mixer
Switcher >
Transition >
ME Trans
Switcher > Bus
Source Select
DescriptionLocationEvent
Select how the switcher will strip or
pass ancillary data.
1. Click a Value button to select
how the switcher treats ancillary
data.
Set the pan level for the selected
channel on the selected device.
1. Click Audio Pan.
2. Click the Audio Mixer button
and select the device you want
to send the command to.
3. Click the Channel button and
select the channel you want to
send the command to.
4. Click the Change Type button
and select whether you want to
set (Absolute) or reset (Reset)
the parameter. Some selections
will not be available when you
reset the parameter.
5. Enter the new pan level in the
Pan Left/Right (%) field.
Set the level for the selected channel
on the selected device.
1. Click Audio Volume.
2. Click the Audio Mixer button
and select the device you want
to send the command to.
3. Click the Channel button and
select the channel you want to
send the command to.
4. Click the Change Type button
and select whether you want to
set (Absolute) or reset (Reset)
the parameter. Some selections
will not be available when you
reset the parameter.
5. Enter the new audio level in the
Volume (%) field.
Performs an auto transition on the
selected ME, MiniME™, or
MultiScreen.
1. Click the ME button and select
the ME, MiniME™, or
MultiScreen that you want to
perform the event on.
2. Click the Action button and
select Auto Trans.
Select a source on the selected bus
for the selected ME, MiniME™,
MultiScreen, or aux.
1. Click the ME button and select
the ME, MiniME™, MultiScreen,
or aux that you want to select a
bus on.
2. Click the Bus/Keyer button and
select the bus that you want to
select a source on.
3. If you selected a key bus, click
a Bus button to select whether
you are selecting a source for
the fill (Video) or the alpha
(Alpha) of the key.
Cancel All CC
Cancel CC
Chroma Key,
Initialize
Chroma Key Color
Chroma Key Mode
Chroma Key Setup
Cancel All
Cancel CC
Switcher >
Keyer >
Chroma Keyer
Init
Switcher >
Keyer >
Chroma Keyer
Color
Switcher >
Keyer >
Chroma Keyer
Mode
Switcher >
Keyer >
Chroma Keyer
Param
DescriptionLocationEvent
4. Click the Source button and
select the source that you want
on the selected bus.
Cancel all running custom controls.Special >
Cancel a running custom control.Special >
1. Click the Bank button and select
the custom control bank you
want to cancel a custom control
on.
2. Click the CC button and select
the custom control you want to
cancel.
Initialize a chroma key for the selected
key for the selected ME or MiniME™.
1. Click the ME button and select
the ME, MiniME™, or
MultiScreen that you want to
perform the event on.
2. Click the Keyer button for the
key you want to perform the
event on.
Select the color you want to key out
for the selected key for the selected
ME or MiniME™.
1. Click the ME button and select
the ME, MiniME™, or
MultiScreen that you want to
perform the event on.
2. Click the Keyer button for the
key you want to perform the
event on.
3. Click Color and select the color
you want to key out.
Select the mode for a chroma key for
the selected key for the selected ME
or MiniME™.
1. Click the ME button and select
the ME, MiniME™, or
MultiScreen that you want to
perform the event on.
2. Click the Keyer button for the
key you want to perform the
event on.
3. Click a Mode button to select
whether you want the chroma
key to operate in basic mode
(Basic), or advanced
(Advanced).
Select the various advanced chroma
key settings for the selected key for
the selected ME or MiniME™.
1. Click the ME button and select
the ME, MiniME™, or
MultiScreen that you want to
perform the event on.
2. Click the Keyer button for the
key you want to perform the
event on.
3. Click the Parameter button and
select the parameter you want
to adjust.
4. Click the Value button and select
the new value you want to enter
for the selected parameter.
52 • Custom Controls — Carbonite Black Solo Operation Manual (v1.2)
Page 53

Clean Feed
Trans Clear
Color Framing
Cut
DVE Freeze
DVE Key Aspect
Switcher
Installation >
ME > ME Clean
Feed
Switcher >
Transition >
ME Trans
Switcher
Installation >
Reference >
Color Framing
Transition >
ME Trans
Switcher >
Keyer > DVE
Freeze
Switcher >
Keyer > DVE
Param
DescriptionLocationEvent
Select the clean feed location for the
selected ME.
1. Click the ME button for the ME
that you want to perform the
event on.
2. Click a Before Keyer button to
select whether you want the
clean feed output to be taken
before key 1 (Keyer 1), key 2
(Keyer 2), or key 3 (Keyer 3).
Configures the next transition area of
the selected ME, MiniME™, or
MultiScreen to take all keys off-air with
the next transition.
1. Click the ME button and select
the ME, MiniME™, or
MultiScreen that you want to
perform the event on.
2. Click the Action button and
select Trans Clear.
Select whether color framing for the
reference outputs is synchronized.
1. Click a Framing button to select
whether color framing is
synchronized (Sync) or not
(NoSync).
Performs a cut on the selected ME.Switcher >
1. Click the ME button and select
the ME, MiniME™, or
MultiScreen that you want to
perform the event on.
2. Click the Action button and
select Cut.
Turn the DVE freeze feature on or off
for the selected key for the selected
ME, MiniME™, or MultiScreen.
1. Click the ME button and select
the ME, MiniME™, or
MultiScreen that you want to
perform the event on.
2. Click the Keyer button for the
key you want to perform the
event on.
3. Click the Change Type button
and select whether you want to
set (Absolute) or reset (Reset)
the parameter. Some selections
will not be available when you
reset the parameter.
4. Click the Value button and select
whether to freeze the video and
appearance of a key (On) or not
(Off). When a key is frozen, the
DVE attribute are disabled and
you can not move the key.
Select the aspect ratio for the DVE key
on the selected key for the selected
ME.
1. Click the ME button for the ME
that you want to perform the
event on.
2. Click the Keyer button for the
key you want to perform the
event on.
DVE Key Border
Color (HSL)
DVE Key Border
Color (Preset)
DVE Key Border
DescriptionLocationEvent
3. Click the Parameter button and
select Aspect.
4. Click the Change Type button
and select whether you want to
set (Absolute) or reset (Reset)
the parameter. Some selections
will not be available when you
reset the parameter.
5. Enter an aspect ratio in the
Value (%) field.
Switcher >
Keyer > DVE
(HSL) MultiScreen. Each component of the
Switcher >
Keyer > DVE
Border Color
(Preset)
Switcher >
Keyer > DVE
Param
Select the custom color you want to
apply to the border of the DVE key of
the selected ME, MiniME™, orBorder Color
HSL color must be inserted
individually.
1. Click the ME button and select
the ME, MiniME™, or
MultiScreen that you want to
perform the event on.
2. Click the Keyer button for the
key you want to perform the
event on.
3. Click the Change Type button
and select whether you want to
set (Absolute) or reset (Reset)
the parameter. Some selections
will not be available when you
reset the parameter.
4. Click the Component button and
select the HSL component you
want to assign a value to. A
value should be applied to all
three components.
5. Enter a value for the selected
component in the Value (%)
field.
Select the preset color you want to
apply to the border of the DVE key of
the selected key for the selected ME,
MiniME™, or MultiScreen.
1. Click the ME button and select
the ME, MiniME™, or
MultiScreen that you want to
perform the event on.
2. Click the Keyer button for the
key you want to perform the
event on.
3. Click the Color button and select
the preset color you want to
apply to the border.
Select the size of border for the DVE
key on the selected key for the
selected ME.
1. Click the ME button for the ME
that you want to perform the
event on.
2. Click the Keyer button for the
key you want to perform the
event on.
3. Click the Parameter button and
select Border.
4. Click the Change Type button
and select whether you want to
set (Absolute) or reset (Reset)
the parameter. Some selections
will not be available when you
reset the parameter.
Carbonite Black Solo Operation Manual (v1.2) — Custom Controls • 53
Page 54

DVE Key Crop
(Bottom Edge)
DVE Key Crop
(Dual Edge)
DVE Key Crop (Left
Edge)
Switcher >
Keyer > DVE
Param
Switcher >
Keyer > DVE
Crop Param
Switcher >
Keyer > DVE
Param
DescriptionLocationEvent
5. Enter a size for the border in the
Value (%) field.
Select the amount of cropping on the
bottom edge of the DVE key on the
selected key for the selected ME.
1. Click the ME button for the ME
that you want to perform the
event on.
2. Click the Keyer button for the
key you want to perform the
event on.
3. Click the Parameter button and
select Bottom Edge.
4. Click the Change Type button
and select whether you want to
set (Absolute) or reset (Reset)
the parameter. Some selections
will not be available when you
reset the parameter.
5. Enter the amount of cropping in
the Value (%) field.
Select the amount of cropping on both
horizontal or vertical edges of the DVE
key of the selected key for the selected
ME, MiniME™, or MultiScreen.
1. Click the ME button and select
the ME, MiniME™, or
MultiScreen that you want to
perform the event on.
2. Click the Keyer button for the
key you want to perform the
event on.
3. Click the Change Type button
and select whether you want to
set (Absolute) or reset (Reset)
the parameter. Some selections
will not be available when you
reset the parameter.
4. Click the Parameter button and
select the edges you want to
crop.
5. Enter the amount of Left or Top
cropping you want to apply in the
Value % field.
6. Enter the amount of Right or
Bottom cropping you want to
apply in the Other Value % field.
Select the amount of cropping on the
left edge of the DVE key on the
selected key for the selected ME.
1. Click the ME button for the ME
that you want to perform the
event on.
2. Click the Keyer button for the
key you want to perform the
event on.
3. Click the Parameter button and
select Left Edge.
4. Click the Change Type button
and select whether you want to
set (Absolute) or reset (Reset)
the parameter. Some selections
will not be available when you
reset the parameter.
5. Enter the amount of cropping in
the Value (%) field.
DVE Key Crop
(Right Edge)
DVE Key Crop (Top
Edge)
DVE Key Edge
Softness
DVE Key Size
Switcher >
Keyer > DVE
Param
Switcher >
Keyer > DVE
Param
Switcher >
Keyer > DVE
Param
Switcher >
Keyer > DVE
Param
DescriptionLocationEvent
Select the amount of cropping on the
right edge of the DVE key on the
selected key for the selected ME.
1. Click the ME button for the ME
that you want to perform the
event on.
2. Click the Keyer button for the
key you want to perform the
event on.
3. Click the Parameter button and
select Right Edge.
4. Click the Change Type button
and select whether you want to
set (Absolute) or reset (Reset)
the parameter. Some selections
will not be available when you
reset the parameter.
5. Enter the amount of cropping in
the Value (%) field.
Select the amount of cropping on the
top edge of the DVE key on the
selected key for the selected ME.
1. Click the ME button for the ME
that you want to perform the
event on.
2. Click the Keyer button for the
key you want to perform the
event on.
3. Click the Parameter button and
select Top Edge.
4. Click the Change Type button
and select whether you want to
set (Absolute) or reset (Reset)
the parameter. Some selections
will not be available when you
reset the parameter.
5. Enter the amount of cropping in
the Value (%) field.
Select the amount of softness to apply
to the edge of the DVE key on the
selected key for the selected ME.
1. Click the ME button for the ME
that you want to perform the
event on.
2. Click the Keyer button for the
key you want to perform the
event on.
3. Click the Parameter button and
select Softness.
4. Click the Change Type button
and select whether you want to
set (Absolute) or reset (Reset)
the parameter. Some selections
will not be available when you
reset the parameter.
5. Enter an amount of softness for
the DVE key or border in the
Value (%) field.
Select the size of the DVE key on the
selected key for the selected ME.
1. Click the ME button for the ME
that you want to perform the
event on.
2. Click the Keyer button for the
key you want to perform the
event on.
54 • Custom Controls — Carbonite Black Solo Operation Manual (v1.2)
Page 55

DVE Key
X-Position
DVE Key
Y-Position
DVE Wipe, Reset
DVE Wipe Direction
(Flip-Flop)
Switcher >
Keyer > DVE
Param
Switcher >
Keyer > DVE
Param
Switcher >
Transition >
DVE Wipe
Reset
Switcher >
Transition >
DVE Wipe
Direction
DescriptionLocationEvent
3. Click the Parameter button and
select Size.
4. Click the Change Type button
and select whether you want to
set (Absolute) or reset (Reset)
the parameter. Some selections
will not be available when you
reset the parameter.
5. Enter a new size in the Value
(%) field.
Select the x-axis position of the DVE
key on the selected key for the
selected ME.
1. Click the ME button for the ME
that you want to perform the
event on.
2. Click the Keyer button for the
key you want to perform the
event on.
3. Click the Parameter button and
select X-Pos.
4. Click the Change Type button
and select whether you want to
set (Absolute) or reset (Reset)
the parameter. Some selections
will not be available when you
reset the parameter.
5. Enter a new position in the
Value (%) field.
Select the y-axis position for the DVE
key on the selected key for the
selected ME.
1. Click the ME button for the ME
that you want to perform the
event on.
2. Click the Keyer button for the
key you want to perform the
event on.
3. Click the Parameter button and
select Y-Pos.
4. Click the Change Type button
and select whether you want to
set (Absolute) or reset (Reset)
the parameter. Some selections
will not be available when you
reset the parameter.
5. Enter a new position in the
Value (%) field.
Reset the parameters or direction and
flip-flop for the DVE wipe transition of
the selected ME.
1. Click the ME button for the ME
that you want to perform the
event on.
2. Click Reset to reset the DVE
wipe parameters.
Select whether the DVE wipe reverses
direction for every second transition of
the selected ME.
1. Click the ME button for the ME
that you want to perform the
event on.
2. Click the Change Type button
and select whether you want to
set (Absolute) or reset (Reset)
the parameter. Some selections
DVE Wipe Direction
DVE Wipe Pattern
EmbeddedTriggers
— Enable
EmbeddedTriggers
— Insert Trigger
EmbeddedTriggers
— Set DID
Switcher >
Transition >
DVE Wipe
Direction
Switcher >
Transition >
DVE Wipe
Effect
Switcher
Installation >
Embedded
Trigger >
Enable
Switcher
Installation >
Embedded
Trigger >
Trigger CC
Switcher
Installation >
Embedded
Trigger >
Settings
DescriptionLocationEvent
will not be available when you
reset the parameter.
3. Click Flip-Flip.
4. Click On or Off to select whether
Flip-Flop is on (On) or not (Off).
Select the direction for the DVE wipe
transition of the selected ME.
1. Click the ME button for the ME
that you want to perform the
event on.
2. Click the Change Type button
and select whether you want to
set (Absolute) or reset (Reset)
the parameter. Some selections
will not be available when you
reset the parameter.
3. Click Direction.
4. Click Forward or Reverse to
select whether the DVE wipe
moves in a forward (Forward)
or reverse (Reverse) direction.
Select the pattern you want to use for
a DVE wipe transition of the selected
ME.
1. Click the ME button for the ME
that you want to perform the
event on.
2. Click the Effect button and
select the pattern you want to
use for the DVE wipe.
Select whether EmbeddedTriggers is
enabled or not for the selected output.
1. Click the Output button and
select the output BNC that you
want to send EmbeddedTriggers
commands on.
2. Click the Change Type button
and select whether you want to
set (Absolute) or reset (Reset)
the parameter. Some selections
will not be available when you
reset the parameter.
3. Click a Value button to select
whether EmbeddedTriggers
commands are inserted for the
selected output (On) or not (Off).
Select the custom control to insert into
the EmbeddedTriggers message.
1. Enter the custom control bank in
the Bank field.
2. Enter the custom control in the
CC field.
Select the data identifier word (DID)
you want to use for the
EmbeddedTriggers message.
1. Click DID
2. Click the Change Type button
and select whether you want to
set (Absolute) or reset (Reset)
the parameter. Some selections
will not be available when you
reset the parameter.
3. Enter the DID value you want to
use in the Value field.
Carbonite Black Solo Operation Manual (v1.2) — Custom Controls • 55
Page 56

EmbeddedTriggers
— Set Line
EmbeddedTriggers
— Set Remote ID
EmbeddedTriggers
— Set SDID
Fly Key (DVE)
Trigger Setup
Switcher
Installation >
Embedded
Trigger >
Settings
Switcher
Installation >
Embedded
Trigger >
Settings
Switcher
Installation >
Embedded
Trigger >
Settings
Switcher >
Keyer > Keyer
Fly
Devices > GPOGPI Output — Edge
DescriptionLocationEvent
Select the line in the VANC that the
EmbeddedTriggers message will be
inserted on.
1. Click Line
2. Click the Change Type button
and select whether you want to
set (Absolute) or reset (Reset)
the parameter. Some selections
will not be available when you
reset the parameter.
3. Enter the line value you want to
use in the Value field.
Select the remote ID you want to use
to identify the switcher that the
EmbeddedTriggers message is coming
from.
1. Click Remote ID
2. Click the Change Type button
and select whether you want to
set (Absolute) or reset (Reset)
the parameter. Some selections
will not be available when you
reset the parameter.
3. Enter the remote ID value you
want to use in the Value field.
Select the secondary data identifier
word (SDID) you want to use for the
EmbeddedTriggers message.
1. Click SDID
2. Click the Change Type button
and select whether you want to
set (Absolute) or reset (Reset)
the parameter. Some selections
will not be available when you
reset the parameter.
3. Enter the SDID value you want
to use in the Value field.
Assign DVE resources (Fly) to the
selected key for the selected ME,
MiniME™, or MultiScreen.
1. Click the ME button and select
the ME, MiniME™, or
MultiScreen that you want to
perform the event on.
2. Click the Keyer button for the
key you want to perform the
event on.
3. Click the Change Type button
and select whether you want to
set (Absolute) or reset (Reset)
the parameter. Some selections
will not be available when you
reset the parameter.
4. Click the Value button and select
whether DVE resources are
assigned to the key (On) or not
(Off).
Set up the type of edge trigger for the
GPI output.
1. Click GPO Edge Duration
2. Click the GPO button and select
the GPI output that you want to
configure.
3. Click the Change Type button
and select whether you want to
set (Absolute) or reset (Reset)
Level Trigger Setup
Mode
Trigger
Trigger Type
Key, Make Linear
Key Active
Devices > GPOGPI Output —
Devices > GPOGPI Output —
Devices > GPOGPI Output —
Switcher >
Keyer > Keyer
Make Linear
Switcher >
Keyer > Keyer
Active
DescriptionLocationEvent
the parameter. Some selections
will not be available when you
reset the parameter.
4. Enter the duration of the edge
trigger in the Duration (fr) field.
Set up the type of level trigger for the
GPI output.
1. Click GPO Level Config
2. Click the GPO button and select
the GPI output that you want to
configure.
3. Click a Level to select whether
the level trigger uses a high
(High) or low (Low) level trigger.
Select whether the level trigger GPI
output act as a tally.
1. Click GPO Mode
2. Click the GPO button and select
the GPI output that you want to
configure.
3. Click a Mode button to select
whether the level trigger GPI
output, when assigned to video
source, acts as a roll clip
(Normal) or as a tally (Tally) for
the selected source.
Trigger a GPI output.Devices > GPOGPI Output —
1. Click GPO Trigger
2. Click the GPO button and select
the GPI output that you want to
trigger.
Select the type of trigger for the GPI
output.
1. Click GPO Trigger
Configuration
2. Click the GPO button and select
the GPI output that you want to
configure.
3. Click a Trigger to select whether
the GPI output uses a level
(Level) or edge (Edge) trigger.
Insert a hold into the custom control.Special > HoldHold CC
Make the selected key linear on the
selected ME, MiniME™, or
MultiScreen.
1. Click the ME button and select
the ME, MiniME™, or
MultiScreen that you want to
perform the event on.
2. Click the Keyer button for the
key you want to make linear.
Transition a key (or include it in the
next transition) on or off-air for the
selected ME, MiniME™, or
MultiScreen.
1. Click the ME button and select
the ME, MiniME™, or
MultiScreen that you want to
perform the event on.
2. Click the Keyer button for the
key you want to perform the
event on.
56 • Custom Controls — Carbonite Black Solo Operation Manual (v1.2)
Page 57

Key Copy
Key Invert
Key Mode
Switcher >
Keyer > Keyer
Copy
Switcher >
Keyer > Keyer
Invert
Switcher >
Keyer > Keyer
Mode
DescriptionLocationEvent
3. Click the Change Type button
and select whether you want to
set (Absolute) or reset (Reset)
the parameter. Some selections
will not be available when you
reset the parameter.
4. Click the Parameter button and
select a cut (Cut Key) or auto
transition (Trans Key) for the
key, or have to key included in
the next transition (Include
Key).
5. Click the Value button to select
whether the key is transitioned
on-air / included in the next
transition to go on-air (On) or
off-air / included in the next
transition to go off-air (Off).
Copy the contents of one key to
another key the same or a different
ME, MiniME™, or MultiScreen.
1. Click the Target ME button and
select where you want to copy
the key to.
2. Click the Target Keyer button
for the key you want to copy to.
3. Click the Source ME button and
select where you want to copy
the key from.
4. Click the Source Keyer button
for the key you want to copy
from.
Turn the key invert feature on or off for
the selected key for the selected ME,
MiniME™, or MultiScreen.
1. Click the ME button and select
the ME, MiniME™, or
MultiScreen that you want to
perform the event on.
2. Click the Keyer button for the
key you want to reverse the
polarity of the key alpha so that
the holes in the background are
cut by dark areas of the key
alpha instead of bright areas.
3. Click the Change Type button
and select whether you want to
set (Absolute) or reset (Reset)
the parameter. Some selections
will not be available when you
reset the parameter.
4. Click a Value button to turn key
invert on (On) or off (Off).
Select the mode for the selected key
for the selected ME, MiniME™, or
MultiScreen.
1. Click the ME button and select
the ME, MiniME™, or
MultiScreen that you want to
perform the event on.
2. Click the Keyer button for the
key you want to perform the
event on.
3. Click a Mode button to have the
key set as shaped/unshaped
from the key (Normal), as
additive for a shaped source
DescriptionLocationEvent
(Additive), or alpha to fully
opaque/white (Full).
Key Only
Transition
Key Reset
Key Settings (Clip,
Gain,
Transparency) selected ME, MiniME™, or
Key Swap
Key Trans Rate
Switcher >
Keyer > Keyer
Trans
Switcher >
Keyer > Keyer
Reset Params
Switcher >
Keyer > Keyer
Settings
Switcher >
Keyer > Keyer
Swap
Switcher >
Keyer > Keyer
Trans Rate
Perform a key only transition for the
selected ME, MiniME™, or
MultiScreen.
1. Click the ME button and select
the ME, MiniME™, or
MultiScreen that you want to
perform the event on.
2. Click the Keyer button for the
key you want to perform the
event on.
3. Click the Action button and
select whether they key should
perform a cut (Cut), or auto
transition (Auto Trans).
Reset the parameters for the selected
key for the selected ME, MiniME™, or
MultiScreen.
1. Click the ME button and select
the ME, MiniME™, or
MultiScreen that you want to
perform the event on.
2. Click the Keyer button for the
key you want to reset the clip,
gain, transparency, invert, and
mask for.
Select clip, gain, and transparency
settings for the selected key for the
MultiScreen.
1. Click the ME button and select
the ME, MiniME™, or
MultiScreen that you want to
perform the event on.
2. Click the Keyer button for the
key you want to perform the
event on.
3. Click the Change Type button
and select whether you want to
set (Absolute) or reset (Reset)
the parameter. Some selections
will not be available when you
reset the parameter.
4. Enter a value for the clip, gain,
or transparency for the key in the
Value field.
Swap the contents of one key with
another key the same or a different
ME, MiniME™, or MultiScreen.
1. Click the 1st ME button and
select where the first key you
want to swap is.
2. Click the 1st Keyer button for
the first key you want to swap.
3. Click the 2nd ME button and
select where the second key you
want to swap is.
4. Click the 2nd Keyer button for
the second key you want to
swap.
Set or reset the keyer transition rate
of the selected ME, MiniME™, or
MultiScreen.
1. Click the ME button and select
the ME, MiniME™, or
Carbonite Black Solo Operation Manual (v1.2) — Custom Controls • 57
Page 58

Key Type
Layer Mode
Mask, Force
Mask, Invert
Switcher >
Keyer > Keyer
Type
Switcher
Installation >
ME > ME Layer
Mode
Switcher >
Keyer > Mask
Force
Switcher >
Keyer > Mask
Invert
DescriptionLocationEvent
MultiScreen that you want to
perform the event on.
2. Click the Keyer button for the
key you want to perform the
event on.
3. Click the Change Type button
and select whether you want to
set (Absolute) or reset (Reset)
the parameter. Some selections
will not be available when you
reset the parameter.
4. Enter a new transition rate, in
frames, for the key in the Value
(fr) field.
Assign a key type for a key for the
selected ME, MiniME™, or
MultiScreen.
1. Click the ME button and select
the ME, MiniME™, or
MultiScreen that you want to
perform the event on.
2. Click the Keyer button for the
key you want to perform the
event on.
3. Click a Type button to assign the
key type to the selected key.
Select whether external layer mode is
active for the selected ME.
1. Click the ME button for the ME
that you want to perform the
event on.
2. Click the Change Type button
and select whether you want to
set (Absolute) or reset (Reset)
the parameter. Some selections
will not be available when you
reset the parameter.
3. Click a Value button to select
whether external layer mode is
on (On) or not (Off).
Insert a loop into the custom control.Special > LoopLoop CC
Apply a mask to the selected key for
the selected ME.
1. Click the ME button for the ME
that you want to perform the
event on.
2. Click the Keyer button for the
key you want to perform the
event on.
3. Click the Change Type button
and select whether you want to
set (Absolute) or reset (Reset)
the parameter. Some selections
will not be available when you
reset the parameter.
4. Click the Value button and select
whether to force the area inside
the mask region to the
foreground (On) or not (Off).
Invert the mask of the selected key for
the selected ME.
1. Click the ME button for the ME
that you want to perform the
event on.
Mask, Reset
Mask (Box) —
Bottom Edge
PositionMask (Box)
— Bottom Edge
Position
Mask (Box) — Left
Edge Position
Switcher >
Keyer > Mask
Reset
Switcher >
Keyer > Box
Mask Param
Switcher >
Keyer > Box
Mask Param
DescriptionLocationEvent
2. Click the Keyer button for the
key you want to perform the
event on.
3. Click the Change Type button
and select whether you want to
set (Absolute) or reset (Reset)
the parameter. Some selections
will not be available when you
reset the parameter.
4. Click the Value button and select
whether to invert the masked
area with the unmasked area
(On) or not (Off).
Reset the mask of the selected key for
the selected ME.
1. Click the ME button for the ME
that you want to perform the
event on.
2. Click the Keyer button for the
key you want to perform the
event on.
3. Click the Action button and
select the parameter you want
to reset.
• Reset Type — turn mask
off.
• Reset Forced — turn force
off.
• Reset Inverted — turn
invert off.
• Reset X-Pos — reset
horizontal position.
• Reset Y-Pos — reset
vertical position.
• Reset Size — reset size.
• Reset Ver Edges — reset
top and bottom edges.
• Reset Hor Edges — reset
left and right edges.
Select the position for the bottom edge
of the box mask on the selected key
for the selected ME.
1. Click the ME button for the ME
that you want to perform the
event on.
2. Click the Keyer button for the
key you want to perform the
event on.
3. Click the Parameter button and
select Bottom Edge.
4. Click the Change Type button
and select whether you want to
set (Absolute) or reset (Reset)
the parameter. Some selections
will not be available when you
reset the parameter.
5. Enter a new position in the
Value (%) field.
Select the position for the left edge of
the box mask on the selected key for
the selected ME.
1. Click the ME button for the ME
that you want to perform the
event on.
58 • Custom Controls — Carbonite Black Solo Operation Manual (v1.2)
Page 59

Mask (Box) —
Right Edge
Position
Mask (Box) — Size
Mask (Box) — Top
Edge Position
Switcher >
Keyer > Box
Mask Param
Switcher >
Keyer > Box
Mask Param
Switcher >
Keyer > Box
Mask Param
DescriptionLocationEvent
2. Click the Keyer button for the
key you want to perform the
event on.
3. Click the Parameter button and
select Left Edge.
4. Click the Change Type button
and select whether you want to
set (Absolute) or reset (Reset)
the parameter. Some selections
will not be available when you
reset the parameter.
5. Enter a new position in the
Value (%) field.
Select the position for the right edge
of the box mask on the selected key
for the selected ME.
1. Click the ME button for the ME
that you want to perform the
event on.
2. Click the Keyer button for the
key you want to perform the
event on.
3. Click the Parameter button and
select Right Edge.
4. Click the Change Type button
and select whether you want to
set (Absolute) or reset (Reset)
the parameter. Some selections
will not be available when you
reset the parameter.
5. Enter a new position in the
Value (%) field.
Select the size of the box mask on the
selected key for the selected ME.
1. Click the ME button for the ME
that you want to perform the
event on.
2. Click the Keyer button for the
key you want to perform the
event on.
3. Click the Parameter button and
select Size.
4. Click the Change Type button
and select whether you want to
set (Absolute) or reset (Reset)
the parameter. Some selections
will not be available when you
reset the parameter.
5. Enter a new size in the Value
(%) field.
Select the position for the top edge of
the box mask on the selected key for
the selected ME.
1. Click the ME button for the ME
that you want to perform the
event on.
2. Click the Keyer button for the
key you want to perform the
event on.
3. Click the Parameter button and
select Top Edge.
4. Click the Change Type button
and select whether you want to
set (Absolute) or reset (Reset)
the parameter. Some selections
will not be available when you
reset the parameter.
Mask (Box) —
X-Position
Mask (Box) —
Y-Position
Mask (Pattern) —
Aspect Ratio
Mask (Pattern) —
Border Size
Switcher >
Keyer > Box
Mask Param
Switcher >
Keyer > Box
Mask Param
Switcher >
Keyer >
Pattern Mask
Param
Switcher >
Keyer >
Pattern Mask
Param
DescriptionLocationEvent
5. Enter a new position in the
Value (%) field.
Select the x-axis position of the box
mask on the selected key for the
selected ME.
1. Click the ME button for the ME
that you want to perform the
event on.
2. Click the Keyer button for the
key you want to perform the
event on.
3. Click the Parameter button and
select X-Pos.
4. Click the Change Type button
and select whether you want to
set (Absolute) or reset (Reset)
the parameter. Some selections
will not be available when you
reset the parameter.
5. Enter a new position in the
Value (%) field.
Select the y-axis position for the box
mask on the selected key for the
selected ME.
1. Click the ME button for the ME
that you want to perform the
event on.
2. Click the Keyer button for the
key you want to perform the
event on.
3. Click the Parameter button and
select Y-Pos.
4. Click the Change Type button
and select whether you want to
set (Absolute) or reset (Reset)
the parameter. Some selections
will not be available when you
reset the parameter.
5. Enter a new position in the
Value (%) field.
Select the aspect ratio for the pattern
mask for the selected ME.
1. Click the ME button for the ME
that you want to perform the
event on.
2. Click the Parameter button and
select Aspect.
3. Click the Change Type button
and select whether you want to
set (Absolute) or reset (Reset)
the parameter. Some selections
will not be available when you
reset the parameter.
4. Enter an aspect ratio in the
Value (%) field.
Select the size of border for the pattern
mask on the selected key for the
selected ME.
1. Click the ME button for the ME
that you want to perform the
event on.
2. Click the Parameter button and
select Border Size.
3. Click the Change Type button
and select whether you want to
set (Absolute) or reset (Reset)
Carbonite Black Solo Operation Manual (v1.2) — Custom Controls • 59
Page 60

Mask (Pattern) —
Edge Softness
Mask (Pattern) —
Horizontal
Multiplication
Mask (Pattern) —
Pattern
Mask (Pattern) —
Reset
Mask (Pattern) —
Rotation
Switcher >
Keyer >
Pattern Mask
Param
Switcher >
Keyer >
Pattern Mask
Param
Switcher >
Keyer >
Pattern Mask
Effect
Keyer >
Pattern Mask
Reset
Switcher >
Keyer >
Pattern Mask
Param
DescriptionLocationEvent
the parameter. Some selections
will not be available when you
reset the parameter.
4. Enter a size for the border in the
Value (%) field.
Select the amount of softness to apply
to the edge of the mask for the
selected ME.
1. Click the ME button for the ME
that you want to perform the
event on.
2. Click the Parameter button and
select Softness.
3. Click the Change Type button
and select whether you want to
set (Absolute) or reset (Reset)
the parameter. Some selections
will not be available when you
reset the parameter.
4. Enter an amount of softness for
the pattern or border in the
Value (%) field.
Select the number of times you want
to multiply the pattern mask
horizontally for the selected ME.
1. Click the ME button for the ME
that you want to perform the
event on.
2. Click the Parameter button and
select Horizontal Mult.
3. Click the Change Type button
and select whether you want to
set (Absolute) or reset (Reset)
the parameter. Some selections
will not be available when you
reset the parameter.
4. Enter the number of times the
pattern is multiplied in the Value
field.
Select a pattern for the pattern mask
for the selected ME.
1. Click the ME button for the ME
that you want to perform the
event on.
2. Click the Pattern and select the
pattern you want to use for the
pattern generator.
Reset the mask for the selected ME.Switcher >
1. Click the ME button for the ME
that you want to perform the
event on.
2. Click Reset Params.
Select the rotation for the pattern mask
for the selected ME.
1. Click the ME button for the ME
that you want to perform the
event on.
2. Click the Parameter button and
select Rotation.
3. Click the Change Type button
and select whether you want to
set (Absolute) or reset (Reset)
the parameter. Some selections
will not be available when you
reset the parameter.
Mask (Pattern) —
Size
Mask (Pattern) —
Vertical
Multiplication
Mask (Pattern) —
X-Position
Mask (Pattern) —
Y-Position
Switcher >
Keyer >
Pattern Mask
Param
Switcher >
Keyer >
Pattern Mask
Param
Switcher >
Keyer >
Pattern Mask
Param
Switcher >
Keyer >
Pattern Mask
Param
DescriptionLocationEvent
4. Enter a rotation in the Value (%)
field.
Select the size of the pattern mask for
the selected ME.
1. Click the ME button for the ME
that you want to perform the
event on.
2. Click the Parameter button and
select Size.
3. Click the Change Type button
and select whether you want to
set (Absolute) or reset (Reset)
the parameter. Some selections
will not be available when you
reset the parameter.
4. Enter a new size in the Value
(%) field.
Select the number of times you want
to multiply the pattern mask vertically
for the selected ME.
1. Click the ME button for the ME
that you want to perform the
event on.
2. Click the Parameter button and
select Vertical Mult.
3. Click the Change Type button
and select whether you want to
set (Absolute) or reset (Reset)
the parameter. Some selections
will not be available when you
reset the parameter.
4. Enter the number of times the
pattern is multiplied in the Value
field.
Select the x-axis position of the pattern
mask for the selected ME.
1. Click the ME button for the ME
that you want to perform the
event on.
2. Click the Parameter button and
select X-Pos.
3. Click the Change Type button
and select whether you want to
set (Absolute) or reset (Reset)
the parameter. Some selections
will not be available when you
reset the parameter.
4. Enter a new position in the
Value (%) field.
Select the y-axis position for the
pattern mask for the selected ME.
1. Click the ME button for the ME
that you want to perform the
event on.
2. Click the Parameter button and
select Y-Pos.
3. Click the Change Type button
and select whether you want to
set (Absolute) or reset (Reset)
the parameter. Some selections
will not be available when you
reset the parameter.
4. Enter a new position in the
Value (%) field.
60 • Custom Controls — Carbonite Black Solo Operation Manual (v1.2)
Page 61

Mask
Matte Color, Reset
Matte Color (HSL)
Matte Color
(Preset)
ME Copy
Media Cut Point,
Set
Switcher >
Keyer > Mask
Type
Switcher >
Matte > Matte
Color Reset
Switcher >
Matte > Matte
Color (HSL)
Switcher >
Matte > Matte
Color (Preset)
Switcher > ME
Copy
Switcher >
Transition >
ME Trans
DescriptionLocationEvent
Apply a mask to the selected key for
the selected ME.
1. Click the ME button for the ME
that you want to perform the
event on.
2. Click the Keyer button for the
key you want to perform the
event on.
3. Click a Mask Type button to
apply a pattern mask (Pattern),
box mask (Box, or turn the mask
off (Off).
Reset the matte color for the selected
ME or aux.
1. Click the ME/Matte button for the
ME or aux that you want to
perform the event on.
2. For an ME, click the Matte
button and select Matte.
Select the custom matte color for the
selected ME or aux. Each component
of the HSL color must be inserted
individually.
1. Click the ME/Matte button for the
ME or aux that you want to
perform the event on.
2. Click the Matte button and select
Matte.
3. Click the Change Type button
and select whether you want to
set (Absolute) or reset (Reset)
the parameter. Some selections
will not be available when you
reset the parameter.
4. Click the Component button and
select the HSL component you
want to assign a value to. A
value should be applied to all
three components.
5. Enter a value for the selected
component in the Value (%)
field.
Select a preset matte color for the
selected ME or aux.
1. Click the ME/Matte button for the
ME or aux that you want to
perform the event on.
2. Click the Matte button and select
Matte.
3. Click the Color button and select
the color you want to use.
Copy the contents of one ME,
MiniME™, MultiScreen, or aux to
another.
1. Click the Target ME button and
select the location that you want
to copy to.
2. Click the Source ME button and
select the location that you want
to copy from.
Sets the cut point for a MediaWipe
transition for the selected ME,
MiniME™, or MultiScreen. You must
select the point in the transition that
Media-Store —
Auto Play
Media-Store —
Capture Alpha
Media-Store —
Capture
Media-Store —
Capture Mode
Switcher >
MediaStore >
Attributes
Switcher >
MediaStore >
Capture Alpha
Switcher >
MediaStore >
Capture
Switcher >
MediaStore >
Capture
Display
DescriptionLocationEvent
you want to place the cut before
running this event.
1. Click the ME button and select
the ME, MiniME™, or
MultiScreen that you want to
perform the event on.
2. Click the Action button and
select Set Media Cut.
Select whether an animation plays
automatically when taken on-air for the
selected Media-Store channel.
1. Click the MediaStore Channel
button for the Media-Store
channel you want to perform the
event on.
2. Click the Change Type button
and select whether you want to
set (Absolute) or reset (Reset)
the parameter. Some selections
will not be available when you
reset the parameter.
3. Click the Parameter button and
select Auto Play.
4. Click the Value button and select
whether the animation plays
automatically (On) or not (Off).
Select whether to include the alpha
with a capture on the selected
Media-Store channel.
1. Click the MediaStore Channel
button for the Media-Store
channel you want to perform the
event on.
2. Click the Change Type button
and select whether you want to
set (Absolute) or reset (Reset)
the parameter. Some selections
will not be available when you
reset the parameter.
3. Click the Enable button and
select whether the alpha is
captured with the source (On) or
not (Off).
Capture a still to the selected
Media-Store channel.
1. Click the MediaStore Channel
button for the Media-Store
channel you want to perform the
event on.
2. Enter the number you want to
assign to the capture file in the
Capture File field.
Select the capture mode for the
selected Media-Store channel.
1. Click the MediaStore Channel
button for the Media-Store
channel you want to perform the
event on.
2. Click a Capture Display button
to select whether the capture is
in electronic-to-electronic "E/E"
(End to End) or playback "P/B"
(Playback) mode.
Carbonite Black Solo Operation Manual (v1.2) — Custom Controls • 61
Page 62

Media-Store —
Capture Source
Media-Store —
Clear Channel
Media-Store — Cut
Frame
Media-Store —
Delete Capture
Media-Store Load
Media-Store —
Looping
Switcher >
MediaStore >
Media Capture
Source
Switcher >
MediaStore >
Channel
Action
Switcher >
MediaStore >
Attributes
MediaStore >
Delete Media
Capture
Switcher >
MediaStore >
Load
Switcher >
MediaStore >
Attributes
DescriptionLocationEvent
Select the video source you want to
capture for the selected Media-Store
channel.
1. Click the MediaStore Channel
button for the Media-Store
channel you want to perform the
event on.
2. Click Source and select the
video source that you want to
capture.
Clear the selected Media-Store
channel.
1. Click the MediaStore Channel
button for the Media-Store
channel you want to perform the
event on.
2. Click Clear Channel.
Select the point, in frames, from the
start of the animation that the
MediaWipe background cut occurs for
the selected Media-Store channel.
1. Click the MediaStore Channel
button for the Media-Store
channel you want to perform the
event on.
2. Click the Change Type button
and select whether you want to
set (Absolute) or reset (Reset)
the parameter. Some selections
will not be available when you
reset the parameter.
3. Click the Parameter button and
select Cut Frame.
4. Enter the frame in the animation
that you want to cut to occur for
the MediaWipe in the Value
field.
Delete a captured still.Switcher >
1. Enter the number of the capture
file you want to delete in the
Capture File field.
Load a media item into the selected
Media-Store channel.
1. Click the MediaStore Channel
button for the Media-Store
channel you want to perform the
event on.
2. Click the Location button to
select whether the media item
you want to load is located on
the internal storage (Internal) or
on the USB (USB).
3. Enter the number of the media
item you want to load in the
Media Number field.
Select whether an animation will loop
at the end for the selected Media-Store
channel.
1. Click the MediaStore Channel
button for the Media-Store
channel you want to perform the
event on.
2. Click the Change Type button
and select whether you want to
set (Absolute) or reset (Reset)
Media-Store —
Move To Frame
Media-Store —
Mute
Media-Store —
Play
Media-Store —
Play Speed
Switcher >
MediaStore >
Attributes
Switcher >
MediaStore >
Attributes
Switcher >
MediaStore >
Channel
Action
Switcher >
MediaStore >
Playback
Speed
DescriptionLocationEvent
the parameter. Some selections
will not be available when you
reset the parameter.
3. Click the Parameter button and
select Looping.
4. Click the Value button and select
whether the animation loops at
the end (On) or not (Off).
Move to a specific frame in the media
item for the selected Media-Store
channel.
1. Click the MediaStore Channel
button for the Media-Store
channel you want to perform the
event on.
2. Click the Change Type button
and select whether you want to
set (Absolute) or reset (Reset)
the parameter. Some selections
will not be available when you
reset the parameter.
3. Click the Parameter button and
select Move To Frame.
4. Enter the frame that you want to
jump to in the media item in the
Value field.
Select whether the associated audio
is turned on or off during playback for
the selected Media-Store channel.
1. Click the MediaStore Channel
button for the Media-Store
channel you want to perform the
event on.
2. Click the Change Type button
and select whether you want to
set (Absolute) or reset (Reset)
the parameter. Some selections
will not be available when you
reset the parameter.
3. Click the Parameter button and
select Mute.
4. Click the Value button and select
whether the audio plays (On) or
not (Off).
Start an animation playing for the
selected Media-Store channel.
1. Click the MediaStore Channel
button for the Media-Store
channel you want to perform the
event on.
2. Click Toggle Play.
Select the speed for an animation to
play at on the selected Media-Store
channel.
1. Click the MediaStore Channel
button for the Media-Store
channel you want to perform the
event on.
2. Click the Change Type button
and select whether you want to
set (Absolute) or reset (Reset)
the parameter. Some selections
will not be available when you
reset the parameter.
3. Click the Parameter button and
select Playback Speed.
62 • Custom Controls — Carbonite Black Solo Operation Manual (v1.2)
Page 63

Media-Store —
Reset Media
Media-Store —
Reverse
Media-Store —
Rewind
Media-Store —
Shaped
Media-Store —
Trigger GPI Output
Switcher >
MediaStore >
Channel
Action
Switcher >
MediaStore >
Attributes
Switcher >
MediaStore >
Channel
Action
Switcher >
MediaStore >
Attributes
Switcher >
MediaStore >
Attributes
DescriptionLocationEvent
4. Enter the speed, faster or slower
than 100%, that you want the
animation to play at in the Value
(%) field.
Reset the selected Media-Store
channel.
1. Click the MediaStore Channel
button for the Media-Store
channel you want to perform the
event on.
2. Click Reset Media.
Select whether an animation plays in
reverse for the selected Media-Store
channel.
1. Click the MediaStore Channel
button for the Media-Store
channel you want to perform the
event on.
2. Click the Change Type button
and select whether you want to
set (Absolute) or reset (Reset)
the parameter. Some selections
will not be available when you
reset the parameter.
3. Click the Parameter button and
select Reverse.
4. Click the Value button and select
whether the animation plays in
reverse (On) or not (Off).
Rewind an animation to the first frame
for the selected Media-Store channel.
1. Click the MediaStore Channel
button for the Media-Store
channel you want to perform the
event on.
2. Click Move to Frame 1.
Select whether the alpha of the media
item should be shaped or ushaped for
the selected Media-Store channel.
1. Click the MediaStore Channel
button for the Media-Store
channel you want to perform the
event on.
2. Click the Change Type button
and select whether you want to
set (Absolute) or reset (Reset)
the parameter. Some selections
will not be available when you
reset the parameter.
3. Click the Parameter button and
select Shaped.
4. Click the Value button and select
whether the alpha of the media
item is shaped (On) or not (Off).
Select the GPI output that you want to
trigger with a MediaWipe for the
selected Media-Store channel.
1. Click the MediaStore Channel
button for the Media-Store
channel you want to perform the
event on.
2. Click the Change Type button
and select whether you want to
set (Absolute) or reset (Reset)
the parameter. Some selections
DescriptionLocationEvent
will not be available when you
reset the parameter.
3. Click the Parameter button and
select GPO.
4. Enter the GPI output that you
want to trigger with the
MediaWipe in the Value field.
Media-Store —
Trigger GPI Output
Delay triggered for the selected Media-Store
Media-Store —
X-Position
Media-Store —
Y-Position
MediaWipe —
Channel
Switcher >
MediaStore >
Attributes
Switcher >
MediaStore >
Attributes
Switcher >
MediaStore >
Attributes
Switcher >
Transition >
Media Wipe
Channel
Select the time from the start of the
MediaWipe that the GPI output is
channel.
1. Click the MediaStore Channel
button for the Media-Store
channel you want to perform the
event on.
2. Click the Change Type button
and select whether you want to
set (Absolute) or reset (Reset)
the parameter. Some selections
will not be available when you
reset the parameter.
3. Click the Parameter button and
select GPO Frame.
4. Enter the delay, in frames, for
the GPI output to be triggered in
the Value (fr) field.
Select the x-axis position for the media
item for the selected Media-Store
channel.
1. Click the MediaStore Channel
button for the Media-Store
channel you want to perform the
event on.
2. Click the Change Type button
and select whether you want to
set (Absolute) or reset (Reset)
the parameter. Some selections
will not be available when you
reset the parameter.
3. Click the Parameter button and
select X-Pos.
4. Enter a new position in the
Value field.
Select the y-axis position for the media
item for the selected Media-Store
channel.
1. Click the MediaStore Channel
button for the Media-Store
channel you want to perform the
event on.
2. Click the Change Type button
and select whether you want to
set (Absolute) or reset (Reset)
the parameter. Some selections
will not be available when you
reset the parameter.
3. Click the Parameter button and
select Y-Pos.
4. Enter a new position in the
Value field.
Select which Media-Store channel will
be used for the MediaWipe transition
of the selected ME.
1. Click the ME button for the ME
that you want to perform the
event on.
Carbonite Black Solo Operation Manual (v1.2) — Custom Controls • 63
Page 64

MediaWipe —
Direction, Flip-Flop
MediaWipe —
Direction
Memory Recall
ME Trans Rate
Switcher >
Transition >
Media Wipe
Direction
Switcher >
Transition >
Media Wipe
Direction
Switcher >
Memory Recall
Switcher >
Transition >
ME Trans Rate
DescriptionLocationEvent
2. Click M1 or M2 to assign that
Media-Store channel to the
MediaWipe.
Select whether the MediaWipe
reverses direction for every second
transition of the selected ME.
1. Click the ME button for the ME
that you want to perform the
event on.
2. Click the Change Type button
and select whether you want to
set (Absolute) or reset (Reset)
the parameter. Some selections
will not be available when you
reset the parameter.
3. Click Flip-Flip.
4. Click the Value button and select
whether Flip-Flop is on (On) or
not (Off).
Select the direction for the MediaWipe
transition of the selected ME.
1. Click the ME button for the ME
that you want to perform the
event on.
2. Click the Change Type button
and select whether you want to
set (Absolute) or reset (Reset)
the parameter. Some selections
will not be available when you
reset the parameter.
3. Click Direction.
4. Click the Value button and select
whether the MediaWipe moves
in a forward (Forward) or
reverse (Reverse) direction.
Recall a memory for the selected ME,
MiniME™, or MultiScreen.
1. Click the Include button and
select all the locations that you
want to perform the memory
recall on.
2. Click the Bank button and select
the bank that you want to recall
the memory on.
3. Click the Memory button and
select the memory that you want
to recall.
Set or reset the background transition
rate of the selected ME, MiniME™, or
MultiScreen.
1. Click the ME button and select
the ME, MiniME™, or
MultiScreen that you want to
perform the event on.
2. Click the Change Type button
and select whether you want to
set (Absolute) or reset (Reset)
the parameter. Some selections
will not be available when you
reset the parameter.
3. Enter a new transition rate, in
frames, in the Value (fr) field.
ME Trans Type
MultiScreen —
Edge Blending
MultiScreen —
Edge Distance
MultiScreen —
Edge Gamma
Switcher >
Transition >
ME Trans Type
Switcher
Installation >
MultiScreen >
Edge
Properties
Switcher
Installation >
MultiScreen >
Edge
Parameters
Switcher
Installation >
MultiScreen >
Edge
Parameters
DescriptionLocationEvent
Select the transition type for a
background transition of the selected
ME, MiniME™, or MultiScreen.
1. Click the ME button and select
the ME, MiniME™, or
MultiScreen that you want to
perform the event on.
2. Click the Type button for the
type of transition you want to
use.
Select whether edge blending is
applied to the edges of the overlapping
edges for the selected MultiScreen.
1. Click the ME button for the
MultiScreen that you want to
perform the event on.
2. Click the Parameter button and
select Blending.
3. Click the Change Type button
and select whether you want to
set (Absolute) or reset (Reset)
the parameter. Some selections
will not be available when you
reset the parameter.
4. Click the Edge button and select
the edge that you want to adjust.
5. Click the Value button and select
whether blending is applied edge
(On) or not (Off).
Select the distance between screens
for the selected MultiScreen.
1. Click the ME button for the
MultiScreen that you want to
perform the event on.
2. Click the Parameter button and
select Distance.
3. Click the Change Type button
and select whether you want to
set (Absolute) or reset (Reset)
the parameter. Some selections
will not be available when you
reset the parameter.
4. Click the Edge button and select
the edge that you want to adjust.
5. Enter the distance between the
screens on the selected edge in
the Value (%) field.
Select the amount of gamma
correction applied to the overlapping
edges for the selected MultiScreen.
1. Click the ME button for the
MultiScreen that you want to
perform the event on.
2. Click the Parameter button and
select Gamma.
3. Click the Change Type button
and select whether you want to
set (Absolute) or reset (Reset)
the parameter. Some selections
will not be available when you
reset the parameter.
4. Click the Edge button and select
the edge that you want to adjust.
5. Enter the amount of gamma
correction in the Value (%) field.
64 • Custom Controls — Carbonite Black Solo Operation Manual (v1.2)
Page 65

MultiScreen —
Edge Smoothness
MultiScreen —
Layout
MultiScreen —
Offset
MultiViewer Box —
Aspect Ratio
Markers
MultiViewer Box —
Border
Switcher
Installation >
MultiScreen >
Edge
Parameters
Switcher
Installation >
MultiScreen >
Layout
Switcher
Installation >
MultiScreen >
Offset
MultiViewer >
Box > MV Box
Aspect Ratio
MultiViewer >
Box > MV Box
Border Mode
DescriptionLocationEvent
Select the amount of smoothing
applied to the overlapping edges for
the selected MultiScreen.
1. Click the ME button for the
MultiScreen that you want to
perform the event on.
2. Click the Parameter button and
select Smoothness.
3. Click the Change Type button
and select whether you want to
set (Absolute) or reset (Reset)
the parameter. Some selections
will not be available when you
reset the parameter.
4. Click the Edge button and select
the edge that you want to adjust.
5. Enter the amount of smoothing
in the Value (%) field.
Select a layout for the selected
MultiScreen.
1. Click the ME button for the
MultiScreen that you want to
perform the event on.
2. Click the Layout button and
select the layout you want to
use.
Select the placement of the
background scaling for the selected
MultiScreen.
1. Click the ME button for the
MultiScreen that you want to
perform the event on.
2. Click the Parameter button and
select Offset.
3. Click the Change Type button
and select whether you want to
set (Absolute) or reset (Reset)
the parameter. Some selections
will not be available when you
reset the parameter.
4. Enter the amount of offset in the
Value (%) field.
Select whether aspect ratio markers
are shown for the selected box on the
selected MultiViewer.
1. Click a MultiViewer button to
select which MultiViewer you
want that you want to perform
the event on.
2. Click the Box button and select
the box that you want perform
the event on.
3. Click the Change Type button
and select whether you want to
set (Absolute) or reset (Reset)
the parameter. Some selections
will not be available when you
reset the parameter.
4. Click a Value button and select
whether aspect ratio markers are
shown (On) or not (Off).
Select the type of border you want to
apply to the selected box on the
selected MultiViewer.
1. Click a MultiViewer button to
select which MultiViewer you
MultiViewer Box —
Green Tally
(Preview)
MultiViewer Box —
Label
MultiViewer Box —
Label Mode
MultiViewer >
Box > MV Box
Preview Tally
MultiViewer >
Box > MV Box
Label
MultiViewer >
Box > MV Box
Label Mode
DescriptionLocationEvent
want that you want to perform
the event on.
2. Click the Box button and select
the box that you want perform
the event on.
3. Click a Border Mode button and
select whether the border around
the selected box is white
(White), black (Black), or if there
is no border (Off).
Select whether a green (preview) tally
is shown for the selected box on the
selected MultiViewer.
1. Click a MultiViewer button to
select which MultiViewer you
want that you want to perform
the event on.
2. Click the Box button and select
the box that you want perform
the event on.
3. Click the Change Type button
and select whether you want to
set (Absolute) or reset (Reset)
the parameter. Some selections
will not be available when you
reset the parameter.
4. Click a Value button and select
whether a green tally is shown
on the selected box (On) or not
(Off).
Select whether the source label is on
or off for the selected box on the
selected MultiViewer.
1. Click a MultiViewer button to
select which MultiViewer you
want that you want to perform
the event on.
2. Click the Box button and select
the box that you want perform
the event on.
3. Click the Change Type button
and select whether you want to
set (Absolute) or reset (Reset)
the parameter. Some selections
will not be available when you
reset the parameter.
4. Click a Value button and select
whether the label on the selected
box is on (On) or not (Off).
Select what source name is shown on
the label for the selected box on the
selected MultiViewer. This event only
applies to the Carbonite eXtreme.
1. Click a MultiViewer button to
select which MultiViewer you
want that you want to perform
the event on.
2. Click the Box button and select
the box that you want perform
the event on.
3. Click the Change Type button
and select whether you want to
set (Absolute) or reset (Reset)
the parameter. Some selections
will not be available when you
reset the parameter.
4. Click a Label Mode button and
select whether the name comes
Carbonite Black Solo Operation Manual (v1.2) — Custom Controls • 65
Page 66

DescriptionLocationEvent
from the switcher (Switcher), the
router (Router), or both are
shown (Both).
MultiViewer Box —
Label Position
MultiViewer Box —
Label
Transparency
MultiViewer Box —
MultiScreen
Markers selected MultiViewer. The overlay
MultiViewer >
Box > MV Box
Label Position
MultiViewer >
MV Label
Transp
MultiViewer >
Box > MV Box
MultiScreen
Marker
Select the position of the source label
for the selected box on the selected
MultiViewer.
1. Click a MultiViewer button to
select which MultiViewer you
want that you want to perform
the event on.
2. Click the Box button and select
the box that you want perform
the event on.
3. Click the Change Type button
and select whether you want to
set (Absolute) or reset (Reset)
the parameter. Some selections
will not be available when you
reset the parameter.
4. Click a Value button and select
whether the label on the selected
box is at the top (Top) or bottom
(Bottom).
Select transparency for the
background behind the source labels
on the selected MultiViewer.
1. Click a MultiViewer button to
select which MultiViewer you
want that you want to perform
the event on.
2. Click the Change Type button
and select whether you want to
set (Absolute) or reset (Reset)
the parameter. Some selections
will not be available when you
reset the parameter.
3. Enter the amount of
transparency in the Value (%)
field.
Select whether the MultiScreen overlay
is shown for the selected box on the
shows what portions of the image are
cropped out to fit into the output of the
MultiScreen.
1. Click a MultiViewer button to
select which MultiViewer you
want that you want to perform
the event on.
2. Click the Box button and select
the box that you want perform
the event on.
3. Click the ME button and select
the MultiScreen you want to
view.
4. Click the Change Type button
and select whether you want to
set (Absolute) or reset (Reset)
the parameter. Some selections
will not be available when you
reset the parameter.
5. Click a Value button and select
whether the overlay is shown
(On) or not (Off).
MultiViewer Box —
Red Tally (On-Air)
MultiViewer Box —
Video Source
MultiViewer — Clip
MultiViewer Clock
— Background
Color (Preset)
MultiViewer Clock
— Foreground
Color (HSL)
MultiViewer >
Box > MV Box
On-Air Tally
MultiViewer >
Box > MV Box
Source
MultiViewer >
MV Keyer Clip
MultiViewer >
Clock > MV
Clock (Preset
Color)
MultiViewer >
Clock > MV
Clock (HSL
Color)
DescriptionLocationEvent
Select whether a red (on-air) tally is
shown for the selected box on the
selected MultiViewer.
1. Click a MultiViewer button to
select which MultiViewer you
want that you want to perform
the event on.
2. Click the Box button and select
the box that you want perform
the event on.
3. Click the Change Type button
and select whether you want to
set (Absolute) or reset (Reset)
the parameter. Some selections
will not be available when you
reset the parameter.
4. Click a Value button and select
whether a red tally is shown on
the selected box (On) or not
(Off).
Assign a source to one of the boxes
on the selected MultiViewer.
1. Click a MultiViewer button to
select which MultiViewer you
want that you want to perform
the event on.
2. Click the Box button and select
the box that you want perform
the event on.
3. Click the Value button and select
the source that you want to
assign to the box.
Select the amount of clipping to be
applied to the overlay source on the
selected MultiViewer.
1. Click a MultiViewer button to
select which MultiViewer you
want that you want to perform
the event on.
2. Click the Change Type button
and select whether you want to
set (Absolute) or reset (Reset)
the parameter. Some selections
will not be available when you
reset the parameter.
3. Enter the amount of clipping to
be applied in the Value field.
Select a preset color for the
background of the clock on the
selected MultiViewer.
1. Click a MultiViewer button to
select which MultiViewer you
want that you want to perform
the event on.
2. Click Background.
3. Click the Color button and select
the color you want to use.
Select the custom color for the lettering
of the clock on the selected
MultiViewer.
1. Click a MultiViewer button to
select which MultiViewer you
want that you want to perform
the event on.
2. Click the Clock Area button and
select Foreground.
66 • Custom Controls — Carbonite Black Solo Operation Manual (v1.2)
Page 67

MultiViewer Clock
— Foreground
Color (Preset)
MultiViewer Clock
— Format
MultiViewer Clock
— Mode
MultiViewer Clock
— Size
MultiViewer Clock
— Timecode Frame
Count
MultiViewer >
Clock > MV
Clock (Preset
Color)
MultiViewer >
Clock > MV
Clock Format
MultiViewer >
Clock > MV
Clock Mode
MultiViewer >
Clock > MV
Clock Param
MultiViewer >
Clock > MV
Clock Frame
Count
DescriptionLocationEvent
3. Click the Change Type button
and select whether you want to
set (Absolute) or reset (Reset)
the parameter. Some selections
will not be available when you
reset the parameter.
4. Click the Component button and
select the HSL component you
want to assign a value to. A
value should be applied to all
three components.
5. Enter a value for the selected
component in the Value (%)
field.
Select a preset color for the lettering
of the clock on the selected
MultiViewer.
1. Click a MultiViewer button to
select which MultiViewer you
want that you want to perform
the event on.
2. Click Foreground.
3. Click the Color button and select
the color you want to use.
Select the hour format for the clock on
the selected MultiViewer.
1. Click a MultiViewer button to
select which MultiViewer you
want that you want to perform
the event on.
2. Click a Value button and select
whether the clock shows 24-hour
(24-Hours), 12-hour with am/pm
(12-Hour AM/PM), or simple
12-hour (12-Hour) clock.
Select whether the clock shows
timecode or system time on the
selected MultiViewer.
1. Click a MultiViewer button to
select which MultiViewer you
want that you want to perform
the event on.
2. Click a Clock Mode button and
select whether the clock shows
timecode (Timecode), system
time (System), or is off (Off).
Select the size of the cock on the
selected MultiViewer.
1. Click a MultiViewer button to
select which MultiViewer you
want that you want to perform
the event on.
2. Click Clock Size.
3. Click the Change Type button
and select whether you want to
set (Absolute) or reset (Reset)
the parameter. Some selections
will not be available when you
reset the parameter.
4. Enter the size of the clock in the
Value (%) field.
Select whether number of frames for
a timecode are shown on the selected
MultiViewer.
1. Click a MultiViewer button to
select which MultiViewer you
MultiViewer Clock
— X-Position
MultiViewer
MultiViewer —
FSFC Label
MultiViewer >
Clock > MV
Clock Param
MultiViewer >
Clock > MV
Clock (HSL
Color)
MultiViewer >
MV FSFC Label
DescriptionLocationEvent
want that you want to perform
the event on.
2. Click the Change Type button
and select whether you want to
set (Absolute) or reset (Reset)
the parameter. Some selections
will not be available when you
reset the parameter.
3. Click a Value button and select
whether the frame count is
shown (On) or not (Off).
Select the horizontal position of the
cock on the selected MultiViewer.
1. Click a MultiViewer button to
select which MultiViewer you
want that you want to perform
the event on.
2. Click Clock X-Pos.
3. Click the Change Type button
and select whether you want to
set (Absolute) or reset (Reset)
the parameter. Some selections
will not be available when you
reset the parameter.
4. Enter the horizontal position of
the clock in the Value (%) field.
Select the custom color for the
background of the clock on the
selected MultiViewer.
1. Click a MultiViewer button to
select which MultiViewer you
want that you want to perform
the event on.
2. Click the Clock Area button and
select Background.
3. Click the Change Type button
and select whether you want to
set (Absolute) or reset (Reset)
the parameter. Some selections
will not be available when you
reset the parameter.
4. Click the Component button and
select the HSL component you
want to assign a value to. A
value should be applied to all
three components.
5. Enter a value for the selected
component in the Value (%)
field.
Select whether FSFC is shown on the
label on the selected MultiViewer when
a source has an FSFC applies to it.
1. Click a MultiViewer button to
select which MultiViewer you
want that you want to perform
the event on.
2. Click the Change Type button
and select whether you want to
set (Absolute) or reset (Reset)
the parameter. Some selections
will not be available when you
reset the parameter.
3. Click a Value button to select
whether FSFC is shown on the
label (On) or not (Off).
Carbonite Black Solo Operation Manual (v1.2) — Custom Controls • 67
Page 68

MultiViewer —
Layout
MultiViewer —
Outputs
MultiViewer —
Tally Display
Output BNC
Assignment
PBus — Recall
MultiViewer >
MV Layout
Switcher
Installation >
Output Mode
MultiViewer >
MV Tally
Display
Switcher
Installation >
Output
Assignment
Devices >
PBus
DescriptionLocationEvent
Select a layout for the selected
MultiViewer.
1. Click a MultiViewer button to
select which MultiViewer you
want that you want to perform
the event on.
2. Click the Layout button and
select the layout you want to
use.
Select which outputs the MultiViewer
is available on. This feature is only
available when the switcher is
operating in a standard-definition or
3G video mode.
1. Click an Outputs button to
select which pair of output BNCs
you want to assign to as
MultiViewer outputs.
2. Click a Lock MultiViewers
button to assign the selected
output BNCs as MultiViewer
outputs (On) or not (Off).
Select how the tallies are shown on
the selected MultiViewer.
1. Click a MultiViewer button to
select which MultiViewer you
want that you want to perform
the event on.
2. Click a Tally Display button to
select whether tallies are shown
as a border around the box
(Box), as boxes on either side
of the label (Label), or as boxes
on either side of the label but
swapped (Label Reverse).
Assign a source to the selected output
BNC.
1. Click the Output button and
select the output BNC that you
want to assign a source to.
2. Click the Source button and
select the source that you want
to assign to the selected output
BNC.
Insert a pause into the custom control.Special > HoldPause CC
1. Enter the length of the pause in
the Pause (fr) field.
Recall a register on the selected PBus
device.
1. Click PBus Recall Register.
2. Click the PBus button and select
the device you want to send the
command to.
3. Click the Device button and
select the channel you want to
send the command to.
4. Click the Change Type button
and select whether you want to
set (Absolute) or reset (Reset)
the parameter. Some selections
will not be available when you
reset the parameter.
5. Enter number of the register you
want to recall in the Register
field.
PBus — Trigger
Personality — Auto
Remove Key
Personality — Auto
Trans Second
Press (Key)
Personality — Auto
Trans Second
Press (ME)
DescriptionLocationEvent
Devices >
PBus
Switcher
Personality >
Key has been transitioned off-air using the
Switcher
Personality >
Key Auto
Trans 2nd
Press
Switcher
Personality >
ME Auto Trans
2nd Press
Trigger a function on the selected
PBus device.
1. Click PBus Trigger Function.
2. Click the PBus button and select
the device you want to send the
command to.
3. Click the Device button and
select the channel you want to
send the command to.
4. Click the Change Type button
and select whether you want to
set (Absolute) or reset (Reset)
the parameter. Some selections
will not be available when you
reset the parameter.
5. Enter the number of the function
you want to trigger in the
Function field.
Have a key removed from the Next
Transition area, so that it is not
included in the next transition, after itAuto Remove
KEY X CUT or KEY X AUTO buttons.
1. Click the Change Type button
and select whether you want to
set (Absolute) or reset (Reset)
the parameter. Some selections
will not be available when you
reset the parameter.
2. Click the Value button and select
whether the personality option is
on (On) or not (Off).
Select how the switcher reacts when
the KEY AUTO button is pressed
during a transition.
1. Click the Second Auto button
and select how the switcher
reacts to pressing the button
during a transition.
• Ignore — the buttons are
ignored during the transition
• Halt Forward — halt the
transition and move forward
through the transition when
pressed again
• Halt Reverse — halt the
transition and move
backwards through the
transition when pressed
again
• Reverse — reverse the
transition immediately
• Cut — cut the transition to
the end
Select how the switcher reacts when
the AUTO TRANS button is pressed
during a transition.
1. Click the Second Auto button
and select how the switcher
reacts to pressing the button
during a transition.
• Ignore — the buttons are
ignored during the transition
• Halt Forward — halt the
transition and move forward
through the transition when
pressed again
68 • Custom Controls — Carbonite Black Solo Operation Manual (v1.2)
Page 69

Personality — Next
Trans Reset
Personality — Roll
Clip
Play CC
Reference Source
Reset
Resume CC
Robotic Camera —
Halt All
Switcher
Personality >
Auto Reset
Trans
Switcher
Personality >
Roll Clip Force
CC
Switcher
Installation >
Reference >
Video
Reference
Switcher >
Transition >
ME Trans
Resume CC
Devices >
Camera
DescriptionLocationEvent
• Halt Reverse — halt the
transition and move
backwards through the
transition when pressed
again
• Reverse — reverse the
transition immediately
• Cut — cut the transition to
the end
Have the transition area reset to a
default background dissolve after each
transition.
1. Click the Change Type button
and select whether you want to
set (Absolute) or reset (Reset)
the parameter. Some selections
will not be available when you
reset the parameter.
2. Click the Value button and select
whether the personality option is
on (On) or not (Off).
Select whether the Roll Clip
functionality is always on.
1. Click a Value button to select
whether Roll Clip is always on
(Force) or must be turned on
manually (User).
Play a custom control.Special > Play
1. Click the Bank button and select
the custom control bank you
want to play a custom control on.
2. Click the CC button and select
the custom control you want to
play.
Select the reference source for the
switcher.
1. Click a Reference Source
button to select whether to use
an internal (Internal) or external
(External) reference source.
Resets the transition area of the
selected ME, MiniME™, or
MultiScreen.
1. Click the ME button and select
the ME, MiniME™, or
MultiScreen that you want to
perform the event on.
2. Click the Action button and
select Reset.
Resume a custom control at hold.Special >
1. Click the Bank button and select
the custom control bank you
want to resume a custom control
on.
2. Click the CC button and select
the custom control you want to
resume.
Send the halt command to the selected
camera.
1. Click Camera Halt All.
2. Click the Camera button and
select the device you want to
send the command to.
Robotic Camera —
Recall Shot
Robotic Camera —
Recall Shot Fast
Robotic Camera —
Store Shot
Roll Clip
RossTalk CC
Devices >
Camera
Devices >
Camera
Camera
Switcher >
Transition >
Roll Clip
Devices >
RossTalk
DescriptionLocationEvent
Recall a shot on the selected camera
at the rate/speed set in the shot.
1. Click Recall Shot.
2. Click the Camera button and
select the device you want to
send the command to.
3. Click the Channel button and
select the channel you want to
send the command to.
4. Click the Change Type button
and select whether you want to
set (Absolute) or reset (Reset)
the parameter. Some selections
will not be available when you
reset the parameter.
5. Enter the shot number you want
to recall from in the Shot field.
Recall a shot on the selected camera
as quickly as possible.
1. Click Recall Shot (Fast).
2. Click the Camera button and
select the device you want to
send the command to.
3. Click the Channel button and
select the channel you want to
send the command to.
4. Click the Change Type button
and select whether you want to
set (Absolute) or reset (Reset)
the parameter. Some selections
will not be available when you
reset the parameter.
5. Enter the shot number you want
to recall from in the Shot field.
Store a shot on the selected camera.Devices >
1. Click Store Shot.
2. Click the Camera button and
select the device you want to
send the command to.
3. Click the Channel button and
select the channel you want to
send the command to.
4. Click the Change Type button
and select whether you want to
set (Absolute) or reset (Reset)
the parameter. Some selections
will not be available when you
reset the parameter.
5. Enter the shot number you want
to store to in the Shot field.
Turn the Roll Clip feature on or off for
the selected ME, MiniME™, or
MultiScreen.
1. Click the ME button and select
the ME, MiniME™, or
MultiScreen that you want to
perform the event on.
2. Click the Value button and select
whether roll clip is on (On) or not
(Off).
Send the simulated custom control to
the selected device.
1. Click CC.
2. Click the RossTalk Device
button and select the device you
Carbonite Black Solo Operation Manual (v1.2) — Custom Controls • 69
Page 70

RossTalk Clear
RossTalk — Cue
(item +
framebuffer)
RossTalk — Cue
(item + framebuffer
+ layer)
RossTalk — Cue
Current
RossTalk — Focus
Devices >
RossTalk
Devices >
RossTalk
Devices >
RossTalk
Devices >
RossTalk
Devices >
RossTalk
DescriptionLocationEvent
want to send the RossTalk
command to.
3. Enter the bank of the custom
control in the Bank field.
4. Enter the number of the custom
control in the Custom field.
Send the Clear Framebuffer command
for a framebuffer and layer to the
selected device.
1. Click Clear Channel.
2. Click the RossTalk Device
button and select the device you
want to send the RossTalk
command to.
3. Enter the framebuffer that you
want to clear in the Channel
field.
4. Enter the layer that you want to
clear in the Layer field.
Send the Cue command for a specific
item and framebuffer to the selected
device.
1. Click Cue (2).
2. Click the RossTalk Device
button and select the device you
want to send the RossTalk
command to.
3. Enter the take item id of the item
you want to cue in the Take ID
field.
4. Enter the framebuffer that you
want to cue the item on in the
Channel field.
Send the Cue command for a specific
item and location to the selected
device.
1. Click Cue (3).
2. Click the RossTalk Device
button and select the device you
want to send the RossTalk
command to.
3. Enter the take item id of the item
you want to cue in the Take ID
field.
4. Enter the framebuffer that you
want to cue the item on in the
Channel field.
5. Enter the layer that you want to
cue the item on in the Layer
field.
Send the Cue command to the
selected device.
1. Click Cue.
2. Click the RossTalk Device
button and select the device you
want to send the RossTalk
command to.
Send the Focus command for a
specific item to the selected device.
1. Click Focus.
2. Click the RossTalk Device
button and select the device you
want to send the RossTalk
command to.
RossTalk — GPI
RossTalk — Next
RossTalk — Read
RossTalk —
Resume
RossTalk —
Sequencer Down
RossTalk —
Sequencer Up
Devices >
RossTalk
Devices >
RossTalk
Devices >
RossTalk
Devices >
RossTalk
Devices >
RossTalk
Devices >
RossTalk
DescriptionLocationEvent
3. Enter the take item id of the item
you want to have focus in the
Take ID field.
Send the simulated GPI input to the
selected device.
1. Click GPI.
2. Click the RossTalk Device
button and select the device you
want to send the RossTalk
command to.
3. Enter the GPI you want to
simulate triggering in the GPI
field.
Send the Next command to the
selected device.
1. Click Take Next.
2. Click the RossTalk Device
button and select the device you
want to send the RossTalk
command to.
Send the Read command for a specific
item and layer to the selected device.
1. Click Read.
2. Click the RossTalk Device
button and select the device you
want to send the RossTalk
command to.
3. Enter the take item id of the item
you want to read in the Take ID
field.
4. Enter the layer that you want to
cue the item on in the Layer
field.
Send the Resume command for a
framebuffer and layer to the selected
device.
1. Click Clear Channel.
2. Click the RossTalk Device
button and select the device you
want to send the RossTalk
command to.
3. Enter the framebuffer that you
want to resume in the Channel
field.
4. Enter the layer that you want to
resume in the Layer field.
Send the Sequencer Down command
to the selected device.
1. Click Sequencer Down.
2. Click the RossTalk Device
button and select the device you
want to send the RossTalk
command to.
Send the Sequencer Up command to
the selected device.
1. Click Sequencer Up.
2. Click the RossTalk Device
button and select the device you
want to send the RossTalk
command to.
70 • Custom Controls — Carbonite Black Solo Operation Manual (v1.2)
Page 71

RossTalk — Swap
Current
RossTalk — Swap
RossTalk — Take
Current
RossTalk — Take
RossTalk — Take
Off
RState, Load
Devices >
RossTalk
Devices >
RossTalk
Devices >
RossTalk
Devices >
RossTalk
Devices >
RossTalk
Switcher >
Load RState
DescriptionLocationEvent
Send the Swap command to the
selected device.
1. Click Swap.
2. Click the RossTalk Device
button and select the device you
want to send the RossTalk
command to.
Send the Swap command for a specific
location to the selected device.
1. Click Swap (2).
2. Click the RossTalk Device
button and select the device you
want to send the RossTalk
command to.
3. Enter the framebuffer that you
want to swap the items on in the
Channel field.
4. Enter the layer that you want to
swap the items on in the Layer
field.
Send the Take command to the
selected device.
1. Click Take.
2. Click the RossTalk Device
button and select the device you
want to send the RossTalk
command to.
Send the Take command for a specific
item and location to the selected
device.
1. Click Take (3).
2. Click the RossTalk Device
button and select the device you
want to send the RossTalk
command to.
3. Enter the take item id of the item
you want to take in the Take ID
field.
4. Enter the framebuffer that you
want to take the item on in the
Channel field.
5. Enter the layer that you want to
take the item on in the Layer
field.
Send the Take Off command for a
specific item to the selected device.
1. Click Take Offline.
2. Click the RossTalk Device
button and select the device you
want to send the RossTalk
command to.
3. Enter the take item id of the item
you want to take in the Take ID
field.
Load the custom reset settings for the
selected ME, MiniME™, or
MultiScreen.
1. Click the Include button and
select all the locations that you
want to recall the custom reset
settings on.
Source
Substitution,
Delete
Source
Substitution
Switching Field
Trans Elements
Trans Limit —
On/Off
Switcher
Installation >
Source
Substitution >
Delete Subst
Table
Switcher
Installation >
Source
Substitution >
Source ME
Sub
Special > StateState, Insert
Switcher
Installation >
Field Switch
Switcher >
Transition >
ME Trans
Elements
Switcher >
Transition >
ME Trans Limit
DescriptionLocationEvent
Delete an entry from the substitution
table.
1. Click the Source button and
select the source that you want
to delete the substitution(s) for.
If more than one substitution
entry exists for the selected
source, all those entries will be
deleted.
Set a source substitution for the
substitution table.
1. Click the Source button and
select the source that you want
to set a substitution for.
2. Click the ME button and select
the MiniME™that you want to
assign a substitution source to.
3. Click the Subst button and
select the source you want to
substitute for the selected
source.
Insert the current state of the switcher
into the custom control.
1. Click State Attributes and
select the elements that you
want to include in the state of the
switcher when it is stored to the
custom control.
Select the field that a video transition
will be performed on.
1. Click a Switch Field button to
select whether video transitions
are performed on field 1 only
(Field 1), field 2 only(Field 2), or
the current field (Both).
Select the elements to be included in
the next transition of the selected ME,
MiniME™, or MultiScreen.
1. Click the ME button and select
the ME, MiniME™, or
MultiScreen that you want to
perform the event on.
2. Click the Elements button and
select background and/or the
keys that you want to include in
the next transition.
Turn the transition limit feature on or
off for the selected ME, MiniME™, or
MultiScreen.
1. Click the ME button and select
the ME, MiniME™, or
MultiScreen that you want to
perform the event on.
2. Click the Change Type button
and select whether you want to
set (Absolute) or reset (Reset)
the parameter. Some selections
will not be available when you
reset the parameter.
3. Click the Value button and select
whether trans limit is on (On) or
not (Off).
Carbonite Black Solo Operation Manual (v1.2) — Custom Controls • 71
Page 72

Trans Limit —
Reset
Trans Limit — Set
Trans Limit —
Value
Video Mode
Video Server —
Cue
Video Server —
Loop Off
Video Server —
Loop On
Switcher >
Transition >
ME Trans
Switcher >
Transition >
ME Trans
Switcher >
Transition >
ME Trans Limit
Value
Switcher
Installation >
Reference >
Video Format
Devices >
Video Server
Devices >
Video Server
Devices >
Video Server
DescriptionLocationEvent
Resets the transition limit point of the
selected ME, MiniME™, or
MultiScreen.
1. Click the ME button and select
the ME, MiniME™, or
MultiScreen that you want to
perform the event on.
2. Click the Action button and
select Reset Limit.
Sets the transition limit point of the
selected ME, MiniME™, or
MultiScreen. You must select the point
in the transition that you want to place
the limit before running this event.
1. Click the ME button and select
the ME, MiniME™, or
MultiScreen that you want to
perform the event on.
2. Click the Action button and
select Set Limit.
Select the limit point for the trans limit
of the selected ME, MiniME™, or
MultiScreen.
1. Click the ME button and select
the ME, MiniME™, or
MultiScreen that you want to
perform the event on.
2. Click the Change Type button
and select whether you want to
set (Absolute) or reset (Reset)
the parameter. Some selections
will not be available when you
reset the parameter.
3. Enter the point in the transition
that you want to place the trans
limit in the Value (%) field.
Select the video format that the
switcher will operate in.
1. Click the Video Mode button
and select the video format for
the switcher.
Send the Cue command and name of
clip to cue to the selected device.
1. Click Cue.
2. Click the Video Server button
and select the device you want
to send the command to.
3. Click a Channel button to select
the channel you want to send the
command to.
4. Enter the identifier of the clip in
the Clip Name field.
Send the Loop Off command to the
selected device.
1. Click Loop Off.
2. Click the Video Server button
and select the device you want
to send the command to.
3. Click a Channel button to select
the channel you want to send the
command to.
Send the Loop On command to the
selected device.
1. Click Loop On.
Video Server —
Play
Video Server —
Record
Video Server —
Stop
Wash Color (HSL)
Wash Color
(Preset)
Devices >
Video Server
Devices >
Video Server
Devices >
Video Server
Switcher >
Matte > Wash
Color (HSL)
Switcher >
Matte > Wash
Color (Preset)
DescriptionLocationEvent
2. Click the Video Server button
and select the device you want
to send the command to.
3. Click a Channel button to select
the channel you want to send the
command to.
Send the Play command to the
selected device.
1. Click Play.
2. Click the Video Server button
and select the device you want
to send the command to.
3. Click a Channel button to select
the channel you want to send the
command to.
Send the Record command to the
selected device.
1. Click Record.
2. Click the Video Server button
and select the device you want
to send the command to.
3. Click a Channel button to select
the channel you want to send the
command to.
Send the Stop command to the
selected device.
1. Click Play.
2. Click the Video Server button
and select the device you want
to send the command to.
3. Click a Channel button to select
the channel you want to send the
command to.
Select the custom matte color for the
selected ME or aux. Each component
of the HSL color must be inserted
individually. This is the second color
of the wash, the first color is set from
the matte color.
1. Click the ME button for the ME
that you want to perform the
event on.
2. Click the Matte button and select
Wash.
3. Click the Change Type button
and select whether you want to
set (Absolute) or reset (Reset)
the parameter. Some selections
will not be available when you
reset the parameter.
4. Click the Component button and
select the HSL component you
want to assign a value to. A
value should be applied to all
three components.
5. Enter a value for the selected
component in the Value (%)
field.
Select a preset wash color for the
selected ME. This is the second color
of the wash, the first color is set from
the matte color.
1. Click the ME button for the ME
that you want to perform the
event on.
72 • Custom Controls — Carbonite Black Solo Operation Manual (v1.2)
Page 73

Wash Color Reset
Wash Generator —
Disable
Wash Generator —
Enable
Wipe Direction
(Flip-Flop)
Wipe Direction
Switcher >
Matte > Wash
Color Reset
Switcher >
Matte > Wash
Enabled Reset
Switcher >
Matte > Wash
Enabled
Switcher >
Transition >
Wipe Direction
Switcher >
Transition >
Wipe Direction
DescriptionLocationEvent
2. Click the Matte button and select
Wash.
3. Click the Color button and select
the color you want to use.
Reset the matte color for the selected
ME. This is the second color of the
wash, the first color is set from the
matte color.
1. Click the ME button for the ME
that you want to perform the
event on.
2. Click the Matte button and select
Wash.
Disable the wash generator for the
selected ME.
1. Click the ME button for the ME
that you want to perform the
event on.
Enable the wash generator for the
selected ME.
1. Click the ME button for the ME
that you want to perform the
event on.
2. Click the Wash button and select
whether the wash generator is
enabled (On) or not (Off).
Select whether the wipe reverses
direction for every second transition of
the selected ME.
1. Click the ME button for the ME
that you want to perform the
event on.
2. Click the Pattern button and
select Wipe.
3. Click the Change Type button
and select whether you want to
set (Absolute) or reset (Reset)
the parameter. Some selections
will not be available when you
reset the parameter.
4. Click the Parameter button and
select Flip-Flip.
5. Click the Value button and select
whether Flip-Flop is on (On) or
off (Off).
Select the direction for the wipe
transition of the selected ME.
1. Click the ME button for the ME
that you want to perform the
event on.
2. Click the Pattern button and
select Wipe.
3. Click the Change Type button
and select whether you want to
set (Absolute) or reset (Reset)
the parameter. Some selections
will not be available when you
reset the parameter.
4. Click the Parameter button and
select Direction.
5. Click the Value button and select
whether the wipe moves in a
forward (Forward) or reverse
(Reverse) direction.
Wipe Pattern —
Aspect Ratio
Wipe Pattern —
Border Color (HSL)
Wipe Pattern —
Border Color
(Preset)
Wipe Pattern —
Border Size
DescriptionLocationEvent
Switcher >
Transition >
Wipe Param
Switcher >
Transition >
Color (HSL) Each component of the HSL color must
Switcher >
Transition >
Wipe Border
Color (Preset)
Switcher >
Transition >
Wipe Param
Select the aspect ratio for the wipe
pattern you want to use for a wipe
transition of the selected ME.
1. Click the ME button for the ME
that you want to perform the
event on.
2. Click the Parameter button and
select Aspect.
3. Click the Change Type button
and select whether you want to
set (Absolute) or reset (Reset)
the parameter. Some selections
will not be available when you
reset the parameter.
4. Enter an aspect ratio in the
Value (%) field.
Select the custom color you want to
apply to the border of the pattern for
the wipe transition of the selected ME.Wipe Border
be inserted individually.
1. Click the ME button for the ME
that you want to perform the
event on.
2. Click the Matte button and select
Wipe Border.
3. Click the Change Type button
and select whether you want to
set (Absolute) or reset (Reset)
the parameter. Some selections
will not be available when you
reset the parameter.
4. Click the Component button and
select the HSL component you
want to assign a value to. A
value should be applied to all
three components.
5. Enter a value for the selected
component in the Value (%)
field.
Select the preset color you want to
apply to the border of the pattern for
the wipe transition of the selected ME.
1. Click the ME button for the ME
that you want to perform the
event on.
2. Click the Matte button and select
Wipe Border.
3. Click the Color button and select
the preset color you want to
apply to the border.
Select the size of border for the wipe
pattern you want to use for a wipe
transition of the selected ME.
1. Click the ME button for the ME
that you want to perform the
event on.
2. Click the Parameter button and
select Border Size.
3. Click the Change Type button
and select whether you want to
set (Absolute) or reset (Reset)
the parameter. Some selections
will not be available when you
reset the parameter.
4. Enter a size for the border in the
Value (%) field.
Carbonite Black Solo Operation Manual (v1.2) — Custom Controls • 73
Page 74

DescriptionLocationEvent
Wipe Pattern —
Edge Softness
Wipe Pattern —
Horizontal
Multiplication for the wipe transition of the selected
Wipe Pattern —
Pattern
Wipe Pattern —
Rotation
Wipe Pattern —
Size
Switcher >
Transition >
Wipe Param
Switcher >
Transition >
Wipe Param
Switcher >
Transition >
Wipe Effect
Switcher >
Transition >
Wipe Param
Switcher >
Transition >
Wipe Param
Select the amount of softness to apply
to the edge of the pattern or border for
the wipe pattern you want to use for a
wipe transition of the selected ME.
1. Click the ME button for the ME
that you want to perform the
event on.
2. Click the Parameter button and
select Softness.
3. Click the Change Type button
and select whether you want to
set (Absolute) or reset (Reset)
the parameter. Some selections
will not be available when you
reset the parameter.
4. Enter an amount of softness for
the pattern or border in the
Value (%) field.
Select the number of times you want
to multiply the wipe pattern horizontally
ME.
1. Click the ME button for the ME
that you want to perform the
event on.
2. Click the Parameter button and
select Horizontal Mult.
3. Click the Change Type button
and select whether you want to
set (Absolute) or reset (Reset)
the parameter. Some selections
will not be available when you
reset the parameter.
4. Enter the number of times the
pattern is multiplied in the Value
field.
Select the pattern you want to use for
a wipe transition of the selected ME.
1. Click the ME button for the ME
that you want to perform the
event on.
2. Click the Pattern button and
select the pattern you want to
use for the wipe.
Select the rotation for the wipe pattern
you want to use for a wipe transition
of the selected ME.
1. Click the ME button for the ME
that you want to perform the
event on.
2. Click the Parameter button and
select Rotation.
3. Click the Change Type button
and select whether you want to
set (Absolute) or reset (Reset)
the parameter. Some selections
will not be available when you
reset the parameter.
4. Enter a rotation in the Value (%)
field.
Select the size for the wipe pattern you
want to use for a wipe transition of the
selected ME.
1. Click the ME button for the ME
that you want to perform the
event on.
DescriptionLocationEvent
2. Click the Parameter button and
select Size.
3. Click the Change Type button
and select whether you want to
set (Absolute) or reset (Reset)
the parameter. Some selections
will not be available when you
reset the parameter.
4. Enter a new size in the Value
(%) field.
Wipe Pattern —
Vertical
Multiplication for the wipe transition of the selected
Wipe Pattern —
X-Position
Wipe Pattern —
Y-Position
Wipe Reset
Switcher >
Transition >
Wipe Param
Switcher >
Transition >
Wipe Param
Switcher >
Transition >
Wipe Param
Switcher >
Transition >
Wipe Reset
Select the number of times you want
to multiply the wipe pattern vertically
ME.
1. Click the ME button for the ME
that you want to perform the
event on.
2. Click the Parameter button and
select Vertical Mult.
3. Click the Change Type button
and select whether you want to
set (Absolute) or reset (Reset)
the parameter. Some selections
will not be available when you
reset the parameter.
4. Enter the number of times the
pattern is multiplied in the Value
field.
Select the x-axis position for the wipe
pattern you want to use for a wipe
transition of the selected ME.
1. Click the ME button for the ME
that you want to perform the
event on.
2. Click the Parameter button and
select X-Pos.
3. Click the Change Type button
and select whether you want to
set (Absolute) or reset (Reset)
the parameter. Some selections
will not be available when you
reset the parameter.
4. Enter a new position in the
Value (%) field.
Select the y-axis position for the wipe
pattern you want to use for a wipe
transition of the selected ME.
1. Click the ME button for the ME
that you want to perform the
event on.
2. Click the Parameter button and
select Y-Pos.
3. Click the Change Type button
and select whether you want to
set (Absolute) or reset (Reset)
the parameter. Some selections
will not be available when you
reset the parameter.
4. Enter a new position in the
Value (%) field.
Reset the parameters or direction and
flip-flop for the wipe transition of the
selected ME.
1. Click the ME button for the ME
that you want to perform the
event on.
74 • Custom Controls — Carbonite Black Solo Operation Manual (v1.2)
Page 75

DescriptionLocationEvent
2. Click Reset Params to reset the
wipe parameters or Reset
Direction to reset the wipe
direction and flip-flop.
5.
Press the Confrm knob to delete the custom control.
Copying and Pasting Custom Controls
Naming Custom Controls
Each custom control can be given a unique name. This
name is shown on the menus in DashBoard.
Note: Refer to To Edit a CC From DashBoard on page 51 for
information on naming a custom control from DashBoard.
To Name a Custom Control
The procedure to name or rename a custom control is the
same.
1.
Press MENU > BANK 1 > EDIT
2.
Use the Bank knob to select the bank that the
custom control you want to name is stored on, or
select the bank button directly.
3.
Use the CC knob to select the custom control that
you want to name, or select the custom control on
the bus directly.
4.
Use the Func knob to select Rename.
5.
Press the Func knob.
Select a name as follows:
6.
a)
Use the Pos knob to select the character
position to edit. A name can have up to 8
character.
b)
Use the Char knob to select a character for the
current position.
The contents, or events, of a custom control can be copied
from one custom control and pasted to another. Along
with the events, the name and mnemonic settings are also
copied.
Note: Refer to To Edit a CC From DashBoard on page 51 for
information on copying and pasting a custom control from
DashBoard.
To Copy and Paste a Custom Control
1.
Press MENU > BANK 1 > Edit.
2.
Use the Bank knob to select the bank that the
custom control you want to copy is on, or select the
bank button directly.
3.
Use the CC knob to select the custom control that
you want to copy, or select the custom control on
the bus directly. If the custom control has a macro
recorded, an * is shown next to the number.
4.
Press Copy.
Select the custom control that you want to paste into.
5.
6.
Press Paste.
Deleting Custom Controls
Any custom control on the switcher can be deleted to
remove unused customs to free up space for new custom
controls.
Note: Refer to To Edit a CC From DashBoard on page 51 for
information on deleting a custom control from DashBoard.
To Delete a Custom Control
There is no undo for this delete function.
1.
Press MENU > BANK 1 > DELETE
2.
Use the Bank knob to select the bank that the
custom control you want to delete is stored on, or
select the bank button directly.
3.
Use the CC knob to select the custom control that
you want to delete, or select the custom control on
the bus directly.
4.
Press the Func knob.
Carbonite Black Solo Operation Manual (v1.2) — Custom Controls • 75
Page 76

Switcher Soft Reset
If required, the switcher can be reset to return it to a
user-dened default setting, or the factory default state.
A reset can be performed for the entire switcher, or
individual components, such as keys.
Soft Reset
The software reset returns the switcher to the default
state. Black is selected on all buses, all keys are cut
off-air, and the transition rate is set back to default. This
is useful if you need to return the switcher to a known
state.
To Reset the Switcher Software
1.
Press and hold MENU.
2.
Press RESET.
Custom Reset Settings
You can customize many of the default switcher
parameters and save them as a user-dened reset settings.
These custom reset settings can then be recalled when
you want to return the switcher to a previous state.
To Save a Custom Reset Setting
You can customize many of the default switcher
parameters and save them as a user-dened custom reset.
Tip: Custom reset settings can also be set from the Memory >
RState tabs on the Live Assist node in DashBoard.
1.
Press MENU > RESET > NEXT.
2.
Use the Attrib knob to select Media.
3.
Use the Media knob to select Media1.
4.
Use the Value knob to select whether the
Media-Store channel is reset with a switcher reset
or not.
•
NoRst — the Media-Store channel is not reset
•
Reset — the Media-Store channel is reset with
a switcher reset
Repeat this for the remaining Media-Store channels.
5.
6.
Use the Attrib knob to select Aux.
7.
Use the Aux knob to select Aux 1.
8.
Use the Value knob to select whether the Aux bus
is reset with a switcher reset or not.
•
NoRst — the Aux bus is not reset
•
Reset — the Aux bus is reset with a switcher
reset
Repeat this for the remaining Aux buses.
9.
10.
Use the Value knob to select whether the Aux bus
is reset with a switcher reset or not.
•
NoRst — the Aux bus is not reset
•
Reset — the Aux bus is reset with a switcher
reset
Repeat this for the remaining Aux buses.
11.
12.
Use the Attrib knob to select MiniME.
13.
Use the MiniME knob to select MME 1.
14.
Use the Value knob to select whether the MiniME
is reset with a switcher reset or not.
•
NoRst — the MiniME™is not reset
•
Reset — the MiniME™is reset with a switcher
reset
Repeat this for the remaining MiniME™outputs.
15.
16.
Use the Attrib knob to select MltScr.
17.
Use the MltScr knob to select MSC 1.
18.
Use the Value knob to select whether the
MultiScreen is reset with a switcher reset or not.
•
NoRst — the MultiScreen is not reset
•
Reset — the MultiScreen is reset with a
switcher reset
19.
Press NEXT > NEXT > NEXT.
20.
Press RState Save and Confrm.
To Load a Custom Reset Setting
Tip: Custom reset settings can also be set from the Memory >
RState tabs on the Live Assist node in DashBoard.
1.
Press MENU > RESET.
2.
Press RState Load.
You can also press and hold MENU and press Reset
All.
Factory Default Settings
You can restore the switcher to the factory default state.
All installation and personality settings are reset.
To Factory Reset the Switcher
1.
Press MENU> RESET > NEXT > NEXT > Factry
Reset.
2.
Press the Confrm knob to load the factory default
settings.
™
76 • Switcher Soft Reset — Carbonite Black Solo Operation Manual (v1.2)
Page 77

Resetting Individual Components
You can reset only the component that you want, instead
of the entire switcher. Individual keys, aux buses,
dissolves, wipes, and menu items can be reset.
Table 7: Resetting Individual Components
ResultButtons to PressTo Reset
all wipe parameters, including
position, pattern, and border, are
reset
all dissolve parameters are resetDISS and RESETDissolves
the ME parameters, including
source selections, are reset
Aux bus X parameters, including
source selections, are reset (each
Aux is reset individually) (X is the
number of the aux bus)
the value for that knob is resetdouble-press the knob
Menu
Items
WIPE and RESETWipes
STORE and RECALLME
AUX X and RESETAux Buses
for the value you want
to reset
Carbonite Black Solo Operation Manual (v1.2) — Switcher Soft Reset • 77
Page 78

Glossary
eliminates the need to manually enter the network
parameters and IP address.
Interlaced
An Interlaced video format starts at the top of the screen
and draws all the odd number scan lines and then all the
even number scan lines in sequence. This results in half
the image being drawn in one pass and the other half of
the image being drawn in the second. These two passes
are called Fields, where the rst pass is called Field 1
and the second pass is called Field 2. When both Field
1 and Field 2 have been drawn, resulting in a complete
image, you have a single Frame.
Progressive
A Progressive scan video format draws each scan line in
sequence, starting from the top of the screen and working
to the bottom. Unlike Interlaced, with Progressive scan
the entire image is drawn at one time, in a single pass.
This means that there are no elds in a Progressive scan
image.
Auto Key
A pairing of two video signals, a key video and a key
alpha, to create a key. In the switcher, you associate the
ll and alpha so that the switcher knows which alpha to
use when the video is selected.
Field
One half of a complete picture (or frame) interval
containing all of the odd, or all of the even, lines in
interlaced scanning. One scan of a TV screen is called a
eld; two elds are required to make a complete picture
(which is a frame).
Force, Mask
An effect that forces the masked region to the foreground
but is not bound by the key. For example, if you have a
preset pattern key and apply a mask to it. The masked
area is bound by the edges of the key pattern. When force
is turned on, the masked area is lled with the video from
the key (nothing appears masked) but you can move the
mask outside of the key pattern and the key video is still
lling the masked region.
Frame
One complete picture consisting of two elds of
interlaced scanning lines.
File Transfer Protocol
A network protocol that is used to transfer les from one
host computer to another over a TCP-based network.
Auto Transition
An automatic transition in which the manual movement
of the fader handle is simulated electronically. The
transition starts when the AUTO TRANS button is
pressed and takes place over a pre-selected time period,
measured in frames.
Chroma Key
Chroma Key is a key in which the hole is cut based on
a color value, or hue, rather than a luminance value or
alpha signal. The color is removed and replaced with
background video from another source.
Cut
An instantaneous switch from one video signal to another.
Dissolve
A transition from one video signal to another in which
one signal is faded down, while the other is
simultaneously faded up. The terms mix or cross-fade
are often used interchangeably with dissolve.
Dynamic Host Configuration Protocol
An Ethernet protocol where a device, such as the
switcher, is given an IP address by the network host. This
Gain
Gain represents the range of signal values present in a
video signal from a lowest to a highest point (from black
to white for example). Increasing gain expands this range,
while decreasing gain compresses this range. Clipping
occurs if applied gain changes cause output signal values
to fall outside the allowable range. Generally, increasing
the gain for a specic color component causes the video
signal colors to become increasingly saturated with that
color. Similarly, decreasing the gain for a specic color
component progressively removes that color component
from the output video signal.
Gamma
Gamma corrections introduce non-linear corrections to
a video signal. A gamma correction can be described as
taking a point on the output versus input video signal
line and pulling it perpendicularly away from the line.
The result is a Bezier curve between the start, the new
point, and the end point. Generally, increasing the gamma
value adds more of the component to the video signal in
the location of the gamma offset point. Decreasing the
gamma value reduces the amount of the component in
the video signal in the location of the gamma offset point.
Moving the gamma offset point allows you to select
78 • Glossary — Carbonite Black Solo Operation Manual (v1.2)
Page 79

which part of the input video signal receives the gamma
correction. For example, if you increase the red gamma
correction to the part of the video signal that has no red
component you will add red to those areas while having
little effect on areas that already contain a signicant
amount of red. This allows you to add a red tint to the
image while minimizing the amount of red-clipping that
occurs.
General Purpose Interface
A simple high/low signal that is used to trigger an action
either on an external device or on the switcher. A GPI
can be an input or an output to the switcher.
High Definition
A high denition (720p, 1080i, or 1080p/3G) video
signal.
Key Mask
A keying technique in which a pattern is combined with
the key source to block out unwanted portions of the key
source.
Key Video
A video input which is timed to ll the hole provided by
the key source video. An example of key video is the
video output of a character generator.
Linear Key
Linear keys make it possible to fully specify the
transparency of a key from opaque, through transparent,
to fully off. The transparency is specied by the key
alpha that is associated with the key video. A keyer
capable of a linear key converts the key signal voltage
directly to the transparency effect on the screen.
Hue
The characteristic of a color signal that determines
whether the color is red, yellow, green, blue, purple, etc.
(the three characteristics of a TV color signal are
chrominance, luminance, and hue). White, black, and
gray are not considered hues.
Hue Rotation
Hue rotate affects the color of the entire video signal by
rotating the input video hues. This produces an output
video signal with colors that are shifted from their
original hues. By rotating colors around the wheel, hue
values will shift. For example, a clockwise rotation where
yellows become orange, reds become magenta, blues
become green. The more rotation applied, the further
around the wheel colors are shifted.
Key
An effect produced by cutting a hole in the background
video, then lling the hole with video or matte from
another source. Key source video cuts the hole, key ll
video lls the hole. The video signal used for cut and ll
can come from the same, or separate, sources.
Mnemonics
A green, orange, or yellow display used to show the
names of a source above or below the source button or
used as a custom command or pattern button.
Offsets
Offsets shift the video signal by a set amount. Depending
on the offset applied, different parts or all of the video
signal may be affected. Clipping occurs if applied offsets
cause output signal values to fall outside the allowable
range.
Pre-Delay
A pre-delay is a delay that is inserted into a transition
between the triggering of a GPI output and performing
the transition. The length of the pre-delay is usually the
length of time your video server requires to start playing
a clip or your character generator required to load a page.
RossTalk
An ethernet based protocol that allows the control over
Ross devices using plain english commands.
Key Alpha
The video signal which cuts a hole in the background
video to make a key effect possible. Also called Key
Video or Source. In practice, this signal controls when
a video mixer circuit will switch from background to key
ll video.
Key Invert
An effect that reverses the polarity of the key source so
that the holes in the background are cut by dark areas of
the key source instead of bright areas.
Standard-Definition
A standard denition (480i or 576i) video signal.
Self Key
A key effect in which the same video signal serves as
both the key signal and key ll.
Shaped Key
An additive key where the Key Alpha cuts a hole based
on the monochrome value of the alpha. Shades of gray
are translated into either white or black, giving the key
Carbonite Black Solo Operation Manual (v1.2) — Glossary • 79
Page 80

a hard edge. Shaped Key alphas are sometimes used with
Character Generators to cut very precise holes for the
ll.
Split Key
A Split key allows you to assign a different alpha source
for a key than the ll/alpha associations that are set up
during conguration or to use a separate alpha source
for a Self key.
Tally
An indicator which illuminates when the associated
button, or control, is selected or is on-air.
Unshaped Key
A multiplicative key where the Key Alpha cuts a hole
based on the gradient values of the alpha. Shades of gray
are translated into transparency levels, giving the key a
soft edge. Unshaped Key alphas can also be considered
true linear alphas. Key alphas are set to unshaped by
default.
80 • Glossary — Carbonite Black Solo Operation Manual (v1.2)
Page 81

Index
A
Abort Transition 22
Allocated DVEs 18
Ancillary Mode 18
Animations 44
Audio 44
Audio Mixer Control 9
Auto Select Keys 30
B
BlackStorm Control 9
Bus Hold 38
Bus Select Buttons 19
ViewControl 19
C
Camera Control 9
Chroma Key 31–32
Advanced Mode 32
Basic Mode 31
Clean Feed 16
Clear Memories 41
Control, External Devices 9
Control Panel 12
Control Panel, Rear 12
Control Panel, Top 12
Copy MEs 17
CPU Temperature 18
Custom Control Buttons 19
ViewControl 19
Custom Control Event 52–74
Ancillary Data Mode 52
Audio Pan 52
Audio Volume 52
Auto Trans 52
Bus Source 52
Cancel All CC 52
Cancel CC 52
Chroma Key Color 52
Chroma Key Initialize 52
Chroma Key Mode 52
Chroma Key Parameters 52
Clean Feed 53
Color Framing 53
Cut Transition 53
DVE Freeze 53
DVE Key Aspect 53
DVE Key Border 53
DVE Key Border Color (HSL) 53
DVE Key Border Color (Preset) 53
DVE Key Crop (Bottom Edge) 54
DVE Key Crop (Dual Edge) 54
DVE Key Crop (Left Edge) 54
DVE Key Crop (Right Edge) 54
Custom Control Event (continued)
DVE Key Crop (Top Edge) 54
DVE Key Edge Softness 54
DVE Key Size 54
DVE Key X-Position 55
DVE Key Y-Position 55
DVE Wipe, Reset 55
DVE Wipe Direction 55
DVE Wipe Direction (Flip-Flop) 55
DVE Wipe Pattern 55
EmbeddedTriggers — Enable 55
EmbeddedTriggers — Insert 55
EmbeddedTriggers — Set DID 55
EmbeddedTriggers — Set Line 56
EmbeddedTriggers — Set Remote ID 56
EmbeddedTriggers — Set SDID 56
Fly Key (DVE) 56
GPI Output — Edge Trigger Setup 56
GPI Output — Level Trigger Setup 56
GPI Output — Mode 56
GPI Output — Trigger 56
GPI Output — Trigger Type 56
Hold CC 56
Key, Make Linear 56
Key, Reset 57
Key Active 56
Key Copy 57
Key Invert 57
Key Mode 57
Key Only Transition 57
Key Settings (Clip, Gain, Transparency) 57
Key Trans Rate 57
Key Type 58
Layer Mode 58
Loop CC 58
Mask 61
Mask, Force 58
Mask, Invert 58
Mask, Reset 58
Mask (Box) — Left Edge Position 58
Mask (Box) — Right Edge Position 59
Mask (Box) — Size 59
Mask (Box) — Top Edge Position 59
Mask (Box) — X-Position 59
Mask (Box) — Y-Position 59
Mask (Pattern) — Aspect Ratio 59
Mask (Pattern) — Border Size 59
Mask (Pattern) — Edge Softness 60
Mask (Pattern) — Horizontal Multiplication 60
Mask (Pattern) — Pattern 60
Mask (Pattern) — Reset 60
Mask (Pattern) — Rotation 60
Mask (Pattern) — Size 60
Mask (Pattern) — Vertical Multiplication 60
Mask (Pattern) — X-Position 60
Mask (Pattern) — Y-Position 60
Matte Color, Reset 61
Matte Color (HSL) 61
Carbonite Black Solo Operation Manual (v1.2) — Index • 81
Page 82

Custom Control Event (continued)
Matte Color (Preset) 61
ME Copy 61
Media Cut Point, Set 61
Media-Store — Auto Play 61
Media-Store — Capture 61
Media-Store — Capture Alpha 61
Media-Store — Capture Mode 61
Media-Store — Capture Source 62
Media-Store — Clear Channel 62
Media-Store — Cut Frame 62
Media-Store — Delete Capture 62
Media-Store — Load 62
Media-Store — Looping 62
Media-Store — Move To Frame 62
Media-Store — Mute 62
Media-Store — Play 62
Media-Store — Play Speed 62
Media-Store — Reset Media 63
Media-Store — Reverse 63
Media-Store — Rewind 63
Media-Store — Shaped 63
Media-Store — Triger GPI Output Delay 63
Media-Store — Trigger GPI Output 63
Media-Store — X-Position 63
Media-Store — Y-Position 63
MediaWipe — Channel 63
MediaWipe — Direction 64
MediaWipe — Direction, Flip-Flop 64
Memory Recall 64
ME Trans Rate 64
ME Trans Type 64
MultiScreen — Edge Blending 64
MultiScreen — Edge Distance 64
MultiScreen — Edge Gamma 64
MultiScreen — Edge Smoothness 65
MultiScreen — Layout 65
MultiScreen — Offset 65
MultiViewer Box — Aspect Ratio Markers 65
MultiViewer Box — Border 65
MultiViewer Box — Green Tally (Preview) 65
MultiViewer Box — Label 65
MultiViewer Box — Label Mode 65
MultiViewer Box — Label Position 66
MultiViewer Box — Label Transparency 66
MultiViewer Box — MultiScreen Markers 66
MultiViewer Box — Red Tally (On-Air) 66
MultiViewer Box — Video Source 66
MultiViewer — Clip 66
MultiViewer Clock — Background Color (HSL) 67
MultiViewer Clock — Background Color (Preset) 66
MultiViewer Clock — Foreground Color (HSL) 66
MultiViewer Clock — Foreground Color (Preset) 67
MultiViewer Clock — Format 67
MultiViewer Clock — Mode 67
MultiViewer Clock — Size 67
MultiViewer Clock — Timecode Frame Count 67
MultiViewer Clock — X-Position 67
MultiViewer — FSFC Label 67
MultiViewer — Layout 68
MultiViewer — Outputs 68
Custom Control Event (continued)
MultiViewer — Tally Display 68
Output BNC Assignment 68
Pause CC 68
PBus — Recall 68
PBus — Trigger 68
Personality — Auto Remove Key 68
Personality — Auto Trans Second Press (Key) 68
Personality — Auto Trans Second Press (ME) 68
Personality — Next Trans Reset 69
Personality — Roll Clip 69
Play CC 69
Reference Source 69
Reset 69
Resume CC 69
Robotic Camera — Halt All 69
Robotic Camera — Recall Shot 69
Robotic Camera — Recall Shot Fast 69
Robotic Camera — Store Shot 69
Roll Clip 69
RossTalk — CC 69
RossTalk — Clear 70
RossTalk — Cue (item + framebuffer) 70
RossTalk — Cue (item + framebuffer + layer) 70
RossTalk — Cue Current 70
RossTalk — Focus 70
RossTalk — GPI 70
RossTalk — Next 70
RossTalk — Read 70
RossTalk — Resume 70
RossTalk — Sequencer Down 70
RossTalk — Sequencer Up 70
RossTalk — Swap 71
RossTalk — Swap Current 71
RossTalk — Take 71
RossTalk — Take Current 71
RossTalk — Take Off 71
RState, Load 71
Source Substitution 71
Source Substitution, Delete 71
State, Insert 71
Switching Field 71
Trans Clear 53
Trans Elements 71
Trans Limit — On/Off 71
Trans Limit — Reset 72
Trans Limit — Set 72
Trans Limit — Value 72
Video Mode 72
Video Server — Cue 72
Video Server — Loop Off 72
Video Server — Loop On 72
Video Server — Play 72
Video Server — Record 72
Video Server — Stop 72
Wash Color (HSL) 72
Wash Color (Preset) 72
Wash Color Reset 73
Wash Generator — Disable 73
Wash Generator — Enable 73
Wipe Direction 73
82 • Index — Carbonite Black Solo Operation Manual (v1.2)
Page 83

Custom Control Event (continued)
Wipe Direction (Flip-Flop) 73
Wipe Pattern — Aspect Ratio 73
Wipe Pattern — Border Color (HSL) 73
Wipe Pattern — Border Color (Preset) 73
Wipe Pattern — Border Size 73
Wipe Pattern — Edge Softness 74
Wipe Pattern — Horizontal Multiplication 74
Wipe Pattern — Pattern 74
Wipe Pattern — Rotation 74
Wipe Pattern — Size 74
Wipe Pattern — Vertical Multiplication 74
Wipe Pattern — X-Position 74
Wipe Pattern — Y-Position 74
Wipe Reset 74
Custom Controls 18, 49–51, 75
Copy 75
DashBoard 18
Delete Event 51
Deleting 75
Editing 51
Events 51
Insert Event 51
Naming 75
Paste 75
Recording 49
Run Event 51
Running 50
Setup 49
Special Functions 49–50
Cancel 50
CancelAll 50
CutKey 49
GPO 49
Hold 49
IncKey 50
Loop 49
Pause 49
Resume 50
State 50
TrnKey 49
Custom Controls (CC) 49
Cut Transitions 22
DVE Allocation 34
DVE Transitions 24
E
Editing Custom Controls 51
Effects Dissolve 39
Duration 39
Engine Type 18
External Reference 18
F
Factory Default 76
Fan#1 OK 18
Fan#2 OK 18
Field Dominance 18
FlexiClean 16
Fly Key 34
FPGA Temperature 18
Freeze 35
K
Keyer Transition Buttons 19
ViewControl 19
Keying 29–32, 34–37
Auto Select 30
Chroma Key 31–32
Advanced 32
Basic 31
Cropping 35
DVE 34–35
Freeze 35
Invert 29
Key Priority 29
Mask 36
Menu Overview 29
MiniME 29
Self Key 29
Split 30
Split Keys 37
Key Mode 29
D
DashBoard 18
Conguration 18
Custom Controls 18
Live Assist 18
MediaManager 18
PaneLINK 18
Status 18
Default 76
Factory 76
Device Control 9
Dissolve Transitions 22
DVE 34–35
Key 34–35
Cropping 35
Freeze 35
L
Live Assist 18
PaneLINK 18
Load Custom Reset 76
Loading Media-Store Images 44
M
Mask 36
Mattes 27
ME 15
Selection 15
ME Copying 17
Carbonite Black Solo Operation Manual (v1.2) — Index • 83
Page 84

MediaManager 18, 47–48
connection status 47
DashBoard 18
Eject 48
Flip Flop 48
login 47
Looping 48
Menu Bar 47
Play 48
Playlist 48
Move Down 48
Move Up 48
Playlists 48
Re-Cue 48
Media Manager 48
Playlist 48
Collapse 48
Delete 48
Expand 48
Load 48
New 48
Next 48
Previous 48
Save 48
MediaManager GUI 47
layouts 47
Media-Store 44, 46
Animations 44
Audio 44
File Specications 44
Loading 44
Menu Overview 46
Media-Store, Capture 45
Media Transitions 24
Memories 38–39
Access Mode 38
Attributes 39
Bus Hold 38
Effects Dissolve 39
MemoryAI 39
Recall Mode 39
Storing 38
Memories, clear 41
Memory AI 39
Menus 14
Auto-Follow 14
Navigating 14
Overview 14
MiniME 10, 15, 21, 29
Keying 29
Selection 15
Transitions 21
MultiViewer 10, 16
O
Overview, Control Panel 12
P
PaneLINK 18
Patterns 27
Pre-Delay Override 22
Preview 16
R
Recall Mode 39
Re-Entry 16
Re-Entry Timing 16
Reference OK 18
Reference Source 18
Reset 76–77
Custom 76
Loading 76
Saving 76
Individual 77
Reset Software 76
RoboCam Control 9
RState, Load 76
RState, Save 76
S
Save Custom Reset 76
Self Key 29
Serial Number 18
Server Control 9
Sets 43
Loading 43
Storing 43
Setup, External Devices 9
Software Version 18
Sources 15
Selecting 15
Sources, Layering 16
Sources, Re-Entry 16
Split Key 37
Split Keys 30
Status 18
Storing Memories 38
T
Temperature OK 18
Timecode 18
Timing Windows, Re-Entry 16
Transition 21–22
Flip-Flop 21
Pre-Delay Override 22
Transition Buttons 19
ViewControl 19
Transition Limit 25
Transition Rate 21
Transitions 21–25
Aborting 22
Cuts 22
Direction 21
84 • Index — Carbonite Black Solo Operation Manual (v1.2)
Page 85

Transitions (continued)
Dissolves 22
DVE 24
Flip-Flop 23–25
GPO Trigger 25
Limit 25
Media 24
Menu Overview 21
MiniME 21
Pause 21
Performing 21
Rate 21
Roll Clip 21
Wipes 23
Trigger GPO 25
V
Video Layering 16
Video Mode 18
Video Processing and Flow 15
Video Server Control 9
Video Sources 15
Selecting 15
ViewControl 19–20
Bus Selection Buttons 19
Button Setup 20
Custom Control Buttons 19
Keyer Transition Buttons 19
Transition Buttons 19
W
Washes 27
WhiteFlash 23
Wipe Transitions 23
X
XPression Control 9
Carbonite Black Solo Operation Manual (v1.2) — Index • 85
 Loading...