

Page 1

FR Prescriptions de montage et mode d’emploi
EN Instruction on mounting and use
Page 2
Page 3
Page 4
Page 5
FR - Prescriptions de montage et mode d’emploi
Consulter les dessins de la première page avec les références
alphabétiques que l’on retrouvera dans le texte explicatif.
Suivre impérativement les instructions de cette notice. Le
constructeur décline toute responsabilité pour tous les
inconvénients, dommages ou incendies provoqués à l’appareil
et dûs à la non observation des instructions de la présente
notice.
Attention
Attention! Ne pas raccorder l’appareil au circuit électrique
avant que le montage ne soit complètement terminé.
Avant toute opération de nettoyage ou d’entretien, débrancher
la hotte du circuit électrique en retirant la prise ou en coupant
l’interrupteur général de l’habitation.
Munissez-vous de gants de travail avant d’effectuer toute
opération d’installation et d’entretien.
L’appareil n’est pas destiné à une utilisation par des enfants
ou des personnes à capacités physiques, sensorielles ou
mentales réduites et sans expérience et connaissance à
moins qu’ils ne soient sous la supervision ou formés sur
l’utilisation de l’appareil par une personne responsable de leur
sécurité.
Les enfants doivent être surveillés afin qu’ils ne jouent pas
avec l’appareil.
Ne jamais utiliser la hotte sans que la grille ne soit montée
correctement!
La hotte ne doit JAMAIS être utilisée comme plan pour
déposer quelque chose sauf si cela est expressément indiqué.
Quand la hotte est utilisée en même temps que d’autres
appareils à combustion de gaz ou d’autres combustibles, le
local doit disposer d’une ventilation suffisante.
L’air aspiré ne doit jamais être envoyé dans un conduit utilisé
pour l’évacuation des fumées produites par des appareils à
combustion de gaz ou d’autres combustibles.
Il est formellement interdit de faire flamber les aliments sous
la hotte.
L’utilisation de flammes libres peut entraîner des dégâts aux
filtres et peut donner lieu à des incendies, il faut donc les
éviter à tout prix.
La friture d’aliments doit être réalisée sous contrôle pour éviter
que l’huile surchauffée ne prenne feu.
En ce qui concerne les mesures techniques et de sécurité à
adopter pour l’évacuation des fumées, s’en tenir strictement à
ce qui est prévu dans les règlements des autorités locales
compétentes.
La hotte doit être régulièrement nettoyée, aussi bien à
l’intérieur qu’à l’extérieur (AU MOINS UNE FOIS PAR MOIS,
respecter néanmoins les instructions relatives à l’entretien
fournies dans ce manuel).
La non observation de ces normes de nettoyage de la hotte et
du changement et nettoyage des filtres comporte des risques
d’incendie.
Ne pas utiliser ou laisser la hotte sans que les ampoules
soient correctement placées pour éviter tout risque de choc
électrique.
La société décline toute responsabilité pour d’éventuels
inconvénients, dégâts ou incendies provoqués par l’appareil et
dérivés de la non observation des instructions reprises dans
ce manuel.
Cet appareil porte le symbole du recyclage conformément à la
Directive Européenne 2002/96/CE concernant les Déchets
d’Équipements Électriques et Électroniques (DEEE ou
WEEE).
En procédant correctement à la mise au rebut de cet appareil,
vous contribuerez à empêcher toute conséquence nuisible
pour l’environnement et la santé de l’homme.
Le symbole
présent sur l’appareil ou sur la
documentation qui l’accompagne indique que ce produit ne
peut en aucun cas être traité comme déchet ménager. Il doit
par conséquent être remis à un centre de collecte des déchets
chargé du recyclage des équipements électriques et
électroniques.
Pour la mise au rebut, respectez les normes relatives à
l’élimination des déchets en vigueur dans le pays
d’installation. Pour obtenir de plus amples détails au sujet du
traitement, de la récupération et du recyclage de cet appareil,
veuillez vous adresser au bureau compétent de votre
commune, à la société de collecte des déchets ou directement
à votre revendeur.
Utilisation
La hotte est réalisée de façon qu’elle puisse être utilisée en
version aspirante à évacuation extérieure, ou filtrante à
recyclage intérieur.
Version évacuation extérieure
La hotte est équipée d’une sortie de l’air supérieure B pour
l’évacuation des fumées vers l’extérieur ( tuyau d’évacuation
et colliers de fixation non fournis). Relier la hotte aux tubes et
trous d’évacuation de la paroi d’un diamètre équivalent à la
sortie de l’air (collier de raccord).
L’utilisation de tubes et des trous d'évacuation à paroi avec un
diamètre inférieur entraînera une diminution des
performances d’aspiration et une nette augmentation du bruit.
Nous déclinons toute responsabilité à cet égard.
Attention! Si la hotte est équipée d'un filtre à charbon, ce
dernier doit être enlevé.
Version recyclage
Dans l’éventualité où il ne serait pas possible d’évacuer les
fumées et les vapeurs de cuisson vers l’extérieur, il est
possible d’utiliser la hotte dans la version recylcage, en
effectuant le montage d’un filtre à charbon actif et d’un
déflecteur F sur le support (bride) G. Les fumées et les
vapeurs sont recyclées à travers le grillage supérieur H, au
moyen d’un tuyau d’évacuation connecté à la sortie d’air
supérieure B et à la bague de connexion montée sur le
déflecteur F (tuyau d’évacuation et colliers de fixation non
fournis).
5
Page 6

Attention! Si la hotte est livrée sans filtre à charbon, celuici doit être commandé et monté avant la mise en service.
Les modèles sans moteur d’aspiration fonctionnent
uniquement dans la version aspirante et ils doivent être
connectés à une unité périphérique d’aspiration (non fournie).
Les instructions de raccordement sont fournies avec l’unité
périphérique d’aspiration.
Installation
La distance minimum entre la superficie de support des
récipients sur le dispositif de cuisson et la partie la plus basse
de la hotte de cuisine ne doit pas être inférieure à 50cm dans
le cas de cuisinières électriques et de 65cm dans le cas de
cuisinières à gaz ou mixtes.
Si les instructions d’installation du dispositif de cuisson au gaz
spécifient une plus grande distance, il faut en tenir compte.
Branchement électrique
La tension électrique doit correspondre à la tension reportée
sur la plaque signalétique située à l’intérieur de la hotte. Si
une prise est présente, branchez la hotte dans une prise
murale conforme aux normes en vigueur et placée dans une
zone accessible. Si aucune prise n’est présente
(raccordement direct au circuit électrique), ou si la prise ne se
trouve pas dans une zone accessible, appliquez un
disjoncteur normalisé pour assurer de débrancher
complètement la hotte du circuit électrique en conditions de
catégorie surtension III, conformément aux règlementations
de montage.
Attention! Avant de rebrancher le circuit de la hotte à
l’alimentation électrique et d’en vérifier le fonctionnement
correct, contrôlez toujours que le câble d’alimentation soit
monté correctement.
Montage
Avant de commencer l’installation:
• Vérifier que le produit acheté soit de dimensions
adéquates pour la zone d’installation choisie.
• Pour faciliter l’installation, il est conseillé d’enlever
temporairement les filtres à graisse et les autres parties
dont il prévu le démontage dans la présente notice
• Enlevez le(s) filtre(s) au charbon actif (*) si ceux-ci sont
fournis (voir également le paragraphe concerné). Celuici(ceux-ci) est(sont) remonté(s) uniquement si l’on veut
utiliser la hotte en version recyclage.
• Vérifiez qu’à l’intérieur de la hotte il n’y est pas (pour des
raisons de transport) d’autre matériel fourni avec
l’équipement (par exemple: vis (*), garanties (*) etc.,
dans ce cas, enlevez-les et conservez-les.
• Protéger la cuisinière et la hotte contre d’éventuels débris
et dégâts en utilisant une toile de protection. Préférer une
surface plane pour l’assemblage. Couvrir cette surface
d’une protection et placer tous les éléments de la hotte et
de la cheminée dessus.
• Préparez le branchement électrique et veillez qu’à
proximité de la zone d’installation de la hotte (dans une
zone également accessible avec la hotte déjà montée), il
y ait une prise électrique et qu’il soit possible de se
raccorder à un dispositif d’évacuation de fumées vers
l’extérieur (uniquement Version Evacuation).
• Effectuer tous les travaux de maçonnerie nécessaires
(par exemple: installation d’une prise électrique et/ou trou
pour le passage des tubes d’évacuation).
La hotte est équipée de chevilles de fixation convenant à la
plupart des parois/plafonds. Il est cependant nécessaire de
s’adresser à un technicien qualifié afin de s’assurer que le
matériel est approprié au type de paroi/plafond. La
paroi/plafond doit être suffisamment solide pour supporter le
poids de la hotte.
Informations préliminaires pour l’installation de la hotte:
Débrancher la hotte, en intervenant sur le tableau électrique
général domestique, pendant les phases de branchement
électrique. Enlever le/les filtres(s) à graisse et le châssis hors
du filtre à charbon.
Assembler le support cheminée (3 parties):
Les trois parties doivent être fixées entre elles avec 4 vis,
l’extension du support est réglagle et doit correspondre à la
largeur interne de la cheminée télescopique.
Assembler le déflecteur (seulement au cas où un
déflecteur composé de trois parties serait fourni – le
déflecteur doit être utilisé uniquement dans la version
filtrante)
Les trois parties doivent être fixées entre elles avec 2 vis,
l’extension du déflecteur est réglable et doit correspondre à la
largeur du support cheminée auquel il sera ensuite fixé.
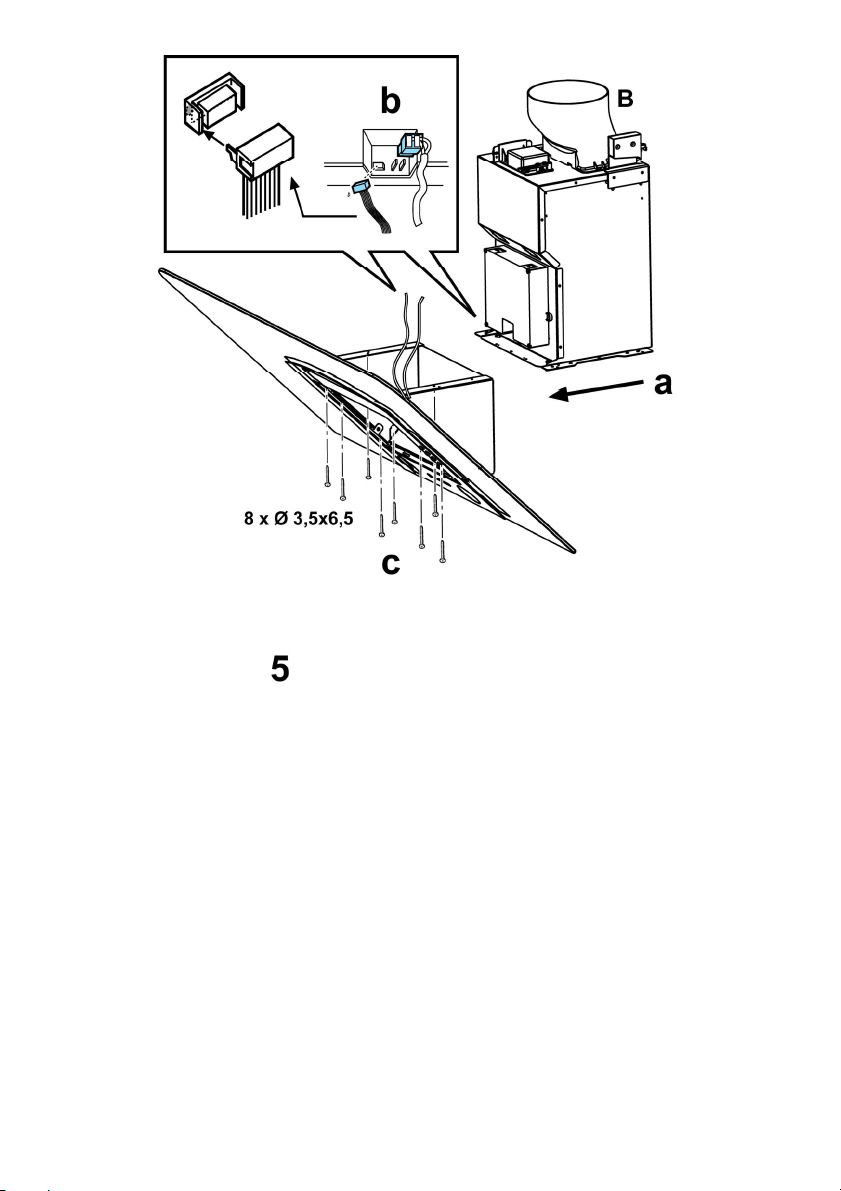
Fig. 5
a. Poser le groupe d’aspiration sur un plan puis enfiler sur
celui-ci la partie inférieure de la hotte.
b. Effectuer les branchements électriques entre les deux
parties.
c. Fixer définitivement la hotte au groupe d’aspiration à
l’aide du nombre et du type de vis indiqués sur la figure.
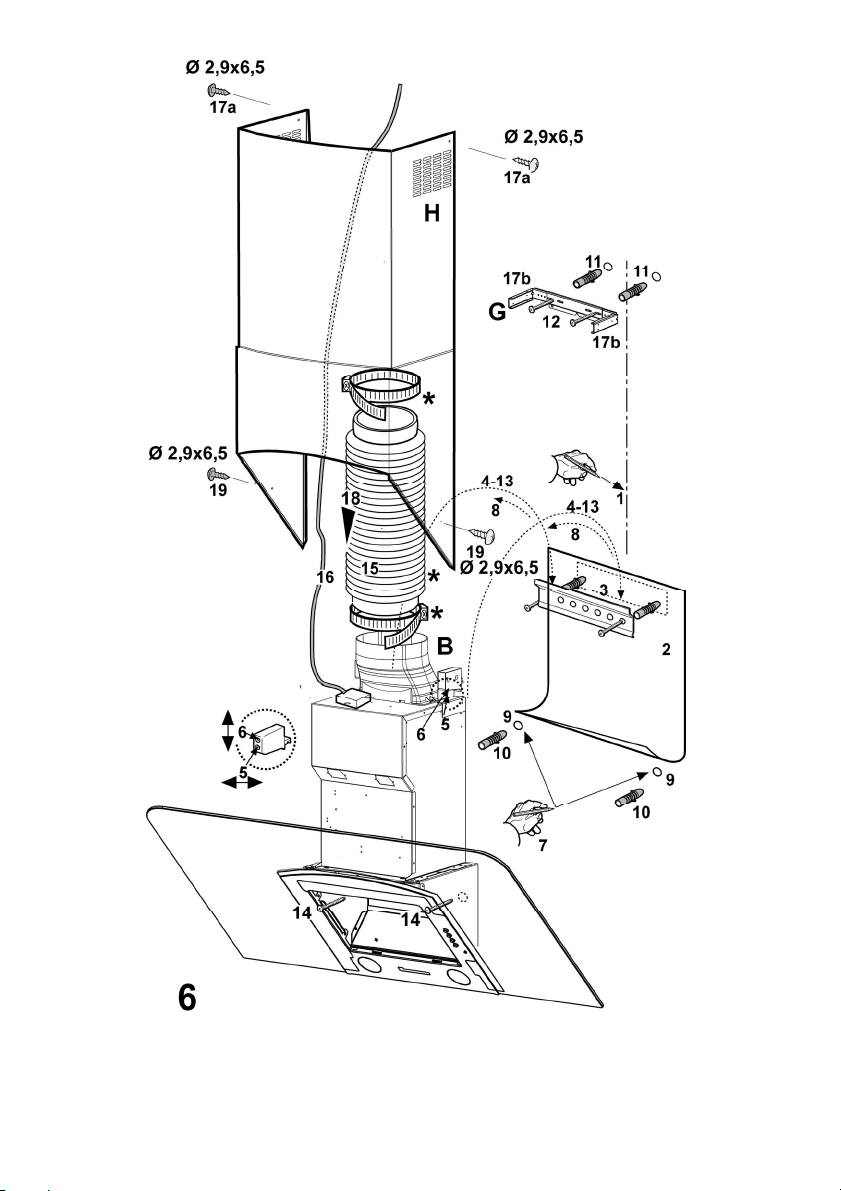
Fig. 6
1. Au moyen d’un crayon, tracer une ligne sur la paroi,
jusqu’au plafond, en correspondance de la ligne médiane
afin de faciliter les opérations d’installation.
2. Appliquer le schéma de perçage contre la paroi: la ligne
6
Page 7

médiane verticale imprimée sur le schéma de perçage
devra correspondre à la ligne médiane dessinée sur le
mur. Le bord inférieur du schéma de perçage devra
également correspondre au bord inférieur de la hotte.
3. Poser la bride de support sur le schéma de perçage, en
le faisant coïncider avec le rectangle hachuré, marquer
les deux trous externes puis percer les trous, retirer le
schéma de perçage, insérer 2 chevilles pour le mur et
fixer la bride de support de la hotte à l’aide de 2 vis de
5x45 mm.
4. Suspendre la hotte sur la bride.
5. Régler la distance de la hotte par rapport à la paroi.
6. Régler la position horizontale de la hotte.
7. A partir de l’intérieur du groupe d’aspiration, à l’aide d’un
crayon marquer le trou pour la fixation définitive de la
hotte (deux points de fixation sont nécessaires pour la
fixation définitive).
8. Retirer la hotte de la bride.
9. Percer un trou en correspondance du point marqué (ø 8
mm. – voir opération 7).
10. Insérer 2 chevilles à mur.
11. Appliquer la bride de support des cheminées „G“ contre
la paroi qui touche le plafond; utiliser la bride de support
en tant que schéma de perçage (le petit oeillet obtenu
sur le support doit coïncider avec la ligne précédemment
tracée sur le mur – opération 1) puis marquer 2 trous à
l’aide d’un crayon, percer les trous (ø 8 mm.), insérer les
deux chevilles.
12. Fixer la bride de support des cheminées contre la paroi,
à l’aide de deux vis de 5x45 mm.
13. Accrocher la hotte sur la bride inférieure.
14. Fixer définitivement la hotte contre la paroi
(ABSOLUMENT NECESSAIRE)
15. Effectuer la connexion entre le tuyau (tuyau et colliers de
fixation non fournis, à acheter séparément) pour
l’évacuation des fumées et la bague de connexion qui se
trouve au-dessus de l’unité moteur d’aspiration. L’autre
extrémité du tuyau devra être connectée à un dispositif
d’évacuation des fumées vers l’extérieur, en cas d’emploi
de la hotte dans la version aspirante. Si l’on souhaite
utiliser la hotte dans la version filtrante,fixer à la bride de
support des cheminées G le déflecteur F et effectuer la
connexion entre l’autre extrémité du tuyau et la bague de
connexion qui se trouve sur le déflecteur F.
16. Effectuer le branchement électrique.
17. Appliquer les cheminées et fixer ces dernières en haut à
l’aide de 2 vis (17a) sur le support des cheminées „G“
(17b).
18. Faire glisser la section inférieure de la cheminée pour
couvrir totalement le groupe d’aspiration, jusqu’à ce
qu’elle soit insérée dans son logement sur la hotte.
19. Fixer les sezione inférieur des cheminées avec 2 vis.
Remonter le châssis du filtre à charbon et le/les filtre(s) à
graisse et contrôler le fonctionnement parfait de la hotte.
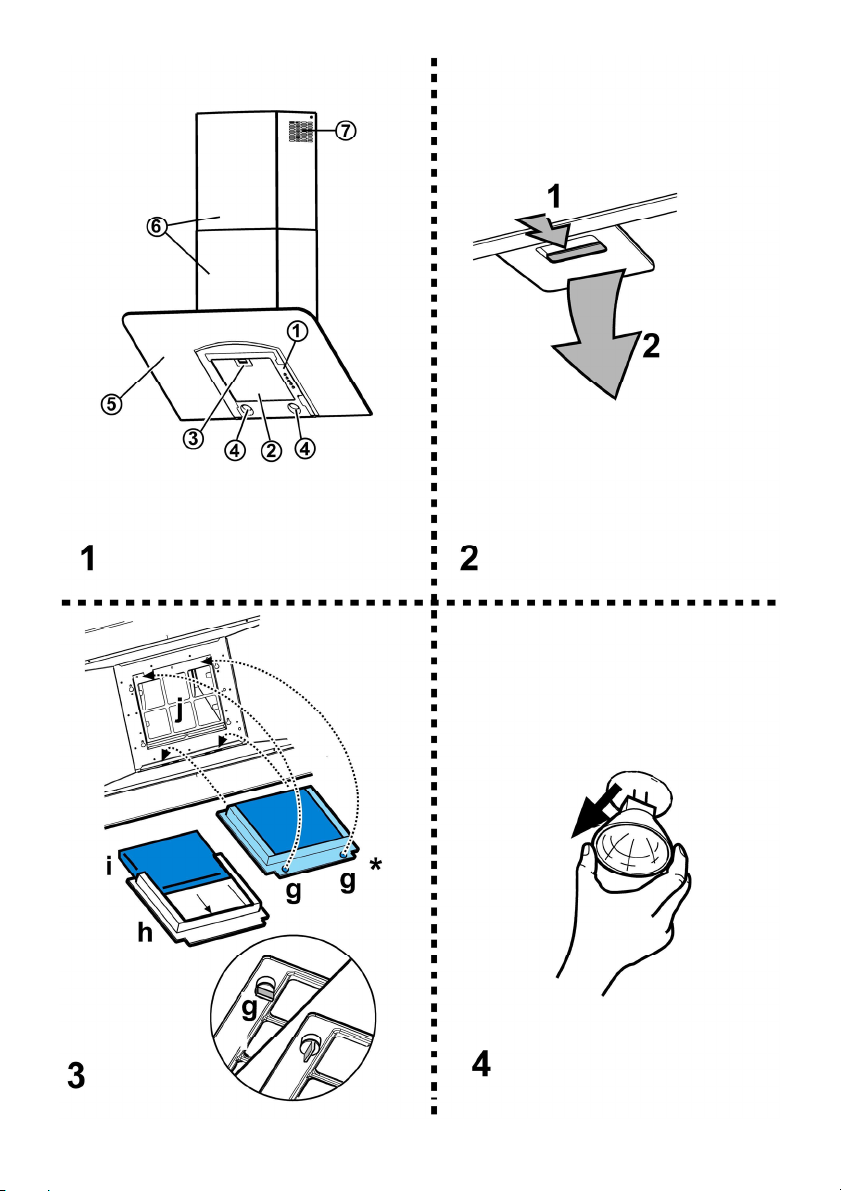
Description de la hotte
Fig. 1
1. Panneau de contrôle
2. Filtre anti-graisse
3. Poignée de décrochage du filtre anti-graisse
4. Lampe halogène
5. Écran vapeurs
6. Cheminée télescopique
7. Sortie de l’air (uniquement pour emploi dans la version
recyclage)
Fonctionnement
Utiliser la puissance d’aspiration maximum en cas de
concentration très importante des vapeurs de cuisson. Nous
conseillons d’allumer la hotte 5 minutes avant de commencer
la cuisson et de la faire fonctionner encore pendant 15
minutes environ après avoir terminé la cuisson.
a. Interrupteur lumières ON/OFF.
b. Interrupteur OFF/vitesse 1
c. Sélection vitesse 2
d. Sélection vitesse 3
Entretien
Attention! Avant toute opération de nettoyage ou
d’entretien, débrancher la hotte du circuit électrique en
enlevant la prise ou en coupant l’interrupteur général de
l’habitation.
Nettoyage
La hotte doit être régulièrement nettoyée à l’intérieur et à
l’extérieur (au moins à la même fréquence que pour l’entretien
des filtres à graisse). Pour le nettoyage, utiliser un chiffon
humidifié avec un détergent liquide neutre. Ne pas utiliser de
produit contenant des abrasifs.
NE PAS UTILISER D'ALCOOL!
ATTENTION: Il y a risque d’incendie si vous ne respectez pas
les instructions concernant le nettoyage de l’appareil et le
remplacement ou le nettoyage du filtre.
La responsabilité du constructeur ne peut en aucun cas être
engagée dans le cas d’un endommagement du moteur ou
d’incendie liés à un entretien négligé ou au non respect des
consignes de sécurité précédemment mentionnées.
7
Page 8

Filtre anti-gras
Il retient les particules de graisse issues de la cuisson.
Le filtre doit être nettoyé une fois par mois (ou lorsque le
système d’indication de saturation des filtres – si prévu sur le
modèle possédé – indique cette nécessité) avec des
détergents non agressifs, à la main ou dans le lave-vaisselle à
faibles températures et cycle rapide.
Le lavage du filtre anti-graisse métallique au lave-vaisselle
peut en provoquer la décoloration. Toutefois, les
caractéristiques de filtrage ne seront en aucun cas modifiées.
Pour démonter le filtre anti-graisse, tirer la poignée de
décrochement à ressort.
Fig. 2
Filtre à charbon actif (uniquement pour version
recyclage)
Retient les odeurs désagréables de cuisson.
Le filtre à charbon peut être nettoyé tous les deux mois (ou
lorsque le système d’indication de saturation des filtres – si
prévu sur le modèle possédé – indique cette nécessité) avec
de l’eau chaude et au moyen de détergents appropriés ou
dans le lave-vaisselle à 65°C (dans le cas de lavage dans le
lave-vaisselle suivre un cycle de lavage complet sans
vaisselle à l’intérieur).
Enlever l’eau qui excède en faisant attention de ne pas
abîmer le filtre, ensuite enlever le coussinet posé à l’intérieur
du châssis en plastique et le mettre dans le four pendant 10
minutes à 100°C pour le sécher définitivement. Remplacer le
coussinet tous les 3 ans et chaque fois que le filtre sera
abîmé.
Enlever le châssis de support filtre en tournant de 90° les
boutons (g) qui le fixent à la hotte.
Introduire le coussinet (i) au charbon à l’intérieur du châssis
(h), puis remonter le tout dans le logement spécialement
prévu à cet effet (j).
Fig. 3
On peut utiliser un filtre à charbon traditionel, ni lavable ni
régénerable, qui doit être changé tous les 3 ou 4 mois.
Châssis tapis du filtre à charbon sont soudés ensemble, le
châssis éventuellement fourni avec la hotte ne doit donc pas
être utilisé.
Si on veut utiliser ce filtre, l'introduire dans son logement et
fermer-le on tournant les 2 boutons.
Remplacement des lampes
Débrancher l’appareil du réseau électrique
Attention! Avant de toucher les lampes, assurez-vous
qu’elles soient froides.
Fig. 4
• A l’aide d’un petit tournevis plat, faire levier sur le bord de
l’ampoule et l’extraire.
• Retirer l’ampoule grillée et remplacez la par une ampoule
de 12V 20W MAX 30° Ø35 GU4.
• Remonter alors la nouvelle ampoule en procédant dans
le sens inverse du démontage.
Dans l’éventualité où l’éclairage ne devait pas fonctionner,
vérifier si les lampes ont été introduites correctement dans
leur logement, avant de contacter le service après-vente.
8
Page 9
EN - Instruction on mounting and use
Consult the designs in the front pages referenced in the text
by alphabet letters.
Closely follow the instructions set out in this manual. All
responsibility, for any eventual inconveniences, damages or
fires caused by not complying with the instructions in this
manual, is declined.
Caution
WARNING! Do not connect the appliance to the mains until
the installation is fully complete.
Before any cleaning or maintenance operation, disconnect the
hood from the mains by removing the plug or disconnecting
the home mains switch.
Always wear work gloves for all installation and maintenance
operations.
The appliance is not intended for use by children or persons
with impaired physical, sensorial or mental faculties, or if
lacking in experience or know-how, unless they are under
supervision or have been trained in the use of the appliance
by a person responsible for their safety.
Children should be monitored to ensure that they do not play
with the appliance.
Never use the hood without effectively mounted grating.!
The hood must NEVER be used as a support surface unless
specifically indicated.
The premises must be sufficiently ventilated, when the kitchen
hood is used together with other gas combustion devices or
other fuels.
The suctioned air must not be conveyed into a conduit used
for the disposal of the fumes generated by appliances that
combust gases or other fuels.
The flaming of foods beneath the hood itself is severely
prohibited.
The use of exposed flames is detrimental to the filters and
may cause a fire risk, and must therefore be avoided in all
circumstances.
Any frying must be done with care in order to make sure that
the oil does not overheat and burst into flames.
As regards the technical and safety measures to be adopted
for fume discharging it is important to closely follow the
relations provided by the competent authorities.
The hood must be regularly cleaned on both the inside and
outside (AT LEAST ONCE A MONTH, it is in any event
necessary to proceed in accordance with the maintenance
instructions provided in this manual)..
Failure to follow the instructions as concerns hood and filter
cleaning will lead to the risk of fires.
Do not use or leave the hood without the lamp correctly
mounted because of the possible risk of electric shocks.
We decline any responsibility for any problems, damage or
fires caused to the appliance as the result of the nonobservance of the instructions included in this manual.
This appliance is marked according to the European directive
2002/96/EC on Waste Electrical and Electronic Equipment
(WEEE). By ensuring this product is disposed of correctly, you
will help prevent potential negative consequences for the
environment and human health, which could otherwise be
caused by inappropriate waste handling of this product.
The symbol
on the product, or on the documents
accompanying the product, indicates that this appliance may
not be treated as household waste. Instead it should be taken
to the appropriate collection point for the recycling of electrical
and electronic equipment. Disposal must be carried out in
accordance with local environmental regulations for waste
disposal.
For more detailed information about treatment, recovery and
recycling of this product, please contact your local council,
your household waste disposal service or the shop where you
purchased the product.
Use
The hood is designed to be used either for exhausting or filter
version.
Ducting version
The hood is equipped with a top air outlet B for discharge of
fumes to the outside (exhaust pipe and pipe fixing clamps not
provided). Connect the hood and discharge holes on the walls
with a diameter equivalent to the air outlet (connection flange).
Using the tubes and discharge holes on walls with smaller
dimensions will cause a diminution of the suction performance
and a drastic increase in noise.
Any responsibility in the matter is therefore declined.
Attention! If the hood is supplied with carbon filter, then it
must be removed.
Filter version
Should it not be possible to discharge cooking fumes and
vapour to the outside, the hood can be used in the filter
version, fitting an activated carbon filter and the deflector F
on the support (bracket) G, fumes and vapours are recycled
through the top grille H by means of an exhaust pipe
connected to the top air outlet B and the connection ring
mounted on the deflector F (exhaust pipe and pipe fixing
clamps not provided).
Attention! If the hood is not supplied with carbon filter,
then it must be ordered and mounted.
The models with no suction motor only operate in ducting
mode, and must be connected to an external suction device
(not supplied).
The connecting instructions are supplied with the peripheral
suction unit.
Installation
The minimum distance between the supporting surface for the
cooking vessels on the hob and the lowest part of the range
hood must be not less than 50cm from electric cookers and
65cm from gas or mixed cookers.
If the instructions for installation for the gas hob specify a
9
Page 10

greater distance, this must be adhered to.
Electrical connection
The mains power supply must correspond to the rating
indicated on the plate situated inside the hood. If provided with
a plug connect the hood to a socket in compliance with current
regulations and positioned in an accessible area. If it not fitted
with a plug (direct mains connection) or if the plug is not
located in an accessible area apply a bi-polar switch in
accordance with standards which assures the complete
disconnection of the mains under conditions relating to overcurrent category III, in accordance with installation
instructions.
Warning! Before re-connecting the hood circuit to the mains
supply and checking the efficient function, always check that
the mains cable is correctly assembled.
Mounting
Before beginning installation:
• Check that the product purchased is of a suitable size for
the chosen installation area.
• To facilitate installation, remove the fat filters and the
other parts allowed and described here, dismantle and
mount it.
To remove see also the relative paragraphs.
• Remove the active carbon (*) filter/s if supplied (see also
relative paragraph). This/these is/are to be mounted only
if you want lo use the hood in the filtering version.
• Check (for transport reasons) that there is no other
supplied material inside the hood (e.g. packets with
screws (*), guarantees (*), etc.), eventually removing
them and keeping them.
• If possible, disconnect and move freestanding or slide-in
range from cabinet opening to provide easier access to
rear wall/ceiling. Otherwise put a thick, protective
covering over countertop, cooktop or range to protect
from damage and debris. Select a flat surface for
assembling the unit. Cover that surface with a protective
covering and place all canopy hood parts and hardware
in it.
• Disconnect the hood during electrical connection, by
turning the home mains switch off.
• In addition check whether near the installation area of the
hood (in the area accessible also with the hood mounted)
an electric socket is available and it is possible to
connect a fumes discharge device to the outside (only
suction version).
• Carry out all the masonry work necessary (e.g.
installation of an electric socket and/or a hole for the
passage of the discharge tube).
Expansion wall plugs are provided to secure the hood to most
types of walls/ceilings. However, a qualified technician must
verify suitability of the materials in accordance with the type of
wall/ceiling. The wall/ceiling must be strong enough to take
the weight of the hood. Do not tile, grout or silicone this
appliance to the wall. Surface mounting only.
Preliminary information for installation of the hood:
Disconnect the hood during electrical connection, by turning
the home mains switch off.
Remove the fat/s filter/s and the carbon filter frame.
Do not tile, grout or silicone this appliance to the wall. Surface
mounting only. Do not fix chimney flue to furniture or fly over
shelves unless the chimney flue can be easily removed, in
case maintenance is ever required.
Assembling the chimney flue support/bracket (3 parts):
The three parts should be fixed with 4 screws, the support
extension is adjustable and should correspond to the internal
width of the telescopic chimney flue.
Assembling the deflector (only when a deflector
composed of 3 parts is supplied – the deflector should be
only for the filter version):
The three parts should be fixed with 2 screws, the deflector
extension is adjustable and should correspond to the width of
the chimney flue support, to which it is then fixed.
Fig. 5
a. Rest the suction unit on a flat surface and thread the
lower part of the hood onto it.
b. Make all the electrical connections between the two
parts.
c. Fix the hood definitively to the suction unit with the
number and type of screws indicated in the figure.
Fig. 6
1. Using a pencil, draw a line on the wall, extending up to
the ceiling, to mark the centre. This will facilitate
installation.
2. Rest the drilling template against the wall: the vertical
centre line printed on the drilling template must
correspond to the centre line drawn on the wall, and the
bottom edge of the drilling template must correspond to
the bottom edge of the hood.
3. Rest the support bracket on the drilling template so that it
coincides with the dotted rectangle, mark the two outer
holes and drill them, remove the drilling template, insert 2
wall plugs and fix the hood support bracket into place
using two 5x45mm screws.
4. Hang the hood on the bracket.
5. Adjust the distance of the hood from the wall.
10
Page 11

6. Adjust the horizontal position of the hood.
7. Using a pencil mark the cooker hood permanent drill hole
inside the suction group (two drill holes are necessary for
fastening).
8. Remove the hood from the bracket.
9. Drill at the point marked (Ø8mm - see operation 7).
10. Insert 2 wall plugs.
11. Rest the chimney support bracket „G“ against the wall,
touching the ceiling. Use the support bracket as a drilling
template (the small slot formed on the support must
coincide with the line drawn on the wall as above –
operation 1) and mark 2 holes with a pencil, drill the
holes (Ø8mm), insert 2 wall plugs.
12. Fix the chimney support bracket to the wall using two
5x45mm screws.
13. Hook the hood onto the bottom bracket.
14. Fix the hood into its final position on the wall
(ABSOLUTELY ESSENTIAL).
15. Connect a pipe (pipe and pipe clamps not provided, to be
purchased separately) for discharge of fumes to the
connection ring located over the suction motor unit.
If the hood is to be used in ducting version, the other end
of the pipe must be connected to a device expelling the
fumes to the outside. If the hood is to be used in filter
version, then fix the deflector F to the chimney support
bracket G and connect the other extremity of the pipe to
the connection ring placed on the deflector F.
16. Make the electrical connections.
17. Apply the chimney stacks and fasten them at the top to
the chimney support „G“ (17b) using 2 screws (17a).
18. Slide the bottom section of the chimney down until it
completely covers the suction unit and slots into the
housing provided on top of the hood.
19. Fix the lower stack of the chimney with 2
screws.Remount the carbon filter frame and the fat/s filter/s
and check the perfect functioning of the hood.
Description of the hood
Fig. 1
1. Control panel
2. Grease filter
3. Grease filter release handle
4. Halogen lamp
5. Vapour catcher
6. Telescopic chimney
7. Air outlet (used for filter version only)
Operation
Use the high suction speed in cases of concentrated kitchen
vapours. It is recommended that the cooker hood suction is
switched on for 5 minutes prior to cooking and to leave in
operation during cooking and for another 15 minutes
approximately after terminating cooking.
a. ON/OFF light switch
b. Speed 1/OFF switch
c. 2-speed selection
d. 3-speed selection
Maintenance
ATTENTION! Before performing any maintenance operation,
isolate the hood from the electrical supply by switching off at
the connector and removing the connector fuse.
Or if the appliance has been connected through a plug and
socket, then the plug must be removed from the socket.
Cleaning
The cooker hood should be cleaned regularly (at least with the
same frequency with which you carry out maintenance of the
fat filters) internally and externally. Clean using the cloth
dampened with neutral liquid detergent. Do not use abrasive
products. DO NOT USE ALCOHOL!
WARNING: Failure to carry out the basic cleaning
recommendations of the cooker hood and replacement of the
filters may cause fire risks.
Therefore, we recommend oserving these instructions.
The manufacturer declines all responsibility for any damage to
the motor or any fire damage linked to inappropriate
maintenance or failure to observe the above safety
recommendations.
11
Page 12

Grease filter
Traps cooking grease particles.
This must be cleaned once a month (or when the filter
saturation indication system – if envisaged on the model in
possession – indicates this necessity) using non aggressive
detergents, either by hand or in the dishwasher, which must
be set to a low temperature and a short cycle.
When washed in a dishwasher, the grease filter may discolour
slightly, but this does not affect its filtering capacity.
To remove the grease filter, pull the spring release handle.
Fig. 2
Charcoal filter (filter version only)
It absorbs unpleasant odours caused by cooking.
The charcoal filter can be washed once every two months (or
when the filter saturation indication system – if envisaged on
the model in possession – indicates this necessity) using hot
water and a suitable detergent, or in a dishwasher at 65°C (if
the dishwasher is used, select the full cycle function and leave
dishes out).
Eliminate excess water without damaging the filter, then
remove the mattress located inside the plastic frame and put it
in the oven for 10 minutes at 100° C to dry completely.
Replace the mattress every 3 years and when the cloth is
damaged.
Remove the filter holder frame by turning the knobs (g) 90°
that affix the chimney to the cooker hood.
Insert the pad (i) of activated carbon into the frame (h) and fit
the whole back into its housing (j).
Fig. 3
It is possible to use a traditional carbon filter, neither
washable nor regenerable, to be replaced every 3 - 4 months.
The filter holder frame of the carbon filter is welded together;
the eventual frame supplied with the hood is not, therefore, to
be used.
Insert it into its housing and fix it turning the 2 plastic knobs.
Replacing lamps
Disconnect the hood from the electricity.
Warning! Prior to touching the light bulbs ensure they are
cooled down.
Fig. 4
• Use a small screwdriver as a lever on the borders of the
lamp in order to remove the lightbulb.
• Slide out the lightbulb to be replaced and replace with a
new 12V 20W MAX 30° Ø35 12V GU4.
• Carry out the replacement and mount the new lightbulb
by following instructions in the reverse.
If the lights do not work, make sure that the lamps are fitted
properly into their housings before you call for technical
assistance.
12
Page 13

Page 14

Page 15

Page 16

LI3JUA Ed. 01/09
 Loading...