

Rosieres RHT 619 IN User Manual
13
11
9
78
B C
S
04306184/3 - 425
12
10
260
D
36
80
80
48
INSTRUCTIONS POUR L'EMPLOI
INSTRUCTIONS FOR USE
GEBRAUCHSANWEISUNG
ISTRUZIONI PER L'USO
GEBRUIKSAANWIJZING

que les valeurs de tension correspondent
à celles qui sont indiquées sur la plaque
des caractéristiques de l’appareil, qui se
trouve à l'intérieur de celui-ci.
Si votre appareil, n'a pas de câble flexible
qui ne peut pas être séparé ni de prise, ou
bien d'autre dispositif qui garantisse le dé-
branchement de tous les pôles du réseau,
avec une distance d'ouverture entre les
contacts d'au moins 3 mm, ces dispositifs
de séparation du réseau doivent alors être
prévus dans l'installation fixe.
Avant de procéder à une opération
d’entretien ou de nettoyage quelconque,
débranchez l’appareil.
appareils peints, utiliser un chiffon mouillé
avec de l’eau tiède et un détersif neutre.
Pour le nettoyage extérieur des appareils
en acier, en cuivre et en laiton il est conseillé
d’utiliser des produits spécifiques et de
suivre les instructions fournies sur le produit.
Pour le nettoyage de l’intérieur de l’appareil,
utiliser un chiffon (ou un pinceau) imbibé
d’alcool dénaturé.
électrique (poêle à gaz, à huile, à charbon
etc.) sont utilisés en même temps.
En effet, en évacuant l'air, la hotte pourrait
créer une dépression dans la pièce.
La pression négative de la pièce ne doit
pas dépasser 0,04mbar, évitant ainsi que
la source de chaleur provoque un appel
des gaz qui doivent être évacués. Il est
donc nécessaire d'équiper la pièce de prises
d'air alimentant un flux d'air frais constant.
ATTENTION: cet appareil doit être relié
à la terre.
Lors du raccordement électrique assurez-
vous que la prise de courant est munie de
connexion de mise à terre; vérifiez aussi
Faites très attention surtout aux filtres anti-
graisse et nettoyez-les périodiquement (au
moins tous les deux mois). Retirez les filtres
anti-graisse et lavez-les avec un détergent
neutre, à la main ou dans le lave-vaisselle.
Pour enlever les filtres anti-graisse: à l'aide
de la poignée, pousser l’arrêt vers l’intérieur
et tirer le filtre vers le bas (Fig. 4); ouvrir
le chariot et enlever l’autre filtre de la même
façon.
L’élimination, d’éventuels dépôts de graisse
sur l’appareil, doit être effectuée en fonction
de l’utilisation de ce dernier (au moins tous
les 2 mois). Il faut éviter d’utiliser des
produits contenant des abrasifs ou des
corrosifs. Pour le nettoyage extérieur des
cuisson et la base de la hotte doit être d'au
moins 65 cm.
L'air aspiré ne doit pas être canalisé dans
un conduit qui est utilisé pour évacuer les
fumées produites par des appareils alimen-
tés par des sources d'énergies autres que
l'énergie électrique (installations de chauf-
fage central, radiateurs, chauffe-eau, etc.).
Pour évacuer l'air qui doit être éliminé
respectez les prescriptions des autorités
compétentes. L'air ne doit pas être évacué
à travers une cavité du mur, à moins que
cette cavité n'ait été prévue à cet effet.
Prévoyez une aération de la pièce adéquate
quand une hotte et des appareils alimentés
par une énergie autre que l'énergie
ENTRETIEN
--------------------------------------------------------
usagée est particulièrement dangereuse.
N'utilisez pas de grils électriques découverts.
Pour éviter des risques d'incendie possibles
suivez les instructions données concernant
le nettoyage des filtres antigraisses et sur
la façon d'enlever des dépots éventuels de
Un entretien soigné est une garantie de
bon fonctionnement et de bon rendement
de votre appareil dans le temps.
graisse sur l'appareil.
ATTENTION
--------------------------------------------------------
La distance entre la surface de la table de
Français
UTILISATION
--------------------------------------------------------
Evitez d'utiliser des appareils pouvant
provoquer des flammes à proximité de la
hotte.
Dans le cas de fritures, faites tout particu-
lièrement attention au danger d’incendie
que représentent les huiles et les corps
gras. A cause de son inflammabilité l’huile
(Fig. 5). Les 3 vis A à utiliser se trouvent
dans le sachet des accessoires joint à
l’entretoise. Couper la pièce
d'entretoisement suivant la distance qui
doit être compensée.
Installation sous un placard mural
Conditions essentielles pour le montage:
– Prévoyez l’alimentation électrique.
– Si votre appareil doit être installé en version
Aspirante, prévoyez le trou d’évacuation
de l’air.
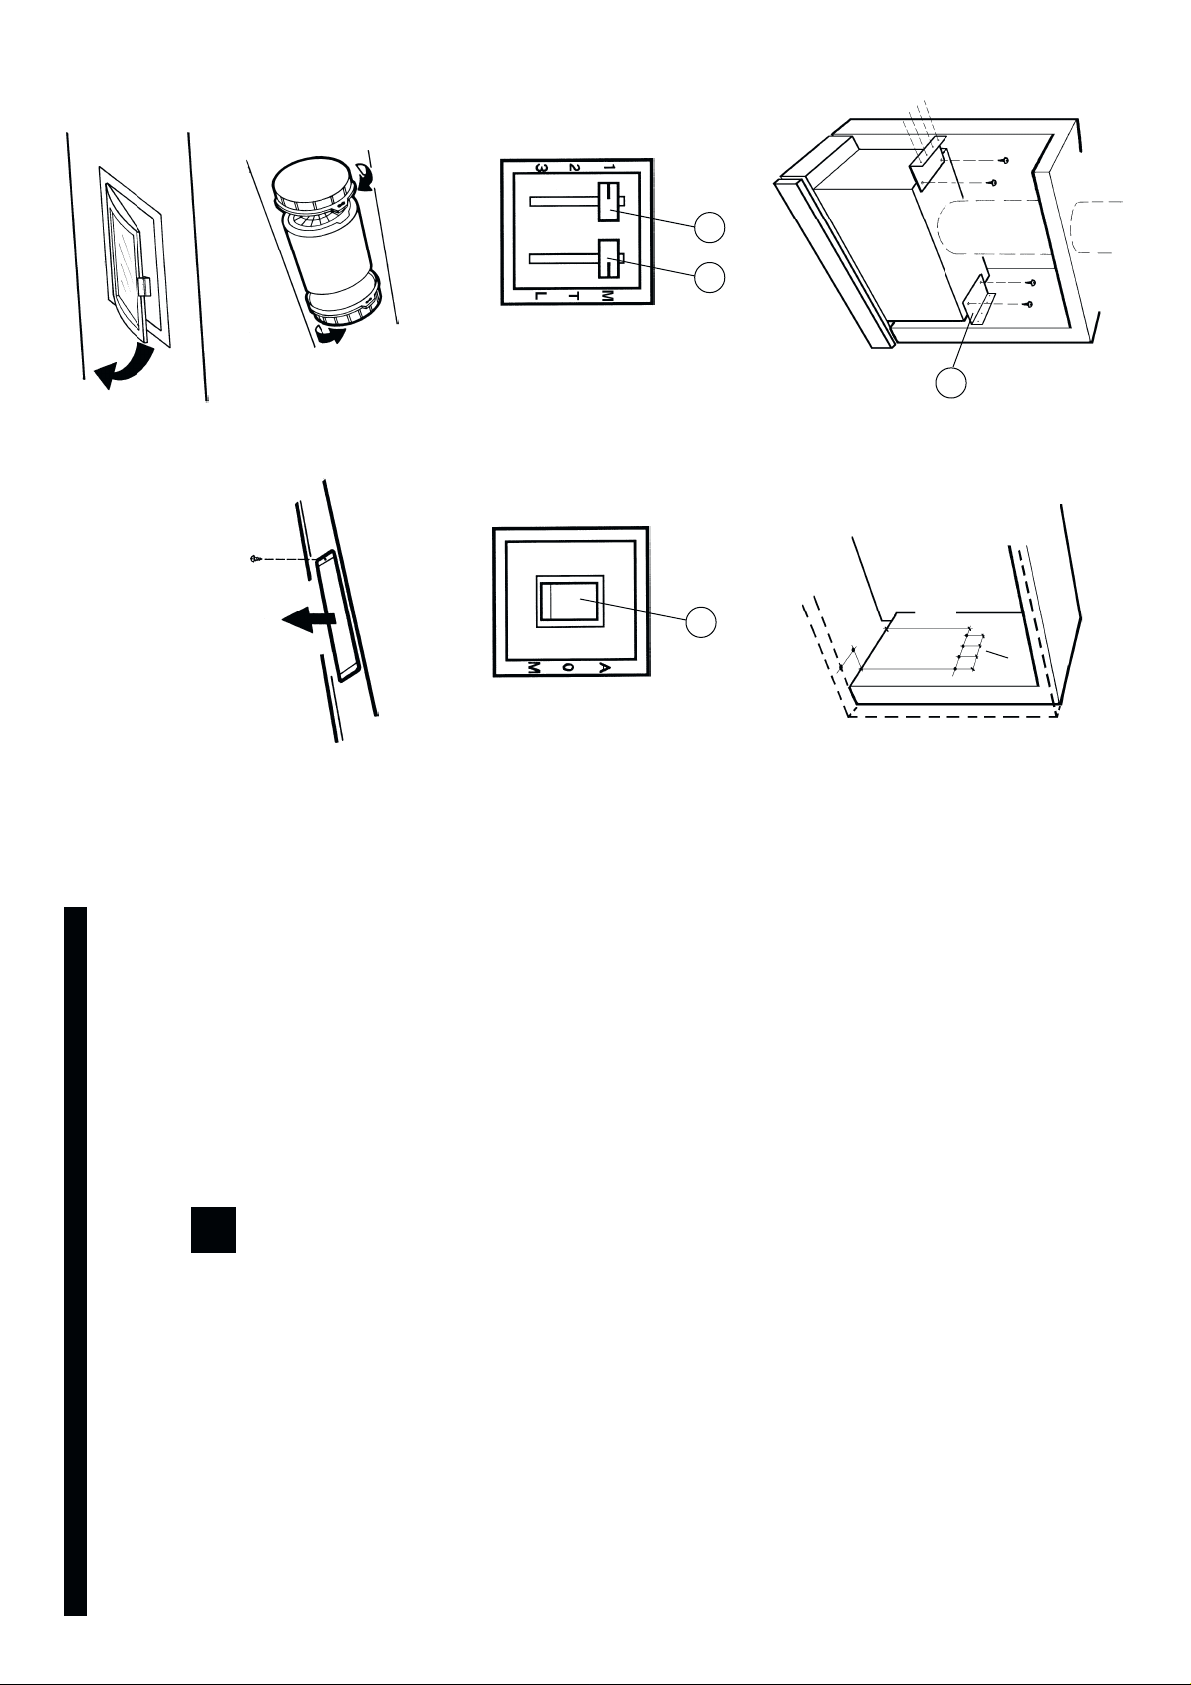
Interrupteur B: sélectionne les vitesses du
Lorsque l’interrupteur est sur la position M ou
T, en ouvrant le chariot le moteur se mettra
en marche automatiquement à la vitesse qui
a été sélectionnée auparavant.
Commandes de la Fig. 10:
Interrupteur D: position A (automatique), le
arrêt;
sur la position L, la lumière est toujours
allumée et le moteur est arrêté (que le
chariot soit ouvert ou fermé); le moteur
reste en position d’arrêt.
moteur.
vis (Fig. 3).
Avant d'effectuer l'assemblage, pour faciliter les
manoeuvres, enlever le filtre anti-graisse: à
l'aide de la poignée, pousser l’arrêt vers l’intérieur
et tirer le filtre vers le bas (Fig. 4); ouvrir le chariot
et enlever l’autre filtre de la même façon.
ATTENTION : Pour ne pas détériorer le
produit, pendant l’installation, N’UTILISER
QUE LES VIS FOURNIES EN EQUIPEMENT
et correctement, comme indiqué dans les
consignes à suivre.
Afin de compenser des vides éventuels de
profondeur entre l'appareil et le mur, une
PIÈCE D'ENTRETOISEMENT en plastique
a été prévue; elle doit être fixée sur l'arrière
de l'appareil au moyen des trois vis A
raccordement de la hotte à un tuyau approprié
de sorte que l'air soit convoyé en dehors du
meuble suspendu et renvoyé dans la pièce.
Faire la connexion électrique.
FONCTIONNEMENT
--------------------------------------------------------
Commandes de la Fig. 9:
Interrupteur C: sur la position M (moteur),
l’ouverture/fermeture du chariot règle la
mise en marche/l’arrêt du moteur; la
lumière reste éteinte;
sur la position T (totale), l’ouverture/
fermeture du chariot règle les lumières et
le moteur: allumées-en marche/éteintes-
dans la pièce.
ATTENTION: Pour la version Recyclage vous
devez utiliser les filtres à charbon qui purifient
l'air qui est remis en circulation dans la pièce.
Dans la version Aspirante (Fig. 2), les vapeurs
et les odeurs de la cuisine sont convoyées
direc-tement à l’extérieur par un tuyau
d’évacuation à travers la paroi/plafond. Il n’est
donc pas nécessaire d’utiliser les filtres à
charbon.
INSTALLATION
--------------------------------------------------------
Fixer la bride d'évacuation de l'air à votre
appareil; la fixation a lieu au moyen des deux
4 vis autotaraudées fournies en
équipement avec l’appareil.
Fixation avec étriers comme sur la Fig. 7:
Sortir du sachet des accessoires les 2
étriers (S) et les 12 vis fournis. Fixer les
étriers à l’élément mural en faisant
attention de les positionner correctement.
Pour cette opération utiliser les 8 vis plus
courtes, puis fixer l’appareil aux étirers à
l’aide des 4 vis plus longues.
Pour la version Aspirante: faites la liaison entre
la bride de raccordement de la hotte et le trou
d'évacuation de l'air préparé dans le mur/
plafond au moyen d'un tube spécial.
Pour la version Recyclage: reliez la bride de
DESCRIPTION
--------------------------------------------------------
L'appareil peut être utilisé en version recyclage
ou aspirante.
Dans la version Recyclage (Fig. 1), l’air et les
vapeurs convoyés par l’appareil sont épurés
par les filtres à charbon et remis en circulation
Fixation comme dans la Fig. 6:
A l'aide du gabarit de perçage faites les
quatre trous de fixation prévus pour votre
modèle dans la base de votre placard
mural, et découpez l'ouverture nécessaire
pour l'évacuation de l'air.
Approcher la hotte au fond de l’élément
mural et l’assurer à ce dernier à l’aide de

lead of this appliance may not correspond
with the coloured markings identifying the
terminals in your plug, proceed as follows:
– the wire which is coloured green and
yellow must be connected to the terminal
in the plug which is marked with the letter
E or by the earth symbol [ ], or co-
loured green or green and yellow;
– the wire which is coloured blue must be
connected to the terminal which is marked
with the letter N or coloured black;
– the wire which is coloured brown must
be connected to the terminal which is
marked with the letter L or coloured red.
When making the electrical connections,
check that the current socket has a ground
en dévissant la vis (Fig. 12). Remplacer avec
lampes du même type.
Pour remplacer les lampes halogènes
rectangulaires, ouvrir le volet (Fig. 13) et
démonter l'ampoule en faisant attention à ne
pas la toucher de la main. Remplacer par une
ampoule ayant les mêmes caractéristiques.
hood and some other heat equipment fed
with an energy other than electricity (gas,
oil, coal heaters, etc) operate at the same
time. In fact the intake hood, disposing of
air, could create a vacuum in the room.
The vacuum should not exceed 0,04mbar.
This prevents the gas exhausted by the
heat source from being intaken again. It is
therefore advisable to ensure the room
contains air taps able to ensure a steady
flow of fresh air.
ATTENTION: This appliance must be
grounded.
The following warning is valid in the United
Kingdom only:
As the colours of the wires in the mains
un peu plus, le moteur fonctionne à la deuxième
vitesse; en l'ouvrant complètement, le moteur
fonctionne à la troisième vitesse.
Si vous utilisez l'appareil en version recyclage,
il est nécessaire de remplacer les filtres à
charbons actifs; la fréquence de cette
opération dépend de l'utilisation que vous en
faites (Fig. 11), mais vous devez le faire
environ tous les six mois. Pour enlever les
filtres, faites-leur suivre un mouvement rotatif,
et raccrochez-les toujours en les faisant
tourner, mais en sens contraire.
Lampes
Pour acceder à le neon, retirer la plafonnier
The distance between the hob and the
lower part of the hood must be at least 65
cm.
The air collected must not be conveyed
into a duct used to blow off smokes from
ap-pliances fed with an energy other than
electricity (central heating systems, ther-
mosiphons, water-heaters, etc.).
Comply with the official instructions provided
by the competent authorities in merit when
installing the disposal duct. In addition,
exhaust air should not be discharged into
a wall cavity, unless the cavity is designed
for that purpose.
The room must be well aerated in case a
En ouvrant partiellement le chariot, le moteur
fonctionne à la première vitesse; en l'ouvrant
moteur et la lumière s'allument u s'éteignent
automatiquement en ouvrant ou en fermant
le chariot. Sur la position M (manuelle) la
lumière est allumée. Sur la position 0, la
lumière est éteinte.
WARNING
--------------------------------------------------------
English
months). Remove the grease filters and
wash them either by hand or in the
dishwasher using neutral detergent. To take
off the anti-grease filters: at the handle,
push the stop inwards and pull the filter
downwards (Fig.4); open the trolley and
take off the other filter doing the same.
Any fat deposits should be removed from
the appliance periodically depending on
amount of use (at least every 2 months).
Avoid using abrasive or corrosive products.
To clean painted appliances on the outside,
use a cloth dipped in lukewarm water and
neutral detergent. To clean steel, copper
or brass appliances on the outside, it is
always best to use specific products,
instructions.
To compensate possible depth voids be-
tween the appliance and the wall, a plastic
SPACING BAR to be fixed at the back of
the appliance by means of the three
screws A is included (Fig. 5). The 3 screws
A to be used are contained in the acces-
sory bag attached to the plastic spacing
bar. Cut the spacing bar according to the
distance to be adjusted.
Assembly under a pensile cupboard
The following operations are essential for assem-
bly:
MAINTENANCE
--------------------------------------------------------
oil and grease from catching fire. Already
used oil is especially dangerous in this re-
spect. Do not use uncovered electric grates.
To avoid possible risks of fire always comply
with the indicated instructions when cleaning
anti-grease filters and when removing
Thorough servicing guarantees correct and
long-lasting operation.
Particular care must be paid to the grease
filters which must be periodically cleaned in
relation to use (at least once every two
filters: at the handle, push the stop inwards
and pull the filter downwards (Fig. 4); open the
trolley and take off the other filter doing the
same.
IMPORTANT: So as not to damage your
product, during installation USE ONLY THE
SCREWS PROVIDED. Make sure these are
used as shown in the following
grease deposits from the appliance.
INSTALLATION
--------------------------------------------------------
Fix the air venting flange onto the apparatus;
it must be fixed either by means of two screws
(Fig. 3).
Before assembling, in order to manoeuvre the
appliance more easily, take off the grease
USE
--------------------------------------------------------
tricity main, with a contact opening distance
of at least 3 mm, such separating device
ensuring disconnection from the main must
be included in the fixed installation.
Always switch off the electricity supply be-
fore carrying out any cleaning or servicing
Avoid using materials which could cause
spurts of flame (flambées) near the ap-
pliance.
When frying, take particular care to prevent
version (Fig. 2), cooking vapours and odours
are conveyed straight outside by a disposal
duct which passes through the wall/ceiling.
Use of charcoal filters is therefore unneces-
sary.
operations on the appliance.
--------------------------------------------------------
The appliance can be used in both the filtering
and ducting version. In the Filtering version
(Fig. 1), the air and va-pours conveyed by the
appliance are depurated by charcoal filter and
recirculated around the room. ATTENTION:
Using the hood as a filtering one it is neces-
sary to use the charcoal filters that purifies
the air sent back into the room. In the Ducting
connection and that the voltage values
correspond to those indicated on the data
plate inside the appliance itself.
In case your appliance is not furnished with
a non separating flexible cable and has no
plug, or has not got any other device ensu-
ring omnipolar disconnection from the elec-
DESCRIPTION
following the instructions on the products
themselves. To clean the inside of the
appliance, use a cloth (or brush) dipped in
denatured ethyl alcohol.

Switch B: it select the speed of the motor.
When the switch is in M or T position, opening
the truck, the motor starts working automati-
cally at the selected speed.
Controls of Fig. 10:
Switch D: position A (automatic), the motor
Position T (total): the motor and the lights
switch ON/OFF by opening/closing the
truck.
Position L: the lights switch ON and the
motor switch OFF either if the truck is
and the light are automatically regulated
ON or OFF by the opening/closing of the
truck. Position M (manual), the light is on.
open or closed; the motor is always OFF.
OPERATION
--------------------------------------------------------
Controls of Fig. 9:
Switch C: position M (motor): the motor
switches ON/OFF by opening/closing the
truck; the lights are always OFF.
Make the electrical connections.
equate tube.
Filtering version: connect a proper pipe to the
flange of the hood so that the air is sent
outside the pensile and sent back into the
room.
Move the hood close to the bottom of the
wall unit and then connect the two units
by means of the 4 self-tapping screws
supplied together with the appliance.
Fixation with brackets as in Fig. 7:
Take the two brackets (S) out of the
accessory bag together with the 12 screws
provided. Fit the brackets to the wall unit
being careful to position these correctly;
for this operation use the 8 shorter screws.
At this point, secure the appliance to the
brackets using the 4 longer screws.
Ducting version: connect the flange of the
hood with the air venting hole made previ-
ously in the wall/ceiling by means of an ad-
changed according to use (Fig. 11), usually
every six months. Remove the filters rotating
them and replace them rotating into the oppo-
site direction.
Light bulb
If the fluorescent light need changing,
slacken the light cover by disconnecting the
screw and remove the bulb itself (Fig. 12).
Replace with a bulb of the same type.
To change the rectangular halogen bulbs
open the cover and remove the bulb without
touching it with bare hands (Fig.13). Replace
with a bulb of the same type.
– Install the wiring system
– Prepare the air venting hole if your applian-
Fixation as indicated in Fig. 6:
Using the relative template make the 4
necessary fixing holes in the bottom of
the cupboard and cut the air venting hole.
ce is to be installed in the Ducting version.
Opening slightly the truck, the motor works at
the I speed; opening a bit more, the motor
works at the II speed; opening totally the truck,
the motor works at the III speed.
When using the filtering version of the appli-
ance, the actived carbon filters must be
Position 0, the light is off.
einen konstanten Zustrom von Frischluft
gewährleisten.
ACHTUNG: dieses Gerät muss geerdet
werden.
Beim elektrischen Anschluss sicherstellen,
dass die Steckdose eine Erdung aufweist.
Beim elektrischen Anschluss muss überprüft
werden, ob die Spannungswerte des
Stromnetzes mit den Werten auf dem im
Innern des Gerätes angebrachten Typens-
childs übereinstimmen. Falls Ihr Gerät nicht
mit einem fest angeschlossenem Kabel mit
Stecker oder einer sonstigen Vorrichtung,
die eine allpolige Unterbrechung mit einer
Kontaktöffnung von mindestens 3 mm
Filter nach unten ziehen (Abb. 4);
Schiebegestell öffnen und den zweiten Filter
auf die gleiche Weise herausnehmen.
Die Entfernung eventueller
Fettablagerungen vom Gerät erfolgt in
regelmäßigen Abständen in Abhängigkeit
von der Benutzung (zumindest alle zwei
Monate). Die Verwendung von
scheuernden oder korrosiven Produkten
vermeiden. Für die äußere Reinigung von
lackierten Geräten ein mit lauwarmen
Wasser und Neutralreiniger angefeuchtetes
Tuch verwenden; für die äußere Reinigung
der Geräte aus Stahl, Kupfer und Messing
wird die Verwendung von Spezialprodukten
empfohlen, wobei die auf dem Produkte
Abluft-Dunstabzugshaube und einer ra-
umluftabhängigen Feuerstätte (wie z. B.
gas-, öl- oder kohlebetriebene Heizgeräte,
Durchlauferhitzer, Warmwasserbereiter) ist
Vorsicht geboten, da beim Absaugen der
Luft durch die Dunstabzugshaube dem
Aufstellraum die Luft entnommen wird, die
die Feuerstätte zur Verbrennung benötigt.
Ein gefahrloser Betrieb ist möglich, wenn
bei gleichzeitigem Betrieb von Haube und
raumluftabhängiger Feuerstätte im Aufstell-
raum der Feuerstätte ein Unterdruck von
höchstens 0,04 mbar erreicht wird und
damit ein Rücksaugen der Feuerstätten-
abgase vermieden wird. Daher den Raum
mit Lüftungsanschlüssen versehen, die
--------------------------------------------------------
Nur eine sorgfältige Pflege garantiert auf
Dauer eine gute Leistung und Funktion
des Geräts.
Besonders wichtig ist die Reinigung der
Fettfilter. Hierzu sind die Metallfilter
abzunehmen. Die Reinigung wird von Hand,
mit biologisch abbaubarem
Reinigungsmittel, oder in der Spülmaschine
empfohlen. Die Reinigungshäufigkeit hängt
ab von der Benutzungsdauer und der Art
der abzusaugenden Wrasen. Zum
Enfgernen der Entfettungsfilter: in
Überreinstimmung mit dem Handgriff den
Feststeller nach innen stossen und den
Das Gerät ist so zu montieren, daß der
Abstand zwischen den Kochplatten und
dem unteren Rand der Dunstabzugshaube
mindestens 65 cm beträgt.
Ein Anschluss der Abluftleitungen an
Verbrennungsabgaskamine (zum Beispiel
Zentralheizung, Heizgeräte, Badezimmer-
öfen usw.) ist nicht gestattet.
In jedem Fall sind bei der Ableitung der
Abluft die behördlichen Vorschriften zu
beachten. Desweiteren darf die Abluft nur
dann durch ein Loch in der Wand geleitet
werden, wenn dieses für diesen Zweck
bestimmt ist.
Achtung! Bei gleichzeitigem Betrieb einer
WARTUNG
Materialien (Flambieren) vermeiden.
Beim Frittieren besonders auf die Brand-
gefahr achten, die durch Öl und Fette
verursacht wird. Besonders gefährlich ist
die Entflammbarkeit von bereits benutztem
Öl. Keine offenen Elektrogrills verwenden.
Zur Vermeidung einer möglichen Brandge-
fahr die Anweisungen zur Reinigung der
Fettfilter und zur Entfernung eventueller
Fettablagerungen auf dem Gerät beachten.
--------------------------------------------------------
In der unmittelbaren Nähe des Geräts die
Benutzung von flammenerzeugenden
MONTAGE UND
GEBRAUCHSANWEISUNG
--------------------------------------------------------
Deutsch
GEBRAUCH
versehen ist, so müssen die entsprechen-
den Trennvorrichtungen bei der festen
Installation vorgesehen werden
Vor jeder Reinigungs- oder Wartungsarbeit
muss das Gerät vom Stromnetz getrennt
werden.
 Loading...