

Page 1

OVENS
USER INSTRUCTIONS
NOTICE D'EMPLOI ET D'INSTALLATION
DES FOURS ENCASTRABLES
GB
FR
USINES DE ROSIÈRES - 30, rue Y. LACELLE - Rosières - 18400 - Lunery - France
Page 2

CONTENTS
1. General warnings
1.1 Declaration of compliance
1.2 Safety hints
1.3 Recommendations
1.4 Installation
1.5 Electrical connection
2. Pro/Exp’r technology
2.1 Oven equipment
2.2 Rotisserie
2.3 LED VISION/U.SEE
3. Cleaning the oven
4. Service centre
5. Description of the display
5.1 Before using the oven for the first time
5.2 How to use oven
6. Cooking mode
7. Pyrolytic cycle
8. Cooking tips
9. Installation
...........................................................................04
...........................................................................15
...............................................................03
.................................................03
.......................................................................03
..............................................................03
..........................................................................03
.........................................................03
..........................................................04
.................................................................04
............................................................04
...............................................................05
.....................................................................05
..................................................05
.................................................................06
.....................................................................07
....................................................................08
........................................................................08
GB
..............................06
SOMMAIRE
1. Instructions générales
1.1 Declaration de conformité
1.2 Consignes de sécurité
1.3 Recommandations
1.4 Installation
1.5 Raccordement éléctrique
2. La technologie pro/exp’r
2.1 Equipement du four
2.2 Tournebroche
2.3 LED VISION / U.SEE
3. Entretien général du four
4. Assistance technique
5. Présentation du tableau de bord
5.1 Conseils avant la premiere utilisation
5.2 Comment utiliser le four
6. Modes de cuisson
7. Pyrolyse
8.Quelques conseils de cuisson
9. Inatallation du four
............................................................................9
......................................................................10
..............................................................................14
........................................................9
....................................................9
..........................................................9
...............................................................9
.....................................................9
....................................................10
.............................................................10
...........................................................10
...................................................11
........................................................11
.......................................11
.....................................................12
..............................................................13
...........................................14
.............................................................15
FR
.................................12
02
Page 3

1. GENERAL WARNINGS
Read the instructions carefully to make the most of your oven. We
recommend you keep the instructions for installation and use for later
reference, and before installing the oven, note its serial number in
case you need to get help from the after-sales service.
When you have unpacked the oven, make sure that it has not been
damaged in any way. If you have any doubts at all, do not to use it.
Contact a professionally qualified person. Keep packing materials
such as plastic bags, polystyrene, or nails out of the reach of children
because they are dangerous for children.
The company shall not be liable if the instructions provided in
this document are not complied with.
! NOTE: Functions, properties and accessories of ovens which
are mentioned in this manual, can be change depending on oven
models.
1.1 DECLARATION OF COMPLIANCE
The parts of this appliance that may come into contact with foodstuffs
comply with the provisions of EEC Directive 89/109.Appliance
complies with European Directives 2006/95/EC and
2004/108/EC, and subsequent amendments.When you have
unpacked the oven, make sure that it has not been damaged in
any way. If you have any doubts at all, do not use it: contact a
professionally qualified person.
Keep packing materials such as plastic bags, polystyrene, or nails out
of the reach of children because they are dangerous for children.
1.2 SAFETY HINTS
•The oven must be used only for the purpose for which it was designed. It
must only be used for cooking food. Any other use, e.g. as a form of
heating, is an improper use of the oven and is therefore dangerous.
•WARNING: The appliance and its accessible parts become hot during
use. Care should be taken to avoid touching heating elements.
•The manufacturers cannot be held responsible for any damage caused
by improper, incorrect or unreasonable use.
When using any electrical appliance you must follow a few basic rules.
- Do not pull on the power cable to remove the plug from the socket.
- Do not touch the oven with wet or damp hands or feet.
- Do not use the oven unless you are wearing something on your feet.
- It is not generally a good idea to use adapters, multiple sockets for
several plugs or cable extensions.
- If the oven breaks down or develops a fault switch it off at the mains and
do not touch it.
• If the cable is damaged it must be replaced promptly.
When replacing the cable, follow these instructions.
Remove the power cable and replace it with one of the H05VV-F type. The
cable must be able to bear the electrical current required by the
oven.Cable replacement must be carried out by properly qualified
technicians.
The earthing cable (yellow-green) must be 10 mm longer than the power
cable.
Use only an approved service centre for repairs and ensure that only
original parts are used. If the above instructions are not adhered to the
manufacturers cannot guarantee the safety of the oven.
•The oven you have just acquired has the described technical
characteristics and you must not make any modifications to it.
•Never use a steam or high-pressure spray to clean the oven.
•Do not store flammable products in the oven; they can catch fire if the
oven comes on accidentally.
•Do not press on and do not let children sit on the oven door.
•Use kitchen oven gloves, when putting into or removing a dish from the
oven.
•This appliance is not intended for use by people (including children) with
reduced physical, sensory or mental capabilities, or lack of experience and
knowledge, unless they have been given supervision or instruction
concerning use of the appliance by a person responsible for their safety.
•Children should be supervised to ensure that they do not play with the
appliance.
•Children less than 8 years of age shall be kept away unless continuously
supervised.
•This appliance can be used by children aged from 8 years and above and
persons with reduced physical, sensory or mental capabilities or lack of
experience and knowledge if they have been given supervision or
instruction concerning use of the appliance in a safe way and understand
the hazards involved.
•During use the appliance becomes hot. Care should be taken to avoid
touching heating elements inside the oven.
•WARNING: Accessible parts may become hot during use. Young children
should be kept away.
•WARNING: Ensure that the appliance is switched off before replacing the
lamp to avoid the possibility of electric shock.
•CAUTION: Accessible parts may be hot when the grill is in use. Young
children should be kept away.
1.3 RECOMMENDATIONS
• After each use of the oven, a minimum of cleaning will help keep the
oven perfectly clean.
• Do not line the oven walls with aluminium foil or single-use protection
available from stores. Aluminium foil or any other protection, in direct
contact with the hot enamel, risks melting and deteriorating the
enamel of the insides.
• In order to prevent excessive dirtying of your oven and the resulting
strong smoky smells, we recommend not using the oven at very high
temperature. It is better to extend the cooking time and lower the
temperature a little.
Identification plate
Code produit:
Numéro de série :
•In addition to the accessories supplied with the oven, we advise you only
use dishes and baking moulds resistant to very high Temperatures.
1.4 INSTALLATION
The manufacturers have no obligation to carry this out. If the
assistance of the manufacturer is required to rectify faults arising from
incorrect installation, this assistance is not covered by the guarantee.
The installation instructions for professionally qualified personnel
must be followed. Incorrect installation may cause harm or injury to
people, animals or belongings. The manufacturer cannot be held
responsible for such harm or injury.
The kitchen unit in which the oven is to be fitted must be made of
material resistant to temperatures of at least 70°C.
The oven can be located high in a column or under a worktop.
Before fixing, you must ensure good ventilation in the oven space to
allow proper circulation of the fresh air required for cooling and
protecting the internal parts. Make the openings specified on last page
according to the type of fitting.
1.5 ELECTRICAL CONNECTION
THE ELECTRICAL CONNECTION SHOULD BE CARRIED OUT BY
AN APPROVED CONTRACTOR OR TECHNICIAN WITH SIMILAR
QUALIFICATIONS.
The installation receiving the appliance must comply with the standard
in force in the installation country.
The manufacturer does not accept any responsibility if this provision is
not complied with.
Connection to the network must be by earthed socket outlet, or by
means of a multipole circuit-breaker, in compliance with the
installation country.
The installation must be protected by suitable fuses, and have wires
with a large enough cross-section to supply the oven normally.
CONNECTION:
The oven is fitted with a power lead for connecting exclusively to a
voltage of 220-240 V AC across the phases or across phase and
neutral.
Connection must be carried out having first checked:
-the supply voltage indicated on the meter,
The lead protection wire (green/yellow) connected to the earth
terminal of the oven must be connected to the earth terminal of the
installation.
Caution:
•Have the earth continuity of the installation checked by an electrician
before making the connection.
•The manufacturer will not be liable for any incident, or the possible
consequences that may arise from the use of the oven not earthed, or
connected to an earth with defective continuity.
NB: Do not forget that the oven may require after-sales service.
Also, locate the socket outlet so that the oven can be connected once
it is removed from its space.
Power supply cable: If the power supply cable has to be changed,
please have this done by the after-sales service or by someone with
similar qualifications.
03 GB
Page 4
2. PRO/EXP'R TECHNOLOGY
Our technology and experience have brought a feature typical of
professional kitchens into the home. A Multijet lateral ventilation
system emit microflows of hot air directly onto the food, at low speeds,
enveloping it completely.
This enables uniform cooking, reduced loss of food moisture and
simultaneous cooking on different levels.
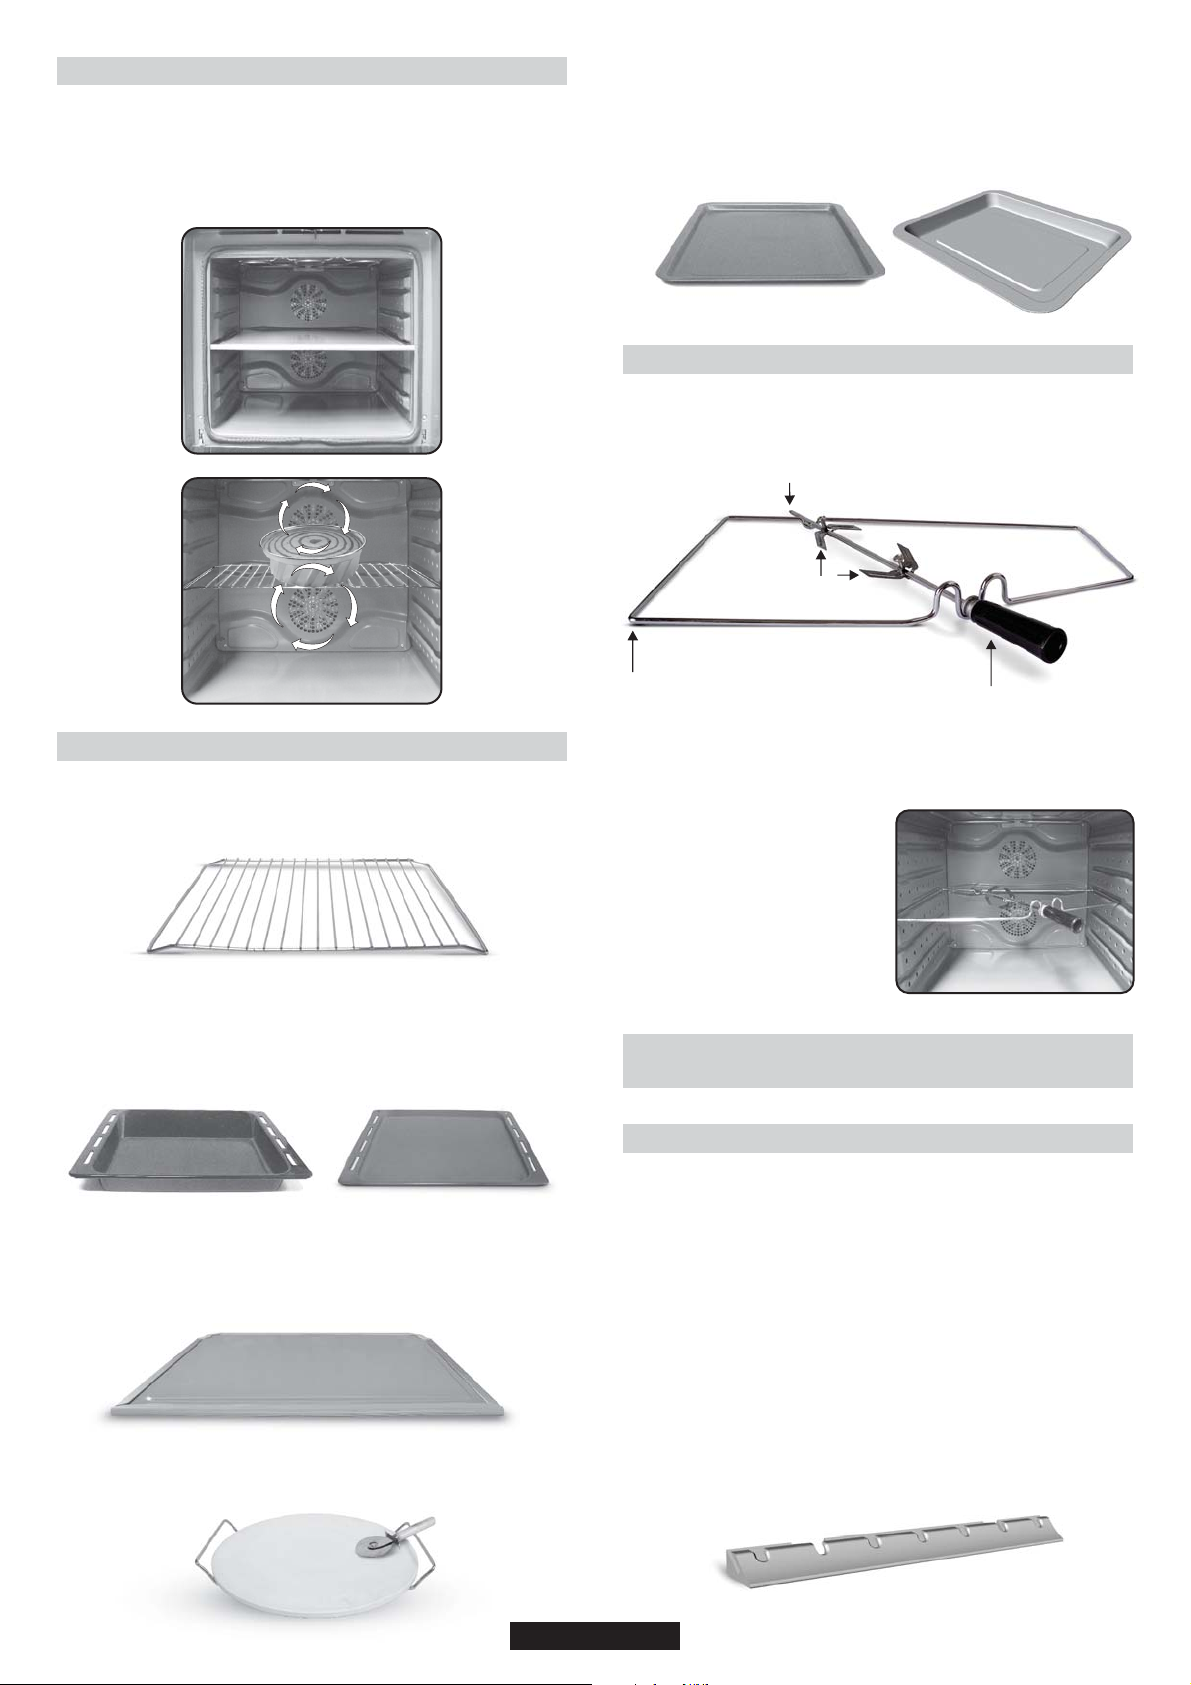
The pastry tray must be placed on the shelf. It is for cooking small
pastries like choux, biscuits, meringues, etc...
Never place the pastry tray directly on the oven bottom and on
the separator.
2.2 ROTISSERIE (According to the model)
No pre-heating is required for rotisserie cooking.
Cooking with the door closed.
The energy consumption is 90-95% less than traditional system.
2
3
2.1 OVEN EQUIPMENT
It is necessary to do an initial cleaning of the equipment before the first
use of each of them. Wash them with a sponge. Rinse and dry off.
The shelf can take moulds and dishes.
The drip tray catches the juices from grilled foods.
Never use he drip tray as a roasting tray as fat deposits can be quickly
spread throughout the oven, which produces excess smoke.
Never place the tray directly on the oven bottom and on the
separator.
The seperator divides oven into two cavities. It seperates upper and
lower cavity when you want to use oven in dual mode. It must be used
in third shelf.
Never leave the seperator inside the oven when the Pyrolytic
mode is on.
1
1- Grid
2- Spit
3- Hooks & Screws
4- Handle
HOW TO USE TURNSPIT
1. Unscrew the hooks
2. Put the spit into the meat
3. Fix the meat with the hooks
4. Tighten the screws
5. Insert the spit into the motor hole
6. Demount the handle
When the oven is in use, any unused accessories should be
removed from the oven.
LED VISION / U.SEE
2.3
Is an illumination system which replaces the traditional « light bulb ».
14 LED (for non-pyrolitic versions) or 10 High Power LED (for pyrolitic
versions) lights are integrated within the door. These produce white
high quality illumination which enables to view the inside of the oven
with clarity without any shadows on all the shelves.
LEDS switch-off during door opening (just for pyrolytic oven).
Advantages :
This system, besides providing excellent illumination inside the oven,
lasts longer than the traditional light bulb its easier and to maintain and
most of all saves energy.
4
The pizza stone for a crisper pizza equipped according to the model
with its stand and the pizza roller.
-Optimum view
-Long life illumination
-Very low energy consumption, -95% in comparison with the
traditional illumination High
04 GB
Page 5
3. CLEANING THE OVEN
4. SERVICE CENTRE
•Wait for the oven to cool down before doing any cleaning by hand.
•Never clean your oven with abrasive cleaners, wire wool or sharp
objects, or the enamel may be damaged beyond repair.
•Only use soapy water or bleach (ammonia) cleaners.
•Never line the oven sides with aluminium foil.
•Do not use a steam cleaner for cleaning operations.
•Cleaning and user maintenance shall not be made by children
without supervision
GLASS PARTS
We recommend you wipe clean the glass door with absorbent kitchen
paper every time you use the oven. If the spattering is heavy, then you
can clean with a well squeezed sponge and detergent, and rinse.
Do not use harsh abrasive cleaners or sharp metal scrapers to clean
the oven door glass since they can scratch the surface, which may
result in shattering of the glass.
OVEN DOOR SEAL
If this gets dirty, clean the oven seal with a slightly damp sponge.
ACCESSORIES
Clean them with a sponge soaked in soapy water. Rinse with clean
water and dry off. Avoid abrasive cleaners.
DRIP TRAY
After grilling, remove the drip tray from the oven.Take care to pour the
warm grease into a container.Wash and rinse the drip tray in hot water
with a sponge soaked in washing up liquid.
If residues remain attached, soak them off in water and detergent.
It can also go in a dish washer or be cleaned with a commercial oven
cleaner.
Never place a soiled drip tray in the oven.
Before calling the Service Centre.
If the oven is not working, we recommend that:
•Check that, if the oven is properly plugged into the power supply.
If the cause of the fault cannot be detected:
•Disconnect the oven from the mains, do not touch the oven and call
the after sales service.
Before calling the Service Centre remember to make a note of the
serial number on the serial number specifications plate.
The oven is supplied with a guarantee certificate that ensures that it
will be repaired free of charge by the Service Centre whilst under
guarantee.
This appliance is marked according to the European
directive 2002/96/EC on Waste Electrical and
Electronic Equipment (WEEE).
By ensuring this product is disposed of correctly, you
will help prevent potential negative consequences for
the environment and human health, which could
otherwise be caused by inappropriate waste handling
of this product.
The symbol on the product indicates that this product
may not be treated as household waste.
Instead it shall be handed over to the applicable collection point for the
recycling of electrical and electronic equipment Disposal must be
carried out in accordance with local environmental regulations for
waste disposal.
For more detailed information about treatment, recovery and
recycling of this product, please contact your local city office, your
household waste disposal service or the shop where you purchased
the product.
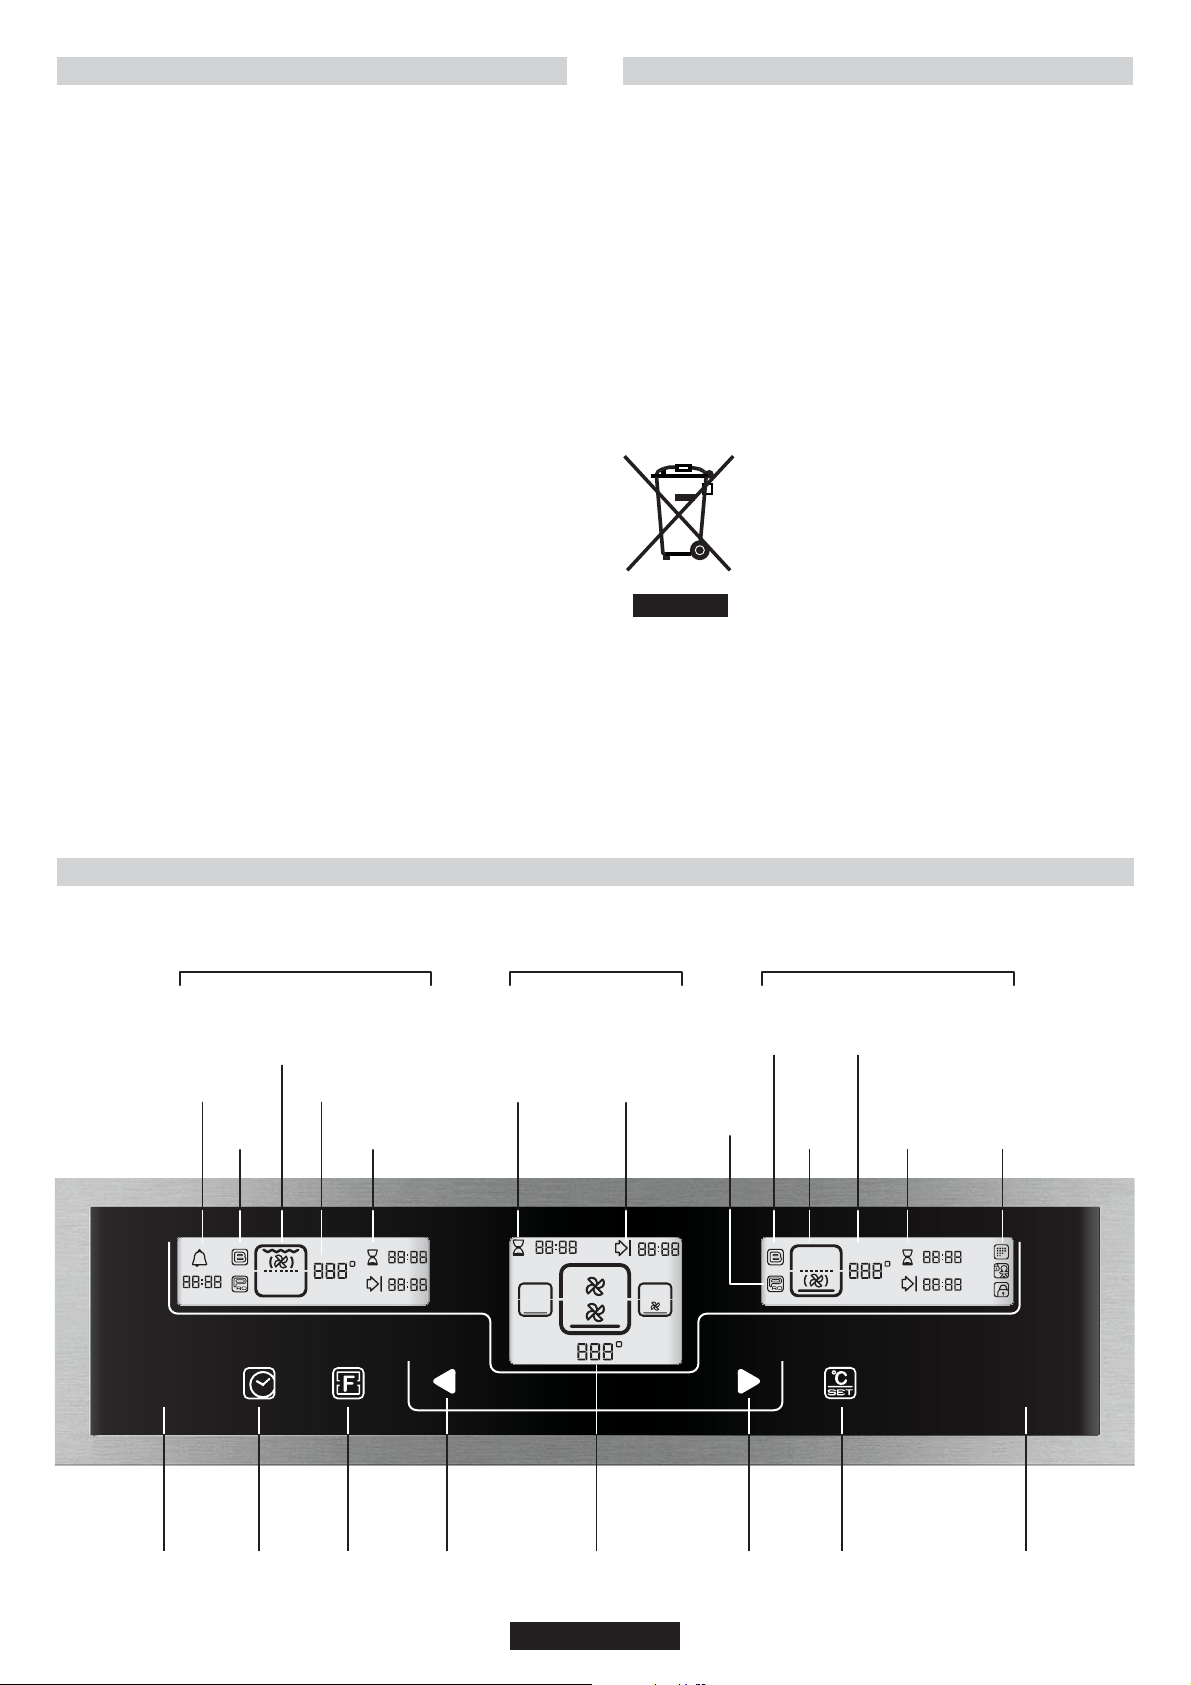
5. DESCRIPTION OF THE DISPLAY
Left Display.
Upper Cavity
Cooking function
upper cavity
Temperature
Cooking duration
End of cooking
ON
OFF
Timer
Booster
Pro
Central Display.
Setting Parameters/
Main Cavity
Cooking duration
(total cavity)
End of
cooking
(total cavity)
Booster
Pro/Booster
(total cavity)
Pro
Cooking
function
Temperature
lower
cavity
Right Display.
Lower Cavity
Cooking duration
End of cooking
Pyrolysis necessary
Child lock
Door lock
START
STOP
On / Off
Time Set
Function /
Cavity
Arrow (-) Arrow (+) Temperature / Time Set Start / Stop
Temperature / Time
05 GB
Page 6

5.1 BEFORE USING THE OVEN FOR THE
FIRST TIME
PRELIMINARY CLEANING
Clean the oven before using for the first time:
•Wipe over external surface with a damp soft cloth.
•Wash all accessories and wipe inside the oven with a solution of hot
water and washing up liquid.
•Set the empty oven to the maximum temperature and leave on for
about 1 hour, this will remove any lingering smells of newness. Ensure
that the room is well ventilated while this is being done.
THINGS TO REMEMBER
Confirmation of operation on timer:
•Modification must be confirmed by pressing “ ” .
5.2 HOW TO USE OVEN
SINGLE MODE
To use the Single Mode, remove the seperator from the oven.
You can choose all the functions below with Single Mode.
The cooking methods suggested are set out in the table below. A
temperature is also suggested for each cooking method. This can be
modified within a pre-determined range.
Function Mode according
to the oven model
Off
Bottom
Bottom+Fans
Pre-set
temperature
°C
-
160
210
Pre-determined
temperature °C
-
50-240
50-240
Function
Booster*
-
-
Booster
Stop the oven:
•This may be necessary if you have input an incorrect instruction. To
stop the oven, press the “ ” .
CLOCK SETTING
When the oven is connected to the electricity supply for the first time of
after a long power cut, the clock must be re-set.
To set the clock:
1.Press the “ ” for few seconds and find the “ ” by using ,
then press the “ ”. The digits on the central display will blink.
2.Set the clock by using then wait a few second or press the
“ ” again to apply your setting.
ADJUSTING THE DISPLAY CONTRAST
1. Press the “ ” for few seconds and find the “ ”by using ,
then press the “ ”. (The contrast of the display brightness is
included between “1” maximum and “5” minimum.)
2. Choose the contrast level by using then wait few seconds or
press the “ ” again to apply your setting.
NOTE: If you want to set the clock or to adjust the display contrast after
the first switching on of the oven, press the “ ” for switch on the
oven, and proceed how described in the points 1 and 2 of the specific
paragraphs.
MINUTE MIND
1.Press the “ ” for switch on the oven.
2.Press the “ ” for few seconds and find the “ ”by using the ,
then press the “ ” .
3.Set the required time by using the , then wait a few seconds or
press the “ ” again to apply your setting.
NOTE: This function allows oven to be used as an alarm clock
independently form the working oven.
CHILD LOCK
1. To set the child lock press “ ” for few seconds.
2.
To activate press “ ” “OK”
To activate press “ ” “NO”
NOTE: It is possible to activate child lock both when the oven in ON
and OFF
ON
OFF
START
STOP
ON
OFF
Bottom+Top
Bottom+Top+Fans
Rings+Fans
Grill
Grill+Fans
Grill+Turnspit+Fans
Defrost
Keep Warm
Pyro
220
210
180
L2
210
240
40
60
NORMAL
50-280
50-240
50-240
L1-L3
180-230
180-240
No
No
ECO:425/65min
NORMAL:425/70min
SUP:425/75min
-
-
-
-
Booster
Booster
-
-
-
*Booster: rapid temperature raised
ON
.
OFF
ON
OFF
START/STOP
START
STOP
START/STOP
1.Press the “ ” to switch on the oven.
2.Press the “ ”. Choose function required to the cooking by using
3.The appropriate temperature or level cooking, according to the
cooking method selected is displayed. It can be modified within a predetermined range - see table above. To modify the temperature
setting, press the “ ” and choose the temperature by using .
Then press the “ ” again to confirm. The temperature display is
fixed but can be modified during the cooking cycle.
4.To start the cooking, press the “ ” . The oven will start
cooking and will start to heat up. The indicator light blinks until the
selection temperature has been reached. An audible sounds at the the
end of this operation and the indicator light becomes fixed.
5.To change the oven function, repeat the steps for 2 to 4.
6.To stop the cooking press the “ ”.
DUAL MODE
To activate the Dual Mode, put the separator into the third shelf of the
oven. You can choose the functions below with Dual Mode.
1- Press the “ ” switch on the oven.
2- Press the “ ” select which part of the oven cavity (UPPER or
LOWER) must be used; choose the function required to the cooking
by using the .
3- The appropriate temperature or level cooking, according to the
method selected is displayed.
It can be modified within a pre-determined range-see table below.
To modify the temperature setting, press the “ ” and choose the
temperature by using .
Then press the “ ”again to confirm. The temperature display is fixed
but can be modified during the cooking cycle.
4- To start the cooking, press the “ ” .
The oven will start cooking and will start to heat up. The indicator light
blinks until the selected temperature has been reached; an audible
sounds at the end of this operation and the indicator light becomes
fixed.
5- To stop the cooking, select the “ ”.
06 GB
Page 7

Upper Cavity
Function Mode according
to the oven model
Ring+Fan
Grill
Grill+Fan
*Booster: rapid temperature raised
temperature °C
Pre-set
180
L2
190
Pre-determined
temperature °C
160-240
L1-L3
160-240
Function
Booster*
-
-
-
6. COOKING MODE
All cooking should be carried out with the door closed.
BOTTOM + FAN - The combination of the bottom heating
element and fan is ideal for fruit flans, tarts, quiches and pastries. It
prevents food from becoming too dry and encourages bread dough to
rise. Place the shelf in the bottom position in the oven.
BOTTOM - Using the lower element. Ideal for cooking all
pastry based dishes. Use this for flans, quiches, tarts, pâté and any
cooking that needs more heat and radiation from below.
ON
OFF
Lower Cavity
Function Mode according
to the oven model
Ring+Fan
Bottom
Bottom+Fan
Pre-set
temperature °C
180
160
160
*Booster: rapid temperature raised
USING UPPER AND LOWER CAVITY AT THE SAME TIME
The two cavity (UPPER and LOWER) must be used
simultaneously, for two different type of cooking; for set this
modality of cooking, proceed in the following mode:
1- Press the “ ” to select the second cavity to be used and follow the
instruction from “1” to “5” of above paragraph.
COOKING DURATION
1.Press “ ” and find “ ” by using “ ”
2.Press “ ” and set the cooking duration by using “ ”
3.To confirm your setting , press “ ” again
END OF COOKING
1.Press “ ” and find “ ” by using “ ”
2.Press “ ” and set the end of cooking time by using “ ”
3.To confirm your setting , press “ ” again.
NOTE: For deleting a time already set, find “ ” by using “ ”
in the time set menu and press “ ”
• • This function is typically used with "cooking duration" function.
For example if the dish has to be cooked for 45 minutes and needs
to be ready by 12:30;
- select the required function
- set the cooking duration time to 45 minutes
- set the end of cooking time to 12:30.
Cooking will start automatically at 11:45 (12:30 minus 45 mins)
and will continue until the pre-set end-of- cooking-time, when the
oven will switch itself off automatically.
WARNING!
If the END OF COOKING is selected without setting the
cooking duration time, the oven will start cooking immediately
and it will stop at the END OF COOKING time set.
Pre-determined
temperature °C
160-240
160-240
160-240
Function
Booster*
-
-
-
START
STOP
in use. This method is ideal for all traditional roasting and baking.When
BOTTOM + GRILL - Both top and bottom heating elements are
cooking red meat, roast beef, leg of lamb, game, bread or foil wrapped
foods.
BOTTOM + GRILL + FAN - Both top and bottom heating
elements are used in conjunction with the fan, which circulates hot air
throughout the oven.We recommend this method for poultry, pastries,
fish and vegetables. By using this method better heat penetration is
achieved and cooking and preheating times are also reduced. The fan
cooking option allows you to cook different foods together at different
positions in the oven all at the same time, providing even heat
distribution but without the risk of mingling tastes and smells. When
cooking different foods at the same time allow a further 10 minutes.
RING + FAN - Air that has been heated is blown by the fan onto
the different levels. It is ideal for cooking different types of food at the
same time (e.g. meat and fish) without mixing tastes and smell. It cooks
very gently and is ideal for sponge cakes, pasties, etc.
GRILL - Using the top heating element. Success is guaranteed
for mixed grills, kebabs and gratin dishes. The grill should be pre-heated
to a high temperature for 5 minutes. White meats should always
beplaced at some distance from the grill element, the cooking time is
slightly longer but the meat will be more succulent. Red meat and fish
fillets can be placed directly onto the shelf with the drip tray placed
beneath on lower shelf position.
GRILL + FAN - The top heating element is used in conjunction
with the fan which circulates the hot air around the oven. Pre heating is
recommended for red meats but is not necessary for white meats.
Grilling is ideal for cooking thicker food items such as pork or poultry.
Food to be grilled should be placed directly at the centre of the middle
shelf. By sliding the drip tray underneath the shelf it will ensure that any
juices are collected. For best results always make sure that the food is
not too close to the grill element and turn the food over half way through
the cooking time.
GRILL + TURNSPIT + FAN - The advantage of using the top
oven element at the same time as the fan and rotisserie is that the food is
evenly cooked, preventing it from becoming dry and tasteless. The
rotisserie is programmed to continue rotating for approximately five
minutes after cooking, making full use of the residual oven heat.No
preheating is required for rotisserie cooking.
DEFROST - When the dial is set to this position. The fan
circulates hot air around the frozen food so that it defrosts in a few
minutes without the protein content of the food being changed or altered.
The temperature is preset in 40°C constant, no regulation is possible.
KEEP WARM - This is reccomended to reheat precooked
foodstuff, positioning the shelf on the second level from top, or to defrost
bread pizza or pastry by positioning the shelf on the lower level.
The temperature is preset in 60°C constant, no regulation is possible.
RING + FAN - Air that has been heated is blown by the fan onto
the different levels. It is ideal for cooking different types of food at the
same time (e.g. meat and fish) without mixing tastes and smell. It cooks
very gently and is ideal for sponge cakes, pasties, etc.
GRILL - Using the top heating element. Success is guaranteed
for mixed grills, kebabs and gratin dishes. The grill should be pre-heated
to a high temperature for 5 minutes. White meats should always
beplaced at some distance from the grill element, the cooking time is
slightly longer but the meat will be more succulent. Red meat and fish
fillets can be placed directly onto the shelf with the drip tray placed
beneath on lower shelf position.
07 GB
Page 8

with the fan which circulates the hot air around the oven. Pre heating is
recommended for red meats but is not necessary for white meats.
Grilling is ideal for cooking thicker food items such as pork or poultry.
Food to be grilled should be placed directly at the centre of the middle
shelf. By sliding the drip tray underneath the shelf it will ensure that any
juices are collected. For best results always make sure that the food is
not too close to the grill element and turn the food over half way through
the cooking time.
the different levels. It is ideal for cooking different types of food at the
same time (e.g. meat and fish) without mixing tastes and smell. It cooks
very gently and is ideal for sponge cakes, pasties, etc.
pastry based dishes. Use this for flans, quiches, tarts, pâté and any
cooking that needs more heat and radiation from below.
element and fan is ideal for fruit flans, tarts, quiches and pastries. It
prevents food from becoming too dry and encourages bread dough to
rise. Place the shelf in the bottom position in the oven.
-Three choices are possible ECO, NORMAL, SUPER
GRILL + FAN - The top heating element is used in conjunction
RING + FAN - Air that has been heated is blown by the fan onto
BOTTOM - Using the lower element. Ideal for cooking all
BOTTOM + FAN - The combination of the bottom heating
PYRO - The oven takes care of the entire inside oven cleaning
7. PYROLYTIC CYCLE (According to the model)
The oven is equipped with a pyrolyser cleaning system, which
destroys food residues at high temperature.The operation is carried
out automatically by means of the programmer.The resulting fumes
are rendered “clean” by passing over a Pyrolyser wich starts as soon
as cooking begins. As very high temperatures are required by the
Pyrolyser, the oven door is fitted with a safety lock.
The pyrolyser can be stopped at any time. The door cannot be opened
until the safety lock is displayed.
NOTE : If a hob has been fitted above the oven, never use the gas
burners or the electric hot-plates while the Pyrolyser is working, this
will prevent the hob from overheating.
THREE PYROLYTIC CYCLE are pre-set.
•ECO PYROCLEAN : Cleans a moderately stained oven.Operates
for a period of 65 minutes.
•NORMAL PYROCLEAN :
for a period of
75 minutes
•SUPER PYROCLEAN : Cleans a heavily stained oven.Operates for
a period of 90 minutes.
Never use commercially available cleaning products on a
Pyrolytic oven !
Tip : Carrying out Pyrolytic cleaning immediately after cooking allows
you to take advantage of residual heat, thus saving energy.
Before carrying out a Pyrolytic cycle :
•Remove all accessories from the oven (seperator, grids, trays,
etc.) : They cannot withstand the high temperatures and would be
damaged by pyrolytic temperatures.
•Remove any large spillages or stains as it would take too long to
destroy them. Also excessively large amounts of grease could ignite
when subject to the very high temperatures of the Pyrolytic cycle.
•Close the oven door.
•Excess spillage must be removed before cleaning.
Using the pyrolytic cycle :
1- Press the “ ”. Choose the “ ” by using then press the
“ ” to confirm. “ ” will appear on screen. ECO mode flashes.
ON
OFF
Remember :
ECO - cycle of 65 minutes - moderately stained oven
NORMAL - cycle of 70 minutes - normaly stained oven
SUP - cycle of 75 minutes - heavily stained oven
2- By using select required Pyrolytic mode, according the
degree of staining: ECO, NORMAL or SUP. Then press the “ ”
to confirm.
Cleans a normaly stained oven. Operates
START
STOP
• Your choice is confirmed after 3 seconds...
The oven starts the pyrolytic cycle. The pyrolytic mode selected
flashes and the “ ” and the “ ” indicator lights will appear. During
the pyrolytic cycle, the locking oven door appears, it indicates that the
door is locked. The cooling fan will operate.
The indicator light flashes until the temperature required is not
reached and then it becomes fixed.
At the end of the pyrolytic cycle the oven will automatically switch off.
For 15 seconds, an audible signal lets you know that the cycle has
ended and the “ ” and the “ ” indicator lights will flash.
•Press the “ ” to stop. Unless you do this, the symbols will
START
STOP
continue flashing. The symbol “ ” disappears on the Timer, the
pyrolytic mode. The oven door will remain locked until the
temperature is high. So, as the locking oven door is light, the oven can
not be opened.
The cooling fan does not switch itself off until the temperature of the
oven components is reasonable.
At the end of the cycle, the indicator flashes again, it will remain also
turned on after having extinguished the oven and it will extinguish
when the inside temperature of the oven is sufficiently low.
Pyrolysis leaves a white residue on the oven walls. Wait for the oven
to cool completely then clean the inside of the oven with a damp
sponge to wipe off the residue.
8. COOKING TIPS
It is better not to salt meats until after cooking as salt encourages the
meat to spatter fat. This will dirty the oven and make a lot of smoke.
Joints of white meat, pork, veal, lamb and fish can be put into the oven
cold. The cooking time is longer than in a preheated oven, but it cooks
through to the centre better as the heat has more time to penetrate the
joint.
Correct preheating is the basis of successful red meat cookery.
GRILLS
• Before loading the grill:
Remove the meat from the refrigerator a few hours before grilling. Lay
it on several layers of kitchen paper. This improves seizing, making it
tastier and avoids it staying cold at the centre.
Add pepper and spices to the meat before grilling, but add any salt
after cooking. This way it will seize better and stay juicy. Baste all the
food to be cooked with a little oil. This is best done with a wide flat
basting brush.Then sprinkle with more pepper and herbs (thyme,
etc.).
• During cooking:
Never pierce the food during cooking even when you turn it. This lets
the juice out and it becomes dry.
BAKING
Avoid using shiny tins, they reflect the heat and can spoil your cakes. If
your cakes brown too quickly, cover them with greaseproof paper or
aluminium foil.
Caution: The correct way to use foil is with the shiny side in towards
the cake. If not the heat is reflected by the shiny surface and does not
penetrate the food.
Avoid opening the door during the first 20 to 25 minutes of
cooking:
Soufflés, brioches, sponge cakes, etc. will tend to fall.You can check if
cakes are done by pricking the centre with a knife blade or metal
knitting needle. If the blade comes out nice and dry, your cake is ready
and you can stop cooking. If the blade comes out moist or with bits of
cake attached, continue baking but slightly lower the thermostat so
that it is finished off without burning.
18 GB
08 GB
Page 9

1. INSTRUCTIONS GENERALES
Lire attentivement les instructions contenues dans cette brochure, elles
fournissent d’importantes indications sur la sécurité d’installation, l’emploi
du four et son entretien. Conserver soigneusement cette notice
d’utilisation pour toutes consultations ultérieures.
- Après avoir déballé votre four, vérifier que l’appareil est complet. Les
emballages comme le plastique, le polystyrène, peuvent constituer un
danger pour les enfants. Ne pas les laisser à leur portée.
Notre responsabilité ne saurait être engagée en cas de non respect des
instructions fournies dans la notice.
Lors de la première utilisation du four, il peut se produire un dégagement
de fumée âcre provoqué par le premier échauffement du collant des
panneaux d’isolation enveloppant le four. Ce phénomène est normal.
Attendez que la fumée cesse avant de cuire des aliments.
Noter le numéro de série pour tout contact avec le service aprèsvente
NOTE: Les fonctions, propriétés et accessoires du four peuvent
changer selon le modéle.
1.1 DECLARATION DE CONFORMITÉ:
Les parties de cet appareil pouvant être en contact avec des substances
alimentaires sont conformes à la prescription de la Dir. CEE
89/109.Produit compatible avec les Directives Européennes
2006/95/EC et 2004/108/EC, et les modifications successives.
1.2 CONSIGNES DE SECURITE
Cet appareil est conçu pour cuire des aliments. Tout autre utilisation
(exemple chauffage d’appoint) doit être considéré comme impropre.
Le constructeur ne peut être tenu comme responsable en cas de
dommages liés à une mauvaise utilisation ou à des modifications
techniques du produit.
•AVERTISSEMENT: L'appareil et les parties accessibles deviennent
chauds pendant l'utilisation. Des précautions doivent être prises pour éviter
de toucher les éléments chauffants
•L’emploi d’un appareil électrique nécessite quelques règles de sécurité.
- Ne pas tirer sur le fil électrique pour débrancher la prise.
- Ne pas toucher l’appareil avec les pieds ou les mains mouillés.
- Evitez d’utiliser l’appareil pieds nus.
- Veillez à ne pas laisser les enfants en bas âge manipuler le four.
L’utilisation de multiprises et de rallonges pour raccorder votre appareil est
fortement déconseillé. En cas de panne ou de mauvais fonctionnement il
faut éteindre le four avant de le démonter. En cas de détérioration du fil
électrique, remplacez-le rapidement en suivant les indications suivantes:
ôtez le fil d’alimentation électrique et remplacez-le par un (du type H05VVF) adapté à la puissance de l’appareil.Vous veillerez à ce que cette
opération soit effectuée par un centre technique agréé. Pour l’utilisateur
c’est la certitude d’obtenir des pièces de rechange d’origine. Le nonrespect de ces règles peut compromettre la sécurité de l’appareil.
•Le four que vous venez d'acquérir possède des caractéristiques
techniques définies et en aucun cas vous ne pourrez apporter des
modifications sur cet appareil.
•Ne jamais utiliser de nettoyeur vapeur ou à haute pression pour le
nettoyage du four.
•Ne pas stocker de produits inflammables dans le four ; ils pourraient
s'enflammer lors d'une mise en route involontaire du four.
•Ne pas s'appuyer et ne pas laisser les enfants s'asseoir sur la porte du
four.
•Utiliser des gants thermiques de cuisine, pour enfourner ou pour retirer un
plat du four.
•Si votre four présente un défaut quelconque, ne pas le brancher ou le
débrancher de l'alimentation générale et faire appel directement à un
service technique agréé du constructeur.
•Cet appareil n’est pas destiné à être utilisé par des personnes (notamment
les enfants) incapables, irresponsables ou sans connaissance sur
l’utilisation du produit, à moins qu’elles ne soient surveillées, ou instruites
sur l’utilisation de l’appareil, par une personne responsable de leur
sécurité.
• Surveillez les enfants pour être sûr qu’ils ne jouent pas avec l’appareil.
•Les enfants de moins de 8 ans doivent être tenus à l'écart à moins d'être
surveillés continuellement.
•Cet appareil n'est pas destiné à être utilisé par des personnes (y compris
les enfants) dont les capacités physiques, sensorielles ou mentales sont
réduites, ou ayant un manque d'expérience et de connaissances, à moins
qu'elles n'aient été formées à l'utilisation de l'appareil, par une personne
responsable de leur sécurité.
•En cours d'utilisation l'appareil devient chaud. Des précautions doivent
être prises pour éviter de toucher les éléments chauds à l'intérieur du four.
•AVERTISSEMENT: Les parties accessibles peuvent devenir chaudes
pendant l'utilisation. Les jeunes enfants doivent être tenus à l'écart.
•L'appareil n'est pas destiné à être utilisé avec une minuterie externe ou un
système de contrôle à distance.
1.3 RECOMMANDATIONS
Après chaque utilisation du four, réaliser un petit entretien qui favorisera le
nettoyage parfait du four.
• Ne pas tapisser les parois du four avec des feuilles en aluminium ou des
protections jetables du commerce. La feuille d'aluminium ou toute autre
protection, en contact direct avec l'émail chauffé, risque de fondre et de
détériorer l'émail du moufle.
Avant installation de l'appareil, il faut relever le numéro de série et le noter
ci-dessous en cas d'éventuelle demande d'intervention.
Plaque signalétique
Code produit:
Numéro de série :
Afin d'éviter les salissures excessives de votre four ainsi que les fortes
odeurs de fumées pouvant en résulter, nous recommandons de ne pas
utiliser le four à trop forte température. Il est préférable de rallonger le
temps de cuisson et de baisser la température.
• Nous vous conseillons de n'utiliser que des plats, des moules à pâtisserie
résistants à de très hautes températures.
1.4 INSTALLATION
La mise en service de l’appareil est à la charge de l’acheteur, le
constructeur est dégagé de ce service. Les pannes liées à une mauvaise
installation ne seront pas couvertes par la garantie. Une mauvaise
installation peut provoquer des dommages aux personnes, aux animaux
domestiques; dans ce cas la responsabilité du constructeur ne peut être
engagée.
L'installation du four doit être réalisée par un installateur agréé ou un
technicien de qualification similaire.
Le meuble dans lequel le four doit être encastré doit être réalisé en
matériaux résistant à de hautes températures 70°C.
Le four peut être placé en hauteur dans une colonne ou enchâssé sous un
plan de travail.
Avant sa fixation: il est indispensable d'assurer une bonne aération dans la
niche d'encastrement afin de permettre la bonne circulation de l'air frais
nécessaire au refroidissement et à la protection des organes intérieurs.
Pour cela, réaliser les ouvertures spécifiées selon le type d'encastrement
(dernière page).
1.5 RACCORDEMENT ELECTRIQUE
LE BRANCHEMENT ELECTRIQUE DOIT ÊTRE REALISE PAR UN
INSTALLATEUR AGREE OU UN TECHNICIEN DE QUALIFICATION
SIMILAIRE.
• L'installation recevant l'appareil doit être conforme à NFC 15100. Le
constructeur décline toute responsabilité en cas de non respect de cette
exigence.
Important:
Faire vérifier la continuité de la terre de l’installation avant de procéder au
raccordement.
Notre responsabilité ne saurait être engagée pour tout incident, ou ses
conséquences éventuelles qui pourraient survenir à l'usage d'un appareil
non relié à la terre, ou relié à une terre dont la continuité serait
défectueuse.
Le raccordement au réseau doit être effectué par une prise de courant
avec prise de terre, ou par l'intermédiaire d'un dispositif à coupure
omnipolaire, selon norme en vigueur dans le pays d’installation.
• L'installation doit obligatoirement être protégée par des fusibles
appropriés, et comporter des fils d'une section suffisante pour alimenter
normalement l'appareil.
Raccordement: cet appareil est équipé d’un cordon d’alimentation
permettant le raccordement exclusivement sous une tension de 220-240
V~ entre phases ou entre phase et neutre.
• Le raccordement devra être effectué après avoir vérifié :
. la tension d’alimentation indiquée au compteur et,
. le réglage du disjoncteur.
• Le fil de protection du cordon (vert/jaune) relié à la Borne Terre de
l’appareil doit être relié à la Borne Terre de l’installation.
NOTA: ne pas oublier que l'appareil peut nécessiter une opération de
S.A.V. Aussi, placez la prise de courant de façon à pouvoir brancher le four
une fois sorti de sa niche.
Câble d'alimentation: si le changement du câble d'alimentation s'avère
nécessaire, nous vous demandons de faire réaliser cette opération par le
service après-vente ou une personne de qualification similaire.
09 FR
09 FR
Page 10

2. LA TECHNOLOGIE PRO/EXP’R
La technologie et l'expérience de notre marque ont permis d'adapter
une caractéristique typique de la cuisine professionnelle au monde
domestique. Le système de ventilation latérale “Multi-chaleur
tournante” distribue un micro flux d'air chaud directement sur
l'aliment, à faible vitesse, en l'enveloppant complètement.
Cela favorise une cuisson plus douce, plus homogène, une faible
perte d'humidité de l'aliment et des cuissons simultanées sur
différents niveaux.
Le plat à pâtisserie doit être positionné sur les rails. On y déposera
les petites pâtisseries telles que choux, sablés, meringues. Il vous
permettra de confectionner des fonds de tartes, génoises, etc…
Ne jamais placer ce plat directement sur la sole du four ou sur le
séparateur de cavité.
2.2 TOURNEBROCHE
Le préchauffage n'est pas nécessaire pour les cuissons au
tournebroche.
Les cuissons au tournebroche se font porte fermée.
Les consommations énergétiques sont diminuées de 90 à 95% par
rapport à un système traditionnel.
2
3
2.1 EQUIPEMENT DU FOUR
Avant la première utilisation des différents accessoires, nous
recommandons un nettoyage avec une éponge suivi d'un rinçage et
d'un séchage.
La grille simple sert de support aux moules et aux plats.
Le plat récolte-sauce est destiné recevoir le jus des grillades.
Ne jamais utiliser ce plat comme plat à rôtir, il en résulterait des
dégagements de fumée, des projections de graisse et un
encrassement rapide du four.
Ne jamais placer ce plat directement sur la sole du four ou sur le
séparateur de cavité.
Le séparateur divise le four en deux cavités. Il sépare la cavité du
haut et la cavité du bas, lorsque vous souhaitez utiliser le four en
double cavité. Le séparateur doit être positionné sur le 3 niveau.
Ne pas laisser le séparateur à l'intérieur du four lorsque vous
programmez une pyrolyse.
à
ème
1
COMMENT UTILISER
TOURNEBROCHE?
1.Dévisser les crochets
2.Insérer la broche dans la viande
à cuire
3.Fixer la viande grâce aux
crochets
4.Serrer les vis
5.Insérer la broche dans le trou où
se trouve le moteur
6.Enlever la époign e
Pendant l’utilisation du four, les accessoires non utilisés doivent
être retirés du four.
Ce système d'éclairage remplace les « ampoules » traditionnelles. 14
LED (pour les versions non-pyrolyse) ou 10 LED haute puissance
(pour les versions pyrolyse) sont intégrés dans la contre porte du four.
Celles-ci illuminent la cavité avec une lumière diffuse permettant une
vision de la cuisson sans ombres, sur plusieurs niveaux.
Le LED s'éteignent lors de l'ouverture de la porte (uniquement pour
les fours à pyrolyse).
1- Grille
2- Broche
3- Crochets et vis
4- Poign eé
2.3
LED VISION / U.SEE
4
La pierre à pizza pour une pizza plus croustillante, livrée selon
modèle avec son support inox et la roulette à pizza.
Les avantages :
-Visibilité optimale des plats
-Durée de vie prolongée
-Consommation énergétique extrêmement basse , -95% par rapport
au système traditionnel d'éclairage du four.
10 FR
Page 11

3. ENTRETIEN GENERAL DU FOUR
4. ASSISTANCE TECHNIQUE
•Attendre le refroidissement du four, avant de réaliser une opération
de nettoyage manuel.
•Ne jamais utiliser de produits abrasifs, d’éponges métalliques ou
d’objets tranchants pour nettoyer le four, l’émail serait
irrémédiablement abîmé.
•N’utiliser que de l’eau savonneuse ou des produits liquides
ammoniaqués.
•Ne jamais tapisser les parois du four avec du papier aluminium.
•Le nettoyage et l'entretien par l'utilisateur ne doit pas être fait par des
enfants sans surveillance.
LES PARTIES VITREES
A la fin de chaque utilisation, essuyer avec un papier absorbant.
Si les projections sont trop importantes, nettoyer avec une éponge et
un produit détergent.
*Ne pas utiliser de nettoyants abrasifs ou de racloirs métalliques
tranchants pour nettoyer la vitre de la porte du four car ils peuvent
rayer la surface, entrainant des risques d'explosion.
LE JOINT PORTE DE FOUR
Nettoyer avec une éponge et un produit détergent.
LES ACCESSOIRES
Nettoyer avec une éponge imbibée d’eau savonneuse. Rincer avec
de l’eau propre et sècher. Eviter les produits abrasifs.
LE PLAT RECOLTE-SAUCE
Après une grillade, retirer le plat récolte-sauce du four. Prendre soin
de reverser les graisses (tièdes) dans l’évier. Laver et rincer le plat
récolte-sauce dans de l’eau chaude, avec une éponge imbibée de
produit lessiviel. Si les résidus restent collés, le faire tremper dans de
l’eau et un produit détergent. Il peut aussi être nettoyé dans un lavevaisselle ou avec un produit du commerce.
Ne jamais replacer le plat récolte-sauce encrassé dans un four.
En cas de mauvais fonctionnement, vérifier si la prise est branchée.
Après ces vérifications, adressez vous à votre revendeur ou prévenez
directement notre service technique qui interviendra dans les plus
brefs délais. Veiller à ce que le coupon de garantie fourni avec le
produit soit correctement rempli, avec la date d’achat du four.
Cet appareil est commercialisé en accord avec la
directive européenne 2002/96/CE sur les déchets
des équipements électriques et électroniques
(DEEE).
En vous assurant que ce produit est correctement
recyclé, vous participez à la prévention des
conséquences négatives sur l’environnement et la
santé publique qui pourrait être causé par une mise
au rebut inappropriée de ce produit.
Le symbole sur ce produit indique qu’il ne doit pas
être traité comme un déchet ménager. Il doit être rapporté jusqu’à un
point de recyclage des déchets électriques et électroniques.
La collecte de ce produit doit se faire en accord avec les
réglementations environnementales concernant la mise au rebut de
ce type de déchets.
Pour plus d’information au sujet du traitement, de la collecte et du
recyclage de ce produit, merci de contacter votre mairie, votre centre
de traitement des déchets ou le magasin où vous avez acheté ce
produit.
5. PR SENTATION DU TABLEAU DE BORDE
ON
OFF
Minuteur
Affichage
Booster/Pro
Ecran gauche
Cavité supérieure
Mode de cuisson
Cavité supérieure
Température
Heure de fin de cuisson
Durée de cuisson
Ecran central
Programmation Cuisson/
Mono Cavité
Durée de cuisson
(mono cavité)
Heure de fin
de cuisson
(mono cavité)
Affichage
Booster/ Pro
Affichage
Booster/Pro
(Mono cavité)
Cavité inférieure
Température
Mode de
cuisson
Cavité
inférieure
Ecran droit
Durée de cuisson
Heure de fin
de cuisson
Voyant Pyrolyse /
Sécurité enfant /
Porte sécurisé
START
STOP
On / Off
Programmation de
l’heure
Sélection Fonction/
Cavité
Flèche (-)
Température / Heure
11 FR
Flèche (+) Confirmation Température /
Heure
Start / Stop
Page 12

5.1 CONSEILS AVANT LA PREMIÈRE
UTILISATION
NETTOYAGE PRELIMINAIRE
Un premier nettoyage doit être réalisé avant la première
utilisation :
- Passer un chiffon doux et humide sur les surfaces extérieures de
l’appareil.
- Nettoyer avec une éponge imbibée de produit lessiviel les
accessoires et l’intérieur du four. Rincer et sécher.
- Faire chauffer le four vide une bonne heure à la température
maximale pour faire disparaitre l’odeur du neuf. Pendant cette
opération, bien aérer la pièce.
CE QU’IL FAUT SAVOIR
Valider les modifications sur le minuteur :
- Les modifications doivent être confirmées en pressant la touche
“ “.
Arrêt du four
- Il est possible qu’au moment de la programmation de la cuisson,
vous ayez entré une information incorrecte. Pour stopper le four,
appuyer sur la touche “ “
REGLAGE DE L'HEURE
A la mise sous tension ou après une coupure de courant, l'horloge du
programmateur doit être réglée.
Pour régler l'heure :
1. Appuyer sur le bouton “ “ pendant quelques secondes.
Chercher à l'écran le symbole “ “ en utilisant les flèches” “
appuyer ensuite sur “ “. Les chiffres sur l'écran central se mettent à
clignoter.
2. Régler l'heure en utilisant les flèches ” “ . Attendre quelques
secondes ou valider l'heure en appuyant sur le bouton “ “.
AJUSTEMENT DU CONTRASTE DE L’ECRAN
1. Appuyer sur le bouton ” “ pendant quelques secondes.
Chercher le voyant “ “ en utilisant les flèches “ “ appuyer
ensuite sur “ “. (Le contraste de luminosité de l’écran est
modifiable de « 1 » maximum à « 5 » minimum)
2. Choisir le contraste souhaité en utilisant les flèches “ “.
Attendre quelques secondes ou valider le contraste en appuyant sur
le bouton ” “.
REMARQUE : Si vous souhaitez régler l’heure ou modifier le
contraste de l’écran après le premier allumage du four, appuyer sur
ON
” “ pour allumer le four, et procéder comme décrit en point 1.
OFF
et 2. du paragraphe ci-dessus.
UTILISATION DU MINUTEUR
1. Appuyer sur “ “ pour mettre en route le four.
2. Appuyer sur le bouton “ “ pendant quelques secondes.
Chercher à l’écran le symbole “ “ en utilisant les flèches “ “
, appuyer ensuite sur “ “.
3. Entrer le temps désiré en utilisant les flèches “ “. Attendre
quelques secondes ou valider en appuyant sur le bouton “ “.
REMARQUE : Cette fonction permet d’utiliser le four comme une
alarme, indépendamment de sa fonction de four.
SECURITE ENFANT
1. Pour programmer la Sécurité Enfant, appuyer quelques
secondes sur la touche “ “.
2.
REMARQUE : Il est possible d’activer la sécurité enfant lorsque le
four est allumé ou non.
START
STOP
ON
OFF
Pour activer, appuyer “ “ , « OK»
Pour désactiver, appuyer “ “ , « NO»
12 FR
5.2 COMMENT UTILISER LE FOUR
MONO CAVITE
Pour utiliser le four en mono cavité, enlever le séparateur du four.
Vous pouvez choisir l’ensemble des fonctions ci-dessous en utilisant
le four en mono cavité.
Les modes de cuisson proposés sont décrits dans le tableau cidessous. Une température pour chaque mode de cuisson est
proposée, elle reste modifiable dans une plage pré-définie.
Fonctions selon le
modèle du four
Off
Sole
Sole + Brassée
Convection Naturelle
Chaleur Brassée
Chaleur Pulsée
Gril
Turbo Gril
Tournebroche
Décongélation
Etuve
Mode Pyrolyse
Température
préconisée °C
-
160
210
220
210
180
L2
210
240
40
60
NORMAL
Variation de
températures
possibles °C
-
50-240
50-240
50-280
50-240
50-240
L1-L3
180-230
180-240
No
No
ECO:425/65min
NORMAL:425/70min
SUP:425/75min
*Booster : montée rapide en température
1. Appuyer sur “ “ pour mettre en route le four.
2. Appuyer sur le bouton “ “. Choisir le mode de cuisson souhaité
en utilisant les flèches “ “.
3. En fonction du mode de cuisson sélectionné, une température de
consigne s’affiche, elle est modifiable dans une plage pré-définie, voir
tableau ci-dessus. Pour modifier la température, appuyer sur le
bouton “ “ et choisir la température en utilisant les flèches “ “
. Appuyer ensuite sur “ “ pour valider la modification. L’affichage
de la température est fixe mais reste modifiable pendant toute la
durée de la cuisson.
4. Pour démarrer la cuisson, appuyer sur la touche “ “.
Le four démarre la cuisson et commence la montée en température.
Le voyant clignote tant que la température de consigne n’est pas
atteinte. A la fin du préchauffage, un bip sonore retentit et le voyant
devient fixe.
5. Pour modifier le mode de cuisson, reprendre les points 1. et 2.
6. Pour stopper la cuisson, appuyer sur “ “.
DOUBLE CAVITE
Pour utiliser la double cavité, mettez le séparateur au 3ème niveau du
four. Voir plus loin les fonctions disponibles en utilisant la double
cavité.
1. Appuyer sur “ “ pour mettre en route le four.
2. Appuyer sur le bouton “ “ pour sélectionner la cavité que vous
souhaitez utiliser (cavité du haut, cavité du bas). Choisir le mode de
cuisson souhaité en utilisant les flèches “ “.
3. En fonction du mode de cuisson sélectionné, une température de
consigne s’affiche, elle est modifiable dans une plage pré-définie, voir
tableau ci-dessus. Pour modifier la température, appuyer sur le
bouton “ “ et choisir la température en utilisant les flèches
” “ . Appuyer ensuite sur “ “ pour valider la modification.
L’affichage de la température est fixe mais reste modifiable pendant
toute la durée de la cuisson.
4. Pour démarrer la cuisson, appuyer sur la touche “ “.
Le four démarre la cuisson et commence la montée en température.
Le voyant clignote tant que la température de consigne n’est pas
atteinte. A la fin du préchauffage, un bip sonore retentit et le voyant
devient fixe.
5. Pour stopper la cuisson, sélectionner le voyant “ “.
ON
OFF
ON
OFF
START
STOP
START/STOP
START/STOP
Fonction
Booster *
-
-
Booster
-
-
-
-
Booster
Booster
-
-
-
Page 13

CAVITE SUPERIEURE
Fonctions selon le
modèle du four
Chaleur Pulsée
Gril
Turbo Gril
*Booster : montée rapide en température
Température
préconisée °C
180
L2
190
Variation de
températures
possibles °C
160-240
L1-L3
160-240
Fonction
Booster *
-
-
-
6. MODES DE CUISSON
Toutes les cuissons sont réalisées porte fermée.
SOLE BRASSEE - Utilisation de la résistance de sole plus la
turbine qui brasse l'air dans l'enceinte du four. Cette fonction est idéale
pour les tartes à fruits juteux, les tourtes, les quiches, les pâtés. Elle évite
le dessèchement des aliments et favorise la levée pour les cuissons de
cake, pâte à pain et autres cuissons par le dessous. Placer la grille sur le
gradin inférieur.
SOLE - Utilisation de la résistance de sole. Idéale pour la
cuisson de tartes, de crème caramel, flans, terrine, toutes préparations
qui nécessitent une cuisson par le dessous (cocottes : poulet, boeuf)
ON
OFF
CAVITE INFERIEURE
Fonctions selon le
modèle du four
Chaleur Pulsée
Sole
Sole + Brassée
Température
préconisée °C
180
160
160
Variation de
températures
possibles °C
160-240
160-240
160-240
Fonction
Booster *
-
-
-
*Booster : montée rapide en température
START
STOP
UTILISATION SIMULTANEE DES CAVITES INFERIEURE ET
SUPERIEURE
Les cavités (inférieure et supérieure) peuvent être utilisées
simultanément, lorsque vous souhaitez utiliser deux types de cuisson
différents pour deux préparations distinctes.
Pour programmer cette fonction, suivez les instructions suivantes :
1. Appuyer sur la touche “ “ pour sélectionner la seconde cavité et
reprendre la procédure de programmation des paramètres de cuisson
décrite dans le paragraphe ci-dessus (points 1. à 5.)
DUREE DE CUISSON
1. Appuyer sur la touche “ “et utiliser les” “ flèches” “ pour
afficher le sablier.
2. Appuyer sur la touche “ “ et entrer la durée souhaitée en utilisant
les flèches “ “.
3. Pour confirmer, appuyer sur le bouton “ “.
HEURE DE FIN DE CUISSON
1. Appuyer sur la touche “ “ et utiliser les flèches” “ “ “
jusqu’à atteindre le symbole en forme de flèche.
2. Appuyer sur la touche “ “ et entrer l’heure de fin de cuisson
souhaitée en utilisant les flèches “ “.
3. Pour confirmer, appuyer sur le bouton “ “.
REMARQUE : Pour annuler un temps de cuisson programmé, faire
apparaitre à l’écran “ “ en utilisant les flèches “ “ et confirmer
par le bouton “ “.
Cette fonction est utilisée conjointement avec la fonction Durée de
cuisson.
Par exemple, si un plat a besoin de 45 minutes de cuisson et doit être
prêt pour 12h30 :
- Sélectionner le mode cuisson
- Programmer la durée de cuisson ( 45 minutes)
- Programmer la fin de la cuisson à 12h30.
La cuisson commencera automatiquement à 11h45 (12h30 moins 45
min) et continuera jusqu'à l'heure de fin de cuisson programmée. Le four
s'éteindra alors automatiquement.
ATTENTION
Si l'heure de fin de cuisson désirée a été sélectionnée sans programmer
la durée de cuisson, le four commencera la cuisson immédiatement et
s'arrêtera à l'heure de fin de cuisson qui a été sélectionnée.
résistance de sole et de voûte. Cette fonction est idéale pour toutes les
CONVECTION NATURELLE - Utilisation simultanée de la
cuissons à l'ancienne, pour saisir les viandes rouges, les rosbifs, gigots,
gibiers, le pain, les papillotes, les feuilletages.
CHALEUR BRASSEE - Utilisation simultanée de la
résistance de sole, de voûte, et de la turbine qui brasse l'air dans
l'enceinte du four. Cette fonction est recommandée pour les volailles, les
pâtisseries, les poissons, les légumes.... La chaleur pénètre mieux à
l'intérieur du mets à cuire et réduit le temps de cuisson. Vous pouvez
réaliser des cuissons combinées avec préparations identiques ou non
sur un ou deux gradins. Ce mode de cuisson assure en effet une
répartition homogène de la chaleur et réduit les mélanges d’odeurs.
Prévoir une dizaine de minutes de plus, lorsque vous utilisez le four pour
deux préparations.
CHALEUR PULSEE - Utilisation simultanée de la résistance
circulaire et de la turbine qui brasse l'air dans l'enceinte du four. Ce mode
de cuisson est idéal pour la cuisson de différents types de plats (ex :
viandes et poissons) sans mélanger odeur et goûts. Cette cuisson lente
est idéale pour les volailles, ou les pâtisseries.
GRIL - Utilisation de la résistance de voûte uniquement. Un
préchauffage de 5 minutes est nécessaire pour le rougissement de la
résistance. C'est le succès assuré pour les grillades, les brochettes et
pour les gratins. Les viandes blanches doivent être écartées du grilloir ;
le temps de cuisson sera alors plus long, mais la viande sera plus
savoureuse. Pour les viandes rouges et filets de poissons, ils peuvent
être placés sur la grille avec le plat récolte sauce glissé dessous. Le
récolte-sauce peut également être positionné sur une grille située sur le
gradin inférieur.
TURBO GRIL - Utilisation de la résistance de voûte plus la
turbine qui brasse l'air dans l'enceinte du four. Un préchauffage est
nécessaire pour les viandes rouges et inutile pour les viandes blanches.
Idéal pour les cuissons de volume épais, de pièce entière telles que rôti
de porc, volailles etc... Placer le mets à cuire directement sur la grille au
centre du four, à un niveau moyen. Glisser le récolte-sauce sous la grille
de façon à récupérer les graisses. S'assurer que le mets ne soit pas trop
près du grilloir. Retourner la pièce à cuire à mi-cuisson.
TOURNEBROCHE VENTILE - Utilisation de la résistance de
voûte, de la turbine, et du tournebroche qui permet la rotation du mets à
cuire. Le tournebroche est temporisé en mode programmation c'est-àdire il continue de tourner cinq minutes après la fin de cuisson pour
répartir les derniers rayonnements résiduels. Idéal pour retrouver toutes
les saveurs de la rôtisserie à l'ancienne. On ne fait pas de préchauffage
pour les cuissons au tournebroche.
DECONGELATION - Fonctionnement de la turbine de cuisson
qui brasse l’air dans l’enceinte du four. Idéale pour réaliser une
décongélation avant une cuisson. La température est pré-réglée à 40°C
constants, aucun réglage n’est possible.
LE MODE ETUVE - Utilisation simultanée de la résistance de
voûte et de sole plus la turbine qui brasse l’air dans l’enceinte du four.
Idéal pour maintenir un plat au chaud sans risque de surcuisson et
pratique aussi pour chauffer les assiettes vides. La température est préréglée à 60°C constants aucun réglage n’est possible.
CHALEUR PULSEE - Utilisation simultanée de la résistance
circulaire et de la turbine qui brasse l'air dans l'enceinte du four. Ce mode
de cuisson est idéal pour la cuisson de différents types de plats (ex :
viandes et poissons) sans mélanger odeur et goûts. Cette cuisson lente
est idéale pour les volailles, ou les pâtisseries.
GRIL - Utilisation de la résistance de voûte uniquement. Un
préchauffage de 5 minutes est nécessaire pour le rougissement de la
résistance. C'est le succès assuré pour les grillades, les brochettes et
pour les gratins. Les viandes blanches doivent être écartées du grilloir ;
13 FR
Page 14

le temps de cuisson sera alors plus long, mais la viande sera plus
savoureuse. Pour les viandes rouges et filets de poissons, ils peuvent
être placés sur la grille avec le plat récolte sauce glissé dessous. Le
récolte-sauce peut également être positionné sur une grille située sur le
gradin inférieur.
turbine qui brasse l'air dans l'enceinte du four. Un préchauffage est
nécessaire pour les viandes rouges et inutile pour les viandes blanches.
Idéal pour les cuissons de volume épais, de pièce entière telles que rôti
de porc, volailles etc... Placer le mets à cuire directement sur la grille au
centre du four, à un niveau moyen. Glisser le récolte-sauce sous la grille
de façon à récupérer les graisses. S'assurer que le mets ne soit pas trop
près du grilloir. Retourner la pièce à cuire à mi-cuisson.
circulaire et de la turbine qui brasse l'air dans l'enceinte du four. Ce mode
de cuisson est idéal pour la cuisson de différents types de plats (ex :
viandes et poissons) sans mélanger odeur et goûts. Cette cuisson lente
est idéale pour les volailles, ou les pâtisseries.
cuisson de tartes, de crème caramel, flans, terrine, toutes préparations
qui nécessitent une cuisson par le dessous (cocottes : poulet, boeuf)
turbine qui brasse l'air dans l'enceinte du four. Cette fonction est idéale
pour les tartes à fruits juteux, les tourtes, les quiches, les pâtés. Elle évite
le dessèchement des aliments et favorise la levée pour les cuissons de
cake, pâte à pain et autres cuissons par le dessous. Placer la grille sur le
gradin inférieur.
four –Trois choix possibles ECO, NORMAL, SUPER.
TURBO GRIL - Utilisation de la résistance de voûte plus la
CHALEUR PULSEE - Utilisation simultanée de la résistance
SOLE - Utilisation de la résistance de sole. Idéale pour la
SOLE BRASSEE - Utilisation de la résistance de sole plus la
MODE PYROLYSE – Le four prend en charge le nettoyage du
7. PYROLYSE (suivant le modèle)
Le four est équipé d'un système de nettoyage par pyrolyse, c'est-àdire par destruction à haute température des salissures. Cette
opération se fait automatiquement au moyen du programmateur. Les
fumées en résultant sont rendues "propres" par passage sur un
pyrolyseur dont l'action commence dès la cuisson des aliments.
A cause de la température élevée nécessaire à la pyrolyse, la porte du
four est munie d'une sécurité qui permet son verrouillage pendant le
cycle.
La Pyrolyse peut être stoppée à tout moment. Cependant, la porte ne
s'ouvrira pas tant que le voyant Blocage de porte est affiché.
NOTE : Si une table de cuisson est installée au dessus du four, ne
jamais utiliser la table pendant l'opération de pyrolyse dans le but
d'éviter un échauffement excessif du tableau de bord du four.
TROIS CYCLES DE PYROLYSE sont proposés
ECO PYROCLEAN : nettoyage du four moyennement sale.
•
Fonctionnement pendant une durée de 65 minutes.
•
NORMAL PYROCLEAN : nettoyage du four normalement sale.
Fonctionnement pendant une durée de 75 minutes.
SUPER PYROCLEAN : nettoyage du four très sale. Fonctionnement
•
pendant une durée de 90 minutes.
Ne jamais utiliser des produits distribués dans le commerce
avant de réaliser le nettoyage du four à pyrolyse !
Remarque : un nettoyage enchaîné derrière une cuisson permet de
bénéficier de la chaleur déjà emmagasinée dans le four d'où une
économie d'énergie.
Avant de réaliser une Pyrolyse
- Retirer du four les accessoires : ils ne supporteraient pas sans
dommage la température de pyrolyse.
- Enlever les débordements importants ou gros déchets dont la
destruction demanderait un temps trop long.De plus, des résidus gras
en quantité élevée sont en effet susceptibles de s'enflammer sous
l'action de la chaleur intense que dégage la pyrolyse.
- Fermer la porte du four.
Mise en route du cycle pyrolyse :
1. Appuyer sur “ “. Afficher le symbole “ “ en utilisant les
flèches “ “. Appuyer sur le bouton “ “ pour confirmer. Le
symbole ” “ s'affiche sur l'écran. Le mode ECO clignote.
ON
OFF
Rappel :
ECO : nettoyage du four moyennement sale. Fonctionnement
pendant une durée de 65 minutes.
NORMAL : nettoyage du four normalement sale. Fonctionnement
pendant une durée de 75 minutes.
SUPER : nettoyage du four très sale. Fonctionnement pendant une
durée de 90 minutes.
2.En utilisant les flèches” “, sélectionner le mode de pyrolyse
souhaité, selon le degré de salissure du four (ECO, NORMAL,
SUPER). Appuyer ensuite sur “ “ pour confirmer.
Votre choix est confirmé après 3 secondes…
START
STOP
Le four démarre le cycle pyrolyse. Le mode choisi clignote et les
indicateurs “ “ et “ “ apparaissent. Au cours du cycle de pyrolyse,
un cadenas apparait sur l'écran pour avertir que la porte est bloquée
et la turbine de refroidissement se met en fonctionnement.
Le voyant du thermomètre clignote tant que la température de
consigne n'est pas atteinte et devient fixe.
Lorsque le temps est écoulé, le four se coupe automatiquement.
Pendant 15 secondes, un bip sonore retentit pour vous avertir et les
symboles “ “et “ “ clignotent.
Appuyer sur “ “ pour stopper la Pyrolyse. Les symboles “ “
et “ “cessent de clignoter. Le symbole “ “ disparait de l'écran
START
STOP
ainsi que l'indication du mode Pyrolyse sélectionné.
Tant que le symbole du Cadenas est affiché, la porte ne peut s'ouvrir
pour des raisons de sécurité car la température centre four est trop
élevée.
La turbine de refroidissement ne s'arrête que lorsque la température
pour les composants électroniques est raisonnable.
A la fin du cycle pyrolyse, le voyant de température clignote à nouveau
et reste allumé même si le four est éteint. Il clignote pendant la
descente de température et disparaît définitivement lorsqu’il atteint
une température suffisamment basse.
La pyrolyse laisse sur les parois du four un dépôt de quelques résidus
blanchâtres. Attendre le refroidissement du four. Nettoyer l'enceinte
du four pour les éliminer avec une éponge humide.
8. QUELQUES CONSEILS DE CUISSON
Il est préférable de ne saler les viandes qu'en fin de cuisson, car le sel
favorise les projections de graisse, donc un encrassage rapide du four et
des fumées importantes.
Les rôtis de viande blanche, porc, veau, agneau, les poissons peuvent
être placés dans le four froid. La cuisson est alors plus longue que dans
le four chauffé préalablement, mais elle se fait mieux au centre de
l'aliment à cuire, la chaleur ayant plus de temps pour se propager vers le
milieu de l'aliment.
Un bon préchauffage est toujours à l'origine de la réussite d'une cuisson
de viande rouge.
POUR LES GRILLADES :
. avant d’enfourner : sortir la viande du réfrigérateur quelques heures
avant de la griller. Nous vous conseillons de la poser sur des épaisseurs
de papier absorbant : elle sera mieux saisie, plus savoureuse et ne
risquera pas de rester froide à l'intérieur. Poivrer et épicer la viande avant
de la faire griller, mais ne la saler qu'une fois cuite, sinon elle serait mal
saisie et moins juteuse. Badigeonner toutes les pièces à cuire avec un
peu d'huile. Le mieux est d'utiliser un pinceau large et plat. Saupoudrer
ensuite de poivre et de quelques herbes (thym, etc..).
. Pendant la cuisson : ne jamais piquer les aliments en cours de
cuisson, ni lorsque vous les retournez : leur jus s'écoulerait et la grillade
serait sèche.
Les viandes devront être retournées à mi-cuisson, exceptées avec le
Tournebroche qui se charge lui-même de la rotation du mets à cuire.
Attention : si votre four est enfumé, la température affichée est trop
forte, pour y remédier, il faut réduire la température.
Ne jamais utiliser le plat récolte-sauce comme plat à rôtir.
POUR LES PATISSERIES : éviter d'utiliser des moules brillants.Ils
réfléchissent la chaleur et peuvent nuire à la cuisson des gâteaux. Si vos
gâteaux dorent trop vite, recouvrez-les avec une feuille de papier
sulfurisé, ou bien avec une feuille de papier aluminium.
Attention : utiliser la feuille d'aluminium dans le bon sens : la face
brillante doit être face au gâteau. Dans le cas contraire, la chaleur se
réflètera sur la face brillante et ne pénètrera pas à l'intérieur du plat.
Eviter d'ouvrir la porte du four pendant les 20 à 25 premières minutes de
cuisson : les soufflés, brioches, biscuits de Savoie, etc... retomberaient
aussitôt.
Pour contrôler la cuisson de vos pâtisseries, piquer le centre avec la
lame d'un couteau. Si elle ressort bien sèche, votre gâteau est cuit.Vous
pouvez arrêter la cuisson. Si la lame ressort humide ou avec quelques
particules de gâteau collées dessus, continuer la cuisson mais en
baissant légèrement la température pour que la pâtisserie finisse de
cuire sans brûler.
18 GB
14 FR
Page 15

Page 16

INSTALLATION DU FOUR FR INSTALLATION GB
FR
560
Four en colonne (dimensions en mm)
GB
Oven in column (dimensions mm)
560
550
440
17
ATTENTION !
Applying torque more than needed to fix the screws can close the ventilation
channels on both sides. Please be sure that, these ventilation channels
are 2mm open after installation to furniture.
ATTENTION !
Un serrage excessif des vis de fixation peut entraîner une obstruction de la
ventilation sur les deux côtés du produit. Assurez-vous qu'un espace de
2 mm est toujours présent après installation dans le meuble.
560
min
FR
Ouverture 500 x 45
GB
Opening 500 x 45
590
595
595
22
FR
Si le meuble est équipé d’un fond à
l’arrière : prévoir une ouverture pour le
passage du câble d'alimentation.
GB
If the furniture is equpped with a
bottom at the back part, provide an
opening for the power supply cable.
FR
Ouverture 500 x 10
Opening 500 x 10
GB
600 min
578
546
TABLE / TOP
FOUR / OVEN
552
2mm
2mm
10 min
FR
Four enchâssé sous plan de travail
(dimensions en mm)
GB
Oven fitted under worktop
(dimensions mm)
4x4.5x25
FR
FR
Ouverture 500 x 10
Opening 500 x 10
GB
FR
Fixation dans la niche d'encastrement
Vous trouverez dans un sachet à
l'intérieur du four les vis de fixation.
Pour la fixation:
lorsque la porte du four est ouverte,
les trous sont accessibles, ils sont situés
de chaque côté des montants latéraux.
Utiliser les vis fournies pour fixer le four.
FR
Ouverture 560 x 45
Opening 560 x 45
GB
GB
Fixing in the location
Inside the oven there is a bag with four
fixing screws.
Fixing:
When the oven door is open, holes
are accessible, they are located on each
side.
Use the screws provided to fix the oven.
Le constructeur décline toute responsabilité concernant d’éventuelles inexacitudes imputables à des erreurs d’impression ou de transcription
contenue dans cette notice. Le constructeur se réserve le droit de modifier les produits en cas de nécessité, même dans l’intérêt de l’utilisation, sans
causer de préjudices aux caractéristiques de fonctionnement de sécurité des appareils.
GB
The manufacturer will not be responsible for any inaccuracy resulting from printing or transcript errors contained in this brochure. We reserve the
right to carry out modifications to products as required, including the interests of consumption, without prejudice to the characteristics relating to
safety or function.
11.2012 • REV A 42806830•
 Loading...