

Page 1

INSTRUCTIONS BOOKLET
built-in cooktops
LIBRETTO ISTRUZIONI
piani cottura ad incasso
NOTICE D'INSTRUCTIONS
plans de cuisson à encastrer
Page 2

Page 3
Important warnings and tips for use
IMPORTANT!
easy reach during the entire life of the cooktop. Please carefully read this manual and all the instructions
contained herein before using the appliance. Keep any spare parts supplied with the appliance.
Installation and all gas/electric connections must be carried out by a qualified technician in accordance
with the manufacturer's instructions and in full compliance with current laws and safety regulations.
This appliance is intended solely for domestic use and is designed for the following functions:
cooking and reheating food. Any other use is considered as improper.
The manufacturer declines all liability resulting from poor installation, tampering,
inexpert use and use for purposes other than those specifically stated.
Check that the appliance has not been damaged during transport; Keep all packaging materials
(plastic bags, polystyrene foam, nylon, etc.) away from children, as they are potentially dangerous.
The packaging material is recyclable, and marked with the recycling symbol
Dispose of the appliance responsibly
This appliance is not intended for use by persons (including children) with reduced physical,
sensory or mental capabilities, or lack of experience and knowledge, unless they have been
given supervision or instruction concerning use of the appliance by a person responsible for their safety.
Children should be supervised to ensure that they do not play with the appliance
Electrical safety can only be guaranteed if the product is connected to a suitable earth connection.
After using the cooktop, ensure the indicator on the knob is turned to the "off" position.
Should you decide not to use the appliance any longer, before scrapping it make it unusable in
accordance with current environmental health and safety laws, ensuring any parts which might
constitute a danger to children are rendered harmless.
Warning: in case of disassembly, maintenance and cleaning of the appliance, be careful.
Please use suitable prevention and protection equipment
The label with technical specifications is placed under the bottom and in the manual. Do not remove it.
Never place inflammable objects on the hob.
When a cooking zone is turned off, it remains hot for a while. During this time avoid touching the hot zone.
Do not use aluminium foil or plastic containers (the protective films are not suitable for this hob)
If there is a drawer under the hob, it is advisable not to keep inflammable objects or spray cans in it.
The power supply cable must never touch hot cooking zones, it might get damaged.
The cooking zone and pan bottom must always be dry and clean.
If you find cracks on the appliance; if the cooking zones are overheated; if the display or the knobs does
not work or if the hob turn-off by itself: immediately turn-off the appliance and call the assistance service.
In case of any malfunction, do not attempt to repair the hob by yourself, but contact the assistance service
Do not cook with empty pan, especially if it is an enamelled or aluminium pan.
Pan bottoms and ceramic glass could be damaged. Use only stainless steel pots and pans
Never place hot pans, frying pans, hard or poinjted objects on the control panel, knobs area or the frame
Sugar and other food with high sugar content will damage the hob. Any spilt food must be removed
immediately with a scraper for glass. Warning !!! The optional scraper for glass has a sharp blade.
The following damages will not affect the correct functioning or the stability of the appliance:
The formation of gelatinous residues due to melted sugar or food with a high sugar content; Scratches
due to salt, sugar or sand grains or rough pan bottoms; metal colour from pan stands.
Only use warm water with a mild detergent. Do not use corrosive or abrasive products,
as they could damage the surfaces. Warning: a steam cleaner is not to be used to clean the appliance.
These instructions are valid only for those countries whose ID initials appear on the
data plate found on the instructions handbook and on the appliance.
This manual constitutes an integral part of the appliance. It must be kept intact and within
FIRE HAZARD!
Declaration of Conformity
This appliance is in compliance with the following European Directives:
2006/95/CE : General regulations / Low tension
2009/142/CE : Concerning gas appliances
1935/2004/CE + 89/336/CE + 90/128CE: This appliance is suitable to come in contact with food
2004/108/CE : Electromagnetic compatibility
Page 4
-
-
-
-
COOKTOP SPECIFICATIONS
Warnings:
This appliance is designed to be built into a housing unit.
The installation class is type 3 for gas and type Y for electric parts.
Housing units must be designed to withstand temperatures of up to 90°C or over.
For correct installation, refer to the relevant paragraph and reference drawings.
The use of a gas cooking appliance produces heat and humidity in the room in which it is
installed. Ensure the kitchen is well ventilated: keep natural ventilation openings open, or install
a mechanical ventilation device (extractor hood with exhaust duct). In the case of intensive or
prolonged use of the appliance it may be necessary to provide additional ventilation, for example,
by opening a window, or more efficient ventilation, for example by increasing the hood speed.
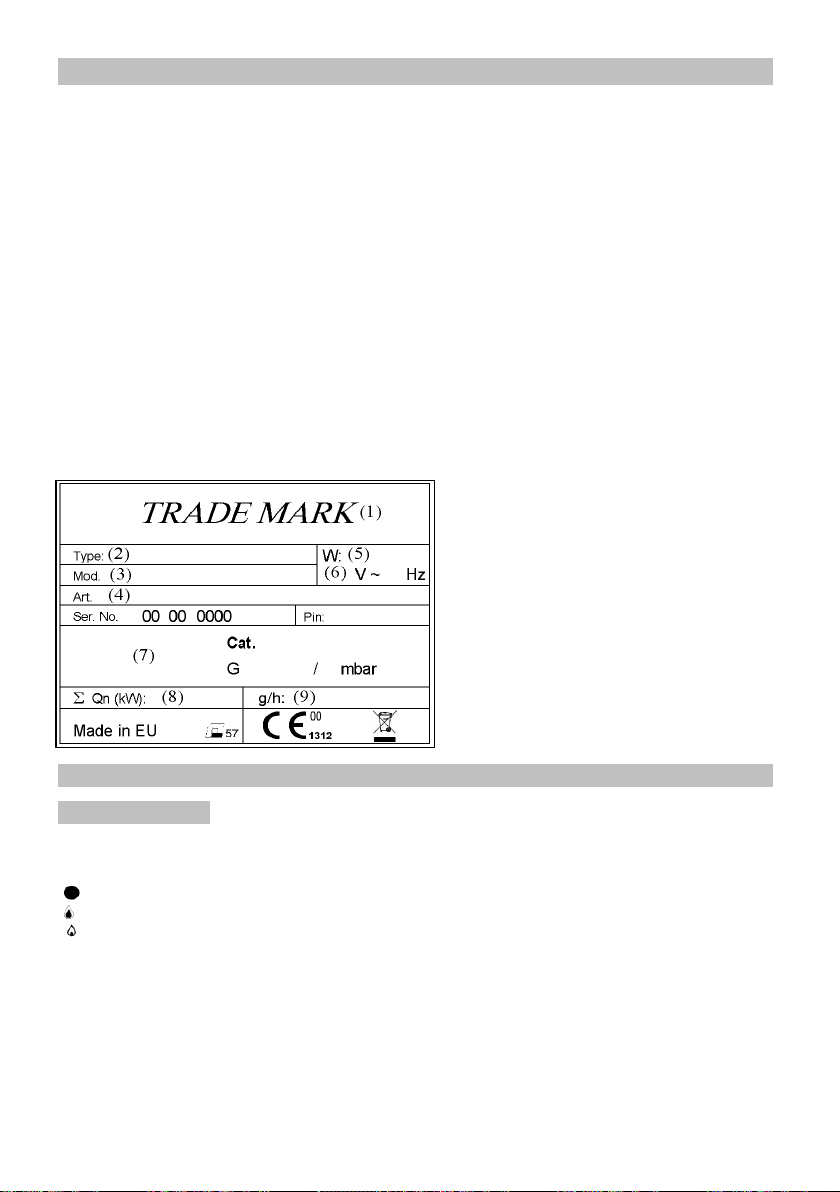
This handbook is valid for several types of cooktop.
Refer to the data plate on the back in order to identify the model that corresponds to your appliance.
These informations, together with the instructions and the illustrations in the following paragraphs
will show you the characteristics of your appliance.
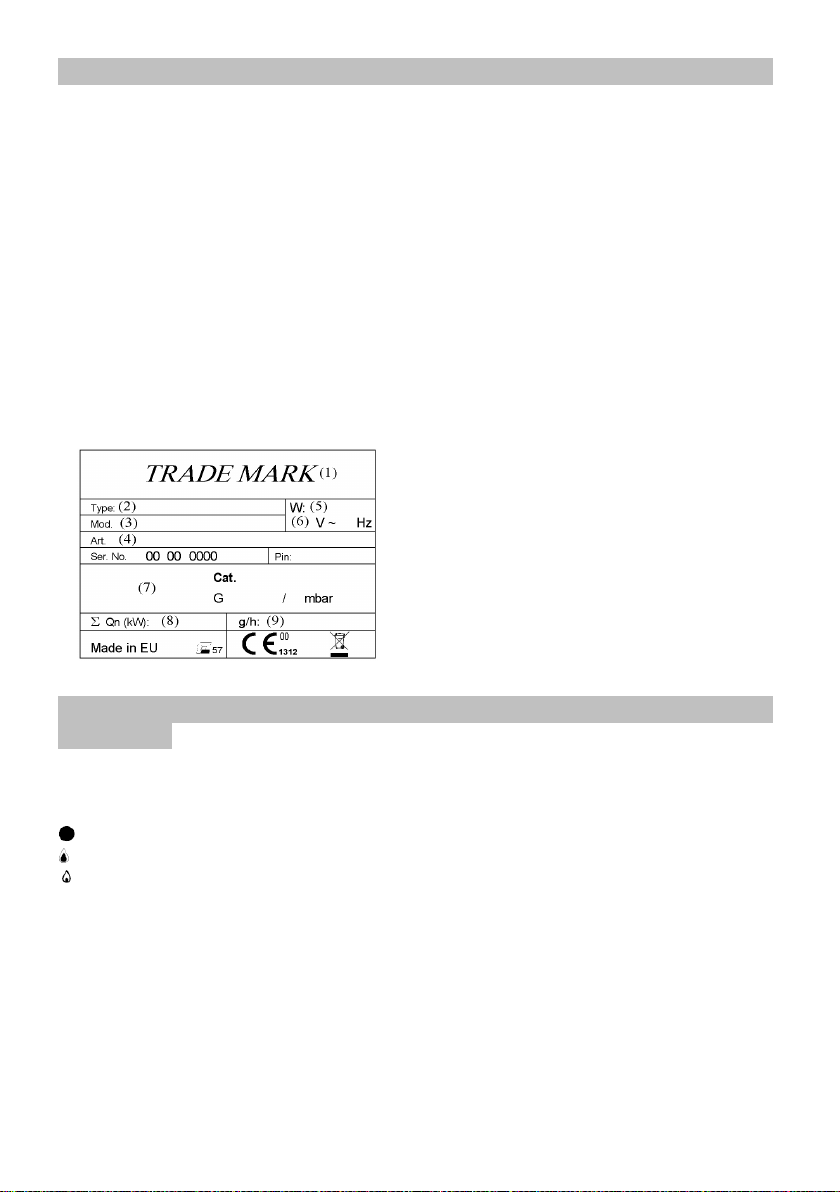
An Example:
Legend:
(1)
Trade Mark
(2)
Corresponding model
(3)
Technical code
(4)
Customer code
(5)
Power inputs
(6)
Voltage and frequency data
(7)
Country of target market and gas details
(8)
Gas burners power
(9)
Gas burners consumptions
USING THE COOKTOP
Gas burners
The delivery of gas to the burners is controlled by the knobs shown in fig.2 that in turn control the taps.
The symbols, depending on the various versions, may be printed over or under the knobs.
By moving the indicator to coincide with the printed symbols, the following adjustment can be made:
Tap closed, no gas delivery
Maximum capacity, maximum gas delivery
Minimum capacity, minimum gas delivery
Burners with safety valve - ignition
These models are equipped with safety valves which automatically shut off the gas delivery
in the event the burner should, for any reason, go out. To relight the burner, turn the knob to
position "tap closed" and repeat the ignition procedure explained in the following paragraphs.
For ignite a burner, turn the gas tap knob to the maximum
delivery position, then press and hold down it for about 4÷5 seconds.
Warnings:
Once the burner is light on, adjust the flame by turning the knob to obtain the desired intensity.
-
The setting must always be positioned between the maximum and minimum, and never
Page 5
between the maximum setting and the off position.
Grids
Choosing the right burner
Electric hotplates
-
-
-
-
-
-
-
-
-
-
If the burner is difficult to light on, or if the flame is tall or irregular, turn off immediately
-
turning the knob to "off" position and call Assistance Service.
If the particular nature of the local gas supply makes it difficult to ignite the burners with the knob
-
turned to the maximum setting, repeat the operation without a pan in position and with the knob
turned to the minimum setting and without pan stands.
Warning: The ignition device must not be used for more than 15 seconds. If after this length of time the
-
burner does not light, or if it goes out again accidentally, wait 1 minute before trying to ignite it again
The panstand grids are designed to make the appliance easy and safe to use. Always check the
panstand grids are properly positioned before using the appliance. Furthermore, always check the
protective rubber feet are all present and correctly positioned.
Grid for small pots or pans (optional - Fig.1A)
This is placed on top of the auxiliary burner grid (the smallest one) when pots or pans of reduced
diameter are used, to avoid unbalancing.
Special "WOK" support grid (optional - Fig.1B)
This is placed on top of the triple crown burner when using a “WOK” (concave bottom pan).
In order to prevent serious malfunction of the burner, never use a wok without this special grid
and never use the wok grid for flat bottomed pans
The symbols stamped on the control panel (fig.2) near the knobs indicate which knob correspond
to which burner. To choose the most suitable burner, take into account the diameter of
the pan as well as the pan capacity (see table).
The diameter of the pan must be proportionate to the burner power in order to ensure high yield.
Pan diameter
Warnings:
Never cook food directly on the electric hotplates; always use suitable pots or containers
Absolutely do not leave the electric plates working without any pots on it.
These wrong use may cause overheating, damages to the appliance and fire hazard.
Take all precautions possible to avoid spilling liquids onto the hotplate when it is hot.
Do not use the appliance if the surface is broken or damaged; in case you find a crack on the
appliance, disconnect immediately he electric supply and contact the After-Sales service.
Bear in mind that the cooking zones remain hot for a relatively long time (about 30 min.),
after switching off.
Never clean with high-pressure water or steam-cleaning equipment.
Do not put flammable materials (paper, plastic, etc…) on the cooking zones (plates or glass-ceramic)
Do not allow heavy or sharp objects to fall on the glass-ceramic cook top.
Do not stare at the halogen lamps on the cook top.
Use flat bottomed pans only with a diameter large enought to cover the entire burner surface.
A
R
TR
Burners
Auxiliary
Rapid
Wok
Ø minimum
60 mm (with reducer)
200 mm 240 mm
240 mm
Ø maximum
140 mm
260 mm
Page 6
Switching on the hotplates:
-
-
-
Fitting the appliance in the worktop
-
To switch on the electric hotplate, turn the knob to the desired position.
Numbers 1 to 6 or 1 to 10 (fig.3), depending on whether the cooktop is fitted with a
power switch or regulator, indicate the settings in progressing temperature (See Table).
When the electric hotplate is in operation an indicator LED on the control panel lights up.
Using the electric hotplates:
Once reached the heating required, adjust the power intensity, bearing in mind that the hotplate
will continue to emit heat for several minutes after being switched off;
Depending on the food to cook, adjust the power intensity following the recommendations below:
Knob position
Switches
figure 3/A figure 3/B
0 0
1
2
3
4
5
6
Regulators
1
2
3
4
5
6
7
8
8
9
10
Cooking type
Off
For melting (butter, chocolate, etc..)
For keeping food warm or reheating small
amounts of liquids
Reheating larger quantities,
whipping creams and sauces
To simmering, soups, pasta, risottos, continuation
of steaming, cooking steaks and fries in general
Browning meats, roast potatoes, fried fish and
for bringing large quantities of water to a boil
Fast frying, grilled steaks, etc.
Type of hotplates:
solid plates
The cooktop may be equipped with a Ø145mm or a Ø180mm hotplate, conventional or rapid power.
The conventional hotplate is entirely black, while the rapid hotplate has a red dot in the centre.
Essentially, the rapid hotplate differs from the conventional one because it:
-
offers greater power;
-
reaches desired temperature more rapidly;
Some electric plates are equipped with a safety thermostat that reduces or disconnect
power supply in case of overheating of the appliance (for example, if forgiven working).
INSTALLATION INSTRUCTIONS
Important!
These instructions are intended for qualified technicians.
The appliance must be installed correctly, in compliance with current laws.
Before carrying out any operation on the appliance, it must be disconnected from the electric supply.
The cooktop may be fitted into any worktop, as long as it is heat resistant (minimum temperature of 90°C)
The dimensions of the hole to be made in the worktop and the minimum distances between rear
and side walls and those above the appliance are shown in figure 4.
Isolation below (fig.6):
If the cooktop is installed without an oven below it, a separator panel must be placed between
Page 7

the bottom of the cooktop and the housing below it, at a minimum distance of 10 mm.
-
-
-
-
If the cooktop is installed over an oven, place a separator panel at a minimum distance of 15mm
and follow the oven manufacturer's instructions, ensuring nonetheless sufficient aeration
as specified in fig.6.
In any event, the electrical connection of the two appliances must be carried out
separately,
It is advisable to use an oven equipped with an internal forced cooling system.
both for electrical safety and to facilitate removal.
Fixing the cooktop (fig.7):
To fix the cooktop in the housing, proceed as follows:
Position the special gasket supplied [C] along the outer perimeter of the worktop, following the
diagram shown in fig.4, so that the ends of the gasket meet exactly without overlapping.
Position the cooktop into the worktop, taking care to ensure it is placed exactly in the centre.
Fix the cooktop to the worktop using the special brackets supplied [A], as shown in fig.7.
Correct installation of the sealing gasket ensures complete protection against infiltration of liquids.
Installation area and removal of combustion fumes
The appliance must be installed and operated in suitable areas, and in compliance with current laws.
The installation technician must observe current laws governing ventilation and removal of combustion fumes
Please remind that the air required for combustion is 2m3/h per kW of power (gas) installed.
Installation area
In the room where the gas appliance is installed, there must be a sufficient natural air supply to
allow the gas to burn correctly (in conformity of currents laws).
The natural flow of air must take place through an opening made on an outside wall of the room
and having a working section of at least 100 cm2 (A). In the case of appliances without safety
valves, this opening must have a minimum working section of 200 cm2 (fig.8).
This opening must be made in such a way that it cannot be obstructed from inside or outside.
It should be positioned near floor level, preferably on the side opposite the fume exhaust devices.
If it is not possible to make the necessary openings, the air can be supplied from an adjacent, suitably
ventilated room, as long as this room is not a bedroom, a dangerous area or a lowpressure area.
Removal of combustion fumes
Combustion fumes produced by gas appliances must be removed by means of a hood connected
directly either to an exhaust duct or to the outside (fig.8).
If a hood cannot be installed, an electric extractor fan must be fitted to the outside wall or the window.
This electric extractor fan must have a sufficient capacity to guarantee a change of air of the
kitchen of at least 3-5 times its volume.
Components shown in fig.8:
A
Opening for air supply
C
Hood for exhaust removal of combustion fumes
E
Electric extractor fan for removal of combustion fumes
Connection to gas supply
Before installation, make sure the type and pressure of the local gas supply are compatible with the cooktop
settings. To do this, check the data on the appliance data plate on the cooktop as well as on this handbook
The gas connection must be carried out by a qualified technician in compliance with local current laws.
If using metal hoses, ensure these do not come into contact with any movable parts and are at no point crushed.
Carry out the connection in such a way as does not cause any stress whatsoever on the appliance.
The gas supply connector is threaded G½” (fig.12).
Page 8
For ISO R7 connections, the gasket is not required.
Electrical connection
-
-
-
-
-
-
For ISO R228 connections, the washer supplied must be fitted.
After connection operations, check for leaks using a soapy solution.
Before connecting the appliance to the electricity supply, check that the voltage corresponds to that on the
data plate and that the power supply cable is suitable for the appliance load also stated on the data place.
If the appliance is connected directly to the mains, fit an all-pole disconnect switch with minimum
contact gap of 3 mm, adequate for the appliance load and complying to regulations.
The plug used must support the power of work of the appliance.
Warnings:
Do not use reducers, adapters or switches for connection to the mains, since these
could overheat and cause burns.
Earth connection is required by law (fig.10).
The manufacturer declines all liability resulting from failure to observe this regulation.
If the power cable must be replaced, use a cable having identical characteristics to the original
supplied by the manufacturer, suitable for the load and temperature (type T90°C). This is available
from After-sales service. Furthermore, the end of the power cable to be connected to the appliance
must have the Yellow-Green earth conductor 20 mm longer than the other conductors.
The cable must support the load of the appliance.
Refer to the table below for the size of the power cable
Cooktop type
Only with gas burners
With electric plate(s) <= 1000W
With electric plate(s) >1000W
Wire size
Ø0,75 mm
Ø0,75 mm
Ø1,50 mm
2
2
2
Should it be necessary to replace the supply cord,
connect the wire in accordance with the following colours/codes:
BLUE
BROWN
YELLOW-GREEN
Check wether there is a omnipolar switch available on the domestic line which is compliant with
current standards laws.
Otherwise, place a device easily reachable between the appliance and the electricity line.
If the cable result damaged, it must be quickly replaced with a new one by a qualified technician
or call the After-Sales service.
ADJUSTMENT TO DIFFERENT TYPES OF GAS
If a different type of gas from the one indicated on the rating plate is used, the injectors must be replaced.
If spare injectors are not supplied with the appliance, they are available from the After-sales service.
For the choice of replacement injectors, refer to the injectors table at the end of this booklet.
The injectors are identified by their diameter, which is expressed in hundredths of mm, stamped on
the body of the injector itself.
Replacing the injectors
Remove the grids and burner caps from the cooktop
Using a socket wrench, replace the injectors “J” (fig.9) with the suitable ones for the gas used
NEUTRAL (N)
LIVE (L)
EARTH (
)
Page 9

-
Replace the burners
-
-
-
-
-
-
Maintenance
The burners do non require primary air adjustment.
Adjustment of minimum setting (fig.13)
After replacing the injectors, light the burner and remove the knob. Turn the tap to the minimum setting
and insert a screwdriver in the rod: tighten to reduce the flame, loosen to increase the flame
For gas G30/G31, tighten the adjustment screw fully
The flame must result small, uniform and regular all around the burner crown.
Check that:
quickly turn the knob from max. to min. position of gas power, the flame doesn't go over
for burners with a safety device, the flame have to licks the thermocouple
leaving the burner alight for a few minutes, it doesn't go over
CLEANING AND MAINTENANCE
To maintain the cooktop in optimum condition, clean it regularly after each use, allowing it to cool
before cleaning.
Never use abrasive or sharp substances or materials to clean the surfaces
Never clean the appliance with high pressure water or steam cleaning equipment
Do not use flamable or alcoholic cleaners
Enamelled parts:
All enamelled parts should be cleaned with a sponge and soapy water or specific detergents.
Never use abrasive cleaning products. Dry thoroughly after cleaning.
Stainless steel top:
The stainless steel top should be cleaned with a damp cloth and proprietary detergents
commercially available. After rinsing, dry preferably with a chamois leather.
Grids:
The enamelled panstand grids of the cooktop are dishwasher safe.
Stainless steel panstand grids may take on a bluish tinge on parts around the burners as a result of
the high temperatures. This effect can be reduced by using commercially available steel wool pads.
Burners:
The burners, comprising two parts, can be removed and cleaned using suitable detergents.
After cleaning, dry the burners thoroughly and reposition them carefully in their seats.
In models with electric ignition, always check that the electrode “E” (fig.11) is clean.
In models with safety device, clean the probe “T” (fig.11) in order to allow regular operation of the
safety valve. Both the electrode and probe must be cleaned with care.
Upon completion of cleaning, replace the burners accurately in their seats.
To prevent damaging the electric ignition, avoid using it when the burners are not in place.
Electric hotplates:
The electric hotplates should be cleaned when they are only slightly warm.
Clean with a damp cloth, then finish off with a cloth dampened with mineral oil.
Use only neutral and not-flammabke detergents.
The appliances do not require any particular maintenance, nonetheless it is advisable to have them
checked at least once every two years.
If the knobs become difficult to turn, or if there is a smell of gas, shut the gas supply tap and call
After-sales service. Faulty taps must be replaced along with their gasket.
Page 10

CUSTOMER ASSISTANCE SERVICE
If you cannot identify the cause of the operating anomaly: switch off the appliance (do not subject it
to rought treatment) and contact the Assistance Service.
PRODUCT SERIAL NUMBER. Where can I find it?
It is important you to inform the Assistance Service of your product code and its serial number
(a 16 character code which begins with the number 3); this can be found on the guarantee certificate
or on the data plate located on the appliance.
This will help to avoid wasted journerys to technicians, thereby (and most significantly) saving
the corresponding callout charges.
Page 11
Avvertenze e consigli importanti per l’uso
IMPORTANTE!
Questo manuale costituisce parte integrante dell’apparecchio. Occorre conservarlo integro e a
portata di mano per tutto il ciclo di vita del piano di cottura. Consigliamo una attenta lettura di questo manuale e
di tutte le indicazioni in esso contenute prima dell’utilizzo dell’apparecchio. Conservare gli eventuali ricambi in
dotazione. L’installazione dovrà essere eseguita da personale qualificato e nel rispetto delle norme vigenti.
Quest’apparecchio è previsto per un impiego domestico ed è costruito per svolgere la seguente funzione:
cottura e riscaldamento dei cibi. Ogni altro uso va considerato improprio. Il costruttore declina ogni
responsabilità per cattiva installazione, manomissione, imperizia d’uso e per utilizzi diversi da quelli indicati
Gli elementi dell’imballo (sacchetti in plastica, polistirolo espanso, nylon, ecc.) non devono
essere lasciati alla portata dei bambini, in quanto potenziali fonti di pericolo.
L’imballo è costituito da materiale riciclabile ed è contrassegnato dal simbolo:
Non disperdere nell’ambiente.
Questo apparecchio non è destinato ad essere usato da bambini e persone incapaci o inesperte all’uso del
prodotto, a meno che non vengano sorvegliate o istruite riguardo all’uso dell’apparecchio da una persona
responsabile della loro sicurezza. Sorvegliare i bambini affinchè non giochino con l'apparecchio.
La sicurezza elettrica è garantita solo quando il prodotto è collegato ad un efficiente impianto di messa a terra
Dopo aver utilizzato il piano, assicurarsi che l’indice delle manopole sia in posizione di chiusura e
chiudere il rubinetto principale del condotto d’erogazione del gas o il rubinetto della bombola.
Qualora decidesse di non utilizzare più quest’apparecchio, prima di gettarlo al macero, si raccomanda di
renderlo inoperante nel modo previsto dalle leggi vigenti in materia di salute e tutela dell’ambiente, rendendo
innocue le parti che possono costituire elemento di pericolo per i bambini.
Per la manutenzione, la movimentazione, l'installazione e la pulizia dell'apparecchio,
si raccomanda di utilizzare opportuni mezzi di prevenzione e protezione.
La targa di identificazione, con i dati tecnici, si trova visibilmente posizionata sotto il carter ed
allegata a questo manuale.
Non posare oggetti infiammabili sul piano cottura.
Dopo utilizzata, la zona cottura spenta rimane calda per qualche minuto. Attenzione a non toccarla.
Non utilizzare fogli di alluminio, contenitori plastici o carta da cucina direttamente sull'apparecchio.
Nel caso vi sia un cassetto sotto al piano, è preferibile non riporvi oggetti infiammabili o contenitori spray.
Il cavo di alimentazione dev'essere lontano dalle zone cottura, potrebbe venire danneggiato.
Le zone di cottura e le pentole e padelle devono essere sempre asciutte e pulite.
Se si trova una crepa sul piano; se le zone cottura si surriscaldano; se il display o le manopole non funzionano
correttamente, spegnere immediatamente l'apparecchio e contattare il servizio di assistenza.
In caso di malfunzionamento, non provare a riparare l'apparecchio da sé ma chiamare un tecnico qualificato.
Non cucinare mai con pentole vuote, di ferro, di alluminio oppure col fondo rovinato o sporco.
Potrebbe rovinarsi il piano. Utilizzare solamente pentole o padelle in acciaio inox.
Non appoggiare pentole o padelle calde, oggetti appuntiti o pesanti nella zona comandi, manopole o cornice.
Lo zucchero ed altri alimenti granulosi possono rovinare il piano. Ogni cibo rovesciato dev'essere rimosso
immediatamente, dai vetri, con lo specifico raschietto per vetro. Attenzione, il raschietto ha la lama tagliente.
I seguenti danni non intaccano il corretto funzionamento dell'apparecchio: la formazione di residui gelatinosi
dovuti alla fusione di cibi; graffi dovuti a sale o ad alimenti corrosivi; scolorazione delle parti in acciaio.
Per la pulizia dell'apparecchio, utilizzare solamente acqua calda ed un detergente non aggressivo;
Evitare assolutamente l'uso di idropulitrici ad alta pressione o pulitrici a getto di vapore
Queste istruzioni sono valide solamente per i paesi di destinazione i cui simboli di identificazione
figurano sulla targhetta posta nel libretto istruzioni e sull’apparecchio
La targhetta sotto il carter non deve mai essere rimossa.
Pericolo di incendio
!
Dichiarazione di Conformità CE
Questo apparecchio è conforme alle seguenti normative comunitarie:
2006/95/CE:
2004/108/CE:
2009/142/CE:
1935/2004/CE + 89/336/CE + 90/128CE: Idoneità dei materiali al contatto con i cibi
Norme Generali / Bassa tensione
Compatibilità elettromagnetica
Apparecchi a gas
Page 12

-
-
-
-
Accensione dei bruciatori
Avvertenze:
CARATTERISTICHE DEL PIANO
USO DEL PIANO COTTURA
Avvertenze:
Questo apparecchio è stato studiato per essere incassato sui mobili.
La classe di installazione è del tipo "3" per la parte gas e del tipo "Y" per le parti elettriche;
I mobili a cui andrà accoppiata devono resistere ad una temperatura di almeno 90°C;
Per una corretta installazione, vedere il paragrafo relativo ed i disegni di riferimento;
L'utilizzo di un apparecchio di cottura a gas comporta la produzione di calore ed umidità nel locale
in cui è installato; Fare in modo che la cucina sia ben areata: tenere aperti gli orifizi di aerazione
naturale, o installare un dispositivo di aerazione forzata (cappa di ventilazione). Un utilizzo intenso
e prolungato dell'apparecchio può richiedere un'aerazione supplementare, ad esempio aprendo
una finestra, o un'aerazione più efficace, come per esempio, aumentando la velocità della cappa.
Questo libretto prevede diversi tipi di piani cottura,
dalla targhetta che si trova sul retro, Lei può individuare il modello (Mod. Tc) corrispondente.
Con questa sigla e le indicazioni contenute nei prossimi paragrafi, guardando le figure poste alla
fine del manuale, Lei potrà conoscere caratteristiche e funzionalità del suo apparecchio.
Ad esempio:
Legenda:
(1)
Marchio commerciale
(2)
Modello corrispondente
(3)
Codice tecnico
(4)
Codice commerciale
(5)
Potenza di esercizio
(6)
Voltaggio e frequenza
(7)
Paese di destinazione e dati gas
(8)
Potenza bruciatori gas (dove presenti)
(9)
Consumo bruciatori gas (dove presenti)
Bruciatori a gas
L'afflusso del gas ai bruciatori è regolato dalle manopole di figura 2 che comandano i rubinetti.
I simboli (con grafica variabile a secondo della versione scelta) sono serigrafati sul pannello comandi.
Facendo coincidere l'indice con i simboli serigrafati si ottiene quanto segue:
Rubinetto chiuso, nessuna erogazione di gas;
Portata massima, massima erogazione di gas;
Portata minima, minima erogazione di gas;
Questi modelli sono dotati di una valvola di sicurezza che interrompe il flusso di gas qualora la fiamma
dovesse, per un qualsiasi motivo, spegnersi. Per ripristinarne il funzionamento, riportare la manopola in
posizione "rubinetto chiuso" e ripetere le seguenti operazioni: per accendere un bruciatore con
dispositivo di accensione incorporata nelle manopole uotare la manopola del rubinetto gas
fino alla posizione di massima erogazione, quindi premere e mantenere la pressione per 4-5 secondi.
Una volta acceso il bruciatore, regolare la fiamma fino all'intensità desiderata, comunque sempre
-
compresa tra le posizioni di massima e minima erogazione e mai tra la massima erogazione
e la posizione di rubinetto chiuso.
Page 13

Se il bruciatore fatica ad accendersi oppure la fiamma risulta alta e/o irregolare, spegnere subito
Scelta del bruciatore
Piastre elettriche
-
-
-
-
-
-
-
-
-
-
portando la manopola in posizione "nessuna erogazione" e chiamare il Servizio Assistenza
Qualora particolari condizioni del gas erogato localmente rendano difficoltosa l'accensione del bruciatore,
-
si consiglia di provare a ripetere l'operazione senza nessun contenitore sulle griglie e con la manopola
in posizione di minima erogazione.
Attenzione: i dispositivi di accensione elettrica non possono essere azionati per più di 15 secondi.
-
Se dopo tale periodo il bruciatore non si è acceso, attendere almeno 1 min. prima di ripetere l'operazione
Griglie
Le griglie del piano cottura sono state progettate per rendere agevole e sicuro l'utilizzo del prodotto.
Consigliamo di verificare, prima di ogni utilizzo, il corretto posizionamento e la stabilità delle stesse.
Inoltre, verificare periodicamente, che i gommini di appoggio siano integri e posizionati correttamente.
griglia per piccoli recipienti (optional, fig.1/A)
Si appoggia solamente sopra la griglia del bruciatore ausiliario (il più piccolo) quando vengono impiegati
recipienti di piccolo diametro, per evitare il loro rovesciamento.
griglia speciale per pentole "WOK" (optional, fig.1/B)
Si appoggia solamente sopra la griglia del bruciatore triplacorona, quando si impiegano pentole "WOK"
(a fondo concavo). Si raccomanda, per non causare gravi anomalie di funzionamento del bruciatore,
di non utilizzare pentole WOK senza questa speciale griglia e di non utilizzarla per pentole a fondo piatto.
La simbologia stampigliata sulla zona comandi (figura 2) accanto alle manopole indica la corrispondenza
tra la manopola ed il bruciatore. La scelta del bruciatore più adatto dipende dal diametro e dalla capacità
dei bruciatori (vedere tabella sottostante).
E' necessario che il diametro della pentola o padella sia adeguato alla potenza del bruciatore,
per non comprometterne il rendimento.
Diametro pentole
A
R
TR
Bruciatore
Ausiliario
Rapido
Tripla-corona
Ø minimo
60 mm (con riduzione)
200 mm
240 mm 260 mm
Ø massimo
140 mm
240 mm
Avvertenze:
non cucinare mai il cibo direttamente sulle piastre elettriche, ma in apposite pentole o contenitori.
evitare assolutamente il funzionamento delle piastre senza recipienti; l'uso a vuoto delle piastre,
può causare surriscaldamenti, rottura dell'apparecchio e principi di incendio.
non versare liquidi né appoggiare oggetti sopra le piastre quando ancora calde.
Non utilizzare il piano se la superficie è rotta o danneggiata; nel caso si noti un’incrinatura del piano,
disinserire immediatamente l’apparecchio dalla rete elettrica e chiamare il Centro Assistenza.
Ricordare che le zone di cottura rimangono calde per un tempo abbastanza lungo (circa 30 min.)
dopo lo spegnimento; evitare di venire in contatto con le parti calde e tenere al sicuro i bambini.
Non utilizzare pulitori a vapore o ad alta pressione
Non appoggiare sulle zone di cottura (piastre o vetro) materiale infiammabili (carta, plastica, ecc…)
Nei piani vetroceramici, non lasciare cadere né appoggiare oggetti pesanti o appuntiti sul vetro
Non fissare intensamente le lampade alogene del piano cottura.
Accensione delle piastre elettriche:
L'accensione delle piastre elettriche avviene ruotando le manopole nella posizione voluta.
I numeri da 1 a 6 oppure da 1 a 10 (figura 3), a seconda se il piano è dotato di commutatori
Page 14

o di regolatori di energia, indicano le posizioni di funzionamento della piastra elettrica ed è segnalato
-
-
-
-
-
Installazione nel top (piano del mobile)
-
-
da una spia luminosa presente sul cruscotto comandi.
Uso delle piastre elettriche:
Una volta raggiunto il calore desiderato, regolare la potenza di emanazione tenendo conto che le
piastre elettriche continueranno ad emanare calore per diversi minuti dopo il loro spegnimento.
In relazione al tipo di vivanda, regolare l'intensità della potenza delle piastre, seguendo i consigli seguenti:
posizione manopola
Commutatori
figura 3/A figura 3/B
0 0
1
2
3
4
5
6
Tipo di piastre elettriche:
piastre elettriche in ghisa
Il piano cottura monta piastre elettriche in ghisa, che possono essere di Ø145mm o Ø180mm, di tipo
normale o rapido. La piastra rapida si distingue dalla normale per la presenza di un bollino rosso al
centro, e si differenzia essenzialmente per:
Potenza maggiore;
Raggiungimento più rapido della emperatura desiderata;
Alcune piastre elettriche sono dotate di un termostato di sicurezza che limita la potenza ed interrompe
la tensione in caso di surriscaldamento della piastra (per esempio, se dimenticata accesa).
Regolatori
1
2
3
4
5
6
7
8
8
9
10
Tipo di cottura
Spento
Per operazioni di fusione (burro o cioccolato)
Per mantenere i cibi caldi e per riscaldare
piccoli quantitativi di liquido
Riscaldare grandi quantità, frustare creme e salse
Lenta bollitura, per minestre, pasta, risotti, continuazione
della cottura a vapore, cottura di bistecche e fritti
Rosolatura delle carni, patate arrosto, pesce
fritto e per portare a bollitura grandi quantità di acqua
Fritture rapide, bistecche ai ferri, ecc…
ISTRUZIONI PER L'INSTALLAZIONE
Importante!
le istruzioni sono rivolte ad un installatore qualificato;
l'apparecchiatura deve essere installata correttamente, in conformità alle norme in vigore;
qualsiasi intervento deve essere eseguito con l'apparecchio elettricamente disinserito;
Il piano di cottura può essere installato in tutti i mobili, purchè resistenti al calore (almeno 90°C);
Le dimensioni del foro da praticare per l'incasso nel piano del mobile e le distanze minime da rispettare
con le pareti posteriori, laterali e sovrastanti l'apparecchio, sono indicate nella figura 4.
Coibentazione sottostante (fig.6):
se il piano cottura è installato senza che ci sia un forno sotto di esso, è tassativo l'impiego di un pannello
di coibentazione posto tra il fondo del piano ed il mobile sottostante, ad una distanza minima di 10mm
Se il piano cottura è installato sopra ad un forno, posizionare il pannello di separazione ad una distanza
Page 15

minima di 15mm, e seguire le istruzioni di installazione relative al forno assicurando ci sia sufficiente
-
-
-
almeno 100cm
2
(A). Nel caso di apparecchi privi di valvola di sicurezza, questa apertura deve
avere una sezione minima di almeno 200 cm
2
(fig.8)
Allacciamento all'impianto gas
aerazione come illustrato in figura 6.
In ogni caso, la connessione elettrica dei due apparecchi dev'essere effettuata
separatamente
Si consiglia di usare un forno dotato di sistema di ventilazione interna forzata.
, sia per ragioni di sicurezza che per facilitarne eventuali interventi in caso di necessità.
Fissaggio del piano (fig.7):
Il fissaggio del piano cottura sul mobile dev'essere effettuato come segue:
posizionare l'apposita guarnizione sigillante fornita in dotazione [C] lungo il perimetro esterno del
foro praticato nel mobile seguendo lo schema indicato in fig.4, in modo che le estremità delle
striscie siano perfettamente unite tra loro senza sormontarsi;
Sistemare il piano nel foro del mobile curandone la centratura;
Fissare il piano al mobile con le apposite staffe [A] fornite in dotazione, come illustrato in figura 7.
Una corretta installazione della guarnizione sigillante, offre un'assoluta garanzia contro infiltrazioni di liquidi.
Locale di installazione e scarico dei prodotti della combustione:
Attenzione: l'apparecchio deve essere installato ed usato esclusivamente in locali idonei,
e comunque in conformità alle leggi vigenti in materia.
L'installatore deve fare riferimento alle in vigore per quanto riguarda la ventilazione e l'evaquazione
dei prodotti della combustione. Si ricorda a tal proposito che l'aria necessaria alla combustione
è di 2m3/h per ogni kW di potenza (gas) installata.
locale di installazione
Il locale dove viene installata l'apparecchiatura a gas deve avere un naturale afflusso d'aria necessaria
alla combustione del gas (norme UNI-CIG 7129 e 7131).
L'afflusso dell'aria deve venire direttamente da una o più aperture praticate su una sezione libera di
Questa apertura deve essere approntata in modo da non risultare ostruita né dall'interno né dall'esterno
e posizionata vicino al pavimento e dal lato opposto rispetto all'evacuazione dei prodotti della combustione.
Qualora non fosse possibile praticare le necessarie aperture, l'aria necessaria può essere introdotta
da un locale adiacente, ventilato come richiesto, purchè questo locale non sia una camera da letto,
un ambiente pericoloso o in depressione (UNI-CIG 7129).
scarico dei prodotti della combustione
Gli apparecchi di cottura a gas devono scaricare i prodotti della combustione attraverso cappe
collegate a canne fumarie oppure direttamente all'esterno (fig.8)
In caso non sia possibile installare una cappa, è necessario l'impiego di un'elettroventilatore
applicato ad una parete esterna o alla finestra dell'ambiente.
Questo elettroventilatore deve avere una portata tale da garantire un ricambio d'aria nel
locale cucina pari ad almeno 3/5 volte il suo volume (UNI-CIG 7129).
componenti illustrati in figura 8:
A
apertura per entrata dell'aria
C
cappa per evacuazione prodotti della combustione
E
elettroventilatore per evacuazione dei prodotti della combustione
Prima dell'installazione assicurarsi che le condizioni di distribuzione locale (natura e pressione del gas
erogato) e le regolazioni del piano siano compatibili, confrontandole con le targhette tecniche del prodotto.
Verificare inoltre che il locale sia conforme come da capitoli precedenti.
Il collegamento gas deve essere eseguito in conformità alle norme UNI-CIG 7129 e 7131.
Page 16

Il piano di cottura deve essere collegato alla rete gas mediante tubi metallici rigidi oppure tubi flessibili
-
-
-
-
Sostituzione degli iniettori:
-
-
in acciaio inox a parete continua, conformi alla norma UNI-CIG 9891, con estensione massima di 2 mt.
Assicurasi, nel caso di utilizzo di tubi flessibili, che non vadano in contatto con parti mobili o schiacciati.
Il collegamento deve essere effettuato in modo da non provocare sollecitazioni di alcun genere
sull'apparecchio.
Il raccordo di entrata del gas è filettato G½" (fig.12).
Per collegamenti ISO R7 non è necessario interporre la guarnizione;
Per collegamenti ISO R228 è necessario interporre la rondella di testa fornita in dotazione.
Dopo le operazioni di allacciamento, si dovrà assolutamente verificare la tenuta delle
connessioni tramite prodotti specifici in commercio o tramite una soluzione saponosa.
Collegamento elettrico
L'apparecchio dev'essere allacciato alla rete elettrica verificando in precendenza che la tensione
di rete corrisponda ai valori indicati nella targhetta caratteristiche del prodotto e che la sezione dei
cavi dell'impianto elettrico possa supportare il carico di tensione indicato anch'esso nella targhetta.
La spina utilizzata per la connessione deve essere a norma, idonea alla potenza assorbita dal piano.
Per il collegamento diretto alla rete, è necessario prevedere un dispositivo che assicuri la disconnessione
dalla rete in caso di necessità, con una distanza di apertura dei contatti che consenta la disconnessione
completa nelle condizioni della categoria di sovratensione III, conformemente alle norme di installazione.
Avvertenze:
Non utilizzare riduzioni, adattatori o deviatori per l'allacciamento alla rete elettrica,
in quanto potrebbero surriscaldarsi e provocare incendi;
Il collegamento a terra dell'apparecchio è obbligatorio a norma di legge (fig.10)
In caso di sostituzione del cavo di alimentazione, utilizzare un cavo avente le stesse caratteristiche di
quello fornito di serie, adatto al carico di tensione di esercizio e dev'essere richiesto al Servizio Assistenza.
E' inoltre necessario che l'estremità che andrà collegata all'apparecchio abbia il filo di messa a terra
colore giallo-verde più lungo di circa 20mm rispetto agli altri.
Per la sezione del cavo di alimentazione, consultare la tabella sottostante:
Tipo di piano
Solo con bruciatori a gas
Con una piastra elettrica da 1000W
Con una piastra elettrica da 1500W o con 2 piastre elettriche
sezione cavo
Ø0,75 mm
Ø0,75 mm
Ø1,50 mm
2
2
2
E' necessario inoltre che venga rispettato il seguente codice-colore durante il collegamento dei cavi:
BLU
MARRONE
GIALLO-VERDE
Si deve poter scollegare l'apparecchio dopo l'installazione. La disconnessione può essere effettuata
tramite una spina oppure un interruttore previsto nella rete, conformemente alle regole d'installazione.
Se il cavo di alimentazione è danneggiato, deve essere tempestivamente sostituito dal costruttore,
del Servizio Assistenza, o da un tecnico qualificato, onde prevenire rischi.
ADATTAMENTO A DIVERSI TIPI DI GAS
Qualora dovesse rendersi necessario l'adattamento del piano ad un gas differente da quello predisposto di
serie, si dovranno sostituire gli iniettori con quelli relativi al gas richiesto (reperibili presso i centri assistenza)
La scelta degli iniettori da montare deve tener conto delle tabelle iniettori poste alla fine del manuale.
Gli iniettori sono identificabili con il diametro, espresso in centesimi di mm, stampigliato sugli iniettori stessi.
Togliere le griglie e gli spartifiamma dal piano cottura;
Con una chiave fissa a tubo sostituire gli iniettori "J" (fig.9) con quelli relativi al gas da utilizzare
NEUTRO (N)
FASE (L)
TERRA ( )
Page 17

-
Rimontare i bruciatori;
Regolazione del minimo (fig.13):
-
-
-
-
-
-
Manutenzione
I bruciatori non richiedono la regolazione dell'aria primaria.
Dopo aver sostituito gli iniettori, accendere il bruciatore e sfilare la manopola. Posizionare il rubinetto sul
minimo, con un cacciavite all'interno dell'asta: avvitare per diminuire la fiamma, svitare per aumentarla.
Per il gas GPL (G30/G31) la vita di regolazione va avvitata completamente.
Il risultato dovrà essere una piccola fiamma omogenea e regolare lungo tutta la corona del bruciatore.
Verificare inoltre che:
ruotando rapidamente il rubinetto dalla pos. di massima erogazione alla minima il fuoco non si spenga
nel caso di piani con valvola di sicurezza, la fiamma al minimo deve lambire leggermente la termocoppia
acceso alcuni minuti al minimo, il fuoco non si deve spegnere
PULIZIA E MANUTENZIONE
Per una buona conservazione del piano cottura, occore pulirlo regolarmente al termine di ogni
utilizzo, dopo averlo lasciato raffreddare.
Non utilizzare detergenti e spugne abrasive oppure oggetti appuntiti per pulire il pianale
Evitare assolutamente l'uso di idropulitrici ad alta pressione o pulitrici a getto di vapore
non utilizzare detergenti alcoolici e/o infiammabili
Parti smaltate:
Tutte le parti smaltate devono essere lavate solamente con una spugna, acqua e sapone o altri prodotti
specifici comunque non abrasivi. Al termine vanno asciugate accuratamente.
Pianale in acciaio inox:
Il pianale con acciaio inox va pulito con un panno umido e con prodotti reperibili in commercio.
Dopo averlo risciacquato asciugare possibilmente con una pelle di daino.
Griglie:
Le griglie del piano sono state progettate per poter essere lavate anche in lavastoviglie.
Le griglie in acciaio inox possono assumere, nella zona dei bruciatori, una colorazione bluastra (a causa
della temperatura elevata). Se non gradito, si può attenuare l'effetto con prodotti reperibili in commercio.
Bruciatori:
I bruciatori, composti di due pezzi (coperchio+bruciatore), possono essere tolti e lavati separatamente.
Dopo la pulizia devono essere accuratamente asciugati e riposizionati perfettamente nella loro sede.
Nei modelli dotati di accensione elettrica, verificare che l'elettrodo "E" (fig.11) sia sempre pulito.
Nei modelli provvisti di valvola di sicurezza, pulire periodicamente la sonda "T" (fig.11) in modo da
permettere il regolare funzionamento della valvola di sicurezza.
Sia l'elettrodo che la sonda devono essere pulti con cautela in quanto parti sensibili.
Per evitare danni all'accensione elettrica, non utilizzarla quando i bruciatori non sono in sede.
Piastre elettriche:
La pulizia delle piastre elettriche in ghisa deve essere effettuata a piastre spente e comunque non calde.
Pulire con uno stofinaccio umido, rifinire con uno straccio imbevuto di olio minerale.
Utilizzare solamente detergenti neutri e comunque non infiammabili.
Gli apparecchi di cottura, al dì là di una corretta gestione e pulizia, non necessitano di particolare
manutenzione, tuttavia si raccomanda di far eseguire un controllo da un tecnico autorizzato almeno
una volta ogni due anni.
Qualora si noti qualcosa al di fuori dell'ordinario utilizzo (eccessivo indurimento nella rotazione delle
manopole, difficoltà nell'accensione dei fuochi, odore di gas, ec…) chiudere immediatamente
il rubinetto generale e chiamare il servizio assistenza tecnica.
Nel caso si debba sostituire il rubinetto, dev'essere cambiata anche la relativa guarnizione.
Page 18

SERVIZIO ASSITENZA CLIENTI
Prima di chiamare il servizio Assistenza Tecnica
In caso di mancato funzionamento del piano Vi consigliamo di:
-
verificare il buon inserimento della spina nella presa di corrente;
-
verificare che l'afflusso di gas sia regolare.
Nel caso non s'individui la causa di malfunzionamento:
spegnere l'apparecchio, non manometterlo e chiamare il Servizio di Assistenza Tecnica.
MATRICOLA DEL PRODOTTO. Dove si trova?
È importante che comunichi al Servizio Assistenza Tecnica Autorizzato la sigla del
prodotto ed il numero di matricola (16 caratteri che iniziano con la cifra 3) che troverà
sul certificato di garanzia oppure sulla targa matricola.
In questo modo Lei potrà contribuire ad evitare trasferte inutili del tecnico,
risparmiando oltretutto i relativi costi.
Page 19

Avertissements et conseils importants pour l'utilisation
.
IMPORTANT !
main pour tout le cycle de vie de la table de cuisson. Lire attentivement ce manuel et toutes les indications
qu'il contient avant l'utilisation de l'appareil. Conserver les pièces de rechange éventuelles fournies.
L’installation devra être effectuée par du personnel qualifié et conformément aux normes en vigueur.
Cet appareil est prévu pour un usage domestique et est fabriqué pour remplir la fonction suivante:
cuisson et réchauffage des aliments
Le fabricant décline toute responsabilité pour une mauvaise installation, pour toute
modification, incapacité d’utilisation et des utilisations différentes de celles indiquées
Les éléments de l’emballage (sacs en plastique, mousse de polystyrène, nylon, etc.) ne doivent
pas être laissés à la portée des enfants car ce sont des sources de danger potentielles.
L’emballage est constitué de matériau recyclable et porte le symbole
Ne pas disperser dans l'environnement
Cet appareil n’est pas destiné à être utilisé par des personnes (notamment les enfants) incapables,
irresponsables ou sans connaissance sur l’utilisation du produit, à moins qu’elles ne soient surveillées,
ou instruites sur l’utilisation de l’appareil, par une personne responsable de leur sécurité.
Surveillez les enfants pour être sûr qu’ils ne jouent pas avec l’appareil
La sécurité électrique n'est assurée que lorsque le produit est raccordé à une installation de mise à terre efficace
Après avoir utilisé la table de cuisson, s’assurer que l’index des manettes soit en position
de fermeture et fermer le robinet principal d’arrivée du gaz ou le robinet de la bouteille.
Si l’on décide de ne plus utiliser cet appareil, avant de l’éliminer, il est recommandé de le rendre inopérant
comme prévu par les lois en vigueur en matière de santé et de protection de l’environnement, en rendant
inoffensives les parties qui pourraient constituer un danger pour les enfants
Attention:
on recommande d’utiliser des instruments de prévention et de protection adéquats
La plaque d'identification, avec les données techniques, se trouve visiblement positionnée sous le
carter et annexée à ce manuel. La plaquette sous le carter ne doit jamais être enlevée.
Ne jamais poser d'objets inflammables sur la plaque de cuisson.
S'on y a un tiroir sous la plaque, on recommande de ne pas ranger d'objets inflammables ou de bombes aérosol
Le papier aluminium, les récipients en plastique et le film de protection n'est pas indiqué pour cette appareil
Avec l’utilisation, les plaques chauffantes se rechauffent.
Le câble d'alimentation ne doit jamais entrer en contact avec des foyers chauds , et pourrait s'endommager
Le foyer et le dessous des casseroles doivent toujours être secs y nettoyés.
En cas de cassures, fissures ou fêlures du verre céramique, si le foyer surchauffe et que
l'afficheur ne fonctionne pas, si la plaque de cuisson s'éteint toute seule sans pouvoir être
utilisée, débrancher immédiatement l'appareil et contacter le service après-vente
Ne pas cuire avec une casserole vide, en particulier en ferre, émail ou en aluminium ou avec le
dessous endommagè. Cela pourrait endommager l’appareil. Utiliser seulement casseroles en inox
Ne jamais poser casseroles ou poêles chaudes sur le panneau de commande, la zone d'affichage ou le cadre.
Le sel, le sucre et le sable peuvent rayer la plaque. Enlevez immédiatement d'éventuels déversements
avec un racloir à verre.
Les dommages suivants n'influent ni sur le bon fonctionnement ni sur la robustesse du la plaque de cuisson:
Formation de résidus gélatineux dus à aliments fondu; eraflures causées par des grains de sel ou par des
dessous de casseroles rugueux; couleur métallique due à l'utilisation de detergents inappropriés;
Pour le nettoyage, ne pas utiliser des produits inflammables, de produits abrasifs, de laines d’acier.
N’utilisez en aucun cas un appareil de nettoyage haute pression ou à vapeur.
Ces instructions ne sont valables que pour les pays de destination dont les symboles d’identification
figurent sur la plaquette reportée dans le manuel d’instructions et sur l’appareil
Déclaration de conformité
Cet appareil est conforme aux directives CE suivantes
2006/95/CE:
2004/108/CE:
2009/142/CE:
1935/2004/CE + 89/336/CE + 90/128CE:
Ce manuel fait partie intégrante de l'appareil. Il faut le conserver en bon état et à portée de la
. Tout autre usage est considéré impropre.
En cas de démontage, entretien et nettoyage de l’appareil, faire attention,
Attention ! Le racloir à verre
Normes Générales / Basse tension
Compatibilité électromagnétique
Appareils à gaz
Aptitude des matériaux en contact avec les aliments
RISQUE D'INCENDIE !!!
Ne pas les toucher!
(en option)
a une lame aiguisée !
Page 20
-
-
-
-
CARACTERISTIQUES DU PLAN
UTILISATION DU PLAN DE CUISSON
Avertissements:
Cet appareil est prévu pour être encastré dans des meubles.
La classe d'installation est du type 3 pour la partie à gaz et du type Y pour la partie électrique.
Les meubles doivent résister à une température d'au moins 90°C.
Pour effectuer une installation correcte, voir le paragraphe relatif et les dessins de référence.
L’utilisation d'un appareil de cuisson à gaz implique le dégagement de chaleur et d'humidité
dans la pièce où il est installé. Faire en sorte que la cuisine soit bien aérée : laisser ouverts les
orifices d'aération naturelle ou installer un dispositif d'aération mécanique (hotte de ventilation).
Une utilisation intensive et prolongée de l’appareil peut réclamer une aération supplémentaire,
par exemple en ouvrant une fenêtre. Il peut également s'avérer utile de disposer d'une aération
plus efficace, par exemple en augmentant la vitesse de la hotte.
Cette notice a été prévue pour plusieurs types de plans. D'après la plaque de données qui se
trouve à l'arrière, il est possible d'identifier le modèle (Mod. Tc) correspondant. En utilisant ce code
et les indications qui sont fournies dans les prochains paragraphes et en regardant les figures
présentées à la fin du manuel, il est possible de savoir comment se compose son propre appareil.
Exemple:
Légende:
(1)
Marque commercial
(2)
Modèle correspondant
(3)
Code technique
(4)
Code commercial
(5)
Puissance absorbee
(6)
Voltage et puissance
(7)
Pays di destination et caractéristiques du gaz
(8)
Puissance du brûleurs au gaz
(9)
Consommation brûleurs àu gaz
Brûleurs à gaz
L’arrivée du gaz aux brûleurs est réglée par les boutons de la fig.2 qui commandent les robinets. Selon
la version choisie, les symboles peuvent être sérigraphiés en position supérieure ou inférieure les boutons
de commande. En faisant coïncider l’indice avec les symboles sérigraphiés, on obtient les réglages suivants.
Robinet fermé, aucune fourniture de gaz
Débit maximum, fourniture de gaz maximum
Débit minimum, fourniture de gaz minimum
Allumage des brûleurs
Cettes modèles sont munis d'une valve de sûreté qui, interrompt automatiquement l'arrivée du
gaz si un brûleur s'éteint pour toute raison quelle qu'elle soit.
Pour rétablir le fonctionnement, remettre le bouton sur la position "robinet fermé" et recommencer les
opérations d'allumage décrites dans les prochains paragraphes.
Dans les modèles munis d'un dispositif d'allumage incorporé dans le bouton,tourner le bouton du robinet de
gaz sur la position de fourniture maximum, puis appuyer et maintenir la pression pendant environ 4÷5 sec.
Page 21

Attention:
Une fois allumè le brûleur, régler la flamme en tournant le bouton de façon à obtenir l'intensité désirée.
Choix du brûleur
Plaques électriques
-
-
-
-
-
-
-
-
Toutes les positions de fonctionnement doivent être choisies entre le maximum et le
minimum et jamais entre le maximum et le point de fermeture.
Au cas le brûleur ne pas allume ou la flamme n'est pas homogène et régulière, éteindre l'appareil
-
remettant le bouton sur la position "robinet fermé" et appeler le Service d'Assistance Technique.
Au cas où les caractéristiques particulières du gaz fourni localement rendraient l'allumage difficile
-
lorsque le bouton est sur le maximum, il est conseillé de recommencer l’opération avant de poser
un récipient sur la grille et en mettant le bouton sur le minimum.
Le dispositif d'allumage ne peut pas être actionné pendant plus de 15”. Si, après ce laps de temps, le
-
brûleur ne s'est pas encore allumé, attendre une minute avant de recommencer l’opération.
Emploi des grilles
Les grilles du plan de cuisson ont été conçues pour faciliter l’utilisation du produit et la rendre sûre.
Avant toute utilisation, il est conseillé de s'assurer que le plan est bine positionné et qu'il est stable.
S'assurer que les caoutchoucs d’appui sont toujours en bon état et qu'ils sont agencés comme il se doit
Grille pour petits récipients (fig.1/A, option)
Ne la poser que sur la grille du brûleur auxiliaire (le plus petit) lorsque l'on utilise des récipients à
petit diamètre, pour les empêcher de se renverser.
Grille spéciale pour casseroles “WOK” (fig.1/B, option)
Ne la poser que sur la grille du brûleur à triple couronne, lorsque l'on utilise des récipients "WOK"
(à fond concave). De façon à ne pas provoquer de graves anomalies de fonctionnement du
brûleur, il est recommandé de pas utiliser les casseroles wok sans cette grille spéciale et de
ne pas l'utiliser pour des casseroles à fond plat.
Les symboles imprimés sur le bandeau (dessin fig.2), à côté des boutons indique la
correspondance entre le bouton et le brûleur. Le choix du brûleur le mieux approprié dépend du
diamètre et de la capacité des récipients (voir tableau). Il est important que le diamètre de
la casserole soit approprié à la puissance du brûleur, pour ne pas en compromettre le rendement.
Diamètre
des
casseroles
Avertissements:
Ne jamais cuire les aliments directement sur les plaques électriques en fonte, mais dans des casseroles
ou dans des récipients prévus à cet effet.
Eviter absolument le fonctionnement sans récipients. L’emploi de la plaque, surtout s'il est
prolongé, peut être à l'origine d'incendies.
Faire en sorte de ne pas renverser de liquides sur les plaques lorsqu'elles sont chaudes.
Dès que l'on aperçoit une fêlure sur le plan, débrancher l’appareil du réseau d'alimentation et
contacter le Centre Assistance.
Ne pas oublier que les zones de cuisson restent chaudes assez longtemps (environ 30 min) après l'arrêt.
Ne pas utiliser nettoyeurs électriques à vapeur.
Ne pas faire tomber d'objets lourds ou pointus sur le plan en vitrocéramique.
Brûleur
AuxiliaireA60 mm (avec réducteur)
R
Rapide
TR
Triple couronne
Ø minimum
200 mm
240 mm 260 mm
Ø maximum
140 mm
240 mm
Page 22

-
Ne pas utiliser produits de nettoyage abrasifs ou inflammables.
-
0
0
1
2
3
4
5
6
7
8
8
9
6
-
-
-
-
-
Installation dans le plan du meuble
10
Ne pas fixer intensément les lampes halogènes du plan de cuisson.
Allumage de la plaque
L’allumage de la plaque électrique s'effectue en tournant le bouton sur la position désirée.
Les numéros de 1 à 6 ou de 1 à 10 (fig.3 A ou B), selon que le plan est muni d'un commutateur
ou d'un régulateur d'énergie, indiquent les positions de fonctionnement à température croissante.
Le fonctionnemen est indiqué par un voyant lumineux qui se trouve sur le bandeau de commande.
Emploi de la plaque électrique
Une fois la température étant atteinte, régler la puissance en fonction de l'intensité de chauffage désirée,
en tenant compte du fait que la plaque continuera à dégager sa chaleur encore pendant quelques minutes
après l'arrêt. Tableau conseils de cuisson:
position poignée
Commutateurs
figure 3/A figure 3/B
1
2
3
4
5
Régulateus
Type de cuisson
Eteint
Pour fondre des mets (beurre ou chocolat)
Pour maintenir les mets chauds et pour
chauffer de petites quantités de liquide
Pour chauffer de grandes quantités, pour
fouetter des crèmes ou des sauces.
Ebullition lente, pour soupes, pâtes, risottos, continuation
de la cuisson à la vapeur, cuisson de bifteck et toutes fritures.
Pour faire roussir viandes et patates, pour frire le poisson ou
faire bouillir de grandes quantités d’eau.
Fritures rapides, viande “à la grille”, etc.
Type de plaques électriques
plaques électrique en fonte
Le plan peut être muni d'une plaque normale ou d'une plaque rapide en fonte, de diamètre 145 ou 180mm.
La plaque normale est complètement noire, tandis que la plaque rapide présente un rond rouge au centre.
La plaque rapide se différencie essentiellement de la plaque normale par les éléments suivants:
Puissance plus forte;
Atteinte plus rapide de la température désirée;
Certains modèles sont munis d'un thermostat que interrompt automatiquement
la tension électrique en cas de surchauffement.
INSTRUCTIONS POUR L’INSTALLATION
Important!
Ces instructions sont destinées aux installateurs qualifiés.
L’appareil doit être installé correctement et conformément aux normes en vigueur.
Toute intervention quelle qu'elle soit doit être exécutée après avoir mis l'appareil hors tension électrique.
Le plan de cuisson peut être installé dans tous les meubles, à condition que ces derniers soient
résistants à la chaleur (température minimale de 90°C).
Page 23

Les dimensions du trou qui doit être effectué sur le plan du meuble et les distances minimales comprises
-
-
-
-
-
d'au moins 100 cm
2
(A). En cas d'appareils démunis de valve de sûreté, cette ouverture doit
présenter une section minimum d'au moins 200 cm
2
(fig.8).
entre les parois situées à l'arrière, à côté et au-dessus de l’appareil sont indiquées sur les figures 4-5.
Ne pas oublier que (fig.6):
Lorsque le plan est installé sans four en accouplement, il est impératif d'utiliser un panneau de
séparation entre le fond du plan et le meuble situé au-dessous, à une distance minimum de 10 mm.
En cas d'accouplement plan/four, intercaler un séparateur à une distance minimale de 15 mm suivre les
indications du fournisseur du four en maintenant toujours une aération fidèle aux instructions de fig.6.
De toute manière, le branchement électrique des deux appareils doit être réalisé séparément
tant pour des raisons de nature électrique que pour faciliter le retrait.
Il est conseillé d'utiliser un four pourvu d'un système de refroidissement interne forcé.
Fixation du plan (fig.7):
La fixation du plan de cuisson au meuble doit être effectuée comme il est indiqué ci-dessus:
Positionner la garniture étanche fournie [C] avec l'appareil le long du périmètre extérieur du trou
pratiqué dans le meuble en suivant le schéma indiqué sur la fig.4, de façon à ce que les
extrémités des bandes soient parfaitement unies l'une à l'autre sans se superposer;
Installer le plan dans le trou du meuble en veillant à bien le centrer;
Fixer le plan au meuble avec les brides fournies à cet effet, comme il est indiqué sur la fig.7.
Une bonne installation de la garniture étanche offre une garantie absolue contre les infiltrations de liquides.
Pièce d'installation et évacuation des produits de la combustion:
L’appareil doit être installé et fonctionner dans des locaux appropriés,
toujours de façon conforme aux lois en vigueur.
L’installateur doit se référer aux lois en vigueur pour ce qui est de la ventilation et l’évacuation des
produitsde la combustion. A cet effet, ne pas oublier que l’air nécessaire à la combustion est de
2m3/h pour chaque kW de puissance (gaz) installée.
Pièce d'installation
La pièce où est installé l’appareil à gaz doit avoir une arrivée d’air nécessaire à la combustion des gaz.
Le flux d'air doit venir directement d'une ou de plusieurs ouvertures effectuées sur une section libre
Cette ouverture doit être réalisée de façon à ne jamais se boucher, ni à l'intérieur, ni à l'extérieur.
Elle doit se trouver près du sol et, de préférence, sur le côté opposé à l'évacuation des produits de la combustion
Lorsqu'il n'est pas possible de réaliser les ouvertures nécessaires, l’air nécessaire peut provenir
d'une pièce voisine et aérée comme il se doit, à condition que cette pièce ne soit ni une chambre à
coucher, ni un lieu dangereux ou en dépression.
Evacuation des produits de la combustion
Les appareils de cuisson à gaz doivent évacuer les produits de la combustion à travers des hottes
raccordées directement à des tuyaux de cheminée ou directement à l'extérieur (fig.8).
Au cas où il ne serait pas possible d'installer la hotte, il est nécessaire d'utiliser un ventilateur
électrique monté sur l'un des murs externes ou sur la fenêtre de la pièce.
Ce ventilateur électrique doit avoir un débit garantissant un renouvellement de l'air de la cuisine
d'au moins 3-5 fois son volume.
Composants présentés sur la fig.8:
A
Ouverture d'entrée de l'air
C
Hotte d'évacuation des produits de la combustion
E
Ventilateur électrique pour l'évacuation des produits de la combustion
Raccordement au réseau de gaz
Avant l’installation, s'assurer que les conditions de distribution locale (nature et pression du gaz)
et les réglages du plan sont compatibles. Pour ce faire, contrôler les données de la plaque du produit
Page 24

qui est appliquée sur le plan et insérée dans cette notice.
Branchement électrique
Avertissements:
-
-
-
-
Le raccordement au gaz doit être exécuté par un technicien spécialisé qui respectera les normes locales
en vigueur. Le plan de cuisson doit être raccordé à l'installation du gaz en utilisant des tuyaux métalliques
rigides ou des tuyau x flexibles en acier inox le long du mur, conformes à la norme et avec une extension
maximale de 2 mt. Contrôler, en cas d'emploi de tuyaux métalliques flexibles,
qu'ils ne soient ni écrasés ni au contact de pièces mobiles.
Effectuer le branche ment de manière à ne provoquer aucune contrainte sur l'appareil.
Le raccord d'arrivée du gaz est fileté G½" conique. (fig.12).
Pour les raccordements ISO R7, il n'est pas nécessaire d'intercaler la garniture.
Pour les raccordements ISO R228, il faut intercal er la rondelle de tête fournie en dotation.
Après les opérations de branchement, contrôler l'étanchéité des raccords avec un peu d'eau savonnée
L'appareil doit être branché au réseau électrique en vérifiant que la tension corresponde bien à la
valeur indiquée sur la plaque signalétique et que la section des câbles de l'installation électrique
puisse supporter la charge indiquée qui est reportée sur la plaque signalétique.
La fiche utilisée pour le branchement doit être conforme e t adaptée à la puissance absorbée par l'appareil.
Si l'appareil est branché directement au secteur, il faut intercaler entre celui -ci et le secteur un interrupteur
omnipolaire ayant une ouverture minimum entre les contacts de 3 mm, dimensionné pour la char ge et
conforme aux normes en la matière.
N'utiliser ni réductions, ni adaptateurs, ni déviateurs pour le branchement au secteur,
car ils pourraient surchauffer et provoquer des brûlures.
La mise à la terre de l'appareil est obligatoire (fig.10).
Le fabricant décli ne toute responsabilité dérivant du non-respect de cette norme.
En cas de remplacement du câble d'alimentation, en utiliser un ayant les mêmes caractéristiques de celui
fourni, adapté à la charge et à la température (type T90°C), et il faudra le demander au centre d'assistance.
En outre, il faut que l extrémité qui va à l'appareil ait le cordon jaune-vert de mise à la terre plus long
de 30 mm par rapport aux autres.
Pour la dimension du câble d'alimentation, consulter le tableau ci -dessous
Type de plan de cuisson
Uniquement avec brûleurs à gaz
Avec puissance électrique jusqu'à 1000W
Avec puissance électrique de plus de 1000W
Dimension
Ø0,75 mm
Ø0,75 mm
Ø1,50 mm
2
2
2
Au cas où il serait nécessaire de remplacer le cable d’alimentation,
assurez vous de respecter les codes-couleur suivants dans le branchement de chacun des fils:
BLEU
MARRON
VERT-JAUNE
Le appareil doit être branché prévoyant un interrupteur omnipolaire conforme aux normes en vigueur
Si le câble de branchement est endommagé, il faut le faire remplacer par le service
d'assistance clientèle afin d'éviter toute situation de danger.
ADAPTATION AUX DIFFÉRENTS TYPES DE GAZ
Au cas où il serait nécessaire d'adapter le plan de cuisson à un gaz différent de celui pour lequel il a été
préparé, il faut remplacer les injecteurs. Si les injecteurs de rechange ne sont pas fournis en dotation, ils
sont disponibles auprès des Centres d'Assistan ce. Le choix des injecteurs à remplacer devra être effectué
en consultant le tableau des injecteurs. Les injecteurs sont identifiables par leur diamètre exprimé en
NEUTRE (N)
PHASE (L)
TERRE ( )
Page 25

centièmes de mm et estampé sur le corps des injecteurs.
-
-
-
-
-
-
-
-
Entretien
Remplacement des injecteurs:
Retirer les grilles du plan de cuisson ainsi que le chapeau du brûleur
À l'aide d'une clé fixe, remplacer les injecteurs "J" (fig.9) par ceux adaptés au gaz utilisé.
Remonter les brûleurs
Les brûleurs n'ont besoin d'aucun réglage de l'air primaire
Réglage du minimum (fig.13):
Après avoir remplacé les injecteurs, allumer le brûleur et dégager la manette.
Placer le robinet en position de minimum, insérer un tournevis à l'intérieur de la tige :
visser pour diminuer la flamme, dévisser pour l'augmenter.
Pour le gaz G30/G31, visser complètement la vis de réglage
Dans tous les cas, le résultat est celui d'une petite flamme homogène et régulière tout autour de la
couronne du brûleur. Vérifier enfin:
qu'aucune extinction ne se produise en tournant rapide ment le robinet de la position
de maximum à celle de minimum;
dans le cas des brûleurs munis de sûreté, vérifier que la flamme lèche légèrement le thermocouple;
Vérifier le bon réglage en laissant le brûleur allumé pendant quelques minutes.
S'il s'éteint, augmenter le minimum.
NETTOYAGE ET ENTRETIEN
Pour bien conserver le plan de cuisson, il faut le nettoyer régulièrement après chaque utilisation,
ceci après l'avoir fait refroidir.
Ne pas utiliser de produits abrasifs, de laines d acier et de produits inflammables;
N’utilisez en aucun cas un appareil de nettoyage haute pression ou à vapeur;
Parties émaillées:
Toutes les parties émaillées doivent être lavées en utilisant une éponge et de l'eau savonnée ou d'autres
produits spécifiques non abrasifs. Après le nettoyage, essuyer soigneusement.
Plan inox
Le plan en acier inox doit être nettoyé avec un chiffon humide et des produits spécifiques disponibles
dans le commerce. Après l'avoir rincé, essuyer si possible avec une peau de daim.
Grilles:
Les grilles émaillées du plan de cuisson ont été conçues pour être lavées aussi au lave-vaisselle.
Dans la zone des brûleurs, la réduction en acier inox peut prendre une couleur bleuâtre à cause de la température
On peut en atténuer l'effet en utilisant les éponges ordinaires pour l'acier, disponibles dans le commerce.
Brûleurs:
Les brûleurs, composés de deux pièces, peuvent être retirées et lavés avec des p roduis appropriés.
Après le nettoyage, il faut les essuyer soigneusement et bien les replacer dans leur logement.
Pour ce qui concerne l'allumage électrique, vérifier que l'électrode "E" (fig.11) soit toujours propre.
Nettoyer la sonde "T" (fig.11) de manière à permettre un fonctionnement régulier de la soupape de sûreté.
Aussi bien l électrode que la sonde doivent être nettoyées délicatement.
Après le nettoyage, bien replacer les brûleurs dans leur logement.
Pour éviter tout dommage à l'allumage électrique, év iter de l'utiliser en absence de brûleurs.
Plaques électriques:
Le nettoyage des plaques électriques doit se faire lorsqu'elles sont tout juste tièdes.
Nettoyer avec un chiffon humide et passer un chiffon imbibé d'huile minérale.
Les appareils ne réclament aucun entretien particulier. Il est toutefois recommandé de faire
exécuter un contrôle au moins une fois tous les deux ans.
Au cas où la rotation des boutons deviendrait dure ou que l'on sentirait une odeur de gaz, fermer le
robinet général et faire appel à l'assistance technique. Le robinet défectueux doit être remplacé avec son joint.
Page 26

SERVICE D ASSISTANCE À LA CLIENTÈLE
Si vous ne pouvez pas identifier la cause d une anomalie :
éteindre l appareil (ne pas le manipuler) et contacter le Service d Assistance.
NUMÉRO DE SÉRIE DU PRODUIT. Où le trouver ?
Il est important que vous communiquiez au Service d Assistance le code
de votre produit et le numéro de série (un code de 16 caractères qui
commence avec le numéro 3) ; celui-ci se trouve sur le certificat de garantie
ou la plaque signalétique située sur l appareil.
Ceci évitera des voyages inutiles des techniciens et permettra (ce qui
est très important) d' économiser sur les frais de déplacement.
Page 27

RDG342SFIN - 33801051
RDG342SFRB - 33801052
RDG342SFFA - 33801053
RDG341SFIN - 33801050
RDVG342SF - 33801057
RDE342IN - 33801054
RDE342RB - 33801055
RDVG341SF - 33801056
2
3
1
4
5
2
3
1
6
7
6
8
9
10
12345
Fig.-Abb.-Rys.:
Burners
EN
Bruciatori
IT
brûleurs Triple couronne
FR
Triple Crown
Tripla corona
Auxiliary
Ausilliario
Auxiliaire
Rapid
Rapido
Rápido
Electric plate Ø145 Electric plate Ø180
Piastra elettrica Ø145 Piastra elettrica Ø180
plaque électriqu Ø145 plaque électriqu Ø180
Page 28

Fig-Abb-Rys-Obr. 1/A
ABA
à mettre côte à côte
da affiancare
Number of hobs
to combined
Nombre de appareils
(340*N)-70
A (mm) =
N =
Numero di piani
B
Fig-Abb-Rys-Obr. 2 Fig-Abb-Rys-Obr. 3
Fig-Abb-Rys-Obr. 1/B
Fig-Abb-Rys-Obr. 4
Page 29

Fig-Abb-Rys-Obr. 5
Without oven
Fig-Abb-Rys-Obr. 6
With oven
Page 30

Fig-Abb-Rys-Obr.7
Fig-Abb-Rys-Obr.8 Fig-Abb-Rys-Obr.9
Marrone / Brown
Marron / Marrón
Blue / Blu / Blau
Bleu / Azul
Giallo-Verde
Yellow-Green
Jaune-vert
Fig-Abb-Rys-Obr.11 Fig-Abb-Rys-Obr.10
Page 31

GB
FR
Fig-Abb-Rys-Obr. 12
D:
Union
IT
Raccordo
Raccord
Gasket
Guarnizione
Joint
Tubo rigido o tubo flessibile
Tuyau rigide ou flexible
F:E:
Pipe or hose
Fig-Abb-Rys-Obr.13
Page 32

Max
Min
kW
Max
Category
Min
Countries
II 2H 3+
II 2E+ 3+
Gas
mbar
B
kW
Tipo di gas/ Gas type / Gassoort / Gasart / Type de gaz /
type / Vrsta gasa / Vrsta plina / Pritisk plina / Typ gazu / Rodzaj gazu /
Pressione gas / Gas pressure / Pression gaz / Gasdruck / Presion gas /
Pressão gás / Tlak gasa / Tlak plina / Ci
Bruciatori / burners / bruleurs / brenner / quemodores / branders /
Portata / power inputs / débit gas / capacidad / vazão / debiet / vermogen /
capacidade / gaszufuhr / opterecenje / kapacitet - zmogljivost /
Jet
Natural Gas (Methane)
Gas naturale (Metano)
Gaz naturel (Méthane)
Gas
mbar
B
A
R
IT GB ES PT CH IE GR RO
FR BE
p
ae
snienie gazu / G
queimadores / plamenici / bocas de gás / gorilniki /
Ø iniettori / injecteur / inyector / injectors / sproeier
gasdüse / mlaznica / brizgalica / šobe /
1,00 0,30
3,00 0,75
àz nyomàsa /
/ Tipo de g
es
t
ae
a
st
a
Jet
0,72
1,15
ás / Gaz
/
e
t
ta
G20 / G25
20 / 25mbar
Wok
LPG (Butane G30 / Propane G31)
GPL (Butano G30 / Propano G31)
Gas
mbar
G30 / G31
28-30 / 37mbar
B
A
R
Wok
1,00
3,00
3,80
kW
0,37
0,90
1,70
1,353,80 1,50
Jet
0,50
0,85
0,98
Page 33

EN The symbol on the product or on its packaging indicates that t his product may not be treated as household waste. Instead it shall be handed
over to the applicable c ollection point for the recycling of electrical and electronic equipment. By ensuring this product is disposed of c orrectly, you will
help prevent potential negative consequences for the environment and human health, which could otherwise be caused by inappropriate waste
handling of this product. For more detailed information about recycling of this product, please contact your local city office, your household waste
disposal service or the shop where you purchased the pr oduct.
DE Dieses Produkt darf am Ende seiner Lebensdauer nich über den normalen Haushaltsabfall entsorgt werden, sondern muss an einem
Sammelpunkt für das Recycling von elektrischen und elektronischen Geräten abgegeben werden. Das Symbol auf dem Produkt, der ebrauchsanleitung
oder der Verpackung weist darauf hin. Die Werkstoffe sind gemäß ihrer Kennzeichnung wiederverwertbar. Mit der Wiederverwendung, der stofflichen
Verwertung oder anderen Formen der Verwertung von Altgeräten leisten S ie einen wichtigen Beitrag zum Schutze unserer U mwelt. Bitte erfragen Sie
bei der Gemeindeverwaltung die zuständige Entsorgungsst elle.
IT Il simbolo sul prodotto o sulla c onfezione indica che il prodotto non deve essere considerato come un normale rifiuto domestico, ma deve
essere portato nel punto di racc olta appropriato per il riciclaggio di apparecchiature elettriche ed elettroniche. Provvedendo a smaltire questo prodotto
in modo appropriato, si contribuisce a evitare potenziali conseguenze negative per l’ambiente e per la salute, che potrebbero derivare da uno
smaltimento inadeguato del prodotto. Per informazioni più dettagliate sul riciclaggio di questo prodotto, contattare l’ufficio comunale, il servizio locale d i
smaltimento rifiuti o il negozio in cui è stato acquistato il prodotto.
FR Ce s ymbole figure sur le produit ou sur son emball age en application de la dir ective européenne 2002/96/CE sur les Déchets d’Équipement
Électrique et Électronique (DEEE). Cette directive sert de règlement cadre à la reprise, au recyclage et à la valorisation des appareils usagés dans
toute l’Europe. Ce produit doit donc faire l’objet d’une collecte sélective. Lorsque vous ne l’utiliserez plus, remettez-le à un servic e de ramassage
spécialisé ou à une déchèterie qui tr aite les DEEE ; vous contribuerez ainsi à éviter des conséquences néfastes pour la santé et l' environnement. Pour
tout renseignement sur la mise au rebut et le recyclage de ce produit, veuillez contacter la mairie ou le service de la propreté de votre commune, ou
encore le magasin dans lequel vous l'avez acheté.
ES Este aparato lleva el marcado CE en conformidad con la Directiva 2002/96/EC del Parlamento Europeo y del C onsejo sobre residuos de
aparatos eléctric os y electrónicos (RAEE). La correcta eliminación de este producto evita consecuencias negativas para el medioambiente y la salud.
El símbolo en el producto o en los documentos que se incluyen con el producto, indica que no se puede tratar como residuo doméstico. Es necesario
entregarlo en un puntode recogida para reciclar aparatos eléctricos y electrónicos. Deséchelo con arreglo a las normas medioambientales para
eliminación de residuos. Para obtener información más detallada s obre el tratamiento, recuperaci ón y reciclaje de este producto, póngas e en contacto
con el ayuntamiento, con el servicio de eliminación de residuos urbanos o la tienda donde adquirió el producto.
PT O símbolo no produto ou na embalagem indica que est e produto não pode s er tratado como lixo doméstico. Em vez disso, deve ser entregue
ao centro de recolha selectiva para a reciclagem de equipamento eléctrico e electrónico. Ao garantir uma eliminação adequada deste produto, ir á
ajudar a evitar eventuais c onsequências negativas para o meio ambiente e para a saúde pública, que, de outra forma, poderiam ser provocadas por
um tratamento incorrecto do produto. Para obter informações mais pormenorizadas sobre a reciclagem deste produto, contacte os serviços
municipalizados locais, o centro de recolha selectiva da sua área de residência ou o estabelecimento onde adquiriu o produto.
UA ɐɟɣɫɢɦɜɨɥɧɚɜɢɪɨɛɿɚɛɨɧɚɣɨɝɨɭɩɚɤɨɜɰɿɩɨɡɧɚɱɚɽ, ɳɨɡ ɧɢɦɧɟɦɨɠɧɚɩɨɜɨɞɢɬɢɫɹ, ɹɤɿɡ ɩɨɛɭɬɨɜɢɦɫɦɿɬɬɹɦ. Ɂɚɦɿɫɬɶ ɰɶɨɝɨɣɨɝɨ
ɧɟɨɛɯɿɞɧɨ ɩɨɜɟɪɧɭɬɢ ɞɨ ɜɿɞɩɨɜɿɞɧɨɝɨɩɭɧɤɬɭ ɡɛɨɪɭɞɥɹ ɩɟɪɟɪɨɛɤɢɟɥɟɤɬɪɢɱɧɨɝɨɬɚɟɥɟɤɬɪɨɧɧɨɝɨɨɛɥɚɞɧɚɧɧɹ. Ɂɚɛɟɡɩɟɱɭɸɱɢɧɚɥɟɠɧɭ
ɩɟɪɟɪɨɛɤɭ ɰɶɨɝɨɜɢɪɨɛɭ, ȼɢɞɨɩɨɦɚɝɚɽɬɟɩɨɩɟɪɟɞɢɬɢɩɨɬɟɧɰɿɣɧɿ ɧɟɝɚɬɢɜɧɿɧɚɫɥɿɞɤɢ ɞɥɹɧɚɜɤɨɥɢɲɧɶɨɝɨ ɫɟɪɟɞɨɜɢɳɚɬɚ ɡɞɨɪɨɜ’ɹɥɸɞɢɧɢ, ɹɤɿ
ɦɨɝɥɢ ɛɢɜɢɧɢɤɧɭɬɢ ɡɚɭɦɨɜ ɧɟɧɚɥɟɠɧɨɝɨ ɩɨɡɛɚɜɥɟɧɧɹɜɿɞ ɰɶɨɝɨɜɢɪɨɛɭ. ɓɨɛ ɨɬɪɢɦɚɬɢɞɟɬɚɥɶɧɿɲɭɿɧɮɨɪɦɚɰɿɸ ɫɬɨɫɨɜɧɨɩɟɪɟɪɨɛɤɢɰɶɨɝɨ
ɜɢɪɨɛɭ, ɡɜɟɪɧɿɬɶɫɹɞɨɫɜɨɝɨɦɿɫɰɟɜɨɝɨɨɮɿɫɭ, ȼɚɲɨʀɫɥɭɠɛɢɭɬɢɥɿɡɚɰɿʀɚɛɨɞɨɦɚɝɚɡɢɧɚ, ɞɟȼɢɩɪɢɞɛɚɥɢɰɟɣɜɢɪɿɛ.
NL Het symbool op het product of op de verpakking wijst erop dat dit product niet als huishoudafval mag worden behandeld. Het moet echter
naar een plaats worden gebracht waar elektrische en elektronische apparatuur wordt gerecycled. Als u ervoor zorgt dat dit product op de correcte
manier wordt verwijderd, voorkomt u mogelijk voor mens en milieu negatieve gevolg en die zich zouden kunnen voordoen in geval van verkeerde
afvalbehandeling. Voor meer details in verband met het recyclen van dit product, neemt u het best contact op met de gemeentelijke instanties, het
bedrijf of de dienst belast met de verwijdering van huishoudafval of de winkel waar u het product hebt gekocht.
RO Simbolul de pe produs sau de pe ambalaj indic ă faptul că produsul nu trebuie aruncat împreună cu gunoiul menajer. Trebuie predat la
punctul de colectare corespunzător pentru reciclarea echipamentelor electrice úi electronice. Asigurându-vă că aĠi eliminat în mod corect produsul,
ajutaĠi la evitarea potenĠialelor consecinĠe negative pentru mediul înc onjurător úi pentru sănătatea persoanelor, consecinĠe care ar putea deriva din
aruncarea necorespunzătoare a acestui pr odus. Pentru mai multe informaĠii detaliate despre reciclarea acestui produs, vă rugăm să contactaĠi biroul
local, serviciul pentru eliminarea deúeurilor sau magazinul de la care l-aĠi achiziĠionat.
SLO Simbol na izdelku ali njegovi embalaži oznaþuje, da z izdelkom ni dovoljeno ravnati kot z obiþajnimi gospodinjskimi odpadki. Izdelek odpeljite
na ustrezno zbirno mesto za predelavo elektriþne in elektronske opreme. S pravilnim naþinom odstranjevanja izdelka boste pomagali prepreþiti
morebitne negativne posledice in vplive na okolje in zdravje ljudi, ki bi se lahko p ojavile v primeru nepravilnega odstranjevanja izdelka. Za podrobnejše
informacije o odstranjevanju in predelavi izdelka se obrnite na pristojen mestni organ za odstranjevanje odpadkov, komunalno službo ali na trgovino, v
kateri ste izdelek kupili.
PL S ymbol na produkcie lub na opakowaniu oznacza, Īe tego produktu nie wolno traktowaü tak, jak innych odpadów domowych. NaleĪy oddaü
go do wáaĞciwego punktu skupu surowców wtórnych zajmującego siĊ záomowanym sprzĊtem elektrycznym i elektronicznym. W áaĞciwa utylizacja i
záomowanie pomaga w eliminacji niekorzystnego wpáywu záomowanych produktów na Ğrodowisko naturalne oraz zdrowie. Aby uzyskaü szczegóáowe
dane dotyczące moĪliwoĞci recyklingu niniejszego urządzenia, naleĪy skontaktowaü siĊ z lokalnym urzĊdem miasta, sáu Ībami oczyszczania miasta lub
sklepem, w którym produkt zost aá zakupiony.
SK Symbol na výrobku alebo na jeho obale znamená, že s výrobkom s a nesmie zaobchádzaĢ ako s domovým odpadom. Namiesto toho ho treba
odovzdaĢ v zbernom stredisku na recykláciu elektrických alebo elektronických zariadení. Zabezp eþte, že tento výrobok bude zlikvidovaný správnym
postupom, aby ste predišli negatívnym vplyvom na ži votné prostredie a Đudské zdravie, þo by bolo spôsobené nesprávnym postupom pri jeho likvidácii.
Podrobnejšie inf ormácie o recyklácii tohto výrobku získate, ak zavoláte miestny úrad vo Vašom bydlisku, zberné suroviny alebo obchod, v ktorom ste
výrobok kúpili.
CZ Symbol na výrobku nebo jeho balení udává, že tento výrobek nepatĜí do domácího odpadu. Je nutné odvézt ho do sbČrného místa pr o
recyklaci elektrického a elektronického zaĜízení. ZajištČním správné likvidace tohoto výrobku pomĤžete zabránit negativním dĤsledkĤm pro životní
prostĜedí a lidské zdraví, kter é by jinak b yly zpĤsobeny nevhodnou likvidací tohoto výrobku. PodrobnČjší informace o recyklaci tohoto výrobku zjistíte u
pĜíslušného místního úĜadu, služby pro likvidaci domovníh o odpadu nebo v obchodČ, kde jste výrobek zakoupili.
SV Symbolen p å produkten eller emballaget anger att produkten inte får hanteras som hushållsavfall. D en skall i st ället lämnas in på
uppsamlingsplats f ör återvinning av el- och elektronikkomponenter. Genom att säkerställa att produkten hanteras på rätt sätt bidrar du till att förebygg a
eventuellt negativa miljö- och hälsoeffekter som kan uppstå om produkten kasseras som vanligt avfall. För ytterligare upplysningar om återvinning bör
du kontakta lokala myndigheter eller sophämtningstjänst eller affären där du köpte varan
Page 34

H01A6590
 Loading...