

Page 1
USER INSTRUCTIONS
COOKERS
NOTICE D'EMPLOI ET D'INSTALLATION
CUISINIERES
GB
FR
USINES DE ROSIÈRES - 30, rue Y. LACELLE - Rosières - 18400 - Lunery - France
Page 2

CONTENTS
1.
General Warnings
1.1.
Symbols Used In This User Manual
1.2.
Declaration Of Compliance
1.3.
Safety Hints
1.4.
Useful Tips
1.5.
Technical Data
2.
Installation
2.1.
Positioning
2.2. F
eet Adjustment
2.3.
Dimensions Of The Appliance
2.4.
General Appearance And Definition Of The Appliance
2.5. Cookers Without Energy Cable
2.6.
Electrical Connection
3.
Vitroceramic Cooktop
3.1. Description Of Cooking Zones
3.2.
Cooktop Cookware Advice
3.3.
The Choice Of Cookware
3.4.
Control Knobs Of The Vitroceramic Cooktop
4.
Use Of The Oven
4.1.
Grilling
4.2.
4.3.
4.4. Cooking Pizza
4.5.
4.6.
4.7. Cooking Turn Spit
4.8. Using The End Of Cooking Timer
4.9. ing The Minute Timer
4.10. Use Of The Electronic Programmer
4.11. Electric Oven
4.12.
5.
Cleaning And Maintenance
5.1.
6.
Service Centre & Troubleshooting
7. Protection Of The Environment
.............................................................................................................................................................................................................05
Suggestions For Cooking
Cooking Cake
Cooking Fish
Cooking Meats
Us
Cooking Tables
Catalytic Self - Cleaning Oven
.............................................................................................................................................................................................01
................................................................................................................................................................01
.............................................................................................................................................................................01
.....................................................................................................................................................................................................01
.......................................................................................................................................................................................................0
..................................................................................................................................................................................................0
.........................................................................................................................................................................................................02
.......................................................................................................................................................................................................02
..............................................................................................................................................................................................02
.........................................................................................................................................................................02
.......................................................................................................................................................................03
.......................................................................................................................................................................................03
.......................................................................................................................................................................................04
.........................................................................................................................................................................04
...............................................................................................................................................................................04
.................................................................................................................................................................................04
...............................................................................................................................................................................................05
.................................................................................................................................................................................05
..................................................................................................................................................................................................05
.................................................................................................................................................................................................05
....................................................................................................................................................................................................05
................................................................................................................................................................................................05
............................................................................................................................................................................................05
....................................................................................................................................................................06
...................................................................................................................................................................................06
..............................................................................................................................................................06
..................................................................................................................................................................................................06
...............................................................................................................................................................................................07
.............................................................................................................................................................................08
..........................................................................................................................................................................08
..................................................................................................................................................................09
......................................................................................................................................................................09
GB
1
1
....................................................................................................................................02
..................................................................................................................................................04
SOMMAIRE
1. Recommandations Générales
1.1. Symboles Utilisés Dans Ce Mode D'emploi
1.2. Déclaration De Conformité
1.2. Déclaration De Conformité
1.3. Conseils De Sécurité
1.4. Quelques Conseils Utiles
1.5. Données Techniques
2.
Installation
2.1. Placement
2.2. Ajustement Des Pieds
2.3. Dimensions De L'appareil
2.4. Apparence Générale Et Définition De L'appareil
2.5. Cuisinières Sans Câble Électrique
2.6. Connexion Électrique
3. Surface De Chauffe Vitrocéramique
3.1. Description Des Zones De Cuisson
3.2. Conseils Relatifs À La Batterie De Cuisine Et Au Plan De Cuisson
3.3. Le Choix De La Batterie De Cuisine
3.4. Bouton De Contrôle Du Plan De Cuisson Vitrocéramique
4. Utilisation Du Four
4.1. Gril
4.2. Suggestions De Cuisson
4.3. Cuire Des Gâteaux
4.4. Cuisson Pizza
4.5. Cuire Les Poissons
4.6. Cuire Les Viandes
4.7.
Cuisson Au Tournebroche
4.8. Utilisation De La Minuterie De Fin De Cuisson
4.9. Utilisation De La Minuterie
4.10. Utilisation Du Programmeur Électronique
4.11. Four Electrique
4.12. Tables De Cuisson
5. Nettoyage Et Entretien
5.1. Four Catalytique Autonettoyant
6. Centre De Maintenance Et Résolution De Problèmes
7. Protection De L'environnement
........................................................................................................................................................................................................11
.......................................................................................................................................................................................................11
...................................................................................................................................................................................................................14
.......................................................................................................................................................................................10
.......................................................................................................................................................................................10
...........................................................................................................................................................................................14
..........................................................................................................................................................................................14
..................................................................................................................................................................................................14
..........................................................................................................................................................................................14
...........................................................................................................................................................................................14
..............................................................................................................................................................................................15
.........................................................................................................................................................................................16
..........................................................................................................................................................................10
....................................................................................................................................................10
..............................................................................................................................................................................10
...............................................................................................................................................................................10
.................................................................................................................................................................................10
.....................................................................................................................................................................................11
................................................................................................................................................................................11
.............................................................................................................................................11
..................................................................................................................................................................12
......................................................................................................................................................................................12
................................................................................................................................................................13
.................................................................................................................................................................13
................................................................................................................................................................13
.............................................................................................................................13
..................................................................................................................................................................................14
................................................................................................................................................................................14
...............................................................................................................................................15
..............................................................................................................................................................................15
......................................................................................................................................................15
......................................................................................................................................................................................17
........................................................................................................................................................................17
...................................................................................................................................18
.......................................................................................................................................................................18
FR
................................................................................................................13
Page 3
1. GENERAL WARNINGS
Thank you for choosing one of our products. To get the most out of
yourcookerwerecommend thatyou:
Read the notes in this manual carefully: they contain important
•
instructions onhowtoinstall, useandservice thiscookerin safety
Keepthisbookletinasafeplaceforeasy,future reference.
In thecase ofthesaleortransferofthe appliance, this manualshould
•
be given together with the appliance in order to guarantee the proper
transfer of the information on installation/usage of the appliance and
therelativewarnings.
All accessible parts are hot when the appliance is in operation, take
•
care tonottouchtheseelements.Whenthecookerisfirstswitched on
it may give off acrid smelling fumes this smoke is harmless we
suggest tooperatethecookersfor 2hourswhile empty.
-
1.1. SYMBOLS USED IN THIS USER MANUAL
For easier comprehension, the symbols below are used in this user
manual.
SafetyInformation
Information forEnvironment Protection
Thisappliance complieswiththe EUE.E.Cdirectives.
1.2. DECLARATION OF COMPLIANCE
All parts of this appliance that may come into contact with foodstuffs
comply with the provisions of EEC Directive 89/109. The appliance
complies with European Directives 73/23/EEC, 89/336/EEC and
90/396/EEC, replaced by 2006/EC, 2004/108/EC and 2003/55/EC,
and subsequent amendments. The appliance also complies with
93/68 GeneralDirectives andsubsequent amendments.
•
The emission of hot air is normal while the appliance is working. Do
notclosethe ventsonthe oven.
•
Some spillage on the appliance may occur, when placing food on or
into the appliance or when removing food with excess fat or water.
Clean such residues immediately after cooking, in order to prevent
unpleasant smellsandpossiblefires.
•
When using any electrical appliance you must follow a few basic
rules:
*It is not generally a good idea to use adapters, multiple sockets for
severalplugsand cableextension.
*Donotpull thepowercableto remove theplugfromthesocket.
*Donottouch theovenwith wetordamp handsorfeet.
*Ifthemain cableisdamageditmustbereplacedpromptly:
*Whenreplacingthecable, followtheinstructionsgivenbelow:
*Cable replacement must becarried out byqualified technicians. Use
only an approved service centre for repairs end ensure that only
originalpartsareused.
*When necessary,remove the power cable and replace it with one of
the H05RR-F, H05VVF, and H05V2V2-F type. The cable have the
capacity fortheelectricalcurrentrequiredbythe product.
•
Donotleavetheapplianceunattendedbeforeit hascooleddown.
If the above instructions are not adhered to, the
manufacturer cannot guarantee the safety of the cooker.
1.4. USEFUL TIPS
•Donotuse deformedorunbalancedpans.
Clean thegrillandthefatcollectingtraycarefullybeforeinitial usage.
•
•When using cleaning sprays, do not spray on heaters or on the
thermostat.
Make surethatovenshelves arecorrectlyplaced.
•
Donotcoverovenpartswith aluminium foil.
•
1.3. SAFETY HINTS
•
The cooker must be used only for the purpose for which it was
designed: itmustonlybe used for cooking food.Any other use, e.g.as
a form of heating, is improper use of the cooker and is therefore
dangerous.
•
The manufacturers cannot be held responsible for any damage
causedbyimproper,incorrectorunreasonableuse.
•
When using any electrical appliance you must follow a few basic
rules. If the appliance breaks down or develops a fault switch it off,
disconnect itfrommains,do nottouchit,call theauthorised Service.
•
This appliance is not intended forusebypersons (including children)
with reduced physical, sensory or mental capabilities, or lack of
experience and knowledge, unless they have been given supervision
orinstructionconcerninguseof theappliancebya personresponsible
fortheirsafety.
•
Children shouldbesupervisedtoensurethattheydonot playwiththe
appliance.
•
An oven by its very nature becomes very hot. Especially the glass of
theovendoor.Do not allow children togoneartheoven when it ishot,
especiallywhenthegrill ison.
•
Alwaysuseglovestoremovefoodfromthe oven.
•
Always keep yourapplianceclean,forsafetyandhealthreasons. Fat
andfoodresiduesmaycause fire.
•
Donotinsertyourhandbetweenovenhinges. Keepchildrenaway.
•
Make sure that all the knobs are in the OFF position when the
appliance isnotin use.
•
Theovendraweristostoreemptytraysor tokeepfoodwarm.
•
Do not put flammable, explosive or cleaning materials like nylon
bags,paper,cloths, etc,intothedrawer.
•
Use only heat resistant pots and pans. Do not use flammable
materials.
•
Itisdangeroustomodifyortoattempt tomodifythe propertiesof
theappliance.
•
Particular attention isnecessarywhenyou arefrying:donot leavethe
appliance unattended.
•
Theapplianceisheavy.Takecare whenmoving.
1.5. TECHNICAL DATA
FEATURES
60 x 60 4 Hilight Heater and Electrical Oven
Rating plate (located at the rear of the cooker)
TOTAL ELECTRIC
POWER
8.4 kW
01 GB
Page 4

2. INSTALLATION
Installation havetobe made byqualifiedpersonnel.Themanufacturer
have no obligation to carry this out. If the assistance of the
manufacturer is required to rectify faults arising from incorrect
installation, thisassistanceis notcoveredbytheguarantee.
The installation instructions for professionally qualified personnel
must be followed. Incorrect installation may cause harm or injury to
people, animals or belongings. The manufacturer cannot be held
responsible forsuchharmor injury.
WARNING!
placed!Itcan onlybeinstalledinacontinuouslyventilatedroom.
Electrical connections must always be disconnected before any
repair,installationormodification.
•Before positioning yourappliance,check theproperties oftheenergy
supplyandmake sure thatyourapplianceisregulated accordingly.
•The appliance must not be installed near flammable materials (e.g.
furniture, curtains,etc.)
Care must be taken regarding where the appliance is
2.1. POSITIONING
20 mm 20 mm
2.3. DIMENSIONS OF THE APPLIANCE
60 x 60
Height (mm)
Width (mm)
Depth (mm)
850
598
600
D
W
2.4. GENERAL APPEARANCE AND DEFINITION
OF THE APPLIANCE
This User Manual has been drawn up as a guide for several models.
Some oftheproperties mentioned in this manual maynotexistinyour
appliance.
H
This appliance is of the "X" type and it has been designed on the
presumption that the adjacent work tops will be no higher than the
cooktopsurface.
Thisapplianceis class2.1
2.2.FEET ADJUSTMENT
A A1 A2
4
3
2
1
CB
60 x 60 COOKER
1-
Cook top
2-
C panel
ontrol
3-
Drawer
4-
Oven door (Front door)
5-
Hilight Heater 1200W
6-
Double Hilight Heater 1700W
7-
Hilight Heater 2300W
8-
Warning Lamps
9-
Hilight heaters control knobs
10-
Oven knob
11-
Thermostat knob
12-
Electronic programmer
13-
Moving Foot
14-
Bolt Foot
2
10
11
6
7
5
8
5
1
12
9
Yourappliancehasadjustablefeetatthe lowercornersofits chassis.
•Themaximumheightof cookerwillbe 868mmbyfixing theadjustable
frontfeetand rearwheelsto the4thhole.
•Thefeet canbeadjustedindividuallywith theaidof awrenchto
guaranteethattheovenis perfectlybalancedandlevelled,so thatany
liquidsinthe pansishorizontal.
•Rearwheelsshouldbefixed tothe2nd hole(pictureA1), standard
height.Thus,standardheightwillbe 850mm.
02 GB
13
14
3
4
Page 5
2.5. COOKERS WITHOUT ENERGY CABLE
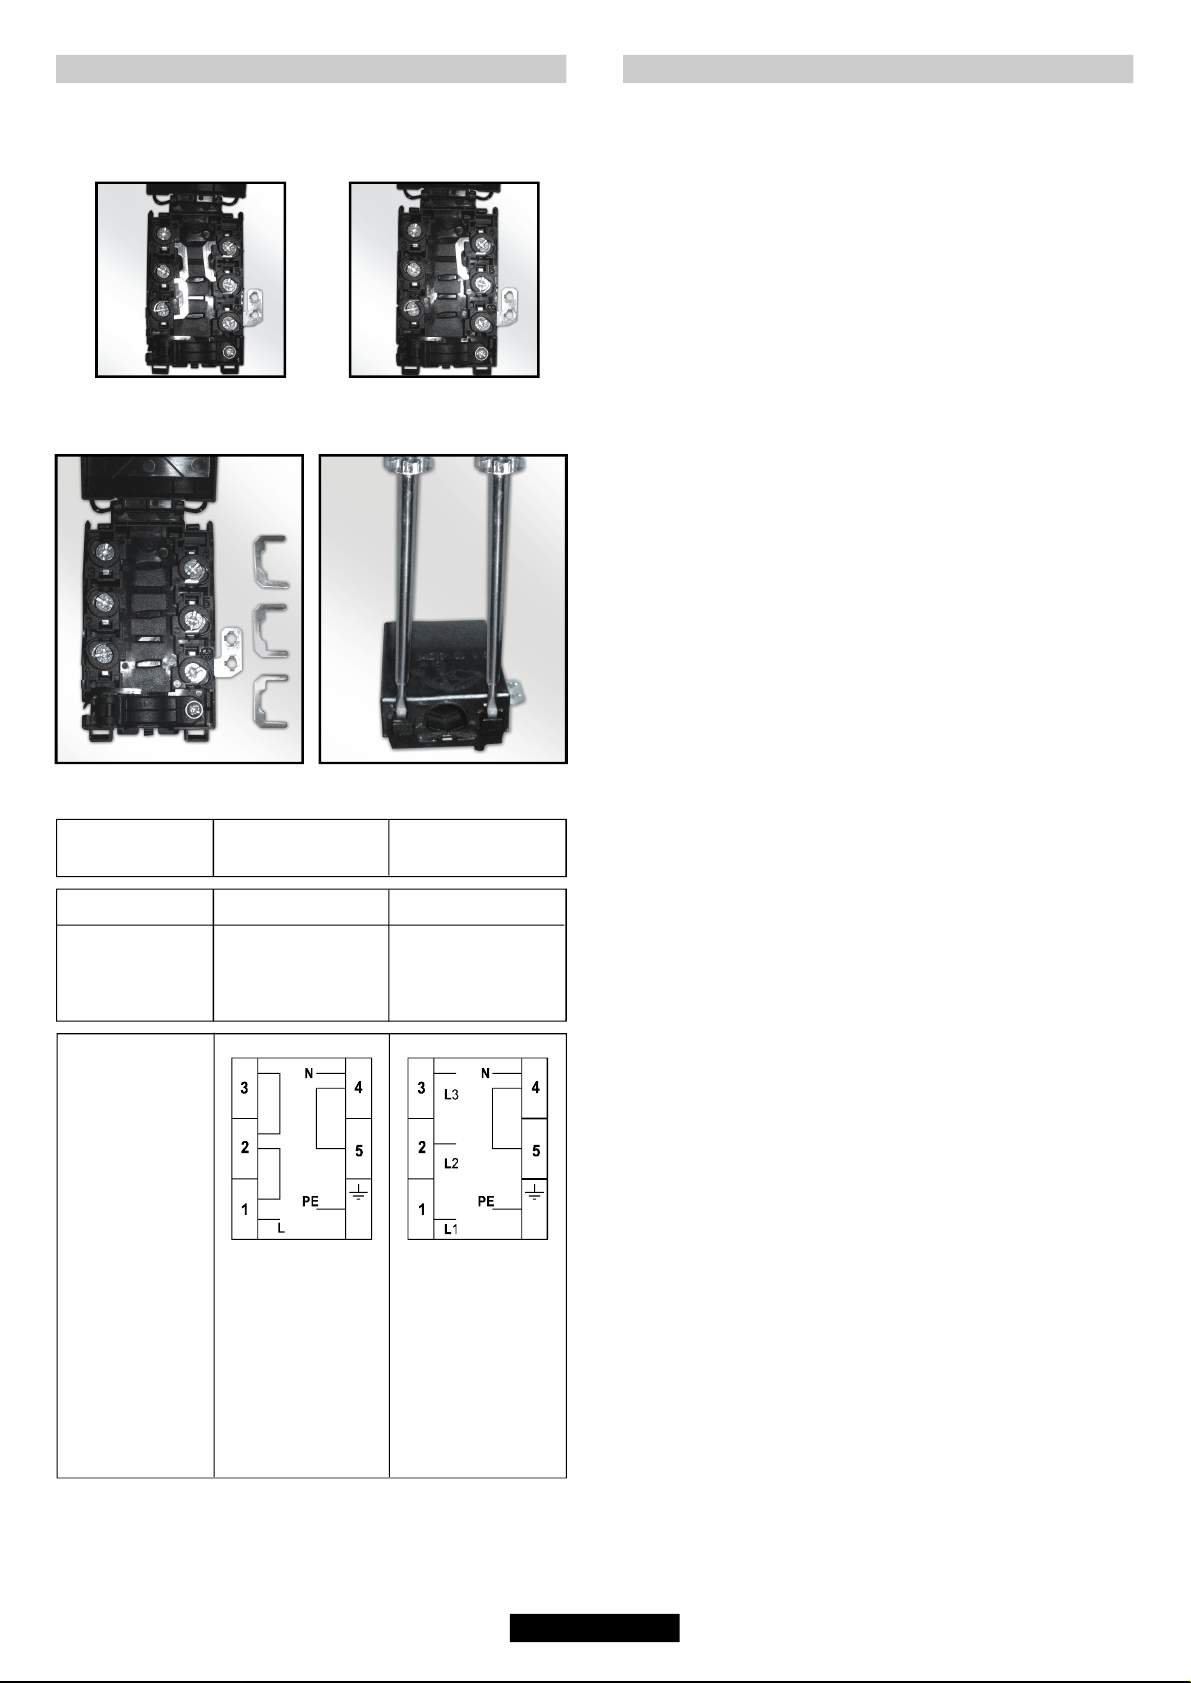
2.6. ELECTRICAL CONNECTION
Cable box connection types
1- Monophase connection 2- Three-phase connection
Attention: A poor clamping can draw away risks dangerous
heating at the level of the cable feeding
Cookers can be presented with or without energy cable. Cable
connection should be done by Authorized service according to
following instructions.
The electrical connection must be made according to the standards
and regulations in force. Before making the electrical connection,
checkthefollowing:
•
Is the capacity of the electrical connections and safety fuses in the
building sufficient to cope with the load of the appliance? (Check with
theadhesiveinfolabel)
•
Does the electricity supplylinehave an earth connection conforming
with the standards in force? A proper earth connection must exist in
your home. If there is not a proper earth connection at your home,
pleaseapplytoan authorized techniciantodealwiththisproblem.
•
Is the socket or the multi-pole switch at a easily reachable point after
theinstallationoftheappliance?
•
A plug conforming to standards should be connected to the mains
cableandthe cableshouldbeinsertedintoasafesocket.
•
A multi-pole switch must be used between the appliance and the
electricity line if a direct electrical connection to the appliance is
required. (It must comply with standards and be appropriate for the
load)
The green-yellow ground cable must not be interrupted by a switch.
The brown phase cable (from the “L" coded connector of the oven)
mustalwaysbeconnectedtothe phaselineof themains.
•
The power line must be positioned so that it is not exposed to
temperatures higherthan50° C.
•
When the powercablemustbe changed,acablewithacross section
appropriate to the indicated power must be used. The green-yellow
ground cable should be approximately 2 cm longer than phase and
neutralcables.
•
Check the heaters by switching them on for 3 minutes, after having
completed theconnection.
•The manufacturer will not accept responsibility for damages
arising dueto non-compliancewiththe safetystandards.
Fuse
Cable - Section
Cable - Type
Monophase
220-240 V~
380-415V3N~
25A 3 x 16 A
3 G 2.5 mm
2
H05VV-F
H05RR-F
L1 : Phase
shunt 1-2 and
shunt 2-3
N : N utral
e
shunt 4-5
PE Earth
Three-phase
5 G 1.5 mm
H05VV-F
H05RR-F
1 Phase
2 Phase
3 Phase
5 Ne
utral
shunt 4-5
PE Earth
2
03 GB
Page 6
3. VITROCERAMIC COOKTOP
3.1. DESCRIPTION OF COOKING ZONES
Highlight zone
ATmetallic conductor strip is spread uniformly over the whole surface
unit.Itis effective within3secondsandis suitableforsteady,even and
alsolengthycooking.
The glass-ceramic cook topbenefitsfromgreaterheatoutputwhichis
generated by the highlight cooking zones thereby accelerating the
cooking process. Modifications to the design of the hob have not
affected the capacity of the glass to withstand high temperatures, but
theyhaveimprovedcontrollability.
With the "Sprinter" facility,reduced cooking times of upto15%can be
achieved, depending on the method of cooking and the type of
saucepans used.
Halo lightzone
his is a combination of halogen (1/3) and highlight (2/3). The
temperature of this surface unit rises extremely quickly. It is suitable
for frying meat, rapid boiling and intensive cooking where a high
temperature isrequiredfora veryshortperiodoftime.
Radiant zone
Even temperature and great stability in maintaining the required
temperature. It is extremely precise and offers very good heat
diffusion.
3.2. COOKTOP COOKWARE ADVICE
Efficientcooking
Theextralargehighlightzone,willdepending
on the dimensions of the cook ware and/or
the quantity of food being cooked, provide
evenhigherperformance levels.
Using good quality cookware is critical for
obtaining the best performance from your
hob.
Use pans with a large enough diameter to
completely
cover the surface unit
the size of the pan should be no smaller than
the heated area. If it is slightly wider the energy will be used at
maximumefficiency.
3.3. THE CHOICE OF COOKWARE
Using this type of cookware will prevent hot spots that cause food to
stick.Thickmetal potsandpans willprovideevendistribution ofheat.
Porcelain/enamel
Goodperformanceonlyif thebaseisthin,smoothandflat.
Glass-ceramic
Notrecommended.Poorperformance.Mayscratchthesurface.
Suitability ofCooking Pans
Keepinmind thatlargerpanshavelargerheatingsurfaces.
This will help them to cook the food faster than pans with smaller
heatingsurfaces.
Always use pan sizes proportionate to the amount of the food to be
cooked. In order to prevent splashing, do not use very small pans,
especially for foods with excess liquid. If you use excessively large
pans for quick cooked foods, sausages and liquids will stick and
residues willremainattachedtothepanafterbeingemptied.
Closed pans and baking trays or moulds are suggested for cooking
sweets. Splashed sugar and juices from anopen pan may stick to the
cooker surface and will be difficult to remove.This is especially
important for pans used for roasting or pressurized cooking at high
temperature.
Do not leave burners unattended without a pan or with an empty pan
ontop.
Check the suitability of cooking pans with respect to the following
criteria;
Theyshouldbeheavy.
They should completely cover the burner surface; they may be a little
biggerbutno smaller.
Base surfaces should be completely flat and fit well on the cooking
surface.
Some parts of the food may be heated while others remain cold due
•
to the uneven distribution of heat under the pan. Therefore,
continuous stirring of the food being cooked is necessary in the case
of thin-bottomed pans. Heat is more effectively and evenly distributed
withthick-basedpans.
Use of very small pans is not recommended. Wider, low-sided pans
•
are more suitable for more effective and quicker cooking than small,
deeppans.
You cannot shorten cooking time by using a small pan over a large
•
burner. You will only waste gas in this way.However,a pan with a lid
willsaveenergy.
The following information will help you to choose cookware which will
givegoodperformance.
Stainless Steel
Highly recommended
. Especially good with a sandwich clad base.
The sandwich base combines the benefits of stainless steel
(appearance, durability and stability) with the advantages of
aluminium orcopper (heatconduction,evenheat distribution).
Aluminium
Heavyweightrecommended.Good conductivity.
Aluminium residues sometimes appear as scratches on the cook top
butcanberemovedifcleaned immediately.Because ofitslowmelting
point,thinaluminiumshouldnotbeused.
Cast Iron
Usable, but not recommended. Poor performance. May scratch the
surface.
Copper Bottom/stoneware
Heavy weight recommended. Good performance, but copper may
leave residues which can appear as scratches. The residues can be
removed, as long as the hob iscleaned immediately.However,do not
let these pots boil dry. Overheated metal can bond to glass hobs.An
overheatedcopperpotwillleavearesidue thatwillpermanentlystain
thecooktop.
Ensure thatthebase ofthepot orpan isdry
when filling pans with liquid or using one that has been stored in the
refrigerator, ensure that the base of the pan is completely dry before
placingiton thehob.Thiswillhelptoavoidstainingthecooktop.
Always use good quality cookware with perfectly flat and thick
bases
3.4. CONTROL KNOBS OF THE
VITROCERAMIC COOKTOP
HOWTOOPERATETHECOOKTOP
Locate the sign corresponding to the
cooking zonethatyouneed.
Turn the control knob to the required
cooking setting
Initially we recommend that the heat zone
be set at the highest position until the
contents of the saucepan have reached the
10
required temperature; the heat can then be
reduced tothe requiredcookingsetting.
The residual heat indicator light will
come on when the cook top surface
temperature reaches 60degreesorabove..
It willremainoneven ifthecooktopisswitched offandwill only goout
whenthecook topsurfacehascooleddown.
Position Some Tips
1-2
3-4
5-6
7-8
9-10
11-12
VeryLow
Low
Moderate
Medium
High
VeryHigh
1
2
3
4
5
6
Tokeep a dishhot,melt butterand chocolate...
Slow cooking, sauces, stews,rice puddingpoachedeggs...
Beans, frozen foods,fruit,boilingwater...
Steamed apples, fresh vegetables,pasta,crepes, fish...
More intense cooking,omelettes,steaks...
Steaks,chops, frying...
Electrique
12
11
9
7
1
4
58
6
2
3
04 GB
Page 7
4. USE OF THE OVEN
4.1. GRILLING
•
Grilling gives food a rich brown colour quickly. Depending on the
quantity of the food, you can switch the grill on to different positions.
Almostallfoodcanbecookedunderthegrillexcept forvery leangame
andmeatrolls.
•
Meat and fish that is going to be grilled should first be lightly doused
withoil.
•
Place afatcollecting traybeneathduringgrilling.Putsomewaterinto
the tray to prevent unpleasant smells and to prevent the fat catching
fire.
•
Grilling is usually preferred for cooking pieces of meat, for example
steaks, which are not too thick, different sized meat parts, cleaved
hunted birds, fish, some vegetables (e.g. courgettes, aubergines,
tomatoes,etc.)togetherwithmeatandfish productsonspits.
Oilthefish lightlybeforeputtingit directly underthegrill.
Add salt on meat after cooking, salt fish into the cleavage before
cooking.
•
The distance from thegrillwilldependonthethicknessofthemeator
fish. Ifthedistanceiscorrectlyjudged,theouterpartswill not be burnt
andtheinside willnotremain raw.
•
Prevent unpleasant odours and smoke caused by dripping fats and
saucesbypouring1-2glassof waterintothe fat-collecting tray.
•
You can also use the grill for toasting, toasted bread or sandwiches,
for example, and also to cook certain fruits (bananas, grapefruit or
pineapple slices, apples etc.). However, fruit must not come into
contactwiththeheatingelements.
Never cover oven inner walls or the bottom with
aluminium foil. Accumulated heat can damage the oven
enamelandyourmeal.
4.5. COOKING FISH
Small fish can be cooked at the maximum temperature from start to
finish. Medium sized fish must be cooked at the maximum
temperature atthebeginning andthenthe temperature mustbe slowly
reduced. Larger fish must be cooked at lower temperatures from start
tofinish.Checkthecutatthe bottom of fish tounderstandwhetheritis
cooked properly. In order to understand whether the fish properly
grilled or not, checkthe cleavage at the bottom of the fish. The colour
(for grilled fish) should be an even matt white. This is not the case for
salmonandtrout.
4.6. COOKING MEATS
•
The minimum quantity of meat to be cooked in the oven is 1 kg.
Otherwise, themeatwillbe toodry.
If yourequirewelldonemeat,uselessfat. Ifmeathasa littlefat,there
is no need touse oil.Ifone side ofthemeatisfatty, place this side up.
The melted fat will sufficiently grease the part below. Red meats
shouldbetakenoutofthefridge atleast1hourbeforethecooking.
•
Otherwise the meat may become tough due to the temperature
difference. Do not use salt before cooking, especially when grilling
meat. Salt will draw the blood and juices out of the meat which will
consequently prevent theroastingoftheuppersurfaceof themeat.
•
Addsaltto roastmeatonly afterhalfof thecookingtimehaselapsed.
•
Place themeattoberoastedin awide,shallowpan.
•
Deep sided containers / pans act as a shield against the heat. Meat
can be placed in the oven in a heat resistant pan or directly onto the
grill. Insert a fat / gravy collecting tray beneath the grill. Sauces must
beaddedatthebeginningifthe food is cookedforashorttime,whileit
would bebettertoaddsaucesinthe lasthalfhourifthe food iscooked
foralonger time.
4.2. SUGGESTIONS FOR COOKING
Traditional Cooking
Heat is generated from the upper and lower heaters. Generally, the
middle shelf position is preferable for cooking. However, if the top or
bottom surface ofthefoodmustbecookedmore,placeitonthe upper
orlowershelf.
Convection Cooking (withFan)
The food iscookedbyevenlydistributedpreheated air blownintothe
•
ovenbythe helpofthe fanlocatedonthe insidebackwall oftheoven.
It is possible to cook several dishes simultaneously on different
shelvesthankstotheevenly distributedheatinsidetheoven.
This type of oven is also very useful for defrosting frozen food. It can
•
also be used for sterilizing canned food, preparing fruit syrups, and
dehydrating fruitsandmushrooms.
4.3. COOKING CAKES
•
Unless otherwise suggested,preheattheoven for atleast10minutes
before use.Donotopen the oven doorwhencooking cakes otherwise
they willnotrise (cakes or dishes withyeastandsoufflés).Theblastof
cold air which will enter the oven will prevent rising. You can check
whether cakesareproperlycookedbyinsertinga rodintothedough.If
the rod comes out dry when you pull it out, it means that the cake is
properly cooked. Do not check in this way until at least three quarters
ofthecookingtimehaselapsed.
Please keepinmindthefollowing tips
•
If the surface of the food is cooked well but it is still raw or partly raw
inside,itmust becookedlongeratalower temperature.
•
On the other hand, if the surface of the food is too dry, it should be
cookedata highertemperatureforashortertime.
4.7. COOKING TURN SPIT
•The cooker is equipped with a metal turnspit, two forks and a hook
usedtosupportthespit.
•Instruction foruse:
-Remove allaccessories fromthe oven;
-putthedeep panonthe bottomofthe ovenoronthelowestbench;
-sticktheturnspitthroughthe meat,centeredbetweenthetwo forks;
-Fix the turnspit into the drive hole located in the bottom wall, then
hang
the support hook in the drive located at the top frontoftheovencavity
andaroundtheedgeofthe turnspit
•Preheating isnotnecessary withtheturnspit.
•CookingTimeRecommendedinturnspit Position
Cooking time (min)Type of food
Beef (1kg)
Lamb sheep, (1kg)
Veal, Poultry (1kg)
Por (1 kg)k
Toswitchoffthecooktop, turn theknobto"O".
•
The oval heating zone consists of two heating areas: a circular area
and an oval shaped section. Turn the control knob from 1 to 12 to
regulate the circular area. Tooperate the oval section, simply turn the
controlknobto position12 andthenselect apositionfrom 1to12.
•
The heating areaconsistsoftwoconcentric zones.Theinnercircleis
activated when the knob is turned to any of the positions from 1 to
12.The outer ring will only be activated when the control is turned
beyond12up toa
maximumpower.
20/30
30/40
60/70
65/75
4.4. PIZZACOOKING
•T
hermostatsettingatmaximum
•P min min
reheating time15 (20 ifpossible)
•P
ositionofthe trayineither oneofthetwolowestposition
•Cookingtime20min.
05 GB
Page 8

4.8. USING THE END OF COOKING TIMER
4.11. ELECTRIC OVEN
90
80
70
4.9. ING THE MINUTE TIMERUS
Dureé de cuisson
50
40
60
30
This control enables to set the desired
10
cooking time (max. 90 min.) the oven will
automatically switch off at the end of the
settime.
20
The timer will count down from the set
Four
Température
( C)
time return to the “O” position and switch
30
offautomatically.
For normal use of oven set the timer to
the position.
40
50
To set theoven ensure the timer is not on
the“O”position.
Function
Temperature
Cooking time
Not in function
Turn spit and grill heater
Oven FunctionPosition
Lamp
Grill heater
Grill heater and fan
Fan
Upper heating element and fan
To set the cooking time, turn dial one
complete revolution and then position the
10
index to the required time. When the time
has lapsed, the signal will ring for a few
seconds.
20
Lower heating element and fan
Upper heating element, lower heating element and fan
Lower and upper heating element
Upper heating element
Lower heating element
Manual
Pizza
4.10. USE OF THE ELECTRONIC PROGRAMMER
FUNCTION HOW TO ACTIVA HOW TO SWITCH IT OFF WHATIT DOES WHAT IT ISFOR
MINUTE MINDER
MANUAL
FUNCTION
COOKING
TIME
END OF
COOKING
•Press andhold thebutton
•Press thebuttons or
to setthe requiredtime
•Release allthe buttons
•Press thebutton
•Set thecooking functionwith
the ovenfunction selector
•Press andhold theTIMER
button
•Press thebuttons or to
set thelenght ofcooking
required
•Release allbuttons
•Set thecooking functionwith
the ovenfunction selector
•Press andhold theEND
button
•Press thebuttons to
set thetime atwhich you
wish theoven toswitch off
•Release thebuttons
•Set thecooking functionwith
the ovenfunction selector
•When theset timeas
elapsed anaudible alarm
is activated(this alarmwill
stop onits own,however
it canbe stopped
immediately bypressing
the button)
•Turn the oven function
selector toposition“O”
•When thetime iselapsed the
oven willswitch off
automatically.Should you
wish tostop cookingearlier
either turnthe function
selector to0, orset time to
0:00(TIMER and buttons)
•At thetime set,the ovenwill
switch off.To switch off
manually,turn the oven
function selectorto position
“O”.
• Soundsan alarmat the endof theset time.
• To checkhowlongis left torun pressthe
button
•Enables youto operatethe oven.
•It allowsto presetthe cooking timerequired
for therecipe chosen.
•To check how long isleft to run pressthe
TIMER button.
•To alter/change the preset timepress TIMER
and buttons
•Enables youto setthe end ofcooking time
•Tocheck thepreset time press theEND button
•Tomodify thepreset time press buttons
END+
•Allows touse theoven as alarmclock (couldbe activated eitherwith operatingthe oven
or without operatingthe oven)
•For cookingthe desiredrecipes
•At theend ofthe cooking settime, theoven will switch off automaticallyand anaudible
alarm willring.
•This functionis typically used with“cooking time”function.For example ifthe dishhas to
be cookedfor 45minutes and needsto beready by12:30, simply selectthe required
function, setthe cookingtime to 45minutes andthe end ofcooking timeto 12:30.
•Cooking willstart automa-ticallyat 11:45(12:30 minus 45 mins)and willcontinue until the
preset endof cooking time,whenthe oven willswitch itselfoff automatically
WARNING!
If theEND ofcooking is Selected withoutsetting thelength of cooking time,the ovenwill
start cookingImmediately andit will Stopat theEND of cookingtime set.
Setting the correct time:
WARNING : the first operation to carry out after the oven has been installed or following the interruption of power
supply (this is recognizable the display pulsating and showing )
is setting the correct time. This is achieved as follows
• Press and hold the TIMER and END buttons ( and )
• Set time with buttons
• Release all buttons
ATTENTION the oven only operates if set on manual function or preset time.
N.B.: on some models the symbols are replaced by + and - .
06 GB
Page 9

4.12. COOKING TABLES
TraditionalandHotAir CirculationCookingMethods;Weights(Gr)
TYPE OFTHEFOOD Traditional CookingMethod
Weight
(Gr)
1000
500
500
TYPE OF THE FOOD
CAKES AND DESSERTS
Dough with stirred egg
Dough
Small Cakes
Cheese Cake
Apple Pie
Strudel
Jam tart
Small cakes
Biscuits
Cream cakes
BREAD AND PIZZA
White Bread
Rye Bread
Sandwich
PASTRY
Macaroni
With vegetable
Small pastries
Lasagne
Traditional
Cooking
Method
Shelf
Tempera
Position
ture(° )-C
2
180
1
180
2
180
1
175
1
180
2
175
2
180
2
180
2
180
2
100
200
1
200
1
200
2
2
200
2
200
2
200
2
200
Hot Air
Circulation
Method
Shelf
Position
2(1and3)
2(1and3)
2(1and3)
2
2(1and3)
2(1and3)
2(1an 3)
d
2(1and3)
2(1and3)
2(1and3)
2
2
2(1and3)
2(1and3)
2(1and3)
2(1and3)
2
Tempera
ture(° )-C
160
160
160
150
160
150
160
160
160
100
175
175
175
175
175
175
175
Cooking
times
(Minutes)
45 - 60
20 - 35
20 - 30
60 - 80
40 - 60
60 - 80
45 - 60
15 - 25
10 - 20
90 - 120
45 ~ 60
30 ~ 45
20 ~ 35
40 ~ 50
45 ~ 60
35 ~ 45
45 ~ 60
N O T E S
Shelf Pozitions
4
3
2
1
Inside the closed oven on
dishes 8 pieces on a tray
Under the grill
1000
1200
1000
1500
1200
1000
4000
1500
3000
1200
1000
800
MEATS
Roast beef
Roast pork
Roast veal
British style roast beef
Lamb
Chicken
Turkey
Duck
Goose
Rabbit
FISH
Whole fish
Fillet
200
2
200
2
200
2
220
2
200
2
200
2
200
2
175
2
175
2
200
2
22200
200
2
2
2
2
2
2
2
2
2
2
2(1and3)
2(1and3)
175
175
175
200
175
175
175
160
160
175
175
175
50 ~ 70
100 ~ 130
90 ~ 120
50 ~ 70
110~ 130
60 ~ 80
210 ~ 240
120 ~ 150
150 ~ 200
60 ~ 80
40 ~ 60
30 ~ 40
Cook on grill
Cook on grill
Cook on grill
Cook on grill
Leg
Full size
Full size
Full size
Full size
In parts
2 Fishes
4 Fillets
NOTE :
1) Cooking times do not include pre heating. Preheating the oven for about 10 minutes is advisable especially for cakes, pizzas and breads.
2) Indicates tray positions for cooking several dishes simultaneously.
3) All cooking operations must be carried out with oven door closed.
COOKING TIMES
(Minutes)
UPPER
SECTION
10
12
10
30
12
13
12
8
12
8
2-3
LOWER
SECTION
8
8
6
20
10
10
-6
--
-1
FOOD TYPES
Beefsteak
Grilled cutlet
Sausage
Chicken parts
Mixed grill
Milky desserts
Tomato slices
Fish fillets
Scallops
Toast
Bread slices
QUANTITY COOKING ON GRILL
N. OF
PARTS
4
4
8
6
4
4
8
4
6
4
4
WEIGHT
800
600
500
800
700
400
500
400
---
--—
SHELF
POSITION
4
4
4
3
4
4
4
4
4
4
4
TEMPERATURE
(°C)
max
max
max
max
max
max
max
max
max
max
max
07 GB
Page 10

5. CLEANING AND MAINTENANCE
Beforeallcleaningandmaintenance:
Disconnect mainsvoltage.
•
Iftheoven ishot,waittill ithascooleddown.
•
Never usea steam orhigh pressure spraytoclean theappliance.
•
Never use abrasive cleaners, wire wool or sharp objects to clean the
•
glassovendoor.
Clean enamelled surfaces with warm, soapy water or with suitable
•
brand products. On no account use abrasive powders that may
damage surfacesandruin theappearanceofthecooker.
Itisvery importanttoclean theoveneach timeitis used.
Usedetergentsandabrasivemetalpadsfor thestainlesssteelgrills.
•
The glass surfaces such as the top, the oven door and the warming
•
compartment doormustbe cleanedwhentheyarecold.
Damage caused by failure to respect this rule is not covered by the
•
guarantee.
Do not use abrasive products, metal cleaning pads, sharp objects,
•
rough cloths, or chemical products and detergents that can
permanently damage thecatalyticlining.
It is a good idea to use deep roasting trays for fatty foods such as
•
jointsofmeatetc.and toputa trayunderneaththegrill tocatchsurplus
fat
.
Cleaning ofOvenDoor
For thorough cleaning of the oven door, it is advisable to remove the
same,asshown in
Open the door completely, turn the two feet on the hinge arms 180º.
Close the doorpartlybya 30º. Remove the door byslightlyliftingtheit
atthisposition.
Forreplacingthedoor,follow thestepsabovein thereverseorder
Before carrying out any maintenance work on the hob, allow it to cool
down.
Only products, (creams and scrapers) specifically designed for glass
ceramic surfaces should be used.Theyareobtainable from hardware
stores.
Avoid spillages, as anything which falls on to the hob surface will
quicklyburnandwillmake cleaningmoredifficult.
It is advisable to keep away from the hob all substances which are
liabletomelt, suchasplasticitems,sugar,or sugar-based products.
below.
.
30 Max
However, you must care not to let any liquid go into the open
zones, andthen topushthe knobs fullyon fitting back.
The glass ceramic surface will withstand scraping from flatbottomed
cooking vessels, however,itisalways better to lift them when moving
themfromone zonetoanother
Donotuse aspongewhichis toowet.
Neverusea knifeora screwdriver.
Ascraper witharazor bladewillnot damagethesurface,
aslongasitis keptatan angleof30 .
Neverleavea scraper witha razorbladewithinthereach ofchildren.
Neveruseabrasiveproductsorscouringpowders.
Themetalsurround
to safely clean the metal surround wash with soap and water, rinse,
thendrywith asoftcloth.
ToReplacetheinside light
•
Switch offthe mainspowersupplyandunscrewbulb.
Replace with an identical bulb that can withstand very high
temperatures.
•
Never usesteamoravaporizerforcleaning.
0
0
180
MAINTENANCE
Place a few drops of the specialised cleaning product on the hob
•
surface.
•Rub anystubbornstainswitha softclothorwithslightlydampkitchen
paper.
•Wipewitha softclothordry kitchenpaperuntilthesurfaceisclean.
Ifthereare stillsomestubbornstains
•Placeafew moredropsof specialised cleaningfluidon thesurface.
•Scrape with a scraper,holdingitatan angleof30to the hob, until the
stainsdisappear.
•Wipewitha softclothordry kitchenpaperuntilthesurfaceisclean.
•Repeat theoperationifnecessary.
AFEW HINTS
Frequent cleaning leaves a protective layer which is essential to
prevent scratches and wear. Make sure that the surface is clean
before using the hob again. Toremove marks left by water, use a few
dropsofwhite vinegar orlemonjuice.
Then wipe with absorbent paper and a few drops of specialised
cleaning fluid.
Thecontrolknobscanbe removedforacompletecleaning.
5.1. CATALYTIC SELF - CLEANING OVEN
•
Special self-cleaning panels covered in a micro-porous coating are
available on some of our models. If they are fitted, the oven no longer
needstobe cleanedbyhand.
•
Theliningmustbeporous forself-cleaning tobe effective.
•
Excessive splattering offat mayblocktheporesand therefore hinder
self-cleaning. This self-cleaning capacity may be restored by
switching ontheemptyovento maximum forabout10-20minutes.
•
If the walls of the oven are so thickly coated in grease that the
catalytic liningisno longereffective,removesurplusgreasewith asoft
cloth or sponge soaked in hot water. All catalytic linings currently on
themarkethavea working lifeabout300hours.Theyshouldtherefore
bereplacedafterabout300 hours.
08 GB
Page 11

6. SERVICE CENTRE & TROUBLESHOOTING
•
If the oven is not working, before calling the service centre we
recommended that:
•
You should check that the oven is properly plugged into the power
supply.
Theovendoes notheatup
Aretheoven controlknobsat thecorrectposition?
Thecookingtime istoo long
Hasthecorrecttemperature beenselected?
7. PROTECTION OF THE ENVIRONMENT
Smoke comesfromtheoven
It is advisable to clean the oven after each use. If fat which splashes
during the cooking of meat is not cleaned, it will cause an unpleasant
smell and smoke the next time you use the oven. (See the Cleaning
andMaintenancechapter)
Theovenlight does notcome on
•
The light might be faulty. To change the bulb, please see the relative
page.
•
If you have checked the above and the oven still does not work
properly,contactthenearestauthorizedserviceforassistance
•
Model andProductionNumber(PNCor ENR).
Thecookingzones donotsimmeror onlyfrygently
Onlyuseflat-bottomedpans.Iflightis visible between thepanandthe
hob,thezone isnottransmittingheatcorrectly.
Thepanbottomshouldfullycover thediameteroftheselectedzone.
Thecookingistooslow
Unsuitable pansare being used. Only use flat bottomed utensils, that
areheavyand haveadiameteratleast thesameasthecooking zone.
Smallscratchesorabrasionsonthehob'sglasssurface
Incorrect cleaning or rough-bottomed pans are used; particles like
grains of sand or salt get between the hob and the bottom of the pan.
Refer to the “CLEANING” section; make sure that pan bottoms are
clean before use and only usesmooth bottomed pans. Scratches can
belessenedonlythecleaning isdonecorrectly.
Metalmarks
Do not slide aluminium pans on the hob. Refer to the cleaning
recommendations.
Youusethe correctmaterials,butthe stainspersist.
Usearazor bladeandfollowthe“CLEANING” section.
•
After positioning the appliance, packaging materials must be
correctly disposedoffor safetyandenvironmentalpurposes.
•
Before disposing of old equipment, cut the power cable in order to
rendertheequipmentunusable.
•This appliance is marked according to the European directive
2002/96/EC onWasteElectricalandElectronicEquipment(WEEE).
•Byensuringthisproductisdisposedofcorrectly,you will helpprevent
potential negative consequences for the environment and human
health, which could otherwise be caused by inappropriate waste
handling ofthisproduct.
•The symbol on the product indicates that this product may not be
treated as household waste. Instead it shall be handed over to the
applicable collectionpoint fortherecycling ofelectrical and electronic
equipment
•Disposal must be carried out in accordance with local environmental
regulations forwastedisposal.
•For more detailed information about treatment, recovery and
recycling of this product, please contact your local city office, your
household waste disposal service or the shop where you purchased
theproduct.
Dark stains
Usearazor bladeandfollowthe“CLEANING” section.
Lightsurfacesonthehob
Marks from an aluminium or copper pan, but also mineral, water or
fooddeposits;theycanbe removedusingthe creamcleaner.
Caramelisationormeltedplastic onthehob.
Refer tothe “CLEANING” section.
Thehobdoesnotoperateorcertainzones don'twork
Theshuntsarenotpositioned correctlyonthe terminalboard.
Haveacheckmadethattheconnection isdoneincompliance withthe
recommendations.
Thecontrolpanelislocked.
Unlockthehob.
Frequency ofon/offoperationsforcooking zones
Theon-offcycles varyaccordingtotherequired heatlevel:
•lowlevel:shortoperating time,
•highlevel:long operating time.
“H”display,residual heat indicator,blinking
The electronic temperature is too high. Atechnician should verify the
fittingincompliancewiththe recommendations.
09 GB
Page 12

1. RECOMMANDATIONS GÉNÉRALES
Merci d'avoir choisi l'un de nos produits. Pour obtenir les meilleurs
résultats de votre cuisinière, nous vous recommandons ce qui suit:
•Lisez soigneusement les notes de ce manuel. Elles contiennent des
instructions importantes sur la manière d'installer, d'utiliser et
d'entretenir cettecuisinièreentoutesécurité.
•Conservez cemoded'emploidansunendroitsûrpourpouvoirvousy
référerplustard.
•En cas de vente ou de cession de l'appareil, il convient de donner
également ce manuel avec l'appareil, de manière à assurer la
transmission des informations d'installation et d'utilisation de
l'appareil,ainsiquelesrecommandations àsonsujet.
•Toutes les parties accessibles de l'appareil sont brûlantes lorsque la
cuisinière est en fonctionnement, veillez à ne pas toucher ces
éléments. La première mise en route de l'appareil peut produire des
fumées âcres; elles ne présentent aucun danger. Nous
recommandons de faire fonctionner la cuisinière à vide pendant deux
heureslorsde sapremièremiseenroute.
1.1. SYMBOLES UTILISÉS DANS CE MODE
D'EMPLOI
Les symboles ci-dessous sont utilisés dans ce manuel en vue de le
rendrebienclair.
Information relative àla sécurité
Information relative àla protectiondel'environnement
Cet appareilestconformeauxdirectives EUE.E.C.
1.2. DÉCLARATION DE CONFORMITÉ
Toutes les parties de cet appareil susceptibles d'être en contact avec
des aliments sont conformes aux stipulations de la directive CEE
89/109. Cet appareil est conforme aux directives CEE 73/23, CEE
89/336 et CEE 90/396, remplacées par les directives CE 2006, CE
2004/108 et CE 2003/55 et leurs amendements subséquents. Cet
appareil est également conforme aux directives générales 93/68 et
leursamendementssubséquents.
pasdematériauxinflammables.
•Il est dangereux de modifier ou d'essayer de modifier les
caractéristiquesdel'appareil.
•Une attention particulière s'impose lorsque vous faites frire des
aliments :ne laissezpasl'appareilsanssurveillance.
•L'appareil estlourd.Prenez gardelorsquevousledéplacez.
•L'émission d'air chaud est normale lorsque l'appareil est en
fonctionnement.N'obturezpasles orifices dufour.
•Lorsque vous placez de la nourriture sur ou dans l'appareil, ou que
vous retirez delanourriturecontenantbeaucoup degraisseoud'eau,
il peut se produire des éclaboussures sur l'appareil. Nettoyez
immédiatement ces éclaboussures dès que vous avez terminé de
cuire, en vue d'éviter des odeurs déplaisantes ou des incendies
possibles.
•L'usage de tout appareil électrique implique quelques règles de
base:
-Il n'est pas conseillé d'utiliser des adaptateurs, des prises multiples
pourplusieursfiches,nides rallongesélectriques.
-Pour enlever la fiche électrique de la prise, ne tirez pas sur le fil
électrique.
-Ne touchez pas le four avec des mains ou des pieds mouillés ou
humides.
-Si le câble principal est endommagé, il convient de le remplacer au
plustôt.
-Lorsque vous voulez faire replacer un nouveau câble, suivez les
instructions ci-dessous:
-Le remplacement du câble ne peut être effectué que par des
techniciens qualifiés. Pourdesréparations, faitesappeluniquement à
unservicede réparation agréé etassurez-vous queseulesdes pièces
d'origine sontutilisées.
-En cas de nécessité, enlevez le câble d'alimentation et remplacez-le
par un autre câble de type H05RR-F, H05VVF, ou H05V2V2-F. Ces
types de câbles sont adéquats pour la puissance électrique exigée
parl'appareil.
•Nelaissezpas l'appareil sanssurveillanceavantqu'il n'aitrefroidi.
Sans respect des instructions ci-dessus, le fabricant ne
peut garantir la sécurité de la cuisinière.
1.3. CONSEILS DE SÉCURITÉ
•La cuisinière nepeutêtreutilisée que cepourquoiellea été conçue :
elle ne peut servir qu'à cuire des aliments. Toute autre usage, par
exemple enguisedechauffage, estincorrectet doncdangereux.
•Le fabricant ne pourra en aucune façon être tenu responsable
d'aucun dommage résultant d'une utilisation impropre, incorrecte ou
déraisonnable.
•L'usage de tout appareil électrique implique quelques règles de
base. Si l'appareil tombe en panne ou présente un défaut,
déconnectez-le de la prise de courant, n'y touchez pas et appelez le
serviceagréé.
•Cet appareil n'est pas prévu pour être employé pardespersonnes (y
compris des enfants) ayant des capacités physiques, sensorielles ou
mentales réduites, ou qui manquent d'expérience et de
connaissances, sauf si elles ont reçu des instructions sur l'utilisation
de l'appareil ou l'emploient sous la surveillance de personnes
responsables deleursécurité.
•Les enfants doivent être surveillés pour garantir qu'ils ne jouent pas
avecl'appareil.
•Unfourestpar nature trèschaud.Spécialement lavitrede la portedu
four.Ne permettez pas à des enfants d'aller trop près du four lorsqu'il
estbrûlant,et spécialement lorsquelegrill fonctionne.
•Utiliseztoujoursdesgants pourretirerdes aliments dufour.
•Assurez toujours la propreté de l'appareil, pour des raisons de
sécurité et desanté.Lesgraisses et lesrésidusdenourriture peuvent
provoquer desincendies.
•Ne placez pas vos doigts entre les charnières de la porte du four.
Écartezlesenfants.
•Assurez-vous que tous les boutons sont en position OFF lorsque
vousn'employezpasl'appareil.
•Le tiroir du four est destiné à ranger des plateaux vides ou à garder
desalimentsau chaud.
•Ne placez pas dans le tiroir des matières inflammables, explosives
ou des produits de nettoyage, comme des sachets plastiques, du
papieroudes vêtements.
•N'employez que des casseroles résistant à la chaleur. N'employez
1.4. QUELQUES CONSEILS UTILES
•N'employez pasdecasserolesdéforméesoudéséquilibrées.
•Avantemploi,nettoyezle grilletleplateaurecueillant lesgraisses.
•Si vous employez des aérosols pour le nettoyage, n'en projetez pas
surlesplaqueschauffantesnisur lethermostat.
•Assurez-vous quelesétagèresdufour sontcorrectement placées.
•Necouvrezaucunepartiedu fouravecde lafeuilled'aluminium.
1.5. DONNÉES TECHNIQUES
PUISSANCE
CARACTÉRISTIQUES
60x60 4 zones de cuisson vitroceramique
et four électrique
Plaque signalétique (située à l'arrière de la cuisinière)
ÉLECTRIQUE
TOTALE
8.4 kW
10 FR
Page 13

2. INSTALLATION
L'installation doit être effectuée pardupersonnel qualifié. Lefabricant
n'a aucune obligation d'effectuer l'installation. Dans le cas où
l'assistance du fabricant serait requise pour remédier à des défauts
résultant d'une installation incorrecte, cette assistance ne sera pas
couverte parlagarantie.
Il convient de respecter les instructions d'installation destinées à du
personnel qualifié. Une installation incorrecte peut provoquer des
dommages ou infliger desblessures auxpersonnes,auxanimaux,ou
à des objets. Le fabricant ne pourra en aucun cas être tenu
responsable detelsdommagesoublessures.
AVERTISSEMENT !
l'appareil sera placé. Il ne peut être installé que dans une pièce
ventilée enpermanence.Lesconnexionsélectriquesdoiventtoujours
êtredébranchéesavanttoute réparation, installationoumodification.
•Avant de placer votre appareil, vérifiez les caractéristiques de votre
système électriqueetassurez-vousquel'appareilyest conforme.
•L'appareil ne peut pas être placé à proximité de matériaux
inflammables (parexempledesmeubles, desrideauxetc.).
Il convient de faire attention à l'endroit où
2.1. PLACEMENT
20 mm 20 mm
2.3. DIMENSIONS DE L'APPAREIL
60 x 60
Hauteur (mm)
Largeur (mm)
Profondeur (mm)
850
598
600
P
L
2.4. APPARENCE GÉNÉRALE ET DÉFINITION
DE L'APPAREIL
Ce mode d'emploi a été rédigé pour s'appliquer à différents modèles.
Certaines des caractéristiques mentionnées dans ce mode d'emploi,
peuvent doncnepasêtre d'application pourvotreappareil.
H
Cet appareil standard aétépositionnédansl'hypothèse que lesplans
de travail adjacents à la cuisinière ne soient pas à une hauteur
supérieure àcelledesplaques decuisson.
.L’appareilestdeClasse2 1
2.2. AJUSTEMENT DES PIEDS
A A1 A2
4
3
2
1
CB
CUISINIÈRE60 X 60
1-
Zone de cuisson supérieure
2-
Panneau de contrôle
3-
Tiroir de rangement
4-
Porte du four (porte avant)
5-
Zone de cuisson 1200 W
6-
Double zone de cuisson 1700 W
7-
Zone de cuisson 2300 W
8-
T
émoins lumineux
9-
Manettes de contrôle des zones de cuisson
10-
Manette du four
11-
Manette du thermostat
12-
Programmateur électronique
13-
Roulettes
14-
Pieds réglables
2
10
11
vitrocéramique
vitrocéramique
vitrocéramique
6
7
5
8
vitrocéramique
5
1
12
9
•La cuisinière est dotée de pieds réglables aux
anglesduchâssis.
•La hauteur maximale du four est de 868 mm en fixant les pieds
réglables àl’avantetlesrouesàl’arrière au4ème trou
•Les pieds doivent êtreréglésl'unaprèsl'autreàl'aided'uneclefpour
que l'appareil soit positionné de telle manière à ce qu'il soit
parfaitement stable et que les plats posés sur les plaques soient
parfaitement équilibrés.
•Les roues arrières doivent être fixées au 2ème trou (photo A1) pour
atteindre lataillestandardde 850mm
2 et de 2 roulettes
.
.
11 FR
13
14
3
4
Page 14

2.5. CUISINIÈRES SANS CÂBLE ÉLECTRIQUE
2.6. CONNEXION ÉLECTRIQUE
Types de connexions de la boîte électrique
1- Connexionmonophasée 2- Connexiontriphasée
Attention: Un serrage insuffisant peut entraîner des risques de
surchauffedangereuseauniveaudel'insertiondu câble.
Les cuisinières peuvent être présentées avec ou sans câble
d'alimentation électrique. La connexion du câble doit être effectuée
parunservice agrééconformémentauxinstructionssuivantes.
La connexion électrique doit être effectuée conformément aux
normes et règlements en vigueur. Avant d'effectuer la connexion
électrique, vérifiezcequi suit:
•La puissance de l'alimentation électrique et des fusibles dans
l'immeuble est-elle suffisante pour supporter la puissance de
l'appareil? (vérifiezsurl'étiquetted'informationadhésive)
•Le circuit électrique d'alimentation dispose-t-il d'une mise à la terre
conforme aux normes en vigueur? Vous devez avoir dans votre
habitation une mise à la terre convenable. S'il n'y a pas de mise à la
terre convenable dans votre habitation, veuillez faire appel à un
technicien agréépourrésoudreceproblème.
•La prise de courant ou le disjoncteur multipolaire sont-ilsplacés à un
endroitquiseraaisémentaccessibleaprèsl'installationdel'appareil?
•Une fiche électrique conforme aux normes doit être connectée au
réseau électrique, et le câble doit être inséré dans une fiche
sécurisée.
•Undisjoncteurmultipolairedoitêtreplacéentrel'appareiletle réseau
électrique dans le cas où il y a une connexion électrique directe avec
l'appareil. (Il doit être conforme aux normes et être approprié à la
puissance).
•Le fil vert-jaune de terre ne doit pas être interrompu par un
interrupteur.Lefil dephasebrun(duconnecteur marqué «L »dufour)
doittoujoursêtreconnectéau fildephasedu réseau.
•Laligneélectriquedoitêtreplacéedefaçon ànejamais êtresoumise
àunetempératuresupérieure à50°C.
•Lorsqu'il faut remplacer le câble électrique, il faut utiliser un câble de
diamètre approprié à la puissance mentionnée. Le fil de terre vertjaunedoitavoirenviron2cm deplusenlongueur quelesfilsdephase
etleneutre.
•Aprèsavoirachevélaconnexion, vérifiezleszonesdecuissonenles
allumant pendant3minutes.
•Le fabricant n'acceptera aucune responsabilité pour des
dommages dusàun manquederespectdesnormesdesécurité.
Disjoncteur
Câble - Section
Câble - Type
Monophasé
220-240 V~
25A 3 x 16 A
3 G 2.5 mm
2
H05VV-F
H05RR-F
L1 : Shunt phase
1-2 et shunt 2-3
N : Shunt
Neutre 4-5
PE Terre
Triphasé
380-415V3N~
5 G 1.5 mm
H05VV-F
H05RR-F
1 Phase
2 Phase
3 Phase
5 Shunt
Neutre 4-5
PE Terre
2
12 FR
Page 15

3. SURFACE DE CHAUFFE VITROCÉRAMIQUE
3.1. DESCRIPTION DES ZONES DE CUISSON
Zone decuissonhighlight
Une surface métallique conductrice recouvre l'ensemble du plan de
cuisson. Elleréagiten3 secondes etconvientàune cuisson régulière,
uniforme, etmêmetrèslongue.
La surface de vitrocéramique a une trèsgrande puissance de chauffe
générée par les zones de cuisson highlight, ce qui accélère le
processus de cuisson. Les modifications à la conception du plan de
cuisson n'ont pas affecté la capacité du verre de supporter des
températures élevées,maisontaméliorélecontrôle.
Aveclafonctionnalité «coupde feu le»,on peut obteniruneréduction
du temps de cuisson allant jusque 15%, selon la méthode de cuisson
etletypede casserole employé.
Zone àhalo-highlight
Il s'agit d'une zone combinant l'halogène (1/3) et highlight (2/3). La
température de cette zone s'élève à unevitesse extrêmement rapide.
Elleconvientpoursauterde laviande,fairebouillirrapidement etcuire
de façon intensive lorsqu'une température élevée est nécessaire
pendant unepériodetrèscourte.
Zone radiante
Température égale et grande stabilité pour maintenir la température
requise. Cette zone est extrêmement précise et offre une très bonne
diffusiondela chaleur.
3.2. CONSEILS RELATIFS À LA BATTERIE DE
CUISINE ET AU PLAN DE CUISSON
Pour unecuissonefficace
Selon les dimensions des casseroles
employées et/ou de laquantitédenourriture
que l'on cuit, la zone de cuisson
vitrocéramique
extra-large fournira des
niveauxdeperformanceencoreplusélevés.
Il est essentiel d'utiliser des casseroles de
bonne qualité pour obtenir les meilleurs
résultats devotreplande cuisson.
Utilisez des casseroles suffisamment
larges pour recouvrir entièrement la surface
delazone decuisson.
La taille de la casserole ne devrait pas être inférieure à la taille de la
zone de chauffe. Si elle est légèrement supérieure, alors l'énergie
serautiliséeavecunmaximum d'efficacité.
3.3. LE CHOIX DE LA BATTERIE DE CUISINE
Voici quelques informations qui vous permettront de choisir les
casseroles quivousdonnerontlesmeilleursrésultats.
Acierinoxydable
Très recommandé. Spécialement efficace si sa base est munie d'un
revêtement sandwich. La base sandwich combine les avantages de
l'acier inoxydable (apparence, durabilité et stabilité) avec ceux de
l'aluminium ou du cuivre (conduction électrique, égalité de la
répartitiondelachaleur).
Aluminium
Nous recommandons d'utiliser de l'aluminium épais. Bonne
conductivité.
Desrésidusd'aluminiumpeuventapparaître commedesérafluressur
la surface de cuisson, mais peuvent être enlevés si on les nettoie
immédiatement. Du fait de sa basse température de fusion, de
l'aluminium finnedevraitjamaisutilisé.
Fonte
Elle peut être utilisée, mais elle n'est pas recommandée. Ses
performances sontmédiocres.Ellepeutgriffer lasurfacedecuisson.
Fonds decuivre/pots engrès
Nous recommandons d'utiliser des instruments lourds. Bonnes
performances, mais le cuivre peut laisser des résidus qui peuvent
paraître être des éraflures. Ces résidus peuvent être enlevés si on
nettoie immédiatement la surface de cuisson. Ne faites cependant
pas bouillir ces pots à sec. Du métal surchauffé peut se souder à une
surface de cuisson en verre. Du cuivre surchauffé laissera un résidu
quitacherala surface decuissondemanièrepermanente.
Assurez-vousquelabase dela casserole estbiensèche.
Lorsque vous remplissez des casseroles avecduliquideouquevous
en utilisez une qui a séjourné dans le réfrigérateur,assurez-vous que
labasedelacasseroleestbien sècheavantdela placer surlasurface
decuisson.Celaéviterade tacherleplan decuisson.
N'utilisez que des casseroles de bonne qualité ayant une base
parfaitement plateetépaisse.
Utiliser ce genre d'instruments permettra d'éviter des zones de
surchauffe auxquelles les aliments vont coller. Des casseroles en
métal épaisassurentunedistributionégalede lachaleur.
Porcelaine/émail
Bonnes performances uniquement si leur base est fine, douce et
plate.
Vitrocéramique
Pas recommandée. Performances médiocres. Elle peut griffer la
surfacedecuisson.
Pertinence descasserolesdecuisson.
Rappelez-vous que des casseroles plus larges ont des surfaces de
chauffeplusgrandes.
Ceci permettra decuiredesalimentsplusvitequ'avecdescasseroles
ayantdessurfacesdechauffe plusréduites.
Utilisez toujours des casseroles ayant une taille appropriée à la
quantité d'aliments à cuire. Pour éviter des éclaboussures, n'utilisez
pas depetitspoêlons,surtoutavecdesalimentscontenant beaucoup
de liquide. Si vous employez des casseroles trop grandes pour des
aliments qui cuisent rapidement, les saucisses et les liquides vont
coller et des résidus resteront collés à la casserole après que vous
l'ayezvidée.
Pourlesdesserts, ilest recommandé d'employer des casserolesavec
couvercle, et des plateaux ou moules de cuisson. Si du sucre ou des
jus cuits dans une casserole ouverte éclaboussent la surface de
cuisson, ils peuvent coller et ils seront difficiles à enlever. Ceci est
spécialement important pour des casseroles utilisées pour rôtir ou
pourdescasserolesàpression quicuisentà hautetempérature.
Nelaissez passanssurveillance les zones decuissons'iln'yapas de
casseroledessus,ouune casserolevide.
Vérifiezquelescasserolesrépondentbienaux critères suivants:
Ellesdoiventêtrelourdes.
Elles doivent couvrirentièrement lasurfacechauffante;elles peuvent
êtreunplus large,maispas pluspetites.
Leur surface de base doit être absolument plate et bien s'adapter à la
surfacedecuisson.
•Si la distribution de chaleur n'est pas égale en dessous de la
casserole, alors certaines parties des aliments pourraient être
chauffées alors que d'autres restent froides. Dans le cas de
casseroles ayant une base fine, il est donc nécessaire de remuer
continuellement ce que l'on cuit dans la casserole. La chaleur est
mieux répartie, avec une meilleure efficience, dans les casseroles à
fondépais.
•Nous ne recommandons d'utiliser des casseroles très petites. Des
casseroles plus larges et peu profondes sont plus efficaces et plus
rapidespourlacuissonquedes casseroles petitesetprofondes.
•Vous ne raccourcirez pas le temps de cuisson en utilisant une petite
casserole sur une zone de cuisson large. Cela vous fera uniquement
gaspiller de l'énergie. Cependant, une casserole avec couvercle
économise l'énergie.
3.4. BOUTON DE CONTRÔLE DU PLAN DE
CUISSON VITROCÉRAMIQUE
COMMENT UTILISER LE PLAN DE
CUISSON
Localisez le symbole correspondant à la
zone decuissondontvous avezbesoin.
Tournez le bouton de contrôle jusqu'à la
position decuisson requise.
Nous recommandons de positionner au
début le bouton à son maximum jusqu'à ce
que le contenu de la casserole ait atteint la
température requise ; la température peut
alors être réduite jusqu'à la position de
cuissonrequise.
L'ampoule témoin de chaleur résiduelle s'allume lorsque la
température duplande cuissonatteintou dépasse60°C.
Elle restera allumée même si les zones de cuissons sont éteintes, et
ellenes'éteindraquelorsque leplandecuissonse serarefroidi.
Positions
1-2
1
3-4
2
5-6
3
7-8
4
9-10
5
6
11-12
Très basse
Basse
Modérée
Moyenne
Élevée
Très élevée
Pour conserver unplat au chaud, fairefondredubeurre ouduchocolat
Cuisson lente, sauces,ragoûts, riz aulait, œufs pochés ...
Haricots, aliments congelés, fruits,eau bouillante...
Pommes au four,légumes frais, pâtes, crêpes, poisson…
Cuisson élevée, omelettes,steaks...
Steaks, côtelettes, friture...
Quelques conseils
13 FR
12
11
10
9
Electrique
7
1
2
3
4
58
6
Page 16

4. UTILISATION DU FOUR
4.1. GRIL
•Griller donne rapidement aux aliments une belle couleur brune. Le
gril dispose de plusieurs positions, que vous utiliserez selon la
quantité d'aliments à griller.Quasiment touslesaliments peuvent être
grillés,àl'exceptiondugibier trèsmaigreet desrouladesde viande.
•Les viandes et poissons à griller doivent d'abord être légèrement
huilés.
•Lorsque vous utilisez le gril, placez en-dessous un plateau pour
recueillir la graisse. Mettez un peu d'eau dans ce plateau pour éviter
desodeursdéplaisantesetempêcherquela graisseneprennefeu.
•Le gril se prête particulièrement à lacuisson de pièces de viande qui
ne sont pas trop épaisses, comme des steaks, des morceaux de
viande de taille différente, des oiseaux fendus en deux, du poisson,
certains légumes (par exemple des courgettes, des aubergines, des
tomates) ainsiquedelaviande etdupoisson surbroche.
•Huilez légèrement le poisson avant de le mettre directement sous le
gril.
•Salez la viande après cuisson, et salezlepoissonsursaface interne
avantcuisson.
•La distance par rapport au gril dépendra de l'épaisseur de la viande
ou du poisson. Une bonne estimation de la distance entre les mets à
griller et le gril permettra de bien cuire le cœur de la pièce sans
toutefois enbrûlerlesbords.
•Pour éviter les odeurs déplaisantes et la fumée dégagées par les
graisses etlessauces quidégoulinent, versez 1à2 verres d'eaudans
leplateau derecueildesgraisses.
Vous pouvez également utiliser le gril pour rôtir du pain ou des
sandwiches, par exemple, ou pour cuire certains fruits (bananes,
tranches de pamplemousse oud'ananas, pommes etc.). Les fruits ne
peuvent cependantentreren contactavecleséléments chauffants.
Ne couvrez jamais les parois internes du four avec de la
feuille d'aluminium. Une accumulation de chaleur peut
endommager l'émaildufour etlesalimentsquevouscuisez
4.2. SUGGESTIONS DE CUISSON
Cuisson traditionnelle
La chaleur est générée par les éléments de chauffe inférieurs et
supérieurs. En général il est préférable de placer le plateau dans sa
position médiane. Cependant, dans lecas où la surface inférieure ou
supérieure de l'aliment doit être plus cuite, placez-le sur un des
plateaux plusbas ouplushaut.
Cuisson parconvection (avec ventilateur)
•Les aliments sont cuits pardel'airpréchauffé quiestdiffuséde façon
égaleparun ventilateursituédanslafaceinternearrièredu four.
Il est possible de cuire différents aliments à la fois sur différents
plateaux, du fait que la chaleur est diffusée partout dans le four de
façonégale.
•Ce type de four est également très utile pour dégeler des aliments
congelés. Il peut enoutreêtreemployé pourstériliser des aliments en
bocaux, préparer des sirops de fruits et déshydrater des fruits et des
champignons.
4.5. CUIRE LES POISSONS
Les petits poissons peuvent être cuits à température maximum du
début à la fin. Des poissons de taille moyenne doivent être cuits à
température maximum au début, puis il faut réduire progressivement
la température. Les poissons plus grands doivent être cuits à une
température plus bassedudébut àlafin.Vérifiezsi lepoissonestbien
cuit en en regardant la face inférieure. Pour voir si le poisson est
correctement grillé, vérifiez la couleur de sa face inférieure. Pour les
poissons grillés, la couleur doit être blanc mat uniforme. Ceci n'est
cependant paslecaspour lesaumonetla truite.
4.6. CUIRE LES VIANDES
•La quantité minimum de viande à cuire dans le four est de 1 kg.
Autrement laviandeseraittrop sèche.
Si vous aimez la viande bien cuite, employez moins de graisse. Si la
viande estunpeugrasseiln'est pas nécessaire del'huiler.Siuneface
du morceau de viande est grasse, placez cette face vers le haut. La
graisse fondante graissera suffisamment les parties qui se trouvent
en-dessous. Les viandes rouges doivent être retirées du frigidaire au
moins1heure avantlacuisson.
•Sanscela,ladifférence detempérature pourraitrendrelaviandeplus
dure. Ne mettez pas de sel avant la cuisson, spécialement lorsque
vous grillez de la viande. Le sel extrairait le sang et les sucs de la
viande,cequi empêcherait lasurfacesupérieuredela viandederôtir.
•Ne salez votre viande rôtie qu'après que se soit écoulée la moitié du
tempsdecuisson.
•Placez laviandeà rôtirdansunrécipientlarge etpeu profond.
•Desrécipientsprofondsempêchentlachaleurd'agir.
Les viandes peuvent être placées dans le four dans un récipient
résistant à lachaleur,ou directement surunegrille. Placez unplateau
en-dessous delagrillepour recueillirlesgraissesetles sauces.
Si les aliments sont cuits pendant une période courte, il vaut mieux
ajouter les sauces dès le début ; mais si les aliments cuisent pendant
longtemps, il est préférable de n'ajouter les sauces que pendant la
dernière demi-heuredecuisson.
4.7. CUISSON AU TOURNEBROCHE
•Il est équipé d’une broche, de deux fourchettes et d’un crochet
servantdesupportdebroche.
•Conseils d’utilisation:
-retirertouslesaccessoiresdufour;
-poser le plat profond sur la sole du four ou sur le niveau de gradin le
plusbas;
-embrocher lapièceàcuire, biencentréeentre lesdeuxfourchettes;
-enclencher la brochedanslecarréd'entraînement situéaufonddela
cavité du four puis placer le crochet dans l’encoche suitée à l’avant enhautdu four insiqu’autourde lapartieavantdelabroche
•Lepréchauffagen’estpasutileavecletournebroche.
•TempsdecuissonrecommandésenpositionTournebroche
a
4.3. CUIRE DES GÂTEAUX
•Àmoins d'autresuggestion, préchauffez lefourpendantaumoins10
minutes avant de l'utiliser. N'ouvrez pas la porte du four lorsque vous
cuisez des gâteaux, ils ne monteraient pas (gâteaux ou plats avec
levure, et soufflés). L'irruption d'air froid dans le four empêcherait la
préparation de monter. Vous pouvez vérifier si le gâteau est bien cuit
enlepiquantavecunetige.Lorsquevousretirezlatige, sielleest bien
sèche cela signifie que le gâteau est bien cuit. Ne pratiquez pas cette
vérification avant qu'au moins trois quarts du temps de cuisson prévu
nesesoient écoulés.
Rappelez-vousdesastucessuivantes:
•Si la surface des aliments est bien cuite comme il faut mais que le
centre ne l'est pas suffisamment, cela signifie qu'il faut cuire plus
longtemps età plusbassetempérature.
•D'autre part, silasurfacedesaliments esttropsèche,ilfaudraitcuire
pendant moinsdetempset àplushautetempérature.
4.4. CUISSON PIZZA
• Réglage du thermostat au maximum
• Temps de préchauffage 15 min (20 min si possible)
• La position du tiroir dans l'une des deux la position la plus basse
• Temps de cuisson 20 min.
Type d'aliments
Bœuf (1kg)
Agneau, mouton (1kg)
Veau, volaille (1kg)
Porc (1kg)
Pour éteindreleplande cuisson,tournezle bouton jusque“0”
•La zone de chauffe ovale consiste en deux zones de chauffe : une
zonecirculaireetune zoneovale.Tournezle bouton decontrôlede1 à
12pourréglerlazonecirculaire. Pourcontrôlerlazone ovale, tournez
simplement le bouton de contrôle jusqu'à la position 12, puis
sélectionnez unepositionde 1à12.
•La zone dechauffeconsiste en deuxzones concentriques. Le cercle
interne est activé en tournant le bouton de contrôle jusqu'à une des
positions de 1 à 12. Le cercle extérieur ne sera activé que lorsque le
bouton de contrôle sera tourné jusqu'à une puissance supérieure audelàde12.
Temps de cuisson(min)
20/30
30/40
60/70
65/75
14 FR
Page 17

4.8. UTILISATION DE LA MINUTERIE DE FIN
DE CUISSON
Il est possible de programmer la durée de
10
90
80
70
50
60
la cuisson et l’extinction automatique du
four(max.90 minutes).
À l’expiration du temps désigné, la
20
manette sera en position O, une sonnerie
retentira et le four s’arrêtera auto-
30
matiquement.
Si l’on souhaite utiliser le four sans
programmer d’arrêt automatique,
40
positionner lamanetteen position .
Le four peut être allumé seulement en
sélectionnant un temps de cuisson ou en
tournant leboutonenposition .
4.11. FOUR ELECTRIQUE
Fonction du fourPosition
Four
Température
( C)
Fonction
Température
Temps de cuisson
Arrêt
Tournebroche et gril de voute.
Eclairage du four.
Gril
Turbo gril
4.9. UTILISATION DE LA MINUTERIE
Dureé de cuisson
Pour sélectionner le temps de cuisson
tournezleboutonsurletempsdésiré.
50
10
Dès que le temps de cuisson est écoulé
une sonneriere retentit. Il ne vous reste
plusqu’àcoupermanuellementlefour.
40
20
30
4.10. UTILISATION DU PROGRAMMEUR
ÉLECTRONIQUE
FONCTION
MINUTERIE
FONCTION
MANUELLE
TEMPS DE
CUISSON
FIN DE
CUISSON
COMMENT
L'ACTIVER
•
Presser etmaintenir le
bouton
•
Presser les boutons ou
pour définir ladurée
requise
•
Relâcher tous lesboutons
••Presser le bouton
Choisir la fonction de
cuisson désirée avec le
sélecteur defonction du four
•
Presser et maintenirle
bouton TIMER
•
Presser les boutons ou
pour sélectionnerla duréede
cuisson souhaitée
•
Relâcher tousles boutons
•
Définir lafonction decuisson
avec lesélecteur defonction
du four
•Presser etmaintenir le
bouton END
•Presser lesboutons
pour définirle moment où
vous voulezque lefour
s'éteigne
•Relâcher lesboutons
•Définir lafonction de
cuisson avecle sélecteur
de fonctiondu four
COMMENT
L'ÉTEINDRE
•Lorsque ladurée prévue
s'est écoulée,un signal
sonore lesignale(cette
alarme s'arrêtera toute
seule, maisellepeut aussi
être arrêtéeen pressantle
bouton )
•Tournez lesélecteurde
fonction dufour jusqu'àla
position O
•Lorsque ladurée prévue
sera écoulée,le four
s'éteindra automatiquement
Pour arrêterla cuisson plus
tôt, mettrele sélecteur de
fonction sur0, ou bienle
temps à0:00 (TIMER et
boutons )
•Au momentprévu,lefour
s'éteindra Pouréteindre
manuellement, mettre le
sélecteur defonctiondu
four surla position O
CE QU'ELLE FAIT
••Déclenche une alarmeà la finde la durée
prévue
Pour vérifiercombiende temps ilreste,
pressez lebouton
•Permet d'utiliserlefour
•
Elle permetde définir laduréede cuisson
requise pourlarecette choisie
•
Pour vérifiercombiende temps ilreste,
pressez leboutonTIMER
•
Pour modifierla, duréeprévue, presser les
boutons TIMERet
•Elle permetde définir lafin dutemps de
cuisson
•Pour vérifierla durée prévue presserle
bouton END
•Pour modifierla duréeprévue presser les
boutons ENDet
Ventilation
Résistance de voûte et ventilation
Sole brassée
Chaleur brassée
Convection naturelle
Résistance de voûte
Résistance de sole
Manuel
Pizza
À QUOI ELLE SERT
•Permet d'utiliserle fourcomme minuterie simple(la minuterie peut êtreactivée en utilisant
le four ousans utiliserle four)
•Pour cuirevos recettes préférées
•À lafin de laduréeprévue, lefour s'éteindra automatiquement etun signal sonore
se produira.
•
Cette fonction esthabituellement utilisée avec lafonction « tempsde cuisson ».Par
exemple, sile plat doitcuire pendant45 minutes etdoitêtre prêt à12h30,
sélectionnez simplement lafonction requise, fixezletemps de cuissonà 45 minutes
et définissezlafin dutemps decuisson à 12:30.
•
La cuissoncommencera automatiquement à11h45 (12h30moins 45 minutes)etse
poursuivra jusqu'àla finde la durée decuisson prévue, lorsque lefour s'éteindra
automatiquement.
AVERTISSEMENT
•Si lafonction END defin decuisson est sélectionnée maisqu'il n'y apas de durée
de cuissonprévue,alorsla cuisson commencera immédiatementet s'arrêtera à
l'heure prévuepar lafonction END defin de cuisson
Introduire l'heure correcte
AVERTISSEMENT : la première chose à faire après avoir installé le four, ou après une coupure de courant (et
dans ce cas l'affichage clignote) est d'introduire l'heure correcte. Cela se fait comme suit :
•Presser et maintenir les boutons TIMER et END ( et )
•Définir l'heure avec les boutons
•Relâcher tous les boutons
ATTENTION : le four ne fonctionne que si on a défini la fonction « manuelle » ou« durée prévue ».
N.B. dans certains modèles, les symboles sont remplacés par les symboles et .
-
+
15 FR
Page 18

4.12. TABLES DE CUISSON
Méthodes de cuisson traditionnelle et à circulation d'air chaud; poids
En grammes
TYPE D'ALIMENT Méthode de cuisson traditionnelle
Poids TYPE D'ALIMENT
GÂTEAUX ET DESSERTS
Pâte avec œufs battus
Pâte
Petits gâteaux
Gâteau au fromage
Gâteau aux pommes
Strudel
Tarte à la confiture
Petits gâteaux
Biscuits
Gâteau à la crème
PAIN ET PIZZA
Pain blanc
1000
Pain gris
500
Sandwich
500
Pizza
250
PÂTES
Macaroni
Avec légumes
Petites pâtes
Lasagne
Méthode de
cuisson
traditionnelle
Position Du
Plateau
Tempéra-
ture (°C)
2
1
2
1
1
2
2
2
2
2
1
1
2
1
2
2
2
2
180
180
180
175
180
175
180
180
180
100
200
200
200
220
200
200
200
200
Méthode de
circulation
d'air chaud
Position Du
Plateau
2(1 3)
et
2(1 3)
et
2(1 3)
et
2
2(1 3)
et
2(1 3)
et
2(1 3)
et
2(1 3)
et
2(1 3)
et
2(1 3)
et
2
2
2(1 3)
2(1 3)etet
2(1 3)
et
(1 3)
2 et
2(1 3)
et
2
Tempéra-
ture (°C)
160
160
160
150
160
150
160
160
160
100
175
175
175
200
175
175
175
175
Durée de
cuisson
(minutes)
45 - 60
20 - 35
20 - 30
60 - 80
40 - 60
60 - 80
45 - 60
15 - 25
10 - 20
90 - 120
45 ~ 60
30 ~ 45
20 ~ 35
20 ~ 35
40 ~ 50
45 ~ 60
35 ~ 45
45 ~ 60
N O T E S
Dans le four fermé,
8 pièces par plat
Sous le gril
Niveau de gradin
4
3
2
1
VIANDES
Rôti de bœuf
1000
Rôti de porc
1200
Rôti de veau
1000
Roast-beef à l'anglaise
1500
Agneau
1200
Poulet
1000
Dinde
4000
Canard
1500
Oie
3000
Lapin
1200
POISSON
Poisson entier
1000
Filet
800
NOTE :
1) Les temps de cuisson n'incluent pas le préchauffage. Il est recommandé de préchauffer le four pendant 10 minutes environ, et spécialement pour les
gâteaux, les pizzas et les pains.
2) Indique les positions des plateaux pour cuire plusieurs plats simultanément.
3) Toutes les opérations de cuisson doivent être exécutées avec la porte du four fermée.
QUANTITÉ CUISSON AU GRILL
TYPE D'ALIMENT
Beefsteak
Côtelette grillée
Saucisse
Morceaux de poulet
Mixed gril
Desserts au lait
Tranchesde tomates
Filets de poisson
Escalopes
Toasts
Tranchesde pain
N.DE
MORCEAUX
4
4
8
6
4
4
8
4
6
4
4
2
2
2
2
2
2
2
2
2
2
2
2
POIDS
800
600
500
800
700
400
500
400
---
--—
200
2
200
2
200
2
220
2
200
2
200
2
200
2
175
2
175
2
200
2
200
2(1 3)
200
2(1 3)etet
POSITION DU
PLATEAU
4
4
4
3
4
4
4
4
4
4
4
175
175
175
200
175
175
175
160
160
175
175
175
TEMPÉRATURE
50 ~ 70
100 ~ 130
90 ~ 120
50 ~ 70
110~ 130
60 ~ 80
210 ~ 240
120 ~ 150
150 ~ 200
60 ~ 80
40 ~ 60
30 ~ 40
(°C)
max
max
max
max
max
max
max
max
max
max
max
Cuire au gril
Cuire au gril
Cuire au gril
Cuire au gril
Gigot
Complet
Complet
Complet
Complet
Parties
2 poissons
4 filets
TEMPS DE CUISSON
(Minutes)
SECTION
SUPÉRIEURE
10
12
10
30
12
13
12
8
12
8
2-3
SECTION
INFÉRIEURE
8
8
6
20
10
10
-6
--
-1
16 FR
Page 19

5. NETTOYAGE ET ENTRETIEN
Avanttoutnettoyageouentretien:
•Déconnecter lapriseélectrique
•Silefour estchaud,attendrequ'ilsesoitrefroidi.
•N'employez jamais un appareil à vapeur ou à haute pression pour
nettoyer l'appareil.
•N'utilisez jamaisderécurant, delained'acier oud'objetspointuspour
nettoyer laporteenverredufour.
•Nettoyez les surfaces émaillées avec de l'eau chaude savonneuse
ou avec des produits appropriés. N'utilisez en aucun cas de crème à
récurer qui peuvent endommager les surfaces et nuire à l'apparence
de la cuisinière. Il est très important de nettoyer le four après chaque
usage.
•Utilisez des détergents et de la laine d'acier pour les grilles d'acier
inoxydable.
•Lessurfaces deverrecommeleplandecuisson, laportedu fouretla
porte du compartiment de chauffage ne peuvent être nettoyées que
lorsqu'elles sontrefroidies.
•Tout dommage dû au manque de respect de cette règle n'est pas
couvertparla garantie.
•N'utilisez pas de crème à récurer, de tampons de laine d'acier,
d'objets pointus, de tissus rugueux ni de produits chimiques ou
détergents qui pourraient abîmer pour toujours le revêtement
catalytique.
•Il est recommandé d'utiliser des plateaux profonds pour rôtir des
aliments gras tels que des gigots etc. et de placer un plateau endessous pourrécupérer lagraisseen excès.
Nettoyage dela porte dufour
Pour nettoyer à fond la porte du four, il est recommandé de l'enlever
complètement,commeillustréplusbas.
Ouvrez complètement la porte, tournez les taquets des deux
charnières à 180°. Refermez partiellementlaportede30°. Enlevez la
porteenla soulevantlégèrement.
Pourreplacerlaporte,faiteslesmêmesopérationsensens inverse.
Avanttoutentretienduplan decuisson,laissez-lese refroidir.
Seuls des produits spécialement destinés aux surfaces de
vitrocéramique peuvent être utilisés. Ils sont disponibles en
quincaillerie.
Évitez derenverser,car toutproduittombantsurle plandecuissonva
rapidement cuire,cequi rendraplusdifficile lenettoyage.
Il est recommandé conserver loin du plan de cuisson toutes les
substances qui peuvent fondre, comme des produits en plastique, du
sucre oudes produits àbase desucre.
30 Max
N'utilisez pasuneéponge tropmouillée.
N'utilisez jamaisuncouteau ouuntournevis.
Un racloir muni d'une lame de rasoir n'endommagera pas la surface
s'ilesttenu àunanglede30°.
Ne laissez jamais un racloir muni d'une lame de rasoir à la portée
d'enfants.
N'employez jamaisdeproduitsabrasifsoude crèmeàrécurer.
L'encadrementdemétal
Pour nettoyer en toutesécurité l'encadrement de métal,lavez-leavec
del'eausavonneuse,puisrincezetséchezavecun chiffondoux.
Remplacer l'ampoule intérieure
•Déconnectez l'alimentation électrique etdévissezl'ampoule.
Remplacez-là par une ampoule identique supportant de très hautes
températures.
•N'employez jamaisdela vapeurniun vaporisateur pourlenettoyage.
0
180
ENTRETIEN
•Placez quelques gouttes du produit de nettoyage spécialisé sur la
surfaceduplandecuisson.
•Frottez les taches récalcitrantes avec un chiffon doux ou avec du
papierabsorbantlégèrementhumidifié.
•Essuyez avec un chiffon sec ou du papier de cuisine sec jusqu'à ce
quelasurface soitpropre.
S'il reste des taches tenaces
•Placez quelques gouttes de plus du produit de nettoyage spécialisé
surlasurface.
•Raclez avec un grattoir,enle tenantàunanglede30° par rapportau
plandecuisson,jusqu'àceque latacheait disparu.
•Essuyez avec un chiffon sec ou du papier absorbant sec jusqu'à ce
quelasurface soitpropre.
•Répétezl'opérationsinécessaire.
QUELQUES CONSEILS
Un nettoyage fréquent laisse une couche de protection qui est
essentielle pour éviter les griffes et l'usure. Assurez-vous que la
surface soit propre avant d'utiliser ànouveauleplandecuisson. Pour
enlever des taches laissées par de l'eau, utilisez quelques gouttes de
5.1. FOUR CATALYTIQUE AUTONETTOYANT
•Certains de nos modèles sont munis de panneaux autonettoyants
spéciaux couverts d'un revêtement microporeux. Si votre cuisinière
enestmunie, vousnedevez plusvousoccuperdenettoyer lefour.
•Lerevêtement,pourrester autonettoyant, doitêtreporeux.
•Des éclaboussements excessifs de graisse peuvent boucher les
pores et donc gêner l'auto nettoyage. La capacité d'auto nettoyage
peut être retrouvée en allumant le four vide sur la position maximum
pendant 10à 20minutes.
•Si les parois du four sont tellement tachées de graisse que le
revêtement catalytique n'est plus efficace, enlevez la graisse avec un
chiffon doux ou une éponge trempée dans de l'eau chaude. Tous les
revêtements catalytiques actuellement sur le marché ont une durée
de vie d'environ 300 heures. Ils doivent donc être remplacés après
environ300heures.
17 FR
Page 20

6. CENTRE DE MAINTENANCE ET
RÉSOLUTION DE PROBLÈMES
•Si le four ne fonctionne pas, avant d'appeler le centre de
maintenance, nousvousrecommandons cequisuit:
•Vérifiezquele fourestcorrectement connectéàlapriseélectrique.
Lefourne chauffepas
Lesboutonsdecontrôledufour sont-ilssurla bonneposition?
Laduréede cuisson esttroplongue
Avez-vous sélectionnélabonne température ?
Ilya dela fuméequisort dufour
Il est recommandable de nettoyer le four après chaque utilisation. Si
les éclaboussures de graisse projetées au cours de la cuisson des
viandes ne sont pas nettoyées, elles vont causer des odeurs
désagréables et de la fumée la prochaine fois que vous utiliserez le
four.(Voirlechapitre Nettoyage etentretien)
Lalumièredu fournes'allumepas
•L'ampoule peut être endommagée. Pour changer l'ampoule,
reportez-vous àlapage concernée.
•Après avoir vérifié ce qui précède, et si le four ne fonctionne toujours
pas correctement, prenez contact avec le service agréé pour obtenir
del'aide.Pourcefaire,munissez-vousdunom du.
Modèleetdu Numéro del'appareil(PNCou ENR).
Les zones de cuisson ne chauffent pas bien, ou seulement trop
peu
N'utilisez que des casseroles à fond plat. Si on peut voirde lalumière
entre la casserole et le plan de cuisson, la zone ne transmet pas
correctement lachaleur.
Le fond de la casserole devrait couvrir entièrement le diamètre de la
zonesélectionnée.
Lacuissonesttroplente
Vous utilisez des casseroles qui ne sont pas appropriées. N'utilisez
que des casseroles à fond plat ayant un diamètre au moins égal à
celuidela zonedecuisson.
Il y a des éraflures ou des griffes dans la surface du plan de
cuisson
Le nettoyage n'est pas fait correctement, ou vous utilisez des
casseroles dont le fond n'est pas lisse ; des particules telles que des
grains desableoude sel seglissententre leplandecuisson et lefond
des casseroles. Voyez la section « Nettoyage » de ce manuel;
assurez-vous que les fonds des casseroles soient propres avant de
les employer, et n'utilisez que des casseroles dont le fond est bien
lisse. Les griffes peuvent être évitées lorsque le nettoyage est fait
correctement.
Fréquence des opérations d'allumage/extinction des zones de
cuisson
Les cycles allumage-extinction varient selon le niveau de chaleur
nécessaire :
•Niveau bas:tempsdefonctionnement court
•Niveau haut: tempsdefonctionnement long
Affichage “H”,l'indicateur dechaleurrésiduelclignote
La température électronique est trop élevée. Un technicien doit
vérifiersiles connexions sontconformesauxinstructions.
7. PROTECTION DE L'ENVIRONNEMENT
•Après avoir installé l'appareil, vous devrez vous défaire des
matériaux d'emballage en respectant les dispositions de sécurité et
deprotectiondel'environnement.
•Avant de jeter un ancien appareil, coupez le cordon d'alimentation
pourrendrel'appareilinutilisable.
•Cet appareil est marqué conformément à la directive 2002/96 CE
relative aux déchets d'équipements électriques et électroniques
(DEEE).
•En vous débarrassant de cet appareil de façon responsable, vous
aiderez à éviter d'éventuelles conséquences négatives pour
l'environnement et la santé humaine, qui pourraient se produire si
vousnerespectezpaslesrègles enlamatière.
•Le symbole apparaissant sur l'appareil indique qu'il ne peut pas être
traitécommeundéchetménager. Ildoit au contraireêtredéposédans
un centre de collecte et de recyclage d'équipements électriques et
électroniques.
•La mise au rebut doit être effectuée conformément aux règlements
locauxsurl'enlèvementdesdéchets.
•Pour plus d'informations sur le traitement, la récupération et le
recyclage de cet appareil, veuillez prendre contact avec votre
municipalité, votre service de collecte des déchets ou le magasin où
vousavezachetécetappareil.
Marques demétal
Ne faites pas glisser des casseroles en aluminium sur le plan de
cuisson.
Voyezles recommandationsdenettoyage.
Vousemployezdesmatériauxcorrects,mais lestachespersistent.
Utilisezunelamederasoiretréférez-vous àla section«Nettoyage».
Tachessombres
Utilisezunelamederasoiretréférez-vous àla section«Nettoyage».
Surfaces clairessurleplande cuisson
Ce sont des marques faites par une casserole en aluminium ou en
cuivre, mais également des dépôts minéraux,d'eauoudenourriture ;
ils peuvent être enlevés en employant le produit de nettoyage
spécialisé.
Caramélisationouplastiquebrûlésur leplande cuisson.
Voyezla section«Nettoyage».
Le plan de cuisson ne fonctionne pas, ou certaines zones ne
fonctionnent pas
Lesconnexionsélectriquesnesontpascorrectes.
Faites vérifier que les connexions électriques suivent bien les
instructions.
Lepanneaude contrôle estbloqué
Débloquez leplan decuisson.
18 FR
Page 21

FR
Leconstructeurdéclinetouteresponsabilité concernantd'éventuellesinexactitudesimputablesà deserreursd'impression oude transcriptioncontenuedans
cettenotice.Leconstructeurseréserve ledroit demodifierles produitsen casdenécessité,mêmedans l'intérêtdel'utilisation,sanscauser depréjudicesaux
caractéristiques defonctionnementdesécurité desappareils.
GB
The manufacturer will not be responsible for any inaccuracy resulting from printing or transcript errors contained in this brochure. We reserve the right
to carry out modifications to products as required, including the interests of con sumption, without prejudice to the characteri stics relating to safety or
function.
 Loading...