

ROSIERES Cookers User Instructions


INHALT
1. Allgemeine Hinweise
1.1. Bedeutung Der Im Text Verwendeten Symbole
1.2. Konformitätserklärung
1.3. Sicherheitshinweise
1.4. Nützliche Hinweise
2. Installation
2.1. Standort Des Herdes
2.2. Einbauposition
2.3. Höhenregulierung Der Füsse
2.4. Elektrischer Anschluss
2.5. Herde Mit Anschlusskabel
2.6. Herde Ohne Anschlusskabel
2.7. Gasanschluss
2.8. Abstimmung Des Herds Auf Eine Andere Gasart
2.9. Gerätemasse
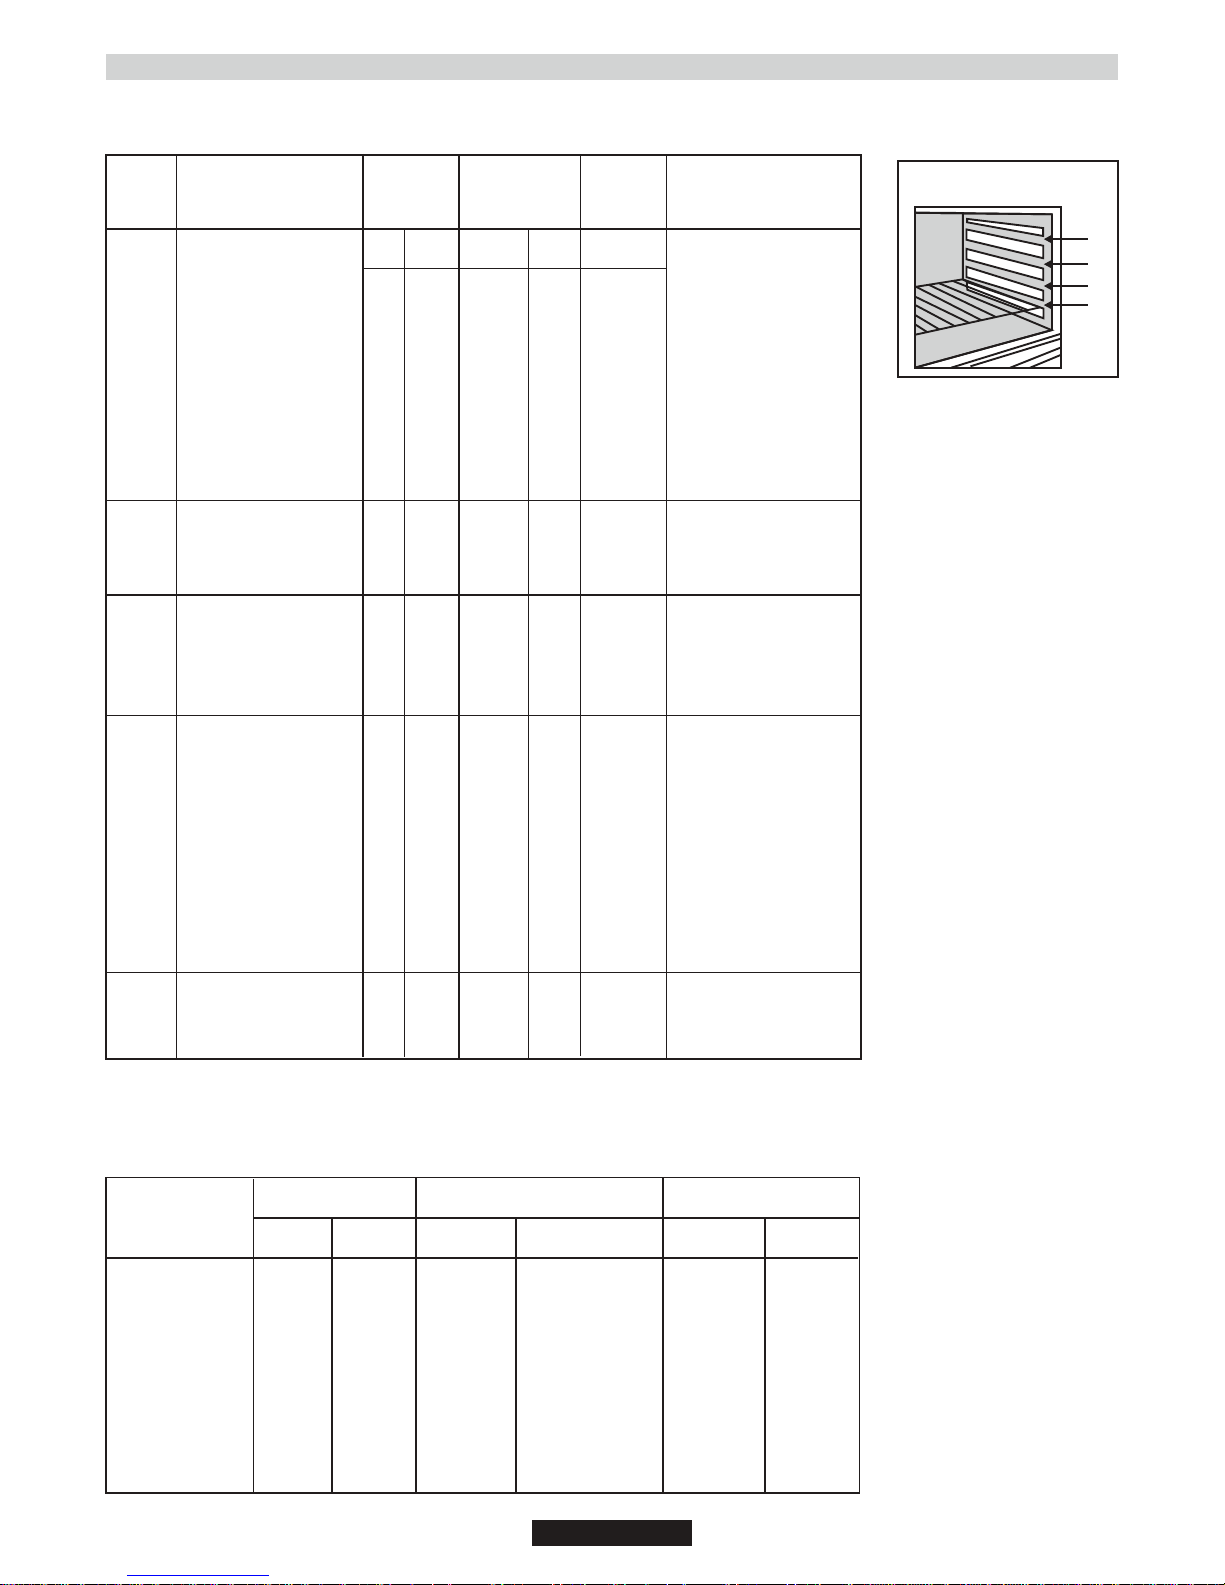
2.10. Allgemeine Beschreibung Des Geräts
3. Bedienung Der Kochstellenbrenner
3.1. Bedienung Der Kochstellenbrenner Des Kochfelds
3.2. Bedienung Der Elektrischen Kochstellen Des Kochfelds
4. Bedienung Des Backofens
4.1. Grill
4.2. Electric Oven
4.3. Bedienung Des Backofens - Tipps
4.4. Zubereitung Von Pizza
4.5. Kuchen Und Gebäck
4.6. Fleisch
4.7. Fisch
4.8. Drehspieß
4.9. Minutenzähler
4.10. Benutzung Des Timers Für Backzeitende
4.11. Gasbackofen
4.12. Bedienung Des Elektronischen Programmierers
4.13. Tabelle Backen, Überbacken, Braten, Grillen
5. Reinigung Und Pflege
5.1. Backofen Mit Katalytischer Reinigungshilfe
6. Kundendienst Und Abhilfe Bei Störungen
7. Umweltgerechte Entsorgung
DE
........................................................................................37
..............................................37
.....................................................................................37
........................................................................................37
..........................................................................................37
........................................................................................................38
.......................................................................................38
................................................................................................38
..........................................................................38
....................................................................................39
...............................................................................39
...........................................................................39
..................................................................................................40
...........................................40
..................................................................................................41
..........................................................41
...............................................................41
........................................41
................................42
..............................................................................43
..................................................................................................................43
...................................................................................................43
..................................................................44
....................................................................................44
.......................................................................................44
.............................................................................................................44
................................................................................................................44
.......................................................................................................45
..................................................................................................45
.....................................................45
.................................................................................................45
..........................................45
...............................................46
.....................................................................................47
....................................................47
....................................................47
..........................................................................47
CONTENTS
1. General Warnings
1.1. Symbols Used In This User Manual
1.2. Declaration Of Compliance
1.3. Safety Hints
1.4. Useful Tips
2. Installation
2.1. Environment The Appliance Should Be Placed
2.2. Positioning
2.3. Feet Adjustment
2.4. Electrical Connection
2.5. Cookers With Energy Cable
2.6. Cookers Without Energy Cable
2.7. Gas Connection
2.8. Conversion For Different Gas Types
2.9. Dimensions Of The Appliance
.10.2 General Appearance And Definition Of The Appliance
3. BurnersUse Of Cooktop
3.1. Gas BurnersUse Of Cooktop
3.2. Use Of Cooktop Electrical Plates
4. Use Of The Oven
4.1. Grilling
4.2. Electric Oven
4.3. Electric Oven Suggestions For Cooking
4.4. Cooking Pizza
4.5. Cooking Cakes
4.6. Cooking Meats
4.7. Cooking Fish
4.8. Cooking Turn Spit
4.9. Using The Minute Timer
4.10. Using The End Of Cooking Timer
4.11. Gas Oven
4.12. Use Of The Electronic Programmer
4.13. Cooking Tables
5. Cleaning And Maintenance
5.1. Catalytic Self - Cleaning Oven
6. Service Centre & Troubleshooting
7. Protection Of The Environment
GB
............................................................................................03
...............................................................03
.............................................................................03
....................................................................................................03
.....................................................................................................03
........................................................................................................04
..............................................04
......................................................................................................04
.............................................................................................04
.....................................................................................05
..........................................................................05
......................................................................05
..............................................................................................06
...............................................................06
........................................................................07
................................07
................................................................................07
.........................................................................07
....................................................................08
.............................................................................................09
............................................................................................................09
.................................................................................................09
.........................................................10
.................................................................................................10
................................................................................................10
................................................................................................10
...................................................................................................10
...........................................................................................11
..................................................................................11
.................................................................11
......................................................................................................11
..............................................................11
.............................................................................................12
.............................................................................13
........................................................................13
.................................................................13
.....................................................................13
CONTENUTO
1. Avvertenze Generali
1.1. Simboli Usati In Questo Manuale
1.2. Dichiarazione Di Conformità
1.3. Suggerimenti Per La Sicurezza
1.4. Suggerimenti Utili
2. Installazione
2.1. L'ambiente In Cui Installare L'elettrodomestico
2.2. Posizionamento
2.3. Regolazione Dei Piedini
2.4. Collegamento Elettrico
2.5. Cucine Con Cavo Di Corrente
2.6. Cucine Senza Cavo Di Corrente
2.7. Collegamento Al Gas
2.8. Conversione Per Tipi Di Gas Diversi
2.9. Dimensioni Dell'elettrodomestico
2.10. Aspetto Generale E Definizioni Dell'elettrodomestico
3. Utilizzo Dei Bruciatori Del Piano Di Cottura
3.1. Utilizzo Dei Bruciatori A Gas Del Piano Di Cottura
3.2. Utilizzo Di Piastre Elettriche Del Piano Di Cottura
4. Uso Del Forno
4.1. Grill
4.2. Forno Elettrico
4.3. Suggerimenti Di Cottura Per Il Forno Elettrico
4.4. Funzione Pizza
4.5. Preparazione Di Torte
4.6. Cottura Della Carne
4.7. Cottura Del Pesce
4.8. Girarrosto
4.9. Uso Del Contaminuti
4.10. Uso Del Temporizzatore
4.11. Forno A Gas
4.12. Utilizzo Del Programmatore Elettronico
4.13. Tabelle Di Cottura
5. Pulizia E Manutenzione
5.1. Forno Catalitico Autopulente
6. Centri Assistenza E Risoluzione Dei Problemi
7. Protezione Dell'ambiente
IT
......................................................................................... 41
1................................................................... 4
1............................................................................ 4
1...................................................................... 4
1........................................................................................... 4
......................................................................................................15
..............................................15
...............................................................................................15
..................................................................................15
...................................................................................16
........................................................................16
.....................................................................16
......................................................................................17
...............................................................17
....................................................................18
...................................18
..................................................18
.........................................18
..........................................19
..................................................................................................20
..................................................................................................................20
................................................................................................20
................................................21
...............................................................................................21
.....................................................................................21
........................................................................................21
...........................................................................................21
........................................................................................................22
.......................................................................................22
................................................................................22
..................................................................................................22
........................................................22
.........................................................................................23
...................................................................................24
...........................................................................24
.............................................24
................................................................................24
SOMMAIRE
1. Recommandations
1.1. Symboles Utilisés Dans La Notice
1.2. Déclaration De Conformité
1.3. Consignes De Sécurite
1.4. Conseils Utiles
2. Installation
2.1. Environnement Dans Lequel L'appareil Doit Être Installé
2.2. Positionnement
2.3. Réglage Des Pieds
2.4. Raccordement Electrique
2.5. Cuisinière Livrée Avec Cordon D'alimentation
2.6. Cuisiniere Livree Sans Cordon D'alimentation
2.7. Raccordement Gaz
2.8. Modification Pour Type De Gaz Différent
2.9. Dimensions De L'appareil
2.10. Aspect Général Et Definition De L'appareil
3. Utilisation Des Brûleurs
3.1. Utilisation Des Brûleurs De La Table De Cuisson
3.2. Utilisation Des Plaques Electriques Sur De La Table De Cuisson
4. Utilisation
4.1. Utilisation Du Four Grill
4.2. Four Electrique
4.3. Suggestions De Cuisson Au Four Electrique
4.4. Cuisson Pizza
4.5. Preparation De Gateaux
4.6. Cuisson De La Viande
4.7. Cuisson Du Poisson
4.8. Cuisson Au Tournebroche
4.9. Utilisation De La Minuterie
4.10. Utilisation Des Bruleurs A Gaz De La Table De Cuisson
4.11. Four A Gaz
4.12. Utilisation Du Programmateur Electronique
4.13. Tableau De Cuisson
5. Nettoyage Et Maintenance
5.1. Four Catalitique Autonettoyant
6. Centre D'assistance Technique Et Résolution Des Problèmes
7. Protection De L’environnement
FR
..........................................................................................25
.................................................................25
.............................................................................25
..................................................................................25
...............................................................................................25
.......................................................................................................26
..............................26
..............................................................................................26
........................................................................................26
..............................................................................27
...............................................27
...............................................27
........................................................................................28
.......................................................28
..............................................................................29
...................................................29
.................................................................................30
..........................................30
.................30
.........................................................................................................31
..................................................................................31
...............................................................................................31
.................................................32
................................................................................................32
................................................................................32
....................................................................................32
.......................................................................................32
.............................................................................33
.............................................................................33
..............................33
....................................................................................................33
..................................................33
.....................................................................................34
............................................................................35
......................................................................35
..................36
....................................................................36

WARNING:The appliance and its accessibleparts become hot during use. Care should be taken to avoid
touching heating elements.
• Children under 8 Year of age must be kept away from the appliance unless they are continuously
supervised.
• This appliance can be used by children aged from 8 years and above and persons with reduced
physical, sensory or mental capabilities or lack of experience and knowledge if they have been given
supervision or instruction concerning use of the appliance in a safe way and understand the hazards
involved.
• Children must not play with the appliance.
• Cleaning and user maintenance shall not be made by children without supervision.
WARNING:Unattended cooking on a hobwith fat or oilcan be dangerousand may result infire.
NEVER try to extinguish a fire with water, but switch off the appliance and then cover flame e.g. with a lid
or a fire blanket.
WARNING:Danger of fire: do notstore items on thecooking surfaces.
• During use the appliance becomes hot. Care should be taken toavoid touchingheating elements inside
the oven.
WARNING:Accessible parts may become hot during use. Youngchildren must be kept away.
• Do not use harsh abrasive cleaners or sharp metal scrapers to clean the oven door glass since they can
scratch the surface, which may result in shattering of the glass.
• The internal bottom surface of the drawer can get hot.
• The oven must be switched offbefore removingthe guard,after cleaning,the guardmust bereplaced in
accordance with the instructions.
• Only use the temperature probe recommended for this oven.
• Do not use a steam cleaner for cleaning operations
•Any spillage shouldbe removed from thelid before opening.
• The hob surface must be allowed to cool down before closing the lid.
WARNING:Avoid possibility of electric shock - ensure the appliance is switched off before replacing the
lamp.
• If the range is placed on a base, measures must to be taken to prevent the appliance slipping off the
base.
• The means for disconnection must be incorporated in the fixed wiring in accordance with the wiring
rules.
• The instructionsstate the type of cord tobe used, taking into account thetemperature of the rear surface
of the appliance.
• If the supply cord is damaged, it must be replaced by a special cord or assembly available from the
manufacturer or its service agent.
CAUTION: In order to avoid a hazard due to inadvertent resetting of the thermal cutout, this appliance
must not be supplied through an external switching device, such as a timer, or connected to a circuit that
is regularly switched on and off by the utility.
• This appliance must be installed in accordance with the regulations in force and only used in a well
ventilated space. Read the instructions before installing or using this appliance.
• These instructions are only valid if the country symbol appears on the appliance. If the symbol does not
appear on the appliance, it is necessary to refer to the technical instructions which will provide the
necessary instructions concerning modification of the appliance to the conditions of use of the country".
• Prior to installation,ensure that the local distributionconditions (nature of the gasand gas pressure) and
the adjustment of the appliance are compatible.
• The adjustment conditions for this appliance are stated on the label (or data plate).
• This appliance is not connected to a combustion products evacuation device. It shall be installed and
connected in accordance with current installation regulations. Particular attention shall be given to the
relevant requirements regarding ventilation.
• The use of a gas cooking appliance results in the production of heat and moisture in the room in which it
is installed. Ensure that the kitchen is well ventilated: keep natural ventilation holes open or install a
mechanical ventilation device (mechanical extractor hood). Prolonged intensive use of the appliance
may call for additional ventilation, for example opening of a window, or more effective ventilation, for
example increasing the level of mechanical ventilation where present.
CAUTION:Accessible parts maybe hot when the grillis in use.Young children must be kept away".
SAFETY INSTRUCTIONS
04 GB
05 GB
1. GENERAL WARNINGS
Thank you for choosing one of our products. To get the most out of
your cooker werecommendthat you:
•Read the notes in this manual carefully: they contain important
instructions on howtoinstall, use and servicethiscooker in safety
Keep this bookletina safe place foreasy, futurereference.
•In the case of the sale or transferof the appliance,this manual should
be given together with the appliance in order to guarantee the proper
transfer of the information on installation/usage of the appliance and
the relative warnings.
•Take care to not touch these elements. When the cooker is first
switched on it may give off acrid smelling fumes this smoke isharmless we suggest tooperatethe cookers for 2hourswhile empty.
These instructionsare only valid if the country symbol appears onthe
appliance. If the symbol does not appear on the appliance, it is
necessary to refer to the technical instructions which will provide the
necessary instructions concerningmodification of theappliance to the
conditions of useofthe country.
1.1. SYMBOLS USED IN THIS USER MANUAL
For easier comprehension, the symbols below are used in this user
manual.
Safety Information
Information for EnvironmentProtection
This appliance complieswiththe EU E.E.C directives.
1.2. DECLARATION OF COMPLIANCE
All parts of this appliance that may come into contact with foodstuffs
comply with the provisions of EEC Directive 89/109. The appliance
complies with European Directives 73/23/EEC, 89/336/EEC and
90/396/EEC, replaced by 2006/EC, 2004/108/EC and 2003/55/EC,
and subsequent amendments. The appliance also complies with
93/68 General Directivesandsubsequent amendments.
1.3. SAFETY HINTS
•The cooker must be used only for the purpose for which it was
designed: it must only beused for cooking food. Any otheruse, e.g. as
a form of heating, is improper use of the cooker and is therefore
dangerous.
•The manufacturers cannot be held responsible for any damage
caused by improper, incorrectorunreasonable use.
•When using any electrical appliance you must follow a few basic
rules. If the appliance breaks down or develops a fault switch it off,
disconnect it frommains,do not touch it,callthe authorised Service.
•Children less than 8 years of age shall be kept away unless
continuously supervised.
•This appliancecan be used by children aged from 8 years and above
and persons with reduced physical, sensory or mental capabilities or
lack of experienceand knowledge ifthey have beengiven supervision
or instruction concerning use of the appliance in a safe way and
understand the hazardsinvolved.
•Always use glovestoremove food from theoven.
•Always keep your appliance clean,for safety and health reasons.Fat
and food residuesmaycause fire.
•Any spillage shouldberemoved from the lidbeforeopening.
•The hob surface should be allowed to cool down before closing the
lid.
•Do not insert your handbetween oven andthe upper lidhinges. Keep
children away.
CAUTION: Accessible partsmay be hot when the grill is in use.Young
children should bekeptaway.
•Make sure that all the knobs are in the OFF position when the
appliance is notinuse.
•The oven draweristo store empty traysorto keep food warm.
•Do not put flammable, explosive or cleaning materials like nylon
bags, paper, cloths, etc, intothedrawer.
•Use only heatresistantpots and pans .Donot use flammable
materials.
•It is dangeroustomodify or to attempttomodify the properties of
the appliance.
•Particular attention isnecessarywhen you arefrying:do not leave the
appliance unattended.
•The appliance isheavy. Take care whenmoving.
NEVER try to extinguish a fire with water, but switch off the appliance
and then coverflamee.g. with a lidora fire blanket.
WARNING: Danger offire:do not store itemsonthe cooking surfaces.
• The emission of hot air is normal while the appliance is working. Do
not close theventson the oven.
•Some spillage on the appliance may occur, when placing food on or
into the appliance or when removing food with excess fat or water.
Clean such residues immediately after cooking, in order to prevent
unpleasant smells andpossiblefires.
•Either reduce the flame or shut down the burners, before removing
pans.
• ARNINGW ! Heat and humidity are produced in the area where
appliances which burngaseous fuels areused. Special attention must
be paid for correct aeration of the environment: if natura ventilation is
inexistent orinsufficient, an extractor fan mustbe installed. If in doubt,
please apply toa Service for advice.GIAS
•When using any electrical appliance you must follow a few basic
rules:
*It is not generally a good idea to use adapters, multiple sockets for
several plugs andcableextension.
*Do not pullthepower cable to removetheplug from the socket.
*Do not touchtheoven with wet ordamphands or feet.
*If the maincableis damaged it mustbereplaced promptly:
*When replacing thecable,follow the instructions givenbelow:
*Cable replacement must be carried out by qualified technicians. Use
only an approved service centre for repairs end ensure that only
original parts areused.
*When necessary, remove the power cable and replace it with one of
the H05RR-F, H05VVF, and H05V2V2-F type. The cable have the
capacity for theelectricalcurrent required by theproduct.
•Check the flexiblegasconnection pipe periodically.
•The gas inlet hose must be kept away from the hot parts of the oven
and must not come into contact with the oven. You can move the gas
inlet connector to the left or to the right of the oven. After such a
modification, check forpossiblegas leakage with asoapysolution.
•After attaching the gas pipe to the connector, anchor it firmly with a
clamp. Particular attention must be paid for gas leakage: check with a
soapy solution.
•Do not leavetheappliance unattended before ithascooled down.
If your appliance has a top lid, it is designed for either protecting the
cook top againstdust when it isnot functioning ortoprevent against oil
spillage during cooking.
•Do not usethelid for other purposes.
•ATTENTION!(For models with glasslid) The glass lidcan break ifit is
exposed an excessive heat. Always check that the burners are off
before closing thelid.
•Do not usedeformedor unbalanced pans.
•Clean the grillandthe fat collecting traycarefullybefore initial usage.
•When using cleaning sprays, do not spray on heaters or on the
thermostat.
•Make sure thatovenshelves are correctly placed.
•Light the burner before placing the pan on top for quicker ignition.
•Check the burnerfora normal flame.
•Do not coverovenparts with aluminium foil.
1.4. USEFUL TIPS
If the above instructions are not adhered to, the
manufacturer cannot guarantee the safety of the cooker.
06 GB
2. INSTALLATION
Installation have to be made by qualified personnel. The manufacturer
have noobligation to carrythis out. If the assistanceof the manufactureris
required to rectify faults arising from incorrect installation, this assistance
is not covered bytheguarantee.
The installation instructions for professionally qualified personnel must be
followed. Incorrect installation may cause harm or injury to people,
animals or belongings. The manufacturer cannot be held responsible for
such harm or injury.
WARNING! Care must be taken regarding where the appliance is placed!
It can only beinstalledina continuously ventilated room.
Electrical connections must always be disconnected before any repair,
installation or modification.
The use of a gas cooking appliance results in the production of heat and
moisture in the room in which it is installed. Ensure that the kitchen is well
ventilated: keep natural ventilation holes open or install a mechanical
ventilation device (mechanical extractor hood). Prolonged intensive use
of the appliance may call for additional ventilation, for example opening of
a window, or more effective ventilation, for example increasing the level of
mechanical ventilation where present.
•Before positioning your appliance, check the properties of the energy
supply (gas type, gas pressure) and make sure that your appliance is
regulated accordingly.
•This appliance must not be connected to the exhaust system of any
equipment running on otherfuel.
•The appliance must not be installed near flammable materials (e.g.
furniture, curtains, etc.)
•If the rangeis placed ona base, measures haveto be takentoprevent the
appliance slipping from thebase.
CAUTION: In order to avoid a hazard due to inadvertent resetting of the
thermal cutout, this appliance must not be supplied through an external
switching device, suchas a timer, or connected toa circuit thatis regularly
switched on and offby theutility.
•This grill(s) should be constructed so that it cannot be closed from
either side andpositionedpreferably near the floor. Grill(s)must not be
placed across the channels through which combustion gases and
exhausted fumes pass.
•If it is impossible to install grilled air vents in the room where the
appliance is installed, the air needed can also be supplied from an
adjacent room providing it is not a bedroom or a room where an air
current could causedanger.
2.1. ENVIRONMENT THE APPLIANCE
SHOULD BE PLACED
•The appliance must notbeplacedon a base
•There must be sufficient natural air ventilation in the room for gas
combustion for the appliancetofunctioncorrectly.
•The air flow shouldenterthroughgrilled air vents inthe outer walls.
•Air grills must have a cross section of 100 cm² for the passage of air and
for appliances with a flame safety device. For appliances with no flame
safety device, this cross section should be 200 cm². (Single or multiple
grills can be used)
Emission of Combustion Gases
•Combustion gases fromcooking appliances mustbereleased directly out
of doors or viaahoodconnected to a chimneyor flue (Figure 1)
•If it isimpossible to install a hood, anelectricextraction fan should befitted
in a wall orawindowopening out of doors(Figure 2)
•Extractor fans should have a capacity of replacing kitchen air 3- 5 times
per hour.
Figure 1 Figure 2
2.3. FEET ADJUSTMENT
2.2. POSITIONING
This appliance is of the "X" type and it has been designed on the
presumption that the adjacent work tops will be no higher than the
cook top surface.
This appliance isclass2.1
750 mm
400 mm
200 mm 200 mm
•The maximum heightofcooker will be 868mmbyfixing the adjustable
front feet andrearwheels to the 4thhole.
•Rear wheels shouldbefixed to the 2ndhole(pictureA1),standard
height. Thus, standard heightwillbe 850 mm.
Adjustable feet.
CB
4
3
2
1
A A1
A2
Your appliance hasadjustablefeet at the lowercornersof its chassis.
•The feet can be adjusted individually with the aid of a wrench to
guarantee that the oven is perfectly balanced andlevelled, so thatany
liquids in thepansis horizontal .
Adjustable feet andwheels.
2.4. ELECTRICAL CONNECTION
Cookers can be presented with or without enrgy cable. Cable
connection should be done by Autorited service according to
following instructions.
The electrical connection must be made according to the standards
and regulations in force. Before making the electrical connection,
check the following:
•Is the capacity of the electrical connections and safety fuses in the
building sufficient to cope with the load of the appliance? (Check with
the adhesive infolabel)
•Does the electricity supply line have anearth connection conforming
with the standards in force? A proper earth connection must exist in
your home. If there is not a proper earth connection at your home,
please apply toanauthorized technician to dealwiththis problem.
•Is the socket or the multi-pole switch at a easily reachable point after
the installation oftheappliance?
•A plug conforming to standards should be connected to the mains
cable and thecableshould be inserted intoasafe socket.
•A multi-pole switch must be used between the appliance and the
electricity line if a direct electrical connection to the appliance is
required. (It must comply with standards and be appropriate for the
load)
The green-yellow ground cable must not be interrupted by a switch.
The brown phase cable (from the “L" coded connector of the oven)
must always beconnectedto the phase lineofthe mains.
•The power line must be positioned so that it is not exposed to
temperatures higher than50°C.
•When the power cable mustbe changed, a cable witha cross section
appropriate to the indicated power must be used. The green-yellow
ground cable should be approximately 2 cm longer than phase and
neutral cables.
•Check the heaters by switching them on for 3 minutes, after having
completed the connection.
•The manufacturer will not accept responsibility for damages
arising due tonon-compliance withthe safety standards.
•For the directconnectionto the fixed wiring,it’snessessary to provide
means for disconnection from the supply mains having a contact
separation in all poles that provide full disconnection under
overvoltage category III conditions, in accordance with the wiring
rules
2.5. COOKERS WITH ENERGY CABLE
•Connection is exclusivelyenvisagedunder tensions of 220-240V
Between phases orbetweenphases and neutral.
Neutral
(blue)
Ground cable (Green-Yellow)
Phase cable
(brown)
•The eventual replacement of the supply cord must be carried on by
the After Sales Service or by an agreed engineer, with a cord whose
characteristics must besimilarto the original one
07 GB
Model rated
power (kW)
Rated Voltage
(V)
Rated Current
(A)
Supply Cable
2.3 kW
3.5 kW
4.0 kW
220 - 240 V
220 - 240 V
220 - 240 V
9.1 A
15.9 A
18.2 A
3 x 1.0 mm
2
3 x 1.5 mm
2
3 x 2.5 mm
2
Ratings/Supply Cable Sections:
Cable box connection types
1- Monophase connection
2- Three-phase connection
Attention: Apoor clamping can draw away risks dangerous
heating at the level of the cable feeding
2.6. COOKERS WITHOUT ENERGY CABLE
Cable - Section
Cable - Type
Monophase
220-240 V~
Two-phase
380-415V2N~
3 G 2.5 mm
2
H05VV-F
H05RR-F
L1 : Phase
shunt 1-2 and
shunt 2-3
N : Neutral
shunt 4-5
PE Earth
1 Phase
2 Phase
5 Neutral
shunt 4-5
PE Earth
4 G 1.5 mm
2
H05VV-F
H05RR-F
Three-phase
380-415V3N~
1 Phase
2 Phase
3 Phase
5 Neutral
shunt 4-5
PE Earth
5 G 1.5 mm
2
H05VV-F
H05RR-F

The gas must be connected to the appliance according to standard
and the provisionsinforce.
•When the appliance left the factory, it was regulated for the gas type
stated on the adhesive info label near the gas inlet at the back of the
appliance.
Make sure that you are using the gas stated on the label. If it is a
different type of gas, follow the instructions in the chapter on
conversion to different gas types'.
•Make sure that gas supply pressure is that given in the gas type
category table (Last 3 pages in this user manual) in order to achieve
maximum efficiency and lowest consumption. If the gas pressure is
different, a proper gas regulator should be used on the gas inlet. The
use of a gas regulator complying with the standards for LPG is
allowed.
Connection with a Solidor Flexible Metal Pipe
•The gas supply can be connected by a proper flexible stainless steel
pipe according to the safety standards in force. In this case, there will
be no further need to move the appliance. The gas inlet connector of
the appliance isGc½.
Connection with a FlexibleNon-metallic Pipe
•If the gas connection is in a position where it can be switched on and
off when required,aflexible pipe complyingwith the standards inforce
can be used.The flexiblepipe must be firmlyfixedwith a clamp.
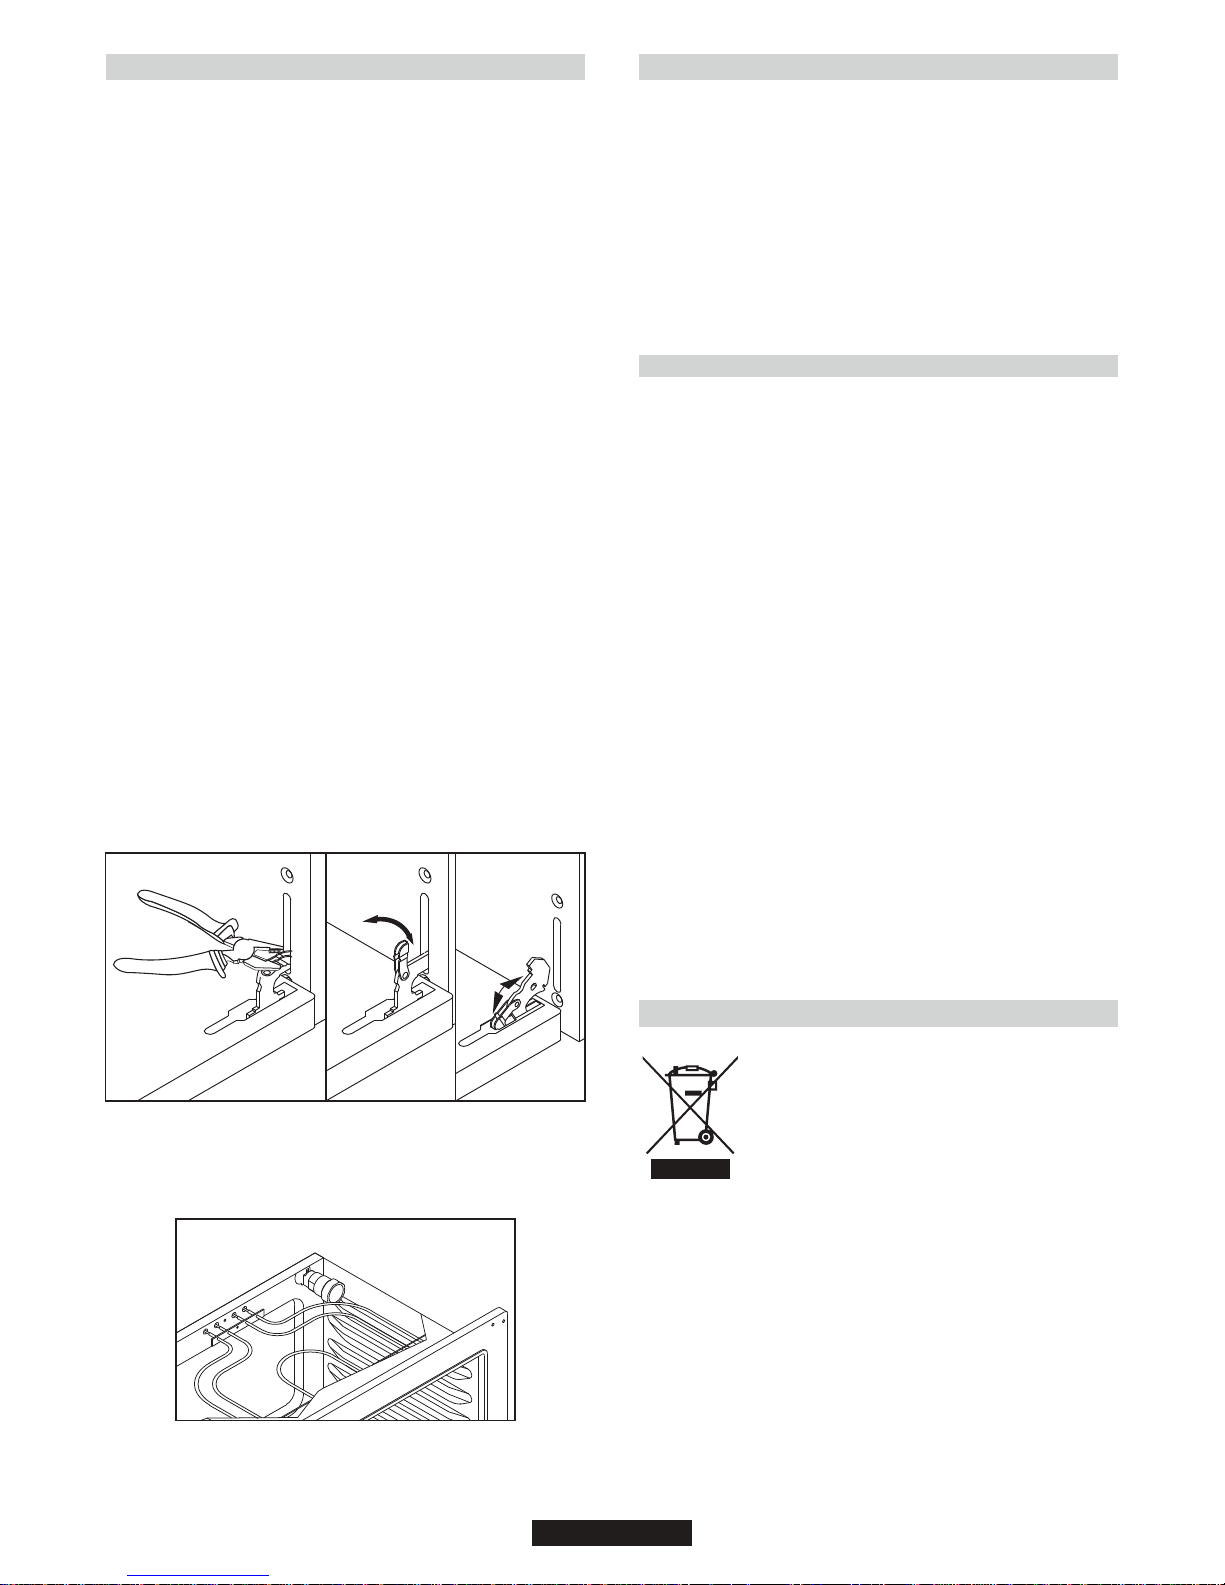
•The flexible pipecanbe connected as follows:
•Since the flexible pipe will be placed behind the oven, it should be
exposed to temperaturesnohigher than 30ºC atanypoint.
•The length shouldbeno longer than 150cm.
•It must notbeexposed to steam.
•No folding, bendingortension is allowed.
•It should beprotectedagainst sharp or piercingobjects.
•It must beaccessiblein order to allowforperiodic inspection.
•The flexible pipe must be checked as follows to guard against wear
over time:
•Check that thereare no cracks,cuts or burned spotson or atthe ends
of the pipe.
•The material must maintain its flexibility . Excessive rigidity is not
allowed.
•There must benorust on the clamps.
•It should bereplacedin any case afternomore than 5 years'usage.
Check all connections for leaks with a soapy substance
after the installation is completed. Do not use a flame
for to check gas leaks.
RIGHT
FLEXIBLE GAS PIPE LINE
ELECTRICAL CABLE
WRONG
FLEXIBLE GAS PIPE LINE
ELECTRICAL CABLE
2.7. GAS CONNECTION
For the cookers below writtenadjustment have tobe done byqualified
technician.
Follow thesteps given below to convertthe appliancefrom the factory
set up tothatfor a different gas type.
Cookers are adjusted NG and connection type
is cylindric (1). For hose type NG connection,
hose adapter (2) can be fixed to cylindrical
adapter with seal.
For LPG connection,LPGhose adapter (3)can
be fixed tocylindricadapter with seal.
Adjustments and changinginjectors
Changing Injectors
•Remove grates.
•Remove burner capsandburners.
•Remove injectorsby using a 7 mm wrench, thenscrew on the correct
injector selected from gas type category table
(last 3 pages in this user manual) according to
the gas tobeused.
•Follow the above steps in the reverse order
after completing the assembly of the new
injector.
Stand by Adjustment
S for the cookerstand by adjustment
without safety devices and with safety devices and button
ingition
•Turn the burner control knob to the small flame position and remove
the knob.
•If conversion from natural gas to LPG is required, turn clockwise the
by-pass screw of the gas valves with a screw driver to their final
position.
•If conversion from LPG to natural gas is required, turn anti-clockwise
the by-pass screw of the gas valves with a screw driver till a smaller
flame of ¼sizeis obtained.
•After completing theadjustment,insert the knobs again.
•Check the adjustment by turningthe burner control knob quicklyfrom
maximum to minimum position. If the flame does not go out, it means
that the adjustmentiscorrect.
•For safety devices,idle flame setting canbe done with screwon valve
body. If there is ignition on the knob for idle flame setting cooktop,
toplid and panelmustbe removed.
2
3
2.8. CONVERSION FOR DIFFERENT GAS TYPES
1
By-pass screw for the burner
without safety
devices
Gas Oven
•Remove rear cover(Figure3)
•Remove adapter.(Figure4)injector
•Remove injectorsby using a 7 mm wrench, thenscrew on the correct
injector selected from gas type category table (last 3 pages in this
user manual) accordingtothe gas to beused.(Figure 5)
•Follow the above steps in the reverse order after completing the
assembly of thenewinjector.
•Burner Gap is4.5+ 0.3 mm forNGand LPG (Figure 6)
Figure3 Figure4
safety devices
•For thermostat valve idle frame setting cooktop, top lid and panel
must be removed.
08 GB
4.5 + 0.3
Figure5 Figure6
09 GB
2.9. DIMENSIONS OF THE APPLIANCE
Height (mm)
Width (mm)
Depth (mm)
850
598-600
600
60 x 60
W
D
H
863
510
600
50 x 60
2.10. GENERAL APPEARANCE AND DEFINITION
OF THE APPLIANCE
This User Manual has been drawn up as a guide for several models.
Some ofthe properties mentioned in this manual may not existin your
appliance.
123456789-
10-
1112131415161718-
Cook top
C panelontrol
Drawer
Oven door (Front door)
Glass top lid or metallic top lid
burnerAuxilary
burner burnerRapid (Semi-Rapid )
burnerUltra rapid burner (Rapid )
Semi-Rapid burner
Left grate
Right grate
Burner control knobs s
Thermostat oven knob
Ignition button or fan button
Lamp knob
Timer knob
Moving Foot (Adjustable Feet)
Bolt Foo t(Adjustable Feet)
9
10
11
14
15
13
12
16
17
18
17
18
123456789-
10-
1112131415161718-
Cook top
panelControl
Drawer
Oven door (Front door)
Metallic top lid or Glass top lid
Auxilary burner
burner burnerRapid (Semi-Rapid )
burnerUltra rapid burner (Rapid )
Hot plate
Left grate
Right grate
Burner control knobs s
Hot plate control knob
Thermostat oven knob
Ignition button or fan button
Signal lamp
Moving Foot (Adjustable Feet)
Bolt Foot (Adjustable Feet)
12345678-
9101112131415-
Cook top
panelControl
Drawer
Oven door (Front door)
Metallic top lid or Glass top lid
burnerAuxilary
burnerRapid
ot plateH
ot plateH
Right grate
Burner control knobs s
Hot plate control knobs s
Thermostat oven knob
Ignition button or fan button
Signal lamp
123456789-
10-
Cook top
Control panel
Drawer
Oven door (Front door)
Metallic top lid or Glass top lid
Hot plate
Hot plate
Hot plate control knobs
Thermostat oven knob
Signal lamp
3. USE OF COOKTOP BURNERS
The knobs which control the burners are positioned on the control
panel.
3.1. GAS BURNERSUSE OF COOKTOP
Figure 7
10 GB
Off Position
When the knob is turned so that the 'dot' symbol faces towards
the panel,it isin theOff position and the gas valve is closed and
the flame willgoout.
Maximum Gas Flow
Press the burner knob and turn it to the left till the 'dot' symbol
faces towards thelargeflame symbol.
The flame isonfull at this position.
In this position,thegas valve is completelyopen.
Minimum Gas Flow
The flame can be decreasedby turning the knob sothat the 'dot'
symbol faces towards the small flame symbol. The valve will be
partially open andtheburner will then beonlow.
A - Burner Lid
- BurnerB
- ElectrodeC
- Injector ( Jet )D
E - Burner body
- Safety deviceF
A
B
C
D
E
F
Figure 8
Ignition of the Burners
Cooktop Gas Burners
The burner mustbeignited before a panisplaced over it.
For models with automatic ignition, the 'spark' button must be
pressed.
Press the knobcontrolling the burner youwant to igniteandthen turn it
left to the big flame symbol. Press the ignition button. On models with
ignition-thru knobs,press and turn the knob controlling the burner you
want to ignite as far as the star symbol; the electrode will be
automatically activated. All the electrodes will be activated
automatically and the burner to which gas is supplied (that relative to
the knob pressed)willignite.
Oven Gas Burners
The buttonmust not be kept presseddown for more than 15sec. If the
burner has not ignited after 15 sec. release the button and open the
compartment door and/or wait at least 1min. before attempting again.
For other modelsthegas is ignited bymeansof the control knobs.
Make sure that the gas is actually burning after this
step! If there is no flame, repeat the procedure
After ignition, adjusttheflame to the sizerequired.
Manual ignition (if theelectricitysupply is notavailable)
Hold a flame (a match or a lit taper or a hand-operated gas lighter),
near the burner.
WARNING!to wait 1 minutebetweentwo ignition tentative.
Press and turn the knob of the burner you want to ignite as far as the
large flame symbol.If the burner doesnot catch fireatthe first attempt,
try again pressing the knoba little longer. Whenthe burner islit, adjust
the flame totherequired level.
If the burner does not light after several attempts, check the correct
position of theburnerand its cap.
Turn the knob clockwise to the “ position in order to close the gasO”
flow. If the burner accidentally stops burning, wait at least one minute
before attempting torelightit.
Some cookers have a flame safety device (see the picture above,
safety device F). If the flame goes out, the gas supply is automatically
cut off.
Minimum and maximumdiametersofthe cooking panbases:
Burner
Auxiliary Burner
Semi Rapid Burner
Rapid Burner
Ultra rapid Burner
Min. Diameter [mm]
Ø 240 mm
180Ø mm
120Ø mm
240Ø mm
Max. Diameter [mm]
280Ø mm
240Ø mm
180Ø mm
280Ø mm
•The outersurface of the flame is hotter thanthe inner part. The tipsof
the flames must touch the bottom of the pan. Flames extending
outside the pancauseunnecessary gas consumption.
•Gas burners, unlike the electrical hot plates, do not need flat
bottomed pans. Flames touching thebase of thepan conduct theheat
completely.
•Although there is no need for special pans for gas burners, pans
made of thinner material conduct the heat faster than those in thicker
material.
•Some parts of the food may be heated while others remain cold due
to the uneven distribution of heat under the pan. Therefore,
continuous stirring of the food being cooked is necessary in the case
of thin-bottomed pans. Heat is more effectively and evenly distributed
with thick-based pans.
•Use of very small pans is not recommended. Wider, low-sided pans
are more suitable for more effective and quicker cooking than small,
deep pans.
•You cannot shorten cooking time by using a small pan over a large
burner. You will only waste gas in this way. However, a pan with a lid
will save energy.
Turn the knob to the position for the required temperature of the hot
plate. The indicator light of the hot plate will come on and the hot plate
will start toheat.
When cooking is completed, turn the knob to the position. Do not“O”
leave thehot plate turned on without a panon it.The diameter and the
base of the pan you use is critical. The m mum diameter of the panini
base is 14cmand the base shouldbeflat.
Leave the hot plate to heat up for 5 minutes before placing a pan on it
the first time you use it. This will allow the heat resistant coating of the
plate to hardendueto burning.
Use a wet cloth and detergent for cleaning the hot plates. Do not
remove food residues from the hot plates with a knife or any other
hard, sharp object.
Turn on the hot plate for a few moments to dry it after cleaning.
However,it must neverbe left onfor more than afew moments without
a pan ontop.
3.2. USE OF COOKTOP ELECTRICAL PLATES
11 GB
This is especially important for pans used for roasting or pressurized
cooking at hightemperature.
Do not leave burners unattended without a pan or with an empty pan
on top.
Check the suitability of cooking pans with respect to the following
criteria;
They should beheavy.
They should completely cover the burner surface; they may be a little
bigger but nosmaller.
Base surfaces should be completely flat and fit well on the cooking
surface.
•For the best use of the electric hotplates and to minimize energy
consumption, only pans with smooth flat bases should be used. The
size of the pan should be as close as possible to the diameter of the
hotplate, and never smaller. The base of the pan should be dry and
spillage shouldbe avoided. Empty pans mustnot be left on theplates,
and the platesshouldnot be left switchedonwithout a pan.
Figure 11
Figure 12
Suitability of Cooking Pans
Keep in mindthatlarger pans have largerheatingsurfaces.
This will help them to cook the food faster than pans with smaller
heating surfaces.
Always use pan sizes proportionate to the amount of the food to be
cooked. In order to prevent splashing, do not use very small pans,
especially for foods with excess liquid. If you use excessively large
pans for quick cooked foods, sausages and liquids will stick and
residues will remainattachedto the pan afterbeingemptied.
Closed pans and baking trays or oulds are suggested for cookingm
sweets. Splashed sugar and juices from an open pan may stick to the
cooker surface andwillbe difficult to remove.
Figure 9 Figure 10
1
2
3
5
6
Hilight
4
Explanation
Off
Heating
Cooking at low temperature
Cooking at low temperature
Cooking, Roasting, Boiling
Cooking, Roasting, Boiling
Cooking, Roasting, Boiling
Power
(Watt)
Posi iont
0
1
2
3
4
5
6
0
100 W
180 W
250 W
500 W
750 W
1000 W
0
135 W
220 W
300 W
850 W
1150 W
1500 W
0
175 W
220 W
300 W
850 W
1150 W
2000 W
Power
(Watt)
Power
(Watt)
4. USE OF THE OVEN
•Meat and fish that is going to be grilled should first be lightly doused with
oil.
•Place a fat collecting tray beneath during grilling. Put some water into the
tray to prevent unpleasantsmellsandto prevent the fatcatching fire.
•Grilling is usually preferred for cooking pieces of meat, for example
steaks, which are not toothick, differentsized meat parts, cleaved hunted
birds, fish, some vegetables (e.g. courgettes, aubergines, tomatoes, etc.)
together with meat andfishproductson spits.
Oil the fish lightlybeforeputtingit directly under thegrill.
Add salt on meataftercooking,salt fish into thecleavage before cooking.
•The distance fromthe grill willdepend on thethicknessof the meator fish.
If the distance is correctly judged, the outer parts will not be burnt and the
inside will not remainraw.
•Prevent unpleasant odours and smoke caused by dripping fats and
sauces by pouring 1-2glassofwater into the fat-collectingtray.
•You can also use the grill for toasting, toasted bread or sandwiches, for
example, and also to cook certain fruits (bananas, grapefruit or pineapple
slices, apples etc.). However, fruit must not come into contact with the
heating elements.
Never cover oven inner walls or the bottom with
aluminium foil. Accumulated heat can damage the oven
enamel and yourmeal.
While the oven functions are running, top lid of the
cooktop must beopenposition.
4.1. GRILLING
Oven Function
Position
Not in function
Grill heater
Lower and upper heating element
Lower heating element
Manual
Pizza
Upper heating element
Lamp
Grill heater and fan
Fan
Lower heating element and fan
Upper heating element and fan
Upper heating element, lower heating element and fan
Turn spit and grill heater
Function
Cooking time
Temperature
4.2. ELECTRIC OVEN
ELECTRIC GRILL: Use with closed door
ONLY
GAS GRILL: It can be used with open door
WITH panel protector inserted under control
panel, as in picture.
•Grilling gives food a rich brown colour
quickly. Depending on the quantity of the
food, you can switch the grill on to different
positions. Almost all food can be cooked
under the grill except for very lean game and
meat rolls.

•Unless otherwise suggested,preheat the oven forat least 10minutes
before use. Do not openthe oven door when cookingcakes otherwise
they will not rise (cakesor dishes with yeast andsoufflés).The blast of
cold air which will enter the oven will prevent rising. You can check
whether cakes areproperly cooked by insertinga rod intothe dough. If
the rod comes out dry when you pull it out, it means that the cake is
properly cooked. Do not check in this way until at least three quarters
of the cookingtimehas elapsed.
Please keep inmindthe following tips
•If the surface of the food is cooked well but it is still raw or partly raw
inside, it mustbecooked longer at alowertemperature.
•On the other hand, if the surface of the food is too dry, it should be
cooked at ahighertemperature for a shortertime.
4.5. COOKING CAKES
•The minimum quantity of meat to be cooked in the oven is 1 kg.
Otherwise, the meatwillbe too dry.
If yourequire welldone meat,use lessfat. Ifmeat hasa littlefat, there
is no need to use oil. If one side of the meat is fatty, place this side up.
The melted fat will sufficiently grease the part below. Red meats
should be takenoutof the fridge atleast1 hour before thecooking.
•Otherwise the meat may become tough due to the temperature
difference. Do not use salt before cooking, especially when grilling
meat. Salt will draw the blood and juices out of the meat which will
consequently prevent theroastingof the upper surfaceofthe meat.
•Add salt toroastmeat only after halfofthe cooking time haselapsed.
•Place the meattobe roasted in awide,shallow pan.
•Deep sided containers / pans act as a shield against the heat. Meat
can be placed in the oven in a heat resistant pan or directly onto the
grill. Insert a fat / gravy collecting tray beneath the grill. Sauces must
be added at the beginningif the food is cookedfor a short time, whileit
would bebetter to add sauces inthe last half hour if the foodis cooked
for a longertime.
4.6. COOKING MEATS
Small fish can be cooked at the maximum temperature from start to
finish. Medium sized fish must be cooked at the maximum
temperature at thebeginningand then the temperaturemustbe slowly
reduced. Larger fish must be cooked at lower temperatures from start
to finish.Check the cut at thebottom of fish to understandwhether it is
cooked properly. In order to understand whether the fish properly
grilled or not, check the cleavage at the bottom of the fish.The colour
(for grilled fish) should be an even matt white. This is not the case for
salmon and trout.
4.7. COOKING FISH
4.3. ELECTRIC OVEN SUGGESTIONS FOR
COOKING
Traditional Cooking
Heat is generated from the upper and lower heaters. Generally, the
middle shelf position is preferable for cooking. However, if the top or
bottom surface of the foodmust be cooked more, placeit on the upper
or lower shelf.
Convection Cooking (with Fan)
•The foodis cookedby evenlydistributed preheated air blown into the
oven by thehelpof the fan locatedonthe inside back wallofthe oven.
It is possible to cook several dishes simultaneously on different
shelves thanks totheevenly distributed heat insidetheoven.
•This type of oven is also very useful for defrosting frozen food. It can
also be used for sterilizing canned food, preparing fruit syrups, and
dehydrating fruits andmushrooms.
•Thermostat setting atmaximum
•P min minreheating time 15 (20 if possible)
•Position of thetrayin either one ofthetwo lowest position
•Cooking time 20min.
4.4. PIZZACOOKING
12 GB
The oven temperature and heater can be
selected by turning the oven adjustment
knob to thedesiredtemperature level.
The oven thermostat range is: 1402 °C.70
Some cookers have flame safety device
on burners. If the flame goes out, the gas
supply is automaticallycutoff.
4.11. GAS OVEN
•The cooker is equipped with a metal turnspit, two forks and a hook
used to supportthespit.
•Instruction for use:
-Remove all accessoriesfromthe oven;
-put the deeppanon the bottom oftheoven or on thelowestbench;
-stick the turnspitthroughthe meat, centered betweenthetwo forks;
-Fix the turnspit into the drive hole located in the bottom wall, then
hang
the support hook in the drive located at the top front of the oven cavity
and around theedgeof the turnspit
•Preheating is notnecessarywith the turnspit.
•Cooking Time Recommended in turnspitPosition
4.8. COOKING TURN SPIT
Cooking time (min)
Gas Oven
Electric oven
Beef (1kg)
Lamb sheep, (1kg)
Veal, Poultry (1kg)
Por (1 kg)k
25/35
35/45
65/75
60/70
20/30
30/40
60/70
65/75
Type of food
4.10. USING THE END OF COOKING TIMER
This control enables to set the desired
cooking time (max. 90 min.) the oven will
automatically switch off at the end of the
set time.
The timer will count down from the set
time return to the “O” position and switch
off automatically.
For normal use of oven set the timer to
the position.
To set the oven ensure the timer is not on
the “O” position.
To set the cooking time, turn dial one
complete revolution and then position
the index tothe required time.When the
time haslapsed, the signal will ring for a
few seconds.
4.9. ING THE MINUTE TIMERUS
• Press and hold the TIMER and END buttons ( and )
• Set time with buttons
• Release all buttons
ATTENTION the oven only operates if set on manual function or preset time.
N.B.: on some models the symbols are replaced by + and - .
•Sounds an alarm at the end of the
set time.
•To check how long is left to run
press the button
FUNCTION
HOW TO ACTIVE
HOW TO SWITCH IT OFF WHAT IT DOES WHAT IT IS FOR
MINUTE
MINDER
•Allows to use the oven as alarm clock (could be activated either with
operating the oven or with out operating the oven)
•Press and hold the
button
•Press the buttons
or to set the
equired time
•Release all the buttons
•For cooking the desired recipes
MANUAL
FUNCTION
•Turn the oven function
selector to position“O”
•Enables you to operate the oven.
COOKING
TIME
•At the end of the cooking set time, the oven will switch off automatically
and an audible alarm will ring.
•When the time is elapsed
the oven will switch off
automatically. Should you
wish to stop cooking earlier
either turn the function
selector to 0, or set time to
0:00(TIMER and
buttons)
•It allows to preset the cooking
time required for the recipe
chosen.
•To check how long is left to run
press the TIMER button.
•To alter/change the preset time
press TIMER and buttons
END OF
COOKING
•This function is typically used with “cooking time” function. For example
if the dish has to be cooked for 45 minutes and needs to be ready by
12:30, simply select the required function, set the cooking time to 45
minutes and the end of cooking time to 12:30.
•Cooking will start automa-tically at 11:45 (12:30 minus 45 mins) and will
continue until the preset end of cooking time, when the oven will switch
itself off automatically
WARNING!
If the END of cooking is Selected without setting the length of cooking
time, the oven will start cooking Immediately and it will Stop at the END of
cooking time set.
•At the time set, the oven
will switch off. To switch off
manually, turn the oven
function selector to position
“O”.
•Enables you to set the end of
cooking time
•To check the preset time press
the END button
•To modify the preset time press
buttons END+
•Press and hold the
TIMER button
•Press the buttons
or to set the lenght
of cooking required
•Release all buttons
•Set the cooking
function with the oven
function selector
•Press the button
•Set the cooking
function with the oven
function selector
•Press and hold the
END button
•Press the buttons
to set the time at which
you wish the oven to
switch off
•Release the buttons
•Set the cooking
function with the oven
function selector
Setting the correct time:
•When the set time as
elapsed an audible alarm
is activated (this alarm will
stop on its own, however
it can be stopped
immediately by pressing
the button)
4.12. USE OF THE ELECTRONIC
PROGRAMMER
13 GB
50
40
30
20
10
Figure 13
90
80
70
60
50
40
30
20
10
Figure 14
Figure 15
150
180
210 240
Max
Min
WARNING : the first operation to carry out after the oven has been installed or
following the interruption of power supply (this is recognizable the display pulsating
and showing ) is setting the correct time. This is achieved as follows
In the programming of a timer with 5 buttons, for manual function, press "TIMER"
and "END" buttons simultaneously
4.13. COOKING TABLES
TraditionalandHotAir Circulation Cooking Methods;Weights(Gr)
TYPE OF THEFOODTraditionalCookingMethod
4
3
2
1
Shelf Pozitions
Weight
(Gr)
TYPE OF THE FOOD
Traditional
Cooking
Method
Hot Air
Circulation
Method
Cooking
times
(Minutes)
N O T E S
CAKES AND DESSERTS
Dough with stirred egg
Dough
Small Cakes
Cheese Cake
Apple Pie
Strudel
Jam tart
Small cakes
Biscuits
Cream cakes
2
1
2
1
1
2
2
2
2
2
180
180
180
175
180
175
180
180
180
100
2(1and3)
2(1and3)
2(1and3)
2
2(1and3)
2(1and3)
2(1an 3)d
2(1and3)
2(1and3)
2(1and3)
160
160
160
150
160
150
160
160
160
100
45 - 60
20 - 35
20 - 30
60 - 80
40 - 60
60 - 80
45 - 60
15 - 25
10 - 20
90 - 120
BREAD AND PIZZA
White Bread
Rye Bread
Sandwich
1
1
2
200
200
200
2
2
2(1and3)
175
175
175
45 ~ 60
30 ~ 45
20 ~ 35
Inside the closed oven on
dishes 8 pieces on a tray
Under the grill
1000
500
500
PASTRY
Macaroni
With vegetable
Small pastries
Lasagne
2
2
2
2
200
200
200
200
2(1and3)
2(1and3)
2(1and3)
2
175
175
175
175
40 ~ 50
45 ~ 60
35 ~ 45
45 ~ 60
1000
1200
1000
1500
1200
1000
4000
1500
3000
1200
MEATS
Roast beef
Roast pork
Roast veal
British style roast beef
Lamb
Chicken
Turkey
Duck
Goose
Rabbit
2
2
2
2
2
2
2
2
2
2
200
200
200
220
200
200
200
175
175
200
2
2
2
2
2
2
2
2
2
2
175
175
175
200
175
175
175
160
160
175
50 ~ 70
100 ~ 130
90 ~ 120
50 ~ 70
110 ~ 130
60 ~ 80
210 ~ 240
120 ~ 150
150 ~ 200
60 ~ 80
Cook on grill
Cook on grill
Cook on grill
Cook on grill
Leg
Full size
Full size
Full size
Full size
In parts
1000
800
FISH
Whole fish
Fillet
2
2
200
200
2(1and3)
2(1and3)
175
175
40 ~ 60
30 ~ 40
2 Fishes
4 Fillets
NOTE :
1) Cooking times do not include pre heating. Preheating the oven for about 10 minutes is advisable especially for cakes, pizzas and breads.
2) Indicates tray positions for cooking several dishes simultaneously.
3) All cooking operations must be carried out with oven door closed.
FOOD TYPES
QUANTITY COOKING ON GRILL
COOKING TIMES
(Minutes)
Beefsteak
Grilled cutlet
Sausage
Chicken parts
Mixed grill
Milky desserts
Tomato slices
Fish fillets
Scallops
Toast
Bread slices
N. OF
PARTS
WEIGHT
SHELF
POSITION
TEMPERATURE
(°C)
4
4
8
6
4
4
8
4
6
4
4
800
600
500
800
700
400
500
400
---
--—
4
4
4
3
4
4
4
4
4
4
4
max
max
max
max
max
max
max
max
max
max
max
10
12
10
30
12
13
12
8
12
8
2-3
8
8
6
20
10
10
-6
--
-1
UPPER
SECTION
LOWER
SECTION
Shelf
Position
Tempera-
Cture(° )
Tempera-
Cture(° )
Shelf
Position
14 GB
Figure 16
•After positioning the appliance, packaging materials
must be correctly disposed of for safety and
environmental purposes.
•Before disposing of old equipment, cut the power
cable in ordertorender the equipment unusable.
This appliance is marked according to the European
directive 2002/96/EC on Waste Electrical and
Electronic Equipment (WEEE).
•By ensuring thisproduct is disposedof correctly, you will helpprevent
potential negative consequences for the environment and human
health, which could otherwise be caused by inappropriate waste
handling of thisproduct.
•The symbol on the product indicates that this product may not be
treated as household waste. Instead it shall be handed over to the
applicable collection point for the recycling of electrical and electronic
equipment
•Disposal must be carried out in accordance with local environmental
regulations for wastedisposal.
•For more detailed information about treatment, recovery and
recycling of this product, please contact your local city office, your
household waste disposal service or the shop where you purchased
the product.
6. SERVICE CENTRE & TROUBLESHOOTING
•If the oven is not working, before calling the service centre we
recommended that :
•You should check that the oven is properly plugged into the power
supply.
Gas input isabnormal
•Check the following:
•Are the holesofthe burner clogged?
•Is the pressureregulatorworking properly?
•If you areusinga pipe, is thereanygas in the pipe?Isthe valve open?
•If you detect something abnormal with the gas valves, contact a
qualified electrician oranauthorised service centre forassistance.
There is asmellof gas where theapplianceis placed
•Please check thefollowing:
•Has a gasvalvebeen left open?
•Is the gaspipein the correct positionandin good condition?
If you suspectagas leak, do notusea flame to check
The oven doesnotheat up
Are the ovencontrolknobs at the correctposition?
The cooking time istoo long
Has the correcttemperaturebeen selected ?
Smoke comes fromtheoven
It is advisable to clean the oven after each use. If fat which splashes
during the cooking of meat is not cleaned, it will cause an unpleasant
smell and smoke the next time you use the oven. (See the Cleaning
and Maintenance chapter)
The oven lightdoes not come on
•The light might be faulty. To change the bulb, please see the relative
page.
•If you have checked the above and the oven still does not work
properly,contactthe nearest authorized serviceforassistance
• Model andProductionNumber (PNC or ENR).
5. CLEANING AND MAINTENANCE
Before all cleaningandmaintenance :
•Cleaning and user maintenance shall not be made by children
without supervision
•Disconnect mains voltage.
•Shut off the gas valve for your own safety. If the oven is adjusted to
natural gas, shutoffthenatural gas valve.
•If the ovenishot, wait till ithascooled down.
•Never use steamora vaporizer for cleaning.
•Clean enamelled surfaces with warm, soapy water or with suitable
brand products. On no account use abrasive powders that may
damage surfaces andruinthe appearance of thecooker.
It is veryimportantto clean the oveneachtime it is used.
•Use detergents andabrasivemetal pads for thestainlesssteel grills.
•The glass surfaces such as the top, the oven door and the warming
compartment door mustbecleaned when they arecold.
•Damage caused by failure to respect this rule is not covered by the
guarantee.
•You canclean burners and burner capswith hot water and detergent.
Also the gaschannels of theburners can becleaned by abrush. Make
sure that burners are dry before replacing them in their seats. Check
correct positioning oftheburner.
especially for cakes,pizzasand breads.
•Periodically clean the ignition electrodes of automatic ignition ovens.
This will preventignitionproblems. Check frequently that
the gas channelsofburners are not blockedbyfood residues, etc.
•Wipe the top lid with a dry cloth in order to prevent harmful effects of
water,oil and steam generatedbythe cooked food.
•Do not use abrasive products, metal cleaning pads, sharp objects,
rough cloths, or chemical products and detergents that can
permanently damage thecatalyticlining.
•It is a good idea to use deep roasting trays for fatty foods such as
joints of meatetc. and to puta tray underneath thegrill to catchsurplus
fat.
Cleaning of OvenDoor
For thorough cleaning of the oven door, it is advisable to remove the
same, as showninbelow.
Open the door completely, turn the two feet on the hinge arms 180º.
Close thedoor partly by a 30º. Remove the door byslightly lifting the it
at this position.
For replacing thedoor, followthe steps above inthe reverse order.
To Replace the inside light
•Switch off the mainspowersupply and unscrew bulb.
Replace with an identical bulb that can withstand very high
temperatures.
7. PROTECTION OF THE ENVIRONMENT
5.1. CATALYTIC SELF - CLEANING OVEN
•Special self-cleaning panels covered in a micro-porous coating are
available on some of our models. If they are fitted, the oven no longer
needs to becleanedby hand.
•The lining mustbeporous for self-cleaning tobeeffective.
•Excessive splatteringof fatmay block the pores and therefore hinder
self-cleaning. This self-cleaning capacity may be restored by
switching on theemptyoven to maximum forabout10-20 minutes.
•If the walls of the oven are so thickly coated in grease that the
catalytic lining isno longer effective, removesurplusgrease with asoft
cloth or sponge soaked in hot water. All catalytic linings currently on
the market havea working lifeabout 300 hours.They should therefore
be replaced afterabout300 hours.
15 GB
Figure 16
Figure 17
180
0

ATTENZIONE: l'apparecchio e le parti accessibili diventano calde durante l'uso. Prestare attenzione a
non toccare le parti calde.
• I bambini al di sotto di 8 anni dovrebbero essere tenuti a distanza se non continuamente supervisionati.
• L'apparecchio può essere usato da bambini dagli 8 anni in su e persone con ridotte capacità fisiche,
sensoriali o mentali o senza esperienza e conoscenza del prodotto se supervisionate o dando loro
istruzioni riguardo al funzionamento dell'apparecchio in maniera sicura e coscente del rischio possibile.
• I bambini non dovrebbero giocare con l'apparecchio.
• La pulizia e la manutenzione non dovrebbero essere fatte da bambini senza supervisione.
ATTENZIONE: cucinare senza supervisione grasso o olio sul piano cottura può essere pericoloso e può
provocare incendi
• MAI provare a spegnere il fuoco con acqua. Prima spegnere l'apparecchio e poi coprire le fiamme, ad
esempio con un coperchio o un telo non infiammabile.
ATTENZIONE: pericolodi incendo: nonlasciare oggetti sul pianocottura.
• Durante l’uso l’apparecchio diventa molto caldo. Si dovrebbe fare attenzione a non toccare gli elementi
riscaldanti all’interno del forno.
ATTENZIONE: Le parti accessibili possono diventare molto calde durante l’uso. I bambini dovrebbero
essere tenuti a distanza.
• Non usare per la pulizia materiali ruvidi abrasivi o raschiettimetallici affilati per pulire le porte di vetro del
forno dato che possono graffiare la superficie e causare la frantumazione del vetro.
• La parte interna del cassetto sotto all'apparecchio può diventare calda
• Spegnere il forno prima di rimuovere lo schermo di protezione e, dopo la pulizia, rimontarlo secondo le
istruzioni.
• Usare solo la sonda termica raccomandata per questo forno.
• Non utilizzare un pulitore a vapore
• Rrimuovere gli eventuali liquidi tracimati dal coperchio prima di aprirlo.
• Far raffreddare la superficie del piano di cottura prima di chiudere il coperchio.
ATTENZIONE: Assicurarsi che l’apparecchio sia spento prima di sostituire la lampada per evitare la
possibilità di scosse elettriche.
• Se la cucinaè posta su un piedistallo,si devono adottare misure perevitare che l’apparecchio scivoli dal
piedistallo.
• Il mezzo di disconnessione deve essere incorporato nel cablaggio fisso in accordo con le leggi di
cablaggio
• le istruzioni devono indicare quale tipo di cavo debba essere utilizzato, tenendo presente la
temperatura della superficie posteriore dell’apparecchio.
• Se il cavo dialimentazione è danneggiato, esso deve essere sostituitoda un cavo o un assieme speciali
disponibili presso il costruttore o il suo servizio assistenza tecnica.
ATTENZIONE: Al fine di evitare ogni pericolo dovuto al riarmo accidentale del dispositivo termico di
interruzione, il presente apparecchio non deve essere alimentato con un dispositivo di manovra esterno,
quale un temporizzatore oppure essere connesso a un circuito che viene regolarmente alimentato o
disalimentato dal servizio.
• Questo apparecchio può essere installato in accordo con il regolamento vigente e solo in un ambiente
ben ventilato. Leggere le istruzzioni prima dell'installazione o l'uso dell'apparecchio.
• Queste istruzioni sono valide solamente se appare il simbolo del paese sull'apparecchio. Se non
appare il simbolo sull'apparecchio, è necessario consultare le istruzioni tecniche che vi daranno le
istruzioni necessarie riguardo alle modifiche delle condizioni d'uso dell'apparecchio nel paese di
riferimento.
• Prima dell'installazione, assicurarsi che le condizioni di distribuzione del locale (natura del gas e
pressione del gas) e l'aggiustamento dell'apparecchio siano compatibili;
• le condizione di aggiustamento dell'apparecchio sono indicate nell'etichetta (o nella targa);
• l'apparecchio non è connesso a un sistema di avacuazione dei prodotti di combustione. Dovrebbe
essere installato e connesso in accordo con le correnti norme di installazione. Particolare attenzione
deve essere posta sui rilevanti requisiti riguardo alla ventilazione.
• L'utilizzo di un apparecchio a gas causa calore e umidità nella stanza in cui è installato. Assicurarsi che
la cucina sia ben ventilata: lasciare aperti i fori di ventilazione naturale o installare un dispositivi di
ventilazione meccanica (cappa meccanica aspirante). L'uso intensivo prolungato dell'apparecchio
potrebbe richiedere un sistema di ventilazione addizionale, per esempio aumentando il livello di
ventilazione meccanica dove presente.
ATTENZIONE: Le parti accessibili possono diventare calde quando il grill è in uso. I bambini dovrebbero
essere tenuti a distanza.
16 IT
INDICAZIONI DI SICUREZZA
17 IT
1. AVVERTENZE GENERALI
Grazieper aver scelto uno dei nostri prodotti.Perottenere i massimi risultati
dallenostre cucineconsigliamodi:
•Leggere attentamente le note di questo manuale, poiché contengono
istruzioni importanti sulle modalità corrette di installazione, utilizzo e
manutenzione di questa cucina. Conservare questo opuscolo in luogo
sicuro,per poterloconsultarefacilmenteinseguito.
•il manuale deve essere consegnato insieme all'elettrodomestico, per
garantire il corretto trasferimento delle informazioni sull'installazione e
sull'utilizzodell'elettrodomestico e le relativeavvertenze.
•Quando la cucina è in uso, tutte le parti accessibili sono molto calde: fare
attenzione a non toccare questi elementi. Alla prima accensione,
l'elettrodomestico potrebbe dare origine ad emissioni di odore acre: tale
fumoè innocuo. Consigliamo di far funzionare la cucinaavuotoperdue ore.
•Queste istruzioni sono valide solamente se appare il simbolo del paese
sull'apparecchio. Se non appare il simbolo sull'apparecchio, è necessario
consultare le istruzioni tecniche che vi daranno le istruzioni necessarie
riguardo alle modifiche delle condizioni d'uso dell'apparecchio nel paese di
riferimento.
1.1. SIMBOLI USATI IN QUESTO MANUALE
Per una più facile comprensione, in questo manuale sono stati
utilizzati i simboliindicatidi seguito.
1.2. DICHIARAZIONE DI CONFORMITÀ
Le parti di questo elettrodomestico che potrebbero venire a diretto
contatto con gli alimenti sono conformi alle indicazioni della direttiva
CEE 89/109. L'elettrodomestico è conforme alle direttive europee
73/23/CEE, 89/336/CEE e 90/396/CEE, emendate dalle 2006/EC,
2004/108/EC e 2003/55/EC, e dagli emendamenti seguenti. Inoltre
l'elettrodomestico è conforme alle direttive generali 93/68 e ai
successivi emendamenti.
1.3. SUGGERIMENTI PER LA SICUREZZA
•La cucina deve essereusata solo per gli scopi per iquali èprogettata:deve
essere usata solo per la cottura del cibo. Qualunque tipo altro utilizzo, per
esempio come forma di riscaldamento, costituisce uso improprio ed è
pertanto pericoloso.
•Il costruttore non può essere ritenuto responsabile per eventuali danni
provocatida usoimproprio,noncorrettoo non ragionevole.
•Quando si utilizza un elettrodomestico occorre seguire alcune regole di
base. Se l'elettrodomestico si rompe o si guasta, spegnerlo, staccare
l'alimentazione di rete, evitare di toccarlo e contattare il centro di assistenza
autorizzato.
•I bambini al di sotto di 8 anni dovrebbero essere tenuti a distanza se non
continuamente supervisionati.
•L'apparecchio può essereusato da bambinidagli 8 anni in su e personecon
ridotte capacità fisiche, sensoriali o mentali o senza esperienza e
conoscenza del prodotto se supervisionate o dando loro istruzioni riguardo
al funzionamento dell'apparecchio in maniera sicura e coscente del rischio
possibile.
•Usaresempre i guantiperrimuovereglialimentidalforno.
•Mantenere sempre pulito l'elettrodomestico, per motivi di sicurezza e di
igiene. I residuidigrasso e di alimentipossono esserecausa di incendi.
•Rimuovereglieventualiliquiditracimatidalcoperchioprima di aprirlo.
•Far raffreddare la superficie del piano di cottura prima di chiudere il
coperchio.
•Nonmettere la manitrailforno e le cernieredello sportello superiore.
Tenere lontaniibambini.
ATTENZIONE: Le parti accessibili possono diventare calde quando il grill è
in uso.I bambini dovrebberoessere tenutiadistanza.
•Assicurarsi che quando l'elettrodomestico non viene utilizzato tutte le
manopole sianoinposizionespenta.
•Lo scaldavivande può essere usato per riporre vassoi vuoti o per
mantenerecaldigli alimenti.
•Non mettere nel vano scaldavivande oggetti infiammabili, esplosivi o
detergenti,adesempioborsedi nylon, carta, panni,ecc.
•Usare esclusivamente pentole e padelle resistenti al calore. Non usare
materialiinfiammabili.
•È pericolosomodificareotentaredi modificareleproprietà
dell'elettrodomestico.
•Occorre prestare particolare attenzione durante la frittura: non lasciare
incustoditol'elettrodomestico.
•L'elettrodomestico è pesante. Prestare attenzione durante gli spostamenti.
MAI provarea spegnere il fuoco con acqua. Primaspegnere l'apparecchioe
poi coprire le fiamme, ad esempio con un coperchio o un telo non
infiammabile.
ATTENZIONE:pericolodi incendo: nonlasciareoggetti sul pianocottura.
•Durante il funzionamento dell'elettrodomestico, è normale l'emissione di
ariacalda.
Nonbloccare le aperture delforno.
•Se si pongono alimenti sopra o all'interno dell'elettrodomestico o quando si
sposta il cibo con acqua o grassi in eccesso, si possono verificare
versamenti.Pulire immediatamente tali residui dopo la cottura, per prevenire
la formazionediodorisgradevoliedipossibiliincendi.
•Primadi togliereirecipientidicottura,ridurreo spegnere la fiamma.
• Nelle zone in cui avviene la combustione di combustibiliAVVERTENZA!
gassosi si producono calore e umidità. Occorre prestare particolare
attenzione all'aerazione dell'ambiente: se l'aerazione naturale è inesistente
o insufficiente occorre installare una ventola di aerazione. In caso di dubbi,
consultareunCentro diAssistenzaCandy.
•Quando si utilizza un elettrodomestico occorre seguire alcune regole di
base:
*In generale non è consigliabile utilizzare adattatori, prese multiple per
piùspineeprolunghe.
*Non tirare il cavo di alimentazione per staccare la spina dalla presa di
alimentazione.
*Nontoccare il fornoconlemanioi piediumidiobagnati.
*Sostituireimmediatamenteilcavodialimentazionedanneggiato.
*Perlasostituzione del cavo,attenersialleseguentiistruzioni:
*La sostituzione del cavo deve essere effettuata da un tecnico
qualificato. Per le riparazioni affidarsi esclusivamente a un centro di
assistenzaautorizzato e assicurarsichevenganousatiricambioriginali.
*Se necessario, rimuovere il cavo di alimentazione e sostituirlo con uno
dei seguenti tipi: H05RRF, H05VVFe H05V2V2-F. Il cavo ha la capacità
necessariaperlacorrenteelettricarichiestadalprodotto.
•Controllare periodicamenteiltubo flessibile del gas.
•Il tubo del gas deve essere tenuto lontano dalle parti calde del forno e
non deve essere a contatto con esso. È possibile spostare il connettore
del gas a sinistra o a destra del forno. Dopo tale modifica, verificare
l'eventualepresenzadiperdite conacquasaponata.
•Dopo avere collegato il tubo flessibile del gas al connettore, fissarlo
saldamente con una fascetta. Occorre prestare particolare attenzione
alleperdite di gas:controllareconuna soluzione saponata.
•Nonlasciarel'elettrodomestico incustoditoprima che si sia raffreddato.
L'eventuale presenza di un coperchio superiore dell'elettrodomestico
consente di proteggere dalla polvere il piano di cottura non utilizzato e di
riparare dai versamenti d'oliodurantelacottura.
•Non utilizzare il coperchioperaltriscopi.
•ATTENZIONE! (Per modelli con coperchio in vetro) Il coperchio in vetro
può rompersi se esposto a calore eccessivo. Prima di chiudere il
coperchio accertarsi sempre cheibruciatorisiano spenti.
•Non usare recipienti dicotturadeformatio non bilanciati.
•Pulire con cura ilgrillela leccarda prima diiniziare a utilizzarli.
•Usando detergenti spray,non spruzzare sulle piastreo sul termostato.
•Assicurarsi che i ripianidelfornosiano collocati in modocorretto.
•Per un'accensione più rapida, accendere il bruciatore prima di collocarvi
sopra il recipiente dicottura.
•Verificarechela fiamma dei bruciatorinon presenti anomalie.
•Non coprire le partidelfornocon fogli di alluminio.
1.4. SUGGERIMENTI UTILI
Il costruttore non può garantire la sicurezza della cucina
qualora le precedenti istruzioni non vengano seguite.
Informazioni per la sicurezza
Informazioni per la protezione dell'ambiente
Questo elettrodomestico è conforme alle direttive CEE
dell'UE
 Loading...