

Page 1
Manuel d'instruction
FR
User Manual
EN
Page 2

1
FR
Veuillez lire attentivement les indications
contenues dans ce manuel. Elles vous aideront à
obtenir de bons résultats lors de l'utilisation de
votre four à vapeur.
CONSERVEZ LA DOCUMENTATION DE CE
PRODUIT POUR TOUTE RÉFÉRENCE
FUTURE.
Gardez le mode d’emploi à portée de main. Si
vous cédez l’appareil à un tiers, veuillez lui
remettre également le manuel !
Indications sur la protection de
l’environnement
Élimination de l’emballage
L‟emballage porte la marque Point Vert.
Pour éliminer les matériaux d‟emballage, comme
le carton, le polyuréthane et les films plastiques,
utilisez des conteneurs adéquats. Vous
garantissez ainsi la réutilisation des matériaux
d‟emballage.
Élimination des appareils hors d'usage
La Directive Européenne 2002/96/EC sur les
Déchets des Equipements Electriques et
Electroniques (DEEE), exige que les appareils
ménagers usagés ne soient pas jetés dans le flux
normal des déchets municipaux.
Les appareils usagés doivent être collectés
séparément afin d‟optimiser le taux de
récupération et le recyclage des matériaux qui les
composent et réduire l‟impact sur la santé
humaine et l‟environnement. Le symbole de la
„„poubelle barrée‟‟ est apposé sur tous les produits
pour rappeler les obligations d‟une collecte
séparée.
Les consommateurs devront contacter les
autorités locales ou leur revendeur concernant la
démarche à suivre pour l‟élimination de leur
appareil hors d‟usage.
Avant d‟éliminer votre appareil, rendez-le
inutilisable. Tirez le câble d‟alimentation, coupez-
le et jetez-le.
Page 3

2
FR
Sommaire
Instructions pour l’installation .......................................................................................................... 3
Avant l‟installation ............................................................................................................................. 3
Après l‟installation ............................................................................................................................. 3
Consignes de sécurité........................................................................................................................ 4
Description de l’appareil .................................................................................................................... 6
Réglages de base ............................................................................................................................... 7
Réglages Initiaux .............................................................................................................................. 7
Réglage de l‟heure ........................................................................................................................... 7
Masquer/Afficher l‟heure ................................................................................................................... 7
Réglage de la dureté de l‟eau ........................................................................................................... 8
Blocage de sécurité .......................................................................................................................... 8
Fonctions de base .............................................................................................................................. 9
Cuisson vapeur 100 ºC ..................................................................................................................... 9
Cuisson vapeur 80 ºC ....................................................................................................................... 9
Cuisson vapeur 40 ºC ..................................................................................................................... 10
Décongélation ................................................................................................................................. 10
Remplissage de l'eau ....................................................................................................................... 11
Pendant le fonctionnement… .......................................................................................................... 12
Interruption d‟une cuisson............................................................................................................... 12
Modification des paramètres........................................................................................................... 12
Annuler une cuisson ....................................................................................................................... 12
Fin d‟une cuisson ............................................................................................................................ 12
Eau résiduelle dans le four ............................................................................................................. 12
Tableaux et conseils ......................................................................................................................... 13
Utilisation des accessoires ............................................................................................................. 13
Nettoyage et entretien du four ......................................................................................................... 19
Nettoyage de l‟enceinte de cuisson ................................................................................................ 19
Décrocher les supports latéraux ..................................................................................................... 19
Enlever la porte de l‟appareil .......................................................................................................... 20
Détartrage ....................................................................................................................................... 21
Solutions détartrantes appropriées ................................................................................................. 21
Procédure de détartrage ................................................................................................................. 22
Surface avant ................................................................................................................................. 23
Intérieur du four .............................................................................................................................. 23
Accessoires .................................................................................................................................... 23
Que faire en cas de mauvais fonctionnement ? ............................................................................. 24
Remplacement de la lampe ............................................................................................................ 24
Caractéristiques techniques ............................................................................................................ 25
Description des fonctions ............................................................................................................... 25
Affichage......................................................................................................................................... 25
Spécifications ................................................................................................................................. 25
Installation ......................................................................................................................................... 50
Page 4

3
FR
Instructions pour l’installation
Avant l’installation
Vérifiez que la tension d’alimentation indiquée
sur la plaque d‟identification correspond à la
tension de votre réseau.
Ouvrez la porte et retirez tous les accessoires
ainsi que les matériaux d‟emballage.
Attention ! Le devant du four peut être enveloppé
d'une pellicule de protection. Retirez-la
soigneusement, avant la première utilisation, en
commençant par le bas.
Assurez-vous que l'appareil n’est pas
endommagé. Vérifiez que la porte fonctionne
correctement et que sa face intérieure et les
parois de l‟enceinte ne sont pas abîmées.
Informez le Service Après-vente en cas de
dommages constatés. Le numéro de téléphone se
trouve au dos de ce livret.
N’UTILISEZ PAS L'APPAREIL si le câble ou la
prise sont endommagés, si l'appareil ne
fonctionne pas correctement, s‟il a subi des
dommages ou s‟il est tombé. Contactez le Service
Après-vente, le cas échéant. Le numéro de
téléphone se trouve au dos de ce manuel.
Après l’installation
L‟appareil est équipé d‟un câble d‟alimentation et
d‟une prise pour courant monophasé (230-240V ~
50Hz)
En cas de raccordement permanent, l‟appareil
doit être installé par un technicien qualifié. Dans
ce cas, l‟appareil doit être raccordé à un circuit
équipé d'un disjoncteur bipolaire dont les contacts
sont séparés d'au moins 3 mm.
ATTENTION : L’APPAREIL DOIT
ABSOLUMENT ÊTRE RELIÉ À LA TERRE.
Le fabricant et le revendeur déclinent toute
responsabilité pour tout dommage causé à des
personnes, des animaux ou des objets, en cas de
non-observation constatée des présentes
instructions d‟installation.
L’appareil ne fonctionne que si la porte est bien
fermée.
Avant la première utilisation, nettoyez l‟intérieur
de l‟appareil et les accessoires en suivant les
instructions de nettoyage au point « Nettoyage et
entretien du four ».
Posez l‟appareil sur une surface plane et stable.
Ne placez pas l'appareil à proximité d‟éléments de
chauffage, d‟une radio ou d‟un téléviseur.
Pendant l’installation, assurez-vous que le
câble d’alimentation n’entre pas en contact
avec de l’humidité, des objets tranchants ou le
dos de l'appareil car les températures élevées
peuvent l’endommager.
Attention : la prise de courant doit rester
accessible, une fois le four installé.
Pendant l’installation, veuillez suivre les instructions fournies séparément.
Page 5

4
FR
Consignes de sécurité
Attention ! Ne laissez jamais l‟appareil
fonctionner sans surveillance.
Attention ! Si vous remarquez de la fumée ou
du feu, maintenez la porte fermée afin
d'étouffer les flammes. Éteignez l'appareil et
débranchez la prise de courant ou coupez
l‟alimentation de l‟appareil.
La graisse et l‟huile surchauffées peuvent
s‟enflammer facilement. Ne chauffez ni huile
ni graisse dans le four. N‟essayez jamais
d‟éteindre de la graisse ou de l'huile en feu
avec de l'eau (risque d'explosion) ! Éteignez
les flammes avec un torchon humide et
gardez toutes les portes et fenêtres fermées.
Attention ! Ne faites chauffer aucun alcool
fort dans le four. Cela peut provoquer une
surchauffe de l'alcool. Risque d'explosion !
Attention ! Cet appareil n‟est pas destiné à
être utilisé par des personnes (y compris des
enfants) qui auraient des capacités
physiques, sensorielles ou mentales
diminuées; ou qui ne possèderaient pas
l‟expérience et la connaissance nécessaire, à
moins qu‟elles ne soient supervisées ou que
des instructions ne leur aient été fournies par
une personne responsable de leur sécurité,
pour l‟utilisation appropriée de l‟appareil.
Attention ! Il est nécessaire de surveiller les
enfants pour s‟assurer qu‟ils ne jouent pas
avec l‟appareil. Utilisez le blocage de sécurité.
Attention ! Au cours de l‟utilisation, l‟appareil
devient chaud. Il faut faire attention à ne pas
toucher les éléments de chauffage à l‟intérieur
du four. RISQUE DE BRÛLURES !
Attention ! Au cours de l‟utilisation, il est
possible que des parties accessibles
deviennent chaudes. Les jeunes enfants
doivent être tenus à l‟écart.
Attention ! Si vous ouvrez la porte pendant
ou après la cuisson, de la vapeur brûlante
et des gouttes d’eau peuvent s’échapper
de l’appareil. Mettez-vous sur le côté ou
reculez.
Attention ! Ne coincez jamais le câble
d‟alimentation d‟un autre appareil électrique
dans la porte du four. La gaine du câble peut
fondre. Risque de court-circuit !
Page 6

5
FR
Consignes de sécurité
Cet appareil est uniquement destiné à une
utilisation domestique !
Cet appareil est destiné à la préparation de
mets dans le cadre domestique. Toute
responsabilité est déclinée en cas de
dommages occasionnés par une utilisation
inadéquate ou interdite.
Si vous respectez les consignes suivantes,
vous ne risquerez pas d’endommager
l’appareil et éviterez toute autre situation
dangereuse :
Ne recouvrez pas et ne bouchez pas les
trous ou la fente d’aération.
Ne laissez aucun objet inflammable dans le
four, il peut brûler si vous l'allumez.
N‟utilisez pas le four comme rangement.
Ne versez aucune eau de vie (par ex. Brandy,
Whisky, Schnaps, etc.) sur les plats chauds.
Risque d‟explosion !
Les accessoires comme la grille ou la plaque
à pâtisserie etc. deviendront très chauds dans
le four. Utilisez toujours des gants de cuisine.
Afin d’éviter les brûlures, utilisez toujours
des gants de cuisine lorsque vous manipulez
la vaisselle, les récipients et touchez l‟intérieur
du four.
Ne vous appuyez pas ou ne vous asseyez
pas sur la porte du four. Cela peut
endommager les gonds, en particulier. La
porte supporte un poids maximal de 8 kg .
Nettoyage :
Après l‟extinction du four, celui-ci reste chaud
encore un moment. Attendez que le four
refroidisse avant de le nettoyer.
Ne pas utiliser de détergents abrasifs ou de
grattoirs en métal tranchant pour nettoyer le
porte vitrée du four car ils risqueraient de
rayer la surface, qui pourrait ensuite voler en
éclat.
Les surfaces de contact de la porte (façade
de l‟enceinte de cuisson et face intérieure de
la porte) doivent rester très propres afin de
garantir un fonctionnement parfait.
Veuillez suivre les instructions en matière de
propreté au point « Nettoyage et entretien du
four ».
En cas de réparation :
Si le câble d‟alimentation est endommagé, il
doit être remplacé par le fabricant, par un
représentant autorisé ou par un technicien
habilité à cette tâche afin d‟éviter toute
situation dangereuse. De plus, cette opération
requiert un outillage spécifique.
Les réparations ou opérations de
maintenance, en particulier des pièces sous
tension, ne peuvent être réalisées que par
des techniciens certifiés par le fabricant.
Les grilles supportent un poids maximal de
8 kg. Ne dépassez pas ce poids afin d'éviter
tout dommage.
Page 7
6
FR
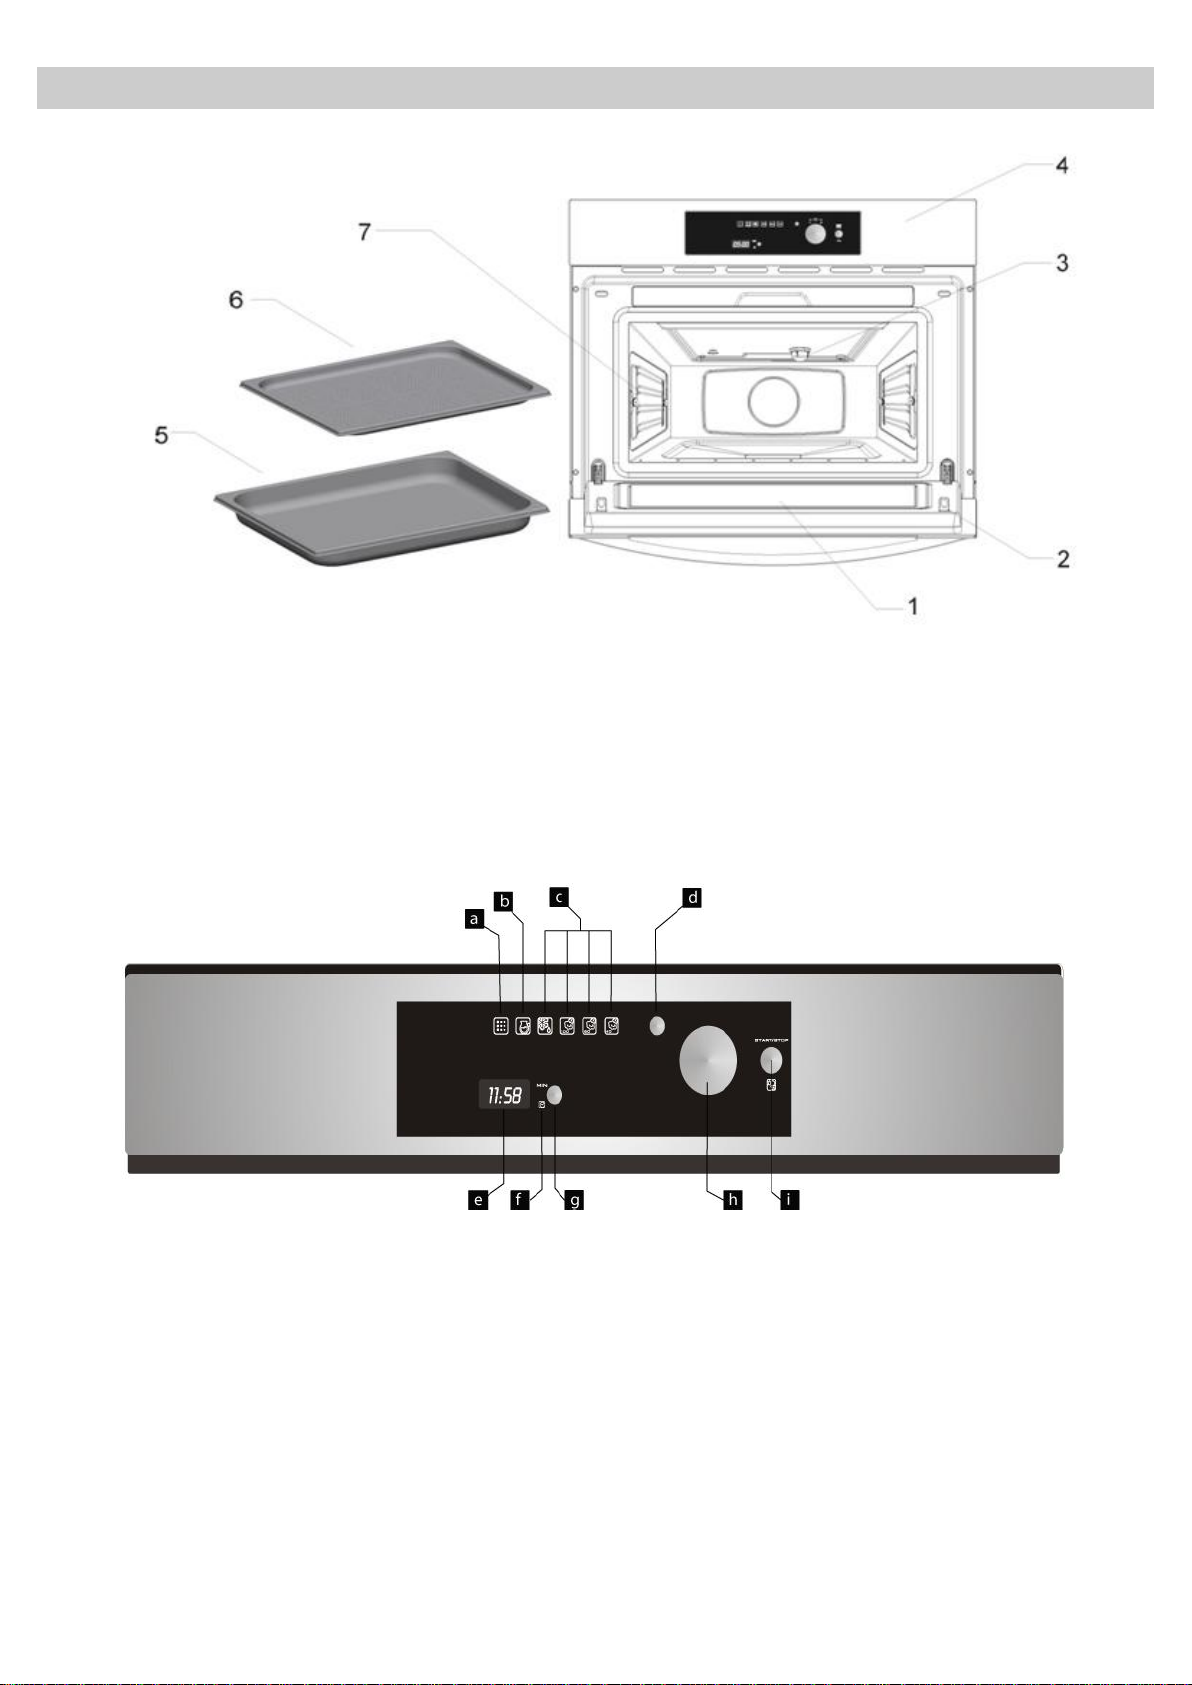
1. Ŕ Porte vitrée
5. Ŕ Bac de cuisson vitré
2. Ŕ Verrous de sécurité
6. Ŕ Bac de cuisson perforé
3. Ŕ Lampe
7. Ŕ Supports latéraux
4. Ŕ Panneau de contrôle
a. Ŕ Voyant de détartrage
b. Ŕ Voyant du réservoir d‟eau
f. Ŕ Voyant de la date et du temps de
fonctionnement
c. Ŕ Voyants des fonctions
d. Ŕ Sélecteur de fonctions
e. Ŕ Affichage et réglage de l‟heure et
du temps de fonctionnement
g. Ŕ Bouton de réglage de l‟heure et du
temps de fonctionnement
h. Ŕ Bouton rotatif
i. Ŕ Bouton Start (Démarrer)/Stop/
Blocage de sécurité
Description de l’appareil
Page 8
7
FR
Réglages de base
Réglages Initiaux
Après raccordement à la ligne de votre four à
micro-ondes ou après une coupure de courant,
l‟affichage de l‟heure clignote pour indiquer que
celle-ci n‟est pas correcte.
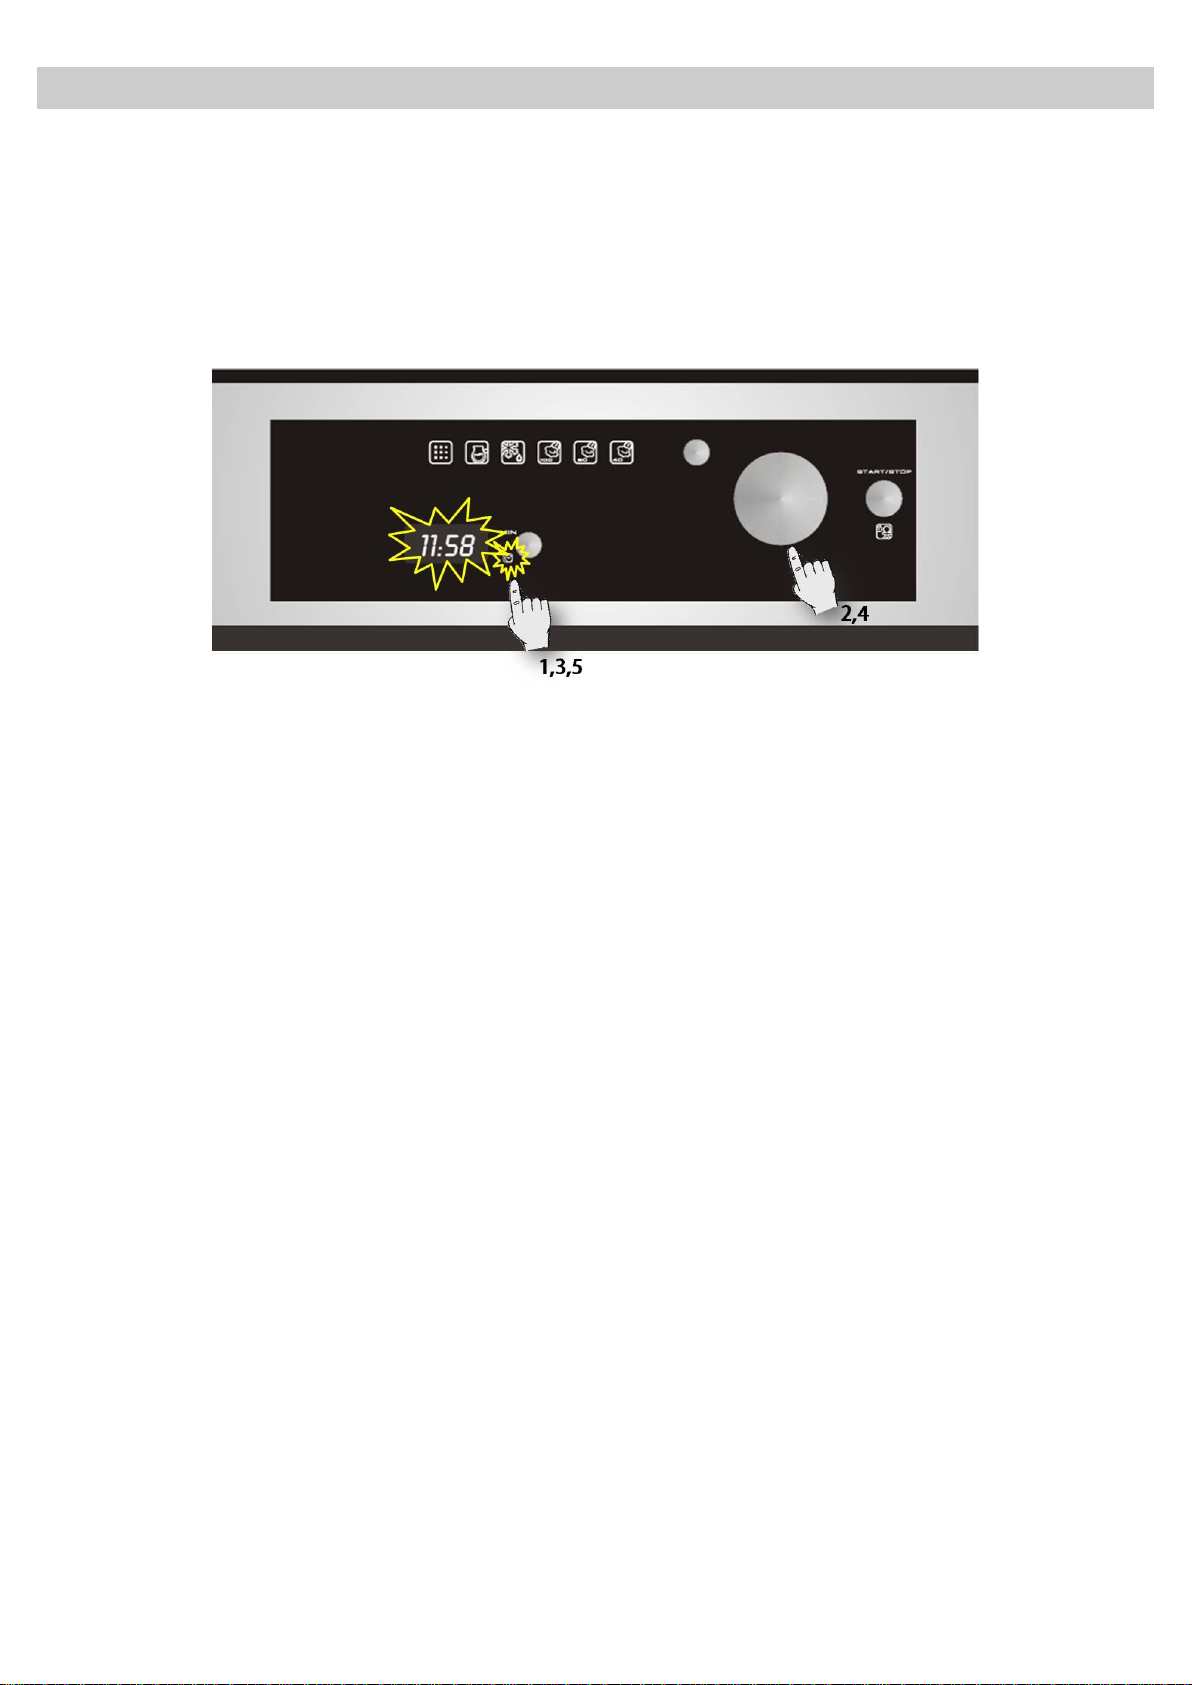
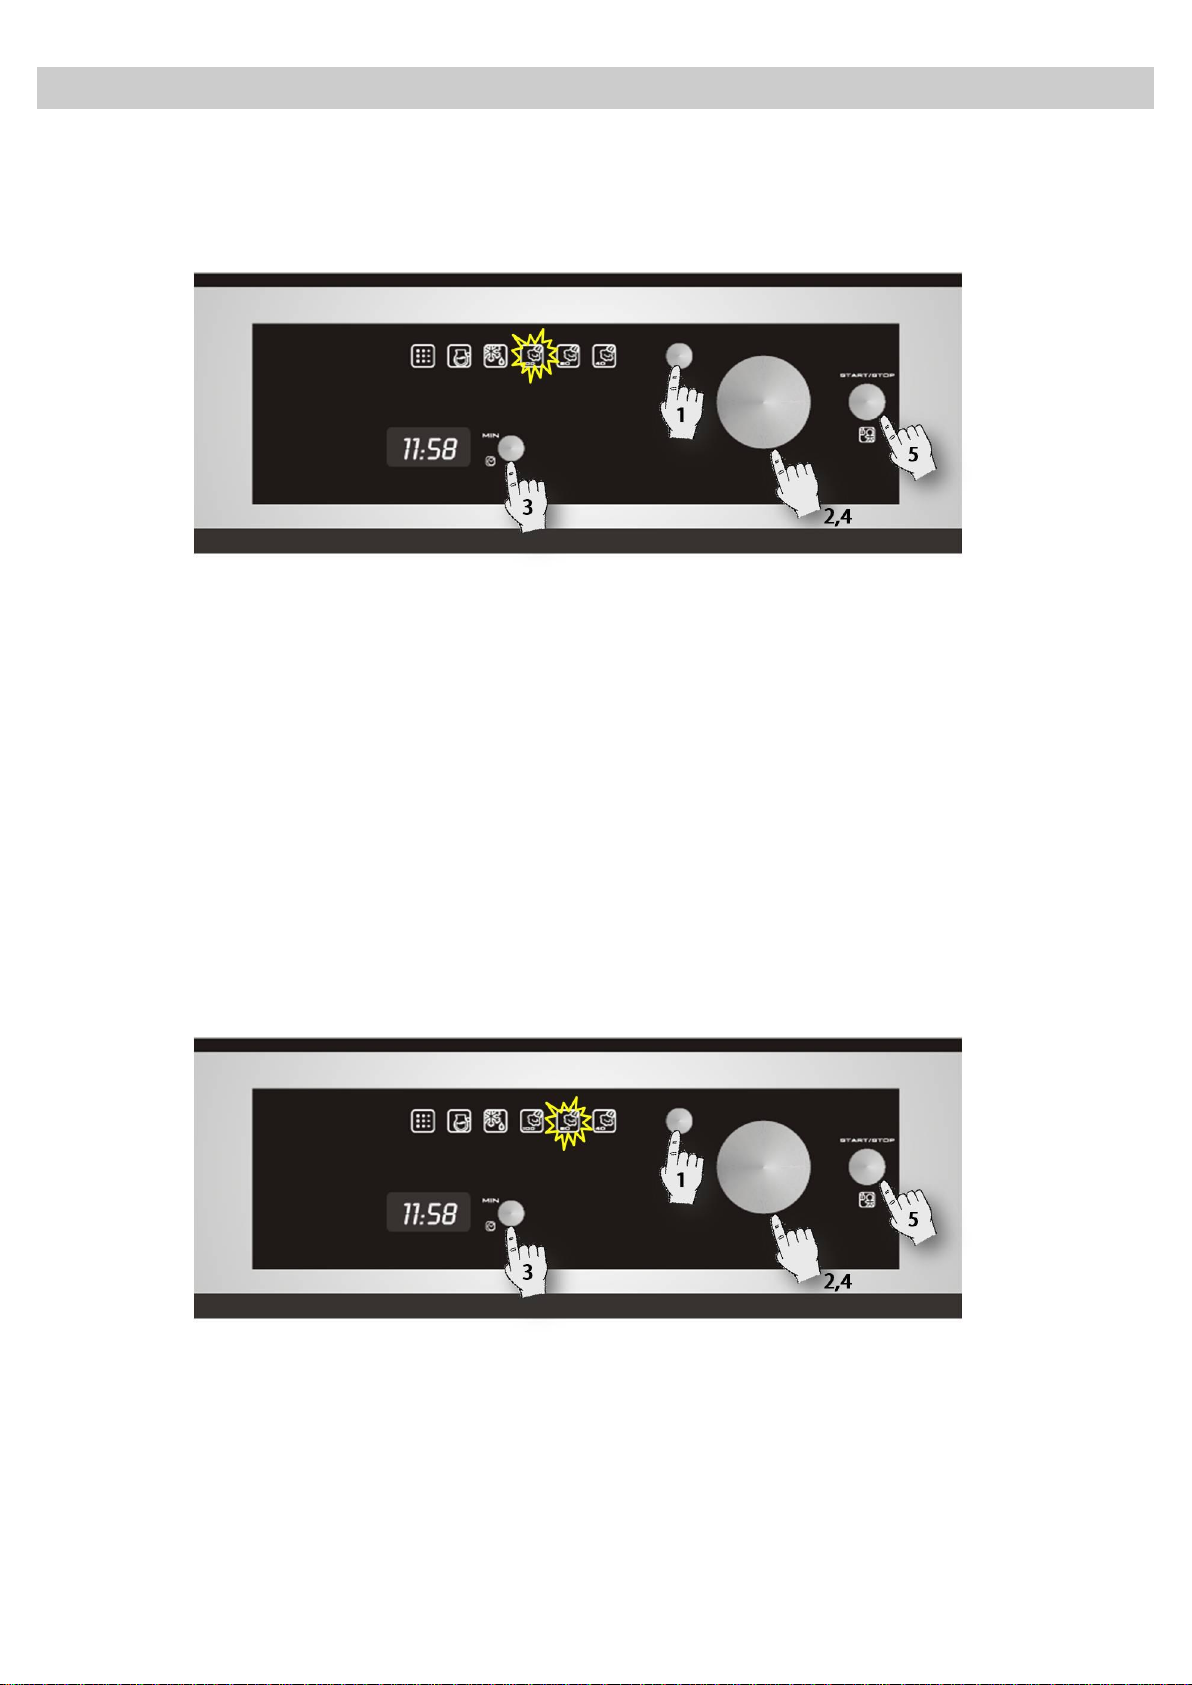
Réglage de l’heure
Voici comment procéder pour régler l‟heure :
1. Appuyez sur le Bouton de Réglage de
l’Heure. L‟affichage de l‟heure se met à
clignoter (il n‟est pas nécessaire d‟appuyer sur
le bouton après le branchement de l‟appareil ou
une panne de courant).
2. Tournez le bouton rotatif afin de régler l‟heure.
L‟appareil ne peut fonctionner qu‟après le réglage
de l‟heure et de la dureté de l‟eau.
Pour régler l‟heure et la dureté de l‟eau, suivez les
instructions ci-dessous.
3. Appuyez à nouveau sur le bouton de réglage
de l’Heure afin de régler les minutes. Les
chiffres des minutes se mettent à clignoter.
4. Tournez le bouton rotatif afin de régler les
minutes.
5. Appuyez à nouveau sur le Bouton de Réglage
de l’Heure pour terminer le réglage.
Masquer/Afficher l’heure
Si l‟affichage de l‟heure vous gêne, vous pouvez
le masquer en appuyant 3 secondes sur le bouton
de réglage de l’Heure. Les points séparant
l‟heure et les minutes continuent de clignoter
aussi longtemps que l‟heure est masquée.
Si vous voulez à nouveau afficher l‟heure,
appuyez à nouveau 3 secondes sur le bouton de
réglage de l’Heure.
Page 9
8
FR
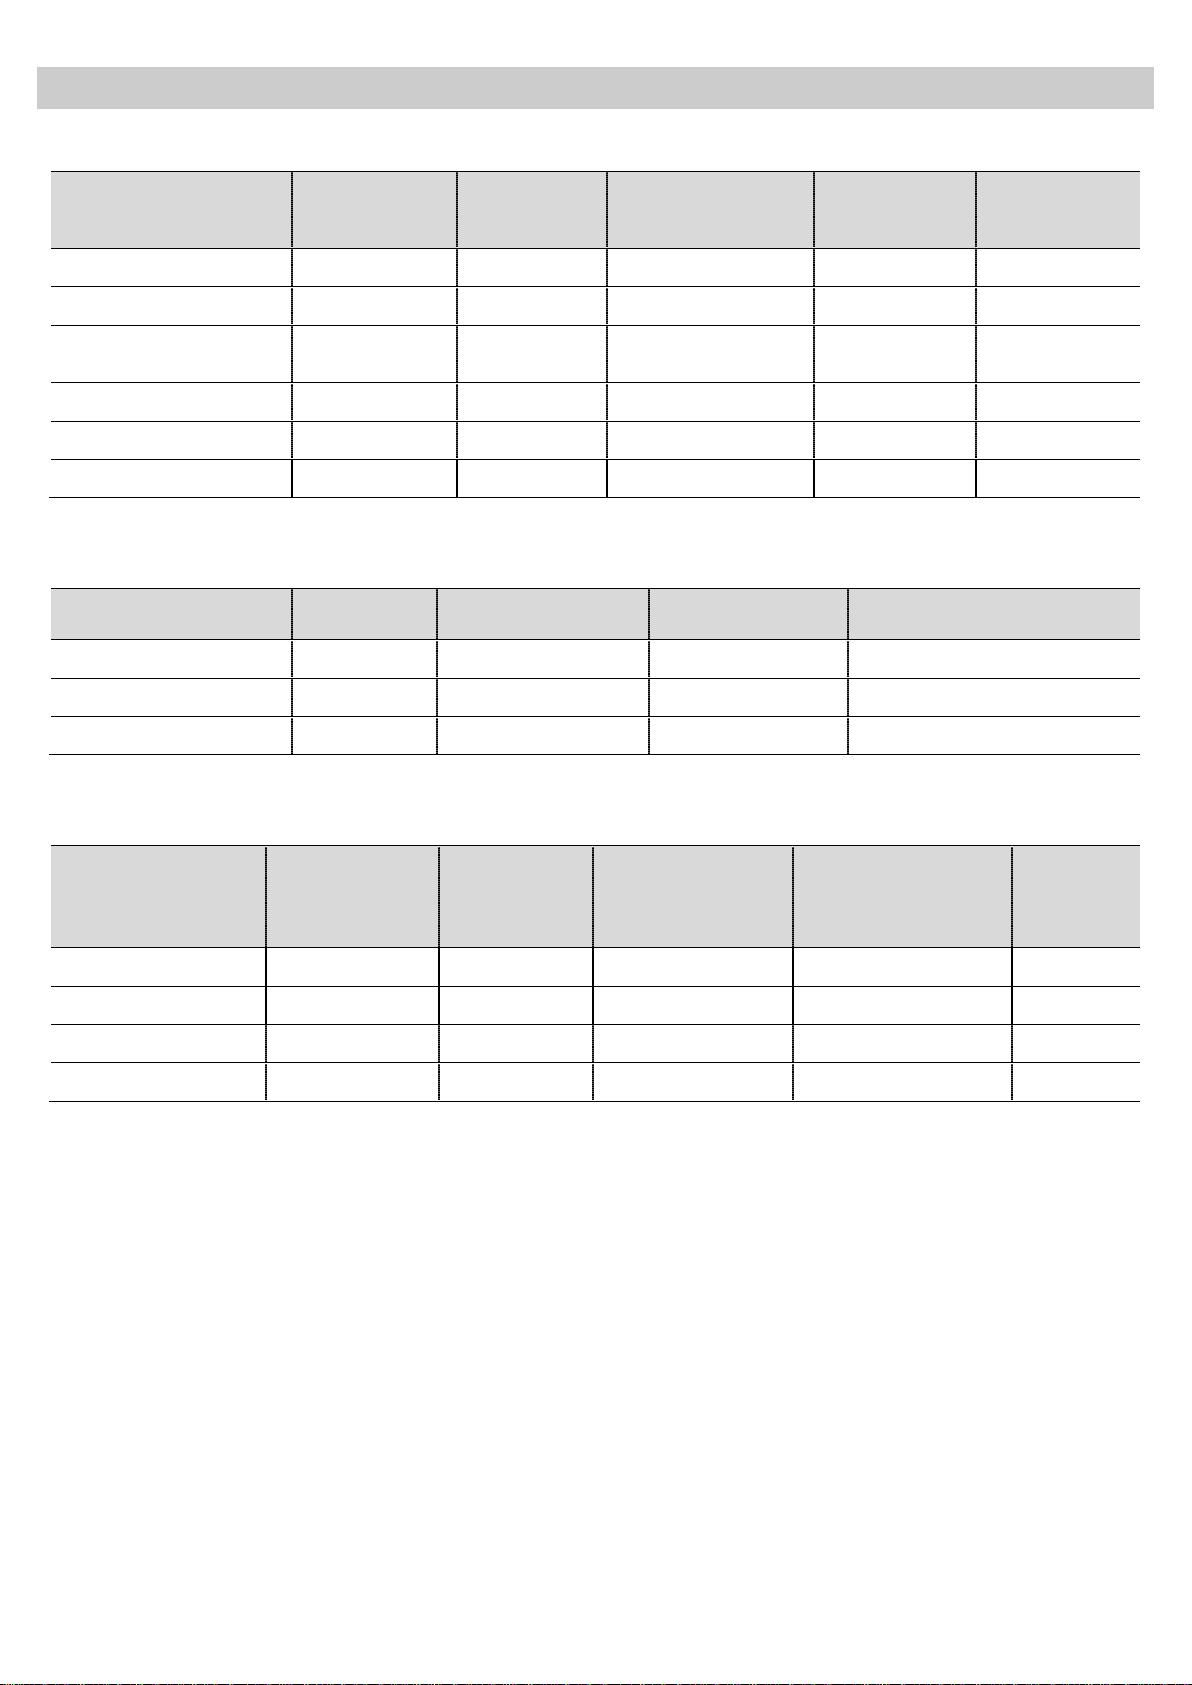
Type
Dureté de l’eau
Affichage
Ca + mg
(ppm)
Degrés anglais
[°da]
Degrés français
[°df]
Degrés
allemands
[°da]
Douce
0 à 150
0 à 11
0 à 15
0 à 8
1
Moyenne
151 à 350
12 à 25
16 à 35
9 à 20
2
Dure
501 à 500
26 à 35
36 à 50
21 à 28
3
Réglages de base
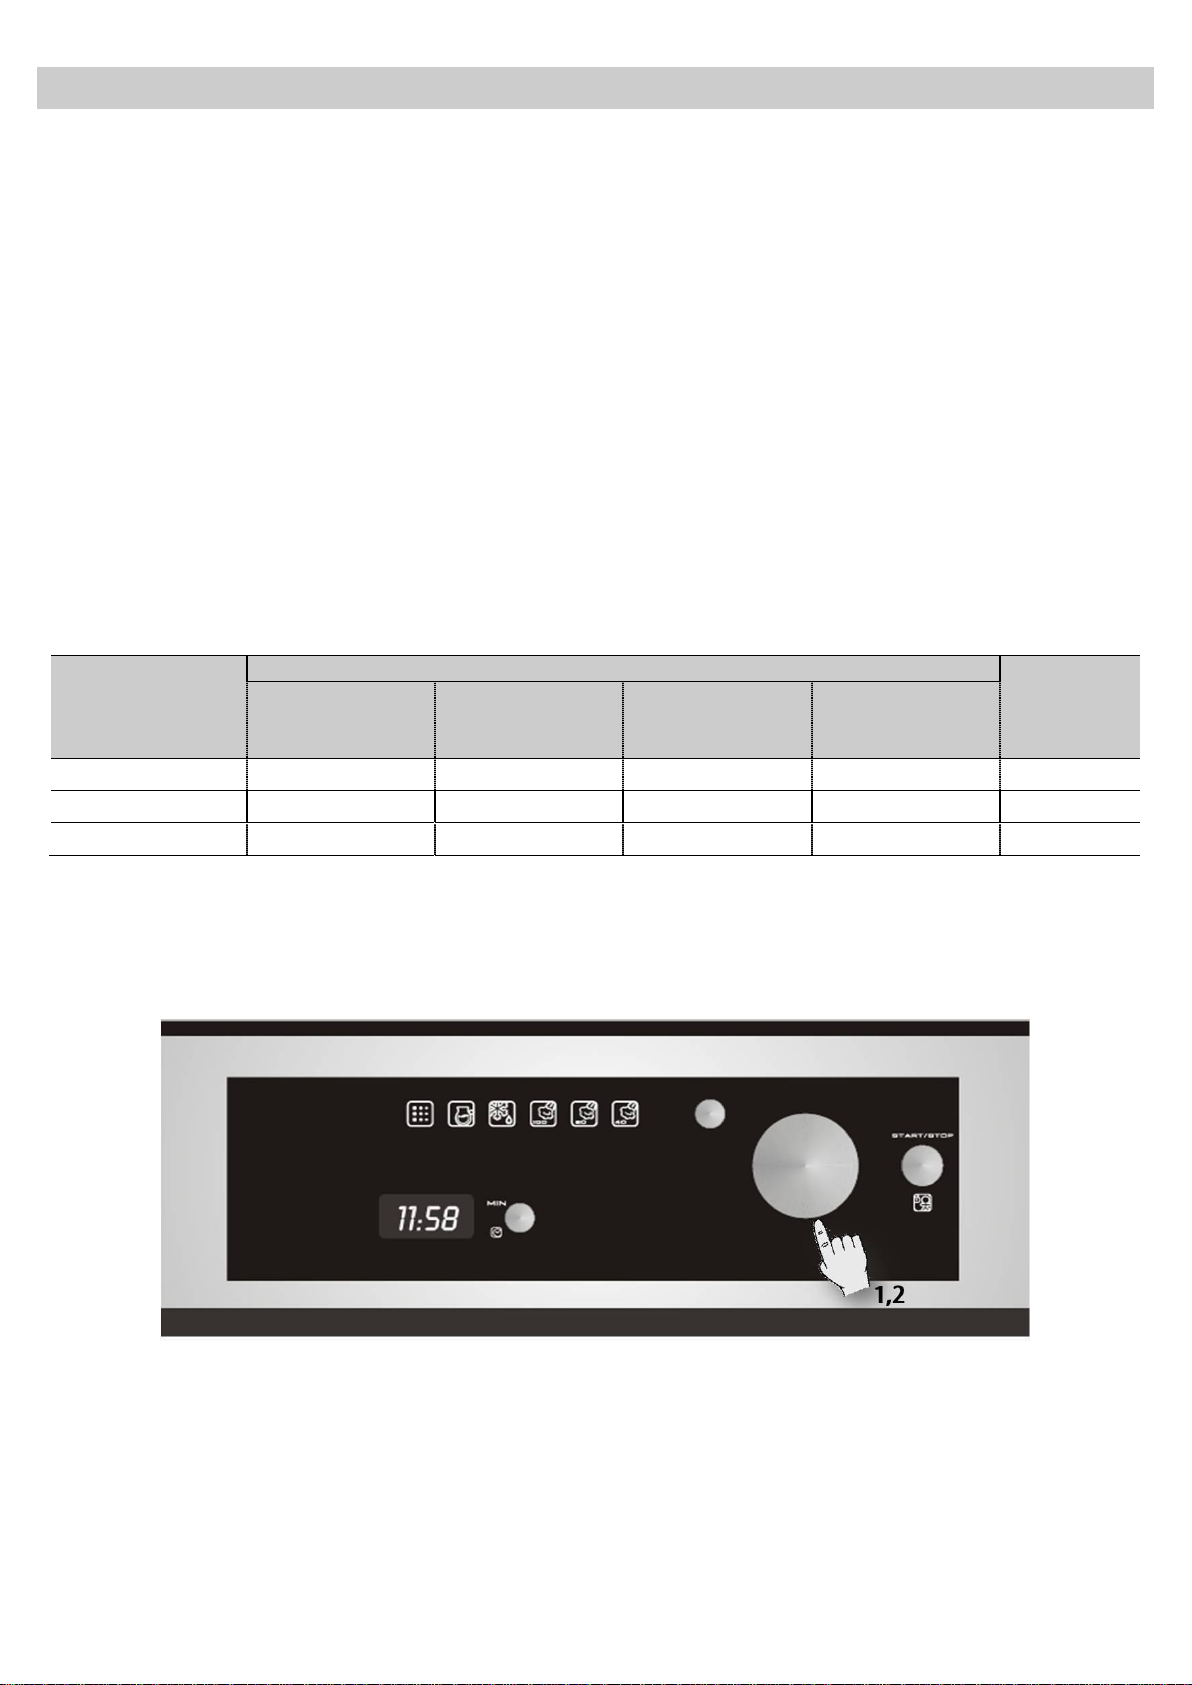
Réglage de la dureté de l’eau
Cet appareil est muni d‟un système qui vous
indique automatiquement lorsqu‟un détartrage est
nécessaire.
Si l‟eau de votre domicile est très douce (même
en utilisant un appareil de durcissement de l‟eau)
ou très dure (voir tableaux ci-dessous) le système
peut être optimisé grâce au réglage de la dureté
de l‟eau.
Pour régler les paramètres de dureté de l‟eau,
procédez comme suit :
1. Appuyez simultanément sur le bouton Start
(Démarrer)/Stop et sur le Bouton de
Sélection de la Fonction. Le chiffre de la
dureté se met à clignoter (il n‟est pas
nécessaire d‟appuyer sur les boutons après le
branchement de l‟appareil ou après une
coupure de courant).
2. Tournez le bouton rotatif pour régler la dureté
de l‟eau en suivant les indications du tableau
ci-dessous.
3. Appuyez sur le bouton de réglage de l‟heure
afin de choisir les paramètres. L‟écran affiche
l‟heure.
Blocage de sécurité
Le fonctionnement du four peut être bloqué (par exemple pour empêcher son utilisation par des
enfants).
1. Appuyez 3 secondes sur le bouton Start
(Démarrer)/Stop pour bloquer l‟appareil. Un
signal retentit et le mot « SAFE » s'affiche sur
l’écran. L'appareil est verrouillé et ne peut être
manipulé.
2. Appuyez à nouveau 3 secondes sur le bouton
Start (Démarrer)/Stop pour déverrouiller
l'appareil. Un signal retentit et l’écran affiche à
nouveau l‟heure.
Si vous voulez voir l‟heure, appuyez
brièvement sur le bouton Start
(Démarrer)/Stop.
Page 10
9
FR
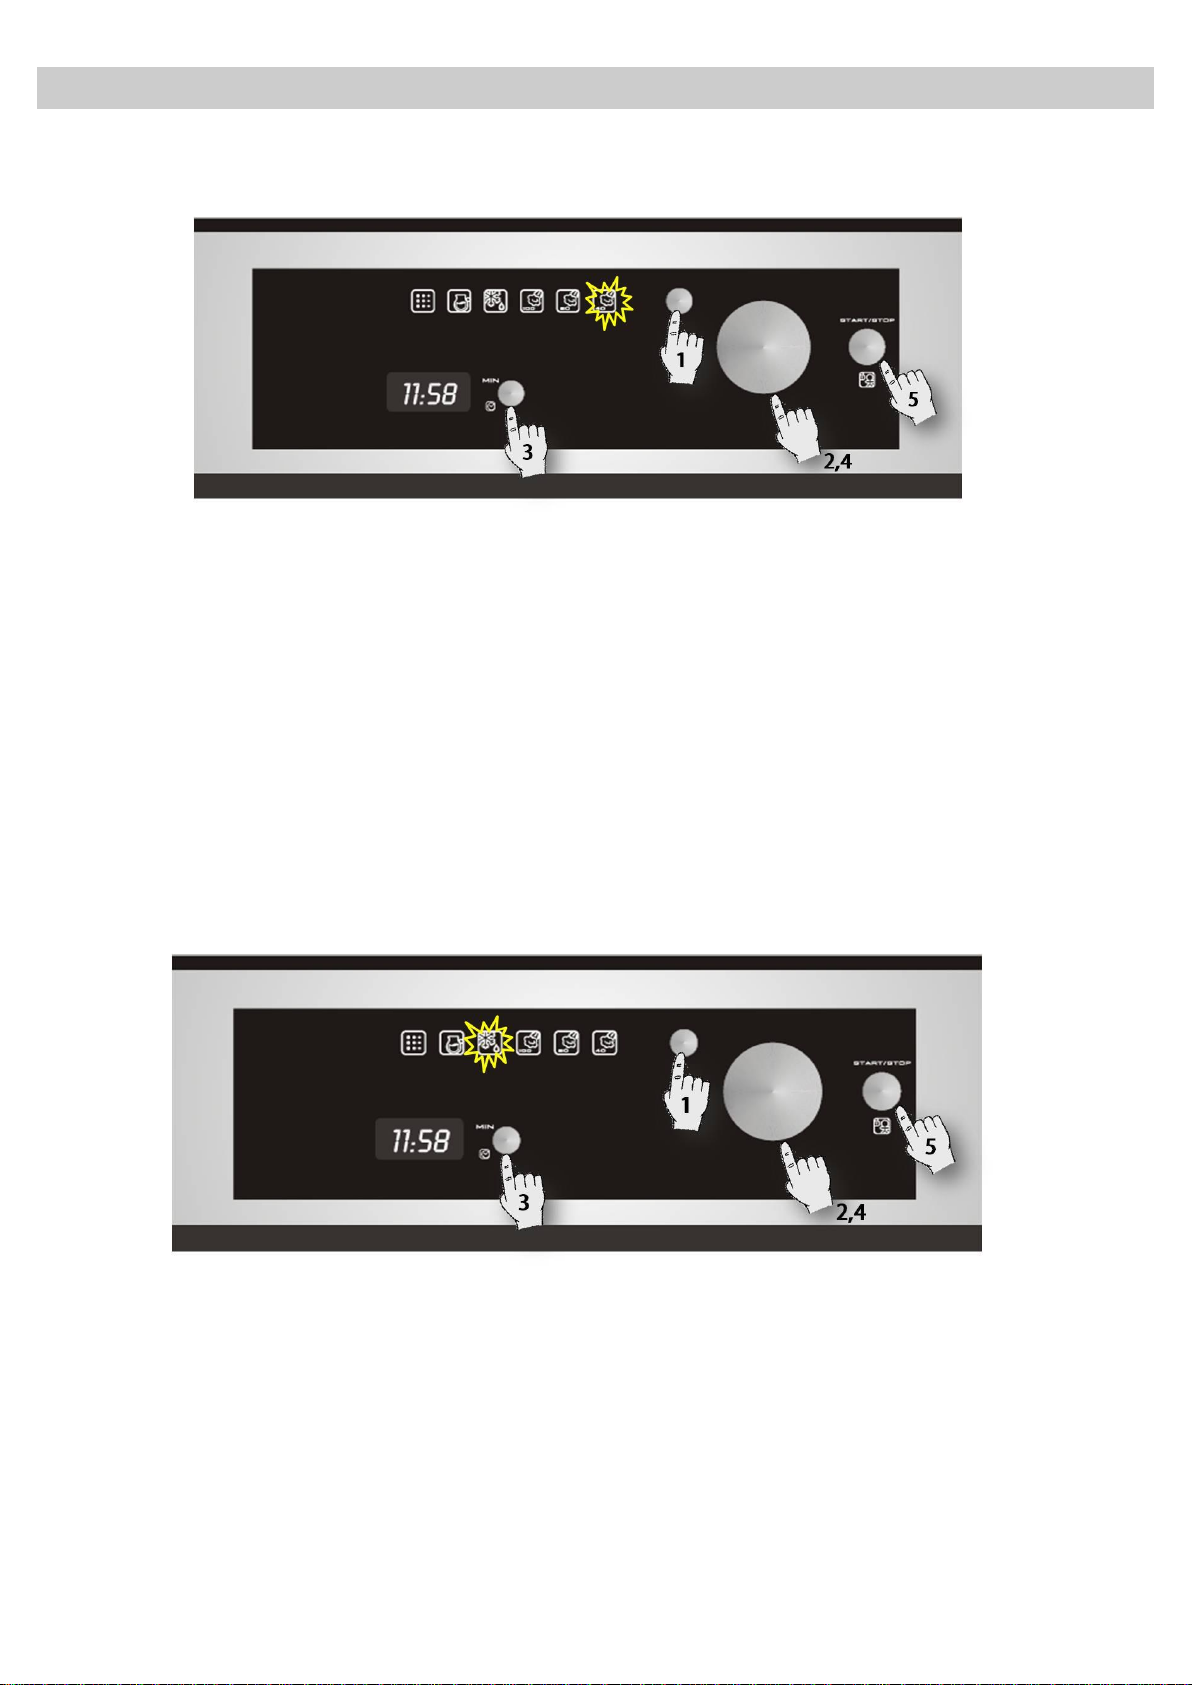
Fonctions de base
Cuisson vapeur 100 ºC
Utilisez cette fonction pour préparer et réchauffer les légumes, le riz, le poisson et la viande. Cette
fonction convient également pour extraire le jus de fruits rouges et pour décongeler et cuire des
légumes.
1. Appuyez sur le Sélecteur de Fonctions. L‟un
des voyants de fonction se met à clignoter.
2. Tournez le Bouton Rotatif dans n‟importe
quelle direction jusqu‟à ce que le chiffre « 100 »
clignote.
3. Appuyez sur le bouton de choix de la durée
pour modifier le temps de fonctionnement.
L‟écran d‟affichage clignote.
4. Choisissez le temps de fonctionnement
souhaité en tournant le Bouton Rotatif dans
n‟importe quelle direction (par ex. 9 minutes).
5. Appuyez sur le bouton START (DEMARRER).
Le four se met en marche.
Cuisson vapeur 80 ºC
Utilisez cette fonction pour pocher du poisson et de la viande, pour préparer des desserts et stériliser
des fruits.
1. Appuyez sur le Sélecteur de Fonctions. L'un
des voyants de fonction se met à clignoter.
2. Tournez le Bouton Rotatif dans n‟importe
quelle direction jusqu‟à ce que le chiffre « 80 »
clignote.
3. Appuyez sur le bouton de Réglage du Temps
de Fonctionnement pour modifier la durée de
la marche. L‟écran d‟affichage clignote.
4. Choisissez le temps de fonctionnement
souhaité en tournant le Bouton Rotatif dans
n‟importe quelle direction (par ex. 9 minutes).
5. Appuyez sur le bouton START (DEMARRER).
Le four se met en marche.
Page 11
10
FR
Fonctions de base
Cuisson vapeur 40 ºC
Utilisez cette fonction pour faire du yaourt et décongeler des aliments sensibles.
1. Appuyez sur le Sélecteur de Fonctions. L'un
des voyants de fonction se met à clignoter.
2. Tournez le Bouton Rotatif dans n‟importe
quelle direction jusqu‟à ce que le chiffre « 40 »
clignote.
3. Appuyez sur le bouton de Réglage du Temps
de Fonctionnement pour modifier la durée de
la marche. L‟écran d‟affichage clignote.
4. Choisissez le temps de fonctionnement
souhaité en tournant le Bouton Rotatif dans
n‟importe quelle direction (par ex. 9 minutes).
5. Appuyez sur le bouton START (DEMARRER).
Le four se met en marche.
Décongélation
Utilisez cette fonction pour décongeler des aliments avec précaution.
1. Appuyez sur le Sélecteur de Fonctions. L'un
des voyants de fonction se met à clignoter.
2. Tournez le Bouton Rotatif dans n‟importe
quelle direction jusqu‟à ce que le voyant de la
fonction Décongélation clignote.
3. Appuyez sur le bouton de Réglage du Temps
de Fonctionnement pour modifier la durée de
la marche. L‟écran d‟affichage clignote.
4. Choisissez le temps de fonctionnement
souhaité en tournant le Bouton Rotatif dans
n‟importe quelle direction (par ex. 9 minutes).
5. Appuyez sur le bouton START (DEMARRER).
Le four se met en marche.
Page 12
11
FR
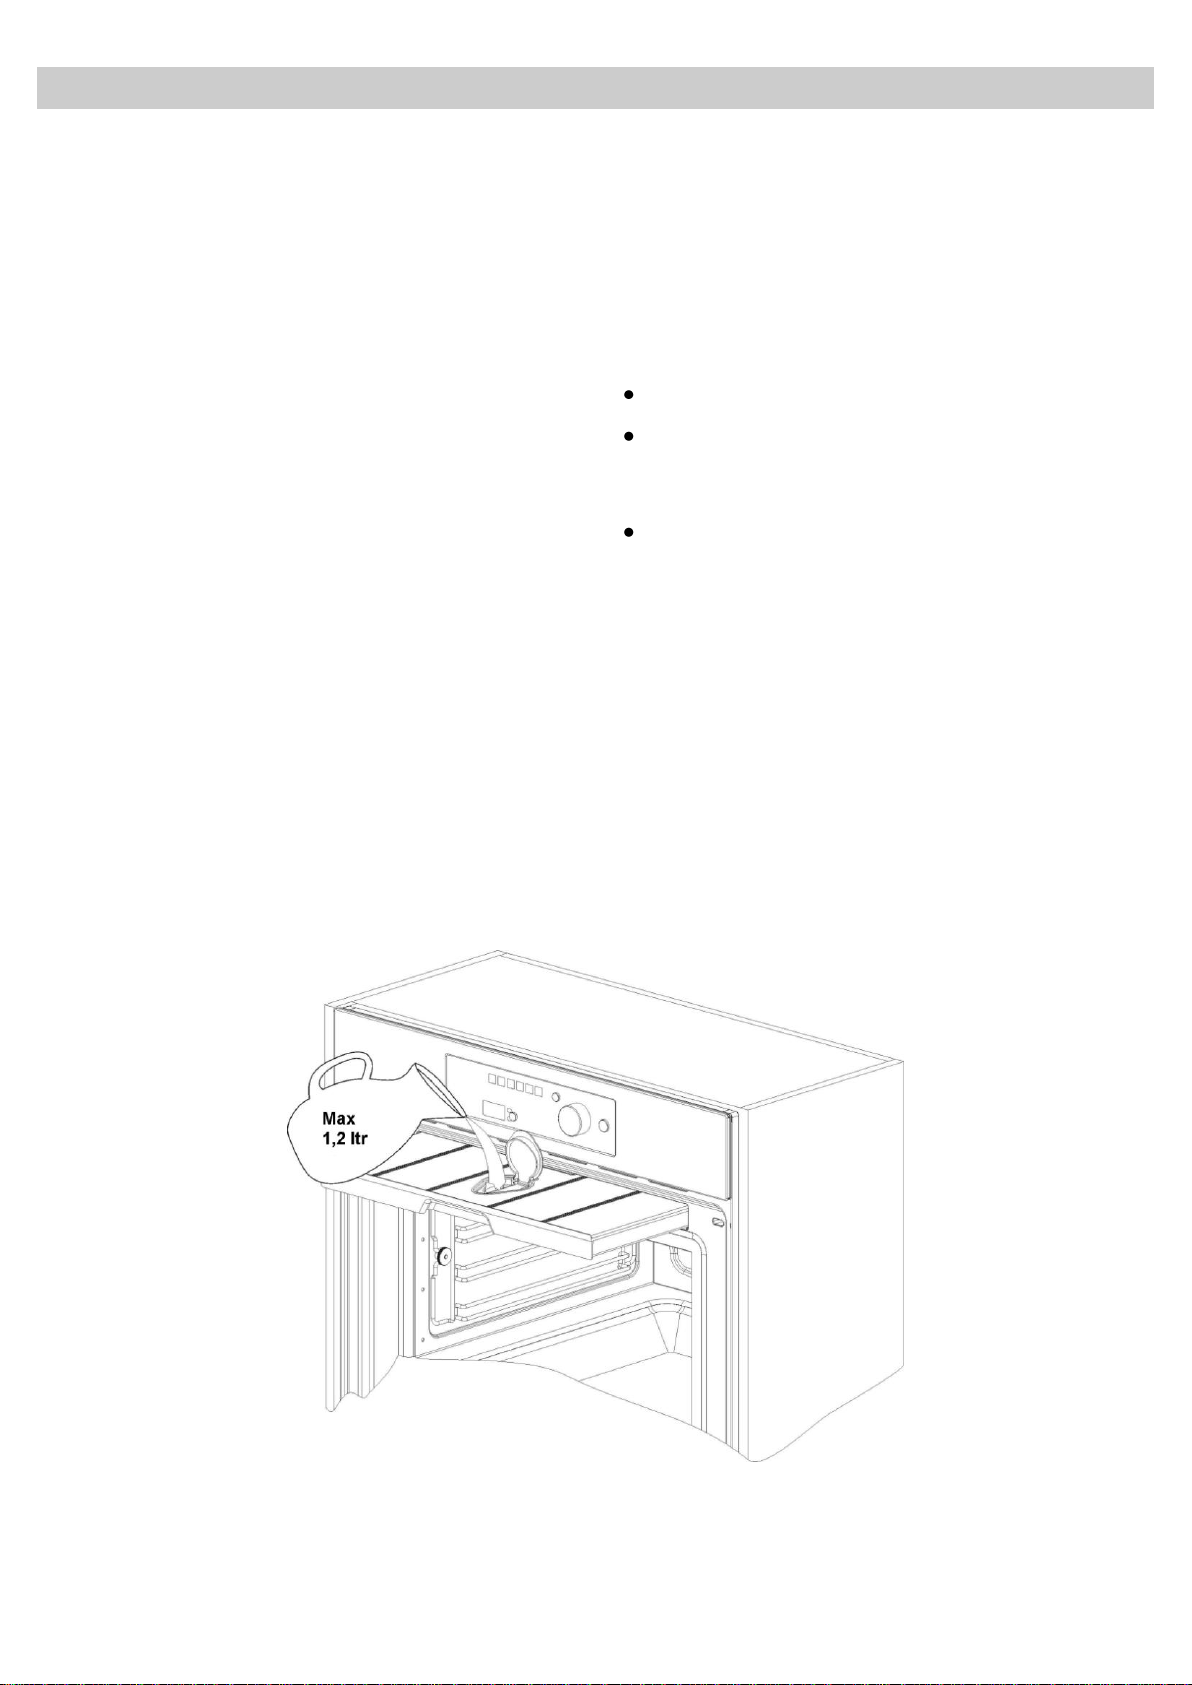
Remplissage de l'eau
Remplissage du réservoir d’eau
Le réservoir d‟eau doit toujours être rempli pour
toutes les fonctions.
Remplissez le réservoir d‟eau avec de l‟eau
potable froide jusqu‟au repère « MAX » et
introduisez-le dans la fente au-dessus de
l‟enceinte de cuisson. (Environ 1L.)
Le message « rES » signifie que le réservoir
d‟eau n‟est pas correctement placé.
Remettre de l’eau
La contenance du réservoir suffit normalement
pour une cuisson de 50-60 minutes.
Si le réservoir d‟eau doit être rerempli, le voyant
du réservoir se met à clignoter. Versez un
maximum de 0,5 litres pour être sûr que l’eau
ne déborde pas lors du repompage. RISQUE
DE DÉBORDEMENT.
Vider le réservoir d’eau
Lorsque l‟appareil est éteint, l‟eau résiduelle est
repompée dans le réservoir.
Cette information sera affichée jusqu‟à ce que
l‟eau atteigne une température de 75°C avant
d‟être repompée dans le réservoir.
Attention : l’eau contenue dans le réservoir
peut être chaude. Risque de brûlures !
Après le repompage de l'eau dans le réservoir,
l‟écran affiche le message « DEP ». Procédez
comme suit :
Retirez le réservoir de l‟appareil et videz-le.
Séchez le réservoir et replacez-le dans
l‟appareil. Essuyez l‟enceinte de cuisson pour
la sécher.
Laissez la porte ouverte jusqu‟à ce que
l‟appareil soit froid et complètement sec.
REMARQUE IMPORTANTE : Il est conseillé de
retirer et de vider le réservoir après chaque
cuisson. Cela évite le développement de
bactéries et la formation de calcaire dans
l’appareil.
Si vous voulez faire deux cuissons consécutives,
le réservoir ne doit pas être vidé. Le message
« DEP » s‟affiche à l‟écran.
Lors du repompage de l'eau, le message
« PUMP » s‟affiche.
Pour supprimer cet avertissement, appuyez sur le
bouton Stop. Une nouvelle cuisson peut être
effectuée sans retirer ni vider le réservoir d‟eau.
Page 13

12
FR
Pendant le fonctionnement…
Interruption d’une cuisson
Vous pouvez interrompre une cuisson à tout
moment en appuyant sur le bouton Start
(Démarrer)/Stop.
L'appareil est équipé d'une fonction d‟élimination
de la vapeur activée par le bouton Start
(Démarrer)/Stop. Cela empêche la vapeur de
s‟échapper lors de l‟ouverture de la porte.
Cette fonction dure environ trois minutes et le
message « VAP » est affiché pendant ce temps.
Attention ! Lorsque la porte est ouverte,
pendant ou après la cuisson, de la vapeur
brûlante s'échappe de l'appareil. Mettez-vous
sur le côté ou reculez-vous, pour éviter tout
risque de brûlures.
À ce moment :
La production de vapeur est interrompue.
Les parois de l‟enceinte de cuisson et le
réservoir d‟eau sont encore très chauds.
Risque de brûlures !
L‟affichage de l‟heure est interrompu et le
temps de fonctionnement restant est affiché
(s‟il a été réglé).
Si vous le souhaitez, vous pouvez alors :
1. Retourner ou mélanger les aliments ;
2. Modifier les paramètres de cuisson.
Fermez la porte et appuyez sur le bouton Start
(Démarrer)/Stop pour reprendre la cuisson.
Modification des paramètres
Annuler une cuisson
Si vous souhaitez annuler une cuisson, appuyez 3
secondes sur le bouton Start (Démarrer)/Stop.
3 signaux sonores retentissent et l’écran affiche
l‟heure.
Fin d’une cuisson
À la fin d‟une cuisson ou après avoir appuyé sur
le bouton Start (Démarrer)/Stop pour annuler
une cuisson, 3 signaux retentissent et le message
« End » s‟affiche. La fonction de réduction de
vapeur du four s‟enclenchera.
Cette fonction évacue progressivement la vapeur
de l‟enceinte de cuisson pour que moins de
vapeur ne s‟échappe de l'appareil lors de
l'ouverture de la porte.
Cette fonction prend à peu près 3 minutes et
pendant son fonctionnement, le mot « VAP » est
affiché.
Attention : Lorsque vous ouvrez la porte
pendant la cuisson ou à la fin de celle-ci,
prenez garde à l'évacuation de l'air chaud et /
ou de la vapeur qui s'échappe de l'enceinte de
cuisson. Reculez ou mettez-vous sur le côté
pour éviter tout risque de brûlures.
Le ventilateur de refroidissement fonctionne
encore un certain temps après que l'appareil ait
été éteint. C'est une fonction normale qui permet
de diminuer la température à l'intérieur du four.
Lorsque le message « DEP » s‟affiche, cela
signifie que l‟eau a été repompée et que vous
pouvez retirer le réservoir d‟eau.
Le temps de fonctionnement peut être modifié
pendant la marche de l‟appareil ou si la cuisson a
été interrompue, en tournant le bouton rotatif. La
nouvelle durée n‟est valable que lorsque
l‟affichage ne clignote plus.
La température ne peut être modifiée que lorsque
l‟appareil est éteint. Appuyez sur le Sélecteur de
fonctions et tournez le Bouton Rotatif jusqu‟à ce
que la nouvelle température clignote. Pour valider
la sélection, appuyez à nouveau sur le Sélecteur
de Fonctions.
Retirez le réservoir et séchez-le complètement.
Laissez refroidir l‟enceinte de cuisson puis
essuyez-la avec un torchon. La porte doit rester
ouverte encore un moment pour que l‟appareil soit
complètement sec.
Eau résiduelle dans le four
Afin de diminuer la quantité d'eau résiduelle dans
le four, il est conseillé de placer un plateau en
métal sur la grille inférieure. Le liquide condensé
commence à suinter de la nourriture et goutte en
eau résiduelle dans le plateau. Ce qui reste d'eau
résiduelle peut être facilement essuyée avec un
chiffon.
Page 14
13
FR
Poisson
Quantité
Température
ºC
Temps de cuisson
(min.)
Récipient
Niveau des
supports en
partant du bas
Dorade
800-1200 g
80
30-40
Bac perforé
2
Truite
4 x 250 g
80
20-25
Bac perforé
2
Filet de saumon
500-1000 g
80
15-25
Bac perforé
2
Truite saumonée
1000-1200 g
80
25-35
Bac perforé
1/2
Crevettes
500-1000 g
80
15-20
Bac perforé
2
Moules vertes
1000-1500 g
100
25-35
Bac perforé
2
Filet de flétan
500-1000 g
80
20-25
Bac perforé
2
Bucardes
500-1000 g
100
10-20
Bac perforé
2
Homard
800-1200 g
100
25-30
Bac perforé
1/2
Filet de cabillaud
1000-1200 g
80
20-25
Bac perforé
2
Moules
1000-1200 g
100
15-25
Bac perforé
2
Omble
4 x 250 g
80
25-30
Bac perforé
2
Haddock
1000-1200 g
80
20-25
Bac perforé
2
Filet de thon
500-1000 g
80
15-20
Bac perforé
2
Sandre
4 x 250 g
80
25-30
Bac perforé
2
Tableaux et conseils
Utilisation des accessoires
Le bac de cuisson perforé sert à étuver des
légumes, de la viande ou de la volaille frais ou
congelés.
Il est donc important que le bac de cuisson nonperforé soit placé au premier niveau des supports
en partant du bas. L‟humidité va ainsi s‟y déposer
en gouttelettes et ne salira pas l‟appareil. Le bac
perforé contenant les aliments doit être placé au
deuxième niveau en partant du bas.
Le bac non-perforé sert à étuver les aliments
délicats, par ex. de la compote, des quenelles et
les plats à base d'eau.
La grille s‟utilise pour étuver les récipients de
cuisson plus petits que l‟emplacement prévu comme
par exemple des coupes à dessert et pour
régénérer des assiettes.
Pour des informations plus précises, consulter les
tableaux.
Les valeurs de temps de cuisson et de
températures sont fournies à titre indicatif. En
fonction du type d‟aliment et de sa constitution, le
temps de cuisson réel peut varier.
Poisson
Page 15
14
FR
Viande
Quantité
Température
ºC
Temps de cuisson
(min.)
Accessoire/
Récipient
Niveau des
supports en
partant du bas
Boulettes de poulet
4-10
100
40-45
Bac perforé
2
Poitrine de poulet
4-6
100
25-35
Bac perforé
2
Côte de porc façon
Kassel
500g -1000g
100
40-50
Bac perforé
2
Escalope de dinde
4-8
100
20-25
Bac perforé
2
Filet de porc entier
4-8
100
20-30
Bac perforé
2
Saucisses
80-100
10-15
Bac perforé
2
Œufs
Température
en ºC
Temps de cuisson
en min.
Récipient
Niveau des supports en
partant du bas
Œufs au plat
100
10-15
Grille
2
Œufs durs
100
15
Grille
2
Œufs à la coque
100
10-12
Grille
2
Garniture
Quantité
Température
en ºC
Temps de cuisson
en min.
Récipient
Niveau des
supports
en partant
du bas
Céréales + liquide
200g + 400ml
100
30-35
Grille, coupe en verre
2
Semoule + liquide
200g + 300ml
100
10-20
Grille, coupe en verre
2
Lentilles + liquide
200g + 375ml
100
20-50
Grille, coupe en verre
2
Riz + liquide
200g + 250ml
100
25-40
Grille, coupe en verre
2
Tableaux et conseils
Viande
Œufs
Garniture
Page 16

15
FR
Légumes/ frais
Température
en ºC
Temps de cuisson
en min.
Récipient
Niveau des
supports
en partant
du bas
Aubergines
En tranches
100
15-20
Bac perforé
2
Haricots 100
35-45
Bac perforé
2
Brocoli
Fleurs avec la tige
100
25-30
Bac perforé
2
Brocoli
Fleurs sans la tige
100
15-20
Bac perforé
2
Choux-fleur
Bouquets
100
25-30
Bac perforé
2
Choux-fleur
La tête entière
100
40-45
Bac perforé
1
Pois 100
30-35
Bac perforé
2
Fenouil
En lamelles
100
15-20
Bac perforé
2
Fenouil
Coupé en deux
100
20-30
Bac perforé
2
Pommes de terre
avec peau
Entières, très petites
100
20-25
Bac perforé
2
Pommes de terre
avec peau
Entières, très grosses
100
45-50
Bac perforé
2
Pommes de terre
sans peau
En cubes
100
20-25
Bac perforé
2
Chou-rave
En lamelles
100
20-25
Bac perforé
2
Haricots mange-tout
100
15-20
Bac perforé
2
Carottes
En rondelles
100
25-30
Bac perforé
2
Épis de maïs
100
50-60
Bac perforé
2
Poivrons
En lamelles
100
12-15
Bac perforé
2
Piments 100
12-15
Bac perforé
2
Champignons
En quartiers
100
12-15
Bac perforé
2
Poireaux
En rondelles
100
10-12
Bac perforé
2
Choux de Bruxelles
100
25-35
Bac perforé
2
Céleri
En lamelles
100
15-20
Bac perforé
2
Asperges
100
20-35
Bac perforé
2
Épinards
100
12-15
Bac perforé
2
Céleri en branches
100
25-30
Bac perforé
2
Courgettes
En rondelles
100
12-18
Bac perforé
2
Tableaux et conseils
Légumes
Page 17

16
FR
Quenelles
Température en
ºC
Temps de cuisson en min.
Récipient
Niveau des
supports
en partant
du bas
Buchtel
100
20-30
Bac non perforé
2
Dampfnudel
100
15-20
Bac non perforé
2
Hefeklöße
100
15-25
Bac non perforé
2
Semmelknödel
100
20-25
Bac non perforé
2
Serviettenkloß
100
25-30
Bac non perforé
2
Desserts
Quantité
Température en
ºC
Temps de
cuisson en min.
Récipient
Niveau des
supports en
partant du
bas
Compote de
pommes
500-1500 g
100
15-25
Bac non perforé
2
Compote de poires
500-1500 g
100
25-30
Bac non perforé
2
Crème brûlée
80
20-25
Grille-coupes
2
Crème caramel
80
25-30
Grille-coupes
2
Yaourt 40
4-6 h.
Grille-coupes
2
Compote de
pêches
500-1500 g
100
15-20
Bac non perforé
2
Fruits
Quantité
Température
en ºC
Temps de
cuisson en min.
Récipient
Niveau des
supports
en partant
du bas
Poires
4-6 verres de 1L
100
30-35
Grille
1
Cerises
4-6 verres de 1L
80
30-35
Grille
1
Pêches
4-6 verres de 1L
80
30-35
Grille
1
Prunes
4-6 verres de 1L
80
30-35
Grille
1
Tableaux et conseils
Quenelles
Desserts
Fruits (Stériliser/réduire)
Page 18

17
FR
Réchauffer
Quantité
Température
en ºC
Temps de
cuisson en
min.
Récipient
Niveau des
supports
en partant
du bas
Assiettes
1-2
100
12-15
Grille
2
Assiettes
3-4
100
15-20
Grille
2
Plats préparés
100
15-20
Grille
2
Légumes
Quantité
Température
en ºC
Temps de
cuisson en
min.
Récipient
Niveau des
supports
en partant
du bas
Par ex. haricots, poireaux
100
10-12
Bac perforé
2
Chou vert
1000-2000 g
100
12-16
Bac perforé
2
Chou frisé
10-20
100
12-15
Bac perforé
2
Chou blanc, entier
2000-2500 g
100
30-45
Bac perforé
1
Tomates pelées
80
12
Grille
2
Tableaux et conseils
Régénérer
Blanchir
Page 19

18
FR
Légumes/ garnitures
Température
en ºC
Temps de
cuisson en min.
Récipient
Niveau des
supports
en partant
du bas
Brocoli
Fleurs avec tige
100
15-20
Bac perforé
2
Macédoine de
légumes
100
15-20
Bac perforé
2
Feuilles d‟épinards
Portions
100
10-15
Bac non perforé
2
Chou-fleur
Bouquets
100
15-20
Bac perforé
2
Haricots 100
15-25
Bac perforé
2
Chou vert
Gros morceau
100
25-35
Bac non perforé
2
Carottes
En rondelles
100
15-20
Bac perforé
2
Choux de Bruxelles
100
20-25
Bac perforé
2
Asperges
100
25-30
Bac perforé
2
Plats préparés
100
selon le besoin
Grille
2
Pain 100
10-25
Grille
2
Riz 100
15-25
Bac non perforé
2
Lentilles 100
15-20
Bac non perforé
2
Nouilles 100
15-20
Bac non perforé
2
Tableaux et conseils
Décongeler
Cuisson sur 2 niveaux
Quelques consignes:
Pour une cuisson sur deux niveaux, les récipients
doivent toujours être placés aux niveaux 2 ou 3 et
au niveau 1 en partant du bas.
Les différents temps de cuisson sont contrôlés
comme suit :
Les aliments qui nécessitent un temps de cuisson
plus long doivent être placés dans la partie
supérieure du four. Les aliments nécessitant un
temps de cuisson plus court sont donc placés au
premier niveau.
Un exemple : Légumes, pommes de terre et
poisson.
Placez les légumes et les pommes de terre dans
des récipients sur la grille au niveau 2 ou 3 en
partant du bas.
Placez le poisson au premier niveau en partant
d‟en bas.
Si vous utilisez le bac perforé pour cuire du
poisson, placez le bac non perforé en bas de
l‟appareil pour recueillir les gouttes de jus de
poisson. Ainsi, l'appareil reste propre.
Temps de cuisson : Légumes et pommes de terre
25-35 min.
Temps de cuisson : Poisson (selon l'espèce) 15-
25 min.
Sélectionnez une durée de cuisson maximale. Les
différents niveaux permettent de cuire les mets
pour que tout soit prêt en même temps et que rien
ne soit trop cuit.
Page 20

19
FR
Nettoyage et entretien du four
Nettoyage de l’enceinte de cuisson
N‟utilisez jamais de produits nettoyants agressifs
comme des éponges à récurer, des éponges
métalliques, etc. Cela peut endommager la
surface de l'enceinte de cuisson.
Nettoyez l‟enceinte de cuisson à chaud avec un
chiffon humide. Pour terminer, essuyez avec un
chiffon sec.
Pour faciliter le nettoyage, les supports latéraux
peuvent être décrochés (voir chapitre suivant).
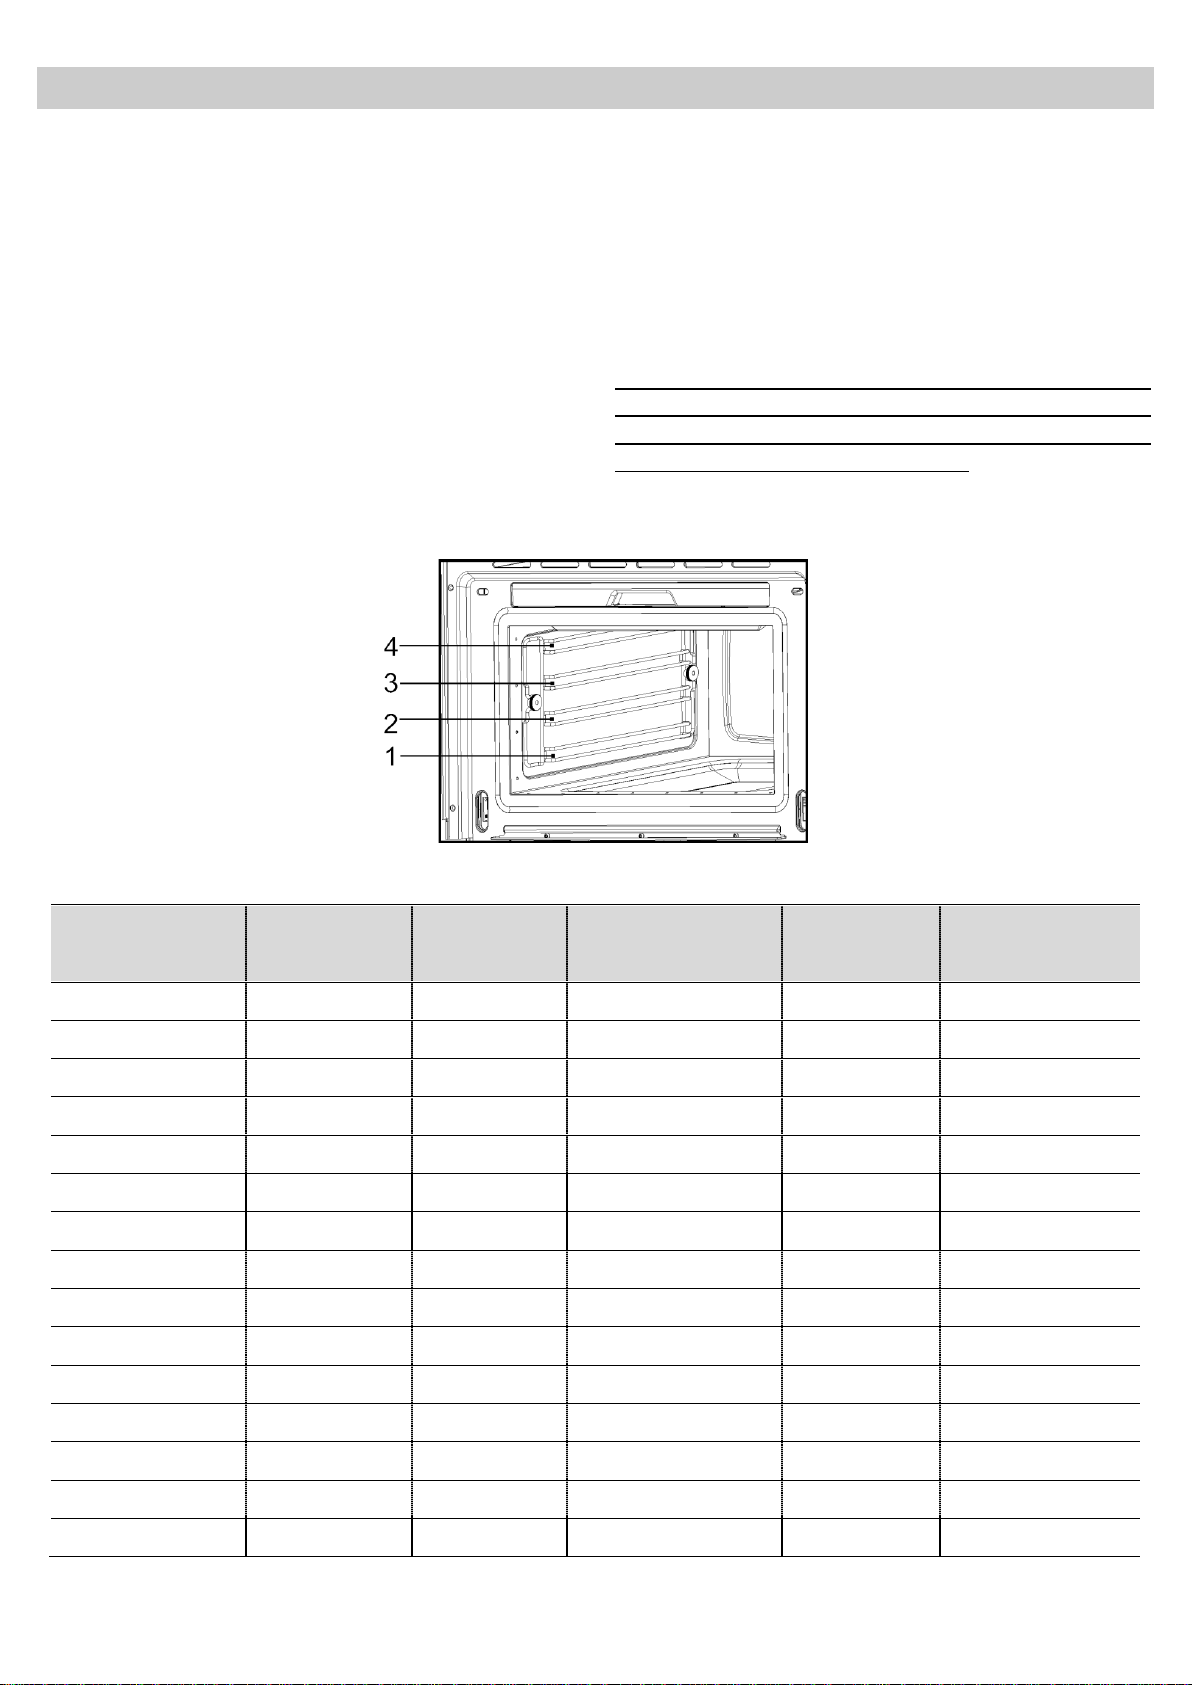
Décrocher les supports latéraux
Dévissez l‟écrou 1 à l‟avant du support dans le
sens inverse des aiguilles d‟une montre.
Tirez légèrement le support vers l‟avant et sortez-
le du four.
Pour remettre en place les supports, glissez-les
dans l‟écrou 2.
Vissez l‟écrou 1 dans le sens des aiguilles d‟une
montre jusqu‟à la butée, revissez fermement
l‟écrou 2.
Dévissez légèrement l‟écrou 2 de la surface de
fixation du support dans le sens inverse des
aiguilles d'une montre. Ne pas ôter l'écrou.
Page 21

20
FR
Nettoyage et entretien du four
Enlever la porte de l’appareil
Ouvrez la porte au maximum.
Placez deux chevilles dans les gongs de la porte.
Fermez la porte juste ce qu‟il faut pour pouvoir la
soulever.
Pour remettre la porte en place, insérez les
charnières dans les trous.
Ouvrez la porte au maximum et enlevez les
chevilles.
Page 22

21
FR
Dureté de l’eau
Détartrage après
Très douce
18 mois
Moyenne
9 mois
Très dure
6 mois
Nettoyage et entretien du four
Détartrage
A chaque fois que de la vapeur se produit,
indépendamment de la dureté de
l'approvisionnement en eau local (par exemple, le
calcaire présent dans l'eau), du calcaire se forme
à l'intérieur du générateur de vapeur.
La fréquence du détartrage dépend de la dureté
de l‟eau et de la fréquence d'utilisation. Si le four
est utilisé à raison de 4x30 minutes par semaine,
le détartrage doit s'effectuer comme suit en
fonction de la dureté de l'eau :
L‟appareil détecte automatiquement lorsqu‟un
détartrage est nécessaire. Le voyant de
détartrage s‟allume. Si le détartrage n‟est pas
effectué, le voyant se met à clignoter. Si après
plusieurs cuissons, l'appareil n'est toujours pas
détartré, le fonctionnement sera bloqué. Le
message « CAL » s'affiche et les voyants
clignotent.
Solutions détartrantes appropriées
Pour le détartrage, utilisez le produit détartrant
« durgol ».
Cette solution permet un détartrage professionnel
et délicat de votre appareil. Vous la trouverez
dans les Centres de Manutention.
Attention ! N’utilisez pas de vinaigre ni de
produits à base de vinaigre puisque ceux-ci
peuvent endommager le circuit interne du
four.
Les solutions détartrantes traditionnelles ne sont
pas appropriées puisqu'elles peuvent contenir
certains agents moussants.
REMARQUE IMPORTANTE : Si l’appareil n’est
pas détartré, l’appareil fonctionnera moins
bien ou sera endommagé.
Page 23

22
FR
Nettoyage et entretien du four
Procédure de détartrage
Attention : Pour des raisons de sécurité, le
processus de détartrage, ayant une durée
d’environ 45 minutes, ne peut être interrompu.
L'appareil peut être détartré que la porte de
l'appareil soit ouverte ou fermée. L'appareil doit
être éteint pour que le cycle de détartrage
commence.
Pour lancer le cycle de détartrage, procédez
comme suit :
1. Appuyez simultanément sur les boutons de
Sélection de Fonction et de Réglage du
Temps de Fonctionnement. Le message
« CAL » apparaît et un signal retentit.
2. Appuyez sur le bouton Start (Démarrer)/Stop.
3. L‟écran affiche « 0.5L », enlevez le réservoir
d‟eau.
4. Versez 0,5 litre de solution détartrante
appropriée dans le réservoir d‟eau et remettezle en place.
5. Appuyez sur le bouton Start (Démarrer)/Stop.
Le détartrage commence et prend environ 30
min.
6. Lorsque l‟écran affiche « 1.0L » en clignotant
et qu‟un signal retentit, le réservoir d‟eau doit
être retiré et vidé.
7. Nettoyez le réservoir d‟eau et remplissez-le
avec 1 litre d‟eau froide. Remettez le réservoir
d'eau en place.
8. Appuyez sur le bouton Start (Démarrer)/Stop.
Le premier cycle de rinçage commence.
9. Lorsque l‟écran affiche à nouveau « 1.0L » en
clignotant et qu‟un signal retentit, le réservoir
d‟eau doit être retiré et vidé.
10. Remplissez le réservoir d‟eau avec 1 litre
d‟eau froide et replacez-le.
12. Appuyez sur le bouton Start
(Démarrer)/Stop. Le deuxième cycle de
rinçage commence.
13. Lorsque le cycle de rinçage est terminé,
l‟affichage indique « End ».
14. Retirez, videz et séchez le réservoir d‟eau.
Page 24

23
FR
Nettoyage et entretien du four
ATTENTION ! Le nettoyage doit être effectué
quand le four est débranché de l'alimentation
électrique. Retirez la prise du mur ou
débranchez le circuit d'alimentation du four.
N'utilisez pas de produits de nettoyage
agressifs ou abrasifs, ni frottoirs, ni objets
pointus qui peuvent rayer les parois.
N'utilisez pas d'appareils de nettoyage à haute
pression ou qui projettent de la vapeur.
Surface avant
Un chiffon humide suffit à nettoyer l‟appareil. Si
l‟appareil est très encrassé, utilisez de l‟eau
additionnée de quelques gouttes de produit
vaisselle. Essuyez ensuite l‟appareil avec un
chiffon sec.
Pour les fours dont le devant est en
aluminium, utilisez un produit doux pour les vitres
et un chiffon doux ne laissant pas de fibres.
Nettoyez horizontalement sans exercer de
pression sur la surface.
Intérieur du four
Après chaque utilisation, nettoyez les parois
intérieures avec un chiffon humide. Laissez la
porte ouverte afin que l‟enceinte de cuisson
refroidisse et sèche.
Pour les saletés les plus difficiles à enlever,
utilisez un produit de nettoyage non agressif.
N'utilisez pas de sprays pour four ni d'autres
produits de nettoyage agressifs ou abrasifs.
Maintenez la porte et les parois de l’appareil
propres en permanence afin de garantir son
parfait fonctionnement.
Évitez que de l'eau entre dans les orifices de
ventilation du four.
Le cache en verre de la lampe se trouve sur le
plafond de l‟appareil et peut facilement être
enlevé pour être nettoyé. Dévissez-le et nettoyezle avec de l'eau additionnée de produit vaisselle.
Accessoires
Retirez immédiatement les taches de calcaire,
graisse, amidon et blanc d'œufs. Elles peuvent
provoquer de la corrosion.
Évitez que de l'eau entre dans le four.
Nettoyez les accessoires après chaque utilisation.
S'ils sont très sales, laissez-les d'abord tremper,
puis lavez-les avec une brosse et une éponge.
Les accessoires peuvent être lavés au lavevaisselle.
Page 25

24
FR
Que faire en cas de mauvais fonctionnement?
ATTENTION ! Toute réparation ne doit être
effectuée que par un technicien spécialisé.
Toute intervention effectuée par une personne
autre que la personne autorisée par le
fabricant est dangereuse.
Les problèmes suivants peuvent être résolus sans
appeler l‟Assistance Technique :
L'écran ne s'allume pas ! Vérifiez si :
- L'affichage de l'heure a été masqué (voir
chapitre Réglages de base).
Rien ne se passe lorsque vous appuyez sur
les touches ! Vérifiez si :
- Le blocage de sécurité est actif (voir chapitre
Réglages de base).
Le four ne fonctionne pas ! Vérifiez si :
- La prise est correctement branchée au mur,
- Le circuit d'alimentation du four est branché.
Pendant le fonctionnement du four, des
bruits étranges se font entendre ! Vérifiez si :
- Il s‟agit de bruits liés au fonctionnement qui
peuvent se produire pendant la production de
vapeur, par exemple lors du pompage de l'eau
par le générateur de vapeur.
Après la fin d'un processus de cuisson, un
bruit retentit ! Ce n‟est pas un problème.
- Le ventilateur de refroidissement fonctionne
encore un moment. Il s‟éteint lorsque la
température est suffisamment redescendue.
L’appareil fonctionne mais l’éclairage
intérieur n’est pas allumé !
- Si toutes les fonctions marchent correctement,
alors la lampe est probablement grillée. Vous
pouvez continuer à utiliser l‟appareil.
Remplacement de la lampe
Procédez comme suit pour remplacer la lampe :
- Débranchez le four de l'alimentation électrique,
en retirant la prise du mur ou en coupant le
circuit d'alimentation du four.
- Dévissez et enlevez le couvercle en verre de la
lampe (1).
- Retirez la lampe halogène (2). Attention ! La
lampe peut être très chaude.
- Installez une nouvelle lampe E14 230-240V /
15W. Suivez les instructions du fabricant de la
lampe.
- La vapeur à l'intérieur de la cavité produit une
accumulation de pression et parfois les parois
de la cavité peuvent produire du bruit quand
elles y réagissent.
- Ces bruits sont normaux, il n‟y a aucun
problème.
Les aliments ne chauffent pas ou chauffent
très lentement ! Vérifiez si :
- Vous avez choisi la bonne température et la
bonne durée de cuisson,
- Vous avez placé à l'intérieur du four une
quantité d'aliments plus importante ou plus
froide que d'habitude.
Si le message « Err_ » s’affiche, veuillez
contacter le Service Client.
- Revissez le couvercle en verre de la lampe (1).
- Rebranchez l'appareil au circuit électrique.
Page 26

25
FR
Symbole
Fonction
Aliments
Cuisson vapeur 100 ºC
Cuisson de toute sorte de légumes, pâtes, compote, poisson et de
viande. Régénérer.
Extraire le jus de fruits rouges.
Cuisson vapeur 80 ºC
Pocher du poisson et de la viande.
Cuisson vapeur 40 ºC
Préparer du yaourt.
Décongeler & cuire
Décongeler et préparer des légumes.
Affichage
Description
Détartrage
1
Eau douce.
2
Eau moyennement dure.
3
Eau dure.
CAL
L‟appareil doit être détartré.
Message clignotant, début du détartrage.
0.6L
Versez 0,5 litre de solution anticalcaire dans le réservoir d‟eau.
1.0L
Pour le rinçage, versez 1 litre d‟eau froide dans le réservoir d‟eau.
Réservoir d’eau
Le réservoir d‟eau est absent.
Retirez, videz et replacez le réservoir d‟eau.
Réduction de vapeur
VAP
Processus de réduction de vapeur en cours.
pump
Arrivée de l‟eau froide dans le générateur de vapeur et écoulement de l‟eau chaude
dans le réservoir d‟eau.
FULL
Retirez, videz et replacez le réservoir d'eau.
Avertissements du système
La température dans la carte de circuit imprimée est trop élevée.
Caractéristiques techniques
Description des fonctions
Affichage
Spécifications
Tension .............................................................................................. (Voir plaque des caractéristiques)
Puissance .......................................................................................... 1500 W
Dimensions hors-tout (L x H x L) ....................................................... 595 x 455 x 472 mm
Dimensions de la cavité (L x H x L) ................................................... 420 x 210 x 390 mm
Capacité du four ................................ ................................ ................ 35 l
Poid ................................................................................................... 32 kg
Page 27

26
EN
We ask you to read the instructions in this booklet
very carefully as this will allow you to get the best
results from using your microwave oven.
KEEP THE DOCUMENTATION OF THIS
PRODUCT FOR FUTURE REFERENCE.
Always keep the instruction manual handy. If
you lend the microwave oven to someone else
give them the manual as well!
Environmental protection
Disposal of the packaging
The packaging bears the Green Dot mark.
Dispose of all the packaging materials such as
cardboard, expanded polystyrene and plastic
wrapping in the appropriate bins. In this way you
can be sure that the packaging materials will be
re-used. Keep all packaging away from small
children as it may present suffocation/choking
hazard.
Disposal of equipment no longer used
According to European Directive 2002/96/EC on
the management of waste electrical and electronic
equipment (WEEE), home electrical appliances
should not be put into the normal systems for
disposal of solid urban waste.
Outdated appliances should be collected
separately to optimise component material
recovery and recycling rates and to prevent
potential harm to human health and the
environment. The symbol of a rubbish container
superimposed by a diagonal cross should be put
on all such products to remind people of their
obligation to have such items collected separately.
Consumers should contact their local authorities
or point of sale and request information on the
appropriate places to leave their old home
electrical appliances.
Before disposing of your appliance, render it nonusable by pulling out the power cable, cutting it off
and disposing of it.
Page 28

27
EN
Contents
Installation instructions ................................................................................................................... 28
Before installation ........................................................................................................................... 28
After installation .............................................................................................................................. 28
Safety Instructions ........................................................................................................................... 29
Description of your oven .................................................................................................................. 31
Basic settings ................................................................................................................................... 32
Initial Settings ................................................................................................................................. 32
Setting the clock ............................................................................................................................. 32
Hiding/Displaying the Clock ............................................................................................................ 32
Water Hardness setting ................................................................ ................................ .................. 33
Safety blocking ............................................................................................................................... 33
Basic functions ................................................................................................................................. 34
Steam function 100 ºC .................................................................................................................... 34
Steam function 80 ºC ...................................................................................................................... 34
Steam function 40 ºC ...................................................................................................................... 35
Defrost function .............................................................................................................................. 35
Water feeding .................................................................................................................................... 36
When the oven is working... ............................................................................................................. 37
Interrupting a cooking cycle ............................................................................................................ 37
Altering parameters ........................................................................................................................ 37
Cancelling a cooking cycle ............................................................................................................. 37
End of a cooking cycle .................................................................................................................... 37
Residual water in the oven ............................................................................................................. 37
Usage, Tables and Tips .................................................................................................................... 38
Use of accessories ......................................................................................................................... 38
Care and maintenance ..................................................................................................................... 43
Cleaning the cooking space............................................................................................................ 43
Removing the shelf guides ............................................................................................................. 43
Removing the appliance door ......................................................................................................... 44
Descaling ........................................................................................................................................ 45
Suitable descaling solutions ........................................................................................................... 45
Descaling procedure ....................................................................................................................... 46
Front surface .................................................................................................................................. 47
Oven interior ................................................................................................................................... 47
Accessories .................................................................................................................................... 47
What should I do if the oven doesn’t work? ................................................................................... 48
Replacing the light bulb .................................................................................................................. 48
Technical characteristics ................................................................................................................. 49
Description of Functions ................................ ................................ ................................ ................. 49
Displays .......................................................................................................................................... 49
Specifications ................................................................................................................................. 49
Installation ......................................................................................................................................... 50
Page 29

28
EN
Installation instructions
Before installation
Check that the input voltage indicated on the
characteristics plate is the same as the voltage of
the power outlet you are going to use.
Open the oven door and take out all the
accessories and remove the packing material.
Warning! The front surface of the oven may be
covered in a protective film. Before using the
oven for the first time, carefully remove this film,
starting on the inside.
Make sure that the oven is not damaged in any
way. Check that the oven door closes correctly
and that the interior of the door and the front of
the oven opening are not damaged. If you find any
damage contact our Customer Care Centre on the
number supplied on the back cover of this
handbook.
DO NOT USE THE OVEN if the power cable or
the plug is damaged, if the oven does not function
correctly or if it has been damaged or dropped.
Contact our Customer Care Centre on the number
supplied on the back cover of this handbook.
After installation
The oven is equipped with a power cable and a
plug for single phase (household) current,
230-240V ~ 50Hz.
If the oven is to be installed on a permanent
basis it must be installed by a qualified
technician. In such a case, the oven should be
connected to a circuit with an all-pole circuit
breaker with a minimum separation of 3 mm
between contacts.
WARNING: THE OVEN MUST BE EARTHED.
The manufacturer and retailers do not accept
responsibility for any damage that may be
caused to persons, animals or property if these
installation instructions are not observed.
The oven only functions when the door is closed
correctly.
Before the first use, clean the inside of the oven
and the accessories, following the cleaning
instructions given in the “Oven cleaning” section.
Put the oven on a flat and stable surface. The
oven must not be installed close to any sources of
heat, radios or televisions.
During installation, make sure that the power
cable does not come into contact with any
moisture or objects with sharp edges and the
back of the oven. High temperatures can
damage the cable.
Warning: after the oven is installed you must
make sure you can access the plug.
During installation, follow the instructions supplied separately.
Page 30

29
EN
Safety Instructions
Warning! Do not leave the oven unsupervised.
Warning! If you see smoke or fire, keep the
door closed in order to smother the flames.
Switch off the oven and take the plug out of the
socket or cut off the oven power supply.
Overheated fat and oil can easily catch fire.
Heating oil in the cooking space to sear meat is
dangerous and should not be done. Never try
to extinguish burning oil or fat with water
(danger of explosion)! Smother the flames with
a damp cloth and keep all doors and windows
closed.
Warning! Do not use alcohol to cook in the
oven. It can cause the overheating of the food.
Danger of explosion!
Warning! This appliance is not intended for
use by persons (including children) with
reduced physical, sensory or mental
capabilities, or lack of experience and
knowledge, unless they have been given
supervision or instruction concerning use of the
appliance by a person responsible for their
safety. Children should be supervised to ensure
that they do not play with the appliance.
Children must be supervised to ensure that
they do not play with the appliance. Use the
safety locks.
Warning! During use the appliance becomes
very hot. Care should be taken to avoid
touching heating elements inside the oven.
RISK OF BURNS!
Warning! Accessible parts may become hot
during use. Young children should be kept
away.
Warning! When opening the door during or
upon completion of the cooking cycle, be
careful of the flow of hot air and/or steam
and water drops coming out of the cooking
chamber. Step back or to the side to avoid
burns.
Warning! Make sure you never catch the
power cables of other electrical appliances in
the hot door or the oven. The cable insulation
may melt. Danger of short-circuiting!
Page 31

30
EN
Safety Instructions
This oven is exclusively for domestic use!
The appliance is designed for use in the home
for preparing food. No liability is assumed for
any damage caused by improper or incorrect
use.
Avoid damaging the oven or other dangerous
situations by following these instructions:
Do not cover or obstruct the ventilation
openings.
Do not keep any inflammable object inside
the oven as it may burn if the oven is switched
on.
Do not use the oven as a pantry.
Do not pour spirits (e.g. brandy, whisky,
schnapps, etc.) over hot food. Danger of
explosion!
Accessories such as wire racks and trays, etc.
get hot in the cooking space. Always wear
protective gloves or use oven cloths.
To avoid being burnt, always use oven gloves
for handling dishes and containers and
touching the oven.
Do not lean or sit on the open oven door.
This may damage the oven, especially in the
hinge zone. The door can bear a maximum
weight of 8 kg.
The racks can bear a maximum load of 8 kg.
To avoid damaging the oven, do not exceed
this load.
Cleaning:
The appliance will remain hot for some time
after it is switched off and cool down only
slowly to room temperature. Please allow
sufficient time for the appliance to cool down
before, for instance, cleaning it.
Do not use harsh abrasive cleaners or sharp
metal scrapers to clean the oven door glass
since they can scratch the surface, which may
result in shattering of the glass.
The door contact surfaces (the front of the
cooking space and the inside part of the doors)
must be kept very clean in order to ensure the
oven functions correctly.
Please follow the instructions regarding
cleaning in the section “Oven Cleaning and
Maintenance”.
Repairs:
If the power cable is damaged it should be
substituted by the manufacturer, authorised
agents or technicians qualified for this task in
order to avoid dangerous situations.
Furthermore, special tools are required for this
task.
Repair and maintenance work, especially of
current carrying parts, can only be carried out
by technicians authorised by the manufacturer.
Page 32

31
EN
1. Ŕ Door window glass
5. Ŕ Baking tray
2. Ŕ Safety catches
6. Ŕ Perforated baking tray
3. Ŕ Lamp bulb
7. Ŕ Shelf guides
4. Ŕ Control panel
a. Ŕ Descale light
f. Ŕ Clock/Duration indication lights
b. Ŕ Water refill light
g. Ŕ Clock/Duration selection key
c. Ŕ Function lights
h. Ŕ Rotary knob
d. Ŕ Function selection key
i. Ŕ Start/Stop/Safety blocking key
e. Ŕ Clock/Duration display
Description of your oven
Page 33

32
EN
Basic settings
Initial Settings
After your steam oven is first plugged in or after a
power failure, the clock display will flash to
indicate that the time shown is not correct.
The oven will not operate until the clock is set and
the water hardness parameter is set.
Setting the clock
To set the clock, proceed as follows:
1. Press the Clock setting key. The hour
numbers will start to flash (not necessary if your
oven is first plugged in or after a power failure).
To set the clock and the water hardness
parameter value proceed as described in the
following chapters.
3. Press again the Clock setting key to set the
minutes. The minute numbers will start to flash.
4. Turn the rotating knob to set the correct minute
value.
2. Turn the rotating knob to set the correct hour
value.
Hiding/Displaying the Clock
If the clock display disturbs you, you can hide it by
pressing the Clock setting key for 3 seconds. The
dots that separate the hours and minutes will flash
but the rest of the clock display will be hidden.
5. To finish, press the Clock setting key again.
If you want to see the clock display again, press
the Clock setting key again for 3 seconds.
Page 34

33
EN
Type
Water hardness
Display
Ca + Mg
(ppm)
English deg.
[°eH]
French deg.
[°dF]
German deg.
[°dH]
Soft water
0 to 150
0 to 11
0 to 15
0 to 8
1
Medium water
151 to 350
12 to 25
16 to 35
9 to 20
2
Hard water
501 to 500
26 to 35
36 to 50
21 to 28
3
Basic settings
Water Hardness setting
The appliance features a system that
automatically indicates when it is time to descale.
The system can be optimised for households with
very soft water (also through using a water
softening appliance) and very hard water, by
changing the user settings to the relevant range of
water hardness (see table below).
To set the water hardness parameter, proceed as
follows:
1. Press the Start/Stop key and the Function
selection key simultaneously. The hardness
number will start to flash on the display (not
necessary if your oven is first plugged in or
after a power failure).
2. Turn the rotating knob to set the correct water
hardness parameter value, according to the
below table.
3. Press the Clock key to set the parameter. The
display shows the clock.
Safety blocking
The oven functioning can be blocked (for example, to stop it being used by children).
1. To block the oven, press the Start/Stop key for
3 seconds. You will hear a sound signal and
the display will show the word “SAFE”. The
oven is blocked in this state and cannot be
used.
2. To unblock the oven, press the Start/Stop key
again for 3 seconds. You will hear a sound
signal and the display will show the clock
again.
The clock can be seen by pressing briefly the
Start/Stop key.
Page 35

34
EN
Basic functions
Steam function 100 ºC
Use this function to cook all sorts of vegetables, rice, fish and meat. It is also suitable for extracting
juice from berries and for simultaneous defrosting and cooking of vegetables.
1. Press the Function Selector key. One of the
function lights will flash.
2. Turn the Rotating Knob in either direction until
the “100” function light flashes.
3. Press the Duration Selection key to change
the operating time. The respective display will
start to flash.
4. Select the operating time you want by turning
the Rotating Knob in either direction (for
example, to 9 minutes).
5. Press the START key. The oven will start to
operate.
Steam function 80 ºC
Use this function to poach and cook fish and meat, to prepare desserts and to boil down fruit.
1. Press the Function Selector key. One of the
function lights will flash.
2. Turn the Rotating Knob in either direction until
the “80” function light flashes.
3. Press the Duration Selection key to change
the operating time. The respective display will
start to flash.
4. Select the operating time you want by turning
the Rotating Knob in either direction (for
example, to 9 minutes).
5. Press the START key. The oven will start to
operate.
Page 36

35
EN
Basic functions
Steam function 40 ºC
Use this function to make yoghurt and defrost delicate foods.
1. Press the Function Selector key. One of the
function lights will flash.
2. Turn the Rotating Knob in either direction until
the “40” function light flashes.
3. Press the Duration Selection key to change
the operating time. The respective display will
start to flash.
Defrost function
Use this function to cautiously defrost food.
4. Select the operating time you want by turning
the Rotating Knob in either direction (for
example, to 9 minutes).
5. Press the START key. The oven will start to
operate.
1. Press the Function Selector key. One of the
function lights will flash.
2. Turn the Rotating Knob in either direction until
the Defrosting function light flashes.
3. Press the Duration Selection key to change
the operating time. The respective display will
start to flash.
4. Select the operating time you want by turning
the Rotating Knob in either direction (for
example, to 9 minutes).
5. Press the START key. The oven will start to
operate.
Page 37

36
EN
Water feeding
Filling the water tank
All functions require the water tank to be full.
Fill the water tank up to the ”MAX” mark with cold,
fresh drinking water and introduce it into the slot
located above the cavity (approximately 1L).
If the indication “rES” appears, it means that the
water tank was not properly inserted.
Refilling the water
The contents of the water tank normally suffice for
one cooking session of 50-60 minutes.
If, however, the water tank needs to be refilled,
the Water refill light switches on. Only fill the
water tank up to a maximum of 0.5 litres to
ensure that the water does not overflow when
it is pumped back to the water tank. RISK OF
OVERFLOW.
Emptying the water tank
When the appliance is switched off, the residual
water is pumped back into the water tank.
While the water is being pumped the display
shows “PUMP”.
This message stays on until the temperature of
the water reaches 75º C before it can be pumped
back to the water tank.
Warning: the water in the tank may be hot.
Danger of burns!
After the water is pumped back to the water tank,
the display will show the message “DEP”
requiring the following actions:
1. Remove and empty the water tank.
2. Dry the water tank and introduce it back into
the slot located above the cavity. Clean and
dry the cooking space.
3. Leave the appliance door open so that the
cooking space can cool down and dry
completely.
IMPORTANT NOTE: It is advisable to remove
the water tank and empty it after a cooking
cycle. This prevents the formation of bacteria
and limestone inside the appliance.
If the water tank has not been removed from the
oven and a new cooking cycle is started, the oven
displays the warning “DEP”.
This warning can be cleared by pressing the Stop
key and proceed with the new cooking cycle
without removing and emptying the water tank.
Page 38

37
EN
When the oven is working...
Interrupting a cooking cycle
You can stop the cooking process at any time by
pressing the Start/Stop key once.
The oven incorporates a steam-reduction function
that is activated when the Start/Stop key is
pressed to gradually release the steam from the
cavity, so that there is no sudden rush of steam
when the appliance door is opened.
This function takes around 3 minutes and during it
the display shows the word “VAP”.
Warning! When opening the door during or
upon completion of the cooking cycle, be
careful of the flow of hot air and/or steam
coming out of the cooking chamber. Step back
or to the side to avoid burns.
At this point:
The steam generation is interrupted.
The cavity walls and the water tank are still
very hot. Danger of burning!
The timer stops and the display shows the
remaining operating time (if this has been set).
Cancelling a cooking cycle
If you wish to cancel the cooking process, press
the Start/Stop key for 3 seconds.
You will then hear a beep and the clock will
appear on the display.
End of a cooking cycle
At the end of the set duration or when you press
the Start/Stop key to finish the cooking cycle, you
will hear three beeps and the display will show the
word “End”, the oven starts the steam-reduction
function.
This function gradually releases the steam from
the cavity, so that there is no sudden rush of
steam when the appliance door is opened.
This function takes around 3 minutes and during it
the display shows the word “VAP”.
Warning! When opening the door during or
upon completion of the cooking cycle, be
careful of the flow of hot air and/or steam
coming out of the cooking chamber. Step back
or to the side to avoid burns.
If you wish, at this point you can:
1. Turn or stir the food to ensure it will be evenly
cooked.
2. Change the cooking parameters.
To restart the process, close the door and press
the Start/Stop key.
Altering parameters
The duration can be altered when the oven is
operating or when the cooking process has been
interrupted by turning the rotating knob. The new
duration defined is valid when the display stops
blinking.
The temperature can only be altered when the
oven is interrupted. Alter the temperature by
pressing the Function Selector key and turning
the Rotating Knob until the new temperature is
blinking. Validate the selection by pressing again
the Function Selector key.
The cooling fan can continue to run for a certain
length of time after the appliance has been
switched off. This is a normal function that is
meant to reduce the temperature inside the oven.
When the display shows the word “DEP”, this
means that the water was pumped and that the
water tank can be removed.
Remove the water tank and dry it thoroughly. Let
the cooking space cool down for a moment and
then clean and dry it with a cloth. The door should
be left open for some time so that the appliance
can dry completely.
Residual water in the oven
To reduce the residual water in the oven, it is
recommended to insert a tray in the bottom rack
level. The condensation released from the food
begins to drip on the tray. The remaining residual
water can be easily dried with a cloth.
Page 39

38
EN
Fish
Quantity
Temperature ºC
Time min.
Container
Level
Gilthead sea bream
800-1200 g
80
30-40
Perforated
2
Trout
4 x 250 g
80
20-25
Perforated
2
Salmon filet
500-1000 g
80
15-25
Perforated
2
Salmon trout
1000-1200 g
80
25-35
Perforated
1/2
King prawns
500-1000 g
80
15-20
Perforated
2
Green-shell mussel
1000-1500 g
100
25-35
Perforated
2
Halibut filet
500-1000 g
80
20-25
Perforated
2
Cockles
500-1000 g
100
10-20
Perforated
2
Lobster
800-1200 g
100
25-30
Perforated
1/2
Cod filet
1000-1200 g
80
20-25
Perforated
2
Blue mussel
1000-1200 g
100
15-25
Perforated
2
Lake trout
4 x 250 g
80
25-30
Perforated
2
Haddock
1000-1200 g
80
20-25
Perforated
2
Tuna filet
500-1000 g
80
15-20
Perforated
2
Pike perch
4 x 250 g
80
25-30
Perforated
2
Usage, tables and tips
Use of accessories
The perforated container is suitable for cooking
fresh or deep frozen vegetables, meat and
poultry. In this case it is important that the nonperforated container is introduced into the first
level. This way, dripping liquids are collected and
the appliance does not get dirty. The perforated
container with the food should be inserted into the
second level.
The non-perforated container is used to steam
sensitive foods, e.g. compotes and dumplings.
The rack is used when cooking with small
containers, as for example, dessert bowls and to
regenerate plate dishes.
For more precise information refer to the tables.
The suggested times and temperatures are
guideline values. The actual cooking time can
vary according to the type and quality of the
foods.
Fish
Page 40

39
EN
Meat
Quantity
Temperature ºC
Time min.
Container
Level
Chicken leg
4-10
100
40-45
Perforated
2
Chicken breast
4-6
100
25-35
Perforated
2
Smoked pork loin
500g Ŕ 1000 g
100
40-50
Perforated
2
Turkey escalope
4-8
100
20-25
Perforated
2
Pork filet, whole
4-8
100
20-30
Perforated
2
Sausages
80-100
10-15
Perforated
2
Eggs
Temperature ºC
Time min.
Container
Level
Eggs in Glass
100
10-15
Rack
2
Eggs, hard
100
15
Rack
2
Eggs, soft
100
10-12
Rack
2
Side dishes
Quantity
Temperature ºC
Time min.
Container
Level
Pearl barley + Liquid
200g + 400 ml
100
30-35
Rack, glass bowl
2
Semolina + Liquid
200g + 300 ml
100
10-20
Rack, glass bowl
2
Lentils + Liquid
200g + 375 ml
100
20-50
Rack, glass bowl
2
Rice + Liquid
200g + 250 ml
100
25-40
Rack, glass bowl
2
Usage, tables and tips
Meat
Eggs
Side dishes
Page 41

40
EN
Vegetables
Temperature
ºC
Time
min.
Container
Level
Eggplant/Aubergine
in slices
100
15-20
Perforated
2
Beans 100
35-45
Perforated
2
Broccoli
florets with stalk
100
25-30
Perforated
2
Broccoli
florets without
stalk
100
15-20
Perforated
2
Cauliflower
florets
100
25-30
Perforated
2
Cauliflower
whole head
100
40-45
Perforated
1
Peas 100
30-35
Perforated
2
Fennel
in stripes
100
15-20
Perforated
2
Fennel
cut in half
100
20-30
Perforated
2
Potatoes with skin
whole, very small
100
20-25
Perforated
2
Potatoes with skin
whole, very big
100
45-50
Perforated
2
Potatoes without skin
in pieces
100
20-25
Perforated
2
Turnip
in sticks
100
20-25
Perforated
2
Snow peas
100
15-20
Perforated
2
Carrots
in slices
100
25-30
Perforated
2
Corn cobs
100
50-60
Perforated
2
Bell peppers
in stripes
100
12-15
Perforated
2
Hot pepper
100
12-15
Perforated
2
Mushrooms
in quarters
100
12-15
Perforated
2
Leeks
in slices
100
10-12
Perforated
2
Brussels sprouts
100
25-35
Perforated
2
Celery
in stripes
100
15-20
Perforated
2
Asparagus
100
20-35
Perforated
2
Spinach 100
12-15
Perforated
2
Celery stalks
100
25-30
Perforated
2
Courgette
in slices
100
12-18
Perforated
2
Dumplings
Temperature
ºC
Time
min.
Container
Level
Sweet dumpling
100
20-30
Not perforated
2
Sweet yeast dumpling
100
15-20
Not perforated
2
Yeast dumpling
100
15-25
Not perforated
2
Bread dumpling
100
20-25
Not perforated
2
Napkin dumpling
100
25-30
Not perforated
2
Usage, tables and tips
Vegetables
Dumplings
Page 42

41
EN
Desserts
Quantity
Temperature ºC
Time min.
Container
Level
Stewed apples
500-1500 g
100
15-25
Not perforated
2
Stewed pears
500-1500 g
100
25-30
Not perforated
2
Crème brûlée
80
20-25
Rack - bowl
2
Crème caramel
80
25-30
Rack - bowl
2
Yogurt 40
4-6 hrs.
Rack - bowl
2
Stewed peaches
500-1500 g
100
15-20
Not perforated
2
Fruit
Quantity
Temperature ºC
Time min.
Container
Level
Pears
4-6 1l glasses
100
30-35
Rack
1
Cherries
4-6 1l glasses
80
30-35
Rack
1
Peaches
4-6 1l glasses
80
30-35
Rack
1
Plums
4-6 1l glasses
80
30-35
Rack
1
Warming-up
Quantity
Temperature ºC
Time min.
Container
Level
Plate dishes
1-2
100
12-15
Rack
2
Plate dishes
3-4
100
15-20
Rack
2
Ready-made meals
100
15-20
Rack
2
Vegetables
Quantity
Temperature ºC
Time min.
Container
Level
e.g. Beans, Leek
100
10-12
Perforated
2
Curly Kale
1000-2000 g
100
12-16
Perforated
2
Savoy cabbage
10-20
100
12-15
Perforated
2
White cabbage, whole
2000-2500 g
100
30-45
Perforated
1
Tomatoes, peeled
80
12
Rack
2
Usage, tables and tips
Desserts
Fruit (Sterilising/Boiling down)
Regenerate
Blanch
Page 43

42
EN
Vegetables / Side dish
Temperature ºC
Time min.
Container
Level
Broccoli
florets with stalk
100
15-20
Perforated
2
Mixed vegetables
100
15-20
Perforated
2
Spinach leaves
portions
100
10-15
Not perforated
2
Cauliflower
florets
100
15-20
Perforated
2
Peas 100
15-25
Perforated
2
Curly kale
bigger portion
100
25-35
Not perforated
2
Carrots
in slices
100
15-20
Perforated
2
Brussels sprouts
100
20-25
Perforated
2
Asparagus
100
25-30
Perforated
2
Ready-made meals
100
as required
Rack
2
Bread 100
10-25
Rack
2
Rice 100
15-25
Not perforated
2
Lentils 100
15-20
Not perforated
2
Noodles 100
15-20
Not perforated
2
Usage, tables and tips
Defrost
Two level cooking
Some suggestions:
When cooking with two levels the accessories
should be always inserted in the 2nd or 3rd level
and in the 1st level.
Different cooking times are controlled this way:
Foods that need a longer cooking time should be
placed in the upper area of the oven. Foods with
a shorter cooking time should be placed on the
1st level.
One example: Vegetables, potatoes and fish.
Place the vegetables and potatoes in any
suitable container on the rack inserted in the 2nd
or 3rd level.
Insert the fish in the 1st level.
When using the perforated tray to cook fish, the
non-perforated tray must be inserted in the
bottom of the appliance to collect liquid dripping
from the fish. This way the appliance is kept
clean.
Time: Vegetables and potatoes 25-35 Min.
Time: Fish Ŕ depending on type Ŕ 15-25 Min.
Select the longest cooking time. Because of the
different levels the food is ready at the same
time, without any over cooking.
Page 44

43
EN
Care and maintenance
Cleaning the cooking space
Avoid using abrasive cleaners such as scouring
pads, steel wool, etc. as they can damage the
surface.
Wipe the cooking space clean using a damp cloth
whilst the appliance is still warm. Finish off by
drying the cooking space.
For ease of cleaning, the shelf guides can be
removed (see the following chapter).
Removing the shelf guides
Unscrew and remove the knurled nuts 1 in the
front of the shelf guides in an anti-clockwise
direction.
Pull the shelf guides to the inside of the cavity and
remove from the front.
To put them back, insert the shelf guides into the
knurled nuts 2 in the back and position on the
screws in the front. Screw the knurled nuts 1 and
2 in a clockwise direction till tight.
Unscrew and loosen the knurled nuts 2 in the
back of the shelf guides in an anti-clockwise
direction. Do not completely remove these nuts.
Page 45

44
EN
Care and maintenance
Removing the appliance door
1. Open the appliance door as far as it will go.
2. Insert 2 pins inside the holes in the hinges.
3. Close the appliance door just enough that it can
be lifted out.
4. To reassemble, push the hinges into the holes
from the front.
5. Open the appliance door as far as it will go and
remove the pins.
Page 46

45
EN
Water hardness
Descale after about
Very soft
18 months
Medium
9 months
Very hard
6 months
Care and maintenance
Descaling
Whenever steam is produced, irrespective of the
hardness of the local water supply (i.e. the
limescale content of the water), limescale is
deposited inside the steam generator.
The time interval between descaling depends on
the hardness of the water and frequency of use. If
steaming 4×30 minutes per week, the appliance
must be descaled (depending on water hardness)
roughly as follows:
The appliance automatically detects when
descaling is necessary and when this happens
the Descale light stays on. If the Descaling
procedure is not performed, some cooking cycles
after the Descale light starts to flash. If once again
the Descaling procedure is not performed, some
cooking cycles after the oven functioning is
blocked, the Descale light stays on and the
display shows “CAL” blinking.
Suitable descaling solutions
For descaling, use the descaling solution “durgol”.
This solution allows a professional and careful
descaling of your appliance. Available at
Customer Care Centres.
Warning! Do not use vinegar or vinegar-based
products as they can cause damage to the
oven’s internal circuit.
Traditional descaling solutions are not appropriate
because they can contain foaming agents.
IMPORTANT NOTE: Failure to descale the
appliance will likely impair the functioning of
or cause damage to the appliance.
Page 47

46
EN
Care and maintenance
Descaling procedure
Warning: For safety reasons, the descaling
process cannot be interrupted and it takes
about 45 minutes.
The appliance can be descaled with the appliance
door open or closed. The appliance must be in
idle state prior to starting the descaling cycle.
To run a descaling cycle proceed as follows:
1. Press the Function Selection and the
Duration Selection keys simultaneously. The
display shows “CAL” and there is an
intermittent beep.
2. Press the Start/Stop key.
3. When the display shows “0.5L”, remove the
water tank.
4. Pour 0.5 litres of an adequate descaling
solution into the water tank and put the water
tank back.
5. Press the Start/Stop key. The Descale cycle is
initiated and takes about 30 minutes.
6. When the display shows “1.0L” flashing and
the oven emits a beep, remove and empty the
water tank.
7. Wash the water tank and fill it with 1.0 litres of
cold water and put the water tank back.
8. Press the Start/Stop key. The first rinsing
cycle starts.
9. When the display again shows “1.0L” flashing
and the oven emits a new beep, remove and
empty the water tank.
10. Fill the water tank with 1.0 litres of cold water
and put the water tank back.
12. Press the Start/Stop key. The second rinsing
cycle starts.
13. When the rinsing cycle has finished the
display shows “End”.
14. Remove, empty and dry the water tank.
Page 48

47
EN
Care and maintenance
Warning! Cleaning should be done with the
oven power switched off. Take the plug out of
the socket or switch off the oven’s power
circuit.
Do not use aggressive or abrasive cleaning
products, scourers that scratch surfaces or
sharp objects, since stains may appear.
Do not use high pressure or steam jet cleaning
appliances.
Front surface
Normally you just need to clean the oven with a
damp cloth. If it is very dirty, add a few drops of
dishwashing liquid to the cleaning water.
Afterwards, wipe the oven with a dry cloth.
In an oven with an aluminium front, use a mild
glass cleaning product and a soft cloth that does
not release any fibres or threads. Wipe from side
to side without exerting any pressure on the
surface.
Immediately remove limescale, fat, starch or egg
white stains. Corrosion can occur under these
stains.
Do not let any water get inside the oven.
Oven interior
After use, remove any water on the bottom of the
cooking space with a soft cloth. Leave the
appliance door open so that the cooking space
can cool down.
To remove dirt that is harder to shift, use a nonaggressive cleaning product. Do not use oven
sprays or other aggressive or abrasive
cleaning products.
Always keep the door and the oven front very
clean to ensure that the door opens and
closes properly.
Make sure water does not enter the oven
ventilation holes.
The glass lamp cover is located on the oven
ceiling and can be removed easily for cleaning.
For this you just need to unscrew it and clean it
with water and dishwashing liquid.
Accessories
Clean the accessories after each use. If they are
very dirty, soak them first of all and then use a
brush and sponge. The accessories can be
washed in a dish washing machine.
Page 49

48
EN
What should I do if the oven doesn’t work?
WARNING! Any type of repair must only be
done by a specialised technician. Any repair
done by a person not authorised by the
manufacturer is dangerous.
You do not need to contact Technical Assistance
to resolve the following questions:
The display is not showing! Check if:
- The time indication has been switched off (see
section on Basic Settings).
Nothing happens when I press the keys!
Check if:
- The Safety Block is active (see section on
Basic Settings).
The oven does not work! Check if:
- The plug is correctly fitted in the socket.
- The oven‟s power is switched on.
When the oven is operating I can hear some
strange noises! This is not a problem.
- It has to do with the operating noises that can
occur during the cooking process, e.g, by the
water pumps in the steam generator.
The appliance still makes a noise after the
cooking process is finished! This is not a
problem.
- The cooling fan keeps on working for some
time. When the temperature has dropped
sufficiently, the fan will switch itself off.
The oven switches on but the interior light
does not go on!
- If all the functions work properly it is probable
that the lamp has blown. You can keep on
using the oven.
Replacing the light bulb
To replace the light bulb, proceed as follows:
- Disconnect the oven from the power supply.
Take the plug out of the socket or switch off the
oven‟s power circuit.
- Unscrew and remove the glass light cover (1).
- Remove the light bulb (2). Warning! The bulb
may be very hot.
- Fit a new E14 230-240V/15W bulb. Follow the
lamp manufacturer‟s instructions.
- The steam inside the cavity produces a
pressure build-up and sometimes the cavity
walls may produce noise when they react to the
pressure.
- This noises are normal, there is no problem.
The food doesn’t heat up or heats very
slowly! Check if:
- You have selected the correct operating times
and temperature setting.
- The food you have put inside the oven is a
larger amount or colder than you usually put in.
If the message “Err_” appears in the
display, please contact the Customer Care.
- Screw the glass light cover into place (1).
- Connect the oven again to the power supply.
Page 50

49
EN
Symbol
Function
Foods
Steam at 100 ºC
Cooking all sorts of foodstuffs, vegetables, compote, fish and meat.
Regenerate.
Extracting juice from berries
Steam at 80 ºC
Poaching and cooking fish and meat.
Steam at 40 ºC
Making yoghurt.
Auto Defrost & Cook
Defrosting & cooking vegetables.
Display
Description
Descaling
1
Soft water.
2
Medium water.
3
Hard water.
CAL
Appliance must be descaled.
Flashing Ŕ descaling starts.
0.6L
Feed 0.5 litre descaling solution into the water tank.
1.0L
Feed 1 litre cold water into the water tank for rinsing.
Water tank
Indication that water tank is missing.
The water tank must be removed, emptied and reinserted.
Steam reduction
VAP
Indication that steam reduction process is ongoing.
PUMP
Indication that cold water is entering the boiler and hot water is being pumped to the
water tank.
FULL
The water tank must be removed, emptied and reinserted.
System warnings
Temperature in the PCB is too high.
Technical characteristics
Description of Functions
Displays
Specifications
AC Voltage .......................................................................................... (see characteristics plate)
Power required .................................................................................... 1500 W
Exterior dimensions (W H D). ............................................................ 595 455 472 mm
Interior dimensions (W H D). ............................................................. 420 210 390 mm
Oven capacity. ..................................................................................... 35 l
Weight ................................................................................................. 32 kg
Page 51

50
EN
1. Push oven completely into the
cabinet and centre it.
2. Open door and fasten the
appliance to the cabinet using
the four screws provided. Insert
the screws through the front
holes.
FR
1. Encastrez entièrement le four
dans le meuble en le centrant.
2. Ouvrez la porte et fixez
l‟appareil au meuble à l‟aide
des quatre vis fournies.
Insérez les vis dans les orifices
prévus à cet effet.
Installation / Installation
Page 52

Cód: 1630142
 Loading...