

Page 1

VITROCÉRAMIQUE
MANUEL D‘UTILISATION
PIANO COTTURA IN
VETROCERAMICA
VITROCERAMIC
COOKING HOB
INSTRUCTION BOOKLET
PLAQUE DE CUISSON EN
MANUALE D'USO E MANUTENZIONE
Page 2
Important warnings and tips for use
IMPORTANT!
This manual constitutes an integral part of the appliance. It must be kept intact and within
easy reach during the entire life of the cooktop. Please carefully read this manual and all the instructions
contained herein before using the appliance. Keep any spare parts supplied with the appliance.
Installation and electrical connections must be carried out by a qualified technician in accordance
with the manufacturer's instructions and in full compliance with current laws and safety regulations.
This appliance is intended solely for domestic use and is designed for the following functions:
cooking and reheating food. Any other use is considered as improper.
The manufacturer declines all liability resulting from poor installation, tampering,
inexpert use and use for purposes other than those specifically stated.
Check that the appliance has not been damaged during transport; Keep all packaging materials
(plastic bags, polystyrene foam, nylon, etc.) away from children, as they are potentially dangerous.
This appliance is not intended for use by persons (including children) with reduced physical,
sensory or mental capabilities, or lack of experience and knowledge, unless they have been
given supervision or instruction concerning use of the appliance by a person responsible for their safety.
Children should be supervised to ensure that they do not play with the appliance
Electrical safety can only be guaranteed if the product is connected to a suitable earth connection.
It is dangerous to modify or attempt to modify the appliance. In the event of a malfunction,
do not attempt to repair the appliance yourself, but contact a qualified technician.
After using the cooktop, ensure that the control is turned to the "off" position.
Should you decide not to use the appliance any longer, before scrapping it make it unusable in
accordance with current environmental health and safety laws, ensuring any parts which might
constitute a danger to children are rendered harmless.
Warning: in case of disassembly, maintenance and cleaning of the appliance, be careful
Please use suitable prevention and protection equipment
The appliance data plate, with technical specifications, is positioned at a visible point under the bottom
and is also enclosed with this manual. The data plate must under no circumstances be removed.
Never place flammable object on the hob.
FIRE HAZARD!
The residual heat indicator warns if zones are hot. Be sure to avoid the following actions:
do not touch cooking zones that are heated.
do not place aluminium foil or plastic containers (the protective films are not suitable for this hob)
If there is a drawer under the hob, it is advisable not to keep inflammable objects or spray cans in it.
The power supply cable must never touch hot cooking zones.
Cable insulation and the hob might get damaged.
The cooking zone and pan bottom must always be dry.
If there are breaks, cracks or splits in the ceramic glass, there is a risk of short-circuiting;
If the cooking zone overheats but the display does not work or if the hob switches off by itself:
Immediately switch off the appliance and contact the technical assistance service.
Illustrations for the use of the appliance are grouped together at the end of this manual.
Declaration of Conformity
This appliance is in compliance with the following European Directives:
93/68/CEE:
General regulations
2006/95/CE:
Concerning low tensions
2004/108/CEE:
Electromagnetic compatibility
CE Regulation n°
1935/2004
: this appliance is suitable to come in contact with food products.
These instructions are valid only for those countries whose ID initials appear on the
data plate found on the instructions handbook and on the appliance.
Page 3
ANY ADJUSTMENT, MAINTENANCE, ETC. MUST BE CARRIED OUT
WITH THE HOB UNPLUGGED AT THE MAINS.
The glass-ceramic cooktop permits rapid vertical transmission of heat from the heating element below the
cooktop to the pots or pans placed on top of it. Heat does not spread horizontally, thus at a distance of just
a few centimetres from the cooking zone, the glass remains relatively ”cool” to the touch.
Before cooking for the first time, it is necessary to clean the surface of the appliance. This should be done
using only recommended ceramic hob cleaners. After cleaning, the appliance should be operated in the
following manner to remove any residues or moisture that may be present within the appliance.
Before switching on, check the control signal to be sure that the desired cooking zone is selected.
It is best to place the pot or pan on the cooking zone before switching on, and remove it only after switching off.
Never cook food directly on the glass-ceramic cooktop; always use suitable pots or containers.
Do not stare at the halogen lamps on the cooktop.
Absolutely do not leave the electric plates working without any pots on it.
Such incorrect usage may cause overheating, damages to the appliance and fire hazzard.
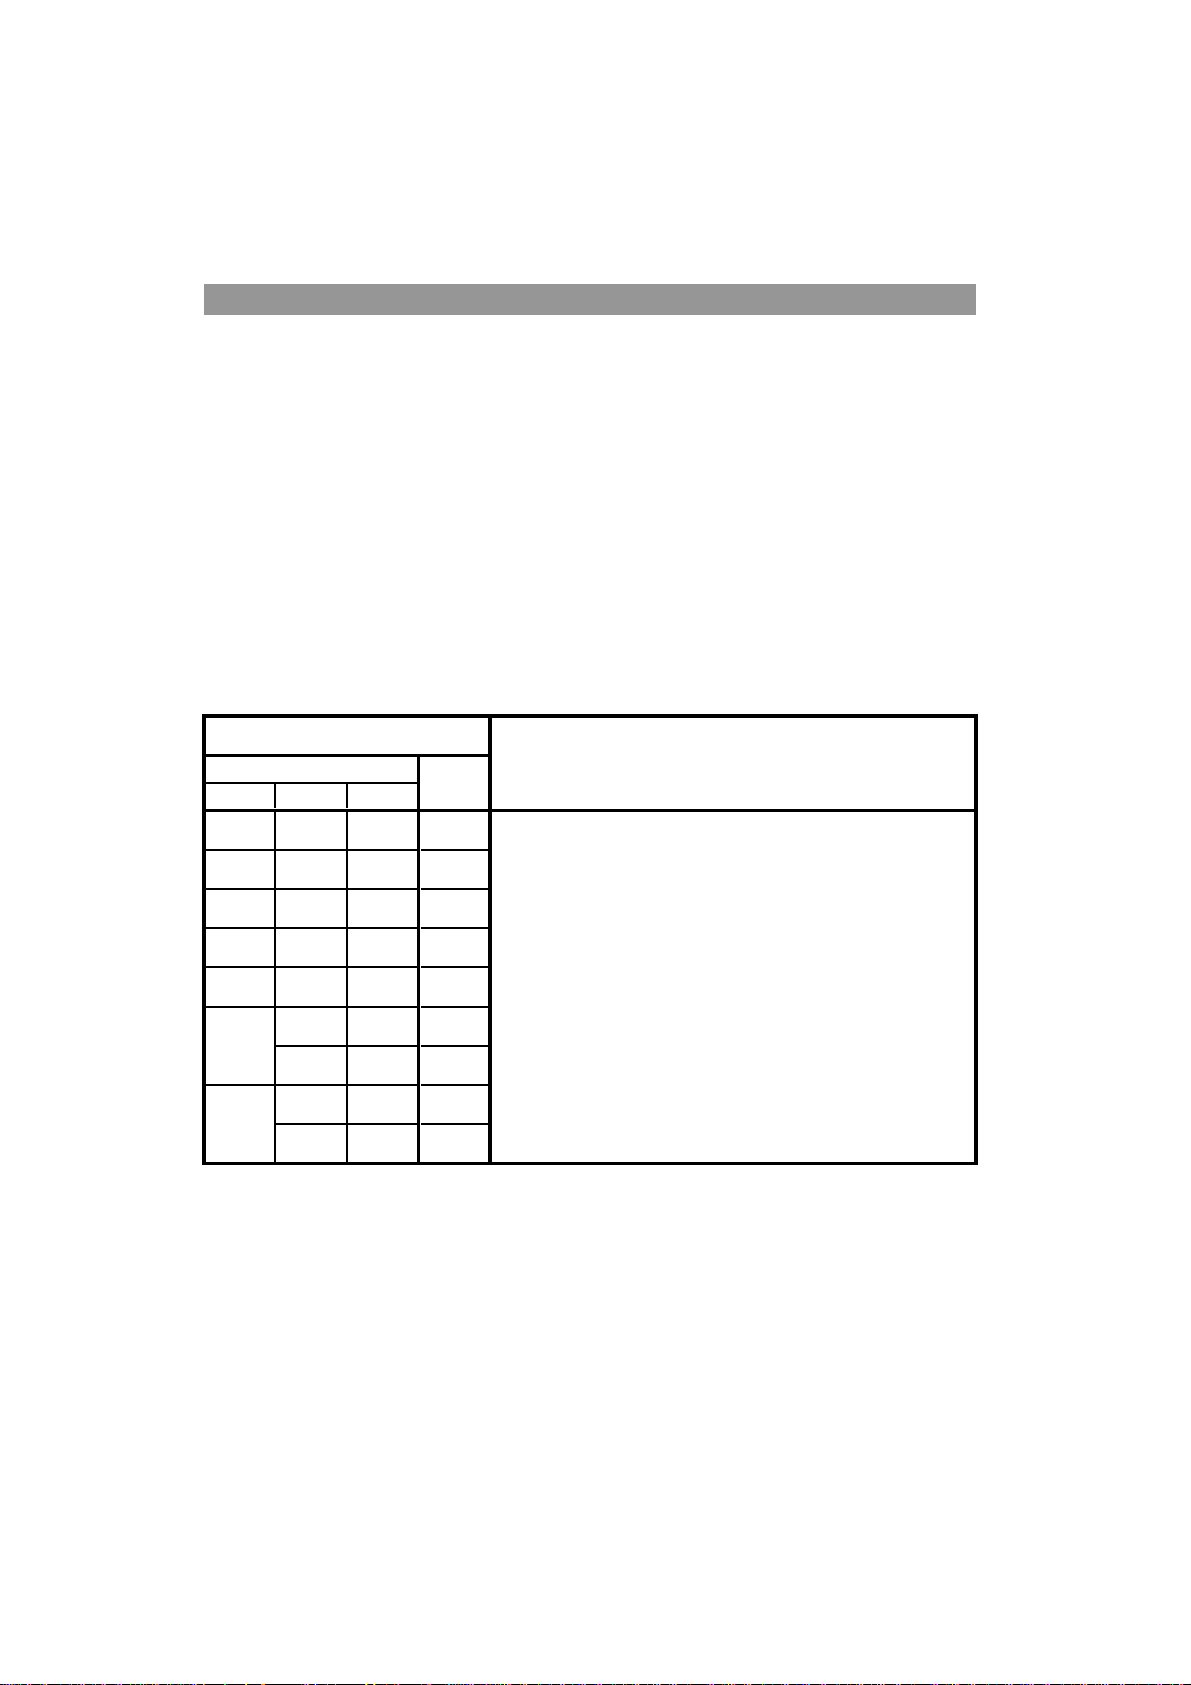
To switch on the electric plate, turn the knob or set the touch-control to the desired power intensity.
Numbers 1 to 6-10 (depending which type of cooktop) indicate the progressive temperature levels.
Depending on the food to cook, adjust the heat intensity following the suggestions below:
Off
For melting processes (butter or chocolate)
For keeping foods hot and heating small amounts of liquids.
For heating larger amounts and beating custards and sauces.
Slow boiling, for soups, pasta and risotto, continuing steaming
processes, and cooking steaks and fried foods in general.
Browning meat, roasted potatoes, fried fish, bringing large
amounts of water to the boil.
Quick frying, char-grilled steaks, ect.
At the end of your cooking, always switch off the hob
RESIDUAL HEAT INDICATOR
These appliances have an indicator light that inform the user that the temperature of the glass is at a
dangerous level in the event of contact with the cooking zone.
In models with knobs control, each heating elements has a corresponding residual heat indicator light,
in models with touch control any residual heat is indicated by an “H” by the corresponding seven-segment display.
Once a cooking zone has been turned off, the corresponding light will stay on for a period of time
necessary for the zone to cool down below the critical level.
Absolutely do not touch the cooking areas or leave flammable objects near it until the light is off.
9
10
2
2-3
8
6
5
3
4
0 0
1-2
7-8
9
1-8
0
1
2
3
4
5
6
7
1 - 2
2 - 3
COOKING
1-10
Control settings
Knob control - range
1-6
control
Touch
1
Cooking operation suggestions
7
8
5
6
3 - 4
3-4
5
6
0
Page 4
KNOBS CONTROL
In these hobs the cooking zones are controlled by knobs connected to power selectors
Numbers are used to indicate cooking settings where "1" is the minimum setting and the highest number is the
maximum setting. Number 0 is the off position. Extensible zones, where available, are activated over max position.
To switch on the extended zone, turn the knob beyond the max setting until a click is heard, then return it to any
setting from min to max. The zone controlled by each knobs is identified by the adjacent cooking zone symbol.
Examples:
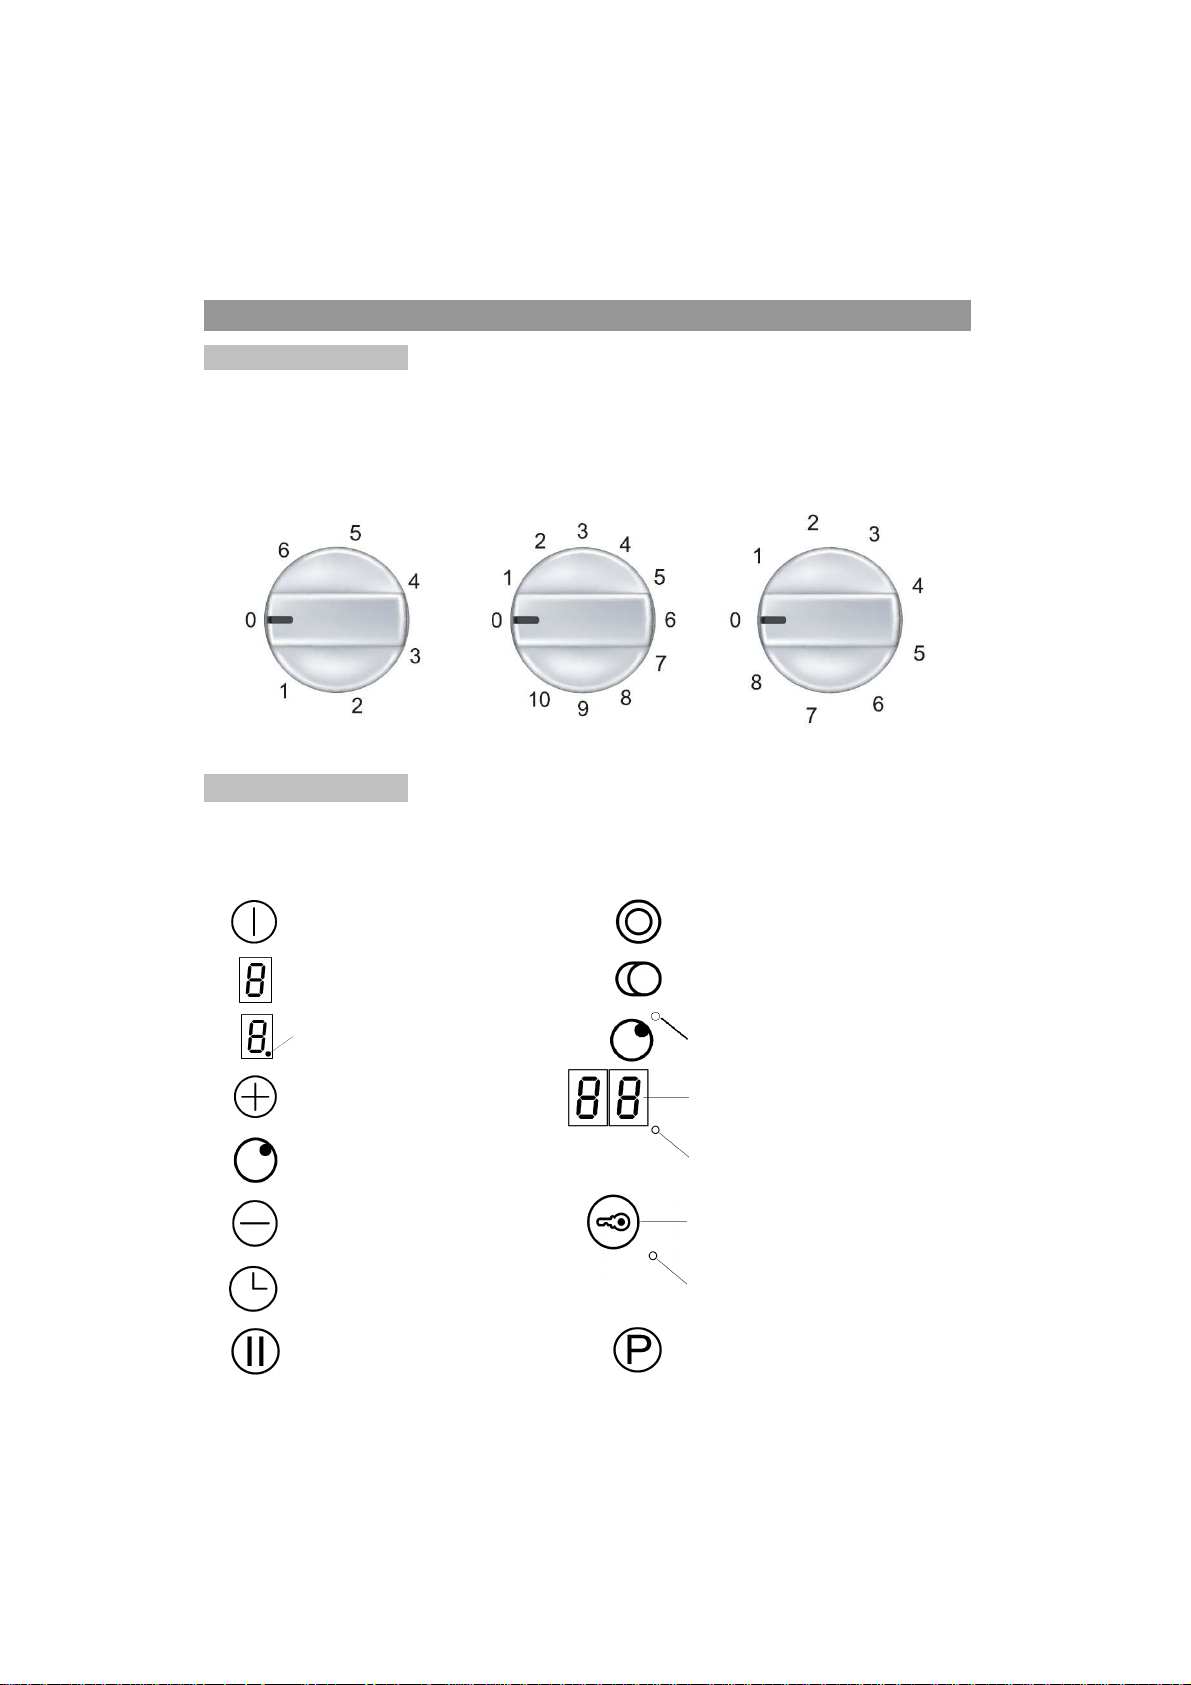
TOUCH CONTROL
In these hobs the cooking zones are controlled by a Touch-control board.
Depending on the version of your appliance, you can have all or part of the controls shown below. The typology
of the controls could change depending on the aesthetics of your appliance however the functions are the same.
On key (ON/OFF Control)
Dual circuit ON/OFF (Optional)
Power level
Extensible zone ON/OFF (Optional)
Selected plate
Dual/Triple circuit indicator (Optional)
Plus
Timer display (Optional)
Select plate
Timer plate indicator
Minus
Lock function (Optional)
Timer ON/OFF (Optional)
Lock indicator (Optional)
Pause function (Optional)
Booster function (Optional)
USE
Page 5

Turning Touch Control on/off
After start-up, the touch control requires about one second before it is ready for use. After reset, all displays and
LED’s will flash for about 1 second. After this time, all displays and LED’s go off and the touch control is in
stand-by status. The touch control can be turned on using the power supply button (key ON/OFF).
The displays of the cooking zones will show. If a cooking zone is hot, the display will show “H”. The touch control is
turned on exclusively by using only the power supply button alone. Pressing the power supply button at the same
time as other keys has no effect and the touch control remains in standby status. The touch control can be
switched off at any time using the power supply button. This is also the case if the control has been locked
with the child safety feature. The power supply button always has highest priority for shutdown.
Turning on a cooking zone
With the touch control on, select a cooking zone by pressing the selection key. When the respective display shows
a "0", the plate is ready. If the area is hot an “H” will be shown on the display for the corresponding plate. By pressing
the key "+" you can select a power level and the zone will start heating up. Starting from level 1, it is increased by
one every 0.4sec. Upon reaching level 9 you cannot make any further increases. If the cooking zone is selected
using the "-" key, the initial level is “9” (the highest level available). If you hold down the key, the active level
decreases. When you reach 1 you cannot decrease it any further. Use the "+" or "-" keys for change settings.
Turning off the cooking zones
A cooking zone can be switched off in the following way:
By pressing the „+“ and the „-“ keys of the desired cooking zone simultaneously
By selecting cooking zone „0“ for the desired cooking zone by pressing the „-“ key.
All cooking zones can be switched off immediately, at any moment, by pressing the power button.
Automatic heating function (where supplied)
When the automatic heating function has been activated, the power of the cooking zone reaches 100% for an
established heating time, which depends on the selected power level. At the end of this heating time, the touch
control returns to the pre-selected power level. Procedure to start automatic heating:
-
The control unit is switched on and a cooking zone is selected;
-
After setting cooking stage "9" automatic heating is activated by pressing the "+" key again.
Immediately afterwards, a "A" appears on the display.
Once the parboiling boost has ended, only the selected cooking stage is indicated on the display.
Using the "minus" key you can de-activate the function at any time.
Automatic switch off function (limitation of operating time)
Based on the power level, each cooking zone is shut off after a maximum preset time if no operations are
performed. Each operation with the cooking zone (using the PLUS or MINUS keys, or the dual circuit in the
zone where present) resets the maximum operation time to its initial value.
• When the control is on, the ON/OFF key has priority over all other keys, so that the control
can be shut off at any time, even in the event of multiple or continuous activation of keys.
• In standby mode, continuous activation of keys will not have any effect. However, before the
electronic control can be turned back on, it must recognize that no key is activated.
Child-Lock function (where supplied)
Where present, press the "key-lock" button to lock. Press it again to un-lock.
Otherwise, to lock press the cooking zone select key of the front right cooking zone and in the
simultaneously press the minus key followed by pressing the cooking zone select key again.
All displays show an “L“ for LOCKED (= child lock against unintentional activation).
This operational procedure must take place within 10sec and no other key than the one described above may be
pressed. The electronics remains in a locked condition until its released, even if the control until is switched off
and on again in the meantime. For release, press the cooking zone select and the minus key simultaneously.
“L“ for LOCKED disappears from the display and all cooking zones display “0“ with a flashing dot. After switching
off the control unit the child lock is reactivated. To de-active the lock function definitely, press the cooking zone
select key and the minus key simultaneously followed by pressing only the minus key again. After carrying out all
steps in the correct order and within a period of 10 sec, the locking is cancelled and the control unit is in a
STAND-BY mode. If the control unit is switched on again by pressing the ON/OFF key, all displays show "0",
the display dots keep flashing and the control unit may be operated for cooking.
Page 6

Use of the multiple circuits (where supplied)
Depending on the model, your appliance can have a DUAL or a TRIPLE heating element. When a multiple plate is
activated, the internal circuits are turned on. If you also want to turn on the outermost circuit, you need only
select the extended zone key. By means of the multiple-circuit key, the outermost circuits of the cooking zone
can be de-activated at any time. An active external circuit is shown by a special additional LED. A new activation
of the multiple-circuit key activates the external circuits again and the assigned LED’s come back on.
If the element to be controlled is a triple-circuit radiant hotplate, the following applies:
Pressing the multiple-circuit button for the first time switches off the outermost circuit and the
indicator light at the top of the display.
Pressing the multiple-circuit button a second time switches off the median circuit and the
indicator light at the bottom of the display.
Pressing this button a third time, switches on the median circuit again.
Further pressing adds the third circuit and its related indicator light.
Timer / Alarm mode (where supplied)
The timer has two different working modes:
-
Timer mode: When the programmed period is over, the timed heating element switches itself off automatically.
If the timer is set in this mode, this is indicated by a led near the timer display.
-
Alarm mode: This is only a count-down timer that does not control the heating elements;
The working mode is programmable by the user by touching the selection-zone key.
In any working mode, after the time has been set, the countdown starts.
When time has expired, a buzzer goes on and the display flashes until any keys is touched (or after few minutes)
It can be set to any value between 1 and 99 minutes and can be modified at any time;
Continuous activation of PLUS or MINUS provide dynamic increase of the speed of variation up to a maximum value.
To cancel the count-down, select the "00" value using the "-" key or press the the "+" or "-" keys at the same time
Timer
Any of the heating elements under the touch control system, both simple or double, can be timed. When the timed
period is over, the timed heating element (and if applicable the twin area as well) switches itself off automatically.
For timer control of a heating element first press the selection-zone key,
then the power level and finally and then the timer keys.
The timer can be apply to one heating element at a time. By selecting another cooking zone after the timer is set,
the display show a led corresponding to the heating zone timed, and the second zone can work normally.
Alarm
The alarm mode is activated by pressing only the "
+
" or "-" key; It can be activated also when the touch control
and the hob are off. If the touch control is turned on (using the power key) the alarm mode goes off automatically.
Thermal protection of the control panel
When the control panel detects an ambient temperature greater than 95°C (+- 5%) it shuts off the elements. A heating
element that is shut off by the thermal protection can be turned on only when the temperature drops below 95°C.
Page 7
INDUCTION
Warnings:
The Induction complies with the valid EMC standards. Therefore no disturbances with other electronic devices
should occur. User with pace maker or other electronic implant are recommended to check with the manufacturer
of the electronic device or their medicine if their electronic device is adequate safe respecting to EMC
The cooking surface may get hot even in case of inductive heating without direct heating of the cooking
surface. But the surface is heated by the pot standing on the cooking zone which reheats the surface.
The temperature protection for pots and depends on the planarity of the vessel. In case of an exceeded air
gap in the centre of the cooking zone the temperature protection (empty boiling pot, oil flaming ) is affected.
Kitchenware or others metalworks should not be put onto the hob because they could get hot.
Receptacles
Use only saucepans and frying pans with a sturdy, preferably thick bottom. This is particularly important
when preparing food requiring high cooking temperatures, such as fried foods. If the bottom of the pan
is not perfectly flat, the food takes loger to cook and uses up more energy. The best heat transfer is
obtained when the saucepan and burner are the same size.
The induction cooking method rapidly transfers the energy needed for cooking directly to the pan,
so the cooktop surface remains cold but the pan heats up. The result is a fast, cost-effective and
accurate cooking method. This type of appliance can be used with enamelled steel or stainless steel
pans; it is not suitable for use with glass, ceramic or aluminium pans (unless a special magnetic base
plate is used). Turn the hob off through its proper device after use (do not rely only on pot detector)
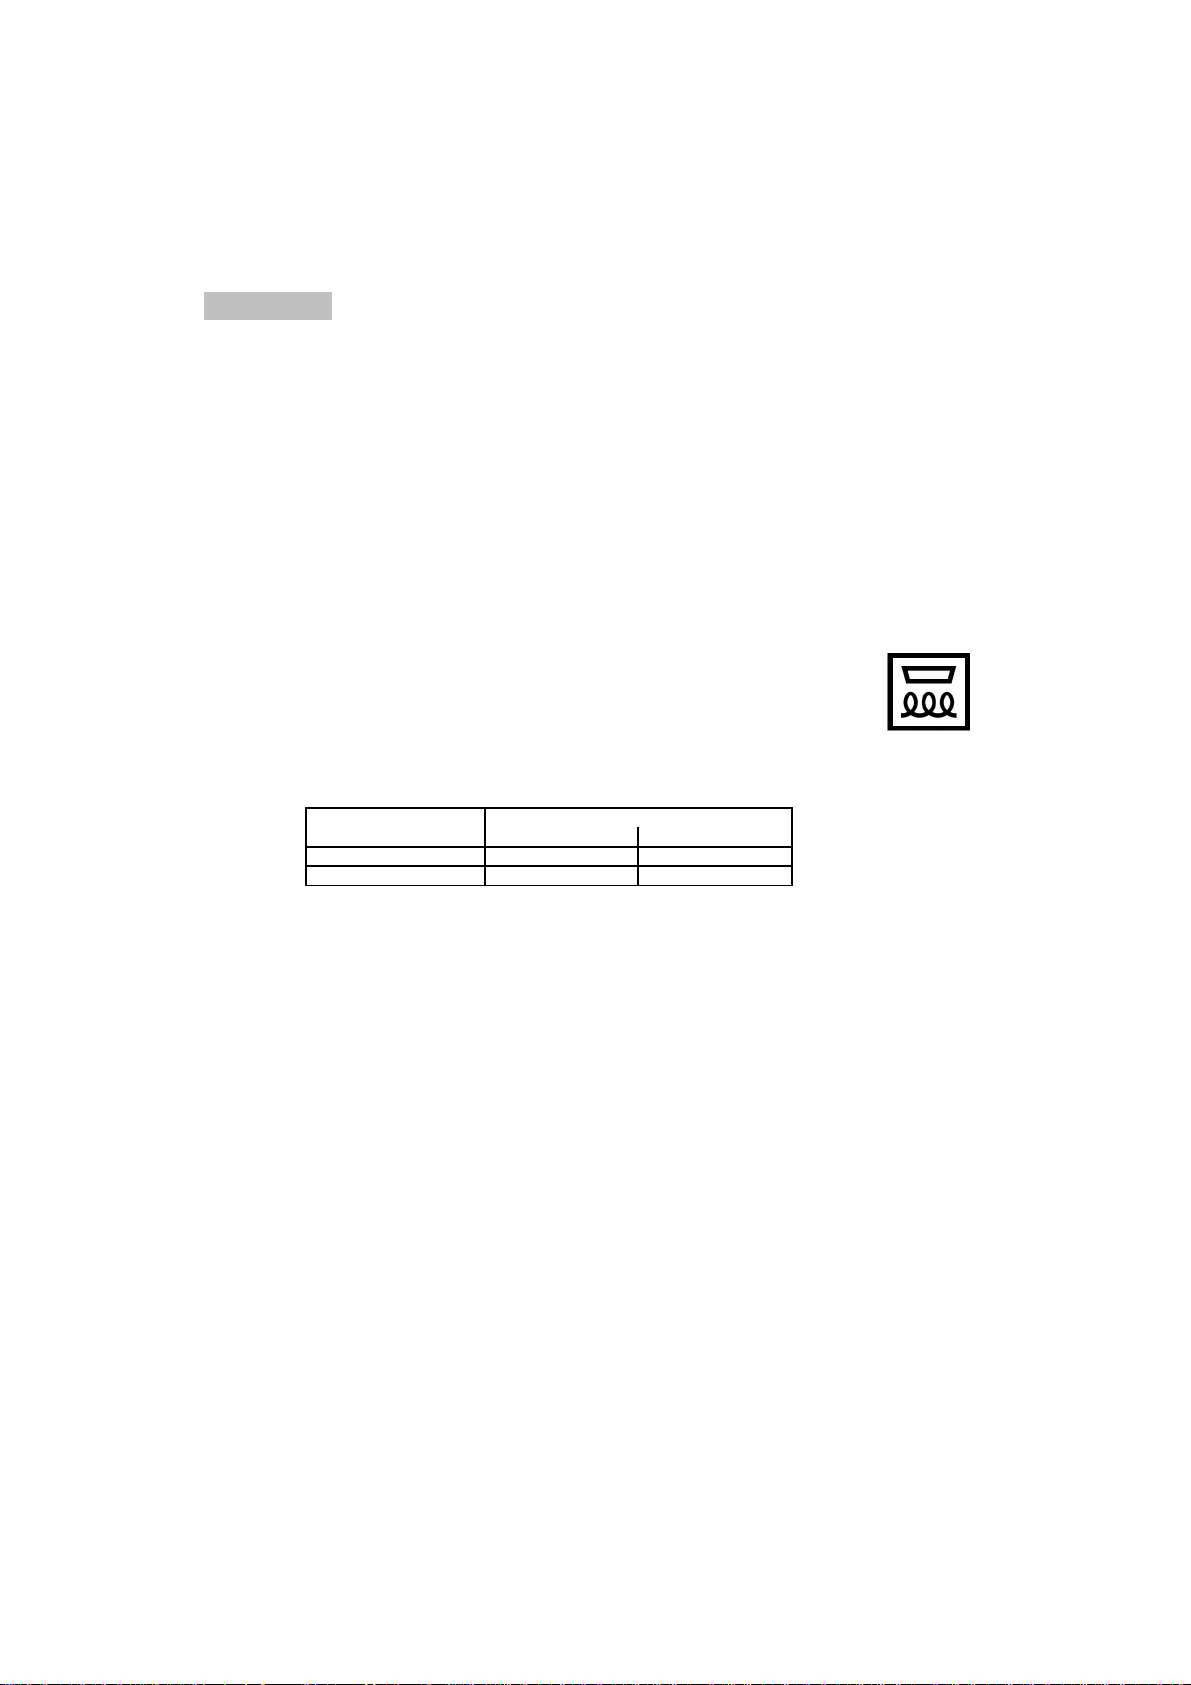
Limits of pot detection function
The following table shows the limits of the pot detection as they are tested with cast iron:
Integrated pot detection
Each one the cooking zones is equipped with a pot detection function. The pot detection prevents a cooking zone
from turning on without a pot being put on it. And the cooking zone turns off as soon as the pot is taken away
from it. The cooking zone is turned off automatically after a certain time when a cooking level is set but there is
no pot put on it. The pot needs to be made of magnetisable material. The pot detection of the induction module
depends on the pot and the material it is made of.
Protection against excess temperature
The generator as well as the coils have integrated functions protecting against excess temperature.
Inside the power board a temperature sensor controls the temperature of the heat sink to protect the devices.
Soiling on the glass ceramic surface
Soiling, normally food stuffs and/or water can – however, not necessarily – be mistaken as a key touch. Also,
dampness in thin layers (film, streaks) may cause this effect. Especially with larger quantities there is a chance
that none, one, several or all keys can, thus, be mistaken as touched briefly or permanently. In this respect,
soiling can, for a short period, lead to alterations of settings which can just as well be generated by an operator.
In case of such an alteration e. g. activation of a cooking zone, the entire Touch Control is disconnected after
max. 10 sec (due to permanent operation detection). This implies that the „activating“ effect on the sensors
caused by the soiling remains basically unchanged for as long as 10 sec
Overheat control for induction cooking zones
In principle, the induction works intrinsically safe. The induction electronics provide temperature sensors at each
cooking zone being located below the glass ceramic surface to monitor temperatures. Further temperature
sensors along the heat sink protect the electronics itself against overheating. The software may reduce the power
or switch off all cooking zones in case of too high measured temperature values.
Min.
Limit of pot detection (switches ON)
Ø 160 mm
Nominal diameter
Ø 200 mm
Max.
Ø 160 mm
Ø 200 mm
Ø 90 mm
Ø 120 mm
of coil
Page 8

Pause Function
When at least one cooking zone is in operation, the heating elements may be switched off by actuating the
special key “pause” for >= 1s. Already programmed times (also egg timer) are
stopped
and do
not
continue
during the pause. Automatic heat-up and booster are also switched off on all cooking zones during activation,
the residual heat calculation and operating time limitation continue and are not stopped. The pause condition
may last for max. 10 minutes. If the status is not terminated within this time, the control switches off. The cooking
zone may be switched at any time with the on/off key – a possibly activated pause mode is then terminated.
In order to terminate the pause mode and put into operation again the cooking zones, the special function
key and any other key (not the same again) has to be actuated within 10 seconds.
Recall Function
By using of the recall function the settings may be recovered quickly, when the control had been switched off
with the main switch by mistake. After switching off the power key the operator has 6s to switch on again the
control and another 6s to actuate the pause key. The pause mode is not possible within the first 6s after
switching on. The execution of the function is only possible, if at least one cooking zone was active (cooking
stage > 0), independent from the key-lock status and is confirmed with an acoustic key signal.
The following is re-established:
-
Cooking stages of all cooking zones
-
Minutes and seconds of programmed cooking zone-related timers
-
Switching condition of the outer circuits (is guaranteed by outer-circuit memo function)
-
Heat up function and booster
Booster function
After selection of a respective cooking zone, the boost function can be selected directly via the boost function
key. If the desired cooking zone has the capacity to receive this power, the display shows a “P” symbol.
In case the power is not permitted the cooking stage display flashes for 3 sec on the cooking zone which needs
to be reduced and which requires automatic adjustment. The boosting time is limited to 10 min. After the booster
is switched off automatically, the cooking zone continues operation on nominal power. The booster can be
reactivated provided that the temperature sensors in the electronics and in the coils have the capacity.
In case that the pan is removed from the cooking zone during boosting, the boosting function remains active and
boosting time continues. If the booster temperature limit of the electronics or the coil of a boosted cooking zone
is exceeded, the booster is cut off automatically and reset to nominal power.
Fan control (Integrated cooling of the generator)
The cooling is integrated within the plastic housing of the Inductor heat element. The operation of the fan is
controlled by the temperature which is measured at the heat sink. Then fan switches on, when a certain
temperature is reached and switches to a higher speed when the second temperature limit is reached.
Start lower speed 45°C
Start higher speed 55°C
Pot with bottom with ferromagnetic material
Magnetic field
Glass-ceramic surface
Coil to spiral of Archimedes
Generator
Page 9

Important!
-
These instructions are intended for qualified technicians.
-
The appliance must be installed correctly, in compliance with current laws.
-
Before carrying out any operation on the appliance, it must be disconnected from the electric supply.
Position (fig.1)
The hob is designed to be fitted into a work surface which is larger than the hob. The dimension of the hole to be
made in the worktop and the minimum distances between rear and side walls and those above are showed on
figure n°1. The hob is supplied with a seal to prevent infiltration into the unit. The seal must be fitted carefully.
Materials and glues used for the kitchen cabinets must withstand a temperature of at least 100°C.
Isolation (fig.4):
-
If the cooktop is installed without an oven below it, a separator panel must be placed between
the bottom of the cooktop and the housing below it, at a minimum distance of 10 mm.
-
If the cooktop is installed over an oven, place a separator panel at a minimum distance of 15mm and follow
the oven manufacturer's instructions, ensuring nonetheless sufficient aeration as specified in fig.4.
The heat produced by the oven, measured on the right side of the bottom of the hob, must be lower than 60°C.
Otherwise, the heat could damage the knobs or the Touch Control system.
In any event, the electrical connection of the two appliances must be carried out separately,
both for
safety and for an easy removal. It is mandatory to use an oven equipped with an internal forced cooling system.
Fix in the worktop (fig.2):
To fix the cooktop in the housing, proceed as follows:
-
Position the special seal supplied [C] along the outer perimeter of the worktop,
so that the ends of the gasket meet exactly without overlapping.
-
Position the cooktop into the worktop, taking care to ensure it is placed exactly in the centre.
-
Fix the cooktop to the worktop using the special brackets supplied [A], and the screws [B], as shown in fig.2.
Electrical connections (fig.6)
Connecting the electrics, ensure that:
-
The household power supply meets the requirements on the labels located under the hob and in this booklet
-
There is an earth system and that it works correctly (earth connection is required by law);
-
For a direct connection to the mains, there must be an omnipolar cut-off device on the power-supply line,
with a contact cut-off distance of 3 mm or greater. The device must also be located in an accessible position.
near the hob (the yellow-green earth wire must not be interrupted).
-
The lead and plug must be easily accessible after the hob has been installed.
-
Do not use reducers or adapters for connect to the mains, since these could overheat and cause burns
-
Connect the wire in accordance with the following colours/codes:
BLUE
NEUTRAL (N)
BROWN
LIVE (L)
YELLOW-GREEN
EARTH
( )
-
If the cable is damaged, it must be quickly replaced, immediately turn-off the hob and call the assistance.
Maintenance
-
Do not cook with empty neither enamelled or aluminium pans. Use only stainless steel pots and pans with
a flat bottom, having same or slightly larger diameter than the heating area (see Fig.5).
Receptacles should not have rough bottoms in order to avoid scratches on the heating glass surface.
-
If you see a crack on the hob, disconnect immediately the electric power supply and contact the assistance
-
Never place hot pans, frying pans, hard or sharped objects on the control panel, knobs area or the frame
-
For cleaning, use only warm water with a mild detergent. Never use abrasive sponges or irritating chemical detergents
as they might cause damage to glass. Warning: a steam cleaner is not to be used to clean the appliance.
-
Any spilt food like sugar and other cause damage the hob, it must be removed immediately with the scaper.
Warning !!! The optional scraper for glass (fig.3) has a sharp blade.
-
The following damages will not affect the correct functioning or the stability of the ceramic glass:
Scratches due to salt, sugar or sand grains or rough pan bottoms; The formation of gelatinous residues
Alteration glass colour from pan use or decoloration due to using unsuitable detergent
FIT INSTRUCTION
Page 10
Error code
Description
Possible error cause
Error clearing
E2
Overheating of the induction coils
/
Cooling down necessary
ER03 &
Permanent use of keys;
Water or cooking utensils on the
Cleaning of the
permanent tone
Control unit cuts off after 10 sec
glass above the control unit
operational surface
E5
Error on filter board
Controller flash defect; check sum not correct
Exchange filter board
5V short circuit with power unit
12V on power unit too low
temperature sensor at cooling body defect
mains synchronous impulse incorrect
Unknow error,
cannot be cleary identified
E9
Exchange temperature sensor
ER12
Control switches off after 10 sec
Short-circuit in the 5V or earthed control relay
Exchange control unit
Control switches off after
60sec at the latest
Short-circuit or disconnected
Remove the cause
pan sensor or power supply
(customer service)
ER20
Flash-failure
µC- faulty
Exchange control unit
Control unit cuts off after controlling
Standard algorithm reaches limit when
Allow cavity to cool down.
due to overheating to
overheated. Ambient temperature of
Check heat sealing-off
avoid damage to the electronics
electronics still to high
of control unit.
Key evaluation defective;
after 3.5 – 7.5 sec
Secondary voltage of the power
supply unit too high (primary>300V).
Control switches off after 1s and a
permanent acoustic signal is heard
Relay voltage too high in switched
-off condition (nominal: 0 Volt)
ER31
Configuration data incorrect Configuration data incorrect
Configuration necessary
ER33
Clean
NTC value is not within it’s
specification (value < 200mV or
>4.9V; control unit cuts off)
Faulty feedback of shift register
or relay activation
ER39 turn-off and call Customer Service
Secondary operational voltage is
identified under tension;
Operational voltage is
the adjusted value
Communication error between
None or faulty
Ensure that connection cable
TC and induction
communication
is plugged on correctly
Secondary voltage of the power
unit to high (primary > 300V).
Control unit is wrongly connected.
Connect to correct
Control unit cuts off after 1sec
mains voltage
releasing a permanent tone.
“H”
Wait until the control card returns
Flashes
to the normal temperature
FA
Error on key "ON-OFF" emitter
Security key error
FC
Error on key "ON-OFF" receiver
Security key error
FE
Ntc short
Touch error
Ft
Ntc open
Touch error
Fc
Over temp T>96°C
Touch error
T<96°C
Fr
Error on relay
Touch relay failure
FH
Eeprom check sum
Eeprom checksum error
FJ
Error on Adc
Security key error
turn-off and call
F0
Error on Sw
Software error
Customer Service
FL
Error on ambient light
Keyboard error
FU
Error divisor
Security key error
turn-off and call Customer Service
Hot pan on the control card; faulty radiant hotplate seal
ER47
U400
Wrong programming options (fuses, lockbits)
ER40
Primary PTC too hot
min.5 s too low, according to
ER37
Return of sliding register signals to select,
turn-off and call Customer Service
signals to the segment
segment or relay triggering incorrect
Water on the glass above the control card
ER36
Short-circuit or discontinuation at NTC
Exchange control unit
ER25
Control wrong connected
Connect to correct mains voltage
ER26
Short circuit in the relay voltage control
Replace the control
Short-circuit or discontinuation at NTC
Exchange control unit
control unit cuts off
in the range of the key evaluation
ER16
Control switches off
ER21
ER22
Coil temperature sensor defective
ER13
Component part defect
Exchange control unit
E6
Error on power unit
Exchange power unit
E7
Sub LIN error between filter and power unit
turn-off and call Customer Service
Disconnect control unit from
the power system
too different from
ER42
The voltage is exceeding from the valid range
or there is too much variance
turn-off and call Customer Service
Page 11

If you cannot identify the cause of the operating anomaly: switch off the appliance (do not subject it
to rought treatment) and contact the Assistance Service.
PRODUCT SERIAL NUMBER. Where can I find it?
It is important you to inform the Assistance Service of your product code and its serial number
(a 16 character code which begins with the number 3); this can be found on the guarantee certificate
or on the data plate located on the appliance.
This will help to avoid wasted journerys to technicians, thereby (and most significantly) saving
the corresponding callout charges.
CUSTOMER ASSISTANCE SERVICE
Page 12

Avvertenze e consigli per l'uso
IMPORTANTE!
Questo manuale costituisce parte integrante dell’apparecchio. Occorre conservarlo integro e a
portata di mano per tutto il ciclo di vita del piano di cottura. Consigliamo una attenta lettura di questo manuale
e di tutte le indicazioni in esso contenute prima dell’utilizzo dell’apparecchio. Conservare gli eventuali ricambi
in dotazione. L’installazione dovrà essere eseguita da personale qualificato e nel rispetto delle norme vigenti.
Quest’apparecchio è previsto per un impiego domestico ed è costruito per svolgere la funzione di cottura e
riscaldamento dei cibi. Ogni altro uso va considerato improprio.
Il costruttore declina ogni responsabilità
per cattiva installazione, manomissione, imperizia d’uso e per utilizzi diversi da quelli indicati.
Verificare che il prodotto non abbia subito danni durante il trasporto. Gli elementi dell’imballo (sacchetti in plastica,
polistirolo, nylon, ecc.) non devono essere lasciati alla portata dei bambini, in quanto potenziali fonti di pericolo.
Questo apparecchio non è destinato ad essere usato da bambini, persone incapaci o inesperte all’uso dello stesso,
a meno che non siano sorvegliate o istruite riguardo all'uso da una persona responsabile della loro sicurezza.
Sorvegliare i bambini in modo tale da assicurarsi che non giochino con l'apparecchio
La sicurezza elettrica è assicurata solo quando il prodotto è collegato ad un efficiente impianto di messa a terra
E’ rischioso modificare o tentare di modificare l’apparecchio. In caso di guasto non tentare di riparare da soli
l’apparecchio ma richiedete l’assistenza di un tecnico qualificato
Dopo aver usato l'apparecchio, assicurarsi che i comandi siano nella posizione "0" - spento.
Qualora decidesse di non utilizzare più quest’apparecchio, prima di gettarlo al macero, si raccomanda di renderlo
inoperante nel modo previsto dalle leggi vigenti in materia di salute e tutela dell’ambiente, rendendo innocue le
parti che possono costituire elemento di pericolo per i bambini
Per la manutenzione, la movimentazione, l'installazione e la pulizia dell'apparecchio, si raccomanda
di
usare opportuni mezzi di prevenzione e protezione
.
La targa di identificazione, con i dati tecnici, si trova visibilmente posizionata sotto il carter ed
allegata a questo manuale. La targhetta sotto il carter non deve mai essere rimossa.
Non appoggiare oggetti infiammabili sul piano cottura.
Pericolo di incendio!
L'indicatore di calore residuo indica quando la superficie è calda. Se acceso, attenzione a:
Non toccare le zone di cottura;
Non appoggiare fogli alluminati o contenitori plastici sul vetro (i fogli di alluminio non sono utilizzabili sul vetro)
Nel caso vi sia un cassetto sotto al piano, è consigliabile non riporvi oggetti infiammabili o spray.
Il cavo di alimentazione o qualsiasi altro cavo elettrico non devono toccare le zone di cottura.
Le zone di cottura ed il fondo delle pentole devono sempre essere asciutti.
Se vi sono delle crepe o delle spaccature sul vetro; se le zone cottura si surriscaldano, il display non si
illumina correttamente o se l'apparecchio si spegne improvvisamente, ci può essere rischio di corto-circuito;
Spegnere e scollegare immediatamente l'apparecchio e chiamare il centro assistenza qualificato.
Queste e le successive istruzioni sono valide solamente per i paesi di destinazione la cui sigla compare
nelle targhette dati tecnici poste alla fine del presente libretto e sul fondo dell'apparecchio.
Illustrazioni ed istruzioni per il corretto funzionamento dell'apparecchio sono contenute nel presente manuale.
Dichiarazione di conformità
Questo apparecchio è conforme alle seguenti normative CE:
93/68/CEE:
Norme generali
2006/95/CEE:
Bassa tensione
2004/108/CEE:
Compatibilità elettromagnetica
Regolamento CE n°
1935/2004
: Idoneità dei materiali al contatto con i cibi
Page 13

OGNI MODIFICA, MANUTENZIONE, ECC. DEV'ESSERE EFFETTUATA
CON L'APPARECCHIO SCOLLEGATO DALLA RETE ELETTRICA
I piani in Vetroceramica permettono una rapida trasmissione del calore in verticale dagli elementi riscaldanti posti sotto
al vetro alle pentole o padelle appoggiate sopra. Il calore non si propaga orizzontalmente, alla distanza di qualche
centimetro dalla zona cottura, il vetro rimane relativamente freddo al tatto.
Prima di cucinare per la prima volta, è necessario pulire la suferficie dell'apparecchio. La pulizia dev'essere effettuata
esclusivamente utilizzando prodotti specifici. Dopo la pulizia, accendere l'apparecchio al minimo e farlo funzionare per
qualche secondo, in modo da asciugare la suferfice e testarne il corretto funzionamento.
Prima di iniziare a cucinare, controllare quale controllo (manopola o touch) comanda la zona che di desidera accendere.
Si consiglia di posizionare la pentola o la padella sopra la zona cottura prima di accenderla, e rimuoverle solo dopo spenta.
Non cucinare mai direttamente sopra al vetro, ma utilizzare pentole o padelle adatti.
Non fissare a lungo le lampade alogene dell'apparecchio, possono danneggiare la vista.
Non lasciare assolutamente le zone cottura accese senza alcun contenitore sopra di esse.
Un uso scorretto dell'apparecchio può causare surriscaldamenti, danneggiare l'apparecchio e provocare incendi.
Per accendere una zona cottura, ruotare la manopola o settare il Touch-control alla potenza desiderata.
I numeri da 1 a 6-10 (a seconda del tipo di apparecchio) indicano i livelli progressivi di temperatura.
Dipendentemente dal tipo di pietanza da cucinare, utilizzare la scala di temperature seguendo i consigli di cui tabella:
Spento
Per operazioni di fusione (burro o cioccolato)
Per mantenere caldi i cibi e scaldare piccole quantità di liquidi
Scaldare grandi quantità e preparare creme o salse
Lenta bollitura, per zuppe, pasta, risotti, continuazione di una
cottura a vapore, per cuocere bistecche o per friggere
Rosolatura delle carni, patate arrosto, pesce fritto e per
portare a bollitura grandi quantità d'acqua
Fritture rapide, bistecche ai ferri, ecc..
Al temine della cottura spegnere sempre l'apparecchio.
INDICATORE DI CALORE RESIDUO
Questi apparecchi sono dotati di un indicatore che segnala all'utente quando il vetro si trova ad una temperatura
pericolosa in caso di contatto diretto con la superficie o in caso di appoggio di oggetti su di esso.
Negli apparecchi dotati di manopole di comando, tale funzione è svolta da una spia rossa posta nella zona comandi,
nei modelli con Touch Control si tratta di un segnale ad "H" che apparirà sul display della zona touch.
Una volta spente le zone cottura, l'indicatore di calore residuo rimane acceso per il perioro di tempo
necessario affinchè la temperatura della superficie ritorni al di sotto del livello critico di pericolosità.
Attenzione a non toccare il vetro e a non appoggiarvi oggetti finchè l'indicatore non è spento.
Consigli per la cottura
7
8
5
6
3 - 4
3-4
5
6
0
1 - 2
2 - 3
COTTURA
1-10
Tipologia di comandi
Controllo con manopole
1-6
control
Touch
1
9
1-8
0
1
2
3
4
5
6
7
0 0
1-2
7-8
9
10
2
2-3
8
6
5
3
4
Page 14

CONTROLLO MEDIANTE MANOPOLE
In questi apparecchi le zone di cottura sono controllate da delle manopole connesse ai regolatori di potenza.
I numeri indicano la scala di potenza, partendo dal minimo "1" e crescendo fino al numero maggiore.
Il numero "0" indica la posizione di spento. Le zone estensibili, dove presenti, si attivano portando la manopola
alla posizione di massima potenza, e girandola ancora fino a sentire uno scatto, a quel punto la zona sarà
accesa e si potrà scegliere l'intensità di potenza desiderata tra i numeri indicati.
La zona cottura corrispondente è indicata dalla simbologia posta di fianco ad ogni manopola.
Esempi:
TOUCH CONTROL
In questi apparecchi le zone cottura sono controllate da una scheda con comando Touch.
Dipendentemente dalla versione dell'apparecchio, possono esserci tutti o parte dei comandi indicati sotto.
La tipologia dei simboli può variare leggermente a seconda dell'estetica, ma le funzioni rimangono invariate.
Accensione (ON/OFF)
Doppio circuito ON/OFF (Optional)
Livello di potenza
Zona estensibile ON/OFF (Optional)
Piastra selezionata
Led doppio/triplo circuito (optional)
Aumentare
Display del timer (Optional)
Selezione zona
Indicatore della piastra col timer
Diminuire
Funzione "Lock" (Optional)
Timer ON/OFF (Optional)
Indicator della funzione "Lock"
(Optional)
Funzione pausa (Optional)
Funzione booster (Optional)
USO
Page 15

Accensione/spegnimento del Touch Control
Dopo l'accensione, il Touch richiede circa un secondo prima di essere pronto al funzionamento. Dopo il reset tutti
i led lampeggiano per circa 1 secondo. Passata questa fase, tutti i display ed i led si spengono ed il Touch control
va in modalità stand-by. Il Touch si accende e spegne facendo pressione solamente sul tasto "ON/OFF".
La pressione del tasto ON/OFF in concomitanza con altri tasti non produce alcun effetto.
Quando pronte, le zone cottura indicano uno "0". Se una zona cottura è calda, il display mostrerà una "H" (Hot).
Il Touch control può essere spento in qualsiasi momento azionando il tasto ON/OFF, anche se i conadi si
trovano nella funzione di sicurezza "Lock" (vedi paragrafi successivi).
Il tasto ON/OFF ha sempre priorità maggiore rispetto a qualsiasi altra funzione.
Accensione di una zona cottura
Col Touch control acceso, la zona cottura può essere selezionata tramite il tasto di selezione; quando il rispettivo
display mostra uno "0" la piastra è pronta. Se l'area è calda il display indica una "H" corrispondente.
Premendo il tasto "+" si può selezionare il livello di potenza con cui iniziare. Partendo dal livello "1" la potenza
viene incrementata ogni 0.4sec. Al raggiungimento del livello 9 non è possibile effettuare ulteriori incrementi.
Se la zona cottura viene selezionata tramite il tasto "-" il livello iniziale è "9", continuando a premere il tasto "-"
si riducono i livelli di potenza fino al livello "0" dal quale non si può più diminuire.
Spegnimento di una zona cottura
Scegliere la zona da spegnere tramite il tasto di selezione. La selezione è indicata con un punto luminoso nella
relativa zona display. Premendo i tasti "+" e "-" contemporaneamente il livello della potenza passa a "0".
In alternativa si può agire sul tasto "-" e diminuire la potenza fino al punto "0".
Se tutte le zone cottura sono accese ma a "0", i punti luminosi di selezione lampeggiano;
Se una determinata zona cottura è pericolosamente calda sopra il livello critico, sul display compare un a "H".
Tutte le zone cottura possono essere spente in qualsiasi momento, immediatamente, premendo il tasto OFF.
Funzione di riscaldamento automatico (dove fornita)
Quando la funzione di riscaldamento automatico è attivata, la piastra riscalda al 100% della potenza per un
determinato periodo, dipendentemente dal valore di potenza desiderato. Al raggiungimento della temperatura
selezionata, la scala ritorna al valore iniziale. Per attivare la funzione riscaldamento automatico:
-
Il touch dev'essere acceso ed una piastra selezionata
-
Al livello di potenza "9", premere nuovamente il tasto "+"
-
Selezionare il livello di potenza desiderato agendo sui tasti "+" e "-"
-
Qualche secondo dopo la selezione della potenza desiderata, sul display appare una "A"
Usando il tasto "-" è possibile uscire dalla funzione in qualsiasi momento.
Una volta terminata la funzione, sul display appare il livello di potenza selezionato.
Funzione di spegnimento automatico (limite del tempo di funzionamento)
In relazione al livello di potenza, ogni zona cottura si spegne autonomamente dopo un tempo massimo
predefinito dal sistema, nel caso non si esegua nessuna operazione.
Una qualsiasi operazione sulla zona cottura (tramite i tasti "+" e "-") resetta il tempo di stand-by
da operazioni della zona cottura al suo valore iniziale.
-
Quando il controllo è acceso, il tasto ON/OFF ha priorità su tutti gli altri tasti, in tal modo
è possibile spegnere l'apparecchio in qualsiasi momento, a prescindere dalla funzione in corso.
-
Nella modalità di stand-by un'attivazione continua sui tasti non genera alcun effetto. Prima che il controllo
possa accendersi nuovamente, analizza che vi sia alcun tasto attivato.
Funzione "Lock" (dove fornita)
Con il tasto “lock” si può bloccare l’intero controllo (dispositivo), al fine di preservarlo da azioni non intenzionali.
Dove presente il tasto "Lock" premere per bloccare la zona comandi; ripremerlo per sbloccarla.
Altrimenti, premere il tasto di selezione della zona in basso a destra ed il tasto "-" simultaneamente, seguiti da una
nuova pressione del tasto di selezione zona. Tutti i display mostreranno una "L" che sta per "Lock" - bloccato.
Questa procedura deve essere compiuta entro 10sec. e nessun altro tasto deve essere premuto del frattempo.
L'elettronica rimane bloccata finchè non viene rilasciata, anche se l'apparecchio viene spento e riacceso.
Per sbloccare, premere il tasto di selezione della zona riscaldante ed il tasto "-" simultaneamente.
La "L" di Lock - Bloccato, scompare dal display lasciando il posto ad uno "0" lampeggiante.
Dopo aver spento l'apparecchio la funzione Lock si riattiva. Per disattivarla definitivamente, premere il tasto di
selezione della zona riscaldante ed il tasto "-" simultaneamente seguiti dal tasto "-" nuovamente.
Dopo questa procedura aspettare circa 10sec., dopo di che il piano si troverà in stato "stand-by".
Page 16

Uso delle zone a circuito multiplo (dove presenti)
Dipendentemente dal modello, l'apparecchio può avere una "DUAL" o "TRIPLA" zona riscaldante. Quando una piastra
multipla viene attivata, si accendono tutti i curcuiti contemporaneamente. Se si vuole accendere solamente il circuito
interno, i circuiti esterni possono essere disattivati con i tasti appositi in qualsiasi momento.
I circuiti esterni attivi sono indicati da uno specifico LED che ne indica il funzionamento.
Se l’elemento da controllare è una radiante a triplo circuito, avviene quanto segue:
La prima attivazione del tasto di circuito-multiplo spegne il circuito più esterno ed il LED in alto del display.
Una seconda attivazione del tasto di circuito-multiplo spegne il circuito mediano ed il LED in basso del display.
Una terza attivazione riaccende il circuito mediano. Un’ulteriore attivazione aggiunge il terzo circuito ed il rispettivo LED.
Funzione contaminuti
L'apparecchio è dotato di un contaminuti indipendente da 1 a 99 min. Un segnale sonoro avvisa quando il tempo è scaduto.
Se il touch è spento il timer autonomo può essere utilizzato attivando il tasto di timer. Attivando il tasto di accensione, il
touch ritorna in modalità di stand-by ed il timer viene spento. Modifiche del valore (0-99 min.), possono essere effettuate
in qualsiasi momento con incrementi di un minuto con i tasti “+” e “–“. Dopo che il timer è stato impostato inizia il conto
alla rovescia. Lo scadere del tempo viene notificato da un segnale sonoro e dal lampeggiare del display;
Il segnale sonoro si ferma automaticamente dopo 2 minuti, oppure azionando un tasto qualsiasi. ll display smette di
lampeggiare e si spegne. Il contaminuti può essere modificato o spento in qualsiasi momento azionando i tasti “+” o “-“;
Portando il tempo a “0” con tasto “-“ oppure azionando i tasti "+" e "-" contemporaneamente, il contaminuti torna a “0”;
Funzione di fine cottura
Con funzione fine cottura, dove presente, è possibile programmare il tempo di spegnimento di una piastra.
Ogni zona cottura controllata dal Touch control, sia essa singola o multicircuito, può essere programmata per
lo spegnimento automatico.
Per attivare il fine cottura premere innanzitutto il tasto di selezione piastra, poi il tasto di incremento potenza
ed infine il tasto specifico col simbolo "timer".
Il fine cottura può essere assegnato ad una sola zona cottura per volta.
Selezionando una seconda zona cottura mentre il timer è in funzione, nel display si accende un led in
corrispondenza della zona cottura per cui il timer è attivo, e la seconda zona opera normalmente.
Protezione termica del pannello di controllo
Quando il pannello di controllo Touch control diagnostica una temperatura ambientale maggiore di 95°C (+- 5%)
spegne automaticamente qualsiasi elemento riscaldante.
Questo potrà essere riattivato quando la temperatura sarà ridiscesa sotto il livello critico.
Page 17

INDUZIONE
Attenzione:
Il dispositivo "
Basic Induction
" è conforme agli standard EMC in vigore. Per questo non si dovrebbero verificare
interferenze con altri apparecchi elettronici. Si consiglia agli utenti con pace-maker o altri innesti elettronici di
controllare con il produttore dell'apparecchio elettronico o con il proprio medico se esso è abbastanza sicuro
rispetto alla compatibilità elettromagnetica
La superficie di vetro di cottura può riscaldarsi in caso di cottura tramite induzione, non per contatto diretto con
l'elemento riscaldante, ma per trasmissione dalla pentola o padella di metallo che si usa per la cottura.
La protezione termica per le pentole dipende dalla planarità del recipiente. In caso di distanza eccessiva dal
centro della zona di cottura viene compromessa la protezione termica (pentola bollente vuota, olio infiammato).
Posate od altri oggetti metallici non devono essere posati sull'apparecchio, possono riscaldarsi e danneggiarlo.
Recipienti
Si consiglia l'utilizzo di contenitori con fondo piatto, con diametro pari o leggermente superiore a quello della
superficie di riscaldamento. I contenitori non devono presentare fondo irregolare per evitare di graffiare la superficie
di riscaldamento. Utilizzare solo casseruole e padelle con fondo resistente e preferibilmente spesso. Ciò è di
particolare importanza per la preparazione di cibi che richiedono alte temperature di cottura, come fritti. Se il fondo
della pentola non è perfettamente piatto, il cibo richiede un tempo di cottura e un consumo energetico maggiore.
Il trasferimento termico migliore si ottiene quando la casseruola ed il bruciatore sono della stessa dimensione
Il metodo di cottura ad induzione trasferisce l'energia necessaria per la cottura direttamente alla pentola,
così la superficie del piano di cottura rimane relativamente fredda mentre la pentola si scalda. Il risultato
è un modo di cottura veloce, economicamente vantaggioso e preciso. Su questo tipo di apparecchio
Si devono utilizzare pentole in acciaio smaltato o inox; non è adatto l'uso di pentole di vetro, ceramica o
alluminio (a meno che non venga usata una piastra base magnetica speciale). Spegnere il piano di
cottura attraverso il dispositivo adatto dopo l'utilizzo (non fare affidamento solo sul rilevamento pentole).
Limiti della funzione di rilevamento pentole
La tabella seguente mostra i limiti del rilevamento pentole testati con ghisa:
Rilevamento pentole integrato
Ogni zona di cottura è dotata della funzione rilevamento pentole. Il rilevamento pentole impedisce l'accensione di
una zona di cottura sulla quale non è presente una pentola. La zona di cottura si spegne non appena la pentola
viene rimossa. La zona di cottura viene spenta automaticamente dopo un certo tempo quando viene impostato un
livello di cottura, ma non è presente una pentola su di essa. La pentola deve essere realizzata in materiale
magnetico. Il rilevamento pentola del modulo a induzione dipende dalla pentola e dal materiale di cui è composta.
Protezione da temperature eccessive
I componenti del piano dispongono di funzioni integrate per la protezione da temperature eccessive. Un sensore di
temperatura controlla la temperatura del dissipatore di calore per proteggere i dispositivi in caso di surriscaldamento.
In caso questo si verifichi, il sensore riduce la potenza degli elementi oppure spegne le zone.
Residui sulla superficie di vetroceramica
Presenza di sporco sul vetro (es.residui di cibo e/o acqua) può essere scambiato, dal sistema, per lo sfioramento
di un pulsante. Anche l'umidità su strati sottili (pellicole, macchie) può provocare lo stesso effetto.
Specialmente in quantità maggiori c'è la possibilità che nessuno, uno, molti o tutti i pulsanti, quindi, possano essere
considerati come se fossero stati sfiorati leggermente o per lungo tempo. A questo proposito, lo sporco può per un
breve periodo provocare modifiche delle impostazioni che possono essere impostate anche dall'operatore. In caso
di tale modifica, ad es. attivazione di una zona di cottura, l'intero comando a sfioramento viene scollegato dopo
max. 10 sec (a causa del rilevamento permanente del funzionamento). Questo implica che l'effetto di "attivazione"
sul sensore provocato dallo sporco rimane essenzialmente immodificato per la durata di 10 sec.
Ø 200 mm
Max.
Ø 160 mm
Ø 200 mm
Ø 90 mm
Ø 120 mm
della serpentina
Min.
Limite del rilevamento pentole
Ø 160 mm
diametro nominale
Page 18

Funzione pausa
Quando almeno una zona di cottura è in funzione, gli elementi di riscaldamento possono essere spenti premendo
il pulsante speciale assegnato per >= 1sec.. I tempi già programmati (anche per l'egg timer) vengono bloccati e non
continuano durante la pausa. Anche il riscaldamento automatico e l'amplificatore vengono spenti su tutte le zone
di cotture durante l'attivazione, il calcolo del calore residuo e il limite del tempo di funzionamento continuano e non
vengono interrotti. La condizione di pausa può durare per max. 10 minuti. Se lo stato non viene interrotto entro
questo tempo, l'unità di comando si spegne. La zona di cottura può essere accesa o spenta in qualsiasi momento
con l'interruttore: un'eventuale modalità di pausa attivata viene quindi interrotta. Per interrompere la modalità di
pausa e rendere nuovamente operative le zone di cottura, il pulsante di funzione speciale e ogni altro pulsante
(non nuovamente lo stesso) devono essere attivati entro 10 secondi.
Funzione di ripristino
Utilizzando la funzione di ripristino è possibile ripristinare rapidamente le impostazioni, nel caso l'unità di comando
sia stata disattivata inavvertitamente con l'interruttore principale. Dopo avere spento il pulsante di alimentazione,
l'operatore ha 6 sec per riattivarlo ed altri 6 sec per attivare il pulsante di pausa. La modalità di pausa non è
consentita entro i primi 6 sec dopo l'attivazione. L'esecuzione della funzione è possibile solo se almeno una zona di
cottura è attiva (livello di cottura > 0), a prescindere dallo stato del bloccaggio, e viene confermata da un segnale
acustico. Viene ripristinato quanto segue:
-
Livelli di potenza delle zone di cottura;
-
Minuti e secondi del timer programmati a seconda della zona;
-
Condizione di commutazione dei circuiti esterni (garantita dalla funzione di memorizzazione del circuito esterno)
-
Funzioni di ricaldamento e booster
Funzione Booster
La funzione booster permette un riscaldamento particolarmente rapido del cibo e permette quindi di risparmiare
tempo. La funzione viene attivata premendo il tasto booster relativo alla zona di cottura interessata, comparirà
senza lampeggiare il simbolo “P”. Con l’attivazione del Booster viene immediatamente arrestato un eventuale
funzione automatic heat up, ed il livello di cottura viene impostato su quello massimo possibile. Per motivi di
sicurezza, la funzione Booster per ogni zona di cottura può essere attivata solo per una durata limitata di 10 minuti.
Se durante il tempo Booster la pentola viene tolta dalla zona di cottura, la funzione Booster rimane attivata e
anche il tempo Booster non viene disattivato. Con il Booster attivato, l’azionamento del tasto “-“ comporta il
disinserimento della funzione Booster. L’azionamento del tasto “+“ non comporta invece alcuna reazione
Controllo ventola (Raffreddamento integrato del generatore)
Il raffreddamento è integrato all'interno dell'alloggiamento in plastica dell'elemento riscaldante ad induzione.
Il funzionamento della ventola è controllato dalla temperatura misurata al dissipatore.
La ventola si accende quando viene raggiunta una certa temperatura e la velocità aumenta quando
viene raggiunto il secondo limite termico
Avvio velocità ridotta 45°C
Avvio velocità superiore 55°C
Pentola con fondo in materiale ferromagnetico
Campo magnetico
Superfice
Serpentina a spirale d'Archimede
Generatore
Page 19

Importante!
-
le presenti istruzioni sono rivolte ad un installatore qualificato;
-
l'apparecchiatura deve essere installata correttamente, in conformità alle norme in vigore;
-
qualsiasi intervento deve essere eseguito con l'apparecchio elettricamente disinserito;
Installazione nel top (piano del mobile)
Il piano di cottura può essere installato in tutti i mobili, purchè resistenti al calore (almeno 90°C);
Le dimensioni del foro da praticare per l'incasso nel piano del mobile e le distanze minime da rispettare
con le pareti posteriori, laterali e sovrastanti l'apparecchio, sono indicate nelle figura 1.
L'apparecchio è fornito con una guarnizione da applicare sotto per prevenire eventuali infiltrazioni di liquido.
Coibentazione sottostante (fig.4):
-
se il piano cottura è installato senza che ci sia un forno sotto di esso, è tassativo l'impiego di un pannello
di coibentazione posto tra il fondo del piano ed il mobile sottostante, ad una distanza minima di 10mm
-
Se il piano cottura è installato sopra ad un forno, posizionare il pannello di separazione ad una distanza
minima di 15mm, e seguire le istruzioni di installazione relative al forno assicurando ci sia sufficiente
aerazione come illustrato in figura 4.
In ogni caso, la connessione elettrica dei due apparecchi dev'essere effettuata
separatamente
, sia per ragioni di sicurezza che per facilitarne eventuali interventi in caso di necessità.
E' obbligatorio utilizzare un forno dotato di sistema di ventilazione interna forzata.
Fissaggio del piano (fig.2):
Il fissaggio del piano cottura sul mobile dev'essere effettuato come segue:
-
posizionare l'apposita guarnizione sigillante fornita in dotazione [C] lungo il perimetro esterno del
foro praticato nel mobile seguendo lo schema indicato in fig.1, in modo che le estremità delle
striscie siano perfettamente unite tra loro senza sormontarsi;
-
Sistemare il piano nel foro del mobile curandone la centratura;
-
Fissare il piano al mobile con le apposite staffe [A] e viti [B] fornite in dotazione, come illustrato in figura 2.
Collegamento elettrico (fig.6)
Prima di effettuare il collegamento elettrico, assicurarsi che:
-
Il voltaggio della rete domestica corrisponda a quello di lavoro dell'apparecchio, indicato nella targhetta dati.
-
Vi sia un collegamento a terra dell'apparecchio (obbligatorio a norma di legge)
-
Per una connessione diretta alla rete, si deve prevedere un'interruttore omnipolare conformemente alle leggi
in vigore, avente una distanza di apertura tra i contatti di almento 3mm. L'interruttore dev'essere posto in una
posizione accessibile vicina all'apparecchio (il cavo di messa a terra giallo-verde non deve essere interrotto)
-
Il cavo e la spina devono essere facilmente accessibili dopo l'installazione del piano.
-
Non usare riduzioni od adattatori per connettere alla rete, potrebbero surriscaldarsi e causare incendi.
-
E' necessario inoltre che venga rispettato il seguente codice-colore durante il collegamento dei cavi:
BLU
NEUTRO (N)
MARRONE
FASE (L)
GIALLO-VERDE
TERRA
( )
-
Se il cavo di alimentazione è danneggiato, deve essere tempestivamente sostituito dal costruttore,
del Servizio Assistenza, o da un tecnico qualificato, onde prevenire rischi.
Manutenzione
-
Non cucinare con pentole vuote oppure in ferro o alluminio. Usare solamente pentole e padelle
in acciaio inox col fondo piatto. Un fondo rovinato o sporco può strisciare la superficie in vetro.
Il diamentro della pentola/padella deve coprire interamente la zona di riscaldamento (figura 5)
-
Se si nota un crepo sul vetro, disconnettere immediatamente dalla rete elettrica e chiamare il servizio assistenza.
-
Non appoggiare pentole calde, oggetti pesanti o appuntiti sul pannello di controllo o sulla cornice.
-
Per pulire, usare solamente acqua tiepida ed un detergente neutro. Non usare prodotti abrasivi o corrosivi,
in quanto possono danneggiare il vetro. Attenzione: non usare assolutamente pulitori a vapore
-
Ogni cibo fuoriuscito (come zucchero o sale) può danneggiare la superficie, dev'essere rimosso immediatemente
usando l'apposito raschietto (fig.3). Attenzione: il raschietto (optional) ha una lama molto affilata.
-
I seguenti danni non intaccano il corretto funzionamento né la robustezza piano:
strisci dovuti a sale, zucchero, od al fondo rovinato delle pentole; formazioni gelatinose dovute a cibo fuso;
Alterazione del colore di alcune zone del vetro o delle parti in acciaio inox dovute a detergenti non idonei.
ISTRUZIONI PER L'INSTALLAZIONE
Page 20

Codice
errore
Descrizione
Possibile causa
risoluzione
E2
Lasciare raffreddare
ER03 &
Attivazione continua dei
Acqua o stoviglie sul vetro nella Pulizia della
segnale acustico
sensori per più di 10 secondi zona del Touch Control
superficie
E5
Errore nella scheda madre
Scheda di controllo difettosa
Sostituire la scheda
Errore sconosciuto
o non identificabile
E9
Sostituire il sensore
ER12
Il Touch si spegne dopo 10 sec.
Corto circuito dei relè di controllo (5V o GND)
Sostituire il Touch
Il Touch si spegne dopo un
max di 60 secondi
ER20
Errore nella lampada
µC- difettoso
Sostituire il Touch control
ER31
Ri-configurare la scheda
ER33
Asciugare e pulire
ER39
Spegnere e contattare
il servizio assistenza
La tensione secondaria è per
più di 5 secondi più bassa del
limite inferiore (tra 1,8V e 2,7V)
Il voltaggio di funzionamento è
Il voltaggio eccede dai limiti impostati
diverso da quanto impostato
oppure c'è troppo sbalzo di tensione
ER42
“H”
lampeggiante
Pentola calda sopra la scheda; guarnizione della radiante difettosa
Attendere finchè la scheda torna a
temperatura normale
U400
Voltaggio della scheda potenza
troppo alto (>300). L'unità si
spegne dopo 1 secondo e rilascia
un segnale acustico
L'unità di controllo è connessa erroneamente
Connettere correttamente tenendo
conto del voltaggio
ER47
Errore di comunicazione tra il Touch
e le piastre
Nessuna o errore di comunicazione
Assicurarsi che il cavo sia connesso
correttamente
Fusibili e condensatori programmati erroneamente
Spegnere e contattare
il servizio assistenza
ER40
PTC primario troppo alto
Sostituire il Touch
ER37
Risposta errata nel registro delle
segnalazioni oppure attivazione del
relè
Ritornare al registro scorrevole per evidenziare
l'innesto scorretto
Spegnere e contattare
il servizio assistenza
Disconnettere l'unità dalla rete
elettrica
Dati di configurazione scorretti
Presenza d'acqua sul vetro sopra la zona comandi
ER36
Valore degli NTC fuori dalle specifiche
(200mV – 4,9V); il Touch si spegne
Corto circuito o interruzione degli NTC
ER26
Voltaggio del relè troppo alto nelle
condizioni di spento
Corto circuito nei controllo tensione del relè
Sostituire il controllo
ER25
Tensione di alimentazione al
secondario troppo alta ( tens al
primario >300V). Il Touch si spegne
dopo 1 secondo ed emette un segnale
sonoro continuo.
Errori di connessione del Touch
Utilizzare una tensione adeguata
ER22
Valutazione difettosa, il Touch si
spegne dopo 3,5 -7,5 secondi.
Corto circuito o interruzione dei sensori
Sostituire il Touch
ER21
Il Touch si spegne al termine del ciclo
di controllo per eccesso di
temperatura, per evitare di
danneggiare l'elettronica
Temperatura ambientale nel locale del Touch
troppo alta
Lasciare raffreddare il piano di
cottura. Controllare l'isolamento
termico dell'elettronica
ER16
I controlli si spengono
Corto circuito o sconnessione nel sensore
pentola o la linea d'alimentazione
Rimuovere la causa
(servizio assistenza)
Sensore di temperatura difettoso
ER13
Componenti difettosi
Sostituire il Touch
Sostituire l'unità di potenza
E7
Sub LIN errore tra il filtro e l'unità di potenza
Spegnere e contattare il servizio
assistenza
Surriscaldamento delle parti elettriche
E6
Errore nella scheda di potenza
5V - corto circuito nella scheda di potenza.
12V nella scheda potenza troppo Bassa –
sensore di temperatura difettoso
Page 21

Prima di chiamare il servizio Assistenza Tecnica
In caso di mancato funzionamento del piano Vi consigliamo di:
-
verificare il buon inserimento della spina nella presa di corrente;
-
verificare che l'afflusso di gas sia regolare.
Nel caso non s'individui la causa di malfunzionamento:
spegnere l'apparecchio, non manometterlo e chiamare il Servizio di Assistenza Tecnica.
MATRICOLA DEL PRODOTTO. Dove si trova?
È importante che comunichi al Servizio Assistenza Tecnica Autorizzato la sigla del
prodotto ed il numero di matricola (16 caratteri che iniziano con la cifra 3) che troverà
sul certificato di garanzia oppure sulla targa matricola.
In questo modo Lei potrà contribuire ad evitare trasferte inutili del tecnico,
risparmiando oltretutto i relativi costi.
SERVIZIO ASSITENZA CLIENTI
Page 22

Avertissements et conseils importants pour l'utilisation
IMPORTANT !
Ce manuel fait partie intégrante de l'appareil. Il faut le conserver en bon état et à portée de
la main pour tout le cycle de vie de la table de cuisson. Lire attentivement ce manuel et toutes les indications
qu'il contient avant l'utilisation de l'appareil. Conserver les pièces de rechange éventuelles fournies.
L’i
nstallation et tous les branchements doivent être exécutés par du personnel qualifié, conformément
aux normes de sécurité et aux lois en vigueur, sur la base des indications fournies par le fabricant
Cet appareil est prévu pour un usage domestique et est fabriqué pour remplir la fonction suivante:
cuisson et réchauffage des aliments. Tout autre usage est considéré impropre
Le fabricant décline toute responsabilité pour une mauvaise installation, pour toute
modification, incapacité d’utilisation et des utilisations différentes de celles indiquées
L’emballage est constitué de matériau recyclable et porte le symbole
Ne pas disperser dans l'environnement
Vérifier que le produit n'ait pas été endommagé pendant le transport
Les éléments de l’emballage (sacs en plastique, mousse de polystyrène, nylon, etc.) ne doivent pas être
laissés à la portée des enfants car ce sont des sources de danger potentielles
Cet appareil n'est pas destiné à être utilisé par des personnes (notamment les enfants) incapables,
irresponsables ou sans conaissance sur l’utilisation du produit, à moins qu’elles ne soient surveillées,
ou instruites sur l’utilisation de l'appareil, par une personne responsable de leur sécurité
Surveillez les enfants pour être sûr qu'ils ne jouent pas avec l'appareil
La sécurité électrique n'est assurée que lorsque le produit est raccordé à une installation de mise à terre
Il est dangereux de modifier ou d'essayer de modifier l’appareil. En cas de dysfonctionnement
ne pas tenter de réparer seuls l’appareil mais demander l’assistance d’un technicien qualifié
Après avoir utilisé l'appareil, s’assurer que l’index soit en position de "0" - fermeture
Si l’on décide de ne plus utiliser cet appareil, avant de l’éliminer, il est recommandé de le rendre inopérant
comme prévu par les lois en vigueur en matière de santé et de protection de l’environnement,
en rendant inoffensives les parties qui pourraient constituer un danger pour les enfants.
Attention:
En cas de démontage, entretien et nettoyage de l’appareil, faire attention,
on recommande d’utiliser des instruments de prévention et de protection adéquats
La plaque d'identification, avec les données techniques, se trouve visiblement positionnée sous le
carter et annexée à ce manuel
. La plaquette sous le carter ne doit jamais être enlevée
Ne jamais poser d'objets inflammables sur la plaque de cuisson.
RISQUE D'INCENDIE
Ne pas toucher les plaques chauffantes.
RISQUE DE BRÛLURES!
Les enfants doivent rester à une distance
de sécurité de l'appareil. L'indicateur de chaleur résiduelle vous signale que les plaques sont chaudes.
Le papier sulfurisé ou les récipients en plastique n'est pas adapté pour cette table de cuisson
Ne jamais stocker de produits combustibles ou bombes aérosols dans des tiroirs sous la table de cuisson
Les câbles de branchement provenant d'appareils électriques ne doivent pas toucher les plaques
chauffantes. Cela pourrait endommager la table de cuisson et l'isolation des câbles.
La plaque chauffante et le dessous des casseroles doivent toujours être secs
En cas de cassures, fissures ou fêlures du verre céramique, il y a risque de courtcircuit. Si la plaque
chauffante surchauffe et l'afficheur est défectueux, si l'appareil s'éteint toute seule et ne peut pas être
utilisée. Débranchez-la immédiatement du secteur et contactez le service après-vente.
Les illustrations pour l'utilisation de l'appareil sont regroupées dans la partie finale de ce manuel
Déclaration de conformité
Cet appareil est conforme aux directives CE suivantes:
¦
93/68/CEE : Normes Générales
¦
2006/95/CEE : Basse tension
¦
2004/108/CEE : Compatibilité électromagnétique
¦
Règlement CE n°
1935/2004
: Aptitude des matériaux en contact avec les aliments
Ces instructions ne sont valables que pour les pays dedestination dont les symboles d’identification
figurent sur la plaquette reportée dans le manuel d’instructions et sur l’appareil
Page 23

TOUT RÉGLAGE, TRAVAIL DE MAINTENANCE, ETC. DOIT ÊTRE EFFECTUÉ
SUR UNE TABLE DE CUISSON DEBRANCHÉE DU SECTEUR.
La caractéristique de la table en vitrocéramique est de permettre une transmission rapide de la chaleur dans le
sens vertical, par les éléments chauffants placés sous la table de cuisson, aux casseroles posées sur celle-ci.
La chaleur ne se propage pas en mode horizontal et donc le verre reste "froid" à quelques centimètres de la zone
Avant la première utilisation, il est nécessaire de nettoyer la surface de la table de cuisson. Cette opération doit
être effectuée uniquement avec des produits de nettoyage pour plaques vitrocéramiques.
Après ce nettoyage, enlever tout résidu ou trace d'humidité éventuellement présent.
Avant d'allumer, vérifier quelle est le commande qui contrôle la zone désirée.
Il est conseillé de poser le récipient sur la zone radiante avant l'allumage et de le retirer après l’extinction.
Ne jamais cuisiner les aliments directement sur la table en vitrocéramique, mais dans des casseroles appropriées.
Ne pas fixer intensément les lampes halogènes de la table de cuisson.
Éviter absolument le fonctionnement sans récipients. L’utilisation à vide de la plaque,
surtout si elle est prolongée, peut être la cause d’incendies.
Pour allumer la table, tourner la manette ou toucher le Touch-control à la potence desireè.
Numéros 1 à 6-10 (dépendamment de le modèle de appareil) regulez la chaleur selon la table suivante:
Éteint
Pour faire fondre les aliments (beurre ou chocolat)
Garder les plats chauds et réchauffer de petites quantités de liquides
Réchauffer grandes quantités; cuisiner des crèmes et sauces
Ebullition lente, adaptée aux soupes, aux pâtes et aux risottos,
ainsi qu'à la cuisson des steaks et des aliments frits en général
Faire dorer des viandes, des pommes de terre sautées, frire du
poisson et pour porter à ébullition de grandes quantités d’eau
Pour fritures rapides, steaks grillés, etc..
A la fìn de la cuisson, éteindre l'appareil.
INDICATEUR DE CHALEUR RÉSIDUELLE
Cette lumiere alerte l'usager que le verre a atteint une température qui pourrait être dangereuse
en cas de contact avec toute la zone au-dessus de la plaque chauffante.
Dans les modeles avec manettes, chaque element chauffante a une correspondent lumiere.
Dans les modeles avec touch control le chaleur résiduelle est indiquée par un “H” dans l'ecran.
La chaleur résiduelle persiste pendant un temps très long après l'extinction de la zone chauffante
jusqu'à ce que la température ne descende sous le niveau critique.
Pendant ce temps il faudra éviter de toucher la zone radiante ; faire très attention surtout aux enfantes.
Opération de cuisson
9
10
2
2-3
8
6
5
3
4
0 0
1-2
7-8
9
1-8
0
1
2
3
4
5
6
7
1 - 2
2 - 3
CUISSON
1-10
Manettes
1-6
control
Touch
1
0
7
8
5
6
3 - 4
3-4
5
6
Page 24

MANETTES
Dans cettes appareils les plates de cuisson sont allumèe par les manettes.
Les numéros indiquent les positions de fonctionnement à température croissante, où n°1 est le minimum.
Numéro "0" est la position de eteint. Les plates extensibles , où prevu, sont allumèe après la position max.
Pour activer la zone extensible, tourner la manette au-delà de la position max. jusqu’à entendre un déclic,
puis la remettre dans la position desirée, comprise entre 1 et le position max.
Les zones controllèe par les manettes sont indiquèe par les symboles dans le bandeau des commandes.
Exemples:
TOUCH CONTROL
Dans cettes appareils les plates de cuisson sont allumèe par la Touch-control bandeau.
Selon de le modele de votre appareil, il peut être dotée de tout ou partes de le commandes suivantes ci-dessous.
Les estetiques des commandes peuvent changer selon le tipes de appareil, mais le fonctionnement
est le même.
Touche de marche/arrêt (ON-OFF)
Marche/arrêt du double circuit (option)
Puissance de la plaque
Marche/arrêt du plaque extensible (opt)
Indicateur plaque chauffante
Témoin de double circuit activé (option)
Augmenter la puissance
Affichage du minuteur (option)
Selectioner la plaque
Témoin de minuteur activé (option)
Diminuer la puissance
Fonction de verrouillage (option)
Marche/arrêt minuteur (option)
Témoin de verrouillage activé (option)
Fonction pause (option)
Fonction booster (option)
USAGE
Page 25

Marche/arrêt du Touch Control
Après la mise sous tension, il faut 1 seconde à l'unité de commande pour être prête à fonctionner. L'unité de
commande peut ensuite être allumée en appuyant sur la touche de MARCHE/ARRÊT. Le système électronique
reste activé pendant 20 secondes. Si entre temps aucune fonction ou aucun temps de cuisson ne sont
sélectionnés, le système électronique se remet automatiquement en mode STAND-BY, en émettant un signal
sonore. L'unité de commande ne s'allume que si la pression exercée sur la touche d'allumage a lieu quand le
système électronique est activé. Si la fonction de verrouillage enfant est active lors de l'allumage de la plaque,
tous les foyers indiquent “L” (locked/verrouillé). Si les foyers sont chauds, l'afficheur indique “H“ (hot/chaud).
Le Touch Control peut être éteint à tout moment, en appuyant sur la touche MARCHE/ARRÊT de l'unité de
commande. Ceci est le même pour le verrouillage de l'unité de commande (verrouillage enfant activé)
Marche de les foyers
Si l'unité de commande est ALLUMÉE, un foyer peut être sélectionné en appuyant sur la touche de sélection
du foyer correspondant. Sur l'afficheur du foyer sélectionné, un témoin fixe s'allume, et “0“ est remplacé par “H“
si le foyer est chaud. Le témoin s'éteint sur les afficheurs de tous les autres foyers. Pour sélectionner la
puissance de chauffe, appuyer à nouveau sur la touche de sélection du foyer plus ou moins.
Le niveau 9 est le niveau maximum de puissance que l'on peut obtenir.
Si la zone de cuisson est sélectionnée à l'aide de la touche "-", le premier niveau de puissance est 9 (niveau
maximum). Maintenez enfoncée la touche pour diminuer le niveau actif de puissance d'une unité.
Arrêt de les foyers
Pour éteindre un seul foyer à la fois, appuyer tout d'abord sur la touche de sélection du foyer correspondant.
Un témoin s'allume sur l'afficheur en indiquant le foyer sélectionné. En appuyant simultanément sur + plus
(la touche + des fonctions de sélection du foyer) et sur le - moins, la puissance de chauffe du foyer sélectionné
retourne à “0“. En alternative, la puissance de chauffe peut être baissée progressivement jusqu'à “0” en
utilisant la touche - moins. Pour obtenir l'arrêt immédiat de tous les foyers, appuyer sur la touche
MARCHE/ARRÊT. En mode stand-by, le symbole “H“ apparaît sur l'afficheur de tous les foyers chauds.
Précuisson automatique (sélectionnable)
Cette fonction permet de préchauffer rapidement une plaque chauffante pendant un temps établi.
La fonction est désactivée automatiquement quand le temps s'est écoulé ou manuellement quand
l'usager en décide. Procédure de démarrage de la Précuisson automatique:
-
Allumer l'unité de commande et sélecxtionner un foyer.
-
Après avoir programmé la puissance de chauffe sur “9“, activer la Précuisson automatique
en appuyant à nouveau sur la touche + plus. Le symbole “A” apparaît sur l'afficheur.
Une fois que la précuisson est terminée, seule la puissance de chauffe est indiquée sur l'afficheur.
Utilisez la touche "-" sur la plaque pour désactiver à tout moment la fonction.
Arrêt automatique (limitateur de temps de marche)
Selon la puissance de chauffe sélectionnée, chaque foyer est éteint séparément après un certain temps de
marche, s'il n'a pas été utilisé entre temps. Toute intervention sur les touches afférentes au foyer (touches "+“
"-“ ou le mise en marche du double circuit) entraîne la remise à zéro du temps de marche maximum.
Le limitateur de temps de marche est automatiquement désactivé par la programmation du
minuteur sur l'un des foyers. Dans ce cas, c'est le minuteur qui contrôle l'arrêt du foyer.
Mécanisme de verrouillage - fonction de verrouillage enfant (où prevu):
Où est prevu la touche de verrouillage, l'appuyer pour verrouiller. Pour déverrouiller, l'appuyer encore une fois.
Autrement, pour verrouiller appuyer simultanément sur la touche de sélection du foyer à la droite en bas et sur la
touche moins, puis à noveau sur la touche de sélection du foyer. Tous les afficheurs indiquent “L“ (locked/verrouillé).
Cette procédure doit avoir lieu sous 10 secondes et aucune autre touche, en dehors de celles indiquées
ci-dessus, ne doit être sélectionnée. Le système électronique reste verrouillé jusqu'à son déblocage, même si
l'unité de commande est éteinte et rallumée entre temps. Pour déverrouiller, appuyer simultanément sur la
touche de sélection du foyer et sur la touche moins. Après avoir suivi toutes ces étapes dans l'ordre indiqué
et sous 10 secondes, le verrouillage est désactivé et l'unité de commande est en mode STAND-BY.
Si l'unité de commande est à nouveau allumée en appuyant sur la touche MARCHE/ARRÊT, tous les afficheurs
indiquent “0“, le témoin de l'afficheur continue de clignoter et l'unité de commande est prête à fonctionner.
Protection thermique du panneau de commande
Quand le panneau de commande détecte une température de plus de 95°C (+- 5%), il éteint les éléments.
Ils peuvent être réactivé quand la température est descendue au-dessous de 95°C (+- 5%).
Page 26

Usage des circuits multiples - doubles ou triples (option)
Selon le modèle, l'unité peut contrôler des circuits doubles ou triples.
En appuyant sur la touche circuit multiple d'un foyer activé (c'est-à-dire à la puissance de chauffe "0“), le circuit
externe correspondant peut être coupé à tout moment. Les circuits externes activés sont indiqués par une LED
supplémentaire. En appuyant à nouveau sur la touche circuit multiple, les circuits externes peuvent être activés
à tout moment ; les LEDs correspondantes s'allument alors à nouveau (fonction réversible). Si le foyer sélectionné
diffère de celui qui accueille le circuit multiple, appuyer sur la touche circuit multiple après avoir désélectionné tous
les foyers (le témoin s'éteint). Cette fonction n'est valable que si un seul circuit multiple est disponible sur l'unité
de commande. En présence de deux circuits multiples ou plus sur une unité de commande, le foyer correspondant
doit être sélectionné pour pouvoir répondre à la commande donnée par la touche. Les relais du double circuit
sont coupés du circuit interne dans un délais de 300 msec, mais ils restent allumés en synchronie avec le circuit
Si l'élément chauffant à contrôler est un élément radiant à circuit triple, la procédure est la suivante:
-
Une première pression sur la touche circuit multiple coupe le circuit externe et la LED supérieure s'éteint.
-
Une deuxième pression sur la touche circuit multiple coupe le circuit central (la LED inférieure s'éteint).
-
Une troisième pression réactive le circuit central, alors qu'une pression supplémentaire
réactive le troisième circuit ; les LEDs correspondantes sont rallumées.
Fonction minuteur (option)
Minuteur autonome 1-99 minutes, avec signal sonore indiquant que le temps programmé est écoulé. Cette fonction
est disponible uniquement hors fonctionnement, c'est-à-dire lorsque aucune cuisson n'est programmée sur le foyer.
Minuteur autonome (option)
• Si l'unité de commande est allumée, le minuteur autonome peut être activé en appuyant sur la touche de
sélection du minuteur. L'afficheur du minuteur indique “00“. Le témoin présent sur l'afficheur clignote. Si aucun
autre réglage n'est fait, le minuteur est désactivé au bout de 10 secondes (afficheur éteint). En cas de réglage
du minuteur sans qu'aucun foyer ne soit activé sous 10 secondes, les afficheurs des foyers s'éteignent.
• Tant que le minuteur est sélectionné il est possible de le régler. Le délai de désélection de 10 secondes
commence dès que la touche du minuteur est relâchée et repart à zéro à chaque pression exercée
sur la touche du minuteur, sur la touche "-" moins ou sur la touche "+" plus.
• Le réglage se fait par pression continue des touches + plus ou – moins, ou bien par pressions successves.
• Le compte à rebours commence à partir du dernier réglage du minuteur. La touche du minuteur est
automatiquement désélectionnée au bout de 10 secondes et l'afficheur n'indique plus que la durée programmée.
Après écoulement de la durée programmée, un signal sonore est émis et l'afficheur clignote en indiquant „00“.
Le signal sonore s'interrompt automatiquement au bout de 2 minutes et/ou en appuyant sur une touche quelconque
Eteindre/Régler le minuteur
• Le minuteur peut être réglé ou éteint en appuyant simultanément sur les touches "+" plus ou "-" moins.
• Le minuteur peut aussi être éteint en appuyant deux fois sur La sur La touche MARCHE/ARRÊT (1ère pression:
réactivation de l'unité de commande; 2ème pression: coupure de l'unité de commande et du minuteur).
Fonction de fin de cuisson
En appuyant sur la touche de sélection d'un foyer et en sélectionnant une puissance de chauffe, le minuteur peut
être programmé avec fonction de coupure sur un seul foyer, à condition d'appuyer ensuite sur la touche de
sélection du minuteur. L'afficheur du minuteur est entouré de quatre LEDs, servant à indiquer le foyer sur lequel
le minuteur a été activé. Dès l'activation du minuteur, la LED correspondante clignote et le témoin s'allume sur
l'afficheur du minuteur. Lorsqu'un foyer est sélectionné, le témoin disparaît de l'afficheur du minuteur, et la LED
cesse de clignoter. En sélectionnant l'un après l'autre les différents foyers, l'afficheur du minuteur indique la
durée programmée correspondant au foyer sélectionné. Les minuteurs programmés pour les autres foyers
restent en tous les cas activés. Les réglages suivants coïncident avec ceux du minuteur AUTONOME. Pour
augmenter la durée programmée, appuyer sur la touche + plus du foyer correspondant.
Au cas où plus d'un
minuteur aurait été activé, la durée la plus brève est automatiquement indiquée au bout de 10 secondes (temps
de désélection). Dès l'écoulement du compte à rebours, un signal sonore est émis et l'afficheur du minuteur
clignote en indiquant le symbole “00“ ; la LED du foyer correspondant clignote elle aussi. Le foyer programmé
s'éteint et le symbole “0“ apparaît sur l'afficheur. Le foyer éteint est automatiquement sélectionné et indiqué par
un témoin fixe, qui s'allume sur l'afficheur du foyer. Au bout de 10 secondes (temps de désélection), les foyers
chauds sont signalés par un “H“ fixe sur l'afficheur. Dans le cas contraire, l'afficheur indique “0“. Le signal sonore
et le clignotement de la LED minuteur du foyer s'interrompent - automatiquement, au bout de 2 minutes et/ou –
en appuyant sur une touche quelconque. Le foyer est désélectionné et l'afficheur du minuteur s'éteint.
Page 27

INDUCTION
Important:
La “
Induction
” est conforme aux normes EMC applicables. De plus, aucun autre appareil électronique ne doit
provoquer d'interférences. Les utilisateurs portant un stimulateur cardiaque ou tout autre implant électronique
doivent contrôler avec le fabricant de l'appareil électronique ou leur médecin si leur appareil est conforme aux
normes EMC. La surface du foyer peut chauffer même par induction sans chauffage direct du foyer.
Mais la surface est chauffée par la casserole au-dessus du foyer qui réchauffe la surface. La protection
thermique des casseroles dépend de la planarité du récipient. Dans le cas d'un excès d'entrefer au centre du
foyer, la protection thermique (casserole vide, huile s'embrasant) peut être affectée. Une batterie de cuisine, ou
d'autres ustensiles métalliques, ne doivent pas être posés sur la table de cuisson car ils pourraient se réchauffer.
Récipients
Nous conseillons des récipients au fond plat dont le diamètre est identique ou légèrement supérieur à celui de la
zone chauffante. Le fond des récipients ne doit pas être rugueux afin d'éviter de rayer la surface chauffante.
Utiliser uniquement des casseroles et poêles dont le fond est solide et épais de préférence. Ceci est
particulièrement important lors de la préparation de denrées nécessitant des températures de cuisson élevées,
telles que les aliments frits. Si le fond du récipient n'est pas parfaitement plat, la nourriture est plus longue à cuire
et utilise plus d'énergie. Le transfert optimal de chaleur est obtenu lorsque la casserole et le brûleur sont de la
même taille. La méthode de cuisson par induction transfère rapidement l’énergie nécessaire à la
cuisson directement au récipient si bien que la surface de la plaque de cuisson reste froide mais
le récipient chauffe. On obtient ainsi une méthode de cuisson rapide, rentable et précise.
Ce type de plaque de cuisson est adapté à des récipients en acier émaillé ou en inox;
il ne convient pas pour les casseroles en verre, en céramique ou en aluminium
(à moins d’utiliser un socle magnétique spécial).
Limites de la fonction de détection des récipients
Le tableau suivant indique les limites de détection des récipients lorsqu'ils sont testés avec des ustensiles en fonte:
Détection intégrée des récipients
Chaque zone de cuisson est munie d’une fonction de détection des récipients. La détection des récipients évite
qu’une zone de cuisson ne se mette en marche sans qu’un récipient soit posé dessus. De même, la zone de
cuisson s’éteint dès que le récipient est retiré. La zone de cuisson est éteinte automatiquement au bout d’un
certain temps si un niveau de cuisson est défini mais qu'il n'y a pas de récipient posé dessus.
Le récipient doit être composé de matériaux magnétisables.
La détection des récipients du module à induction dépend du récipient et de sa matière.
Protection contre les températures excessives
Le générateur ainsi que les bobines sont équipés de fonctions intégrées contre les températures excessives.
Salissures sur la surface vitrocéramique
Les salissures, habituellement des résidus alimentaires et/ou de l’eau, peuvent éventuellement être confondues
avec une commande sensitive. Aussi, l'humidité en couches fines (film, traînées) pourrait produire cet effet.
Pour de grandes quantités en particulier, il se peut qu'aucune, une, plusieurs ou toutes les touches puissent donc
être confondues et activées brièvement ou de manière permanente. À cet égard, les salissures peuvent entraîner
des modifications à court terme des réglages qui pourraient aussi bien être définis par un opérateur. Dans le cas
d'une modification telle que l'activation d'une zone de cuisson, toute la Commande sensitive est déconnectée au
bout de 10 sec au maximum (en raison de la détection permanente de fonctionnement). Ceci implique que l’effet
« d’activation » sur les capteurs dû aux salissures demeure fondamentalement inchangé pendant 10 secondes.
Contrôle de la surchauffe des foyers à induction
En principe, l'induction fonctionne en sécurité. Le système d'induction fournit des capteurs de température à
chaque foyer, placés sous la vitrocéramique pour contrôler les températures. Les capteurs de température le
long du dissipateur thermique protègent le système électronique contre les surchauffes.
Le logiciel peut réduire la puissance ou éteindre tous les foyers en cas de température mesurée trop élevée
Ø 160 mmØ 160 mm
Ø 200 mm
Ø 90 mm
Ø 120 mmØ 200 mm
Diamètre nominal
Limite de détection des récipients (interrupteurs activés)
de la bobine
Min.
Max.
Page 28

Fonction pause
Lorsqu'un ou plusieurs foyers sont en marche, le processus de chauffe peut être interrompu en appuyant sur la
touche pause. Le voyant voisinde la touche pause s'allume. Si un décomptage est en cours, il sera également
interrompu. Si le préchauffage automatique est en cours, il sera interrompu. Important, le décomptage du temps
de préchauffage se poursuit lorsque la table est en mode pause. La fonction pause reste active pendant une
durée maximale de 10 minutes au bout de laquelle la table quitte le mode pause.
Pour sortir du mode pause, appuyez à nouveau sur la touche pause
puis sur n'importe quelle touche de la table
Fonction rappel
Si vous avez éteint la table par inadvertance en appuyant sur la touche marche/arrêt, vous avez la possibilité de
rappeler ensuite, pendant une courte période, les puissances et les foyers que vous étiez en train d'utiliser en
vous servant de la function de rappel. Rallumez la table en appuyant sur la touche marche/arrêt.
S'il est possible d'utiliser la fonction rappel, le voyant adjacent à la touche rappel clignote.
o Appuyez sur la touche rappel, les réglages précédents seront récupérés (y compris les éventuelles
fonctions de préchauffage automatique ou de décomptage de temps qui étaient en cours).
Fonction Booster
Après la sélection d'un foyer, la fonction booster peut être sélectionnée directement à l'aide de la touche
correspondante. Si le foyer choisi peut recevoir cette puissance, l'afficheur affiche le symbole “P”.
Si cette puissance n'est pas admise, l'afficheur du foyer clignote pendant 3 secondes pour le foyer qui a
besoin d'être réduit et d'un réglage automatique. Le temps du booster est limité à 10 min. Après que le
booster s'éteint automatiquement, le foyer continue son fonctionnement à la puissance nominale. Le booster
peut être réactivé pourvu que les capteurs de température dans le système électronique et les spirales en
aient la capacité. Si la casserole est retirée du foyer pendant le fonctionnement du booster, cette fonction
reste active et le temps de booster continue. Si la limite de température du booster dans le système
électronique ou les spirales d'un foyer est dépassée, le booster s'éteint automatiquement et le foyer
revient à la puissance nominale
.
Contrôle du ventilateur (refroidissement du générateur)
Le refroidissement est intégré dans le logement en plastique de l'élément chauffant de l'inducteur.
Le fonctionnement du ventilateur est contrôlé par la température mesurée sur le dissipateur thermique.
Le ventilateur s'allume quand une certaine température est atteinte et il passe à une vitesse supérieure
quand la deuxième limite de température est atteinte.
Démarrage basse vitesse 45°C
Démarrage grande vitesse 55°C
Casserole avec fond en matériau ferromagnétique
Champ magnétique
A feu dox avec vitrocéramique
Bobine de spirale d'Archimède
Générateur
Page 29

Attention:
-
Toutes les opérations devraient être effectuées par du personnel qualifié
-
L'installation doit etre effectuée conformément aux normes en vigueur
-
Avant toute opération débrancher la plaque de cuisson du secteur
Positionnement (fig.1)
L'appareil est conçu pour être intégré sur un plan de travail. Les dimensions de la découpe dans le meuble et les
distances minimums entre les parois arrière, latérales et celles situées au-dessus de l’appareil sont indiquées sur
la figure n°1. La table de cuisson est fournie avec un joint, afin d'empêcher toute infiltration dans l'unité.
Les matériaux et les colles utilisés pour les éléments de cuisine doivent résister à la température de 100°C min.
Isolation (fig.4):
-
Si la table de cuisson est installée sans four au dessous, il est obligatoire d'utiliser un panneau diviseur
entre le dessous de la table de cuisson et le meuble sous-jacent, à une distance minimum de 10 mm.
-
En cas d’accouplement table/four, interposer un séparateur à une distance minimum de 15 mm
en conservant quoiqu’il en soit une aération (voir fig.4).
La chaleur produit par le four, misureé à la droite du fond du le appareil, doit etre inferieur de 60°C.
Autrement, la chaleur peut endommager les manettes ou la Touch-Control système.
Le branchement électrique des deux appareils doit être réalisé séparément
, aussi bien pour des raisons
électriques que pour une extraction plus facile. On raccomande d'utiliser un four équipé d'un ventilateur forcé.
Fixation de la table (fig.2):
La fixation du plan de cuisson au meuble doit être effectuée comme il est indiqué ci-dessus:
-
Positionner la garniture étanche fournie [C] avec l'appareil le long du périmètre extérieur du trou
pratiqué dans le meuble en suivant le schéma indiqué sur la fig.2, de façon à ce que les
extrémités des bandes soient parfaitement unies l'une à l'autre sans se superposer;
-
Installer le plan dans le trou du meuble en veillant à bien le centrer;
-
Fixer le plan au meuble avec les brides fournies à cet effet, comme il est indiqué sur la fig.2.
Une bonne installation de la garniture étanche offre une garantie absolue contre les infiltrations de liquides.
Branchement électrique (fig.6)
Avant tout branchement électrique, s'assurer que:
-
les caractéristiques du système électrique soient conformes aux spécifications indiquée sur la plaque donnée
-
le système dispose d'une mise à la terre efficace (obligatoire conformément à la loi)
-
si l'appareil est branché directement au secteur, il faut intercaler entre celui -ci et le secteur un interrupteur
omnipolaire ayant une ouverture minimum entre les contacts de 3 mm, dimensionné pour la char ge et
conforme aux normes en la matière. Le câble de terre jaune-vert ne doit pas être interrompu
-
La prise ou le câble utilisée pour le branchement doit être facilement accessible après l'installation
-
Ne pas utiliser de réductions, adaptateurs ou déviateurs pour le raccordement au réseau,
car ils pourraient chauffer et provoquer des brûlures.
-
Au cas où il serait nécessaire de remplacer le cable d’alimentation,
assurez vous de respecter les codes-couleur suivants dans le branchement de chacun des fils:
BLEU
NEUTRE (N)
MARRON
PHASE (L)
VERT-JAUNE
TERRE
( )
-
Si le câble de branchement est endommagé, il faut le faire remplacer par le service d'assistance clientèle
Entretien
-
Ne cuire pas à vide, ne utiliser pas des casseroles émaillées ou en aluminium. Utiliser uniquement des
casseroles en acier, avec fond plat et une surface régulière. Les casseroles avec fond irréguliers peuvent
rayer la surface. Le diamètre des casseroles doit couvrir toute la zone de cuisson (fig.5)
-
En cas de fissures du verre céramique, débrancher immédiatement du secteur et de contacter le assistance
-
Ne jamais poser de casseroles chaudes sur le pupitre de commande, la zone d'affichage ou le cadre
-
N'utiliser que de l'eau tiède, aditionnée d'un produit alcalin. Ne pas utiliser de produits corrosifs ou abrasifs,
Ne pas utiliser nettoyeurs à vapeur et à pression.
-
Les aliments débordé peuvent endommager la plaque. Enlever immédiatement les aliments à l'aide racloir.
ATTENTION !!! Le racloir à verre livré en option a une lame aiguisée (fig.3)
INSTALLATION
Page 30

Erreur
Description
Cause possible
Error clearing
E2
Surchauffage des spirales
/
Refroidissement nécessaire
ER03 &
Pression continue sur les touches
Présence d'eau ou d'ustensils de cuisine
Nettoyage de la
permanent tone
Coupure de l'unité au bout de 10 sec
sur le verre de l'unité de commande
surface de travail
E5
Erreur sur le filtre de signaux
/
Remplacer le filtre de signaux
Courtcircuit de 5V avec la platine d'aliment.
12 V trop bas pour la platine d’alimentation
Capteur de température défectueux
Maintien de l’impulsion défectueux
E9
Remp. le capteur de température
Coupure de l'unité de commande
Court-circuit dans le relais
au bout de 10 secondes
de 5V ou de terre
Coupure de l'unité de commande
sous 60 secondes
Court-circuit ou capteur
Eliminer la cause
PAN / alimentation débranché/e
(service client)
ER20
Blocage
µC-erreur Remplacer l'unité de commande
Coupure de l'unité de commande
L'algorithme standard atteint la limite lorqu'il
Laisser refroidir la cavité.
due à surchauffe, afin d'éviter tout
surchauffe. Température ambiante du
Contrôler la résistance à la
endommagement du système
système électronique toujours trop élevée
chaleur de l'unité de commande.
Evaluation touches défectueuses;
au bout de 3,5 - 7,5 secondes
Tension de relais trop élevée à
appareil éteint (nominale : 0 Volt)
ER31
Configuration de données incorrecte Configuration de données incorrecte
Configuration nécessaire
ER33
Essuyer
La valeur produite par le capteur
de température est hors de la plage
prévue (valeur < 200mV ou >4,9V);
coupure de l'unité de commande
ER39
La tension de fonctionnement
secondaire est trop
basse par rapport à la
sous-tension identifiée
Le voltage d'operation est
valeur reglé
Erreur dans l'échange
Aucun échange d'information ou
Vérifier que le câble de connexion
d'information entre TC et induction
échange d'information erroné
soit branché correctement
Tension secondaire de d'aliment.
trop élevé (tension primaire >300V).
Coupure de l'unité de commande
au bout de 1sec.
Attendre que la température
retourné tiède
ER42
débrancher et contacter
le assistance
Débrancher l'unité
de commande du secteur
le voltage est excédent de le valides limites
ou il y a trop de variation
trop différent de le
Remplacer le contrôleur
Tension secondaire de l'unité d'alimentation trop élevé (tension
d'une seconde, accompagnée d'un signal sonore continu.
primaire>300V). Coupure de l'unité de commande au bout
Commande mal branchée
Coupure de l'unité de commande
ER22
Court-circuit ou interruption dans
Remplacer l'unité de commande
Coupure de l'unité de commande
“H” Flashes
Présence d'une casserole chaude sur la
carte de commande ; fuite du foyer radiant
ER25
ER26
ER37
U400
Court-circuit dans le
contrôleur de tension du relais
ER47
ER40
Présence d'eau sur la vitre de la carte de commande
Brancher sur la
tension de secteur correcte
débrancher et contacter
le assistance
Rétroact.défectueuse des signaux
de mémoire temporisée en raison
de l’activation de segments
L'unité de commande est mal branchée.
PTC primaire trop chaud
Faux options de programmation
ER36
Erreur sur l'unité de puissance
Remplacer l'unité de puissance
Court-circuit ou interruption
au niveau du capteur de température
Maintien défectueux de l’impulsion du
réseau d’alimentation
Remplacer l'unité
de commande
Brancher sur la
tension de secteur
correctee
ER12
débrancher et contacter le
assistance
E6
Remplacer l'unité de
commande
Remplacer l'unité
de commande
Composant défectueux
E7
ER13
ER21
Capteur de température de la spirale défectueux
l'évaluation des touches
ER16
Page 31

Si vous ne pouvez pas identifier la cause d une anomalie :
éteindre l appareil (ne pas le manipuler) et contacter le Service d Assistance.
NUMÉRO DE SÉRIE DU PRODUIT. Où le trouver ?
Il est important que vous communiquiez au Service d Assistance le code
de votre produit et le numéro de série (un code de 16 caractères qui
commence avec le numéro 3) ; celui-ci se trouve sur le certificat de garantie
ou la plaque signalétique située sur l appareil.
Ceci évitera des voyages inutiles des techniciens et permettra (ce qui
est très important) d' économiser sur les frais de déplacement.
SERVICE D ASSISTANCE À LA CLIENTÈLE
Page 32

RDVI342B - 33801059
RDVE342MPN - 33801060
RDVE342MRB - 33801061
RDVE342 - 33801058
1
2
1
3
4
5
Fig.-Abb.-Rys.:
Ábra-Obr.
1
mono-circuit vitroceramic plate Ø140mm - 1.2kW
2
mono-circuit vitroceramic plate Ø180mm - 1.8kW
3
double-circuit vitroceramic plate Ø120/180mm - 0.7/1.7kW
4
mono-circuit induction plate Ø160mm - 1.4kW
5
mono-circuit induction plate Ø200mm - 2.3/3.0kW
Page 33

Fig-Abb-Rys-Ábra-Obr. 1
N =
A (mm) = (340*N)-70
Numero di piani da affiancare
Number of hobs to combined
Nombre de appareils à mettre côte à côte
Page 34

Fig-Abb-Rys-Ábra-Obr.3Fig-Abb-Rys-Ábra-Obr.2
Fig-Abb-Rys-Ábra-Obr.4
Fig-Abb-Rys-Ábra-Obr.6
Connection to the power mains
Branchement au resau
Podlaczenie elektryczne
Conecci
n a la red el
éctrica
Fig-Abb-Rys-Ábra-Obr.5
Page 35

EN The symbol on the product or on its packaging indicates that this product may not be treated as household waste. Inst ead it sh all be handed
over to the applicable c ollection point for the recycling of electrical and electronic equipment. By ensuring this product is d isposed of correctly, you will
help prevent potential negative consequences for the environment and human health, which could otherwise be caused by inappropriate waste
handling of this product. For more detailed information about recycling of this product, please c ontact your local city office, your household waste
disposal service or the shop where you purchased the product.
DE Dieses Produkt darf am Ende seiner Lebensdauer nich über den normalen Haushaltsabfall entsorgt werden, sondern muss an einem
Sammelpunkt für das Recycling von elektrischen und elektronischen Geräten abgegeben werden. Das Symbol auf dem Produkt, der ebrauchsanleitung
oder der Verpackung weist dar auf hin. Die W erkst offe sind gemäß ihrer Kennzeichnung wiederverwertbar. Mit der Wiederverwendung, der stofflichen
Verwertung oder anderen Formen der Verwertung von Altgeräten leisten Sie einen wichtigen Beitrag zum Schutze unserer Umwelt. Bit te erfragen Sie
bei der Gemeindeverwaltung die zuständige Entsorgungsstelle.
IT Il simb olo sul prodotto o sulla confezione indica che il prodotto non deve essere considerato c ome un normale rifiuto domestico, ma deve
essere portato nel punto di raccolta appropriato per il riciclaggio di apparecchiature elettriche ed elettroniche. Provvedendo a smaltire questo pr odotto
in modo appropriato, si contribuisce a evitare potenziali conseguenze negative per l’ambiente e per la salute, che potrebbero derivare da uno
smaltimento inadeguato del prodotto. Per informazioni più dettagliate sul riciclaggio di questo prodotto, c ontattare l’ufficio comunale, il servizio locale di
smaltimento rifiuti o il negozio in cui è stato acquistato il prodotto.
FR Ce s ymbole figure sur le produit ou sur s on emballage en application de la directive européenne 2002/96/CE sur les Déchets d’Équipement
Électrique et Électronique (D EEE). C ette directive sert de règlement cadre à la reprise, au recyclage et à la valorisation des appareils usagés dans
toute l’Europe. Ce produit doit donc faire l’objet d’une collecte sélective. Lorsque vous ne l’utiliserez plus, remettez-le à un service de ramassage
spécialisé ou à une déchèterie qui traite les DEEE ; vous contribuerez ainsi à éviter des conséquences néfastes pour la santé et l'environnement. Pour
tout renseignement sur la mise au rebut et le r ecyclage de ce produit, veuillez contacter la mairie ou le service de la propreté de votre commune, ou
encore le magasin dans lequel vous l'avez acheté.
ES Este aparato lleva el marcado CE en conformidad con la Directiva 2002/96/EC del Parlamento Europeo y del Consejo sobre residuos de
aparatos eléctric os y electr ónicos (RAEE). La correcta eliminación de este producto evita consecuencias negativas para el medioambiente y la salud.
El símbolo en el producto o en los documentos q ue se incluyen con el producto, indica que no se puede tratar como residuo doméstico. Es necesario
entregarlo en un puntode recogida para reciclar aparatos eléctricos y electrónicos. Deséchelo con arreglo a las normas medioambientales para
eliminación de residuos. Para obtener información más detallada s obre el tratamiento, recuperación y reciclaje de este producto, póngase en c ontacto
con el ayuntamiento, con el servicio de eliminación de residuos urbanos o la tienda donde adquirió el producto.
PT O símbolo no produto ou na emb alagem indica que este produto não pode ser tratado como lixo doméstico. Em vez disso, deve ser entregue
ao centro de recolha selectiva para a reciclagem de equipamento eléctrico e electrónico. Ao garantir uma eliminação adequada deste produto, irá
ajudar a evitar eventuais consequências negativas para o meio ambiente e para a saúde pública, que, de outra forma, poderiam s er provocadas por
um tratamento incorrecto do produto. Para obter informações mais pormenorizadas sobre a reciclagem deste produto, contacte os serviços
municipalizados locais, o centro de recolha selectiva da sua área de residência ou o estabelecimento onde adquiriu o produto.
UA ɐɟɣɫɢɦɜɨɥɧɚ ɜɢɪɨɛɿɚɛɨɧɚɣɨɝɨ ɭɩɚɤɨɜɰɿɩɨɡɧɚɱɚɽ, ɳɨɡɧɢɦ ɧɟɦɨɠɧɚɩɨɜɨɞɢɬɢɫɹ, ɹɤ ɿɡɩɨɛɭɬɨɜɢɦɫɦɿɬɬɹɦ. Ɂɚɦɿɫɬɶ ɰɶɨɝɨɣɨɝɨ
ɧɟɨɛɯɿɞɧɨ ɩɨɜɟɪɧɭɬɢ ɞɨ ɜɿɞɩɨɜɿɞɧɨɝɨ ɩɭɧɤɬɭ ɡɛɨɪɭ ɞɥɹɩɟɪɟɪɨɛɤɢɟɥɟɤɬɪɢɱɧɨɝɨ ɬɚɟɥɟɤɬɪɨɧɧɨɝɨɨɛɥɚɞɧɚɧɧɹ. Ɂɚɛɟɡɩɟɱɭɸɱɢɧɚɥɟɠɧɭ
ɩɟɪɟɪɨɛɤɭ ɰɶɨɝɨɜɢɪɨɛɭ, ȼɢɞɨɩɨɦɚɝɚɽɬɟ ɩɨɩɟɪɟɞɢɬɢɩɨɬɟɧɰɿɣɧɿ ɧɟɝɚɬɢɜɧɿɧɚɫɥɿɞɤɢ ɞɥɹ ɧɚɜɤɨɥɢɲɧɶɨɝɨɫɟɪɟɞɨɜɢɳɚ ɬɚɡɞɨɪɨɜ’ɹɥɸɞɢɧɢ, ɹɤɿ
ɦɨɝɥɢ ɛɢɜɢɧɢɤɧɭɬɢɡɚ ɭɦɨɜɧɟɧɚɥɟɠɧɨɝɨ ɩɨɡɛɚɜɥɟɧɧɹɜɿɞ ɰɶɨɝɨɜɢɪɨɛɭ. ɓɨɛ ɨɬɪɢɦɚɬɢ ɞɟɬɚɥɶɧɿɲɭɿɧɮɨɪɦɚɰɿɸ ɫɬɨɫɨɜɧɨɩɟɪɟɪɨɛɤɢ ɰɶɨɝɨ
ɜɢɪɨɛɭ, ɡɜɟɪɧɿɬɶɫɹɞɨɫɜɨɝɨɦɿɫɰɟɜɨɝɨɨɮɿɫɭ, ȼɚɲɨʀɫɥɭɠɛɢɭɬɢɥɿɡɚɰɿʀɚɛɨɞɨɦɚɝɚɡɢɧɚ, ɞɟȼɢɩɪɢɞɛɚɥɢɰɟɣɜɢɪɿɛ.
NL Het symbool op het product of op de verpakking wijst erop dat dit product niet als huishoudafval mag worden behandeld. Het moet echter
naar een plaats worden gebracht waar elektrische en elektronische apparatuur wordt gerecycled. Als u ervoor z orgt dat dit product op de correcte
manier wordt verwijderd, voorkomt u mogelijk voor mens en milieu negatieve gevolgen die zich zouden kunnen voordoen in geval van verkeerde
afvalbehandeling. Voor meer details in verband met het recyclen van dit product, neemt u het best contact op met de gemeentelijke instanties, het
bedrijf of de dienst belast met de verwijdering van huishoudafval of de winkel waar u het product hebt gekocht.
RO Simbolul de pe produs sau de pe ambalaj indică f aptul că produsul nu trebuie aruncat împreună cu gunoiul menajer. Trebuie predat la
punctul de colectare corespunzător pentru reciclarea echipamentelor electrice úi electronice. Asigurându-vă că aĠi el iminat în mod corect produsul,
ajutaĠi la evitarea potenĠialelor cons ecinĠe negative pentru mediul înconjurător úi pentru sănătatea persoanelor, c onsecinĠe care ar putea deriva din
aruncarea necorespunzătoare a acestui pr odus. Pentru mai multe informaĠii detaliate despre reciclarea ac estui produs, vă rugăm să contactaĠi biroul
local, serviciul pentru eliminarea deúeurilor sau magazinul de la care l-aĠi achiziĠionat.
SLO Simbol na izdelku ali njegovi embalaži oznaþuje, da z izdelkom ni dovoljeno ravnati kot z obiþajnimi gospodinjskimi odpadki. Izdelek odpeljite
na ustrezno zbirno mesto za predelavo elektriþne in elektronske opreme. S pravilnim naþinom odstranjevanja izdelka boste pomagali prepreþiti
morebitne negativne posledice in vplive na okolje in zdravje ljudi, ki bi se lahko pojavile v primeru nepravilnega odstranjevanja izdelka. Za podrobnejše
informacije o odstranjevanju in predelavi izdelka se obrnite na pristojen mestni organ za odstranjevanje odpadkov, komunalno službo ali na trgovino, v
kateri ste izdelek kupili.
PL S ymbol na produkcie lub na opakowaniu oznacza, Īe tego produktu nie wolno traktowaü tak, jak innych odpadów domowych. N aleĪy oddaü
go do wáaĞciwego punktu skupu surowców wtórnych zajmującego siĊ záomowanym sprzĊtem elektrycznym i elektronicznym. WáaĞciwa utylizacja i
záomowanie pomaga w eliminacji niekorzystnego wpáywu záomowanych produktów na Ğrodowisko naturalne oraz zdrowie. Aby uzyskaü szczegóáowe
dane dotyczące moĪliwoĞci recyklingu niniejszego urządzenia, naleĪy skontaktowaü siĊ z lokalnym urzĊdem miasta, sáuĪbami oczyszczania miasta lub
sklepem, w którym produkt zost aá zakupiony.
SK Symbol na výrobku alebo na jeho obale znamená, že s výrobkom s a nesmie zaobchádzaĢ ako s domovým odpadom. N amiesto toho ho treba
odovzdaĢ v zbernom stredisku na recykláciu elektrických alebo elektronických zariadení. Zabezpeþte, že tento výrobok bude zlikvidovaný správnym
postupom, aby ste predišli negatívnym vplyvom na životné prostredie a Đudské zdravie, þo by bolo spôsobené nesprávnym postupom pri jeho likvid ácii.
Podrobnejšie inf ormácie o recyklácii tohto výrobku získate, ak zavoláte miestny úrad vo Vašom bydlisku, zberné suroviny alebo obchod, v ktorom ste
výrobok kúpili.
CZ Symbol na výrobku nebo jeho balení udává, že tento výrobek nepatĜí do domácího odpadu. J e nutné odvézt ho do sbČrného místa pro
recyklaci elektrického a elektronického zaĜízení. ZajištČním správné likvidace tohoto výrobku pomĤžete zabránit negativním dĤsledkĤm pro životní
prostĜedí a lidské zdraví, které by jinak byly zpĤsobeny nevhodnou likvidací tohoto výrobku. PodrobnČjší informace o recyklaci tohoto výrobku zjistíte u
pĜíslušného místního úĜadu, služby pro likvidaci domovního odpadu nebo v obchodČ, kde jste výrobek zakoupili.
SV Symbolen p å produkten eller emballaget anger att produkten i nte får hanteras som hushållsavfall. Den skall i stället lämnas in p å
uppsamlingsplats f ör återvinning av el- och elektronikkomponenter. Genom att säkerställa att produkten hanteras på rätt sätt bidrar du till att f örebygga
eventuellt negativa miljö- och hälsoeffekter som kan uppstå om produkten kasseras som vanligt avf all. För ytterligare upplysn ingar om återvinning bör
du kontakta lokala myndigheter eller sophämtningstjänst eller affären där du köpte varan
Page 36

H01A7040
 Loading...