

ROSIERES RHP97000/1LIN, RHP67000/1LIN, RHP97000/1LPN, RHP67000/1LRB, RHP67000/1LPN Instruction Manual
...
1
RHP67000/1LIN,RHP67000/1LPN,
RHP67000/1LRB,
RHP97000/1LRB,RHP97000/1LPN,
HHP67000/1LX,HHP67000/1LW,
HHP97000/1LX
Cooker Hood
Hotte de cuisson
Cappa
Odsavač nad sporák
Digestor
EN
Instruction manual
2
FR
Manuel d'instructions
15
IT
Manuale di istruzioni
29
CZ
Návod k použití
43
SK
Návod na použitie
57
RHP97000/1LIN,

2
CONTENT
1. Safety instructions 3
2. Installation 5
3. Start using your cooker hood 8
4. Troubleshooting 9
5. Maintenance and cleaning 10
6. Environment protection 14

3
SAFETY INSTRUCTIONS
This manual explains the proper installation and use of your cooker hood, please read
it carefully before using even if you are familiar with the product. The manual should
be kept in a safe place for future reference.
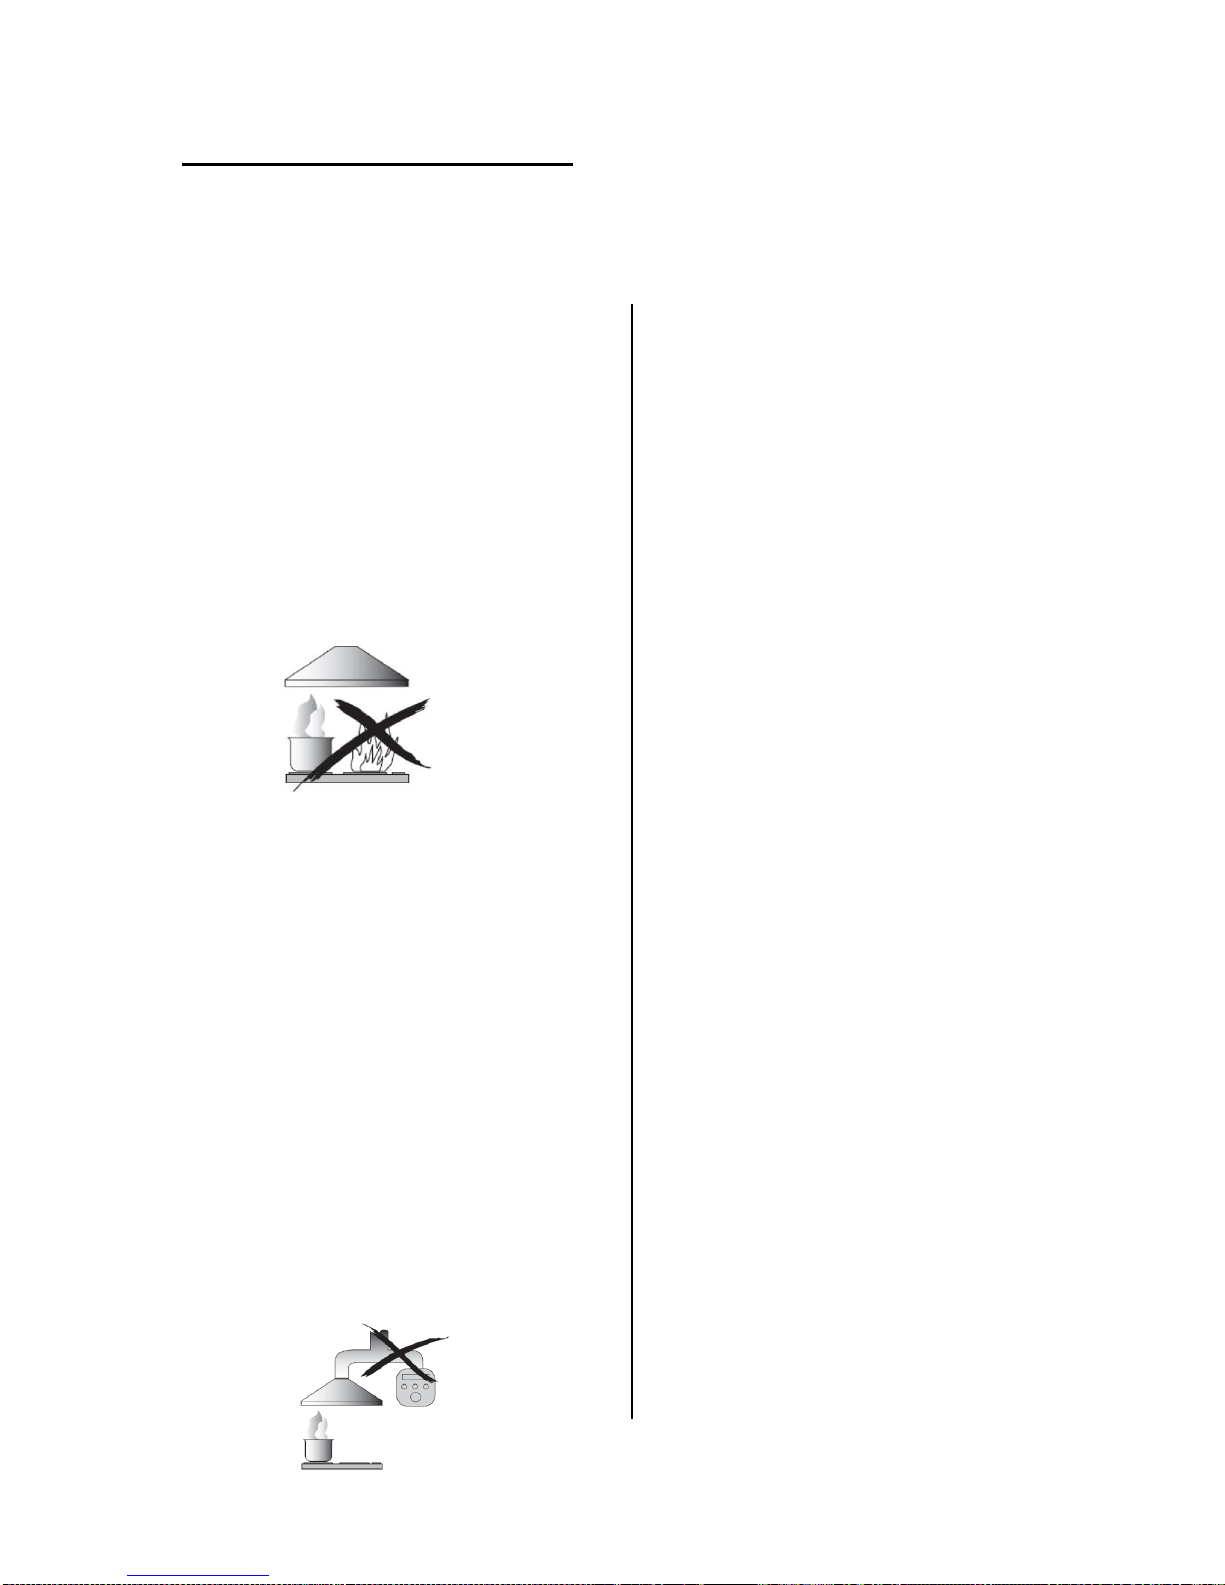
Never to do:
● Do not try to use the cooker hood
without the grease filters or if the filters
are excessively greasy!
● Do not install above a cooker with a
high level grill.
● Do not leave frying pans unattended
during use because overheated fats or
oils might catch fire.
● Never leave naked flames under the
cooker hood.
● If the cooker hood is damaged, do not
attempt to use.
● Do not flambé under the cooker hood.
● CAUTION: Accessible parts may
become hot when used with cooking
appliances.
● The minimum distance between the
supporting surface for the cooking
vessels on the hob and the lowest part
of the cooker hood. (When the cooker
hood is located above a gas appliance,
this distance shall be at least 65 cm)
● The air must not be discharged into a
flue that is used for exhausting fumes
from appliances burning gas or other
fuels.
Always to do:
● Important! Always switch off the
electricity supply at the mains during
installation and maintenance such as
light bulb replacement.
● The cooker hood must be installed in
accordance with the installation
instructions and all measurements
followed.
● All installation work must be carried
out by a competent person or qualified
electrician.
● Please dispose of the packing
material carefully. Children are
vulnerable to it.
● Pay attention to the sharp edges
inside the cooker hood especially
during installation and cleaning.
● When the cooker hood is located
above a gas appliance,the minimum
distance between the supporting
surface for the cooking vessels on the
hob and the lowest part of the cooker
hood that distance must be:
Gas cookers: 75 cm
Electric cookers: 65 cm
Coal or oil cookers: 75 cm
● Make sure the ducting has no bends
sharper than 90 degrees as this will
reduce the efficiency of the cooker
hood.
● Warning: Failure to install the screws
or fixing device in accordance with
these instructions may result in
electrical hazards
● Warning: Before obtaining access to
terminals, all supply circuits must be
disconnected.
4
Always to do:
● Always put lids on pots and pans
when cooking on a gas cooker.
● When in extraction mode, air in the
room is being removed by the cooker
hood. Please make sure that proper
ventilation measures are being
observed. The cooker hood removes
odours from room but not steam.
● There shall be adequate ventilation of
the room when the cooker hood is
used at the same time as appliances
burning gas or other fuels.
● Cooker hood is for domestic use only.
● If the supply cord is damaged, it must
be replaced by the manufacturer, its
service agent or similarly qualified
persons in order to avoid a hazard.
● This appliance can be used by
children aged from 8 years and above
and persons with reduced physical,
sensory or mental capabilities or lack
of experience and knowledge if they
have been given supervision or
instruction concerning use of the
appliance in a safe way and
understand the hazards involved.
Children shall not play with the
appliance. Cleaning and user
maintenance shall not be made by
children without supervision.
Always to do:
● Caution: The appliance and its
accessible parts can become hot
during operation. Be careful to avoid
touching the heating elements.
Children younger than 8 years old
should stay away unless they are
under permanent supervision.
● There shall be adequate ventilation of
the room when the cooker hood is
used at the same time as appliances
burning gas or other fuels.
● There is a fire risk if cleaning is not
carried out in accordance with the
instructions
● Regulations concerning the discharge
of air have to be fulfilled.
● Clean your appliance periodically by
following the method given in the
chapter MAINTENANCE.
● For safety reason, please use only the
same size of fixing or mounting screw
which are recommended in this
instruction manual.
● Regarding the details about the
method and frequency of cleaning,
please refer to maintenance and
cleaning section in the instruction
manual.
● Cleaning and user maintenance shall
not be made by children without
supervision.
● When the cooker hood and
appliances supplied with energy other
than electricity are simultaneously in
operation, the negative pressure in the
room must not exceed 4 Pa
(4 x 10⁻⁵ bar).
5
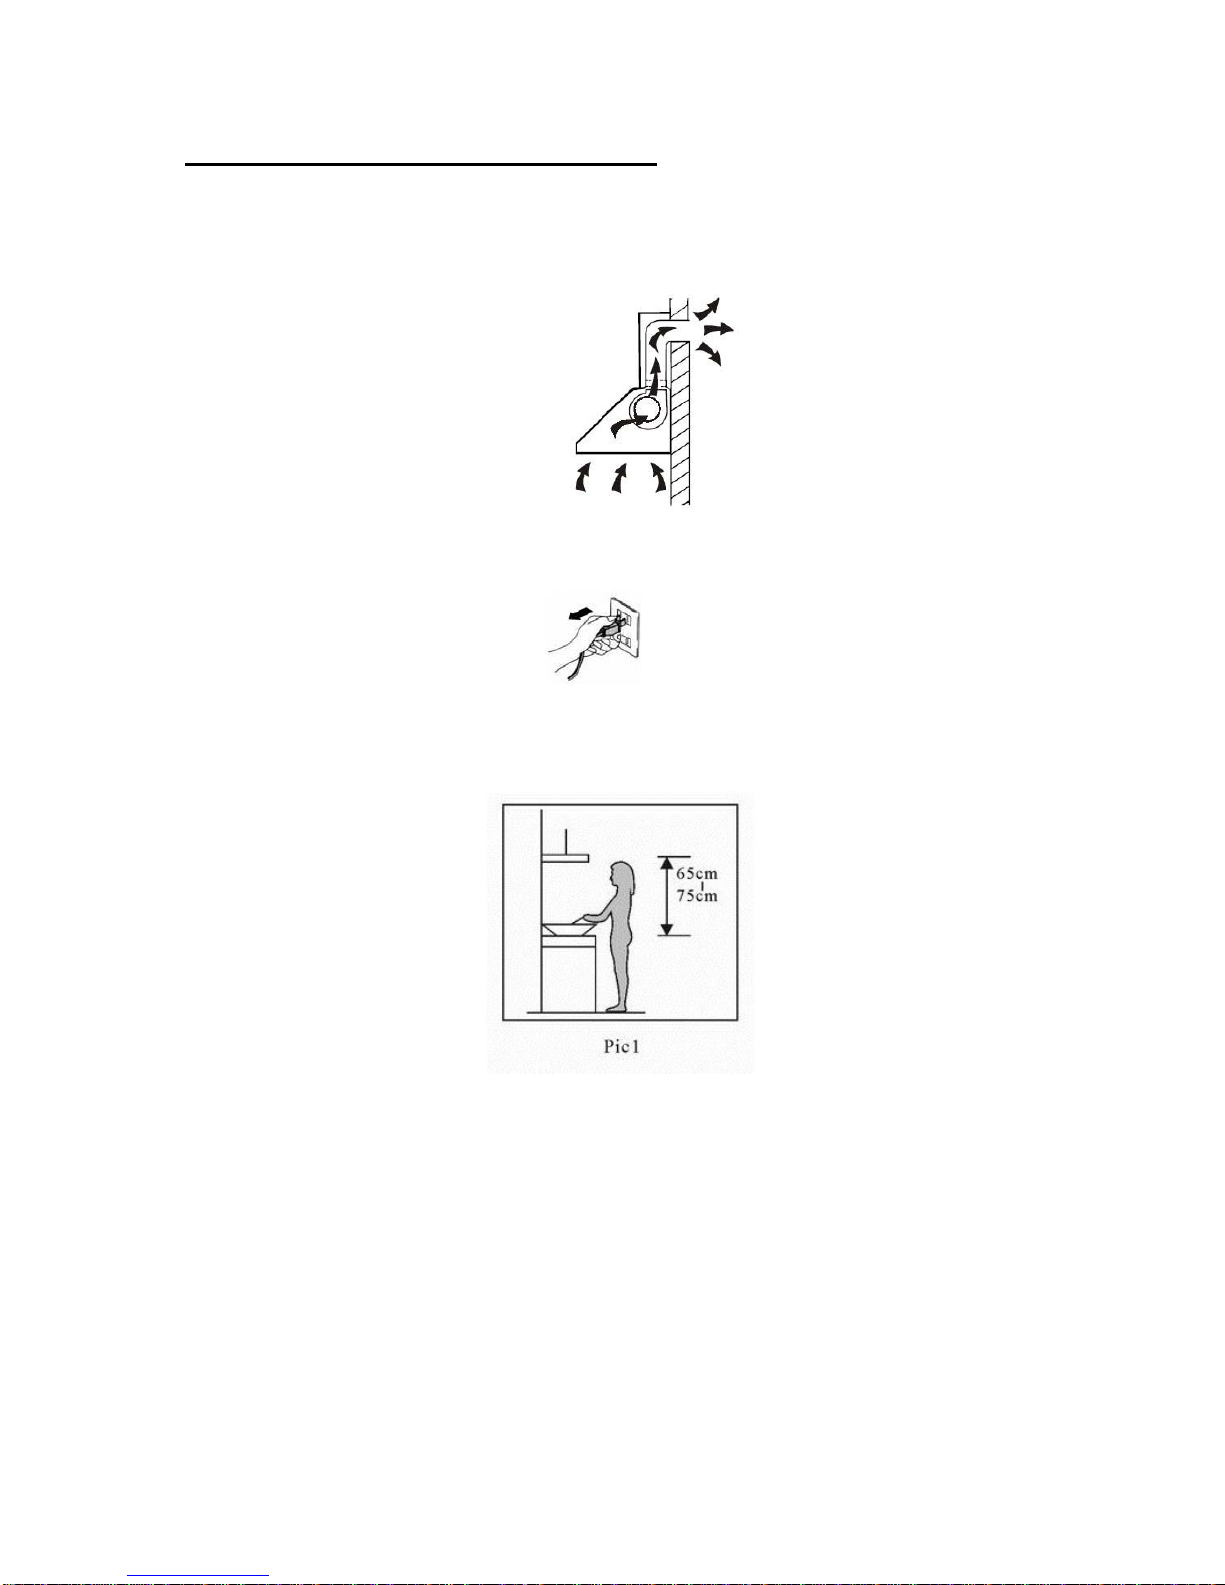
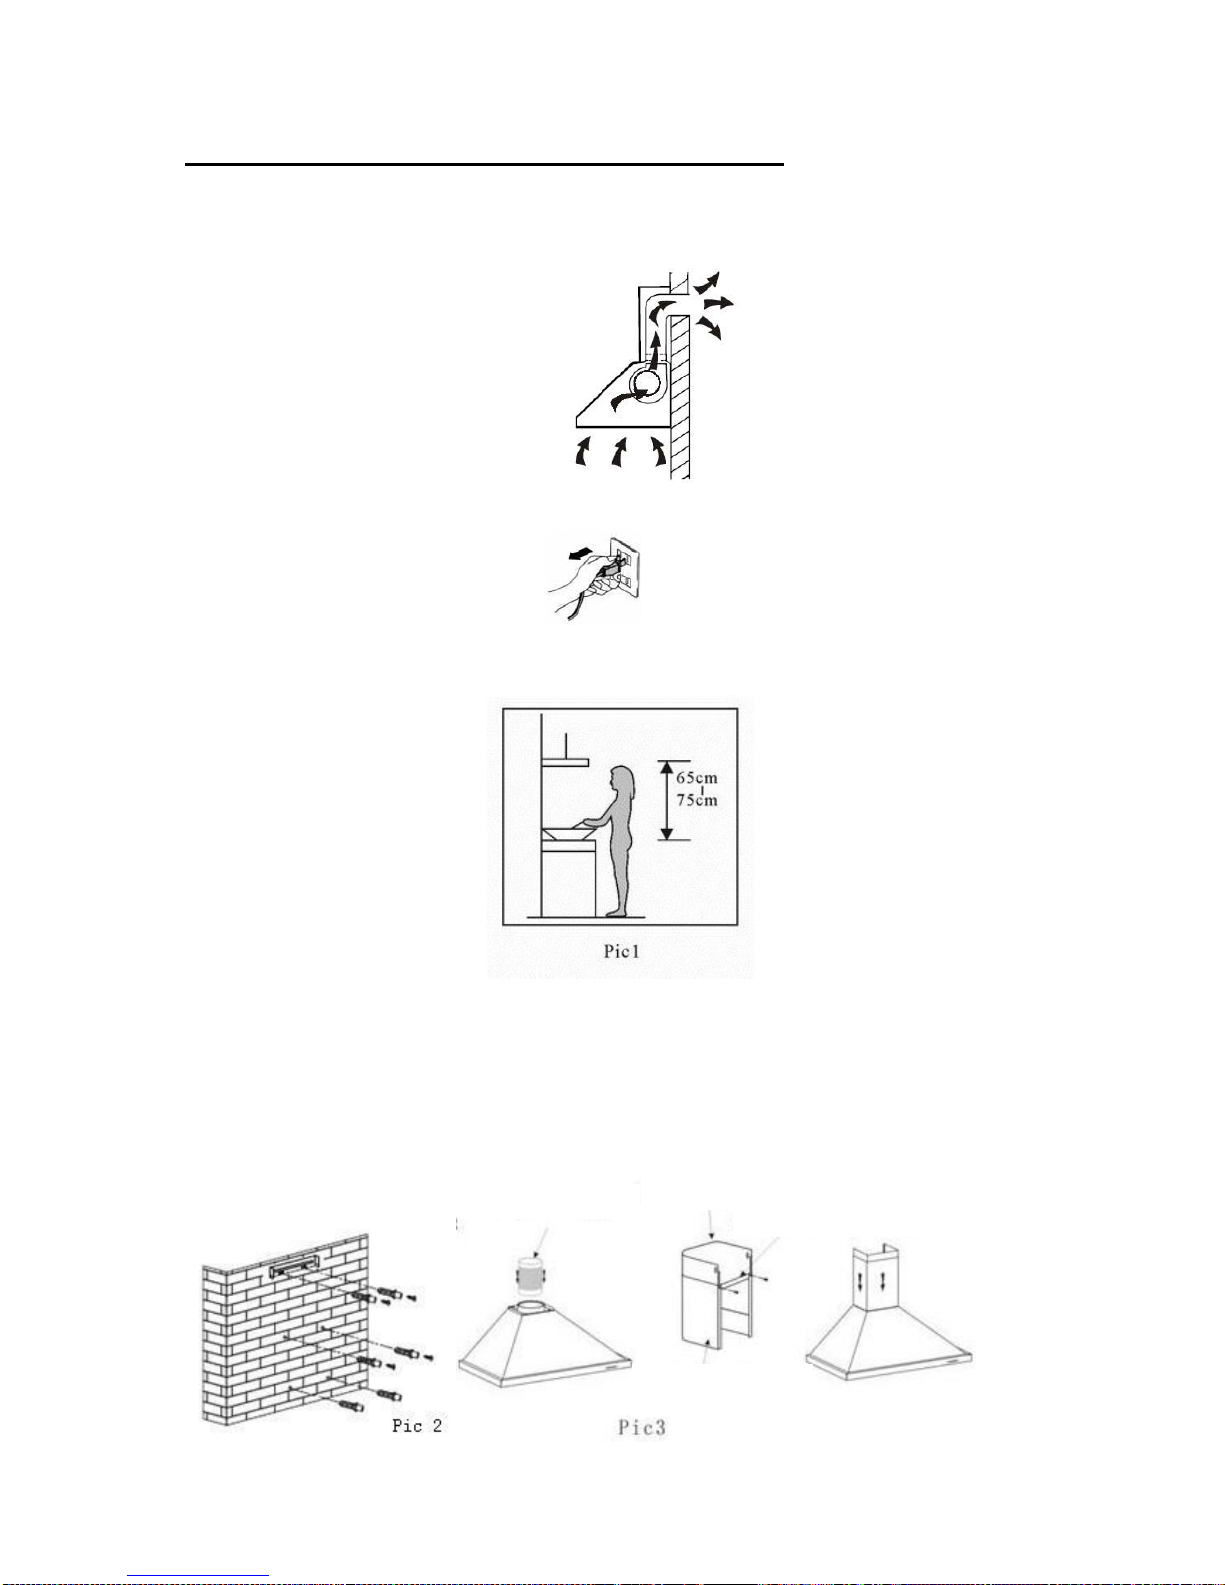
INSTALLATION (VENT OUTSIDE)
If you have an outlet to the outside, your cooker hood can be connected as below
picture by means of an extraction duct (enamel, aluminum, flexible pipe or inflammable
material with an interior diameter of 150/120mm)
1. Before installation, turn the unit off and unplug it from the outlet.
2. The cooker hood should be placed at a distance of 65~75cm above the cooking
plane for best effect.
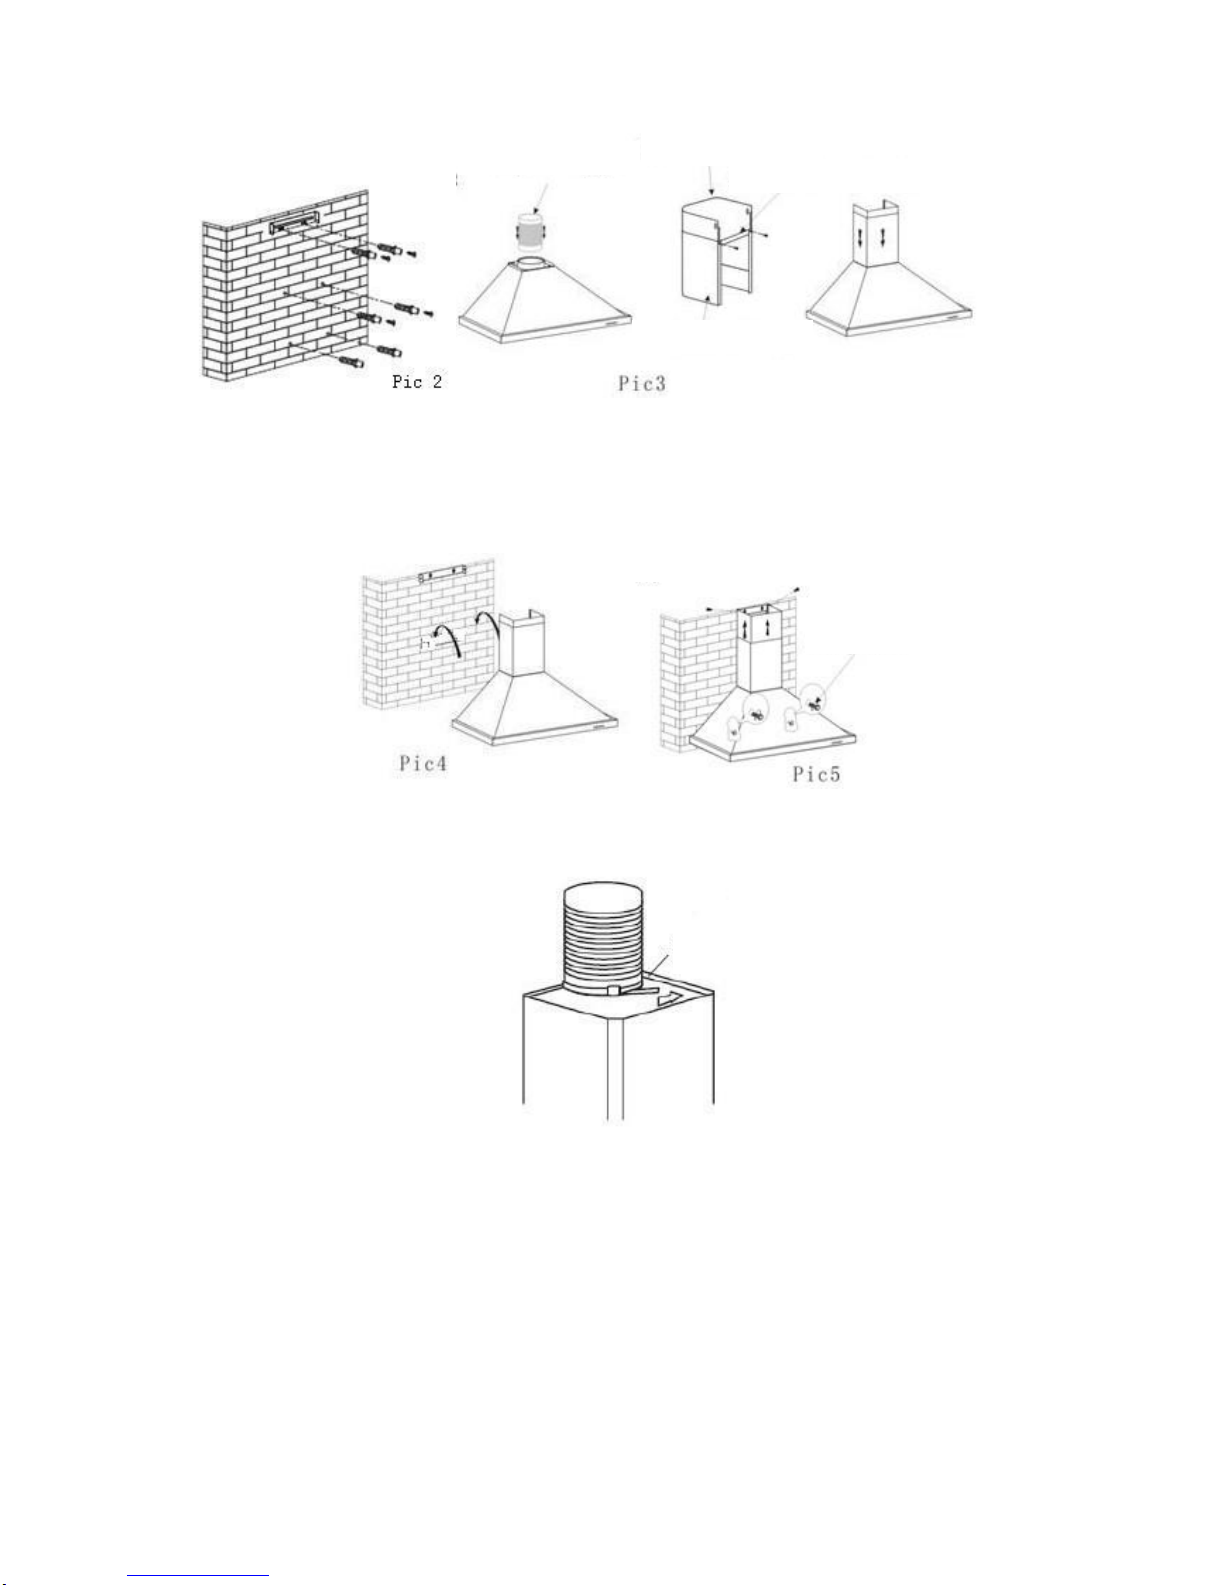
3. Install the hook on a suitable place once the installation height is fixed, and keep it
in line. The fixed position of the inside chimney bracket is the place of chimney.
See pic 2.
4. Fix the outside chimney bracket on the outside chimney, and be sure that the inside
chimney can be adjusted the height in it freely as well as fixing the expansion pipe.
Afterwards, install the expansion pipe and chimney on the cooker hood. See Pic 3.
6
5. Put the cooker hood on the hook. See Pic 4.
6. Adjust the height of the inside chimney to the position of the inside chimney bracket
and fix on it by screw, after adjusting the position, fix the body with safety screw.
See Pic 5.
Note: The two safety vents are positioned on the back housing, with diameter of
6mm.Lay the expansion pipe to the wall outlet. Fix the expansion pipe with the cable
tie (1) on the wall-outlet if it is aluminium foil pipe.
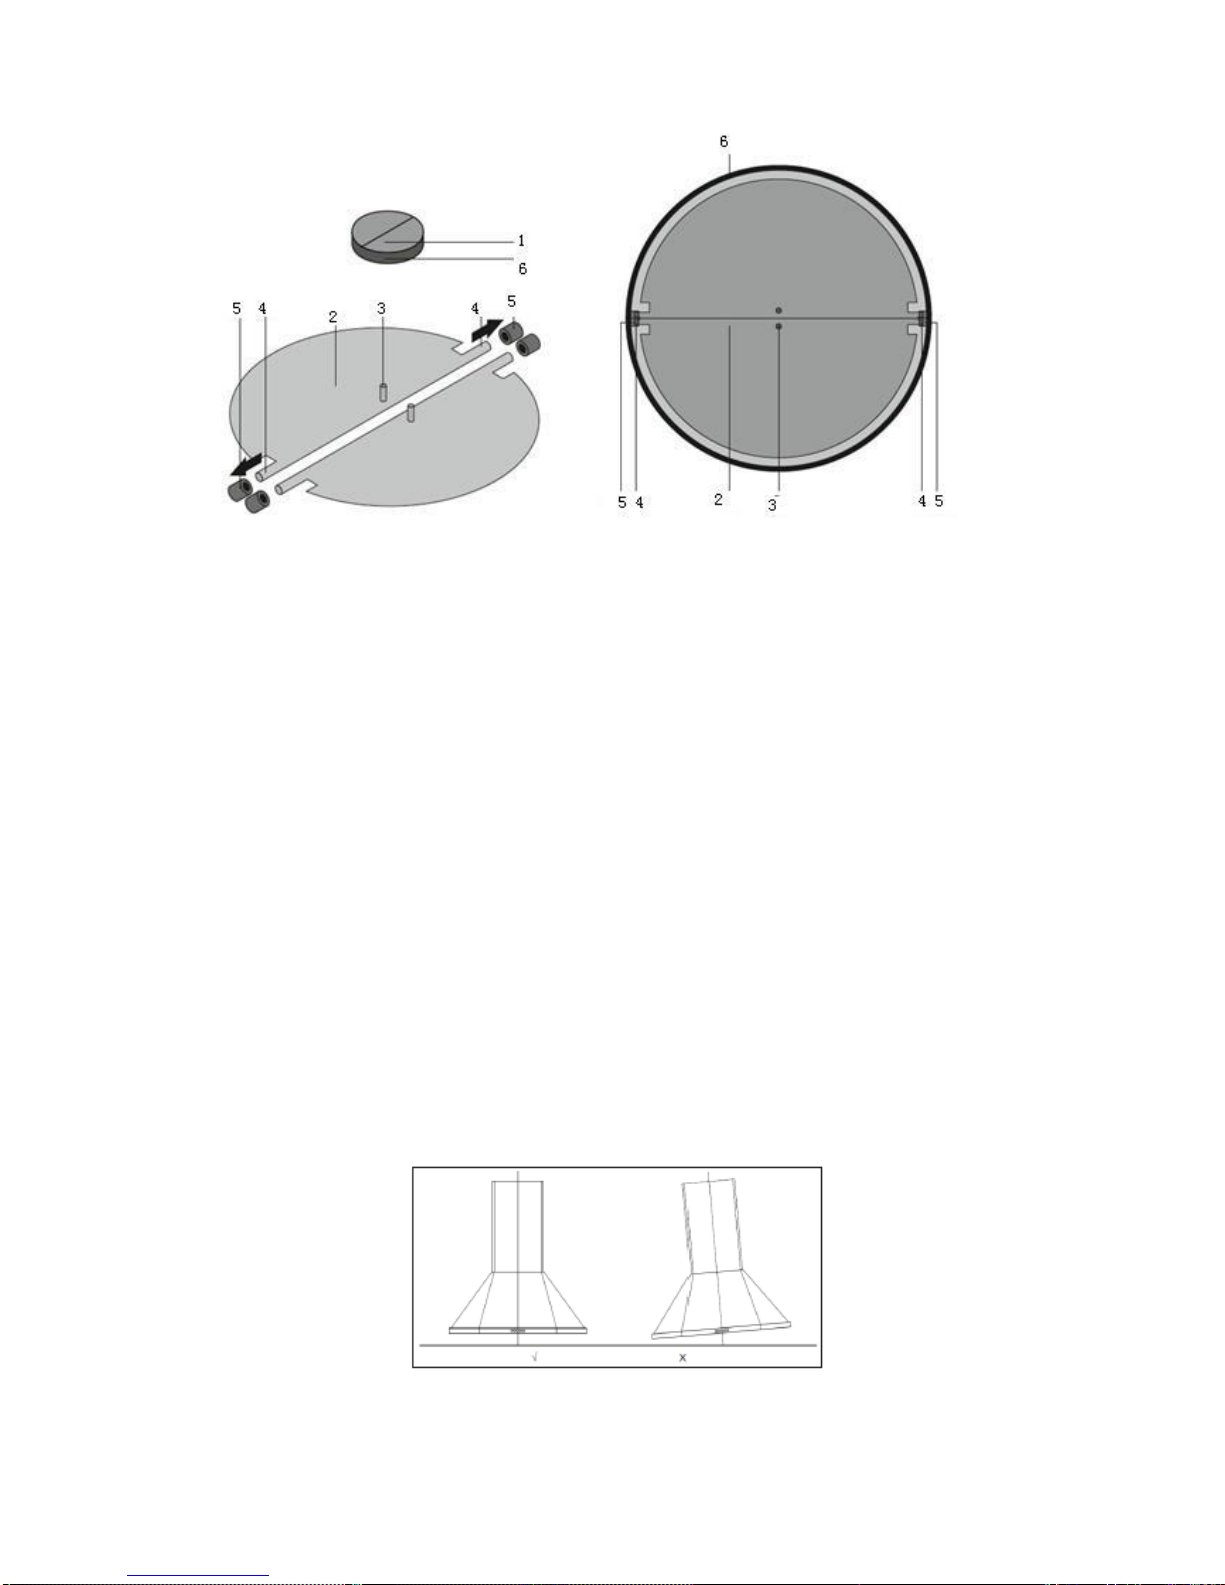
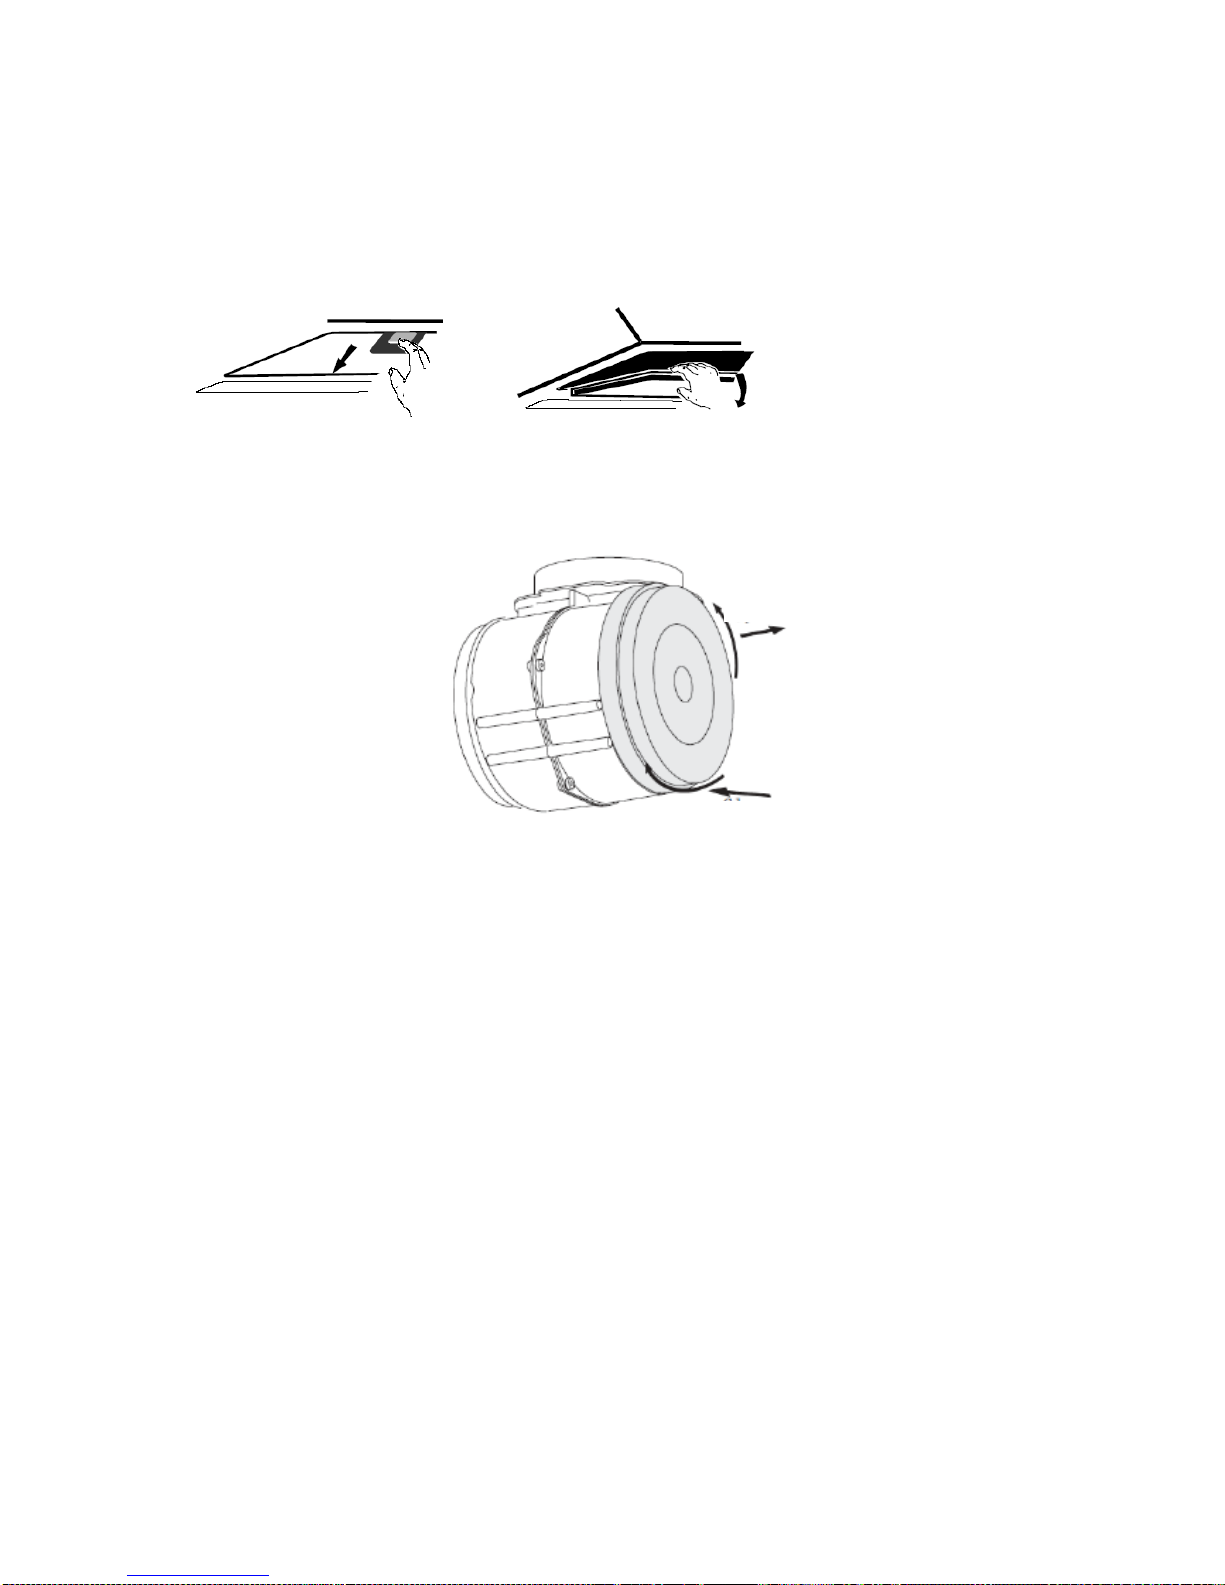
MOUNTING OF THE V-FLAP(Optional)
If the cooker hood does not have an assembled V-flap 1, you should mount the halfparts to the its body.
To mount the V-flap 1 you should:
• Mount two half-parts 2 into the body 6
• a pin 3 should be top oriented;
• the axis 4 should be inserted in the holes 5 on body;
• repeat all the operations for the 2nd half-part
Cable tie
Safety screw
Outside chimney
Outside chimney bracket
Inside chimney
Expansion pipe
7
HINTS FOR EXHAUST DUCT INSTALLATION
The following rules must be strictly followed to obtain optimal air extraction:
Keep expansion pipe short and straight.
Do not reduce the size or restrict expansion pipe.
When using expansion pipe always install the pipe pulled taut to minimize
pressure loss.
Failure to observe these basic instructions will reduce the performance and
increase noise levels of the cooker hood.
Any installation work must be carried out by a qualified electrician or competent
person.
Do not connect the ducting system of the hood to any existing ventilation system
which is being used for any other appliance ,such as warmer tube, gas tube, hot
wind tube.
The angle of the bend of the expansion pipe should not be less than 120º; you
must direct the pipe horizontally, or, alternatively, the pipe should go up from the
initial point and should be led to an outer wall.
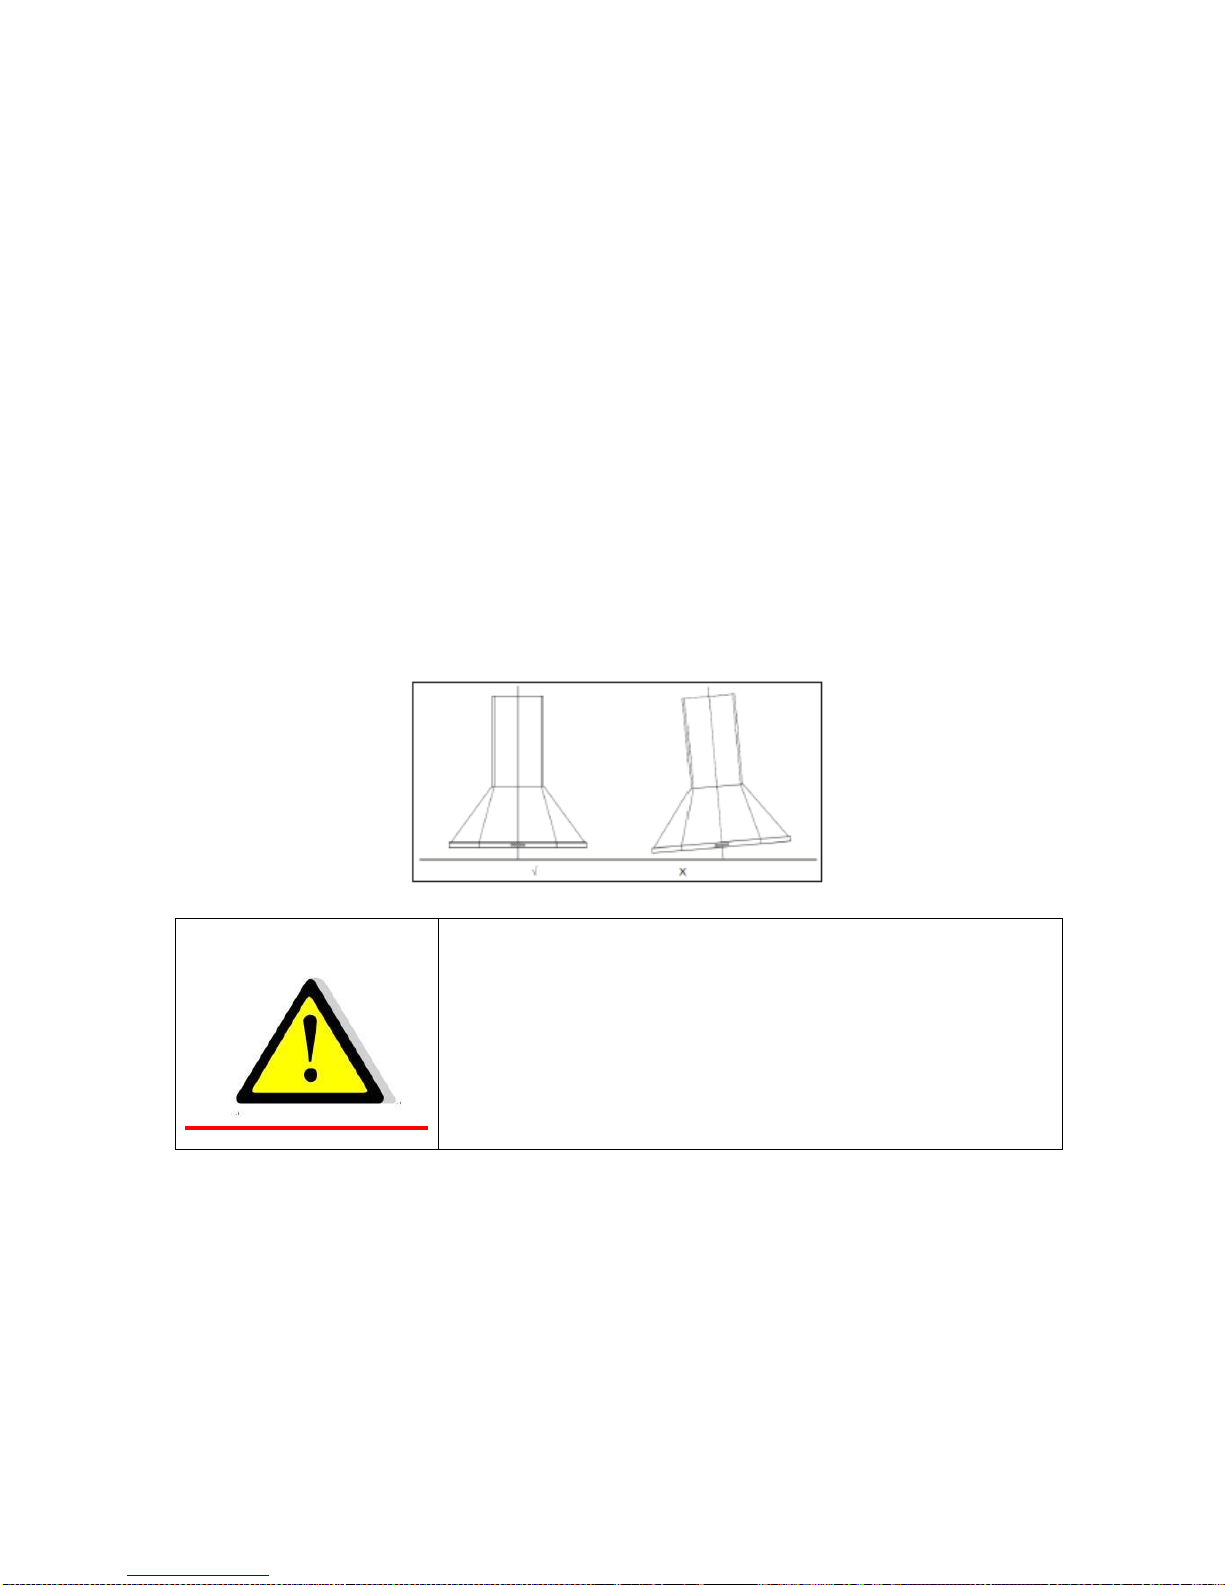
After the installation ,make sure that the cooker hood is level to avoid grease
collection at on end.
Ensure the expansion pipe selected for installation complies with relevant
standards and is fire retardant.

8
WARNING:
For safety reason, please use only the same
size of fixing or mounting screw which are
recommended in this instruction manual.
Failure to install the screws or fixing device in
accordance with these instructions may result in
electrical hazards.
Start Using Your Cooker Hood
LED touch control
LED touch control has five buttons, see pic.
(Decrease), (Increase), (Lamp), (Timer), (Power)
1. Power-on: After connecting the cooker hood to the main supply, the backlight of
button will turn on. The backlight will turn off after 30s without any operation and the
cooker hood will enter into stand-by mode.
2. (Power) button:
2.1. Press (Power) button, the backlight of button will be on and the hood will work at
the mid speed, and the light will be on. The backlight of the buttons (Decrease),
(Increase), (Lamp), and (Power) will be on. Press (Power) button again, the backlight
of button will be off and the cooker hood will be turn off and return into stand-by mode
and operate by the circle.
2.2. Those buttons of (Decrease), (Increase) and (Lamp) button could be operated
without pressing the (Power) button. Press one of those buttons, the cooker hood will
work according to the pressed function button. Press (Power) button, the cooker hood
will be turn off without any functions.
3. (Lamp) button:
Press (Lamp) button, the backlight of button and the lights will be on. Press again, the
lights will be off. The lights run circularly.
4. (Increase) button:
4.1 Press (Increase) button, the backlight of button will be on, the cooker hood starts
to work at the low speed. the LED display will display “1”,
4.2 Press (Increase) button again when it is working on the low speed, the cooker
hood works at the mid speed and the LED display will display “2”,
4.3 Press (Increase) button again when it is working on the mid speed, the cooker
hood works at the high speed and the LED display will display “3”,
9
4.4 Press (Increase) button again when it is working on the high speed, the cooker
hood will still work at the high speed.
5. (Decrease) button
Press (Decrease) button, the cooker hood will decrease one speed, and the display
will show the current working speed. When press (Decrease) button again when it is
working on the low speed, the cooker hood will turn off and the backlight of the
(Decrease) button will be off.
6. (Timer) button:
6.1 The (Timer) button works when the motor and light is on only. The timer setting is
5mins and could be repeat setting. When the time is up, the cooker hood will be turn
off and the light will be off.
6.2 When the timer is set, if adjusting the speeds, the timer will re-calculate the
working time.
TROUBLESHOOTING
Fault
Possible Cause
Solution
Light on, but motor
does not work
Fan switch turned off
Select a fan switch position.
Fan switch failed
Contact service center.
Motor failed
Contact service center.
Light does not
work, motor does
not work
House fuses blown
Reset/Replace fuses.
Power cord loose or
disconnected
Refit cord to power outlet. Switch
power outlet on.
Oil leakage
One way valve and the air
ventilation entrance are not
tightly sealed
Take down the one way valve
and seal with sealant.
Leakage from the connection of
U-shaped section and cover
Take U-shaped section down
and seal.
Lights not working
Broken/Faulty globes
Replace globes as per this
instruction.
Insufficient suction
The distance between the
cooker hood and the gas top is
too far
Refit the cooker hood to the
correct distance.
The Cooker hood
inclines
The fixing screw not tight
enough
Tighten the hanging screw and
make it horizontal.
NOTE:
Any electrical repairs to this appliance must conform to your local, state and
federal laws.Please contact the service centre if in any doubt before
undertaking any of the above.Always disconnect the unit from the power source when
opening the unit.
10
MAINTENANCE AND CLEANING
Caution:
• Before maintenance or cleaning is carried out, the cooker
hood should be disconnected from the main power
supply. Ensure that the cooker hood is switched off at the
wall socket and the plug removed.
• External surfaces are susceptible to scratches and
abrasions, so please follow the cleaning instructions to ensure the best possible
result is achieved without damage.
GENERAL
Cleaning and maintenance should be carried out with the appliance cold especially
when cleaning.Avoid leaving alkaline or acid substances (lemon juice, vinegar etc.) on
the surfaces.
STAINLESS STEEL
The stainless steel must be cleaned regularly (e.g.weekly) to ensure long life
expectancy.Dry with a clean soft cloth. A specialized stainless steel cleaning fluid may
be used.
NOTE:
Ensure that wiping is done along with the grain of the stainless steel to prevent any
unsightly crisscross scratching patterns from appearing.
CONTROL PANEL SURFACE
The inlay control panel can be cleaned using warm soapy water. Ensure the cloth is
clean and well wrung before cleaning. Use a dry soft cloth to remove any excess
moisture left after cleaning.
Important
Using neutral detergents and avoid using harsh cleaning chemicals, strong household
detergents or products containing abrasives,as this will affect the appliance
appearance and potentially remove any printing of artwork on the control panel and
will void manufactures warrantee.
11
GREASE MESH FILTERS
The mesh filters can be cleaned either by hand or in the dishwasher. After cleaning
ensure that the filters are completely dry before refitting.
- By hand: Soak them for about 3 minute in water with a grease-loosening detergent
then brush it gently with a soft brush. Please do not apply too much pressure, avoid to
damage it . (Leave to dry naturally out of direct sun light)
- In a dishwasher: Ensure that placement of the filters is made so as to not impede the
function of the spray arm. Washing the filters in a dishwasher may cause discoloration
of the aluminum inner mesh over time although it will not affect their performance.
Filters should be washed separately to crockery and kitchen utensils. it is advisable
not to use rinse aid.
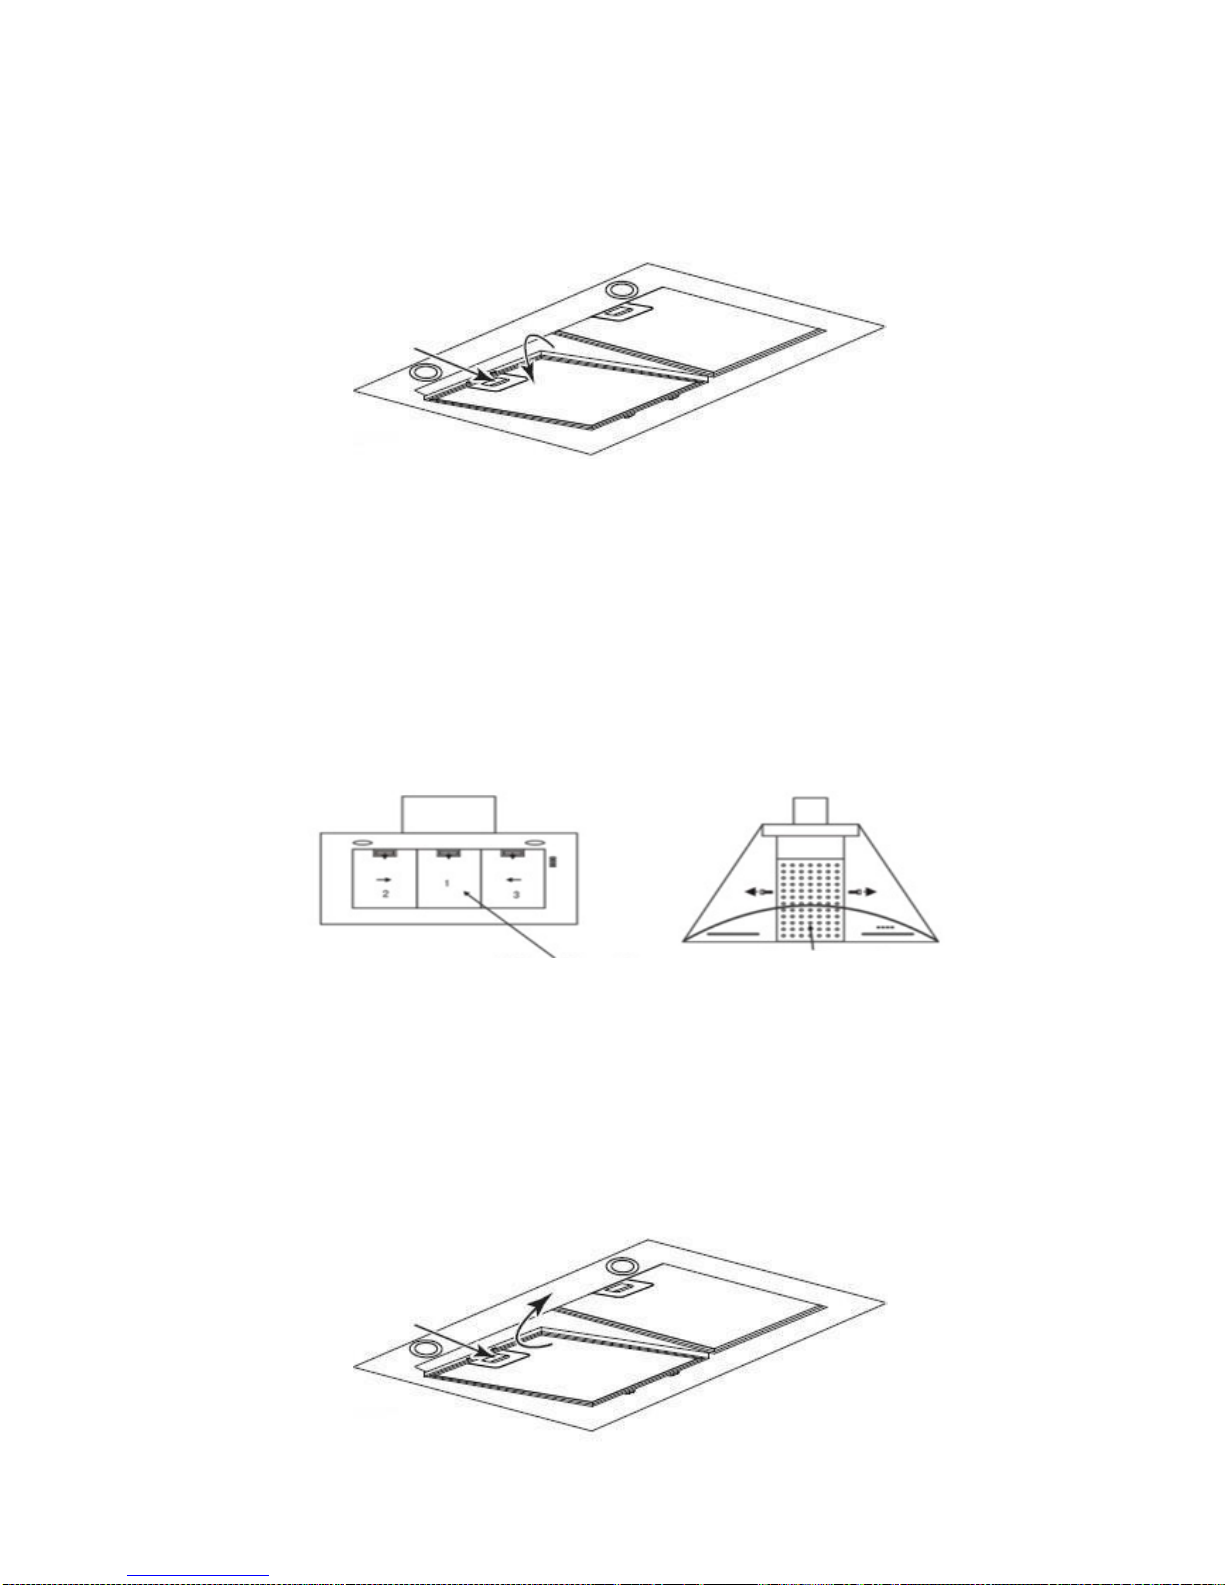
INSTALLING GREASE MESH FILTERS
- To install filters for the following four steps (See pic below):
- Angle the filter into slots at the back of the hood.
- Push the button on handle of the filter.
- Release the handle once the filter fits into a resting position.
- Repeat to install all filters.
Oil soot filter mesh
Oil soot filter mesh
12
CARBON FILTER-buy separately
Activated carbon filter can be used to trap odors. Normally the activated carbon filter
should be changed at three or six months according to your cooking habit. The
installation procedure of activated carbon filter is as below.
In order to install the activated carbon filter, the aluminium filter should be detached
first. Firstly open carefully the stainless steel cover, then press the lock of aluminium
filter and remove it.
NOTE:
Make sure the filter is securely locked. Otherwise, it would loosen and cause
dangerous.
When activated carbon filter attached, the suction power will be lowered.
Open
Close
13
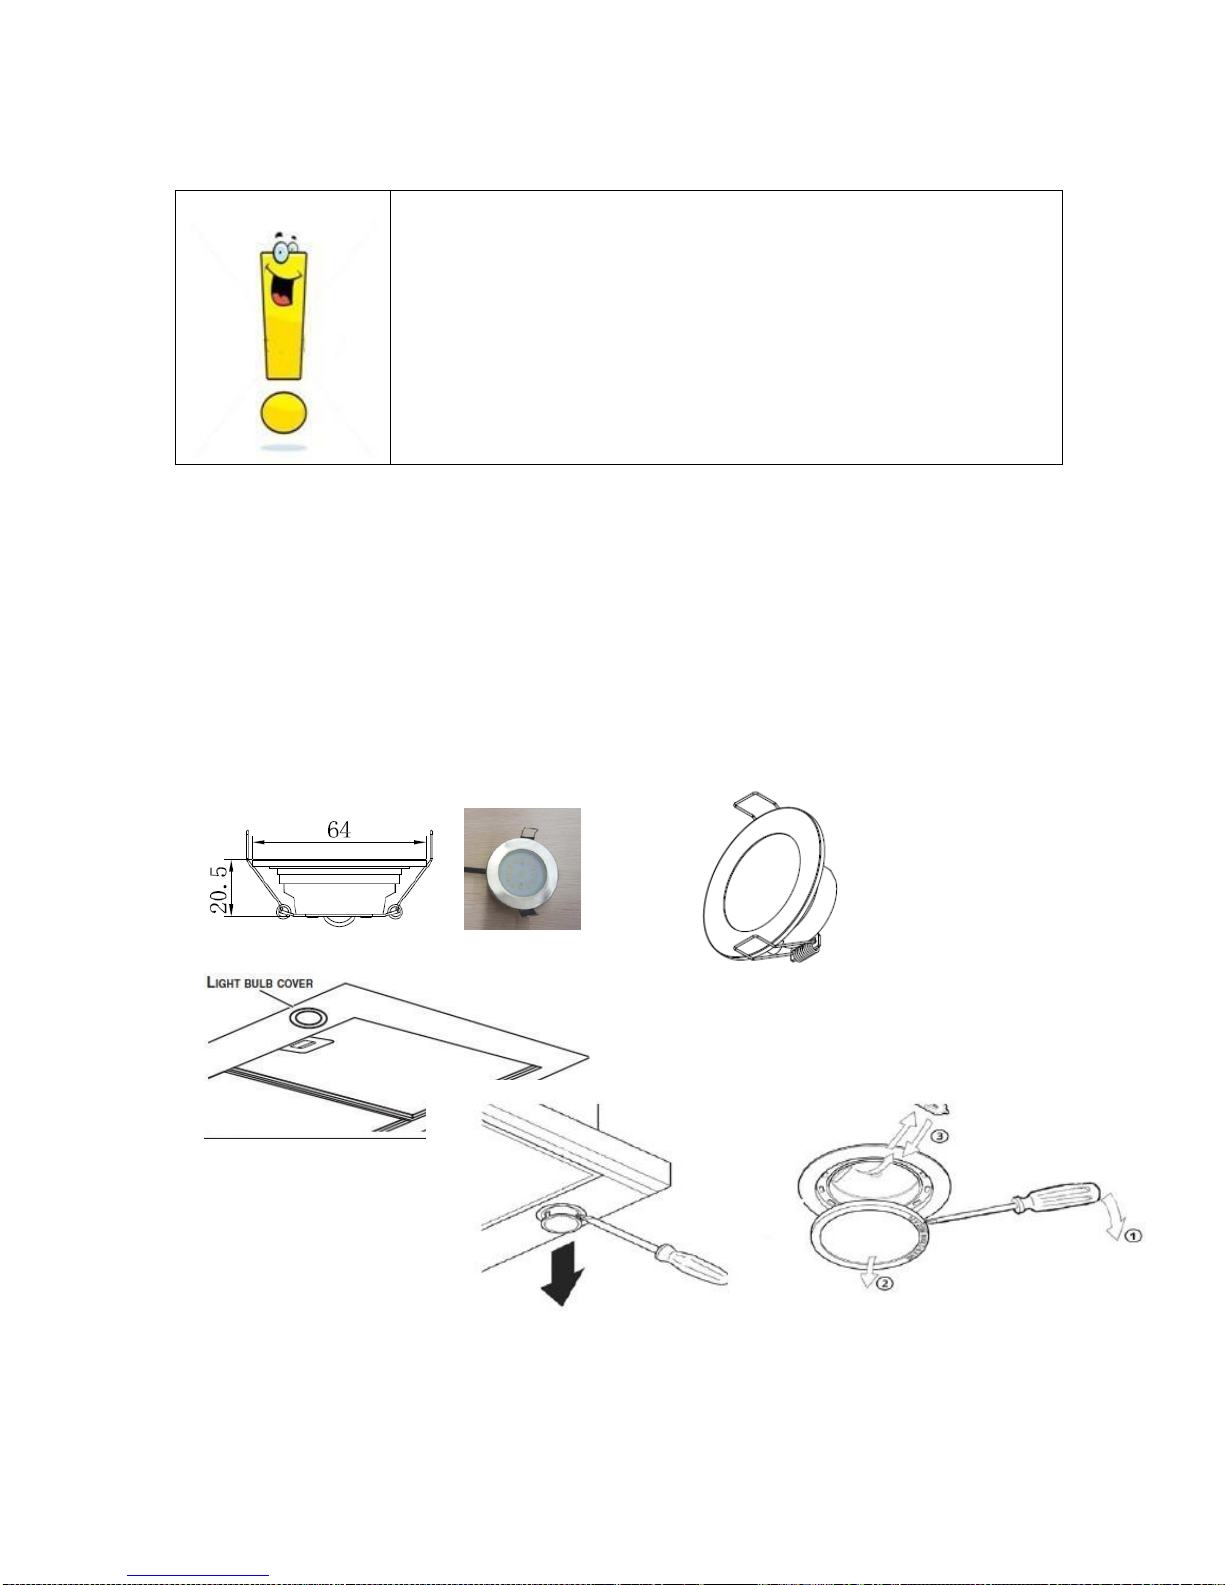
BULB REPLACEMENT
Important :
The bulb must be replaced by the manufacturer, its
service agent or similarly qualified persons.
Always switch off the electricity supply before
carrying out any operations on the appliance. When
handling bulb, make sure it is completely cool down
before any direct contact to hands.
When handling globes hold with a cloth or gloves to
ensure perspiration does not come in contact with
the globe as this can reduce the life of the globe.
1. Switch the unit off and pull out the plug first.
2. Wait until the light bulb is cooled down before replacement.
3. Take out the baffle filter and use the screw driver to take out the frame as the below
pic showed
4. Replace with same type of bulb (LED 2W Max)
Note:Light replacement should carried out by qualified service personnel only.
• ILCOS D code for this lamp is: DBR-2/65-H-64
– LED modules –round lamp
– Max wattage: 2 W
– Voltage range: AC 220-240V
– Dimensions:
14
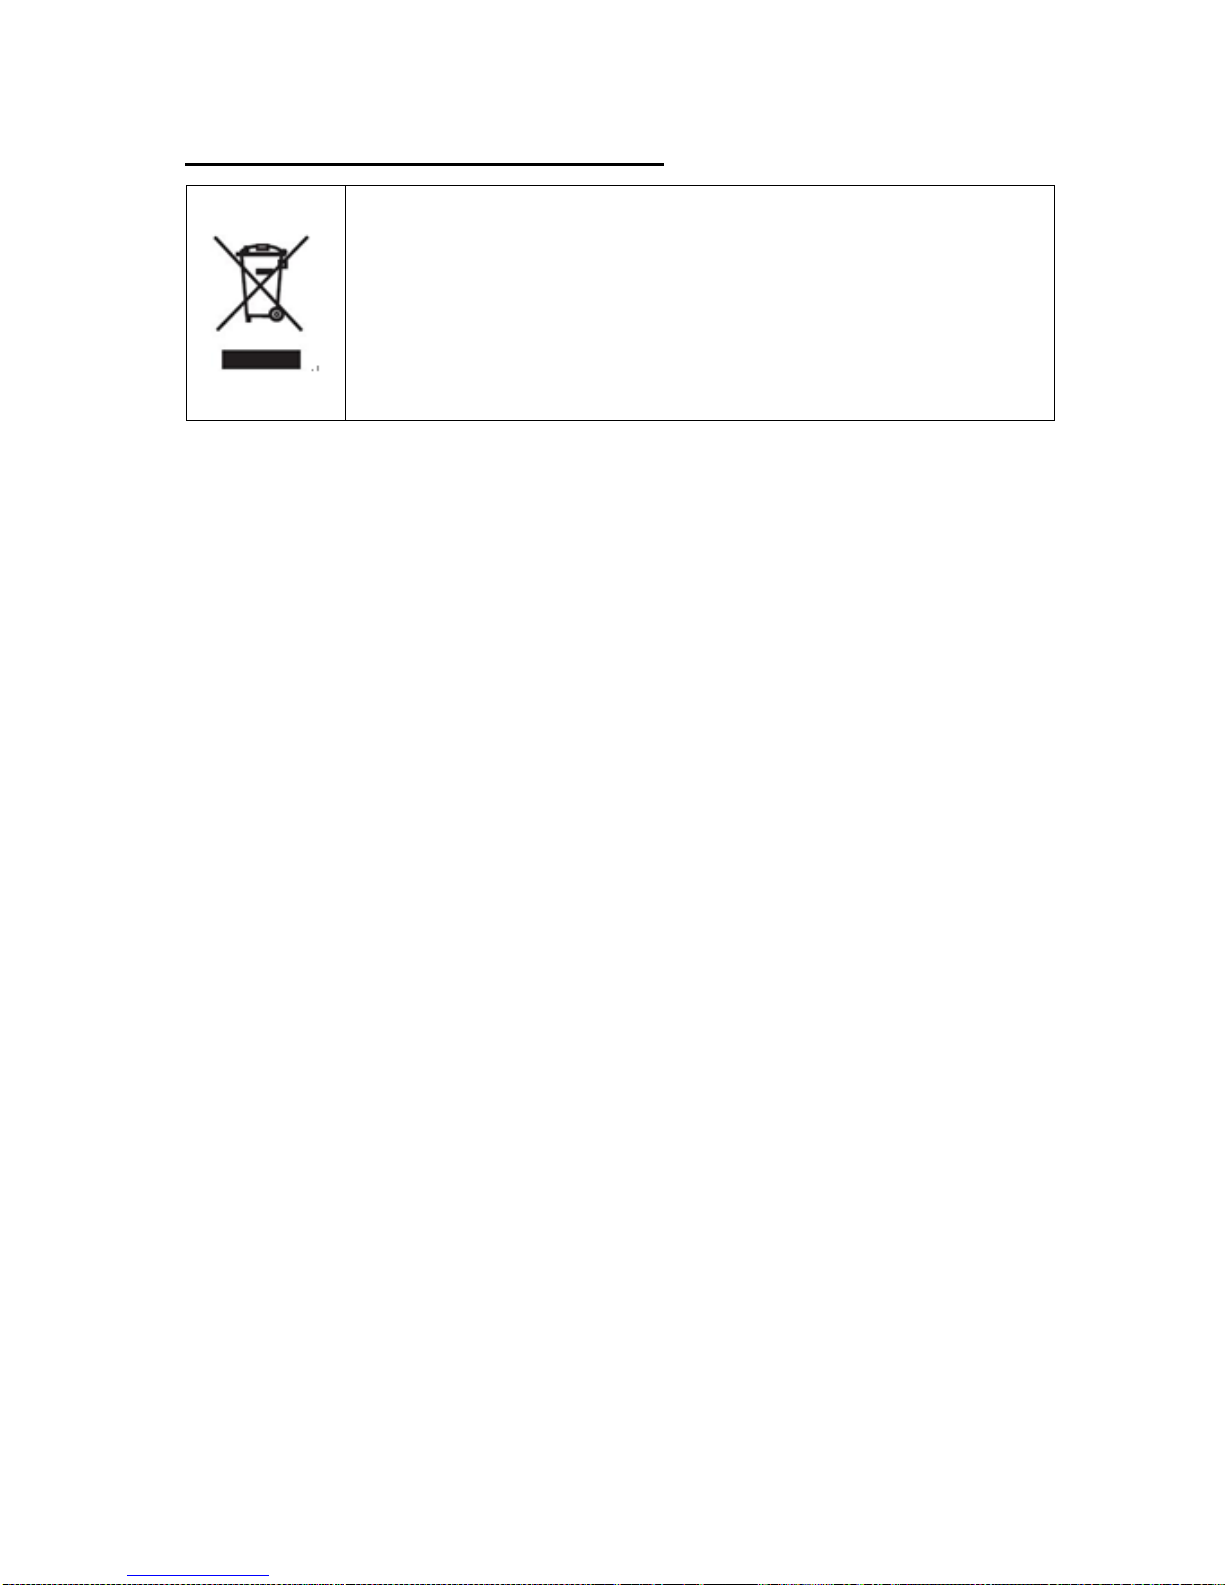
ENVIRONMENTAL PROTECTION:
This product is marked with the symbol on the selective sorting of
waste electronic equipment. This means that this product must not
be disposed of with household waste but must be supported by a
system of selective collection in accordance with Directive
2012/19/EU. It will then be recycled or dismantled to minimize
impacts on the environment, electrical and electronic products are
potentially dangerous for the environment and human health due to
the presence of hazardous substances.For more information, please
contact your local or regional authorities.
NOTE:
The following shows how to reduce total environmental impact (e.g. energy use) of the
cooking process).
(1) Install the cooker hood in a proper place where there is efficient ventilation.
(2) Clean the cooker hood regularly so as not to block the airway.
(3) Remember to switch off the cooker hood light after cooking.
(4) Remember to switch off the cooker hood after cooking.
INFORMATION FOR DISMANTLING
Do not dismantle the appliance in a way which is not shown in the user manual. The
appliance could not be dismantled by user. At the end of life, the appliance should not
be disposed of with household waste. Check with you Local Authority or retainer for
recycling advice.

15
RHP67000/1LIN,RHP67000/1LPN,
RHP67000/1LRB,
RHP97000/1LRB,RHP97000/1LPN,
HHP67000/1LX,HHP67000/1LW,
HHP97000/1LX
Hotte de cuisson
Manuel d'instructions
RHP97000/1LIN,

16
Sommaire
1. Consignes de sécurité ............................................................. 17
2. Installation ............................................................................... 19
3. Comment utiliser votre hotte de cuisson ................................. 22
4. Dépannage.............................................................................. 23
5. Entretien et nettoyage ............................................................. 25
6. Protection de l’environnement ................................................. 28
17
CONSIGNES DE SÉCURITÉ
Ce manuel indique comment installer votre hotte de cuisson et comment vous en
servir. Avant toute utilisation, veuillez le lire attentivement, même si vous connaissez
déjà ce produit. Conservez ce manuel dans un endroit sûr, pour pouvoir le consulter
par la suite.
Avertissements :
● Ne pas utiliser la hotte sans filtres à
graisse ou si les filtres sont trop
encrassés !
● Ne pas installer au-dessus d’une
cuisinière dotée d’un gril très puissant.
● Ne pas laisser de poêles à frire cuire
sans surveillance, car les graisses ou
huiles brûlantes peuvent provoquer un
incendie.
● Ne pas laisser de flammes nues brûler
sous la hotte de cuisson.
● Si la hotte de cuisson est
endommagée, il faut renoncer à
l’utiliser.
● Ne pas flamber d’aliment sous la hotte
de cuisson.
● ATTENTION : Les pièces accessibles
peuvent être chaudes lorsqu’elles sont
utilisées avec des appareils de
cuisson.
● Distance minimum entre la surface
d’appui des récipients de cuisson sur
la plaque et la partie la plus basse de
la hotte. (Si la hotte de cuisson est
installée au-dessus d’un dispositif
fonctionnant au gaz, la distance
minimum est 65 cm)
● L’air ne doit pas être évacué dans un
conduit d’élimination des fumées
d’échappement de dispositifs brûlant
du gaz ou d’autres combustibles.
Ne jamais oublier de :
● Important ! Veuillez toujours couper
l’alimentation électrique au secteur
pendant l’installation ou l’entretien,
comme par exemple le remplacement
d’une ampoule électrique.
● La hotte de cuisson doit être installée
suivant les instructions d’installation et
toutes les mesures ci-dessous :
● Toute l’installation doit être prise en
charge par une personne compétente
ou un électricien professionnel.
● Veillez à l’élimination des matériaux
d’emballage. Il peut représenter un
danger pour les enfants.
● Faites bien attention aux bords
aiguisés à l’intérieur de la hotte,
notamment pendant l’installation et le
nettoyage.
● Quand la hotte est installée au-dessus
d’un appareil à gaz, la distance
minimale entre la surface d’appui des
récipients de cuisson sur la plaque et
la partie la plus basse de la hotte doit
être :
Gazinière : 75 cm
Cuisinière électrique : 65 cm
Cuisinière à charbon ou
cuiseur à huile : 75 cm
● Assurez-vous que le tuyau n’ait pas
de courbure à plus de 90 degrés car
ceci diminuerait l’efficacité de la hotte.
● Attention : Le fait de ne pas installer
les vis ou le dispositif de fixation
conformément à ces instructions peut
entraîner des risques électriques.
● Attention : Avant d’accéder aux
appareils, tous les circuits
d’alimentation doivent être coupés.

18
Ne jamais oublier de :
● Utilisez toujours des couvercles sur
les casseroles et poêles quand vous
cuisinez sur une gazinière.
● En modalité d’extraction, l’air de la
pièce est évacué par la hotte.
Assurez-vous que la pièce soit bien
aérée. Cette hotte élimine les odeurs
de la pièce mais pas la vapeur.
● La pièce doit être correctement
ventilée lorsque la hotte est utilisée en
même temps que des appareils à gaz
ou que des appareils employant
d’autres combustibles.
● La hotte est prévue uniquement pour
un usage domestique.
● Si le câble d'alimentation est
endommagé, il doit être remplacé par
le fabricant, son agent d'entretien ou
des professionnels de même
qualification, afin d'éviter tout risque.
● Cet appareil peut être utilisé par des
enfants âgés de 8 ans et plus, par des
personnes dont les capacités
physiques, sensorielles ou mentales
sont réduites ou par des personnes
sans expérience ou connaissances
spécifiques, si on les a informées sur
la manière d'utiliser l'appareil en toute
sécurité et qu’elles en ont compris les
risques. Les enfants ne doivent pas
jouer avec l'appareil. L’entretien et le
nettoyage ne doivent pas être
effectués par des enfants sans
surveillance.
Ne jamais oublier de :
● Attention : L’appareil et ses parties
accessibles chauffent pendant
l’utilisation. Faites attention de ne pas
toucher les éléments chauds. Les
enfants de moins de 8 ans doivent se
tenir éloignés, à moins qu’ils ne soient
sous surveillance permanente.
● Il faut une ventilation adéquate de la
pièce lorsque la hotte est utilisée en
même temps que des dispositifs
fonctionnant au gaz ou à d’autres
combustibles.
● Il existe un risque d’incendie si le
nettoyage n’est pas réalisé
conformément aux instructions.
● La réglementation en matière
d’évacuation de l’air doit être
respectée.
● Nettoyez régulièrement votre appareil
en suivant la méthode indiquée au
chapitre ENTRETIEN.
● Pour des raisons de sécurité, n’utilisez
que des vis de fixation ou de montage
de la taille indiquée dans ce manuel
d’instructions.
● Pour des explications concernant le
mode de nettoyage, veuillez consulter
le chapitre entretien et nettoyage de
ce manuel d’instructions.
● L’entretien et le nettoyage ne doivent
pas être effectués par des enfants
sans surveillance.
● Lorsque la hotte électrique fonctionne
en même temps que des dispositifs
alimentés par d’autres énergies que
l'électricité, la pression negative de la
pièce ne doit pas dépasser 4 Pa (4 x
10-5 bars).
19
INSTALLATION (ÉVACUATION EXTERNE)
Si vous disposez d’une sortie vers l'extérieur, votre hotte peut être connectée comme
sur l’image ci-dessous par un conduit d'extraction (émail, aluminium, gaine souple ou
matériau inflammable avec diamètre intérieur de 150/120mm)
1. Avant l'installation, éteignez l'appareil et débranchez-le de la prise de courant.
2. Pour une meilleure prestation, la hotte doit être placée à une distance de 65 à 75cm
au-dessus de la plaque de cuisson.
3. Une fois déterminée la hauteur de l’installation, placez le crochet dans la position
appropriée, et bien aligné. La position fixe du support interne du conduit de hotte
est l’emplacement du conduit de hotte. Voir ill. 2.
4. Fixez le support externe du conduit de hotte et assurez-vous que l’intérieur du
conduit de hotte est réglable en hauteur, tout comme la fixation du tuyau
d’expansion. Ensuite, installez le tuyau d’expansion et le conduit de hotte sur la
hotte de cuisson. Voir ill. 3.
Conduit de hotte
extérieur
Support de conduit de hotte extérieur
Conduit de hotte intérieur
Tuyau d’expansion
20
5. Posez la hotte sur le crochet. Voir ill. 4.
6. Ajuster la hauteur du conduit de hotte intérieur sur le support de conduit de hotte
intérieur et fixez avec des vis ; après avoir régler la position, fixez l’élément avec
des vis de sécurité. Voir ill. 5.
Remarque : Les deux évents de sécurité sont positionnés à l’arrière du boîtier, avec
un diamètre de 6mm.Posez le tuyau d’expansion au niveau de la sortie dans le mur.
Fixez le tuyau d’expansion sur la sortie murale avec le segment de câble (1) si c’est
un tuyau en aluminium.
MONTAGE DU RABAT EN V (Option)
Si la hotte de cuisson n’est pas dotée d’un rabat en V 1, vous pouvez en monter les
rabats successivement.
Pour le montage du rabat en V, voilà comment procéder :
• Montez les deux rabats dans la pièce 6
• orienter la goupille 3 vers le haut ;
• l’axe 4 doit être inséré des les trous 5 de la pièce ;
• répétez les mêmes opérations pour la deuxième moitié de rabat
Segment de câble
Vis de sécurité
21
CONSEILS POUR L’INSTALLATION DU CONDUIT
D’ÉVACUATION
Les règles suivantes doivent être appliquées à la lettre pour obtenir une évacuation
optimale de l’air :
• Gardez le tuyau d’expansion court et droit.
• Ne réduisez pas la taille du tuyau d’expansion.
• Si vous utilisez un tuyau d’expansion, installez toujours ce tuyau en l’étirant bien pour
minimiser la perte de pression.
• Le non-respect de ces instructions de base diminue les performances et augmente la
nuisance sonore de la hotte.
• L’installation doit être confiée à un électricien professionnel ou à une personne compétente.
Ne connectez pas le système d’évacuation de la hotte à un système de ventilation déjà en
place, utilisé pour un autre appareil, tel qu’un tuyau de réchaud, un tuyau de gaz ou un tuyau
à air chaud.
L’ angle de courbure du conduit d’expansion ne doit pas être inférieur à 120º ; vous devez
diriger le conduit horizontalement ou, en alternative, le conduit doit monter depuis le point
initial et doit être dirigé jusqu'à la sortie dans la mur.
Après l'installation, assurez-vous que la hotte est de niveau pour éviter l’accumulation de
graisse en fin de parcours.
Assurez-vous que le tuyau d’expansion utilisé pour l’installation est conforme aux normes en
vigueur et ignifuge.
AVERTISSEMENT :
Pour des raisons de sécurité, utilisez
uniquement des vis de fixation ou de montage
de la taille recommandée dans ce manuel
d’instructions.
Le fait de ne pas installer les vis ou le dispositif
de fixation conformément à ces instructions
peut entraîner des risques électriques.
 Loading...