

Page 1

Wireless N Adapter RNX-N250PC
Quick Installation Guide
Page 2

Wireless N Adapter RNX-N250PC Quick Installation Guide
Chapter 1 Product Overview
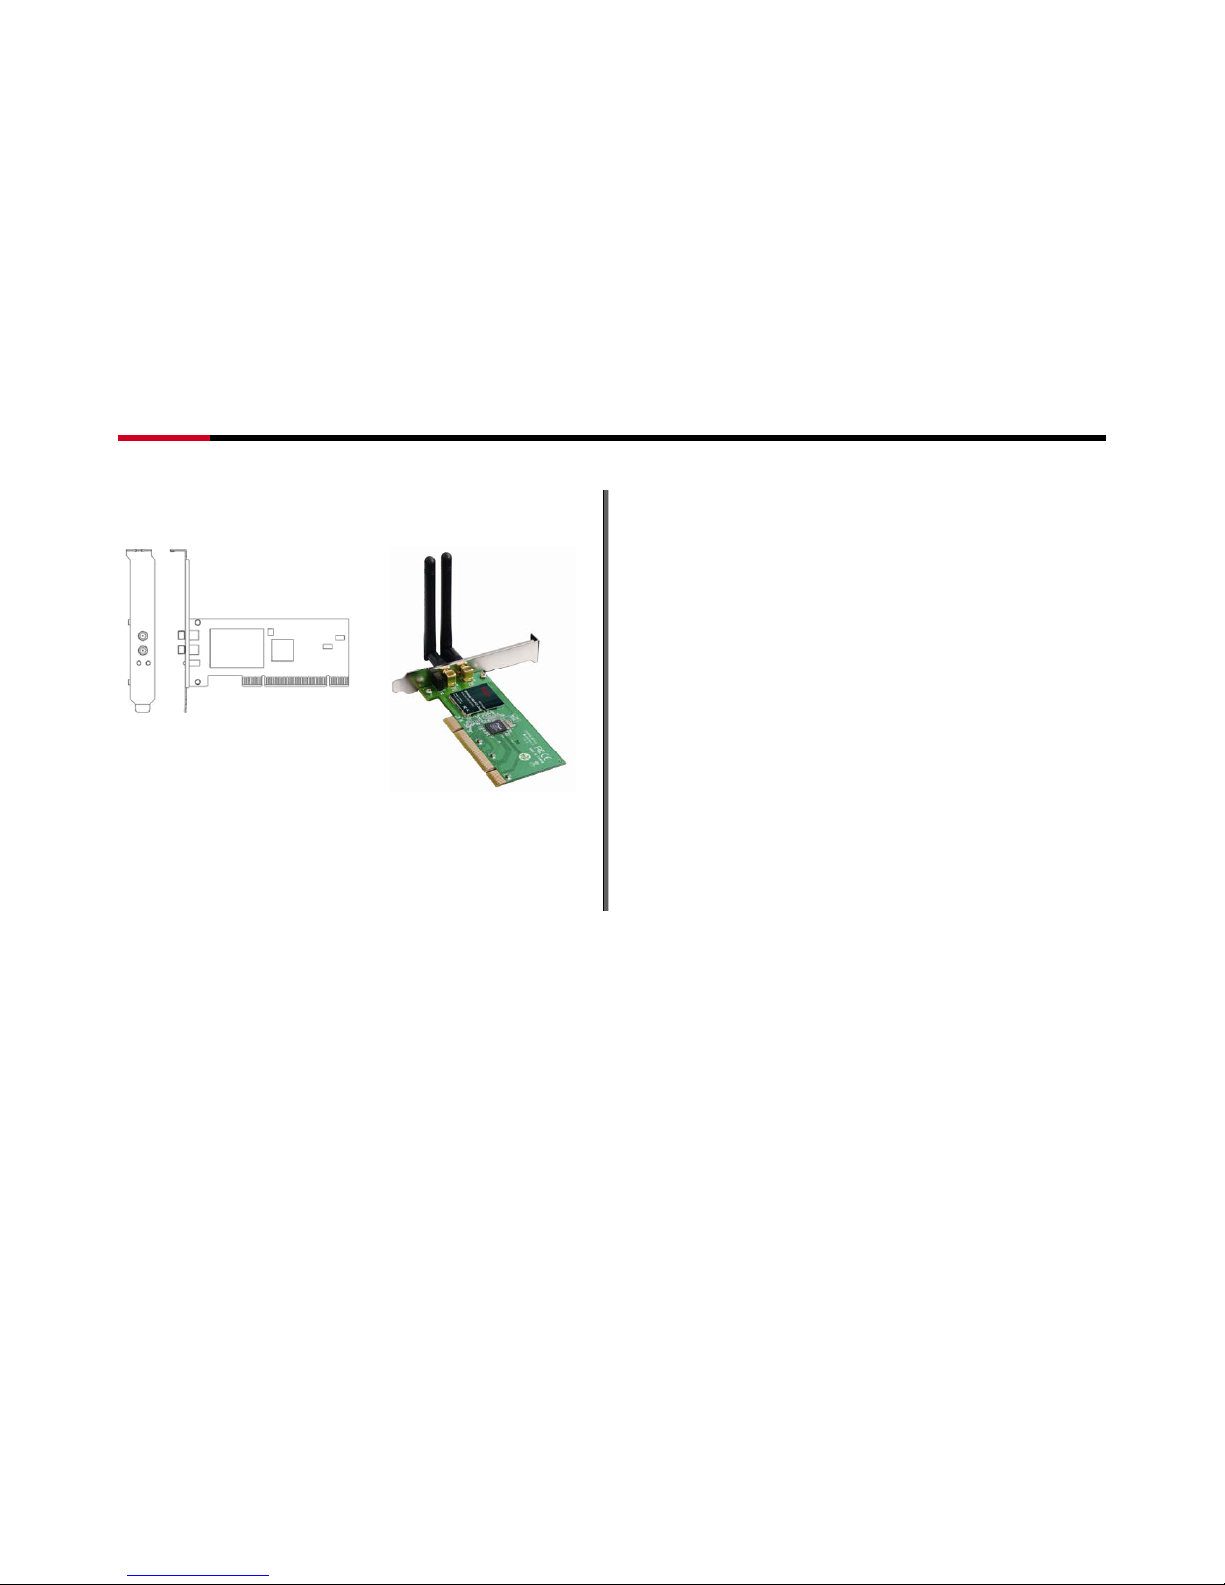
Thank you for choosing Rosewill’s 802.11n Wireless PIC adapter –
RNX-N250PC. This chapter is to introduce you more about this Wireless
Adapter.
1.1 Package Content
Before getting started, please verify that your package includes the
following items:
1. Rosewill 802.11n Wireless PCI Adapter x 1
2. 2 dBi detachable Antenna x 2
3. Low Profile Bracket x 1
4. Quick Installation Guide x 1
5. Resource CD x 1, including:
Rosewill Wireless N Client Utility and Driver
User Manual
Note: Make sure that the package contains the above items. If
any of the listed items are damaged or missing, please contact with your
distributor.
1.2 Overview of the Product
PCI Adapter connects you with IEEE802.11n (Draft 2.0) networks at
transfer rate up to an incredible 300Mbps! By using the reflection signal,
802.11n technology increases the range and reduces “dead spots” in the
wireless coverage area. Unlike ordinary wireless networking of 802.11b/g
standards that are confused by wireless reflections, 802.11n can actually
use these reflections to increase four times transmission range of 802.11g
products.
Besides, when both ends of the wireless link are 802.11n products, the PCI
card can utilize twice radio band to increase three times transmission speed
of ordinary 802.11g standard products, and can comply with backwards
802.11b/802.11g standards.
Soft AP supported by PCI Adapter can help you establish wireless LAN
networking with lowest cost. Also WPS (PBC and PIN) encryption method
can free you from remembering the long passwords. Complete WMM
function makes your voice and video more smooth.
- 2 -
Page 3

Wireless N Adapter RNX-N250PC Quick Installation Guide
1.3 Product Features
Complies with IEEE 802.11n, IEEE 802.11g, IEEE 802.11b
standards
Provides 32-bit PCI interface 2.2
Provides 300Mbps upload and download rate
Supports 20MHz/40MHz frequency width
Supports 64/128-bit WEP, WPA, WPA2 encryption methods
Supports WMM for smooth transmit of multimedia files
Supports Windows 2000, XP 32/64, Vista 32/64, Win 7 32/64,
Linux Kernel 2.6.1
Supports Multiple BSSID
- 3 -
Page 4

Wireless N Adapter RNX-N250PC Quick Installation Guide
1.4 Product Specification
Standard
IEEE 802.11n Draft 2.0 and IEEE802.11g/b
RF Output Power(Typical)
802.11b: up to 17 ± 1 dBm
802.11g: up to 15 ± 1 dBm
802.11n: up to 16 ± 1 dBm
Driver Support
Windows® 2000, XP 32/64, Vista 32/64, Win7 32/64, Linux
2.6.1
Frequency Band
2.400GHz ~ 2.484GHz
Interface
PCI interface 2.2
Security
64/128-bit WEP (Hex & ASCII), WPA(TKIP with IEEE 802.1x),
WPA2(AES with IEEE 802.1x)
Dimension:
Without Bracket
4.7 x 2.08 in (120x 53 mm)
Data Rate
802.11n: up to 300Mbps Upstream and
downstream
802.11g: 54, 48, 36, 24, 18, 12, 9 & 6Mbps
802.11b: 11, 5.5, 2 and 1 Mbps with auto-rate fall
back
Antenna
2dBi External Detachable antenna x 2
Weight: (with Bracket and Antenna)
60 g
Operation Temperature
0°C ~ 55°C ambient temperature
Storage Humidity
10% ~ 90% (Non-condensing)
Storage Temperature
-20°C ~ 70°C ambient temperature
1.5 System Requirement
You must have at least the following
A desktop PC with an available 32-bit PCI slot
Minimum 300MHz processor and 32MB memory
Windows 98SE, ME, 2000, XP 32/64, Vista 32/64, Win7 32/64
A CD-ROM Drive
PCI controller properly installed and working in the desktop PC
802.11n or 802.11b/g Access Point (for infrastructure Mode) or another
802.11n or 802.11b/g wireless adapter (for Ad-Hoc; Peer-to-Peer
networking mode.)
- 4 -
Page 5
Wireless N Adapter RNX-N250PC Quick Installation Guide
- 5 -
1.6 PCI Adapter LED Status
The status LED indicators of the PCI Adapter are described in the following.
Figure 1-1 Wireless PCI Card LED
Lnk/Act ON (Green): Indicates a valid connection.
Lnk/Act Flashing: Indicates the Adapter is transmitting or receiving data
Page 6

Wireless N Adapter RNX-N250PC Quick Installation Guide
Chapter 2 Security Check List before Installation
Wireless Networks are very convenient, however, since it
uses radio waves to send information. It can be vulnerable from those
who intended to do harm. So we recommend you take additional steps
to secure your wireless network.
Change the default wireless network name or SSID on your
wireless router
Change the default password on your wireless router
Enable encryption. We suggest enabling high level of the
encryption such as WPA and above.
Install Anti-virus program and personal firewall software
When set your encryption password, please select strong pass
phrases that are at least eight characters in length. Combines
both letters and numbers to create stronger password and avoid
using standard words that can be found in the dictionary.
Please also remember to keep a record of your wireless network
name, default password (The login name and password which
you will need when linking into your wireless router through
Internet explorer), SSID and encryption password (the
password which you will need when connecting your wireless
adapter with your wireless network) somewhere in case you need
them in the future.
- 6 -
Page 7

Wireless N Adapter RNX-N250PC Quick Installation Guide
Chapter 3 Installation Guide
3.1 Hardware Installation
To install the adapter, follow these steps listed below:
1. Turn off your desktop PC and disconnect the power.
2. Remove your PC case and locate an available PCI slot on the
motherboard. Remove the metal slot cover on the back of the PC. Check
with your computer manufacturer for instructions if needed.
3. Slide the PCI Adapter into the PCI slot. Make sure that all of its pins are
touching the slot's contacts. Once the adapter is firmly in place, secure
its fastening tab to your PC's chassis with a mounting screw as shown in
Figure 3-1. Then, close your PC case.
Figure 3-1
4. Reconnect your PC’s power and turn on your desktop PC.
Note: Select Cancel when “Found New Hardware” window
appears.
- 7 -
Page 8

Wireless N Adapter RNX-N250PC Quick Installation Guide
3.2 Softw
are Installation
Note: The following driver installation guide uses Windows® XP as the
presumed operation system. The procedures and screens in Windows®
2000 and Vista are familiar with Windows® XP.
1. After Inserted PCI adapter into your computer. The system should find
the newly installed device automatically like Figure 3-2. Click cancel to
close this w
indow.
Figure 3-2
2. Insert the CD-Rom that came with this product to your CD-Rom drive. The
menu window pops up automatically as Figure 3-3. Please click the
“Driver” button of this product. Note: If the CD-Rom fails to auto-run,
please click on “My Computer”> your CD-Rom Drive> (folder of this
product)> Driver then double-click the “Setup” icon to start this menu.
Figure 3-3
- 8 -
Page 9

Wireless N Adapter RNX-N250PC Quick Installation Guide
3. Select if you are going to configure your wireless network with this
Rosewill Utility or with Microsoft Zero Configuration tool.
Figure 3-4
4. Clic k the “ Install” button to start installing.
Figure 3-5
- 9 -
Page 10

Wireless N Adapter RNX-N250PC Quick Installation Guide
5. Clic k the “ Finish” button to complete installation.
Figure 3-6
6. You may be prompt to restart your computer for the driver to take effect.
Please select “Restart” or depending on your desire, you can select
“Restart Later”
- 10 -
Page 11

Wireless N Adapter RNX-N250PC Quick Installation Guide
Chapter 4 Connection Guide
This chapter will help you understand the management interface of the
device and how to manage the device.
4.1 Configures a Basic Network Connection
4.1.1 Selecting configuration tool
Windows XP includes a wireless configuration utility named
"Windows Zero configuration" (WZC) which provides basic
configuration functions to RNX-N250PC. Rosewill's utility
provides additional WPA functionality. This utility will let users
make a selection when it first runs after windows XP boots.
Note:
You could use either the software we provide or Microsoft Zero
Configuration tool to configure this adapter. To switch between
the two configuration tools, please mouse right click select
in the lower right hand corner of the Toolbars like Figure 4-1.
Figure 4-1
4.2 Connecting with Microsoft Zero Configuration
1. After specifying the Microsoft Zero Configuration tool to
configure your wireless network, right click on the icon
on system tray as Figure 4-2. Select “View available wireless
Networks” to specify your wireless network.
Figure 4-2
- 11 -
Page 12

Wireless N Adapter RNX-N250PC Quick Installation Guide
2. The tool shows the available wireless networks. Select your
network SSID to connect with like Figure 4-3.
Figure 4-3
3. If your wireless Network has encryption enable, you will be
ask to enter the password like Figure 4-4. Please enter your
wireless password at “Network key” section twice and click
“Connect” to confirm.
Figure 4-4
4. If your wireless Network does not contains encryption, select
the intended access point and click "Connect". Then click
"Connect Anyway" like Figure 4-5.
- 12 -
Page 13

Wireless N Adapter RNX-N250PC Quick Installation Guide
Figure 4-5
5. Once completed, you should see like Figure 4-6 as your
computer is now “Connected” with your wireless Network.
Figure 4-6
6. You should see the pop-up window on your low right hand
corner indicate the connected status. As shown in Figure 4-7.
Figure 4-7
- 13 -
Page 14

Wireless N Adapter RNX-N250PC Quick Installation Guide
- 14 -
Wireless N Adapter RNX-N250PC
Please register your product at: www.rosewill.com for complete warranty information and future support for your product.
Support: techsupport@rosewill.com
 Loading...