

Page 1

VIPER
All manuals and user guides at all-guides.com
all-guides.com
Page 2
1
© All rights reserved by Rosewill
User ManualVIPER Z
CASE
Contents
Open Chassis
P.5
Install Power Supply
P.5
Install Motherboard
P.6
Install Add-in Card
P.7
Disassembling Chart P.2
P.3Top I/O
P.4Accessory Box
P.8Install External 5.25" Device
P.9Install 3.5”/2.5” HDD/SSD
P.9System Ready
P.9Fan Installation
P.10Optional: Additional Fan & Liquid Cooling Radiator
Installation Guide
Product Overview
Thank you for purchasing a High-Quality Rosewill Product.
Please register your product at : http://www.rosewill.com
for complete warranty information and future support for your product.
If you have any questions while using our products, please visit our website : www.rosewill.com
for latest driver & user manual.
Support Phone Number: 800-575-9885
Support Email: techsupport@rosewill.com
All manuals and user guides at all-guides.com
Page 3

2
© All rights reserved by Rosewill
Disassembling Chart
Top Panel
Left side panel
Right Side Panel
Front Panel
HDD Tray
Front I/O Cable Pinout
( Please refer to your motherboard’s user manual to connect. )
USB 3.0 CONNECTOR
USB2.0 CONNECTOR
Card Reader CONNECTOR
HD Audio CONNECTOR
USB+5V
LP
LP+
GND
NC
USB+5V
LP
LP+
GND
NO PIN
AUD GND
GND
NC
USB+5V
LP-
LP+
GND
USB+5V
LP-
LP+
PRESENCE#
SENSE1 RETURN
NO PIN
SENSE2 RETURN
PORT1L
PORT1R
PORT2R
SENSE SEND
PORT2L
NO PIN
NO PIN
PIN
PIN
( Components vary by country )
User ManualVIPER Z
CASE
All manuals and user guides at all-guides.com
Page 4

3
© All rights reserved by Rosewill
Top I/O
User ManualVIPER Z
CASE
Audio
HD AUDIO connector
HD AUDIO connector
to M/B (1 Audio Connection per M/B,
please check HD Audio)
Card Reader
Card Reader
Card Reader connector
Card Reader connector
to M/B
Reset Button
to M/B
Reset SW
USB 2.0
USB
to M/B
USB 3.0
USB
TF
SD
USB USB USB
S
H L
to M/B
Power Button
TO PSU
TO FAN
to M/B
POWER SW
1
2
3
4
4 3 2 1
All manuals and user guides at all-guides.com
Page 5

4
© All rights reserved by Rosewill
User Manual
Accessory Box
16x Screw-A 2.5” HDD/SSD
1x Screw-D Side Panel Lock
16x Screw-B 3.5”/5.25” ODD
1x M/B Sleeve M/B Standoff
1x PC Buzzer Motherboard
2x Cable Tie Cables
1x Side Panel Lock Side Panel
3x M/B Standoff
Motherboard
19x Screw-C
PSU + M/B
VIPER Z
CASE
Part’s Name FunctionFigure
All manuals and user guides at all-guides.com
Page 6

2. Install Power Supply
5
© All rights reserved by Rosewill
Installation Guide
1-1 Remove the 2 thumbscrews on each
panel and slide them out.
2-1 Rest the power supply unit on the bottom of
the case and secure it down with screw-C.
If the PSU is equipped with single fan, you
may have two options of installation:
- Fan Facing Upwards:
No special requirements.
- Fan Facing Downwards:
Make sure that there is enough room for
air-intake between the bottom of case
and the surface where the case is located.
- Clean the dust filter regularly to ensure
adequate airflow.
1. Open Chassis
User ManualVIPER Z
CASE
All manuals and user guides at all-guides.com
all-guides.com
Page 7

3. Install Motherboard
6
© All rights reserved by Rosewill
3-1 Place the motherboard standoffs based on the form factor.
3-2 Secure the motherboard with screw-C.
User ManualVIPER Z
CASE
All manuals and user guides at all-guides.com
Page 8

4. Install Add-in Card
7
© All rights reserved by Rosewill
4-1 Unscrew to remove the
slot cover.
4-2 Install the add-in card.
4-3 Secure with screw.
User ManualVIPER Z
CASE
All manuals and user guides at all-guides.com
Page 9

8
© All rights reserved by Rosewill
5-2
- Insert the 5.25” drive into the bay and secure
with screw-B.
- Unscrew to retrieve the 3.5” adaptor.
- Rest the 3.5” deice onto the adaptor and
secure it down with screws.
- Install the adaptor back into the bay.
- Reinstall the front panel back onto the case.
5-1 Pull the front panel outwards and detach.
Remove the bay cover.
5. Install External 5.25” device
User ManualVIPER Z
CASE
All manuals and user guides at all-guides.com
Page 10

9
© All rights reserved by Rosewill
8-1 Slide the side panels back and secure
with thumbscrews.
6-1 Retrieve the HDD/SSD tray.
6-2 Install the 3.5” HDD onto the tray.
6-3 Secure the 2.5” HDD/SSD down to the tray with
screw-A.
6-4 Insert the tray back into the hard drive cage
until the latch clicks.
6. Install 3.5”/2.5” HDD/SSD
7. Fan Installation 8. System Ready
User ManualVIPER Z
CASE
7-1
The control panel on TOP I/O can connect
up to three fans. Please connect the desired
fans to the control panel, and then connect
the rest of them to the Fan Hub (the PCB
located near M/B). Make sure to connect the
fan hub and PSU with a 4-pin Molex
connector.
Fan Hub
All manuals and user guides at all-guides.com
Page 11
10
© All rights reserved by Rosewill
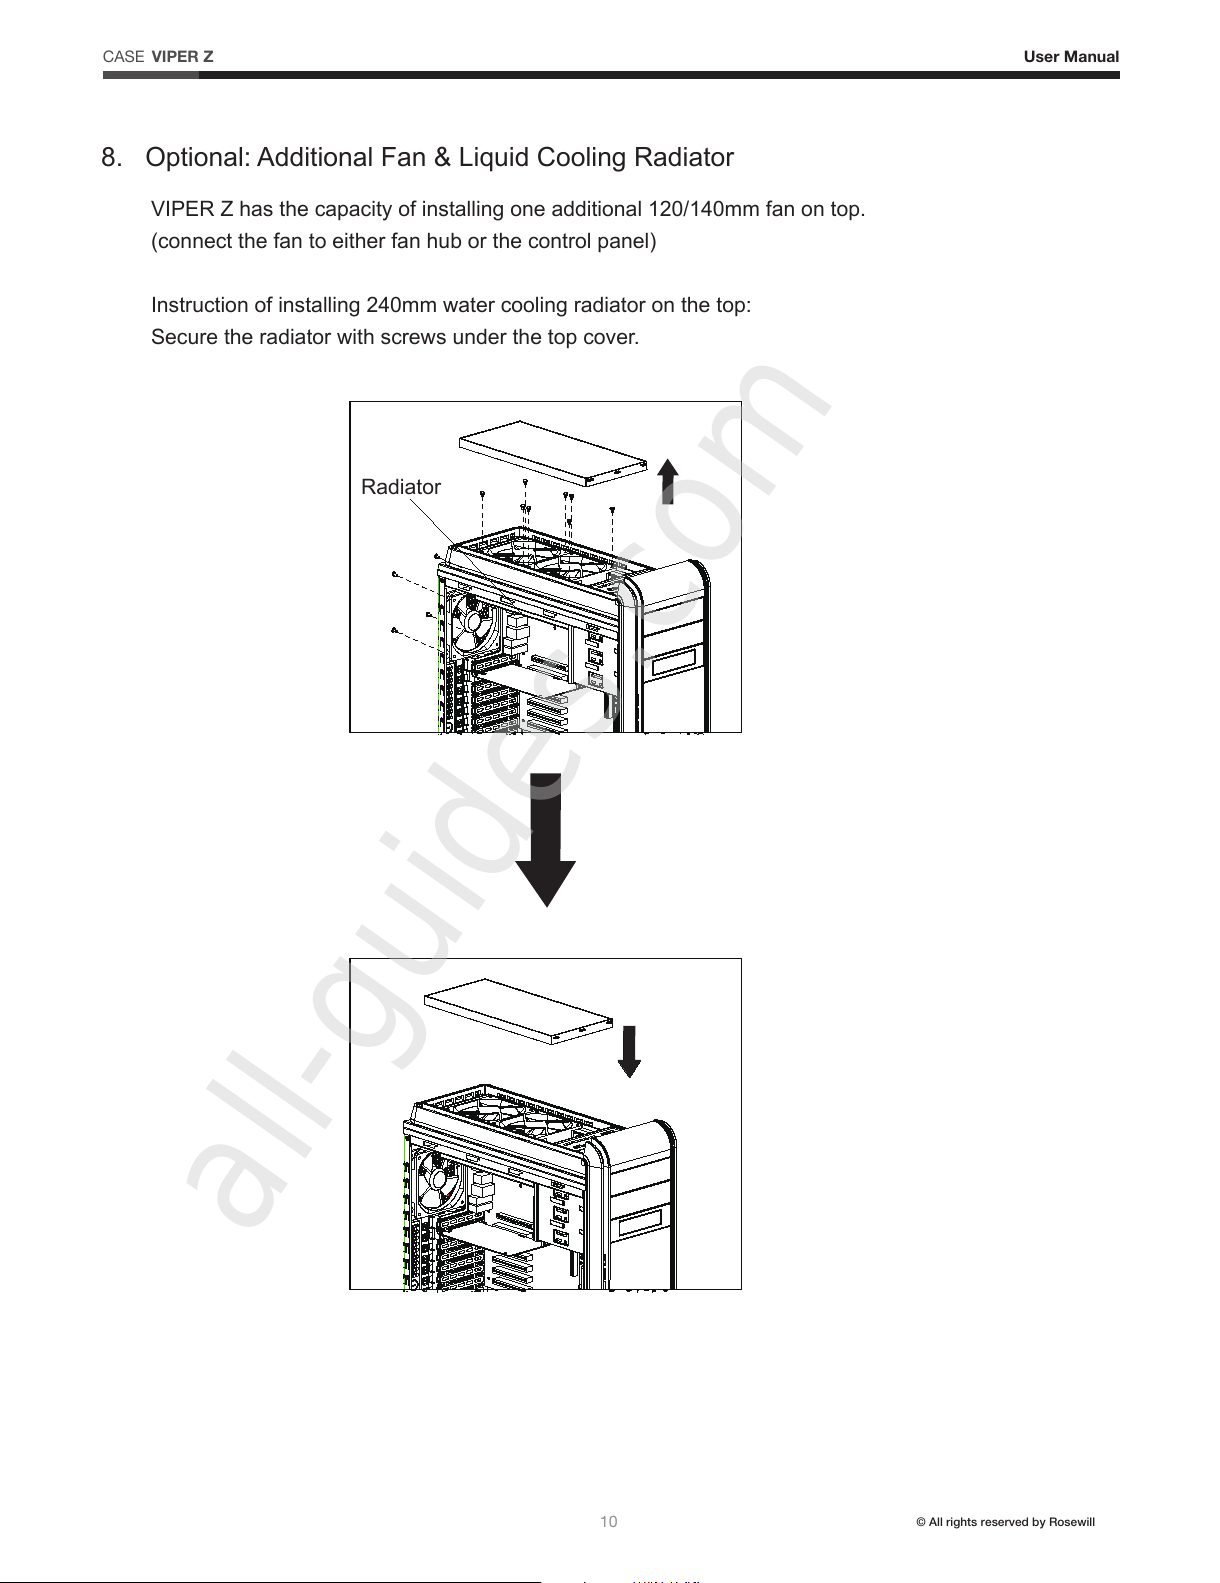
VIPER Z has the capacity of installing one additional 120/140mm fan on top.
(connect the fan to either fan hub or the control panel)
Instruction of installing 240mm water cooling radiator on the top:
Secure the radiator with screws under the top cover.
8. Optional: Additional Fan & Liquid Cooling Radiator
Radiator
User ManualVIPER Z
CASE
All manuals and user guides at all-guides.com
all-guides.com
Page 12

www.rosewill.com
All manuals and user guides at all-guides.com
 Loading...