

Page 1
Page 2

1
Foreword
Congratulations on your purchase of our product ! Before using the
product, please read this manual carefully for further recognizing of
the product.
I. System Requirement
Basic enviroment for using this device:
Hardware requirement : A PC, Notebook with free USB and port
Operation system : windows XP/Vista/7/8
II. Feature :
Supports Raid0, Raid1, JBOD, 2LUN mode
Enhanced data protection and high-performances storage USB 3.0
interface transfer rate up to 5Gbp/s
Backward compliant with USB2.0 transfer rate up to 480Mb/s
Supports Plug-play and Hot-plug and virtualization capabilities.
Support model select for hardware and one button backup function.
Power Supply : Self-Power
Driver enclosure made of aluminum alloy good for heat dissipation
III. Package Content
Check accessories
Before using the product, please check the accessories in the
package compliant with the below. If not, please contact the local
dealer timely.
Page 3
2
◇One 2.5" two bay USB3.0 Enclosure
◇One USB3.0 Connecting cable
◇One User’s Manual
◇One 5V Adapter
◇One CD driver
◇One Stand
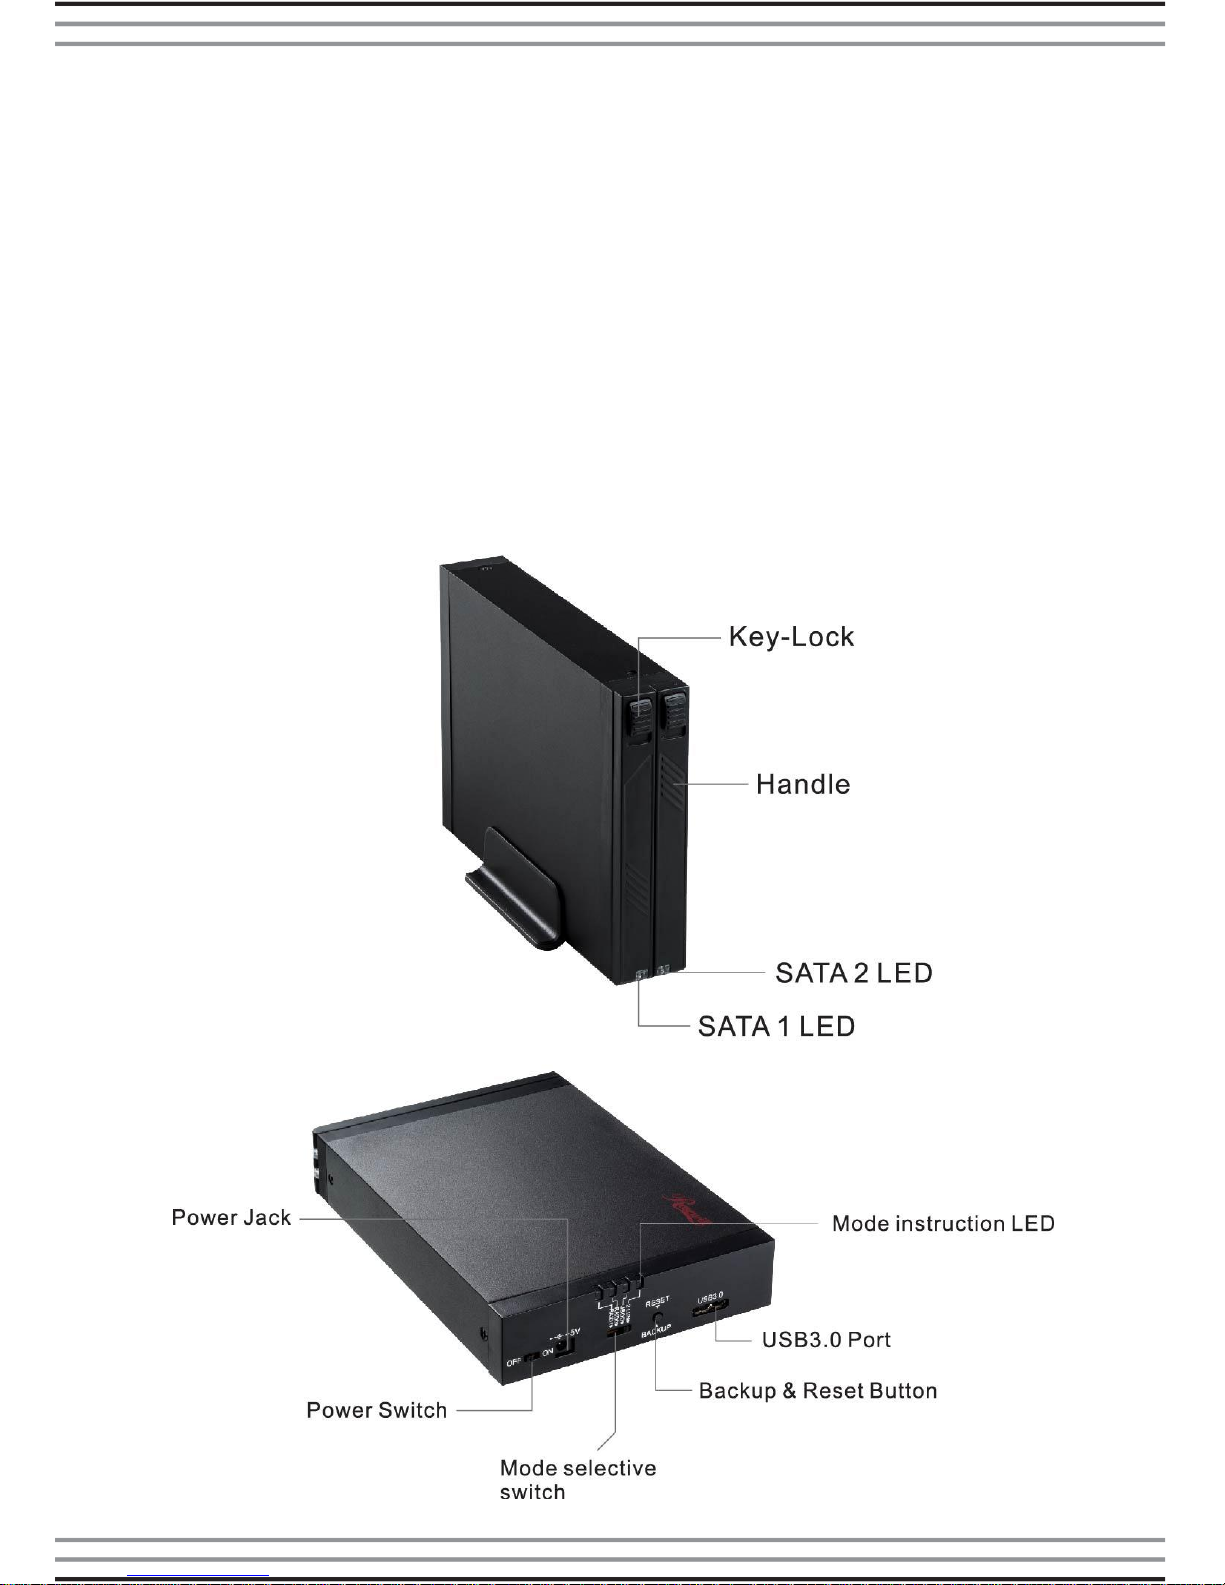
IV. Hardware Installation
Page 4
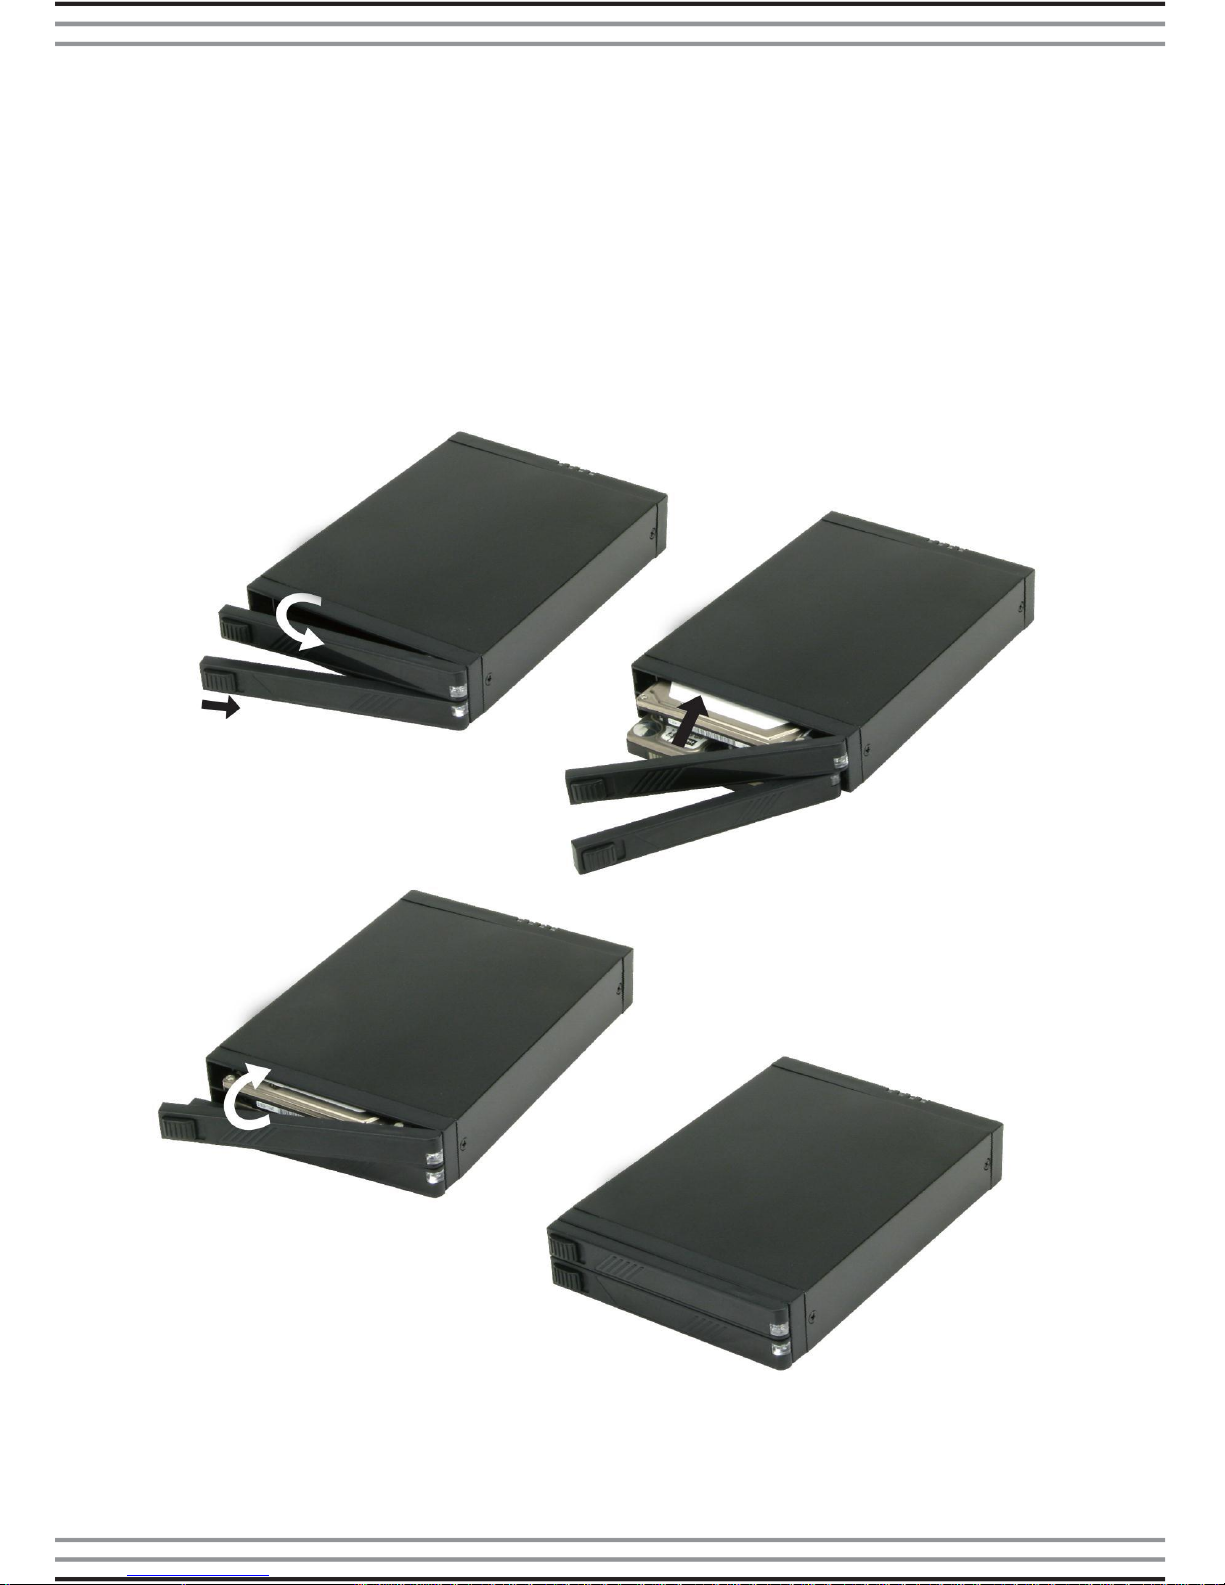
3
1. Push switch on the handle toward the right to open the door
2. Put SATA HDD into enclosure (HDD’s SATA connector toward the
inside of the product)
3. Close the door, handle will be locked automatically
4. HDD installation finished
Page 5
4
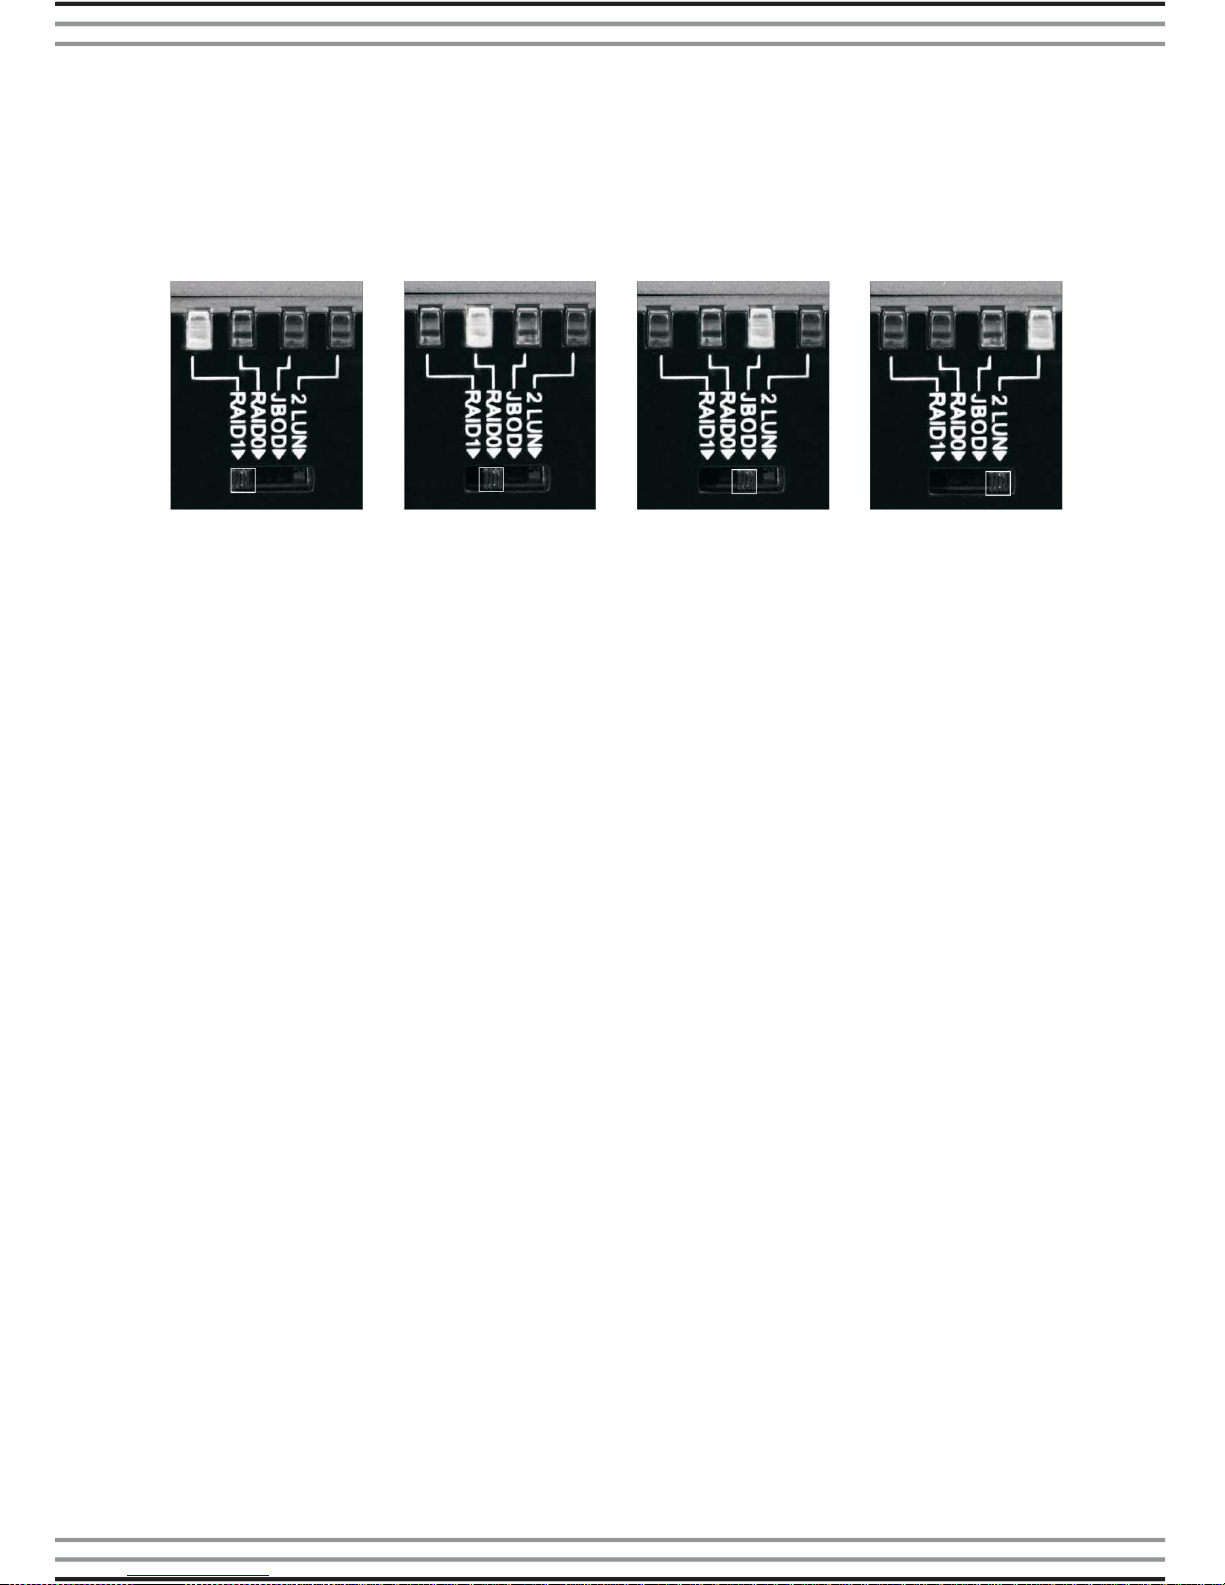
V. Hardware setup and under WIN XP/VISTA/7/8 use :
There have mode which in the rear back of the product, it can
form 4 kinds of different ways through mode switch, it can realize 4
kinds of different functions as below :
RAID1 RAID0 JBOD 2LUN
1. JBOD function Mode
Pleasee move Mode Selective Switch till the position that just
under JBOD mark. Connect power supply with product
properly(Not Allowed to connect USB3.0 Cable at the same
time)Hold Reset button, And power on product, After holding
button with cotinuous 5 seconds, Product will switch to JBOD,
Connect USB 3.0 cable, Product will work well under JBOD
mode.
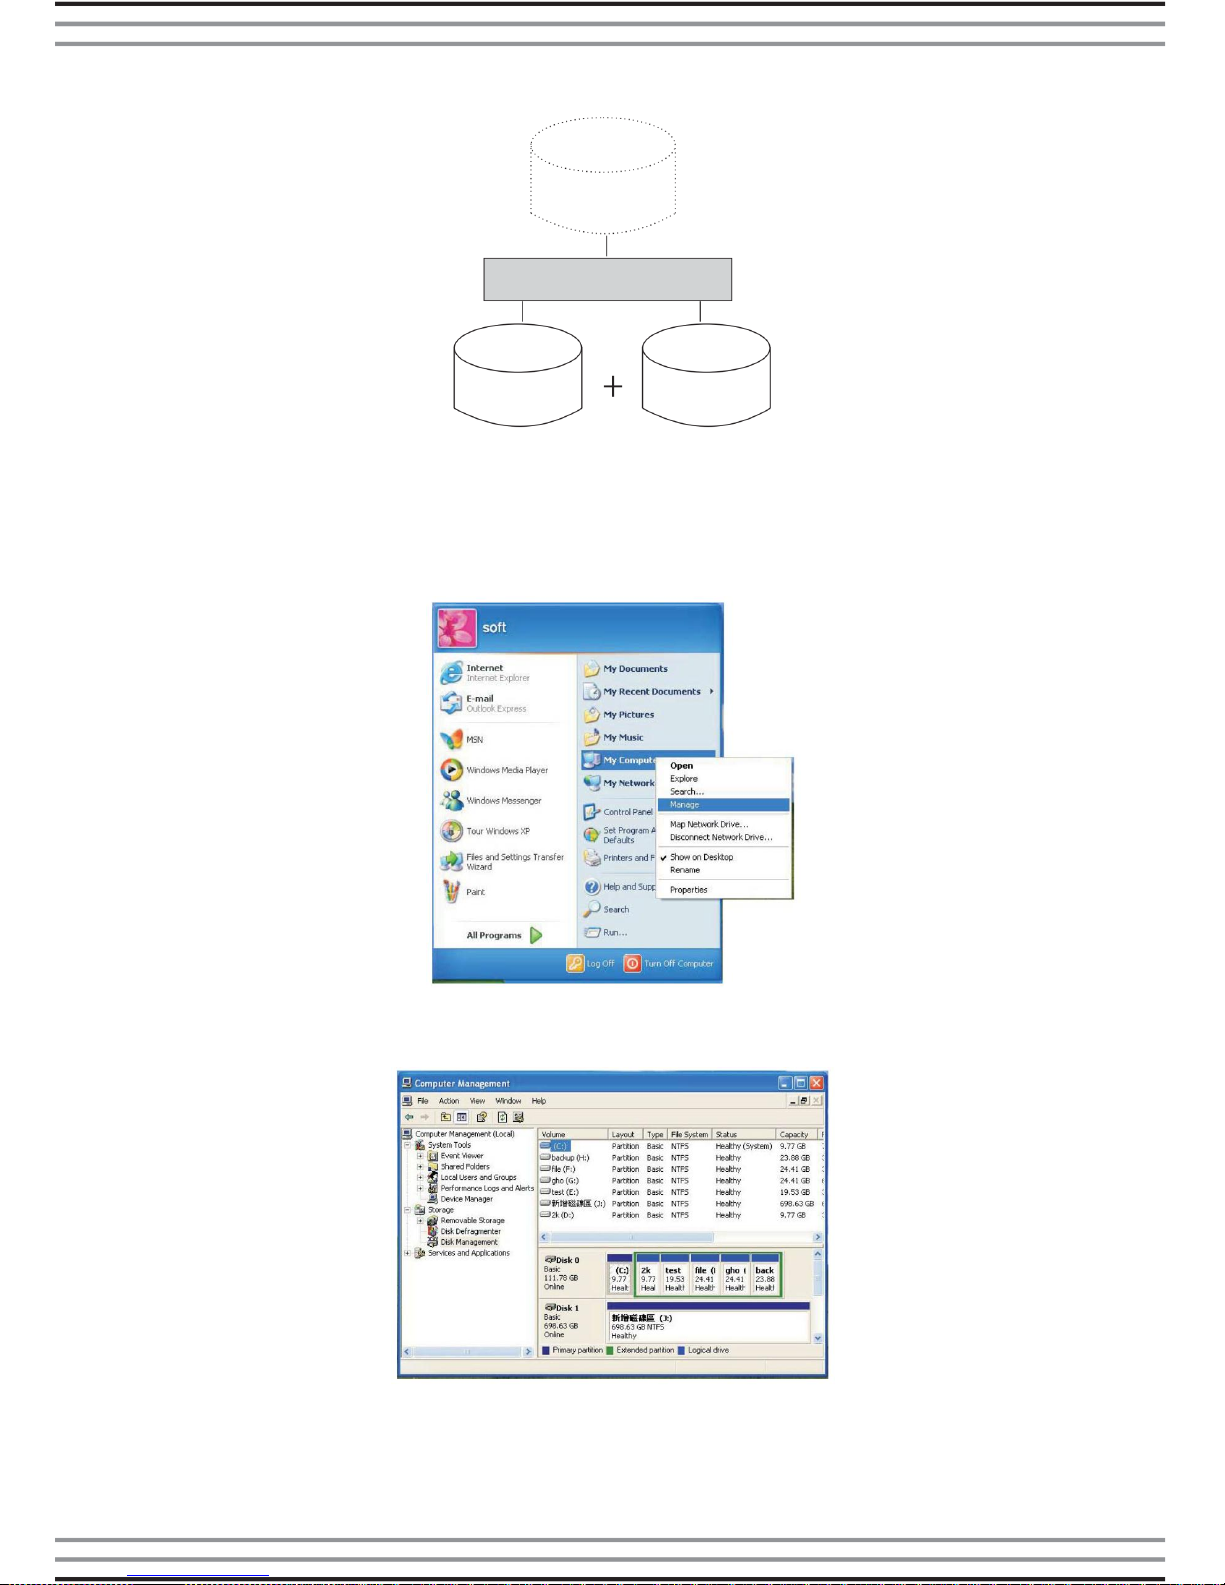
The JBOD storage policy concatenates a series of physical hard
drives as a single large volume ; resulting in a seamless expansion
or virtual volumes beyond the physical limitations of singurlarly
connected hard drives.
Hard drive A and B are concatenated into a single virtual volume in
the Figure below with a storage capacituy that is equal to the sum of
each of the physical hard drives A and B.
Page 6
5
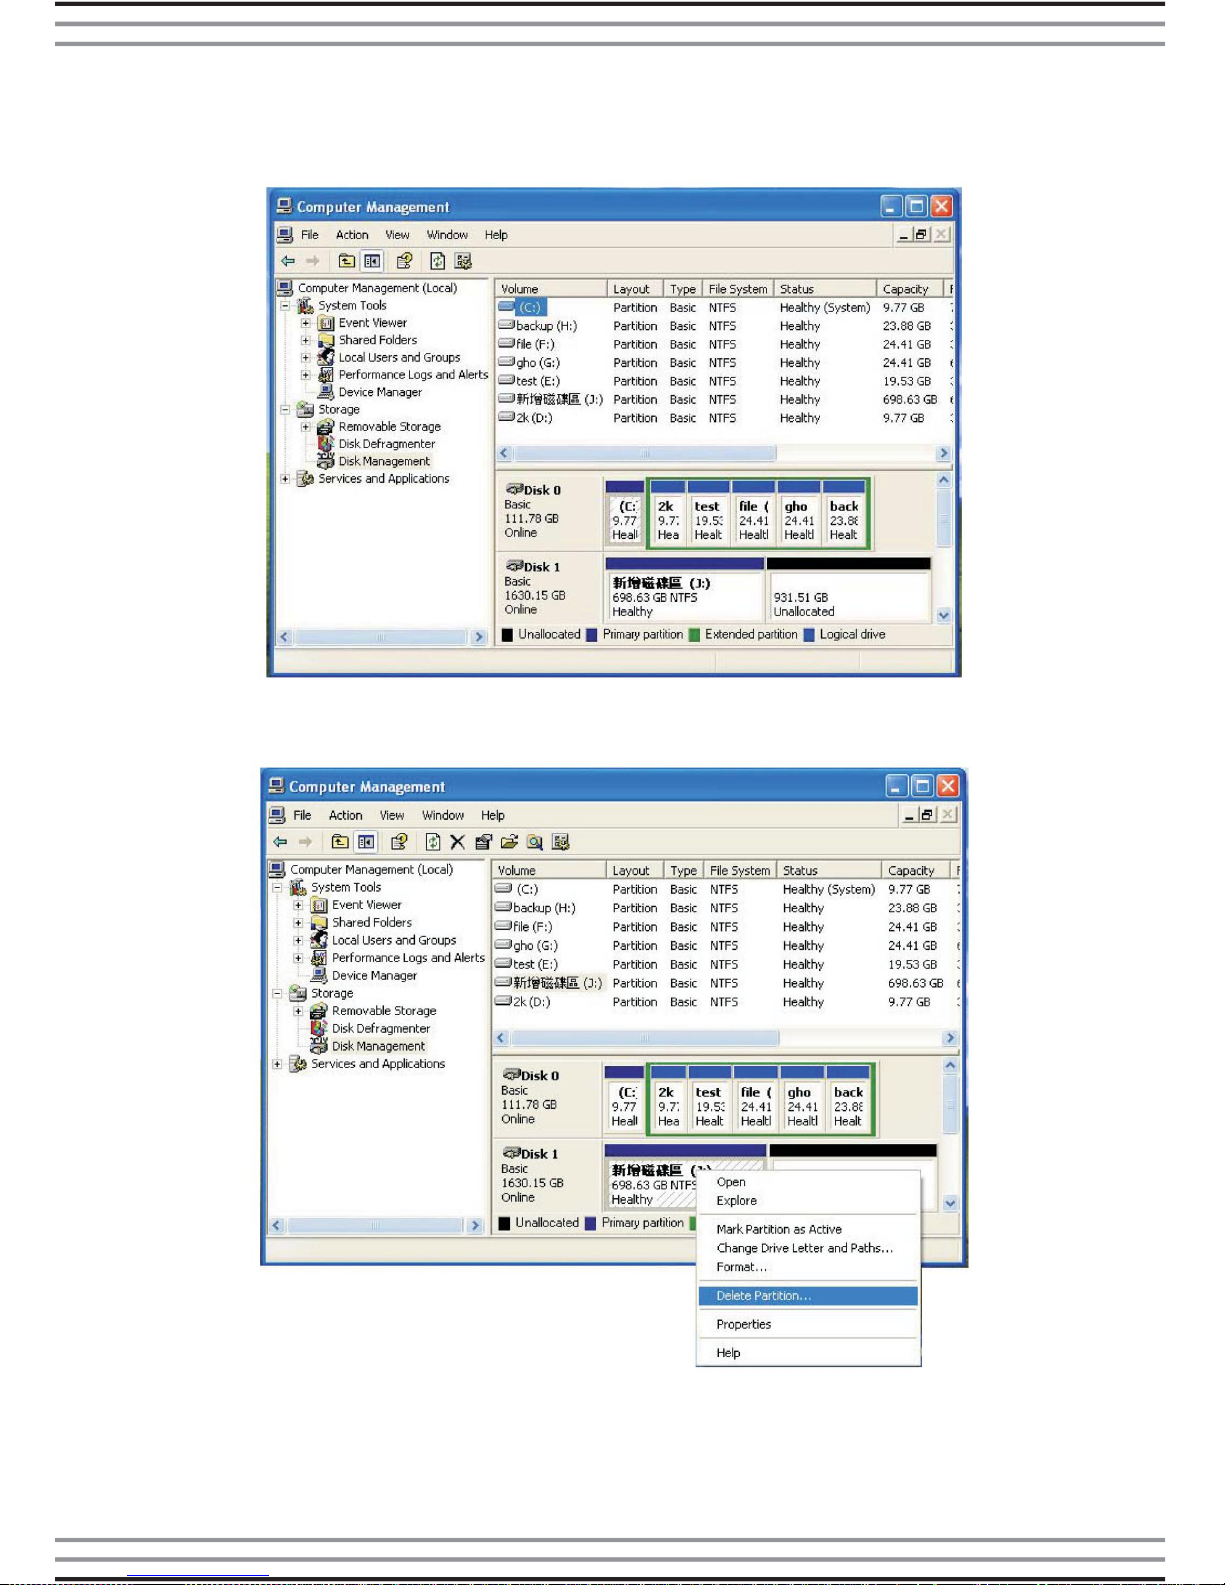
Connect the USB cable to PC and enclosure USB host, then open
the power
Select[Start]-[My Computer]-[Manager] as below :
In the left window, select [System Tools] – [Device Manager] as
below :
Virtual JBOD volume
Capacity is Drive A plus
Drive B
Port 0
Port 1
Drive B
Drive A
Page 7
6
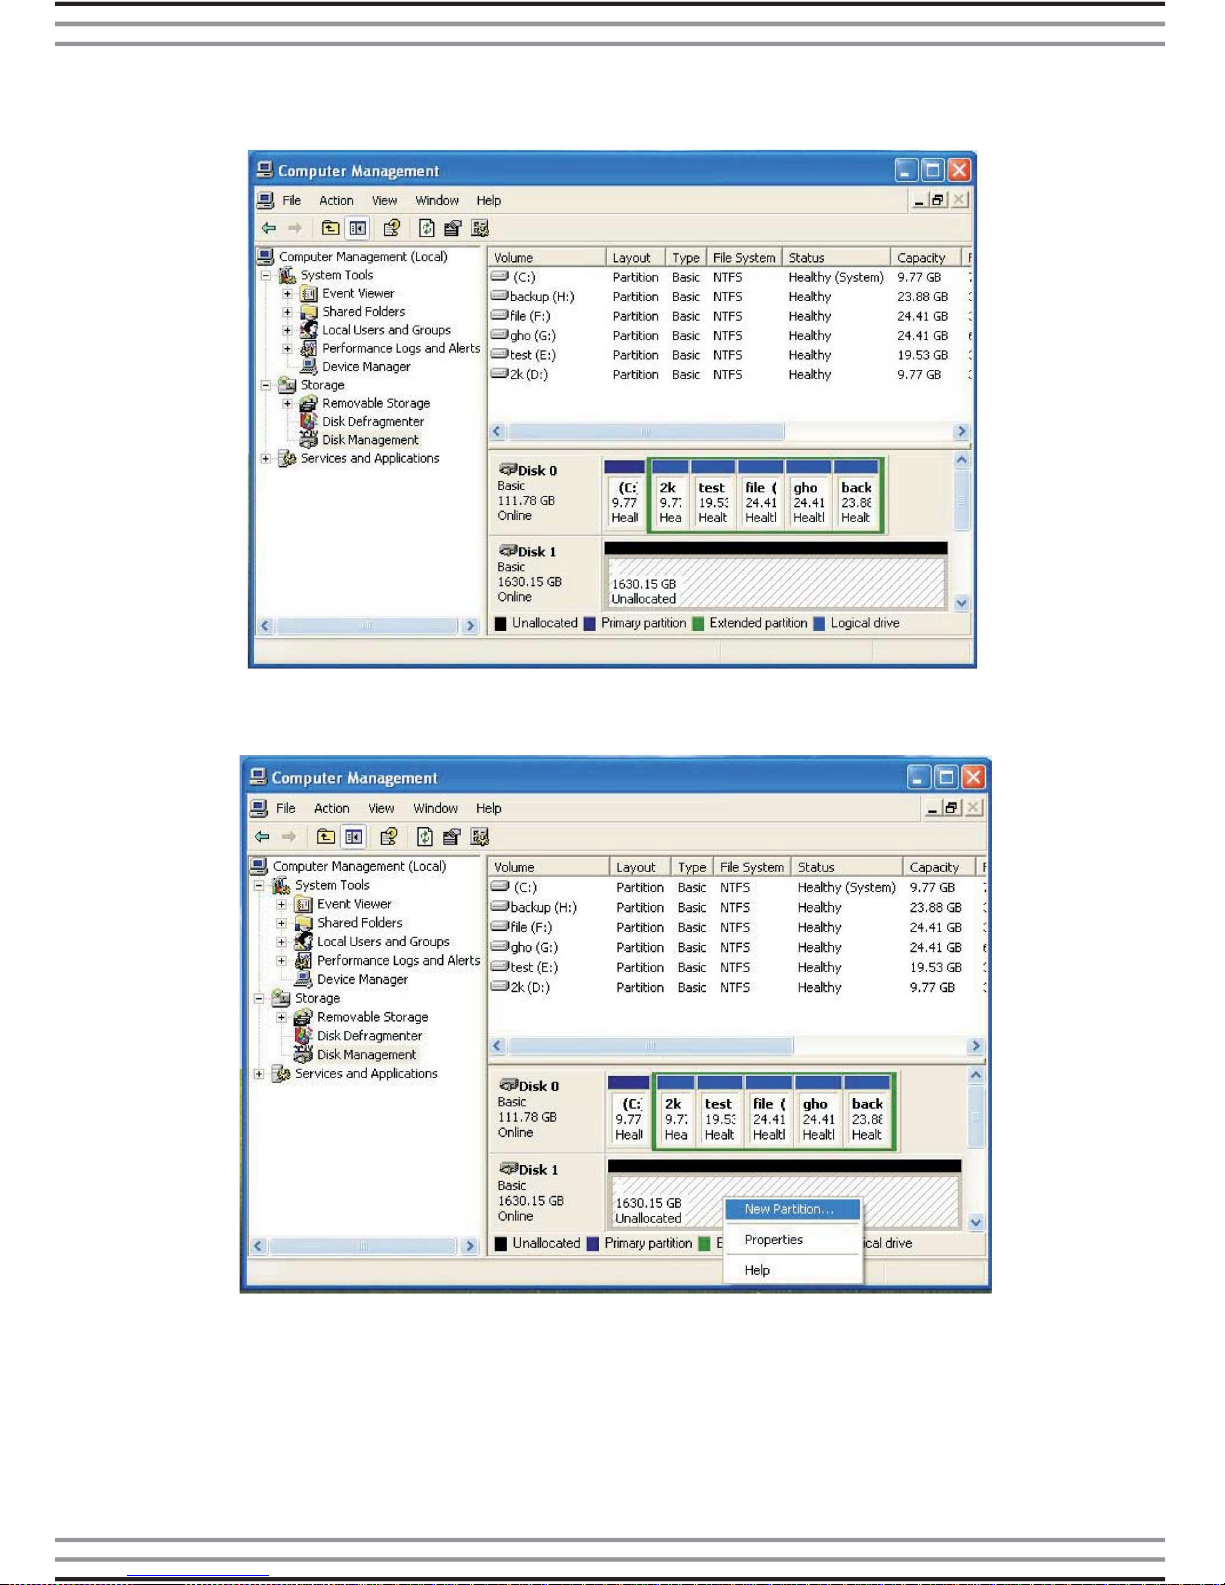
The two External hard disk oicon will appear at the window under
the system hard disk icon
Right click the two icon of the two external hard disk, delete all disk
partition, make this two disk become one JBOD disk.
Page 8
7
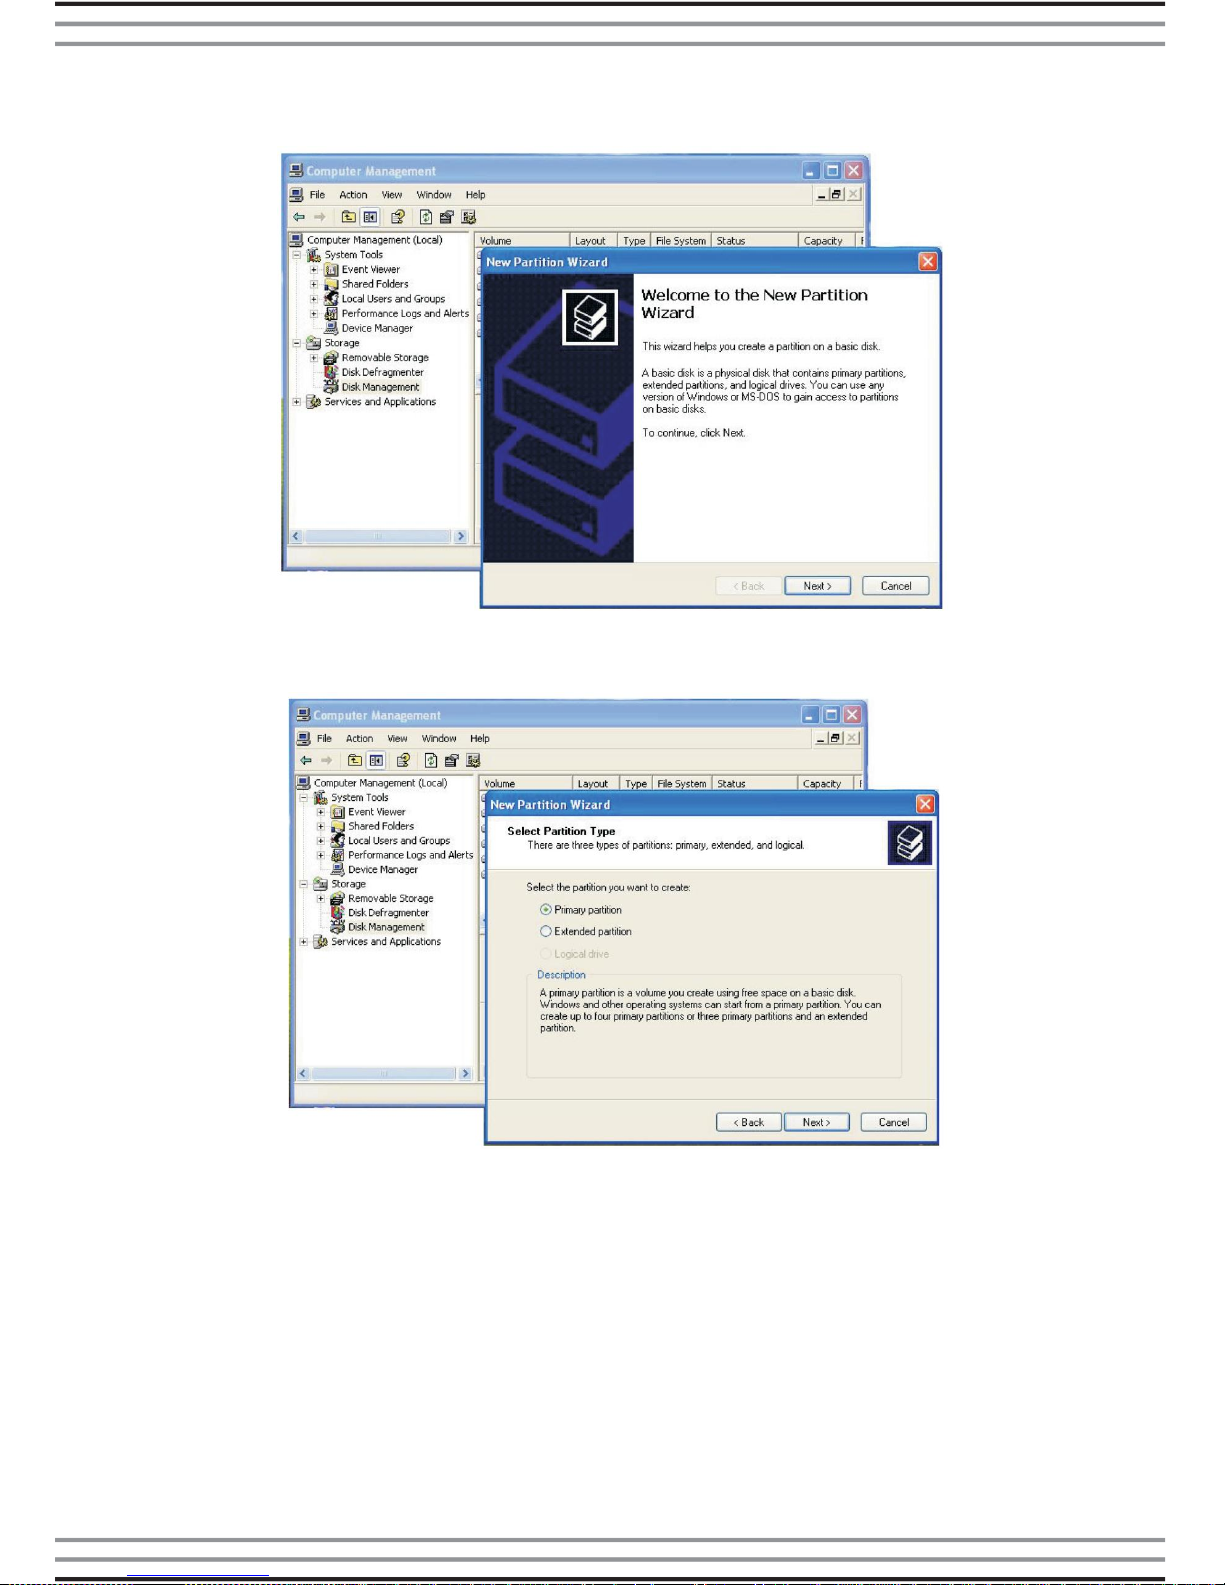
Display one disk and others system disk capacity as below :
Right click the new hard disk icon, make based new partition display
as below :
Page 9
8
Next new partition wizard :
A window will disappear and ask to select partition type [primary
partition] or [Extended partition] as below.
Page 10

9
Select [Extended partition] to continue
Display the hard disk partition size, click [Next] to continue
Page 11

10
Next completing the new partition wizard.
Click « finish » Extended partition finished.
Page 12

11
Now we need to make it to new local drive, follow the step as below :
Next New Partition wizard, local drive will build.
Page 13

12
Next setup local drive size, no more than extended partition size. We
select 800 000 Mo.
Next assign the following drive letter "J :"
Page 14

13
Next format this partition with the following settings.
Select perform a quick forma assign "V"
Next display finish as below :
Page 15

14
Click "finish", began to formatting your Disk size.
Complete formatted this disk size display as below :
You can continue partition and format the other disk
Page 16

15
When finish this step, a new total disk will display at the right window
as below :
2. 2LUN Function Mode
Please move Mode Selective Swich till the position that just
under 2LUN mark. Connect power supply with product properly
(Not allowed to connect USB3.0 Cable at the same time), Hold
RESET button, And power on product, After holding button with
continuous 5 seconds, P{roduct will switch to 2LUN, Connect
USB 3.0 cable, Product will work well under 2LUN mode
The 2LUN(just a bunch of disks) storage policy enables each hard
drive to be seen separately as one drive
Port0
Port1
Drive A
Drive B
Page 17

16
Power on the enclosure, then this two HDD icon will be display in the
[Disk Manager] window as below.
Repeat the same step [Delete Partition]—[New Partition]—[New
Logical Drive] to this two disk.
Page 18

17
When finish this Step, the two disk will show [Healthy] at the [Disk
Manager] window as below, now y ou can use it.
3. RAID0 Function Mode.
Please move Mode Selective Switch till the position that just
under RAID0 mark. Connect power supply with product
properly (Not allowed to connect USB3.0 Cable at the same
time), Hold RESET button, and power on product, After holding
button with continuous 5 seconds Product will switch to RAID0,
Connect USB3.0 cable, Product will work well under RAID0
mode
The Raid0 storage policy distributes access across all hard disk,
also called striping (equivalent to RAID0). RAID0 presents the best
data speed but no data redundancy. RAID0 storage policy
accelerates hard disk operating speed by using many disks in
parallel. Hard drive data segments are written to different disks
simultaneously which increases performance while sacrificing data
dredundancy. To implement the RAID0 storage policy, the storage
processor creates a single virtual volume that is striped across both
hard drives, with a storage capacity that is equal to the sum of both
hard disk drives.
It is possible to set any node wiin a cascaded configuration to RAID0
although there is no performance benefit when using multiple layers
of striping
Page 19

18
Striping across disks
Under RAID0 mode, it will display 2x HDD capacity, if two HDD
capacity are 120GB, so it show 240GB ;if one HDD capacity is
120GB, and other is 500GB, it will show 120x2=240GB
Power on the enclosure, then on disk icon will be display in the [Disk
Manager] window as below.
Capacity is Drive A plus
Drive B
Port0
Port1
Drive A
Drive B
Page 20

19
Right Click the Disk1 icon, run the same process : [Delete
Partition]-[New Partition]-[New Logical Disk]. When finish this step,
the disk1 will show [Healthy] at the [Disk Manager] window as below,
now you can use it.
4. Raid1 Function MOde
Please move Mode Selective Switch till the position that just
under RAID1 mark. Connect power supply with product
properly (Not allowed to connect USB3.0 Cable at the same
time), Hold RESET button, And power on product, after holding
button with continuous 5 seconds, Product will switch to RAID1,
connect USB3.0 cable, product will work well under RAID1
mode.
The Raid1 storage policy stores all data in duplicate on seperate
drives to protect against data loss due to drive failure. One drive
mirrors the other at all times, equivalent to RAID1. Every write
operation goes to both drives. RAID1 provides the highest level of
data protection for critical data that you cannot afford to lose if a hard
drive fails, but halfves the amount of storage capacity because all
data must be stored twice. The resulting storage capcity of the
virtual RAID`1 volume will be equivalent to the size of one hard drive
(if both drives are the same) or the smaller of the two drives( if they
are different)
Page 21

20
If one drive fails, the RAID1 volume is still usable, but is in a
vulnerable state because its mirrored hard drive is inaccessible.
When the offline drive comes back online, the appliance begins a
brebuild process immediately to restore data redundancy.
Although the volume remains available during the rebuild process,
the volume is susceptible to data loss through damange to the
remaining drive until redundancy is restored at the end of the
brebuild and verification process. Host access takes precedence
over the rebuild process. If you continue to use the SAFE volume
during the rebuild, the rebuild process will take a longer time to
complete, and the host data transfer performance will also be
affected.
Any nod within a cascaded configuration can be set to RAID1, but
it is more efficient to use the RAID1 policy at the lowest possible
level within the hierarchy.
It is also possible to create a RAID1 volume using one hard disk
drive connnected to port0 of the storage reference design, although
no mirroring will occur until a second hard disk hdrive is connected
to port1. wWith only one hard disk drive connected, the RAID1
volume will be available, although no data protection will be provided
until a second hard disk drive is connected.
Virtual Raid1
Capacity is the
same aas one
hard drive.
Capacity is the
smaller of unequal
hard drive
120 Go
120 Go
Drive A
120 GB
Drive B
120G GB
Drive A
120 GB
Drive B
500 GB
Port0
Port1
Port0
Port1
Equal hard drive
Unequal hard drives
Page 22

21
Power on the enclosure, then on disk icon will display in[Disk
Manager] window as below..
Page 23

22
NOTE :
● Do not shake the enclosure when it is working
● Before change the hard drive storage policy,
please make sure and backup all files in the hard
drive before setup, all the existent partition will
be deleted.
Page 24

23
VI. Backup software installation and usage
A. Vbackup software installation
1. Open the folder
[PCCLONEEX_LITE] and double click
[Setup], the below window will appear :
2. Click[Agree] to accept the license agreement
Page 25

24
3. Click [Install] enter next step
4. Click [OK] to finish installation
Page 26

25
B. Use backup function
1. After finishing installation, an icon will appear on desktop, double
click [PCCloneEX], the below window will appear :
Page 27

26
2. Press the backup button, program will appear [Please select
file(s)], click [OK]
3. Please select the file(s) which you want to backup in the left
window, then press the button again.
Page 28

27
4. Follow the instruction to press the button again or lick [Start] with
mouse.
5. System Start to backup the file(s) which you have selected, when
finish, there will display [Backup finished], click [OK]
Page 29

28
6. Backup file finished now you may check the file on right window
VII. Remove a external enclosure
Warning : Before removing the USB cable, you must finish the
following procedure :
1). Click icon at the tool bar of your system
2). A [Safely Remove Hardware] message window will appear, click
the [Stop] button
3). [It is now safe to remove the USB device] message will
appear, close the [Safely Remove Hardware] window
4).Remove [power off] the power jack or the 12V power adapter if it
is applied
Page 30

29
* Format a new Hard Disk Drive
If new Hard Disk Drive, you need to partition and format it before
using.
Please follow the steps below to format new Hard Disk Drive :
1) Right click [My Computer], and select [Manager]
2) System will display a « Computer Manager » window, and click
{Disk Manager} on left window
3) On right window, the information of the new Hard Disk Drive will
appear under the system disk, [Unallocated....]
4) Right click the new disk drive, and select [New Partition], and
follow the instruction to finish the step
5) The disk information will be shown [Free Sapace]
6) Right click the new disk drive, and select [New logical drive]
7) Follow the instruction to finish the step, then the information of the
new disk drive will be shown : [New Volume (J : 78.12GB Healthy)
The [J :] disk drive will be shown in [MY Computer] and now you
can use it !
Made in China
 Loading...