

Page 1

SERVER CHASSIS
WITH 12x HOT-SWAPPABLE SATA BAY
RSV-L4411
User Manual
Page 2

SERVER CHASSIS WITH 12x HOT-SWAPPABLE SATA BAY RSV-L4411 User Manual
Contents
Product Overview............................................................................................................................... 2
Introduction.................................................................................................................................3
Feature.........................................................................................................................................3
Specification................................................................................................................................3
Installation Guide...............................................................................................................................4
Top Cover Disassembly..............................................................................................................4
Hard Drive Tray Assembly / Disassembly.................................................................................5
Hard Drive Installation................................................................................................................5
Installing a 3.5” HDD..............................................................................................................5
Installing a 2.5” HDD..............................................................................................................6
Hot Swap Module Cable Installation..........................................................................................7
Server Rail Installation................................................................................................................7
1
Page 3
SERVER CHASSIS WITH 12x HOT-SWAPPABLE SATA BAY RSV-L4411 User Manual
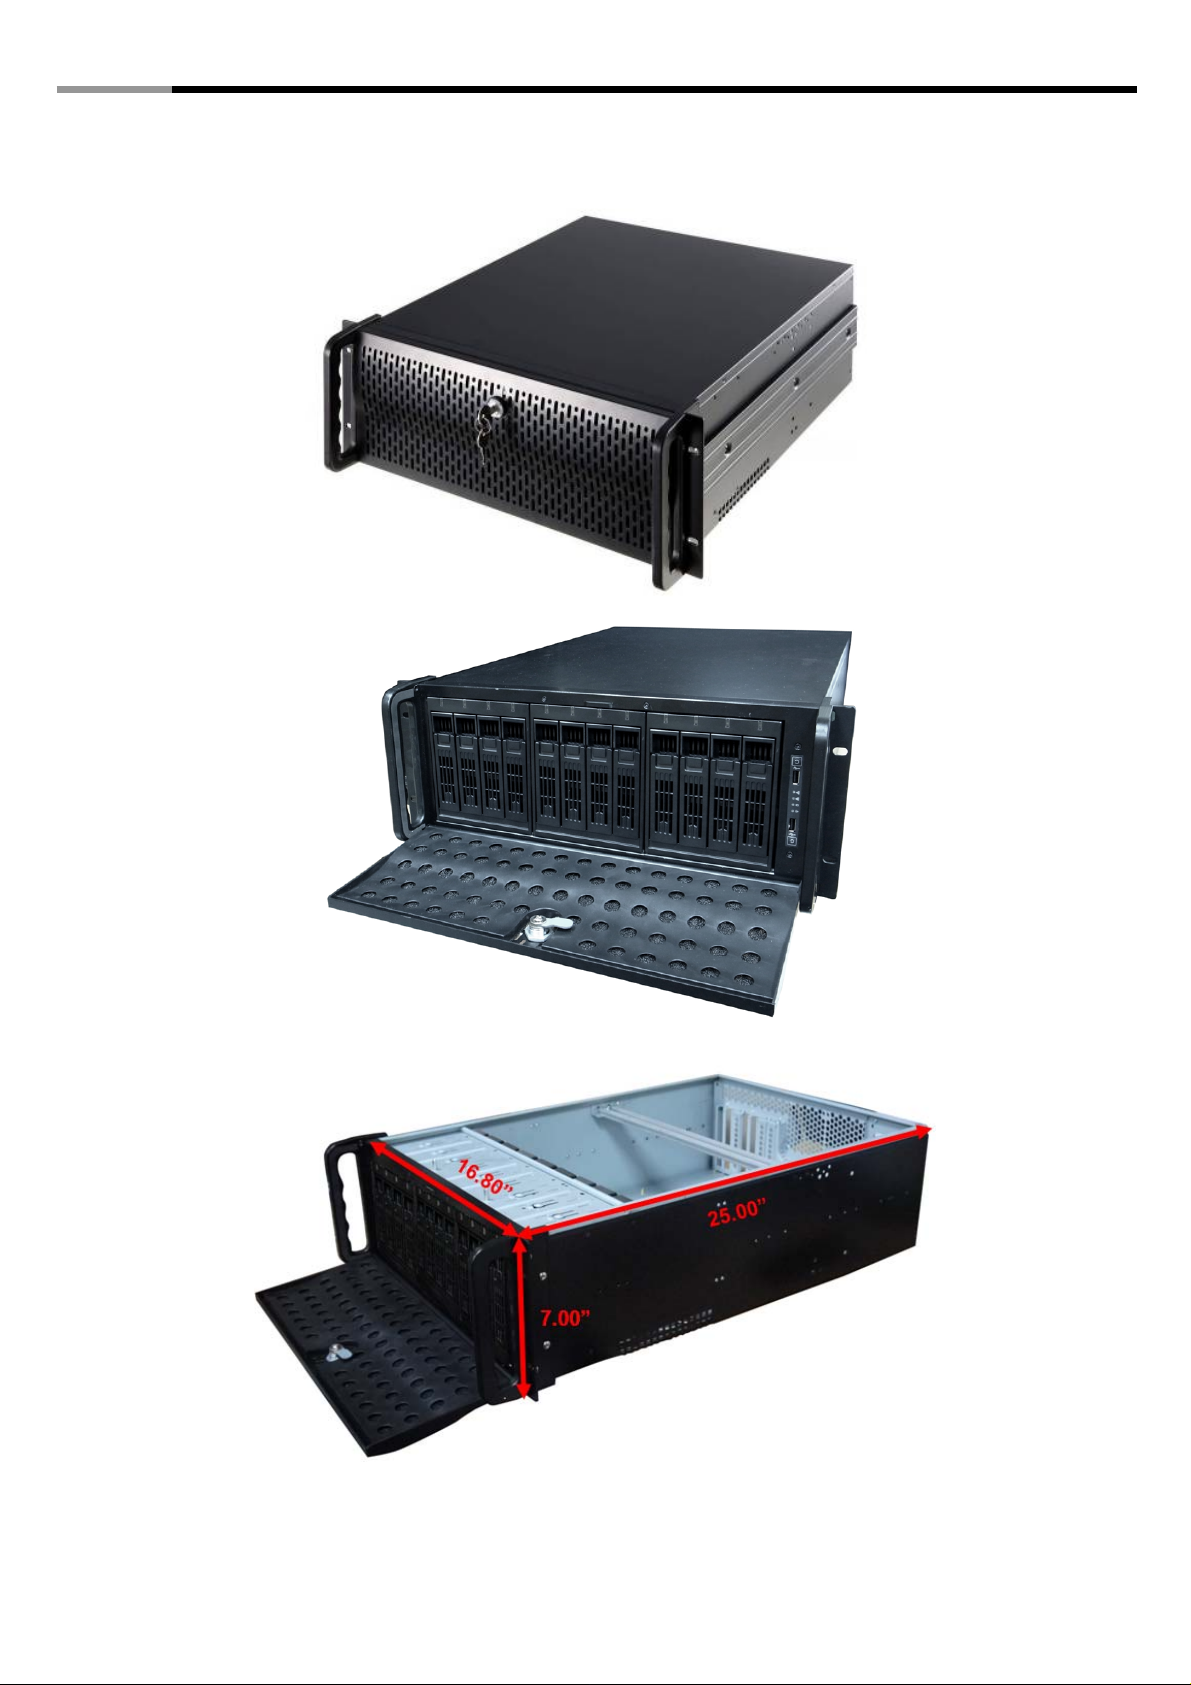
Product Overview
2
Page 4

SERVER CHASSIS WITH 12x HOT-SWAPPABLE SATA BAY RSV-L4411 User Manual
Introduction
RSV-L4411 is a 4U rackmount industrial Hot-swap chassis for various server computers which supports any
E-ATX (12” x 13”) and smaller form factor motherboards. It holds PS2 power supply which provides customers
with wider selection and more affordable choices depending on the system design purposes. In addition,
RSV-L4411 holds 12 hot swap SATA bays with a large-scale fan filter and easy-to-use knob key for great
serviceability of the system.
To use the Hot-Swap feature, Please set motherboard BIOS to AHCI and format the HDD using AHCI.
Feature
z Carries a total of 12x 3.5” (2.5”) Hot Swappable SATA (I, II & III) bay.
z Best cooling design carry up to front 3x 120 mm front cooling fans and 2x 80 mm back cooling fans max (all
are included in RSV- L4411).
z Front door with key lock for better security.
z Special design for add-on cards in the system (7 pieces max).
z 2x USB 2.0 connector in front panel.
Specification
Chassis Type
Color
Case Material
Motherboard Compatibility
Form Factor
80mm Fans
120mm Fans
Hot-Swap 3.5"/2.5” Drive Bays
Expansion Slots
Control & Indicator
Rackmount
Black
Metal/ Steel, 1.0 mm thickness
12" x 13" E-ATX and below
4U
Cooling System
2 max (All 2x 80mm Fans included)
3 max (All 3x 120 mm Fans included)
Expansion
12 (SATA I, II, & III supported)
7
Physical Spec
1x Power switch +1x Reset switch
1x LED (power) +1 x LED (HDD), 2 x LED (LAN); 2x 2.0 USB
Dimensions(L x W x H)
Weight
Package Contents
PIC ITEM PURPOSE PIC ITEM PURPOSE
25" x 16.8" x 7.0" inches (635 x 427 x 178 mm)
Net Weight : 31.9 lbs. (14.5kg)
Gross Weight : 39.8 lbs (18.0kg)
RSV-L4411 Server Case; Keys; Screws; SATA Cables, Other
Accessories
SCREWS x 6 POWER SUPPLY
SCREWS x 20 MOTHERBOARD
MOTHERBOARD
STANDOFF x 3
23.6” (60cm) SATA III
cable x 12
Buzzer x 1
(PC Speaker)
9 standoffs has already screwed on the chassis
3
MOTHERBOAR
D
Page 5

SERVER CHASSIS WITH 12x HOT-SWAPPABLE SATA BAY RSV-L4411 User Manual
Installation Guide
Top Cover Disassembly
1. Remove the screws from each side of
the Chassis. (two on each side)
2. Once the screws removed, push the
top cover to remove from the chassis.
4
Page 6

SERVER CHASSIS WITH 12x HOT-SWAPPABLE SATA BAY RSV-L4411 User Manual
Hard Drive Tray Assembly / Disassembly
1. Each HDD Tray has a press button for
releasing the hinge. To remove the HDD
Tray; first press the button (red circle).
Hard Drive Installation
Installing a 3.5” HDD
2. Upon press the button, the HDD tray will
be easily pull out.
3. To slide in the HDD tray, please make sure
to push the tray all the way into the
module until a click sound indicating that
the arm was fixed into the module.
1. To install a 3.5” HDD, please make sure
that the 3.5” HDD is align with the screw
holes on the side of the tray.
5
Page 7

SERVER CHASSIS WITH 12x HOT-SWAPPABLE SATA BAY RSV-L4411 User Manual
2. Once align, you can fasten the screws on
both side of the tray to fix the HDD.
(Please make sure that the connector of
the HDD is facing outward)
Installing a 2.5” HDD
1. To install a 2.5” HDD, please make sure
that the 2.5” HDD is align with the screw
holes on the tray
2. Once align, you can fasten the screws on
the tray to fix the HDD. (Please make sure
that the connector of the HDD is facing
outward)
6
Page 8

SERVER CHASSIS WITH 12x HOT-SWAPPABLE SATA BAY RSV-L4411 User Manual
Hot Swap Module Cable Installation
Server Rail Installation
1. In order to install the rail, you must first
remove the cover on the side. Three
screws locate on each side.
2. Unscrew all three screws on each side.
7
Page 9

SERVER CHASSIS WITH 12x HOT-SWAPPABLE SATA BAY RSV-L4411 User Manual
3. Upon removing the side bar, you will find
several screw holes for you to install the
server rail.
Thank you for purchasing a quality Rosewill Product.
Please register your product at: www.rosewill.com for complete warranty information and future support for your product.
8
 Loading...