

Page 1

PIR Solar Spotlight/
PIR Solaire Lumière
RSL-113
User Manual
Page 2

CONTENTS
3 1. PIR Solar Spotlight parts
3 2. Battery Charge
3 3. PIR Solar Spotlight Body Installation
4 4. Solar Panel Installation
5 5. Complete The Installation
PIR Solar Spotlight/PIR Solaire Lumière RSL-113
5 6. PIR Sensor Sense Range
6 7. Replace the parts
6 8. Problem Solving
6 9. Safety Guide
6 10. Technical Data
2
Page 3
PIR Solar Spotlight/PIR Solaire Lumière RSL-113
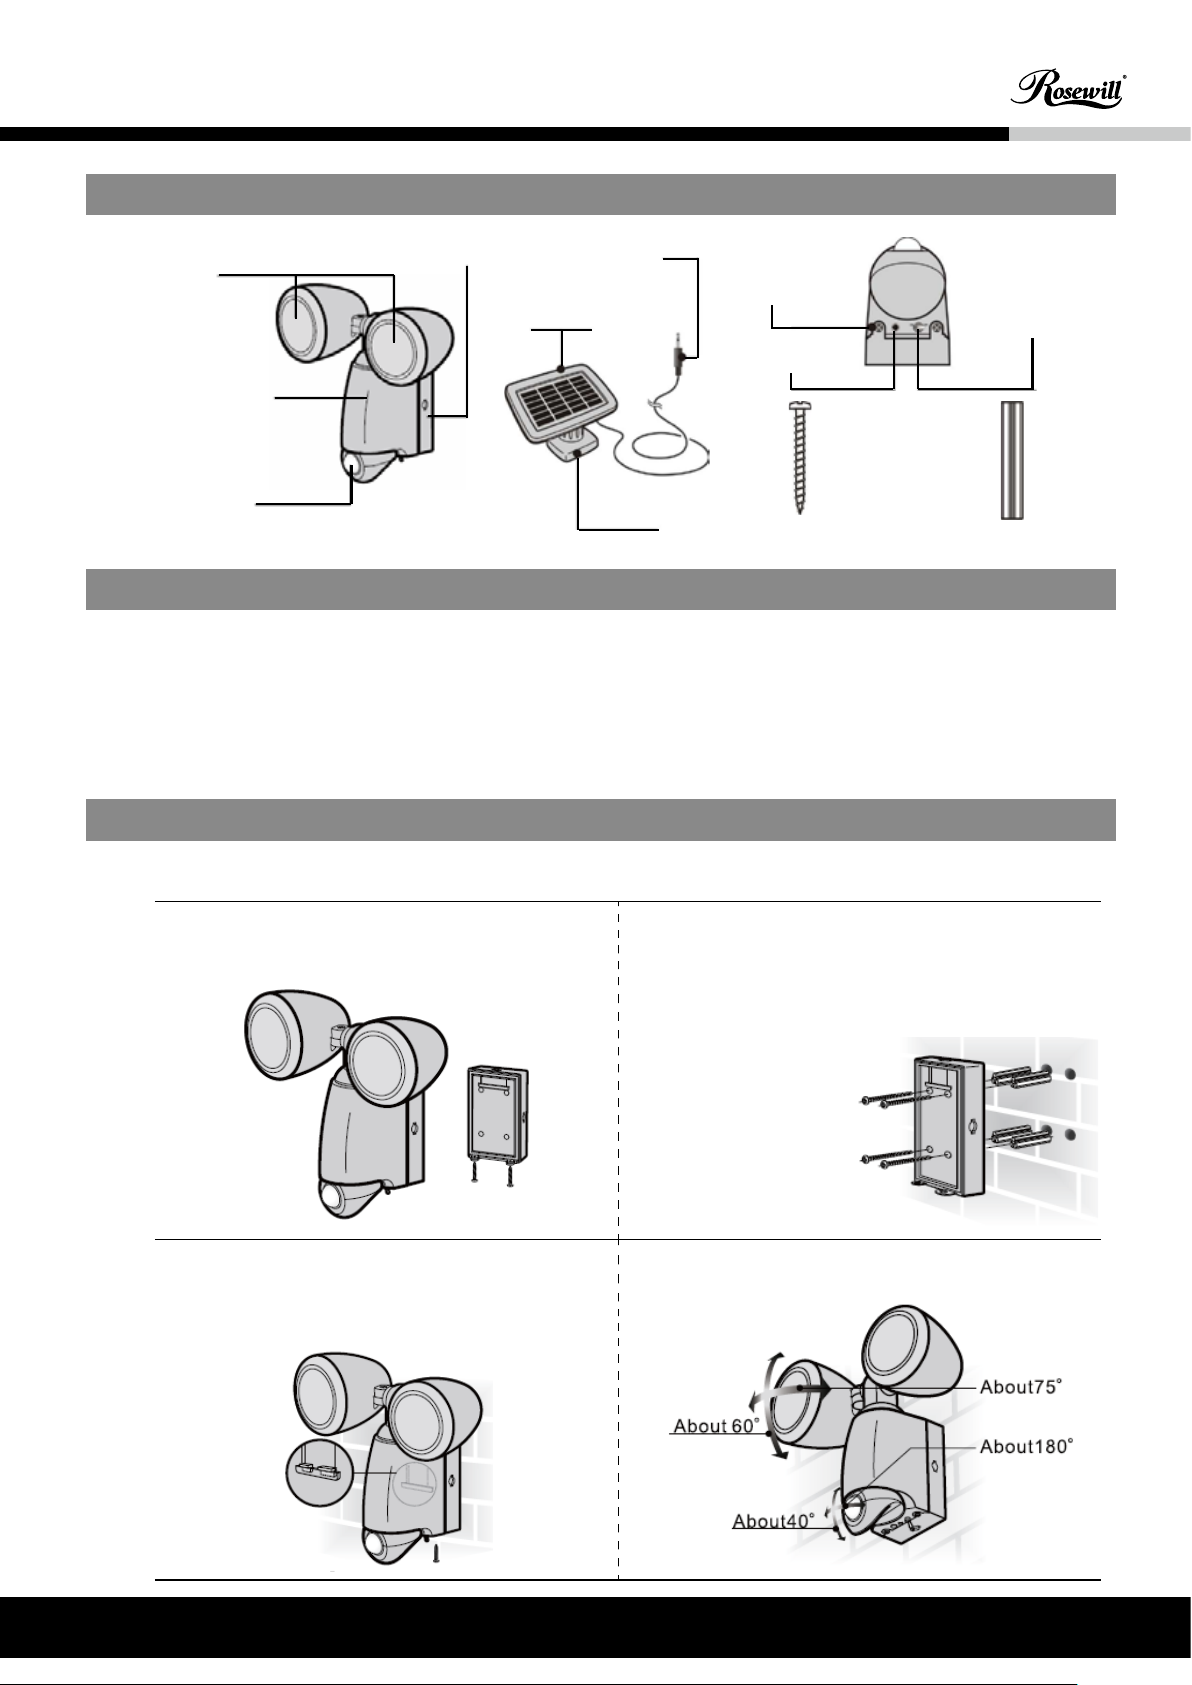
1 PIR Solar Spotlight parts
①
solar light
head
② solar light body
③ PIR sensor
④ battery back cover
⑤ solar panel
⑦ plug
2 Battery Charge
In normal condition, the batteries inside the PIR Solar Spotlight are fully charged. You can
use the light directly. If not, please fully charge the batteries before using: turn the switch
“on” for sunny daytime and turn it “off” when darkness comes. Repeating for 2 days (about
16 hours), the batteries would be fully charged.
3 PIR Solar Spotlight Body Installation
⑾ screw
⑿ on/off switch
⑩ socket
⑧ screw*6
⑨ bulged tube*6
⑥ panel base
Install On the Wall
1.loose the screws and remove the battery
back cover from the light
3.slip the PIR Solar Spotlight body up to
down until the hasp inside is connected, x
the body with screws.
2.drill 4 holes on the wall based on the
four tubes in the battery back cover, insert
the bulged tubes in the holes, and fix the
battery back cover with screws.
4.adjust the angle of light head & PIR
sensor
3
Page 4

Install On the Pillar or Fence
PIR Solar Spotlight/PIR Solaire Lumière RSL-113
1.Insert the L-clip into the hole on the
PIR Solar Spotlight body.
2.Twist the buttery nut to a proper position
to x the light on the pillar or fence.
Remarks for Installation
* The thickness of the fence or pillar is better to be more than 3.5cm
* Do not install the light where people can be easily to be hurt in case of drop.
* Install the light in horizontal level.
4 Solar Panel Installation
Install On the Pillar or Fence
1.Take the solar panel and panel base. 2.Drill two holes on the wall based in the
holes in the panel base, then insert in the
panel base, then insert the bulged tubes
into the holes. Finally x the panel base on
the wall by screws.
2.Twist the solar panel on the panel base.
4
Page 5

PIR Solar Spotlight/PIR Solaire Lumière RSL-113
Install On the Pillar or Fence
*Make sure the solar panel is installed where direct sunlight is sufcient.
Make sure the panel is
45°from the horizontal level.
Be away from shadow of
trees or buildings.
Be away from place where
other night lights existing.
This angle can be adjusted.
WARNING:
please regularly check the panel and light after installation, to avoid any
npredictable re or electronic shock!
5 Complete The Installation 6 PIR Sensor Sense Range
1.insert the wire plug into the socket on the
bottom of the PIR Solar Spotlight body.
2.turn the switch “on” after completing
installation.
Please check the following data for the
sense range.
Remarks: This sense range will verify with
different environment, like temperature,
place, climate etc.
5
Page 6

7 Replace the parts
1. LED can’t be replaced
2. Battery replacement
* Turn the switch “off”
* See 3. PIR Solar Spotlight body installation
* Replace the batteries with 3pcs 1.2V AA
1300mAh Ni-MH rechargeable batteries
8 Problem Solving
*Make sure the switch is “on”.
*Make sure the panel is not broken.
PIR Solar Spotlight/PIR Solaire Lumière RSL-113
*Make sure the panel is installed in places free from shadow
*Make sure the panel is not polluted by dirt. If have, please clean it with water by soft
cloth. Do not use solvents. Take extreme care not to scratch the clear cover.
9 Safety Guide
*The PIR Solar Spotlight is waterproof on normal conditions, but please make sure it is
not always exposed to a lot of water, or installed in some moist places, like bathroom.
*Make sure hands are not wet when replacing the batteries.
*Make sure not to reconstruct the PIR Solar Spotlight by yourself, to avoid any possible
malfunction, re or electronic shock.
*Make sure the PIR Solar Spotlight is not installed where the temperature is too high.
*Please notice that the Ni-MH batteries recharging capacity might decline under extreme
low temperature.
*The LED inside can not be replaced.
10 Technical Data
LED 2pc 1watt power LED (2 heads)
Battery 3pcs 1300mAh Ni-MH batteries
Sensor PIR sensor
Sense About 6m*90°
Light duration per sense 25~35 seconds
Material Plastic
Wire length About 5m
6
Page 7

PIR Solar Spotlight/PIR Solaire Lumière RSL-113
Thank you for purchasing a quality Rosewill Product.
Please register your product at : www.rosewill.com for complete warranty
information and future support for your product.
7
Page 8

www.rosewill.com
 Loading...