

Page 1

Wireless Router RNX-N360RT
Quick Installation Guide
Page 2

Package Contents
The following items should be found in your package:
• RNX-N360RT 300Mbps Wireless N Router
• Power Adapter for RNX-N360RT
• Quick Installation Guide
• Resource CD for RNX-N360RT, including:
This Guide
Other Helpful Information
• RJ45 LAN Cable
Note:
Make sure that the package contains the above items. If any of the listed items
are damaged or missing, please contact with your distributor.
1
Page 3
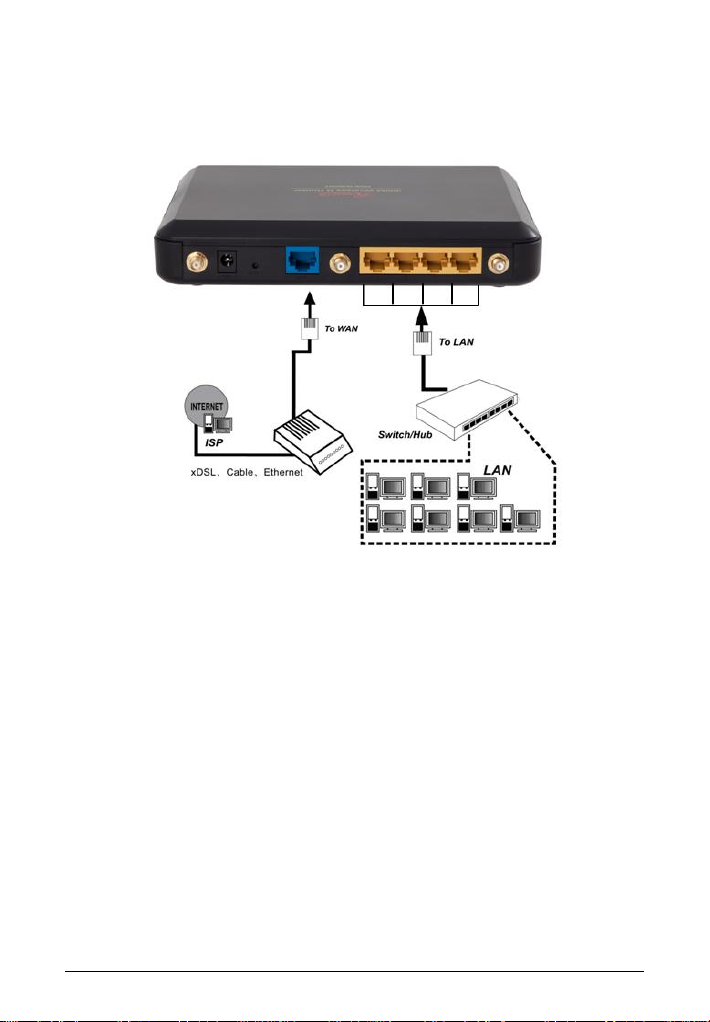
1. Connecting the Router
Figure 2-1 Hardware Installation of the RNX-N360RT
Before installing the Router, make sure your PC is connected to the Internet
through the broadband service successfully. If there is any problem, please
contact your ISP. After that, please install the Router according to the following
steps. Don't forget to pull out the power plug and keep your hands dry.
1. Power off your PC, Cable/DSL Modem, and the Router.
2. Locate an optimum location for the Router. The best place is usually at the
center of your wireless network.
3. Adjust the direction of the antenna. Normally, upright is a good direction.
4. Connect the PC(s) and each Switch/Hub in your LAN to the LAN Ports on
the Router, shown in Figure 2-1. (If you have the wireless NIC and want to
use the wireless function, you can skip this step.)
2
Page 4

5. Connect the DSL/Cable Modem to the WAN port on the Router, shown in
Figure 2-1.
6. Connect the power adapter to the power socket on the Router, and the
other end into an electrical outlet. The Router will start to work
automatically.
7. Power on your PC and Cable/DSL Modem.
2. Quick Installation Guide
With a Web-based utility, it is easy to configure and manage the RNX-N360RT.
The Web-based utility can be used on any Windows, Macintosh or UNIX OS with
a Web browser, such as Microsoft Internet Explorer, Mozilla Firefox or Apple
Safari.
Here are step by step diagrams of the Quick Installation Guide. The detail of
explanation will follow after this:
Step 1 Type http://192.168.1.1 in your Internet Browser.
Step 2 Enter the default Login name and password “admin” into the popup
window and hit OK
3
Page 5

Step 3 Click on Quick Setup
Step 4 Click Next when sees this window
4
Page 6

Step 5 Click Auto-Detect in this window as your wireless router will detect and
select for you connection option.
(** If you are certain of your connection type, you can click directly to
the other three selections.
Step 6 entering your connection information in the next step. You will need to
verify with your ISP.
PPPoE:
Dynamic IP: You do not need to enter anything in this option.
Static IP:
5
Page 7

Step 7 You will need to set up your wireless signal in this step.
Step 8 Click Finish and you are ready!
6
Page 8

Thank you for purchasing a quality Rosewill Product.
Please register your product at: www.rosewill.com for complete warranty
information and future support for your product.
Rosewill Customer Service Hotline: 1-800-575-9885
Rosewill Customer Service Support:
techsupport@rosewill.com
7
 Loading...