

Page 1

RMS-SDM01 Desk Mount Installation Guide
Rosewill Technical Support information
1-800-575-9885 Monday - Friday 8AM - 5PM PST
techsupport@rosewill.com
Page 2

RMS-SDM01 Desk Mount Installation Guide
Index
ENGLISH
1 Package Contents ...................................................... 1
2 Installation.............................................................2~10
3 Installation Guide for VESA ...............................11~13
FRENCH
1 Contenu de la boîte .................................................. 14
2 Installation...........................................................16~23
3 Moniteur VESA trous ..........................................24~26
SPANISH
1 Contenido del paquete ............................................. 27
2 Instalación ...........................................................29~36
3 Monitor VESA agujeros ......................................37~39
Page 3
RMS-SDM01 Desk Mount Installation Guide
ENGLISH
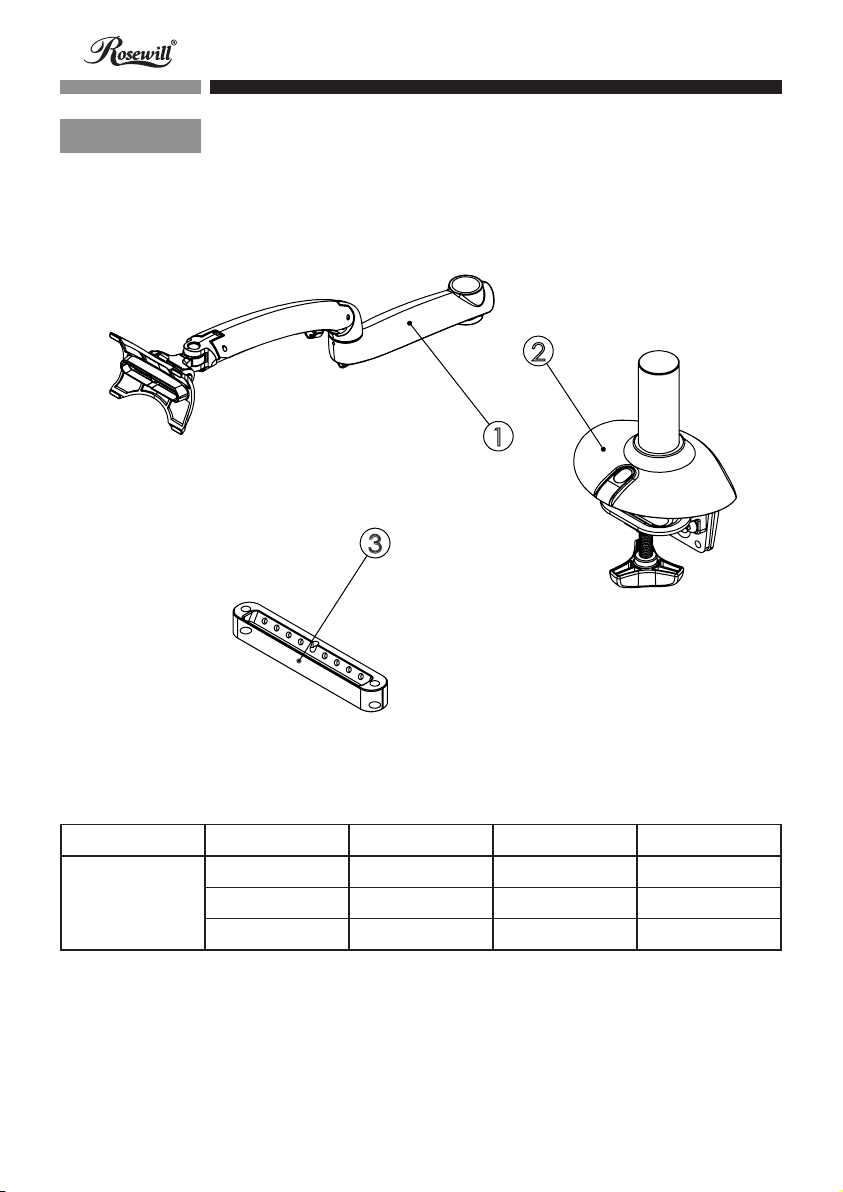
Package Contents
2
1
3
Part No. Part Qty. Sub-Part No. Sub-part Qty. Description
1 1 1 Arm Set
N/A
1 2 1 Desk Clamp Base
1 3 1 Mounting Plate
1
Page 4
RMS-SDM01 Desk Mount Installation Guide
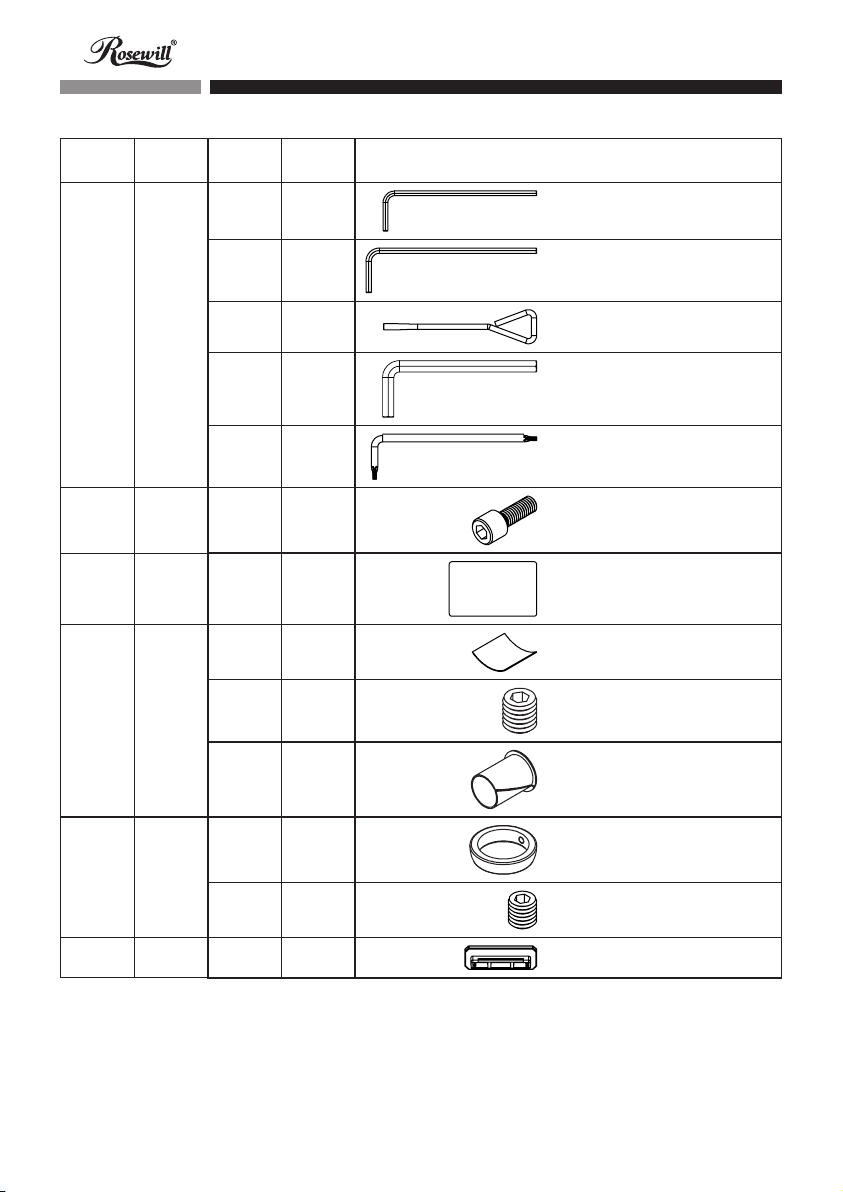
Part No. Part Qty.
A-1 1
A-2 2 A-F 2 Monitor Screw
A-3 1 A-G 1 Access Card
B-1 1
Sub-Part
Sub-part
No.
A-A 1 2.5mm Allen Wrench
A-B 1 3mm Allen Wrench
A-C 1 Adjustable Wrench
A-D 1 5mm Allen Wrench
A-E 1 Torx Tool
B-A 1 Fixed Clip
B-B 1 M6 x 5mm Socket Set Screw
Qty.
Description
B-C 1 Adjustable Arm Sleeve
B-D 1 Arm Support Block
B-2 1
B-E 1 M5 x 5mm Socket Set Screw
C-1 1 C-A 4 Plastic Pad
2
Page 5
RMS-SDM01 Desk Mount Installation Guide
Installation
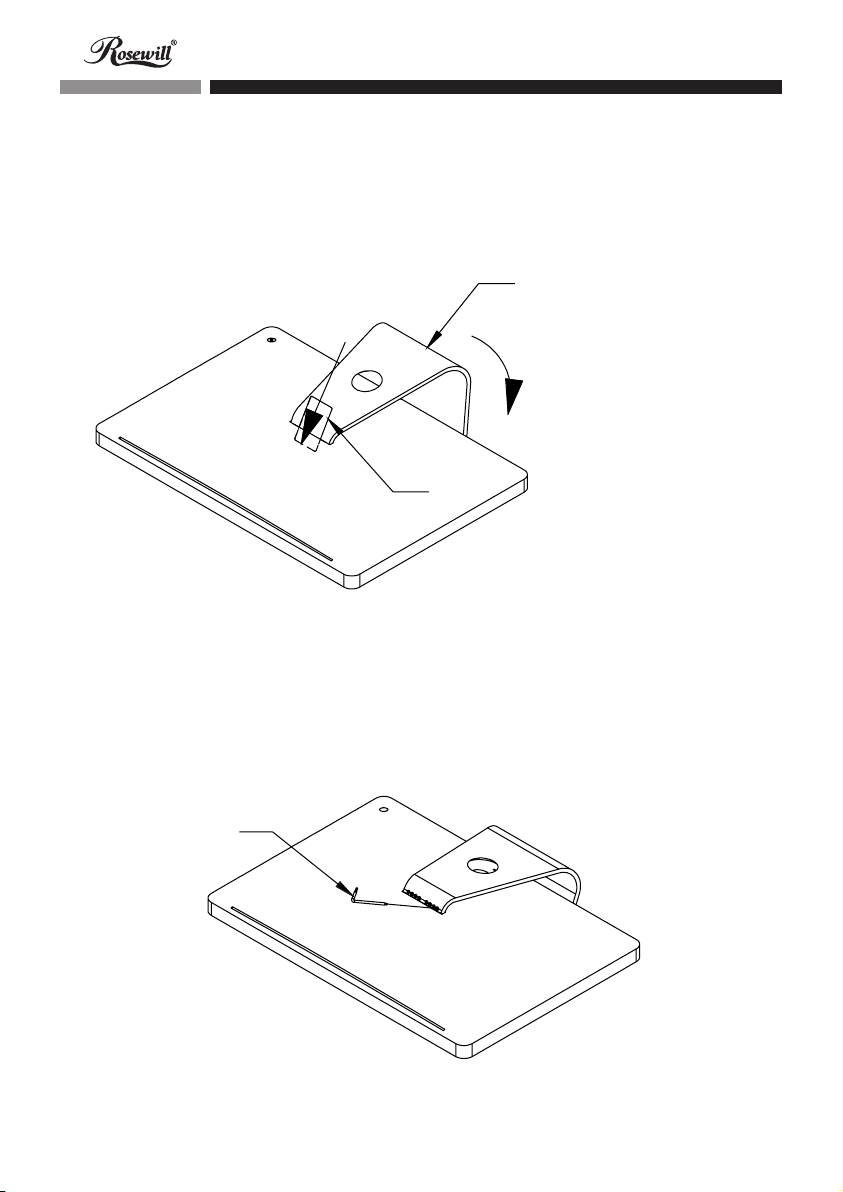
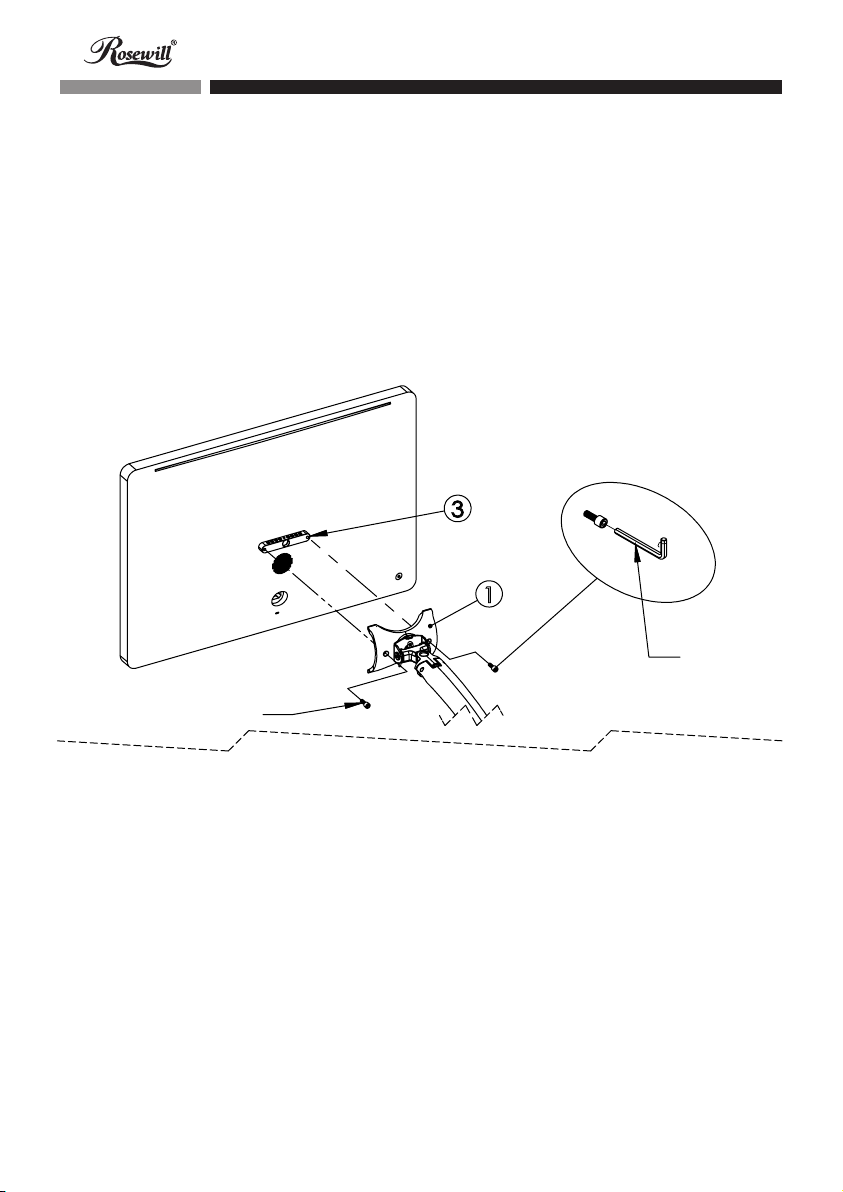
Step 1 :
Carefully place the computer faced down on a flat surface to ensure not to scratch the display
with the stand hanging over the edge. Lift the stand up to its highest point. Insert A-G card at
slight upward angle until you feel the latch.
Original iMac stand
A-G
Step 2 :
With the card in the slot, lower the stand until it is as far down as it can be (you will see screws).
Separate the stand from iMac monitor by using A-E tool, and set the original M3 screw 8 pcs
aside carefully.
A-E
3
Page 6
RMS-SDM01 Desk Mount Installation Guide
Step 3 :
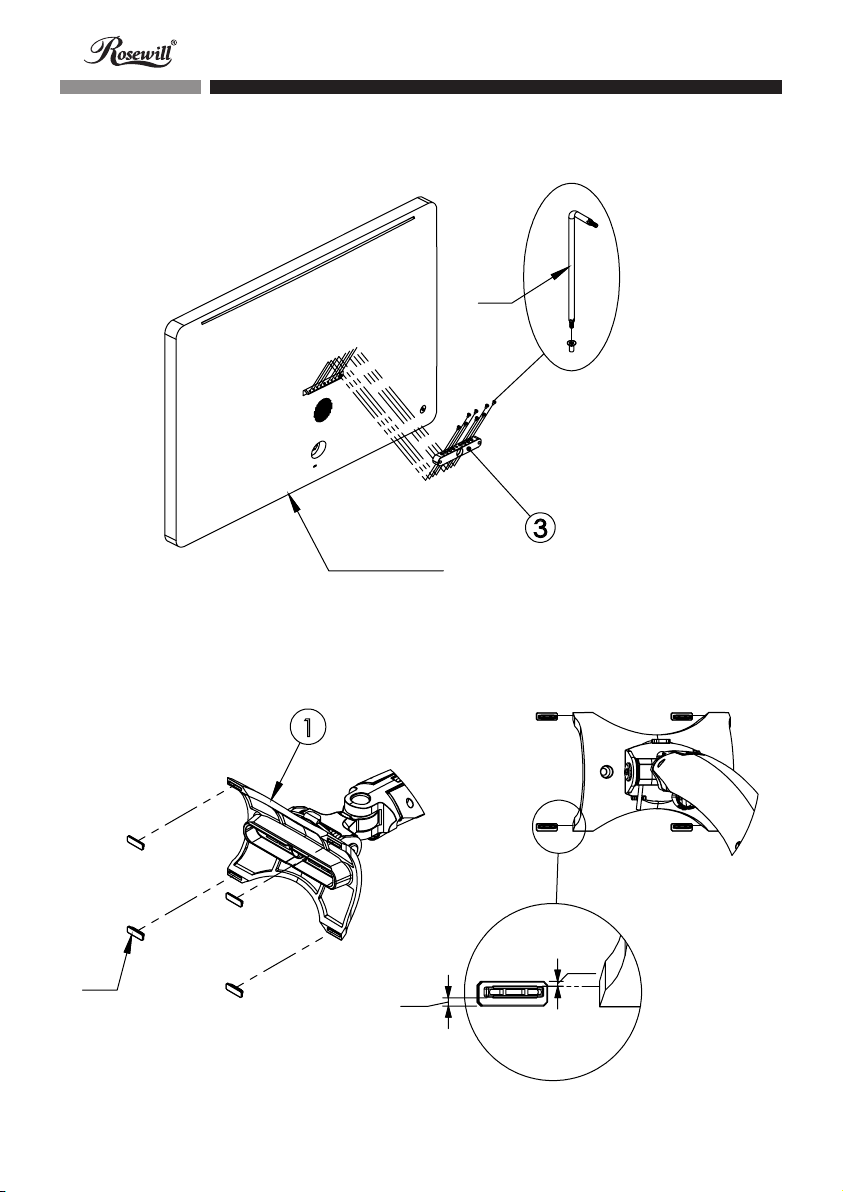
Fasten the mounting plate on the iMac monitor by using the M3 screws.
A-E
3
iMac Monitor Original M3 screws x 8
Step 4 :
Install C-A into four holes at the corners of 1.
# Use A-E tool to
fasten M3 screws
C-A
1
S
L
L toward outside
4
Page 7
RMS-SDM01 Desk Mount Installation Guide
Step 5 :
Fasten the arm set onto the mounting plate by using A-F screws.
# Use A-D wrench for A-F screws
3
1
A-D
A-F
5
Page 8
RMS-SDM01 Desk Mount Installation Guide
Step 6 :
Fasten the desk clamp base on the edge of the desk.
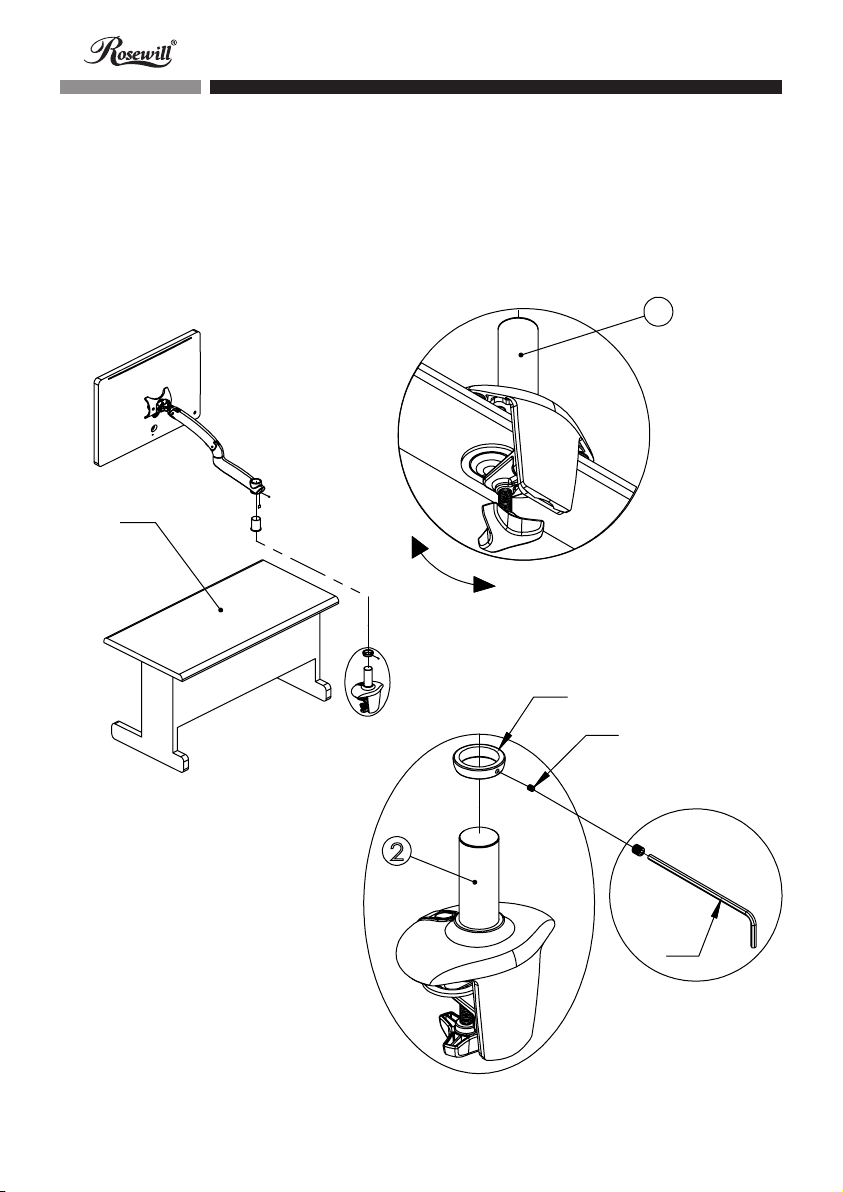
Step 7 :
Insert B-D block into the desk clamp base, and fasten the block in the suitable position with
B-E screw.
2
Desk
B-D
B-E
2
A-A
6
Page 9

RMS-SDM01 Desk Mount Installation Guide
Step 8 :
Insert B-A clip into the curved notch of the arm connection set.
Step 9 :
Install B-C sleeve into the hole of the arm connection set. (Note the sleeve gap location)
Step 10 :
Set the arm connection set into the desk clamp base, and tighten the arm set with B-B
screw.
1
A-B
B-B
B-A
1
B-C
The gap should be on the
opposite side to B-A clip.
2
7
Page 10
RMS-SDM01 Desk Mount Installation Guide
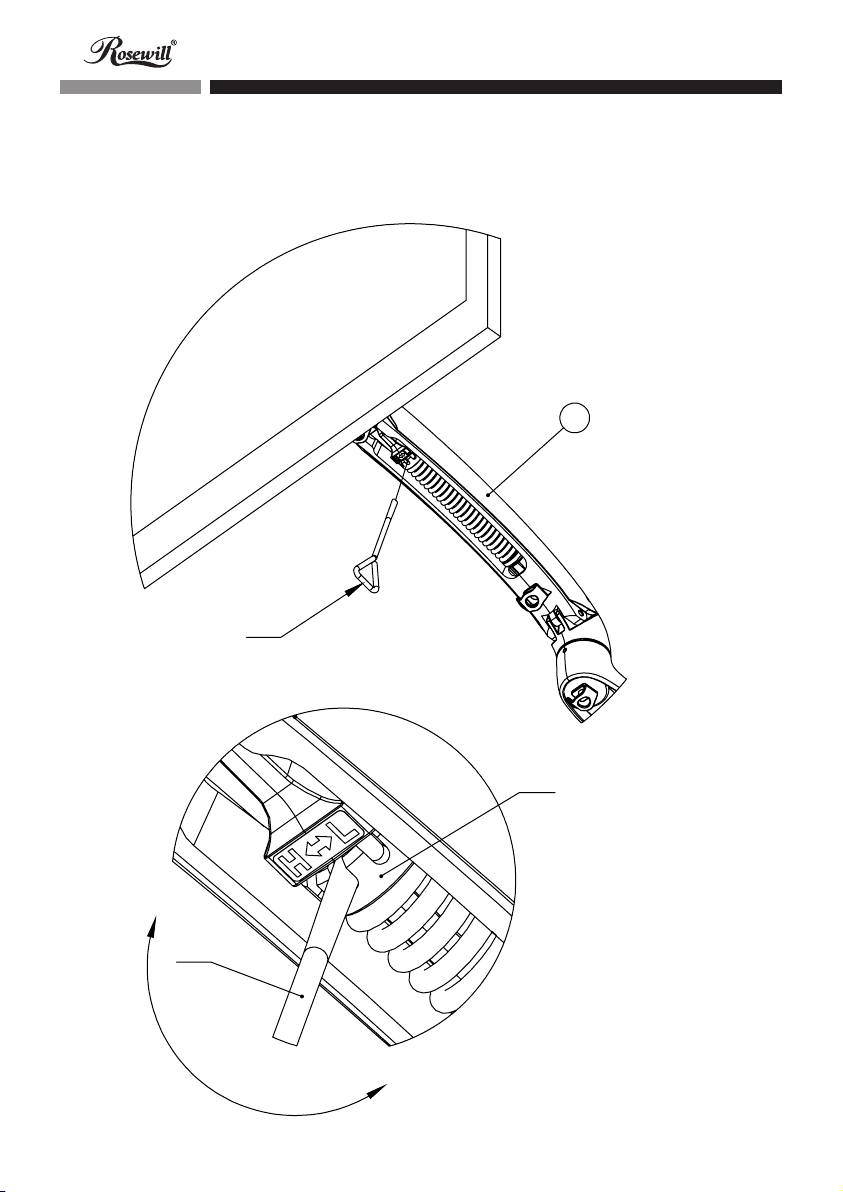
Note :
After installation, please use A-C wrench to adjust the spring adjusting block tension
based on the weight of the monitor. “H” is provided for the heavy monitor and “L” is
provided for the light monitor.
1
A-C
A-C
Spring adjusting block.
8
Page 11
RMS-SDM01 Desk Mount Installation Guide
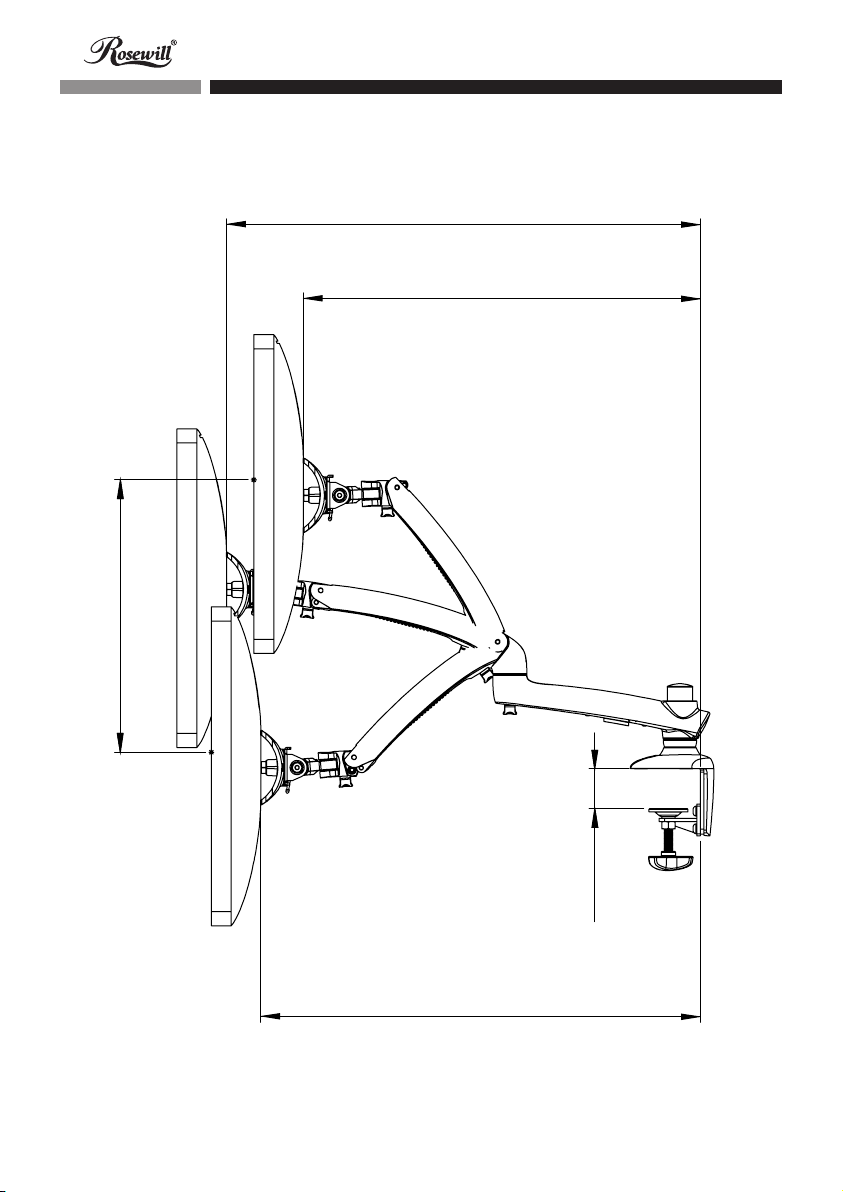
The distance of the arm extension is depending on the spring tension adjusted for different
※
weights of monitors.
[27.6±0.1]
700±2mm
285~340±5mm
[11.2~13.4±0.2]
[21.3~23.6±0.2]
540~600±5mm
[23.6~26.4±0.2]
600~670±5mm
9
[0.2~2.2]
5~55mm
Page 12
RMS-SDM01 Desk Mount Installation Guide
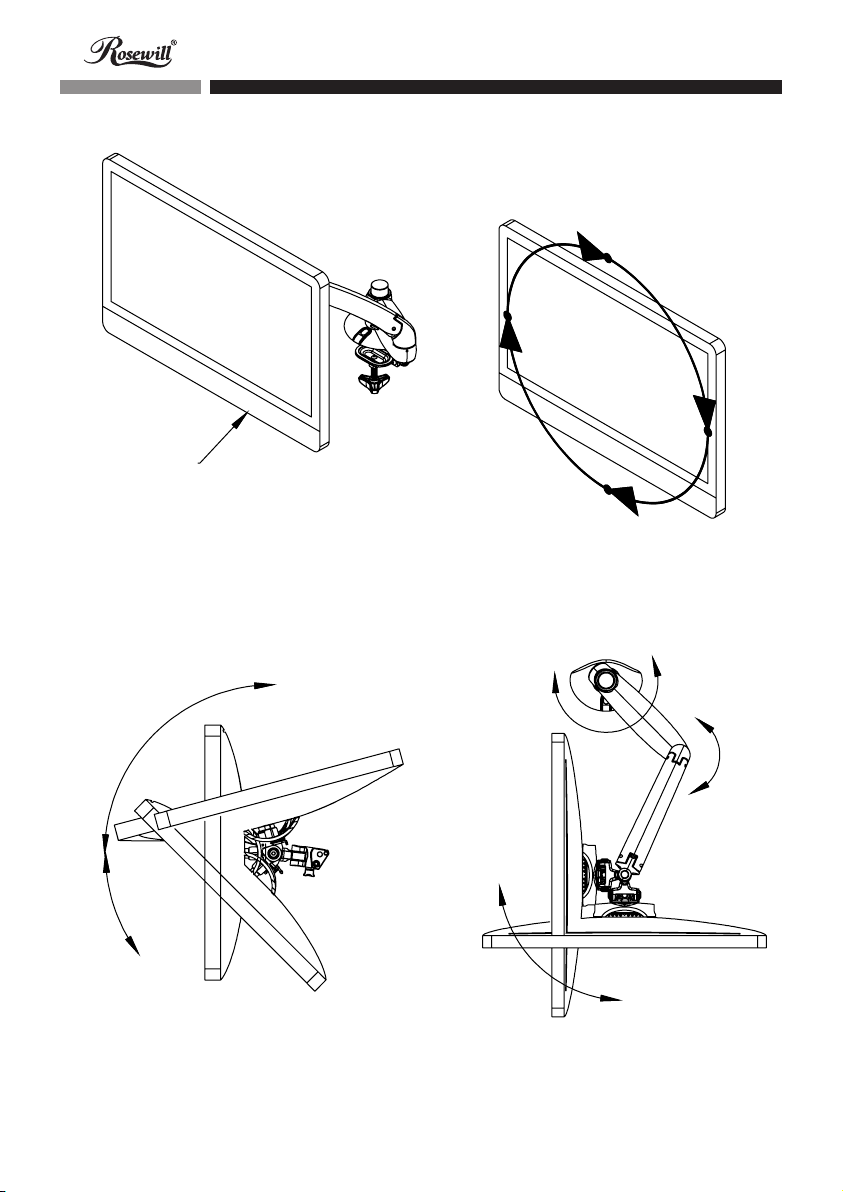
Monitor Compatibility:
Thunderbolt Display.
# Below angles are estimated for general monitors.
Actual angles would depend on the monitor in use.
360
o
o
360
o
90
o
45
o
360
o
180
10
Page 13

RMS-SDM01 Desk Mount Installation Guide
Installation Guide for VESA
Part No. Part Qty.
N/A 1 4 1 VESA Mounting Plate
D-1 1
D-2 1
Sub-Part
Sub-part
No.
D-A 4 M4 x 15mm Philips Screw
D-B 4 M4 x 30mm Philips Screw
D-C 4 M5 x 15mm Philips Screw
D-D 4 M5 x 30mm Philips Screw
D-E 4 5mm Spacer
Qty.
Description
D-3 1
D-F 4 10mm Spacer
11
Page 14

RMS-SDM01 Desk Mount Installation Guide
Step 1 :
Use D-1 or D-2 screws for part 4, and use D-3 5mm or 10mm spacers between part 4 and
the monitor. (Due to the various depths of the VESA holes, please determine and select
the suitable spacers and screws to use)
Monitor VESA holes
Part No. D-1 or D-2
(Selective based on the monitor holes)
4
Monitor
Part No. D-3
(Selective based on the monitor holes)
12
Page 15

RMS-SDM01 Desk Mount Installation Guide
Step 2 :
Fasten the 1 onto the 4 by using A-F screws.
#Use A-D wrench for A-F screw
4
1
A-D
A-F
13
Page 16

RMS-SDM01 Desk Mount Guide d'installation
FRENCH
Contenu de la boîte
2
1
3
No. pièce Qté no. pièce No. sous-pièce Qté sous-pièce Description
1 1 1 Jeu de bras
N/A
1 2 1
1 3 1 Plaque de montage
14
Base de fixation
bureau
Page 17

RMS-SDM01 Desk Mount Guide d'installation
No.
pièce
A-1 1
A-2 2 A-F 2 Vis de moniteur
A-3 1 A-G 1 Carte d'accès
B-1 1
Qté no.
pièce
No.
souspièce
A-A 1 Clé Allen 2.5mm
A-B 1 Clé Allen 3mm
A-C 1 Clé à molette ajustable
A-D 1 Clé Allen 5mm
A-E 1 Clé Torx
B-A 1 Abrazadera de fijación
B-B 1 Tornillo con encastre M6 x 5 mm
Qté
souspièce
Description
B-C 1 Manguito del brazo ajustable
B-D 1 bloc de support de bras
B-2 1
B-E 1 bloc de support de bras
C-1 1 C-A 4 Tampon en plastique
15
Page 18

RMS-SDM01 Desk Mount Guide d'installation
Installation
Étape 1 :
Placer délicatement l'ordinateur face vers le bas sur une surface plane afin de s'assurer de
ne pas rayer l'écran avec le support suspendu au-dessus du bord. Soulevez-le à son point
culminant. Insérer la carte A-G légèrement vers l'angle du haut jusqu'à ce que vous sentiez le
verrou.
Original support iMac
A-G
Étape 2:
Avec la carte dans la fente, abaisser le support jusqu'à ce qu'il soit aussi loin que possible (vous
verrez les vis). Séparer le socle du moniteur iMac en utilisant l'outil A-D, et placer les 8 vis
originales M3 sur le côté avec soin.
A-E
16
Page 19

RMS-SDM01 Desk Mount Guide d'installation
Étape 3 :
Fixer la plaque de montage sur le moniteur iMac à l'aide des vis M3.
A-E
3
iMac moniteur Original M3 vis x 8
Étape 4 :
Installer C-A dans les quatre trous au niveau des coins de 1.
# Utiliser l'outil A-E
outil pour f ixer
les vis M3
C-A
1
S
L
L vers l'extérieur
17
Page 20

RMS-SDM01 Desk Mount Installation Guide
Étape 5 :
Fixer le jeu de bras sur la plaque de montage à l'aide de la vis A-F.
# Utiliser la clé A-D pour la vis A-F
3
1
A-D
A-F
18
Page 21

RMS-SDM01 Desk Mount Guide d'installation
Étape 6 :
Fixer la pince de bureau base sur le bord du bureau.
Étape 7 :
Insérez le bloc B-D dans la tige à la base de la fixation bureau et serrez le bloc sur la position
souhaitée avec la vis B-E.
2
bureau
B-D
B-E
2
A-A
19
Page 22

RMS-SDM01 Desk Mount Guide d'installation
Étape 8 :
Insérez le clip B-A dans l'encoche courbée du jeu de bras.
Étape 9 :
Installez la manche B-C dans le trou du jeu de bras. (Notez l'emplacement d'espacement de
la manche)
Étape 10 :
Placez le jeu de connexion de bras dans la tige à la base de la fixation bureau et serrez le
jeu de bras avec la vis B-B.
1
A-B
B-B
B-A
1
B-C
L'espace doit être sur le côté
opposé au clip B-A
2
20
Page 23

RMS-SDM01 Desk Mount Guide d'installation
Remarque :
Après installation, utilisez la clé à molette A-C pour ajuster la tension du bloc d'ajustement du
ressort selon le poids du moniteur. « H » est fourni pour les moniteurs lourds, et « L » pour les
légers.
1
A-C
A-C
Bloc d'ajustement du ressort
21
Page 24

RMS-SDM01 Desk Mount Guide d'installation
La longueur de l'extension du bras dépend de la tension du ressort ajustée pour différents
※
poids de moniteurs.
[27.6±0.1]
700±2mm
285~340±5mm
[11.2~13.4±0.2]
[21.3~23.6±0.2]
540~600±5mm
[23.6~26.4±0.2]
600~670±5mm
22
[0.2~2.2]
5~55mm
Page 25

RMS-SDM01 Desk Mount Guide d'installation
360
Moniteur Compatibilité:
Thunderbolt Display.
# Les angles ci-dessous sont estimés pour des moniteurs généraux.
Les angles réels dépendent du moniteur utilisé
o
o
360
o
90
o
45
o
360
o
180
23
Page 26

RMS-SDM01 Desk Mount Guide d'installation
Guide d'installation pour VESA
No.
pièce
N/A 1 4 1 Plaque de montage VESA
D-1 1
D-2 1
Qté no.
pièce
No.
souspièce
D-A 4 M4 x 15mm vis Phillips
D-B 4
D-C 4 M5 x 15mm vis Phillips
D-D 4 M5 x 30mm vis Phillips
D-E 4 5mm entretoise
Qté
souspièce
Description
M4 x 30mm vis Phillips
D-3 1
D-F 4 10mm entretoise
24
Page 27

RMS-SDM01 Desk Mount Guide d'installation
Étape 1 :
Utilisez les vis D-1 ou D-2 de la partie 4, et utiliser des entretoises de 5mm ou 10mm
D-3 entre le moniteur et la partie 4. (En raison des différentes profondeurs des trous
VESA, choisissez les espaceurs et vis adaptés à votre installation.) Répétez pour chaque
moniteur et bras.
Moniteur VESA trous
Référence no. D-1 ou D-2
(Sélectif basé sur les trous du moniteur)
4
Monitor
Référence no. D-3
(Sélectif basé sur les trous du moniteur)
25
Page 28

RMS-SDM01 Desk Mount Guide d'installation
Étape 2 :
Fixer le 1 sur le 4 en utilisant les vis A-F.
# Utiliser la clé A-D pour la vis A-F
4
1
A-D
A-F
26
Page 29

RMS-SDM01 Desk Mount Guía de instalación
SPANISH
Contenido del paquete
2
1
3
N.º pieza Cantidad n.º pieza N.º subpieza
1 1 1 Conjunto del brazo
N/A
1 2 1
1 3 1 Placa de montaje
27
Cantidad n.º
subpieza
Descripción
Base de pinza para
escritorio
Page 30

RMS-SDM01 Desk Mount Guía de instalación
N.º
Cantidad
pieza
n.º pieza
A-1 1
A-2 2 A-F 2 Tornillo de monitor
A-3 1 A-G 1 Tarjeta de acceso
B-1 1
N.º
subpieza
A-A 1 Llave Allen de 2.5mm
A-B 1 Llave Allen de 3mm
A-C 1 Llave ajustable
A-D 1 Llave Allen de 5mm
A-E 1 Herramienta Torx
B-A 1 Abrazadera de fijación
B-B 1
Cantidad
n.º
subpieza
Descripción
Tornillo con encastre
M6 x 5 mm
B-C 1 Manguito del brazo ajustable
B-D 1 Brazo soporte bloque
B-2 1
B-E 1 Tornillo M5 x 5mm de
C-1 1 C-A 4 Almohadilla plástica
28
Page 31

RMS-SDM01 Desk Mount Guía de instalación
Instalación
Paso 1 :
Coloque el equipo con cuidado boca abajo en una superficie plana para garantizar que la
pantalla no se raya con el pedestal colgando sobre el borde. Levante el pedestal hasta su punto
más alto. Inserte una tarjeta A-G con un ángulo ligeramente hacia arriba hasta que sienta el
pasador
Soporte original iMac
A-G
Paso 2:
Con la tarjeta la ranura, baje el pedestal hasta que esté tan abajo como pueda estar (verá los
tornillos). Separe el pedestal del monitor iMac utilizando una herramienta A-E y coloque aparte
las 8 unidades del tornillo M3 original.
A-E
29
Page 32

RMS-SDM01 Desk Mount Guide d'installation
Paso 3 :
Fije la placa de montaje al monitor iMac utilizando los tornillos M3.
A-E
3
iMac moniteur Tornillos originales M3x 8
Paso 4 :
Instale C-A en los cuatro orificios en las esquinas de 1.
# Utilice una
herramienta A-E
para apretar los
tornillos M3
C-A
1
S
L
L hacia afuera
30
Page 33

RMS-SDM01 Desk Mount Installation Guide
Paso 5 :
Apriete el brazo en la placa de montaje utilizando el tornillo A -F.
# Utilice la llave A-D para el tornillo A-F
3
1
A-D
A-F
31
Page 34

RMS-SDM01 Desk Mount Guide d'installation
Paso 6 :
Apriete la abrazadera de escritorio base en el borde de la mesa.
Paso 7 :
Inserte el bloque B-D en el eje de la base de la pinza para escritorio y fije el bloqueo hasta
alcanzar la posición correcta con el tornillo B-E.
2
escritorio
B-D
B-E
2
A-A
32
Page 35

RMS-SDM01 Desk Mount Guide d'installation
Paso 8 :
Inserte la abrazadera B-A en la muesca curvada del conjunto del brazo.
Paso 9 :
Instale el manguito B-C en el orificio del conjunto del brazo. (Ubique el espacio del manguito).
Paso10 :
Acople el conjunto de conexión del brazo en el eje de la base de la pinza para escritorio y
ajuste el conjunto del brazo con el tornillo B-B.
1
A-B
B-B
B-A
1
B-C
El espacio debería encontrarse
en el lado opuesto de la
abrazadera B-A.
2
33
Page 36

RMS-SDM01 Desk Mount Guide d'installation
Nota :
Una vez finalizada la instalación, utilice una llave A-C para ajustar la tensión del bloqueo de
ajuste del muelle en función del peso del monitor. “H” indica un monitor pesado y “L” indica un
monitor ligero.
1
A-C
A-C
Bloqueo de ajuste del
muelle
34
Page 37

RMS-SDM01 Desk Mount Guide d'installation
La distancia de la extensión del brazo depende del ajuste de la tensión del muelle en
※
función de los diferentes pesos de los monitores.
[27.6±0.1]
700±2mm
285~340±5mm
[11.2~13.4±0.2]
[21.3~23.6±0.2]
540~600±5mm
[23.6~26.4±0.2]
600~670±5mm
35
[0.2~2.2]
5~55mm
Page 38

RMS-SDM01 Desk Mount Guide d'installation
360
Monitor de Compatibilidad:
Thunderbolt Display.
#Los siguientes ángulos están calculados para los monitores generales.
Los ángulos reales dependerán del monitor que utilice
o
o
360
o
90
o
45
o
360
o
180
36
Page 39

RMS-SDM01 Desk Mount Guide d'installation
Guía de instalación para VESA
N.º
pieza
Cantidad
n.º pieza
N/A 1 4 1 VESA placa de montaje
D-1 1
D-2 1
N.º
subpieza
D-A 4 M4 x 15mm tornillo Phillips
D-B 4
D-C 4 M5 x 15mm tornillo Phillips
D-D 4 M5 x 30mm tornillo Phillips
D-E 4 5mm espaciador
Cantidad
n.º
subpieza
Descripción
M4 x 30mm tornillo Phillips
D-3 1
D-F 4 10mm espaciador
37
Page 40

RMS-SDM01 Desk Mount Guide d'installation
Paso 1 :
Utilice D-1 o D-2 tornillos de la parte 4 y D-3 espaciadores 5 ó 10mm entre la parte 4 y el
monitor. (Debido a los diferentes niveles de profundidad del orificio VESA, seleccione los
espaciadores y los tornillos adecuados para la instalación). Repita este paso para cada
monitor y cada brazo.
Monitor VESA agujeros
Parte no. D-1 o D-2
(Selectivo basado en los agujeros del monitor)
4
Monitor
Parte no. D-3
(Selectivo basado en los agujeros del monitor)
38
Page 41

RMS-SDM01 Desk Mount Guide d'installation
Paso 2 :
Apriete el 1 en el 4 mediante tornillos A-F.
# Utilice la llave A-D para el tornillo A-F
4
1
A-D
A-F
39
 Loading...