

Page 1

Slim Wireless Multimedia Keyboard
& Laser Mouse
RKM-1600RF
User Manual
Page 2

Slim Wireless Multimedia Keyboard & Laser Mouse User ManualRKM-1600RF
CONTENTS
English
Deutsch
Français
Español
繁體中文
简体中文
Quick Installation Guide.................... 1-1
Bedienungsanleitung....................... 2-1
Manuel d’utilisation......................... 3-1
Manual del usuario.......................... 4-1
................................................... 5-1
................................................... 6-1
Page 3
Sli m Wirel ess Mul timed ia Keyb oard & La ser M ouse User ManualRKM-1600RF
Slim Wireless Multimedia Keyboard &
Laser Mouse
Welcome
Congratulations on your purchase of an RKM-1600RF Wireless keyboard and
Laser mouse combo. The RKM-1600RF wireless keyboard and Laser mouse
combo uses the latest 2.4GHz Frequency Hopping Spread Spectrum
RF technology to provide you with extended range and flawless
communication between the keyboard, mouse, and your computer. Four
automatically selected channels eliminate any possible interference when this
keyboard and mouse combo is used around other RF devices.
The 2.4GHz ISM RF Digital Radio technology allows the RKM-1600RF to stay
connected to the devices in up to a 10M radius. The 2.4GHz Wireless
communication link operates in the 2400 - 2483 MHz frequency band available
unlicensed world wide for Industrial, Scientific and Medical (ISM) applications. For
users that demand the highest performance, quality, and convenience,the
RKM-1600RF keyboard and mouse combo is a perfect choice.
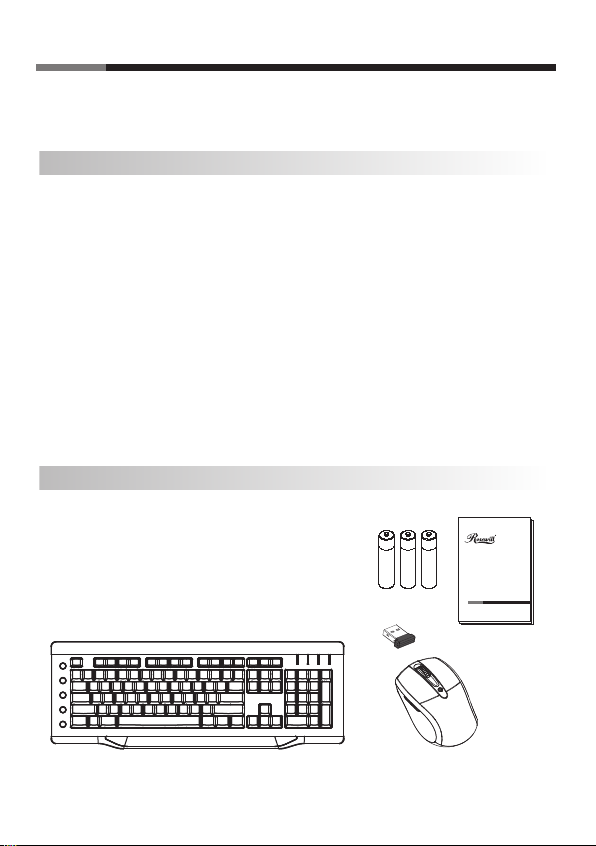
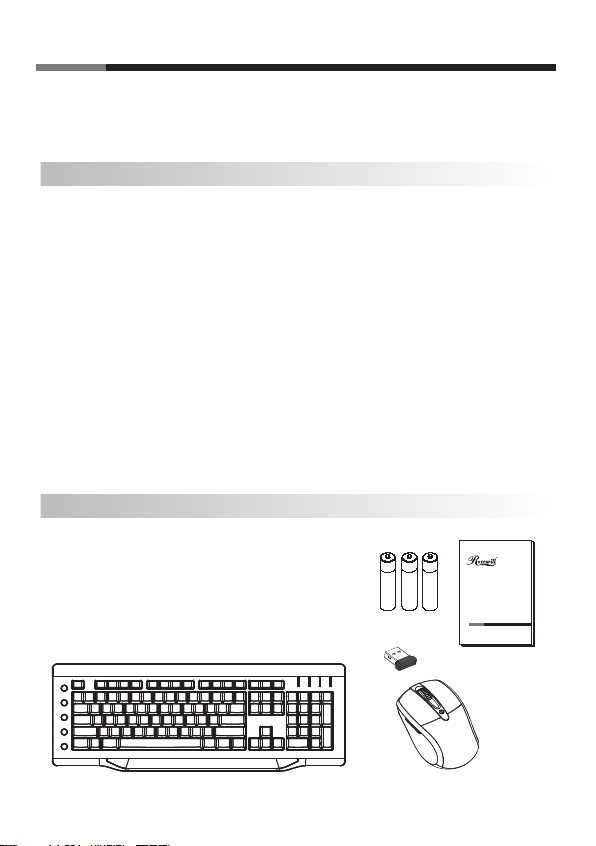
Package Contents
Wireless keyboard X 1
Wireless Laser mouse X 1
USB Nano Dongle X 1
AA size alkaline batteries X 3
+
+
A
A
A
A
Quick installation guide X 1
+
A
A
(FHSS) ISM
Slim Wireless Multimedia Keyboard
& Laser mouse
RKM-1600RF
User Manual
1-1
Page 4
Slim Wireless Multimedia Keyboard & Laser Mouse User ManualRKM-1600RF
Product Information
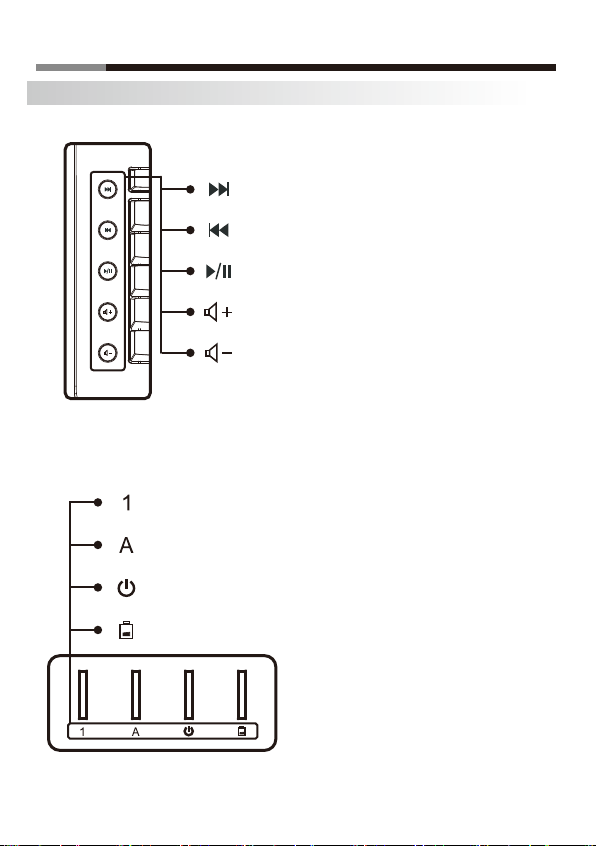
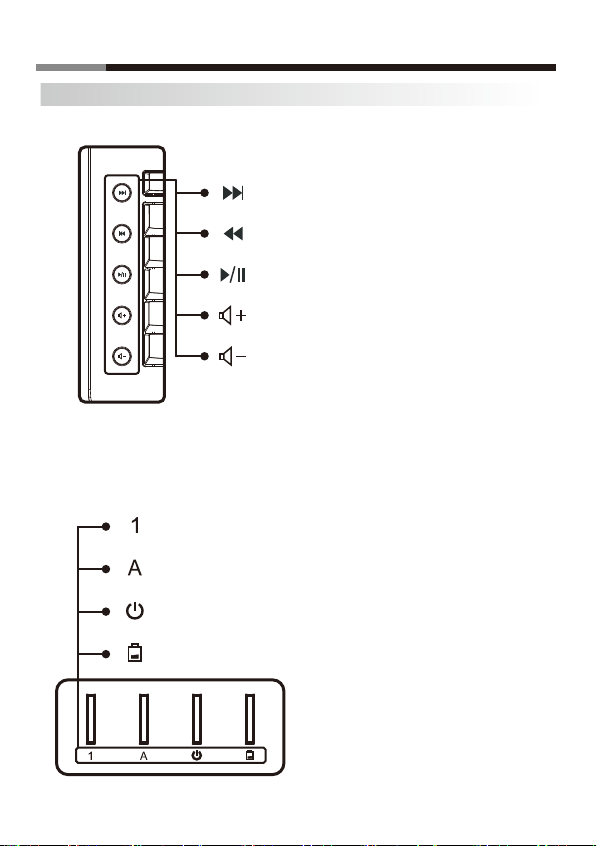
1. System and Application Keys
Next track
Previous track
Play / Pause
Volume up
Volume down
※The hot keys “function can directly be activated under Windows ME, 2000, XP,
Vista” system, no need install any device driver to find functions.
2. Keyboard LEDs
Num LED:Indicate the Num Lock state
Caps LED:Indicate the Caps Lock state
Power LED:The power LED lights green to,
indicate that the unit is powered on.
Battery low LED:Indicate battery power lower.
1-2
Page 5
Sli m Wirel ess Mul timed ia Keyb oard & La ser M ouse User ManualRKM-1600RF
Hardware Installation
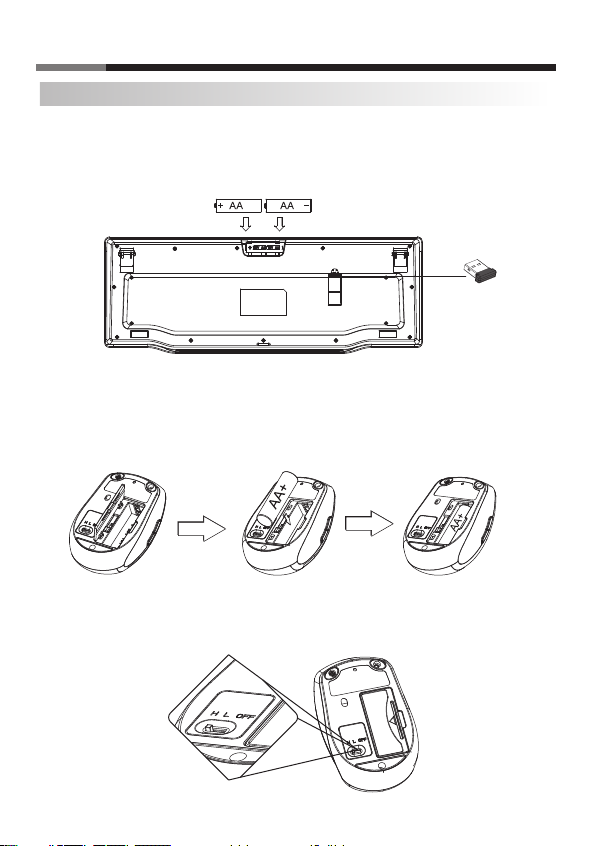
1. Set up the Keyboard (Put provided batteries into keyboard’s batteries housing)
Take the keyboard and make sure the 2 x AA alkaline batteries on the back are
installed correctly, replace battery door.
(Follow the polarity signs in the battery compartment.)
2. Set up the mouse
Open the battery housing cover under the cordless mouse’s bottom side.
Install the provided batteries into the battery housing.
(Please follow the polarity signs in the battery housing.)
Close the mouse battery housing cover.
Switch the button to “ H “ for 1600 dpi resolution , to “ L “ for 800 dpi resolution
and to “ OFF” for power off.
Please turn off the power for saving power if you don’t use the mouse at the long time.
Ready to use.
1-3
Page 6
Sli m Wirel ess Mul timed ia Keyb oard & La ser M ouse User ManualRKM-1600RF
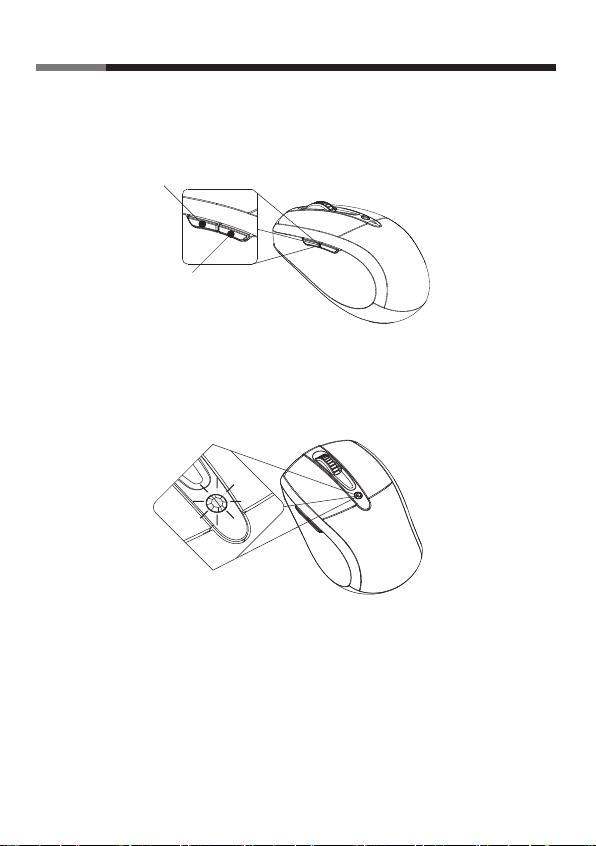
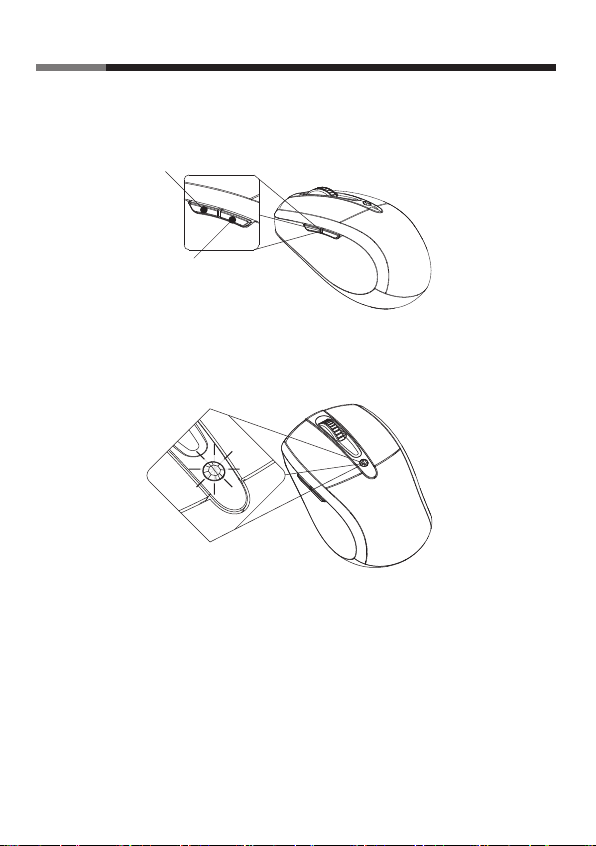
Note1:Some products own the side buttons, the button function define as
below.The Backward & forward button are only for fast control of
Internet browser.
Backward Button
Forward Button
Note2:Battery low indication. when the battery light is flashing , please turn off
the power then change the new battery.
3. Easy automatic wireless connection: Connect the USB Nano receiver to your
computer by plugging in the receiver connector into your PC USB port, wait
until automatic installation has completed.
4. Ready to use.
1-4
Page 7

Sli m Wirel ess Mul timed ia Keyb oard & La ser M ouse User ManualRKM-1600RF
ID Setting
In general, the mouse and keyboard kit were done the ID setting
while producing, User doesn’t do any thing about the ID setting.
This ID-recognition function helps to protect against interference
from other RF keyboards and mouse in the same environment.
Remember to set the ID when you replace the batteries or your
keyboard or mouse do not work properly. Please follow below
steps to complete the necessary ID-Setting process for your
wireless mouse and USB nano receiver.
1. Make sure the keyboard and mouse hardware installation is completed.
2. Plug the USB nano receiver into your computer's USB port.
3. Waiting for the USB plug and play initialization completed, and the nano
receiver LED will light flush.
4. For the mouse ID setting: Keeping the mouse to close the receiver within 30cm,
press and hold both left and right button then turn on the power button on the
bottom of mouse at the same time, it will take about 3 to 4 seconds for linking.
For the keyboard ID setting:Keeping the keyboard to close the receiver within
30cm,press and hold the "Esc" key then removing and replacing the battery at
the same time it will take about 3 to 4 seconds for linking.
5. Once the ID setting process is completed, the receiver LED will light off.
The receiver LED will light on again when wireless keyboard and mouse
are working.
6. If the mouse or keyboard doesn't work properly, please remove the USB nano
receiver from computer's USB port, then repeat do step 3 to step 5 again.
Enjoy using your keyboard and mouse.
1-5
Page 8

Sli m Wirel ess Mul timed ia Keyb oard & La ser M ouse User ManualRKM-1600RF
Troubleshooting
What do I do if the wireless mouse or keyboard does not work?
•Check the USB nano receiver is connected to your computer’s USB port.
•Make sure the batteries are correctly installed into your wireless mouse and
keyboard.
(The positive (+) and negative (-) ends of each battery must match the polarity
signs in the battery housing)
•Make sure the batteries power qualities are good for use.
•Make sure the ID Setting process is well completed.
Please change batteries immediately when the wireless keyboard/mouse
battery low indicator light up.
•Warning : Please remove batteries from your wireless mouse when not sing
for a long period of time.
•Less performance:Metal object close to or in between the device.
(Please remove objects.)
•Mouse will have reduced tracking performance on very shiny or transparent
surfaces.
System Requirements:
To use the wireless mouse, your computer must meet the following hardware
requirements and run one of the operation system listed below.
One USB port
Microsoft
Macintosh OS X 10.1 or later. (Multimedia hotkeys not supported)
®
Windows® ME, 2000, XP, Vista™, 7 or above
All product names are trademarks or registered trademarks of their respective owners.
Microsoft®, Windows®and Windows® logo are trademarks or registered trademarks of
Microsoft® Corporation in the United Stated and /or other countries.
1-6
Page 9
Sli m Wirel ess Mul timed ia Keyb oard & La ser M ouse User ManualRKM-1600RF
Dünne drahtlose Multimedia Tastatur und
Laser-Maus
Willkommen
Herzliche Glückwünsche zu Ihrem Kauf dieser RKM-1600RF drahtlosen Tastatur
und Laser-Maus Combo. Die
Combo verwendet die neueste 2,4GHz ISM RF Frequenzspreiztechnologie
(Frequency Hopping Spread Spectrum - FHSS) für erweiterte Reichweite und
reibungslose Kommunikation zwischen Tastatur, Maus und Ihrem Computer. Vier
automatisch gewählte Kanäle verhindern Störungen, wenn diese Tastatur und
Maus Combo in der Nähe von anderen RF-Geräten betrieben wird. Mithilfe der
2,4 GHz ISM RF digitalen Radiotechnologie kann der
Reichweite von bis zu 10m betrieben werden.
Die 2,4GHz drahtlose Verbindung arbeitet im Frequenzbereich 2400 bis
2483MHz, ein weltweit für industrielle, wissenschaftliche und medizinische
Zwecke (Industrial, Scientific & Medical - ISM) ohne Lizenz freigegebenes
Frequenzband. Für Benutzer mit den höchsten Ansprüchen an Leistung, Qualität
und Komfort ist die
RKM-1600RF
Wahl.
Lieferumfang
•Drahtlose Tastatur X 1
•Drahtlose Laser-Maus X 1
•USB-Nano-Empfänger X 1
•3 Stück AA Alkalibatterien
•Kurzanleitung X 1
RKM-1600RF drahtlose Tastatur und Laser-Maus
RKM-1600RF mit einer
drahtlose Tastatur und Maus Combo die ideale
+
+
+
A
A
A
A
A
A
Slim Wireless Multimedia Keyboard
& Laser mouse
RKM-1600RF
User Manual
2-1
Page 10
Slim Wireless Multimedia Keyboard & Laser Mouse User ManualRKM-1600RF
Produktinformationen
1. System- und Funktionstasten
Nächster Track
Vorheriger Track
Wiedergabe / Pause
Lautstärke +
Lautstärke -
※Unter Windows ME, 2000, XP, Vista Betriebssystem können die Hotkeys direkt
aktiviert werden, es werden keine Treiber benötigt.
2. Tastatur LEDs
Num Lock LED:Zeigen Status für Num Lock
Caps Lock LED:Zeigen Status für Caps Lock
Ein/Aus LED:Die Ein/Aus LED leuchtet grün,
wenn das Gerät eingeschaltet ist
Batterie-LED:Zeigt eine niedrige Batterieleistung an.
2-2
Page 11

Sli m Wirel ess Mul timed ia Keyb oard & La ser M ouse User ManualRKM-1600RF
Hardwareinstallation
1. Installieren Sie die Tastatur (legen Sie die beiliegenden Batterien in das Tastatur-Batteriefach)
Prüfen Sie, dass die beiden AA Nickeleisenbatterien an der Rückseite der Tastatur
korrekt installiert sind. Schließen Sie das Batteriefach.
gekennzeichnete Polarität der Batterien.)
(Beachten Sie die im Batteriefach
2. Einrichten der Maus
•Öffnen Sie die die Abdeckung des Batteriefachs auf der Unterseite der drahtlosen Maus.
•Legen Sie die mitgelieferten Batterien in das Batteriefach ein.
(Bitte beachten Sie die Polaritätskennzeichnungen im Batteriefach.)
•Schließen Sie die Abdeckung des Batteriefachs.
•Schieben Sie den Schalter zur Einstellung der 1600 dpi-Auflösung auf “H“ und zur
Einstellung der 800 dpi-Auflösung auf “L“; mit “OFF” schalten Sie die Maus aus.
•Bitte schalten Sie die Maus aus Energiespargründen aus, wenn Sie sie über einen
längeren Zeitraum nicht benutzen.
•Nun ist sie betriebsbereit.
2-3
Page 12
Sli m Wirel ess Mul timed ia Keyb oard & La ser M ouse User ManualRKM-1600RF
Hinweis 1:Einige Produkt verfügen über seitliche Tasten; die
Tastenfunktion wird nachstehend beschrieben.
Rückwärtstaste
Vorwärtstaste
Hinweis 2:Batterieanzeige. Sobald die Batterie-LED blinkt, schalten Sie
die Maus bitte aus und ersetzen die Batterien.
3. Einfache, automatische drahtlose Verbindung: Verbinden Sie den
USB-Miniempfänger mit Ihrem Computer, indem Sie den Empfängerstecker
in eine USB-Buchse Ihres PCs stecken. Warten Sie, bis die automatische
Installation abgeschlossen ist.
4. Das Gerät ist betriebsbereit.
2-4
Page 13

Sli m Wirel ess Mul timed ia Keyb oard & La ser M ouse User ManualRKM-1600RF
ID-Einstellung
Im Allgemeinen wird die ID-Einstellung für Maus und Tastatur im Werk
durchgeführt, und der Benutzer muss keine ID-Einstellung vornehmen.
Diese ID-Erkennungsfunktion dient als Schutz vor Störungen durch andere
Funktastatur- und Mausgeräte in der gleichen Umgebung. Sie sollten die ID
immer dann einstellen, wenn Ihre Tastatur oder Maus nicht einwandfrei
funktionieren. Bitte beachten Sie die folgenden Schritte zur benötigten
ID-Einstellung Ihren drahtlosen Maus und USB-Nano-Empfängers.
1. Stellen Sie sicher, dass die Hardware-Installation von Tastatur und Maus
abgeschlossen ist.
2. Schließen Sie den USB-Nano-Empfänger am USB-Anschluss des
Computers an.
3. Warten Sie, bis die USB-Plug-&-Play-Initialisierung abgeschlossen ist;
daraufhin leuchtet die LED des Nano-Empfängers.
4. Bei der Maus-ID-Einstellung: Halten Sie die Maus in einem Abstand von 30 cm
zum Empfänger; halten Sie beide Tasten gedrückt, betätigen Sie dann gleichzeitig
zum Einschalten der Maus den Ein-/Ausschalter an der Unterseite der Maus; der
Verbindungsaufbau dauert etwa 3 bis 4 Sekunden.
Bei der Tastatur-ID-Einstellung:Halten Sie die Tastatur in einem Abstand von 30 cm
zum Empfänger; halten Sie die “Esc”-Taste gedrückt und ersetzen Sie dann
gleichzeitig die Batterie; der Verbindungsaufbau dauert etwa 3 bis 4 Sekunden.
5. Sobald die ID-Einstellung abgeschlossen ist, schaltet sich die Empfänger- LED aus.
Die Empfänger-LED schaltet sich wieder ein, wenn die schnurlose Maus oder
Tastatur in Betrieb sind.
6. Wenn Maus oder Tastatur nicht richtig funktionieren, entfernen Sie bitte den
USB-Nano-Empfänge vom USB-Anschluss des Computers und wiederholen
Sie die Schritte 3 bis Schritt 5.
Viel Spaß mit Ihrer Tastatur und Maus!
2-5
Page 14

Sli m Wirel ess Mul timed ia Keyb oard & La ser M ouse User ManualRKM-1600RF
Fehlerbehebung
Drahtlose Maus oder Tastatur funktionieren nicht. Was kann ich tun?
•Prüfen Sie, dass der USB-Dongle-Empfänger mit einer USB-Buchse Ihres
Computers verbunden ist.
•Prüfen Sie, dass die Batterien Ihrer drahtlosen Maus und Tastatur
ordnungsgemäß installiert sind.
(Die positiven (+) und negativen (-) Pole der Batterien müssen entsprechend
der Kennzeichnungen im Batteriefach ausgerichtet sein)
•Prüfen Sie, dass die Batterien voll sind.
•Prüfen Sie, dass die ID-Einstellung erfolgreich abgeschlossen wurde.
•Bitte wechseln Sie umgehend die Batterien, wenn der Batteriestandsindikator
der drahtlosen Tastatur/Maus leuchtet.
•Warnung: Nehmen Sie bei längerer Nichtverwendung Ihrer drahtlosen Maus die
Batterien heraus.
•Geringe Leistung: Metallobjekte können die Leistung der drahtlosen
Verbindung beeinträchtigen. (Entfernen Sie die Objekte.)
•Die Maus hat auf sehr glänzenden oder durchscheinenden Oberflächen eine
geringere Abtastfähigkeit.
Systemanforderungen:
Um die drahtlose Maus verwenden zu können, muss Ihr Computer die folgenden
Systemanforderungen erfüllen und eines der aufgeführten Betriebssysteme
aufweisen.
•Eine USB-Buchse
•Microsoft® Windows® ME, 2000, XP, Vista™, 7 oder höher
•Macintosh OS X 10.1 oder höher. (Multimedia-Hotkeys werden nicht unterstützt)
Alle Marken und Produktnamen sind Warenzeichen oder eingetragene Warenzeichen der
jeweiligen Eigentümer.
Microsoft®, Windows® und Windows® Logo sind Warenzeichen oder eingetragene
Warenzeichen von Microsoft® Corporation in den Vereinigten Staaten und/oder anderen Ländern.
2-6
Page 15

Sli m Wirel ess Mul timed ia Keyb oard & La ser M ouse User ManualRKM-1600RF
Multimédia sans fil minces clavier et souris de
laser
Bienvenue
Félicitations pour votre achat de l’ensemble clavier et souris laser sans fil
RKM-1600RF. L’ensemble clavier et souris laser sans fil RKM-1600RF utilise la
dernière technologie RF ISM Frequency Hopping Spread Spectrum (FHSS)
2.4GHz pour vous permettre d’étendre la portée et de faire communiquer
facilement la clavier, la souris et votre ordinateur. Quatre canaux sélectionnés
automatiquement éliminent toute interférence possible lorsque cet ensemble
clavier et souris est utilisé avec d’autres appareil RF alentours.
La technologie radio numérique RF ISM 2.4GHz permet au
connecté à des appareils jusqu’à une portée de 10M.Le lien de communication
sans fil 2.4GHz opère dans la bande de fréquences des 2400 - 2483 MHz
utilisable mondialement sans licence pour les applications industrielles,
scientifiques et médicales (ISM). Pour les utilisateurs sensibles aux hautes
performances, à la qualité, et à l’aspect pratique, l’ensemble clavier et souris
RKM-1600RF est le choix parfait.
Contenu de L’emballage
•Clavier sans fil X 1
•Souris laser sans fil X 1
•Récepteur Nano USB X 1
•3 piles alcalines AA
•Guide d’installation rapide X 1
RKM-1600RF de rester
+
+
+
A
A
A
A
A
A
Slim Wireless Multimedia Keyboard
& Laser mouse
RKM-1600RF
User Manual
3-1
Page 16

Sli m Wirel ess Mul timed ia Keyb oard & La ser M ouse User ManualRKM-1600RF
Informations Produit
1. Touches système et application
Piste suivante
Piste précédente
Lecture / Pause
Augmenter le volume
Diminuer le volume
※La fonction touches de raccourcis peut s'activer directement sous les systémes
Windows ME, 2000, XP, Vista, pas besoin d'installer de pilote de périphérique
pour accéder à ces fonctions.
2. LED clavier
Num Lock LED:Indique l'état de Num Lock
Caps Lock LED:Indique l'état de Caps Lock
LED d’alimentation:La LED d’alimentation s’allume en vert pour
indiquer que l’appareil est sous tension.
Voyant pile faible:indique que l’alimentation est faible.
3-2
Page 17

Sli m Wirel ess Mul timed ia Keyb oard & La ser M ouse User ManualRKM-1600RF
Installation Matérielle
1. Installez le clavier (Installez les piles fournis dans le logement à piles du clavier)
Prenez le clavier et assurez-vous que les piles alcalines 2 x AA à l’arrière sont
correctement installées, remettez en place le couvercle des piles.
signes de polarité dans le logement des piles.)
(Respectez les
2. Installation de la souris
•Ouvrez le couvercle du compartiment à piles, sous la souris sans fil.
•Installez les piles fournies dans le compartiment à piles.
(Veuillez respecter les symboles de polarité dans le compartiment à piles.)
•Fermez le couvercle du compartiment à piles.
•Placez le bouton en position «H» pour une résolution de 1600 dpi, en position «L»
pour une résolution de 800 dpi ou sur «OFF» pour mettre la souris hors tension.
•Si vous ne prévoyez pas d’utiliser votre souris pendant une longue durée, veuillez
la mettre hors tension pour économiser l’énergie.
•La souris est prête à l’emploi.
3-3
Page 18

Sli m Wirel ess Mul timed ia Keyb oard & La ser M ouse User ManualRKM-1600RF
Remarque 1:certains produits sont dotés de boutons latéraux. Leurs
fonctions sont décrites ci-dessous.
Bouton Retour
Bouton Suite
Remarque 2:indicateur du niveau faible de la batterie. Lorsque le
voyant batterie clignote, mettez la souris hors tension
puis remplacer la batterie.
3. Connexion sans fil automatique et facile: Connectez le mini récepteur
USB sur votre ordinateur en branchant le connecteur du récepteur sur
le port USB de votre ordinateur, et attendez que l’installation automatique
se termine.
4. Prêt à l’emploi.
3-4
Page 19

Sli m Wirel ess Mul timed ia Keyb oard & La ser M ouse User ManualRKM-1600RF
Paramètre ID
En général, le paramétrage ID de l’ensemble clavier et souris est effectué
lors de leur fabrication. L’utilisateur n’a pas à se soucier du paramétrage ID.
Cette fonction de reconnaissance ID constitue une protection contre les
interférences générées par d’autres claviers et souris RF présents dans le
même environnement. N’oubliez pas de paramétrer l’ID lorsque votre
clavier ou votre souris ne fonctionne pas correctement. Veuillez suivre les
étapes ci-dessous pour réaliser le processus de réglage d’ID nécessaire à
votre souris sans fil et à votre nano récepteur USB.
1. Assurez-vous d’avoir terminé l’installation de la souris et du clavier.
2. Branchez le récepteur nano USB sur le port USB de votre ordinateur.
3. Patientez le temps de l’initialisation ‘plug-and-play’ USB. Le voyant DEL du
récepteur nana va alors clignoter.
4. Pour le paramétrage de l’ID de la souris : placez la souris à proximité du
récepteur(30 cm). Restez appuyé sur le bouton gauche et droit de la souris.
Mettez-là alors sous tension (bouton d’alimentation sous la souris). La liaison
s’établit en 3 ou 4 secondes.
Pour le paramétrage de l’ID du clavier:placez le clavier à proximité du
récepteur(30 cm). Restez appuyé sur la touche ‘Esc’ tout en enlevant puis en
remettant la pile en place. La liaison s’établit en 3 ou 4 secondes.
5. Une fois le paramétrage de l’ID effectué, le voyant DEL du récepteur s’éteint.
Le voyant DEL du récepteur s’allume à nouveau lorsque le clavier ou la souris
sont en cours d’utilisation.
6. Si la souris ou le clavier ne fonctionne pas correctement, débranchez le
récepteur nano USB du port USB de l’ordinateur, puis reprenez les étape 3 à 5.
Profitez maintenant de votre clavier et de votre souris.
3-5
Page 20

Sli m Wirel ess Mul timed ia Keyb oard & La ser M ouse User ManualRKM-1600RF
Dépannage
Que faire si la souris ou le clavier sans fil ne fonctionne pas ?
•Vérifiez que le dongle récepteur USB est connecté sur le port USB de votre
ordinateur.
•Assurez-vous que les piles sont correctement installées dans votre souris et
votre clavier sans fil.
(Les pôles positif (+) et négatif (-) de chaque pile doivent respecter les signes
de polarité dans le logements à piles)
•Assurez-vous de la qualité des piles et de leur aptitude à l’emploi.
•Assurez-vous que le processus de réglage d’ID a été réalisé.
•Veuillez remplacer les piles immédiatement lorsque l’indicateur de piles faibles
du clavier ou de la souris sans fil s’allume.
•Avertissement: Veuillez enlever les piles de votre souris sans fil lorsqu’elle n’est
pas utilisée pendant une période prolongée.
•Baisse de performances : Un objet métallique est à proximité ou dans le
champ de l’appareil. (Veuillez enlever de tels objets.)
•La souris a des performances de suivi réduites sur les surfaces brillantes ou
transparentes.
Configuration système requise:
Pour utiliser la souris sans fil, votre ordinateur doit satisfaire aux exigences
matérielles suivantes, et tourner sous l’un des systèmes d’exploitations cités
ci-dessous.
•Un port USB
•Microsoft® Windows® ME, 2000, XP, Vista™, 7 ou supérieur
•Macintosh OS X 10.1 ou supérieur. (Les touches de raccourcis multimédias
ne sont pas prises en charge)
Tous les noms de produits sont des marques déposées ou des marques commerciales de leurs
détenteurs respectifs.
Les logo Microsoft®, Windows® et Windows® sont des marques déposées ou des marques
commerciales de Microsoft ® Corporation aux Etats-Unis et/ou dans d’autres pays.
3-6
Page 21

Sli m Wirel ess Mul timed ia Keyb oard & La ser M ouse User ManualRKM-1600RF
Teclado sin hilos delgado de las multimedias y
ratón del laser
Bienvenido
Felicidades por su compra de un combo RKM-1600RF de teclado inalámbrico y
ratón láser Rosewill. El combo
Rosewill usa la más moderna tecnología ISM RF de Espectro Disperso por Salto de
Frecuencia (FHSS) de 2.4GHz para proporcionarle con un alcance ampliado y
una comunicación sin defectos entre el teclado, el ratón y su ordenador.
Cuatro canales seleccionados automáticamente eliminan cualquier posible
interferencia al usar este combo de teclado y ratón cerca de otros dispositivos de
RF.
La tecnología ISM RF de 2.4GHz permite al RKM-1600RF permanecer
conectado a dispositivos en hasta 10M de radio. El enlace de comunicación
inalámbrico de 2.4GHz funciona en la banda de frecuencia 2400 - 2483 MHz,
disponible sin licencia en todo el mundo para aplicaciones Industriales, Científicas
y Médicas (ISM). Para los usuarios que requieran un mayor rendimiento, calidad
y comodidad, el combo RKM-1600RF de teclado y ratón es la elección
perfecta.
Contenidos del Embalaje
•Teclado Inalámbrico X 1
•Ratón láser inalámbrico X 1
•Receptor USB Nano X 1
•Baterías alcalinas de tamaño AA x 3
•Guía de Instalación Rápida X 1
RKM-1600RF de teclado inalámbrico y ratón láser
+
+
+
A
A
A
A
A
A
Slim Wireless Multimedia Keyboard
& Laser mouse
RKM-1600RF
User Manual
4-1
Page 22

Sli m Wirel ess Mul timed ia Keyb oard & La ser M ouse User ManualRKM-1600RF
Información sobre el Producto
1. Teclas del Sistema y de las Aplicaciones
Pista siguiente
Pista anterior
Reproducir / Pausa
Subir volumen
Bajar volumen
※La función de las teclas de acceso directo “puede activarse directamente con
el sistema Windows ME, 2000, XP, Vista”, no es necesario instalar ningún
dispositivo para activar las funciones.
2. LEDs del Teclado
Num Lock LED:Indica que está en modo Num Lock
Caps Lock LED:Indica que está en modo Caps Lock
LED de Encendido:El LED de encendido se enciende en verde
para indicar que la unidad está encendida
LED de Batería Baja:indica un nivel de bajo de batería.
4-2
Page 23

Sli m Wirel ess Mul timed ia Keyb oard & La ser M ouse User ManualRKM-1600RF
Instalación de Hardware
1. Configurar el Teclado (Coloque las baterías suministradas en el compartimento para las
baterías del teclado)
Asegúrese de que las 2 baterías alcalinas AA de la parte posterior del teclado están
instaladas correctamente, vuelva a colocar puerta de las baterías.
(Colóquelas de acuerdo con los signos de polaridad del compartimento de las baterías.)
2. Preparar el ratón
•Abra el compartimento de las pilas que se encuentra debajo del ratón inalámbrico.
•Instale las pilas proporcionadas en el compartimento de las mismas.
(Tenga en cuenta los símbolos de polaridad que se encuentran en el compartimento de las pilas.)
•Cierre la tapa del compartimento de las pilas.
•Coloque el botón en la posición “H” o “L” para conseguir una resolución de 1600
ó 800 ppp, respectivamente. Colóquelo en la posición “OFF”
(APAGADO) para apagarlo.
•Desconecte la alimentación para ahorrar energía si no va a utilizar el ratón durante
un prolongado período de tiempo.
•Ahora podrá utilizar el ratón.
4-3
Page 24

Sli m Wirel ess Mul timed ia Keyb oard & La ser M ouse User ManualRKM-1600RF
Nota 1:a función de los botones laterales que hay en algunos ratones es la
siguiente:Los botones botón de avance y retroceso solamente
se utilizan para
Botón Retroceder
Botón Avanzar
Nota 2:indicación de carga baja de las pilas. Cuando la luz de las pilas
parpadee, desconecte la alimentación y cambie las pilas por
unas nuevas.
3. Fácil conexión inalámbrica automática: Conecte el mini receptor USB
a su ordenador conectando el conector del receptor al puerto USB de
su PC. Espere hasta que la instalación automática se haya completado.
4. Ya está listo para usar.
4-4
Page 25

Sli m Wirel ess Mul timed ia Keyb oard & La ser M ouse User ManualRKM-1600RF
Configuración de identificación
En general, el kit de ratón y teclado recibe una ID durante la fabricación. El usuario
no tiene que hacer nada para configurar la ID. Esta función de reconocimiento
de ID permite proteger el kit contra interferencias de otros teclados y ratones
RF cercanos. Recuerde configurar la ID de su teclado o ratón si no funcionan
correctamente. Por favor, siga los pasos a continuación para completar el
proceso de Configuración de la ID necesario para su ratón inalámbrico y su
dispositivo receptor nano USB.
1. Asegúrese de que haya finalizado la instalación de hardware del teclado y el ratón.
2. Conecte el receptor nano USB al puerto USB de su equipo.
3. Espere a que finalice la inicialización “Plug and Play” del puerto USB.
A continuación, se iluminará el indicador LED del receptor nano.
4. Para configurar la identificación del ratón: Mantenga pulsados los botones izquierdo
y derecho del ratón mientras éste se encuentra a una distancia inferior a 30 cm del
receptor. Al mismo tiempo, pulse el botón de encendido situado en la parte inferior
del ratón. El proceso de enlace durará 3 o 4 segundos.
Para configurar la identificación del teclado:Mantenga pulsada la tecla "Esc" del
teclado mientras éste se encuentra a una distancia inferior a 30 cm del receptor.
Al mismo tiempo, extraiga la batería y vuelva a insertarla. El proceso de enlace
durará 3 o 4 segundos.
5. Una vez finalizado el proceso de configuración de identificación, el indicador
LED del receptor se apagará. El indicador LED del receptor volverá a iluminarse
de nuevo cuando el teclado y el ratón inalámbricos se encuentren en uso.
6. Si el ratón o el teclado no funcionan correctamente, desconecte el receptor nano
USB del puerto USB del equipo y repita de nuevo las acciones descritas entre
el paso 3 y el paso 5.
Disfrute del uso de su teclado y su ratón.
4-5
Page 26

Sli m Wirel ess Mul timed ia Keyb oard & La ser M ouse User ManualRKM-1600RF
Resolución de Problemas
¿Qué hago si el ratón inalámbrico o el teclado no funcionan?
•Compruebe que el dispositivo receptor USB esté conectado al puerto USB de
su ordenador.
•Asegúrese de que las baterías estén instaladas correctamente en su ratón y
teclado inalámbricos.
(Los polos positivo (+) y negativo (-) de cada batería deben coincidir con los signos
de polaridad del compartimento de las baterías)
•Asegúrese de que las baterías sean las indicadas.
•Asegúrese de que el proceso de Configuración de la ID se haya completado
correctamente.
•Por favor, cambie las baterías inmediatamente cuando se encienda el indicador
de batería baja del teclado/ratón inalámbrico.
•Aviso: Por favor, extraiga las baterías de su ratón inalámbrico cuando no vaya a
usarlo durante un largo período de tiempo.
•Menor Rendimiento:Si hay objetos metálicos cerca o interponiéndose con el
dispositivo. (Por favor, mueva los objetos.)
•El ratón tendrá menor rendimiento al moverse si está situado en
superficies muy brillantes o transparentes.
Requisitos del Sistema:
Para usar el ratón inalámbrico, su ordenador debe cumplir con los siguientes
requisitos de hardware y tener uno de los sistemas operativos indicados más
abajo.
•Un puerto USB
•Microsoft® Windows® ME, 2000, XP, Vista™, 7 o superior
•Macintosh OS X 10.1 ó posterior. (Las teclas multimedia no son compatibles)
Todos los nombres de productos son marcas o marcas registradas de sus respectivos propietarios.
Los logotipos de Microsoft®, Windows® y Windows® son marcas o marcas registradas de
Microsoft® Corporation en los Estados Unidos y/o otros países.
4-6
Page 27

Slim Wireless Multimedia Keyboard & Laser Mouse User ManualRKM-1600RF
超薄2.4GHz多媒體無線鍵盤滑鼠組
歡迎使用
感謝您購買Rosewill RKM-1600RF無線鍵盤組,RKM-1600RF 無線鍵盤和光學
滑鼠使用最新的2.4GHz 跳頻展頻(FHSS)技術提供電腦週邊產品的無線傳輸。
RKM-1600RF鍵盤和鼠標取代傳統無線產品會出現彼此互相干擾的狀況,數位
訊號接收斷訊等問題,4 個自動跳頻的技術阻絕任何可能的無線產品干擾。提供
8,388,608組的識別碼,可以避免您的鍵盤滑鼠被其他RF 產品干擾,具有接收
360度特性傳輸接收無死角,使用者不需將鍵盤滑鼠特意對準接收器即能隨意自
在操作;RKM-1600RF鍵盤滑鼠組不僅無障礙與接收器進行訊號傳輸,傳輸有
效距離更可達10公尺,因為RKM-1600RF運用全球可通用的2.4GHz ISM頻段的
技術(Industry Science Medicine)通用頻段。可輕鬆在客廳、書房、研究室甚至
醫院等地方使用,免於無線裝置的干擾,讓鍵盤滑鼠與電腦間溝通無礙。
RKM-1600RF無線鍵盤組是您最好的選擇!
包裝內容
•無線鍵盤 X 1
•無線雷射滑鼠 X 1
•USB迷你無線接收器 X 1
•AA尺寸鹼性電池 X 3顆
•快速安裝手冊 X 1
+
+
+
A
A
A
A
A
A
Slim Wireless Multimedia Keyboard
& Laser mouse
RKM-1600RF
User Manual
5-1
Page 28

Slim Wireless Multimedia Keyboard & Laser Mouse User ManualRKM-1600RF
快捷鍵及LED燈說明
1.多媒體快捷鍵說明
下一段
上一段
播放 / 暫停
增加音量
降低音量
※多媒體按鍵功能在Windows ME, 2000,XP, Vista,7作業系統下可直接
使用,不需驅動程式
2.LED 燈說明
數字鍵切換指示燈
字母大小寫切換指示燈
鍵盤電源指示燈
電池低電源指示燈
5-2
Page 29

Slim Wireless Multimedia Keyboard & Laser Mouse User ManualRKM-1600RF
硬體安裝
1.電池置入鍵盤:
取下鍵盤背後的電池蓋,置入電池,並且確認電池的正、負極與電池盒內的標示
方向相符;關上電池蓋
電池置入滑鼠:
2.
•取下滑鼠背後的電池蓋,置入電池,並且確認電池的正、負極與電池盒內的標示
方向相符;關上電池蓋。
•開啟滑鼠電源開關,即可使用。
5-3
Page 30

Slim Wireless Multimedia Keyboard & Laser Mouse User ManualRKM-1600RF
•切換開關:H表1600dpi解析度、L表800dpi解析度、OFF表關閉電源。
•在您安裝電池時,請確認您所使用的為新電池。
•當滑鼠長時間不使用時, 請將滑鼠底部的開關關掉, 以達省電作用。
注意1:產品擁有側鍵功能,前一頁 / 後一頁功能可加速網際網路頁面的快速瀏覽
前一頁按鍵
後一頁按鍵
注意2:低電壓指示燈,當指示燈亮起時,請將電源開關關閉然後更換新的電池
3. 無線連接方式:
請將USB迷你接收器插入您電腦的USB埠,電腦系統會自動偵側到USB接收器
,非常容易就能完成無線連接。
4. 安裝完成可使用
5-4
Page 31

Slim Wireless Multimedia Keyboard & Laser Mouse User ManualRKM-1600RF
ID辨識碼設定
每款無線滑鼠與鍵盤在使用前需進行ID辨識碼設定,但是RKM-1600RF在出廠時
都完成ID設定碼,使用者只需將硬體安裝完成插入電腦的USB連接埠之後即可立
即使用此無線鍵盤滑鼠組。此 ID設定的功能在於防止電腦與鍵盤、滑鼠間之無線
訊號被其他在同一環境下的無線產品所影響。如果鍵盤或滑鼠無法正常運作的話
,請依照下列的步驟重新設定ID。
滑鼠設定程序:
1. 確認電腦的電源是開啟狀態。
2. 確定滑鼠及鍵盤的電池已經完成安裝。
3. 請將USB迷你接收器插入電腦的USB連接埠。
4. 此時接收器 ID 的 LED 燈會亮起然後再熄滅以表示
它已準備好接收鍵盤和滑鼠的設定訊號。
5.滑鼠對碼:
移動無線滑鼠至USB接收器約30公分處;然後同時按住滑鼠的左鍵及右鍵不放
,再將滑鼠底部的電源開關開啟,滑鼠即進行ID辨識,此時接收器會再亮起。
鍵盤對碼:
移動無線鍵盤至USB接收器約30公分處;然後按住鍵盤 "ESC"鍵不放,再將
鍵盤的電池取出再裝回去,此時鍵盤即將進行ID辨識設定,此時接收器會再亮
起。
6. 第一次ID設定完成後迷你無線接收器LED燈光會熄滅 。當無線滑鼠或鍵盤正常
執行操作時,迷你無線接收器LED燈光會再度亮起。
7. 如果滑鼠或者鍵盤仍然無法正常運作,請將USB迷你接收器從電腦的USB連接
埠移出,然後再重複2-6安裝程序。
可以開始享受
RKM-1600RF帶給您的數位生活!
5-5
Page 32

Slim Wireless Multimedia Keyboard & Laser Mouse User ManualRKM-1600RF
疑難排解
若您對RKM-1600RF無線鍵盤滑鼠組無法正常動作有任何疑問,請嘗試下面步驟
說明:
•確認USB迷你無線接收器是正確與電腦的USB連接埠正常連接。
•注意只能使用鹼性電池。
•確認電池的正負極是與電池盒內的標示方向相同。
•確定電池的蓄電能量是沒有問題,請勿將老舊電池或不同類型(例如炭鋅或鹼
性)電池混合使用。
•當無線鍵盤或滑鼠的低電量指示燈亮起時,代表電源不足,請更換新的電池。
•重新確認ID識別碼的設定完成,請依照ID辨識碼設定。
•長時間不使用
RKM-1600RF裝置,請將電池取出。
系統需求
使用無線滑鼠請確認您的系統與您購買的產品相容
•最少要一個 USB連接埠
•微軟的視窗系統 ME, 2000, XP,Vista
•微軟作業系統 Internet Explorer 5.0 或更新版本
Microsoft®及Windows®係Microsoft®Corporation 在美國及/或其他國家(地區)的註冊商標或商標。
在此提及之公司名稱或產品名稱為各自擁有之商標。
TM
, 7 或更新版
5-6
Page 33

Slim Wireless Multimedia Keyboard & Laser Mouse User ManualRKM-1600RF
超薄2.4GHz多媒体无线键盘鼠标组
欢迎使用
感谢您购买Rosewill RKM-1600RF无线键盘组,RKM-1600RF无线键盘和光学
鼠标使用最新的2.4GHz 跳频展频(FHSS)技术提供计算机外设产品的无线传输。
RKM-1600RF键盘和鼠标取代传统无线产品会出现彼此互相干扰的状况,数字
讯号接收断讯等问题,4 个自动跳频的技术阻绝任何可能的无线产品干扰。提
供8,388,608组的识别码,可以避免您的键盘鼠标被其它RF 产品干扰,具有接
收360度特性传输接收无死角,使用者不需将键盘鼠标特意对准接收器即能随意
自在操作;RKM-1600RF键盘鼠标组不仅无障碍与接收器进行讯号传输,传输
有效距离更可达10公尺,因为RKM-1600RF运用全球可通用的2.4GHz ISM频段
的技术(Industry Science Medicine)通用频段。可轻松在客厅、书房、研究室
甚至医院等地方使用,免于无线装置的干扰,让键盘鼠标与计算机间沟通无碍
。RKM-1600RF无线键盘组是您最好的选择!
包装内容
•无线键盘 X 1
•无线雷射鼠标 X 1
•USB迷你无线接收器 X 1
•AA尺寸碱性电池 X 3颗
•快速安装手册 X 1
+
+
+
A
A
A
A
A
A
Slim Wireless Multimedia Keyboard
& Laser mouse
RKM-1600RF
User Manual
6-1
Page 34

Slim Wireless Multimedia Keyboard & Laser Mouse User ManualRKM-1600RF
快捷键及LED灯说明
1.多媒体快捷键说明
下一段
上一段
播放 / 暂停
增加音量
降低音量
※多媒体按键功能在Windows ME, 2000,XP, Vista,7操作系统下可直接
使用,不需驱动程序
2.LED 灯说明
字母大小写切换指示灯
数字键切换指示灯
键盘电源指示灯
电池低电源指示灯
6-2
Page 35

Slim Wireless Multimedia Keyboard & Laser Mouse User ManualRKM-1600RF
硬件安装
1.电池置入键盘:
取下键盘背后的电池盖,置入电池,并且确认电池的正、负极与电池盒内的标示
方向相符;关上电池盖
2.
电池置入鼠标:
•取下鼠标背后的电池盖,置入电池,并且确认电池的正、负极与电池盒内的标示
方向相符;关上电池盖。
•开启鼠标电源开关,即可使用。
6-3
Page 36

Slim Wireless Multimedia Keyboard & Laser Mouse User ManualRKM-1600RF
•切换开关:H表1600dpi分辨率、L表800dpi分辨率、OFF表关闭电源。
•在您安装电池时,请确认您所使用的为新电池。
•当鼠标长时间不使用时, 请将鼠标底部的开关关掉, 以达省电作用。
注意1:产品拥有侧键功能,前一页 / 后一页功能可加速因特网页面的快速浏览
前一页按键
后一页按键
注意2:低电压指示灯,当指示灯亮起时,请将电源开关关闭然后更换新的电池
3. 无线连接方式:
请将USB迷你接收器插入您计算机的USB端口,计算机系统会自动侦侧到USB接收
器,非常容易就能完成无线连接。
4. 安装完成可使用
6-4
Page 37

Slim Wireless Multimedia Keyboard & Laser Mouse User ManualRKM-1600RF
ID辨识码设定
每款无线鼠标与键盘在使用前需进行ID辨识码设定,但是RKM-1600RF在出厂时都
完成ID设定码,使用者只需将硬件安装完成插入计算机的USB连接端口之后即可
立即使用此无线键盘鼠标组。此 ID设定的功能在于防止计算机与键盘、鼠标间
之无线讯号被其它在同一环境下的无线产品所影响。如果键盘或鼠标无法正常运
作的话,请依照下列的步骤重新设定ID。
鼠标设定程序:
1. 确认计算机的电源是开启状态。
2. 确定鼠标及键盘的电池已经完成安装。
3. 请将USB迷你接收器插入计算机的USB连接端口。
4. 此时接收器 ID 的 LED 灯会亮起然后再熄灭以表示它已准备好接收键盘和鼠
标的设定讯号。
5.鼠标对码:移动无线鼠标至USB接收器约30公分处;然后同时按住鼠标的左键及
右键不放,再将鼠标底部的电源开关开启,鼠标即进行ID辨识,此时接收器会
再亮起。
键盘对码:移动无线键盘至USB接收器约30公分处;然后按住键盘 "ESC"键不
放,再将键盘的电池取出再装回去,此时键盘即将进行ID辨识设定,此时接收
器会再亮起。
6. 第一次ID设定完成后迷你无线接收器LED灯光会熄灭 。当无线鼠标或键盘正常
执行操作时,迷你无线接收器LED灯光会再度亮起。
7. 如果鼠标或者键盘仍然无法正常运作,请将USB迷你接收器从计算机的USB连接
端口移出,然后再重复2-6安装程序。
可以开始享受RKM-1600RF带给您的数字生活!
6-5
Page 38

Slim Wireless Multimedia Keyboard & Laser Mouse User ManualRKM-1600RF
疑难排解
若您对RKM-1600RF无线键盘鼠标组无法正常动作有任何疑问,请尝试下面步骤说
明:
•确认USB迷你无线接收器是正确与计算机的USB连接端口正常连接。
•注意只能使用碱性电池。
•确认电池的正负极是与电池盒内的标示方向相同。
•确定电池的蓄电能量是没有问题,请勿将老旧电池或不同类型(例如炭锌或碱
性)电池混合使用。
•当无线键盘或鼠标的低电量指示灯亮起时,代表电源不足,请更换新的电池。
•重新确认ID识别码的设定完成,请依照ID辨识码设定。
•长时间不使用RKM-1600RF装置,请将电池取出。
系统需求
使用无线鼠标请确认您的系统与您购买的产品兼容
•最少要一个 USB连接埠
•微软的窗口系统 ME, 2000, XP,Vista
•微软操作系统 Internet Explorer 5.0 或更新版本
Microsoft®及Windows®系Microsoft®Corporation 在美国及/或其它国家(地区)的注册商标或商标。
在此提及之公司名称或产品名称为各自拥有之商标。
TM
, 7或更新版
6-6
Page 39

Sli m Wirel ess Mul timed ia Keyb oard & La ser M ouse User ManualRKM-1600RF
Federal Communication Commission Interference Statement
This equipment has been tested and found to comply with the limits for a Class
B digital device, pur-suant to Part 15 of the FCC Rules. These limits are designed
to provide reasonable protection against harmful interference in a residential
installation. This equipment generates, uses and can radiated ra-dio frequency
energy and, if not installed and used in accordance with the instructions, may cause
harmful interference to radio communications. However, there is no guarantee that
interference will not occur in a particular installation. If this equipment does
cause harmful interference to radio or television reception, which can be
determined by turning the equipment off and on, the user is en-couraged to try
to correct the interference by one of the following measures:
• Reorient or relocate the receiving antenna.
• Increase the separation between the equipment and receiver.
• Connect the equipment into an outlet on a circuit different from that to which
the receiver is connected.
• Consult the dealer or an experienced radio/TV technician for help.
FCC Caution: To assure continued compliance, (example – use only shielded
interface cables when connecting to computer or peripheral devices). Any changes or
modifications not expressly approved by the party responsible for compliance could
void the user’s authority to operate this equipment.
FCC Radiation Exposure Statement
This equipment complies with FCC radiation exposure limits set forth for an
uncontrolled environ-ment. This equipment should be installed and operated with
minimum distance 20 cm between the ra-diator & your body.
This device complies with Part 15 of the FCC Rules. Operation is subject to
the following two condi-tions:
(1) This device may not cause harmful interference, and (2) this device must
accept any inter-ference received, including interference that may cause undesired
operation.
Page 40

Thank you for purchasing a quality Rosewill Product.
Please register your product at : www.rosewill.com
for complete warranty information and future support for your product.
 Loading...