

Page 1
2-Pound Bread Maker
RHBM-15001
Read this booklet thoroughly before using your Bread Maker,
and save it for future reference.
User Manual
Page 2

1
USER MANUAL
2-POUND BREAD MAKER
RHBM-15001
CONTENTS
IMPORTANT SAFEGUARDS
.....................................2
KNOW YOUR BREAD MAKER
. . . . . . . . . . . . . . . . . . . . . . . . . . . . . . . . . . . 3
INTRODUCTION TO THE CONTROL PANEL
. . . . . . . . . . . . . . . . . . 4-6
KEEP WARM FUNCTION
........................................6
AUTOMATIC DISPENSER FUNCTION
. . . . . . . . . . . . . . . . . . . . . . . . . . . 6
MEMORY
........................................................6
OPERATING ENVIRONMENT
....................................6
WARNING DISPLAY
.............................................7
FOR THE FIRST USE
............................................7
HOW TO MAKE BREAD
.......................................7-8
SPECIAL INTRODUCTION
.....................................8-9
CLEANING AND MAINTENANCE
. . . . . . . . . . . . . . . . . . . . . . . . . . . . . . . . 9
INTRODUCTION TO BREAD’S INGREDIENTS
. . . . . . . . . . . . . . . . 9-11
MEASURING INGREDIENTS
.................................11-12
BREAD MAKER COOKBOOK
...............................12-14
TROUBLE SHOOTING
.......................................15-18
SPECIFICATIONS
...............................................19
Page 3

2
USER MANUAL
2-POUND BREAD MAKER
RHBM-15001
IMPORTANT SAFEGUARDS
Before using the electrical appliance, these basic precautions should always be
followed:
1. READ ALL INSTRUCTIONS.
2. Before using, check that the voltage of wall outlet corresponds to that shown on the
rating plate.
3. Do not operate any appliance with a damaged cord or plug, or after the appliance
malfunctions, or if it is dropped or damaged in any manner. Return the appliance
to manufacturer or the nearest authorized service agent for examination, repair, or
electrical or mechanical adjustment.
4. Do not touch hot surfaces.
5. To protect against electric shock, do not immerse cord, plugs, or housing in water or
other liquid.
6. Unplug from outlet when not in use, before putting on or taking off parts, and before
cleaning.
7. Do not let cord hang over the edge of a table or hot surface.
8. The use of accessory attachments not recommended by the appliance manufacturer
may cause injuries.
9. Do not place on or near a hot gas or electric burner, or in a heated oven.
10. Do not touch any moving or spinning parts of the machine when baking.
11. Never switch on the appliance without bread pan inserted properly and filled with
ingredients.
12. Never strike the bread pan on the top or edge to remove it as this may damage the
bread pan and prevent safe use of it thereafter.
13. Metal foils or other materials must not be inserted into the bread maker as this can give
rise to the risk of a fire or short circuit.
14. Never cover the bread maker with a towel or any other material – heat and steam must
be able to escape freely. A fire can be caused if it is covered by or comes into contact
with combustible material.
15. Do not operate the appliance for anything other than its intended use.
16. Always use the appliance on a secure, dry, level surface.
17. Do not use outdoors.
18. The appliance is not intended to be operated by means of an external timer or separate
remote-control system.
19. To avoid damaging the appliance, do not operate the unit without bread pan placed in
the chamber.
Page 4
3
USER MANUAL
2-POUND BREAD MAKER
RHBM-15001
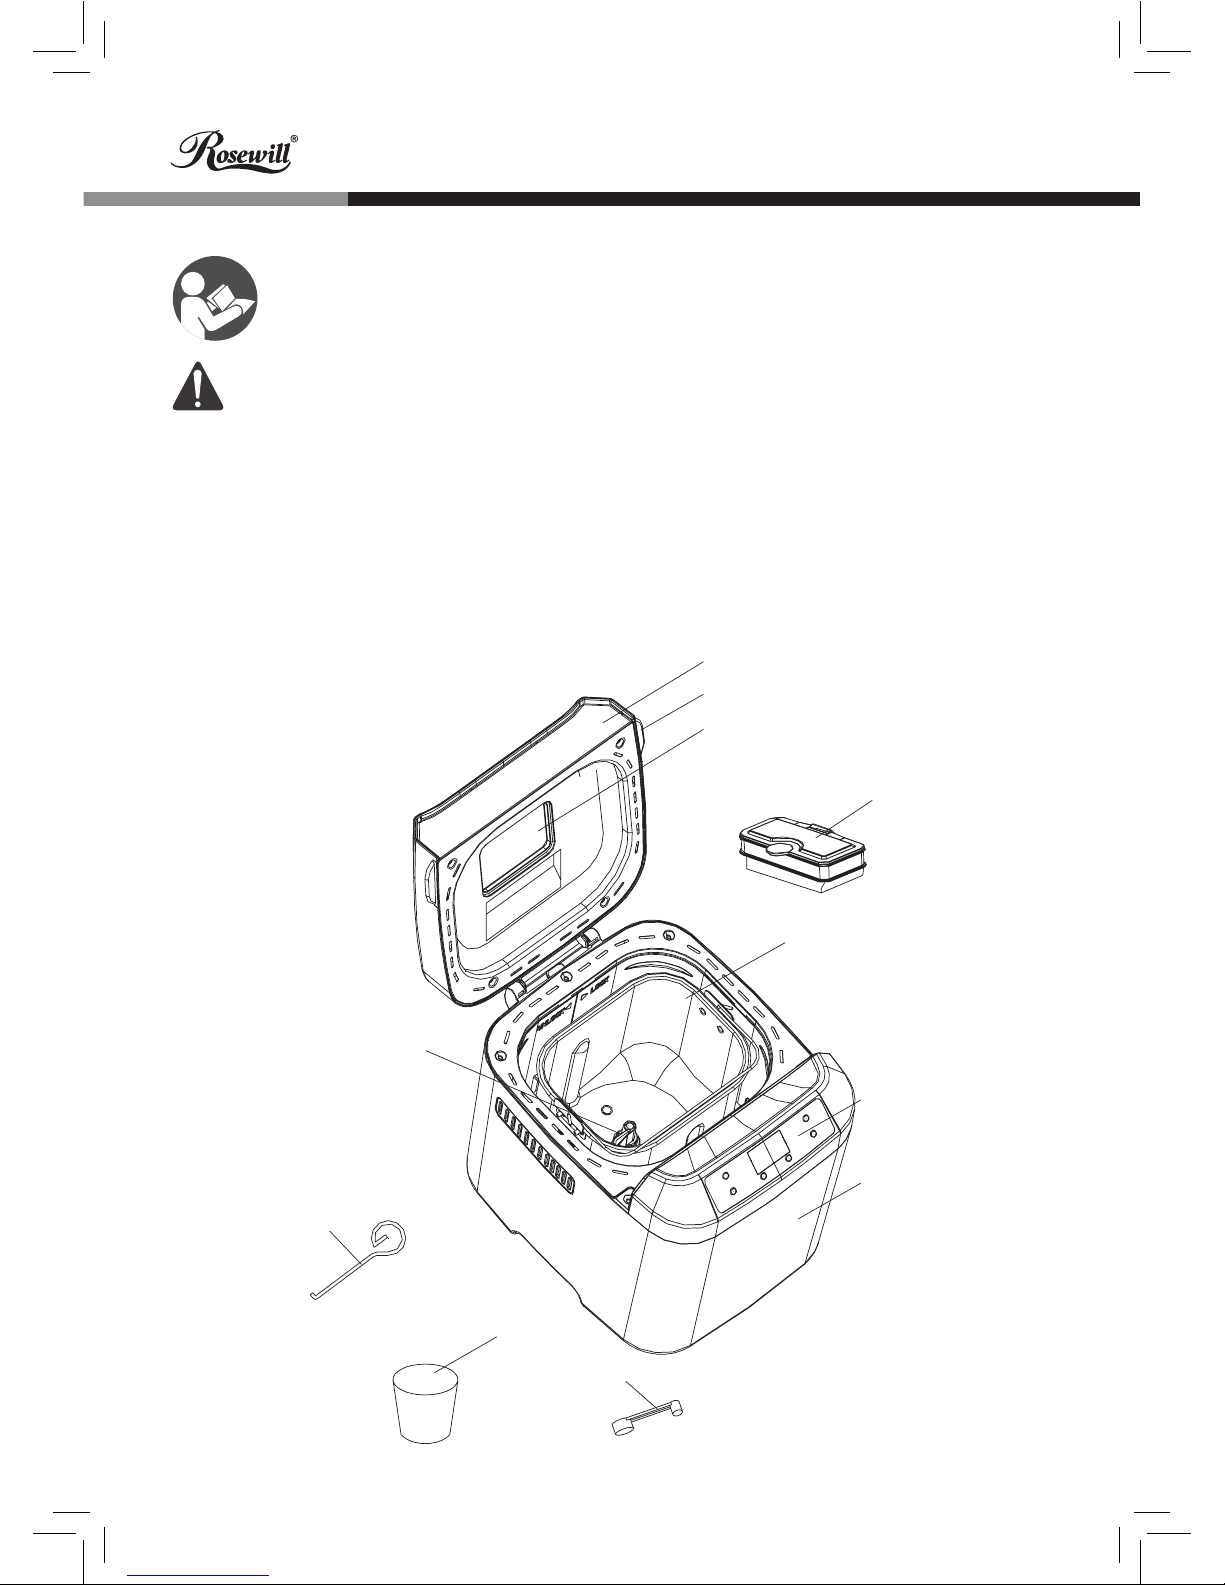
Housing
Control panel
Bread pan
Measuring spoon
Measuring cup
Hook
Kneading blade
Ingredient pan
Viewing window
Handle
Lid
SAVE THESE INSTRUCTIONS
HOUSEHOLD USE ONLY
NOTES ON THE ELECTRICAL CORD:
This appliance has a polarized electrical plug. To reduce the risk of electric shock, this plug
is intended to fit into a polarized outlet only one way. If the plug does not fit fully into the
outlet, reverse the plug. If it still does not fit, contact a qualified electrician. Do not attempt
to modify the plug in any way.
KNOW YOUR BREAD MAKER
Page 5
4
USER MANUAL
2-POUND BREAD MAKER
RHBM-15001
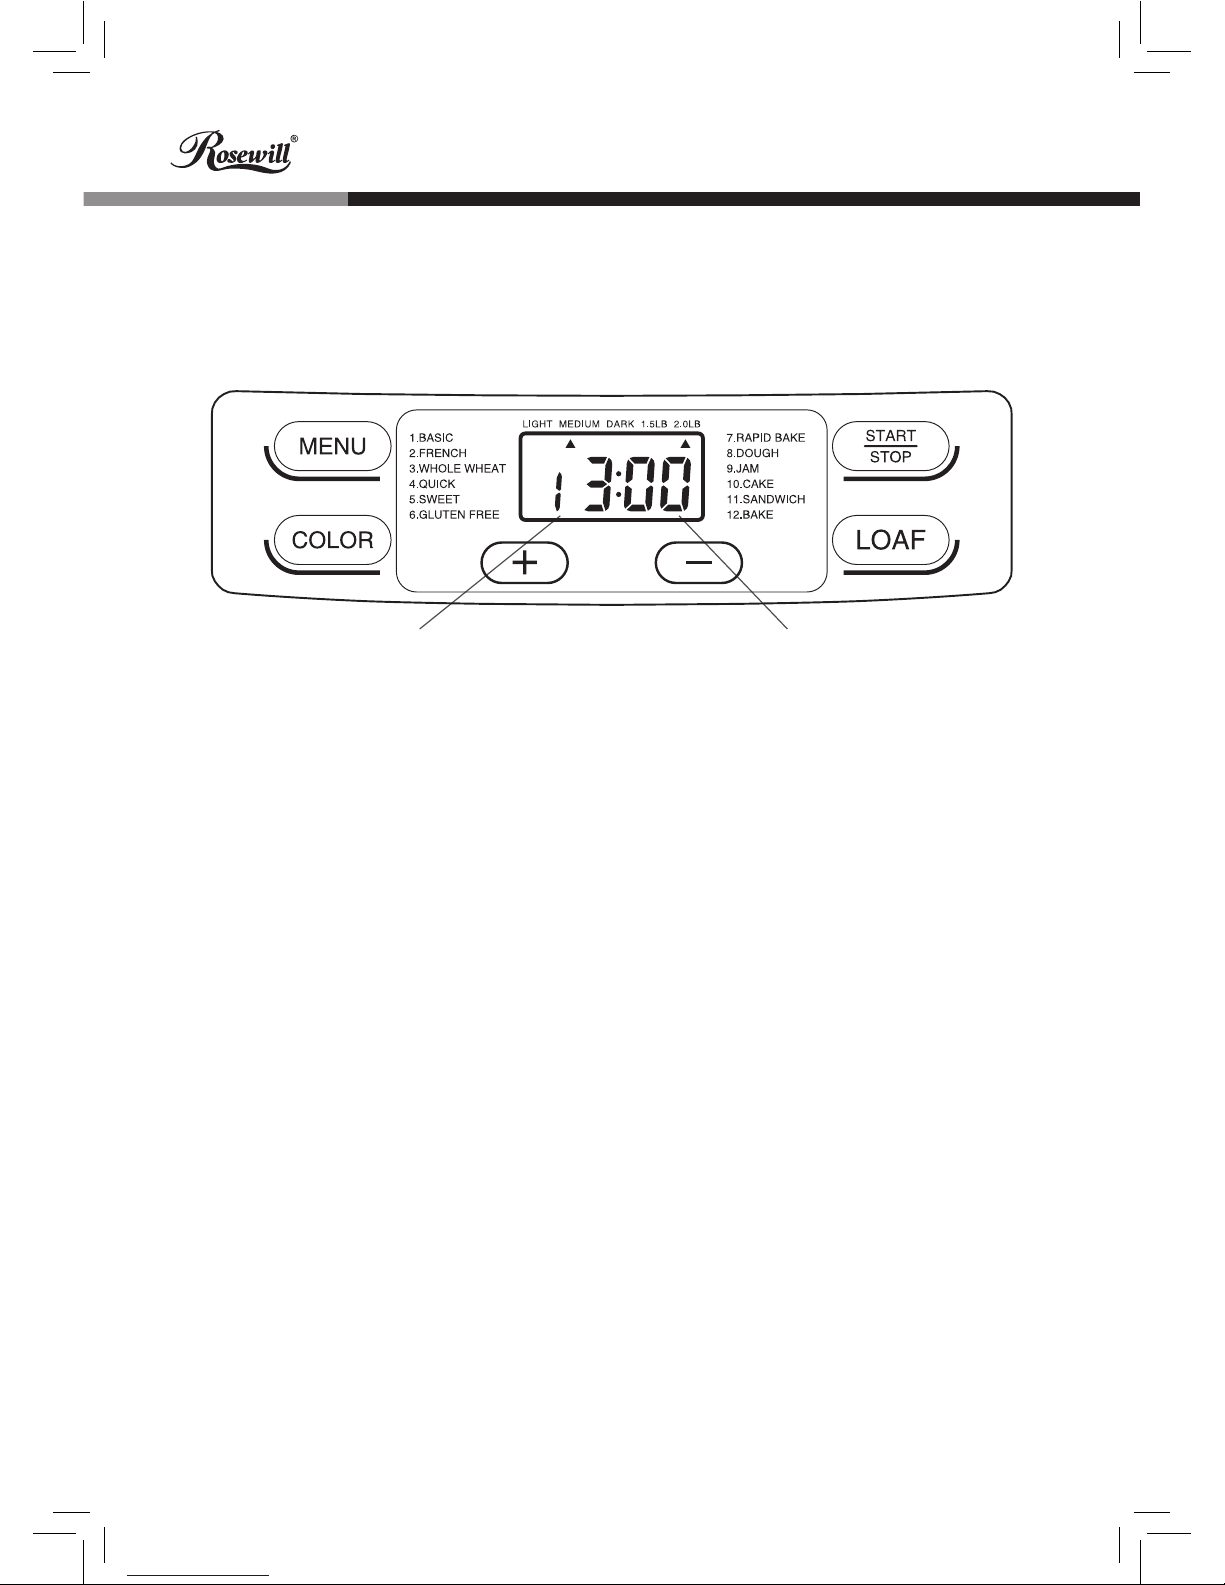
INTRODUCTION TO THE CONTROL PANEL
• (The screen is subject to change without prior notice.)
The operation time
for each program
This indicates the program
you have chosen
AFTER POWER-UP
As soon as the bread maker is plugged into the power supply, a beep will be heard and
“3:00” appears in the display after a short time. But the two dots between the “3” and “00”
don’t flash constantly. The arrow points to 1.5LB and MEDIUM. This is the default setting.
START/STOP
This button is used for starting and stopping the selected baking program.
To start a program, press the START/STOP button once. A short beep will be heard and
the two dots on the LCD screen will begin to flash, the working light will illuminate and the
program will start. After a program has begun, all buttons will be deactivated except the
START/STOP button. This feature will help to prevent any unintentional disruption to the
operation of program.
To stop the program, press the START/STOP button for approx. 2 seconds; a beep will
be heard and the working light will be extinguished. This means the program has been
switched off.
PAUSE FUNCTION
After a program begins, press the START/STOP button once to interrupt it at any time. The
program will be paused but the setting will be saved and the cooking time will flash on the
LCD screen. Press the START/STOP button again (or within 10 minutes) without touching
any other button and the program will continue.
Page 6

5
USER MANUAL
2-POUND BREAD MAKER
RHBM-15001
1. Basic: Kneading, rising and baking normal bread. You may also add ingredients to
increase flavor.
2. French: Kneading, rising and baking with a longer rise time. The bread baked in this
menu will usually have a crispier crust and lighter texture.
3. Whole Wheat: Kneading, rising and baking of whole wheat bread. It is not advisable to
use the delay function as this can produce poor results.
4. Quick: Kneading, rising and baking using less time than the Basic setting. The bread
baked on this setting is usually smaller and has a denser texture.
5. Sweet: Kneading, rising and baking sweet bread. You may also add ingredients to
alter the flavor.
6. Gluten-free: Kneading, rising and baking gluten-free bread. You may also add
ingredients to add flavor.
7. Rapid Bake: Kneading adding, rising and baking in the shortest amount of time.
Usually the bread made is smaller and rougher than that made using the Quick
program.
8. Dough: Kneading and rising, but without baking. Remove the dough and use for
making bread rolls, pizza, steamed bread, etc.
9. Jam: Boiling jams and marmalades. Fruits and vegetables must be chopped before
putting them into the bread pan.
10. Cake: Kneading, rising and baking. Use baking soda and/or baking powder.
11. Sandwich: Kneading, rising and baking sandwiches. For baking light-texture bread
with a thinner crust.
12. Bake: Only baking, no kneading or rising. Also used to increase the baking time on
selected settings.
COLOR
Use the Color button to select a LIGHT, MEDIUM or DARK color for the crust. This button
is not applicable for the Dough or Jam programs.
LOAF SIZE
Press this button to select the desired size of the loaf. Please note the total operation time
may vary among loaf sizes. This button is not applicable for the Quick, Dough, Jam, Cake
or Bake programs.
MENU
The Menu button is used to select a program. Each time it is pressed, the program will
vary. Press the button repeatedly to cycle through the 12 programs on the LCD display.
Select your desired program. The functions of 12 menus are explained below.
Page 7

6
USER MANUAL
2-POUND BREAD MAKER
RHBM-15001
Example: At 8:30 p.m, if you would like your bread to be ready in the next morning at 7 a.m.,
i.e. in 10 hours and 30 minutes, select your menu, color, and loaf size, then press the “+” or
“–” to add the time until “10:30” appears on the LCD screen. Then press the STOP/START
button to activate this program. The dot will flash and the display will count down, showing
the remaining time. You will get fresh bread at 7 o’clock in the morning. If you don’t want to
take out the bread immediately, the keep warm time of 1 hour will begin automatically.
Note: 1. This button is not applicable for the Rapid Bake, Jam or Bake programs.
2. For time-delayed baking, do not use any easily perishable ingredients such as
eggs, fresh milk, fruits, vegetables, etc.
DELAY FUNCTION
Use this button to delay the start time for your desired program.
Begin by determining the when a freshly baked loaf of bread is desired, then press the + and
– buttons to set the required time in 10-minute increments. Please note: Total time should
include the delay time and the baking time of the selected program. In other words, at the
completion of the total delay time, hot bread will be ready. Maximum delay time is 13 hours.
KEEP WARM FUNCTION
Bread will be automatically kept warm for 60 minutes after baking. If you would like to take
the bread out at any time after the selected program ends, switch the program off with the
START/STOP button.
AUTOMATIC DISPENSER FUNCTION
Put the fruit or nut into ingredient pan before start the program, when making bread ,the
program will put the ingredient in bread bucket automatically.
MEMORY
If the power supply is interrupted during the course of bread making, the bread making
process will be continued automatically within 10 minutes, even without pressing the
START/STOP button. If the break time exceeds 10 minutes, the memory will not be saved
and the bread maker must be restarted. However, if the dough is no further than the
kneading phase when the power supply breaks off, press the “START/STOP” to restart the
program from the beginning.
OPERATING ENVIRONMENT
The machine may work well in a wide range of temperatures, but there could be a
difference in loaf size between a very warm room and a very cold room. We suggest the
room temperature be between 59 and 94°F (15 and 34°C).
Page 8

7
USER MANUAL
2-POUND BREAD MAKER
RHBM-15001
FOR THE FIRST USE
1. Please ensure all parts and accessories are complete and free of damage.
2. Clean all parts according to the section “Cleaning and Maintenance” below.
3. Set the bread maker in “Bake” mode and bake empty for about 10 minutes. After
allowing it to cool down, clean once more.
4. Dry all parts thoroughly and reassemble. The appliance is now ready for use.
1. Place the pan in position and turn it clockwise until it clicks into correct position. Insert
the kneading blade onto the drive shaft. It is recommended to fill holes with heatresistant margarine prior to installing the kneaders; this prevents the dough from
sticking below the kneaders and the kneaders can be more easily removed from bread.
2. Place ingredients into the bread pan. Please follow the order as outlined in the recipe.
Usually the water or liquid substance should be added first, then sugar, salt and flour;
always add yeast or baking powder as the final ingredient.
Note: For the maximum quantities of the flour and yeast which may be used, refer to
the recipe.
HOW TO MAKE BREAD
Yeast or soda
Dry ingredients
Water or liquid
Note: The maximum quantity of flour and yeast separately is 17oz (490g) and 0.2oz (6g).
WARNING DISPLAY:
1. If the display shows “HHH” (accompanied by 5 beep sounds) after the program has
been started, the temperature inside is still too high. In this case, the program has to
be stopped. Open the lid and let the bread maker cool down for 10 to 20 minutes.
2. If the display shows “LLL” (accompanied by 5 beep sounds) after pressing the START/
STOP button (except on the Bake program), the temperature inside is too low. Press
the START/STOP button, open the lid, and let the machine rest for 10 to 20 minutes to
return to room temperature.
3. If the display shows “EE0” after you have pressed START/STOP, the temperature
sensor is disconnected. Please have the sensor checked by an authorized expert.
Page 9

8
USER MANUAL
2-POUND BREAD MAKER
RHBM-15001
3. Use your finger to make a small indentation on one side of the flour. Add yeast to
indentation. Make sure yeast does not come into contact with the liquid ingredients or
salt.
4. Close the lid gently and plug the power cord into a wall outlet.
5. Press the Menu button until your desired program is selected.
6. Press the COLOR button to select the desired crust color.
7. Press the LOAF button to select the desired size – 1.5LB or 2.0LB.
8. Set the delay time by pressing the + or – buttons. This step may be skipped if you want
the bread maker to start working immediately.
9. Press the START/STOP button to start working, the working light will illuminate.
10. For the Basic, French, Whole Wheat, Quick, Sweet, Rapid Bake, Cake and Sandwich
programs, 10 beep sounds will be heard during operation. This is to prompt you to add
ingredients. It is possible that steam will escape through the vent slits in the lid during
baking. This is normal.
11. Once the process has been completed, 10 beep sounds will be heard, and the working
light will extinguish. Press START/STOP button for approx. 2 seconds to stop the
process and remove bread. Open the lid and while using oven mitts, firmly grasp the
bread pan handle. Turn the pan counter-clockwise and gently pull the pan straight up
and out of the machine.
12. Use non-stick spatula to gently loosen the sides of the bread from the pan.
Caution: The Bread pan and bread may be very hot! Always handle with care and
use oven mitts.
13. Turn bread pan upside down onto a clean cooking surface and gently shake until bread
falls out onto rack.
14. Remove the bread carefully from the pan and cool for about 20 minutes before slicing.
15. If you are out of the room or have not pressed START/STOP button at the end of
operation, the bread will be kept warm automatically for 1 hour. If you would like to take
the bread out, switch the program off with the START/STOP button.
16. When not in use, unplug the power cord.
Note: Before slicing the loaf, use the hook to remove the kneading blade hidden
on the bottom of loaf. The loaf will be hot – never use bare hands to remove the
kneading blade.
SPECIAL INTRODUCTION
1. For Quick breads
Quick breads are made with baking powder and baking soda that activates by moisture
and heat. For perfect quick breads, it is suggested that all liquids be placed in the bottom
of the bread pan and dry ingredients on top. During the initial mixing of quick bread, batter
Page 10

9
USER MANUAL
2-POUND BREAD MAKER
RHBM-15001
CLEANING AND MAINTENANCE
INTRODUCTION TO BREAD’S INGREDIENTS
1. Bread flour
Bread flour has a high gluten content, so it can be also be called high-gluten flour – also
containing high protein content. It has an elastic texture and the bread retains its size after rising.
Since the gluten content is higher than regular flour, it can be used for making larger loaves of
bread with better inner fiber. Bread flour is the most important ingredient in making bread.
2. Plain flour
Flour that contains no baking powder is better for making extouch bread.
Unplug the machine and let it cool down prior to cleaning.
1. Bread pan: Rub inside and outside with a damp cloth. Do not use any sharp or
abrasive agents in order to protect the non-stick coating. The pan must be dried
completely prior to use.
2. Kneading blade: If the kneading bar is difficult to remove from the axle, fill the container
with warm water and allow it to soak for approx. 30 minutes. The kneader can then be
easily removed for cleaning. Also, wipe the blade carefully with a cotton damp cloth.
Please note: both the bread pan and kneading blade are dishwasher-safe components.
3. Lid and window: Clean the lid’s inside and outside with a slightly damp cloth.
4. Housing: Gently wipe the outer surface of housing with a wet cloth. Do not use any
abrasive cleaner to clean as this would degrade the high polish of the surface. Never
immerse the housing in water for cleaning.
5. Before the bread maker is packed away for storage, ensure that it has completely
cooled down and is clean and dry; put the spoon and the kneading blade in the drawer
and close lid.
and dry ingredients may collect in the corners of the pan, so it may be necessary to help
machine mix to avoid flour clumps. If so, use a rubber spatula.
2. About Rapid Bake program
The bread maker can bake a loaf within 1 hour on the Rapid Bake program. This setting
can bake bread in 58 minutes; the bread will be a little denser in texture than bread baked
on the normal Bake setting. Please note: water should be hot – in the range of 118 - 122°F
(48 - 50°C) when added. Use a cooking thermometer to measure the temperature. The
water temperature is very critical to the baking performance. If the water temperature is too
low the bread will not be rise to expected size; if the water temperature is too high it will kill
the yeast prior to rising, which also will largely affect the baking performance.
Page 11

10
USER MANUAL
2-POUND BREAD MAKER
RHBM-15001
3. Whole-wheat flour
Whole-wheat flour is ground from grain. It contains wheat skin and gluten. Whole-wheat
flour is heavier and more nutritious than common flour. The bread made by whole-wheat
flour is usually smaller in size. Many recipes therefore combine whole-wheat flour with plain
bread flour to achieve the best result.
4. Black wheat flour
Black wheat flour, also called “rough flour,” is a kind of high-fiber flour, and is similar to
whole-wheat flour. To obtain a large loaf size after rising, it must be used in combination
with a high proportion of bread flour.
5. Self-rising flour
A type of flour that contains baking powder, self-rising flour is often used for making cakes.
6. Corn flour and Oatmeal flour
Corn flour and oatmeal flour are ground from corn and oatmeal. They are the additive
ingredients in making “rough” bread, used for enhancing flavor and texture.
7. Sugar
Sugar is a very important ingredient in bread as it sweetens the taste and enhances the
color. It also nourishes the yeast in bread. White sugar is largely used. Brown sugar,
powdered sugar, or cotton sugar may also be used in certain recipes.
8. Yeast
After yeasting process, the yeast will produce carbon dioxide. The carbon dioxide will
expand bread and make the inner fiber soften. However, fast-breeding yeast needs the
carbohydrates in sugar and flour as nourishment.
1 tsp. active dry yeast = 3/4 tsp. instant yeast
1.5 tsp. active dry yeast = 1 tsp. instant yeast
2 tsp. active dry yeast = 1.5 tsp. instant yeast
Yeast must be stored in the refrigerator as the fungus in it will be killed at high temperature.
Before using, check the production date and storage life of your yeast. Store it in the
refrigerator as soon as possible after each use. Usually the failure of bread rising is caused
by the bad yeast.
The steps below will determine whether your yeast is fresh and active.
(1) Pour 1/2 cup warm water 113 - 122°F (45 - 50°C) into a measuring cup.
(2) Put 1 tsp. white sugar into the cup and stir, then sprinkle 2 tsp. yeast over the water.
(3) Place the measuring cup in a warm place for about 10 minutes. Do not stir the water.
(4) The mixture should produce up to 1 cup of froth. If not, the yeast is dead or inactive.
9. Salt
Salt is necessary to improve bread’s flavor and crust color. But salt can restrain yeast from
rising. Never use too much salt in a recipe. Loaf size will be larger without salt.
Page 12

11
USER MANUAL
2-POUND BREAD MAKER
RHBM-15001
MEASURING INGREDIENTS
One important step for making good bread is the proper amount of ingredients. For best
results, it is strongly recommended that you use a measuring cup or measuring spoon to
obtain accurate amounts.
1. Weighing liquid ingredients
Water, fresh milk, or a milk/powder solution should be measured with measuring cups.
Carefully measure liquid ingredients on a level surface. When you measure cooking oil or
other ingredients, clean the measuring cup thoroughly without any other ingredients.
2. Dry measurements
Dry measuring must be done by gently spooning ingredients into a measuring cup. Once
filled, level off with a straight edge. Scooping or tapping a measuring cup with more than
is required can alter a recipe. Measurements must be level, not heaped, as this small
difference may affect the critical balance of the recipe. When measuring small amounts of
dry ingredients, a measuring spoon must be used.
3. Adding sequence
The uniform sequence of adding ingredients should be followed. Generally speaking, the
sequence is: liquid ingredient, eggs, salt, milk powder – then any remaining ingredients.
10. Eggs
Eggs can improve bread texture, make the bread more nourishing, and increase size. Eggs
must be peeled and stirred evenly.
11. Grease, butter and vegetable oil
Grease can make bread soften and prolong storage life. Butter should be melted or
chopped to small particles before using.
12. Baking powder
Baking powder aids rising in breads and cakes on the Rapid Bake setting. Since it does
not need prolonged rising time, and it can produce air bubbles, the chemical composition of
baking powder will soften the texture of bread.
13. Soda
Soda powder is similar to baking powder and can also be used in combination with it.
14. Water and other liquids
Water is an essential ingredient for making bread. Generally speaking, water temperature
between 68 and 77°F (20 and 25°C) is the best. Water may be replaced with fresh milk or
a mix of water with 2% milk powder, which may enhance bread flavor and improve crust
color. Some recipes may call for juice for the purpose of enhancing bread flavor, e.g. apple
juice, orange juice, lemon juice and so on.
Page 13

12
USER MANUAL
2-POUND BREAD MAKER
RHBM-15001
BREAD MAKER COOKBOOK
1. BASIC BREAD:
2. FRENCH BREAD:
3. WHOLE-WHEAT BREAD:
Ingredients 1.5LB Loaf 2.0LB Loaf
1. Water 280 ml 280g 340 ml 340g
2. Oil 2 Tablespoons 24g 3 Tablespoons 36g
3. Salt 1 teaspoons 7g 1.5 teaspoons 10g
4. Sugar 2 Tablespoons 24g 3 Tablespoons 36g
5. Flour 3 cups 420g 3 1/2 cups 490g
6. Yeast 0.5 teaspoons 1.5g 0.5 teaspoons 1.5g
Ingredients 1.5LB Loaf 2.0LB Loaf
1. Water 280 ml 280g 340 ml 340g
2. Oil 2 Tablespoons 24g 3 Tablespoons 36g
3. Salt 1.5 teaspoons 10g 2 teaspoons 14g
4. Sugar 1.5 Tablespoons 18g 2 Tablespoons 24g
5. Flour 3 cups 420g 3 1/2 cups 490g
6. Yeast 0.5 teaspoons 1.5g 0.5 teaspoons 1.5g
Ingredients 1.5LB Loaf 2.0LB Loaf
1. Water 260 ml 260g 340 ml 340g
2. Oil 2 Tablespoons 24g 3 Tablespoons 36g
3. Salt 4 teaspoons 7g 2 teaspoons 14g
4. Whole wheat flour 1 cups 110g 2 cups 220g
5. Plain flour 2 cups 280g 2 cups 280g
6. Brown sugar 2 Tablespoons 18g 2 .5 Tablespoons 23g
7. Milk powder 2 Tablespoons 14g 3 Tablespoons 21g
8. Yeast 0.5 teaspoons 1.5g 0.5 teaspoons 1.5g
When adding ingredients, do not let the flour become completely moistened by the liquid.
Yeast can only be placed on dry flour. Furthermore, yeast mustn’t contact salt. When using
the delay function for long periods of time, do not add perishable ingredients such as eggs,
fresh fruits, etc.
Page 14

13
USER MANUAL
2-POUND BREAD MAKER
RHBM-15001
5. SWEET BREAD:
Ingredients 1.5LB Loaf 2.0LB Loaf
1. Water 280 ml 260g 340 ml 340g
2. Vegetable Oil 2 Tablespoons 24g 3 Tablespoons 36g
3. Salt 1.5 teaspoon 10g 2 teaspoon 14g
4. Sugar 3 Tablespoons 36g 4 Tablespoons 48g
5. Flour 3 cups 420g 3 1/2 cups 490g
6. Milk powder 2 Tablespoons 14g 2 Tablespoons 14g
7. Yeast 0.5 teaspoons 1.5g 0.5 teaspoons 1.5g
Ingredients 1.5LB Loaf
1. Warm water 104-122°F (40-50°C) 270 ml 270g
2. Oil 2 Tablespoons 24g
3. Salt 1 teaspoon 7g
4. Sugar 3 Tablespoons 36g
5. Flour 3 cups 420g
6. Yeast 2 teaspoon 6g
6. GLUTEN-FREE:
7. Rapid Bake BREAD:
Ingredients 1.5LB Loaf 2.0LB Loaf
1. Water 280 ml 340 ml
2. Oil 2 Tablespoons 3 Tablespoons
3. Salt 1 1 1/2
4. Gluten-free flour 3 cups 4 cups
5. Sugar 2 Tablespoons 2 Tablespoons
6. Yeast 2 teaspoon 1.5 teaspoon
4. QUICK BREAD:
Ingredients 2.0LB Loaf
1. Warm water 104-122°F (40-50°C) 320 ml 320g
2. Oil 2 Tablespoons 24g
3. Salt 1.5 teaspoons 10g
4. Sugar 2 Tablespoons 24g
5. Flour 3 1/2 cups 490g
6. Yeast 2 teaspoons 6g
Page 15

14
USER MANUAL
2-POUND BREAD MAKER
RHBM-15001
Ingredients
1. Cake oil 2 Tablespoons 24g
2. Sugar 8 Tablespoons 96g
3. Egg 6 270g
4. Self-rising flour 1 cup 250g
5. Flavoring essence/extract 1 teaspoon 2g
6. Lemon juice 1.3 Tablespoons 10g
7. Yeast 1 teaspoons 3g
10. CAKE:
11. SANDWICH BREAD:
12. BAKE: only baking, no kneading and rise. Also used to increase the baking time on
selected settings, there is no proportioning table.
Ingredients 1.5LB Loaf 2.0LB Loaf
1. Water 270 ml 270g 360 ml 360g
2. Butter or margarine 1.5 Tablespoons 2 Tablespoons
3. Salt 1.5 teaspoons 10g 2 teaspoons 14g
4. Sugar 1.5 Tablespoons 18g 2 tablespoon 24g
5. Dry milk 1.5 Tablespoons 10g 2 tablespoon 14g
6. Bread flour 3 cups 420g 4 cups 560g
7. Dry Yeast 1 teaspoons 3g 1 teaspoons 3g
8. DOUGH:
9. JAM:
Ingredients
1. Water 360 ml 360g
2. Oil 2 Tablespoons 24g
3. Salt 1.5 teaspoons 10g
4. Refined flour 4 cups 560g
5. Sugar 2 Tablespoons 24g
6. Yeast 0.5 teaspoons 1.5g
Ingredients
1. Crushed strawberries 4 cups
2. Sugar 1 cup 230g
3. Pudding powder 1 cup 150g
Page 16

15
USER MANUAL
2-POUND BREAD MAKER
RHBM-15001
13. TROUBLESHOOTING
Troubleshooting
Issues with
Your Bread
Maker
Problem Cause Solution
Smoke comes
out of the baking
compartment or of
the vents
The ingredients stick to
the baking compartment
or on the outside of the
baking pan
Pull out the plug and
clean the outside of the
baking pan or the baking
compartment.
Bread is sunken in the
middle and is moist
on the bottom
The bread was left too
long in the pan after
baking and warming.
Take the bread out of the
baking pan before the
warming function is over.
It is difficult to take
the bread out of the
baking pan.
The bottom of the loaf
is stuck to the kneading
blade
Clean the kneading
blade and shafts after the
baking. If necessary, fill
the baking pan with warm
water for 30 minutes, then
the kneading blade can
be easily removed and
cleaned.
The ingredients are
not mixed or the
bread is not baked
correctly
Incorrect program setting
Check the selected menu
and the other settings
The START/STOP button
was touched while the
machine was working
Discard used ingredients
and start over again
The lid opened several
times while the machine
was working
Do not open the lid
frequently unless it is
necessary, such as to add
ingredients. Make sure the
lid was closed well after
being opened.
Long blackout while the
machine was working
Discard used ingredients
and start over again.
The rotation of the
kneading blade is blocked
Check if the kneading
blade is blocked by grains,
etc. Pull out the baking
pan and check whether
the drivers turn. If not,
contact customer service.
The appliance does
not start. The display
shows HHH
The appliance is still hot
after the previous baking
procedure
Unplug device, take
out the baking pan and
leave it to cool at room
temperature. Then insert
the plug and start again.
Page 17

16
USER MANUAL
2-POUND BREAD MAKER
RHBM-15001
For the
Following
Issues,
Please Refer
to the Key at
the Bottom
of this Table
Problem Cause Solution
Bread rises too fast
Too much yeast, too much
flour, not enough salt,
or combination of these
causes
A, B
Bread does not rise at
all or not enough
No yeast at all or too little A, B
Old or stale yeast E
Liquid too hot C
The yeast has come into
contact with the liquid
D
Wrong flour type or stale
flour
E
Too much or not enough
liquid
A, B, G
Not enough sugar A, B
The dough rises too
much and spills over
the baking pan
If the water is too soft the
yeast ferments more
F
Too much milk affects the
fermentation of the yeast
C
The bread goes down
in the middle
The dough volume is
larger than the pan and
the loaf is malformed.
A, F
Fermentation too short or
too fast due to excessive
temperature of the water
or baking chamber or due
to excessive moisture
C, H, I
Page 18

17
USER MANUAL
2-POUND BREAD MAKER
RHBM-15001
For the
Following
Issues,
Please Refer
to the Key at
the Bottom
of this Table
Problem Cause Solution
Heavy, lumpy texture
Too much flour or not
enough liquid
A, B, G
Not enough yeast or sugar A, B
Too much fruit, whole
meal flour or of one of the
other ingredients
B
Old or stale flour and
warm liquids make the
dough rise too quickly
and loaf deforms before
baking
E
No salt or not enough
sugar
Too much liquid
The bread is not fully
baked in the center
Too much or not enough
liquid
A, B, G
Too much humidity H
Recipes with highmoisture ingredients, e.g.
yogurt, applesauce
G
Open or coarse
texture or too many
holes
Too much water G
No salt B
High humidity, water too
hot
H, I
Too much liquid C
Page 19

18
USER MANUAL
2-POUND BREAD MAKER
RHBM-15001
For the
Following
Issues,
Please Refer
to the Key at
the Bottom
of this Table
Problem Cause Solution
Mushroom-like,
unbaked surface
Bread volume too big for
the pan
A, F
Too much flour, especially
for white bread
F
Too much yeast or not
enough salt
A, B
Too much sugar A, B
Sweet ingredients besides
the sugar
B
The slices are uneven
or there are clumps in
the middle
Bread not cooled enough
(the vapor has not
escaped)
J
Flour deposits on the
bread crust
The flour did not knead
well on the sides
G, I
A) Measure the ingredients correctly.
B) Adjust the ingredient amounts and check that all the ingredients have been added.
C) Use another liquid or leave it to cool at room temperature. Add the ingredients specified
in the recipe in the right order, make a small impression in the middle of the flour and
put in the crumbled yeast or the dry yeast, avoid letting the yeast and the liquid come
into direct contact.
D) Use only fresh and correctly stored ingredients.
E) Reduce the total amount of the ingredients, do not use more than the specified amount
of flour. Reduce all the ingredients by 1/3.
F) Correct/adjust the amount of liquid. If ingredients containing water are used, the amount
of the liquid to be added must be duly reduced.
G) In the case of very humid weather, remove 1-2 Tablespoons of water.
H) In the case of excessively warm weather, do not use the timing function. Use cold liquids.
I) Take the bread out of the pan immediately after baking and leave it on a cooling/drying
rack to cool for at least 15 minutes before cutting it.
J) Reduce the amount of yeast – or of all the ingredient amounts – by 1/4.
K) Never grease the pan
L) Add a tablespoon of wheat gluten to the dough.
Page 20

19
USER MANUAL
2-POUND BREAD MAKER
RHBM-15001
We appreciate you purchasing a quality Rosewill product.
If you have any questions or need assistance, please contact our
Customer Service Department: 1-800-575-9885 or techsupport@rosewill.com
Item
2-Pound Bread Maker
Model
RHBM-15001
Dimensions (L x W x H)
10.2” x 12.2” x 11.0”
Voltage
120 V
Watts
550 W
Weight
9.48 lb.
Cord Length
27.56 Inches
Color
White
Materials / Finish
Plastic
Specifications
Electric Household Cooking and Food Serving Appliances - UL 1026, 6th
Edition, Rev. Jan. 27, 2012
Portable Electrical Motor-Operated and Heating Appliances: Particular
Requirements for Portable Electric Cooking Appliances - CSA C22.2 No.
1335.2.9-93, Rev. 2008 (See also CSA-C22.2 No. 1335.1-93, Rev. 2008)
 Loading...