

Page 1
1100W Oil-Less Low Fat Air Fryer
- 2.5 Quart (2.4L)
RHAF-15001 & RHAF-15002
Page 2
1
1100W Oil-Less Low Fat Air Fryer - 2.5 Quart (2.4L)
RHAF-15001 & RHAF-15002
Introduction
Congratulations on your purchase. Your new air fryer allows you to prepare your favourite ingredients and snacks in a healthier way.
The air fryer uses hot air in combination with high-speed air circulation (Rapid Air) and a top grill
to prepare a variety of tasty dishes in a healthy, fast and easy way. Your ingredients are heated
from all sides at once and there is no need to add oil to most of the ingredients.
You can now make dishes like cakes and quiches and cook fragile food in a more convenient
way.
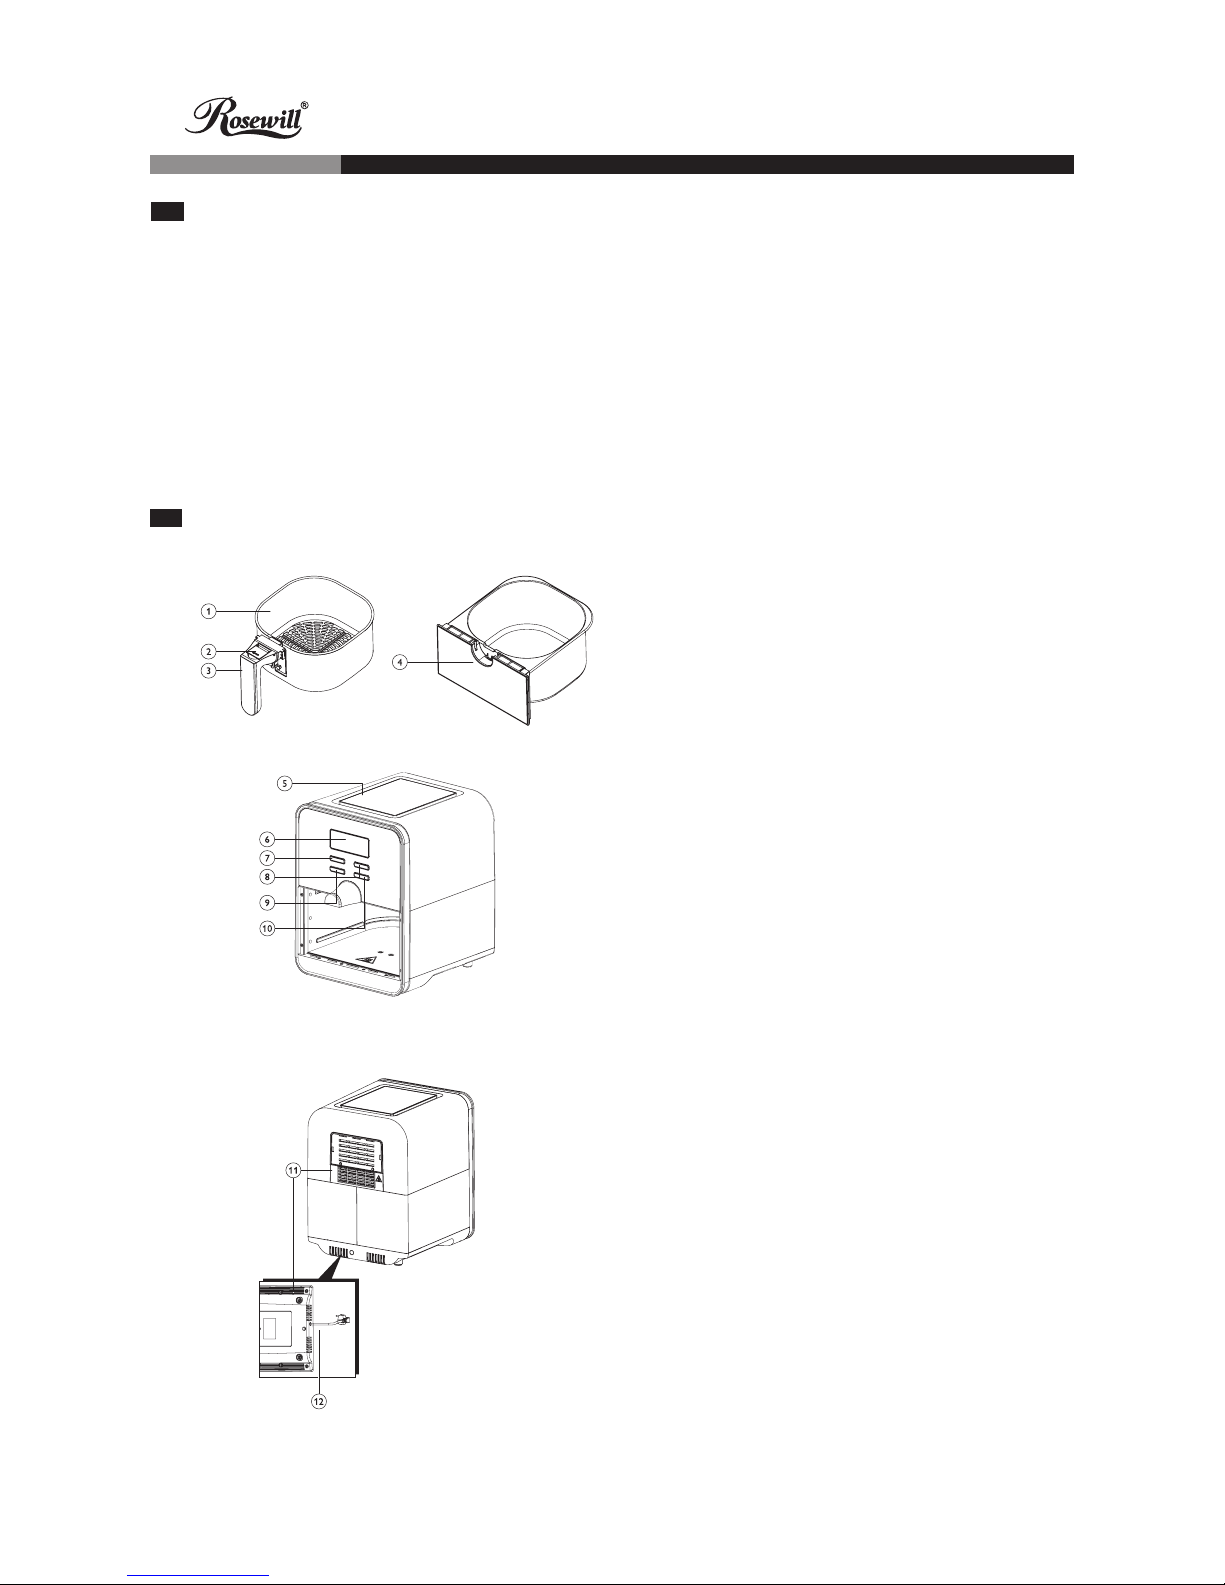
General description
5 Air inlet
6 Control panel
7 Increase time and temperature
8 Time and temperature
9 Decrease time and temperature
10 On and Off
11 Air outlet openings
12 Power cord
1 Basket
2 Basket release button
3 Basket handle
4 Pan
Page 3

2
1100W Oil-Less Low Fat Air Fryer - 2.5 Quart (2.4L)
RHAF-15001 & RHAF-15002
Read this manual carefully before using the appliance and save it for future reference.
Danger
- Never immerse the housing, which contains electrical components and the heating elements,
in water nor rinse it under the tap.
- To prevent electric shock, do not let any water or other liquid enter the appliance.
- Always put the ingredients to be fried in the basket, to prevent them from coming into contact
with the heating elements.
- Do not cover the air inlet or outlet openings while the appliance is operating.
- Do not ll the pan with oil as this may cause a re hazard.
Warnings
- Make sure the required voltage matches the supplied voltage before plugging in your air fryer.
- Do not use the appliance if the plug, the power cord or the appliance itself is damaged.
- If the power cord is damaged, you must have it replaced by a qualied service center authorized
by Rosewill Inc, or similarly qualied technician, in order to avoid a hazard.
- This appliance is not intended for use by persons (including children) with reduced physical,
sensory or mental capabilities, or lack of experience and knowledge, unless they have been
given supervision or instruction concerning use of the appliance by a person responsible for
their safety.
- Keep the appliance and its cord out of the reach of children.
- Keep the power cord away from hot surfaces.
- Do not plug in the appliance or operate the control panel with wet hands.
- Only connect the appliance to a grounded wall socket. Always make sure the plug is inserted
into the wall socket properly.
- This appliance is not intended to be operated by means of an external timer or a separate
remote-control system.
- Do not place the appliance on or near combustible materials such as a tablecloth or curtain.
- Do not place the appliance against a wall or against other appliances. Leave at least 6 inches
(15cm) of free space around all sides of the appliance when in use. Do not place anything on top
of the appliance.
- Do not use the appliance for any other purpose than described in this manual.
- Do not let the appliance operate unattended.
- During hot air frying, hot steam is released through the air outlet openings. Keep your hands and
face at a safe distance from the steam and from the appliance.
- The accessible surfaces may become hot during use.
- Immediately unplug the appliance if you see dark smoke coming out of the appliance. Wait for
the smoke emission to stop before removing the pan from the appliance.
- The baking tray becomes hot all over when it is used in the air fryer. Always use oven gloves
when handling the baking tray.
Attention
- Taking out the drawer during the cooking process causes the safety switch to automatically
engage, pausing operation. After pushing the drawer back into place, the fryer will resume
operation and the timer will continue.
- If the interior temperature is higher than 176°F (80°C) after cooking process has terminated,
Important
Page 4
3
1100W Oil-Less Low Fat Air Fryer - 2.5 Quart (2.4L)
RHAF-15001 & RHAF-15002
the fans inside will continue to operate. Fans will continue until the fryer has a reached a safe
temperature.
To switch off the appliance manually, please press the On/Off button.
Electromagnetic elds (EMF)
This Rosewill appliance complies with all standards regarding electromagnetic elds (EMF). If
handled properly and according to the instructions in this user manual, the appliance is safe to
use based on scientic evidence available today.
Before rst use
1 Remove all packaging material.
2 Remove any stickers or labels from the appliance.
3 Thoroughly clean the basket and the pan with hot water, liquid dish soap, and a
non-abrasive sponge.
Note: You can also clean these parts in the dishwasher.
4 Wipe the inside and outside of the appliance with a moist cloth.
This is an air fryer that works on hot air. Do not ll the pan with oil or frying fat.
Preparing for use
1 Place the appliance on a stable, horizontal and level surface.
Do not place the appliance on non-heat-resistant surfaces.
2 Place the basket in the pan properly (Fig.2).
3 Pull out the power cord.
Do not ll the pan with oil or any other liquid.
Do not put anything on top of the appliance. This disrupts the airow and affects the
hot air frying result.
Using the appliance
The air fryer can prepare a large range of ingredients. The recipe booklet included helps you
get to know the appliance.
Page 5

4
1100W Oil-Less Low Fat Air Fryer - 2.5 Quart (2.4L)
RHAF-15001 & RHAF-15002
Preheating
1 Plug the power cord into a grounded wall socket.
2 Press the power on/off button to switch on the appliance. (Fig.7)
The display shows the last selected temperature.
3 Press the temperature increase or decrease button to set the required temperature.
See the section titled Temp/Timer in this chapter to determine the right temperature.
(Fig. 6)
Tip: Press the increase or decrease button longer to put the temperature forward or back
ward more quickly.
Note: If you do not want to preheat, but want to start frying immediately, skip step 4 and
follow the instructions in the section titled “Hot air frying” in this chapter.
4 Press the On/Off button. (Fig.7)
The appliance will begin to heat up.
The set temperature will ash until the desired temperature has been reached, then the
appliance will beep and the temperature indicator will display continuously.
Beeping will commence until cooking time as been set (see step 4 in the section titled
“Hot air frying”).
Note: You can also start the preheating process manually by setting the temperature and then
pressing the timer decrease button until ‘- -’ appears. (Fig 5 and Fig 6)
Hot air frying
1 Open the drawer by pulling at the handle. (Fig.1)
2 Put the ingredients in the basket (Fig.3)
Note: Never ll the basket beyond the MAX indication or exceed the amount indicated in the table
(see section ‘Temp/Timer’ in this chapter), as this could affect the quality of the end result.
3 Slide the drawer back into the air fryer by the handle (Fig.4)
Never use the pan without the basket in it. If you heat up the appliance without basket, use
oven gloves to open the drawer. The edges and inside of the drawer become very hot.
Caution: Do not touch the pan during and some time after use, as it gets very hot.
4 Press the timer increase or decrease button to set the timer to the required cooking
time. See section ‘Temp/Timer’ in this chapter to determine the correct cooking time.
(Fig.5)
Tip: Press the timer increase or decrease button longer to put the time forward or backward more
quickly.
Note: If you have not preheated the appliance, add 3 minutes to the cooking time.
Note: If you do not set the required cooking time within 5 minutes, the appliance switches off
automatically for safety reasons.
Page 6

5
1100W Oil-Less Low Fat Air Fryer - 2.5 Quart (2.4L)
RHAF-15001 & RHAF-15002
5 Press the On/Off button to start the cooking process. (Fig.7)
The display starts counting down from the set cooking time.
Excess oil from the ingredients is collected on the bottom of the pan.
6 When the appliance starts to beep, the set cooking time has elapsed.
Note: You can also stop the cooking process manually. To do this, press the On/Off
button (Fig.7)
7 Open the drawer by pulling the handle and check if the ingredients are ready. (Fig.8)
If the ingredients are not ready yet, simply re-insert the drawer by the handle and add a few
extra minutes to the set time.
8 To remove small ingredients (e.g., fries), lift the basket out of the pan by the handle.
(Fig.10)
After the cooking process, the pan, the basket and the ingredients are hot. Depending on
the type of ingredients in the air fryer, steam may escape from the pan.
9 Empty the basket into a bowl or onto a plate. (Fig.11)
Tip: To remove large or fragile ingredients, use a pair of tongs to lift the ingredients out of the
basket (Fig.12)
10 When a batch of ingredients is ready, the air fryer is instantly ready for preparing
another batch.
Note: Repeat steps 1 to 9 if you want to prepare another batch..
Note: If you prepare another batch within 30 minutes, it is not necessary to preheat the appliance
again.
Temp/Timer
The table below will assist you in selecting the basic Temp/Timer for the best results in
your food preparation.
Note: These are general guidelines only. As ingredients differ in size, shape, origin, and other
factors, nding the optimal Temp/Timer for your food may require some practice.
Because the Rapid-Air technology instantly reheats the air inside the appliance, pulling the pan
out briey will not signicantly affect the cooking process.
Page 7

6
1100W Oil-Less Low Fat Air Fryer - 2.5 Quart (2.4L)
RHAF-15001 & RHAF-15002
Tips
- A larger amount of ingredients only requires a slightly longer preparation time, a smaller amount
of ingredients only requires a slightly shorter preparation time.
- Shaking smaller ingredients halfway through the preparation time optimizes the end result and
can help prevent unevenly fried ingredients.
- Add some oil to fresh potatoes for a crispy result. Fry your ingredients in the air fryer within a
few minutes after you added the oil.
- Do not prepare extremely greasy ingredients such as sausages in the air fryer.
- Snacks that can be prepared in an oven can also be prepared in the air fryer.
- The optimal quantity for preparing crispy fries is about 17 ounces (500 grams).
- Use pre-made dough to prepare lled snacks quickly and easily. Pre-made dough also requires
a shorter preparation time than home-made dough.
- You can also use the air fryer to reheat ingredients. To reheat ingredients, set the temperature
to 300°F (150°C) and reheat food for up to 10 minutes.
Min-Max-
Amount (oz)
Time
(min.)
Temperature
(F)
Shake
Extra
Information
Potatoes & fries
Thin frozen fries 10.6-24.7 12-16 400 Shake
Thick frozen fries 10.6-24.7 12-20 400 Shake
Home-made fries
(0.3”×0.3”)
10.6-28.2 18-25 360 Shake add 1/2 tbsp of oil
Home-made potato
wedges
10.6-28.2 18-22 360 Shake add 1/2 tbsp of oil
Home-made potato
cubes
10.6-26.5 12-18 360 Shake add 1/2 tbsp of oil
Rosti 8.8 15-18 360
Potato gratin 17.6 18-22 360
Meat & Poultry
Steak 3.5-17.6 8-12 360
Pork chops 3.5-17.6 10-14 360
Hamburger 3.5-17.6 7-14 360
Sausage roll 3.5-17.6 13-15 400
Drumsticks 3.5-17.6 18-22 360
Chicken breast 3.5-17.6 10-15 360
Snacks
Spring rolls 3.5-14.1 8-10 400 Shake Use oven-ready
Frozen chicken
nuggets
3.5-17.6 6-10 400 Shake Use oven-ready
Page 8

Min-Max-
Amount (oz)
Time
(min.)
Temperature
(F)
Shake
Extra
Information
Frozen sh ngers 3.5-14.1 6-10 400 Use oven-ready
Frozen breaded
cheese snacks
3.5-14.1 8-10 360 Use oven-ready
Stuffed vegetables 3.5-14.1 10 320
Baking
Cake 10.6 20-25 320 Use baking tray
Quiche 14.4 20-22 360
Use baking tray/
oven dish
Mufns 10.6 15-18 400 Use baking tray
Sweet snacks 14.4 20 320
Use baking tray/
oven dish
Note: When you use ingredients that rise (such as cake, quiche or mufns) the baking tray should
not be lled more than halfway.
Note: Add 3 minutes to the preparation time if you start frying while the air fryer is still cold.
Making home-made fries
For best results, we recommend using pre-baked (frozen) fries. For truly home-made fries,
follow the steps below.
1 Peel potatoes and cut them into your desired shape.
2 Soak them in a bowl of water for at least 30 minutes; remove and dry them.
3 Pour 1/2 Tablespoon of olive oil in a bowl and add fries. Mix until the fries are coated
with oil.
4 Remove fries from the bowl by hand or with a utensil so that excess oil stays in the
bowl. Add fries to the air fryer basket.
Note: Do not pour your fries from the mixing bowl into the basket at once so as to prevent excess
oil from pouring into the basket and ultimately the bottom of the pan.
5 Fry according to the instructions in this chapter.
7
1100W Oil-Less Low Fat Air Fryer - 2.5 Quart (2.4L)
RHAF-15001 & RHAF-15002
Page 9

Cleaning
Clean the appliance after every use.
The pan, basket and the inside of the appliance have a non-stick coating. Do not use metal
kitchen utensils or abrasive cleaning materials to clean them, as this may damage the non-stick
coating.
1 Remove the power cord plug from the wall socket and let the appliance cool down.
Note: Remove the pan to let the air fryer cool down more quickly.
2 Wipe the outside of the appliance with a moist cloth.
3 Clean the pan and basket with hot water, dish soap, and a non-abrasive sponge.
You can use a degreasing liquid to remove any remaining dirt.
Note: The pan and basket are dishwasher-safe.
Tip: If dirt is stuck to the basket or the bottom of the pan, ll the pan with hot water mixed
with dish soap. Put the basket in the pan and let the pan and basket soak for approximately
10 minutes.
4 Clean the inside of the appliance with hot water and a non-abrasive sponge.
5 Clean the heating element with a cleaning brush to remove any food residue.
Storage
1 Unplug the appliance and let it cool down.
2 Make sure all parts are clean and dry..
3 Push the cord into the cord storage compartment. Secure the cord by inserting it into the
appropriate slot.
Environment
- Do not throw away the appliance with the normal household waste at the end of its life, but
hand it in at an ofcial collection point for recycling. By doing this, you can help to preserve the
environment. (Fig. 14)
8
1100W Oil-Less Low Fat Air Fryer - 2.5 Quart (2.4L)
RHAF-15001 & RHAF-15002
Page 10

Problem Possible cause Solution
The air fryer
does not work.
The appliance is not
plugged in.
Put the power cord plug in grounded wall
socket.
You have not set the timer. Turn the timer knob to the required preparation
time to switch on the appliance.
The ingredients
fried with the
air fryer are not
done.
The amount of ingredients
in the basket is too big.
Put smaller batches of ingredients in the basket. Smaller batches are fried more evenly.
The set temperature is
too low.
Turn the temperature control knob to the required temperature setting (see section ‘Temp/
Timer’ in chapter ‘Using the appliance’).
The preparation time is too
short.
Turn the timer knob to the required preparation time (see section ‘Temp/Timer’ in chapter
‘Using the appliance’).
The ingredients are fried
unevenly in the
air fryer.
Certain types of ingredients need to be shaken
halfway through the preparation time.
Ingredients that lie on top of or across each
other (e.g. fries) need to be shaken halfway
through the preparation time. See section
‘Temp/Timer’ in chapter ‘Using the appliance’).
Fried snacks
are not crispy
when they
come out of the
air fryer.
You used a type of snack
meant to be prepared in a
traditional deep fryer.
Use oven snacks or lightly brush some oil onto
the snacks for a crispier result.
I cannot slide
the pan into
the appliance
properly.
The basket is overlled. Do not ll the basket beyond the MAX indica-
tion.
The basket is not placed in
the pan correctly.
Push the basket down into the pan until your
hear a click.
The handle of the baking
tray is obstructing the pan.
Push the handle to a horizontal position, so it
does not stick out on top of the basket.
White smoke
comes out of
the appliance.
You are preparing greasy
ingredients.
When you fry greasy ingredients in the air fryer,
a large amount of oil will leak into the pan.
The oil produces white smoke and the pan may
heat up more than usual. This does not affect
the appliance or the end result.
The pan still contains
grease residue from previous use.
White smoke is caused by grease heating up in
the pan. Make sure you clean the pan properly
after each use.
French fries are
fried unevenly
in the air fryer.
You did not soak the fries
properly before you fried
them.
Soak the fries in a bowl for at least 30 minutes,
taken them out and dry them with kitchen
paper.
9
1100W Oil-Less Low Fat Air Fryer - 2.5 Quart (2.4L)
RHAF-15001 & RHAF-15002
Page 11

You did not use the right
potato type.
Use fresh potatoes and make sure they stay
rm during frying.
French fries are
not crispy when
they come out
of the air fryer.
The crispiness of the fries
depends on the amount of
oil and water in the fries.
Make sure you dry the fries properly before you
add the oil.
Cut the fries smaller for a crispier result.
Add slightly more oil for a crispier result.
10
1100W Oil-Less Low Fat Air Fryer - 2.5 Quart (2.4L)
RHAF-15001 & RHAF-15002
Page 12

11
1100W Oil-Less Low Fat Air Fryer - 2.5 Quart (2.4L)
RHAF-15001 & RHAF-15002
We appreciate you purchasing a quality Rosewill product.
If you have any questions or need assistance,
please contact our Customer Service Department:
1-800-575-9885 or techsupport@rosewill.com
Specications
Part Number 96-268-088 96-268-089
Model RHAF-15001 RHAF-15002
Dimensions 12.6 x 10 x 12.8" 12.6 x 10 x 12.8"
Capacity 2.5 Q (2.4 L) 2.5 Q (2.4 L)
Voltage 120 V 120 V
Power 1100 W 1100 W
Cord Length 39.4" 39.4"
Weight 12.8 lb 12.8 lb
Color Black White
Material & Finish Plastic & Stainless Steel Plastic & Stainless Steel
 Loading...