

Page 1
Adaptateur pour disque dur IDE / SATA périphérique
RCAD-11003
User Manual
USB3.0 Adapter for
IDE / SATA Device
Page 2
User’s manual
USB3.0 Adapter for IDE / SATA Device
Adaptateur pour disque dur IDE / SATA périphérique
RCAD-11003
1
1
1
3
4
5
5
5
7
8
9
9
9
11
12
13
13
13
15
16
17
17
17
19
20
21
21
21
23
24
► English
1.System Requirements
2.Package Contents
3.Hardware Installation
4.Software Installation
5.Troubleshooting
►
Français
1.Configuration système requise
2.Contenu de l’emballage
3.Installation du matériel
4.Installation du logiciel
5.Dépannage
► Deutsch
1.Systemanforderungen
2.Lieferumfang
3.Hardwareinstallation
4.Softwareinstallation
5.Problemlösung
► Español
1.Requisitos del sistema
2.Contenido del paquete
3.Instalación del hardware
4.Instalación del software
5.Solucionar problemas
►
1.系統需求
2.包裝內容
3.硬體安裝
4.軟體安裝
5.疑難排解
►
1.系统需求
2.包装内容
3.硬件安装
4.软件安装
5.疑难排解
CONTENTS
繁體中文
简体中文
Page 3
User’s manual
USB3.0 Adapter for IDE / SATA Device
Adaptateur pour disque dur IDE / SATA périphérique
RCAD-11003
System Requirements
1
Hardware Installation
3
Package Contents
2
1
Hardware:
• A USB3.0 or 2.0 enabled PC or Mac
• Serial-ATA Hard Drive, 3.5” IDE or 2.5” IDE Drive
Software:
Windows 2000, XP, Vista, Windows 7 or Mac OS X
• The USB 3.0 to IDE or SATA Adapter
• AC Power Cord
• SATA Data Cable
• IDE Extension Cable (Male to Female)
• User Manual
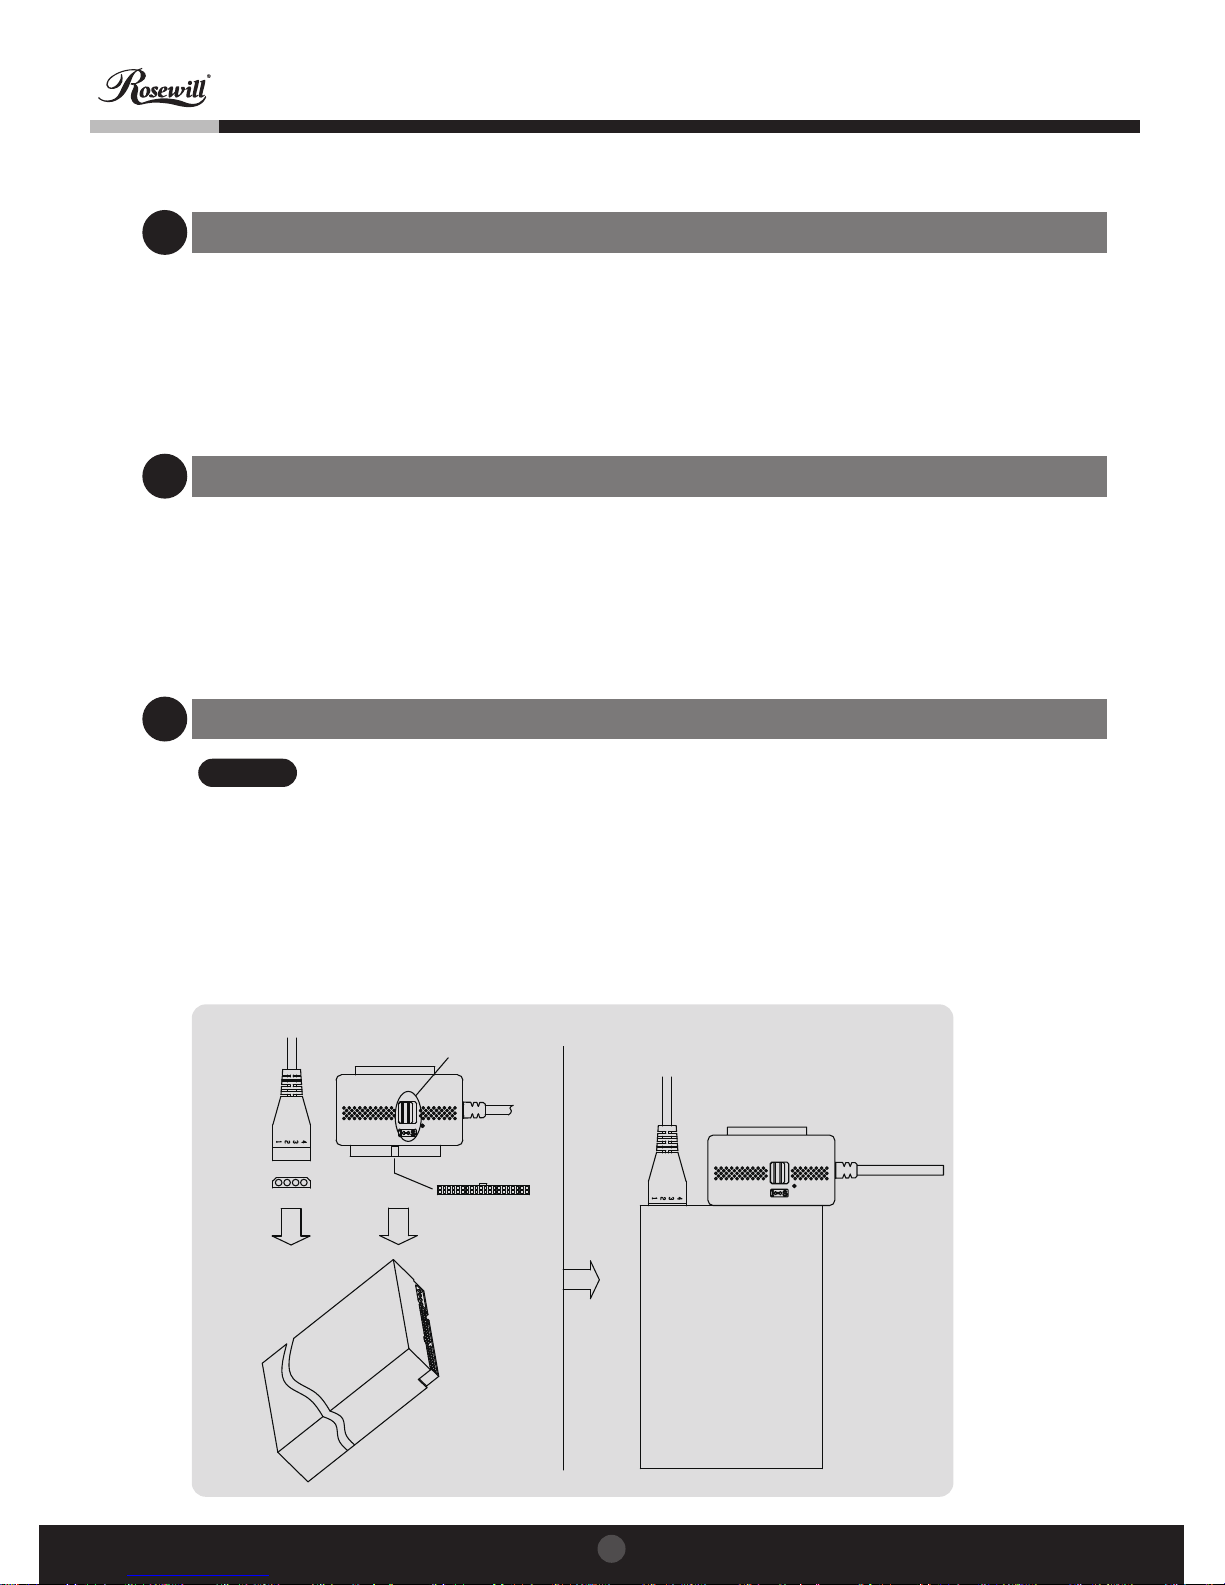
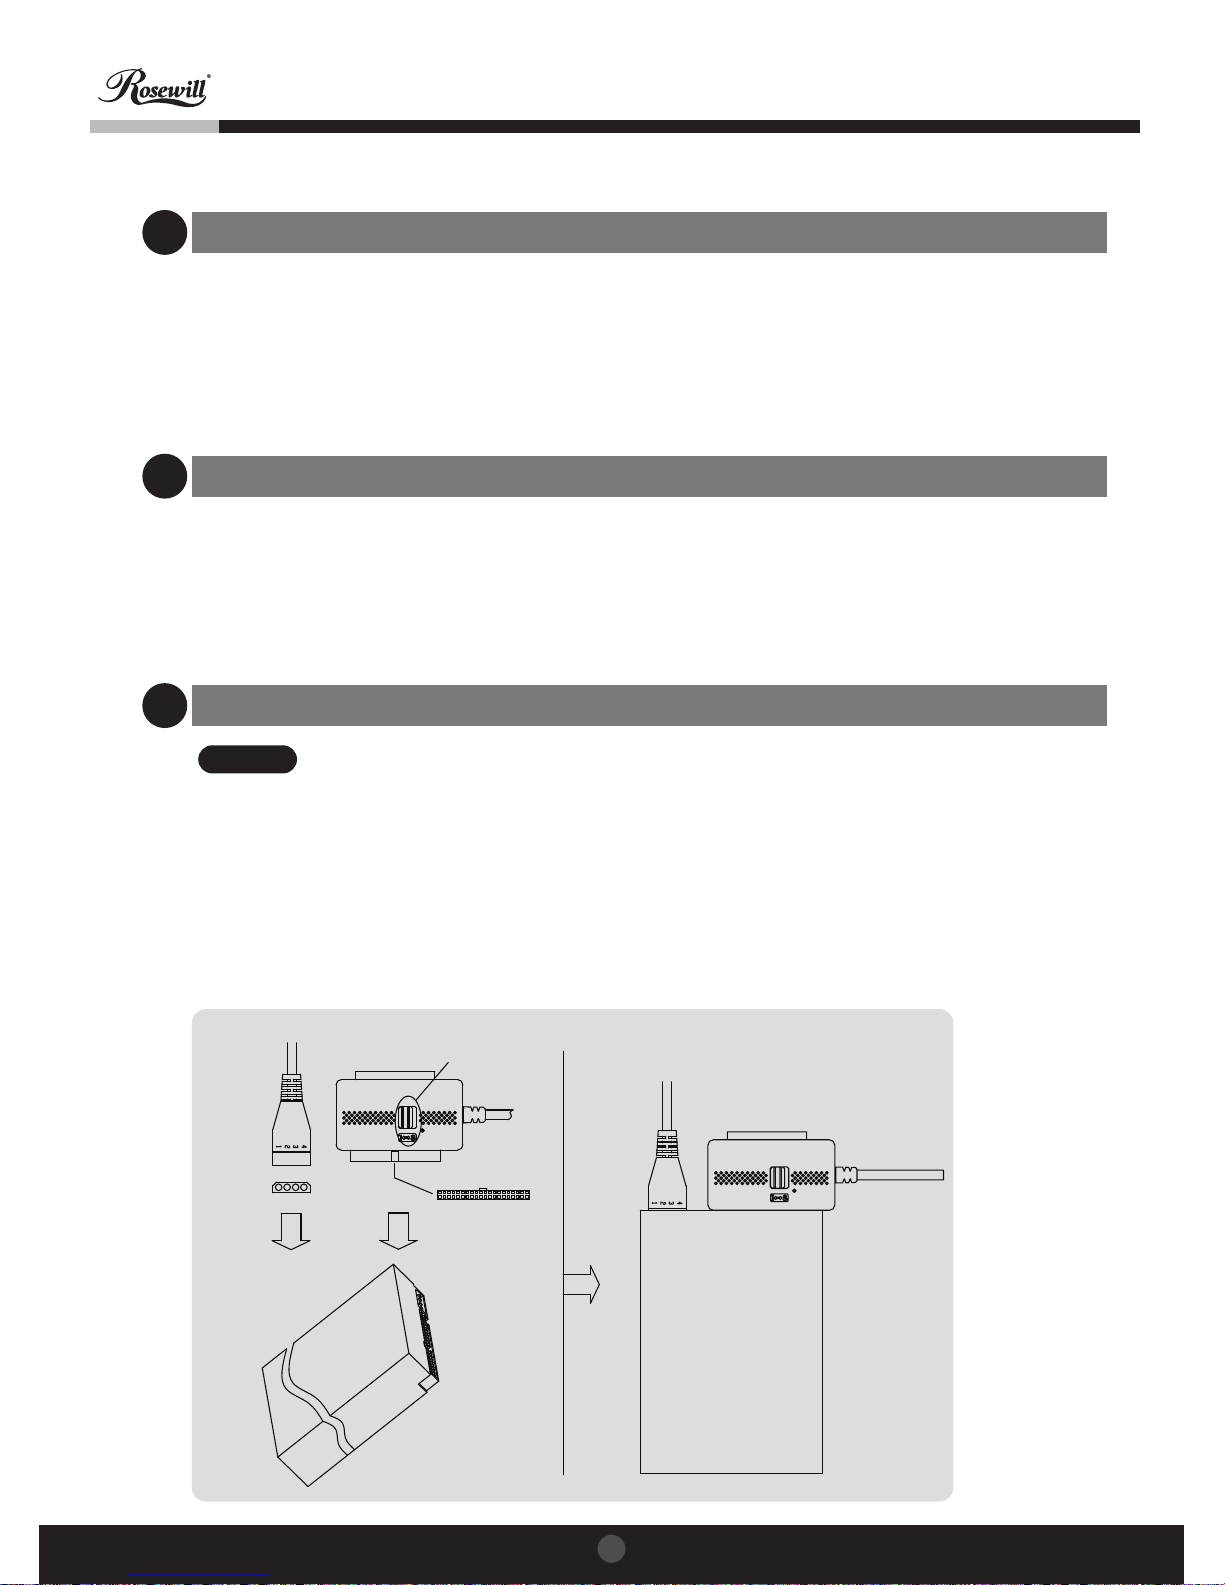
1. Switch to “I” side.
2. Connect the 4-pin molex power plug to the drive’s power receptacle.
3. Plug the drive directly to the 40-pin connector on the adapter
(it is keyed, and will only fit one way).
Step 1
For 3.5” IDE drive:
4 pin Molex Power Plug
SATA/IDE Switch
3.5” IDE
HDD
3.5” IDE HDD
4 pin Molex Power Plug
Page 4
User’s manual
USB3.0 Adapter for IDE / SATA Device
Adaptateur pour disque dur IDE / SATA périphérique
RCAD-11003
2
System Requirements
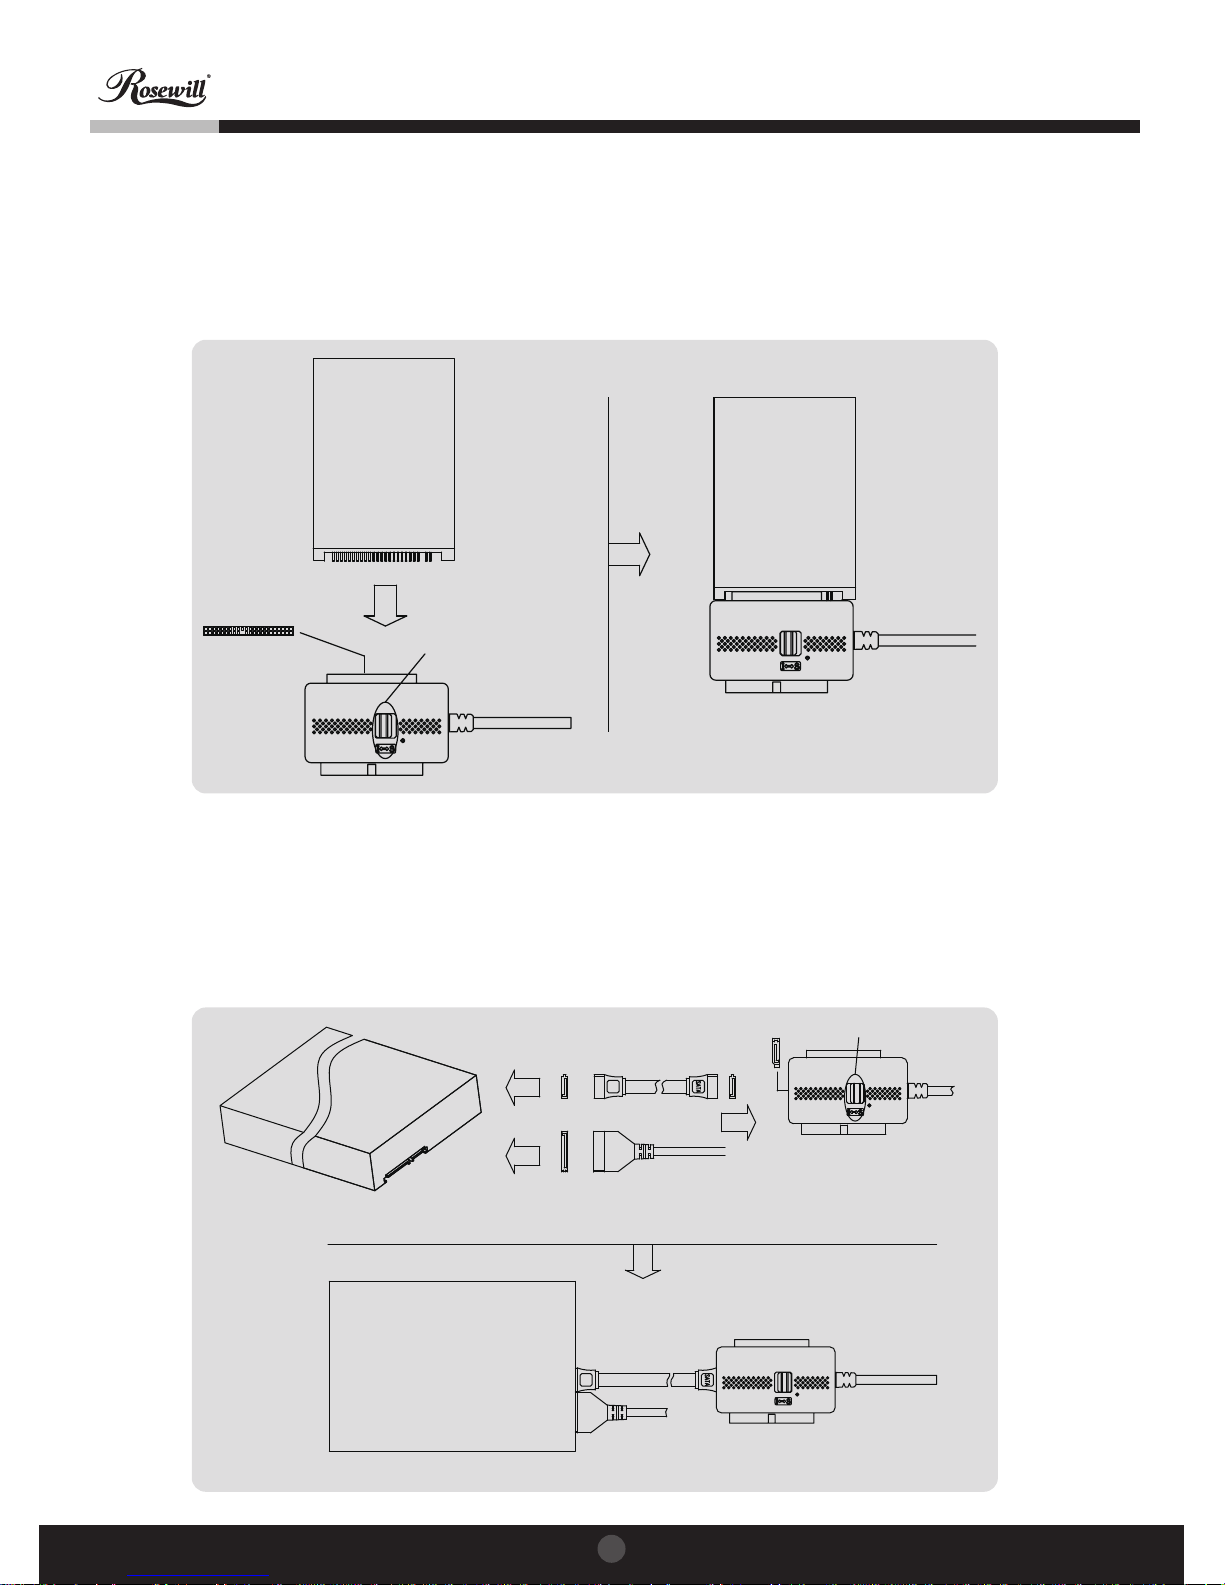
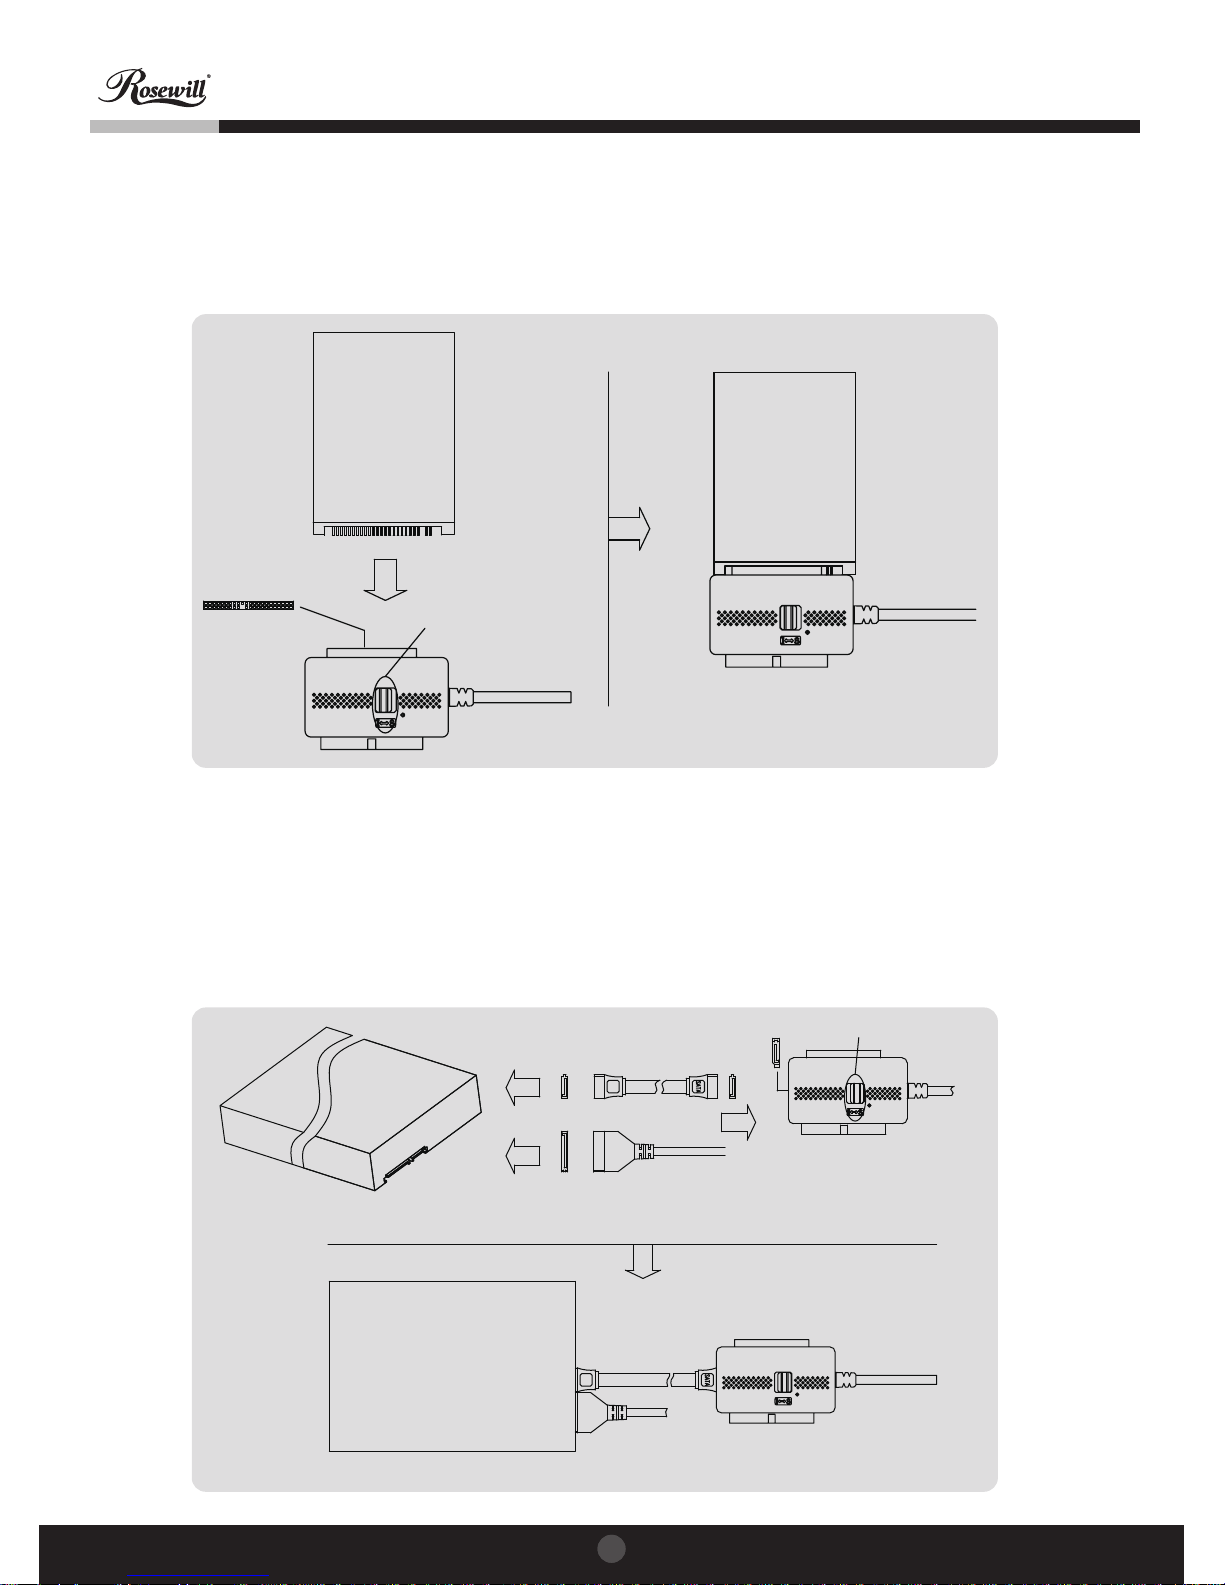
1. Switch to “I” side
2. Plug the drive directly to the 44-pin connector on the adapter
(it is keyed, and will only fit one way).
For 2.5” IDE drive:
3.5” IDE
HDD
3.5” IDE
HDD
SATA/IDE Switch
System Requirements
1. Switch to “S” side.
2. Connect the 15-pin SATA (flat) power plug to the SATA drive’s power receptacle.
3. Connect the Serial-ATA data cable from the SATA drive to the receptacle on
the adapter.
For SATA drive:
SATA/IDE Switch
3.5” SATA
HDD
SATA Cable
SATA Power
SATA Cable
SATA Power
3.5” SATA HDD
Page 5
User’s manual
USB3.0 Adapter for IDE / SATA Device
Adaptateur pour disque dur IDE / SATA périphérique
RCAD-11003
3
Software Installation
4
Connect the power cable to the power adapter.
Plug the power supply into the wall. Push the power button. The green LED should
light, and you should hear the drive spin up.
After the computer boots, connect the USB plug on the adapter to an available USB
port on the computer. Windows will find new hardware and install the appropriate
drivers.
Hardware installation is complete. Your drive is ready to use!
No software installation is required! Just plug it in and your drive will be detected
automatically.
To Verify Successful Installation in Windows® 2000/XP
1. Right-click My Computer, and select Properties. Click the Hardware tab, then
Device Manager.
2. You should see a category called Universal Serial Bus Controllers and a device
called USB Mass Storage Device, and a category called Disk Drives with your
drive listed as a USB Drive.
To Verify Successful Installation in Windows® Vista/Windows 7
1. Right-click My Computer, and select Properties. Click Device Manager .
2. You should see a category called Universal Serial Bus Controllers and a device
called USB Mass Storage Device, and a category called Disk Drives with your
drive listed as a USB Drive.
Step 2
Step 3
Step 4
Step 5
Page 6
User’s manual
USB3.0 Adapter for IDE / SATA Device
Adaptateur pour disque dur IDE / SATA périphérique
RCAD-11003
Problem:
Drive and adapter show properly in Device Manager, but no drive letter is
available in My Computer or Windows Explorer.
Solution:
This is a normal occurrence with a new drive, or with a drive that contains an
existing partition that Windows does not understand.
Using a new drive with Windows 2000/XP/Vista/Windows 7:
You can partition and format the drive via USB using the Logical Disk Manager
utility. Click Start, then Run. (Vista/Windows 7 users click Start and use the
search box). Type diskmgmt.msc , and click Ok. This will start the utility. The
USB drive should be visible in the bottom pane. Use Windows help for
assistance with using Logical Disk Manager. Once you have partitioned and
formatted the drive, Windows will assign it a drive letter and it is ready to use.
Using a drive with existing data that Windows does not recognize:
If Windows does not assign a drive letter for a drive with data on it, it is because
Windows does not recognize the partition on the drive. This is common if the
drive came from another operation system, if the drive is encrypted NTFS, if it
was partitioned with a third party utility, or if some or all of the data on the drive
is corrupted. Unfortunately, there is not a practical workaround. The drive may
work if it is erased and reformatted, but the data may not be recoverable.
Macintosh OS X:
When you install a new drive using OSX, the Application “Disk Utility” is what
you use to Partition, Format, RAID, Test, or Erase the drive. Disk Utility is
located in the Applications/Utility folder.
4
Troubleshooting
5
Page 7
User’s manual
USB3.0 Adapter for IDE / SATA Device
Adaptateur pour disque dur IDE / SATA périphérique
RCAD-11003
Configuration système requise
1
Installation du matériel
3
Contenu de l’emballage
2
Matériel :
• PC ou Mac compatible USB3.0 ou 2.0
• Disque dur Serial-ATA, lecteur IDE 3,5” IDE ou IDE 2,5”
Logiciel:
Windows 2000, XP, Vista, Windows 7 ou Mac OS X
• Adaptateur USB 3.0 vers IDE ou SATA
• Cordon d’alimentation CA
• Câble de données SATA
• IDE Câble d'extension (mâle vers femelle)
• Guide d’utilisation
1. Poussez le commutateur vers le côté « I ».
2. Branchez la fiche d’alimentation molex à 4 broches sur le connecteur
d’alimentation du disque dur.
3. Branchez le disque dur directement sur le connecteur à 40 broches de l'adaptateur
(il ne peut s’insérer que dans un seul sens).
Étape 1
Pour disque dur IDE 3,5”:
Fiche molex 4 broches
Commutateur SATA/IDE
HDD IDE
3,5”
HDD IDE 3,5”
Fiche molex 4 broches
5
Page 8
User’s manual
USB3.0 Adapter for IDE / SATA Device
Adaptateur pour disque dur IDE / SATA périphérique
RCAD-11003
System Requirements
1. Poussez le commutateur vers le côté « I ».
2. Branchez le disque dur directement sur le connecteur à 44 broches de l'adaptateur
(il ne peut s’insérer que dans un seul sens).
Pour disque dur IDE 2,5”:
HDD
IDE 2,5”
HDD
IDE 2,5”
Commutateur SATA/IDE
System Requirements
1. Poussez le commutateur vers le côté « S ».
2. Branchez la fiche d’alimentation SATA à 15 broches (plate) sur le connecteur
d’alimentation du disque dur SATA.
3. Branchez le câble de données Serial-ATA du disque dur SATA sur le connecteur
de l'adaptateur.
Pour disque dur SATA :
Commutateur SATA/IDE
HDD SATA
3,5”
Câble SATA
Alimentation SATA
Câble SATA
Alimentation SATA
HDD SATA 3,5”
66
Page 9
User’s manual
USB3.0 Adapter for IDE / SATA Device
Adaptateur pour disque dur IDE / SATA périphérique
RCAD-11003
Installation du logiciel
4
Branchez le câble d’alimentation sur l’adaptateur d’alimentation.
Branchez l’alimentation sur une prise secteur. Appuyez sur le bouton de mise en
marche. Le témoin LED vert devrait s’allumer et vous deviez entendre le disque dur
se mettre en rotation.
Après le démarrage de l’ordinateur, branchez la fiche USB de l’adaptateur sur un port
USB libre de votre ordinateur. Windows va automatiquement détecter le nouveau
matériel et installer les pilotes requis.
L’installation du matériel est terminée. Votre disque dur est prêt à être utilisé !
Aucun logiciel n’est nécessaire ! Branchez simplement votre disque dur et il sera
automatiquement détecté.
Pour vérifier l’installation sous Windows® 2000/XP
1. Cliquez droit sur Poste de travail, et sélectionnez Propriétés. Cliquez sur l’onglet
Matériel, puis sur Gestionnaire de périphériques.
2. Repérez la catégorie intitulée Contrôleurs de bus USB puis un périphérique
appelé Périphérique de stockage de masse USB et enfin la catégorie Lecteurs
de disque dans laquelle devrait figurer votre disque dur en tant que disque USB.
Pour vérifier l’installation sous Windows® Vista/Windows 7
1. Cliquez droit sur Poste de travail, et sélectionnez Propriétés. Cliquez sur
Gestionnaire de périphériques.
2. Repérez la catégorie intitulée Contrôleurs de bus USB puis un périphérique
appelé Périphérique de stockage de masse USB et enfin la catégorie Lecteurs
de disque dans laquelle devrait figurer votre disque dur en tant que disque USB.
Étape 2
Étape 3
Étape 4
Étape 5
67
Page 10

User’s manual
USB3.0 Adapter for IDE / SATA Device
Adaptateur pour disque dur IDE / SATA périphérique
RCAD-11003
68
Problème :
Le disque dur et l’adaptateur s’affichent correctement dans le Gestionnaire de
périphériques, mais aucune lettre de lecteur n’est disponible depuis le Poste de
Travail ou Windows Explorer.
Solution :
Ceci est normal lorsque vous installez un nouveau disque dur ou un disque
contenant une partition existante que Windows ne reconnaît pas.
Utiliser un nouveau lecteur avec Windows 2000/XP/Vista/Windows 7 :
vous pouvez partitionner et formater le disque dur via USB à l’aide de l’utilitaire
Gestionnaire de disque logique. Cliquez sur Démarrer, puis sur Exécuter. (Pour les
utilisateurs de Vista/Windows 7, cliquez sur Démarrer, puis utilisez la zone de
recherche). Saisissez diskmgmt.msc, puis cliquez sur Ok. Ceci va lancer l’utilitaire.
Le lecteur USB devrait s’afficher dans le panneau inférieur. Consultez l’aide de
Windows pour plus de détails sur l’utilisation du Gestionnaire de disque logique.
Une fois votre lecteur partitionné et formaté, Windows lui attribuera une lettre et
vous pourrez alors l’utiliser.
Utilisation d’un disque dur avec des données existantes que
Windows ne reconnaît pas :
Si Windows n’attribue pas de lettre au disque dur contenant déjà des données, c’est
parce que Windows ne reconnaît par la partition sur ce lecteur. Ce problème se
pose fréquemment si le disque dur provient d’un autre système d’exploitation, si le
disque dur est crypté au format NTFS, s’il a été partitionné à l’aide d’un utilitaire
tiers, ou si une partie ou l’intégralité des données qu’il contient est corrompue.
Malheureusement, il n’existe aucune solution miracle. Le disque dur pourra
éventuellement être réutilisé s’il est effacé et reformaté, mais les données peuvent
être irrémédiablement perdues.
Macintosh OS X :
Lorsque vous installez un nouveau disque dur à l’aide de OSX, l’application «
Utilitaire disque » est celle que vous utilisez pour partitionner, formater, installer un
RAID, tester ou effacer le disque. L’Utilitaire disque se trouve dans le dossier
Applications/Utilitaire.
Dépannage
5
Page 11

User’s manual
USB3.0 Adapter for IDE / SATA Device
Adaptateur pour disque dur IDE / SATA périphérique
RCAD-11003
9
Systemanforderungen
1
Hardwareinstallation
3
Lieferumfang
2
Hardware:
• Ein USB3.0-oder 2.0-fähiger PC oder Mac
• Serial-ATA-Festplatte, 3,5-Zoll-IDE- oder 2,5-Zoll-IDE-Festplatte
Software:
Windows 2000, XP, Vista, Windows 7-oder Mac OS X
• USB 3.0-zu-IDE/SATA-Adapter
• AC-Netzkabel
• SATA-Datenkabel
• IDE-Verlängerungskabel (männlich zu weiblich)
• Bedienungsanleitung
1. Auf „I“ umschalten.
2. 4-poligen Molex-Netzstecker am Netzanschluss der Festplatte anschließen.
3. Festplatte direkt am 40-poligen Anschluss des Adapters anschließen
(formschlüssig, passt nur in einer Richtung).
Schritt 1
Bei einer 3,5-Zoll-IDE-Festplatte:
4-poliger Molex-Netzanschluss
SATA/IDE-Schalter
3,5-Zoll-
IDE-
Festplatte
3,5-Zoll-IDEFestplatte
4-poliger Molex-Netzanschluss
Page 12

User’s manual
USB3.0 Adapter for IDE / SATA Device
Adaptateur pour disque dur IDE / SATA périphérique
RCAD-11003
System Requirements
1. Auf „I“ umschalten.
2. Festplatte direkt am 44-poligen Anschluss des Adapters anschließen
(formschlüssig, passt nur in einer Richtung).
Bei einer 2,5-Zoll-IDE-Festplatte:
2,5-Zoll-IDEFestplatte
2,5-Zoll-IDEFestplatte
SATA/IDE-Schalter
System Requirements
1. Auf „S“ umschalten.
2. 15-poligen SATA-Netzstecker (flach) am Netzanschluss der SATA-Festplatte
anschließen.
3. Serial-ATA-Datenkabel mit SATA-Festplatte mit dem Anschluss am Adapter verbinden.
Bei einer SATA-Festplatte:
SATA-Schalter
3,5-ZollSATAFestplatte
SATA-Kabel
SATA-Stromversorgung
SATA-Kabel
SATA-Stromversorgung
3,5-Zoll-SATAFestplatte
10
Page 13

User’s manual
USB3.0 Adapter for IDE / SATA Device
Adaptateur pour disque dur IDE / SATA périphérique
RCAD-11003
Softwareinstallation
4
Netzkabel am Adapter anschließen.
Netzstecker an eine Steckdose anschließen. Ein-/Austaste drücken. Die grüne LED
sollte aufleuchten, die Festplatte zu drehen beginnen.
Nach dem Hochfahren des Computers verbinden Sie den USB-Stecker am Adapter
mit einem freien USB-Port des PCs. Windows erkennt die neue Hardware und
installiert die entsprechenden Treiber.
Die Hardwareinstallation ist abgeschlossen. Ihre Festplatte ist einsatzbereit!
Es ist keine Softwareinstallation erforderlich! Schließen Sie das Gerät einfach an,
Ihre Festplatte wird automatisch erkannt.
So stellen Sie eine erfolgreiche Installation unter Windows® 2000/XP sicher
1. Klicken Sie mit der rechten Maustaste auf Arbeitsplatz, wählen Sie
Eigenschaften. Klicken Sie auf das Hardware-Register und anschließend auf
Geräte-Manager.
2. Sie sollten eine Kategorie mit dem Namen USB-Controller und ein Gerät, das als
USB-Massenspeichergerät angegeben wird, sowie die Kategorie Laufwerke,
unter der Ihre Festplatte als USB-Festplatte aufgelistet ist, sehen.
So stellen Sie eine erfolgreiche Installation unter Windows®
Vista/Windows 7 sicher
1. Klicken Sie mit der rechten Maustaste auf Computer, wählen Sie Eigenschaften.
Klicken Sie auf Geräte-Manager.
2. Sie sollten eine Kategorie mit dem Namen USB-Controller und ein Gerät, das als
USB-Massenspeichergerät angegeben wird, sowie die Kategorie Laufwerke,
unter der Ihre Festplatte als USB-Festplatte aufgelistet ist, sehen.
Schritt 2
Schritt 3
Schritt 4
Schritt 5
11
Page 14

User’s manual
USB3.0 Adapter for IDE / SATA Device
Adaptateur pour disque dur IDE / SATA périphérique
RCAD-11003
Problem:
Festplatte und Adapter werden richtig im Geräte-Manager angezeigt, es ist jedoch
kein Laufwerksbuchstaben unter Computer/Arbeitsplatz bzw. im Windows Explorer
verfügbar.
Lösung:
Dies ist bei Festplatten normal, die entweder neu sind oder eine Partition enthalten,
die von Windows nicht erkannt wird.
So verwenden Sie eine neue Festplatte unter Windows
2000/XP/Vista/Windows 7:
Sie können die Festplatte per USB über das Dienstprogramm
Datenträgerverwaltung partitionieren und formatieren. Klicken Sie auf Start, dann
auf Ausführen. (Vista/Windows 7-Benutzer klicken auf Start und verwenden dann
das Suchfeld.) Geben Sie diskmgmt.msc ein und klicken auf OK. Dadurch wird das
Dienstprogramm ausgeführt. Die USB-Festplatte sollte im unteren Feld erscheinen.
Halten Sie sich an die Windows-Hilfe, falls Sie Hinweise zur Verwendung des
Datenträgerverwaltung-Dienstprogrammes benötigen. Sobald Sie die Festplatte
partitioniert und formatiert haben, weist Windows ihr einen Laufwerksbuchstaben
zu, das Gerät ist einsatzbereit.
Einsatz einer Festplatte mit gespeicherten Daten, die Windows nicht erkennt:
Falls Windows einer Festplatte, die bereits Daten enthält, keinen
Laufwerksbuchstaben zuweist, erkennt Windows die Partition der Festplatte nicht.
Dies tritt häufig auf, wenn Festplatten von einem anderen Betriebssystem stammen,
NTFS-verschlüsselt sind, durch das Dienstprogramm eines Drittanbieters
partitioniert wurden oder einige bzw. alle Daten auf der Festplatte beschädigt sind.
Leider gibt es hier keine praktische Lösung. Möglicherweise funktioniert die
Festplatte, nachdem sie gelöscht und neu formatiert wurde; dadurch sind die Daten
jedoch gegebenenfalls nicht wiederherstellbar.
Macintosh OS X:
Wenn Sie eine neue Festplatte unter OSX installieren, verwenden Sie zum
Partitionieren, Formatieren, Einrichten eines RAID, Testen und Löschen der
Festplatte „Festplatten-Dienstprogramm“. Festplatten-Dienstprogramm finden Sie
im Ordner Programme/Dienstprogramme.
Problemlösung
5
12
Page 15

User’s manual
USB3.0 Adapter for IDE / SATA Device
Adaptateur pour disque dur IDE / SATA périphérique
RCAD-11003
Requisitos del sistema
1
Instalación del hardware
3
Contenido del paquete
2
Hardware:
• PC o Mac con USB 3.0 o USB 2.0
• Unidad de disco duro Serial-ATA, IDE de 3,5” o IDE de 2,5”
Software:
Windows 2000, XP, Vista, Windows 7 o Mac OS X
• Adaptador USB 3.0 a IDE o SATA
• Cable de alimentación de CA
• Cable de datos SATA
• IDE Cable de extensión (hombre a mujer)
• Manual del usuario
1. Colocar en el lado “I”.
2. Conecte el enchufe de alimentación Molex de 4 contactos en la toma de
alimentación de la unidad.
3. Enchufe la unidad directamente en el conector de 40 contactos del adaptador
(tiene una señal y solamente encajará en una posición).
Paso 1
Para unidad IDE de 3,5”:
enchufe de alimentación molex de 4 contactos
SATA/IDE Switch
3.5” IDE
HDD
3.5” IDE HDD
enchufe de alimentación molex de 4 contactos
13
Page 16

User’s manual
USB3.0 Adapter for IDE / SATA Device
Adaptateur pour disque dur IDE / SATA périphérique
RCAD-11003
14
System Requirements
1. Colocar en el lado “I”
2. Enchufe la unidad directamente en el conector de 44 contactos del adaptador
(tiene una señal y solamente encajará en una posición).
Para unidad IDE de 2,5”:
HDD IDE
DE 2,5”
HDD IDE
DE 2,5”
SATA/IDE Switch
System Requirements
1. Colocar en el lado “S”.
2. Conecte el enchufe de alimentación SATA (plano) de 15 contactos en la toma de
alimentación de la unidad SATA.
3. Conecte el cable de datos Serial-ATA entre la unidad SATA y la toma del adaptador.
Para una unidad SATA:
Conmutador SATA
HDD SATA
DE 3,5”
Cable SATA
Alimentación SATA
Cable SATA
Alimentación SATA
HDD SATA DE 3,5”
Page 17

User’s manual
USB3.0 Adapter for IDE / SATA Device
Adaptateur pour disque dur IDE / SATA périphérique
RCAD-11003
15
Instalación del software
4
Conecte el cable de alimentación al adaptador de alimentación adecuado.
Enchufe la toma de alimentación a la pared. Pulsar el botón de alimentación.
PCuando el equipo arranque, conecte el enchufe USB del adaptador a un puerto
USB disponible de aquel. Windows encontrará el nuevo hardware e instalará los
controladores apropiados.
¡La instalación del hardware se ha completado. La unidad ahora está preparada
para usarse!
No es necesario instalar ningún software! Simplemente enchufe su unidad y se
detectará automáticamente.
Para comprobar si la instalación se ha realizado correctamente en Windows®
2000/XP
1. Haga clic con el botón secundario del ratón en Mi PC y seleccione Propiedades.
Haga clic en la ficha Hardware y, a continuación, en Administrador de
dispositivos.
2. Debe ver una categoría denominada Controladores de bus serie universal y un
dispositivo denominado Dispositivo de almacenamiento masivo USB, así como
una categoría llamada Unidades de disco en la que aparecerá la unidad como
Unidad USB.
Para comprobar si la instalación se ha realizado correctamente en Windows®
Vista/Windows 7
1. Haga clic con el botón secundario en Equipo y seleccione Propiedades. Haga
clic en Administrador de dispositivos.
2. Debe ver una categoría denominada Controladores de bus serie universal y un
dispositivo denominado Dispositivo de almacenamiento masivo USB, así como
una categoría llamada Unidades de disco en la que aparecerá la unidad como
Unidad USB.
Paso 2
Paso 3
Paso 4
Paso 5
Page 18

User’s manual
USB3.0 Adapter for IDE / SATA Device
Adaptateur pour disque dur IDE / SATA périphérique
RCAD-11003
16
Problema:
La unidad y el adaptador aparecen correctamente en el Administrador de
dispositivos, pero ninguna letra de unidad está disponible en Mi PC o en el
Explorador de Windows.
Solución:
Se trata de una situación normal con una unidad nueva o con una unidad que
contiene una partición existente que Windows comprende.
Utilizar una nueva unidad con Windows 2000/XP/Vista/Windows 7:
Puede crear particiones en la unidad o darle formato a través de USB mediante
la utilidad Administrador de discos lógicos. Haga clic en Inicio y, a continuación,
en Ejecutar. (los usuarios de Vista/Windows 7 deben hacer clic en Iniciar y
utilizar el cuadro de búsqueda). Escriba diskmgmt.msc y haga clic en Aceptar.
Este comando iniciará la utilidad. La unidad USB debe aparecer en el panel
inferior. Utilice la ayuda de Windows si tiene problemas utilizando el
Administrador de discos lógicos. Cuando haya creado las particiones en la
unidad y le haya dado formato, Windows le asignará una letra de unidad y
podrá utilizarla.
Utilizar una unidad con datos existentes que Windows no reconoce:
Si Windows no asigna una letra de unidad a una unidad que contiene datos es
debido a que Windows no reconoce la partición en dicha unidad. Se trata de
una situación común si la unidad procede de otro sistema operativo, si la unidad
tiene el formato NTFS, si las particiones que contiene se crearon con una
utilidad de otros fabricantes o si algunos o todos los datos de dicha unidad
están dañados. Desgraciadamente, no existe una solución alternativa práctica.
La unidad puede funcionar si se borra o se le vuelve a dar formato, pero los
datos pueden no ser recuperables.
Macintosh OS X:
Si instala una nueva unidad mediante OSX, con la aplicación “Utilidad de disco”
realizará las siguientes operaciones en la unidad: particiones, formato, RAID,
pruebas o borrado. La Utilidad de disco se encuentra en la carpeta
Aplicaciones/Utilidad.
Solucionar problemas
5
Page 19

User’s manual
USB3.0 Adapter for IDE / SATA Device
Adaptateur pour disque dur IDE / SATA périphérique
RCAD-11003
系統需求
1
硬體安裝
3
包裝內容
2
硬體:
• 含USB 3.0或2.0之PC 或Mac
• SATA 硬碟, 3.5吋或2.5吋IDE 硬碟
軟體
:
Windows 2000, XP, Vista, Windows 7 or Mac OS X
• USB 3.0 轉IDE或SATA快捷線
• 變壓器
• SATA線
• IDE 延長線 (公對母)
• 使用手冊
1. 切換至 “I”
2. 連接 4 pin電源線至硬碟的電源插槽
3. 將快捷線上40 pin的連接頭接到硬碟上(防呆裝置,只允許單一方向)
步驟 1
3.5吋IDE硬碟
4 pin Molex 電源插頭
SATA/IDE 開關
3.5” IDE
硬碟
3.5” IDE 硬碟
4 pin Molex 電源插頭
17
Page 20

User’s manual
USB3.0 Adapter for IDE / SATA Device
Adaptateur pour disque dur IDE / SATA périphérique
RCAD-11003
18
System Requirements
1. 切換至 “I”
2. 將快捷線上44 pin的連接頭接到硬碟上(防呆裝置,只允許單一方向)
2.5
吋IDE硬碟
2.5” IDE
硬碟
2.5” IDE
硬碟
SATA/IDE 開關
System Requirements
1. 切換至 “S”
2. 連接 15 pin SATA (扁) 線至SATA硬碟的電源插槽
3. 使用SATA線連接SATA硬碟及快捷線
SATA
硬碟
SATA/IDE 開關
3.5” SATA
硬碟
SATA 線
SATA 電源
SATA 線
SATA 電源
3.5” SATA 硬碟
Page 21

User’s manual
USB3.0 Adapter for IDE / SATA Device
Adaptateur pour disque dur IDE / SATA périphérique
RCAD-11003
19
軟體安裝
4
連接電源變壓器
電源供應器插電. 按下電源開關. 綠色LED燈應該會亮起並且您會聽到硬碟
轉動的聲音
當電腦開機後,將快捷線上USB插頭連接至電腦上USB插槽. Windows隨即
會找到新的硬體並安裝適當的驅動程式
硬體安裝完成. 您的硬碟可開始使用
此產品不需任何軟體安裝! 接上後您的硬碟將會自動偵測.
確認是否在
Windows® 2000/XP成功安裝
1. 我的電腦按右鍵 選取內容 → 硬體 → 裝置管理員
2. 您應該會看到一個種類稱通用序列匯排流控制器底下有
USB Mass Storage Device, 也會在磁碟機
底下看到您USB的裝置名稱
確認是否在
Windows® Vista/Windows 7成功安裝
1. 我的電腦按右鍵 選取內容 → 裝置管理員
2. 您應該會看到一個種類稱通用序列匯排流控制器底下有
USB Mass Storage Device, 也會在磁碟機
底下看到您USB的裝置名稱
步驟 2
步驟 3
步驟 4
步驟 5
Page 22

User’s manual
USB3.0 Adapter for IDE / SATA Device
Adaptateur pour disque dur IDE / SATA périphérique
RCAD-11003
20
問題:
硬碟和快捷線在裝置管理員中均可以看到,但是沒有顯示在我的電腦或
是檔案總管中的任何硬碟槽
排解
:
這是新裝置或是當硬碟包含分區是Windows無法辨識時的正常現象,
在
Windows 2000/XP/Vista/Windows 7下使用新硬碟:
您可以透過USB使用邏輯磁碟管理服務來分割及格式化硬碟. 開始→
執行 (Vista/Windows 7使用者點 “開始” 後運用搜尋的方法) 輸入
diskmgmt.msc 並按下Ok. 這個方式會開始執行程式. USB硬碟將會顯
示在表框的最下列. 使用Windows邏輯磁碟管理服務來做協助, 當您需
要分割及格式化硬碟時, Windows就會自動分配出一個可使用的硬碟
槽
當硬碟中存有資料但
Windows無法辨識時:
如果Windows沒有分配出一個可使用的硬碟槽是因為Windows沒辦法
辨認出這顆硬碟. 這情況最常發生於硬碟是從其他作業系統中取下, 硬
碟是加密的NTFS, 是由其他的運用程式所分割, 又或者部份或全部的
資料已經損毀. 在這樣的情況下, 這個方式便無法解決您的問題.若您重
新進行資料抹除或是格式化, 那麼硬碟裡原有的資料便會遺失.
Macintosh OS X:
如果您是用 OSX來安裝新的硬碟, “磁碟工具程式” 將可以幫助您做硬
碟分割, 格式化, 硬碟陣列, 測試, 或是抹除硬碟資料. 磁碟工具是在 「
應用程式」→「工具程式」
疑難排解
5
Page 23

User’s manual
USB3.0 Adapter for IDE / SATA Device
Adaptateur pour disque dur IDE / SATA périphérique
RCAD-11003
21
系统需求
1
硬件安装
3
包装内容
2
硬体:
• 含USB 3.0或2.0之PC 或Mac
• SATA 硬盘, 3.5吋或2.5吋IDE 硬盘
软体
:
Windows 2000, XP, Vista, Windows 7 or Mac OS X
• USB 3.0 转IDE或SATA快捷线
• 变压器
• SATA线
• IDE 延长线 (公对母)
• 使用手册
1. 切换至 “I”
2. 连接 4 pin电源线至硬盘的电源插槽
3. 将快捷线上40 pin的连接头接到硬盘上(防呆装置,只允许单一方向)
步骤 1
3.5吋IDE硬盘
4 pin Molex 电源插头
SATA/IDE 开关
3.5” IDE
硬盘
3.5” IDE 硬盘
4 pin Molex 电源插头
Page 24

User’s manual
USB3.0 Adapter for IDE / SATA Device
Adaptateur pour disque dur IDE / SATA périphérique
RCAD-11003
22
System Requirements
1. 切换至 “I”
2. 将快捷线上44 pin的连接头接到硬盘上(防呆装置,只允许单一方向)
2.5
吋IDE硬盘
2.5” IDE
硬盘
2.5” IDE
硬盘
SATA/IDE 开关
System Requirements
1. 切换至 “S”
2. 连接 15 pin SATA (扁) 线至SATA硬盘的电源插槽
3. 使用SATA线连接SATA硬盘及快捷线
SATA
硬盘
SATA/IDE 开关
3.5” SATA
硬盘
SATA 线
SATA 电源
SATA 线
SATA 电源
3.5” SATA 硬盘
Page 25

User’s manual
USB3.0 Adapter for IDE / SATA Device
Adaptateur pour disque dur IDE / SATA périphérique
RCAD-11003
23
软件安装
4
连接电源变压器
电源供应器插电. 按下电源开关. 绿色LED灯应该会亮起并且您会听到硬盘
转动的声音
当电脑开机后,将快捷线上USB插头连接至电脑上USB插槽. Windows随即
会找到新的硬体并安装适当的驱动程序
硬体安装完成. 您的硬盘可开始使用
此产品不需任何软体安装! 接上后您的硬盘将会自动侦测:
确认是否在
Windows® 2000/XP成功安装
1. 我的电脑按右键 选取属性 → 硬件 → 设备管理器
2. 您应该会看到一个种类称通用序列总线控制器底下有
USB Mass Storage Device, 也会在磁盘机
底下看到您USB的装置名称
確認是否在
Windows® Vista/Windows 7成功安裝
1. 我的电脑按右键 选取属性 → 设备管理器
2. 您应该会看到一个种类称通用序列总线控制器底下有
USB Mass Storage Device, 也会在磁盘机
底下看到您USB的装置名称
步骤 2
步骤 3
步骤 4
步骤 5
Page 26

User’s manual
USB3.0 Adapter for IDE / SATA Device
Adaptateur pour disque dur IDE / SATA périphérique
RCAD-11003
24
问题:
硬盘和快捷线在装置管理员中均可以看到,但是没有显示在我的电脑或
是资源管理器中的任何硬盘槽
排解
:
这是新装置或是当硬盘包含分区是Windows无法辨识时的正常现象,
在
Windows 2000/XP/Vista/Windows 7下使用新硬盘:
您可以透过USB使用逻辑磁盘管理服务来分割及格式化硬盘. 开始→
执行 (Vista/Windows 7使用者点 “开始” 后运用搜寻的方法) 输入
diskmgmt.msc 并按下Ok. 这个方式会开始执行程序. USB硬盘将会显
示在表框的最下列. 使用Windows逻辑磁盘管理服务来做协助, 当您需
要分割及格式化硬盘时, Windows就会自动分配出一个可使用的硬盘
槽
当硬盘中存有资料但
Windows无法辨识时:
如果Windows没有分配出一个可使用的硬盘槽是因为Windows没办法
辨认出这颗硬盘. 这情况最常发生于硬盘是从其他作业系统中取下, 硬
盘是加密的NTFS, 是由其他的运用程序所分割, 又或者部份或全部的
资料已经损毁. 在这样的情况下, 这个方式便无法解决您的问题.若您重
新进行资料抹除或是格式化, 那么硬盘里原有的资料便会遗失.
Macintosh OS X:
Macintosh OS X: 如果您是用 OSX来安装新的硬盘, “磁盘工具程序”
将可以帮助您做硬盘分割, 格式化, 硬盘阵列, 测试, 或是抹除硬盘资料.
磁盘工具是在 「应用程序」→「工具程序」
疑难排解
5
Page 27

www.rosewill.com
 Loading...