

Page 1

ATA-133 2 Port PCI Adaptor without RAID
RC208
User Manual
Page 2

1
User Manual
ATA-133 2 Port PCI Adaptor without RAID RC208
ULTRA ATA/133 PCI Card
Features and Benefits
• Silicon Image SiI 0680
• Compliant with UltraDMA6 ATA/133 specifications
• Compliant with PCI v2.2 Plug-n-Play
• Provides two independent Ultra ATA channels
• Full ACPI power management support
• Supports Ultra DMA 0-6 and Multi-word DMA 0-2
• Supports hard drives larger than 137GB
• CRC(Cyclical Redundancy Check) error-checking provides data verification and
achieves flawless data transfer
• Achieves burst data transfer rates up to 133MB/sec
• Works with various brand, capacity hard disk drives and ATAPI devices
System Requirements
• Pentium-class computer with an available PCI slot
• Windows® 98SE/ME/NT 4.0/2000/XP/Server 2003
Package Contents
• UltraATA 133 PCI Adapter
• Two ATA/133 (80-wires/40-pin) IDE Cable
• Driver CD
• User Manual
Page 3
2
User Manual
ATA-133 2 Port PCI Adaptor without RAID RC208
Hardware Installation
1. Turn Off the power to your computer and any other connected peripheral devices.
2. Unplug the power cord from the back of the computer.
3. Remove your computer’s cover.
4. Remove the slot bracket from an available PCI slot.
5. To install the card, carefully align the card’s bus connector with the selected PCI slot
on the motherboard. Push the board down firmly, but gently, until it is well seated.
6. Replace the slot bracket’s holding screw to secure the card.
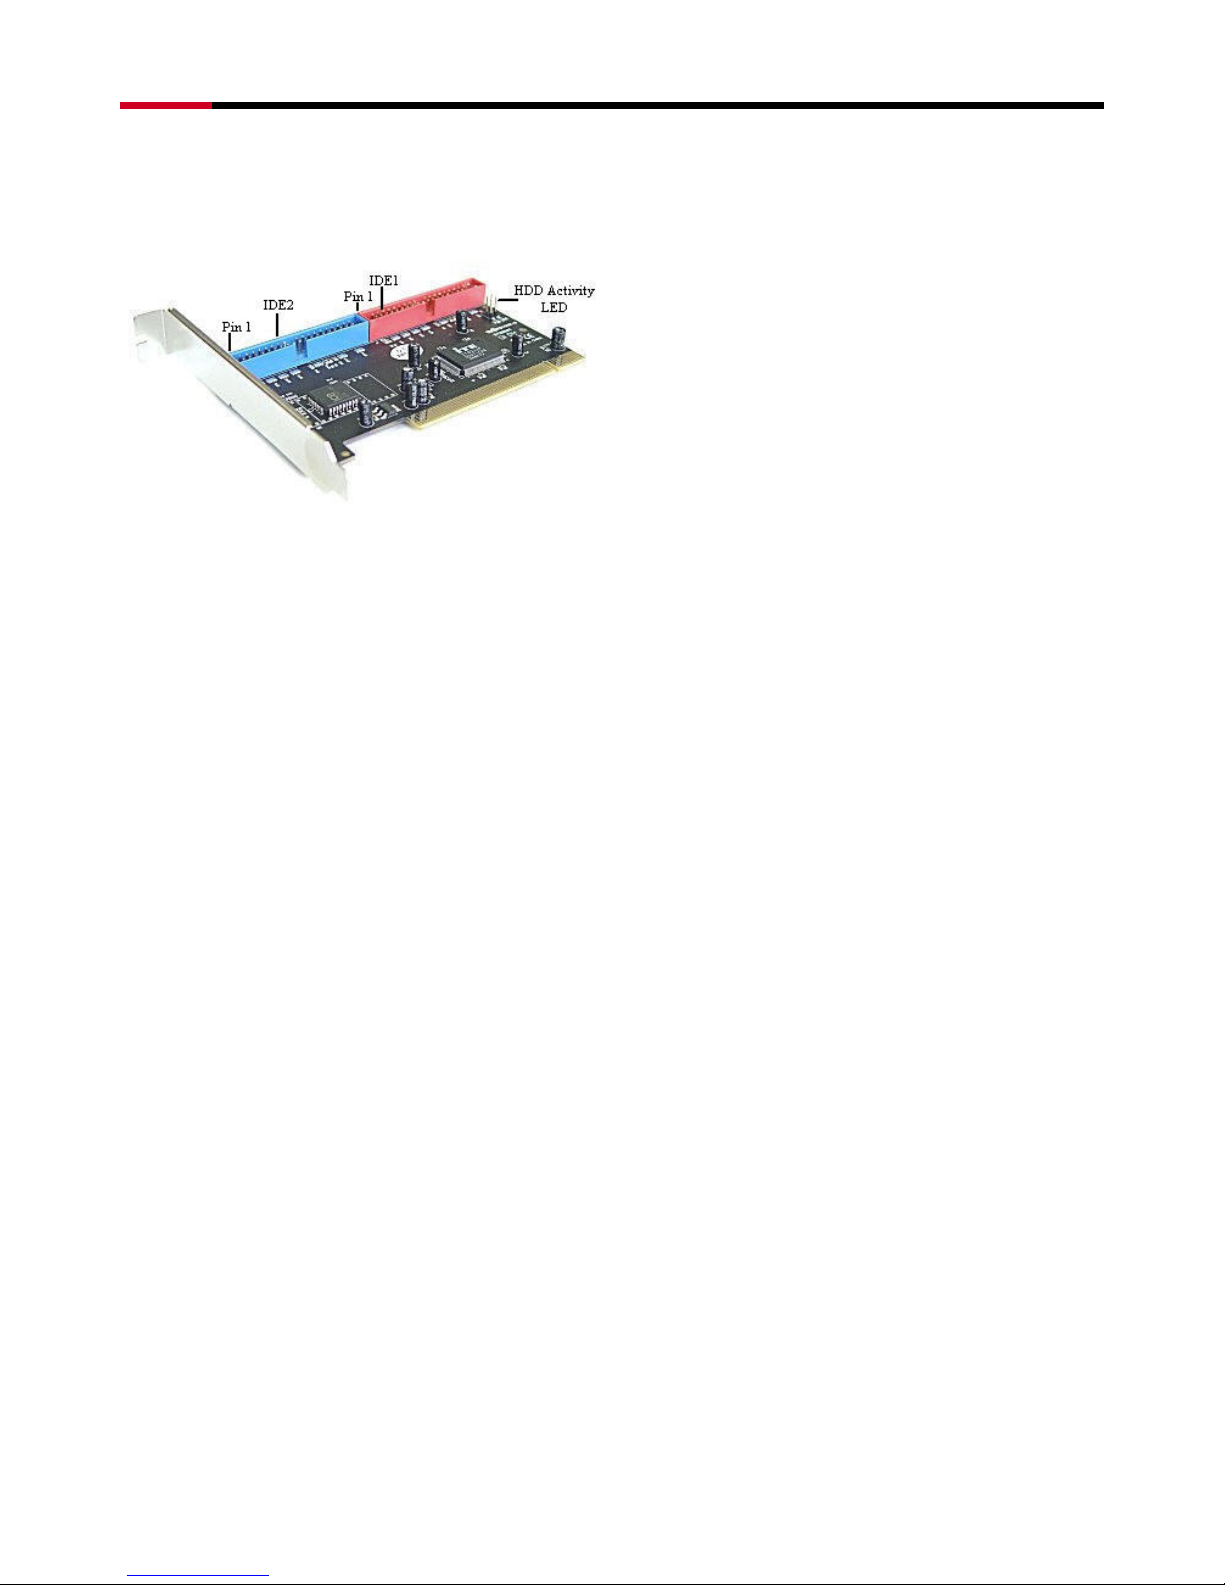
Device Connection
The UltraATA 133 PCI is a dual channel Ultra ATA/133 controller that support up to for IDE hard
disk drives or ATAPI devices. If you plan to use the second channel (IDE2).
In order to achieve high-speed data transfer, a 40-pin/80-wire Ultra ATA ribbon cable is
recommended. Also, do not mix Ultra ATA/133 hard disk with slow IDE or ATAPI devices on the
same channel.
1. Install hard disk drive(s) in chassis.
2. Attach one connector on the long end of Ultra ATA ribbon cable to the board’s IDE controller
and the other connector(s) to your IDE drive(s) to your IDE drive(s). Make sure pin 1 on the
cable (indicated by the colored stripe) matches pin 1 on the board’s IDE connector and your
IDE drive(s).
3. When two drives are installed on the Same IDE channel, make sure one drive is set up as
Master and the other as Slave. This rule applies to both IDE channels.
4. The Ultra ATA ribbon cable has two connectors. If you install only one drive, connect it to
the end connector of the cable. On the other hand, if you install two drives, connect the
mast drive to the end connector of the cable and the slave drive in the middle connector.
5. Reconnect the system power and other peripherals to your computer..
Page 4

3
User Manual
ATA-133 2 Port PCI Adaptor without RAID RC208
Driver Installation
For Windows® 98 SE
For New Windows® 98SE Installation
1. Install the board and follow Microsoft procedures to install Windows® 98 SE accordingly.
2. Once Windows has been installed, right click My Computer and click Properties.
Select Device Manager tab.
3. Double click PCI Mass Storage Controller listed under Other Devices.
4. Select Driver tab, then click Update Driver button.
5. Insert the driver CD into the CD-ROM Drive and click Next.
6. Select Search for the best driver for your device(Recommended) from the following dialog
box and type D:\PCI_IO\Cmd0680\ide133 (Note: “D:\” represents the drive letter assigned
to the CD-ROM drive you are using. If D is not letter of your CD-ROM drive, substitute D
with the correct drive letter), then click Next.
7. Click Next again, then Finish.
8. Restart Windows to complete driver installation.
For Existing Windows® 98SE Installation
1. Install the board and boot up Windows® 98SE.
2. At the Add New Hardware Wizard, click Next.
3. Select Search for the best driver for your device and click Next.
4. Insert the driver CD into the CD-ROM Drive and click Next.
5. Select Search for the best driver for your device(Recommended) from the following dialog
box and type D:\PCI_IO\Cmd0680\ide133 (Note: “D:\” represents the drive letter assigned
to the CD-ROM drive you are using. If D is not letter of your CD-ROM drive, substitute D
with the correct drive letter), then click Next.
6. Click Next again, then Finish.
7. Restart Windows to complete driver installation.
For Windows® ME
For New Windows® ME Installation
1. Install the board and follow Microsoft procedures to install Windows® ME accordingly.
2. Once Windows has been installed, right click My Computer and click Properties. Select
Device Manager tab.
Page 5

4
User Manual
ATA-133 2 Port PCI Adaptor without RAID RC208
3. Double click PCI Mass Storage Controller listed under Other Devices.
4. Select Driver tab, then click Update Driver button.
5. Insert the driver CD into the CD-ROM Drive and click Next.
6. Select Search for the best driver for your device(Recommended) from the following dialog
box and type D:\PCI_IO\Cmd0680\ide133 (Note: “D:\” represents the drive letter assigned
to the CD-ROM drive you are using. If D is not letter of your CD-ROM drive, substitute D
with the correct drive letter), then click Next.
7. Click Next again, then Finish.
8. Restart Windows to complete driver installation.
For Existing Windows® ME Installation
1. Install the board and boot up Windows® ME.
2. At the Add New Hardware Wizard, click Next.
3. Select Search for the best driver for your device and click Next.
4. Insert the driver CD into the CD-ROM Drive and click Next.
5. Select Search for the best driver for your device(Recommended) from the following dialog
box and type D:\PCI_IO\Cmd0680\ide133 (Note: “D:\” represents the drive letter assigned
to the CD-ROM drive you are using. If D is not letter of your CD-ROM drive, substitute D
with the correct drive letter), then click Next.
6. Click Next again, then Finish.
7. Restart Windows to complete driver installation.
To Verify Windows® 98SE/ME Installation
1. Right-click My Computer, then click Properties, Select Device Manager tab.
2. Double click SCSI Controllers, an entry, Silicon Image SiI 0680 ATA/133 Controller should
be listed.
3. Highlight Silicon Image SiI 0680 ATA/133 Controller and click Properties. A message this
device is working properly is displayed in the dialog box, the driver has been correctly
installed. If any error message is displayed, remove Silicon Image SiI 0680 ATA/133
Controller and restart your system.
For Windows® NT 4.0
For New Windows® NT 4.0 Installation
A new installation requires a floppy disk for the driver installation. To make this floppy disk,
copy the contents of the “PCI_IO\Cmd0680\ide133” folder, found on the driver CD, onto a
blank floppy disk then follow the directions below.
Page 6

5
User Manual
ATA-133 2 Port PCI Adaptor without RAID RC208
1. Install the board and follow Microsoft procedures to install Windows NT 4.0 accordingly.
2. At the Windows NT Setup screen, press F6 to specify and add the driver.
3. Press S, select Other, then press Enter.
4. Insert the driver diskette and press Enter.
5. Select Silicon Image SiI 0680 ATA/133 Controller and press Enter.
6. Press Enter to continue and follow on-screen instructions to complete Windows NT 4.0
installation.
For Existing Windows® NT 4.0 Installation
1. Install the board and boot up Windows® NT 4.0.
2. Double click My Computer/Control Panel/SCSI Adapters, then click Drivers tab.
3. Click Add… then Have Disk…
4. Insert the driver CD, type D:\PCI_IO\Cmd0680\ide133 (Note: “D:\” represents the drive
letter assigned to the CD-ROM drive you are using. If D is not letter of your CD-ROM drive,
substitute D with the correct drive letter), then click OK
5. Highlight Silicon Image SiI 0680 ATA/133 Controller and click OK.
6. Click OK, restart Windows NT 4.0 to complete driver installation.
To Verify Windows® NT 4.0 Installation
1. Double click My Computer/Control Panel/SCSI Adapters.
2. Highlight Silicon Image SiI 0680 ATA/133 Controller from SCSI Adapters listing and click
Properties. A message this device is working properly is displayed in the dialog box, the driver
has been correctly installed.
For Windows® 2000
For New Windows® 2000 Installation
A new installation requires a floppy disk for the driver installation. To make this floppy disk,
copy the contents of the “PCI_IO\Cmd0680\ide133” folder, found on the driver CD, onto a
blank floppy disk then follow the directions below.
1. Install the board and follow Microsoft procedures to install Windows 2000 accordingly.
2. Restart your system when prompted during Windows’ installation.
3. At the Windows 2000 screen, press F6 to install the driver.
4. Insert the driver diskette. Press S, then press Enter.
5. Select Silicon Image SiI 0680 ATA/133 Controller and press Enter.
6. Press Enter to continue and follow on-screen instructions to complete installation.
Page 7

6
User Manual
ATA-133 2 Port PCI Adaptor without RAID RC208
For Existing Windows® 2000 Installation
1. Install the board and boot up Windows® 2000.
2. At the Found New Hardware Wizard, click Next.
3. Select Search for a suitable driver for my device(recommended) and click Next.
4. Check the option Specify a location and then click Next to continue.
5. Insert the driver CD into CD ROM Drive, and they type D:\PCI_IO\Cmd0680\ide133
(Note: “D:\” represents the drive letter assigned to the CD-ROM drive you are using.
If D is not letter of your CD-ROM drive, substitute D with the correct drive letter),
then click OK.
6. Click Next again, then Finish.
7. Restart Windows to complete driver installation.
For Windows® XP/Server 2003
For New Windows® XP/Server 2003 Installation
A new installation requires a floppy disk for the driver installation. To make this floppy disk,
copy the contents of the “PCI_IO\Cmd0680\ide133” folder, found on the driver CD, onto a
blank floppy disk then follow the directions below.
1. Install the board and follow Microsoft procedures to install Windows XP/Server 2003
accordingly.
2. Restart your system when prompted during Windows’ installation.
3. At the Windows XP/Server 2003 screen, press F6 to install the driver.
4. Insert the driver diskette. Press S, then press Enter.
5. Select Silicon Image SiI 0680 ATA/133 Controller and press Enter.
6. Press Enter to continue and follow on-screen instructions to complete installation.
7. When the Software Installation warning pops up. Click Yes. And when the Hardware
Installation warning pops up, click Yes again.
For Existing Windows® XP/Server 2003 Installation
1. Install the board and boot up Windows.
2. At the Found New Hardware Wizard, click Next.
3. Choose “Install from a list or specific location(Advanced), and then click Next to continue.
4. Choose Search for the best driver in these location and check the option Include this location
in the search.
5. Inset the driver CD into CD ROM Drive, and then type D:\PCI_IO\Cmd0680\ide133
(Note: “D:\” represents the drive letter assigned to the CD-ROM drive you are using.
If D is not letter of your CD-ROM drive, substitute D with the correct drive letter),
then click OK.
Page 8

7
User Manual
ATA-133 2 Port PCI Adaptor without RAID RC208
6. The Hardware Installation window pops up, click Continue Anyway, the Finish.
7. Click Next again, then Finish.
8. Restart Windows to complete driver installation.
To Verify Windows® 2000/XP/Server 2003 Installation
1. Right click My Computer and click Manage.
2. Select Device Manager.
3. Double click SCSI and RAID Controller, then double click Silicon Image SiI 0680 ATA/133
Controller to display driver properties. A message this device is working properly is
displayed in the dialog box, the driver has been correctly installed.
Thank you for purchasing a quality Rosewill Product.
Please register your product at : www.rosewill.com/
for complete warranty information and future support for your product.
If you have any question while using our products, please feel free to contact us at feedback@rosewill.com
Page 9

8
User Manual
ATA-133 2 Port PCI Adaptor without RAID RC208
 Loading...