

Page 1

Wireless N Dual Band Adapter N600PCE
Quick Installation Guide
Page 2

Wireless N Dual Band Adapter N600PCE Quick Installation Guide
LED Name
Light Status
Description
Link
On
Link to a wireless access point
Overview
Thank you for purchasing Rosewill’s N600PCE wireless dual band PCI-Express card! This
network card can operate in 2.4GHz or 5GHz wireless network. Excepting common wireless
standards 802.11a/b/g, this wireless network card is also able to access 802.11n wireless
networks - data transfer rate is 300Mbps, and that’s six times faster than 802.11g wireless
network!
1.1 Package Content
Before getting started, please verify that your package includes the following items:
1. Rosewill N600PCE Wireless Dual Band PCI-E Adapter x 1
2. Quick Installation Guide x 1
3. 3dBi dual-band antenna x 2
4. Low Profile Bracket x 1
5. Resource CD x 1, including:
Wireless Utility and Driver
User Manual
Quick installation guide x 1
Note:
Make sure that the package contains the above items. If any of the listed items are damaged or missing, please contact with
your distributor.
1.5 System Requirement
You must have at least the following
A desktop PC with an available PCI-Express slot
At least a 300MHz processor and 32MB of memory
Windows OS for WinXP, Vista, and 7
A CD-ROM Drive
A 802.11n、802.11g or 802.11a/b Wireless (and Dual Band) Access Point/Router (for
infrastructure Mode) or another 802.11n、802.11g or 802.11b wireless (and Dual Band)
adapter (for Ad-Hoc; Peer-to-Peer networking mode).
1.6 LED Status
This PCIE Adapter contains one LED. Please refer to the following description for LED definition.
2
Page 3
Wireless N Dual Band Adapter N600PCE Quick Installation Guide
Off
Not linked to any wireless access point
Tx/Rx
On
Wireless WPS function is activated. The network card will
wait for 2 minutes to establish WPS connection.
Blinking
Wireless network card is normally installed /Linked to a
wireless access point /
Transferring or receiving data.
Off
No wireless activity
Installation Guide
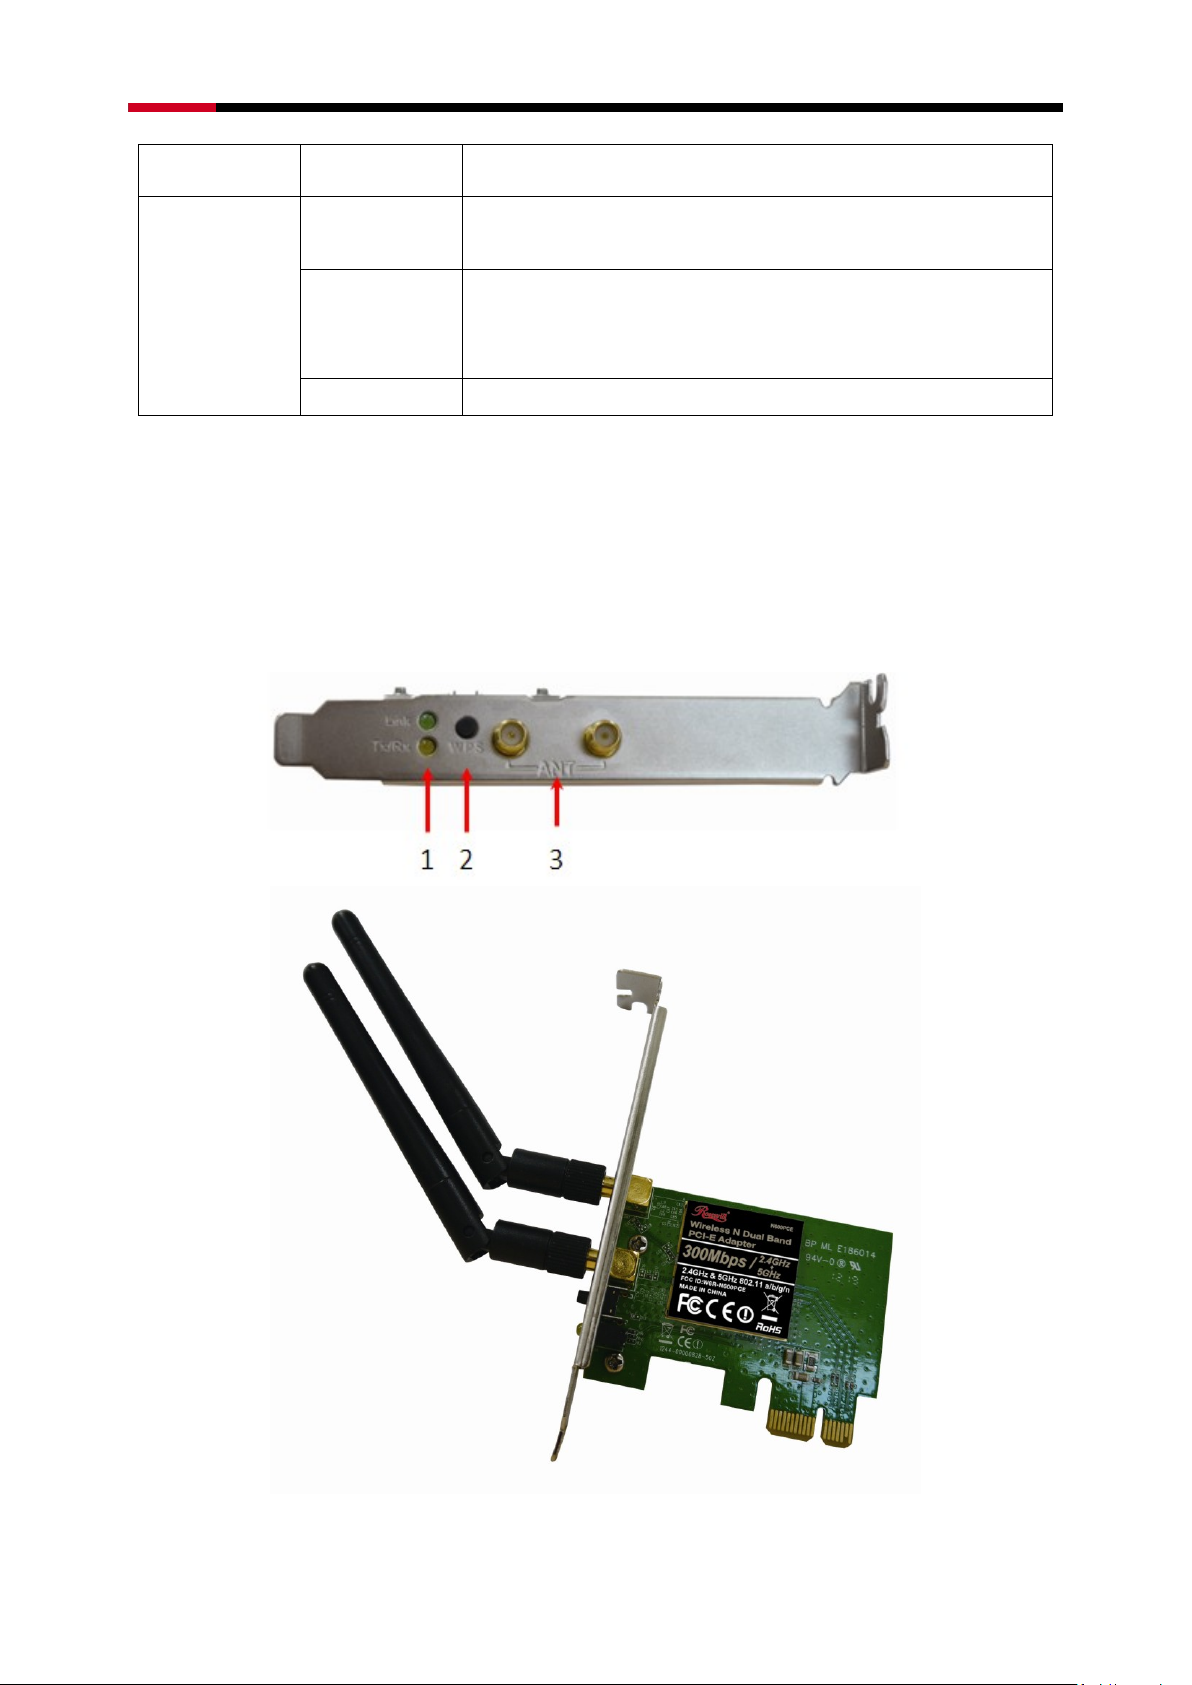
2.1 Hardware Diagram
1. Link and Tx/Rx LED
2. WPS Button
3. Antenna
3
Page 4
Wireless N Dual Band Adapter N600PCE Quick Installation Guide
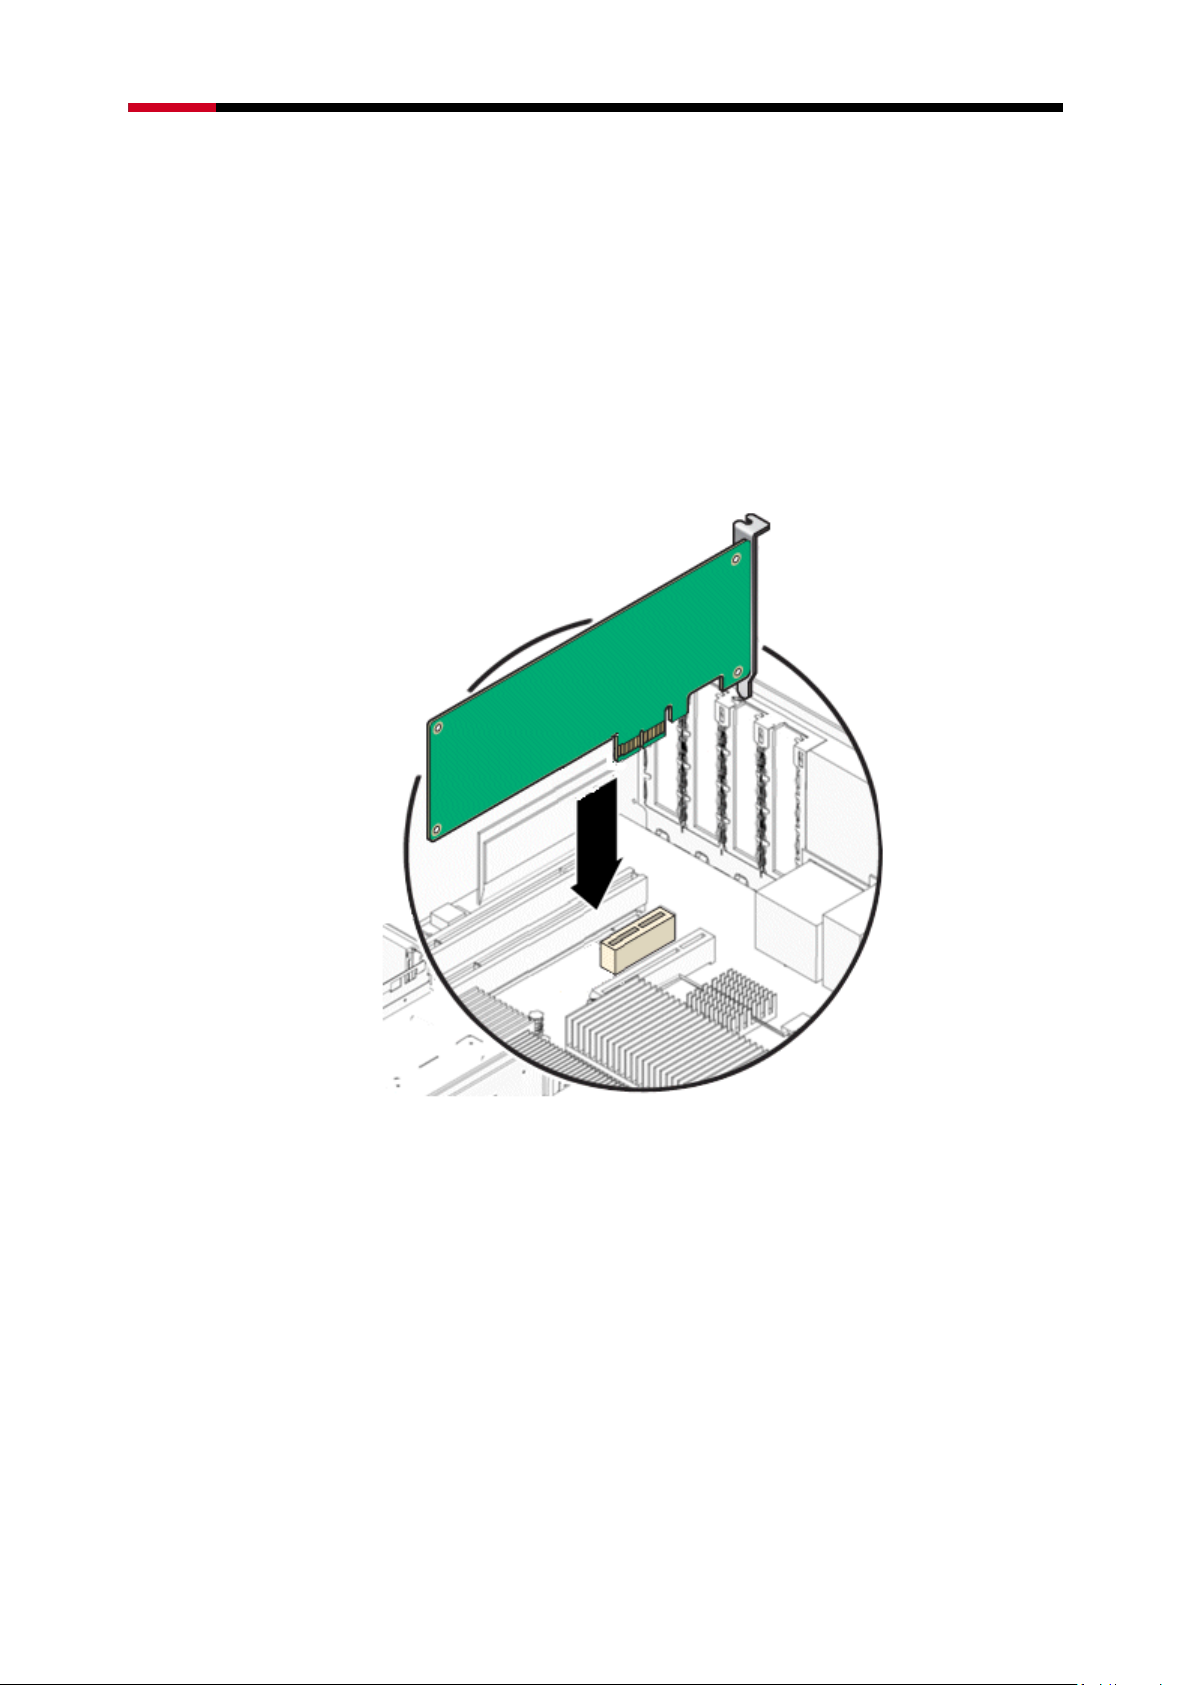
2.2 PCI-Express Card Installation
1. Turn off your computer and unplug the power cord from the computer.
2. Open the case and locate an available PCI-E slot. Remove the metal slot cover on
the back of the PC. Keep the screws. Turn to your computer manufacturer for
instructions if needed.
3. Insert the PCI-E adapter into the PCI-E slot. Make sure that all of its pins have
touched the slot’s contacts. Once the adapter has been firmly inserted, screw its
fastening tab. Then, close your PC case.
4. Insert the power cable back into the computer and turn on your computer.
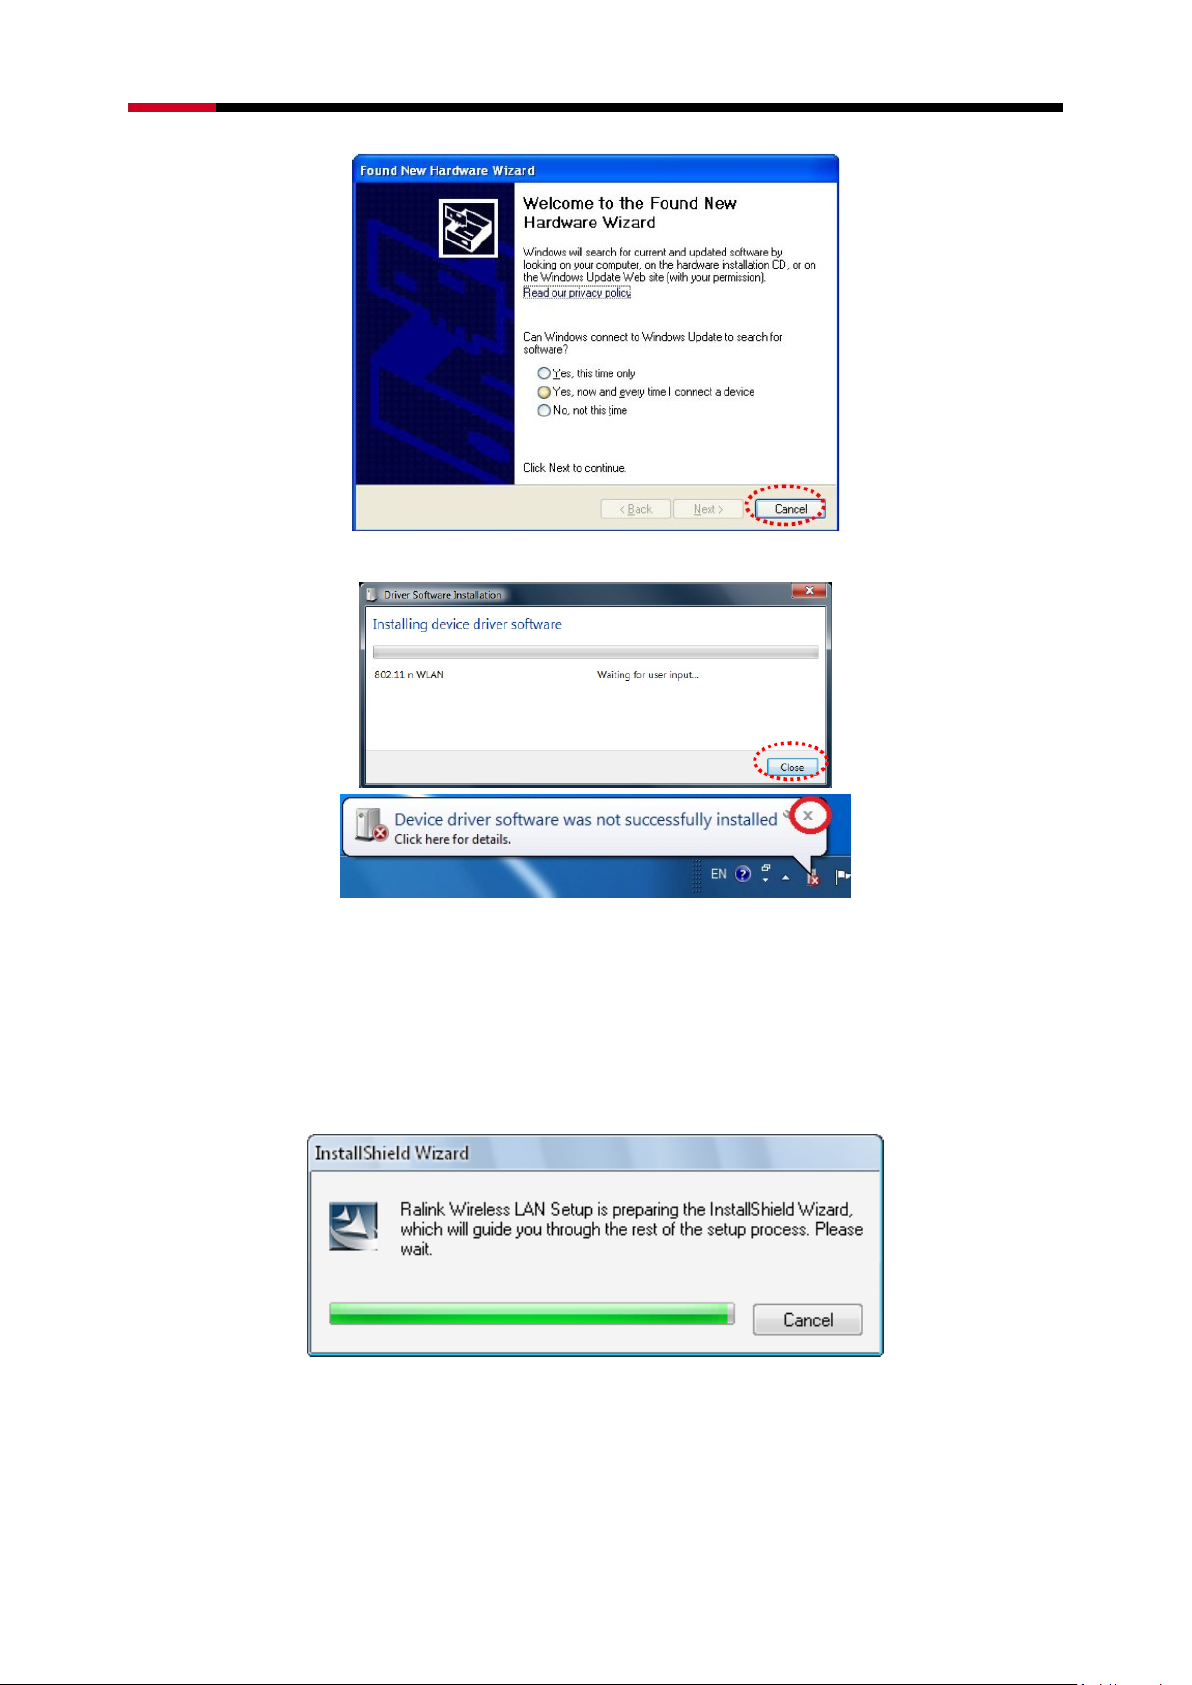
5. If the following window popup after you turn on the computer, please click Cancel or Close:
Under Win XP
4
Page 5
Wireless N Dual Band Adapter N600PCE Quick Installation Guide
Under Windows Vista/Win7
2.3 Installing Drivers and/or Utility
The Installation procedures in different OS are quite similar; please see below for
procedures:
1. Insert the Resource CD into your CD-ROM drive. To continue, double-click My
Computer, and then double-click the CD/DVD drive where the installation CD was
placed. Double-click Setup.exe. Then you will see below windows show up.
2. The following next window will display. After review, click “I accept the terms of the
license agreement”, then “Next” to continue.
5
Page 6

Wireless N Dual Band Adapter N600PCE Quick Installation Guide
3. You will see next window for you to choose a Setup type. It is recommended that you
select:
Install Driver and Ralink WLAN Utility for Windows XP.
Select Install Driver Only to install driver only for Windows Vista and Win7.
Click Next to continue.
4. For Windows XP, you may see this window pop up; you can choose based Ralink
Configuration Tool or Microsoft Zero Configuration tool as you desire. Click
Next to Continue.
6
Page 7

Wireless N Dual Band Adapter N600PCE Quick Installation Guide
5. Upon Selecting Next, you should see this next window pop up to start installation
phrase. You can click Install on start the installation phrase.
6. You will see that the installation process under this window.
7
Page 8

Wireless N Dual Band Adapter N600PCE Quick Installation Guide
7. Once the installation process completes, you will see the following window
Note:
For Windows XP, Setup Wizard may notify you of how to proceed with the installation during these
steps. Our drivers have been tested thoroughly, and are able to work with the operating system. Click
Continue Anyway to continue the Installation.
8
Page 9

Wireless N Dual Band Adapter N600PCE Quick Installation Guide
Wireless Connection Guide
This chapter describes how to configure your Adapter for wireless connectivity on your Wireless
Local Area Network (WLAN) and use the data security encryption features.
After Installing the Adapter, the Adapter’s tray icon will appear in your system tray. It appears at
the bottom of the screen, and shows the signal strength using color and the received signal
strength indication (RSSI).
In the following instruction for making a network connection, we use the provided Utility to
configure your wireless network settings.
Note: You could use either the software we provide or Microsoft Zero Configuration tool to
configure this adapter.
3.1 Connecting with Microsoft Zero Configuration tool (Win XP)
After specifying the Microsoft Zero Configuration tool to configure your wireless network,
right click on the icon on system tray. Select “View Available Wireless Networks” to
specify your wireless network.
9
Page 10

Wireless N Dual Band Adapter N600PCE Quick Installation Guide
The tool shows the available wireless networks. Select your demanding network to connect
with.
If prompted, enter the password/network key for your wireless network and click the Connect
button.
3.2 Connecting with Window Vista and Windows 7
You can easily access to wireless with Win Vista and Win7 . First, move your mouse to lower
right hand corner as below and click on the icon where arrow pointing to.
10
Page 11

Wireless N Dual Band Adapter N600PCE Quick Installation Guide
Click Refresh to get an update of your Wireless Network Connection. This should help you
search the SSID of the network you want to connect to.
Select your desired SSID, then Click “Connect”.
You will be prompt to ask you entering the network security key. Once entered, please click OK
to complete.
11
Page 12

Wireless N Dual Band Adapter N600PCE Quick Installation Guide
You should see below in a very short period and find out whether you are connected or now.
If this is your first time connect, you will see a window show up and ask you for setting up
Network Location. Please select the location based on your internet usage.
3.3 Connecting with Ralink Wireless Utility
We also provide a Ralink Wireless Utility for users to connect to a wireless network easily. It
provides more information and configuration for this adapter. As default, the Utility will start
automatically if you select “Install driver and Ralink WLAN Utility” when installing drivers. You
can find this icon and double click to start it on the lower right hand corner of your computer
desktop. Or you can right click the tray icon and select Launch Config Utility.
12
Page 13

Wireless N Dual Band Adapter N600PCE Quick Installation Guide
This is the startup window of the Ralink
Wireless Utility
Here is each button’s function:
Wi-Fi Direct
(will appear only if your computer
can support this function)
Site Survey
Link Information
Profile
Advanced
About
Please first start by selecting to
search nearby wireless signal for
connection.
When click on , a window will
popup and presents to you the nearby
Wi-Fi Signals.
If you did not see the signal you want to
connect, please click to rescan.
13
Page 14

Wireless N Dual Band Adapter N600PCE Quick Installation Guide
One time connection:
Please first highlight your desired
SSID, and click . Then follow the
popup window’s direction to
connect.
Setup the Profile for all future
connection:
Please click to add
the SSID to profile for all future use.
For detail.
Now you have completed the setup of your wireless network. You should be ready to surf!
Thank you for purchasing a quality Rosewill Product.
Please register your product at: www.rosewill.com for complete warranty information and future
support for your product.
Let us know!
Rosewill Support: techsupport@rosewill.com
Call Center: (800) 575-9885
Web: http://www.rosewill.com
14
 Loading...