

Page 1

User’s Manual
www.rosewill.co m
U2
Page 2
© All rights reserved by Rosewill
User’s ManualLegacy U2
CASE
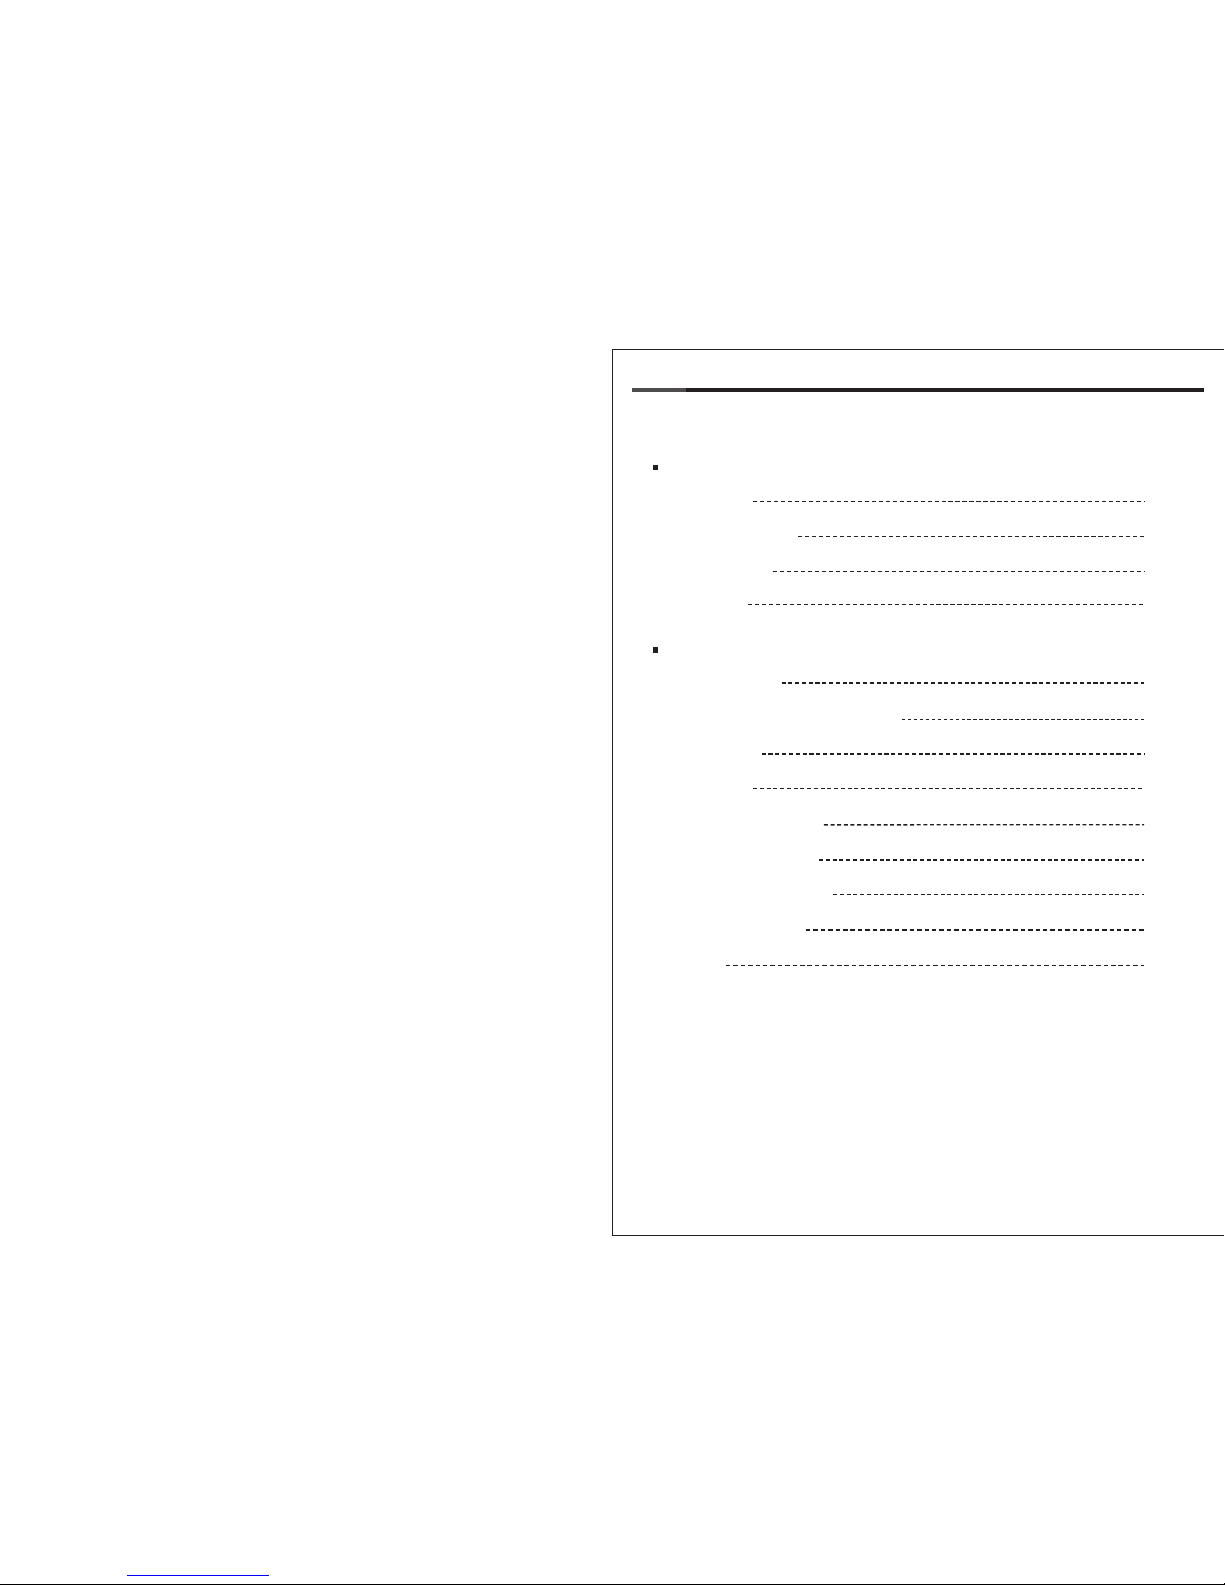
Contents
Opening Chassis
P.4
Installing 3.5” HDD or 120mm Fan
P.4
Installing PSU
P.5
Specification P.2
Disassemble Chart P.3
P.3Accessory Box
P.3Connectors
P.5Installing Motherboard
P.5Installing Display Card
P.6Installing 3.5”/2.5” HDD
Installation Guide
Product Overview
P.5
Installing I/O
P.6Installing PSU Raek
P.7Finished
Page 3

Hard drive LED Connection
Power Button Connection Power LED Connection
HD AUDIO Connection
USB 3.0 Connection
V BU S
S SR X 1 S SR X 1 +
S ST X 1 S ST X 1 +
D 1D 1+
G ND
G ND
N C
V BU S
S SR X 2 -
G ND
S ST X 2 -
G ND
D 2-
S SR X 2 +
S ST X 2 +
D 2+
Connectors
LH
S
120mm Fan
ITX Motherboard
Display Card
Fan Speed Controller
Side Panel
ATX PSU
2 x 2.5” HDD or 1 x 3.5” HDD + 1 x 2.5” HDD (Base Panel)
120mm Fan or 1 x 3.5 HDD (Front Panel)
Specification
Material
Dimension
Motherboard
Drive
Bay
Cooling System
Fan Speed Controller
Expansion Slot
CPU Cooler
Display Card
Front I/O Port
Power Supply
Weight
2.0 Aluminum Alloy
1.5 Aluminum Alloy
208 x 233 x319 mm (12mm feet not included) (WxDxH)
ITX (within 170mm x 170mm)
2 x 2.5” or 1 x 2.5” + 1 x 3.5”
1 x 3.5” or 1 x 120mm fan
2 x 120mm fans (built-in 1 x 120mm fan on rear panel)
3 level of fan speed
2
Not higher than 175mm
Not longer than 220mm
USB3.0 x 2, Audio x 1, MIC x1
Standard ATX PSII PSU
Net 2.0KG / Gross 2.5kg
Base plate
Front plate
Body
Back/Side
Disassemble Chart
For locking 3.5”HDD 8PCS
Buzzer 1PCS
For locking 2.5”HDD 8PCS
For locking Fans 4PCS
Gasket 10PCS
For locking
motherboard and PSU
HDD Rubber 4PCS
PSU Rack 1PCS
9PCS
Bunch Wire Ties 3PCS
Accessory Box
Hexagonal Stand-off 4PCS
PORT 1L
PORT 1R
PORT 2R
SENCE_SEND
PORT 2L
AUG GND
PRESENCE
SENSE1_RETURN
SENSE2_RETURN
PSU, Display Card, Motherboard, Front Fan & HDDs are NOT INCLUDED.
PSU Rack
2
© All rights reserved by Rosewill
3
© All rights reserved by Rosewill
User’s ManualLegacy U2
CASE
User’s ManualLegacy U2
CASE
Page 4

Installation Guide Installation Guide
ENGLISH
Install the 3.5” HDD or the 120mm fan.
(Be aware of the HDD interface direction)
DEUTSCH
Installieren Sie die 3,5-Zoll HDD oder
einen 120mm Lüfter (beachten Sie die
Richtung der HDD-Schnittstelle).
ITALIANO
Installare HDD da 3,5 pollici o ventola
da 120mm (attenzione sulla direzione
d’interfaccia HDD).
ESPAÑOL
Instalar un HDD de 3.5 pulgadas o un
ventilador de 120 mm. (Ten cuidado
con la dirección de la interfaz de HDD.
FRANÇAIS
Monter 1 disque dur de 3.5’’ ou 1
ventilateur de 120mm (attention au
sens de l’interface du connecteur du
disque dur).
Pусский
Установите HDD 3.5" или
вентилятор 120мм (обратите
внимание на направление
интерфейса HDD)
한국의
3.5 촌 HDD 혹은120mm 선풍기를
장착하세요.(HDD의 이음매 방향을
주의하세요.)
繁体中文
裝上3.5 寸HDD或120mm風扇
(注意HDD的接口方向)。
简体中文
装上3.5 寸HDD或120mm风扇
(注意HDD的接口方向)。
日本語
3.5寸HDD或は120mm ファンを取り
付ける。( HDD のインターフェース
の方向を注意する)
2.
Interface
ENGLISH
Remove the front mounting rack
with a cross screwdriver.
DEUTSCH
Demontieren Sie die Montageabdeckung
mit einem Kreutzschlitzschraubendreher.
ITALIANO
Rimuovere il telaio anteriore di
conversione con cacciavite piatto.
ESPAÑOL
Utiliza un destornillador de cruz para
quitar el bastidor lateral del disco duro.
FRANÇAIS
Démonter le rack qui se trouve à l’avant
à l’aide d’un tournevis cruciforme.
Pусский
Снимите стойку переключения
переднего расположения
крестообразной отверткой.
한국의
십자 드라이버로 전치전환프레임을
분해하여주세요.
繁体中文
用十字螺絲刀拆下前置轉換架。
简体中文
用十字螺丝刀拆下前置转换架。
日本語
十字ドライバーで前置変換台を取り外す。
1.
3.
ENGLISH
Unscrew the two screws to remove
the side panel.
DEUTSCH
Lösen Sie die beiden Rändelschrauben,
und entfernen Sie das Gehäuseseiten
teil.
ITALIANO
Allentare a mano le 2 viti serrate,
rimuovere il pannello laterale.
ESPAÑOL
Aflojar los dos tornillos de mano y
retirar los paneles laterales.
FRANÇAIS
Dévisser les deux écrous à main et
enlever la plaque latérale.
Pусский
Ослабьте два ручных зажимных
винты, снимите боковую панель
корпуса.
한국의
나사못을 2개 풀고 측판을
내려놓으세요.
繁体中文
鬆開2顆手擰螺絲,取下側板。
简体中文
松开2颗手拧螺丝,取下侧板。
日本語
2 本のノブねじをゆるめて側板を外
す。
ENGLISH
Remove PCI slot cover to install the
display card and secure with screws.
DEUTSCH
Entfernen Sie die PCI -Slotblende,
montieren und verschrauben Sie
anschließend die Grafikkarte.
ITALIANO
Rimuovere la barra di ritenuta PCI,
montare e bloccare la scheda grafica.
ESPAÑOL
Retirar la barra de retención de PCI,
cargar y cierrar el gráfico.
FRANÇAIS
Enlever le cache du slot d’extension
puis monter et verrouiller la carte
graphique.
Pусский
Снимите упорную ленту PCI,
установите и крепите видео карту.
한국의
PCI 베어리 스트립를 떼내고
그래픽 카드를 장착 및 로킹하여
주세요.
繁体中文
取下PCI 擋條,裝上並鎖固顯卡。
简体中文
取下PCI 挡条,装上并锁固显卡。
日本語
PCI ブラケットを外し、グラフィ
ックカードを取り付けて固定する。
5.
4.
6.
ENGLISH
Install the I/O cover and 4 hexagonal
stand-offs, and then install the motherboard.
DEUTSCH
Setzen Sie die I/O-Halterung mit Hilfe
der vier Sechskantschrauben ein und
montieren Sie dann das Mainboard.
ITALIANO
Mettere staffa I/O, inserire 4 perni esagonali,
e poi montare la scheda madre.
ESPAÑOL
Instala la metralla de I/O y cinco
postes hexagonalesLos otros agujeros
de la palca de base se apoyan con las
columnas espacial de placa.
FRANÇAIS
Monter la rondelle de butée entrée/
sortie et 4 goujon-filetés hexagonaux
puis mettre la carte mère.
Pусский
Установите пластину I/O, установите
четыре шпильки с шестигранной
головкой, а затем установите
материнскую плату
한국의
I/O더미 웨이퍼를 장착하고 6각
나사대를 4개 장착한후 메인보드에
장착하세요.
繁体中文
裝入I/O擋片,裝上4顆六角螺柱,
再裝入主板
。
简体中文
装入I/O挡片,装上4颗六角螺柱,
再裝入主板。
日本語
I / Oブラケットを装着し、4本の六角植込
みポルトをしめつけ、マザーボードを取り
付ける。
ENGLISH
DEUTSCH
Installieren Sie das Netzteil. Ist das NT mit
einem 120 mm (oder größer) Lüfter
ausgestattet, muss der Lüfter nach unten
gerichtet sein, um die Saugwirkung des
Lüfters zu gewährleisten.
ITALIANO
Installare PSU, se il PSU è per ventola da più
di 120mm, si deve mettere la ventola verso il
basso, al fine di evitare che la ventola non
aspira più vento.
ESPAÑOL
Instalar PSU, si el modelo del ventilador de
PSU es más de 120 mm, debe asegurarse
de que el ventilador hacia abajo por si acaso
no aviva succión menos de viento.
FRANÇAIS
Installer l’alimentation, s’il s’agit d’une
alimentation avec un ventilateur de plus de
120mm, mettre le ventilateur vers le dessous
pour s’assurer que le ventilateur aspire l’air.
Pусский
Установите PSU, если применяется
вентилятор 120мм и свыше, то следует
установить вентилятор вниз во
избежание невсасывания вентилятором.
한국의
PSU를 장착하고 120mm이상의 선풍기의
PSU이면 선풍기를 아래로 하여 선풍기가
바람을 흡수하지 못하게 하여야 합니다.
繁体中文
安裝PSU,如果是120mm以上風扇的PSU,
請一定將風扇朝下,以免風扇吸不到風。
简体中文
安装PSU,如果是120mm以上风扇的PSU,
请一定将风扇朝下,以免风扇吸不到风。
日本語
PSUを装置する場合、120mm以上の
ファンの PSU なら、風を吸うように、
必ずファンを下に向けてください。
Install the PSU. For PSU with fan larger
than 120mm, please have the fan face to
the bottom to avoid airflow blocking.
User’s ManualLegacy U2
CASE
User’s ManualLegacy U2
CASE
4
© All rights reserved by Rosewill
5
© All rights reserved by Rosewill
Page 5

Installation Guide
or
8.
7
.
ENGLISH
DEUTSCH
An der Gehäuseunterseite können
1×3,5" HDD und 1×2,5" oder 2×2,5"
HDD installiert werden (Hinweis:
Wenn Sie eine Dual-Slot-Grafikkarte
montieren, kann diese mit einer 3,5"
HDD kollidieren)
.
ITALIANO
Si può montare HDD da 1×3.5″ e
1×2.5″ o 2×2.5″ nella parte inferiore
del telaio (Nota: Se si installa scheda
grafica con due fessure, può interferire
con 3.5" HDD).
ESPAÑOL
El HDD de 1×3.5″o de 1×2.5″se
pueden instalar en la parte inferior de la
chasis. (nota:si instala una tarjeta de
doble ranura de gráficos, puede haber
interferencias con el HDD del modelo
de 1×3.5.
FRANÇAIS
On peut monter 1 disque dur de 3.5″ et
1 disque dur de 2.5″ ou 2 disques durs
de 2.5″ (nota: si la carte graphique est
de double slot, il existe probablement
une interférence avec disque dur de
3.5″.
Pусский
На нижней части корпуса можно установить
HDD 1×3.5”и HDD 1×2.5” или HDD 2×2.5”
(Внимание! Если устанавливается
двухслотовая видеокарта, то это может быть
несовместимо с 3.5” HDD).
한국의
케이스 아래에1×3.5촌HDD와 1×2.5촌혹은
2×2.5촌HDD를 장착할수 있습니다.
(주의:만약 장착한것이 더블슬록의 그래픽
카드이면3.5촌HDD와 간섭할수 있습니다. )
繁体中文
機箱底部可安裝1×3.5寸和1×2.5寸HDD或
2×2.5寸HDD (注意:如果安裝的是雙槽位
的顯卡,可能會與3.5寸HDD干涉) 。
简体中文
机箱底部可安装1×3.5寸和1×2.5寸HDD或
2×2.5寸HDD (注意:如果安装的是双槽位
的显卡,可能会与3.5寸HDD干涉) 。
日本語
ケースの底に1×3.5寸HDDと1×2.5寸
または2×2.5寸HDDの設置がする。
(注意:ダブル槽位のグラフィッ
クカードを取り付ける場合、3.5寸
HDDと干渉する可能性がある)
ENGLISH
Install the PSU rack .
DEUTSCH
ITALIANO
ESPAÑOL
FRANÇAIS
Pусский
한국의
繁体中文
简体中文
日本語
Thank you for purchasing a High-Quality Rosewill Product.
Please register your product at : http://www.rosewill.com
for complete warranty information and future support for your product.
If you have any question while using our products, please visit our website : www.rosewill.com
for latest driver & user manual or feel free to contact us.
Support Phone Number: 800-575-9885
Support Email: techsupport@rosewill.com
Install either 1x3.5”&1x2.5” HDD or
2x2.5”HDD on base panel. ( Note: If Dual
-Slot display card is applied, it may
interfere with the installation of 3.5” HDD.)
ENGLISH
Reinstall the side panel. Assembly complete.
DEUTSCH
Setzen Sie die Seitenabdeckung
zurück ins Gehäuse, dann ist der
Zusammenbau fertig.
ITALIANO
Riposizionare il pannello laterale nel
telaio, completare il montaggio.
ESPAÑOL
Vuelve a colocar el panel lateral del
chasis y así completa el conjunto.
FRANÇAIS
Remettre la plaque latérale sur le
châssis, assemblage accompli.
Pусский
Обратно установте боковую панель
на корпус, и сборка завершается.
한국의
측판을 케이스에 장착하고 조립을
완성하세요.
繁体中文
將側板裝回機箱,完成組裝。
简体中文
将侧板装回机箱,完成组装。
日本語
側板をケースに積み返し、組み立て
を完成する。
Installation Guide
9.
將電源支撐架裝上。
将电源支撑架装上。
Bauen Sie die Auflage der
Stromquelle auf.
Installer le support de
source d'alimentation.
電源のホルターを取りつける。
전원 지지대를 설치함。
Monte el soporte para
alimentación.
Montare il supporto sorgente.
Установить держатель
источника питания.
User’s ManualLegacy U2
CASE
User’s ManualLegacy U2
CASE
6
© All rights reserved by Rosewill
7
© All rights reserved by Rosewill
 Loading...