

Page 1
Quick User Guide
Gaming Case
Page 2

Page 3

Table of Contents
Thank you for purchasing a Rosewill Computer Case
Please read the instruction manual before using and
retain it for your future reference.
1
• Product Overview
Product Diagram ................................................ 02
Front I/O Pin-out ................................................ 02
Front I/O Diagram .............................................. 03
Accessory Kit ...................................................... 03
• Installation Guide
1. Open the Unit ................................................ 04
2. Install the Power Supply ................................ 05
3. Install the Motherboard ................................. 05
4. Install the Add-on Card ................................. 06
5. Install an External 5.25” Device ..................... 07
6. Install a 3.5” or 2.5” Drive .............................. 09
7. Care ............................................................... 11
8. Options .......................................................... 12
• Specications Table ........................................... 13
Page 4
Gaming Case
Quick User Guide
2
HIMARS
Product Overview
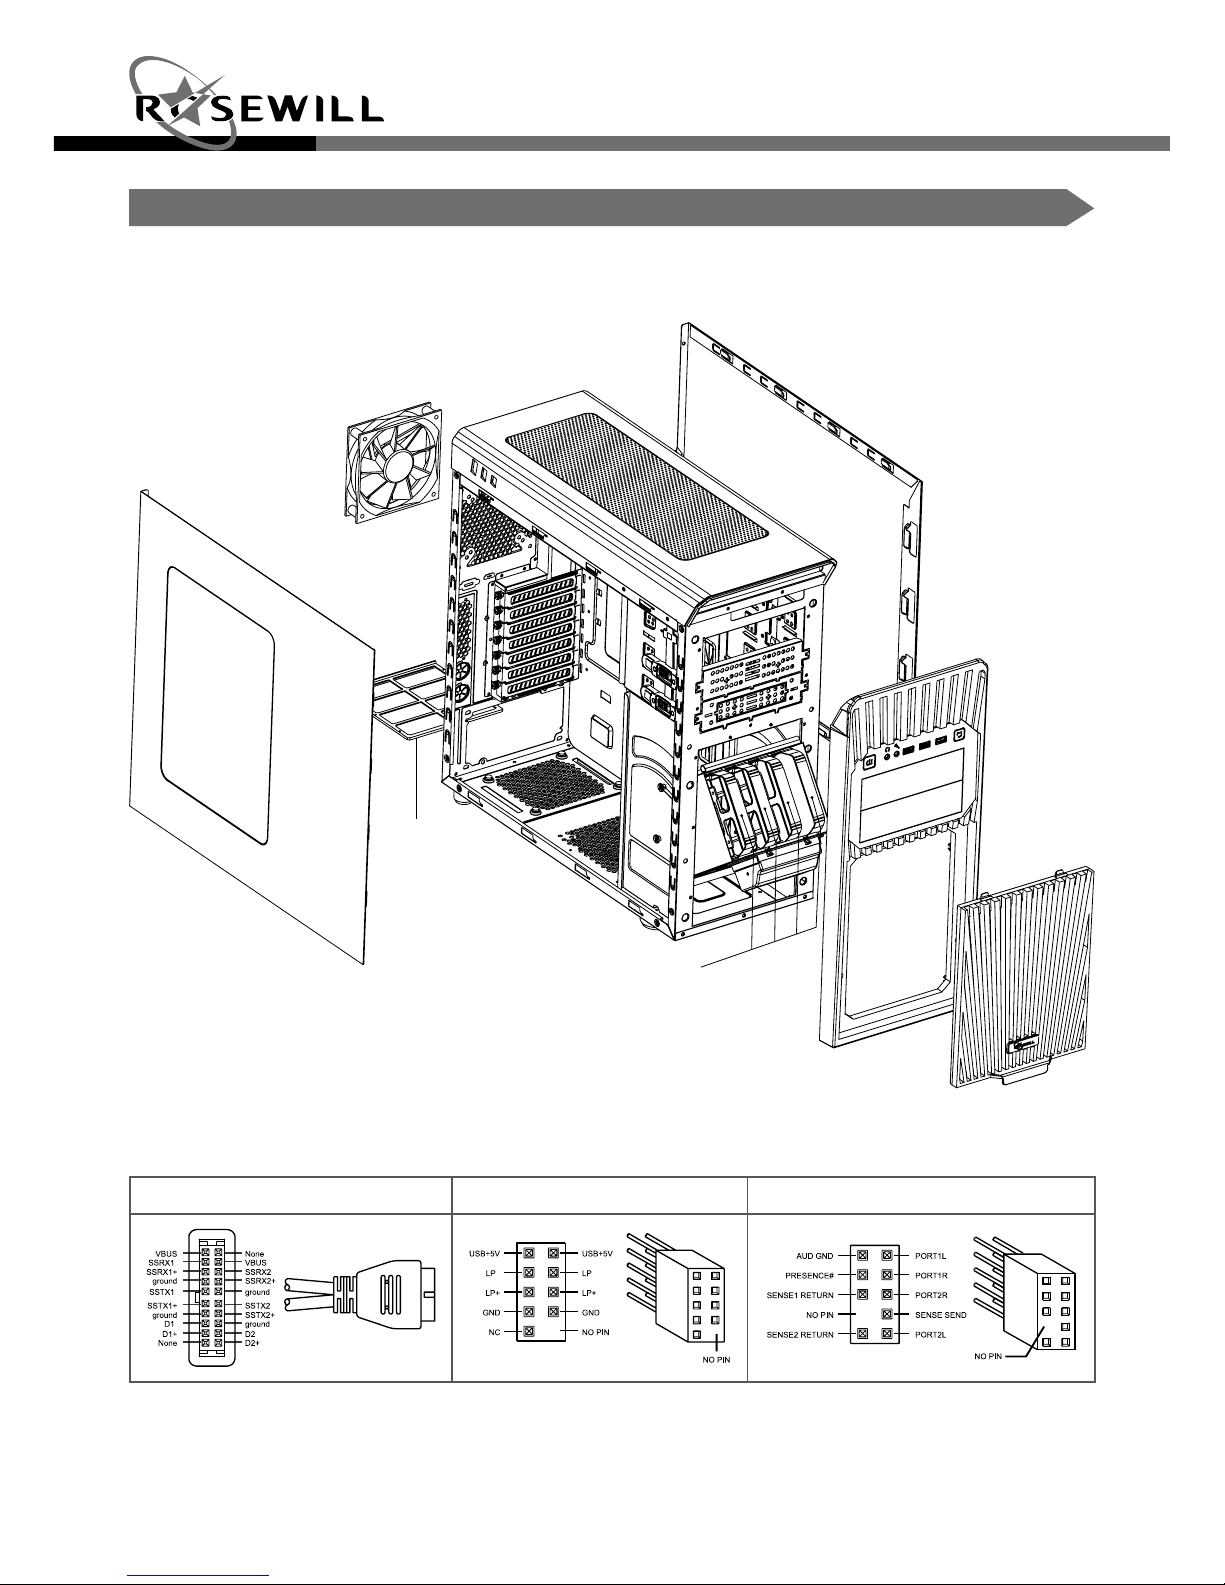
Product Diagram (Components vary by country)
Front I/O Pin-out
USB 3.0 CONNECTOR USB 2.0 CONNECTOR HD AUDIO CONNECTOR
Panel L
Dust Filter
HDD Tray
120mm Fan
Panel R
Front Panel
HDD Door
Page 5
3
Gaming Case
Quick User GuideHIMARS
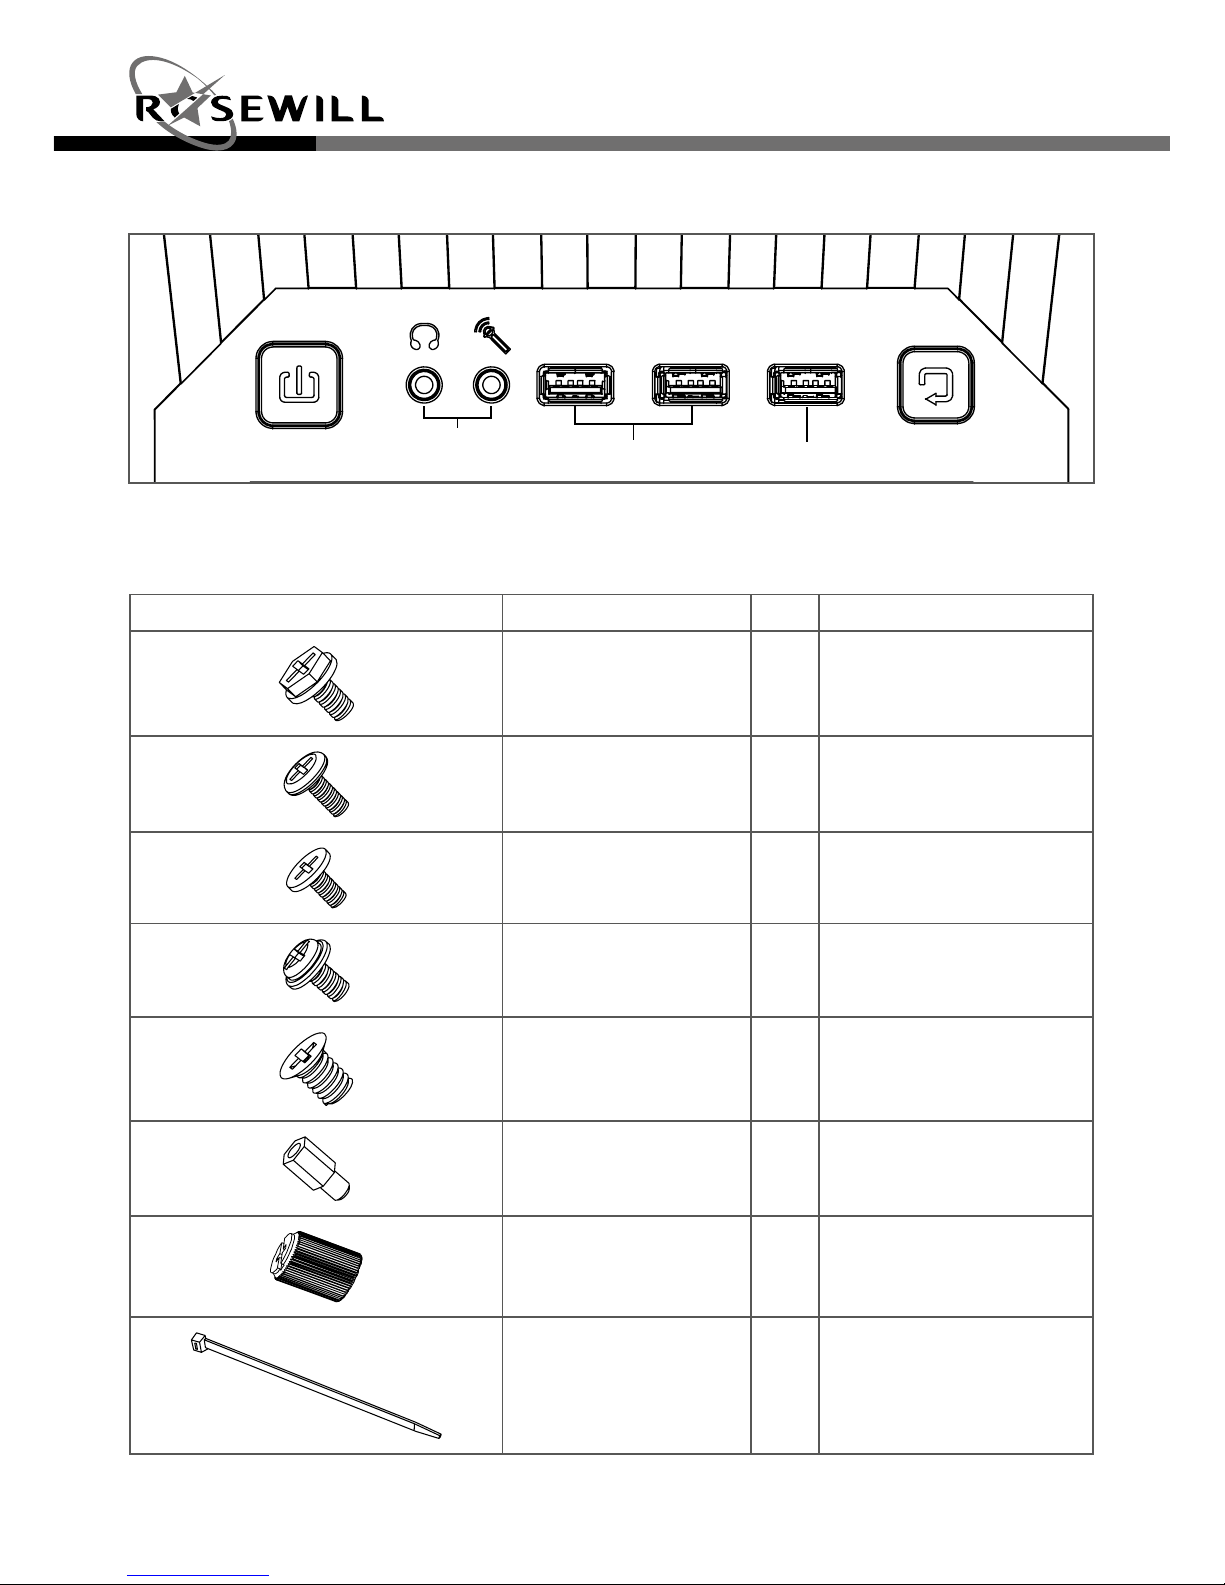
Accessory Kit
Front I/O Diagram
Image Part Name Oty Function/Component
Screw-A 4 PSU
Screw-B 19 Motherboard/ 3.5' HDD
Screw-C 20 2.5” HDD/SSD
Screw-D 4 ODD
Screw-E 4 Fan
Standoff 11 Motherboard
Nut Setter 1 Standoff Installation
Cable Tie 5 Cable Management
Power Button Reset Button
HD Audio
In / Out
USB 3.0 USB 2.0
Page 6

Gaming Case
Quick User Guide
4
HIMARS
Installation Guide
1. Open the Unit
1-1. Remove the thumbscrews and slide out panels R and L (Figure 1).
1
Page 7

5
Gaming Case
Quick User GuideHIMARS
2. Install the Power Supply
2-1. Seat the power supply unit (PSU) in the bottom-rear of the case and secure with Screw-A
(Figure 2).
3. Install the Motherboard
3-1. Line up the standoffs with the screw holes on the motherboard (Figure 3a).
2
3a
Page 8

Gaming Case
Quick User Guide
6
HIMARS
4. Install the Add-on Card
4-1. Untwist the screws and remove the slot cover (Figure 4a).
3-2. Secure the motherboard down with Screw-B (Figure 3b).
4a
3b
Page 9

7
Gaming Case
Quick User GuideHIMARS
5. Install an External 5.25” Device
5-1. Remove the front panel (Figure 5a).
4-2. Install the add-on card and secure with the screws (Figure 4b).
5a
4b
Page 10

Gaming Case
Quick User Guide
8
HIMARS
5-2. Remove the 5.25” bay cover from the chassis (Figure 5b).
5-3. Insert the 5.25” drive and push it back into the case. Make sure it’s secured (Figure 5c).
5b
5c
Page 11

9
Gaming Case
Quick User GuideHIMARS
6-2. Plug in the SATA power connectors and SATA interface connectors.
6. Install a 3.5” or 2.5” Drive
6-1. Pull to remove the HDD cover from the front panel (Figure 6a), and open the HDD Cage
(Figure 6b).
6a 6b
SATA Power
Connector
SATA
Interface
Connector
Page 12

Gaming Case
Quick User Guide
10
HIMARS
6-3. Pull out the HDD trays from the cage. Remove the SSD tray from the back of the case.
(Figure 6c & 6d).
6c
6-4. 3.5” Drives: Install a 3.5” HDD onto
the tray, and secure with Screw-B if
desired (Figure 6e).
6-5. Insert the tray into the HDD Cage, and secure the SSD tray back onto the case with the
thumbscrew.
2.5” Drives: Screw a 2.5” SSD/HDD onto
the tray with Screw-C (Figure 6f).
6f
6e
6d
Page 13

11
Gaming Case
Quick User GuideHIMARS
7. Care
To prevent damage, keep all panels closed and secured.
7-1. Slide the side panels back into place and secure with thumbscrews (Figure 7).
7
Page 14

Gaming Case
Quick User Guide
12
HIMARS
8. Options
8-1. Additional Fan Installation
The HIMARS provides ample space for adding cooling fans. Please refer to the
Specications Table for options.
8-2. Liquid-Cooling Radiator Installation
The HIMARS gives you the option of installing a 360 mm radiator on top to more effectively
cool high-performance systems:
a. Secure the fans and water-cooling radiator on top with screws (Figure 8a).
8a
Page 15

13
Gaming Case
Quick User GuideHIMARS
Specifications Table
Model
Model Name HIMARS
Features
Type Mid Tower
Color Black
Case Material Steel/Plastic
Power Supply Included No
Motherboard Compatibility Micro-ATX, ATX
Side Panel Window Yes
Expansion
External 5.25" Drive Bays 2
Internal 3.5" Drive Bays 4 (0)
Internal 2.5" Drive Bays 1 (5)
Expansion Slots 7
Front Ports
Front Ports
USB 3.0 x 2
USB 2.0 x 1
Audio In/Out
Cooling System Options
120 mm Fans
3 x Top (optional)
1 x Rear (Blue LED) (pre-installed)
140 mm Fans 1 x Front (pre-installed)
Physical Specifications
Dimensions 8.07” x 19.47” x 20.28” (W x H x D)
Weight 18.5 lb
Page 16

HIMARS_B
Technical Support Information
techsupport@rosewill.com 1-800-575-9885
---------------------------------------------------------------------------------Thank you for purchasing a quality Rosewill product.
Please register your product at : www.rosewill.com
for complete warranty information and support for your product.
 Loading...