

Page 1
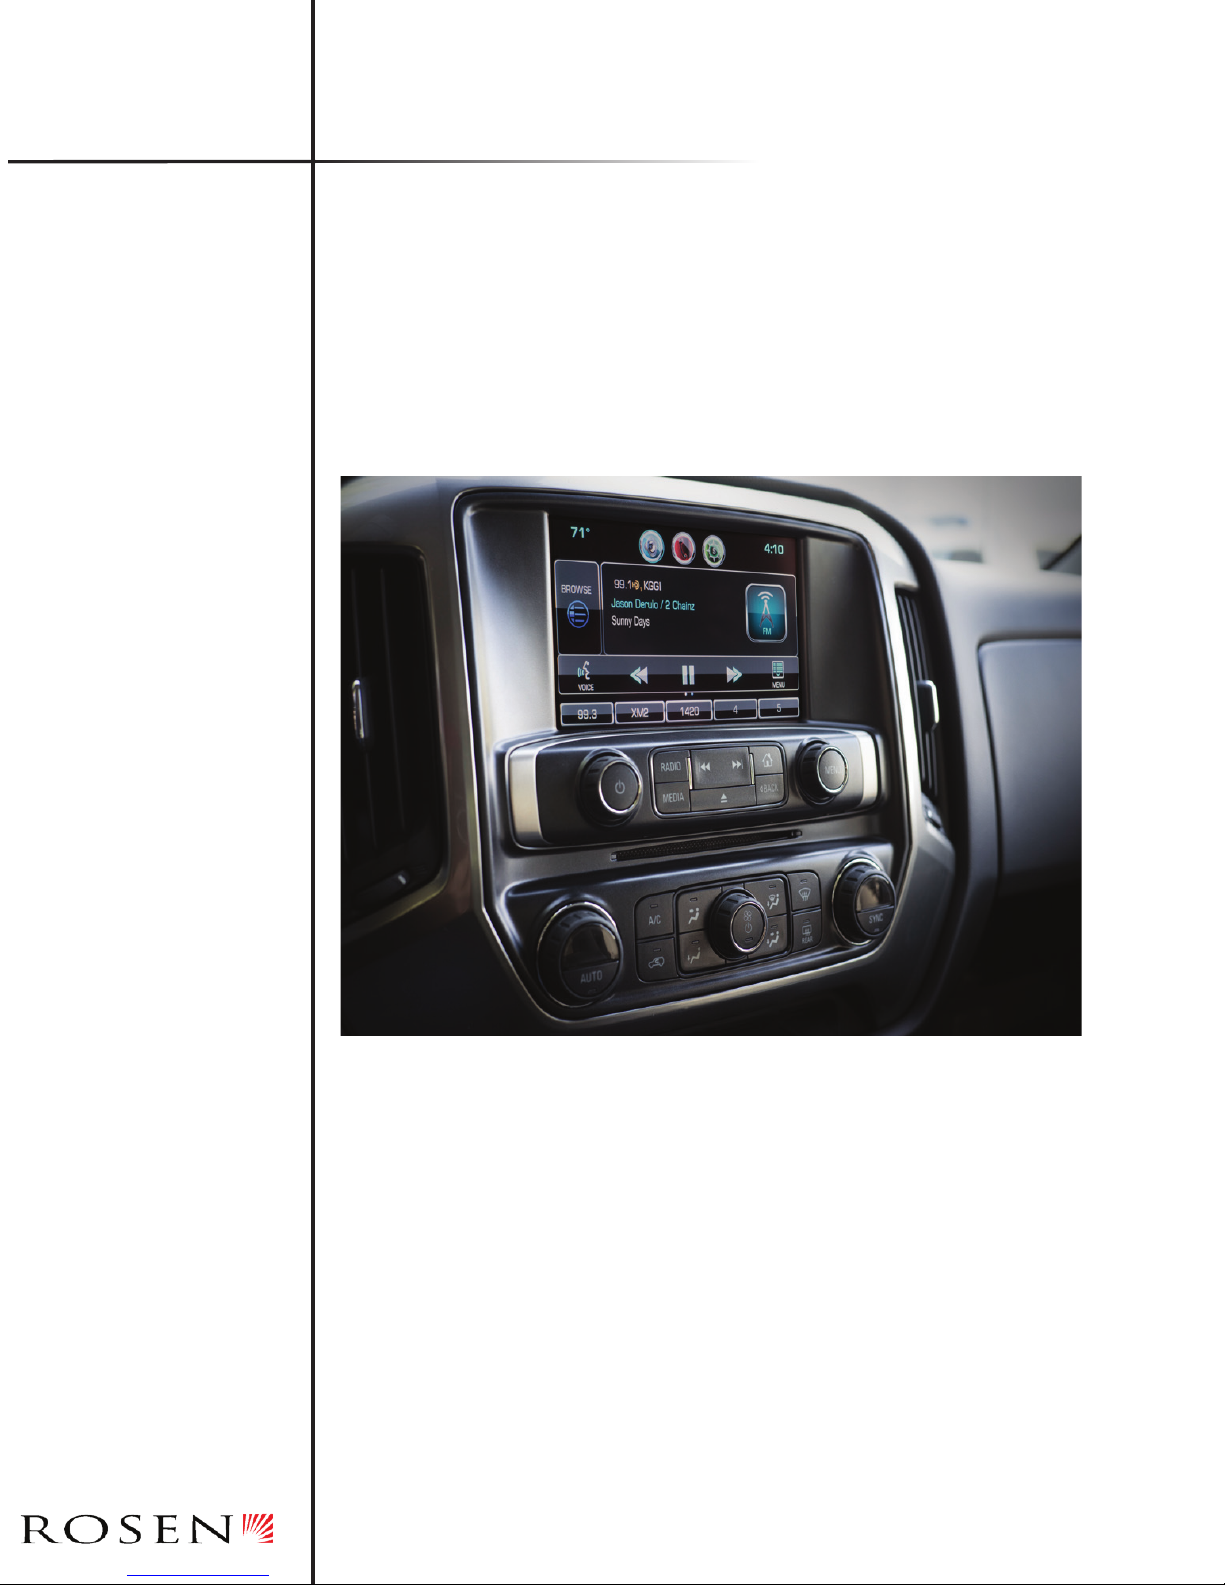
Multimedia
Navigation
System
Quick Start Guide
GM Series3 Navigation
Application: For models equipped with 8” MyLink
color displays.
Page 2

Page 3

NOTICE OF INTENDED USE
Some features of Rosen Electronics, LP are not intended for viewing by the driver when the vehicle is in motion, such as
movie playback. When using navigation, minimize the amount of time spent viewing the screen and use voice prompts as
much as possible. Avoid prolonged use of the touch screen controls. Such use might distract the driver or interfere with
the driver’s safe operation of the vehicle, and thus result in serious injury or death. Such use might also violate state or
local laws.
Rosen Electronics LP disclaims any liability for
any bodily injury or property damage that might result
from any improper or unintended use.
ABOUT THE REGISTERED TRADEMARKS
This item incorporates copy protection technology that is protected by U.S. patents and other
intellectual property rights of Rovi Corporation. Reverse engineering and disassembly are
prohibited.
NAVIGATION MAPS
Car navigation maps are frequently updated. While the database was judged to be as accurate as possible at the time of its release, a map database can never be 100% accurate.
Road information that is maintained in the map databases, such as turn restrictions or road
names may change over time.
Errors or missing information in the map data are not covered by the Product Warranty. New
and/or updates for the map data are the responsibility of the End-user.
NOTE: Features listed in this manual are subject to change without notice.
Copyright © 2014 by Rosen Electronics,LP. All rights reserved. Except as permitted under
the Copyright Act of 1976, no part of this publication may be reproduced or distributed in any
form or by any means, or stored in a database or retrieval system, without the prior written
permission of Rosen Electronics, LP.
Page 4

For complete Owner’s and Navigation Manuals,
please visit
Rosen Electronics LP online at
www.RosenElectronics.com
Page 5
1
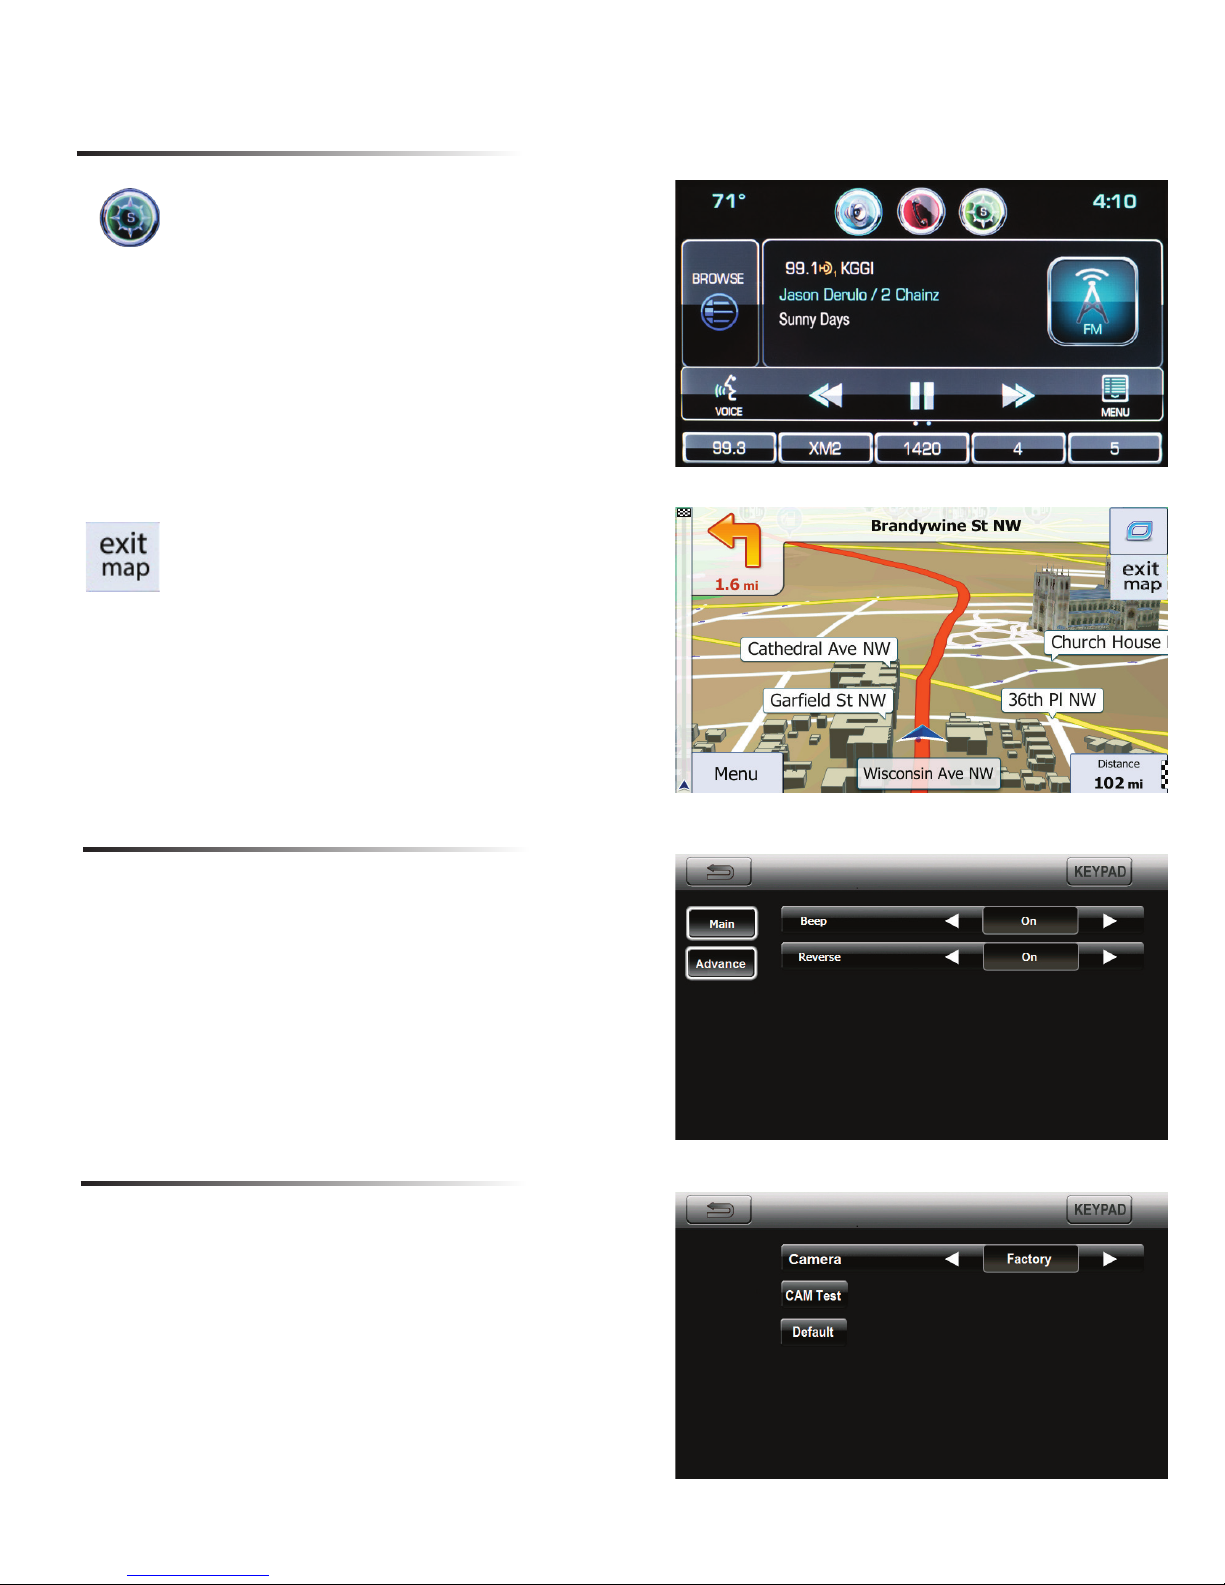
Entering Navigation
The Basics
Beep: Touch screen beep On/Off
Reverse: Camera On/Off setting.
If no Factory camera equipped, set to Off.
Main Settings
To Enter Navigation Mode, press
and hold Compass located on touch
screen for two seconds.
To enter Installer settings, press and hold
Compass for more than ve seconds.
Using Aftermarket Camera
To Exit Navigation Mode, press
Exit Map located on the top of
the screen.
1. From the Main Settings page, press
Keypad and enter “1120” Ok.
Camera: Set Camera Setting from Factory to
Rosen. This will enable Aftermarket Camera
Input.
Page 6
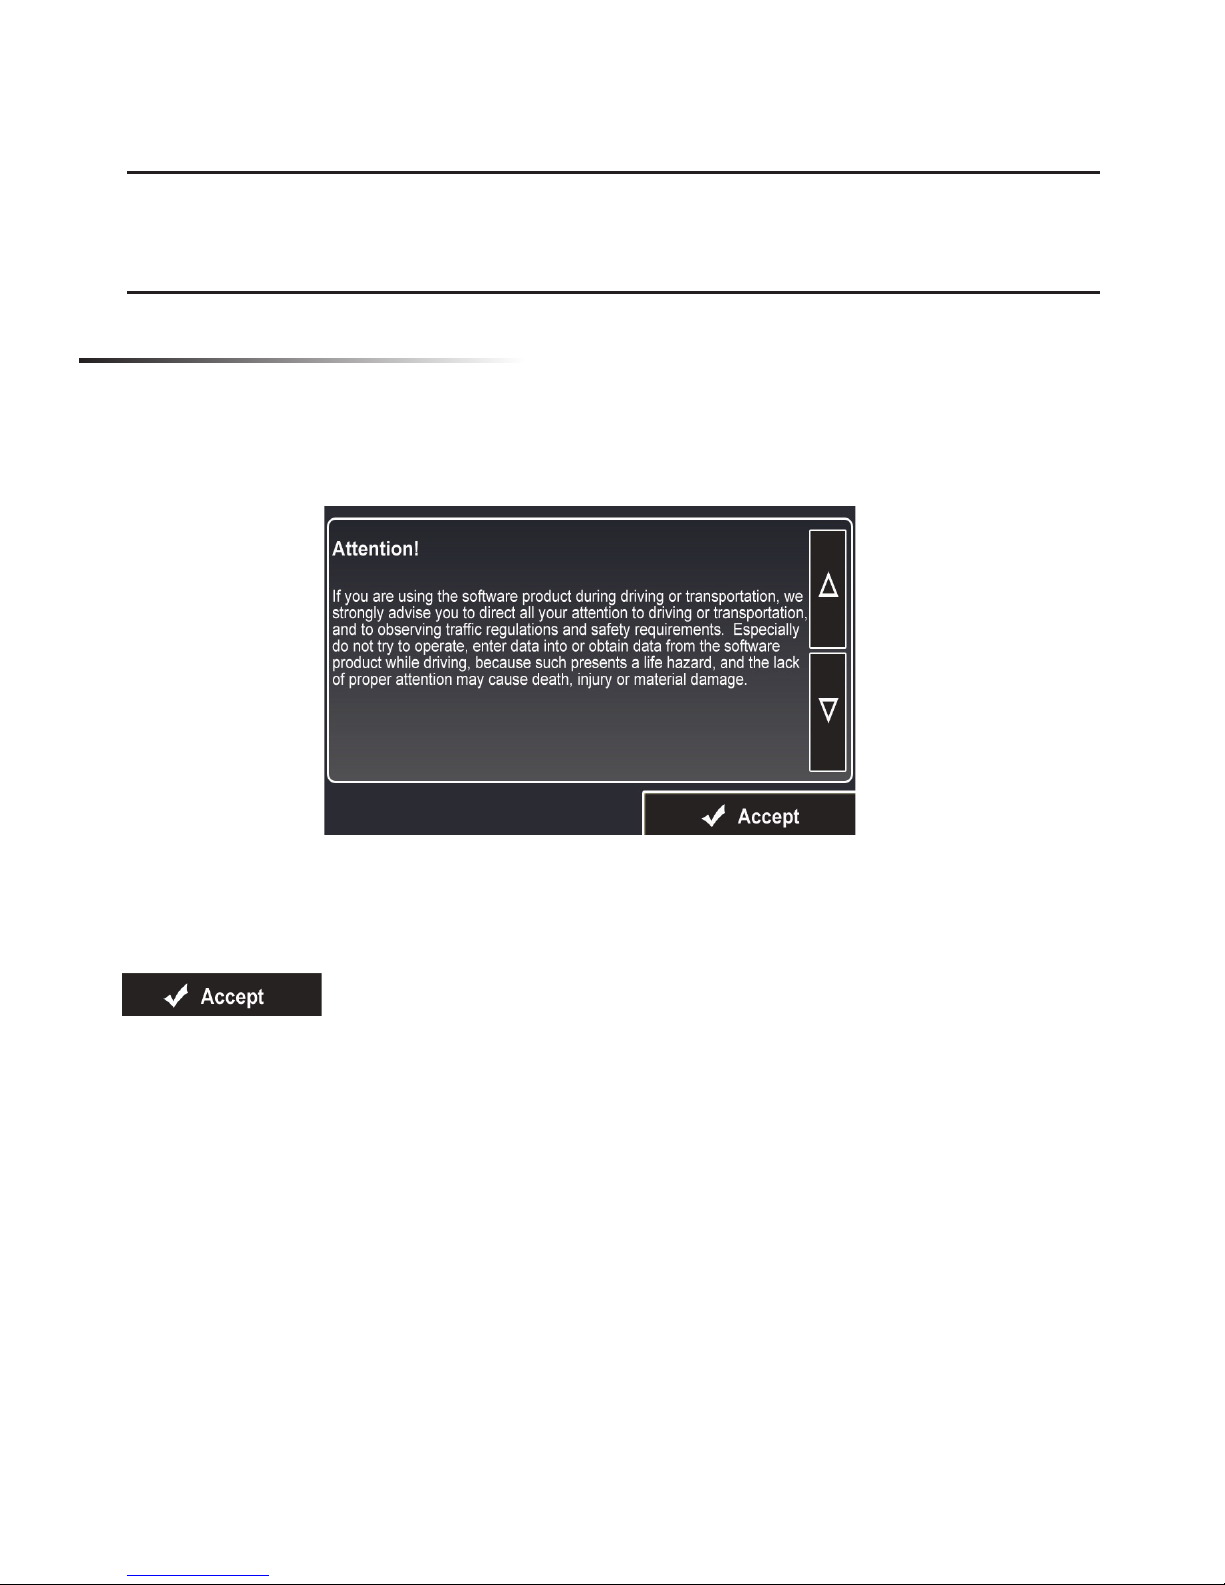
Before operating your Rosen Navigation system, please carefully read and
follow the instructions provided in the “Safety Information and Precautions”
located on the inside back cover of this Quick Start Guide.
When the navigation software starts, you will see the reminder warning to use your
navigation software safely and lawfully.
Start Up
You must accept these conditions to continue
Please refer to the User’s Manual for additional information and warning on proper
use of the Rosen Navigation product.
2
Navigation
Page 7
3
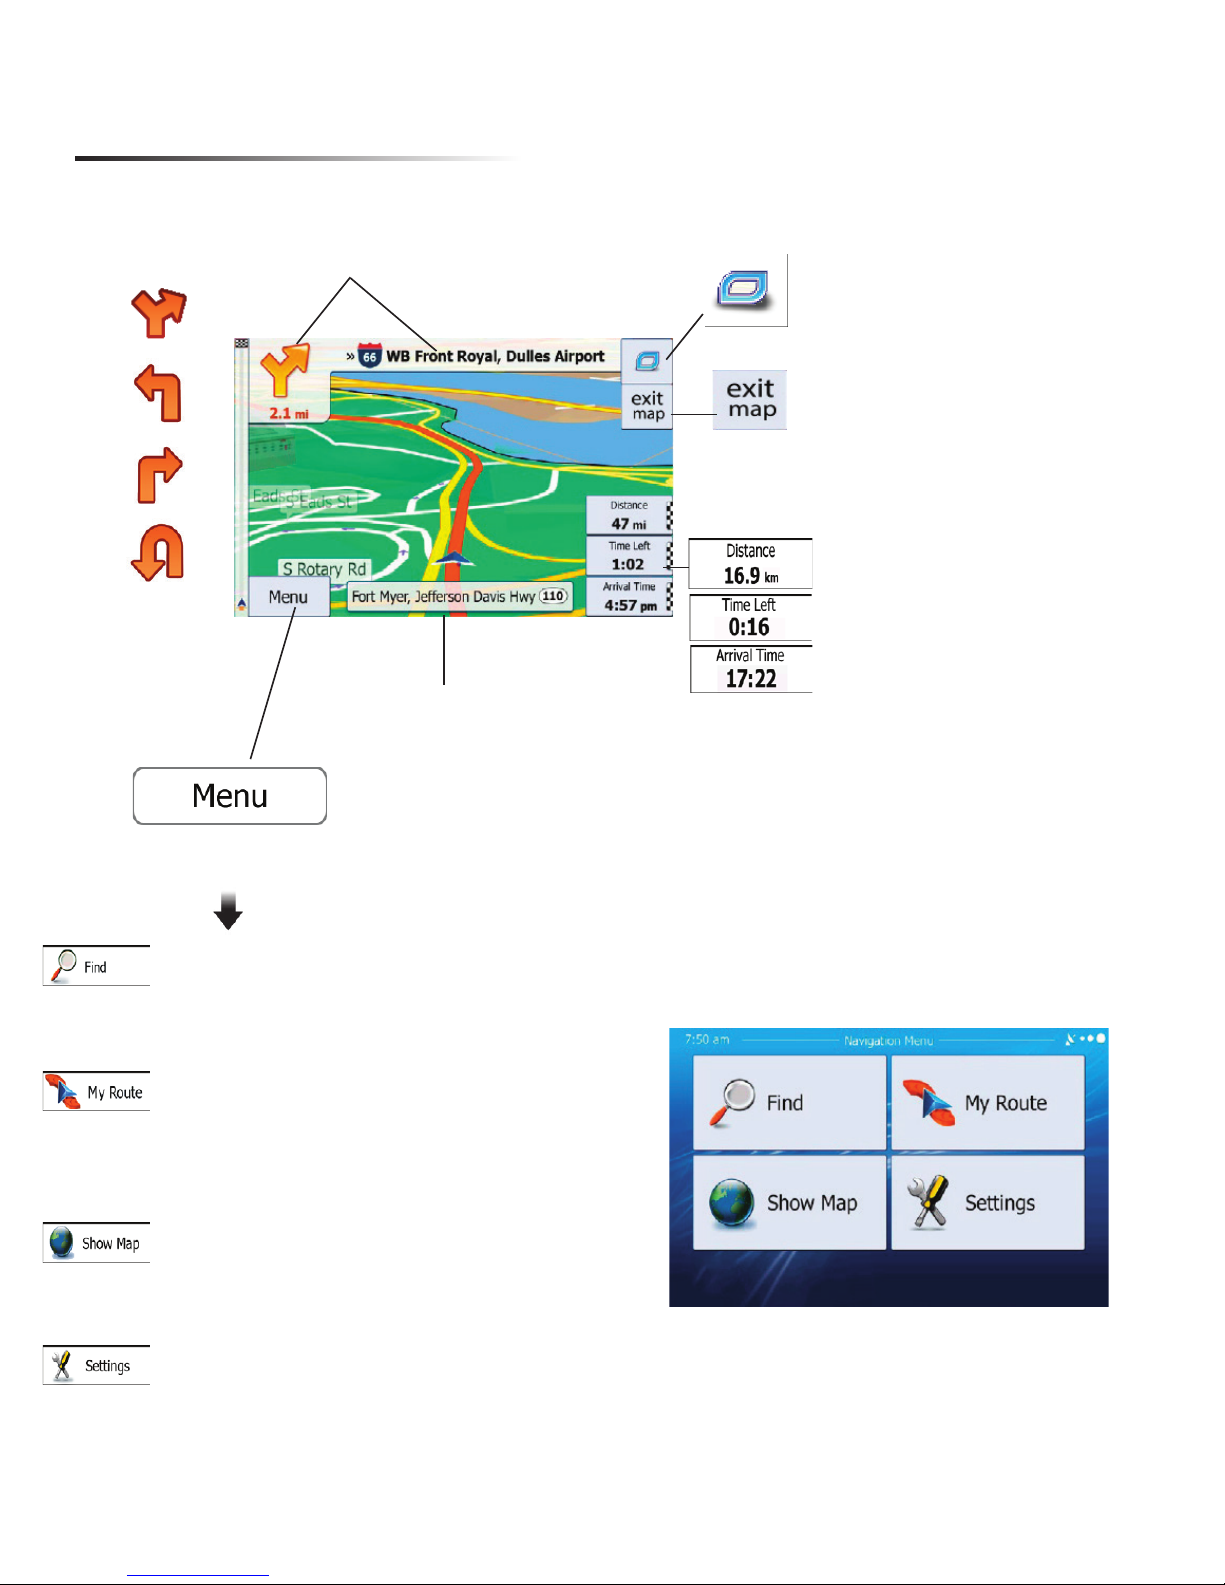
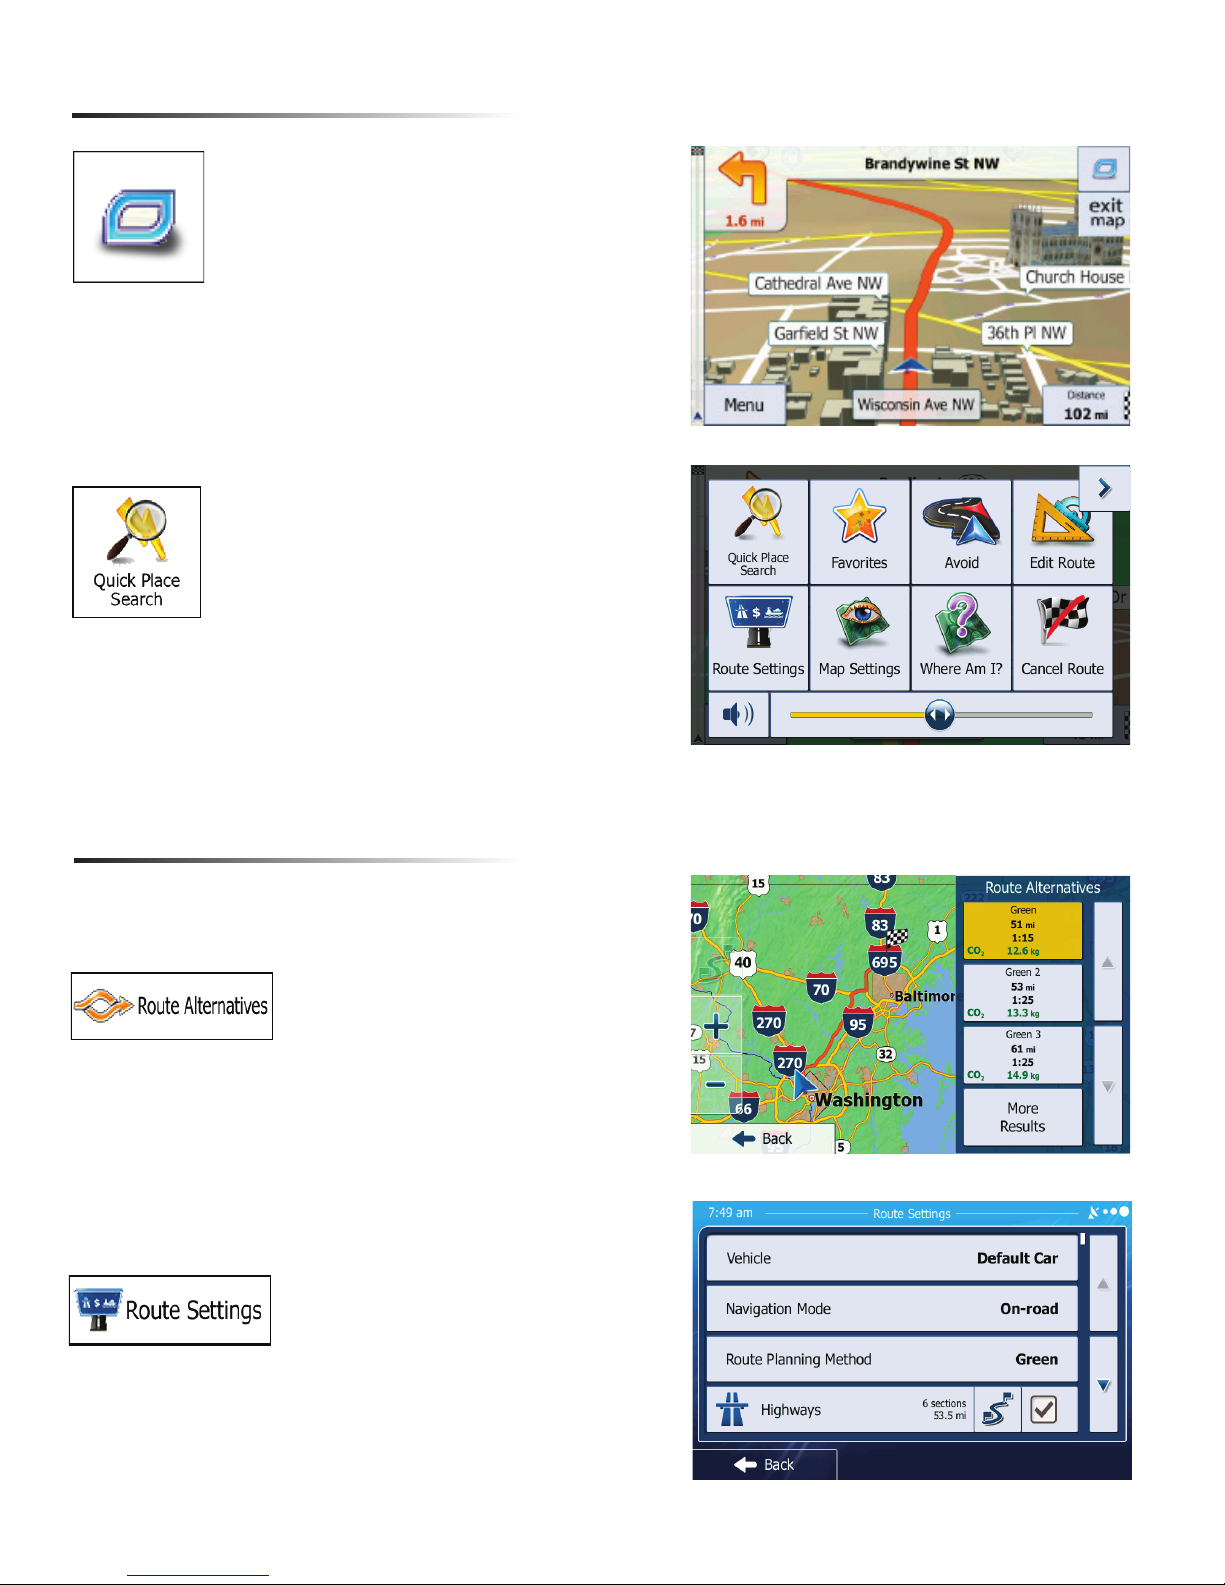
Understanding the Map
Select the Quick
Menu to access the
most used functions
These displays show
you the distance, time
left and the estimated
arrival time of your trip
The top part of the screen shows
you what the next street is and which
direction to turn on your route
Shows you the street
you are currently on
Access the Navigation Menu
Find an address or Point of Interest and
access the Favorites and History menu
Displays the route details and allows
you to edit, change or cancel existing
route
Displays current position, surrounding
map area and route.
Customize the navigation software
Press to exit Nav
Page 8
4
Modifying Existing Routes
You can modify an existing route by accessing
either the Quick Menu or Main Navigation menu
Quick Menu
Located in the top right corner of the
map screen is the Quick Menu. In
this screen, there is a selection of
functions that are frequently needed
during navigation.
Note: Use side bar to adjust
Navigation volume.
You can use this option to search for
places of interest along the way of
your route, such as: Gas Stations,
Restaurants, Parking, etc.
You can use this option to select an alternative route to your
destination.
This option is a good way to
change road types and modes.
You can avoid highways, allow
toll roads, etc.
Page 9
Enter or Find Address
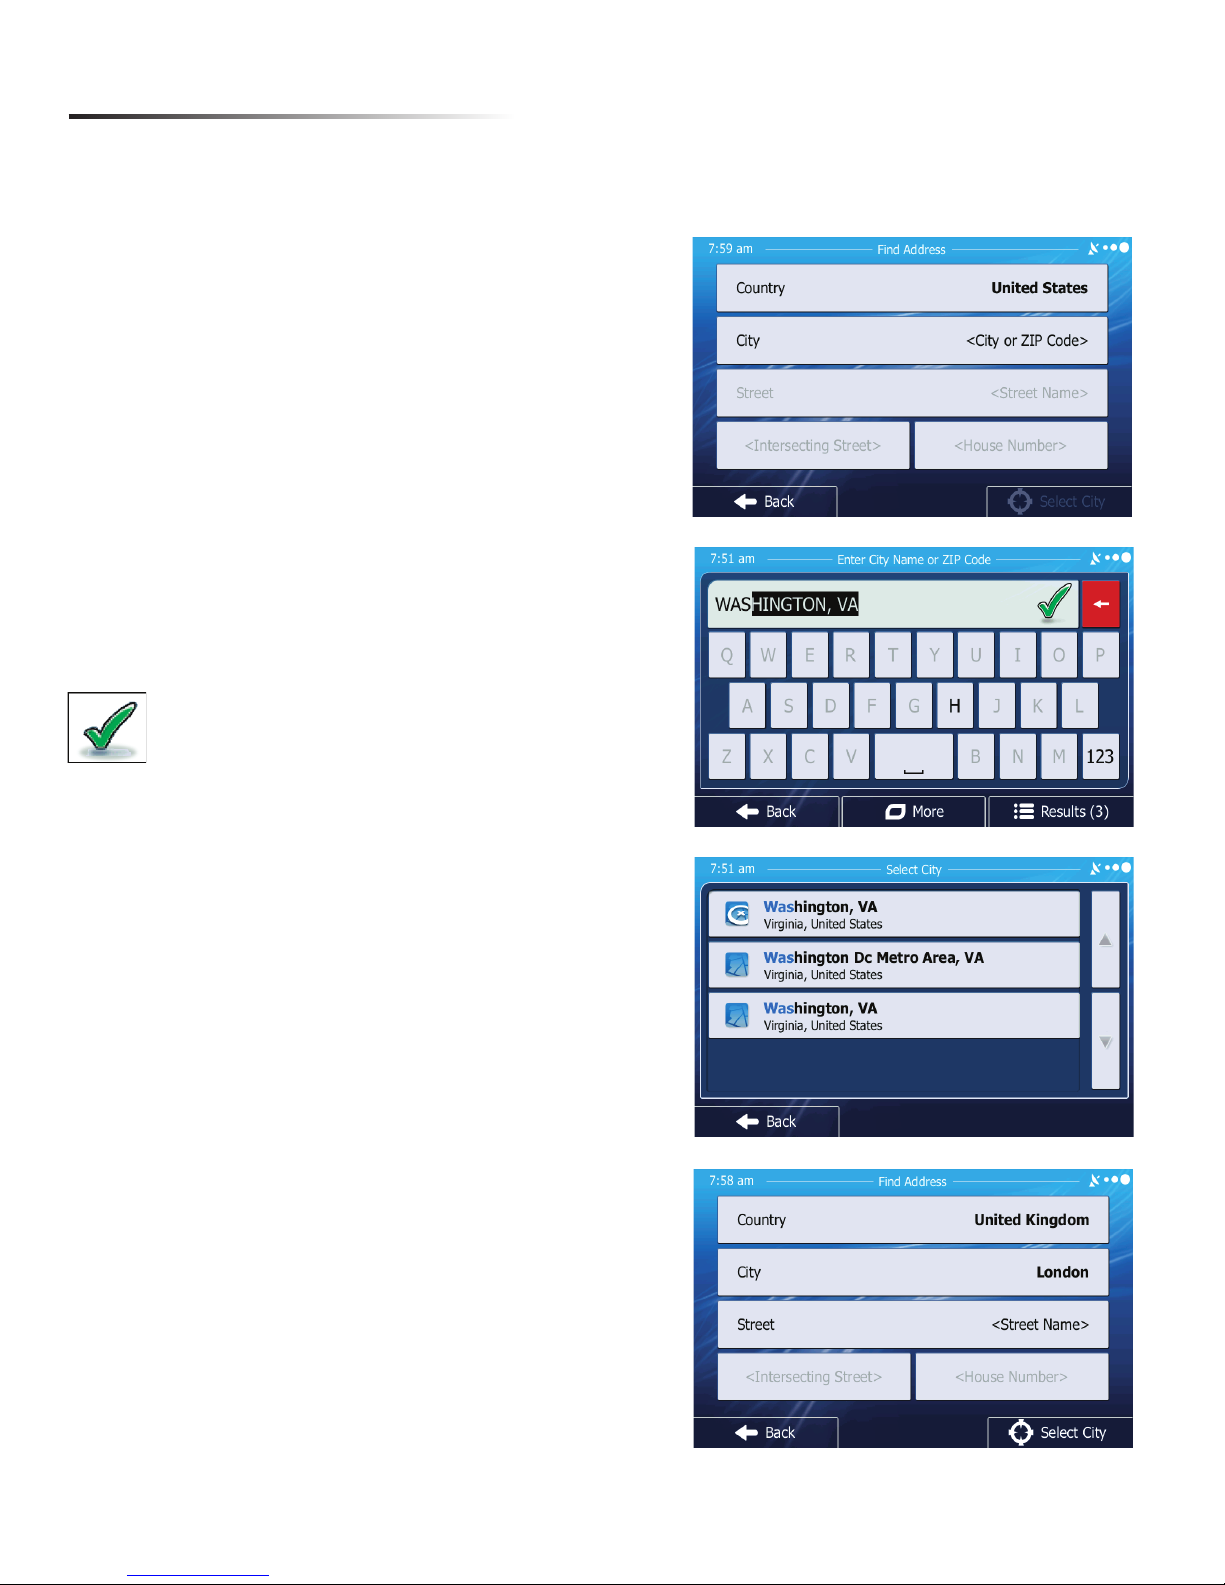
If you are on the Map screen, press MENU. In the Navigation Menu, select Find Address.
Note: By default, the software proposes the country and state where you are currently
located.
1. Touch “City Name” and the keyboard screen will appear.
2. Your current city will automatically
default. To search for a different city,
start typing each letter of the City
name
Tap to conrm city
3. A “Select City” screen will appear.
This will show a list of cities that
match your selection. Touch the city
you desire.
4. Select “Street” and the keyboard
screen will appear.
5
Page 10
6
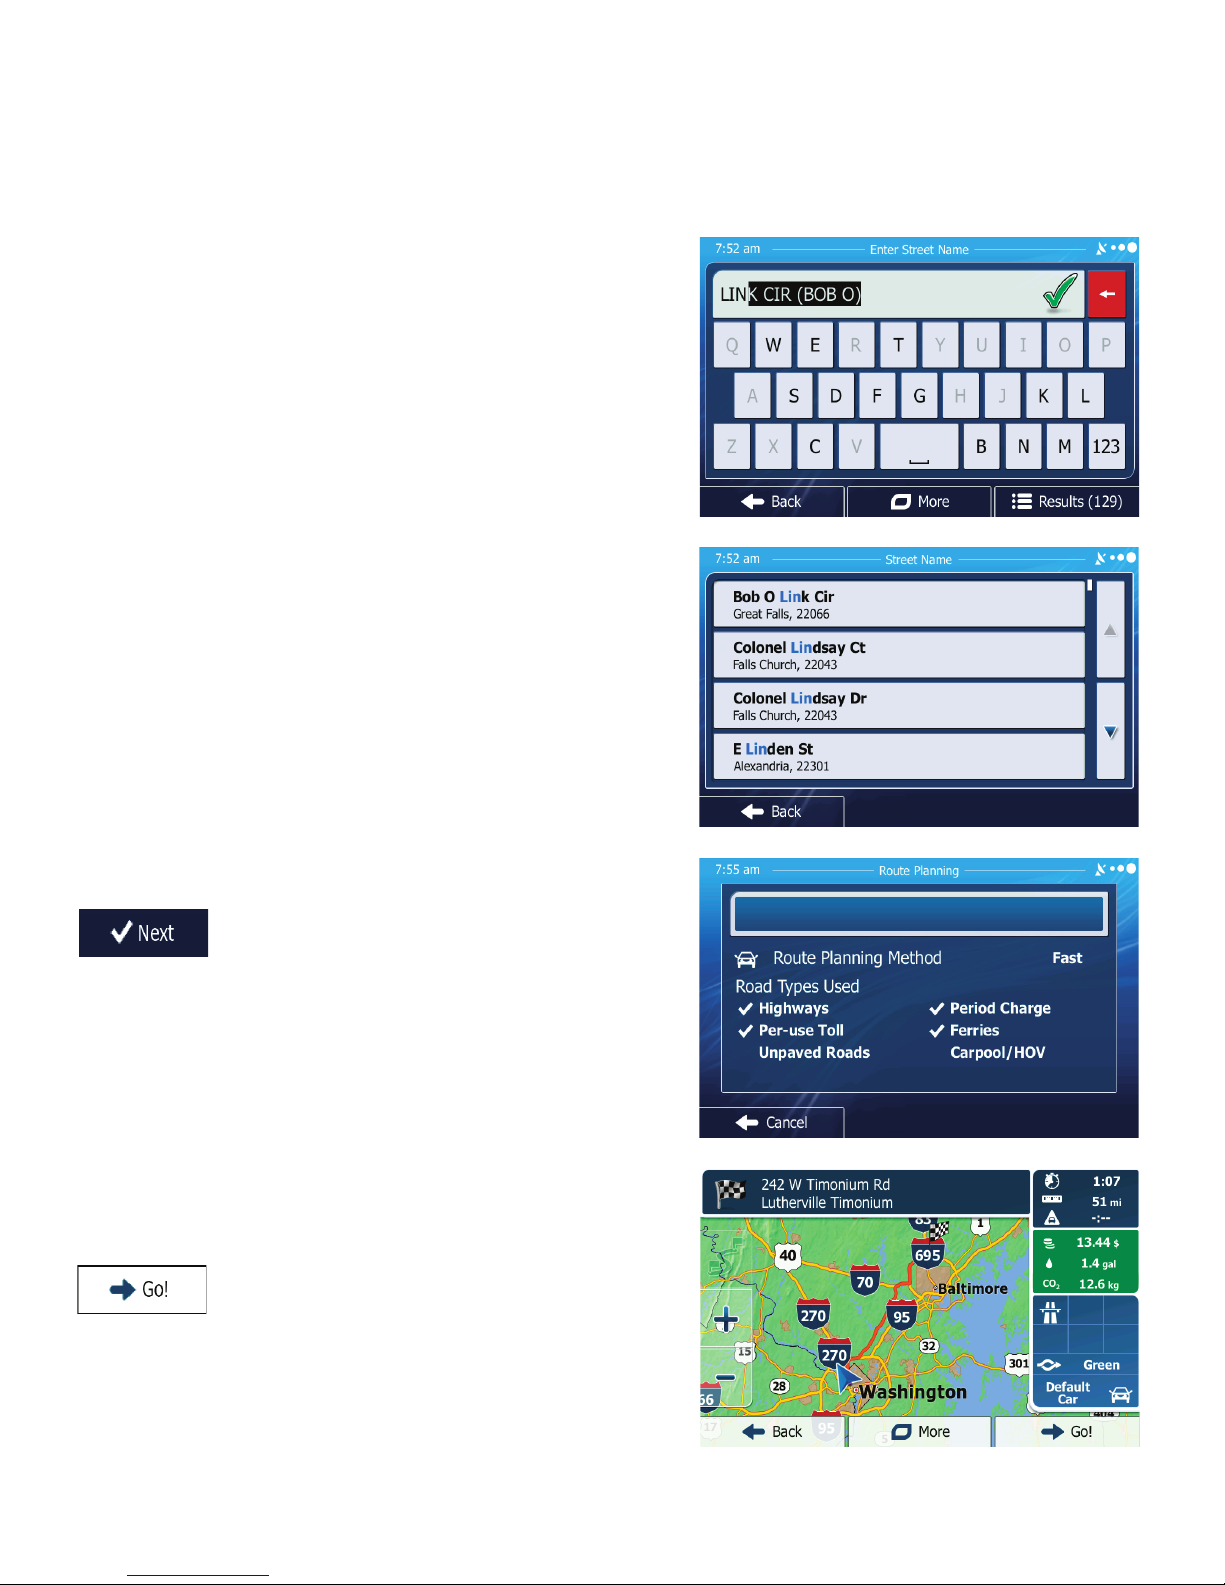
7. Repeat these steps for House number,
or if you do not know it, you can select the
SELECT STREET option.
8. A map will appear.
Click Next and a short
summary of the route will ash on the
screen for a few seconds.
9. After the summary, the map appears showing the entire route.
Tap to start your journey.
5. Start typing each letter of the street
name.
6. A Street Name list will appear. Select
the one you are looking for.
Page 11
7
Setting Favorites
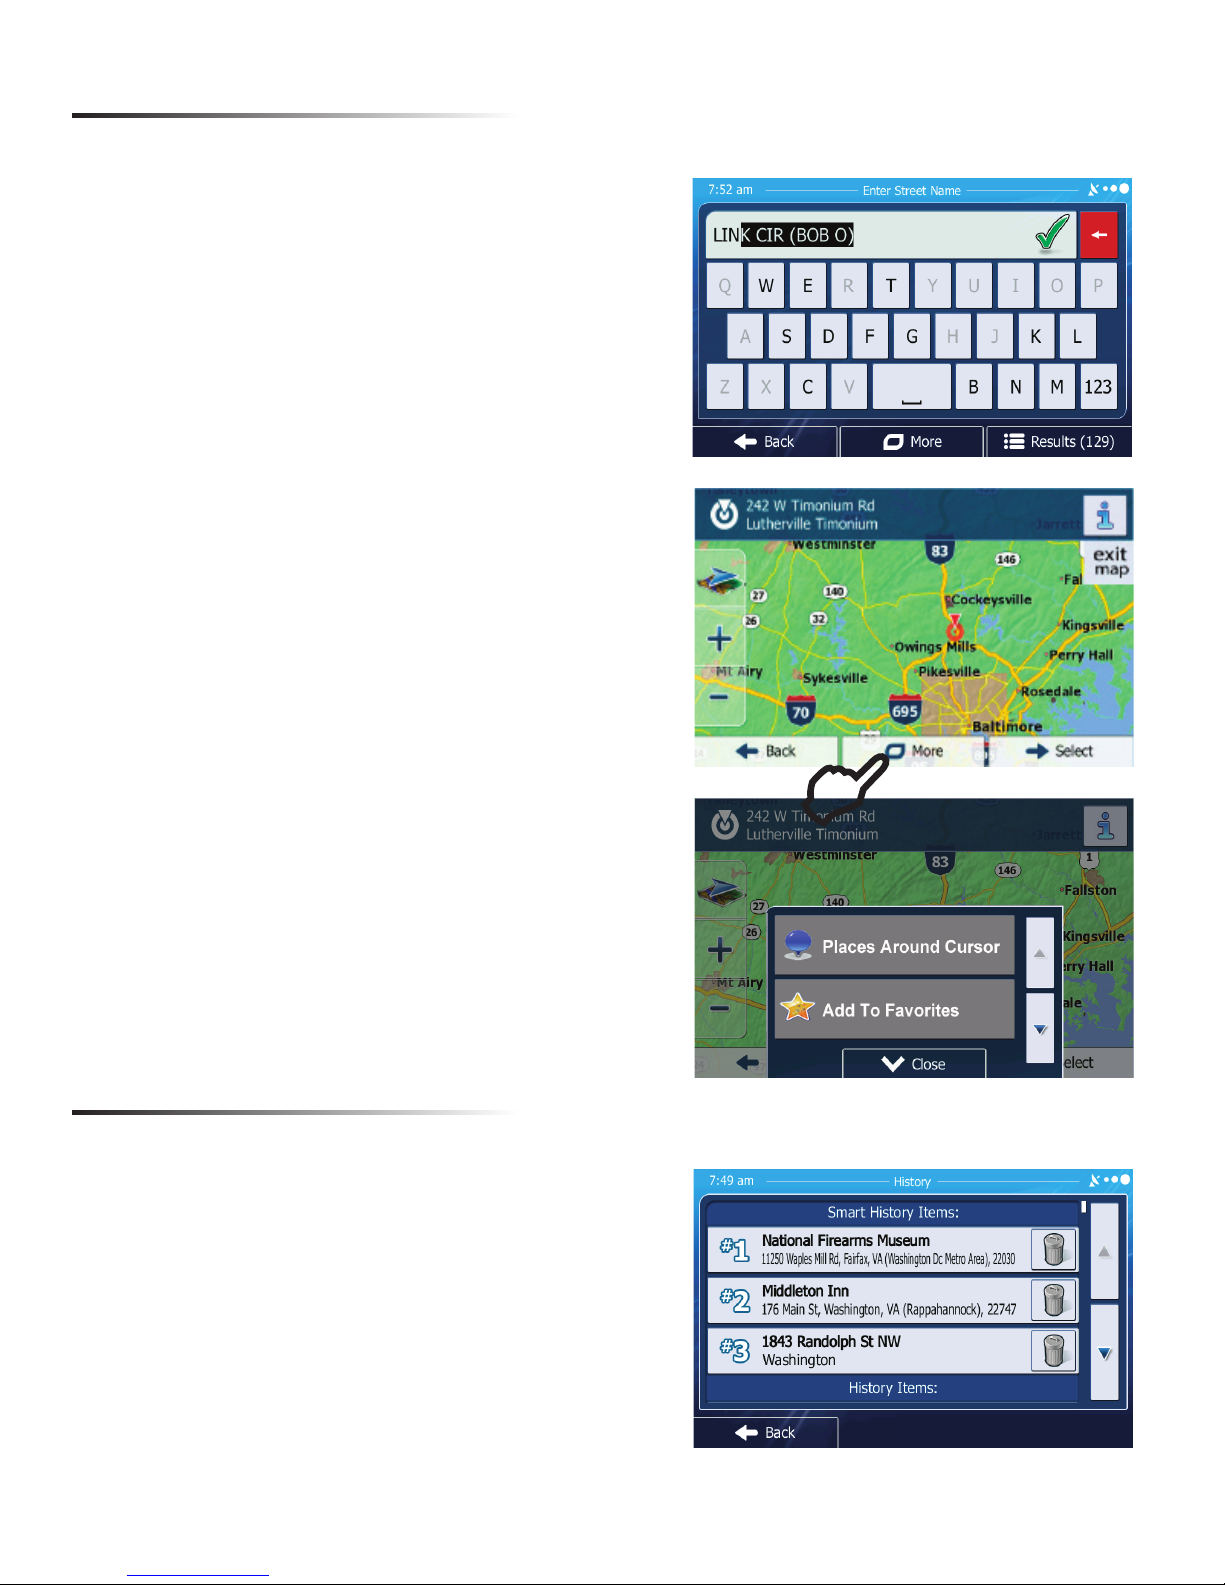
You can set Favorite destinations (like Home, etc) so you do not have to enter it manually
each time.
-Once you have entered all information and press
DONE, in the next screen, you will select MORE
-Select ADD TO FAVORITES
-It will take you to keyboard where you can rename
your favorite. (Example: HOME)
-Select DONE and you Favorite is now saved.
Route History
You can also set a Favorite from the History
section. Please see below.
You can search through the History menu to access
past routes or to set a past route as a Favorite.
-From the QUICK MENU or SETTINGS in the main
menu, select HISTORY
- To set as a Route, select the address, then tap
SELECT.
-To set as a Favorite, select the address, then tap
MORE. Select ADD TO FAVORITES.
E
Page 12
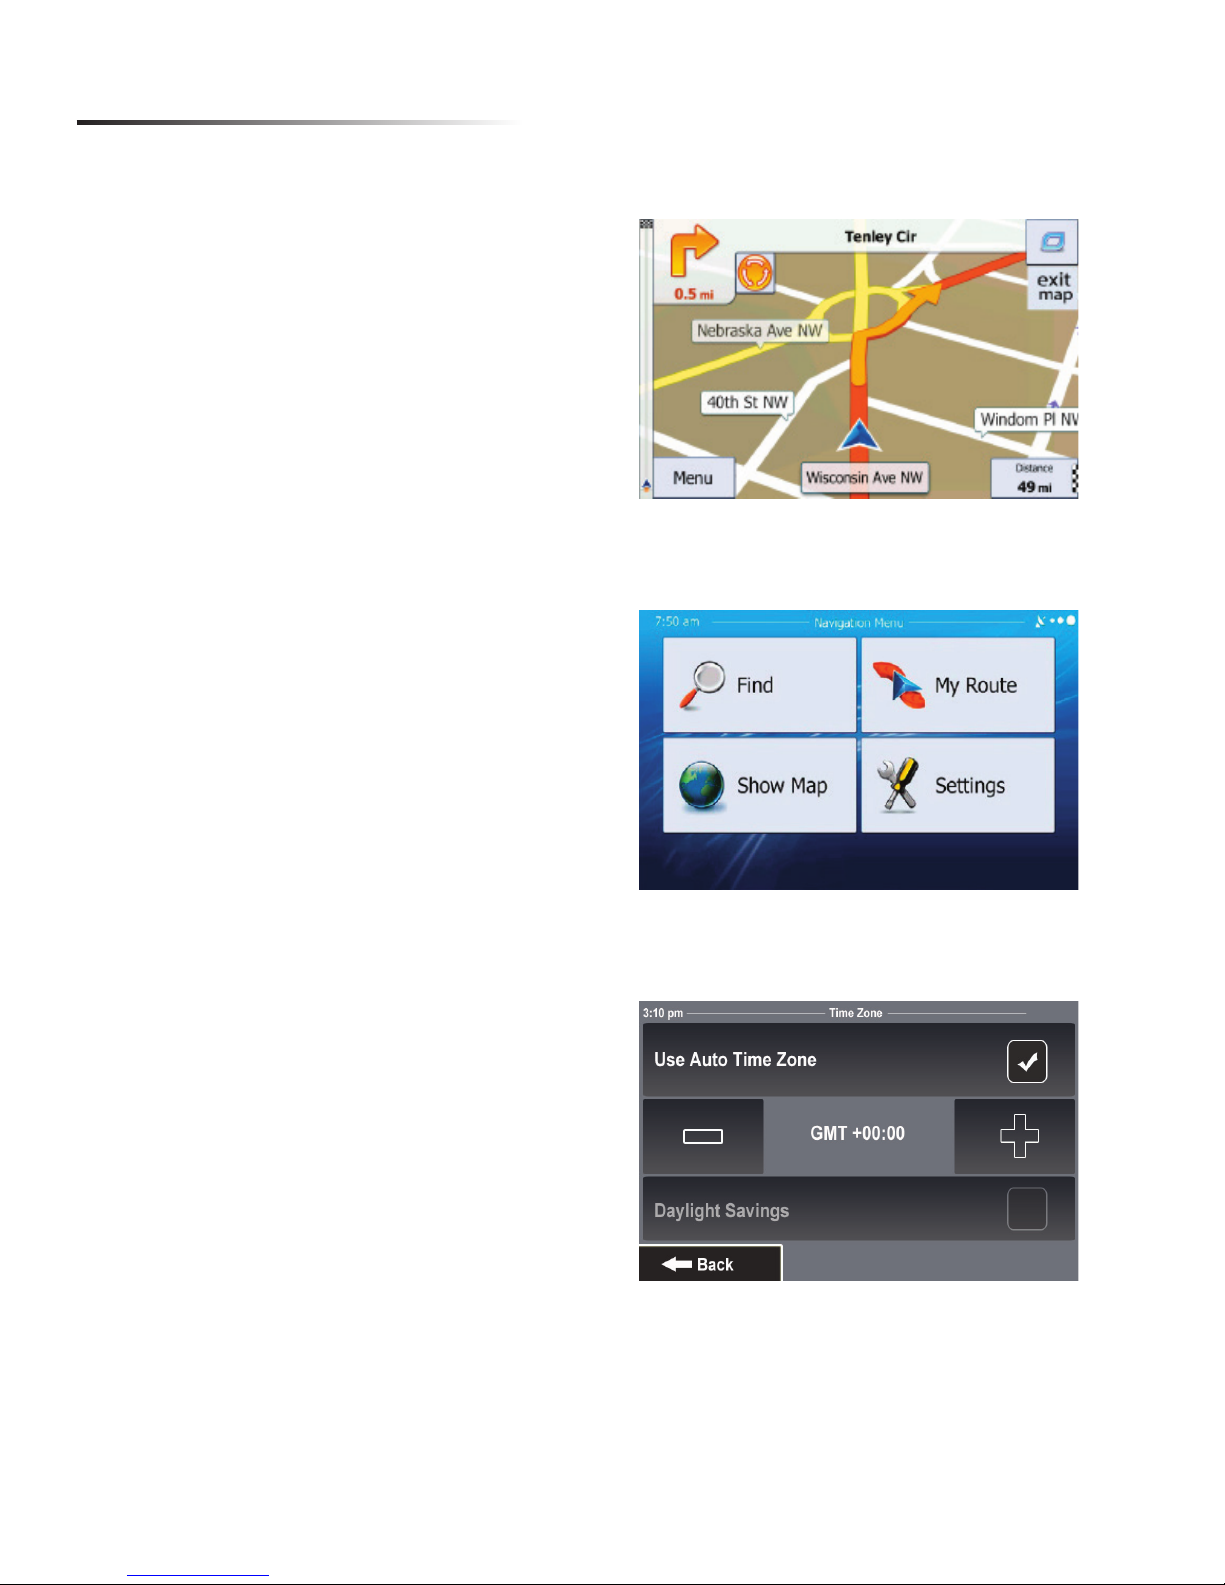
Adjusting the Time Zone
To adjust the time displayed on the unit, please use the steps below.
1. Press MENU in the bottom left
corner of the screen
2. Select SETTINGS
---->REGIONAL
---->Time Zone
3. Now you are in the clock setting screen.
-Use can set the time zone to change
automatically when entering a new time
zone.
-Use the minus and plus icons to adjust
the time in increments of 15 min
-Set Daylight Savings OFF/ON
8
Page 13
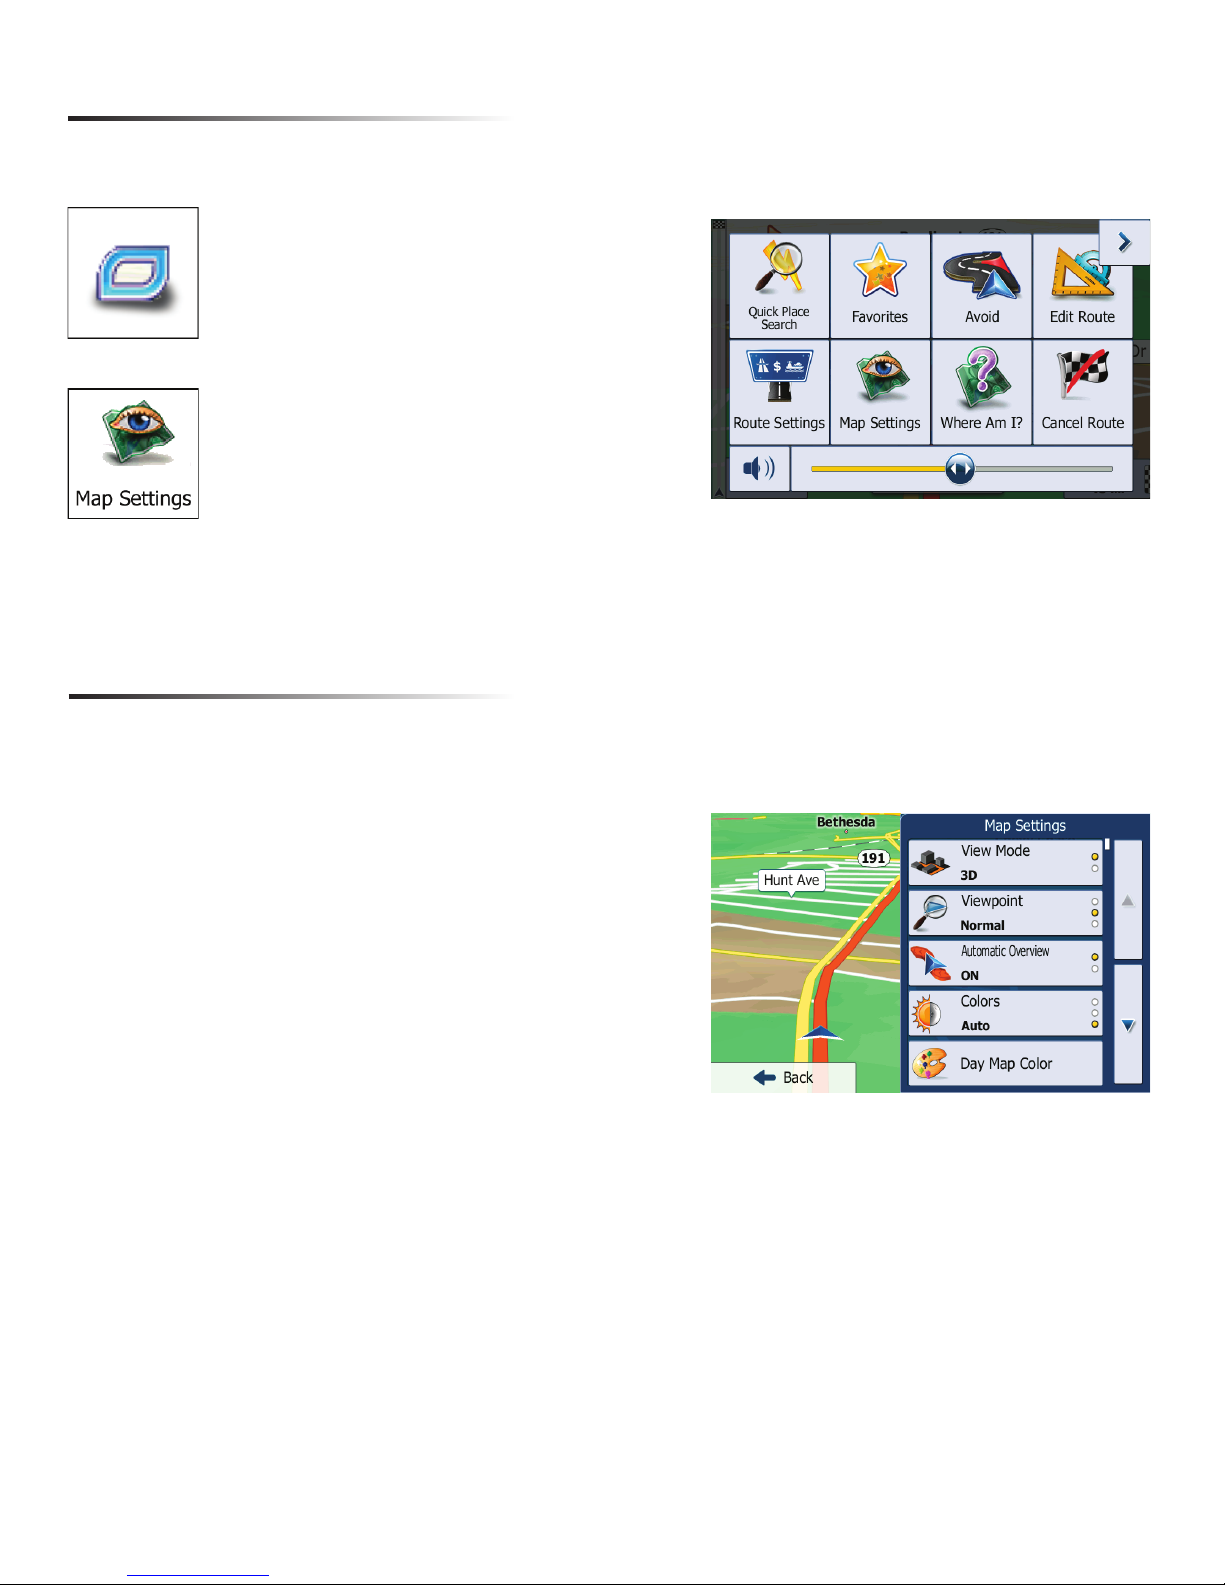
From the map screen select the
Quick Menu button.
Select Map Settings from the list
Map Settings
You can modify and customize the way your maps are displayed by accessing the Map
Settings
Map Setting Options
View Mode: Set as 3D or 2D
Viewpoint: Low, Med or High
Automatic Overview: ON/OFF
Colors: Day, Night or Auto
Day Map Color: Select from several themes
Night Map Color: Select from several themes
3D Vehicle Gallery: Select from several vehicles/people
that will be displayed as your marker
Landmarks: ON/OFF
Buildings: ON/OFF
Track Logs: ON/OFF
Place Markers: Select what markers (such as gas, food,
etc) that you would like the map to automatically display
9
Page 14

Safety Information and Precautions
WARNING! Please read and follow the following safety precautions.
Failure to follow the instructions below may increase
your risk of collision and personal injury.
The Rosen Navigation software is not a substitute for your personal judgment. The route suggestions should never supersede
any local trafc regulation or your personal judgment and /or knowledge of safe driving practices. Prior to completing any
maneuvers suggested by your Rosen Navigation software (for example, a U-turn or a left turn), verify that you can legally and
safely complete the maneuver. Do not follow route suggestions if they direct you to perform an unsafe or illegal maneuver, would
place you in an unsafe situation, or would route you into an area that you consider unsafe.
Do not use the Rosen Navigation software to locate emergency services (such as police, re stations, hospitals, and clinics).
The database may not include all emergency service providers. Use your own best judgment and ask for directions in these
situations.
If the vehicle is in motion, only a passenger should program the Rosen Navigation software. The driver should not program the
system unless the vehicle is parked in a safe location.
The Rosen Navigation software’s map database provides information on suggested routes without regard to factors that may
affect your driving experience or the time required to arrive at your destination. For example, the system does not reect road
detours, closures or construction, some road characteristics (e.g., road surface, slope or grade, weight or height restrictions,
etc.), temporary trafc congestion, weather conditions, and similar factors.
Vehicle Position
The Rosen Navigation software’s computer considers vehicle speed and heading changes, together with longitude and latitude
information, to accurately determine vehicle heading and position on a digital map.
Map and Information Database
The map database used by your Rosen Navigation software was created using high-resolution aerial and land based data
collection.
Car navigation maps are frequently updated. While the database was judged to be as accurate as possible at the time of its
release, a map database can never be 100% accurate. Road information that is maintained in the map databases, such as turn
restrictions or road names may change over time.
Errors or missing information in the map data are not covered by the Product Warranty. New and/or updates for the map data
are the responsibility of the End-user.
End-User License Agreement
Please refer to the Rosen Navigation User’s Manual to review and accept the terms and conditions in the End-User License
before operating this product.
Page 15

Page 16

All rights reserved. Copyright 2014 Rosen Electronics, LP
DB-GMSERIES3-QSG Rev A
 Loading...