

Page 1
DVD Entertainment System
Owner's Manual
SURROUND
R
.mp3
WIDE
RES
SOUND
Page 2

Page 3

NOTICE OF INTENDED USE
Rosen Entertainment Systems are designed to enable
viewing of video ONL Y for rear-seat occup ant s, and are not
intended for viewing by the driver when the vehicle is in
motion. Such use might distract the driver or interfere with
the driver’s safe operation of the vehicle, and thus result in
serious injury or death. Such use might also violate state or
local laws.
Rosen Entertainment Systems disclaims any liability for
any bodily injury or property damage that might result from
any improper or unintended use.
About the Registered Marks
This product incorporates copyright protection technology that is protected by
method claims of certain U.S. patents and other intellectual property rights
owned by Macrovision Corporation and other rights owners. Use of this copyright
protection technology must be authorized by Macrovision Corporation, and is
intended for home and other limited viewing uses only unless otherwise
authorized by Macrovision Corporation. Reverse engineering or disassembly is
prohibited.
Page 4

Page 5

Table of Contents
Getting Started ................................................................................................................................................................................................ 6
Switching On, Lowering and Adjusting the Screen, Finding the Remote Control Buttons Y ou Need, Listening Over the Vehicle Speakers
Introduction .................................................................................................................................................................................................... 8
Discs Played by the A7 .................................................................................................................................................................................. 9
Using the Headphones ................................................................................................................................................................................. 9
Changing Monitor Settings .......................................................................................................................................................................... 10
Using the Remote Control ...........................................................................................................................................................................11
Basic Remote Control Buttons ................................................................................................................................................................... 12
Using Menu and Navigation Buttons .......................................................................................................................................................... 13
Using Audio Buttons .................................................................................................................................................................................... 13
Using DVD Disc Feature Buttons ............................................................................................................................................................... 14
Changing the Shape and Size of the Image .............................................................................................................................................. 14
Changing the Remote Battery ..................................................................................................................................................................... 14
Audio CD and MP3 Playback....................................................................................................................................................................... 15
Listening Over the Car Speakers ................................................................................................................................................................ 16
Watching Broadcast Television (with Tuner-equipped systems) ............................................................................................................. 16
Using Games and Camcorders ................................................................................................................................................................. 17
Optional Accessories for your A7................................................................................................................................................................. 17
What Can I Do About Black Bars On the Screen?...................................................................................................................................... 18
Changing DVD Setup .................................................................................................................................................................................. 20
Troubleshooting........................................................................................................................................................................................... 22
Page 6
GETTING STARTED USING YOUR A7
Switching On, Lowering and Adjusting the Screen
Use the system when your vehicle is running, or with the
ignition key switch in the “accessory” position.
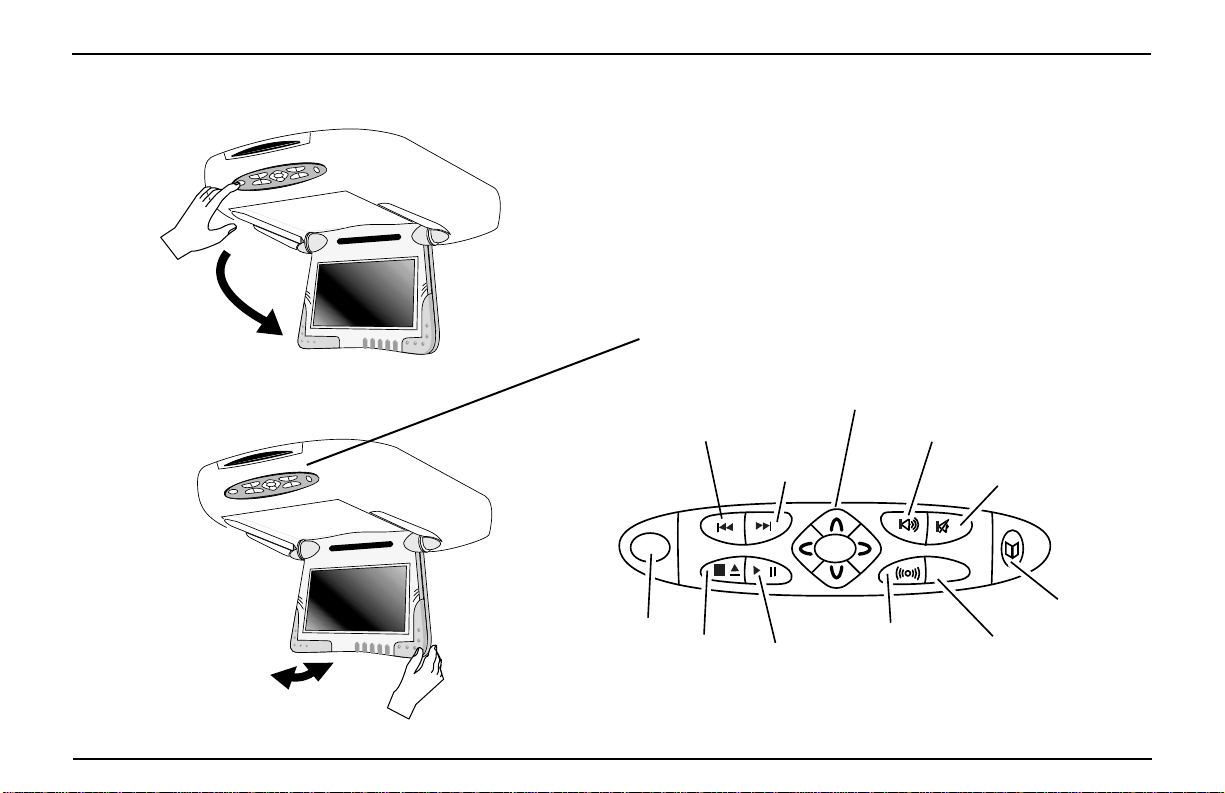
Press the OPEN button, as shown. The screen lowers and
powers on automatically.
The Front Panel Controls of the A7
Navigation
Keys
Previous
Speaker
On/Off
OPEN
Open
Stop/
Eject
Next
Play/
Pause
ENTER
Rosen
Entertainment
Sound
Mute
SOURCE
Video Menu
Source
Select
Page 7
Watching Video
To Watch a DVD:
(Note: The ignition key switch must be in the Run or Accessory position)
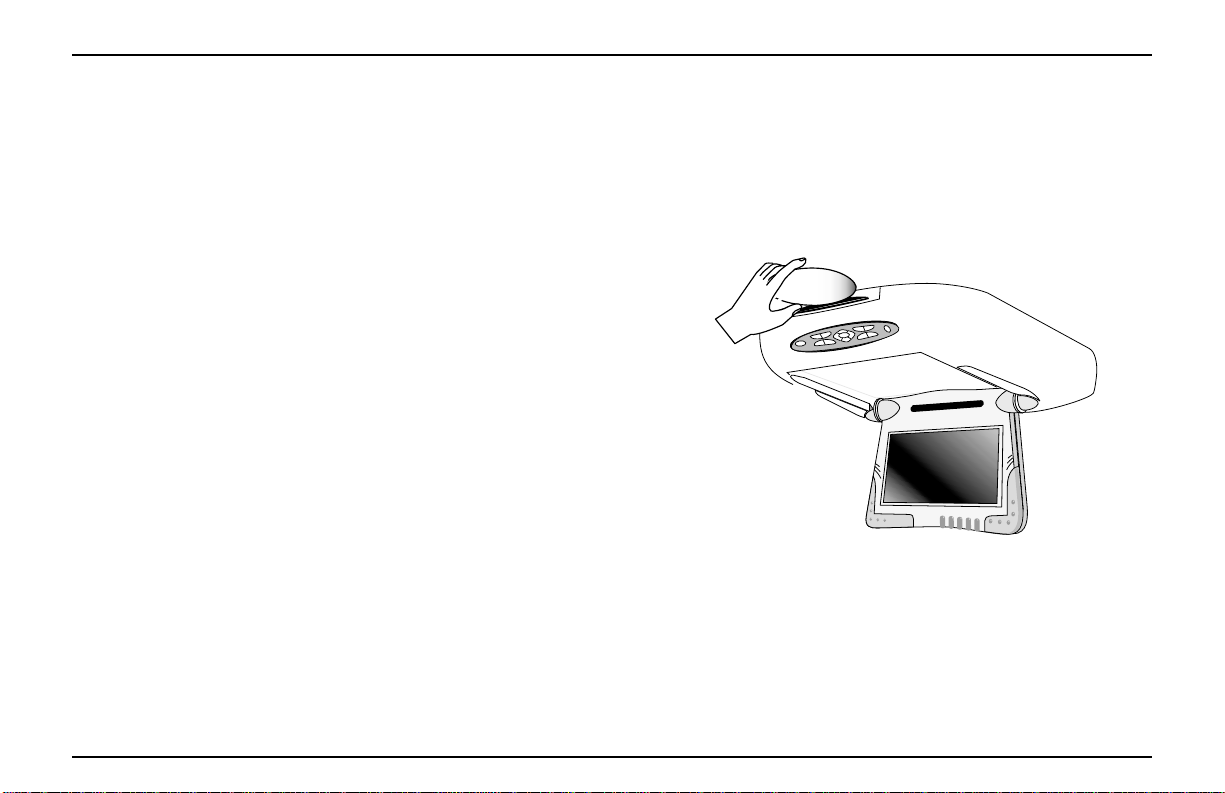
1 Press EJECT to remove any loaded disc.
2 Insert a DVD onto the slot, label side up.
3 For most DVDs, playback begins automatically. If not, press
PLA Y or ENTER as instructed on screen (this varies by DVD).
To Watch Broadcast Television (using optional TV Tuner)
1 Press SOURCE until “TV Tuner “ appears on the screen.
2 Use the remote control for the TV Tuner to change channels.
To Use Another Video Source (optional video game or camcorder):
1 Connect the RCA audio and video outputs of the device to the
RCA inputs of the A7 (check with your Authorized Rosen
dealer for the location of these connectors).
2 Press SOURCE until “Auxiliary Input” appears on the screen.
Listening Over the Vehicle Speakers
1 Press SPEAKER. “Speaker Sound Enabled” will appear on the
screen. (If “Headphone Sound Only” appears, press again.)
2 Turn on the car radio. Make sure A7
frequency 87.9. If no A7 audio is heard, try tuning in 88.3.
MUTE is off. Tune to FM
Inserting a disc
Page 8

Rosen A7 Owner’s Manual
INTRODUCTION
Welcome to the Rosen A7 Vehicle Entertainment System Owner’s
Manual. To get the most enjoyment from using your A7 system,
please make sure that you and your passengers take time to read
these instructions.
Your system includes the following components:
· An 7.0” widescreen flat panel display
· An internal DVD/CD/MP3 Player
· Wireless Infrared (IR) Headphones (2 pair)
· A Remote Control
· A Stereo FM Modulator (lets A7 sound be heard over your
vehicle’s speakers)
· Other parts and cables installed out of sight in your vehicle
Precautions
In order to operate the player,
the vehicle ignition key switch
must be in the ACC or engine ON position.
WARNING!
Operate the system with the engine
running, if possible. To avoid a dead
battery, do not use the system for long
periods of time without starting the
engine.
ACC or engine
ON position
• Use this system only if properly installed by a qualified installer.
• If the units show signs of overheating or malfunction, power off
the unit and consult your dealer immediately.
• Do not open the unit - there are no serviceable parts inside.
• Do not press on the display surface; this can damage it.
• Clean the LCD panel with a slightly damp, soft cloth using
household glass cleaner. Do not use solvents such as benzene,
thinner, or commercially available cleaners.
• If your car was parked in a very cold or very hot place, the
picture may not be clear. The A7 system is not damaged. The
picture will become clear after the temperature returns to normal.
• When using portable radios and telephones near the system,
picture or sound interference may occur.
Notes:
The system’s operating voltage range is 11-16VDC operat-
ing voltage.
Celsius. Use of the A7 system beyond the safe operating
ranges listed can cause temporary or permanent damage to
the unit, and such damage may not covered by the
manufacturer’s warranty.
Adjust volume using the volume control on the headphones
or the vehicle radio. There is no volume control on the A7
remote or on the overhead console.
The system operating temperature is 0
o
to 50
o
8
Page 9
Rosen Entertainment Systems
DISCS PLA YED BY THE A7
DVD, Video CD (VCD), CD/CD-R, and MP3 discs are compatible with
the A7.
DVD Regions
This digital media player is designed and manufactured to respond to
the Region Management Information that is recorded on a DVD disc. If
the Region number described on the DVD disc does not correspond
to the Region number of this player (Region 1), it will not be able to
play the DVD disc. Some DVD discs are manufactured to operate in
“all” zones, and those discs are compatible with the A7.
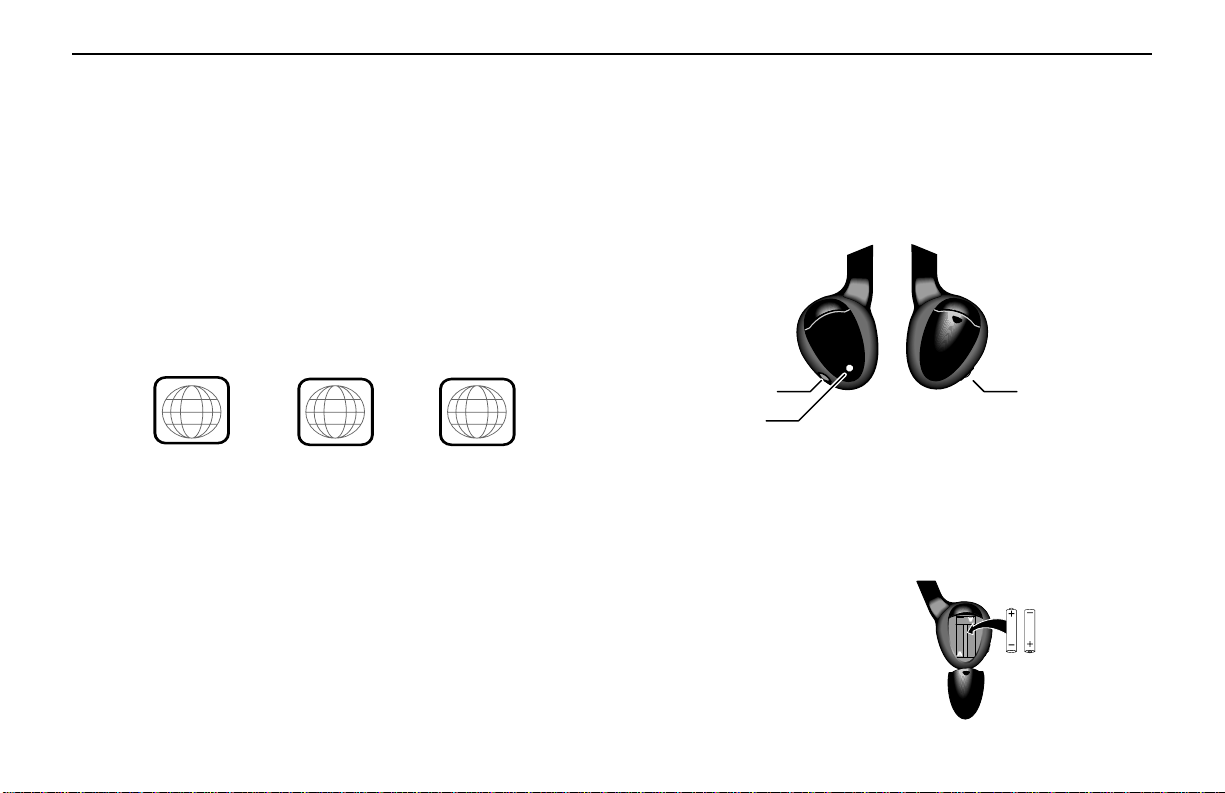
Region Icons:
ALL
Incompatible Discs:
The following disc types are incompatible:
· DVD-ROM
· DVD-R/DVD-RW/DVD-RAM
· Photo CD
· CD-ROM (Excluding most CD-Recordable discs using MP3 or CD-A
formats)
· CD-Audio manufactured with certain copy protection methods
· Any DVD with a Region number other than “1” and “ALL”
1
1
4
6
USING THE HEADPHONES
Using the headphones allows rear-seat passengers to listen to their
DVD, CD, video cassette, or video game without disturbing front-seat
passengers. The system comes with wireless IR headphones that
receive a signal from an IR transmitter concealed in the frame around
the display.
Volume Power ON/OFF
Power LED
To turn the headphones on and off, push the Power ON/OFF button
on the right ear piece. The Power LED on the left ear piece indicates
when headphone power is on. Power turns off automatically after
three minutes of no audio to preserve battery life. To adjust the
headphone volume, rotate the thumb wheel switch on the headphones.
The wireless IR headphones
require two AAA batteries.
To replace the batteries,
remove the battery compartment
cap on the right earpiece and
insert batteries, as shown.
9
Page 10

Rosen A7 Owner’s Manual
Changing Monitor Settings
Display Adjustments: The A7 monitor has adjustable video settings.
To change these settings, press the VIDEO MENU button on the
overhead console. A menu with the following options appears:
COLOR
CONTRAST
BRIGHT
TINT
DIMMER
FORMAT
RESET
To select a setting to be changed: Press the DOWN button to move
the cursor down the menu list (it will cycle back to the the top).
To change the value of a setting: Use the LEFT and RIGHT arrow
buttons to decrease and increase the value of the setting. The range
of the color, contrast, brightness, and tint settings is from zero to 63,
with 32 as the default. The dimmer setting is OFF or ON, and the
FORMAT setting is described below.
To exit the menu: Press the VIDEO MENU button to save the settings
and exit the menu.
Selecting among various display modes: The A7 has a
“widescreen” display format, with a 16:9 aspect ratio (the same
aspect ratio as high-definition televisions). These settings can also be
changed by pressing the VIDEO MENU button and selecting FORMAT.
• To view widescreen DVD’s, press the DISPLAY MODE button
until “CINEMA” is displayed on the screen.
• To watch “fullscreen” DVD’s or broadcast television (using an
optional TV tuner), press until “NORMAL” is displayed.
• To stretch the picture to take up more of the screen, select the
“FULL” mode.
To zoom in on the image, select the “ZOOM” mode.
Note: If viewing a DVD image, the DVD Zoom feature is
recommended. See page 14 for more information.
Note: While it is not technically a “monitor” setting, the
internal DVD player can be configured for either a widescreen
16:9 output compatible with the 7” screen, or for a a standard
4:3 output. Using the correct “WIDE” setting will eliminate or
greatly reduce the “black bars” on the top and bottom of the
screen when viewing a widescreen DVD. See page 18 more
more information.
10
Page 11
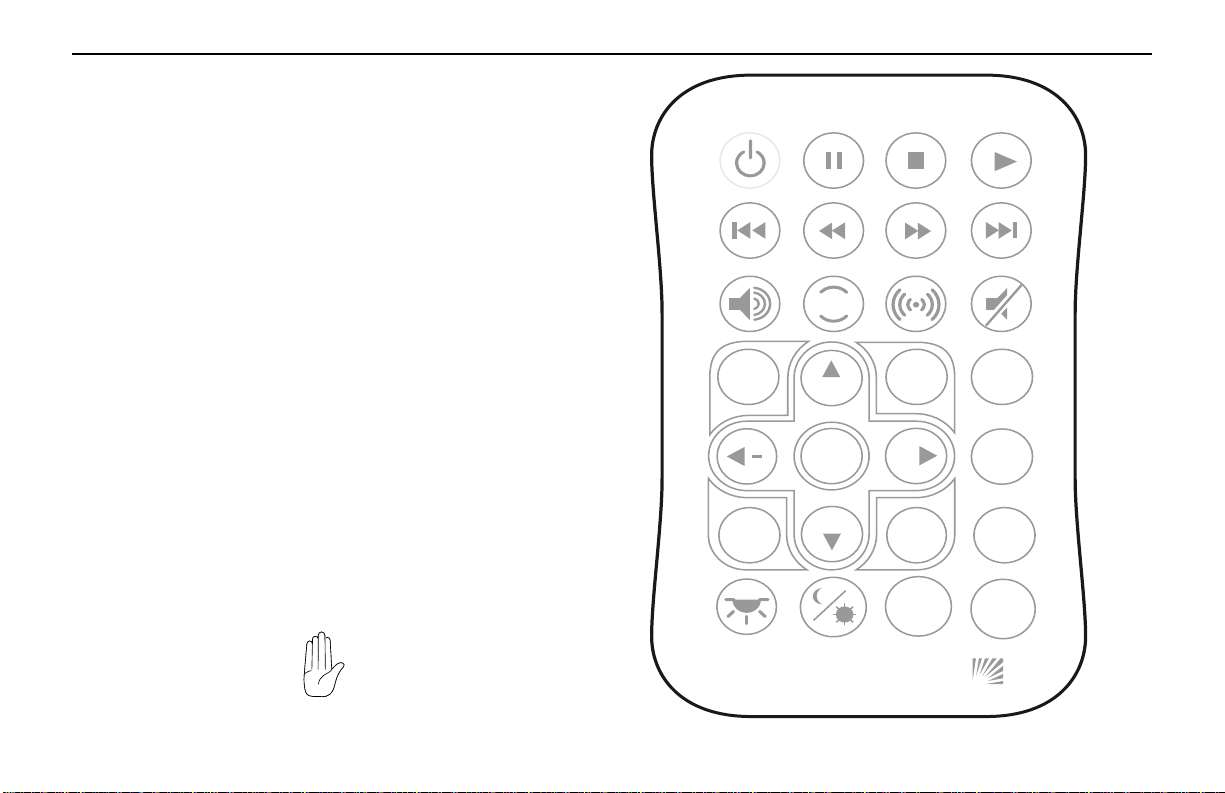
USING THE REMOTE CONTROL
Rosen Entertainment Systems
You can use the A7 remote control or the front-panel controls to
operate the system. The remote control offers more functionality than
the front-panel controls. Always aim the remote control at the A7
control panel - it contains the infrared sensor. For definitions of each
remote control button’s specific function, see the following sections
of this manual.
1 Optional Source Unit Power 15 Info
2 Pause 16 Eject
3 Stop 17 Navigate left
4 Play 18 Enter
5 Previous Chapter/Track 19 Navigate Right
6 Reverse 20 Subtitle
7 Fast forward 21 Source Menu
8 Next Chapter/Track 22 Navigate Down
9 Speaker on/off 23 Disc Menu
10 Rosen Entertainment Sound 24 Disc Zoom
11 Surround Sound 25 No function
12 Mute 26 Day/night
13 Source select 27 Random play
14 Navigate up 28 Display Mode
If you try to perform a DVD action that is not permitted (such as
accessing the disc menu while the disc is loading), the on-screen
display will use the following symbol:
1 2 3 4
5 6 7 8
9 10 11 12
RES
13 14 15 16
SOURCE
CH
17 18
ENTER
21
SOURCE
MENU
22
CH
25 26 27 28
INFO
19 20
+
23
RANDOM
DISC
MENU
PLAY
24
ROSEN
EJECT
SUB
TITLE
DISC
ZOOM
DISPLAY
MODE
11
Page 12
Rosen A7 Owner’s Manual
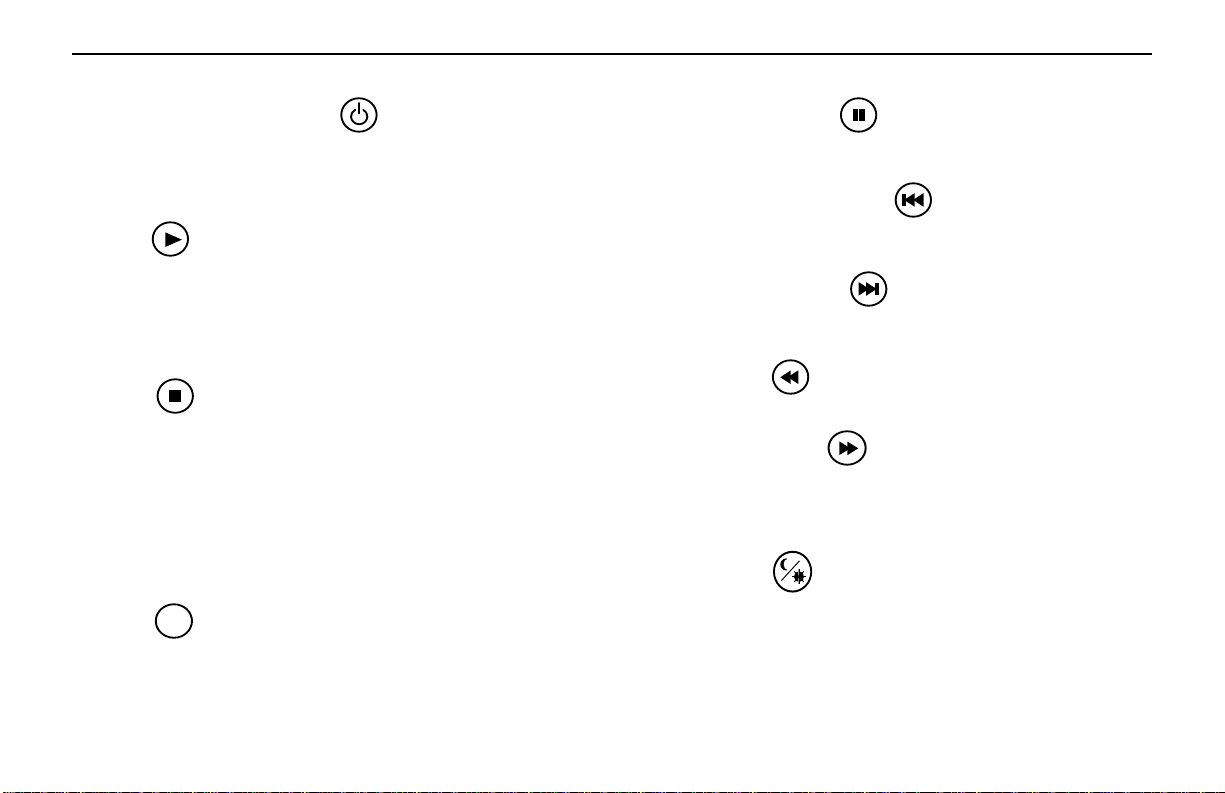
BASIC REMOTE CONTROL BUTTONS
1 Optional Source Unit Power
This button controls some optional source units.
Note: The A7 automatically turns on and off when the monitor is
opened and closed.
4 Play
Press to begin or resume playback of a DVD.
Note: DVD playback varies from disc to disc. When the disc
is first inserted, you may have to press PLAY or ENTER to
begin playback.
3 Stop
Press once to temporarily stop playback of a DVD. To resume normal
playback from the same point, press PLAY.
Press STOP twice and then press PLAY to begin playback from the
beginning of the disc.
Note: When STOP is pressed twice, the A7 cannot return to
the exact point and resume playback - it can only begin
playing from the beginning of the disc.
16 Eject
Press to eject a DVD or CD.
EJECT
BASIC BUTTONS, CONTINUED
2 Pause/Frame Step
Press once to pause playback or press repeatedly to advance video
frame by frame. To resume normal playback, press PLAY.
5 Previous Chapter/Track
Press to jump to the previous title or chapter, if available on a DVD, or
to the previous track on an audio CD.
8 Next Chapter/Track
Press to jump to the next title or chapter, if available on a DVD, or to
the next track on an audio CD.
6 Reverse
Press to search in reverse. To resume normal playback, press PLAY.
7 Forward/Search
Press during playback to fast forward. Press the RIGHT and LEFT
arrow buttons to adjust search direction and speed. Options include
2x, 4x, 6x, 8x, 12x, 16x, 32x, and 64x. Press PLAY to resume regular
play.
25 Day/Night
This button decreases the brightness of the display, optimizing the
picture brightness for low-light conditions, and making nighttime
viewing more comfortable. Set the Brightness setting on page 8 for
daylight viewing, and then use this button to select Night mode when
viewing at night. When this button is pressed, the on-screen display
will read “DIMMER ON” or “DIMMER OFF”.
12
Page 13
Rosen Entertainment Systems
USING MENU AND NA VIGA TION BUTTONS
INFO
SOURCE
ENTER
SOURCE
MENU
CH
CH
+
13 Source
Press to choose between the DVD/CD drive or the Auxiliary input.
This button also is used to access the optional TV Tuner,
VideoCassette Player, or other optional auxiliary sources.
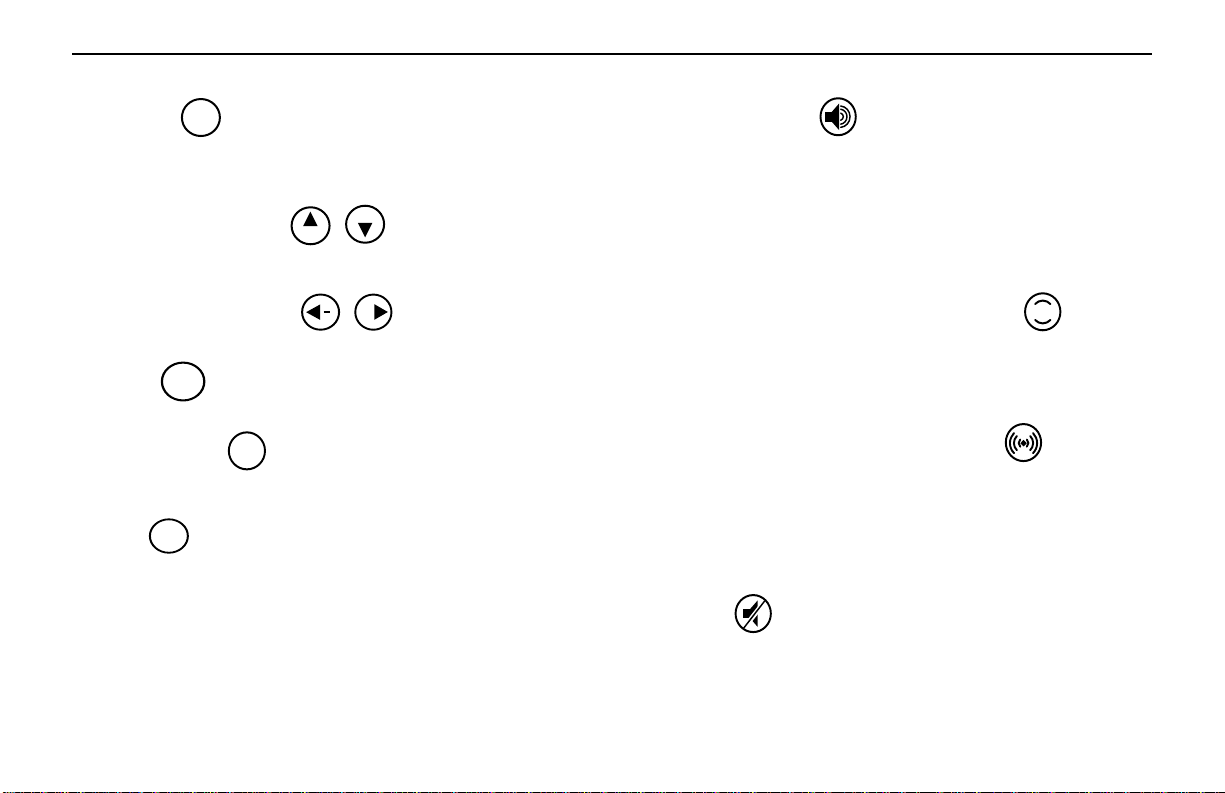
14, 22 Up/Down Arrows
Press to move up or down in a menu or to change channel when
watching TV.
17, 19 Left/Right Arrows
Press to move left or right in a menu.
18 Enter
Press to make a menu selection.
21 Source Menu
Use to personalize operation of your DVD player or VCR. For more
information, see “Changing DVD Player or VCR Setup”.
15 Info
Press to view the status, current title number, track number and the
total playing time of the disc on the monitor.
Note: If the DVD Player is selected and there is no disc
loaded, pressing the INFO button will display the software
version of the A7. This is for the use of factory personnel.
USING AUDIO BUTTONS
9 Speaker Sound
Press this button to hear A7 audio through the car speakers; Speaker
Sound On appears on the screen. Headphone audio is not affected.
Press again to hear A7 audio only through the headphones; Headphone Audio Only appears on the screen. Refer to “Using the
Headphones” and “Listening Over the Car Speakers” for more details.
Note: The Speaker button on the control panel performs the
same function.
10 Rosen Entertainment Sound Processing
RES
This button turns on and off the Rosen Entertainment Sound
Processing. Various equalization mdoes are available when this
button is pressed.
Equalization modes: Standard, Classic, Rock, Jazz, Pop.
11 Rosen Entertainment Surround-sound
This button selects various Rosen Entertainment Surround-sound
modes. Rosen Surround-sound is optimized for headphone listening.
Surround-sound modes: Off, Concert, Church, Passive, Wide, Live.
Note: This button on the front control panel controls both
Surround-sound and Sound Processing.
12 Mute
Press once to mute the audio. As long as the Mute function is active,
“Mute” will appear on the screen. Press again to turn Mute off.
Note: The Mute button on the control panel performs the same
function.
13
Page 14
Rosen A7 Owner’s Manual
USING DVD DISC FEA TURE BUTTONS
Some DVDs include menu and viewing options. Use the following
buttons to access DVD-only menus and features.
20 Subtitle
SUB
TITLE
Press repeatedly to cycle through the language options available on
the DVD being played.
23 Disc Menu
DISC
MENU
Press to see the main menu for the DVD being played. To resume
normal playback, press PLAY.
CHANGING THE SHAPE AND SIZE OF THE IMAGE
24 Disc Zoom
View the same scene at different magnifications.
1 Press the DISC ZOOM button during playback to select among the
following options: x1.5, x2, and x4.
2 Press the arrow buttons to shift the magnified section of the
screen.
3 To resume normal playback, press DISC ZOOM until “Zoom off” is
displayed.
DISC
ZOOM
• To view widescreen DVD’s, press this button until “Wide” is
displayed on the screen.
• To watch “fullscreen” DVD’s or broadcast television (using an
optional TV tuner), press until “Standard” is displayed.
• To stretch the picture to take up more of the screen, select the
“Stretch” mode.
• To zoom the picture, select the “Zoom” mode.
Note: For best results when zooming in on DVD images, use the
Disc Zoom feature instead of the “Zoom” Display Mode.
For more information about display modes and image
shapes, see “Why the Black Bars?” on page 18.
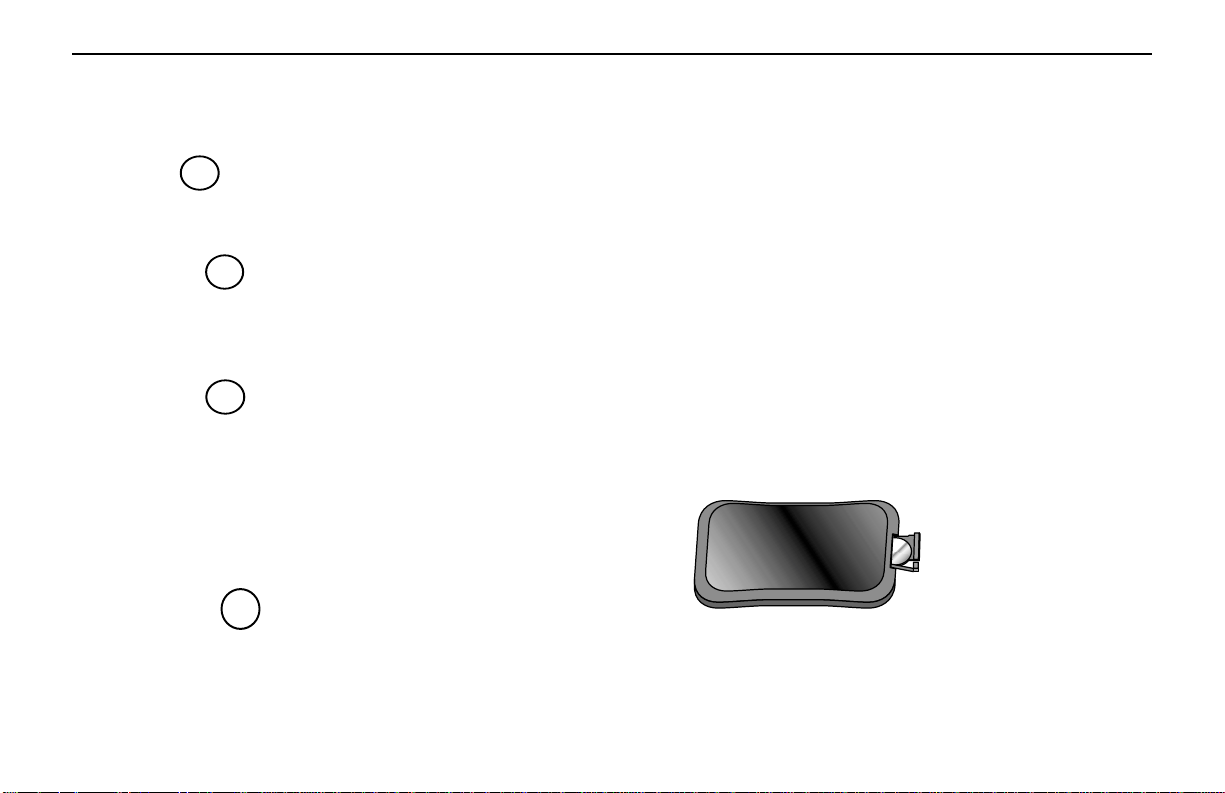
REPLACING THE REMOTE BA TTERY
28 Display Mode
DISPLAY
MODE
This button selects among various display modes. The A7 has a
“widescreen” display, with a 16:9 aspect ratio (the same aspect ratio
as high-definition televisions).
14
Use a single 3V battery, type CR2025. Insert as shown. Observe the
correct orientation of the battery as marked on the battery tray.
Battery life is approximately six months, depending on how often the
remote is used.
Page 15
Rosen Entertainment Systems
CD AUDIO AND MP3 PLA YBACK
CD Audio Playback
When an Audio CD is inserted, “CD” will appear on the screen. To
display track information, press INFO. To play the tracks in a random
order, press RANDOM PLAY.
MP3, JPEG , and Video CD Playback
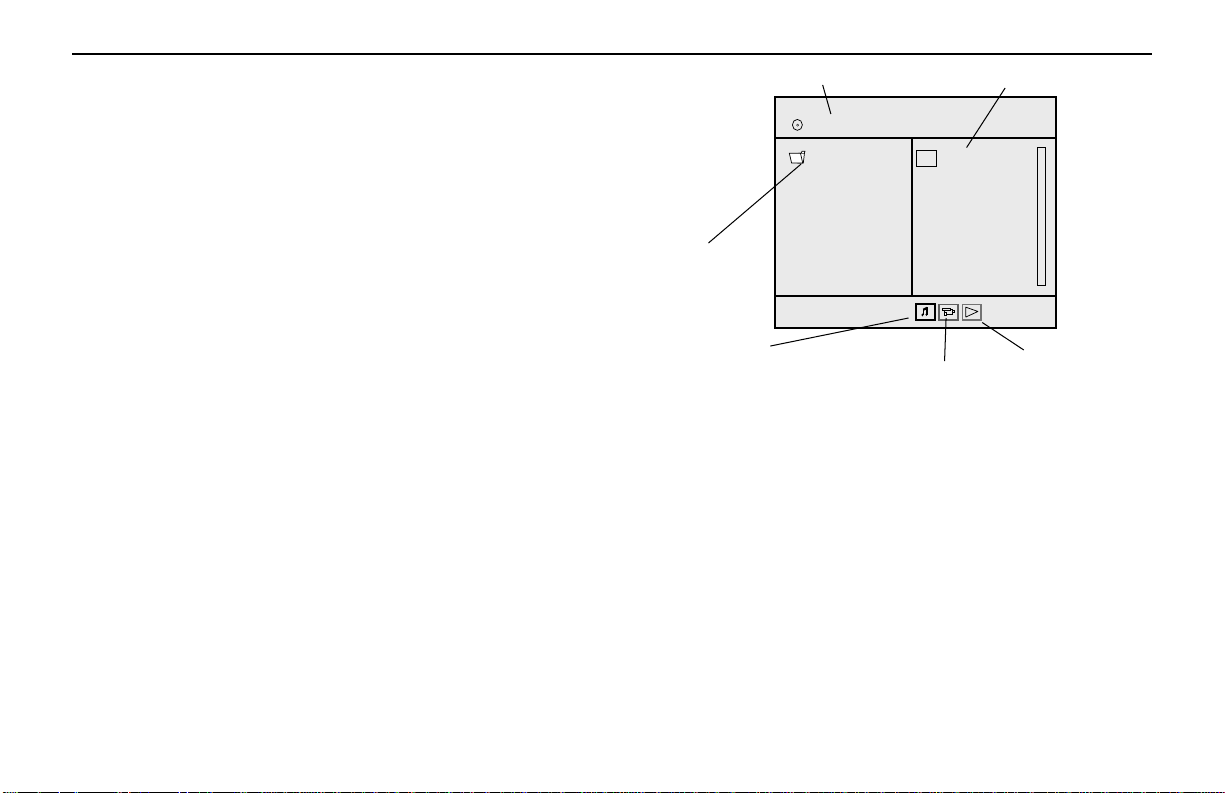
When a compact disc with MP3 files is inserted, the screen at right
will appear. Navigate the files and folders using the navigation arrow
keys, and select a file or folder to be played by using the ENTER
button. To move to the next file or the previous file, use the NEXT and
PREVIOUS buttons.
MP3 Disc Recording and File Extensions
When recording a CD with MP3 files to be played on the A7, always
add a file extension “ .MP3” or “.mp3” to MP3 files by using single-
byte letters. If you add a different file extension, or forget to add the
file extension “ .MP3” or “.mp3,” the file cannot be played. In
addition, if you use upper case and lower case letters (capital and
small letters) mixed together for file extensions, the file may not play.
Notes:
· Some CDs recorded in CD-R or CD-RW mode may not play.
· Files saved without MP3 data will not play.
When recording Audio CDs or MP3 files, make sure to check
your CD recorder’s level setting - too high a level will result in
distorted sound.
Name of selected file List of files in the selected folder
[-]MP3_003.JPG
01. -
01. MP3_003
Selected folder
MP3 playback
Video CD or
JPEG playback
Display folder
contents
Supported MP3 File Formats
· ISO9660, level 1 and level 2 (the most common type of MP3
format)
· Joliet (a version of ISO9660 that supports longer filenames)
· Romeo (a format used by some CD-creating software)
15
Page 16

Rosen A7 Owner’s Manual
LISTENING OVER THE CAR SPEAKERS
The A7 uses an FM Modulator to send audio through the vehicle radio
and thus through the speakers. To listen to A7 system audio through
your car speakers:
1 Press SPEAKER. “Speaker Sound Enabled” will appear on the
screen. (If “Headphone Sound Only” appears, press SPEAKER
again.)
2 Turn on the car radio. Make sure A7 MUTE is off. Tune to FM
frequency 87.9. If no A7 audio is heard, try tuning in 88.3.
To turn off A7 system audio over the car speakers, press SPEAKER.
“Headphone Sound Only” appears on the screen. Audio from the A7
system is then heard only over the headphones.
The A7 remembers which mode you have selected, and will return to
that mode each time the system is turned on. You may want to store
the FM Modulator frequency as a preset on your radio for ease of
use. This will be either 87.9 or 88.3 FM.
Note: When the FM Modulator is on, you may notice some
reduced radio reception. When the system is off, the FM
Modulator also turns off. To listen to the radio when the A7 is
not in use, close the A7 monitor, and both the A7 system and
the FM Modulator will turn off.
Note: If there seems to be a strong station on the FM
Modulator frequency, your Rosen authorized dealer can
switch the system to the alternate frequency.
WA TCHING BROADCAST TELEVISION
(ON TV TUNER-EQUIPPED SYSTEMS)
You can watch television or videotapes on the A7 if you have
installed an optional TV Tuner.
Note: Broadcast television reception varies with location,
terrain, distance from the broadcast tower, and other factors.
Signal quality is likely to vary in a moving vehicle.
1 Press SOURCE to select the “TV Tuner” input.
2 Use the TV TUner’s remote control to change channels.
Note: To watch broadcast television or videotapes in their
original format, press the DISPLAY MODE button on the
remote control until “Standard” is displayed on the screen.
This will properly size the image, instead of stretching the
image across the A7 wide screen. In “Standard” mode, you
will see black bars on the sides of the image, like this:
16
Page 17

Rosen Entertainment Systems
USING GAMES AND CAMCORDERS
You may use video games, camcorders, and other portable video
units by connecting the unit to the auxiliary RCA input cables of the
A7. Check with your Rosen authorized dealer for the location of
these RCA jacks.
Red—Right channel audio input
White—Left channel audio input
Yellow—Video input
Press SOURCE to select the “Auxiliary Input”.
To use a game system, a 12VDC to 110VAC power inverter, available
at most electronic retail stores, is often required.
Note:
If you want to watch non-widescreen, 4:3 images, press
the DISPLAY MODE button on the remote control until
“Standard” is displayed on the screen. This will properly size
the image, instead of stretching the image across the A7 wide
screen. In “Standard” mode, you will see black bars on the
sides of the image, like this:
OPTIONAL ROSEN ACCESSORIES FOR YOUR A7
The following Rosen acessories are available for your A7. Most of
these require some installation parts and labor - check with your
authorized Rosen dealer for details.
AC3105 TV Tuner
The AC3105 TV Tuner receives VHF and UHF television broadcasts.
It requires a TV antenna (not included).
R5000-series Videocassette Player
The R5000 series of videocassette players play VHS videotapes.
AC3003 Infrared Wireless Headphones
AC3205 Remote Control
Additional headphones and remotes are available from your authorized Rosen dealer.
17
Page 18
Rosen A7 Owner’s Manual
WHA T CAN I DO ABOUT BLACK BARS ON THE
SCREEN?
Motion picture film and cameras, and later
television screens, were originally designed
around a screen size that was almost square - it
was one-third wider than it was high (another
way to say this is that it had a width-to-height
ratio, or aspect ratio, of 4:3. This ratio, 4:3 can
also be expressed as 1.66:1.)
When widescreen movies such as
Cinemascope and Panavision became
popular, new aspect ratios were used
for them - 1.78:1, 2.35:1, and even 2.4:1.
When high-definition television was
developed, a screen shape with an aspect
ratio of 16:9, or 1.85:1, was selected as the
best compromise for viewing widescreen
images.
16:9
1.85:1
4:3
1.66:1
WHY ARE THE BLACK BARS STILL THERE SOMETIMES?
There are three possible reasons for black bars to appear on the top
and bottom of your A7 display:
1) You are watching a widescreen movie with an aspect ratio
greater than 1.85:1. (For more options on dealing with this, see
below). Check the disc jewel box to determine the DVD’s aspect
ratio.
2) The DVD section of the A7 has been set for a 4:3 display instead
of a 16:9 wide display. See the next page for how to correct this.
3) The “widescreen” DVD movie you are viewing is not “anamorphic”
or “enhanced for widescreen televisions”. These films, often older
DVD conversions, are not recommended for widescreen displays.
You can usually determine if your DVD was produced for optimum
compatibility with widescreen televisions by looking for the word
“anamorphic” or the phrase “enhanced for widescreen televisions”
on the box.
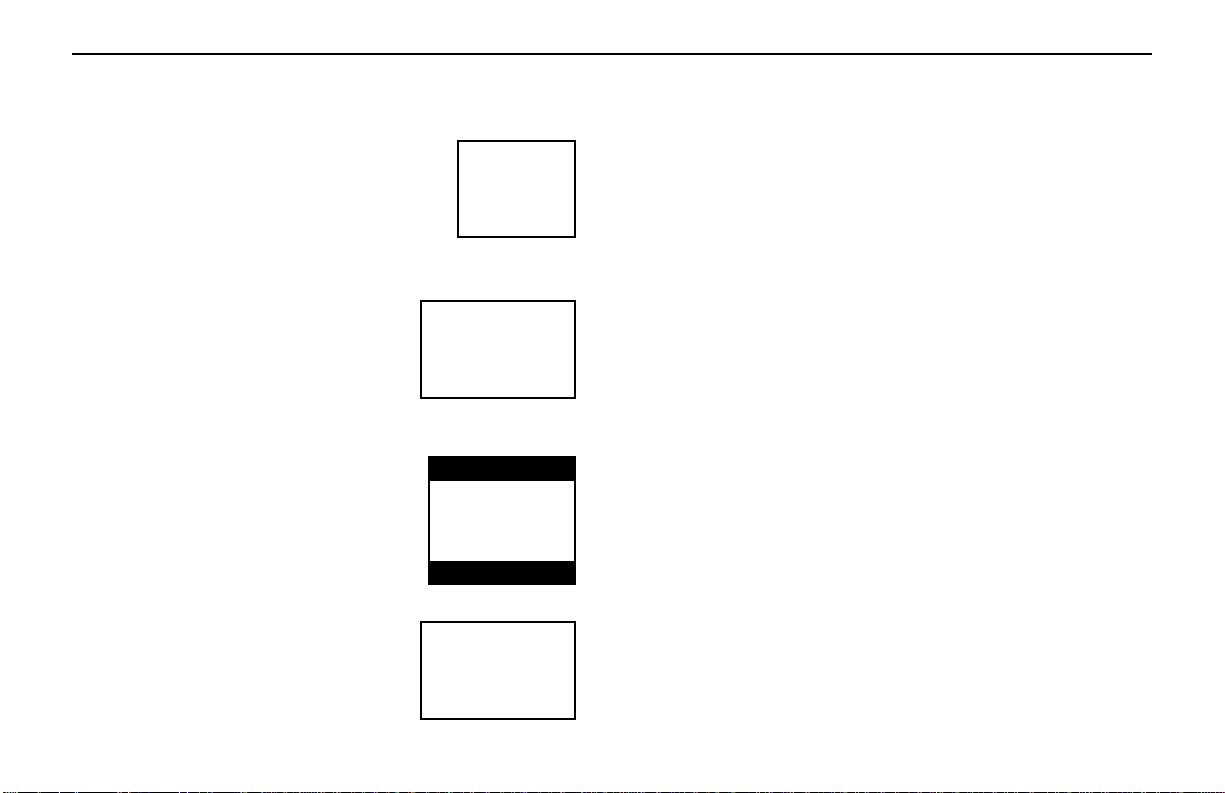
When you watch widescreen movies on a
standard 4:3 television, there are “black bars”
on the top and bottom of the screen. This is
often called a “letterbox” image.
Your A7 uses a widescreen 16:9, or 1.85:1
display - the same aspect ratio as highdefinition televisions. This means that when
viewing widescreen DVD’s, these black bars
are either non-existent, or greatly minimized.
18
Letterbox
Widescreen
WHAT CAN I DO?
First, Rosen recommends that for best results you use DVD’s that
say “anamorphic” or “enhanced for widescreen televisions” on the
box . However, your A7 can get rid of black bars with just about any
DVD using Rosen’s exclusive image-sizing features, explained below.
Only Rosen gives you so many wide-screen-filling options!
Page 19

Make sure that the A7 internal DVD player is set to “WIDE”
(see DVD Setup, page 20).
Use the Display Mode button to select “Wide” or “Stretch”.
• To view widescreen DVD’s, use “Wide”.
• To stretch the picture to take up more of the screen, use “ Stretch”.
• To zoom the picture, use the “Zoom” mode.
Note: for best results when zooming in on DVD images, use
the Disc Zoom feature below instead of the “Zoom” Display
Mode.
Finally, use the Disc Zoom feature to completely fill the
screen.
1 Press the DISC ZOOM button during playback to select among
the following options: Standard, x2, x3, x4, 1/2, 1/3, and 1/4 size.
2 Press the arrow buttons to shift the magnified image left and right.
Note: To watch “fullscreen” DVD’s or broadcast television (using
an optional TV tuner), you can use the DISPLAY MODE button to
select “Standard”. This will properly size the image, instead of
stretching the image across the wide screen. In “Standard” mode,
you will see black bars on the sides of the image, like this:
Rosen Entertainment Systems
19
Page 20
Rosen A7 Owner’s Manual
DVD TYPICAL SETUP AND CONFIGURA TION
The following section explains how to customize various features of
the Internal DVD Player, including various language, display, and
parental control features.
Note: Many DVD menu settings do not apply to this system,
since it is specifically engineered for automotive use.
Changing the state of some settings can cause apparent
system failure. Don’t change any settings other than those
described in this section. Some unused settings may be
deleted from your unit at the time of manufacture.
A DVD disc must be loaded to access the Internal DVD settings.
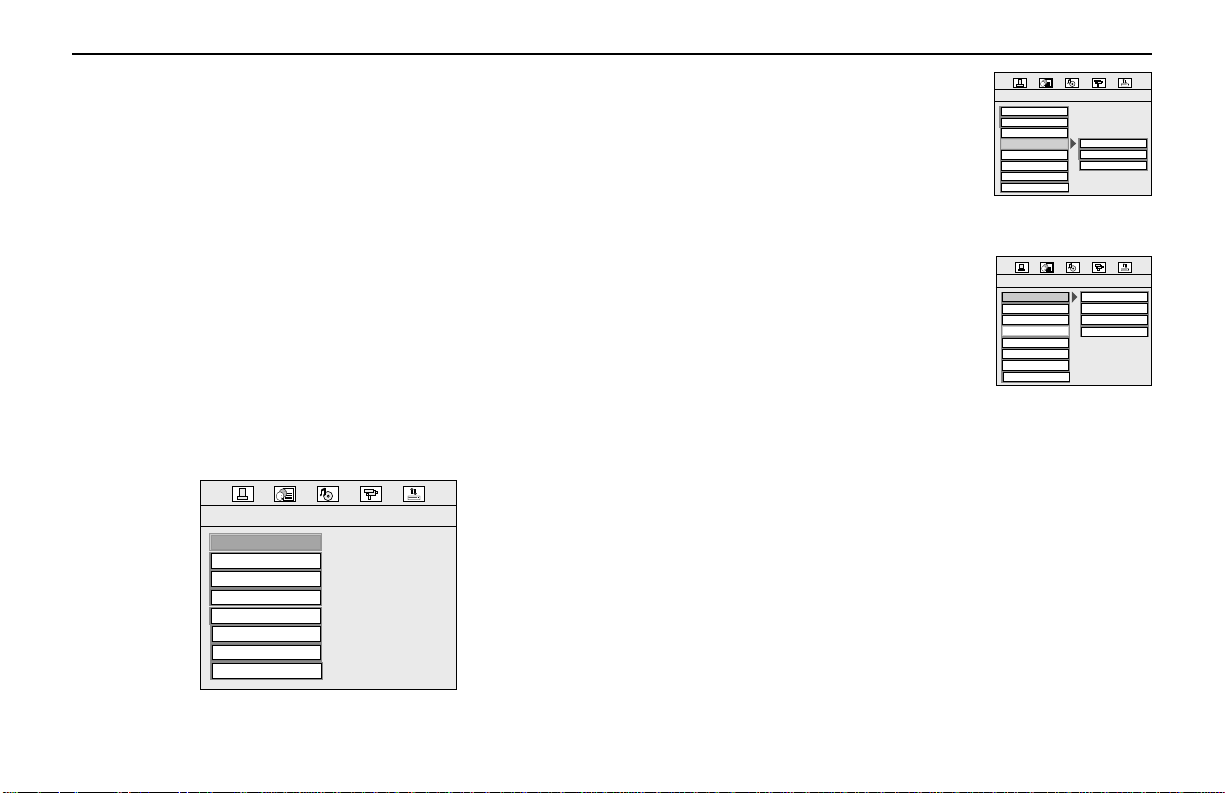
1 Press SOURCE SETUP .
2 Use the Left and Right arrow buttons to select a page.
3 Use the Up and Down arrow buttons to select the setting to
change.
4 Use the Left and Right buttons again to change the value of the
setting.
:
SYSTEM SETUP
TV SYSTEM
VIDEO
TV TYPE
PASSWORD
RATING
DEFAULT
EXIT SETUP
Changing the Aspect Ratio Mode
This is under the SYSTEM SETUP tab,
under TV TYPE. The correct setting is
WIDE. Changing this setting to NORMAL/PS
or NORMAL/LB will result in distorted
video.
SYSTEM SETUP
TV SYSTEM
VIDEO
TV TYPE
PASSWORD
RATING
DEFAULT
EXIT SETUP
4:3 PS
4:3 LB
16:9
Changing the Video Output Mode
To change the video output mode, select
SYSTEM SETUP, and then select TV
SYSTEM. The default is NTSC. If you want
to be able to play PAL discs on your NTSC
monitors, select PAL. If you change this
setting and the picture “rolls”, see your
SYSTEM SETUP
TV SYSTEM
VIDEO
TV TYPE
PASSWORD
RATING
DEFAULT
EXIT SETUP
NTSC
PAL60
PAL
AUTO
Rosen dealer.
Note: The setting “AUTO” will automatically output NTSC
video from NTSC discs, and PAL video from PAL discs.
NTSC is the North American standard. Some discs may
not play properly when AUTO is selected.
The Digital Output Setting
There is a setting in the menu for a Digital Audio output under DIGITAL
SETUP. This unit does not have a digital audio output. Leave this
setting in the ANALOG mode.
Note: Enabling the Digital Audio mode disables the analog
audio output used by the FM Modulator and the IR headphones, and can resemble a system audio failure.
20
Page 21
Rosen Entertainment Systems
Parental Control
The supplied remote control does not support the Parental Control
feature.
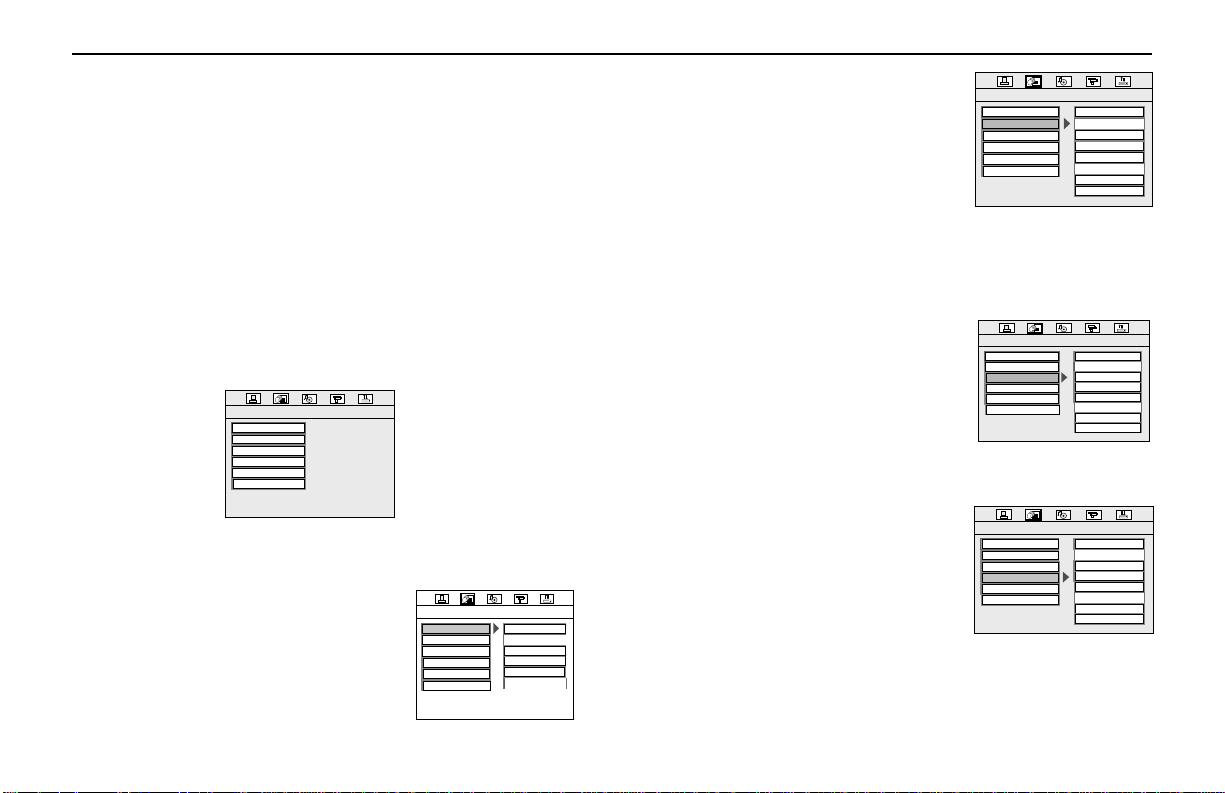
Changing Language Settings
Several language settings can be customized on the DVD Player.
These languages can vary depending on the language supported by
the DVD disc. To change these settings, select the LANGUAGE
SETTINGS page.
Note:
To change the on-screen
display language, select
OSD LANGUAGE.
· Not all language settings are supported by all discs.
LANGUAGE SETUP
OSD LANGUAGE
AUDIO LANG
SUBTITLE LANG
MENU LANG
EXIT SETUP
LANGUAGE SETUP
OSD LANGUAGE
AUDIO LANG
SUBTITLE LANG
MENU LANG
EXIT SETUP
ENGLISH
CHINESE
GERMAN
SPANISH
FRENCH
PORTUGUESE
To change the soundtrack language, select AUDIO LANG.
To change the subtitle or caption
language, select SUBTITLE LANG. You
can also press the SUBTITLE button on
the remote to select among the available
subtitle languages.
To change the disc menu language,
select MENU LANG .
NOTE: If you select another language, the change takes effect
immediately on the on-screen menu,
making any needed correction
difficult if you select a language you
don’t read. Avoid changing menu
languages unless absolutely needed.
LANGUAGE SETUP
OSD LANGUAGE
AUDIO LANG
SUBTITLE LANG
MENU LANG
EXIT SETUP
LANGUAGE SETUP
OSD LANGUAGE
AUDIO LANG
SUBTITLE LANG
MENU LANG
EXIT SETUP
LANGUAGE SETUP
OSD LANGUAGE
AUDIO LANG
SUBTITLE LANG
MENU LANG
EXIT SETUP
CHINESE
ENGLISH
JAPAN
FRENCH
SPANISH
PORTUGUESE
LATIN
GERMAN
CHINESE
ENGLISH
JAPAN
FRENCH
SPANISH
PORTUGUESE
GERMAN
OFF
CHINESE
ENGLISH
JAPAN
FRENCH
SPANISH
PORTUGUESE
GERMAN
LATIN
21
Page 22

Rosen A7 Owner’s Manual
TROUBLESHOOTING
NO PICTURE, NO SOUND
The A7 system has low- and high-voltage and temperature protection
circuits. If the voltage or temperature goes beyond the limits, the
system shuts off. The power wire or power harness may have been
disconnected, or the fuse may have failed. Contact your Rosen
authorized dealer to determine if this is the case.
Note: The system voltage range is 11-16VDC operating
voltage. The system operating temperature is 0o to 50
Celsius. Use of the DVD Player beyond the safe operating
ranges listed can cause temporary or permanent damage to
the unit, and such damage may not be covered by the
manufacturer’s warranty.
GOOD PICTURE, BUT NO SOUND OR DISTORTED, “TINNY” SOUND
o
NO RESPONSE WHEN PRESSING THE REMOTE BUTTONS
Check the battery in the remote control.
I HAVE BLACK BARS ON THE TO P AND BOTT OM OF MY SCREEN
WITH A WIDESCREEN DVD.
See page 18.
If the tips in this section do not address your question, please contact
your Rosen authorized dealer - your A7 has internal diagnostic
capabilities that are accessible to authorized Rosen dealers.
Check the MUTE button. Check the volume on the radio, and make
sure to try both 87.9 FM and 88.3 FM. Check the headphones; ensure
the headphones have a direct “line of sight” to the infrared transmitter
below the monitor. Replace headphone batteries, if needed. Check
the DVD Setup Menu - the Audio Output setting must be set to
“ANALOG” and the Speaker Downmix setting must be set to
“STEREO”. If using a CD you have made yourself, make sure you did
not set the recording level too high.
GOOD SOUND, BUT BLURRY PICTURE
This happens if the system components are very cold. Allow the
interior of the vehicle to warm up before using the A7 system.
Make sure that the DVD you are playing is in good condition. If using
an optional source unit, check the manual for that unit.
22
To locate a Rosen Entertainment Systems authorized dealer, please
visit www.rosenentertainment.com.
Page 23

Page 24

RES PN 9100237 Rev B
© 2005 Rosen Entertainment Systems
www.rosenentertainment.com
(951) 898-9808
No part of this publication may be reproduced, stored in a retrieval sytem or transmitted in any form, electronic, mechanical, recording or other means without prior written permission from Rosen.
All rights reserved.
 Loading...