

Page 1
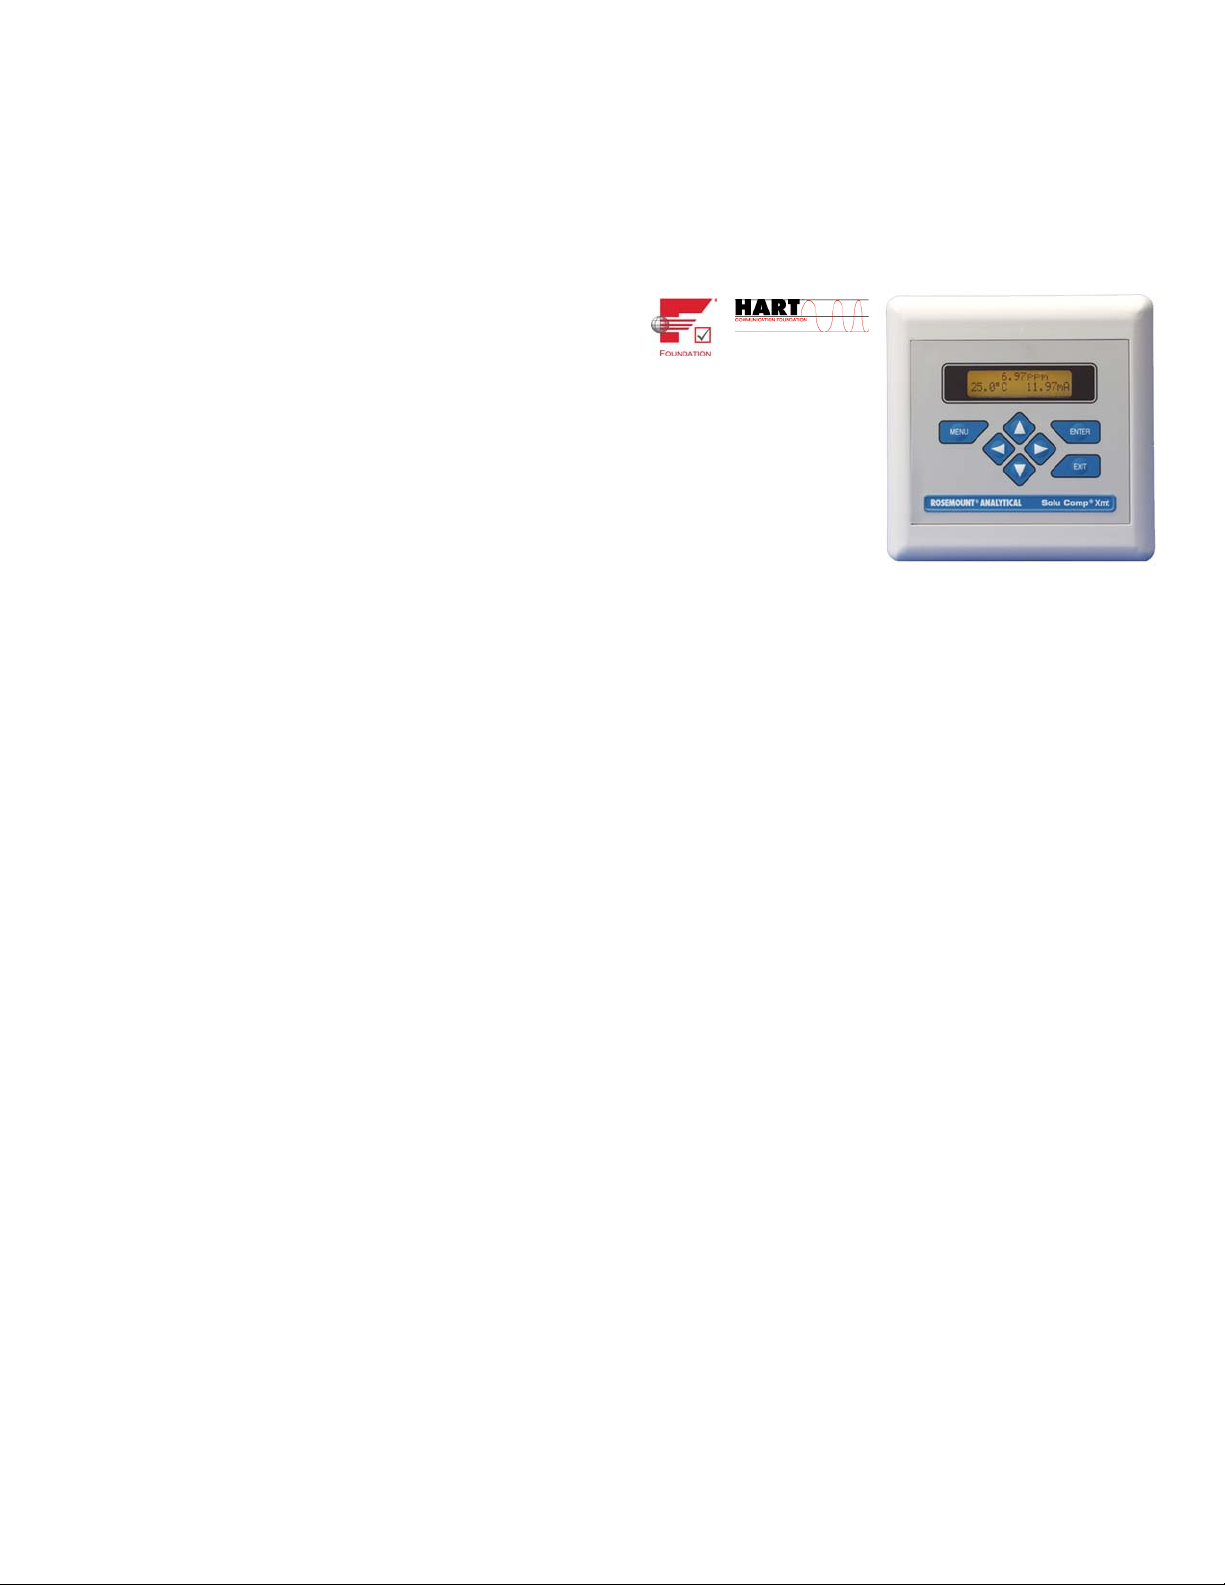
Solu Comp Xmt-A-HT
HART®SMART Chlorine, Dissolved Oxygen, and Ozone
Transmitter
Instruction Manual
PN 51-Xmt-A-HT/rev.K
March 2012
Page 2
ESSENTIAL INSTRUCTIONS
READ THIS PAGE BEFORE PROCEEDING!
Rosemount Analytical designs, manufactures, and tests its products to meet many national and international
standards. Because these instruments are sophisticated technical products, you must properly install, use, and
maintain them to ensure they continue to operate within their normal specifications. The following instructions
must be adhered to and integrated into your safety program when installing, using, and maintaining Rosemount
Analytical products. Failure to follow the proper instructions may cause any one of the following situations to
occur: Loss of life; personal injury; property damage; damage to this instrument; and warranty invalidation.
• Read all instructions prior to installing, operating, and servicing the product. If this Instruction Manual is not the
correct manual, telephone 1-800-654-7768 and the requested manual will be provided. Save this Instruction
Manual for future reference.
• If you do not understand any of the instructions, contact your Rosemount representative for clarification.
• Follow all warnings, cautions, and instructions marked on and supplied with the product.
• Inform and educate your personnel in the proper installation, operation, and maintenance of the product.
• Install your equipment as specified in the Installation Instructions of the appropriate Instruction Manual and per
applicable local and national codes. Connect all products to the proper electrical and pressure sources.
• To ensure proper performance, use qualified personnel to install, operate, update, program, and maintain the
product.
• When replacement parts are required, ensure that qualified people use replacement parts specified by
Rosemount. Unauthorized parts and procedures can affect the product’s performance and place the safe
operation of your process at risk. Look alike substitutions may result in fire, electrical hazards, or improper
operation.
• Ensure that all equipment doors are closed and protective covers are in place, except when maintenance is
being performed by qualified persons, to prevent electrical shock and personal injury.
Emerson Process Management
2400 Barranca Parkway
Irvine, CA 92606 USA
Tel: (949) 757-8500
Fax: (949) 474-7250
http://www.rosemountanalytical.com
© Rosemount Analytical Inc. 2012
CAUTION
If a Model 375 Universal Hart® Communicator is used with these
transmitters, the software within the Model 375 may require
modification.
If a software modification is required, please contact your local
Emerson Process Management Service Group or National Response
Center at 1-800-654-7768.
Page 3
5. Choose the desired language. Choose >> to show more choices.
6. Choose type of measurement: Oxygen, Ozone, Free Chlorine, Total Chlorine, or
Monochloramine. To see more choices, move the cursor to >> and press ENTER.
If you chose Oxygen, go to step 6a.
If you chose Ozone, go to step 7a.
If you chose Free Chlorine, go to step 8a.
If you chose Total Chlorine or Monochloramine, go to step 9a.
7a. For Oxygen, select the manufacturer of the sensor, Rosemount or Other. If you chose
Rosemount, go to step 6b. If you chose Other go to step 6c.
7b. Select the application: Water/Waste, Trace Oxygen, or Biopharm. To see more choic-
es, move the cursor to >> and press ENTER.
7c. Choose the units in which you want the oxygen measurement dis-played. If you chose
partialPress (partial pressure), the default units are mm Hg. To select different units,
refer to Section 7.4.
7d. Choose temperature units: °C or °F.
8a. For Ozone, select units: ppm or ppb.
8b. Choose temperature units: °C or °F.
9a. For Free Chlorine, select Auto or Manual pH compensation.
9b. If you selected Manual, enter the pH of the process liquid.
9c. Choose temperature units: °C or °F.
10a.For Total Chlorine and Monochloramine, choose temperature units: °C or °F.
11. To change output settings, to scale the 4-20 mA output, to change pH-related settings
(free chlorine only) from the default values, and to set security codes, press MENU.
Select Program and follow the prompts. For more information refer to section 7.0. For
calibration information, refer to section 8.0.
12. To return the transmitter to default settings, choose ResetAnalyzer in the Program menu.
The menu tree for the Solu Comp Xmt-A-HT is on the following page.
Measurement type
Oxygen
Ozone >>
units?
ppm
%sat ppb >>
units?
ppm
ppb
Application?
Water/Waste
>>
Manufacturer?
Rosemount
Other
Temperature in?
°C °
F
Temperature in?
°C °
F
pH Comp?
Auto
Manual
Manual pH
0
7.00 pH
Temperature in?
°C °
F
Temperature in?
°C °
F
1. Refer to Section 2.0 for installation instructions.
2. Wire sensors to the analyzer. See section 3.0.
3. Once connections are secure and verified, apply power to the transmitter.
4. When the transmitter is powered up for the first time, Quick Start screens appear. Using Quick Start is easy.
a. A blinking field shows the position of the cursor.
b. Use the t or u key to move the cursor left or right. Use the p or q key to move the cursor up or down or to increase or
decrease the value of a digit. Use the p or q key to move the decimal point.
c. Press ENTER to store a setting. Press EXIT to leave without storing changes. Pressing EXIT also returns the display to the
previous screen.
QUICK START GUIDE
FOR MODEL SOLU COMP Xmt-A-HT TRANSMITTER
English
Français
Español >>
Page 4
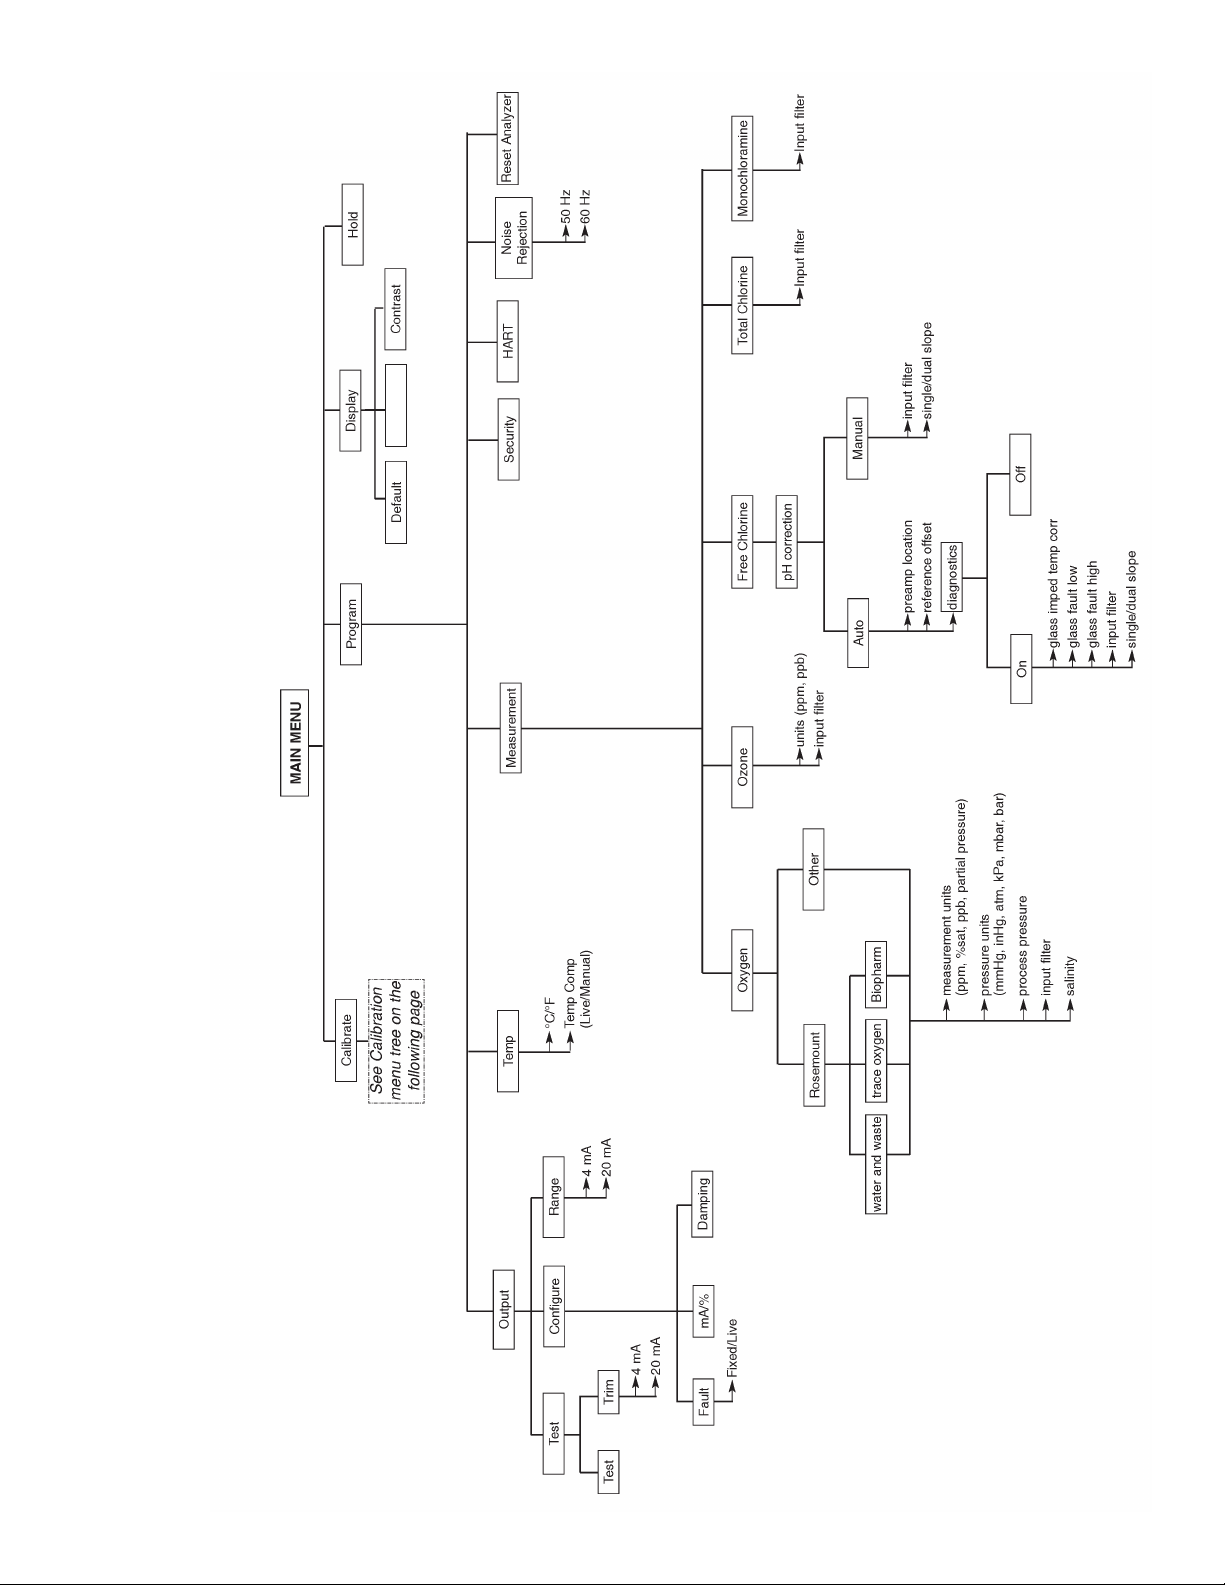
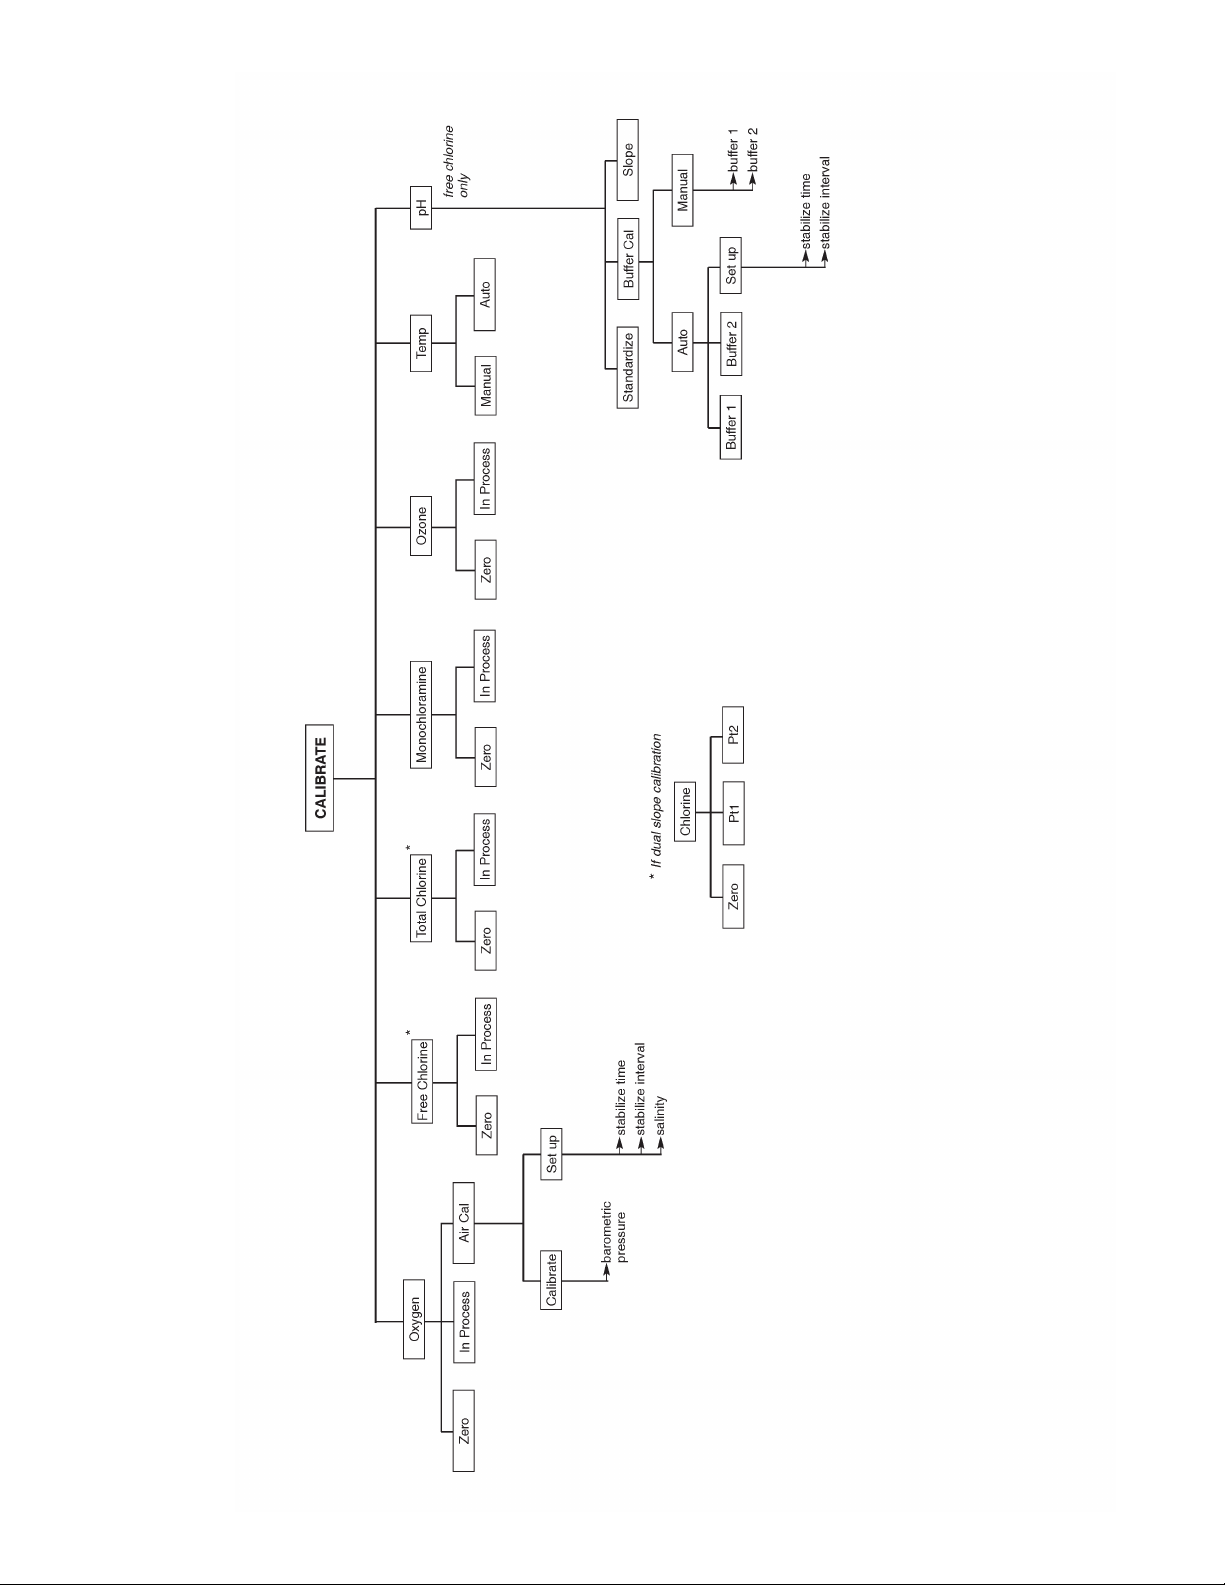
QUICK START GUIDE
MENU TREE FOR MODEL SOLU COMP Xmt-A-HT TRANSMITTER
Language
Page 5
Page 6

i
MODEL XMT-A-HT TABLE OF CONTENTS
MODEL XMT-A-HT MICROPROCESSOR TRANSMITTER
TABLE OF CONTENTS
Section Title Page
1.0 DESCRIPTION AND SPECIFICATIONS ................................................................ 1
1.1 Features and Applications........................................................................................ 1
1.2 Specifications - General........................................................................................... 2
1.3 Specifications - Oxygen ........................................................................................... 4
1.4 Specifications - Free Chlorine.................................................................................. 4
1.5 Specifications - Total Chlorine.................................................................................. 4
1.6 Specifications - Monochloramine ............................................................................. 4
1.7 Specifications - Ozone ............................................................................................ 4
1.8 Transmitter Display During Calibration and Programming ...................................... 5
1.9 HART Communication ............................................................................................. 5
1.10 Ordering Information ............................................................................................... 6
1.11 Accessories ............................................................................................................. 6
2.0 INSTALLATION ....................................................................................................... 7
2.1 Unpacking and Inspection........................................................................................ 7
2.2 Installation................................................................................................................ 7
2.3 Power Supply/Current Loop..................................................................................... 11
3.0 SENSOR WIRING ................................................................................................... 14
3.1 Wiring Model 499A Oxygen, Chlorine, Monochloramine, and Ozone Sensors........ 14
3.2 Wiring Model 499ACL-01 (Free Chlorine) Sensors and pH Sensors....................... 15
3.3 Wiring Model Hx438, Gx448, and Bx438 Sensors................................................... 18
4.0 INTRINSICALLY SAFE AND EXPLOSION PROOF INSTALLATIONS.................. 19
5.0 DISPLAY AND OPERATION ................................................................................... 28
5.1 Display ..................................................................................................................... 28
5.2 Keypad..................................................................................................................... 28
5.3 Programming and Calibrating the Model Xmt — Tutorial......................................... 29
5.4 Security .................................................................................................................... 30
5.5 Using Hold ............................................................................................................... 30
6.0 OPERATION WITH MODEL 375............................................................................. 31
6.1 Note on Model 375 HART Communicator................................................................ 31
6.2 Connecting the HART Communicator...................................................................... 31
6.3 Operation ................................................................................................................. 32
7.0 PROGRAMMING..................................................................................................... 37
7.1 General .................................................................................................................... 37
7.2 Changing Start-up Settings...................................................................................... 37
7.3 Configuring and Ranging the Output ....................................................................... 39
7.4 Choosing and Configuring the Analytical Measurement .......................................... 42
7.5 Making Temperature Settings .................................................................................. 46
7.6 Setting a Security Code ........................................................................................... 47
7.7 Making HART-Related Settings ............................................................................... 48
7.8 Noise Reduction....................................................................................................... 48
7.9 Resetting Factory Calibration and Factory Default Settings .................................... 48
7.10 Selecting a Default Screen and Screen Contrast .................................................... 49
Page 7

MODEL XMT-A-HT TABLE OF CONTENTS
TABLE OF CONTENTS CONT’D
Section Title Page
8.0 CALIBRATION — TEMPERATURE ........................................................................ 50
8.1 Introduction .............................................................................................................. 50
8.2 Procedure — Calibrating Temperature .................................................................... 51
9.0 CALIBRATION — DISSOLVED OXYGEN .............................................................. 52
9.1 Introduction .............................................................................................................. 52
9.2 Procedure — Zeroing the Sensor ............................................................................ 53
9.3 Procedure — Calibrating the Sensor in Air .............................................................. 54
9.4 Procedure — Calibrating the Sensor Against a Standard Instrument ...................... 56
10.0 CALIBRATION — FREE CHLORINE ..................................................................... 57
10.1 Introduction .............................................................................................................. 57
10.2 Procedure — Zeroing the Sensor ............................................................................ 58
10.3 Procedure — Full Scale Calibration......................................................................... 59
10.4 Dual Slope Calibration ............................................................................................. 60
11.0 CALIBRATION — TOTAL CHLORINE ................................................................... 62
11.1 Introduction .............................................................................................................. 62
11.2 Procedure — Zeroing the Sensor ............................................................................ 63
11.3 Procedure — Full Scale Calibration......................................................................... 64
11.4 Dual Slope Calibration ............................................................................................. 65
12.0 CALIBRATION — MONOCHLORAMINE ............................................................... 67
12.1 Introduction .............................................................................................................. 67
12.2 Procedure — Zeroing the Sensor ............................................................................ 68
12.3 Procedure — Full Scale Calibration......................................................................... 69
13.0 CALIBRATION — OZONE ...................................................................................... 70
13.1 Introduction .............................................................................................................. 70
13.2 Procedure — Zeroing the Sensor ............................................................................ 71
13.3 Procedure — Full Scale Calibration......................................................................... 72
14.0 CALIBRATION — pH .............................................................................................. 73
14.1 Introduction .............................................................................................................. 73
14.2 Procedure — Auto Calibration ................................................................................. 74
14.3 Procedure — Manual Calibration............................................................................. 76
14.4 Procedure — Standardization.................................................................................. 77
14.5 Procedure — Entering a Known Slope Value .......................................................... 78
ii
Page 8

iii
MODEL XMT-A-HT TABLE OF CONTENTS
TABLE OF CONTENTS CONT’D
Section Title Page
15.0 TROUBLESHOOTING ........................................................................................... 79
15.1 Overview .................................................................................................................. 79
15.2 Troubleshooting When a Fault or Warning Message is Showing ............................ 80
15.3 Troubleshooting When No Fault Message is Showing — Temperature................... 82
15.4 Troubleshooting When No Fault Message is Showing — Oxygen .......................... 83
15.5 Troubleshooting When No Fault Message is Showing — Free Chlorine................. 86
15.6 Troubleshooting When No Fault Message is Showing — Total Chlorine................. 88
15.7 Troubleshooting When No Fault Message is Showing — Monochloramine ............ 89
15.8 Troubleshooting When No Fault Message is Showing — Ozone ............................ 92
15.9 Troubleshooting When No Fault Message is Showing — pH .................................. 94
15.10 Troubleshooting Not Related to Measurement Problems ........................................ 97
15.11 Simulating Input Currents — Dissolved Oxygen...................................................... 97
15.12 Simulating Input Currents — Chlorine and Ozone ................................................... 98
15.13 Simulating Inputs — pH ........................................................................................... 99
15.14 Simulating Temperature........................................................................................... 100
15.15 Measuring Reference Voltage.................................................................................. 101
16.0 MAINTENANCE ...................................................................................................... 102
17.0 RETURN OF MATERIAL......................................................................................... 103
Appendix Title Page
A BAROMETRIC PRESSURE AS A FUNCTION OF ALTITUDE............................... 104
LIST OF TABLES
Number Title Page
7-1 Default Settings ....................................................................................................... 38
Page 9

iv
MODEL XMT-A-HT TABLE OF CONTENTS
LIST OF FIGURES
Number Title Page
1-1 HART Communication.............................................................................................. 5
2-1 Removing the Knockouts ......................................................................................... 7
2-2 Panel Mount Installation ........................................................................................... 8
2-3 Pipe Mount Installation ............................................................................................. 9
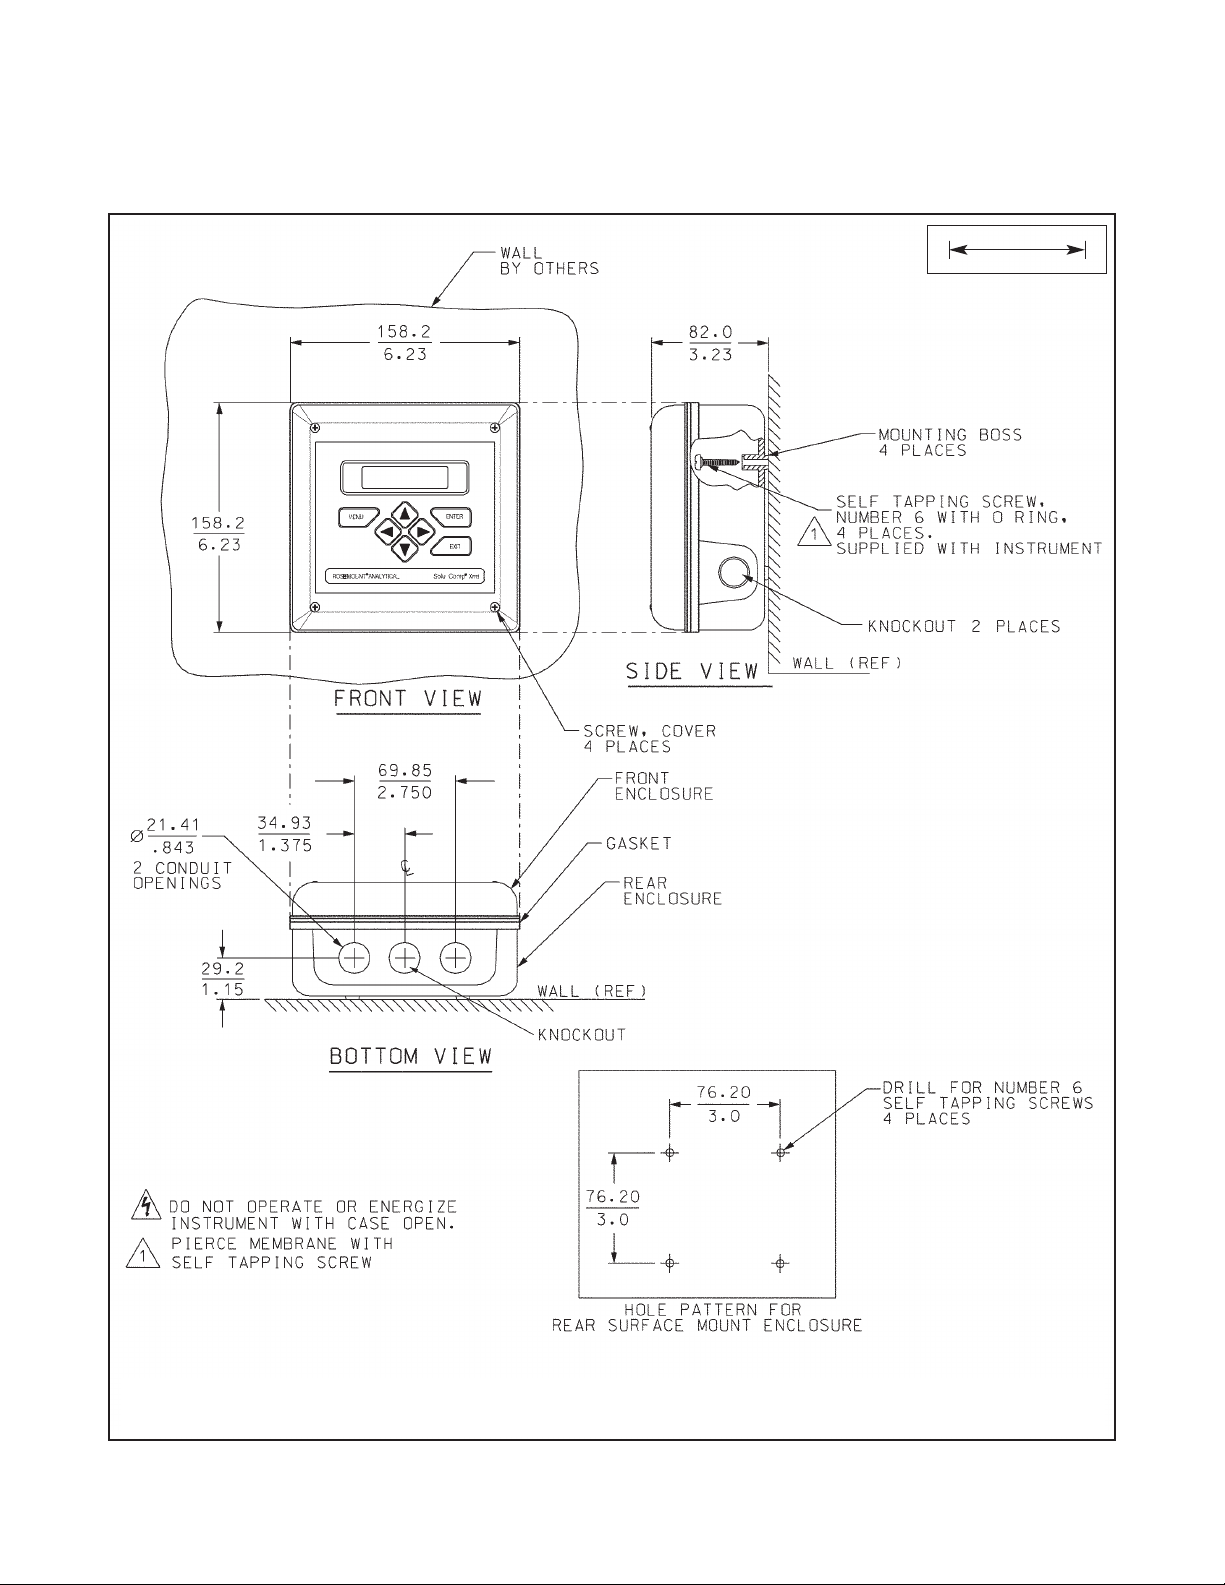
2-4 Surface Mount Installation........................................................................................ 10
2-5 Load/Power Supply Requirements........................................................................... 11
2-6 Power Supply/Current Loop Wiring .......................................................................... 12
2-7 Power & Sensor Wiring Terminals and Wiring Label for Xmt-A-HT Panel Mount ... 12
2-8 Power & Sensor Wiring Terminals and Wiring Label for Xmt-A-HT Pipe/Surface Mount 13
3-1 Xmt-A-HT panel mount; 499A sensors with standard cable .................................... 14
3-2 Xmt-A-HT panel mount; 499A sensors with optimum EMI/RFI cable or Variopol cable 14
3-3 Xmt-A-HT wall/pipe mount; 499A sensors with standard cable............................... 14
3-4 Xmt-A-HT wall/pipe mount; 499A sensors with optimum EMI/RFI cable or ...........
Variopol cable .................................................................................................... 14
3-5 Xmt-A-HT panel mount; free chlorine sensor with standard cable and 399-09-62 .
pH sensor .................................................................................................... 15
3-6 Xmt-A-HT panel mount; free chlorine sensor with standard cable and 399-VP-09
pH sensor .................................................................................................... 15
3-7 Xmt-A-HT panel mount; free chlorine sensor with standard cable and 399-14 pH
sensor .................................................................................................... 16
3-8 Xmt-A-HT panel mount; free chlorine sensor with optimum EMI/RFI cable or ......
Variopol cable and 399-09-62 pH sensor................................................................. 16
3-9 Xmt-A-HT panel mount; free chlorine sensor with optimum EMI/RFI cable or ......
Variopol cable and 399-VP-09 pH sensor................................................................ 16
3-10 Xmt-A-HT panel mount; free chlorine sensor with optimum EMI/RFI cable or ......
Variopol cable and 399-14 pH sensor...................................................................... 17
3-11 Xmt-A-HT wall/pipe mount; free chlorine sensor with standard cable and 399-09-62
pH sensor .................................................................................................... 17
3-12 Xmt-A-HT wall/pipe mount; free chlorine sensor with standard cable and .............
399-VP-09pH sensor................................................................................................ 17
3-13 Xmt-A-HT wall/pipe mount; free chlorine sensor with standard cable and 399-14 .
pH sensor .................................................................................................... 17
3-14 Xmt-A-HT wall/pipe mount; free chlorine sensor with optimum EMI/RFI cable or
Variopol cable and 399-09-62 pH sensor................................................................. 17
3-15 Xmt-A-HT wall/pipe mount; free chlorine sensor with optimum EMI/RFI cable or
Variopol cable and 399-VP-09 pH sensor................................................................ 18
3-16 Xmt-A-HT wall/pipe mount; free chlorine sensor with optimum EMI/RFI cable or
Variopol cable and 399-14 pH sensor...................................................................... 18
3-17 Xmt-A-HT panel mount with Hx438 or Gx448 sensor.............................................. 18
3-18 Xmt-A-HT wall/pipe mount with Hx438 or Gx448 sensor ........................................ 18
3-19 Wiring Model Bx438 to Xmt-A-HT-10....................................................................... 18
3-20 Wiring Model Bx438 to Xmt-A-HT-11 ....................................................................... 18
4-1 FM Intrinsically Safe Installation Label..................................................................... 19
4-2 FM Intrinsically Safe Installation Wiring ................................................................... 20
4-3 CSA Intrinsically Safe Installation Label................................................................... 22
4-4 CSA Intrinsically Safe Installation Wiring ................................................................. 23
Page 10

About This Document
This manual contains instructions for installation and operation of the Model Solu Comp Xmt-A-HT Dissolved
Oxygen, Chlorine, and Ozone Transmitter.
The following list provides notes concerning all revisions of this document.
Rev. Level Date Notes
A 9/03 This is the initial release of the product manual.
B 12/03 Added note to troubleshooting, p. 70.
C 9/04 Added agency wiring drawings.
D 11/04 Updated mounting drawings.
E 4/05 Revised panel mount drawing.
F 9/05 Added Foundation fieldbus agency approvals and FISCO version.
G 2/06 Revised section 1.0, p. 1, and substituted standard text on 1.2, p.2.
H 6/06 Revised Quick Start choices adding language as #5. Added Language
box to Quick start guide on page D. Deleted 230A in accessories chart on page 5.
I 10/08 Addition of Hazardous Location Approvals.
J 05/10 Include EC Certificates on page 107
K 03/12 Update addresses - mail and web and DNV certificate logo
MODEL XMT-A-HT TABLE OF CONTENTS
LIST OF FIGURES (continued)
Number Title Page
4-5 Baseefa/ATEX Intrinsically Safe Installation Label................................................... 25
4-6 Baseefa/ATEX Intrinsically Safe Installation Wiring ................................................. 26
5-1 Displays During Normal Operation........................................................................... 28
5-2 Solu Comp II Keypad ............................................................................................... 28
6-1 Connecting the HART Communicator ...................................................................... 31
6-2 Xmt-A-HT HART/Model 275 Menu Tree .................................................................. 33
9-1 Sensor Current as a Function of Dissolved Oxygen Concentration ........................ 52
10-1 Sensor Current as a Function of Free Chlorine Concentration ............................... 57
10-2 Dual Slope Calibration ............................................................................................. 60
11-1 Determination of Total Chlorine................................................................................ 62
11-2 Sensor Current as a Function of Total Chlorine Concentration ............................... 62
11-3 Dual Slope Calibration ............................................................................................. 65
12-1 Sensor Current as a Function of Monochloramine Concentration........................... 67
13-1 Sensor Current as a Function of Ozone Concentration........................................... 70
14-1 Calibration Slope and Offset .................................................................................... 72
15-1 Simulate dissolved oxygen....................................................................................... 97
15-2 Simulate chlorine and ozone.................................................................................... 98
15-3 Simulate pH.............................................................................................................. 99
15-4 Three-wire RTD Configuration ................................................................................. 100
15-5 Simulating RTD Inputs ............................................................................................. 100
15-6 Checking for a Poisoned Reference Electrode........................................................ 101
16-1 Exploded View of Model Xmt-A-HT Transmitter ...................................................... 102
v
Page 11
1
MODEL XMT-A-HT SECTION 1.0
DESCRIPTION AND SPECIFICATIONS
SECTION 1.0
DESCRIPTION AND SPECIFICATIONS
Xmt Family of Two-wire Transmitters
• CHOICE OF COMMUNICATION PROTOCOLS:
HART
®
or FOUNDATION®Fieldbus
• CLEAR, EASY-TO-READ two-line display shows commissioning menus
and process measurement displays in English
• SIMPLE TO USE MENU STRUCTURE
• CHOICE OF PANEL OR PIPE/SURFACE MOUNTING
• NON-VOLATILE MEMORY retains program settings and calibration
data during power failures
• SIX LOCAL LANGUAGES - English, French, German, Italian, Spanish and Portuguese
1.1 FEATURES AND APPLICATIONS
The Solu Comp Xmt family of transmitters can be used to
measure pH, ORP, conductivity (using either contacting or
toroidal sensors), resistivity, oxygen (ppm and ppb level),
free chlorine, total chlorine, monochloramine and ozone in
a variety of process liquids. The Xmt is compatible with
most Rosemount Analytical sensors. See the Specification
sections for details.
The transmitter has a rugged, weatherproof, corrosionresistant enclosure (NEMA 4X and IP65). The panel mount
version fits standard ½ DIN panel cutouts, and its shallow
depth is ideally suited for easy mounting in cabinet-type
enclosures. A panel mount gasket is included to maintain
the weather rating of the panel. Surface/pipe mount enclosure includes self-tapping screws for surface mounting. A
pipe mounting accessory kit is available for mounting to a
2-inch pipe.
The transmitter has a two-line 16-character display. Menu
screens for calibrating and registering choices are simple
and intuitive. Plain language prompts guide the user
through the procedures. There are no service codes to
enter before gaining access to menus.
Two digital communication protocols are available: HART
(model option -HT) and F
OUNDATION fieldbus (model option
-FF or -FI). Digital communications allow access to AMS
(Asset Management Solutions). Use AMS to set up and
configure the transmitter, read process variables, and troubleshoot problems from a personal computer or host anywhere in the plant.
The seven-button membrane-type keypad allows local programming and calibrating of the transmitter. The HART
Model 375 communicator can also be used for programming and calibrating the transmitter.
The Model Xmt-A Transmitter with the appropriate sensor
measures dissolved oxygen (ppm and ppb level), free
chlorine, total chlorine, monochloramine, and ozone in
water and aqueous solutions. The transmitter is compatible with Rosemount Analytical 499A amperometric sensors for oxygen, chlorine, monochloramine, and ozone;
and with Hx438, Bx438, and Gx448 steam-sterilizable oxygen sensors.
For free chlorine measurements, both automatic and manual pH correction are available. pH correction is necessary
because amperometric free chlorine sensors respond only
to hypochlorous acid, not free chlorine, which is the sum of
hypochlorous acid and hypochlorite ion. To measure free
chlorine, most competing instruments require an acidified
sample. Acid lowers the pH and converts hypochlorite ion
to hypochlorous acid. The Model Xmt-A eliminates the
need for messy and expensive sample conditioning by
measuring the sample pH and using it to correct the chlorine sensor signal. If the pH is relatively constant, a fixed
pH correction can be used, and the pH measurement is
not necessary. If the pH is greater than 7.0 and fluctuates
more than about 0.2 units, continuous measurement of pH
and automatic pH correction is necessary. See
Specifications section for recommended pH sensors.
Corrections are valid to pH 9.5.
The transmitter fully compensates oxygen, ozone, free
chlorine, total chlorine, and monochloramine readings for
changes in membrane permeability caused by temperature changes.
For pH measurements — pH is available with free chlorine
only — the Xmt-A features automatic buffer recognition
and stabilization check. Buffer pH and temperature data
for commonly used buffers are stored in the transmitter.
Glass impedance diagnostics warn the user of an aging or
failed pH sensor.
Page 12
2
MODEL XMT-A-HT SECTION 1.0
DESCRIPTION AND SPECIFICATIONS
1.2 SPECIFICATIONS - GENERAL
Case: ABS (panel mount), polycarbonate (pipe/wall mount);
NEMA 4X/CSA 4 (IP65)
Dimensions
Panel (code -10): 6.10 x 6.10 x 3.72 in. (155 x 155 x
94.5 mm)
Surface/Pipe (code -11): 6.23 x 6.23 x 3.23 in. (158
x 158 x 82 mm); see page 5 for dimensions of pipe
mounting bracket.
Conduit openings: Accepts PG13.5 or 1/2 in. conduit fit-
tings
Ambient Temperature: 32 to 122°F (0 to 50°C). Some
degradation of display above 50°C.
Storage Temperature: -4 to 158°F (-20 to 70°C)
Relative Humidity: 10 to 90% (non-condensing)
Weight/Shipping Weight: 10 lb/10 lb (4.5/5.0 kg)
Display: Two line, 16-character display. Character height:
4.8 mm; first line shows process variable (oxygen,
ozone, free chlorine, total chlorine, or monochloramine), second line shows process temperature and
output current. For pH/chlorine combination, pH may
also be displayed. Fault and warning messages,
when triggered, alternate with temperature and output
readings.
During calibration and programming, messages,
prompts, and editable values appear in the two-line
display.
Temperature resolution: 0.1°C (≤99.9°C);
1°C (≥100°C)
Input ranges: 0-330 nA, 0.3-4µA, 3.7-30 µA, 27-100 µA
Repeatability (input): ±0.1% of range
Linearity (input): ±0.3% of range
Temperature range: 0-100°C (0-150°C for steam steriliz-
able sensors)
Temperature accuracy using RTD: ±0.5°C between 0
and 50°C, ±1°C above 50°C
Temperature accuracy using 22k NTC: ±0.5°C between
0 and 50°C, ±2°C above 50°C
HART Communications: PV, SV, TV, and 4V assignable
to measurement (oxygen, ozone, or chlorine), temperature, pH, and sensor current.
RFI/EMI: EN-61326
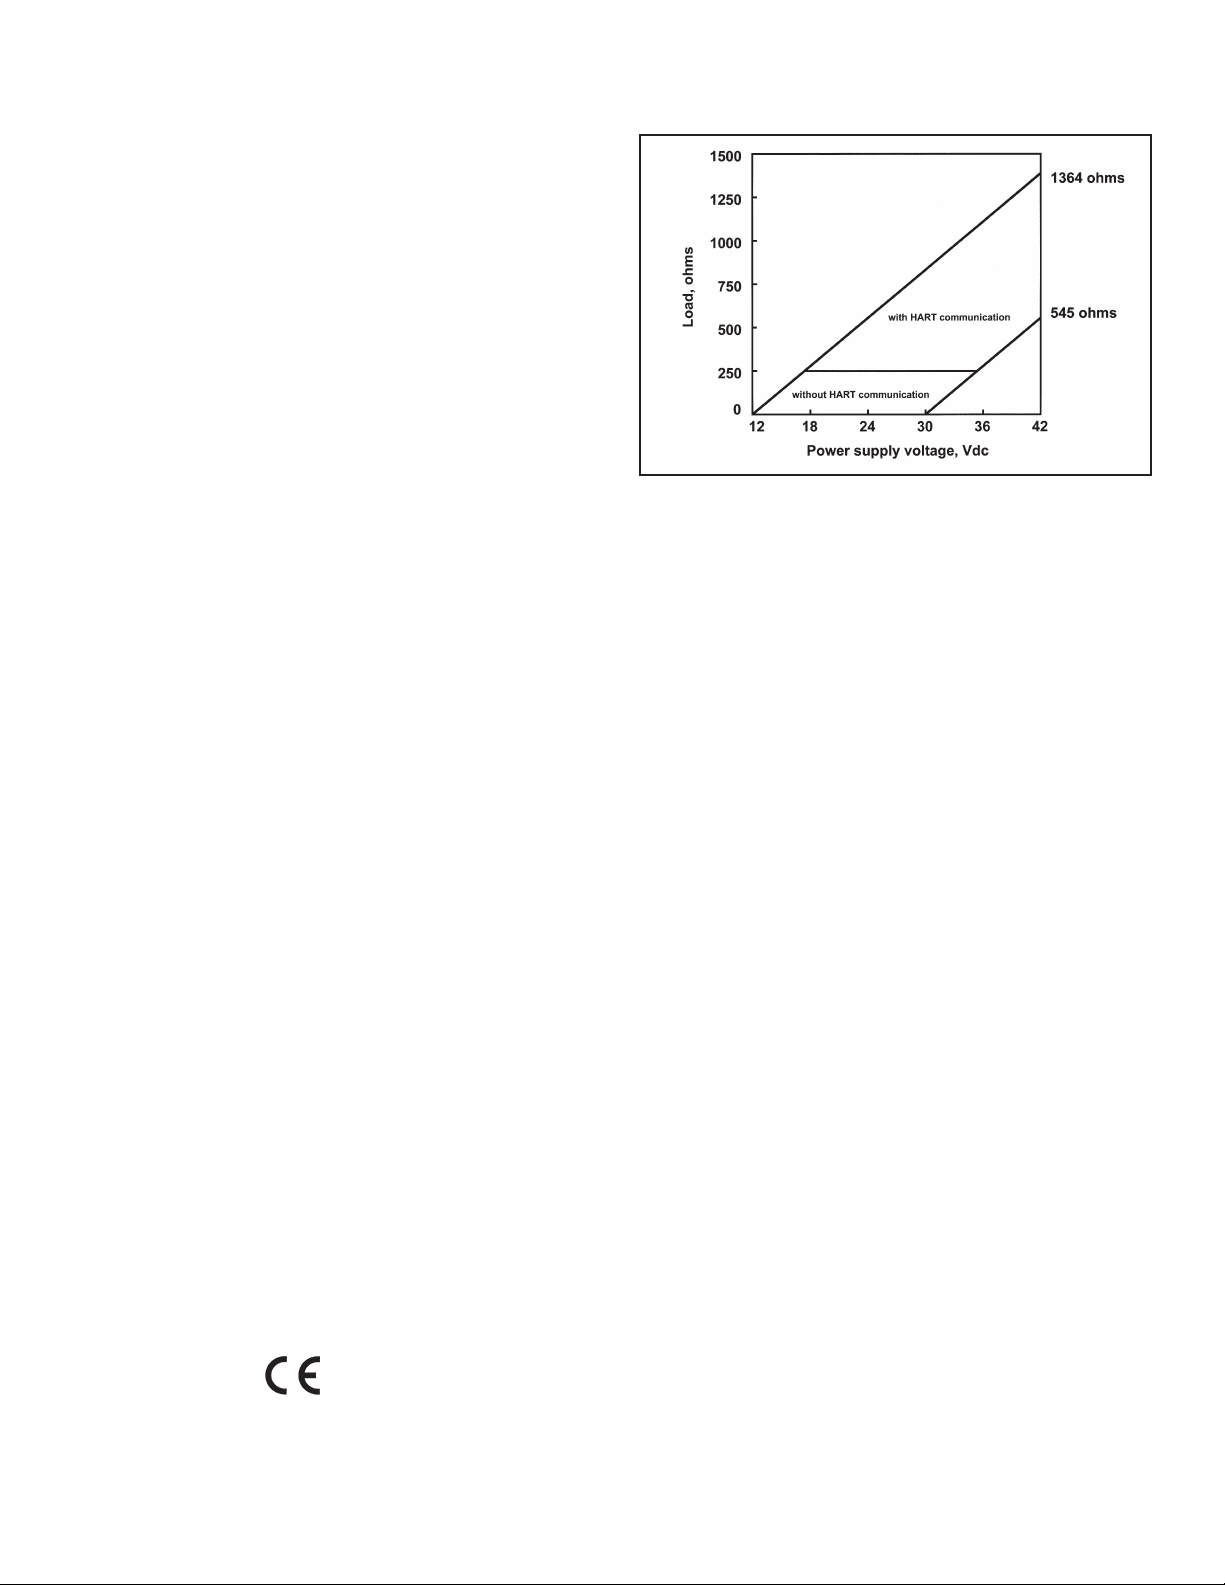
Power & Load Requirements: Supply voltage at the
transmitter terminals should be at least 12 Vdc.
Power supply voltage should cover the voltage drop
on the cable plus the external load resistor required
for HART communications (250 Ω minimum).
Minimum power supply voltage is 12 Vdc. Maximum
power supply voltage is 42.4 Vdc (30 Vdc for intrinsically safe operation). The graph shows the supply
voltage required to maintain 12 Vdc (upper line) and
30 Vdc (lower line) at the transmitter terminals when
the current is 22 mA.
Analog Output: Two-wire, 4-20 mA output with superim-
posed HART digital signal. Fully scalable over the
operating range of the sensor.
Output accuracy: ±0.05 mA
Page 13
3
MODEL XMT-A-HT SECTION 1.0
DESCRIPTION AND SPECIFICATIONS
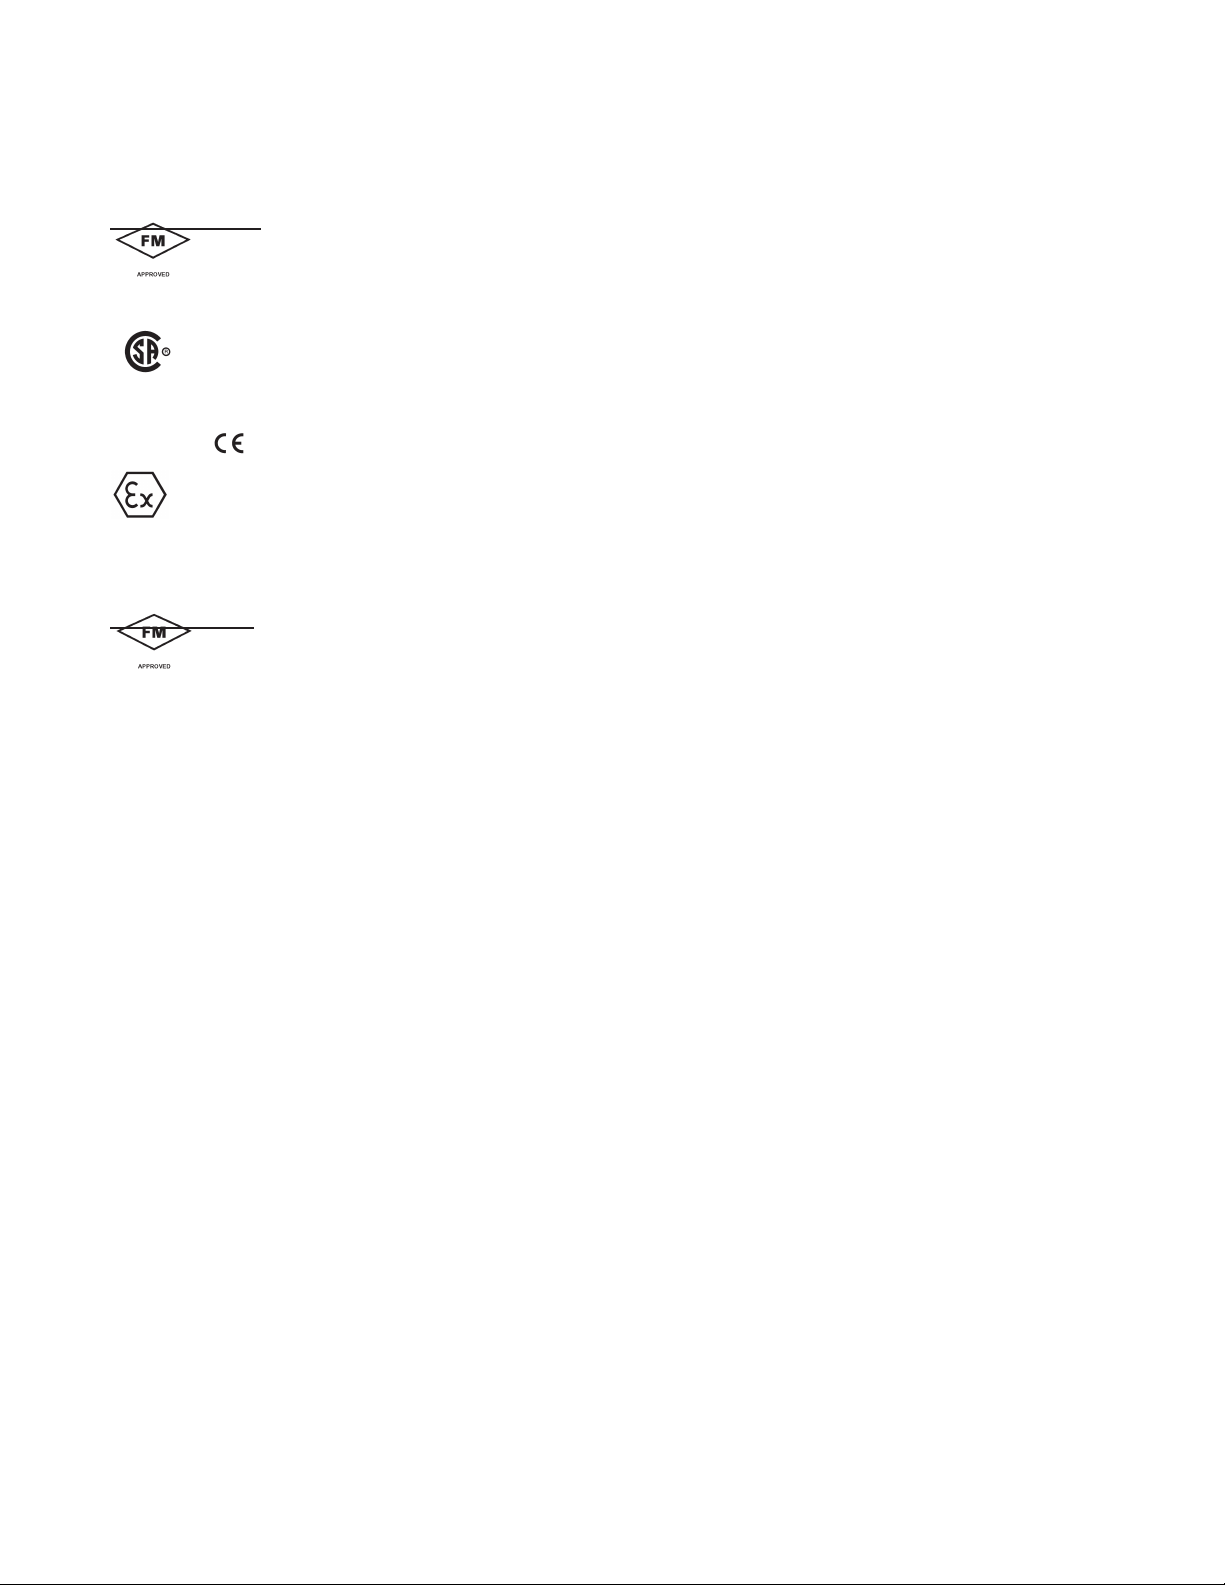
HAZARDOUS LOCATION APPROVALS
Intrinsic Safety:
Class I, II, III, Div. 1
Groups A-G
T4 Tamb = 50°C
Class I, II, III, Div. 1
Groups A-G
T4 Tamb = 50°C
1180 II 1 G
Baseefa04ATEX0213X
EEx ia IIC T4
Tamb = 0°C to 50°C
Non-Incendive:
Class I, Div. 2, Groups A-D
Dust Ignition Proof
Class II & III, Div. 1, Groups E-G
NEMA 4/4X Enclosure
Class I, Div. 2, Groups A-D
Dust Ignition Proof
Class II & III, Div. 1, Groups E-G
NEMA 4/4X Enclosure
T4 Tamb = 50°C
ATEX
Page 14

4
MODEL XMT-A-HT SECTION 1.0
DESCRIPTION AND SPECIFICATIONS
1.3 SPECIFICATIONS — OXYGEN
Measurement Range: 0-20 ppm (mg/L),
or equivalent partial pressure or % saturation
(limited by sensor)
Units: ppm, ppb, % saturation, partial pressure (mmHg,
inHg, atm, mbar, bar, kPa)
Resolution: 4 digits. Position of decimal point depends
on units selected
for partial pressure (x.xxx to xxxx)
for % saturation (fixed at xxx.x%)
for ppm (fixed at xx.xx ppm)
for ppb (fixed at xxx.x ppb, changes to 1.00 ppm
when ppb reading exceeds 999.9 ppb)
Temperature correction for membrane permeability:
automatic between 0 and 50°C (can be disabled)
Calibration: air calibration (user must enter barometric
pressure) or calibration against a standard instrument
SENSORS — OXYGEN:
Model 499A DO-54, 499A DO-54-VP for ppm level
Model 499A TrDO-54, 499A TrDO-54-VP for ppb level
Hx438, Gx448, and Bx438 steam-sterilizable oxygen
sensors
1.4 SPECIFICATIONS — FREE CHLORINE
Measurement Range: 0-20 ppm (mg/L) as Cl
2
(limited by sensor)
Resolution: 0.001 ppm (Autoranges at 0.999 to 1.00 and
9.99 to 10.0)
Temperature correction for membrane permeability:
automatic between 0 and 50°C (can be disabled)
pH Correction: Automatic between pH 6.0 and 9.5.
Manual pH correction is also available.
Calibration: against grab sample analyzed using portable
test kit.
SENSOR — FREE CHLORINE:
Model 499A CL-01-54, 499A CL-01-54-VP
SPECIFICATIONS — pH
Application: pH measurement available with free chlo-
rine only
Measurement Range: 0-14 pH
Resolution: 0.01 pH
Sensor Diagnostics: Glass impedance (for broken or
aging electrode) and reference offset. Reference impedance (for fouled reference junction) is not available.
Repeatability: ±0.01 pH at 25°C
SENSORS — pH:
Use Model 399-09-62, 399-14, or 399VP-09.
See pH sensor product data sheet for complete ordering
information.
1.5 SPECIFICATIONS — TOTAL CHLORINE
Measurement Range: 0-20 ppm (mg/L) as Cl
2
(limited by sensor)
Resolution: 0.001 ppm (Autoranges at 0.999 to 1.00 and
9.99 to 10.0)
Temperature correction for membrane permeability:
automatic between 5 and 35°C (can be disabled)
Calibration: against grab sample analyzed using portable
test kit.
SENSOR — TOTAL CHLORINE:
Model 499A CL-02-54 (must be used with SCS 921)
1.6 SPECIFICATIONS — MONOCHLORAMINE
Measurement Range: 0-20 ppm (mg/L) as Cl
2
(limited by sensor)
Resolution: 0.001 ppm (Autoranges at 0.999 to 1.00 and
9.99 to 10.0)
Temperature correction for membrane permeability:
automatic between 5 and 35°C (can be disabled)
Calibration: against grab sample analyzed using portable
test kit.
SENSOR — MONOCHLORAMINE:
Model 499A CL-03-54, 499A CL-03-54-VP
1.7 SPECIFICATIONS — OZONE
Measurement Range: 0-10 ppm (mg/L) (limited by sensor)
Units: ppm and ppb
Resolution:
for ppm: x.xxx to xxxx
for ppb: xxx.x to xxxx
Temperature correction for membrane permeability:
automatic between 5 and 35°C (can be disabled)
Calibration: against grab sample analyzed using portable
test kit.
SENSOR — OZONE:
Model 499A OZ-54, 499A OZ-54-VP
Page 15

5
MODEL XMT-A-HT SECTION 1.0
DESCRIPTION AND SPECIFICATIONS
1.8 TRANSMITTER DISPLAY DURING CALIBRATION AND PROGRAMMING
The display can be readily configured to meet user requirements.
Basic display for all measurements:
For the measurement of oxygen, a variety of units are available: ppm, ppb (for 499ATrDO sensor only), % saturation,
and partial pressure (in units of mm Hg, in Hg, bar, mbar, atm, or kPa).
For chlorine measurements with continuous pH correction, the basic display also shows the pH.
A display showing the raw sensor current can also be selected.
1.9 HART COMMUNICATION (Figure 1-1)
The Model 375 HART Communicator is a hand-held device that provides a common link to all HART SMART instruments and allows access to AMS (Asset Management Solutions). Use the HART communicator to set up and control the
Xmt-A-HT and to read measured variables. Press ON to display the on-line menu. All setup menus are available through
this menu.
FIGURE 1-1. HART Communication
1.234ppm
25.0°C 12.34mA
1.234ppm
7.89pH 25.0°C
1.234ppm
25.0°C 500nA
Page 16
6
MODEL XMT-A-HT SECTION 1.0
DESCRIPTION AND SPECIFICATIONS
1.10 ORDERING INFORMATION
The Model Xmt-A-HT Transmitter is intended for the determination of oxygen (ppm and ppb level), free chlorine, total
chlorine, monochloramine, and ozone. For free chlorine measurements, which often require continuous pH correction, a
second input for a pH sensor is available.
ACCESSORIES
MODEL/PN DESCRIPTION
515 DC loop power supply (see product data sheet 71-515)
23820-00 2-in. pipe mounting kit
9240048-00 Stainless steel tag, specify marking
Model 375 To order HART Model 375 Communicator, call Emerson Process Management at (800) 999-9307
AMS software To order AMS software, call Emerson Process Management at (800) 999-9307
23554-00 Gland fittings PG 13.5, 5 per package
1.11 ACCESSORIES
POWER SUPPLY: Use the Model 515 Power Supply to
provide dc loop power to the transmitter. The Model 515
provides two isolated sources at 24Vdc and 200 mA each.
For more information refer to product data sheet 71-515.
ALARM MODULE: The Model 230A alarm Module
receives the 4-20 mA signal from the Xmt-A-HT transmitter and activates two alarm relays. High/high, low/low, and
high/low are available. Hysteresis (deadband) is also
adjustable. For more information, refer to product data
sheet 71-230A.
HART COMMUNICATOR: The Model 375 HART communicator allows the user to view measurement values as
well as to program and configure the transmitter. The
Model 375 attaches to any wiring terminal across the output loop. A minimum 250 Ω load must be between the
power supply and transmitter. Order the Model 375 communicator from Emerson Process Management. Call
(800) 999-9307.
CODE REQUIRED SELECTION
HT Analog 4-20 mA output with superimposed HART digital signal
FF Foundation fieldbus digital output
FI Foundation fieldbus digital output with FISCO
CODE REQUIRED SELECTION
10 Panel mounting enclosure
11 Pipe/Surface mounting enclosure (pipe mounting requires accessory kit PN 23820-00)
CODE AGENCY APPROVALS
60 No approval
67 FM approved intrinsically safe and non-incendive (when used with appropriate sensor and safety barrier)
69 CSA approved intrinsically safe and non-incendive (when used with appropriate sensor and safety barrier)
73 ATEX approved intrinsically safe (when used with appropriate sensor and safety barrier)
CODE REQUIRED SELECTION
P pH/ORP
MODEL
Xmt SMART TWO-WIRE MICROPROCESSOR TRANSMITTER
Xmt-P-HT-10-67 EXAMPLE
Page 17
7
MODEL XMT-A-HT SECTION 2.0
INSTALLATION
SECTION 2.0
INSTALLATION
Type of Mounting Section
Panel 2.2.2
Pipe 2.2.3
Surface 2.2.4
2.1 UNPACKING AND INSPECTION
Inspect the shipping container. If it is damaged, contact the shipper immediately for instructions. Save the box. If
there is no apparent damage, unpack the container. Be sure all items shown on the packing list are present. If
items are missing, notify Emerson Process Management immediately.
2.2 INSTALLATION
2.2.1 General Information
1. Although the transmitter is suitable for outdoor use, do not install it in direct sunlight or in areas of extreme
temperatures.
2. Install the transmitter in an area where vibrations and electromagnetic and radio frequency interference are
minimized or absent.
3. Keep the transmitter and sensor wiring at least one foot from high voltage conductors. Be sure there is easy
access to the transmitter.
4. The transmitter is suitable for panel, pipe, or surface mounting. Refer to the table below.
5. The transmitter case has two 1/2-inch (PG13.5) conduit openings and four 1/2-inch knockouts. One conduit
opening is for the power/output cable; the other opening is for the sensor cable. The center knockout in the
bottom of the enclosure should be removed only if a second sensor is required, i.e., if free chlorine with continuous pH correction is being measured. (Note: Earlier versions of the Xmt-A-HT pipe/surface mount transmitters may have three openings in the bottom of the enclosure. The transmitter is shipped with a NEMA 4X
plug installed in the center opening.)
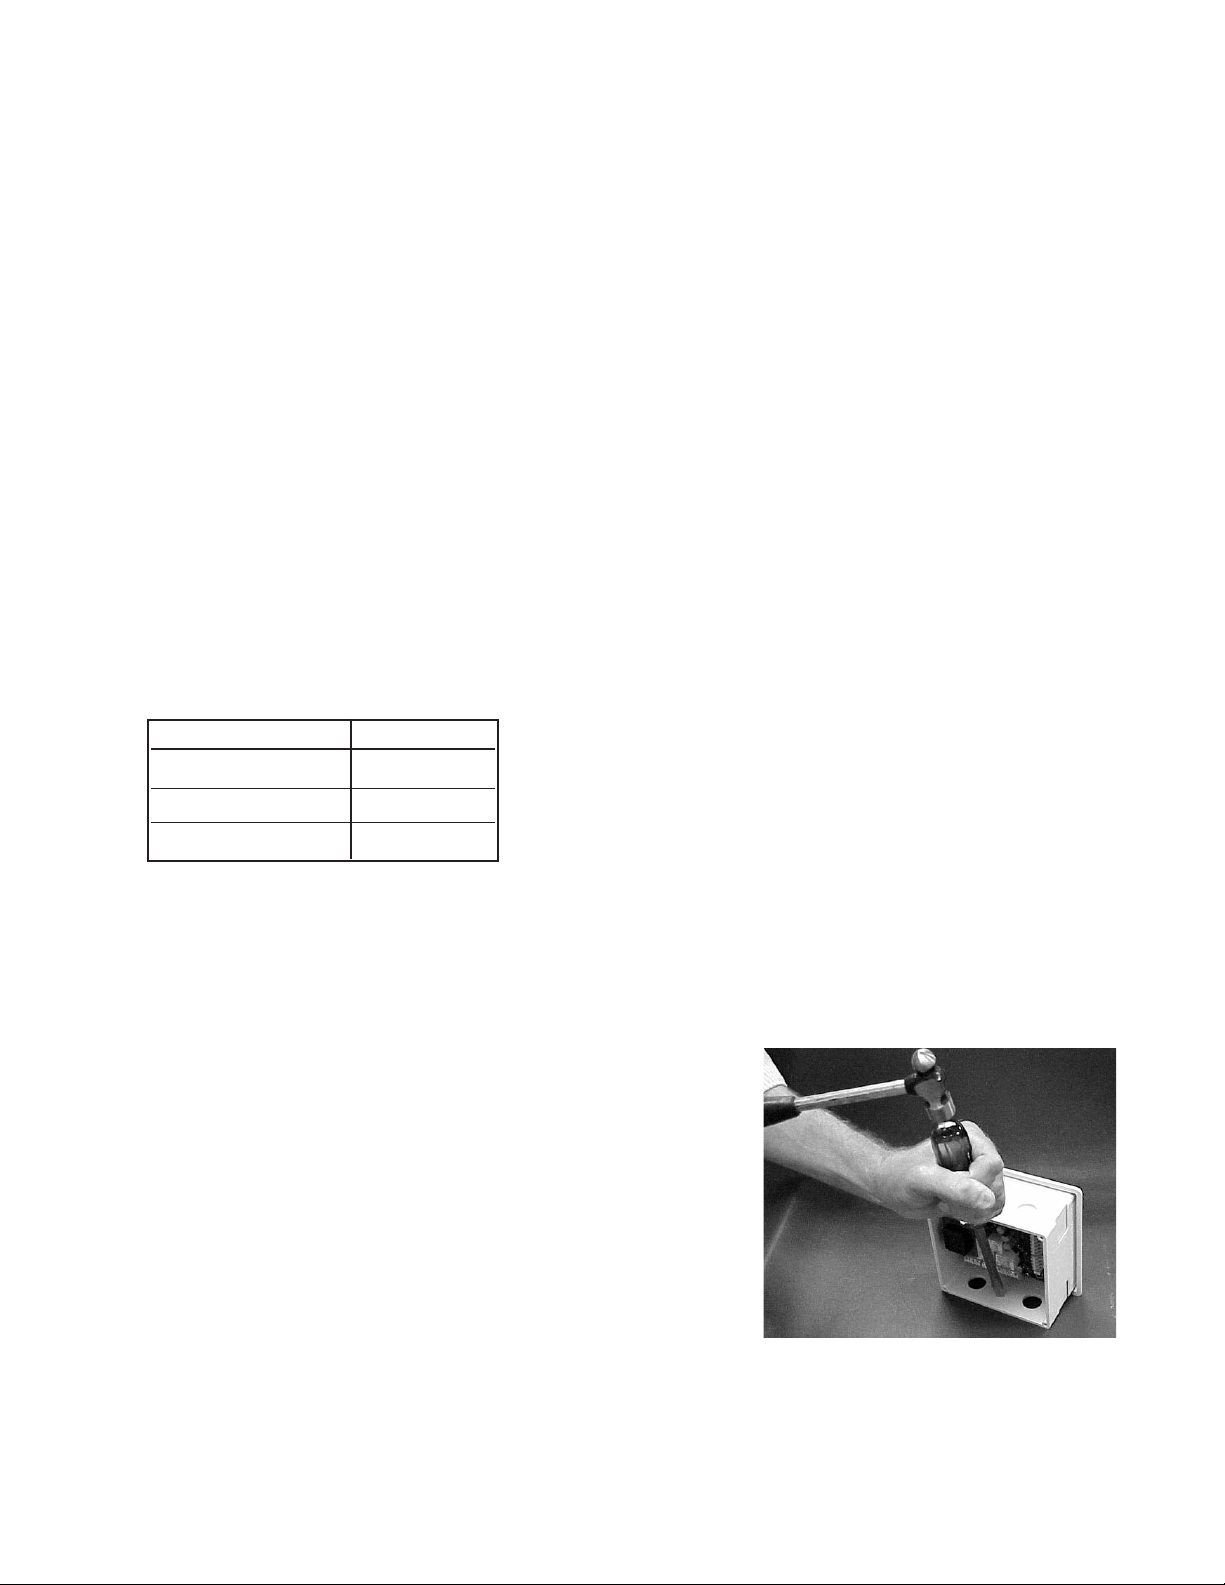
Figure 2-1 shows how to remove a knockout. The knockout grooves
are on the outside of the case. Place the screwdriver blade on the
inside of the case and align it approximately along the groove. Rap
the screwdriver sharply with a hammer until the groove cracks.
Move the screwdriver to an uncracked portion of the groove and
continue the process until the knockout falls out. Use a small knife
to remove the flash from the inside of the hole.
6. Use weathertight cable glands to keep moisture out to the transmitter. If conduit is used, plug and seal the connections at the transmitter housing to prevent moisture from getting inside the instrument.
7. To reduce the likelihood of stress on wiring connections, do not
remove the hinged front panel (-11 models) from the base during
wiring installation. Allow sufficient wire length to avoid stress on conductors.
FIGURE 2-1. Removing the Knockouts
Page 18
8
MODEL XMT-A-HT SECTION 2.0
INSTALLATION
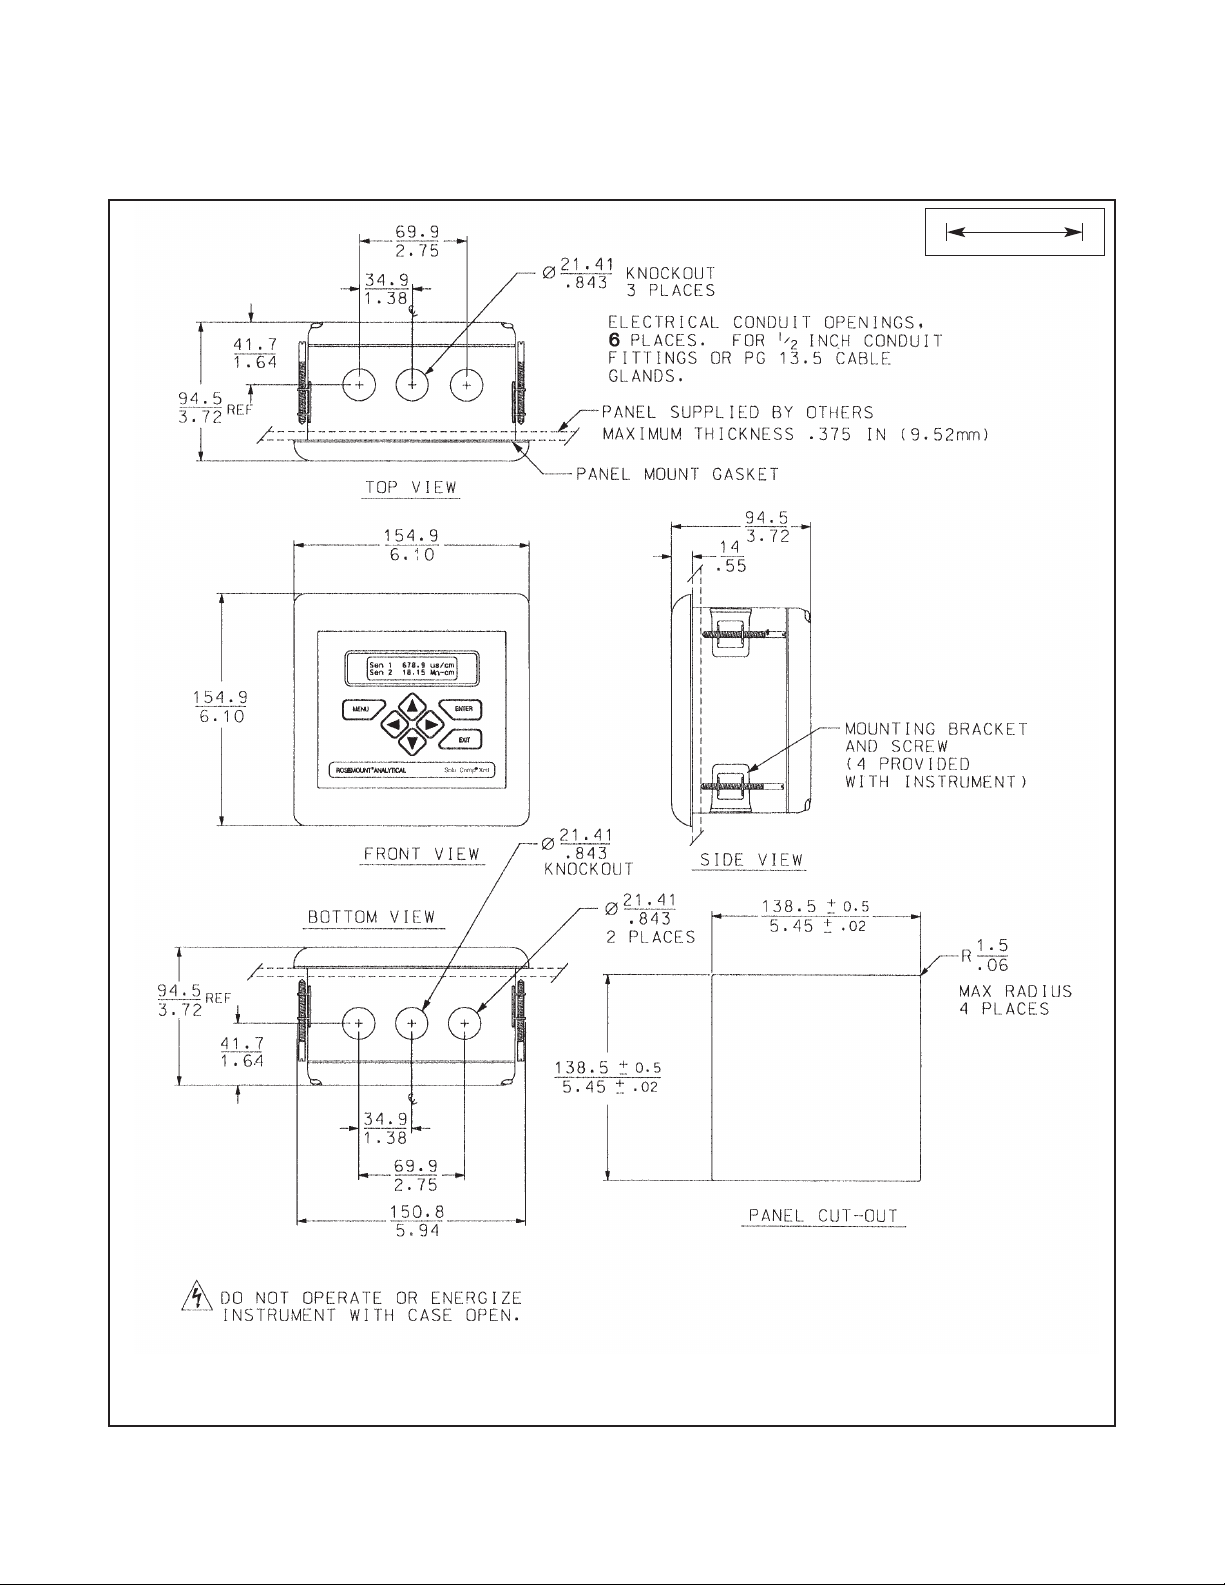
FIGURE 2-2. Panel Mount Installation
Access to the wiring terminals is through the rear cover. Four screws hold the cover in place.
2.2.2 Panel Mounting.
MILLIMETER
INCH
Page 19
9
MODEL XMT-A-HT SECTION 2.0
INSTALLATION
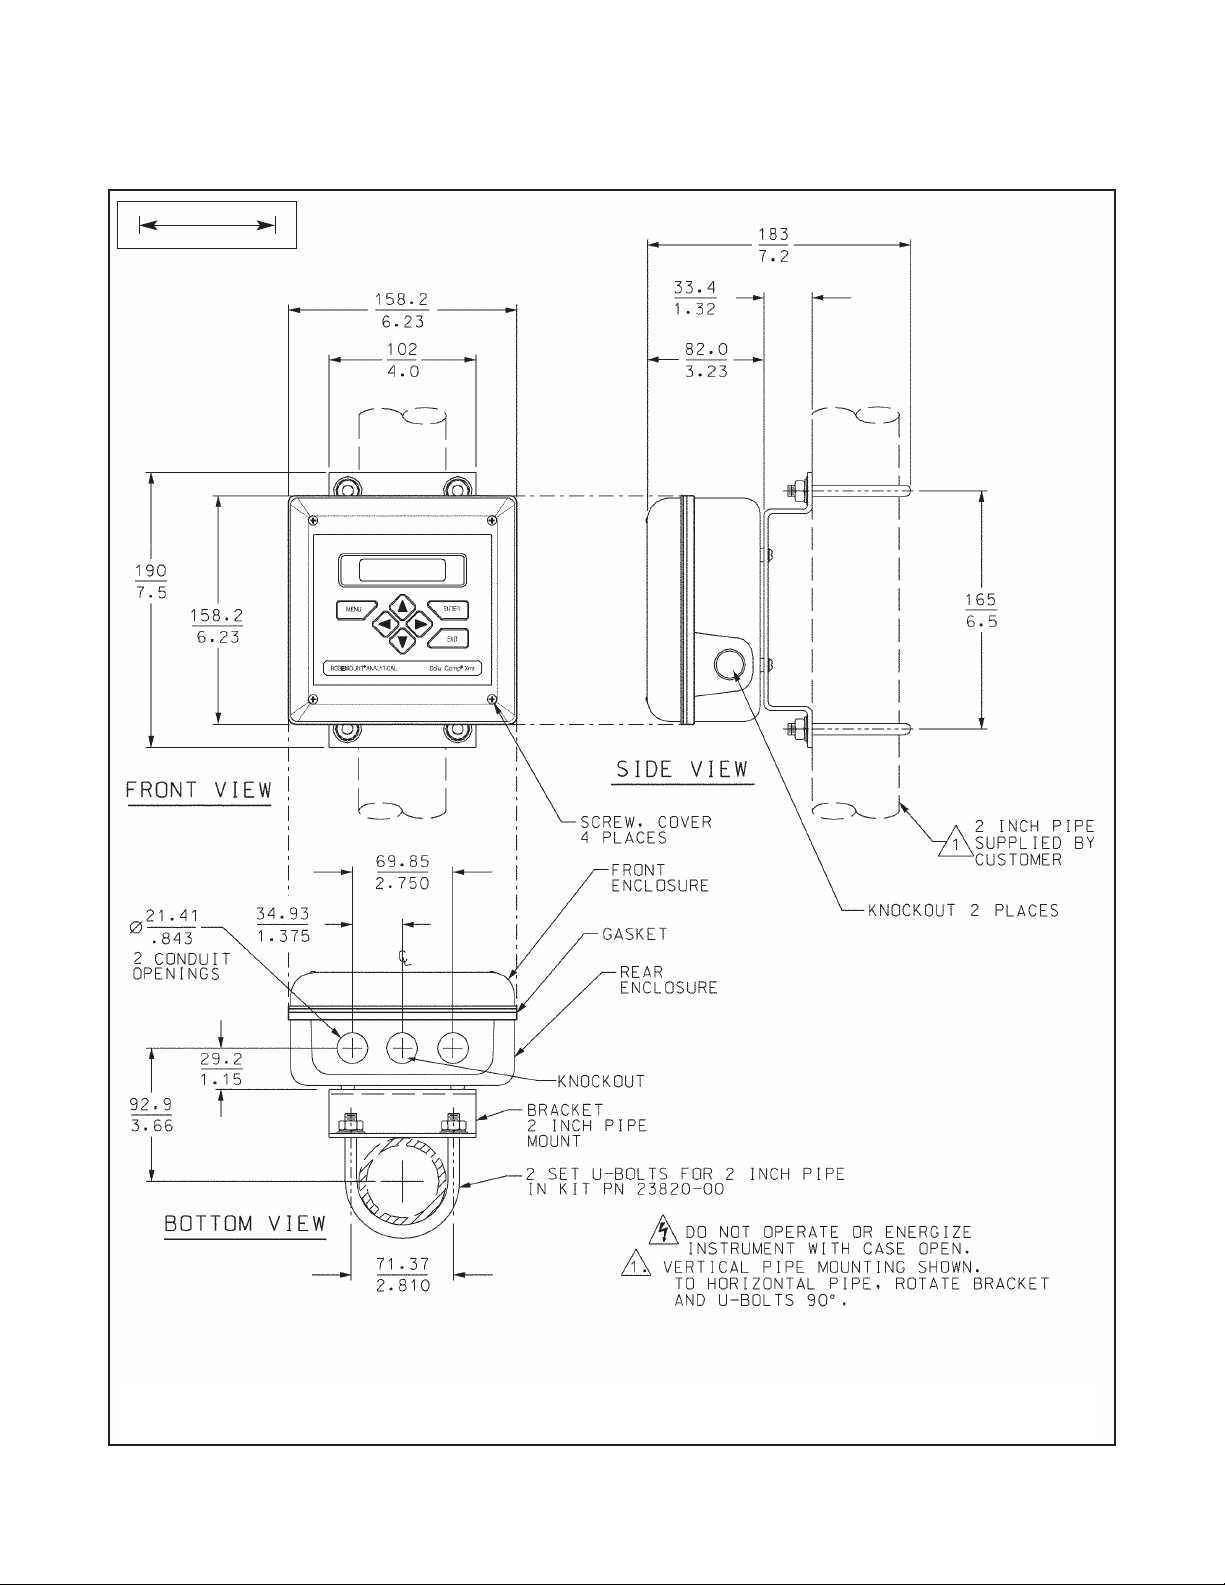
FIGURE 2-3. Pipe Mount Installation
The front panel is hinged at the bottom. The panel swings down for access to the wiring terminals.
2.2.3 Pipe Mounting.
MILLIMETER
INCH
Page 20
10
MODEL XMT-A-HT SECTION 2.0
INSTALLATION
FIGURE 2-4. Surface Mount Installation
The front panel is hinged at the bottom. The panel swings down for access to the wiring terminals.
2.2.4 Surface Mounting.
MILLIMETER
INCH
Page 21
11
MODEL XMT-A-HT SECTION 2.0
INSTALLATION
2.3 POWER SUPPLY/CURRENT LOOP
2.3.1 Power Supply and Load Requirements.
Refer to Figure 2-5.
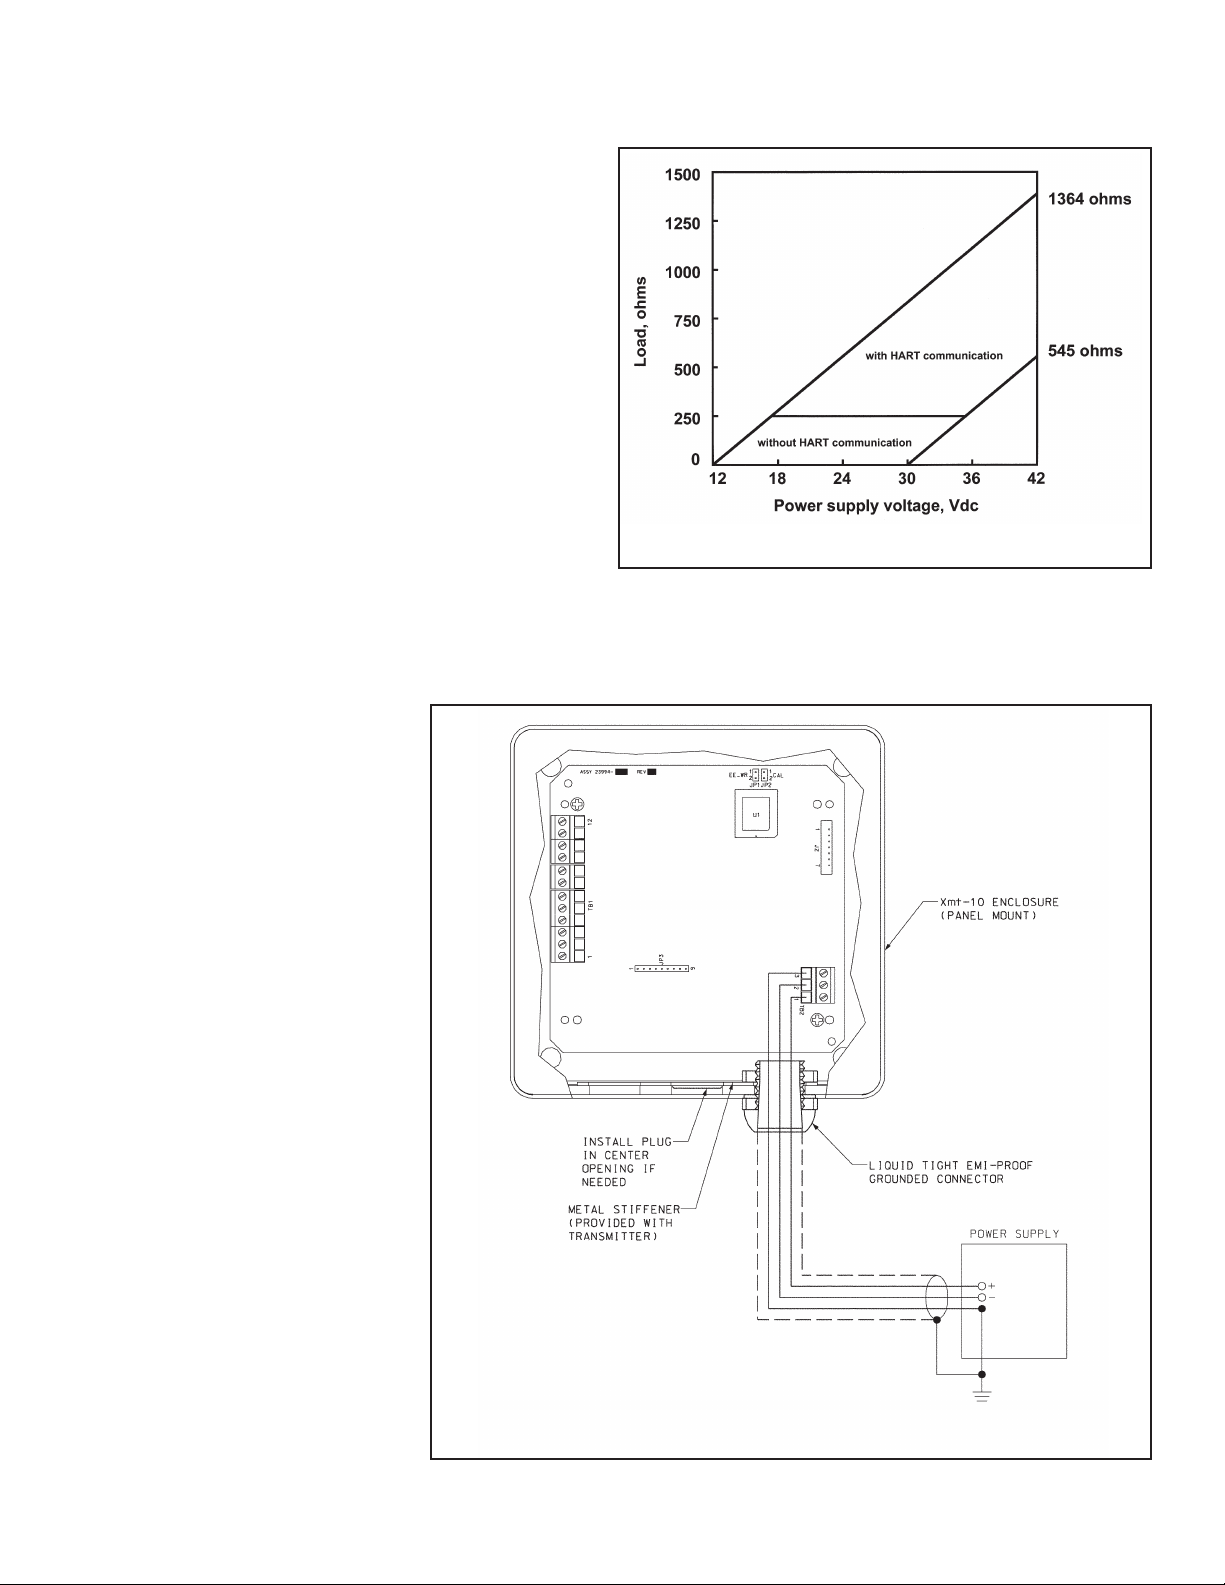
The supply voltage must be at least 12.0 Vdc at the transmitter terminals. The power supply must be able to cover the
voltage drop on the cable as well as the load resistor (250 Ω
minimum) required for HART communications. The maximum power supply voltage is 42.0 Vdc. For intrinsically
safe installations, the maximum power supply voltage is
30.0 Vdc. The graph shows load and power supply requirements. The upper line is the power supply voltage needed
to provide 12 Vdc at the transmitter terminals for a 22 mA
current. The lower line is the power supply voltage needed
to provide 30 Vdc for a 22 mA current.
The power supply must provide a surge current during the
first 80 milliseconds of startup. The maximum current is
about 24 mA.
For digital communications, the load must be at least 250 ohms. To supply the 12.0 Vdc lift off voltage at the transmitter,
the power supply voltage must be at least 17.5 Vdc.
FIGURE 2-5. Load/Power Supply Requirements
FIGURE 2-6. Power Supply/Current Loop Wiring
2.3.2 Power Supply-Current Loop
Wiring.
Refer to Figures 2-6, 2-7, and 2-8.
Run the power/signal wiring through
the opening nearest TB-2.
For optimum EMI/RFI protection . . .
1. Use shielded power/signal cable
and ground the shield at the
power supply.
2. Use a metal cable gland and be
sure the shield makes good electrical contact with the gland.
3. Use the metal backing plate (see
Figure 2-6) when attaching the
gland to transmitter enclosure.
The power/signal cable can also be
enclosed in an earth-grounded
metal conduit.
Do not run power supply/signal
wiring in the same conduit or cable
tray with AC power lines or with
relay actuated signal cables. Keep
power supply/signal wiring at least
6 ft (2 m) away from heavy electrical
equipment.
Page 22
12
MODEL XMT-A-HT SECTION 2.0
INSTALLATION
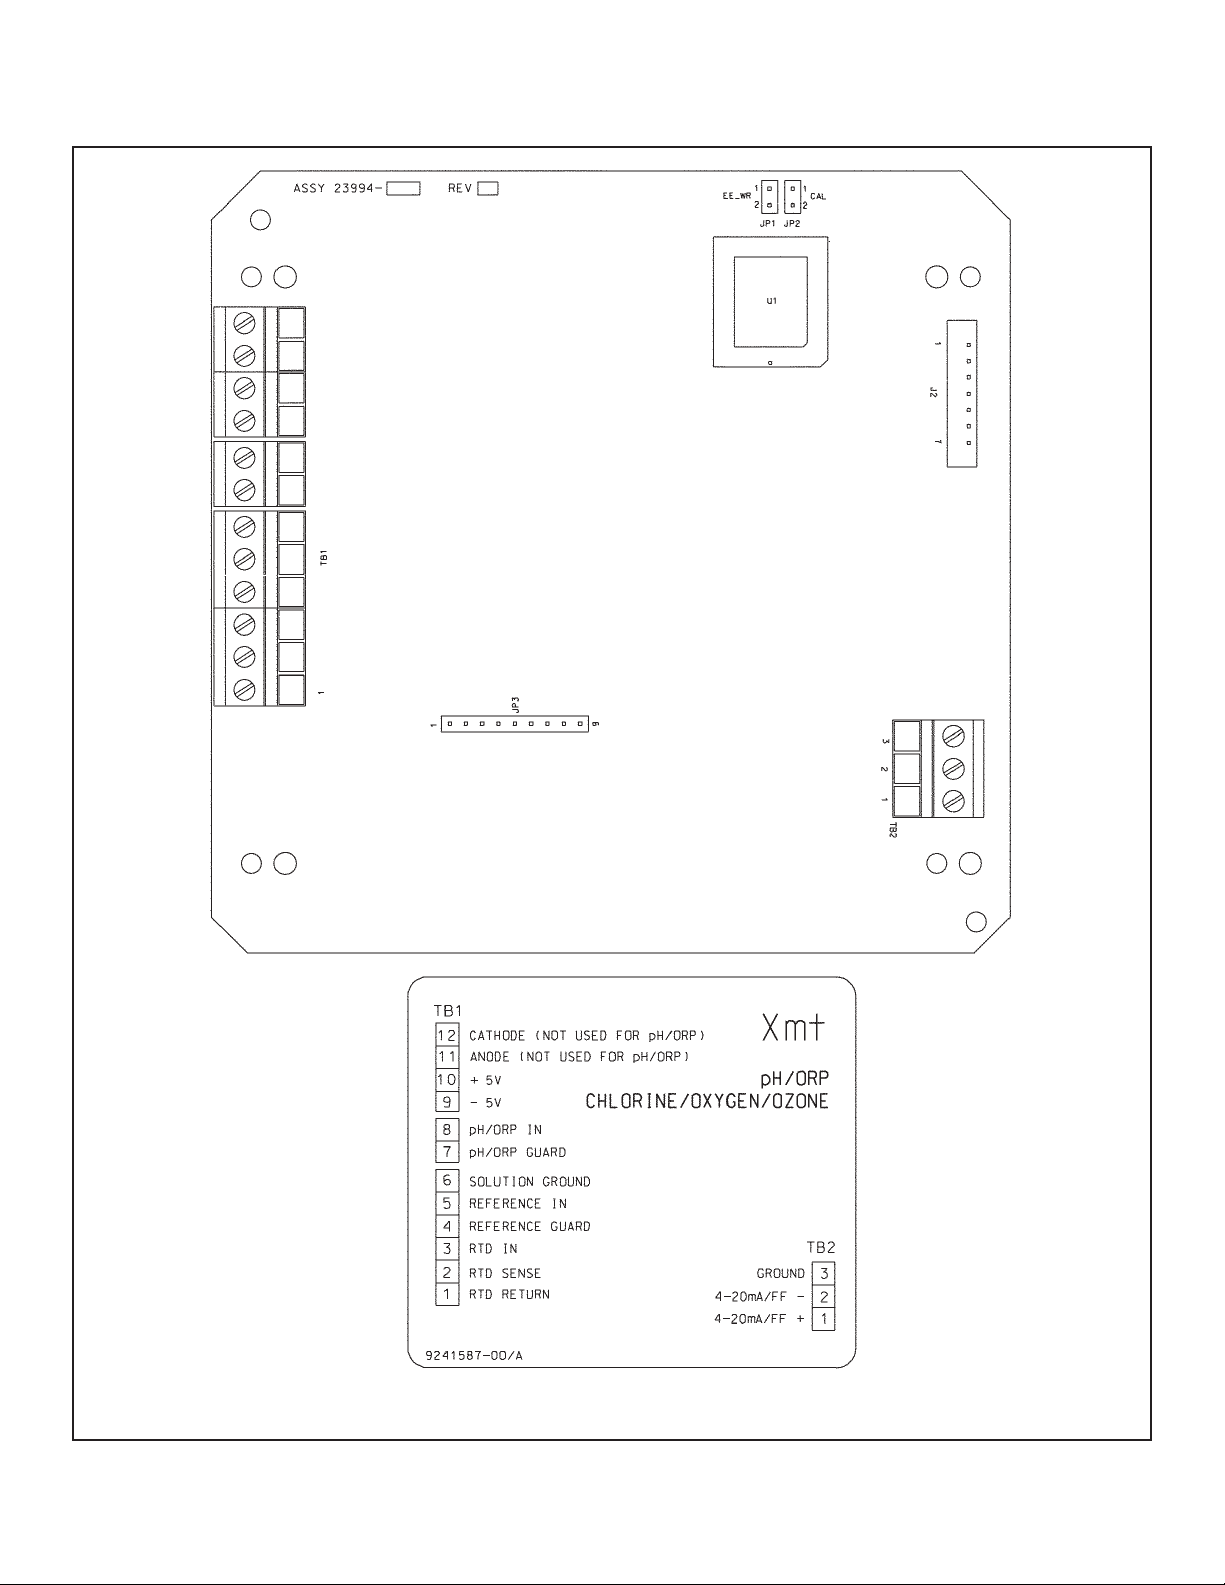
FIGURE 2-7. Power and Sensor Wiring Terminals and Wiring Label for Xmt-A-HT Panel Mount Enclosure.
Page 23
13
MODEL XMT-A-HT SECTION 2.0
INSTALLATION
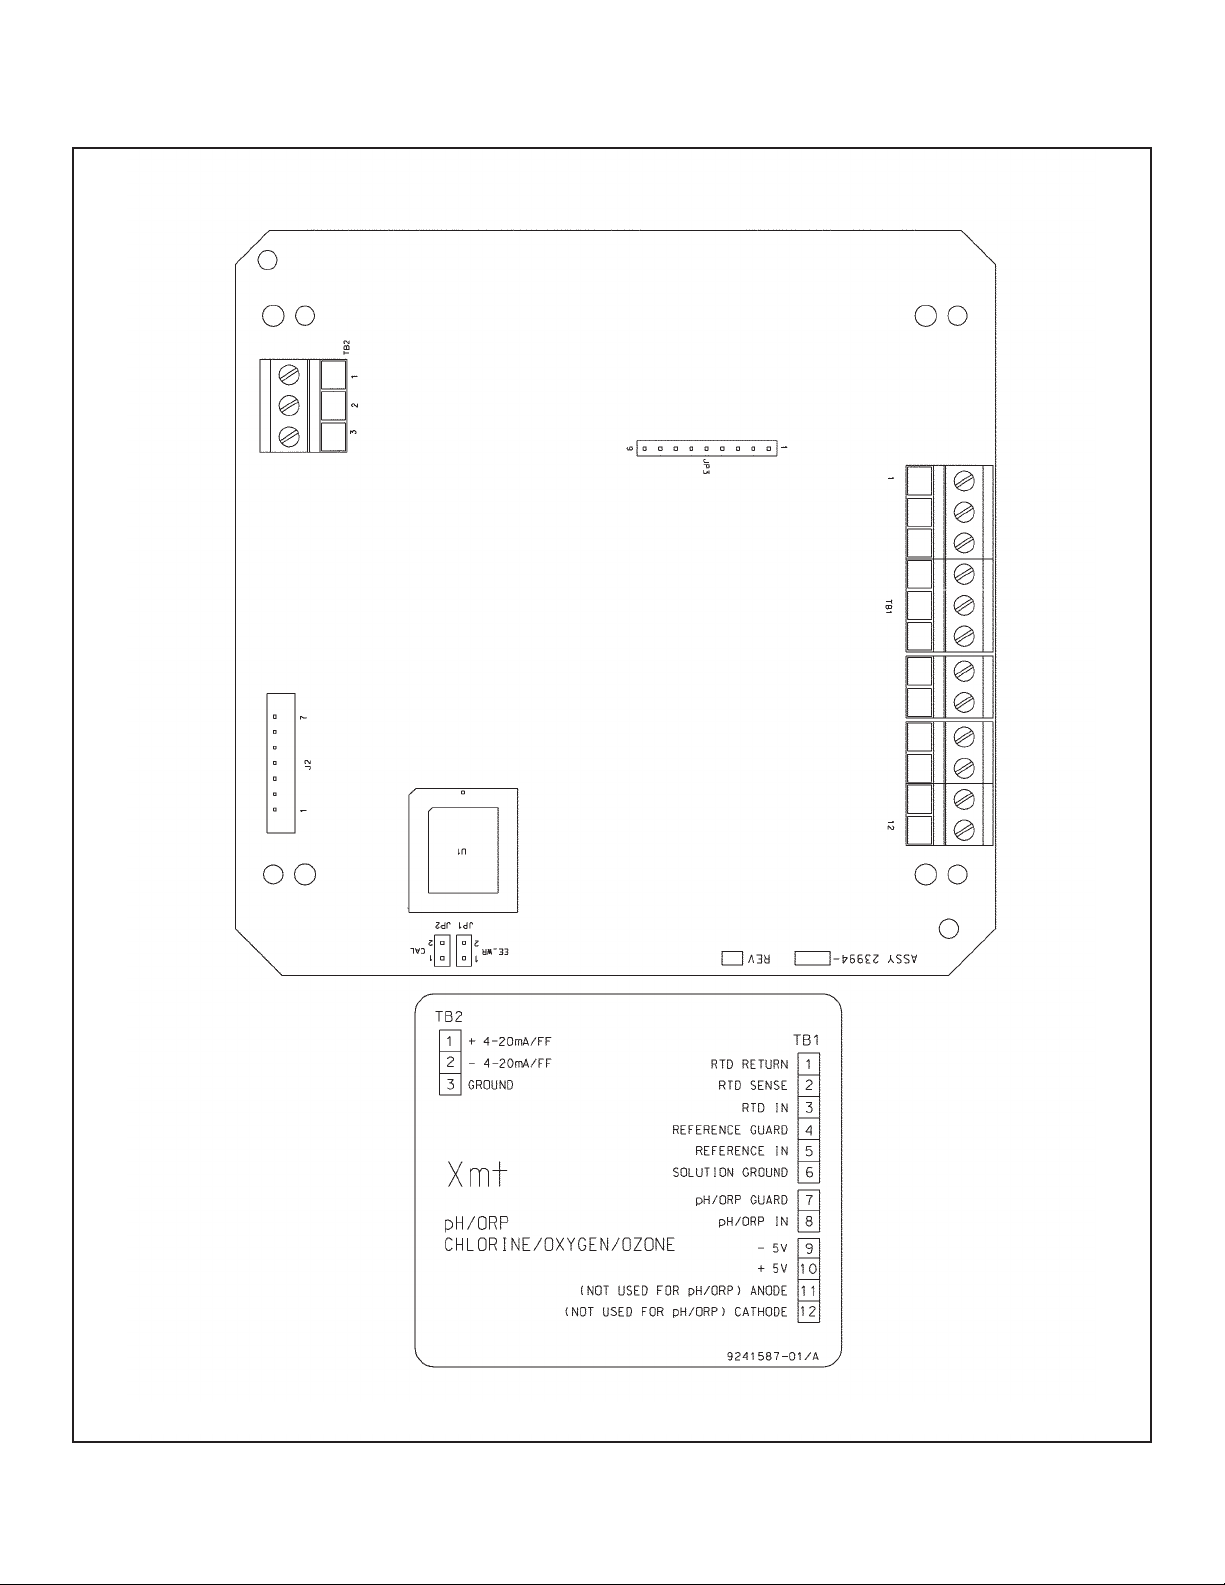
FIGURE 2-8. Power and Sensor Wiring Terminals and Wiring Label for Xmt-A-HT Pipe/Surface Mount Enclosure.
Page 24
14
MODEL XMT-A-HT SECTION 3.0
SENSOR WIRING
SECTION 3.0
SENSOR WIRING
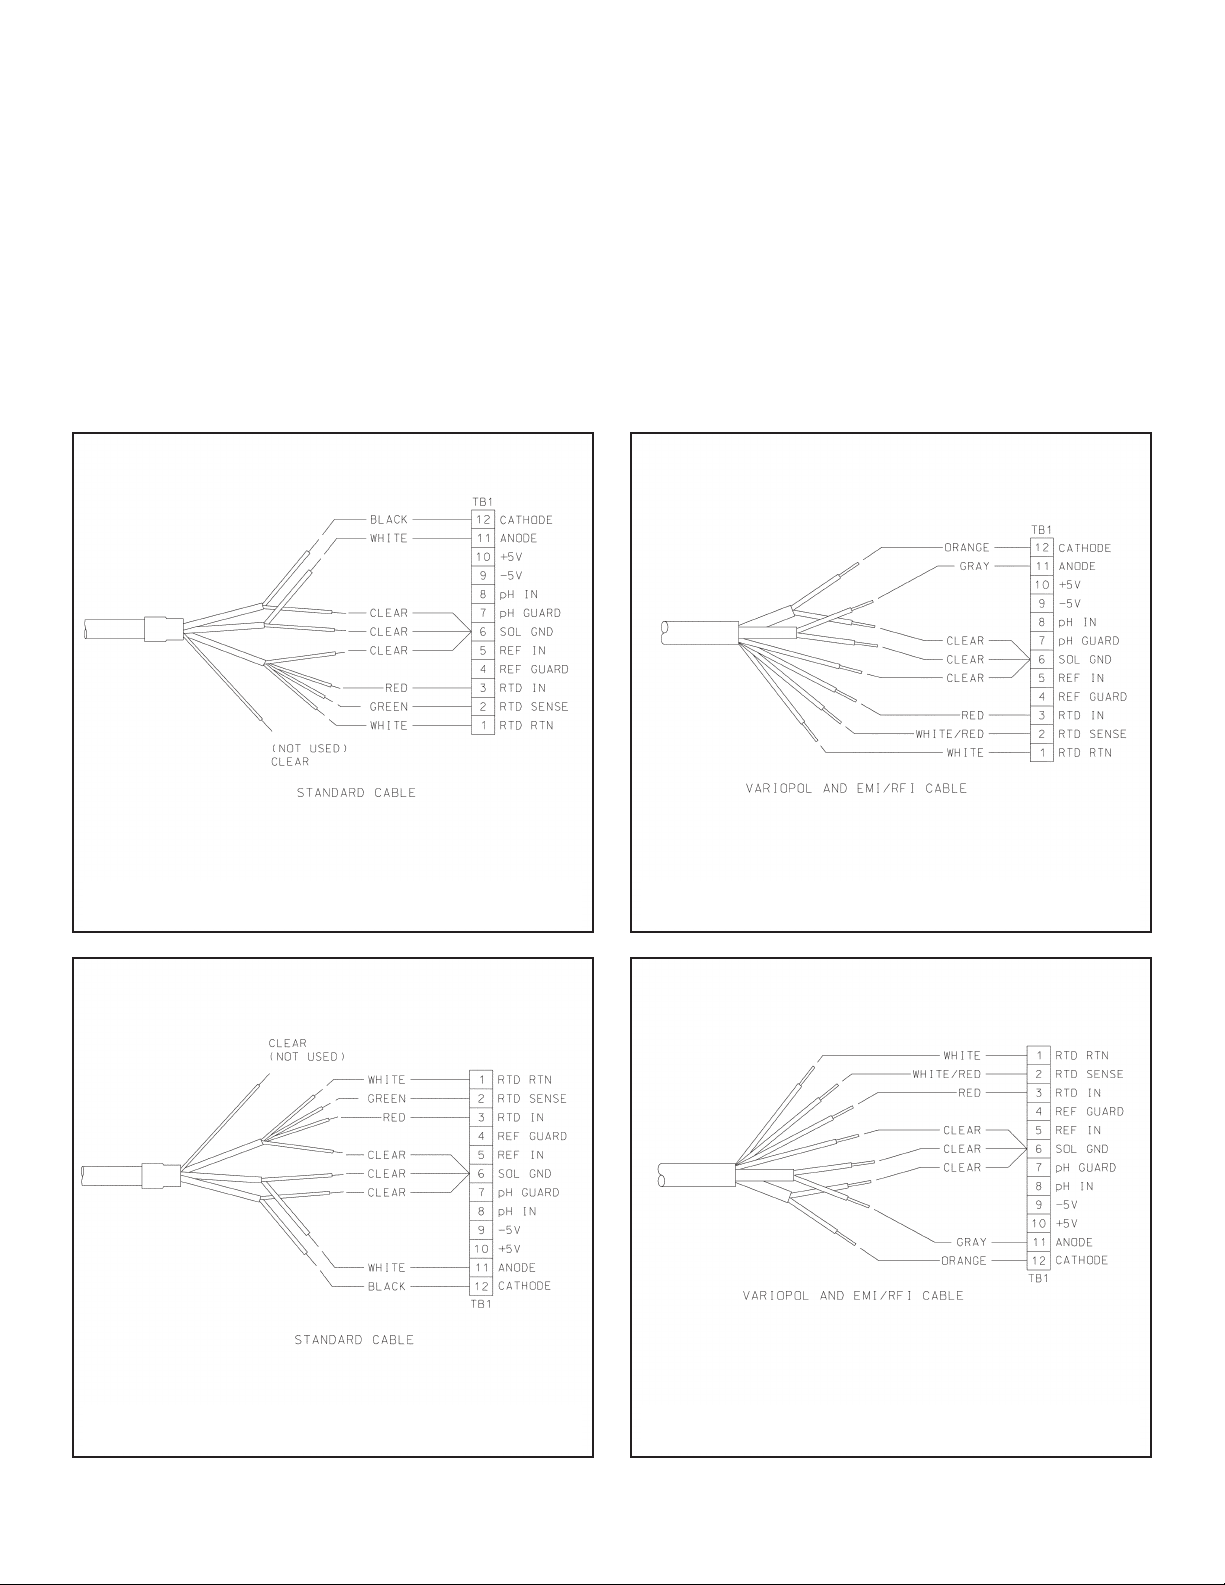
3.1 WIRING MODEL 499A OXYGEN, CHLORINE, MONOCHLORAMINE, AND OZONE SENSORS
All 499A sensors (499ADO, 499ATrDO, 499ACL-01, 499ACL-02, 499ACL-03, and 499AOZ) have identical wiring.
Use the pigtail wire and wire nuts provided with the sensor when more than one wire must be attached to a single terminal.
FIGURE 33. Xmt-A-HT wall/pipe mount; 499A sen-
sors with standard cable
FIGURE 3-4. Xmt-A-HT wall/pipe mount; 499A sen-
sors with optimum EMI/RFI or Variopol cable
FIGURE 3-1. Xmt-A-HT panel mount; 499A sensors
with standard cable
FIGURE 3-2. Xmt-A-HT panel mount; 499A sensors
with optimum EMI/RFI or Variopol cable
Page 25
15
MODEL XMT-A-HT SECTION 3.0
SENSOR WIRING
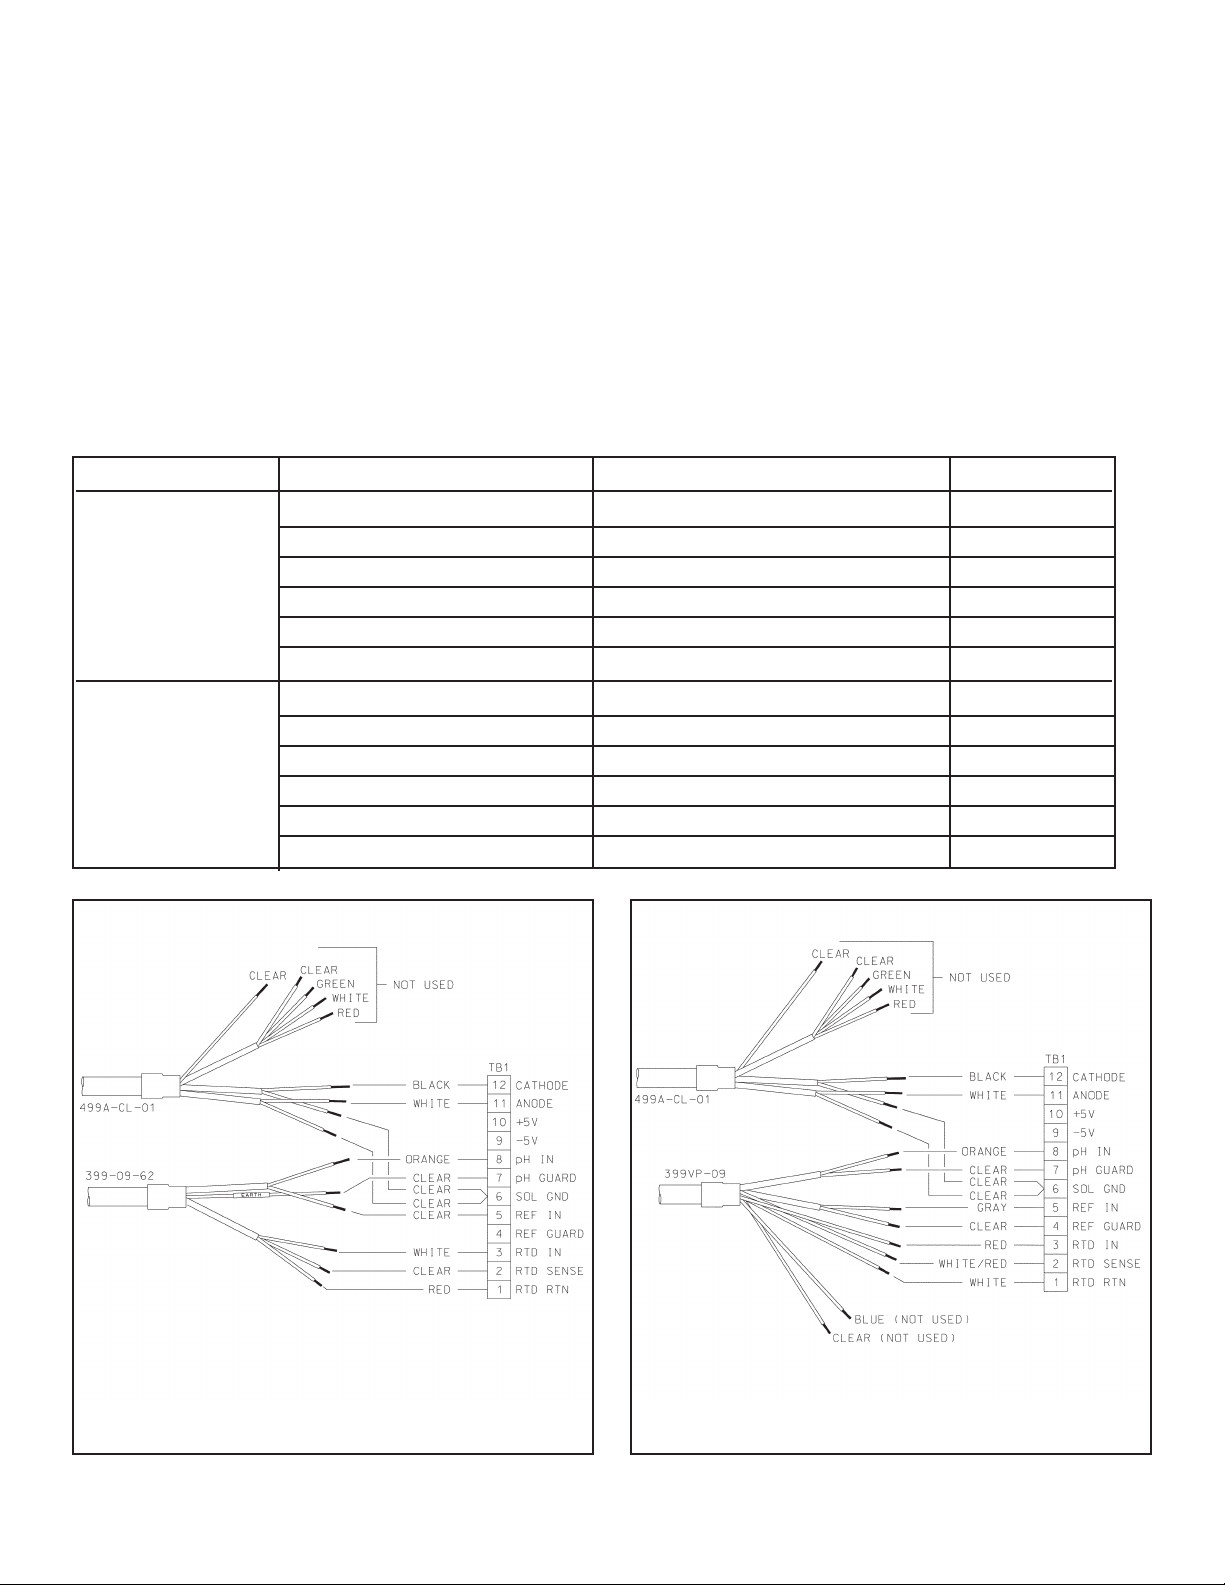
FIGURE 3-5. Xmt-A-HT panel mount; free chlorine
sensor with standard cable and 399-09-62 pH sensor.
FIGURE 3-6. Xmt-A-HT panel mount; free chlorine
sensor with standard cable and 399-VP-09 pH sensor.
Xmt-A-HT mounting Free chlorine sensor cable pH sensor Figure
Panel standard 399-09-62 3.5
standard 399-VP-09 3.6
standard 399-14 3.7
EMI/RFI or Variopol 399-09-62 3.8
EMI/RFI or Variopol 399-VP-09 3.9
EMI/RFI or Variopol 399-14 3.10
Wall/pipe standard 399-09-62 3.11
standard 399-VP-09 3.12
standard 399-14 3.13
EMI/RFI or Variopol 399-09-62 3.14
EMI/RFI or Variopol 399-VP-09 3.15
EMI/RFI or Variopol 399-14 3.16
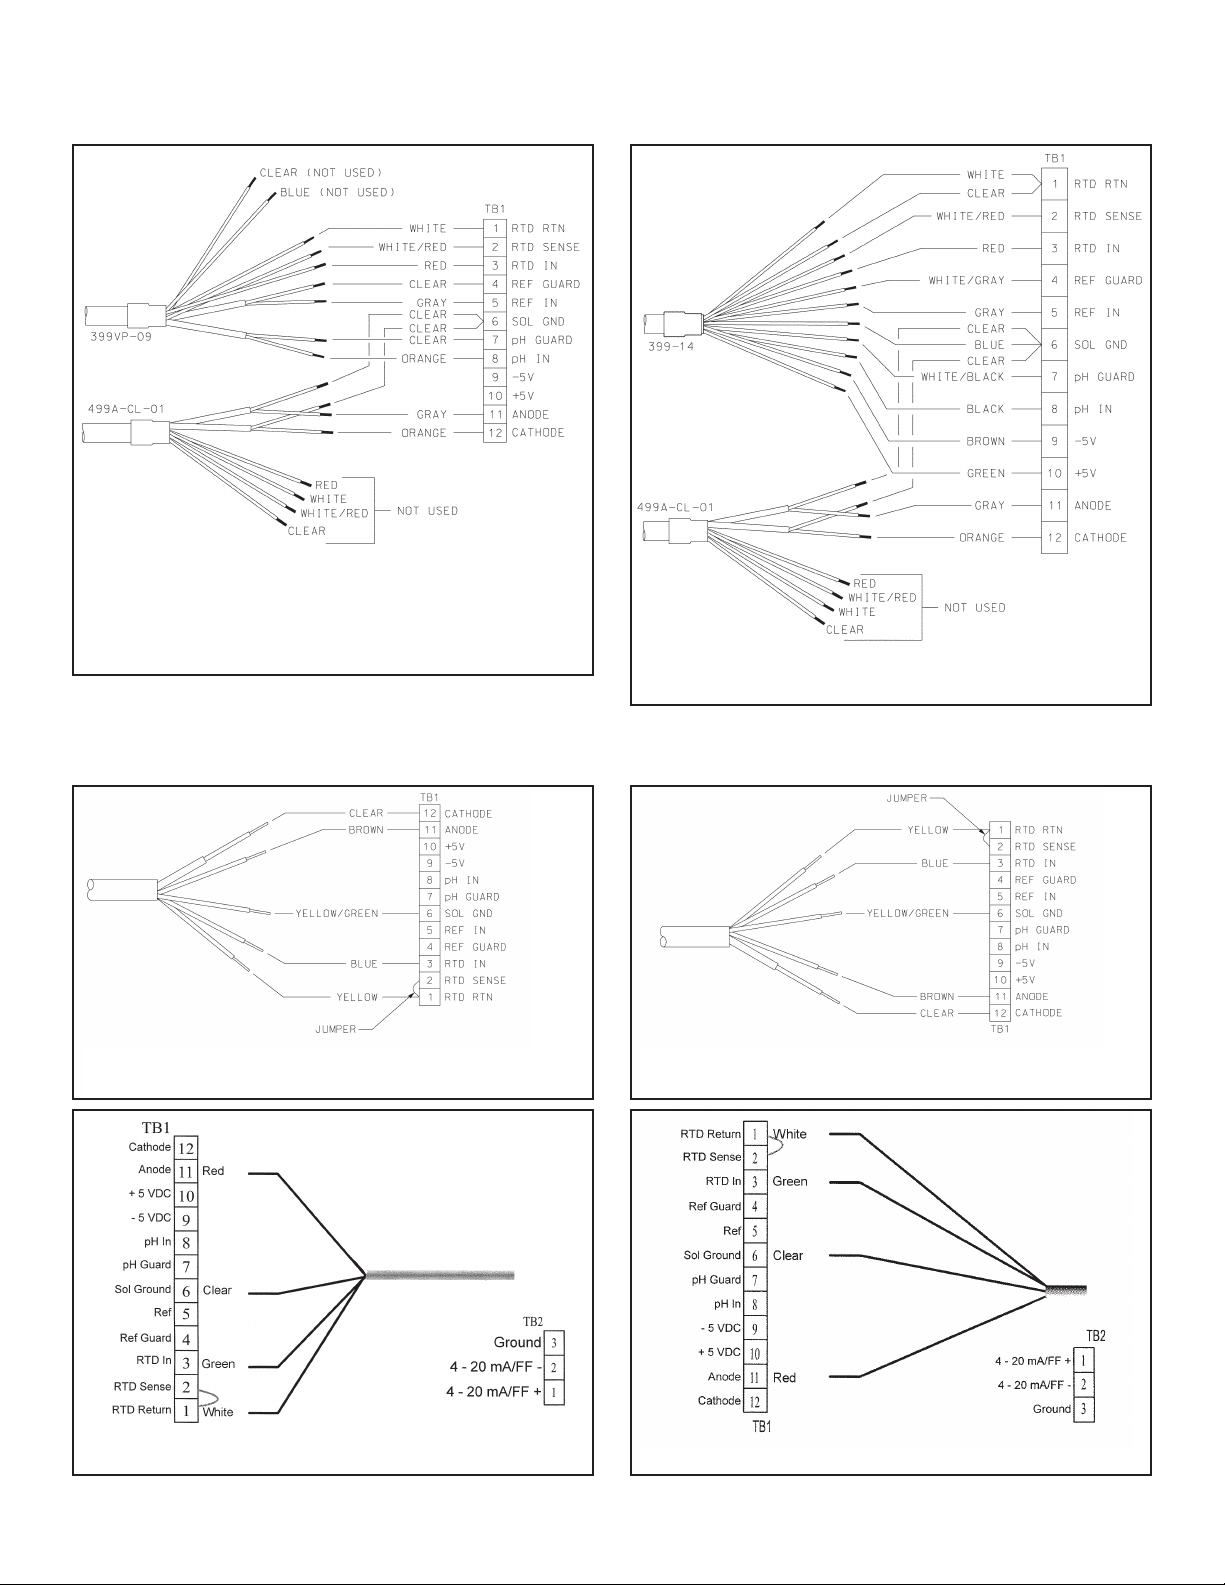
3.2 WIRING MODEL 499ACL-01 (Free Chlorine) SENSORS AND pH SENSORS
If free chlorine is being measured and the pH of the liquid varies more than 0.2 pH unit, a continuous correction for pH
must be applied to the chlorine reading. Therefore, a pH sensor must be wired to the transmitter. This section gives wiring
diagrams for the pH sensors typically used.
When using the 499ACL-01 (free chlorine) sensor with a pH sensor, use the RTD in the pH sensor for measuring
temperature. DO NOT use the RTD in the chlorine sensor.
The pH sensor RTD is needed for temperature measurement during buffer calibration. During normal operation, the RTD
in the pH sensor provides the temperature measurement required for the free chlorine membrane permeability correction.
Refer to the table to select the appropriate wiring diagram. Most of the wiring diagrams require that two or more shield
wires be attached to a single terminal. Use the pigtail wire and wire nuts provided with the chlorine sensor to make the connection. Insulate and tape back unused wires.
Page 26
16
MODEL XMT-A-HT SECTION 3.0
SENSOR WIRING
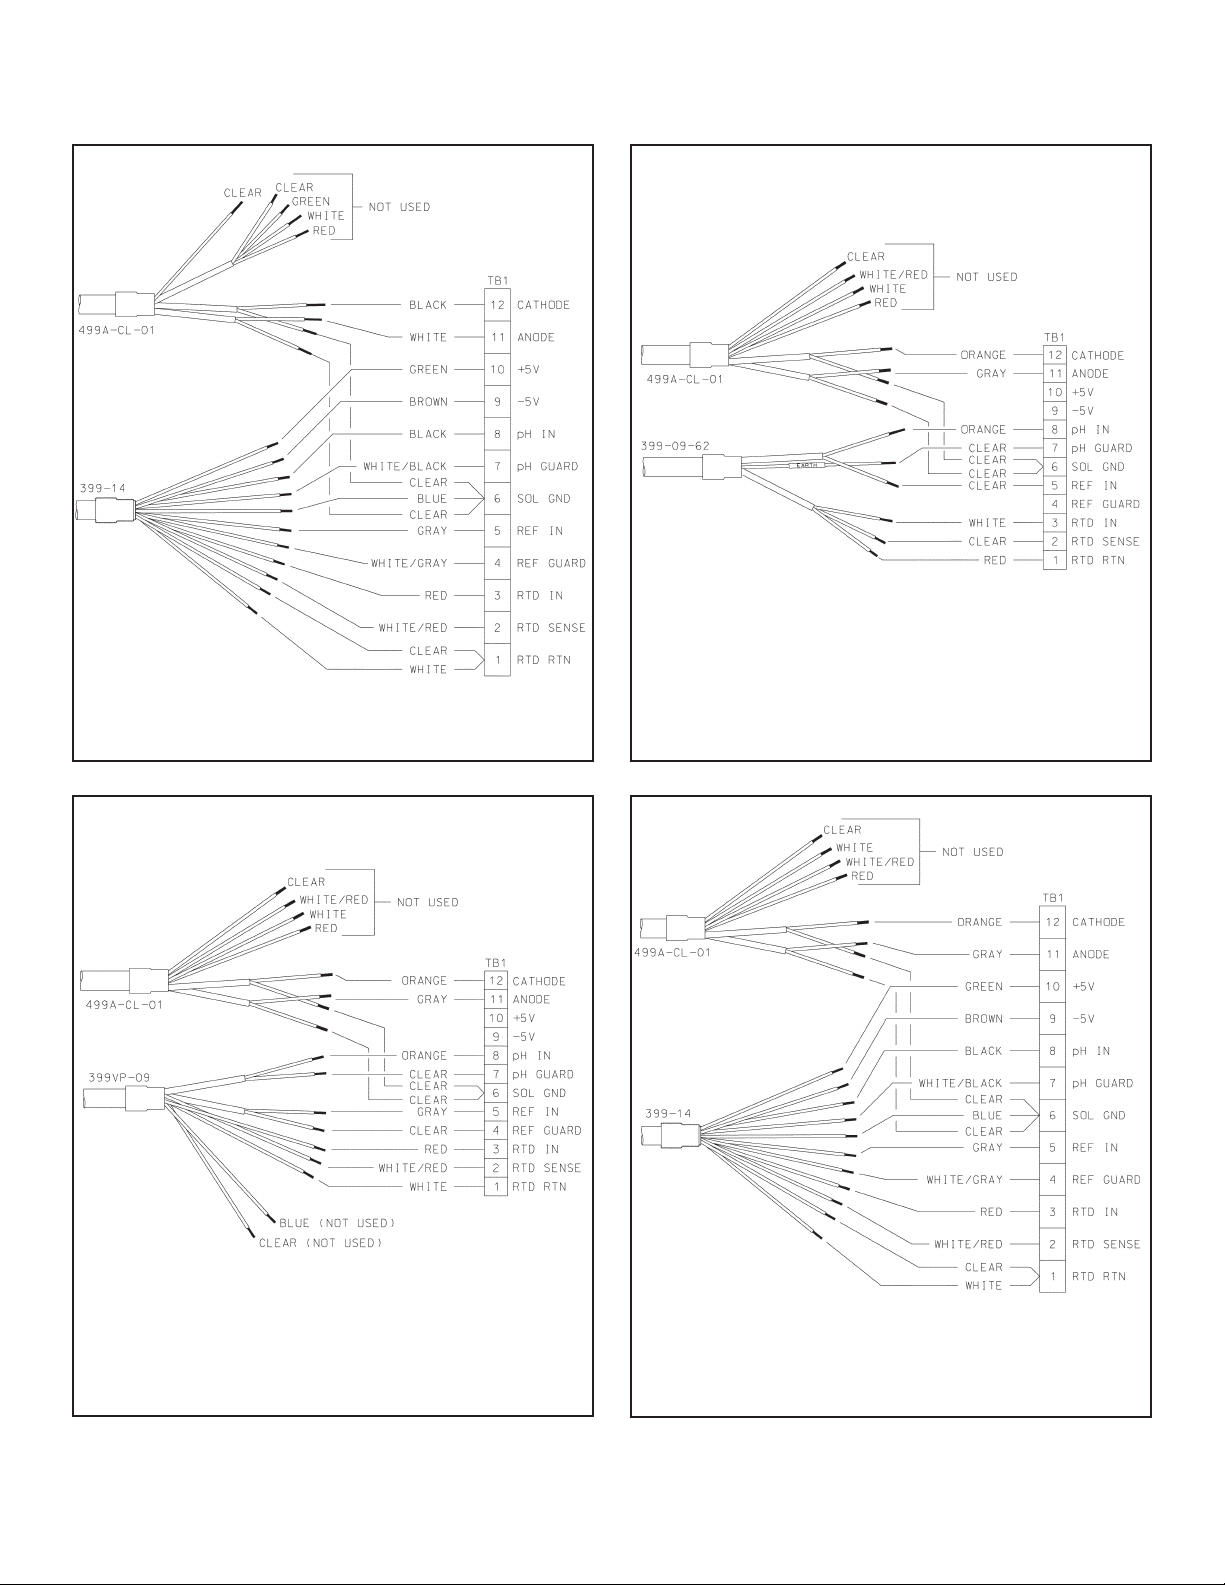
FIGURE 3-9. Xmt-A-HT panel mount; free chlorine
sensor with optimum EMI/RFI or Variopol and
399-VP-09- pH sensor.
FIGURE 3-10. Xmt-A-HT panel mount; free chlorine
sensor with optimum EMI/RFI or Variopol
399-14 pH sensor.
FIGURE 3-7. Xmt-A-HT panel mount; free chlorine
sensor with standard cable and 399-14 pH sensor.
FIGURE 3-8. Xmt-A-HT panel mount; free chlorine
sensor with optimum EMI/RFI or Variopol cable
and 399-09-62 pH sensor.
Page 27
17
MODEL XMT-A-HT SECTION 3.0
SENSOR WIRING
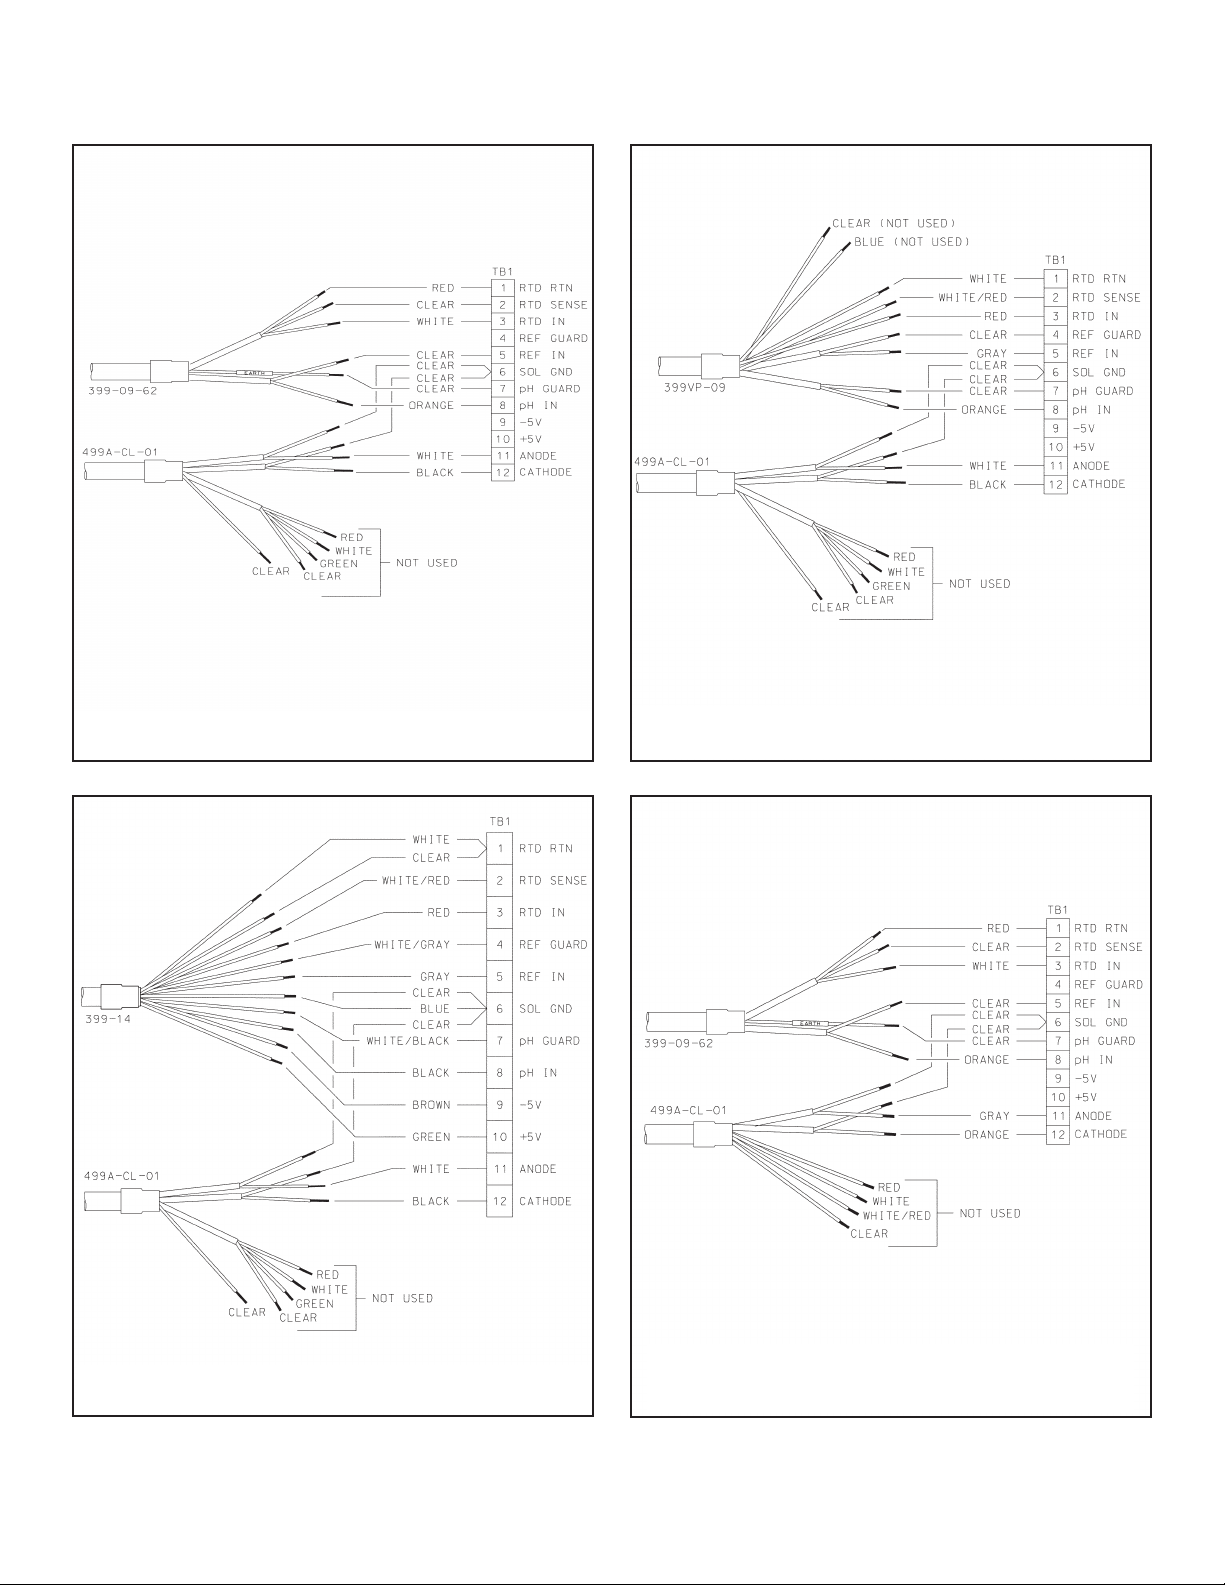
FIGURE 3-13. Xmt-A-HT wall/pipe mount; free chlorine
sensor with standard cable and 399-14 pH sensor.
FIGURE 3-14. Xmt-A-HT wall/pipe mount; free
chlorine sensor with optimum EMI/RFI or Variopol
cable and 399-09-62 pH sensor.
FIGURE 3-11. Xmt-A-HT wall/pipe mount; free chlorine
sensor with standard cable and 399-09-62 pH sensor.
FIGURE 3-12. Xmt-A-HT wall/pipe mount; free chlorine
sensor with standard cable and 399-VP-09 pH sensor.
Page 28
18
MODEL XMT-A-HT SECTION 3.0
SENSOR WIRING
FIGURE 3-15. Xmt-A-HT wall/pipe mount; free
chlorine sensor with optimum EMI/RFI or Variopol
and 399-VP-09- pH sensor.
FIGURE 3-16. Xmt-A-HT wall/pipe mount; free chlorine sen-
sor with optimum EMI/RFI or Variopol 399-14 pH sensor.
FIGURE 3-17. Xmt-A-HT panel mount with Hx438 or
Gx448 sensor.
FIGURE 3-18. Xmt-A-HT wall/pipe mount with Hx438
or Gx448 sensor.
FIGURE 3-19. Wiring Bx438 to Xmt-A-HT-10 FIGURE 3-20. Wiring Bx438 to Xmt-A-HT-11
3.3 WIRING MODEL Hx438, Gx448, AND Bx438 SENSORS
Page 29

19
MODEL XMT-A-HT SECTION 4.0
INTRINSICALLY SAFE OPERATION
FIGURE 4-1. FM Intrinsically Safe Installation Label
SECTION 4.0
INTRINSICALLY SAFE OPERATION
Page 30
20
MODEL XMT-A-HT SECTION 4.0
INTRINSICALLY SAFE OPERATION
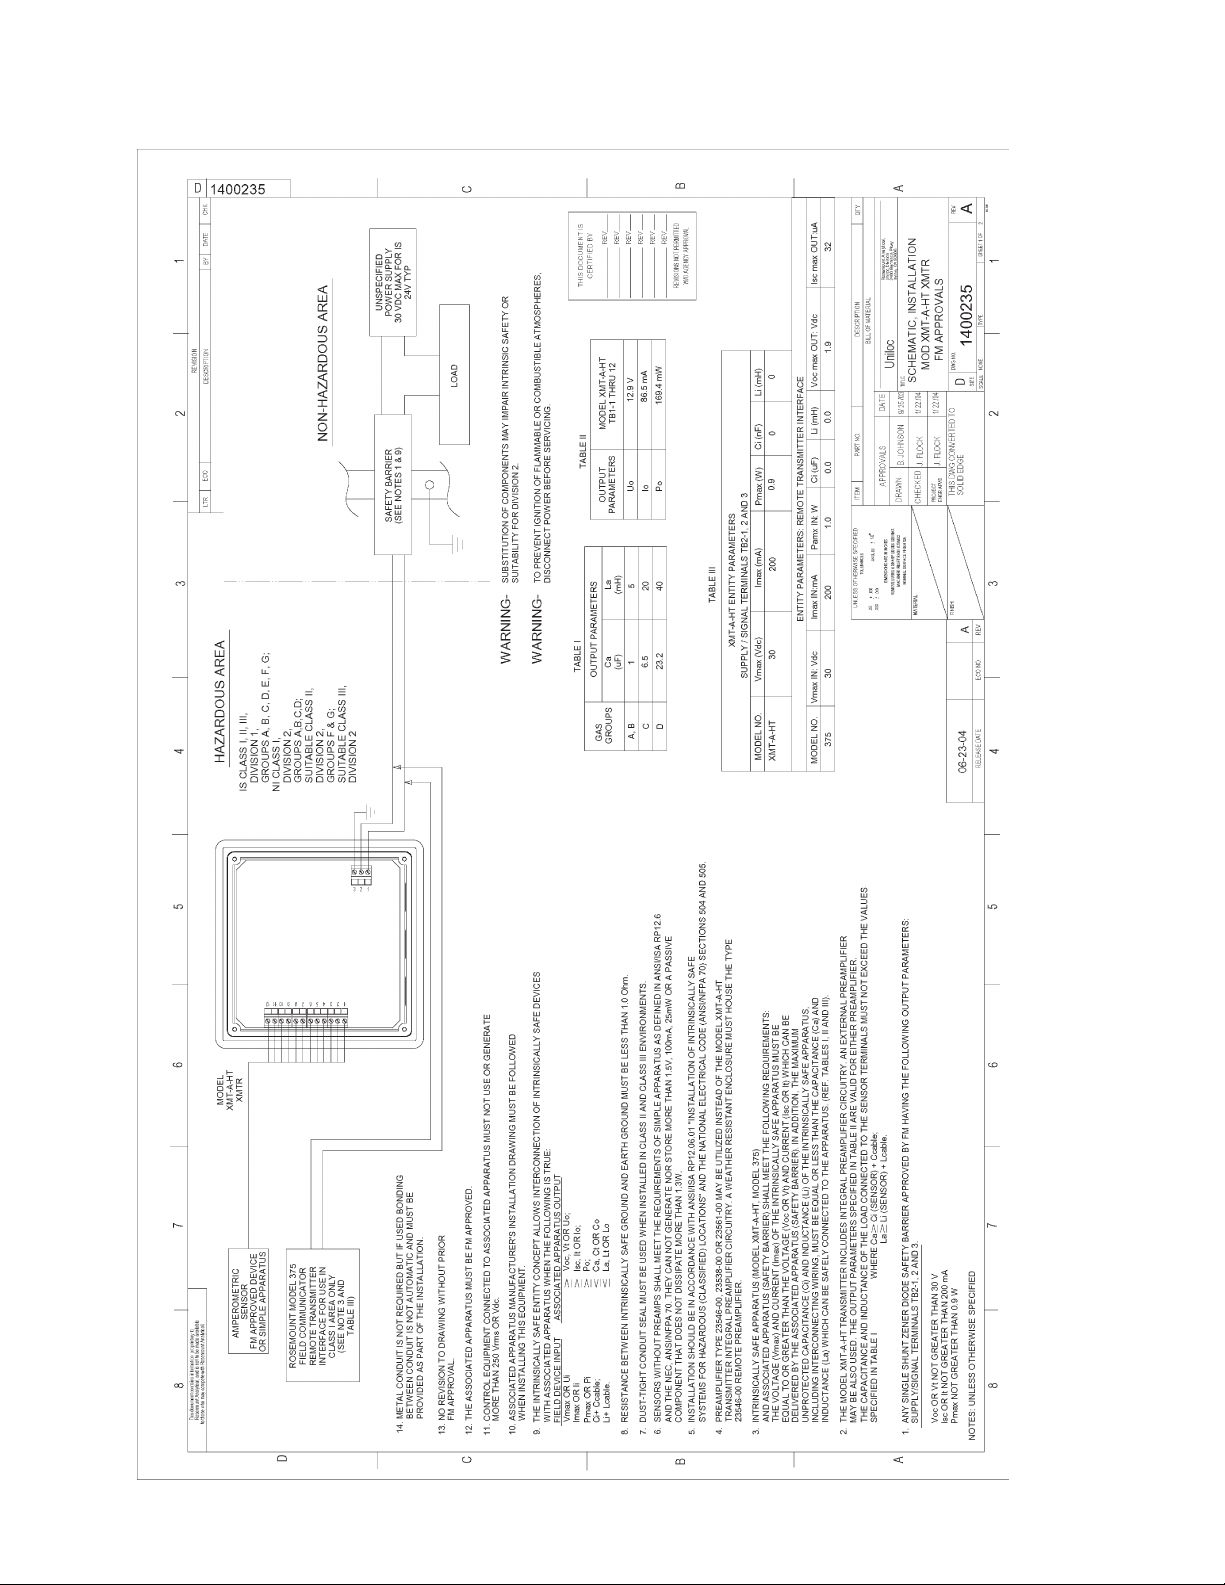
FIGURE 4-2. FM Intrinsically Safe Installation Wiring (1 of 2)
Page 31

21
MODEL XMT-A-HT SECTION 4.0
INTRINSICALLY SAFE OPERATION
FIGURE 4-2. FM Intrinsically Safe Installation Wiring (2 of 2)
Page 32

22
MODEL XMT-A-HT SECTION 4.0
INTRINSICALLY SAFE OPERATION
FIGURE 4-3. CSA Intrinsically Safe Installation Label
Page 33

23
MODEL XMT-A-HT SECTION 4.0
INTRINSICALLY SAFE OPERATION
FIGURE 4-4. CSA Intrinsically Safe Installation Wiring (1 of 2)
Page 34

24
MODEL XMT-A-HT SECTION 4.0
INTRINSICALLY SAFE OPERATION
FIGURE 4-4. CSA Intrinsically Safe Installation Wiring (2 of 2)
Page 35

25
MODEL XMT-A-HT SECTION 4.0
INTRINSICALLY SAFE OPERATION
FIGURE 4-5. Baseefa/ATEX Intrinsically Safe Installation Label
Page 36

26
MODEL XMT-A-HT SECTION 4.0
INTRINSICALLY SAFE OPERATION
FIGURE 4-6. Baseefa/ATEX Intrinsically Safe Installation Wiring (1 of 2)
Page 37

27
MODEL XMT-A-HT SECTION 4.0
INTRINSICALLY SAFE OPERATION
FIGURE 4-6. Baseefa/ATEX Intrinsically Safe Installation Wiring (2 of 2)
Page 38

28
MODEL XMT-A-HT SECTION 5.0
DISPLAY AND OPERATION
SECTION 5.0
DISPLAY AND OPERATION
5.1. DISPLAY
The Model Xmt-A-HT has a two-line
display. Generally, the user can program the transmitter to show one of
two displays. If the transmitter has
been configured to measure free
chlorine with continuous pH correction, more displays are available.
Figure 5-1 shows the displays available for dissolved oxygen.
The transmitter has information
screens that supplement the data in
the main display. Press q to view
the information screens. The first
information screen shows the type
of measurement being made (oxygen, ozone, free chlorine, total chlorine, or monochloramine). The last
information screen is the software version number.
During calibration and programming, key presses cause different
displays to appear. The displays are
self-explanatory and guide the user
step-by-step through the procedure.
5.2 KEYPAD
Figure 5-2 shows the Solu Comp
Xmt keypad.
FIGURE 5-1. Displays During Normal Operation
Screen A shows the dissolved oxygen reading, the temperature, and the output current generated by the transmitter. Screen B shows the same information
as screen A except the output current has been substituted with the raw sensor current. Screen B is most useful while troubleshooting sensor problems.
FIGURE 5-2. Solu Comp Xmt Keypad
Four arrow keys move the cursor around the screen. A blinking word or numeral show the position of the cursor. The arrow keys are also used to change the
value of a numeral. Pressing ENTER stores numbers and settings and moves
the display to the next screen. Pressing EXIT returns to the previous screen
without storing changes. Pressing MENU always causes the main menu
screen to appear. Pressing MENU followed by EXIT causes the main display
to appear.
Page 39

29
MODEL XMT-A-HT SECTION 5.0
DISPLAY AND OPERATION
5.3 PROGRAMMING AND CALIBRATING THE MODEL Xmt
- TUTORIAL
Setting up and calibrating the Model Xmt is easy. The following tutorial
describes how to move around in the programming menus. For practice, the
tutorial also describes how to assign values to the 4 and 20 mA output.
1. If the menu screeen (shown at the left) is not already showing, press
MENU. Calibrate is blinking, which means the cursor is on Calibrate.
2. To assign values to the current output, the Program sub-menu must be
open. Press q. The cursor moves to Program (Program blinking.)
Press ENTER. Pressing ENTER opens the Program sub-menu.
3. The Program sub-menu permits the user to configure and assign val-
ues to the 4-20 mA output, to test and trim the output, to change the
type of measurement from what was selected during Quick Start, to set
manual or automatic temperature correction for membrane permeability,
and to set security codes. When the sub-menu opens, Output is blinking, which means the cursor is on Output. Press q or u (or any arrow
key) to move the cursor around the display. Move the cursor to >> and
press ENTER to cause a second screen with more program items to
appear. There are three screens in the Program sub-menu. Pressing
>> and ENTER in the third screen cause the display to return to the first
screen (Output, Temp, Measurement).
4. For practice, assign values to the 4 and 20 mA output. Move the cursor
to Output and press ENTER.
5. The screen shown at left appears. Test is blinking. Move the cursor to
Range and press ENTER.
6. The screen shown at left appears. + is blinking, which means the cursor
is on +.
a. To toggle between + and - press p or q.
b. To move from one digit to the next, press t or u.
c. To increase or decrease the value of a digit, press p or q.
d. To move the decimal point, press t or u until the cursor is on the
decimal point. Press p to move the decimal to the right. Press q to
move the decimal point to the left.
e. Press ENTER to store the number.
7. The screen shown at left appears. Use this screen to assign a full scale
value to the 20 mA output. Use the arrow keys to change the number to
the desired value. Press ENTER to store the setting.
8. The screen shown at left appears. To configure the output or to test the
output, move the cursor to the appropriate place and press ENTER.
9. To return to the main menu, press MENU. To return to the main display,
press MENU then EXIT, or press EXIT repeatedly until the main display
appears. To return to the previous display, press EXIT.
NOTE
To store values or settings, press ENTER before pressing EXIT.
Calibrate
Hold
Program Display
Calibrate Hold
Program
Display
Output
Temp
Measurement >>
Security
HART
>>
Output Range?
20mA +
10.00ppm
Noise Rejection
ResetAnalyzer
>>
Output Range?
4mA
+
0.000ppm
Output?
Test
Configure Range
Output? Test
Configure
Range
Page 40

30
MODEL XMT-A-HT SECTION 5.0
DISPLAY AND OPERATION
1. If a security code has been programmed, pressing MENU causes the
security screen to appear.
2. Enter the three-digit security code.
a. If a security code has been assigned to configure only, entering it will
unlock all the menus.
b. If separate security codes have been assigned to calibrate and con-
figure, entering the calibrate code will allow the user access to only
the calibrate and hold menus; entering the configuration code will
allow the user access to all menus.
3. If the entered code is correct, the main menu screen appears. If the code
is incorrect, the Invalid Code screen appears. The Enter Security Code
screen reappears after two seconds.
Enter Security
Code:
0
00
Invalid Code
Calibrate
Hold
Program Display
Hold Outputs?
Yes
No
5.4 SECURITY
5.4.1 How the Security Code Works
Use security codes to prevent accidental or unwanted changes to program settings, displays, and calibration. Two
three-digit security codes can be used to do the following…
a. Allow a user to view the default display and information screens only.
b. Allow a user access to the calibration and hold menus only.
c. Allow a user access to all the menus.
5.4.2 Bypassing the Security Code
Enter 555. The main menu will open.
5.4.3 Setting a Security Code
See Section 7.6.
5.5 USING HOLD
5.5.1 Purpose
The transmitter output is always proportional to the process variable (oxygen, free chlorine, total chlorine, monochloramine, or ozone). To prevent improper operation of control systems or dosing pumps, place the transmitter in
hold before removing the sensor for maintenance. Be sure to remove the transmitter from hold once the work is
complete and the sensor has been returned to the process liquid. During hold the transmitter current goes to the
value programmed by the user. Once in hold, the transmitter remains there indefinitely. While in hold, the word
"hold" appears periodically in the display.
5.5.2 Using the Hold Function
1. Press MENU. The main menu screen appears. Choose Hold.
2. The Hold Output screen appears. Choose Yes to put the transmitter in
hold.
3. The top line in the display is the present current output. Use the arrow
keys to change the number in the second line to the desired current during hold.
4. The main display screen appears.
5. To take the transmitter out of hole, repeat steps 1 and 2 and choose No
in step 2.
Output Range? 10.00mA
Hold at 2
0.00mA
Page 41

31
MODEL XMT-A-HT SECTION 6.0
OPERATION WITH MODEL 375
SECTION 6.0
OPERATION WITH MODEL 375
6.1 Note on Model 375 HART Communicator
The Model 375 HART Communicator is a product of Emerson Process Management, Rosemount Inc. This section
contains selected information on using the Model 375 with the Rosemount Analytical Model Xmt-A-HT Transmitter.
For complete information on the Model 375 Communicator, see the Model 375 instruction manual. For technical
support on the Model 375 Communicator, call Rosemount Inc. at (800) 999-9307 within the United States. Support
is available worldwide on the internet at http://rosemount.com.
6.2 Connecting the HART Communicator
Figure 6-1 shows how the Model 275 or 375 HART Communicator connects to the output lines from the Model Xmt-A-HT Transmitter.
CAUTION
For intrinsically safe CSA and FM
wiring connections, see the Model
375 instruction manual.
FIGURE 6-1. Connecting the HART Communicator
Page 42

32
6.3 Operation
6.3.1 Off-line and On-line Operation
The Model 375 Communicator features off-line and on-line communications. On-line means the communicator is
connected to the transmitter in the usual fashion. While the communicator is on line, the operator can view measurement data, change program settings, and read diagnostic messages. Off-line means the communicator is not
connected to the transmitter. When the communicator is off line, the operator can still program settings into the
communicator. Later, after the communicator has been connected to a transmitter, the operator can transfer the
programmed settings to the transmitter. Off-line operation permits settings common to several transmitters to be
easily stored in all of them.
6.3.2 Making HART related settings from the keypad
6.3.3 Menu Tree
The menu tree for the Model 375 HART communicator is on the following page.
1. Press MENU. The main menu screen appears. Choose Program.
2. Choose >>.
3. Choose HART.
4. To display the device ID, choose DevID. To change the polling address,
choose PollAddrs. To make burst mode settings, choose Burst. To
change the preamble count, choose Preamble.
MODEL XMT-A-HT SECTION 6.0
OPERATION WITH MODEL 375
Calibrate Hold
Program
Display
Output Temp
Measurement
>>
Security
HART
>>
DevID
PollAddrs
Burst Preamble
Page 43

33
MODEL XMT-A-HT SECTION 6.0
OPERATION WITH MODEL 375
-------------------------------------------------------------------------------Xmt-A-HT 375 Menu Tree
-------------------------------------------------------------------------------Device setup
Process variables
View Fld Dev Vars
Oxygen *
Temp
Snsr Cur
pH #
pH mV #
GI #
Temp Res
View PV-Analog 1
PV is Oxygen *
PV
PV % rnge
PV AO
View SV
SV is Temp **
SV
View TV
TV is Snsr Cur ***
TV
View 4V
4V is Temp Res ****
4V
View Status
Diag/Service
Test device
Loop test
View Status
Master Reset
Fault History
Hold Mode
Calibration
Zero Main Sensor
Air Calibration
In-process Cal
Dual Range Cal #####
Adjust Temperature
pH 2-Pt Cal #
pH Auto Cal #
Standardize pH #
D/A trim
FIGURE 6-2. Xmt-A-HT HART/Model 375 Menu Tree
Page 44

34
MODEL XMT-A-HT SECTION 6.0
OPERATION WITH MODEL 375
Diagnostic Vars
Oxygen
Snsr Cur
Sensitivity
Zero Current
pH Value #
pH mV #
pH Slope #
pH Zero Offset #
GI #
Temp
Temp Res
Noise rejection
Basic setup
Ta g
PV Range Values
PV LRV
PV URV
PV
PV % rnge
Device information
Distributor
Model
Dev id
Ta g
Date
Write protect
Snsr text
Descriptor
Message
Revision #'s
Universal rev
Fld dev rev
Software rev
Hardware rev
Detailed setup
Sensors
Oxygen *
Oxygen Unit [ppm, ppb, %sat, mmHg, inHg, atm, kPa, mbar, bar] *, *****
Oxygen Sensor [ADO, TRDO, SSDO1, SSDO2] ##
Salinity ###
Pressure Unit [mmHg, inHg, atm, kPa, mbar, bar] ##
Use process pressure for %saturation? [No, Yes] ###
Process pressure (Note: Valid only when process pressure is enabled)
Air cal pressure ## (read only)
Input filter
Sensor SST
Sensor SSS
Dual Range Cal [Disable, Enable] ####
FIGURE 6-2. Xmt-A-HT HART/Model 375 Menu Tree
Page 45

35
MODEL XMT-A-HT SECTION 6.0
OPERATION WITH MODEL 375
pH #
pH Value
pH Comp [Auto, Manual]
Manual pH
Preamp loc [Sensor, Xmtr]
Autocal [Manual, Standard, DIN 19267, Ingold, Merck]
pH Slope
pH SST
pH SSS
pH Zero Offset Limit
pH Diagnostics
Diagnostics [Off, On]
GFH
GFL
Imped Comp [Off, On]
Temperature
Temp Comp [Auto, Manual]
Man. Temp
Temp unit [ºC, ºF]
Temp Snsr
Signal condition
LRV
URV
AO Damp
% rnge
Xfer fnctn
AO lo end point
AO hi end pt
Output condition
Analog output
AO
AO Alrm typ
Fixed
Fault mode [Fixed, Live]
Fault
Loop test
D/A trim
HART output
PV is Oxygen *
SV is Temp **
TV is Snsr Cur ***
4V is pH ****
Poll addr
Burst option [PV, %range/current, Process vars/crnt]
Burst mode [Off, On]
Num req preams
Num resp preams
FIGURE 6-2. Xmt-A-HT HART/Model 375 Menu Tree
Page 46

36
MODEL XMT-A-HT SECTION 6.0
OPERATION WITH MODEL 375
Device information
Distributor
Model
Dev id
Ta g
Date
Write protect
Snsr text
Descriptor
Message
Revision #'s
Universal rev
Fld dev rev
Software rev
Hardware rev
Local Display
AO LOI Units [mA, %]
LOI cfg code
LOI cal code
Noise rejection
Load Default Conf.
Review
Sensors
Outputs
Device information
PV
PV AO
PV LRV
PV URV
--------------------------------------------------------------------------------
Notes:
* Can be Oxygen, Free Cl, Ozone, Ttl Cl, or Chlrmn
** Can be *, Temp, pH, GI
*** Can be *, Snsr Cur, Temp, pH, GI
**** Can be *, Snsr Cur, Temp, pH, GI, Temp Res, Not Used
***** Units for Ozone can be ppm or ppb. For any of the chlorines, unit is
always ppm.
# Valid when PV = Free Cl
## Valid when PV = Oxygen
### Valid when PV = Oxygen and unit = %sat
#### Valid when PV = Free Cl, Ttl Cl, or Chlrmn
##### Valid when Dual Range Cal = Enable
FIGURE 6-2. Xmt-A-HT HART/Model 375 Menu Tree
Page 47

37
MODEL XMT-A-HT SECTION 7.0
PROGRAMMING THE TRANSMITTER
SECTION 7.0
PROGRAMMING THE TRANSMITTER
7.1 GENERAL
This section describes how to program the transmitter using the keypad.
1. Configure and assign values to the 4-20 mA output.
2. Test and trim the current output.
3. Select the measurement to be made (oxygen, ozone, free chlorine, total chlorine, or monochloramine).
4. Choose temperature units and automatic or manual temperature mode.
5. Set a security code.
6. Make certain settings relating to HART communication.
7. Program the transmitter for maximum reduction of environmental noise.
Default settings are shown in Table 7-1. To change a default setting, refer to the section listed in the table. To return the
transmitter to the default settings, see Section 7.9.
7.2 CHANGING START-UP SETTINGS
When the Solu Comp Xmt is powered up for the first time, startup screens appear. The screens prompt the user to
enter the measurement being made and if oxygen was selected, to identify the sensor being used, to select automatic or manual pH correction (free chlorine only) and to select temperature units. If incorrect settings were entered at
startup, enter the correct settings now. To change the measurement, refer to Section 7.4.
Page 48

38
TABLE 7-1. Default Settings
MODEL XMT-A-HT SECTION 7.0
PROGRAMMING THE TRANSMITTER
Table 7-1 continued on following page
Page 49

39
MODEL XMT-A-HT SECTION 7.0
PROGRAMMING THE TRANSMITTER
7.3 CONFIGURING AND RANGING THE OUTPUT
7.3.1 Purpose
1. Configuring an output means
a. displaying the output reading in units of mA or percent of full scale.
b. changing the time constant for output dampening.
c. assigning the value the output current will take if the transmitter detects a fault in itself or the sensor.
2. Ranging the output means assigning values to the 4 mA and 20 mA outputs.
3. Testing an output means entering a test value from the keypad to check the operation of recorders or controllers.
4. Trimming an output means calibrating the 4 and 20 mA current outputs against a referee milliammeter.
7.3.2 Definitions
1. CURRENT OUTPUT. The transmitter provides a continuous 4-20 mA output current directly proportional to the
concentration of oxygen, ozone, chlorine, or monochloramine in the sample.
2. FAULT. The transmitter continuously monitors itself and the sensor for faults. If the transmitter detects a fault, the
4-20 mA output can be programmed to go to a fixed value or it can be programmed to continue to display the live
current reading. In any event Fault appears intermittently in the second line of the display.
3. DAMPEN. Output dampening smooths out noisy readings. But it also increases the response time of the output. To
estimate the time (in minutes) required for the output to reach 95% of the final reading following a step change, divide
the setting by 20. Thus, a setting of 140 means that, following a step change, the output takes about seven minutes
to reach 95% of final reading. The output dampen setting does not affect the response time of the process display. The
maximum setting is 255.
4. TEST. The transmitter can be programmed to generate a test current.
TABLE 7-1. Default Settings (continued)
Page 50

40
MODEL XMT-A-HT SECTION 7.0
PROGRAMMING THE TRANSMITTER
7.3.3 Procedure: Configuring the Output
1. Press MENU. The menu screen appears. Choose Program.
2. Choose Output.
3. Choose Configure.
4. Choose Fault.
5. Choose Fixed or Live.
6. If you chose Fixed, the screen at left appears. Use the arrow keys to change the
fault current to the desired value. The limits are 4.00 to 22.00 mA. If you chose
Live, there are no settings to make.
7. The screen at left appears. Choose mA/%.
8. Choose mA or percent. Percent means the display will show percent of full scale
reading.
9. The screen at left appears. Choose Damping.
10. Use the arrow keys to change the blinking display to the desired time constant.
1. Press MENU. The menu screen appears. Choose Program.
2. Choose Output.
3. Choose Range.
4. Assign a value to the 4 mA output and press ENTER. Then assign a value to the
20 mA output. Press ENTER. Use the arrow keys to change the flashing display
to the desired value.
Calibrate
Hold
Program Display
Display Ouput?
mA
percent
Output
Temp
Measurement° >>
Configure?
Fault
mA/% Damping
Configure? Fault
mA/%
Damping
Configure? Fault
mA/%
Damping
Set to value?
Fixed
Live
Current Output
if Fault:
2
2.00mA
Damping? 000−255
0
00 sec
Output range?
4mA
0
.000ppm
Output? Test
Configure
Range
Output
Temp
Measurement° >>
Output? Test
Configure
Range
7.3.4 Procedure: Ranging the output
Calibrate Hold
Program
Display
Page 51

41
MODEL XMT-A-HT SECTION 7.0
PROGRAMMING THE TRANSMITTER
Current Output
for Test:
1
2.00mA
Output
Temp
Measurement° >>
Test Output
Trim Output
Output?
Test
Configure Range
7.3.5 Procedure: Testing the output
Calibrate Hold
Program
Display
1. Press MENU. The menu screen appears. Choose Program.
2. Choose Output.
3. Choose Test.
4. Choose Test Output.
5. Use the arrow keys to change the displayed current to the desired value. Press
ENTER. The output will change to the value just entered.
6. To return to normal operation, press EXIT. The output will return to the value determined by the process variable.
7. To return to the main display, press MENU then EXIT.
Meter reading:
0
4.00mA
Meter reading:
2
0.00mA
Trim Complete
Output
Temp
Measurement >>
Test Output
Trim Output
Output?
Test
Configure Range
7.3.6 Procedure: Trimming the output
Calibrate Hold
Program
Display
1. Connect an accurate milliammeter in series with the current output.
2. Press MENU. The menu screen appears. Choose Program.
3. Choose Output.
4. Choose Test.
5. Choose Trim Output.
6. The output goes to 4.00 mA. If the milliammeter does not read 4.00 mA, use the
arrow keys to change the display to match the current measured by the milliammeter.
7. The output goes to 20.00 mA. If the milliammeter does not read 20.00 mA, use
the arrow keys to change the display to match the current measured by the milliammeter.
8. To return to the main display, press MENU then EXIT.
Page 52

42
MODEL XMT-A-HT SECTION 7.0
PROGRAMMING THE TRANSMITTER
7.4 CHOOSING AND CONFIGURING THE ANALYTICAL MEASUREMENT
7.4.1 Purpose
This section describes how to do the following:
1. Configure the transmitter to measure oxygen, ozone, free chlorine, total chlorine, or monochloramine.
2. Choose the concentration units to be displayed
3. Set an input filter for the raw sensor current.
4. If oxygen was selected, there are additional selections to make.
a. identify the type of sensor being used
b. choose the units in which barometric pressure will be displayed
c. select a process pressure for calculating % saturation
d. enter the salinity of the process liquid
5. If free chlorine was selected, there are additional selections and settings to make.
a. choose automatic or manual pH correction
b. configure the pH sensor if automatic pH correction was selected
c. choose single or dual slope calibration
6. If total chlorine was selected, single or dual slope calibration must also be specified.
7.4.2 Definitions
1. MEASUREMENT. The transmitter can be configured to measure dissolve oxygen (ppm and ppb level), free chlorine,
total chlorine, monochloramine, and ozone.
2. FREE CHLORINE. Free chlorine is the product of adding sodium hypochlorite (bleach) or chlorine gas to fresh water.
Free chlorine is the sum of hypochlorous acid (HOCl) and hypochlorite ion (OCl-).
3. TOTAL CHLORINE. Total chlorine is the sum of free and combined chlorine. Combined chlorine generally refers to
chlorine oxidants in which chlorine is combined with ammonia or organic amines. The term total chlorine also refers to
other chlorine oxidants such as chlorine dioxide. To measure total chlorine, the sample must first be treated with acetic
acid and potassium iodide. Total chlorine reacts with iodide to produce an equivalent amount of iodine, which the sensor measures.
4. MONOCHLORAMINE. Monochloramine (NH
2
Cl) is commonly used in the United States for disinfecting drinking water.
It is made by first treating the water with ammonia followed by just the exact amount of chlorine to completely react
with the ammonia. Monochloramine is a useful disinfectant in waters that have a tendency to produce trihalomethanes
(THMs) when treated free chlorine.
5. BAROMETRIC PRESSURE (DISSOLVED OXYGEN ONLY). Dissolved oxygen sensors are usually calibrated by
exposing them to air. The sensor current in air is exactly the same as the current when the sensor is in water saturated with air. The maximum solubility of atmospheric oxygen in water depends on temperature and barometric pressure.
A temperature device in the oxygen sensor measures temperature. The user must enter the barometric pressure.
6. PERCENT SATURATION (DISSOLVED OXYGEN ONLY). Percent saturation is the ratio of the concentration of dissolved oxygen in a sample to the maximum amount of oxygen the sample can hold at the same temperature. Pressure
also affects the percent saturation. Usually, percent saturation is calculated using the barometric pressure during calibration. If the user desires, percent saturation can also be calculated using the process pressure.
Page 53

43
7. SALINITY (DISSOLVED OXYGEN ONLY). The solubility of oxygen in water depends on the concentration of dissolved salts in water. Increasing the concentration decreases the solubility. If the salt concentration is greater than
about 1000 ppm, the accuracy of the measurement can be improved by applying a salinity correction. Enter the salinity as parts per thousand. One percent is ten parts per thousand.
8. pH CORRECTION (FREE CHLORINE ONLY). Free chlorine is the sum of hypochlorous acid (HOCl) and hypochlorite
ion (OCl-). The relative amount of each depends on pH. As pH increases, the fraction of free chlorine present as HOCl
decreases and the fraction present as OCl-increases. Because the sensor responds only to HOCl, a correction is necessary to convert the sensor current into a free chlorine reading. The Solu Comp Xmt uses both automatic and manual pH correction. In automatic pH correction the transmitter continuously monitors the pH of the sample and corrects
the free chlorine reading for changes in pH. In manual pH correction, the user enters the pH of the sample. Generally,
if the pH varies more than about 0.2 units over short periods of time, automatic pH correction is best. If the pH is relatively steady or subject only to seasonal changes, manual pH correction is adequate.
9. pH SETTINGS (FREE CHLORINE ONLY). If you are measuring free chlorine with continuous (automatic) pH correction, there are additional pH settings to make.
a. PREAMPLIFIER. The raw pH signal is a high impedance voltage. A voltage follower or preamplifier, located either
in the sensor or transmitter, converts the high impedance signal into a low impedance one. Normally, high impedance signals should be sent no further than about 15 feet.
b. REFERENCE OFFSET. Ideally, a pH sensor in pH 7 buffer should have a voltage of 0 mV. The difference between
the measured voltage in pH 7 buffer and the ideal value is the reference offset. Typically, the reference offset is
less than 60 mV.
c. DIAGNOSTICS. The Solu Comp Xmt continuously monitors the pH sensor for faults. If it detects a fault, the trans-
mitter displays a fault message.
d. GLASS IMPEDANCE. The transmitter monitors the condition of the pH-sensitive glass membrane in the sensor by
continuously measuring the impedance across the membrane. Typical impedance is between 100 and 500 MΩ.
Low impedance (<10 MΩ) implies the glass bulb has cracked and the sensor must be replaced. An extremely high
impedance (>1000 MΩ) implirs the sensor is aging and may soon need replacement. High impedance might also
mean that the glass membrane is no longer immersed in the process liquid.
10. DUAL SLOPE CALIBRATION (FREE AND TOTAL CHLORINE ONLY). The Model 499ACL-01 (free chlorine) and
499ACL-02 (total chlorine) sensors lose sensitivity at high concentrations of chlorine. The Solu Comp Xmt has a dual
slope feature that allows the user to compensate for the non-linearity of the sensor. For the vast majority of applications, dual slope calibration is unnecessary.
11. INPUT FILTER. The raw sensor current can be filtered to reduce noise. Filtering also increases the response time. The
filter is the time required for the input to reach 63% of its final reading following a step change.
MODEL XMT-A-HT SECTION 7.0
PROGRAMMING THE TRANSMITTER
Page 54

44
MODEL XMT-A-HT SECTION 7.0
PROGRAMMING THE TRANSMITTER
Manufacturer?
Rosemount
Other
Application?
Water/Waste
>>
units?
ppm
%sat ppb >>
units?
ppm
ppb
Pressure units?
mmHg
inHg atm >>
Use processPress
for %satn? Yes No
Process pressure
%sat: 7
60mmHg
Input filter?
63% in 0
05sec
Input filter?
63% in
0
05sec
Salinity, parts/
thousand?
2
0.0
Outputs Temp
Measurement°
>>
Measurement type
Oxygen
Ozone >>
7.4.3 Procedure: Measurement
Calibrate Hold
Program
Display
1. Press MENU. The menu screen appears. Choose Program.
2. Choose Measurement.
3. Choose Measurement type (oxygen, ozone, free chlorine, total chlorine, or
monochloramine).
4. The screen appearing next depends on the selection made in step 3.
a. If you chose oxygen, go to step 5a.
b. If you chose ozone, go to step 6a.
c. If you chose free chlorine, go to step 7a.
d. If you chose total chlorine, go to step 8a.
e. If you chose monochloramine, go to step 9a.
5a. Identify the manufacturer of the oxygen sensor: Rosemount or Other.
5b. Identify the application: water or wastewater, trace oxygen, or biopharm. Move
the cursor to >> and press ENTER to move to the next screen.
5c. Choose the units in which results are to be displayed: ppm, ppb, partialPress, or
%sat. Select >> to view the next screen. If you chose partialPress, the partial
pressure and the barometric pressure used in air calibration will be displayed in
the pressure units selected below.
5d. Choose pressure units: mm Hg, in Hg, atm, kPa, bar, or mbar.
5e. If percent saturation is to be calculated using the process pressure, choose Yes
and go to step 5f. If percent saturation is to be calculated using the barometric
pressure during air calibration, choose No. If you chose No, the screen changes
to the screen in step 5g.
5f. Enter the desired pressure.
5g. Enter the time constant for the input filter.
5h. Enter the salinity in parts per thousand.
5i. To return to the main display press MENU then EXIT.
6a. If you chose ozone, select the units in which the ozone concentration is to be displayed.
6b. Enter the time constant for the input filter.
6c. To return to the main display, press MENU then EXIT.
Page 55

45
MODEL XMT-A-HT SECTION 7.0
PROGRAMMING THE TRANSMITTER
7a. For free chlorine, choose auto or manual pH correction. If you chose auto,
you must also configure the pH sensor. Go to step 7b. If you chose manual, go
to step 7k.
7b. Identify the location of the pre-amplifier for the pH sensor. Is it in the transmitter
(Xmtr) or in the sensor or junction box (Sensor/Jbox)?
pH sensor pre-amplifier location
399-09-62 Sensor/JBox
399VP-09 Sensor/JBox
399-14 Xmtr
7c. Select a maximum value for the pH sensor reference offset.
7d. Activate diagnostic messages. Even if diagnostic messages are turned off, the
current pulses used to measure diagnostics will still be operating.
7e. Turn on or turn off the temperature correction for the glass membrane imped-
ance measurement. Keeping the temperature correction on is recommended.
7f. Select a value at which the low glass impedance fault message will be shown.
The default value is 0010 MΩ.
7g. Select a value at which the high glass impedance fault message will be shown.
The default value is 1000 MΩ.
7h. Enter the time constant for the input filter.
7i. Choose single or dual slope calibration. For the vast majority of applications,
dual slope calibration is unnecessary.
7j. To return to the main display, press MENU then EXIT.
7k. If you choose manual pH correction, enter the desired pH. The transmitter will
use this value in all subsequent calculations no matter what the true pH is.
7l. Enter the time constant for the input filter.
7m. Choose single or dual slope calibration. For the vast majority of applications,
dual slope calibration is unnecessary.
7n. To return to the main display, press MENU then EXIT.
pH Comp?
Auto
Manual
Use Preamp in?
Xmtr
Sensor/JBox
Cal Slope?
Single
Dual
Cal Slope?
Single
Dual
Diagnostic msgs?
On
Off
GlassZ temp
correct
On
Off
Glass fault low
value: 0
010mΩ
Glass fault high
value:
1
000mΩ
Manual pH
0
7.00pH
Max pH reference
offset:
0
60mV
Input filter?
63% in
0
05sec
Input filter?
63% in
0
05sec
Page 56

46
MODEL XMT-A-HT SECTION 7.0
PROGRAMMING THE TRANSMITTER
8a. If you chose total chlorine, select single or dual slope calibration. For the vast
majority of applications, dual slope calibration is unnecessary.
8b. Enter the time constant for the input filter.
8c. To return to the main display, press MENU then EXIT.
9a. If you chose monochloramine, enter the time constant for the input filter.
9b. To return to the main display, press MENU then EXIT.
Cl Cal Slope?
Single
Dual
7.5 MAKING TEMPERATURE SETTINGS
7.5.1 Purpose
This section describes how to do the following:
1. Choose temperature units (°C or °F).
2. Choose automatic or manual temperature correction for membrane permeability.
3. Choose automatic or manual temperature compensation for pH (pH settings apply to free chlorine only).
4. Enter a temperature for manual temperature compensation.
7.5.2 Definitions — oxygen, ozone, chlorine, and monochloramine
1. AUTOMATIC TEMPERATURE CORRECTION. Membrane-covered amperometric sensors produce a current directly
proportional to the rate the analyte (the substance being measured) diffuses through the membrane. The diffusion
rate is proportional to the concentration of analyte and the temperature. As temperature increases, membrane permeability increases. Thus, an increase in temperature will cause the sensor current to increase even though the
analyte level remained constant. A correction equation in the transmitter software automatically corrects for changes
in membrane permeability. In automatic temperature correction, the transmitter uses the temperature measured by
the sensor for the correction.
2. MANUAL TEMPERATURE CORRECTION. In manual temperature correction the transmitter uses the temperature
entered by the user for the membrane permeability correction. It does not use the actual process temperature. Do
NOT use manual temperature correction unless the measurement and calibration temperatures differ by no more
than about 2°C. Manual temperature correction is useful only if the sensor temperature element has failed and a
replacement sensor is not available.
7.5.3 Definitions — pH
1. AUTOMATIC TEMPERATURE COMPENSATION. The transmitter uses a temperature-dependent factor to convert
measured cell voltage to pH. In automatic temperature compensation, the transmitter measures the temperature and
automatically calculates the correct conversion factor. For maximum accuracy, use automatic temperature compensation.
2. MANUAL TEMPERATURE COMPENSATION. In manual temperature compensation, the transmitter converts measured voltage to pH using the temperature entered by the user. It does not use the actual process temperature. Do
NOT use manual temperature compensation unless the process temperature varies no more than about ±2°C or the
pH is between 6 and 8. Manual temperature compensation is useful if the sensor temperature element has failed
and a replacement sensor is not available.
Input filter?
63% in
0
05sec
Input filter?
63% in
0
05sec
Page 57

47
MODEL XMT-A-HT SECTION 7.0
PROGRAMMING THE TRANSMITTER
Outputs
Temp
Measurement >>
Config Temp?
°
C/F
Live/Manual
7.5.3 Procedure: Temperature settings
Calibrate Hold
Program
Display
1. Press MENU. The menu screen appears. Choose Program.
2. Choose Temp.
3. Choose °C/°F to change the display units. Choose Live/Manual to turn on (Live) or
turn off (Manual) automatic temperature correction for membrane permeability
and automatic temperature compensation for pH.
a. If you chose °C/°F, select °C or °F.
b. If you chose Live/Manual, select Live or Manual.
c. If you chose Manual, enter the temperature in the next screen. The tempera-
ture entered in this step will be used in all subsequent measurements, no matter what the process temperature is.
4. To return to the main display, press MENU then EXIT.
Outputs Temp
Measurement
>>
Security
HART
>>
7.6.2 Procedure: Setting a security code
Calibrate Hold
Program
Display
Lock?
Calib
Config
1. Press MENU. The menu screen appears. Choose Program.
2. Choose >>.
3. Choose Security.
4. Choose Calib or Config.
a. If you chose Calib, enter a three-digit security code.
b. If you chose Config, enter a three-digit security code.
5. To return to the main display, press MENU then EXIT.
7.6 SETTING A SECURITY CODE
7.6.1 Purpose
This section describes how to set a security code. There are three levels of security:
a. A user can view the default display and information screens only.
b. A user has access to the calibration and hold menus only.
c. A user has access to all menus.
The security code is a three-digit number. The table shows what happens when security codes are assigned to Calib
(calibration) and Config (configure). In the table XXX and YYY are the assigned security codes. To bypass security,
enter 555.
Code assignments
Calib Config What happens
000 XXX User enters XXX and has access to all menus.
XXX YYY User enters XXX and has access to calibration and hold menus only. User enters YYY and has access to all menus.
XXX 000 User needs no security code to have access to all menus.
000 000 User needs no security code to have access to all menus.
Page 58

48
MODEL XMT-A-HT SECTION 7.0
PROGRAMMING THE TRANSMITTER
Outputs Temp
Measurement
>>
Security HART
>>
7.8.2 Procedure: Noise reduction
Calibrate Hold
Program
Display
Ambient AC Power
60Hz
50Hz
Noise Rejection
ResetTransmitter >>
Noise Rejection
ResetTransmitter
>>
1. Press MENU. The menu screen appears. Choose Program.
2. Choose >>.
3. Choose >>.
4. Choose Noise Reduction.
5. Select the frequency of the ambient AC power.
6. To return to the main display, press MENU then EXIT.
7.7 MAKING HART RELATED SETTINGS
For more information refer to Section 6.0.
7.8 NOISE REDUCTION
7.8.1 Purpose
For maximum noise reduction, the frequency of the ambient AC power must be entered.
Outputs Temp
Measurement
>>
Security
HART
>>
Calibrate Hold
Program
Display
Load factory
settings?
Yes
No
1. Press MENU. The menu screen appears. Choose Program.
2. Choose >>.
3. Choose >>.
4. Choose ResetTransmitter.
5. Choose Yes or No. Choosing Yes clears previous settings and calibrations and
returns the transmitter to the first quick start screen.
7.9 RESETTING FACTORY CALIBRATION AND FACTORY DEFAULT SETTINGS
7.9.1 Purpose
This section describes how to install factory calibration and default values. The process also clears all fault messages
and returns the display to the first quick start screen.
7.9.2 Procedure: Installing default settings
Page 59

49
Default Display
Display Contrast
7.10.2 Procedure: Choosing a display screen.
Calibrate Hold
Program Display
1. Press MENU. The menu screen appears. Choose Display.
2. Choose Default Display.
3. Press êuntil the desired screen appears. Press ENTER.
4. The display returns to the screen in step 2. Press MENU then EXIT to return to
the main display.
7.10 SELECTING A DEFAULT SCREEN AND SCREEN CONTRAST
7.10.1 Purpose
This section describes how to do the following:
1. Set a default screen. The default screen is the screen shown during normal operation. The Solu Comp Xmt allows
the user to choose from a number of screens. Which screens are available depends on the measurement the transmitter is making.
2. Change the screen contrast.
Default Display
Display Contrast
Display contrast
Lighter
Darker
7.10.3 Procedure: Changing screen contrast.
Calibrate Hold
Program
Display
1. Press MENU. The menu screen appears. Choose Display.
2. Choose Display Contrast.
3. To increase the contrast, select darker. Press ENTER. Each key press increases
the contrast. To reduce the contrast, select lighter, Press ENTER. Each key press
decreases the contrast.
4. To return to the main display, press MENU then EXIT.
MODEL XMT-A-HT SECTION 7.0
PROGRAMMING THE TRANSMITTER
NOTE:
Screen contrast can also be adjusted from the main display. Press MENU and é at
the same time to increase contrast. Press MENU and êat the same time to decrease
contrast. Repeatedly pressing the arrow key increases or reduces the contrast.
Page 60

50
MODEL XMT-A-HT SECTION 8.0
CALIBRATION — TEMPERATURE
SECTION 8.0
CALIBRATION — TEMPERATURE
8.1 INTRODUCTION
All five amperometric sensors (oxygen, ozone, free chlorine, total chlorine, and monochloramine) are membranecovered sensors. As the sensor operates, the analyte (the substance to be determined) diffuses through the membrane and is consumed at an electrode immediately behind the membrane. The reaction produces a current that
depends on the rate at which the analyte diffuses through the membrane. The diffusion rate, in turn, depends on the
concentration of the analyte and how easily it passes through the membrane (the membrane permeability). Because
the membrane permeability is a function of temperature, the sensor current will change if the temperature changes.
To correct for changes in sensor current caused by temperature, the transmitter automatically applies a membrane
permeability correction. Although the membrane permeability is different for each sensor, the change is about 3%/°C
at 25°C, so a 1°C error in temperature produces about a 3% error in the reading.
Temperature plays an additional role in oxygen measurements. Oxygen sensors are calibrated by exposing them
to water-saturated air, which, from the point of view of the sensor, is equivalent to water saturated with atmospheric
oxygen (see Section 9.0 for more information). During calibration, the transmitter calculates the solubility of atmospheric oxygen in water using the following steps. First, the transmitter measures the temperature. From the temperature, the transmitter calculates the vapor pressure of water and, using the barometric pressure, calculates the
partial pressure of atmospheric oxygen. Once the transmitter knows the partial pressure, it calculates the equilibrium solubility of oxygen in water using a temperature-dependent factor called the Bunsen coefficient. Overall, a
1°C error in the temperature measurement produces about a 2% error in the solubility calculated during calibration and about the same error in subsequent measurements.
Temperature is also important in the pH measurement required to correct free chlorine readings.
1. The transmitter uses a temperature dependent factor to convert measured cell voltage to pH. Normally, a slight
inaccuracy in the temperature reading is unimportant unless the pH reading is significantly different from 7.00.
Even then, the error is small. For example, at pH 12 and 25°C, a 1°C error produces a pH error less than ±0.02.
2. During auto calibration, the transmitter recognizes the buffer being used and calculates the actual pH of the
buffer at the measured temperature. Because the pH of most buffers changes only slightly with temperature,
reasonable errors in temperature do not produce large errors in the buffer pH. For example, a 1°C error causes at most an error of ±0.03 in the calculated buffer pH.
Without calibration the accuracy of the temperature measurement is about ±0.4°C. Calibrate the transmitter if
1. ±0.4°C accuracy is not acceptable
2. the temperature measurement is suspected of being in error. Calibrate temperature by making the transmitterreading match the temperature measured with a standard thermometer.
Page 61

51
MODEL XMT-A-HT SECTION 8.0
CALIBRATION — TEMPERATURE
4. Press MENU. The menu screen appears. Choose Calibrate.
5. Choose Temp.
6. If transmitter was programmed in Section 7.5 to use the actual process
temperature, go to step 7.
If the transmitter was programmed to use a temperature entered by the
user, go to step 9.
7. To calibrate the temperature, change the number in the second line to
match the temperature measured with the standard thermometer.
Press ENTER.
8. Press MENU then EXIT to return to the main display.
9. If the temperature value shown in the display is not correct, use the
arrow keys to change it to the desired value. The transmitter will use the
temperature entered in this step in all measurements and calculations,
no matter what the true temperature is.
10. Press MENU then EXIT to return to the main display.
8.2 PROCEDURE: CALIBRATING TEMPERATURE
1. Remove the sensor from the process liquid. Place it in an insulated container of water along with a calibrated
thermometer. Submerge at least the bottom two inches of the sensor. Stir continuously.
2. Allow the sensor to reach thermal equilibrium. For some sensors, the time constant for a change in temperature is 5 min., so it may take as long as 30 min. for temperature equilibration.
3. Change the Solu Comp Xmt display to match the calibrated thermometer using the procedure below.
Cal?
Measurement
Temp
Calibrate
Hold
Program Display
Live 25.0ºC
Cal
+
025.0ºC
Manual Temp?
+25.0ºC
Page 62

52
MODEL XMT-A-HT SECTION 9.0
CALIBRATION — DISSOLVED OXYGEN
SECTION 9.0
CALIBRATION — DISSOLVED OXYGEN
9.1 INTRODUCTION
As Figure 9-1 shows, oxygen sensors generate a current directly proportional to the concentration of dissolved
oxygen in the sample. Calibrating the sensor requires exposing it to a solution containing no oxygen (zero standard) and to a solution containing a known amount of oxygen (full-scale standard).
The zero standard is necessary because oxygen sensors, even when no oxygen is present in the sample, generate a small current called the residual current. The transmitter compensates for the residual current by subtracting
it from the measured current before converting the result to a dissolved oxygen value. New sensors require zeroing before being placed in service, and sensors should be zeroed whenever the electrolyte solution is replaced.
The recommended zero standard is 5% sodium sulfite in water, although oxygen-free nitrogen can also be used.
The Model 499A TrDO sensor, used for the determination of trace (ppb) oxygen levels, has very low residual current and does not normally require zeroing. The residual current in the 499A TrDO sensor is equivalent
to less than 0.5 ppb oxygen.
The purpose of the full-scale standard is to establish the slope of the calibration curve. Because the solubility of
atmospheric oxygen in water as a function of temperature and barometric pressure is well known, the natural
choice for a full-scale standard is air-saturated water. However, air-saturated water is difficult to prepare and use,
so the universal practice is to use air for calibration. From the point of view of the oxygen sensor, air and air-saturated water are identical. The equivalence comes about because the sensor really measures the chemical potential of oxygen. Chemical potential is the force that causes oxygen molecules to diffuse from the sample into the
sensor where they can be measured. It is also the force that causes oxygen molecules in air to dissolve in water
and to continue to dissolve until the water is saturated with oxygen. Once the water is saturated, the chemical
potential of oxygen in the two phases (air and water) is the same.
Oxygen sensors generate a current directly proportional to the rate at which oxygen molecules diffuse through a
membrane stretched over the end of the sensor. The diffusion rate depends on the difference in chemical potential between oxygen in the sensor and oxygen in the sample. An electrochemical reaction, which destroys any oxygen molecules entering the sensor, keeps the concentration (and the chemical potential) of oxygen inside the sensor equal to zero. Therefore, the chemical potential of oxygen in the sample alone determines the diffusion rate
and the sensor current.
When the sensor is calibrated, the chemical potential of oxygen in the standard determines the sensor current.
Whether the sensor is calibrated in air or air-saturated water is immaterial. The chemical potential of oxygen is the
same in either phase. Normally, to make the calculation of solubility in common units (like ppm DO) simpler, it is
convenient to use water-saturated air for calibration.
Automatic air calibration is standard. The user simply exposes the sensor to water-saturated air. The transmitter
monitors the sensor current. When the current is stable, the transmitter stores the current and measures the temperature using a temperature element inside the oxygen sensor. The user must enter the barometric pressure.
From the temperature the transmitter calculates the saturation vapor pressure of water. Next, it calculates the pressure of dry air by subtracting the vapor pressure from the
barometric pressure. Using the fact that dry air always contains 20.95% oxygen, the transmitter calculates the partial
pressure of oxygen. Once the transmitter knows the partial
pressure of oxygen, it uses the Bunsen coefficient to calculate the equilibrium solubility of atmospheric oxygen in
water at the prevailing temperature. At 25°C and 760 mm
Hg, the equilibrium solubility is 8.24 ppm.
Often it is too difficult or messy to remove the sensor from
the process liquid for calibration. In this case, the sensor
can be calibrated against a measurement made with a
portable laboratory instrument. The laboratory instrument
typically uses a membrane-covered amperometric sensor
that has been calibrated against water-saturated air.
FIGURE 9-1. Sensor Current as a Function of
Dissolved Oxygen Concentration
Page 63

53
MODEL XMT-A-HT SECTION 9.0
CALIBRATION — DISSOLVED OXYGEN
2. Press MENU. The menu screen appears. Choose Calibrate.
3. Choose Oxygen.
4. Choose Zero.
5. The screen at left appears. The top line is the raw sensor current.
6. Once the reading is stable, the screen at left appears. Sensor zero is
complete and the transmitter has stored the zero current. The screen
remains until the operator presses MENU then EXIT to return to the
main display.
NOTE
Pressing ENTER during the zero step will cause the transmitter to
use the present sensor current as the zero current. If the sensor is
zeroed before the current has reach a minimum stable value, subsequent readings will be in error.
7. This screen appears if the zero current is extremely high. See Section
17 for troubleshooting. To repeat the zero step, press EXIT and choose
Zero.
8. This screen appears if the zero current is moderately high. To continue,
choose Yes. To repeat the zero step choose No. See Section 15 for troubleshooting.
9.2 PROCEDURE — ZEROING THE SENSOR
1. Place the sensor in a fresh solution of 5% sodium sulfite (Na2SO3) in water. Be sure air bubbles are not
trapped against the membrane. The current will drop rapidly at first and then gradually reach a stable zero
value. To monitor the sensor current, go to the main display and press ê until the input current screen appears.
Note the units: nA is nanoamps, µA is microamps. The table gives typical zero currents for Rosemount
Analytical sensors.
A new sensor or a sensor in which the electrolyte solution has been replaced may require several hours (occasionally as long as overnight) to reach a minimum current. DO NOT START THE ZERO ROUTINE UNTIL THE
SENSOR HAS BEEN IN ZERO SOLUTION FOR AT LEAST TWO HOURS.
Sensor Zero Current
499ADO <50 nA
499ATrDO <5 nA
Hx438 and Gx448 <1 nA
Cal?
Oxygen
Temp
Cal? AirCal
InProcess
Zero
Live 200nA
Zeroing
Wait
Possible ZeroErr
Proceed? Yes No
Live 0.000ppm
Sensor Zero Done
Sensor Zero Fail
Current too high
Calibrate
Hold
Program Display
Page 64

54
MODEL XMT-A-HT SECTION 9.0
CALIBRATION — DISSOLVED OXYGEN
4. Press MENU. The main menu screen appears. Choose Calibrate.
5. Choose Oxygen.
6. Choose AirCal.
7. To continue air calibration, choose EnterPress and go to step 8. To
change the stabilization criteria for air calibration or to enter a salinity different from the default value (0.0 parts per thousand), choose Setup and
go to step 12.
8. Enter the barometric pressure.
NOTE
Be sure to enter the actual barometric pressure. Weather forecasters and airports usually report barometric pressure corrected to sea
level; they do not report the actual barometric pressure. To estimate
barometric pressure from altitude, see Appendix A.
9. The display changes to the screen shown at left. The live reading is the
concentration of dissolved oxygen based on the previous calibration.
Wait flashes until the reading meets the stability criteria programmed in
step 12.
10. The screen at left appears once calibration is complete. The concentration of oxygen in the display is the equilibrium solubility of atmsopheric
oxygen in water. The transmitter automatically calculates the solubility
from the measured temperature and the barometric pressure entered by
the user. The transmitter also assumes that the sensor is in water-saturated air when the calibration is done. To return to the main display press
MENU then EXIT.
11. This screen appears if the sensitivity (sensor current divided by concentration) is much higher or lower than expected. See Section 15 for troubleshooting. To repeat the calibration step, choose No. To continue
choose Yes.
Procedure continued on following page.
9.3 PROCEDURE - CALIBRATING THE SENSOR IN AIR
1. Remove the sensor from the process liquid. Use a soft tissue and a stream of water from a wash bottle to clean
the membrane. Blot dry. The membrane must be dry during air calibration.
2. Pour some water in a beaker and suspend the sensor with the membrane about 0.5 inch (1 cm) above the water surface. To avoid drift caused by temperature changes, keep the sensor out of the direct sun.
3. Monitor the dissolved oxygen reading and the temperature. Once readings have stopped drifting begin the calibration. It may take 5-10 minutes for the sensor reading to stabilize. Stabilization time may be even longer if
the process temperature is appreciably different from the air temperature. For an accurate calibration, the temperature measured by the sensor must be stable.
Cal?
AirCal
InProcess Zero
AirCal?
EnterPress
Setup
Calibrate
Hold
Program Display
Air Calibrate
Press
7
60.0mmHg
Live 8.00ppm
AirCal
Wait
Live 8.00ppm
Air Cal Done
Air Cal Failure
Check sensor
Cal?
Oxygen
Temp
Page 65

55
MODEL XMT-A-HT SECTION 9.0
CALIBRATION — DISSOLVED OXYGEN
12. If you chose Setup in step 6, the screen at left appears. This screen and
the following one let you change the stabilization criteria for air calibration. The transmitter will not complete an air calibration until the drift is
less than a certain amount in a specified period of time. The default
value is 0.02 ppm in 10 seconds.
a. Enter the desired stabilization time.
b. Enter the minimum amount the reading is permitted to change in the
time specified in step 12a.
13. Enter the desired salinity in parts per thousand.
14. To return to the main display press MENU then EXIT.
9.3 PROCEDURE - CALIBRATING THE SENSOR IN AIR (continued)
Air Stabilize
Time:
1
0sec
Restart time if
Change >
0
.02ppm
Salinity, parts/
thousand? 0
0.0
Page 66

56
MODEL XMT-A-HT SECTION 9.0
CALIBRATION — DISSOLVED OXYGEN
4. Press MENU. The main menu screen appears. Choose Calibrate.
5. Choose Oxygen.
6. Choose InProcess.
7. The screen at left appears for two seconds.
8. The screen at left appears. The number in the first line is the concentration of dissolved oxygen based on the previous calibration. Wait until the
reading is stable, then press ENTER.
9. The screen at left appears. Press ENTER. The transmitter will store the
present sensor current and temperature and use those values in the calibration.
10. Use the arrow keys to change the value in the second line to match the
reading of the standard instrument. To return to the main display press
MENU then EXIT.
11. This screen appears momentarily if the sensitivity (sensor current divided by concentration) is much higher or lower than expected. The display
then returns to the screen in step 5. See Section 15 for troubleshooting.
9.4 PROCEDURE - CALIBRATING THE SENSOR AGAINST A STANDARD INSTRUMENT
The sensor can be calibrated against a standard instrument. For oxygen sensors installed in aeration basins in
waste treatment plants, calibration against a second instrument is often preferred. For an accurate calibration be
sure that . . .
1. The standard instrument has been zeroed and calibrated against water-saturated air following the manufacturer's instructions.
2. The standard sensor is immersed in the liquid as close to the process sensor as possible.
3. Adequate time is allowed for the standard sensor to stabilize before calibrating the process instrument.
Cal? AirCal
InProcess
Zero
Wait for
Stable reading.
Calibrate
Hold
Program Display
Stable? 10.00ppm
Press enter.
Take sample;
Press enter.
Sample 10.00ppm
Cal 1
0.00ppm
Calibration
Error
Cal?
Oxygen
Temp
Page 67

57
10.1 INTRODUCTION
As Figure 10-1 shows, a free chlorine sensor generates a current directly proportional to the concentration of free
chlorine in the sample. Calibrating the sensor requires exposing it to a solution containing no chlorine (zero standard) and to a solution containing a known amount of chlorine (full-scale standard).
The zero standard is necessary because chlorine sensors, even when no chlorine is in the sample, generate a
small current called the residual current. The transmitter compensates for the residual current by subtracting it
from the measured current before converting the result to a chlorine value. New sensors require zeroing before
being placed in service, and sensors should be zeroed whenever the electrolyte solution is replaced. Either of the
following makes a good zero standard:
• Deionized water containing about 500 ppm sodium chloride. Dissolve 0.5 grams (1/8 teaspoonful) of table
salt in 1 liter of water. DO NOT USE DEIONIZED WATER ALONE FOR ZEROING THE SENSOR. THE
CONDUCTIVITY OF THE ZERO WATER MUST BE GREATER THAN 50 μS/cm.
• Tap water known to contain no chlorine. Expose tap water to bright sunlight for at least 24 hours.
The purpose of the full-scale standard is to establish the slope of the calibration curve. Because stable chlorine
standards do not exist, the sensor must be calibrated against a test run on a grab sample of the process liq-
uid. Several manufacturers offer portable test kits for this purpose. Observe the following precautions when taking and testing the grab sample.
• Take the grab sample from a point as close to the sensor as possible. Be sure that taking the sample does
not alter the flow of the sample to the sensor. It is best to install the sample tap just downstream from the
sensor.
• Chlorine solutions are unstable. Run the test immediately after taking the sample. Try to calibrate the sensor when the chlorine concentration is at the upper end of the normal operating range.
Free chlorine measurements made with the 499ACL-01 sensor also require a pH correction. Free chlorine is the sum of
hypochlorous acid (HOCl) and hyprochlorite ion (OCl-). The relative amount of each depends on the pH. As pH increases, the concentration of HOCl decreases and the concentration of OCl-increases. Because the sensor responds only
to HOCl, a pH correction is necessary to properly convert the sensor current into a free chlorine reading.
The transmitter uses both automatic and manual pH correction. In automatic pH correction, the transmitter continuously monitors the pH of the solution and corrects the free chlorine reading for changes in pH. In manual pH
correction, the transmitter uses a fixed pH value entered by the user to make the correction. Generally, if the pH
changes more than about 0.2 units over short periods of time, automatic pH correction is best. If the pH is relatively steady or subject only to seasonal changes, manual pH correction is adequate.
During calibration, the transmitter must know the pH of the sample. If the transmitter is using automatic pH correction, the pH sensor (properly calibrated) must be in the process liquid before starting the calibration. If the
transmitter is using manual pH correction, be sure to enter the pH value before starting the calibration.
The Model 499ACL-01 free chlorine sensor loses sensitivity at high
concentrations of chlorine. The
Model Xmt-A-HT has a dual slope
feature that allows the user to
compensate for the non-linearity of
the sensor. However, for the vast
majority of applications, dual slope
calibration is unnecessary.
MODEL XMT-A-HT SECTION 10.0
CALIBRATION - FREE CHLORINE
SECTION 10.0
CALIBRATION — FREE CHLORINE
FIGURE 10-1. Sensor Current as a Function of Free Chlorine Concentration
Page 68

58
MODEL XMT-A-HT SECTION 10.0
CALIBRATION - FREE CHLORINE
10.2 PROCEDURE — ZEROING THE SENSOR
1. Place the sensor in the zero standard (see Section 10.1). Be sure no air bubbles are trapped against the membrane. The sensor current will drop rapidly at first and then gradually reach a stable zero value. To monitor the
sensor current, go to the main display and press ê until the input current screen appears. Note the units: nA
is nanoamps, µA is microamps. Typical zero current for a free chlorine sensor is between -10 and +10 nA.
A new sensor or a sensor in which the electrolyte solution has been replaced may require several hours (occasionally as long as overnight) to reach a minimum current. DO NOT START THE ZERO ROUTINE UNTIL
THE SENSOR HAS BEEN IN ZERO SOLUTION FOR AT LEAST TWO HOURS.
2. Press MENU. The menu screen appears. Choose Calibrate.
3. Choose Chlorine.
4. Choose Zero.
5. The screen at left appears. The top line is the raw sensor current.
6. Once the reading is stable, the screen at left appears. Sensor zero is
complete and the transmitter has stored the zero current. The screen
remains until the operator presses MENU then EXIT to return to the
main display.
NOTE
Pressing ENTER during the zero step will cause the transmitter to
use the present sensor current as the zero current. If the sensor is
zeroed before the current has reach a minimum stable value, subsequent readings will be in error.
7. This screen appears if the zero current is extremely high. See Section
17 for troubleshooting. To repeat the zero step, press EXIT and choose
Zero.
8. This screen appears if the zero current is moderately high. To continue,
choose Yes. To repeat the zero step, choose No. See Section 15 for
troubleshooting.
Cal? pH
Chlorine
Temp
Cal?
InProcess
Zero
Live 200nA
Zeroing
Wait
Sensor Zero Fail
Current too high
Possible ZeroErr
Proceed? Yes No
Calibrate
Hold
Program Display
Live 0.000ppm
Sensor Zero Done
Page 69

59
MODEL XMT-A-HT SECTION 10.0
CALIBRATION - FREE CHLORINE
10.3 PROCEDURE — FULL SCALE CALIBRATION
1. Place the sensor in the process liquid. If automatic pH correction is being used, calibrate the pH sensor (see
Section 14) and place it in the process liquid. If manual pH correction is being used, measure the pH of the
process liquid and enter the value (see Section 7.4). Adjust the sample flow until it is within the range recommended for the chlorine sensor. Refer to the sensor instruction sheet.
2. Adjust the chlorine concentration until it is near the upper end of the operating range. Wait until the transmitter reading is stable before starting the calibration.
3. Press MENU. The main menu screen appears. Choose Calibrate.
4. Choose Chlorine.
5. Choose InProcess.
6. The screen at left appears for two seconds.
7. The screen at left appears. The number in the first line is the concentration of chlorine based on the previous calibration. Wait until the reading is stable, then press ENTER.
8. The screen at left appears. Take a grab sample of the process liquid
and immediately press ENTER. The transmitter will store the present
sensor current and temperature and use those values in the calibration.
9. Immediately determine the free chlorine concentration in the sample.
10. Use the arrow keys to change the value in the second line to match the
results of the laboratory test. To return to the main display press MENU
then EXIT.
11. This screen appears momentarily if the sensitivity (sensor current divided by concentration) is much higher or lower than expected. The display then returns to the screen in step 5. See Section 15 for troubleshooting.
Cal? pH
Chlorine
Temp
Calibrate
Hold
Program Display
Cal?
InProcess
Zero
Wait for
Stable reading.
Stable? 1.00ppm
Press enter.
Take sample;
Press enter.
Sample 1.00ppm
Cal
1
.00ppm
Calibration
Error
Page 70

60
MODEL XMT-A-HT SECTION 10.0
CALIBRATION - FREE CHLORINE
10.4 DUAL SLOPE CALIBRATION
Figure 10.2 shows the principle of dual slope calibration. Between zero and concentration C1, the sensor response is linear. When the concentration of chlorine becomes greater than C1, the response is non-linear. In spite
of the non-linearity, the sensor response between C1 and C2 can be approximated by a straight line.
Dual slope calibration is rarely needed. It is probably useful in fewer than 5% of applications.
1. Be sure the transmitter has been configured for dual slope
calibration. See Section 7.4.
2. Place the sensor in the zero solution. (see Section 10.1).
Be sure no air bubbles are trapped against the membrane.
The sensor current will drop rapidly at first and then gradually reach a stable zero value. To monitor the sensor current, go to the main display and press ê until the input current screen appears. Note the units: nA is nanoamps, µA
is microamps. Typical zero current for a free chlorine sensor is between -10 and +10 nA.
A new sensor or a sensor in which the electrolyte solution
has been replaced may require several hours (occasionally as long as overnight) to reach a minimum current. DO
NOT START THE ZERO ROUTINE UNTIL THE SENSOR
HAS BEEN IN ZERO SOLUTION FOR AT LEAST TWO
HOURS.
3. Press MENU. The main menu screen appears. Choose Calibrate.
4. Choose Chlorine.
5. Choose Zero.
6. The screen at left appears. The top line is the raw sensor current.
7. Once the reading is stable, the screen at left appears. Sensor zero is
complete and the transmitter has stored the zero current. The display
returns to the screen in step 5.
NOTE
Pressing ENTER during the zero step will cause the transmitter to
use the present sensor current as the zero current. If the sensor is
zeroed before the current has reach a minimum stable value, subsequent readings will be in error.
8. This screen appears if the zero current is extremely high. See Section
15 for troubleshooting. To repeat the zero step, press EXIT and choose
Zero.
Process continued on following page.
FIGURE 10-2. Dual Slope Calibration
Cal? pH
Chlorine
Temp
Cal?
Zero
pt1 pt2
Live 200nA
Zeroing
Wait
Sensor Zero Fail
Current too high
Calibrate
Hold
Program Display
Live 0.000ppm
Sensor Zero Done
Page 71

61
MODEL XMT-A-HT SECTION 10.0
CALIBRATION - FREE CHLORINE
9. This screen appears if the zero current is moderately high. To continue,
choose Yes. To repeat the zero step, choose No. See Section 15 for
troubleshooting.
10. If the sensor was just zeroed, place it in the process liquid. If automatic pH correction is being used, calibrate the pH sensor (see Section 14)
and place it in the process liquid. If manual pH correction is being used,
measure the pH of the process liquid and enter the value (See Section
7.4). Adjust the sample flow until it is within the range recommended for
the chlorine sensor. Refer to the sensor instruction sheet.
11. Adjust the chlorine concentration until it is near the upper end of the linear range, point C1 in Figure 10-2. Wait until the transmitter reading is
stable before starting the calibration.
12. Choose pt1.
13. The screen at left appears for two seconds.
14. The screen at left appears. The number in the first line is the concentration of chlorine based on the previous calibration. Wait until the reading is stable, then press ENTER.
15. The screen at left appears. Take a grab sample of the process liquid
and immediately press ENTER. The transmitter will store the present
sensor current and temperature and use those values in the calibration.
16. Immediately determine the free chlorine concentration in the sample.
17. Use the arrow keys to change the value in the second line to match the
results of the laboratory test.
18. This screen appears momentarily if the sensitivity (sensor current divided by concentration) is much higher or lower than expected. The display then returns to the screen in step 5. See Section 15 for troubleshooting.
19. Adjust the concentration of chlorine in the sample until it is near the
upper end of the control range (point C2 in Figure 10.2)
20. Choose pt2 and repeat steps 13-17 above.
21. To return to the main display press MENU then EXIT.
Possible ZeroErr
Proceed? Yes
No
Cal?
Zero
pt1
pt2
Cal?
Zero pt1
pt2
Wait for
Stable reading.
Stable? 6.00ppm
Press enter.
Take sample;
Press enter.
Sample 6.00ppm
Cal
6
.00ppm
Calibration
Error
Page 72

62
MODEL XMT-A-HT SECTION 11.0
CALIBRATION - TOTAL CHLORINE
SECTION 11.0
CALIBRATION — TOTAL CHLORINE
11.1 INTRODUCTION
Total chlorine is the sum of free and combined chlorine. The continuous determination of total chlorine requires two
steps. See Figure 11-1. First, the sample flows into a conditioning system (SCS 921A) where a pump continuously adds acetic acid and potassium iodide to the sample. The acid lowers the pH, which allows total chlorine in the
sample to quantitatively oxidize the iodide in the reagent to iodine. In the second step, the treated sample flows to
the sensor. The sensor is a membrane-covered amperometric sensor, whose output is proportional to the concentration of iodine. Because the concentration of iodine is proportional to the concentration of total chlorine, the
transmitter can be calibrated to read total chlorine.
Figure 11-2 shows a typical calibration curve for a total chlorine sensor. Because the sensor really measures
iodine, calibrating the sensor requires exposing it to a solution containing no iodine (zero standard) and to a solution containing a known amount of iodine (full-scale standard).
The zero standard is necessary because the sensor, even when no iodine is present, generates a small current
called the residual current. The transmitter compensates for the residual current by subtracting it from the measured current before converting the result to a total chlorine value. New sensors require zeroing before being
placed in service, and sensors should be zeroed whenever the electrolyte solution is replaced. The best zero standard is sample without reagent added.
The purpose of the full-scale standard is to
establish the slope of the calibration curve.
Because stable total chlorine standards do not
exist, the sensor must be calibrated against
a test run on a grab sample of the process
liquid. Several manufacturers offer portable
test kits for this purpose. Observe the following
precautions when taking and testing the grab
sample.
• Take the grab sample from a point as close
as possible to the inlet of the SCS921 sample conditioning system. Be sure that taking
the sample does not alter the flow through
the SCS921A.
• Chlorine solutions are unstable. Run the
test immediately after taking the sample.
Try to calibrate the sensor when the chlorine concentration is at the upper end of
the normal operating range.
The Model 499ACL-02 (total chlorine) sensor
loses sensitivity at high concentrations of chlorine. The Model Xmt-A-HT has a dual slope
feature that allows the user to compensate for
the non-linearity of the sensor. However, for
the vast majority of applications, dual slope
calibration is unnecessary.
FIGURE 11-1. Determination of Total Chlorine
FIGURE 11-2. Sensor Current as a Function of Total
Chlorine Concentration
Page 73

63
MODEL XMT-A-HT SECTION 11.0
CALIBRATION - TOTAL CHLORINE
11.2 PROCEDURE — ZEROING THE SENSOR
1. Complete the startup sequence described in the SCS921 instruction manual.
2. Remove the reagent uptake tube from the reagent bottle and let it dangle in air. The peristaltic pump will simply pump air into the sample.
3. Let the system run until the sensor current is stable. The sensor current will drop rapidly at first and then gradually reach a stable zero value. To monitor the sensor current, go to the main display and press ê until the
input current screen appears. Note the units: nA is nanoamps, µA is microamps. Typical zero current for a free
chlorine sensor is between -10 and +30 nA.
A new sensor or a sensor in which the electrolyte solution has been replaced may require several hours (occasionally as long as overnight) to reach a minimum current. DO NOT START THE ZERO ROUTINE UNTIL
THE SENSOR HAS BEEN IN ZERO SOLUTION FOR AT LEAST TWO HOURS.
4. Press MENU. The menu screen appears. Choose Calibrate.
5. Choose Chlorine.
6. Choose Zero.
7. The screen at left appears. The top line is the raw sensor current.
8. Once the reading is stable, the screen at left appears. Sensor zero is
complete and the transmitter has stored the zero current. The screen
remains until the operator presses MENU then EXIT to return to the
main display.
NOTE
Pressing ENTER during the zero step will cause the transmitter to
use the present sensor current as the zero current. If the sensor is
zeroed before the current has reach a minimum stable value, subsequent readings will be in error.
9. This screen appears if the zero current is extremely high. See Section
17 for troubleshooting. To repeat the zero step, press EXIT and choose
Zero.
10. This screen appears if the zero current is moderately high. To continue,
choose Yes. To repeat the zero step, choose No. See Section 15 for
troubleshooting.
Cal?
Chlorine
Temp
Cal?
InProcess
Zero
Live 200nA
Zeroing
Wait
Sensor Zero Fail
Current too high
Possible ZeroErr
Proceed? Yes
No
Calibrate
Hold
Program Display
Live 0.000ppm
Sensor Zero Done
Page 74

64
MODEL XMT-A-HT SECTION 11.0
CALIBRATION - TOTAL CHLORINE
11.3 PROCEDURE — FULL SCALE CALIBRATION
1. If the sensor was just zeroed, place the reagent uptake tube back in the bottle. Once the flow of reagent starts,
it takes about one minute for the sensor current to begin to increase. It may take an hour or longer for the reading to stabilize.
2. Adjust the chlorine concentration until it is near the upper end of the operating range. Wait until the transmitter reading is stable before starting the calibration.
3. Press MENU. The main menu screen appears. Choose Calibrate.
4. Choose Chlorine.
5. Choose InProcess.
6. The screen at left appears for two seconds.
7. The screen at left appears. The number in the first line is the concentration of chlorine based on the previous calibration. Wait until the reading is stable, then press ENTER.
8. The screen at left appears. Take a grab sample of the process liquid
and immediately press ENTER. The transmitter will store the present
sensor current and temperature and use those values in the calibration.
9. Immediately determine the total chlorine concentration in the sample.
10. Use the arrow keys to change the value in the second line to match the
results of the laboratory test. To return to the main display press MENU
then EXIT.
11. This screen appears momentarily if the sensitivity (sensor current divided by concentration) is much higher or lower than expected. The display then returns to the screen in step 5. See Section 15 for troubleshooting.
Cal?
Chlorine
Temp
Calibrate
Hold
Program Display
Cal?
InProcess
Zero
Wait for
Stable reading.
Stable? 1.00ppm
Press enter.
Take sample;
Press enter.
Sample 1.00ppm
Cal 1
.00ppm
Calibration
Error
Page 75

65
MODEL XMT-A-HT SECTION 11.0
CALIBRATION - TOTAL CHLORINE
11.4 DUAL SLOPE CALIBRATION
Figure 11-3 shows the principle of dual slope calibration. Between zero and concentration C1, the sensor response is linear. When the concentration of chlorine becomes greater than C1, the response is non-linear. In spite
of the non-linearity, the sensor response between C1 and C2 can be approximated by a straight line.
Dual slope calibration is rarely needed. It is probably useful in fewer than 5% of applications.
1. Be sure the transmitter has been configured for dual slope
calibration. See Section 7.4.
2. Place the sensor in the zero solution. (see Section 10.1).
Be sure no air bubbles are trapped against the membrane.
The sensor current will drop rapidly at first and then gradually reach a stable zero value. To monitor the sensor current, go to the main display and press ê until the input current screen appears. Note the units: nA is nanoamps, µA
is microamps. Typical zero current for a total chlorine sensor is between -10 and +30 nA.
A new sensor or a sensor in which the electrolyte solution
has been replaced may require several hours (occasionally as long as overnight) to reach a minimum current. DO
NOT START THE ZERO ROUTINE UNTIL THE SENSOR
HAS BEEN IN ZERO SOLUTION FOR AT LEAST TWO
HOURS.
3. Press MENU. The main menu screen appears. Choose Calibrate.
4. Choose Chlorine.
5. Choose Zero.
6. The screen at left appears. The top line is the raw sensor current.
7. Once the reading is stable, the screen at left appears. Sensor zero is
complete and the transmitter has stored the zero current. The display
returns to the screen in step 6.
NOTE
Pressing ENTER during the zero step will cause the transmitter to
use the present sensor current as the zero current. If the sensor is
zeroed before the current has reach a minimum stable value, subsequent readings will be in error.
8. This screen appears if the zero current is extremely high. See Section
15 for troubleshooting. To repeat the zero step, press EXIT and choose
Zero.
Process continued on following page.
FIGURE 11-3. Dual Slope Calibration
Cal?
Chlorine
Temp
Cal?
Zero
pt1 pt2
Live 200nA
Zeroing
Wait
Sensor Zero Fail
Current too high
Calibrate
Hold
Program Display
Live 0.000ppm
Sensor Zero Done
Page 76

66
MODEL XMT-A-HT SECTION 11.0
CALIBRATION - TOTAL CHLORINE
9. This screen appears if the zero current is moderately high. To continue,
choose Yes. To repeat the zero step, choose No. See Section 15 for
troubleshooting.
10. If the sensor was just zeroed, place the reagent uptake tube back in the
reagent bottle. Once the flow of reagent starts, it takes about one
minute for the sensor current to begin to increase. It may take an hour
or longer for the reading to stabilize. Be sure the sample flow stays
between 80 and 100 mL/min and the pressure is between 3 and 5 psig.
11. Adjust the chlorine concentration until it is near the upper end of the linear range, point C1 in Figure 11-2. Wait until the transmitter reading is
stable before starting the calibration.
12. Choose pt1.
13. The screen at left appears for two seconds.
14. The screen at left appears. The number in the first line is the concentration of chlorine based on the previous calibration. Wait until the reading is stable, then press ENTER.
15. The screen at left appears. Take a grab sample of the process liquid
and immediately press ENTER. The transmitter will store the present
sensor current and temperature and use those values in the calibration.
16. Immediately determine the total chlorine concentration in the sample.
17. Use the arrow keys to change the value in the second line to match the
results of the laboratory test.
18. This screen appears momentarily if the sensitivity (sensor current divided by concentration) is much higher or lower than expected. The display then returns to the screen in step 5. See Section 15 for troubleshooting.
19. Adjust the concentration of chlorine in the sample until it is near the
upper end of the control range (point C2 in Figure 10.2)
20. Choose pt2 and repeat steps 13-17 above.
21. To return to the main display press MENU then EXIT.
Possible ZeroErr
Proceed? Yes
No
Cal?
Zero pt1
pt2
Cal?
Zero pt1 pt2
Wait for
Stable reading.
Stable? 6.00ppm
Press enter.
Take sample;
Press enter.
Sample 6.00ppm
Cal
6
.00ppm
Calibration
Error
Page 77

67
MODEL Xmt-A-HT SECTION 12.0
CALIBRATION - MONOCHLORAMINE
SECTION 12.0
CALIBRATION - MONOCHLORAMINE
12.1 INTRODUCTION
As Figure 12-1 shows, a monochloramine sensor generates a current directly proportional to the concentration of
monochloramine in the sample. Calibrating the sensor requires exposing it to a solution containing no monochloramine (zero standard) and to a solution containing a known amount of monochloramine (full-scale standard).
The zero standard is necessary because monochloramine sensors, even when no monochloramine is in the
sample, generate a small current called the residual or zero current. The transmitter compensates for the residual current by subtracting it from the measured current before converting the result to a monochloramine value.
New sensors require zeroing before being placed in service, and sensors should be zeroed whenever the electrolyte solution is replaced. The best zero standard is deionized water.
The purpose of the full-scale standard is to establish the slope of the calibration curve. Because stable monochloramine standards do not exist, the sensor must be calibrated against a test run on a grab sample of the
process liquid. Several manufacturers offer portable test kits for this purpose. Observe the following precautions
when taking and testing the grab sample.
• Take the grab sample from a point as close to the sensor as possible. Be sure that taking the sample does not
alter the flow of the sample to the sensor. It is best to install the sample tap just downstream from the sensor.
• Monochloramine solutions are unstable. Run the test immediately after taking the sample. Try to calibrate
the sensor when the monochloramine concentration is at the upper end of the normal operating range.
FIGURE 12-1. Sensor Current as a Function of Monochloramine Concentration
Page 78

68
MODEL Xmt-A-HT SECTION 12.0
CALIBRATION - MONOCHLORAMINE
12.2 PROCEDURE — ZEROING THE SENSOR
1. Place the sensor in the zero standard (see Section 10.1). Be sure no air bubbles are trapped against the membrane. The sensor current will drop rapidly at first and then gradually reach a stable zero value. To monitor the
sensor current, go to the main display and press ê until the input current screen appears. Note the units: nA
is nanoamps, µA is microamps. Typical zero current for a monochloramine sensor is between 0 and +20 nA.
A new sensor or a sensor in which the electrolyte solution has been replaced may require several hours (occasionally as long as overnight) to reach a minimum current. DO NOT START THE ZERO ROUTINE UNTIL
THE SENSOR HAS BEEN IN ZERO SOLUTION FOR AT LEAST TWO HOURS.
2. Press MENU. The menu screen appears. Choose Calibrate.
3. Choose Chlorine.
4. Choose Zero.
5. The screen at left appears. The top line is the raw sensor current.
6. Once the reading is stable, the screen at left appears. Sensor zero is
complete and the transmitter has stored the zero current. The screen
remains until the operator presses MENU then EXIT to return to the
main display.
NOTE
Pressing ENTER during the zero step will cause the transmitter to
use the present sensor current as the zero current. If the sensor is
zeroed before the current has reach a minimum stable value, subsequent readings will be in error.
7. This screen appears if the zero current is extremely high. See Section
15 for troubleshooting. To repeat the zero step, press EXIT and choose
Zero.
8. This screen appears if the zero current is moderately high. To continue,
choose Yes. To repeat the zero step, choose No. See Section 15 for
troubleshooting.
Cal?
Chlorine
Temp
Cal?
InProcess
Zero
Live 200nA
Zeroing
Wait
Sensor Zero Fail
Current too high
Possible ZeroErr
Proceed? Yes No
Calibrate
Hold
Program Display
Live 0.000ppm
Sensor Zero Done
Page 79

69
MODEL Xmt-A-HT SECTION 12.0
CALIBRATION - MONOCHLORAMINE
12.3 PROCEDURE — FULL SCALE CALIBRATION
1. Place the sensor in the process liquid. Adjust the sample flow until it is within the range recommended for the
sensor. Refer to the sensor instruction sheet.
2. Adjust the chlorine concentration until it is near the upper end of the operating range. Wait until the transmitter reading is stable before starting the calibration.
3. Press MENU. The main menu screen appears. Choose Calibrate.
4. Choose Chlorine.
5. Choose InProcess.
6. The screen at left appears for two seconds.
7. The screen at left appears. The number in the first line is the concentration of chlorine based on the previous calibration. Wait until the reading is stable, then press ENTER.
8. The screen at left appears. Take a grab sample of the process liquid
and immediately press ENTER. The transmitter will store the present
sensor current and temperature and use those values in the calibration.
9. Immediately determine the monochloramine concentration in the sample.
10. Use the arrow keys to change the value in the second line to match the
results of the laboratory test. To return to the main display press MENU
then EXIT.
11. This screen appears momentarily if the sensitivity (sensor current divided by concentration) is much higher or lower than expected. The display then returns to the screen in step 5. See Section 15 for troubleshooting.
Cal?
Chlorine
Temp
Calibrate
Hold
Program Display
Cal?
InProcess
Zero
Wait for
Stable reading.
Stable? 1.00ppm
Press enter.
Take sample;
Press enter.
Sample 1.00ppm
Cal
1
.00ppm
Calibration
Error
Page 80

70
MODEL XMT-A-HT SECTION 13.0
CALIBRATION - OZONE
SECTION 13.0
CALIBRATION — OZONE
13.1 INTRODUCTION
As Figure 13-1 shows, an ozone sensor generates a current directly proportional to the concentration of ozone in
the sample. Calibrating the sensor requires exposing it to a solution containing no ozone (zero standard) and to a
solution containing a known amount of ozone (full-scale standard).
The zero standard is necessary because ozone sensors, even when no ozone is in the sample, generate a small
current called the residual or zero current. The transmitter compensates for the residual current by subtracting it
from the measured current before converting the result to an ozone value. New sensors require zeroing before
being placed in service, and sensors should be zeroed whenever the electrolyte solution is replaced. The best zero
standard is deionized water.
The purpose of the full-scale standard is to establish the slope of the calibration curve. Because stable ozone standards do not exist, the sensor must be calibrated against a test run on a grab sample of the process liquid.
Several manufacturers offer portable test kits for this purpose. Observe the following precautions when taking and
testing the grab sample.
• Take the grab sample from a point as close to the sensor as possible. Be sure that taking the sample does not
alter the flow of the sample to the sensor. It is best to install the sample tap just downstream from the sensor.
• Ozone solutions are unstable. Run the test immediately after taking the sample. Try to calibrate the sensor
when the ozone concentration is at the upper end of the normal operating range.
FIGURE 13-1. Sensor Current as a Function of Ozone Concentration
Page 81

71
MODEL XMT-A-HT SECTION 13.0
CALIBRATION - OZONE
13.2 PROCEDURE — ZEROING THE SENSOR
1. Place the sensor in the zero standard (see Section 10.1). Be sure no air bubbles are trapped against the membrane. The sensor current will drop rapidly at first and then gradually reach a stable zero value. To monitor the
sensor current, go to the main display and press ê until the input current screen appears. Note the units: nA
is nanoamps, µA is microamps. Typical zero current for a ozone sensor is between -10 and +10 nA.
A new sensor or a sensor in which the electrolyte solution has been replaced may require several hours (occasionally as long as overnight) to reach a minimum current. DO NOT START THE ZERO ROUTINE UNTIL
THE SENSOR HAS BEEN IN ZERO SOLUTION FOR AT LEAST TWO HOURS.
2. Press MENU. The menu screen appears. Choose Calibrate.
3. Choose Ozone.
4. Choose Zero.
5. The screen at left appears. The top line is the raw sensor current.
6. Once the reading is stable, the screen at left appears. Sensor zero is
complete and the transmitter has stored the zero current. The screen
remains until the operator presses MENU then EXIT to return to the
main display.
NOTE
Pressing ENTER during the zero step will cause the transmitter to
use the present sensor current as the zero current. If the sensor is
zeroed before the current has reach a minimum stable value, subsequent readings will be in error.
7. This screen appears if the zero current is extremely high. See Section
15 for troubleshooting. To repeat the zero step, press EXIT and choose
Zero.
8. This screen appears if the zero current is moderately high. To continue,
choose Yes. To repeat the zero step, choose No. See Section 15 for
troubleshooting.
Cal?
Ozone
Temp
Cal?
InProcess
Zero
Live 200nA
Zeroing
Wait
Sensor Zero Fail
Current too high
Possible ZeroErr
Proceed? Yes
No
Calibrate
Hold
Program Display
Live 0.000ppm
Sensor Zero Done
Page 82

72
MODEL XMT-A-HT SECTION 13.0
CALIBRATION - OZONE
13.3 PROCEDURE — FULL SCALE CALIBRATION
1. Place the sensor in the process liquid. Adjust the sample flow until it is within the range recommended for the
sensor. Refer to the sensor instruction sheet.
2. Adjust the ozone concentration until it is near the upper end of the operating range. Wait until the transmitter
reading is stable before starting the calibration.
3. Press MENU. The main menu screen appears. Choose Calibrate.
4. Choose Ozone.
5. Choose InProcess.
6. The screen at left appears for two seconds.
7. The screen at left appears. The number in the first line is the concentration of chlorine based on the previous calibration. Wait until the reading is stable, then press ENTER.
8. The screen at left appears. Take a grab sample of the process liquid
and immediately press ENTER. The transmitter will store the present
sensor current and temperature and use those values in the calibration.
9. Immediately determine the ozone concentration in the sample.
10. Use the arrow keys to change the value in the second line to match the
results of the laboratory test. To return to the main display press MENU
then EXIT.
11. This screen appears momentarily if the sensitivity (sensor current divided by concentration) is much higher or lower than expected. The display then returns to the screen in step 5. See Section 15 for troubleshooting.
Cal?
Ozone
Temp
Calibrate
Hold
Program Display
Cal?
InProcess
Zero
Wait for
Stable reading.
Stable? 1.00ppm
Press enter.
Take sample;
Press enter.
Sample 1.00ppm
Cal
1
.00ppm
Calibration
Error
Page 83

73
MODEL XMT-A-HT SECTION 14.0
CALIBRATION - pH
SECTION 14.0
CALIBRATION — pH
14.1 INTRODUCTION
A new pH sensor must be calibrated before use. Regular recalibration is also necessary.
A pH measurement cell (pH sensor and the solution to be measured) can be pictured as a battery with an extremely high internal resistance. The voltage of the battery depends on the pH of the solution. The pH meter, which is
basically a voltmeter with a very high input impedance, measures the cell voltage and calculates pH using a conversion factor. The actual value of the voltage-to-pH conversion factor depends on the sensitivity of the pH sensing element (and the temperature). The sensing element is a thin, glass membrane at the end of the sensor. As
the glass membrane ages, the sensitivity drops. Regular recalibration corrects for the loss of sensitivity. pH calibration standards, also called buffers, are readily available.
Two-point calibration is standard. Both automatic calibration and manual calibration are available. Auto calibration
avoids common pitfalls and reduces errors. Its use is recommended.
In automatic calibration the transmitter recognizes the buffer and uses temperature-corrected pH values in the calibration. The table below lists the standard buffers the controller recognizes. The controller also recognizes several technical buffers: Merck, Ingold, and DIN 19267. Temperature-pH data stored in the controller are valid between
at least 0 and 60°C.
pH at 25°C Standard(s)
(nominal pH)
1.68 NIST, DIN 19266, JSI 8802, BSI (see note 1)
3.56 NIST, BSI
3.78 NIST
4.01 NIST, DIN 19266, JSI 8802, BSI
6.86 NIST, DIN 19266, JSI 8802, BSI
7.00 (see note 2)
7.41 NIST
9.18 NIST, DIN 19266, JSI 8802, BSI
10.01 NIST, JSI 8802, BSI
12.45 NIST, DIN 19266
FIGURE 14-1. Calibration Slope and Offset
Note 1: NIST is National Institute of Standards,
DIN is Deutsche Institute für Normung, JSI is
Japan Standards Institute, and BSI is British
Standards Institute.
Note 2: pH 7 buffer is not a standard buffer. It is
a popular commercial buffer in the United
States.
During automatic calibration, the transmitter also measures
noise and drift and does not accept calibration data until
readings are stable. Calibration data will be accepted as
soon as the pH reading is constant to within the factory-set
limits of 0.02 pH units for 10 seconds. The stability settings
can be changed. See Section 7.10.
In manual calibration, the user judges when pH readings are
stable. He also has to look up the pH of the buffer at the
temperature it is being used and enter the value in the transmitter.
Once the transmitter completes the calibration, it calculates
the calibration slope and offset. The slope is reported as the
slope at 25°C. Figure 14-1 defines the terms.
The transmitter can also be standardized. Standardization is
the process of forcing the transmitter reading to match the
reading from a second pH instrument. Standardization is
sometimes called a one-point calibration.
Page 84

74
MODEL XMT-A-HT SECTION 14.0
CALIBRATION - pH
14.2 PROCEDURE — AUTO CALIBRATION
1. Obtain two buffer solutions. Ideally, the buffer values should bracket the range of pH values to be measured.
2. Remove the pH sensor from the process liquid. If the process and buffer temperatures are appreciably different, place the sensor in a container of tap water at the buffer temperature. Do not start the calibration until the
sensor has reached the buffer temperature. Thirty minutes is usually adequate.
3. Press MENU. The main menu appears. Choose Calibrate.
4. Choose pH.
5. Choose BufferCal.
6. Choose Auto.
7. To continue with the calibration, choose Buffer1.Then go to step 8. To
change stability criteria, choose Setup and go to step 19.
8. Rinse the sensor with water and place it in buffer 1. Be sure the glass
bulb and the reference junction are completely submerged. Swirl the
sensor.
9. The screen at left is displayed with “Wait” flashing until the reading is
stable. The default stability setting is <0.02 pH change in 10 sec. To
change the stability criteria, go to step 19. When the reading is stable,
the screen in step 10 appears.
10. The top line shows the actual reading. The transmitter also identifies the
buffer and displays the nominal buffer value (buffer pH at 25°C). If the
displayed value is not correct, press é or êto display the correct
value. The nominal value will change, for example from 7.01 to 6.86 pH.
Press ENTER to store.
11. The screen at left appears momentarily.
12. The screen at left appears. Remove the sensor from Buffer 1, rinse it
with water, and place it in Buffer 2. Be sure the glass bulb and the reference junction are completely submerged. Swirl the sensor. Choose
Buffer2.
13. The screen at left is displayed with “Wait” flashing until the reading is
stable. When the reading is stable, the screen in step 14 appears.
Calibrate
Hold
Program Display
Cal?
pH
Chlorine Temp
BufferCal?
Auto
Manual
AutoCal? Setup
Buffer1
Buffer2
AutoCal? Setup
Buffer1 Buffer2
pH Standardize
Slope
BufferCal
Live 7.00pH
AutoBuf1
Wait
Live 7.00pH
AutoBuf1
7.01pH
Live 10.01pH
AutoBuf2
Wait
Cal in progess.
Please wait.
Page 85

75
MODEL XMT-A-HT SECTION 14.0
CALIBRATION - pH
14. The top line shows the actual reading. The transmitter also identifies the
buffer and displays the nominal buffer value (buffer pH at 25°C). If the
displayed value is not correct, press é or êto display the correct
value. The nominal value will change, for example from 7.01 to 6.86 pH.
Press ENTER to store.
15. The screen at left appears momentarily.
16. If the calibration was successful, the transmitter will display the offset
and slope (at 25°). The display will return to the screen in step 6.
17. If the slope is out of range (less than 45 mV/pH or greater than 60
mV/pH) or if the offset exceeds the value programmed in Section 7.4, an
error screen appears. The display then returns to the screen in step 6.
18. To return to the main display, press MENU then EXIT.
19. Choosing Setup in step 7 causes the Buffer Stabilize screen to appear.
The transmitter will not accept calibration data until the pH reading is
stable. The default requirement is a pH change less than 0.02 units in
10 seconds. To change the stability criteria:
a. Enter the desired stabilization time
b. Enter the minimum amount the reading is permitted to change in
the time specified in step 19a.
20. To return to the main display, press MENU then EXIT.
Live 10.01pH
AutoBuf2
10.01pH
Buffer Stabilize
Time:
1
0sec
Restart time if
change >
0
.02pH
Offset 0mV
Slope 59.16@25
°C
Calibration
Error
Cal in progess.
Please wait.
Page 86

76
MODEL XMT-A-HT SECTION 14.0
CALIBRATION - pH
14.3 PROCEDURE — MANUAL TWO-POINT CALIBRATION
1. Obtain two buffer solutions. Ideally, the buffer values should bracket the range of pH values to be measured.
2. Remove the pH sensor from the process liquid. If the process and buffer temperatures are appreciably different,
place the sensor in a container of tap water at the buffer temperature. Do not start the calibration until the sensor
has reached the buffer temperature. Thirty minutes is usually adequate. Make a note of the temperature.
3. Press MENU. The main menu appears. Choose Calibrate.
4. Choose pH.
5. Choose BufferCal.
6. Choose Manual.
7. Choose Buffer1.
8. Rinse the sensor with water and place it in buffer 1. Be sure the glass
bulb and reference junction are completely submerged. Swirl the sensor.
9. The reading in the top line is the live pH reading. Wait until the live reading is stable. Then, use the arrow keys to change the reading in the second line to the match the pH value of the buffer. The pH of buffer solutions is a function of temperature. Be sure to enter the pH of the buffer
at the actual temperature of the buffer.
10. Remove the sensor from buffer 1 and rinse it with water. Place it in
buffer 2. Be sure the glass bulb and the reference junction are completely submerged. Swirl the sensor. Choose Buffer2.
11. The reading in the top line is the live pH reading. Wait until the live reading is stable. Then, use the arrow keys to change the reading in the second line to the match the pH value of the buffer. The pH of buffer solutions is a function of temperature. Be sure to enter the pH of the buffer
at the actual temperature of the buffer.
12. The screen at left appears momentarily.
13. If the calibration was successful, the transmitter will display the offset
and slope (at 25°). The display will return to the screen in step 5.
14. If the slope is out of range (less than 45 mV/pH or greater than 60
mV/pH) or if the offset exceeds the value programmed in Section 7.4, an
error screen appears. The display then returns to the screen in step 6.
15. To return to the main display, press MENU then EXIT.
Calibrate
Hold
Program Display
Cal?
pH
Chlorine Temp
BufferCal?
Auto
Manual
AutoCal? Setup
Buffer1
Buffer2
ManualCal?
Buffer1
Buffer2
pH Standardize
Slope
BufferCal
Live 7.00pH
Buf1
0
7.00pH
Live 10.01pH
Buf1
1
0.01pH
Cal in progess.
Please wait.
Offset 0mV
Slope 59.16@25
°C
Calibration
Error
Page 87

77
MODEL XMT-A-HT SECTION 14.0
CALIBRATION - pH
14.4 PROCEDURE — STANDARDIZATION
1. The pH measured by the transmitter can be changed to match the reading from a second or referee instrument. The process of making the two readings agree is called standardization.
2. During standardization, the difference between the two values is converted to the equivalent voltage. The voltage, called the reference offset, is added to all subsequent measured cell voltages before they are converted
to pH. If after standardization the sensor is placed in a buffer solution, the measured pH will differ from the
buffer pH by an amount equivalent to the standardization offset.
3. Install the pH sensor in the process liquid.
4. Once readings are stable, measure the pH of the liquid using a referee instrument.
5. Because the pH of the process liquid may change if the temperature changes, measure the pH of the grab
sample immediately after taking it.
6. For poorly buffered samples, it is best to determine the pH of a continuously flowing sample from a point as
close as possible to the sensor.
7. Press MENU. The main menu appears. Choose Calibrate.
8. Choose pH.
9. Choose Standardize.
10. The top line shows the present reading. Use the arrow keys to change
the pH reading in the second line to match the pH reading from the referee instrument.
11. The screen at left appears if the entered pH was greater than 14.00 or
if the mV offset calculated by the transmitter during standardization
exceeds the reference offset limit programmed into the transmitter. The
display then returns to step 10. Repeat the standardization. To change
the reference offset from the default value (60 mV), see section 7.4.
12. If the entry was accepted the display returns to step 9.
13. To return to the main display, press MENU then EXIT.
Calibrate
Hold
Program Display
pH:
Standardize
Slope BufferCal
Cal?
pH
Chlorine Temp
Calibration
Error
Live 7.01pH
Cal
0
7.01pH
Page 88

78
MODEL XMT-A-HT SECTION 14.0
CALIBRATION - pH
14.5 PROCEDURE — ENTERING A KNOWN SLOPE VALUE.
1. If the electrode slope is known from other measurements, it can be entered directly into the transmitter. The
slope must be entered as the slope at 25°C. To calculate the slope at 25°C from the slope at temperature t°C,
use the equation:
slope at 25°C = (slope at t°C)
Changing the slope overrides the slope determined from the previous buffer calibration.
2. Press MENU. The main menu appears. Choose Calibrate.
3. Choose pH.
4. Choose slope.
5. The screen at left appears briefly.
6. Change the slope to the desired value. Press ENTER.
7. The slope must be between 45 and 60 mV/pH. If the value entered is
outside this range, the screen at left appears.
8. If the entry was accepted, the screen at left appears.
9. To return to the main display, press MENU then EXIT.
298
t°C + 273
Invalid Input!
Min: 45.00mV/pH
Calibrate
Hold
Program Display
Changing slope
overrides bufcal.
pH: Standardize
Slope
BufferCal
pH Slope @25°C?
5
9.16mV/pH
Cal?
pH
Chlorine Temp
Page 89

79
MODEL Xmt-A-HT SECTION 15.0
TROUBLESHOOTING
SECTION 15.0
TROUBLESHOOTING
15.1 OVERVIEW
The Xmt-A-HT transmitter continuously monitors itself and the sensor for problems. If the transmitter detects a
problem, the word "fault" or "warn" appears in the main display alternating with the measurement.
A fault condition means the measurement is seriously in error and is not to be trusted. A fault condition might also
mean that the transmitter has failed. Fault conditions must be corrected immediately. When a fault occurs the output goes to 22.00 mA or the to value programmed in Section 7.3. The output can also be programmed to reflect
the live measurement.
A warning means that the instrument is usable, but steps should be taken as soon as possible to correct the con-
dition causing the warning.
See Section 15.2 for an explanation of fault and warning messages and suggested corrective actions.
The Xmt-A-HT also displays error and warning messages if a calibration is seriously in error. Refer to the section
below for assistance. Each section also contains hints for correcting other measurement and calibration problems.
For troubleshooting not related to measurement problems, see
Section 15.10.
Measurement Section
Temperature 15.3
Dissolved oxygen 15.4
Free chlorine 15.5
Total chlorine 15.6
Monochloramine 15.7
Ozone 15.8
pH 15.9
NOTE
A large number of information screens are available to aid troubleshooting. The most useful of these are
raw sensor current and sensitivity and zero current at last calibration. For pH measurements (available
with free chlorine only), sensor slope and offset and glass impedance are also available. To view the
information screens, go to the main display and press the êkey.
Page 90

80
MODEL Xmt-A-HT SECTION 15.0
TROUBLESHOOTING
15.2 TROUBLESHOOTING WHEN A FAULT OR WARNING MESSAGE IS SHOWING
Fault message Explanation See Section
RTD Open RTD measuring circuit is open 15.2.1
RTD W Overrange RTD resistance is outside the range for Pt 100 or 22kNTC 15.2.1
Broken pH Glass pH sensing element in pH sensor is broken 15.2.2
pH Glass Z High pH glass impedance exceeds programmed level 15.2.2
ADC Read Error Analog to digital converter failed 15.2.3
Warning message Explanation See Section
PV > DisplayLimit Process variable value exceeds display limit 15.2.4
Sensor Curr High Sensor input current exceed 210 uA 15.2.4
Sensor Curr Low Sensor input current is a large negative number 15.2.4
Need Zero Cal Sensor needs re-zeroing. Concentration reading is too negative. 15.2.5
pH mV Too High mV signal from pH sensor is too big 15.2.6
No pH Soln GND Solution ground terminal is not connected 15.2.7
Temperature High Temperature reading exceeds 150°C 15.2.1
Temperature Low Temperature reading is less than -15°C 15.2.1
Sense Line Open RTD sense line is not connected 15.2.8
Need Factory Cal Transmitter needs factory calibration 15.2.9
Ground >10% Off Bad ground 15.2.10
EE Buffer Overflow EEPROM buffer overflow 15.2.11
EE Chksum Error EEPROM checksum error 15.2.12
EE Write Error EEPROM write error 15.2.13
15.2.1 RTD Open, RTD Ω Overrange, Temperature High, Temperature Low
These messages usually mean that the RTD (or thermistor in the case of the HX438 and GX448 sensors) is open or shorted or there is an open or short in the connecting wiring.
1. Verify all wiring connections, including wiring in a junction box, if one is being used.
2. Disconnect the RTD IN, RTD SENSE, and RTD RETURN leads or the thermistor leads at the transmitter. Be sure to
note the color of the wire and where it was attached. Measure the resistance between the RTD IN and RETURN leads.
For a thermistor, measure the resistance between the two leads. The resistance should be close to the value in the
table in Section 15.14.2. If the temperature element is open (infinite resistance) or shorted (very low resistance),
replace the sensor. In the meantime, use manual temperature compensation.
3. For oxygen measurements using the HX438 and GX448 sensors, or other steam-sterilizable sensor using a 22kNTC,
the Temperature High error will appear if the transmitter was not properly configured. See Section 7.4.
Page 91

81
MODEL Xmt-A-HT SECTION 15.0
TROUBLESHOOTING
15.2.2 Broken pH Glass and pH Glass Z High
These messages mean that the pH sensor glass impedance is outside the programmed limits. To read the impedance go
to the main display and press êuntil Glass Imp appears in the display. The default lower limit is 10 MΩ. The default upper
limit is 1000 MΩ. Low glass impedance means the glass membrane — the sensing element in a pH sensor — is cracked
or broken. High glass impedance means the membrane is aging and nearing the end of its useful life. High impedance can
also mean the pH sensor is not completely submerged in the process liquid.
1. Check the sensor wiring, including connections in a junction box.
2. Verify that the sensor is completely submerged in the process liquid.
3. Verify that the software switch identifying the position of the preamplifier is properly set. See Section 7.4.
4. Check the sensor response in buffers. If the sensor can be calibrated, it is in satisfactory condition. To disable the fault
message, reprogram the glass impedance limits to include the measured impedance. If the sensor cannot be calibrated, it has failed and must be replaced.
15.2.3 ADC Read Error
The analog to digital converter has probably failed.
1. Verify that sensor wiring is correct and connections are tight. Be sure to check connections at the junction box if one
is being used. See Section 3.1 for wiring information.
2. Disconnect the sensor(s) and simulate temperature and sensor input.
3. If the transmitter does not respond to simulate signals, call the factory for assistance.
15.2.4 PV>DisplayLimit, Sensor Curr High, Sensor Curr Low.
The first two messages imply that the amperometric sensor current is very high (greater than 210 µA) or the sensor current has a very large negative number. Normally, excessive current or negative current implies that the amperometric sensor is miswired or has failed. Occasionally, these messages may appear when a new sensor is first placed in service.
1. Verify that wiring is correct and connections are tight. Be sure to check connections at the junction box if one is being
used. Pay particular attention the anode and cathode connections.
2. Verify that the transmitter is configured for the correct measurement. See Section 7.4. Configuring the measurements
sets (among other things) the polarizing voltage. Applying the wrong polarizing voltage to the sensor can cause a large
negative current.
3. If the sensor was just placed in service, put the sensor in the zero solution and observe the sensor current. It should
be moving fairly quickly toward zero. To view the sensor current go to the main display and press êuntil Input Current
appears. Note the units: nA is nanoamps, µA is microamps.
4. Replace the sensor membrane and electrolyte solution and clean the cathode if necessary. See the sensor instruction
sheet for details.
5. Replace the sensor.
To simulate See Section
Dissolved oxygen 15.11
Ozone, monochloramine, chlorine 15.12
pH 15.13
Temperature 15.14
Page 92

82
MODEL Xmt-A-HT SECTION 15.0
TROUBLESHOOTING
15.2.5 Need Zero Cal
Need Zero Cal means the measured concentration is a large negative number. The transmitter subtracts the zero current
from the measured current before converting the result to a concentration reading. If the zero current is much greater than
the measured current, the concentration reading will be negative.
1. Check the zero current and the present sensor current. To view the zero current, go to the main display and press
ê
until Zero Current appears. The value shown is the zero current the last time the sensor was zeroed. To view the pres-
ent sensor current, go to the main display and press êuntil Input Current appears. Note the units: nA is nanoamps,
µA is microamps.
2. Refer to the appropriate section for calibrating the sensor. Place the sensor in the zero solution. Verify that the sensor
reading is within or at least very close to the zero current limits. It may take as long as overnight for the sensor to reach
a stable zero current.
15.2.6 pH mV Too High
This message means the raw millivolt signal from the sensor is outside the range -2100 to 2100 mV.
1. Verify all wiring connections, including connections in a junction box.
2. Check that the pH sensor is completely submerged in the process liquid.
3. Check the pH sensor for cleanliness. If the sensor look fouled of dirty, clean it. Refer to the sensor instruction manual
for cleaning procedures.
15.2.7 No pH Soln GND
In the transmitter, the solution ground (Soln GND) terminal is connected to instrument common. Normally, unless the pH
sensor has a solution ground, the reference terminal must be jumpered to the solution ground terminal. HOWEVER, WHEN
THE pH SENSOR IS USED WITH A FREE CHLORINE SENSOR THIS CONNECTION IS NEVER MADE.
15.2.8 Sense Line Open
Most Rosemount Analytical sensors use a Pt100 or Pt1000 RTD in a three-wire configuration (see Figure 15-4). The in and
return leads connect the RTD to the measuring circuit in the transmitter. A third wire, called the sense line, is connected to
the return lead. The sense line allows the transmitter to correct for the resistance of the in and return leads and to correct
for changes in lead wire resistance with changes in ambient temperature.
1. Verify that all wiring connections are secure, including connections in a junction box.
2. Disconnect the RTD SENSE and RTD RETURN wires. Measure the resistance between the leads. It should be less
than 5Ω.
3. The transmitter can be operated with the sense line open. The measurement will be less accurate because the transmitter can no longer compensate for lead wire resistance. However, if the sensor is to be used at approximately constant ambient temperature, the lead wire resistance error can be eliminated by calibrating the sensor at the measurement temperature. Errors caused by changes in ambient temperature cannot be eliminated. To make the warning message disappear, connect the RTD SENSE and RETURN terminals with a jumper.
15.2.9 Need Factory Cal
This warning message means the transmitter requires factory calibration. Call the factory for assistance.
15.2.10 Ground >10% Off
This warning message means there is a problem with the analog circuitry. Call the factory for assistance.
Page 93

83
MODEL Xmt-A-HT SECTION 15.0
TROUBLESHOOTING
15.2.11 EE Buffer Overflow
EE Buffer Overflow means the software is trying to change too many background variables at once. Remove
power from the transmitter for about 30 seconds. If the warning message does not disappear once power is
restored, call the factory for assistance.
15.2.12 EE Chksum Error
EE Chksum Error means a software setting changed when it was not supposed to. The EEPROM may be going
bad. Call the factory for assistance.
15.2.13 EE Write Error
EE Write Error usually means at least one byte in the EEPROM has gone bad. Try entering the data again. If the
error message continues to appear, call the factory for assistance.
15.3 TROUBLESHOOTING WHEN NO FAULT MESSAGE IS SHOWING - TEMPERATURE
15.3.1 Temperature measured by standard was more than 1°C different from controller.
A. Is the standard thermometer, RTD, or thermistor accurate? General purpose liquid-in-glass thermometers, par-
ticularly ones that have been mistreated, can have surprisingly large errors.
B. Is the temperature element in the sensor completely submerged in the liquid?
C. Is the standard temperature sensor submerged to the correct level?
15.4 TROUBLESHOOTING WHEN NO FAULT MESSAGE IS SHOWING - OXYGEN
Problem See Section
Zero current was accepted, but current is greater than the value in the table in Section 7.2 15.4.1
Error or warning message while zeroing the sensor (zero current is too high) 15.4.1
Zero reading is unstable 15.4.2
Sensor can be calibrated, but current is outside the range in the table in Section 7.3 15.4.3
Possible error warning during air calibration 15.4.3
Possible error warning during in-process calibration 15.4.4
Process readings are erratic 15.4.5
Readings drift 15.4.6
Page 94

84
MODEL Xmt-A-HT SECTION 15.0
TROUBLESHOOTING
15.4.1 Zero current is too high
A. Is the sensor properly wired to the analyzer? See Section 3.0.
B. Is the membrane completely covered with zero solution and are air bubbles not trapped against the mem-
brane? Swirl and tap the sensor to release air bubbles.
C. Is the zero solution fresh and properly made? Zero the sensor in a solution of 5% sodium sulfite in water.
Prepare the solution immediately before use. It has a shelf life of only a few days.
D. If the sensor is being zeroed with nitrogen gas, verify that the nitrogen is oxygen-free and the flow is adequate
to prevent back-diffusion of air into the chamber.
E. The major contributor to the zero current is dissolved oxygen in the electrolyte solution inside the sensor. A
long zeroing period usually means that an air bubble is trapped in the electrolyte. To ensure the 499ADO or
499A TrDO sensor contains no air bubbles, carefully follow the procedure in the sensor manual for filling the
sensor. If the electrolyte solution has just been replaced, allow several hours for the zero current to stabilize.
On rare occasions, the sensor may require as long as overnight to zero.
F. Check the membrane for damage and replace the membrane if necessary
.
15.4.2 Zero reading Is unstable.
A. Is the sensor properly wired to the analyzer? See Section 3.0. Verify that all wiring connections are tight.
B. Readings are often erratic when a new or rebuilt sensor is first placed in service. Readings usually stabilize
after an hour.
C. Is the space between the membrane and cathode filled with electrolyte solution and is the flow path between
the electrolyte reservoir and the membrane clear? Often the flow of electrolyte can be started by simply hold-
ing the sensor with the membrane end pointing down and sharply shaking the sensor a few times as though
shaking down a clinical thermometer. If shaking does not work, perform the checks below. Refer to the sensor
instruction manuals for additional information.
For 499ADO and 499A TrDO sensors, verify that the holes at the base of the cathode stem are open (use a
straightened paperclip to clear the holes). Also verify that air bubbles are not blocking the holes. Fill the reservoir
and establish electrolyte flow to the cathode. Refer to the sensor instruction manual for the detailed procedure.
For Gx438 and Hx438 sensors, the best way to ensure that there is an adequate supply of electrolyte solution
is to simply add fresh electrolyte solution to the sensor. Refer to the sensor instruction manual for details.
15.4.3 Sensor can be calibrated, but current in air is too high or too low
A. Is the sensor properly wired to the analyzer? See Section 3.0. Verify that all connections are tight.
B. Is the membrane dry? The membrane must be dry during air calibration. A droplet of water on the membrane
during air calibration will lower the sensor current and cause an inaccurate calibration.
C. If the sensor current in air is very low and the sensor is new, either the electrolyte flow has stopped or the mem-
brane is torn or loose. For instructions on how to restart electrolyte flow see Section 15.4.2 or refer to the sen-
sor instruction manual. To replace a torn membrane, refer to the sensor instruction manual.
D. Is the temperature low? Sensor current is a strong function of temperature. The sensor current decreases
about 3% for every °C drop in temperature.
E. Is the membrane fouled or coated? A dirty membrane inhibits diffusion of oxygen through the membrane,
reducing the sensor current. Clean the membrane by rinsing it with a stream of water from a wash bottle or by
gently wiping the membrane with a soft tissue. If cleaning the membrane does not improve the sensor
response, replace the membrane and electrolyte solution. If necessary, polish the cathode. See the sensor
instruction sheet for more information.
15.4.4 Possible error warning during in-process calibration
This error warning appears if the current process reading and the reading it is being changed to, ie, the reading
from the standard instrument, are appreciably different.
A. Is the standard instrument properly zeroed and calibrated?
B. Are the standard and process sensor measuring the same sample? Place the sensors as close together as
possible.
C. Is the process sensor working properly? Check the response of the process sensor in air and in sodium sul-
fite solution.
Page 95

85
MODEL Xmt-A-HT SECTION 15.0
TROUBLESHOOTING
15.4.5 Process readings are erratic.
A. Readings are often erratic when a new sensor or a rebuilt sensor is first placed in service. The current usually sta-
bilizes after a few hours.
B. Is the sample flow within the recommended range? High sample flow may cause erratic readings. Refer to the sen-
sor instruction manual for recommended flow rates.
C. Gas bubbles impinging on the membrane may cause erratic readings. Orienting the sensor at an angle away from
vertical may reduce the noise.
D. The holes between the membrane and electrolyte reservoir might be plugged (applies to Models 499A DO and 499A
TrDO sensors only). Refer to Section 15.4.2.
E. Verify that wiring is correct. Pay particular attention to shield and ground connections.
F. Is the membrane in good condition and is the sensor filled with electrolyte solution? Replace the fill solution and
electrolyte. Refer to the sensor instruction manual for details.
15.4.6 Readings drift.
A. Is the sample temperature changing? Membrane permeability is a function of temperature. For the 499ADO and
499ATrDO sensors, the time constant for response to a temperature change is about 5 minutes. Therefore, the read-
ing may drift for a while after a sudden temperature change. The time constant for the Gx438 and Hx448 sensors is
much shorter; these sensors respond fairly rapidly to temperature changes.
B. Is the membrane clean? For the sensor to work properly oxygen must diffuse freely through the membrane. A coat-
ing on the membrane will interfere with the passage of oxygen, resulting in slow response.
C. Is the sensor in direct sunlight? If the sensor is in direct sunlight during air calibration, readings will drift as the sen-
sor warms up. Because the temperature reading lags the true temperature of the membrane, calibrating the sensor
in direct sunlight may introduce an error.
D. Is the sample flow within the recommended range? Gradual loss of sample flow will cause downward drift.
E. Is the sensor new or has it been recently serviced? New or rebuilt sensors may require several hours to stabilize.
15.4.7 Sensor does not respond to changes in oxygen level.
A. If readings are being compared with a portable laboratory instrument, verify that the laboratory instrument is work-
ing.
B. Is the membrane clean? Clean the membrane and replace it if necessary. Check that the holes at the base of the
cathode stem are open. Use a straightened paper clip to clear blockages. Replace the electrolyte solution.
C. Replace the sensor.
15.4.8 Oxygen readings are too low.
A. Low readings can be caused by zeroing the sensor before the residual current has reached a stable minimum value.
Residual current is the current the sensor generates even when no oxygen is in the sample. Because the residual cur-
rent is subtracted from subsequent measured currents, zeroing before the current is a minimum can lead to low results.
Example: the true residual (zero) current for a 499ADO sensor is 0.05 μA, and the sensitivity based on calibra-
tion in water-saturated air is 2.35 μA/ppm. Assume the measured current is 2.00 μA. The true concentration is
(2.00 - 0.05)/2.35 or 0.83 ppm. If the sensor was zeroed prematurely when the current was 0.2 μA, the measured
concentration will be (2.00 - 0.2)/2.35 or 0.77 ppm. The error is 7.2%. Suppose the measured current is 5.00 μA.
The true concentration is 2.11 ppm, and the measured concentration is 2.05 ppm. The error is now 3.3%. The
absolute difference between the readings remains the same, 0.06 ppm.
B. Sensor response depends on flow. If the flow is too low, readings will be low and flow sensitive. Verify that the flow
past the sensor equals or exceeds the minimum value. See the sensor instruction manual for recommended flows.
If the sensor is in an aeration basin, move the sensor to an area where the flow or agitation is greater.
Page 96

86
MODEL Xmt-A-HT SECTION 15.0
TROUBLESHOOTING
15.5 TROUBLESHOOTING WHEN NO FAULT MESSAGE IS SHOWING - FREE CHLORINE
15.5.1 Zero current is too high
A. Is the sensor properly wired to the controller. See Section 3.0.
B. Is the zero solution chlorine-free? Take a sample of the solution and test it for free chlorine level. The con-
centration should be less than 0.02 ppm.
C. Has adequate time been allowed for the sensor to reach a minimum stable residual current? It may take sev-
eral hours, sometimes as long as overnight, for a new sensor to stabilize.
D. Check the membrane for damage and replace it if necessary.
15.5.2 Zero current is unstable
A. Is the sensor properly wired to the analyzer? See Section 3.0. Verify that all wiring connections are tight.
B. Readings are often erratic when a new or rebuilt sensor is first placed in service. Readings usually stabilize
after about an hour.
C. Is the conductivity of the zero solution greater than 50 μS/cm? DO NOT USE DEIONIZED OR DISTILLED
WATER TO ZERO THE SENSOR. The zero solution should contain at least 0.5 grams of sodium chloride per
liter.
D. Is the space between the membrane and cathode filled with electrolyte solution and is the flow path between
the electrolyte reservoir and membrane clear? Often the flow of electrolyte and be started by simply holding
the sensor with the membrane end pointing down and sharply shaking the sensor a few times as though shak-
ing down a clinical thermometer.
If shaking does not work, try clearing the holes around the cathode stem. Hold the sensor with the membrane
end pointing up. Unscrew the membrane retainer and remove the membrane assembly. Be sure the wood ring
remains with the membrane assembly. Use the end of a straightened paper clip to clear the holes at the base
of the cathode stem. Replace the membrane.
Verify that the sensor is filled with electrolyte solution. Refer to the sensor instruction manual for details.
Problem See Section
Zero current was accepted, but the current is outside the range -10 to 10 nA 15.5.1
Error or warning message appears while zeroing the sensor (zero current is too high) 15.5.1
Zero current is unstable 15.5.2
Sensor can be calibrated, but the current is less than about 250 nA/ppm at 25°C and pH 7 15.5.3
Process readings are erratic 15.5.4
Readings drift 15.5.5
Sensor does not respond to changes in chlorine level 15.5.6
Chlorine reading spikes following rapid change in pH 15.5.7
Page 97

87
MODEL Xmt-A-HT SECTION 14.0
TROUBLESHOOTING
15.5.3 Sensor can be calibrated, but the current is too low
A. Is the temperature low or is the pH high? Sensor current is a strong function of pH and temperature. The sen-
sor current decreases about 3% for every °C drop in temperature. Sensor current also decreases as pH
increases. Above pH 7, a 0.1 unit increase in pH lowers the current about 5%.
B. Sensor current depends on the rate of sample flow past the sensor tip. If the flow is too low, chlorine readings
will be low. Refer to the sensor instruction sheet for recommended sample flows.
C. Low current can be caused by lack of electrolyte flow to the cathode and membrane. See step D in Section
15.5.2.
D. Is the membrane fouled or coated? A dirty membrane inhibits diffusion of free chlorine through the membrane,
reducing the sensor current and increasing the response time. Clean the membrane by rinsing it with a stream
of water from a wash bottle. DO NOT use a membrane or tissue to wipe the membrane.
E. If cleaning the membrane does not improve the sensor response, replace the membrane and electrolyte solu-
tion. If necessary, polish the cathode. See the sensor instruction sheet for details.
15.5.4 Process readings are erratic
A. Readings are often erratic when a new sensor or a rebuilt sensor is first placed in service. The current usual-
ly stabilizes after a few hours.
B. Is the sample flow within the recommended range? High sample flow may cause erratic readings. Refer to the
sensor instruction sheet for recommended flow rates.
C. Are the holes between the membrane and the electrolyte reservoir open. Refer to Section 15.5.2.
D. Verify that wiring is correct. Pay particular attention to shield and ground connections.
E. If automatic pH correction is being used, check the pH reading. If the pH reading is noisy, the chlorine read-
ing will also be noisy. If the pH sensor is the cause of the noise, use manual pH correction until the problem
with the pH sensor can be corrected.
F. Is the membrane in good condition and is the sensor filled with electrolyte solution? Replace the fill solution
and electrolyte. Refer to the sensor instruction manual for details.
15.5.5 Readings drift
A. Is the sample temperature changing? Membrane permeability is a function of temperature. The time constant
for the 499ACL-01 sensor is about five minutes. Therefore, the reading may drift for a while after a sudden
temperature change.
B. Is the membrane clean? For the sensor to work properly, chlorine must diffuse freely through the membrane.
A coating on the membrane will interfere with the passage of chlorine, resulting in slow response. Clean the
membrane by rinsing it with a stream of water from a wash bottle. DO NOT use a membrane or tissue to wipe
the membrane.
C. Is the sample flow within the recommended range? Gradual loss of sample flow will cause a downward drift.
D. Is the sensor new or has it been recently serviced? New or rebuilt sensors may require several hours to sta-
bilize.
E. Is the pH of the process changing? If manual pH correction is being used, a gradual change in pH will cause
a gradual change in the chlorine reading. As pH increases, chlorine readings will decrease, even though the
free chlorine level (as determined by a grab sample test) remained constant. If the pH change is no more than
about 0.2, the change in the chlorine reading will be no more than about 10% of reading. If the pH changes
are more than 0.2, use automatic pH correction.
Page 98

88
MODEL Xmt-A-HT SECTION 15.0
TROUBLESHOOTING
15.5.6 Sensor does not respond to changes in chlorine level.
A. Is the grab sample test accurate? Is the grab sample representative of the sample flowing to the sensor?
B. Is the pH compensation correct? If the controller is using manual pH correction, verify that the pH value in the
controller equals the actual pH to within ±0.1 pH. If the controller is using automatic pH correction, check the
calibration of the pH sensor.
C. Is the membrane clean? Clean the membrane and replace it if necessary. Check that the holes at the base of
the cathode stem are open. Use a straightened paper clip to clear blockages. Replace the electrolyte solution.
D. Replace the sensor.
15.5.7 Chlorine readings spike following sudden changes in pH (automatic pH correction).
Changes in pH alter the relative amounts of hypochlorous acid (HOCl) and hypochlorite ion (OCl-) in the sam-
ple. Because the sensor responds only to HOCl, an increase in pH causes the sensor current (and the appar-
ent chlorine level) to drop even though the actual free chlorine concentration remained constant. To correct for
the pH effect, the controller automatically applies a correction. Generally, the pH sensor responds faster than
the chlorine sensor. After a sudden pH change, the controller will temporarily over-compensate and gradually
return to the correct value. The time constant for return to normal is about 5 minutes.
15.5.8 Chlorine readings are too low.
A. Was the sample tested as soon as it was taken? Chlorine solutions are unstable. Test the sample immediate-
ly after collecting it. Avoid exposing the sample to sunlight.
B. Low readings can be caused by zeroing the sensor before the residual current has reached a stable minimum
value. Residual current is the current the sensor generates even when no chlorine is in the sample. Because
the residual current is subtracted from subsequent measured currents, zeroing before the current is a mini-
mum can lead to low results.
Example: The true residual current for a free chlorine sensor is 4 nA, and the sensitivity is 350 nA/ppm.
Assume the measured current is 200 nA. The true concentration is (200-4)/350 or 0.56 ppm. If the sensor was
zeroed prematurely when the current was 10 nA, the measured concentration will be (200-10)/350 or 0.54
ppm. The error is 3.6%. Suppose the measured current is 400 nA. The true concentration is 1.13 ppm, and
the measured concentration is 1.11 ppm. The error is now 1.8%. The absolute difference between the reading
remains the same, 0.02 ppm.
C. Sensor response depends on flow. If the flow is too low, readings will be low and flow sensitive. Verify that the
flow past the sensor equals or exceeds the minimum value. See the sensor instruction manual for recom-
mended flows.
15.6 TROUBLESHOOTING WHEN NO FAULT MESSAGE IS SHOWING - TOTAL CHLORINE
Refer to the instruction manual for the SCS921 for a complete troubleshooting guide.
Page 99

89
MODEL Xmt-A-HT SECTION 15.0
TROUBLESHOOTING
15.7 TROUBLESHOOTING WHEN NO ERROR MESSAGE IS SHOWING —
MONOCHLORAMINE
15.7.1 Zero current is too high
A. Is the sensor properly wired to the analyzer? See Section 3.0.
B. Is the zero solution monochloramine-free? Take a sample of the solution and test it for monochloramine level.
The concentration should be less than 0.02 ppm.
C. Has adequate time been allowed for the sensor to reach a minimum stable residual current? It may take sev-
eral hours, sometimes as long as overnight, for a new sensor to stabilize.
D. Check the membrane for damage and replace it if necessary. Be careful not to touch the membrane or cath-
ode. Touching the cathode mesh may damage it.
15.7.2 Zero current is unstable
A. Is the sensor properly wired to the analyzer? See Section 3.0. Verify that all wiring connections are tight.
B. Readings are often erratic when a new or rebuilt sensor is first placed in service. Readings usually stabilize
after about an hour.
C. Is the space between the membrane and cathode mesh filled with electrolyte solution? Often the flow of elec-
trolyte and be started by simply holding the sensor with the membrane end pointing down and sharply shaking the sensor a few times as though shaking down a clinical thermometer.
Verify that the sensor is filled with electrolyte solution. Refer to the sensor instruction manual for details.
Problem See Section
Zero current was accepted, but the current is outside the range -10 to 50 nA 15.7.1
Error or warning message appears while zeroing the sensor (zero current is too high) 15.7.1
Zero current is unstable 15.7.2
Sensor can be calibrated, but the current is less than about 250 nA/ppm at 25°C 15.7.3
Process readings are erratic 15.7.4
Readings drift 15.7.5
Sensor does not respond to changes in monochloramine level 15.7.6
Page 100

90
MODEL Xmt-A-HT SECTION 15.0
TROUBLESHOOTING
15.7.3 Sensor can be calibrated, but the current is too low
A. Is the temperature low? The sensor current decreases about 5% for every °C drop in temperature.
B. Sensor current depends on the rate of sample flow past the sensor tip. If the flow is too low, monochloramine
readings will be low. Refer to the sensor instruction sheet for recommended sample flows.
C. Low current can be caused by lack of electrolyte flow to the cathode and membrane. See step C in Section
15.7.2.
D. When was the sensor fill solution last replaced? The monochloramine sensor loses sensitivity, that is, it gen-
erates less current per ppm of monochloramine, as it operates. Gradual loss of sensitivity can usually be com-
pensated for by calibrating the sensor weekly. After about two months, the sensitivity will have dropped to
about 70% of its original value. At this point, the electrolyte solution and membrane should be replaced. Refer
to the sensor instruction manual.
E. Is the membrane fouled or coated? A dirty membrane inhibits diffusion of monochloramine through the mem-
brane, reducing the sensor current and increasing the response time. Clean the membrane by rinsing it with
a stream of water from a wash bottle. DO NOT use a membrane or tissue to wipe the membrane.
F. If cleaning the membrane does not improve the sensor response, replace the membrane and electrolyte solu-
tion. See the sensor instruction sheet for details.
15.7.4 Process readings are erratic
A. Readings are often erratic when a new sensor or rebuilt sensor is first placed in service. The current usually
stabilizes after a few hours.
B. Is the sample flow within the recommended range? High sample flow may cause erratic readings. Refer to the
sensor instruction sheet for recommended flow rates.
C. Verify that wiring is correct. Pay particular attention to shield and ground connections.
D. Is the membrane in good condition and is the sensor filled with electrolyte solution? Replace the fill solution
and electrolyte. Refer to the sensor instruction manual for details.
15.7.5 Readings drift
A. Is the sample temperature changing? Membrane permeability is a function of temperature. The time constant
for the sensor is about five minutes. Therefore, the reading may drift for a while after a sudden temperature
change.
B. Is the membrane clean? For the sensor to work properly, monochloramine must diffuse freely through the
membrane. A coating on the membrane will interfere with the passage of monochloramine, resulting in slow
response. Clean the membrane by rinsing it with a stream of water from a wash bottle. DO NOT use a mem-
brane or tissue to wipe the membrane.
C. Is the sample flow within the recommended range? Gradual loss of sample flow will cause a downward drift.
D. Is the sensor new or has it been recently serviced? New or rebuilt sensors may require several hours to sta-
bilize.
E. Gradual downward drift is caused by depletion of the fill solution. Normally, calibrating the sensor every week
adequately compensates for the drift. After the sensor has been in service for several months, it will probably
be necessary to replace the fill solution and membrane. Refer to the sensor instruction manual for details.
15.7.6 Sensor does not respond to changes in monochloramine level.
A. Is the grab sample test accurate? Is the grab sample representative of the sample flowing to the sensor?
B. When was the sensor fill solution last replaced? The monochloramine sensor loses sensitivity, that is, it gen-
erates less current per ppm of monochloramine, as it operates. After about two months, the sensitivity will have
dropped to about 70% of its original value. If the fill solution is extremely old, the sensor may be completely
non-responsive to monochloramine. Replace the fill solution and membrane. See the sensor instruction man-
ual for details.
C. Is the membrane clean? Clean the membrane with a stream of water and replace it if necessary.
D. Replace the sensor.
 Loading...