

Page 1
Quick Start Guide
LIQ-QSG-338+, Rev BB
January 2018
Rosemount™ Hx338+
Steam Sterilizable and Autoclavable Pre-Pressurized pH Sensor
Page 2

Essential instructions
Read this page before proceeding!
Emerson designs, manufactures, and tests its Rosemount products to meet many national and international standards. Because
these instruments are sophisticated technical products, you must properly install, use, and maintain them to ensure they continue
to operate within their normal specifications. The following instructions must be adhered to and integrated into your safety
program when installing, using, and maintaining Rosemount products. Failure to follow the proper instructions may cause any one
of the following situations to occur: loss of life, personal injury, property damage, damage to this instrument, and warranty
invalidation.
• Read all instructions prior to installing, operating, and servicing this product. If this instruction manual is not the correct
manual, call 1-855-724-2638, and we will provide the requested manual. Save this manual for future reference.
• If you do not understand any of the instructions, contact your Emerson representative for clarification.
• Follow all warnings, cautions, and instructions marked on and supplied with the product.
• Inform and educate your personnel in the proper installation, operation, and maintenance of the product.
• Install your equipment as specified in the installation instructions of the appropriate manual and per applicable local and
national codes. Connect all products to the proper electrical and pressure sources.
• Install your equipment as specified in the Installation section and per applicable local and national codes. Connect all
products to the proper electrical and pressure sources.
• To ensure proper performance, use qualified personnel to install, operate, update, program, and maintain the product.
• When replacement parts are required, ensure that qualified people use replacement parts specified by Rosemount.
Unauthorized parts and procedures can affect the product's performance and place the safe operation of your process at
risk. Look alike substitutions may result in fire, electrical hazards, or improper operation.
• Ensure that all equipment doors are closed and protective covers are in place, except when maintenance is being performed
by qualified people, to prevent electrical shock and personal injury.
About this document
Revision level Date Notes
A 8/2017 This is the initial release of the Quick Start Guide.
B 9/2017 Updated wiring diagrams.
BA 11/2017 Added Section 4.3. Updated 1056, 56, and 1057 wiring diagrams.
Page 3

Contents
Contents
Chapter 1 Plan ..................................................................................................................................1
1.1 Electrode preparation .....................................................................................................................1
1.2 Storage and handling ..................................................................................................................... 1
1.3 Specifications .................................................................................................................................2
1.4 Rosemount Hx338+ pH Sensor design specifications ..................................................................... 3
1.5 Rosemount Hx338+ pH Sensor ordering information ..................................................................... 4
Chapter 2 Install ...............................................................................................................................5
2.1 Installing the sensor ....................................................................................................................... 5
Chapter 3 Wiring ............................................................................................................................. 7
3.1 Wiring the Rosemount™ Hx338+ pH Sensor ....................................................................................7
Chapter 4 Calibration and maintenance .........................................................................................11
4.1 Two point buffer calibration ......................................................................................................... 11
4.2 Recommended pH sensor standardization ...................................................................................11
4.3 Electrode refresh procedure ......................................................................................................... 12
Chapter 5 Troubleshooting ............................................................................................................ 13
5.1 Cleaning or replacing the electrodes ............................................................................................ 13
Rosemount Hx338+ pH Sensor i
Page 4

Contents
ii Quick Start Guide
Page 5

1 Plan
1.1 Electrode preparation
1. Remove electrode from shipping container.
2. Remove the protective boot covering the electrode bulb.
3. Rinse away salt film with clean water and then shake the electrode so that the
internal solution fills the bulb, thus removing any air trapped there.
Note
Do not allow lubricant to coat electrode bulb or reference junction. If it does, wipe it clean
before installation.
1.2 Storage and handling
Plan
Proper storage and handling instructions of the electrodes must be followed to ensure
correct measurements.
1. Store the electrodes in their original shipping containers until needed.
2. Do not store at temperatures below -5 °C (23 °F).
3. Store the electrodes with a protective cap containing KCI solution (PN 9210342).
4. For overnight storage, immerse the sensor in tap water or 4 pH buffer solution.
5. Use the startup and calibration procedure described in Section 4.1 to properly
calibrate the sensors.
6. The standard sensor shelf life is one year from manufacturing date. Follow the
refresh procedure described in Section 4.3 at one year and eighteen months to
extend the shelf life to a maximum of two years.
Rosemount Hx338+ pH Sensor 1
Page 6
Plan
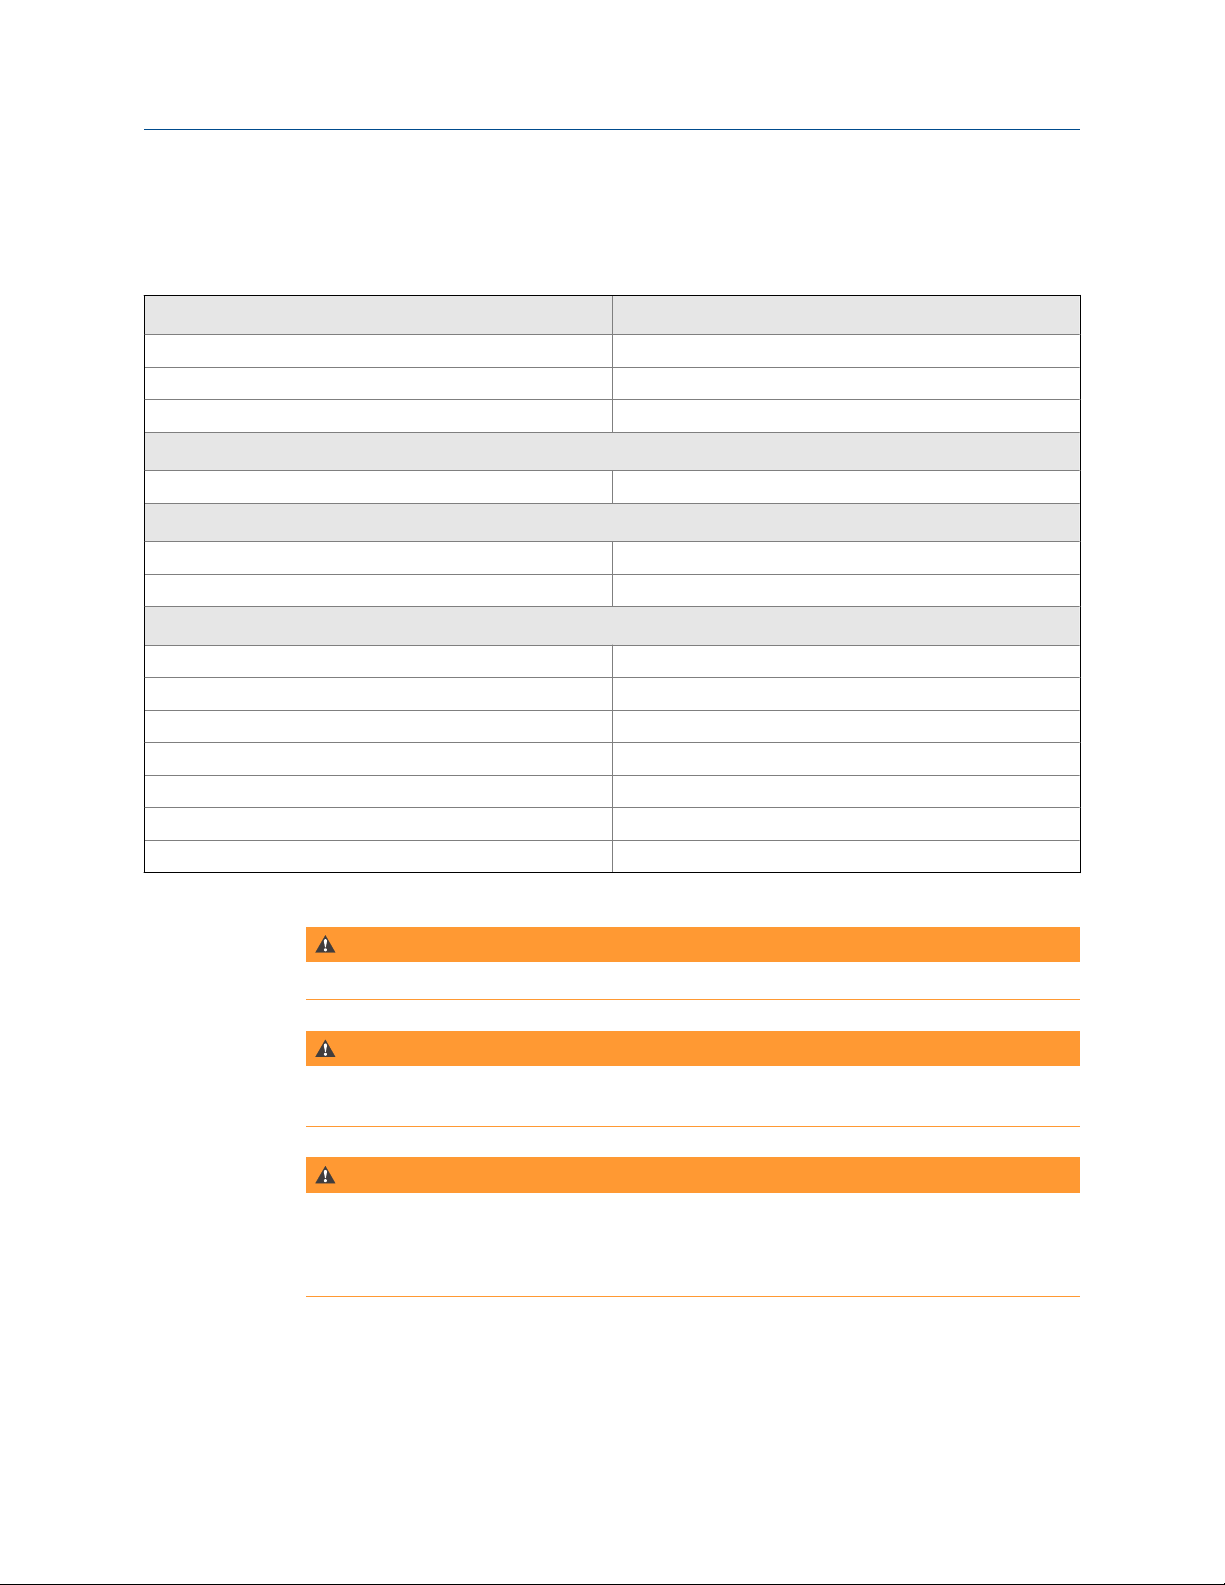
1.3 Specifications
Rosemount™ Hx338+ pH Sensor SpecificationsTable 1-1:
Rosemount Hx338+ Sensor specifications Materials and units
Operating temperature range 0 to 140 °C (32 to 283 °F)
Pressure range 0 to 6 bar
pH range 0 to 14
Measuring method
Combination electrode pH potential measured against reference electrode
Wetted materials
pH electrode Glass
O-ring EPDM (FDA approved)
Operations parameters
Process connection PG 13.5
Electrical connector Variopol (VP 6.0)
Minimum conductivity of sample 100 µS/cm
Zero-point 0 ±20 mV
Sensitivity 57 - 59 mV / pH at 25 °C (77 °F)
Electrolyte Pressurized
Temperature sensor Pt-100
WARNING!
Do not exceed temperature and pressure limitations of 140 °C (284 °F) and 6 bar.
WARNING!
Before removing the sensor, be absolutely certain that the process pressure is reduced to 0
psig and the process temperature is lowered to a safe level!
WARNING!
CORROSIVE SUBSTANCE
Hydrofluoric acid and the mixture of hydrochloric acid and thiorea is toxic and highly corrosive.
Avoid skin contact; wear protective gloves. Use only in a well-ventilated area. Do not inhale
fumes. In case of an accident, consult a doctor immediately.
2 Quick Start Guide
Page 7

CAUTION!
SENSOR/PROCESS APPLICATION COMPATIBILITY
The wetted sensor materials may not be compatible with process composition and operating
conditions. Application compatibility is entirely your responsibility.
1.4 Rosemount Hx338+ pH Sensor design specifications
See Figure 1-1 for sensor dimensions.
Rosemount Hx338+-01-72 Dimensional DrawingFigure 1-1:
Plan
A. VP 6.0 plug
B. SW-19 free spinning PG13.5 screw thread
C. Washer
D. O-ring
Rosemount Hx338+ pH Sensor 3
Page 8

Plan
1.5 Rosemount Hx338+ pH Sensor ordering
information
Rosemount Hx338+ pH Sensor Ordering InformationTable 1-2:
Model Sensor type
Hx338+ pH Sensor
Sensor length
01 4.8 in. (120 mm)
Cable connection
72 Pt-100 RTD with Variopol (VP6) Connector (Requires accessory mating cable)
Typical model number: Hx338+-01-72
AccessoriesTable 1-3:
Part number Description
24281-00 15 ft (4.6 m) VP8 cable
24281-01 25 ft (7.6 m) VP8 cable
24281-02 2.5 ft (0.8 m) VP8 cable
24281-05 4 ft (1.2 m) VP8 cable
24281-06 10 ft (3.0 m) VP8 cable
24281-07 20 ft (6.1 m) VP8 cable
24281-08 30 ft (9.1 m)VP8 cable
Mounting accessories
Part number Description
9160478 Insertion assembly, 2.75 in. (70 mm) insertion, for 4.72 in. (120 mm) sensor, G 1-1/4 in.
9160483 15 degree weld-in socket, G 1-1/4 in. thread, 44 mm
9160484 Service kit for insertion mounting assembly
Other accessories
Part number Description
9210012 Buffer solution, pH 4.01, 16 oz
9210013 Buffer solution, pH 6.86, 16 oz
9210014 Buffer solution, pH 9.18, 16 oz
4 Quick Start Guide
Page 9

2 Install
2.1 Installing the sensor
Procedure
1. Mount the sensor in a vertical pipe run with flow from bottom to top.
If the sensor must be mounted in a horizontal pipe run, orient the sensor in the
3 o'clock or 9 o'clock position.
2. Orient the sensor within 80 ° of vertical. See Figure 2-1.
Sensor OrientationFigure 2-1:
Install
Rosemount Hx338+ pH Sensor 5
Page 10

Install
6 Quick Start Guide
Page 11

3 Wiring
3.1 Wiring the Rosemount™ Hx338+ pH Sensor
Use the following wiring diagrams to wire the sensor to the Rosemount 56, Rosemount
1056, Rosemount 1057, Rosemount 1066, and Rosemount 5081 transmitters.
1. See Figure 3-1 to wire the Rosemount Hx338+ pH Sensor to the Rosemount 56,
1056, or 1057 Transmitter.
Wiring
Figure 3-1:
Wire the Rosemount Hx338+ pH Sensor to the Rosemount 56,
1056, or 1057 Transmitter
Rosemount Hx338+ pH Sensor 7
Page 12

Wiring
2. See Figure 3-2 to wire the Rosemount Hx338+ pH Sensor to the Rosemount 1066
Transmitter.
Figure 3-2:
Wire the Rosemount Hx338+ pH Sensor to the Rosemount 1066
Transmitter
8 Quick Start Guide
Page 13

3. See Figure 3-3 to wire the Rosemount Hx338+ pH Sensor to the Rosemount 5081
Transmitter.
Wiring
Figure 3-3:
Wire the Rosemount Hx338+ pH Sensor to the Rosemount 5081
Transmitter
Rosemount Hx338+ pH Sensor 9
Page 14

Wiring
10 Quick Start Guide
Page 15

Calibration and maintenance
4 Calibration and maintenance
4.1 Two point buffer calibration
Prerequisites
Select two stable buffer solutions, preferably pH 4.0 and 7.0 (pH buffers other than pH 4.0
and pH 7.0 can be used as long as the pH values are at least two pH units apart).
Note
A pH 7.0 buffer solution reads an mV value of approximately zero, and pH buffers read approximately
±59.1 mV for each pH unit above or below pH 7.0. Check the pH buffer manufacturer specifications
for millivolt values at various temperatures, as it may affect the actual value of the buffer solution
mV/pH value.
Procedure
1. Immerse sensor in the first buffer solution. Allow sensor to equilibrate to the buffer
temperature (to avoid errors due to temperature differences between the buffer
solution and sensor temperature) and wait for reading to stabilize.
4.2
The value of the buffer can now be acknowledged by the transmitter.
2. Once the first buffer has been acknowledged by the transmitter, rinse the buffer
solution off of the sensor with distilled or deionized water.
3. Repeat steps 1 and 2 using the second buffer solution.
The theoretical slope value, according to the Nernst equation for calculating pH, is
approximately 59.17 mV/pH. Over time the sensor will age, both in the process and
in storage, and this will result in reduced slope values. To ensure accurate readings,
Emerson recommends replacing the electrode when the slope value falls below 47
to 49 mV/pH.
Recommended pH sensor standardization
For maximum accuracy, the sensor can be standardized on-line or with a process grab
sample after a buffer calibration has been performed and the sensor has been conditioned
to the process. Standardization accounts for the sensor junction potential and other
interferences. Standardization will not change the sensor’s slope, but will simply adjust the
transmitter’s reading to match that of the known process pH.
Rosemount Hx338+ pH Sensor 11
Page 16

Calibration and maintenance
4.3 Electrode refresh procedure
The pressurized electrode in the Rosemount™ Hx338+ has a storage life of one year
without an electrode refresh. At one year of shelf life, all sensors should be refreshed for
peak performance. Please follow this procedure for refreshing the sensor.
Prerequisites
Select the two refresh solutions. A 0.4-4% by weight sodium hydroxide (NaOH) solution for
a base and a 0.73-3.65% by weight hydrochloric acid (HCl) solution for an acid are
recommended. Also, a potassium chloride (KCl) solution is needed for cleaning and
storage.
Record the sensor serial number, lot number, and date of manufacturing on a worksheet.
Remove sensor from the package. Inspect the connection, electrode, and glass for any
defects or scratches and remove the cap by relieving the rubber gasket.
Procedure
1. Clean the sensor with water; bottled or mineral water is recommended.
2. Place the sensor electrodes into the NaOH solution for 10 minutes.
3. Rinse the electrodes with water.
4. Place the electrodes into the HCl solution for 10 minutes.
5. Rinse the electrodes with water.
6. Place the electrodes into the KCl solution for a minimum of 60 minutes.
Zero and calibrate the sensor, following the procedure highlighted in Section 4.1, after the
refresh procedure and replace the cap with fresh KCl solution covering the sensor bulb and
reference junction.
12 Quick Start Guide
Page 17

5 Troubleshooting
5.1 Cleaning or replacing the electrodes
Electrodes should respond rapidly. Sluggishness, offsets, and erratic readings are
indicators that the electrodes may need cleaning or replacement.
1. Use a mild non-abrasive detergent to clean and remove oil deposits from the
electrode.
2. Soak electrodes for 30 to 60 minutes in a 5% hydrochloric acid solution to remove
scale deposits.
Temperature effect on life expectancy: If glass electrode life expectancy is 100% at
25 °C (77 °F), then it will be approximately 25% at 80 °C (176 °F), and approximately
5% at 120 °C (248 °F).
Troubleshooting
Rosemount Hx338+ pH Sensor 13
Page 18

Troubleshooting
14 Quick Start Guide
Page 19

Troubleshooting
Rosemount Hx338+ pH Sensor 15
Page 20

GLOBAL HEADQUARTERS
Emerson Automation Solutions
6021 Innovation Blvd
Shakopee, MN 55379, USA
+1 800 999 9307 or +1 952 906 8888
F +1 952 949 7001
liquid.csc@emerson.com
NORTH AMERICA
Emerson Automation Solutions
8200 Market Blvd
Chanhassen, MN 55317
Toll Free +1 800 999 9307
F +1 952 949 7001
liquid.csc@emerson.com
LIQ-QSG-338+
Rev BB
2018
EUROPE
Emerson Automation Solutions
Neuhofstrasse 19a P.O. Box 1046
CH-6340 Baar
Switzerland
T + 41 (0) 41 768 6111
F + 41 (0) 41 768 6300
liquid.csc@emerson.com
Linkedin.com/company/Emerson-Automation-Solutions
twitter.com/rosemount_news
Facebook.com/Rosemount
youtube.com/RosemountMeasurement
google.com/+RosemountMeasurement
AnalyticExpert.com
MIDDLE EAST AND AFRICA
Emerson Automation Solutions
Emerson FZE
Jebel Ali Free Zone
Dubai, United Arab Emirates, P.O. Box 17033
T +971 4 811 8100
F +971 4 886 5465
liquid.csc@emerson.com
©
2018 Emerson. All rights reserved.
The Emerson logo is a trademark and service mark of Emerson Electric Co. Rosemount is a
mark of one of the Emerson family of companies. All other marks are the property of their
respective owners.
ASIA-PACIFIC
Emerson Automation Solutions
1 Pandan Crescent
Singapore 128461
Singapore
T +65 777 8211
F +65 777 0947
liquid.csc@emerson.com
 Loading...